Have you ever heard someone say that a telephoto lens “compresses” the background or “flattens” an image? What exactly does this mean? The perceived distance between your subject and the rest of the scene is dependent on two things: where you stand relative to your subject to take the photo and the focal length of the lens you choose. In this short article, I want to discuss this type of perspective distortion, and how to use it to compose exciting photographs.
Table of Contents
What Lens Compression Isn’t!
I have often heard photographers say that images taken with a telephoto lens will appear to have a shorter subject-to-background distance than those taken with a wide angle lens. This isn’t completely true. If you take two photos from exactly the same place, one with a wide angle lens and one with a telephoto lens, they will have the same perceived distance from front to back – that’s because the perspective has not changed! To see this, crop an image taken with a wide lens down to the same field of view as a telephoto lens. And yes, the quality of the crop will be horrible, but that’s not the point! The point is that the crop will look identical to the telephoto shot.
Take a look at these two images. The first was taken at a focal length of 24 mm, while the second was taken at a focal length of 70 mm. Both shots were taken from exactly the same place, on a tripod, and I focused on the bridge at the center of the images.
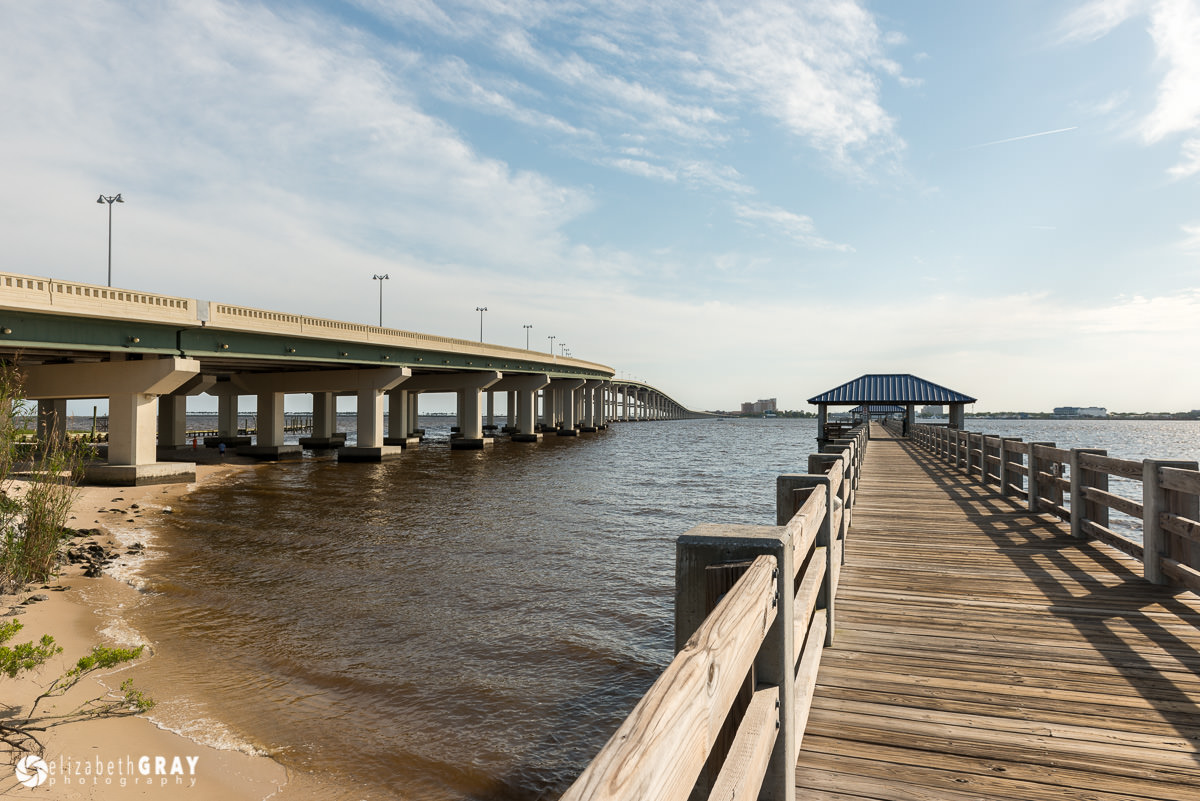
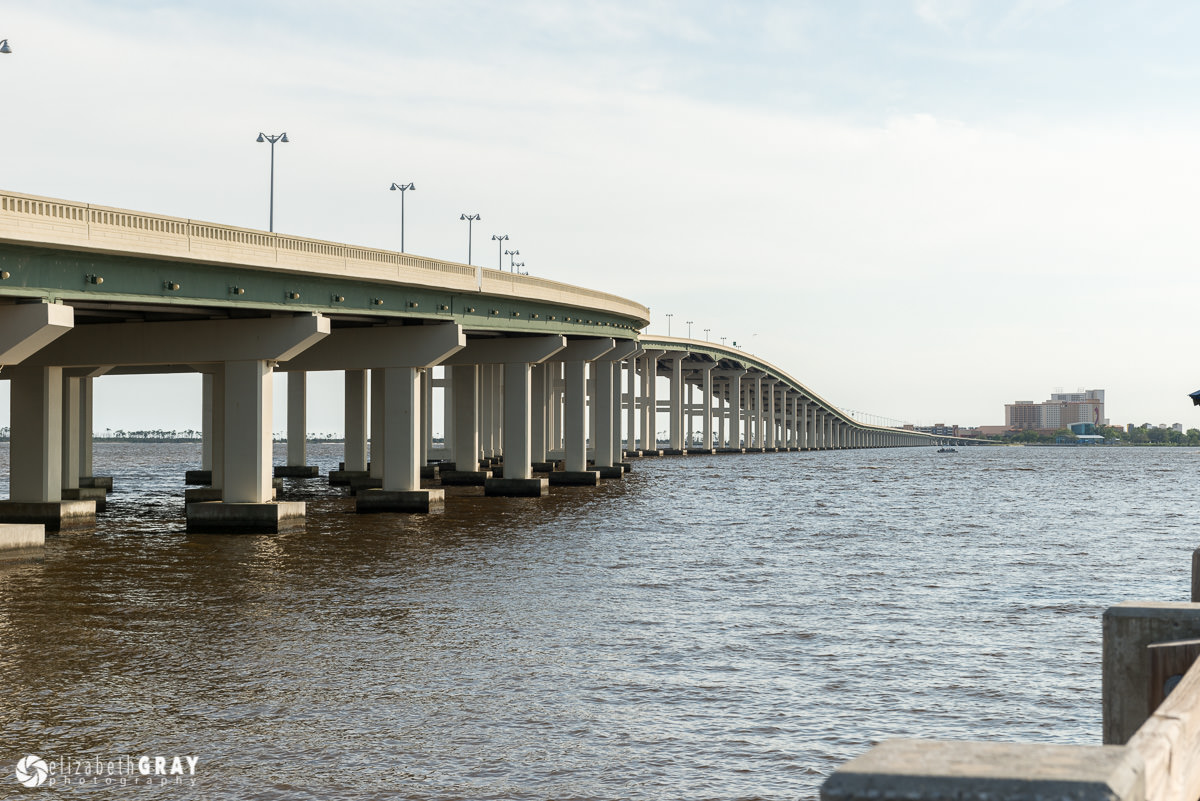
Now I am going to crop the wide shot so that the composition is the same as the telephoto shot. To compare the shots, I had to enlarge the crop approximately 285%, not something I would normally recommend doing! Notice how this crop looks the same as the shot taken at 70 mm. The bridge has not become distorted and the railing of the fishing pier (on the right side) is in the same location. In other words, there was no distortion or “compression” using the longer focal length.

The only difference is their depth of field. The foreground is not as sharp in the photo taken at 70 mm. It turns out that depth of field is a property, not only of aperture, but also of focal length, camera to subject distance and sensor size. However, that’s a discussion for another article!
The important thing to realize in the above example is that the distance from the camera to the subject did not change. As a result, the proportions in the image did not change. If your feet don’t move when you take a shot, then the effect that a telephoto lens gives is exactly the same as cropping, although without the loss of detail and sharpness that you would find in a crop.
What is Lens Compression?
So what is lens compression then? Lens compression does occur when you take a picture with a telephoto lens, but it is not because of the lens or its focal length. It is because we tend to stand farther away from our subjects when we use a long lens. This combination of long lens and camera-to-subject distance gives the viewer the impression that distant objects are larger than they actually are. As a result, it gives the appearance that the background has pulled in closer to the subject. The opposite effect occurs when you use a wide angle lens. When we use a wide lens, we tend to stand much closer to our subjects compared to a telephoto lens. Because of this relative closeness, near objects will look proportionally larger than objects in the distance. As a result, the background elements become much smaller and seem farther away.
Here are two examples. In this first shot I was using a long lens. Notice how close the freighter seems to the birds. In actual fact, they were probably about a kilometre away from each other.

In this photo of a goat I used a very wide angle lens. Notice how large the goat’s head appears relative to his body.
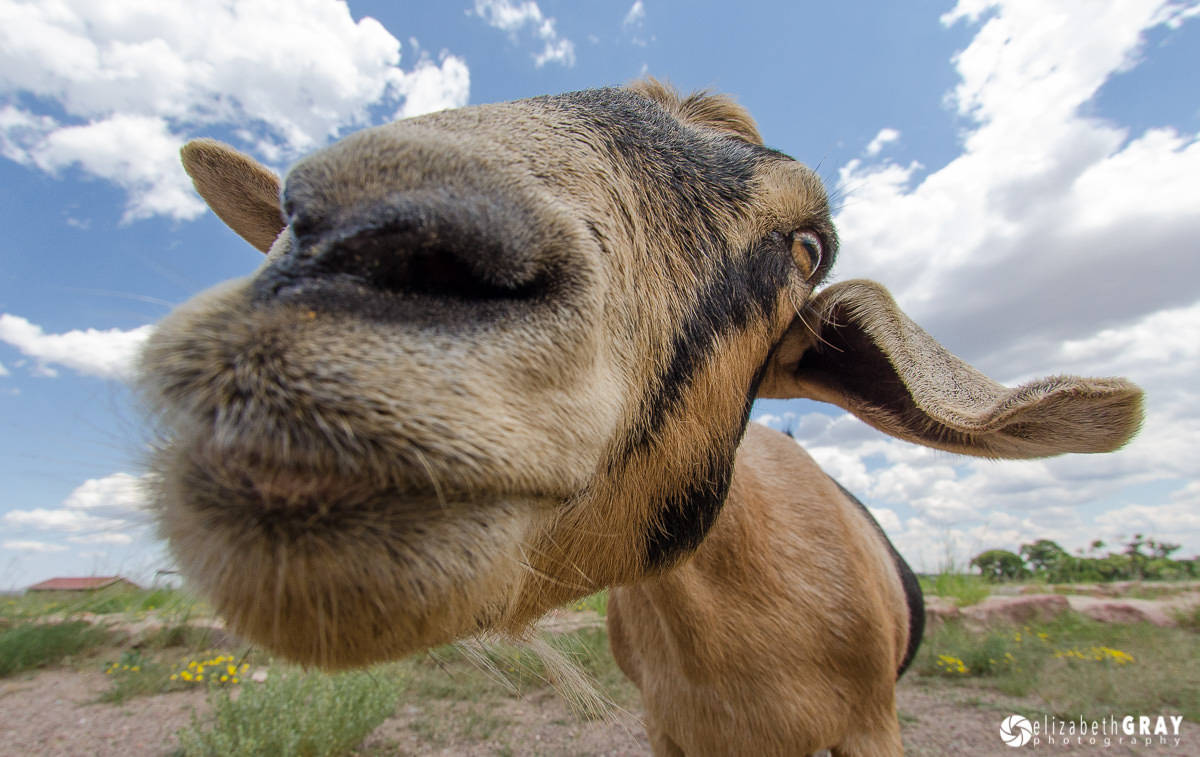
The important thing here is not that I used different lenses, but the fact that my subject to camera distance was drastically different in each picture. For the picture of the birds and freighter my camera-to-subject (birds) distance was probably 100 metres. In the goat picture, my camera was literally inches away from his nose!
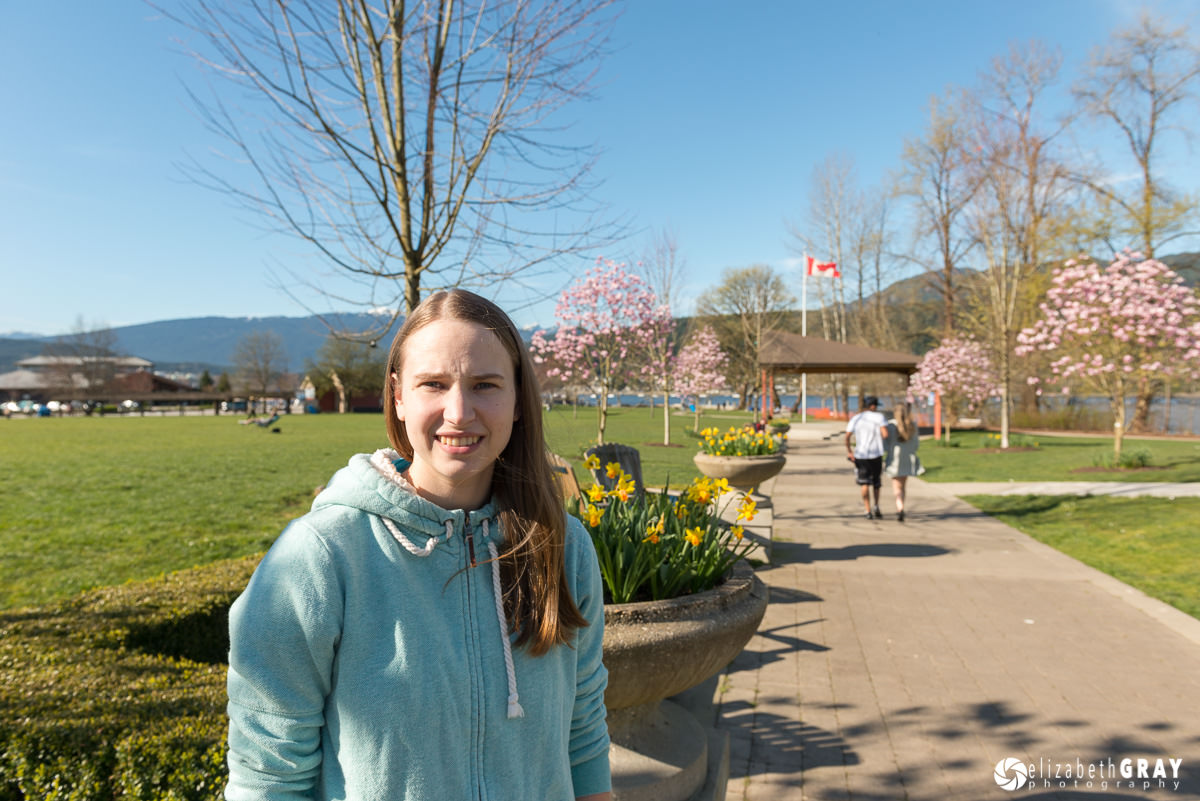
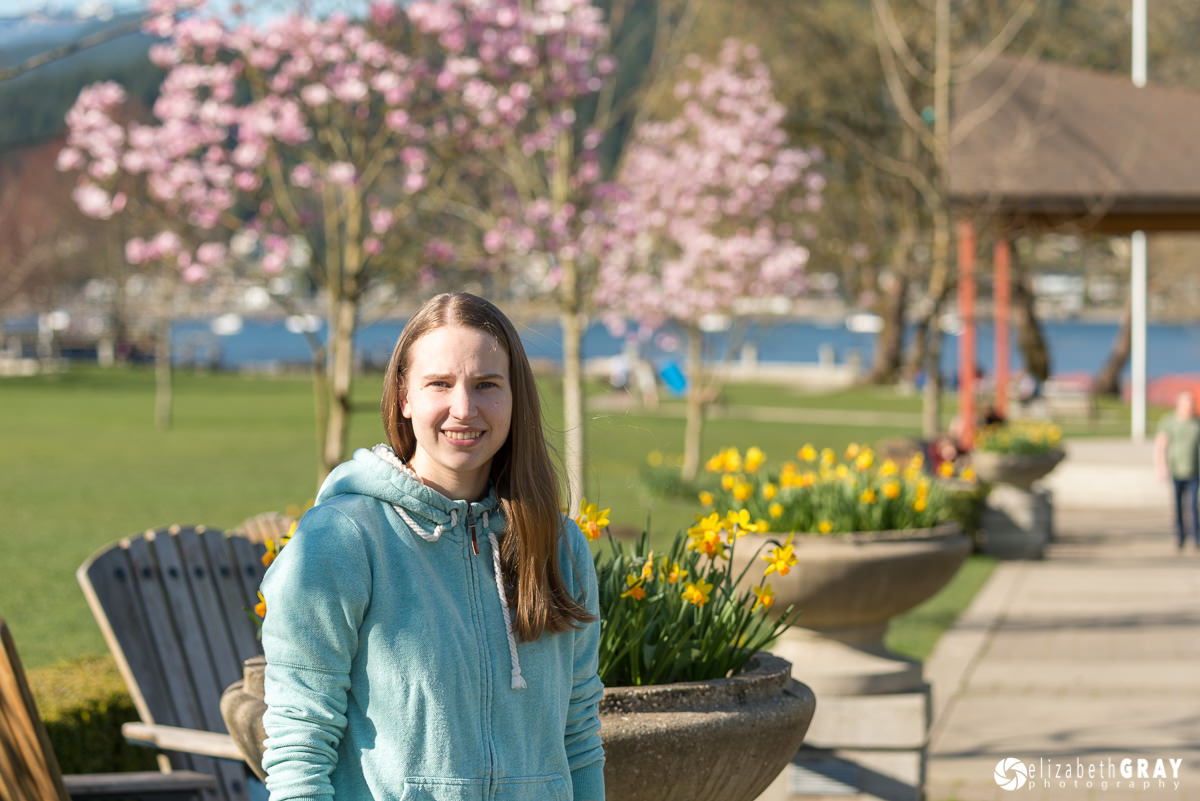
These last two examples don’t exactly explain lens compression though, especially since they are of two different subjects. To clarify why compression happens, lets look at a series of photographs. These images were taken so that the subject (my very cooperative and patient daughter) appears relatively the same size in each photo. To do this, I had to move the camera farther away from her each time I increased the focal length. This is worth repeating. I had to adjust the distance between her and the camera to keep her the same size in the frame. Pay close attention to the background. Also, just a quick note, I am not a portrait photographer, so no harsh comments about the lighting and posing please!
The first image is taken at 24mm. Look at the wide expanse of background; it gives the viewer a sense of place. Notice the flag and how far away the flower planters appear. Also, because I was standing so close to my daughter, her nose is unfortunately looking rather large!
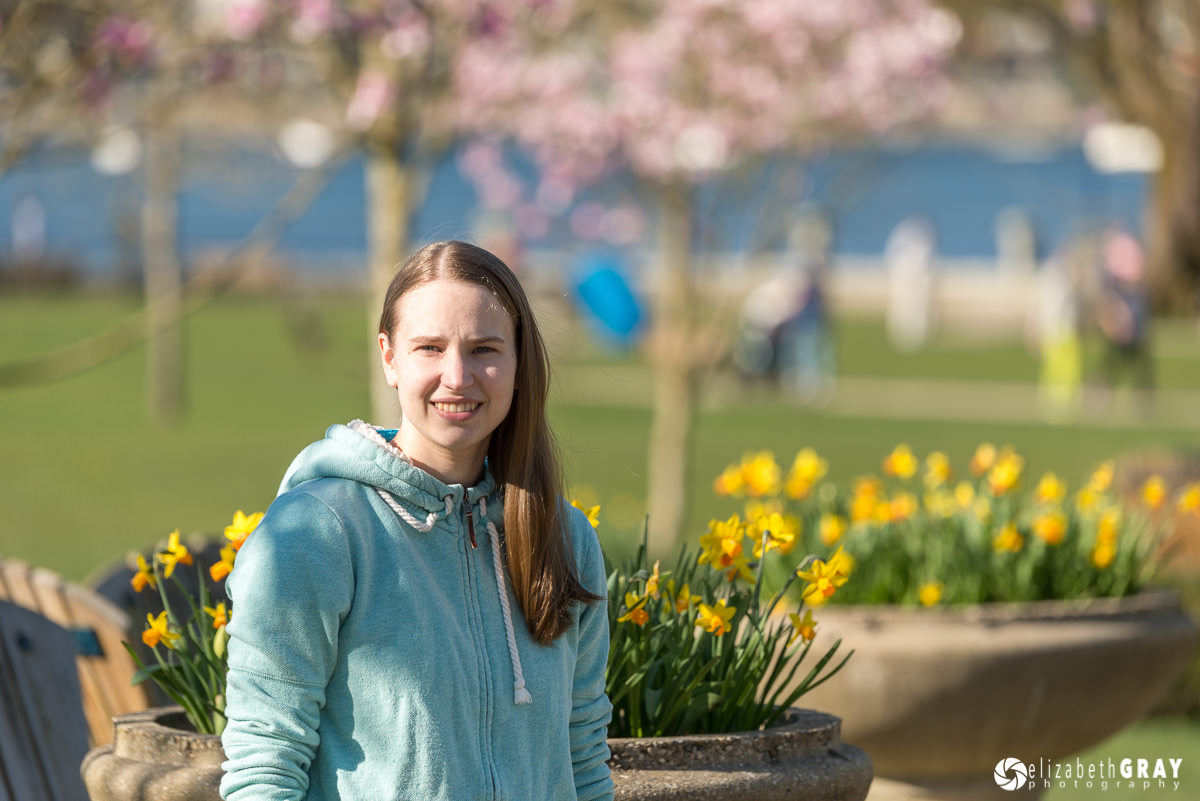
This next shot was taken at a focal length of 70mm. The flag appears larger. Also notice what is happening to the trees in the background. They seem closer, as do the planters.

105mm. You can no longer see the flag. The cherry blossom trees are becoming more prominent.
My focal length is now 200mm. The background is getting even closer still. It is very hard to get a feel for distances now.

This final image is taken at 300mm. The planters were about 10m apart in reality, but look how close together they appear now.
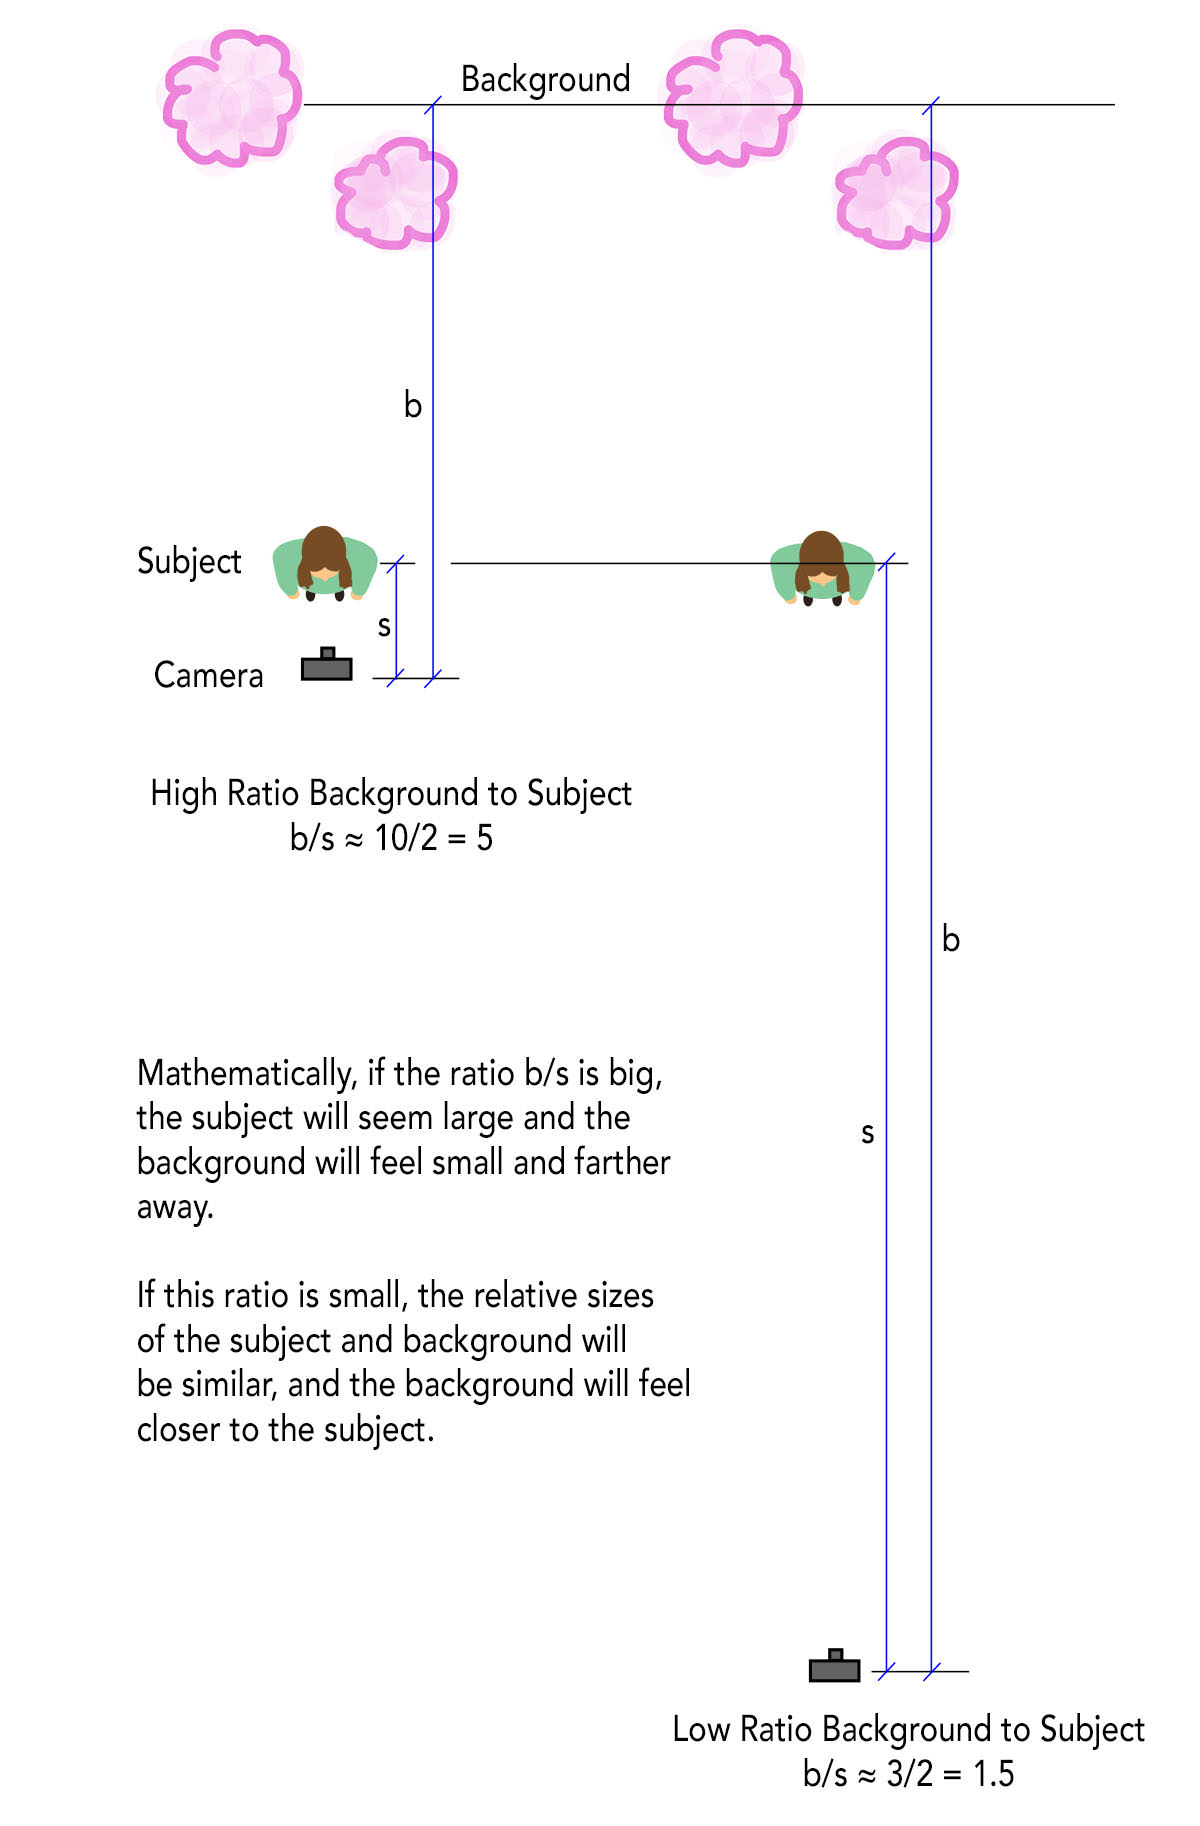
Compression is actually due to the distance between the camera and the subject. With longer focal lengths (which have a narrow field of view), you have to step back to keep your subject the same size in the frame. A wide angle lens has a much wider field of view. To keep your subject the same size in a wide angle image, you need to get very close to your subject. In the shots above, the distance from my daughter to the background didn’t change; it was the distance from the camera to her that was changing as I changed focal lengths.
Think of it this way. If an object is close to you, it appears relatively large. Double the distance between you and the object and its size is halved. Increase that distance by ten times, and the object is one-tenth the size. In the wide angle cases, the distance between the camera and my daughter is short compared to the distance between my daughter and the background. Thus, Lisa is relatively large compared to the trees (as objects appear smaller with distance).
In the telephoto cases, Lisa and the background appear closer in size because they are both relatively far away from the camera. The distance between her and the background is becoming less significant as I increase the distance between her and my camera.
Lens Compression and Composition
You can use lens compression to your advantage once you understand that it is the distance between the camera and your subject that causes this distortion. For example, if you are trying to take a portrait, and there are a lot of distracting elements in the background, try using a long lens and standing back from your subject. By stepping back, you can isolate your subject against a single element in the background instead of all the clutter.
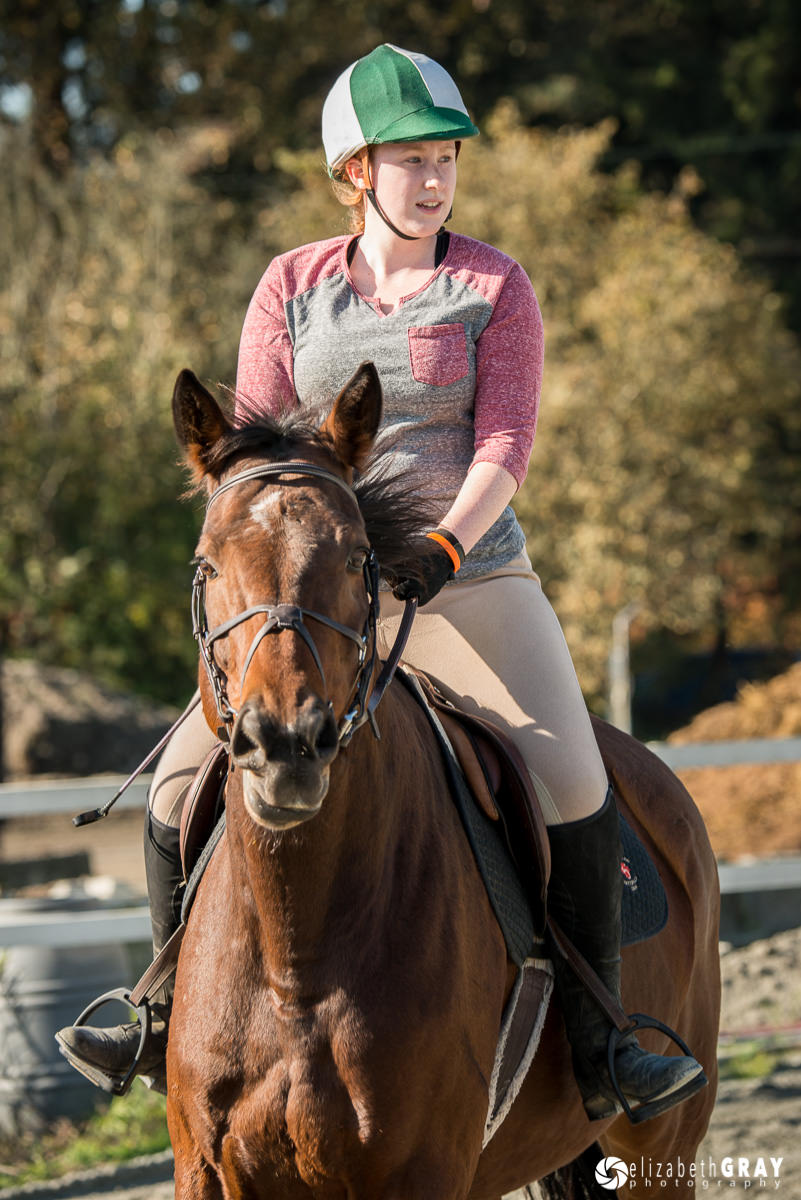
By using a longer lens, not only could I stay a safe distance from the horse and rider, but I was able to isolate them from a very busy background

I set up so that when the hummingbird hovered after drinking from the feeder, he was in front of a pink and green bush in the background
If you are trying to show the vastness of a landscape, get close to a foreground element with a wide angle lens. This will give the impression that the distant features are even grander.


Conclusion
So to summarize, the closer your camera is to the subject, the farther away the background will appear. This will exaggerate the relative subject and background sizes and distance. As you move your camera farther away from the subject, the foreground and background will appear closer together. Use this to create intimacy between your subject and a distant background.
When you are composing your photos, think about your camera-to-subject distance. Instead of just zooming your lens in and out, try moving your feet! Get close to your subject with a wide lens or farther away with a telephoto. Experiment with this technique and see how the dynamics of your photographs are impacted! Have fun shooting!
Thanks for the article! I’ve got a bit of a technical question for a photo series I’m planning and I’m trying to wrap my head around it. I’m so baffled that I’m thinking of just experimenting to find out, but I’d like to know if there’s a mathematical explanation…
So I plan on taking a photo of a landscape with my drone – let’s say an apartment building (lets call this photo 1), and also take a photo with my dslr of a person sitting in a chair (lets call this photo 2). Then I will composite the photos together so it looks like a GIANT person sitting on an apartment building. I know how to match the perspectives, but how do I match the compression??
If the subject in photo 2 is 50x their original size, do I just take photo 1 from 50x the distance that I took photo 2 from?
Does that make any sense at all? My brain hurts.
Yes, to make the person look 50x normal size, take photo 2 at 1/50th the distance of photo 1. Assuming both photos were taken with the same focal length, you can then just cut out the person from photo 2 and place it at the desired position in photo 1.
If you use different focal lengths for the two photos, one will need to be resized in proportion to the ratio of the focal lengths.
Leonardo da Vinci studied perspective and realised that the perspective seen by the viewer of a painting depends not only on the perspective captured in the painting itself, but also on the position of the viewer relative to the painting.
When we look at a two-dimensional image, we often “see” the scene as a three-dimensional scene. Our brains use various cues in the image to work out that different parts of the image are at different distances from the viewer. It is all just an optical illusion, of course, as the image itself is purely two-dimensional.
If the viewer’s perspective is changed, this often changes his or her perception of depth in the image. Magnifying the image leads to a perception that distances to and from the viewer have been compressed. This is perspective compression. Look through a telescope or binoculars and you will see this effect. You see a magnified image of the scene in front of you and everything appears closer.
In photography, using a longer focal length causes the image to be magnified. That is what causes perspective compression. The camera position is irrelevant.
It is surprisingly difficult to find a good and scientifically sound explanation of the role of perspective in photography. The best that I am aware of is in Chapter 4 of The Manual of Photography by Ralph Jacobson et al. (7th Edition, 1978) in which six pages are devoted to perspective. Subsections include: “Perspective on taking a photograph” and “Perspective on viewing a photograph”.
“Correct” perspective is shown to be achieved when “the print is viewed at such a distance that it subtends at the eye the same angle as was subtended by the original scene at the lens”.
Correct perspective is no longer regarded as important in photography because today we see images taken with many different focal lengths and those images are viewed at many different sizes and distances. Few people worry about the “correct” viewing distance. Most photographers probably don’t even know what it means.
However, this theory of perspective still correctly explains perspective distortion. Perspective compression occurs when the viewing distance is a lot less than the “correct” viewing distance. Wide-angle distortion occurs when the viewing distance is a lot greater than the “correct” viewing distance.
Tom Axford wrote: “Leonardo da Vinci studied perspective…”
A very poor example because he used, at best, only linear single-point perspective. Photographers need to understand three-point, linear and curvilinear, perspective.
QUOTE
Apart from the paintings of Piero della Francesca, which are a model of the genre, the majority of 15th century works show serious errors in their geometric construction. This is true of Masaccio’s Trinity fresco and of many works, including those by renowned artists like Leonardo da Vinci.
en.m.wikipedia.org/wiki/…graphical)
END OF QUOTE
Tom Axford continued: “… and realised that the perspective seen by the viewer of a painting depends not only on the perspective captured in the painting itself, but also on the position of the viewer relative to the painting.”
QUOTE ibid.
Limitations
Perspective images are created with reference to a particular center of vision for the picture plane. In order for the resulting image to appear identical to the original scene, a viewer must view the image from the exact vantage point used in the calculations relative to the image. When viewed from a different point, this cancels out what would appear to be distortions in the image. For example, a sphere drawn in perspective will be stretched into an ellipse. These apparent distortions are more pronounced away from the center of the image as the angle between a projected ray (from the scene to the eye) becomes more acute relative to the picture plane. Artists may choose to “correct” perspective distortions, for example by drawing all spheres as perfect circles, or by drawing figures as if centered on the direction of view. In practice, unless the viewer observes the image from an extreme angle, like standing far to the side of a painting, the perspective normally looks more or less correct. This is referred to as “Zeeman’s Paradox”.[42]
END OF QUOTE
Reference 42 is an excellent resource:
“Handprint : Perspective in the world”, Bruce MacEvoy.
www.handprint.com/HP/WC…pect1.html
That wikipedia article on perspective (graphical) is of interest to artists who wish to use perspective in their drawings and paintings, but it is of very little help in trying to understand lens compression in photography.
You will find the Wikipedia article on perspective distortion to be much more relevant, although somewhat muddled and contradictory in places (reflecting the views of photographers at large).
en.wikipedia.org/wiki/…distortion
“You will find the Wikipedia article on perspective distortion to be much more relevant, although somewhat muddled and contradictory in places (reflecting the views of photographers at large).”
I’ve already linked to an article that is “much more relevant”, thank you.
“Handprint : Perspective in the world”, Bruce MacEvoy.
Being formally trained in drawing and projection I’m reasonably qualified to assert that Elizabeth’s article, on which you are commenting, is exemplary for its intended purpose.
Your argument technique, deployed both here and on other forums, is not something I wish to further engage with.
Bruce MacEvoy’s article is very long and detailed and it has taken me a while to get far enough into it to comment. However, you are correct in stating that it is “much more relevant”. It is directed very much at the artist creating drawings or paintings rather than at a modern photographer, but the theory of perspective remains the same.
This section:
www.handprint.com/HP/WC…aygeometry
is particularly relevant to a discussion of lens compression.
It begins: “The importance of the display geometry has been recognized by painters since the Renaissance, especially in the design of large area frescos, but to my knowledge it has not received a systematic modern discussion.”
Some key quotes that are pertinent to lens compression:
“3. The viewing distance fixes the image visual angle (3) or apparent size of the primary form in the image. If the viewer can compare this image size to the actual physical size of the primary form, then the viewer achieves an awareness of a virtual object distance — the distance in real space that would produce an image of the physical object that matches the object’s image size in the artwork.”
“5. As a result, the viewing distance and format dimensions determine the format scale or apparent size of the artwork within the viewer’s visual field. The viewing distance is fixed, and observable by the viewer as a real distance in real space. The apparent size of the virtual object (its angular size in the visual field), compared to the known actual size of the object in real space (if the object is familiar, or viewed in a recognizable context) creates an implied viewer-object distance. For example, an image on a postcard of the entire span of the Golden Gate Bridge implies that the bridge is very far away (as the photographer was when he made the image).”
“Image Impact. Thus, the actual image impact depends on three viewing factors:
….
• viewpoint vs. center of projection – the shape of objects, vanishing lines and central recession (especially the perspective gradient) in the image determines the correspondence between the image diagonal vanishing points and the 90° visual separation of the viewer’s diagonal vanishing points — in other words, the spatial alignment between the viewpoint and center of projection on a line perpendicular to the image plane. A discrepancy between the two produces the sense of a telescopic or wide angle image.”
He then gives a diagram that show five different viewing situations. The fifth one (telescopic view) is pertinent to lens compression. It occurs when the viewpoint is closer to the image than the centre of projections.
“The geometries of extreme enlargement, telescopic view and wide angle view are typical of optical systems (cameras, telescopes, microscopes) or images based directly on them. I do not analyze those image issues here, but a superb general discussion is available in The Camera by Ansel Adams.”
The points I made in earlier posts are fully consistent with Bruce MacEvoy’s article. In other parts of his article he discusses the geometry and mathematics of perspective. This provides the mathematical basis from which we can work out exactly how much distances are compressed when viewing an image from closer than the centre of projection.
Unfortunately, his article is not easy for photographers because it it written very much from the point of view an artist creating a painting or drawing.
The mathematics of perspective compression is as follows. When we judge distances, one of the main cues that we use is the size of familiar objects. An adult standing 100m away has an angular size of around one degree, while an adult at 200m has an angular size of about half a degree (which is about the diameter of the full moon).
However, if we look through 10x binoculars or telescope, the image is magnified ten times so the person at 100m now has an angular size of 10 degrees and the person at 200m is 5 degrees. Our brains expect a person of size 10 degrees to be 10m away and a person of size 5 degrees to be 20m away.
So, when looking through 10x binoculars at two people 100m and 200m away, our brains instinctively interpret the image as if we are looking at people 10m and 20m away. All distances measured from the viewer appear to be compressed.
This is what we call perspective compression: distances away from the viewer appear to be reduced by the magnification factor.
You appear to be regurgitating this:
What is telephoto compression (perspective compression)? Tom Axford 2023, DPRevived
dprevived.com/t/wha…2023/2029/
This is the best explanation I have found for understanding this phenomenon. The math formula is especially useful. Well done.
Thank you for the explanation, it was easy to understand.
Excellent explanation! This really helped me wrap my head around it.
This was a great article. What you’ve inspired me to do was to … actually go shoot something with different lenses, different distances to a subject, and experience/learn how it works for myself!! You (in this article) set the ground work, you discussed some principles, but to really digest this (for those who needed the meal.. lol) we should go do it for ourselves. Teachers inspire students, I’m a student of photography. Thanks for the inspiration!!!!
I’m sorry but I always find it funny when people are explaining that there is no difference between a 24mm lens and a 70mm lens by turning the 24mm picture into a 70mm picture ???
Of course lens is not distorting space !
You are forgetting that we are looking at a picture with an angle of view, and if it is different from the angle of view at which the picture has been taken, then our brain is interpreting the picture as a more or less compressed scene !
There is why we are talking about standard lens !
Great article – thanks for the excellent use of laymans terms! Most of the times when compression has created a WOW! effect in my pics are by accident – that I loved! Now I need to practice making it happen when I want to! I didn’t hear any discussion about the focus point used ( assuming single point). In a set of 3 waves I shot, the last wave was way bigger and pic was very dramic and powerful! There is no ship as large as the one in your pelican picture – but I love the dramic looks in this case!
Thanks for the description. I’d not heard the term before, so this was very helpful.
Hi Elizabeth. Nice article. However, re: the NIKON D90 + 18-200mm f/3.5-5.6 @ 18mm, ISO 400, 1/90, f/9.5 image where you say, “If you are trying to show the vastness of a landscape, get close to a foreground element with a wide angle lens. This will give the impression that the distant features are even grander.” It’s the opposite, if by “grander” you mean bigger. A shorter focal length will make the distant mountains appear smaller. However, you may have meant that the background in total will look “better / grander” b/c there is more in the frame, but that might confuse people.