In this article, we will go over what exposure compensation is on a digital camera and how you can take advantage of it to make adjustments to your exposure when shooting in camera modes such as aperture priority, shutter priority, program mode and other scene modes of your camera.
Every modern camera today has a built-in capability to adjust exposure settings in order to make it easier to properly expose images. In simple terms, the idea is to be able to control the brightness of an image, so that it does not end up looking too bright or too dark. To be able to do this, one has to use the Exposure Compensation feature, which is typically provided either as a dedicated button on a camera or as a dial that one can move from positive exposure compensation to negative. Let’s take a look at how you can utilize this great feature on your camera and take full control of your exposure.
Before we show you where you can find the exposure compensation feature on your camera, let’s explore what it does and in what camera modes the feature can be used. But first, it helps to have a good understanding of exposure, which is the sum total of the three most important settings in all of photography: shutter speed, aperture, and ISO. Collectively, these form what is known as the exposure triangle.
Table of Contents
What is Exposure Compensation?
Exposure Compensation allows photographers to override exposure settings picked by your camera’s light meter to darken or brighten images before they are captured. Since camera meters work by evaluating light reflected off subjects and are standardized on middle gray (also known as 18% gray), any time a camera is pointed at something very dark, the meter will work the opposite way by brightening up the exposure, whereas a very bright subject will cause the meter to darken the exposure.
This is done to get as close to the middle gray as possible so that the resulting image is not too dark or too bright. While this works out quite well in most cases, one might experience overexposure or underexposure in more challenging lighting conditions, where the camera meter might be adjusting the exposure too aggressively. This is where Exposure Compensation comes into play, with the photographer manually taking control of the brightness of the image and overriding it using the exposure compensation feature of the camera.
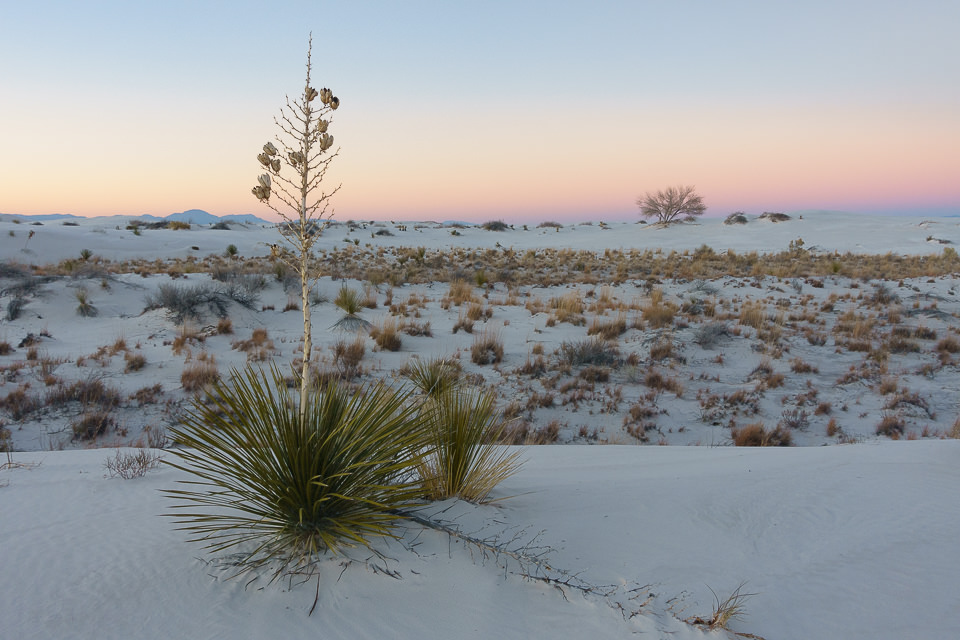
Let’s take a look at an example, where my camera’s metering system did a poor job at properly exposing the scene:

DSC-RX100M4 + 24-70mm F1.8-2.8 @ 10.15mm, ISO 200, 1/13, f/11.0
While shooting in Aperture Priority mode, the camera’s meter ended up underexposing the image, because the scene was rather challenging—the sky and the white sand in the foreground were bright, so the camera ended up darkening the whole image, which resulted in my subjects in the scene appearing way too dark.
To address this problem, I used the Exposure Compensation feature of my camera and dialed +1 EV (Exposure Value), which resulted in a much brighter image:
DSC-RX100M4 + 24-70mm F1.8-2.8 @ 10.15mm, ISO 200, 1/6, f/11.0
The image is now properly exposed, with the whole scene appearing much brighter compared to what the camera thought was the right brightness. By using the Exposure Compensation feature of the camera, I was able to take care of the problem in a matter of seconds.
Note: if you are wondering how different metering modes impact your images, please see our detailed article on Camera Metering Modes.
How to Use Exposure Compensation?
In order to use exposure compensation, you must be in one of the camera modes that use the camera meter, such as aperture priority, shutter priority, program mode, or any other “scene” mode that performs automatic exposure adjustments. Unless one has Auto ISO turned on, exposure compensation will do absolutely nothing in Manual mode. Once the proper camera mode is selected, it will be possible to adjust the brightness of the image by using the exposure compensation feature of the camera.
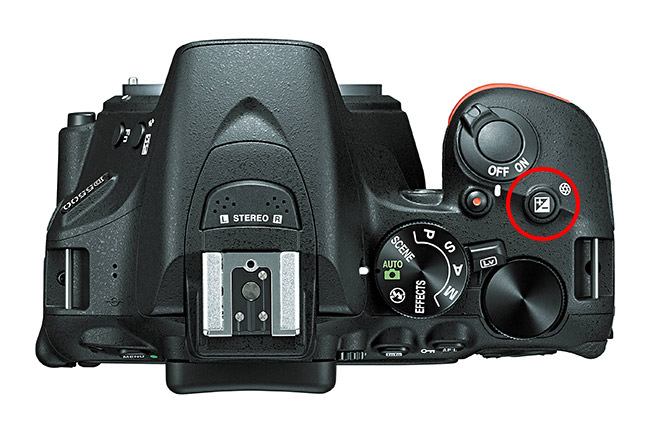
So where do you find the exposure compensation feature on a camera? Unfortunately, it all varies by camera make and model. While most cameras will have a dedicated button on either top or the back of the camera, some cameras might have this feature available only through a dial. Identifying the exposure compensation button on a camera is pretty easy – look for a button that has plus and minus signs, similar to the following illustration:

And if you cannot find such a button, there might be a dial on the top or the back of the camera that goes from a negative value to a positive value, such as -3 to +3, with small increments in between. If you are having a hard time finding the exposure compensation button or dial, please check your camera manual for details.
If you are using a Nikon camera, it will most likely be a button near the shutter release of the camera:
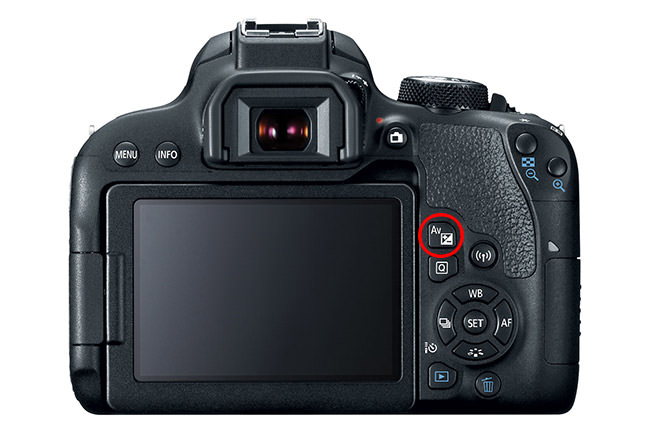
If you are using a Canon camera, there might be an “AV” button on the back of the camera:
And on some other cameras, especially mirrorless cameras with a retro design, you might find an exposure compensation dial on top of the camera, as in the case of the Fuji X-T20 below:
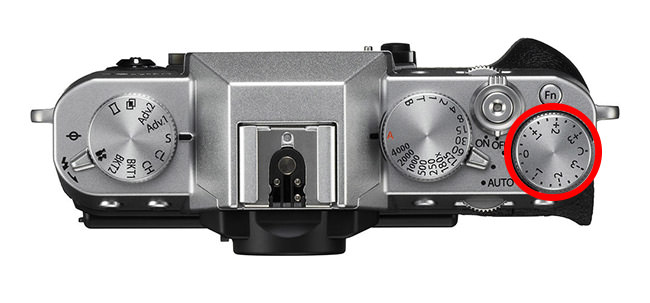
Using exposure compensation is very easy. If an image appears to be dark, you dial a positive number (+EV), whereas if the image appears to be bright, you dial a negative number (-EV). For cameras that have a button, you will need to hold the button and rotate one of the thumb dials, or press it once and use the LCD screen to adjust the exposure value. For cameras that have a dial it is even simpler – all you have to do is move it in the proper direction and your exposure should get adjusted accordingly.
Since DSLR cameras have optical viewfinders, they will have an exposure compensation area within the viewfinder that looks like the following:
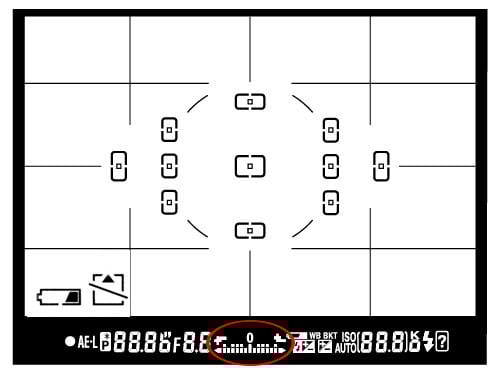
As you start making adjustments to your exposure through exposure compensation, you will notice a bar going to the left or to the right of the middle “0” value, which indicates that you are dialing negative (-) or positive (+) exposure compensation (if you have never used this feature, you might not even see the area highlighted in red until an exposure compensation value is added).
If you are using a mirrorless camera, adjusting exposure compensation should brighten or darken the image on the camera’s LCD and electronic viewfinder (EVF), making it easy to see the end result. Along with the automatic brightness adjustments, there should be an information overlay that shows the current exposure compensation value. It might be shown in one, or multiple areas of the viewfinder:
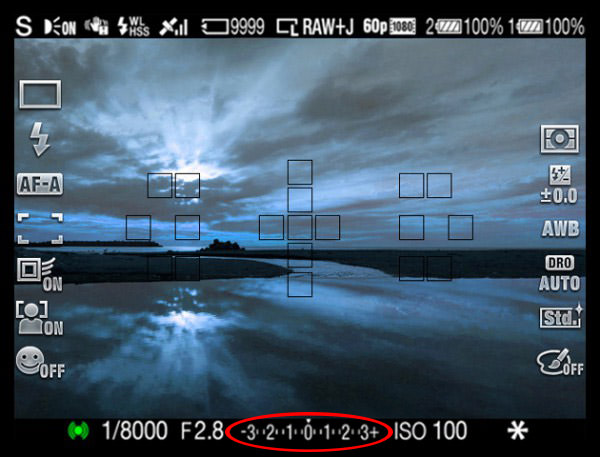
Once you make adjustments to exposure compensation, the +- EV values will be shown in the LCD and the EVF. If you cannot see those values after making changes, you might need to turn on informational overlays from the camera menu.
How Exposure Compensation Works
Exposure compensation works by adjusting one or more of the exposure variables, depending on what camera mode you are using. When shooting in Aperture Priority mode, the photographer sets the camera’s Aperture, while the camera automatically sets the Shutter Speed depending on the reading from the camera meter. When adjusting exposure via exposure compensation, the photographer essentially overrides the shutter speed set by the camera. Take a look at the below sample chart, where we will try to adjust exposure using exposure compensation in aperture priority mode:
| CAMERA METERED EXPOSURE (APERTURE PRIORITY) | ||||
|---|---|---|---|---|
| f/1.4 | f/2.0 | f/2.8 | f/4.0 | f/5.6 |
| 1/1000 | 1/500 | 1/250 | 1/125 | 1/60 |
Dialing in -1 EV via exposure compensation will increase the shutter speed from 1/250th of a second to 1/500th of a second, while keeping the aperture constant:
| APERTURE PRIORITY, -1 EV EXPOSURE COMPENSATION | ||||
|---|---|---|---|---|
| f/1.4 | f/2.0 | f/2.8 | f/4.0 | f/5.6 |
| 1/1000 | 1/500 | 1/250 | 1/125 | 1/60 |
This essentially darkens the image, since there is less light hitting the sensor. On the other hand, if we dial +1 EV, we will end up with a brighter image and the shutter speed will be halved, resulting in a brighter image:
| APERTURE PRIORITY, +1 EV EXPOSURE COMPENSATION | ||||
|---|---|---|---|---|
| f/1.4 | f/2.0 | f/2.8 | f/4.0 | f/5.6 |
| 1/1000 | 1/500 | 1/250 | 1/125 | 1/60 |
When shooting in Shutter Priority mode, using the exposure compensation feature will impact the camera’s aperture instead of shutter speed. Let’s start with the same base exposure, where we set 1/250th of a second as the shutter speed:
| CAMERA METERED EXPOSURE (SHUTTER PRIORITY) | ||||
|---|---|---|---|---|
| f/1.4 | f/2.0 | f/2.8 | f/4.0 | f/5.6 |
| 1/1000 | 1/500 | 1/250 | 1/125 | 1/60 |
Dialing in -1 EV via exposure compensation will adjust the camera’s aperture from f/2.8 to f/4.0, while keeping the shutter speed constant:
| SHUTTER PRIORITY, -1 EV EXPOSURE COMPENSATION | ||||
|---|---|---|---|---|
| f/1.4 | f/2.0 | f/2.8 | f/4.0 | f/5.6 |
| 1/1000 | 1/500 | 1/250 | 1/125 | 1/60 |
Whereas dialing in +1 EV will open up the aperture to f/2.0 and thus brighten the image:
| SHUTTER PRIORITY, +1 EV EXPOSURE COMPENSATION | ||||
|---|---|---|---|---|
| f/1.4 | f/2.0 | f/2.8 | f/4.0 | f/5.6 |
| 1/1000 | 1/500 | 1/250 | 1/125 | 1/60 |
When shooting in Manual Mode, the only variable that can change is Camera ISO, but it first has to be set to Auto ISO, as pointed out earlier. It would work similarly as in the above cases, except both the aperture and shutter speed would remain constant.
Exposure Compensation with Advanced Metering Systems
Although I have stated above that metering systems on cameras standardize on middle gray, many of the modern cameras now come with sophisticated metering systems that are capable of recognizing scenes based on pre-loaded data and making necessary adjustments to the exposure, essentially minimizing the use of the exposure compensation feature.
Some cameras are even able to recognize the presence of people in an image, basing exposure primarily on people’s skin tones to reduce the chance of over or underexposure. Many cameras also have a highlight priority or highlight-weighted metering option. In this option, the camera tries its best to expose as much as possible but without blowing out any highlights.
Because of such advancements, our cameras might require less and less manual intervention by using the exposure compensation feature. However, no matter how intelligent our cameras are going to get, knowing how to quickly make exposure adjustments is still important, not just because you might need to use it one day, but also because you can push the limits of your camera by taking advantage of such techniques as exposing to the right.

Exposing to the Right
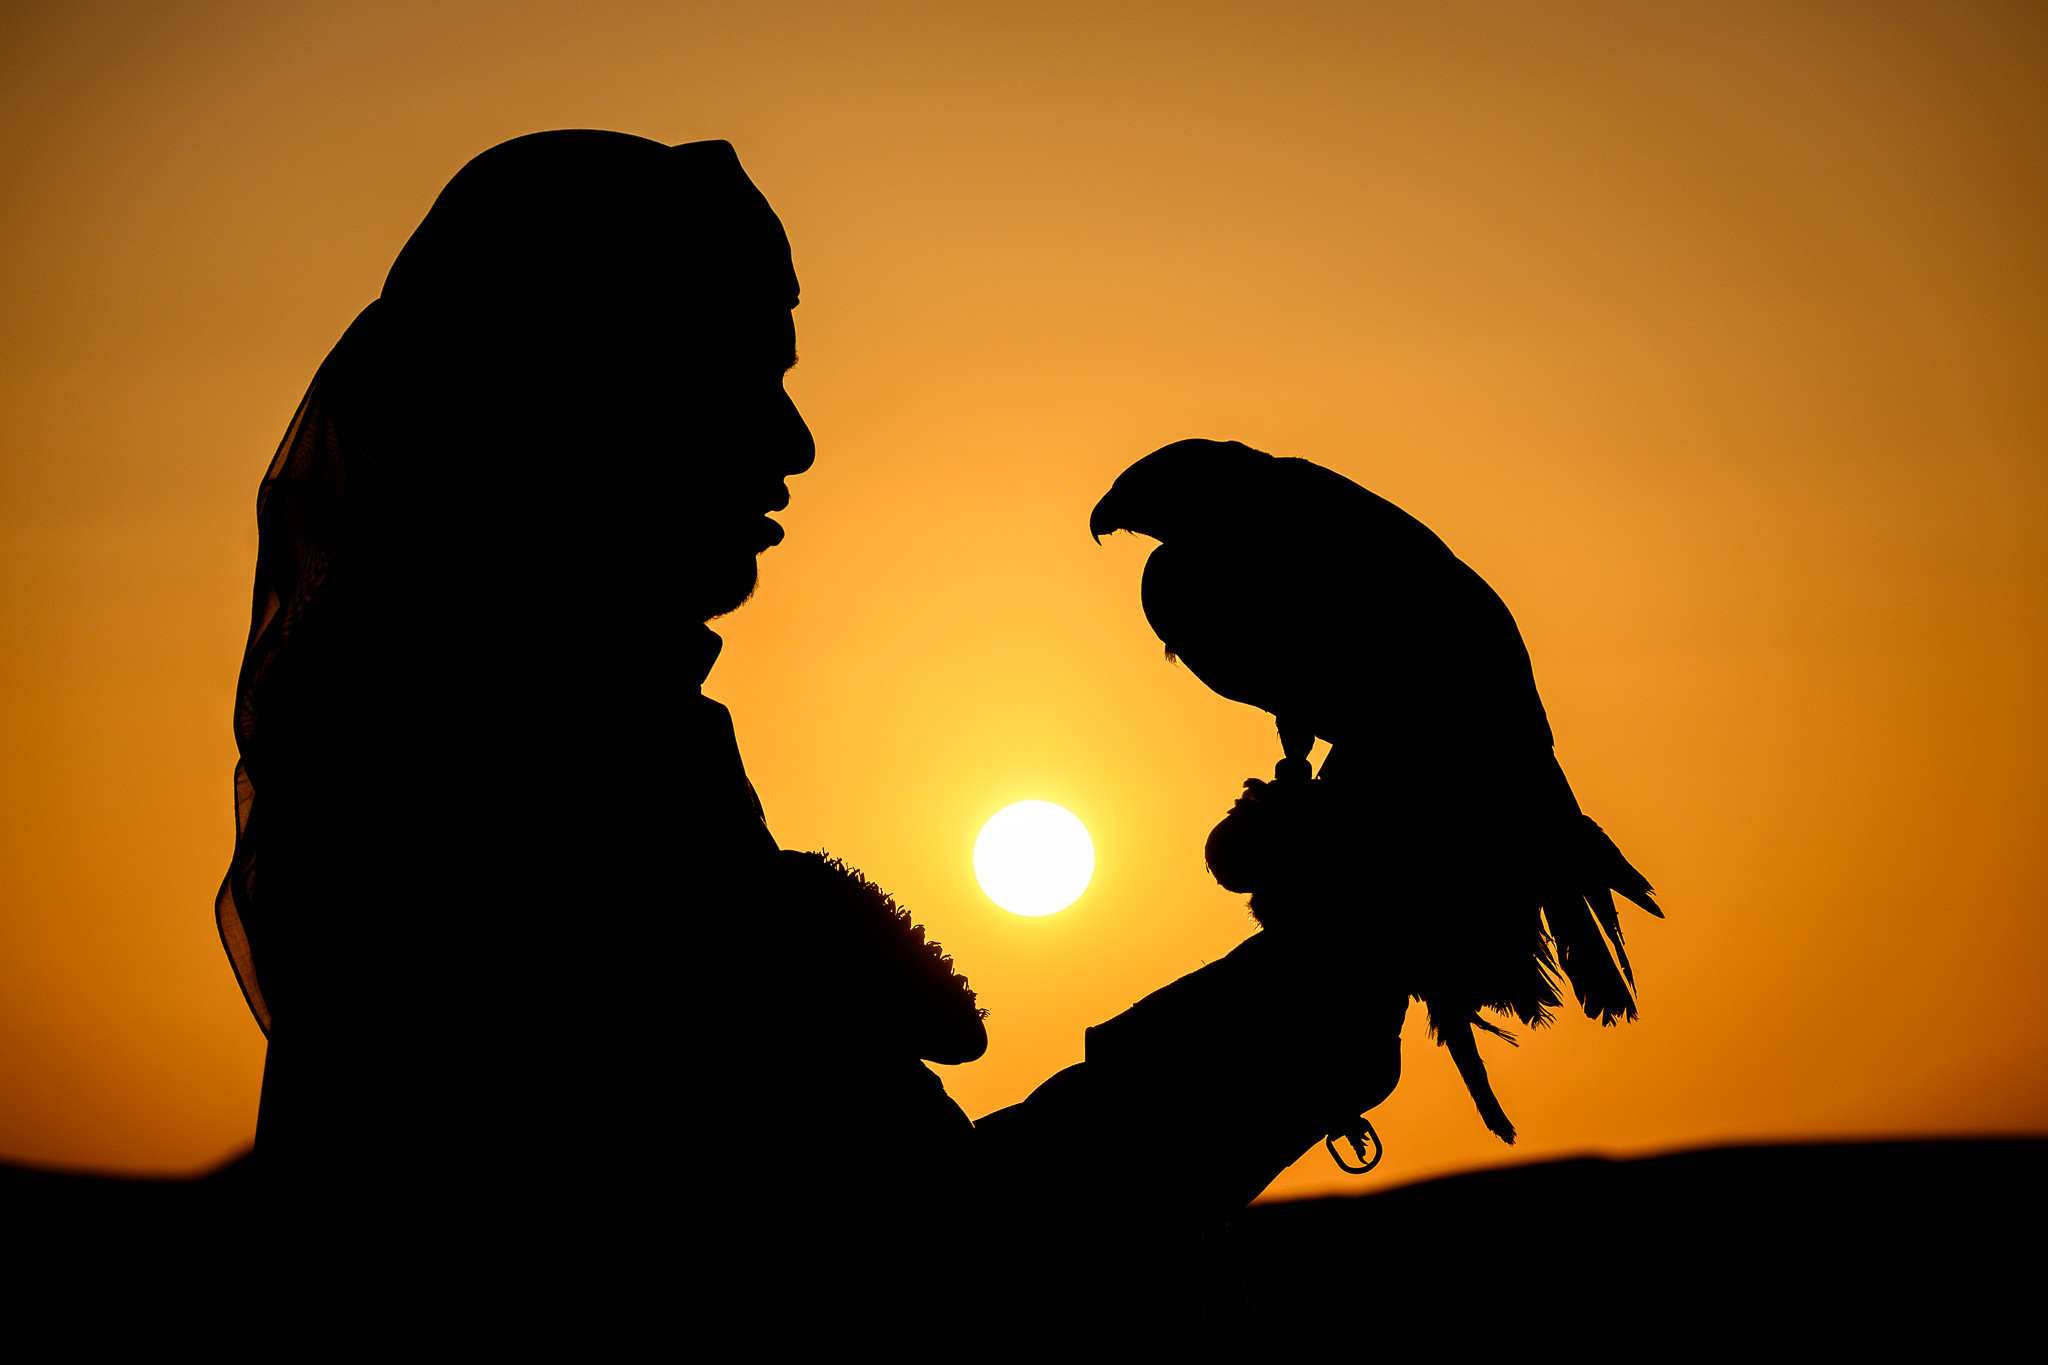
Although there is no such thing as “proper exposure” for every scene because we as photographers often pick relative brightness of the scene depending on what we are trying to portray (such as intentionally darkening an image to highlight silhouettes, as in the image above), there are cases where one can make exposure adjustments using the exposure compensation feature to get the best out every image.
This technique, known as “Exposing to the Right”, allows photographers to make images as bright as possible without blowing out any highlights, which essentially results in obtaining images of the highest-quality possible. Be warned that this is not a beginner technique by any means though, as it requires shooting in Raw to get the best results. If you would like to explore this topic in more detail, please see our Exposing to the Right article.
Hi sir how are you? I read your photography story who you have written but I have seen a mistake in your story of your exposure compensation chapter where you have written that “one has Auto ISO turned on, exposure compensation will do absolutely nothing in Manual mode.” While you know very well exposure compensation doesn’t work manual mode that’s it
Exposure compensation changes only the calibration of the internal light meter — regardless of the selected exposure mode.
Therefore:
● when using Auto ISO in manual exposure mode, changing the amount of exposure compensation will change the ISO value selected by the camera.
● when using manual ISO in manual exposure mode, changing the amount of exposure compensation will change the reading of the internal exposure indicator/meter. It will also change the flash exposure level when using a TTL flash mode.
“Standard (middle) grey” is 13%, not 18%
Wrong
Okay, I was wondering why none of my cameras did anything when I messed with Exposure Compensation. I always shoot Manual. I guess that answers my question.
The exposure compensation (EC) control alters only the calibration of the camera’s built‑in light meter.
When shooting in manual mode, the user sets shutter speed, aperture, and ISO value, so the EC control can alter only the exposure indicator reading.
However, when shooting in manual mode with Auto ISO, the EC control will no longer alter the exposure indicator reading, it will alter the ISO value instead.
If you shoot in manual mode you don’t have the option for exposure compensation. Manual mode is just that anyway.
“the camera’s meter ended up underexposing the image, because the scene was rather challenging” -wrong. The scene is not challenging, the camera underexposed due to the high level of bright tones in the image. In fact the camera got the exposure “right” according to its algorithms. This is a fundamental aspect of how cameras work and a lack of a proper understanding of this often leads to poor and over complicated articles trying to explain something that is fact relatively simple.
“the camera underexposed due to the high level of bright tones in the image”
You have that backwards. The camera underexposed the image due to the high level of bright tones in the scene.
Thanks for this great article. Well explained so that everyone can grasp the concept of exposure compensation.
Really easy to follow explanations and outcome examples – thanks for having them here.
For my type of photography I have never used exposure compensation. I shoot everything manual which is much easier! I select the aperture I want and adjust the shutter speed and viceversa. If a scene is challenging, I close or open the aperture (or shutter) to obtain the perfect exposure.
A most informative and useful article; well explained!
Dear Nasim, I went through many websites, videos and tutorials…but nothing is better than yours…Thank you very much for sharing this..keep it up
Thank you for a most informative article.