When viewing images on the Internet, you might have noticed that some websites provide valuable information related to those images, such as their exposure settings, camera brand, etc. This information known as “EXIF Data” can be an important source of knowledge in figuring out how photographers capture images and what tools they use in the process. In this article, we will take a look at what EXIF data is and how you can extract it from images.
Table of Contents
What is EXIF Data?
Exchangeable Image File Format (EXIF) is a standard that defines specific information related to an image or other media captured by a digital camera. It is capable of storing such important data as camera exposure, date/time the image was captured, and even GPS location.
Back in the early film days, photographers were forced to carry a pen and a notepad with them to record important information such as shutter speed, aperture, and date. They would then use this information in the lab, going through one picture at a time, hoping that what they wrote actually corresponds to the right image. It was a very painful process, especially for newbies who wanted to understand what they did wrong when an image didn’t come out right.
Nowadays, every modern digital camera has the capability to record this information, along with many other camera settings and other relevant data, right into photographs. These settings can then be later used to organize photographs, perform searches, and provide vital information to photographers about the way a particular photograph was captured. Such stored data is called “EXIF Data”, and it is comprised of a range of settings such as ISO speed, shutter speed, aperture, white balance, camera model and make, date and time, lens used, focal length, and much more.
Being able to read such data can be of great importance not only for beginners but also for other photographers who want to find out what settings and tools were used to create a particular photograph. Unfortunately, though, the only web-friendly (in terms of size) file format that can handle EXIF is JPEG, which means that you often cannot read the data from other image formats such as GIF and PNG.
In addition, some photographers choose to strip EXIF data from their images to protect their work and their style. In the past, some photographers even did it to safe website traffic, although the additional 40kb from the EXIF data is rather minimal these days. Those, who leave this data in their images either have no idea that they even have it, or they intentionally leave it like I do – for others to see and possibly learn from.
While many photographers choose to retain EXIF data in their images, this information does not show up when looking at photos through web browsers, because it is not part of the actual image. Instead, EXIF data is embedded in the physical file, and specific tools that are capable of reading this information must be used to view it. For example, some image viewers and post-processing tools like Lightroom are capable of viewing and extracting such information in order to properly organize images, while some operating systems are capable of reading and displaying this data.
You can read more about the Exchangeable Image File Format here.
How to View EXIF Data
So, how does one view this EXIF data online? Let’s take a look at a few easy ways to read it from images.
How to View EXIF Data in Firefox
If you are using the Firefox browser, get the Exif Viewer addon by clicking the “Add to Firefox” button. After the addon is installed and Firefox is restarted, you will be able to instantly view the EXIF data by just right-clicking on an image and selecting “Exif Viewer”.
Go ahead and try it on this image:

Once you click on “Exif Viewer”, you should see a new window that looks like this:
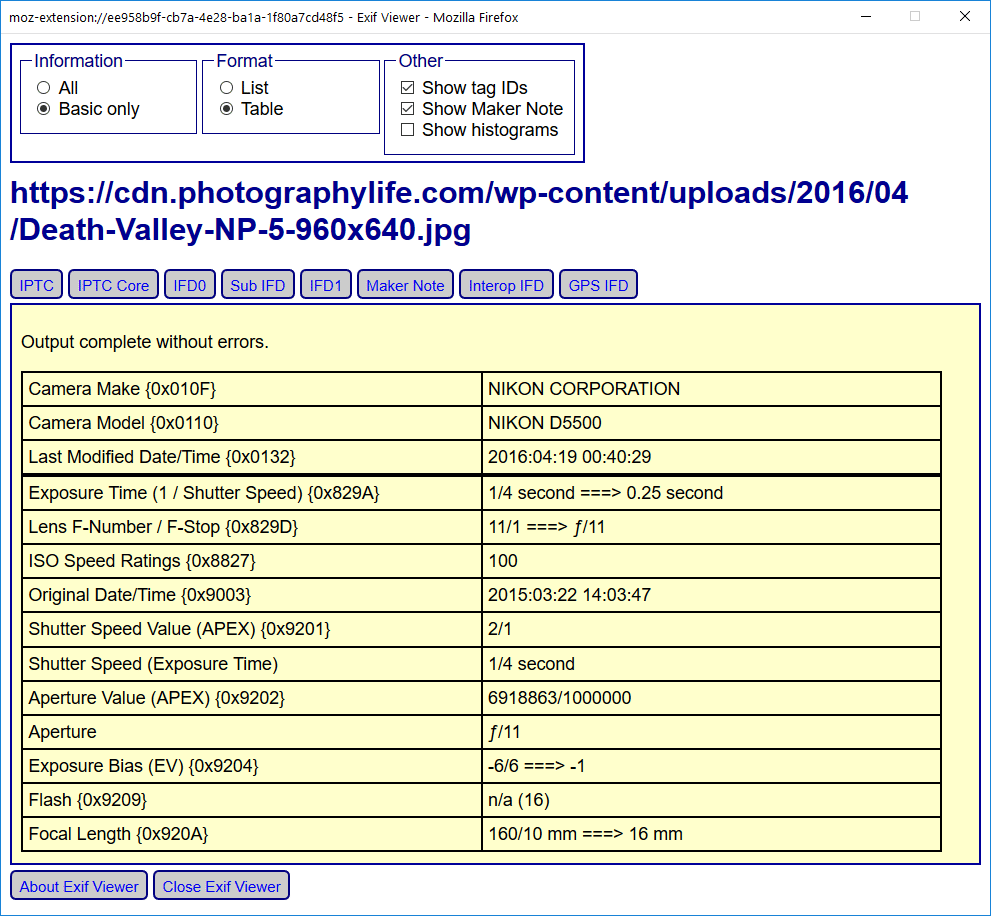
As you can see from the above screenshot, the EXIF information indicates that I used the Nikon D5500, with camera ISO set to ISO 100, aperture at f/11, and shutter speed set to 1/4th of a second to photograph the above image. I used a wide-angle lens for this shot and the EXIF data indicates that the lens was set to 16mm at the time of taking. The original date/time field indicates 2016-04-19, although the time on my camera was set wrong (probably forgot to adjust it after traveling). There are a few other bits of information that can be useful, especially if you select the “All” checkbox under “Information”.
One thing to keep in mind though – thumbnail images typically do not contain EXIF data. So, whenever you see a clickable thumbnail image, do not select “Exif Data”, but rather open the image fully, then use the tool on the full-sized image.
If you see an error that says “Unable to extract some or all of the Exif data”, it means that the JPEG file you are looking at contains no EXIF information.
How to View EXIF Data in Chrome
If you prefer to use the Chrome browser, it also has a similar extension that is capable of viewing EXIF data. Download and install the “EXIF Viewer” by clicking “Add to Chrome”. Once installed, you will be able to right-click any image and select “Show EXIF data”, which brings up a pop-up that looks like this:
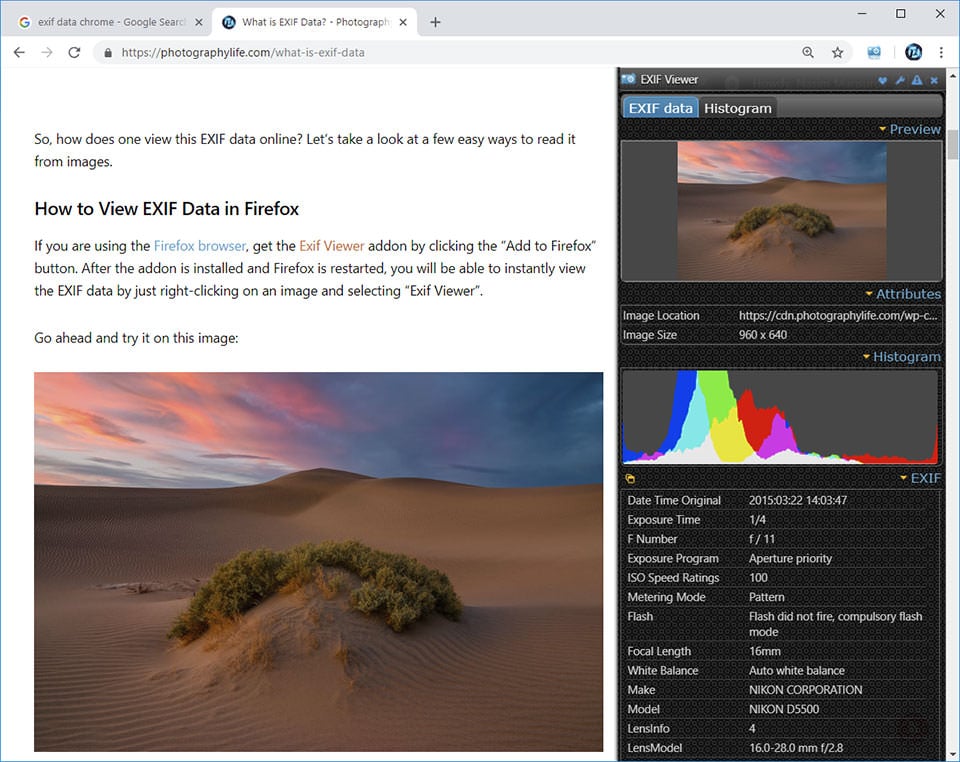
As you can see, this tool provides quite a bit of useful information, including a histogram. All the common exposure, camera, date and other information is provided in the “EXIF” section of the extension.
How to View EXIF Data in OS and with a Photo Viewer
If for whatever reason you do not want to install a browser add-on, or perhaps you want to be able to view this data on existing images on your computer, you can also use a separate photo viewer application or the built-in capabilities of your operating system. This method can be a bit slower than the above two for viewing images online because you will need to first download images, then use the photo viewer or your OS to view the EXIF data. However, if images are already on your computer, a dedicated photo viewer application or your OS tools will probably be the best way to go.
Let’s first take a look at how you can use your operating system to view EXIF data. If you are using a Windows OS, simply right-clicking the image and clicking the “Details” tab will reveal some information, as you can see below:

You can also view a similar window in MacOS by right-clicking on an image file and then selecting “Get Info”. You’ll be presented with a screen that looks like this:
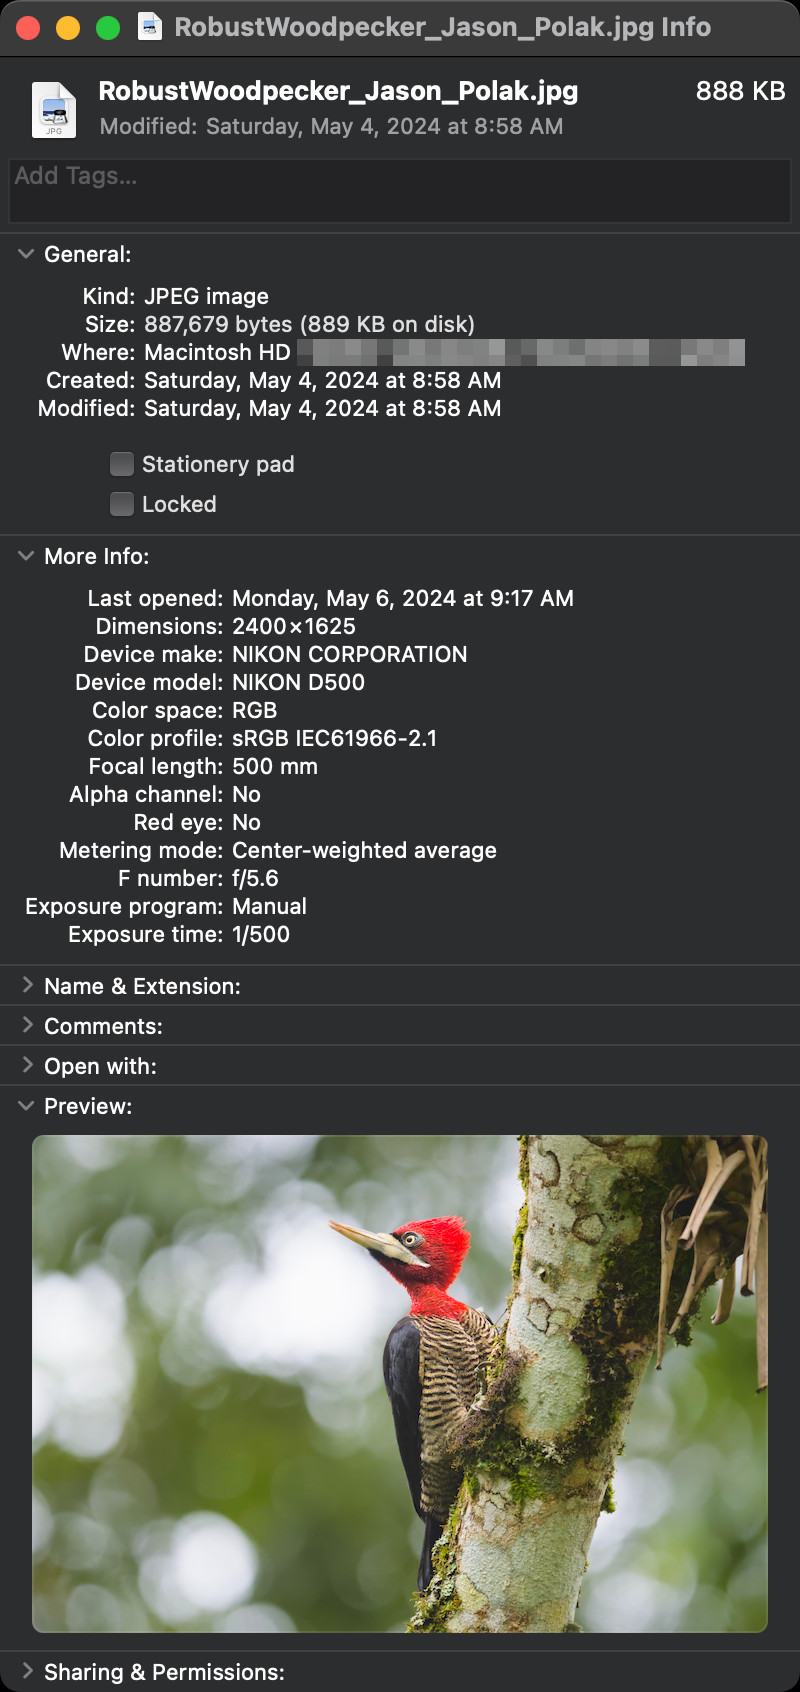
However, keep in mind that this is pretty limited information compared to all the EXIF information in the file – if you want more details, such as what lens was used when capturing the image, you might not be able to find such detail in this tab. To get that information, you will need to use a photo viewer.
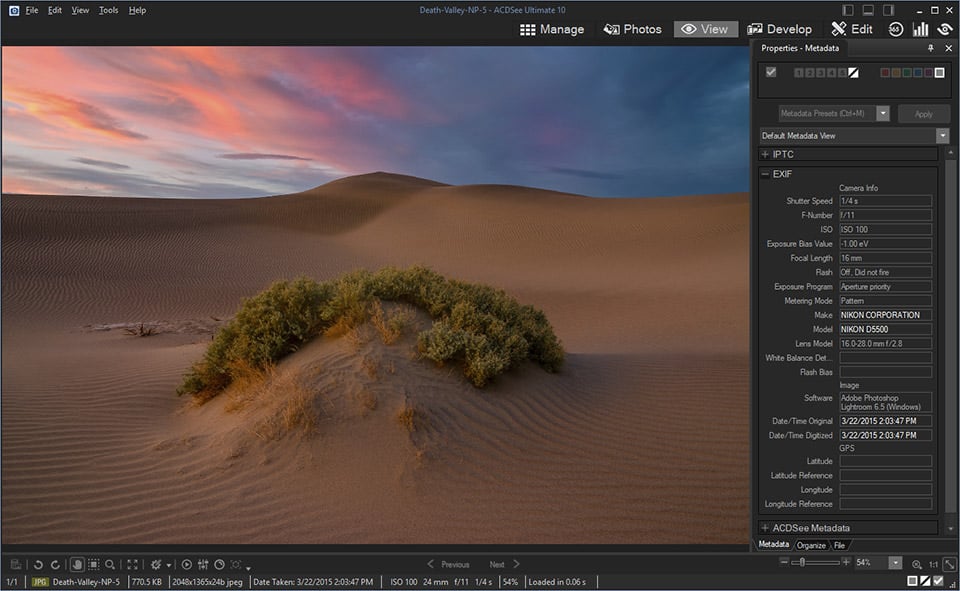
Now if you are wondering which photo viewer to use, there are way too many to list and it is all a matter of personal preference. Personally, I have been using ACDSee for years and find it to be an excellent tool to view EXIF data. Take a look at the below screenshot that shows EXIF data for the same image above:
Another open-source possibility with less commercial bloat is DigiKam, which lets you both view and edit EXIF information.
How to Extract Images with EXIF Data in Lightroom
Now that you know how to view EXIF data in images using various tools, let’s take a look at how you can extract photos with the EXIF data preserved in them. I will go through the export process in Lightroom, but if you are using some other post-processing tool, it should be able to handle this process as well. Pick a photo you want to export, then navigate to the Export screen (File -> Export), which will bring up a window like this:

There is a “Metadata” field here, which is what describes the EXIF data that will be extracted with the image. If “All Metadata” is selected, all EXIF data will be embedded into the resulting JPEG image. There are two important checkboxes that you might want to look into here. The first one is “Remove Person Info” and the second one is “Remove Location Info”. If you want to protect your privacy and make sure that your personal info and GPS location are not extracted, always make sure to keep both of these boxes checked, something I recommend to do.
For example, if you extract an image that you captured with a GPS-enabled camera or your smartphone and you have the “Remove Location Info” field unchecked, your GPS data will be saved as part of your EXIF data, and someone else might use that information to track your location.
If you want to be selective about the type of information you want to extract from Lightroom, you can click on the “Include” drop-down and pick a different setting. For example, some photographers might want to strip all EXIF data but only keep their copyright information. You can achieve that by selecting “Copyright Only” from the drop-down field.
If you have already extracted images and you want to strip EXIF data from them, or your post-processing tool does not have the capability to remove EXIF data, you might want to check out the next section of this article.
How to Remove EXIF Data
When sending images or exporting them from your post-processing software, you might be including sensitive data such as your GPS location in those images. That’s because most cameras today automatically embed this information into photographs by default. In this section, we will go through the process of removing EXIF data from your photographs using different tools.
Why Remove EXIF Data?
There are multiple reasons why you might want to remove EXIF fully or partially from files:
- To remove sensitive data such as your personal information and GPS location
- To post images to a low-bandwidth site and keep their sizes small
- To protect your work and hide information that reveals your camera gear, settings, and even post-processing adjustments
- To remove unnecessary junk from JPEG files to keep them smaller, yet retain important EXIF data such as camera exposure and equipment used.
I personally use the last reason to keep my files a little smaller and to make sure that unnecessary junk does not get written into my JPEG files. However, in many cases, you might want to remove sensitive data such as your GPS location from every image you are planning to send or upload on the web.
What EXIF Data is Saved In Images
Let me first explain what EXIF data is written into a file. If you use Adobe products such as Photoshop or Lightroom for manipulating your images, EXIF Data typically consists of three parts: normal EXIF data that contains your camera settings, XMP Data that contains post-processing steps you took before the image was exported, and a thumbnail of the image. Here is a short excerpt from the linked Wikipedia article:
XMP also defines particular schemas for basic properties useful for recording the history of a resource as it passes through multiple processing steps, from being photographed, scanned, or authored as text, through photo editing steps (such as cropping or color adjustment), to assembly into a final image. XMP allows each software program or device along the way to add its own information to a digital resource, which can then be retained in the final digital file.
Is this good or bad? Storing XMP data in your original images certainly has its benefits, especially in case you lose your image catalog. Since all your post-processing adjustments are stored as XMP data either directly in the file (JPEG, TIFF and DNG), or in a separate XMP sidecar file (RAW), you can easily restore your image catalog without losing your edits.
However, why would you want to keep all of that in your exported images Let’s look at a sample image that contains XMP Data:

I opened an image using an ASCII text editor and look at what’s in that file – that’s in addition to the EXIF data that is already stored in the file header. Scrolling down, I could see everything from White Balance to Saturation and Hue adjustments I used in Lightroom before exporting the image. Worst of all, the file even included ALL of the image history, including what I did in Photoshop and how many times the image was saved!
Take a look at the yellow area highlighted in this screenshot:

I applied Tone Curve to my image and as you can see, the history is right there. Imagine how large your files can grow if you work on them multiple times! In addition, why would you want to preserve the thumbnail of the image (saved inside the image) that is being exported for the web?
Let’s now talk about how you can either completely or partially remove both EXIF and XMP Data from an image. There are multiple ways to remove EXIF and XMP data from JPEG files – you can either remove it completely, or you can choose what to keep while deleting specifically what you want.
How to Completely Remove EXIF Data
The easiest way to remove EXIF and XMP Data from an image without involving third party software is to either do it in Photoshop or in Lightroom. In Photoshop, simply go to File -> Export -> Save for Web and make sure that “Metadata” is set to “None”:

Once you save the file, all EXIF and XMP Data will be completely removed!
You can achieve a similar result in Lightroom by selecting “Copyright Only” from the “Include” drop-down field under “Metadata” section, which will remove the EXIF data, except your copyright information from the image:

However, this only does what it says – it does not completely remove all the metadata. While things like your camera information, exposure settings, and XMP data will be gone, your copyright information along with an embedded image thumbnail will be preserved. Unfortunately, Lightroom does not give an option to strip all the metadata from files, so you will need to use other tools to do it.
While there are some websites that allow one to upload images and strip metadata from them, I personally use Phil Harvey’s “ExifTool” to do the job, because it is fast and I can process many images at once. Download the executable file, then use the following command prompt:
exiftool -all= SourceFile.jpgObviously, replace SourceFile.jpg with the name of the JPEG file you want EXIF data deleted from. As a result, all metadata, including the image thumbnail will be stripped from the file. If you want to remove EXIF data from all images in the same folder, specify “*” (without quotes) instead of the file name and it will go through every image. You can also supply an additional flag if you want the files to be changed in place, instead of keeping the original and creating a new one without the EXIF data:
exiftool -all= -overwrite_original SourceFile.jpgHow to Selectively Remove EXIF Data
This part is for those like me, who like to keep important EXIF data in their images, but want to get rid of all other junk such as XMP Data and image thumbnails from their images. There are two ways to do this – from Lightroom directly, or from a command prompt. I personally like to do it directly from Lightroom, because it saves me a lot of time. If you already have a bunch of exported files, it might be easier to just run the tool from the command prompt.
First, download ExifTool, if you haven’t done it already.
Instructions for Windows OS
If you use Windows OS, create a folder called “ExifTool” on your root folder and put the executable “exiftool(-k).exe” into that folder. On my Windows 10 system, the full path to the executable file is “C:\ExifTool\exiftool(-k).exe”. You can save it elsewhere, if you want to – that’s totally your choice. Then, go ahead and create a text file in notepad and copy-paste the following into it:
“C:\ExifTool\exiftool(-k).exe” -overwrite_original ^
-XMP:All= ^
-IPTC:Keywords= ^
-ThumbnailImage= ^
%*
Now save the file as “RemoveJunkEXIF.bat” in the same folder where you saved the ExifTool executable. You should now have two files in that folder.
So, what does the above batch file do? It basically calls ExifTool, removes all XMP Data, IPTC Keywords, and image thumbnail from your file, while keeping the rest of the EXIF data intact. The option “-overwrite_original” makes the tool overwrite the file, rather than creating a separate file and renaming the original.
Once you save the file, go to Lightroom and open the export dialog box. On the very bottom of the page, expand “Post-Processing”, then select “Open in Other Application…” from the “After Export” drop-down. Then click on “Choose…” button, browse to “C:\ExifTool” folder, and double click on the RemoveJunkEXIF.bat file. The export screen should look like this:
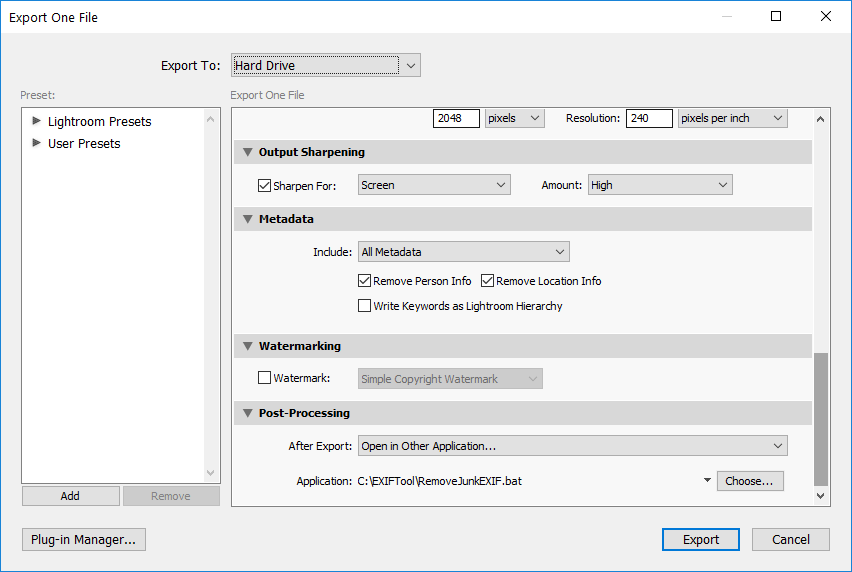
Now click “Export” and make sure that you are not getting any errors. If the export succeeded and you did not receive any errors, you are all set! Next time when you export your images, this setting will be preserved and your EXIF data will be automatically removed from your files.
Instructions for macOS
If you use macOS, download the macOS package and install it. Since the app is coming from an unapproved third party, you will need to go to Settings -> Security & Privacy, and manually approve the installation from the bottom of the “General” tab. Once installed, ExifTool will reside in /usr/local/bin folder.
The next step is to create an executable shell script that Lightroom can call. Go ahead and fire up TextEdit, then copy-paste the following code into the file:
#!/bin/sh
/usr/local/bin/exiftool -overwrite_original \
-XMP:All= \
-IPTC:Keywords= \
-ThumbnailImage= "$1"
Save the file as “RemoveJunkEXIF.sh” on your Desktop, or a folder of your choice. The next step is to make this file executable. Fire up the Terminal, then issue the following command:
sudo chmod +x /Users/YourName/Desktop/RemoveJunkEXIF.shThe shell script is ready to go. Before we move on to selecting the shell script in Lightroom, go ahead and export a JPEG image from Lightroom first. We will use this file to compare to the file that’s been cleaned up by ExifTool later.
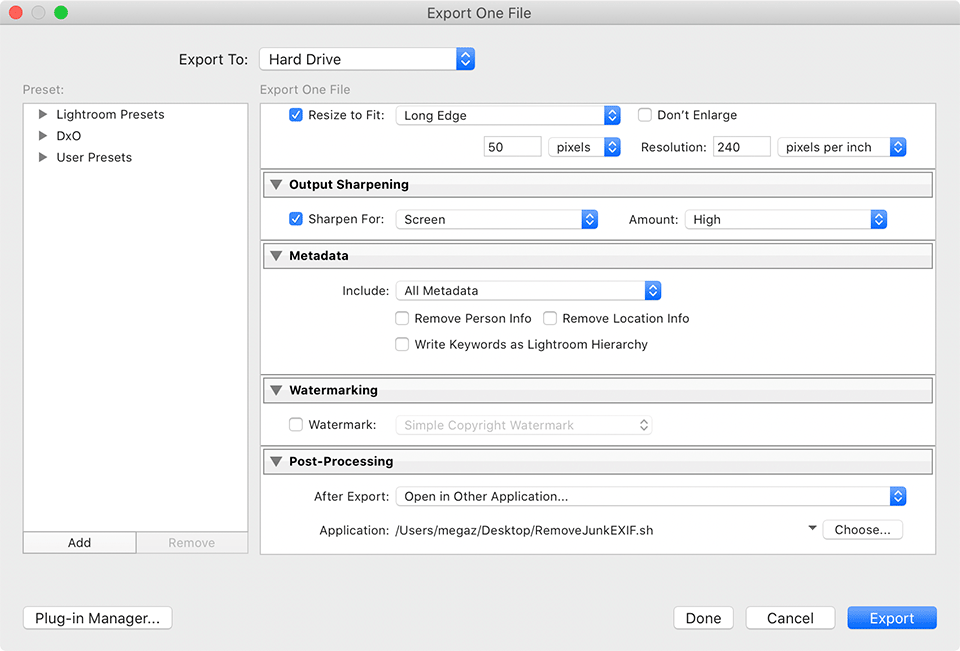
Now all you have to do is open up the export screen of Lightroom, select “Open in Other Application…” under Post-Processing, then click “Choose” and select the RemoveJunkEXIF.sh shell script, as shown below:
Go ahead and export another image, but make sure that you create a unique file name, so that it does not overwrite the previous image. Now use the Finder to compare size differences between the two images – the second image should be smaller. If that’s the case, you are good to go! If file sizes are identical, then there is a problem with either your ExifTool install, or the shell script.
Removing EXIF Data from a Batch of JPEG Images
If you have a bunch of images that you need to remove EXIF data from, then I recommend executing ExifTool directly from a command prompt. Just copy all your image files to a folder like “C:\ExifTool”, then open up the command prompt and do the following:
cd "C:\ExifTool"
RemoveJunkEXIF.bat *.jpg
On macOS, you would do something similar using Terminal:
cd /Users/YourName/Desktop
sh RemoveJunkEXIF.sh *.jpg
Obviously, if you placed ExifTool in a different folder, just change the folder path above and everything should work perfectly!
Great and thorough article. In Windows, you can use the free BatchPurifier Lite to thoroughly remove all EXIF, XMP, and other hidden data from multiple JPEGs. Unlike ExifTool, it integrates with the file explorer, so you can right-click on any file and folder and quickly send it for cleaning.
Thank you for all this information. Why would you want to remove your IPTC data from your identity if you sell your photos or share them? On the contrary, it helps to guarantee and show that copyright is present. If we remove this, our photo could be lost and reused more easily by anyone, couldn’t it?
balls
Exporting the metadata is not a big deal. I figured it out in a few minutes. My problem is, I need to modify the metadata on raw files. For example, the camera doesn’t get the location data from SnapBridge (mainly because I left my cell phone in the car). The EXIF command line app claims it can be done, but the instructions don’t make it clear how to change specific data fields. My attempts to make the changes fail.
Hi, I’ve just changed the EXIF data in my old photos. You can change this on a set of images with Adobe Bridge. Unfortunately, Lightroom only allows you to do this one image at a time.
Wonderful post buddy. Thank you so much for such a detailed article covering each aspect of EXIF. I’d like to know your feedback on the AnyExif tool as well since I’m using it and feels like it’s quite better than ExifTool.
thanks so much
Nice effort. Thanks for sharing it. It really helps me a lot. If you want to convert JPG to SVG in a few seconds. So, use Convert JPG’s online jpg to svg converter. It will convert your JPG images to SVG file format in a few seconds and you’ll get optimal quality SVG files. It will save your time for sure.
nice article
Exciting new world of photography how can I learn more?
Super tip about the EXIF Viewer Firefox extension, but please modify the ‘Go ahead and try it on this image’ bit, because it gives null results. I even downloaded and checked the image with EXIFinfo (exifinfo.org) and SnipTag (sniptagapp.com). Only the next para clarified that one must first click open the full-sized image, and then EXIF Viewer shows the full metadata.