When photographers talk about lens diffraction, they are referring to the fact that a photograph grows progressively less sharp at small aperture values – f/16, f/22, and so on. As you stop down your lens to such small apertures, the finest detail in your photographs will begin to blur. With good reason, this effect can worry beginning photographers. However, if you understand how diffraction impacts your photographs, you can make educated decisions and take the sharpest possible photographs in the field. In this article, we will explore the topic of lens diffraction in detail and talk about different techniques you can utilize to avoid it.
The effects of diffraction – that your sharpness decreases at smaller and smaller apertures – are shown in the comparison below. Keep in mind that these are fairly extreme crops:

The reason that this occurs is based upon the principles of physics; in short, as the aperture gets smaller and smaller, light waves spread out and interfere with one another increasingly more. This causes small details of your photographs to blur.
However, this explanation is overly simple, and it still can be confusing to beginning photographers. What, physically, causes diffraction? At what point does diffraction begin to blur your photographs? Is there anything you can do to prevent diffraction? Are expensive lenses better at controlling diffraction? The answers to all of these questions will be explained in-depth below.
Table of Contents
What is Diffraction?
In explaining diffraction, it can be difficult to straddle the line between avoiding and embracing references to optical physics. Most photographers are interested in day-to-day knowledge rather than comprehensive background information, but it is impossible to talk about diffraction without describing how it works at a fundamental level. That said, this section is meant to be understandable even if you are not a physicist; we recommend reading it, since it will provide a more solid foundation for your understanding of diffraction.
At its most basic, diffraction is the concept that waves – including light waves – can interfere with one another. In fact, every time that waves pass through a slit, they will interfere. To make this easy to visualize, consider waves of water. If you drop a rock into a perfectly still lake, you will cause a ripple of small waves to form. These waves spread out in concentric circles, just like the image below:

What happens if you create a barrier to block the path of these waves? Quite simply, you would stop their movement. This is boring:

To make it interesting, then, you cut a hole in the barrier so that water can pass. Now, what sorts of patterns would the waves create?

The waves look similar to how you might expect, although there are a few additional patterns that form aside from the primary wave:
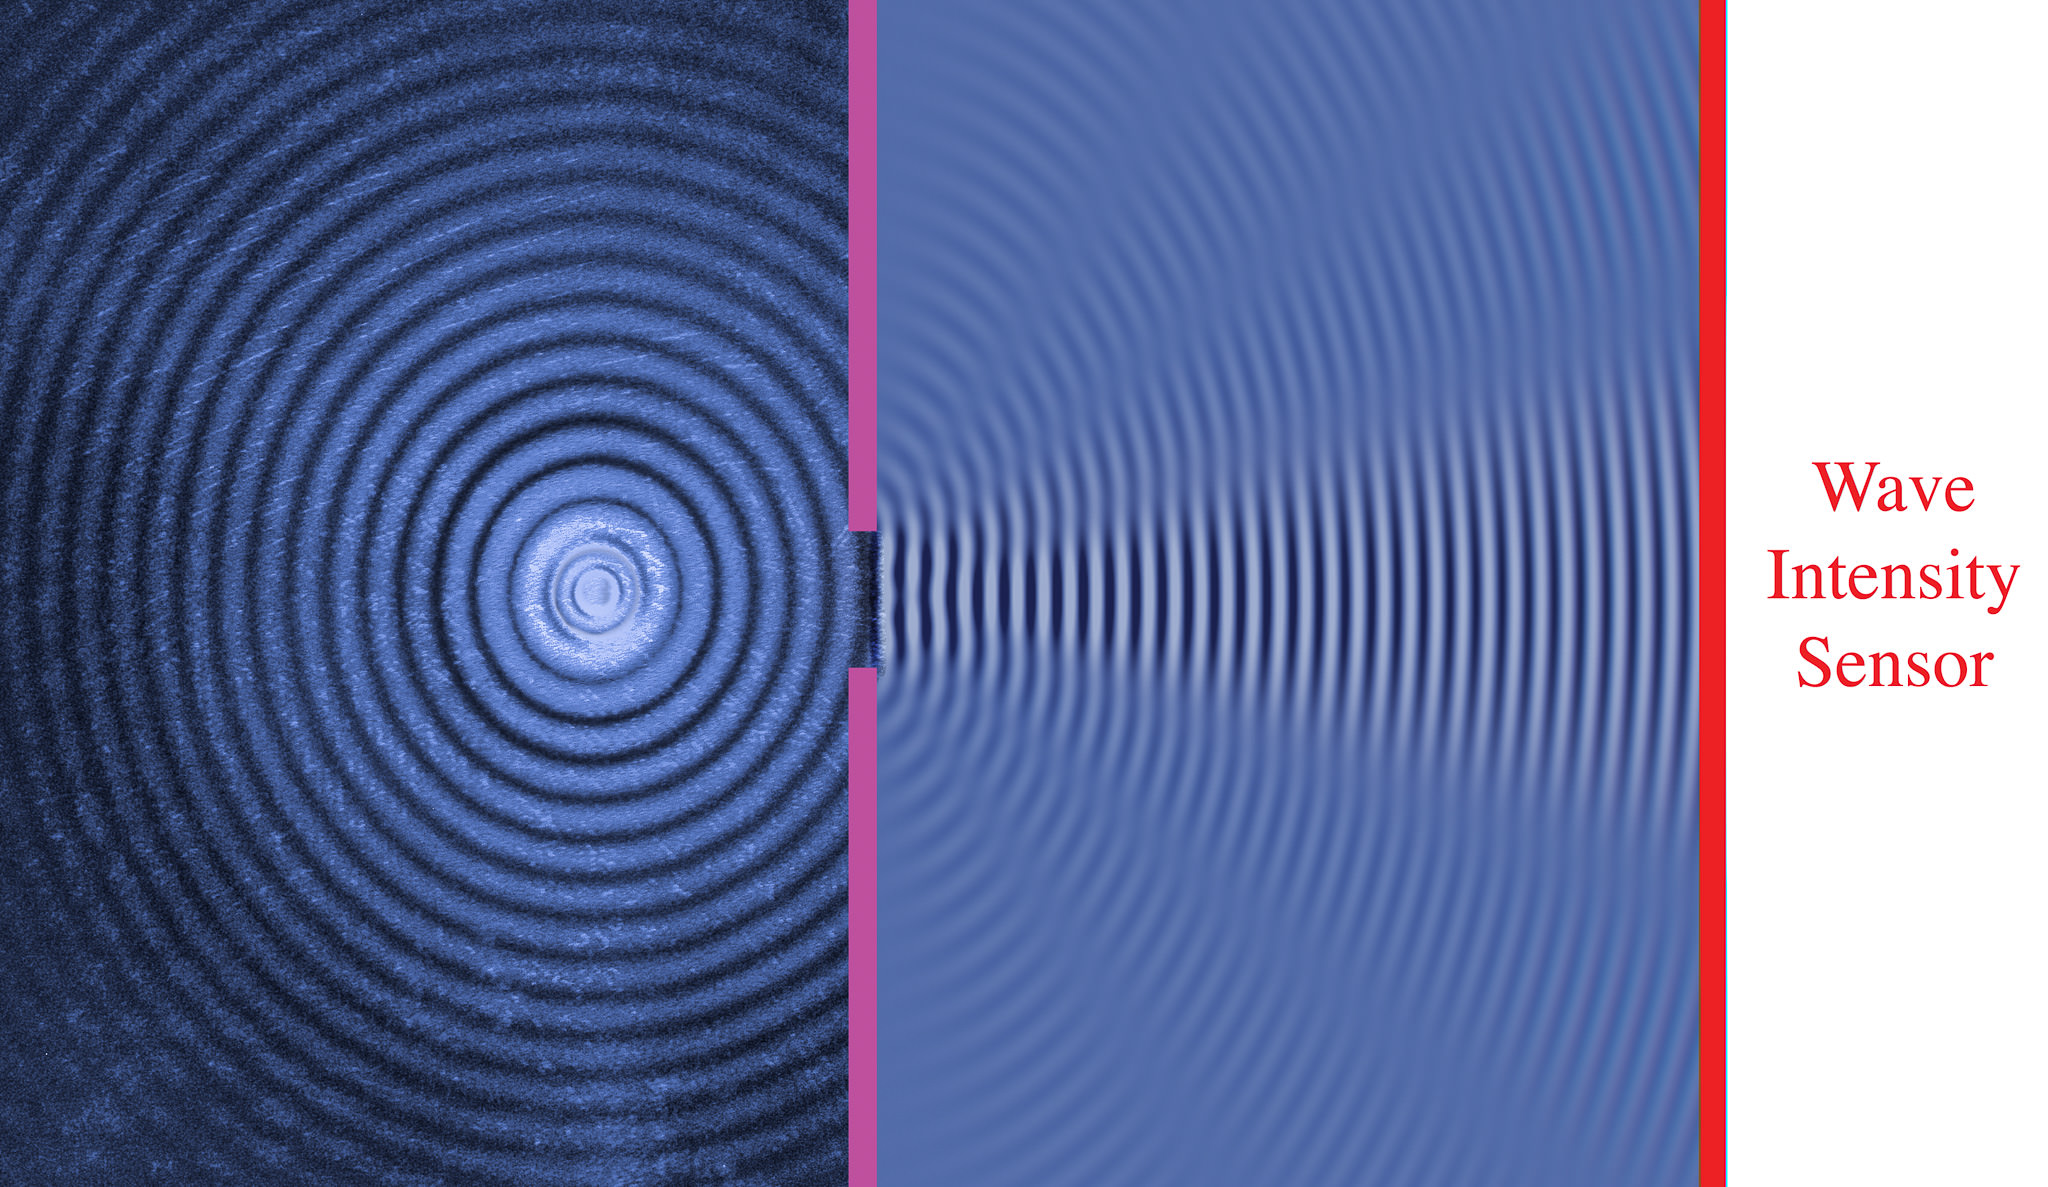
These additional patterns are artifacts from the wave bending around the corners. They arise because the two corners act, essentially, as individual sources of waves – waves which can collide with one another. In certain areas of collision, the waves cancel each other out (destructive interference); that is why some areas of the diagram look completely still. In other places, though, the waves add together (constructive interference), which causes an additional pattern to form off to the sides.
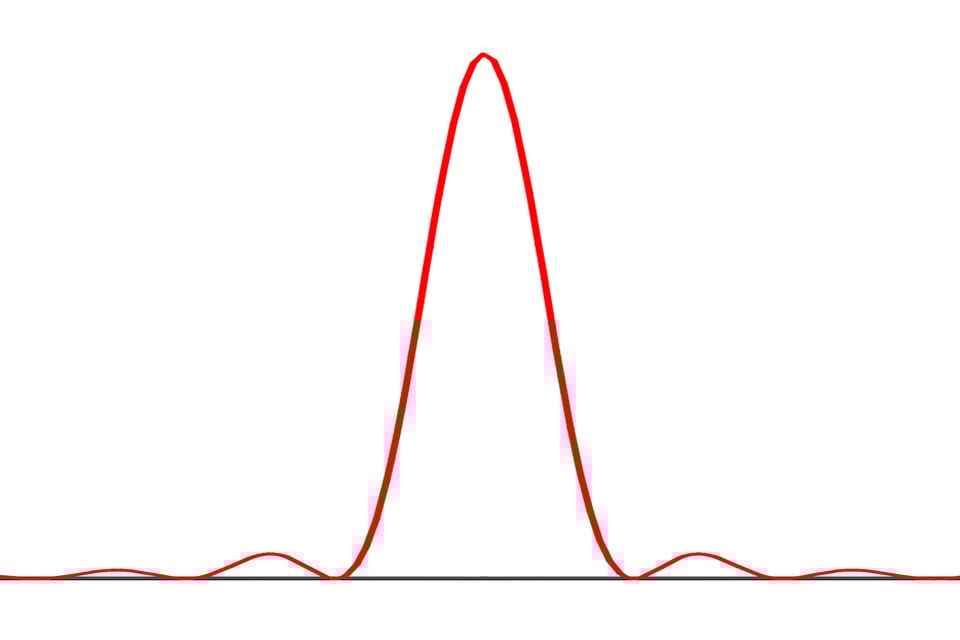
To visualize this, let’s say that there is a sensor along the far-right edge of the diagram. This sensor measures the intensity of the waves at a given point, which increases with the amplitude of the wave. A graph of the intensity is shown below:
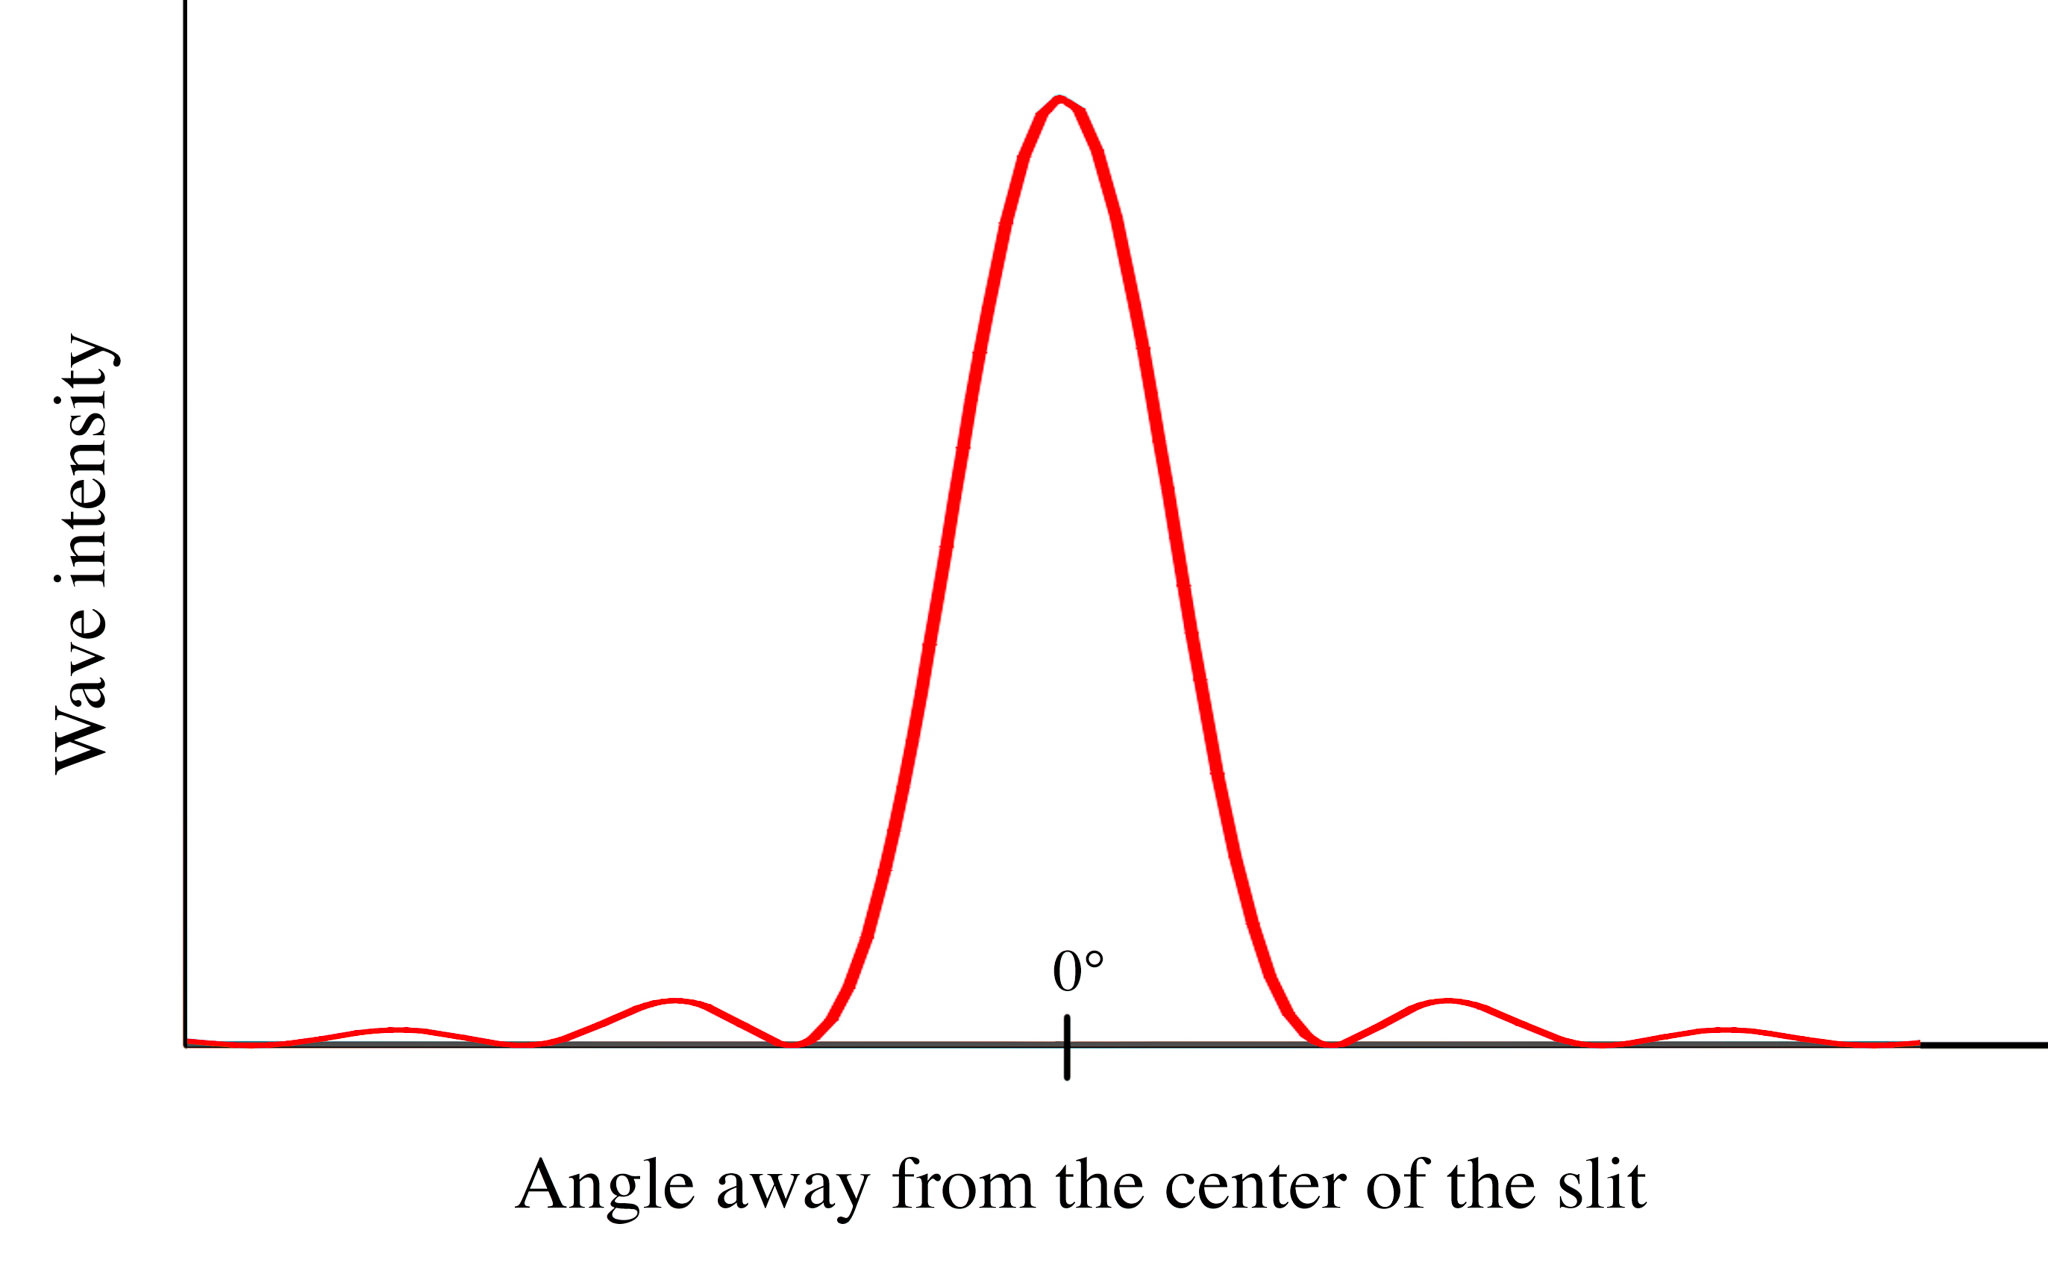
Clearly, the central pattern is the most significant. The patterns off to the side are still present, but they don’t have nearly the same intensity as the one in the center. This means that the central pattern is most significant in photography, as we will cover in a moment. For now, though, let’s see what happens with a large versus a narrow opening in the barrier. Note that the images below have been simplified, and only the central wave pattern is included:
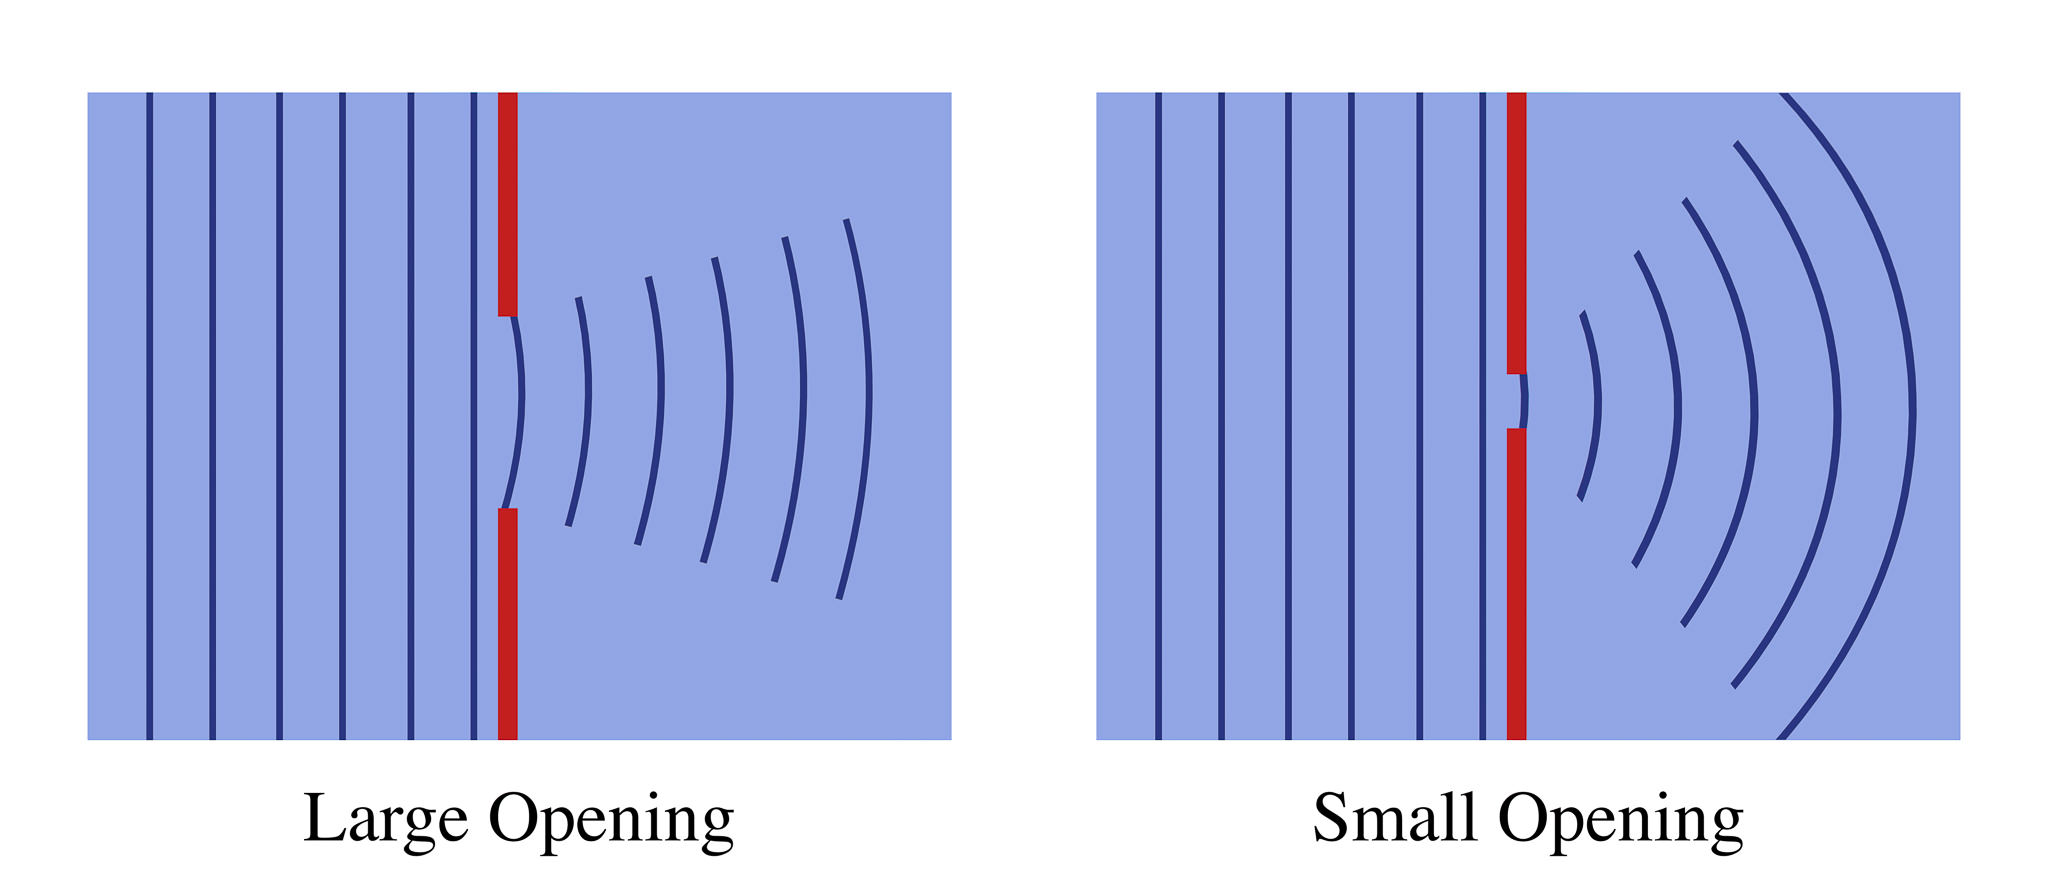
The main difference between these two images is that the smaller opening results in a larger spread of waves, while the large opening causes much less spreading.
Take a look at a comparison between the graphs of the two waves:
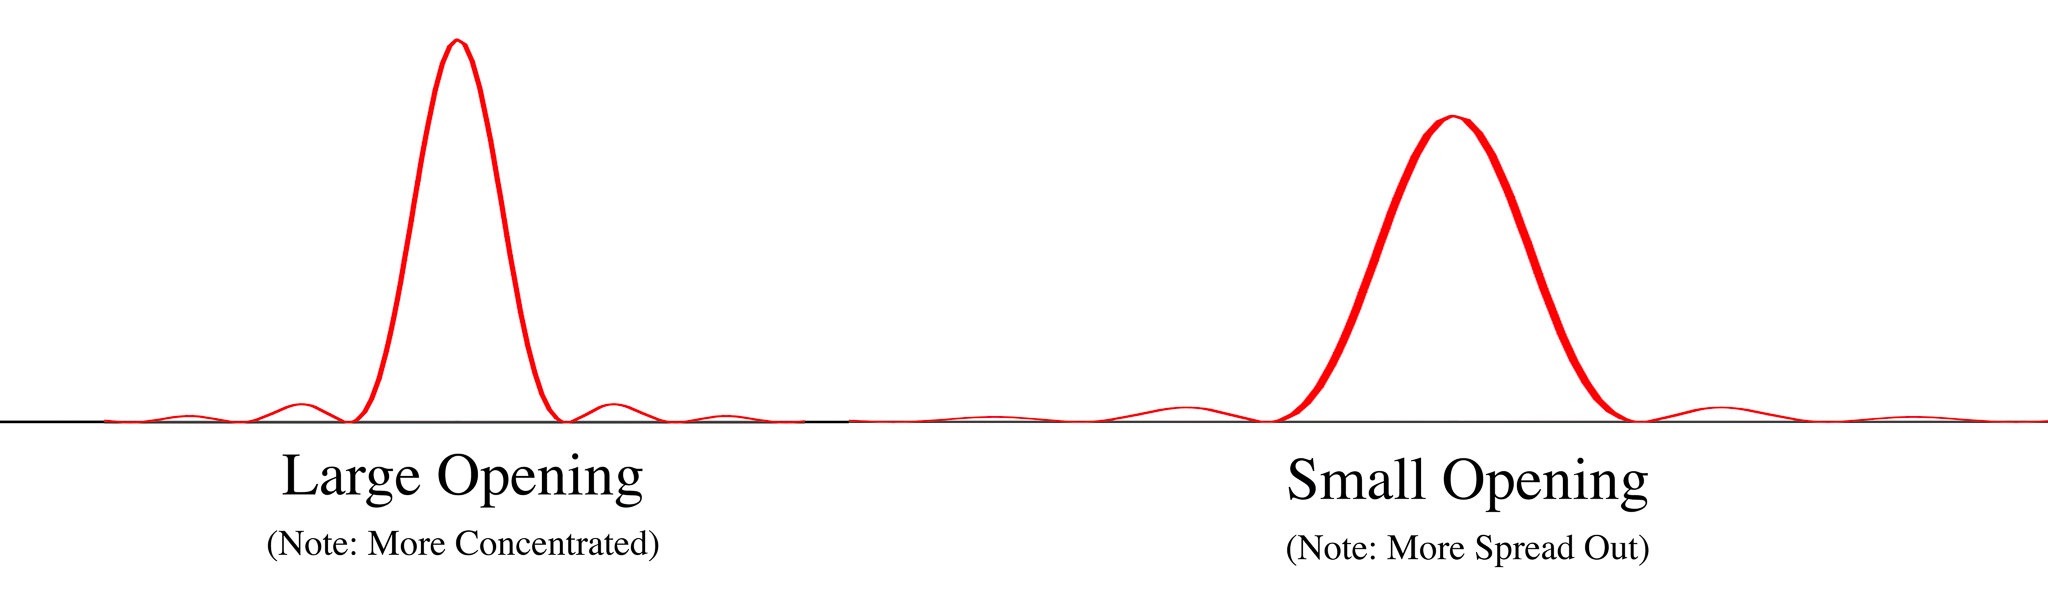
Although it may initially seem unusual that a small opening leads to a larger spread of waves, the illustrations above should show that it makes logical sense. Essentially, larger openings allow the waves to pass without much interference. Since the waves are not particularly disturbed, they follow a relatively straight path towards the edge of the pool. Smaller openings, though, affect a wave more significantly, causing it to bend at harsher angles. (This is a slight simplification; for more technical information, I recommend reading the Wikipedia page on the Huygens principle.)
Finally, note that a “small” opening is relative. In fact, the opening only causes diffraction when it is similar in size to the wavelength that passes through it. This is why light, which has a tiny wavelength, will not diffract significantly if it passes through a ten-foot wide opening – even though the ocean does.
Congratulations! You now understand the physics of diffraction. At its most basic, a small opening causes waves to bend and interfere with one another; this, in turn, spreads out their signal.
Diffraction in Photography
Clearly, diffraction is an important concept in physics. In fact, a similar experiment (with two slits rather than one) played a major role in proving that light can behave as a wave – one of the most important discoveries in scientific history. But how does this impact your everyday photography?
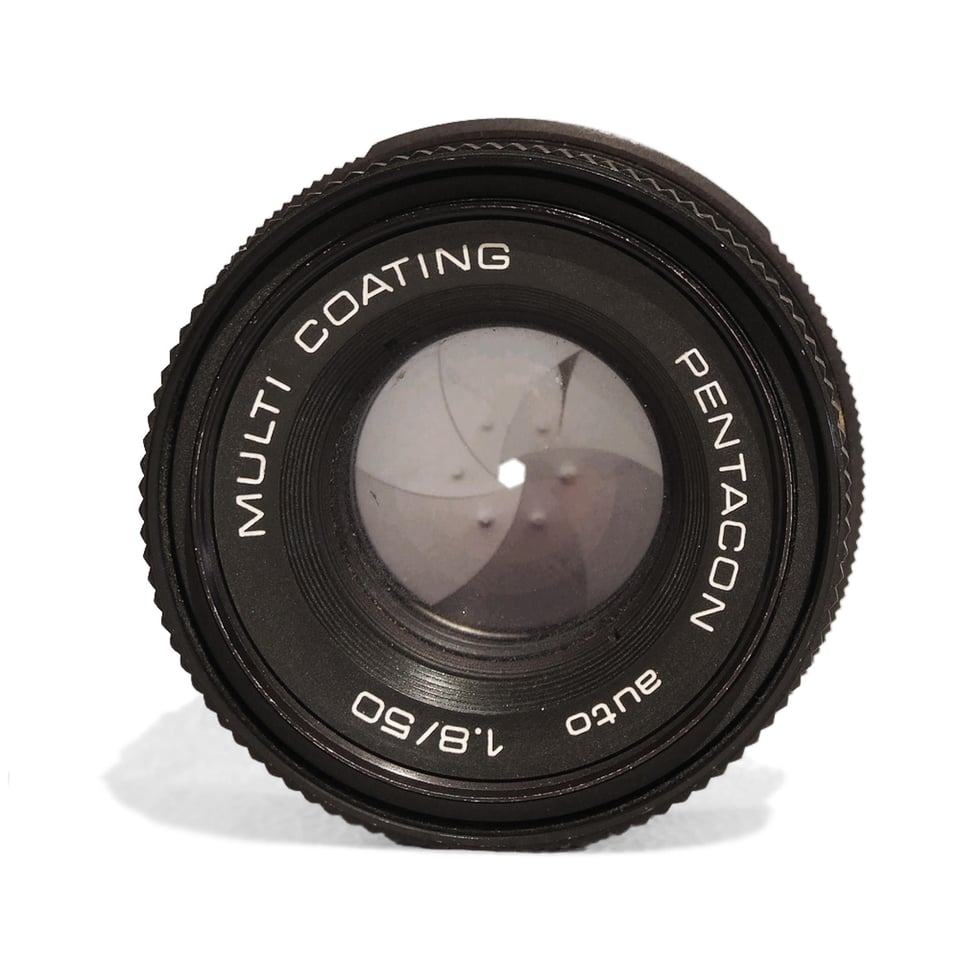
It all comes down to the aperture of a lens. Shown in the photograph above, the aperture blades in a lens act as a single slit that passes waves of light. A pattern of the light’s intensity is exactly what you would expect to see:
This, though, is a two-dimensional graph. In the real world, a pinpoint of light projects in three dimensions. So, a more accurate graph appears below:
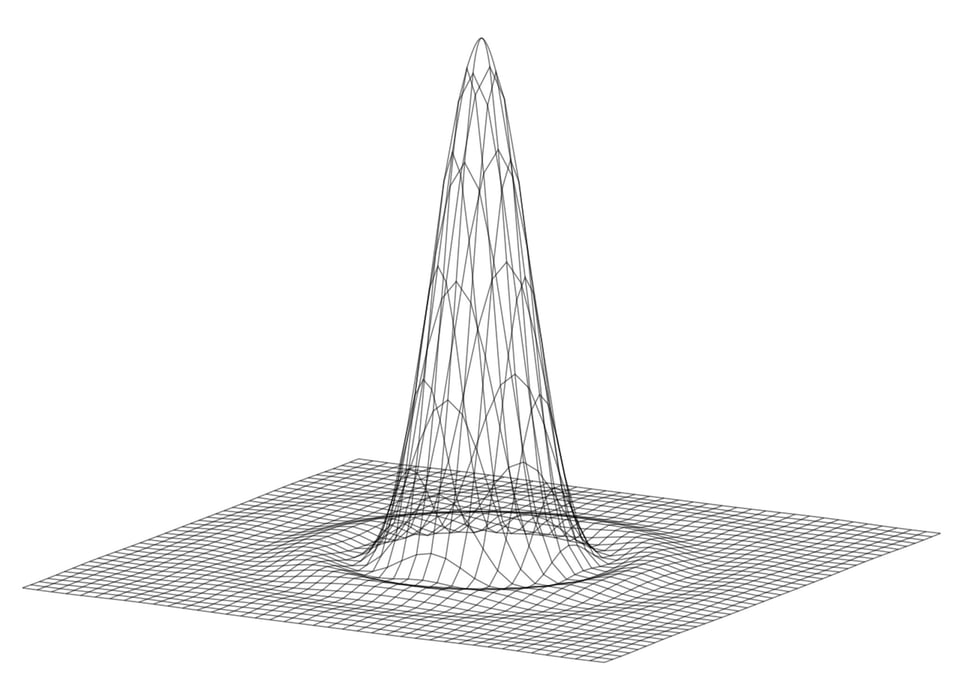
This three-dimensional pattern occurs every time that light shines through the aperture in your camera lens. When projected onto the sensor of your camera, it looks like this:

The figure above shows what is known as an Airy disk. This is, quite simply, the appearance of a diffraction pattern when it hits your camera sensor. The central region is the brightest, and it has the largest effect on your photographs.
It isn’t difficult to tell why this Airy disk can cause a photograph to blur. We already know that a small opening – or, a small aperture – causes waves to spread out. This means that, at small apertures, the Airy disk becomes much larger. If you can envision the Airy disk as hitting your camera sensor, you get a picture that looks like this, where the grid represents the pixels on your sensor:
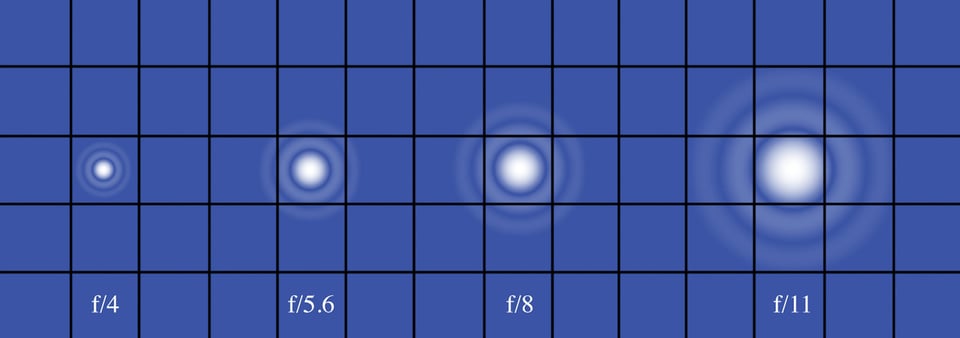
Now, think of a scene as being composed of countless tiny sources of light. Every pinpoint of light travels through the aperture of your lens; as a result, each part of your photograph projects onto your sensor as an Airy disk. These, as shown above, become blurrier with small aperture values. This is the reason that you see diffraction!
High- Versus Low-Megapixel Cameras
The comparison above, showing an Airy disk hitting the pixels of your sensor, might prompt a question: if the pixels were larger, wouldn’t the Airy disk be less likely to bleed over?
In fact, that is completely true! Large pixels – those which are bigger than the Airy disk – do not show diffraction at the same apertures that a small-pixel camera would. Perhaps I can stop down to f/11 on the 12-megapixel Nikon D700 before noticing any diffraction, while the 36-megapixel D800/D810 would show visible diffraction at any aperture smaller than f/5.6. These numbers aren’t set in stone, though; I recommend testing your own camera to see when diffraction begins to grow noticeable (and, more importantly, when it begins to grow objectionable).
However, this isn’t a problem with high-resolution sensors. In fact, if all your settings are the same, a high-resolution sensor will always capture more detail than a low-resolution sensor of the same size. More pixels will never lead to lower detail, even at the tiniest of apertures. This means that, if you print your photos at the same size, a Nikon D800/D810 photo will always have more detail than a Nikon D700 photo, all else equal.
That said, if you buy the Nikon D800/D810, chances are good that you want to print large or pixel-peep. If this is the case for you, diffraction absolutely is a bigger issue than it would have been with a low-resolution sensor! To get the best possible sharpness from a D800/D810, you should pay attention if your aperture is smaller than about f/8. Again, I recommend testing the exact boundaries of your camera yourself.

Small Versus Large Sensors
It is often said that crop-sensor cameras (i.e., DX Nikon cameras) show diffraction more easily than full-frame cameras (FX Nikon). Is this a myth, or does it hold true?
Let’s start with what we know. At a given aperture on a lens, the Airy disk will always be the same physical size. It doesn’t matter what sensor you use; this is a property of physics that only depends upon the aperture itself. For example, whether I put a 50mm f/1.8 lens on the full-frame D750 or the crop-sensor D3300, the size of its Airy disk projection will be identical (assuming the same aperture).
So, where’s the confusion? The issue irises from the fact that the same Airy disk takes up a larger percentage of a crop-sensor camera than a full-frame camera. Take a look at the example below:
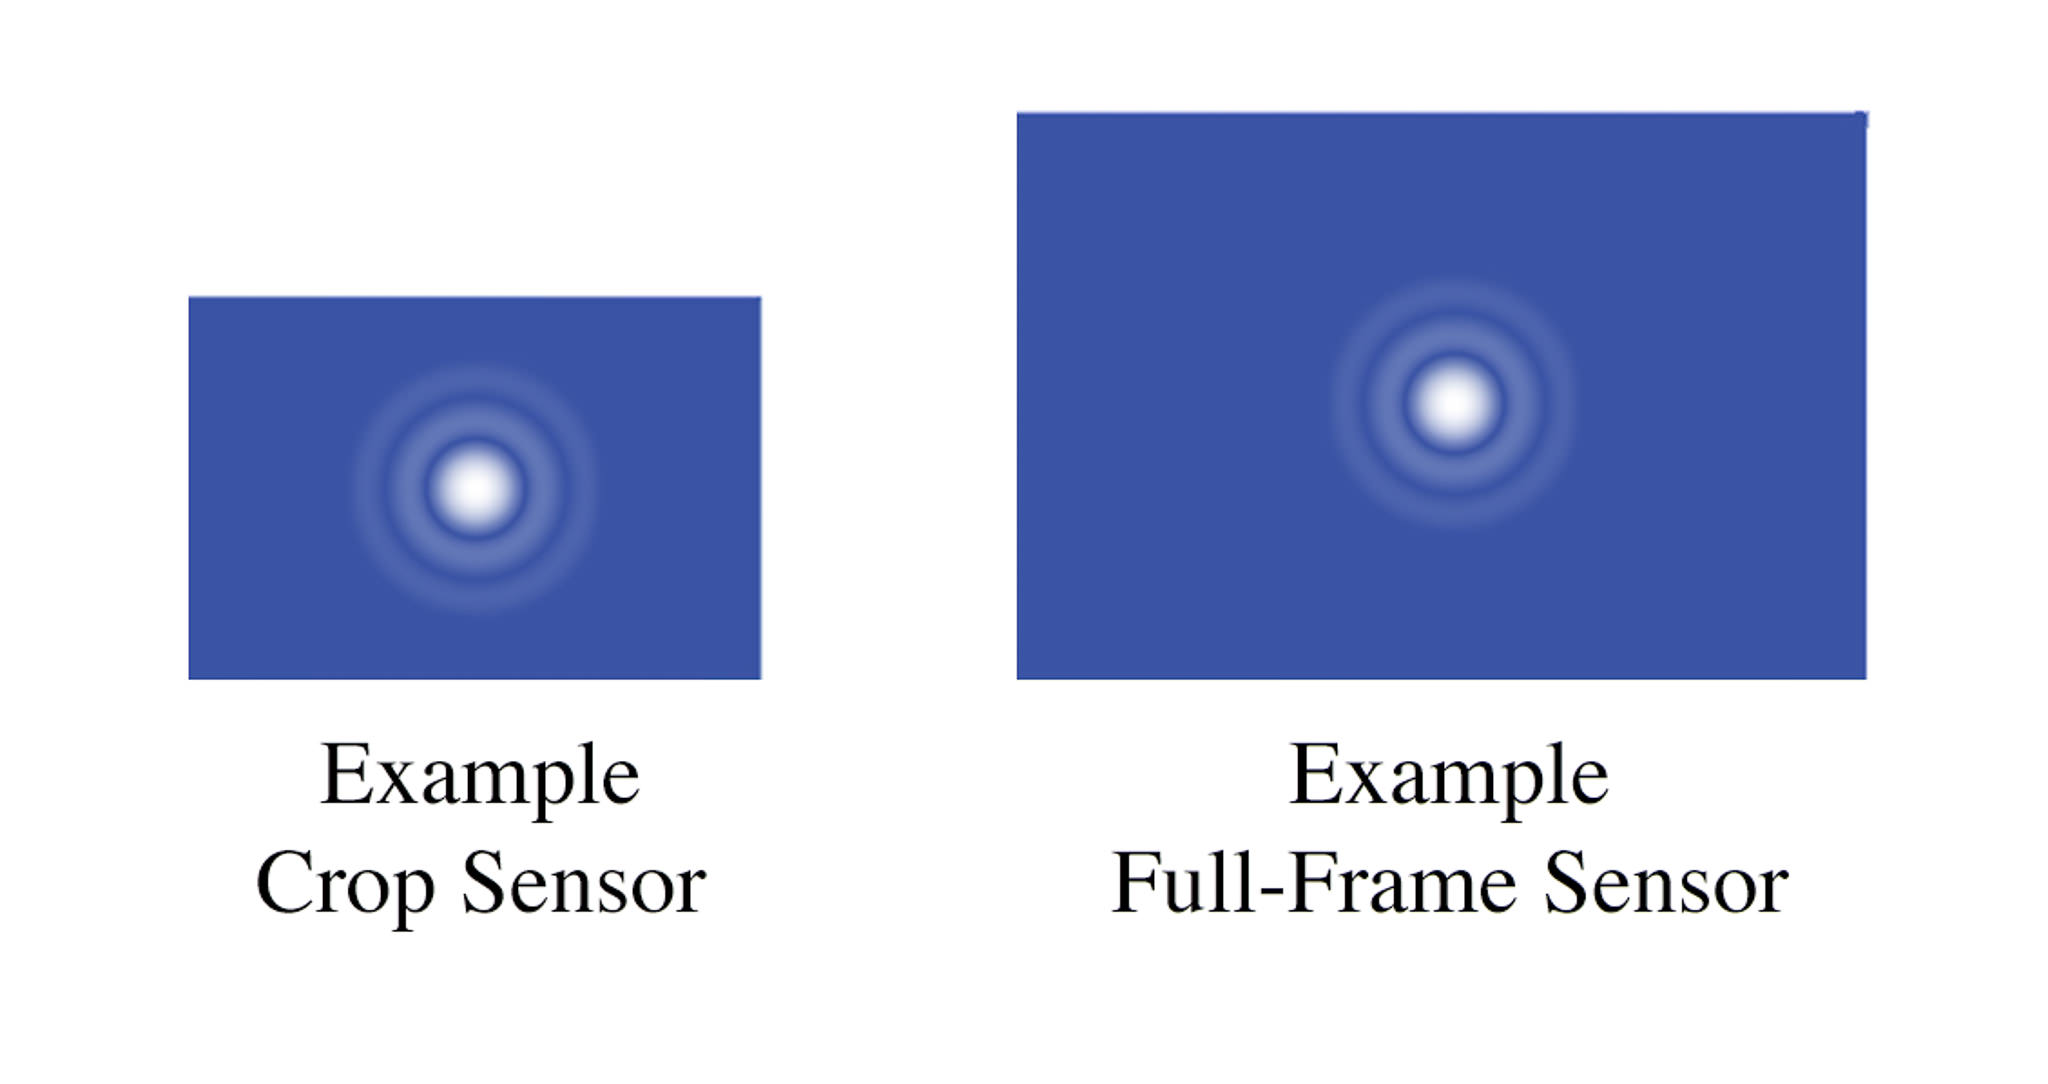
In fact, at an equal print size, a DX camera will show more diffraction than an FX camera. This is because the DX sensor is essentially a crop of the FX sensor; in other words, it magnifies everything in your photograph – including the diffraction – just like cropping in post-production.
The amount of additional diffraction is the same as your crop factor. So, for a 1.5x crop-sensor camera, multiply your aperture by 1.5 in order to see the equivalent diffraction on a full-frame camera. For example, the Airy disk at f/11 on a DX camera takes up roughly the same percentage of your sensor as the Airy disk at f/16 would on a full-frame camera.
Of course, if you use a DX camera, you may not print quite as large as you would with an FX camera. For many photographers, then, there is no practical difference; the smaller prints from a DX camera cancel out the additional diffraction. If you do print at large sizes with a DX camera, be aware that diffraction will be more significant at a given aperture.

Diffraction and Depth of Field
Diffraction decreases a photograph’s sharpness at small apertures. Yet, at the same time, small apertures increase the amount of depth of field in a photograph. This is not a contradiction, although it can be confusing at first. Look, for example, at the comparison below:
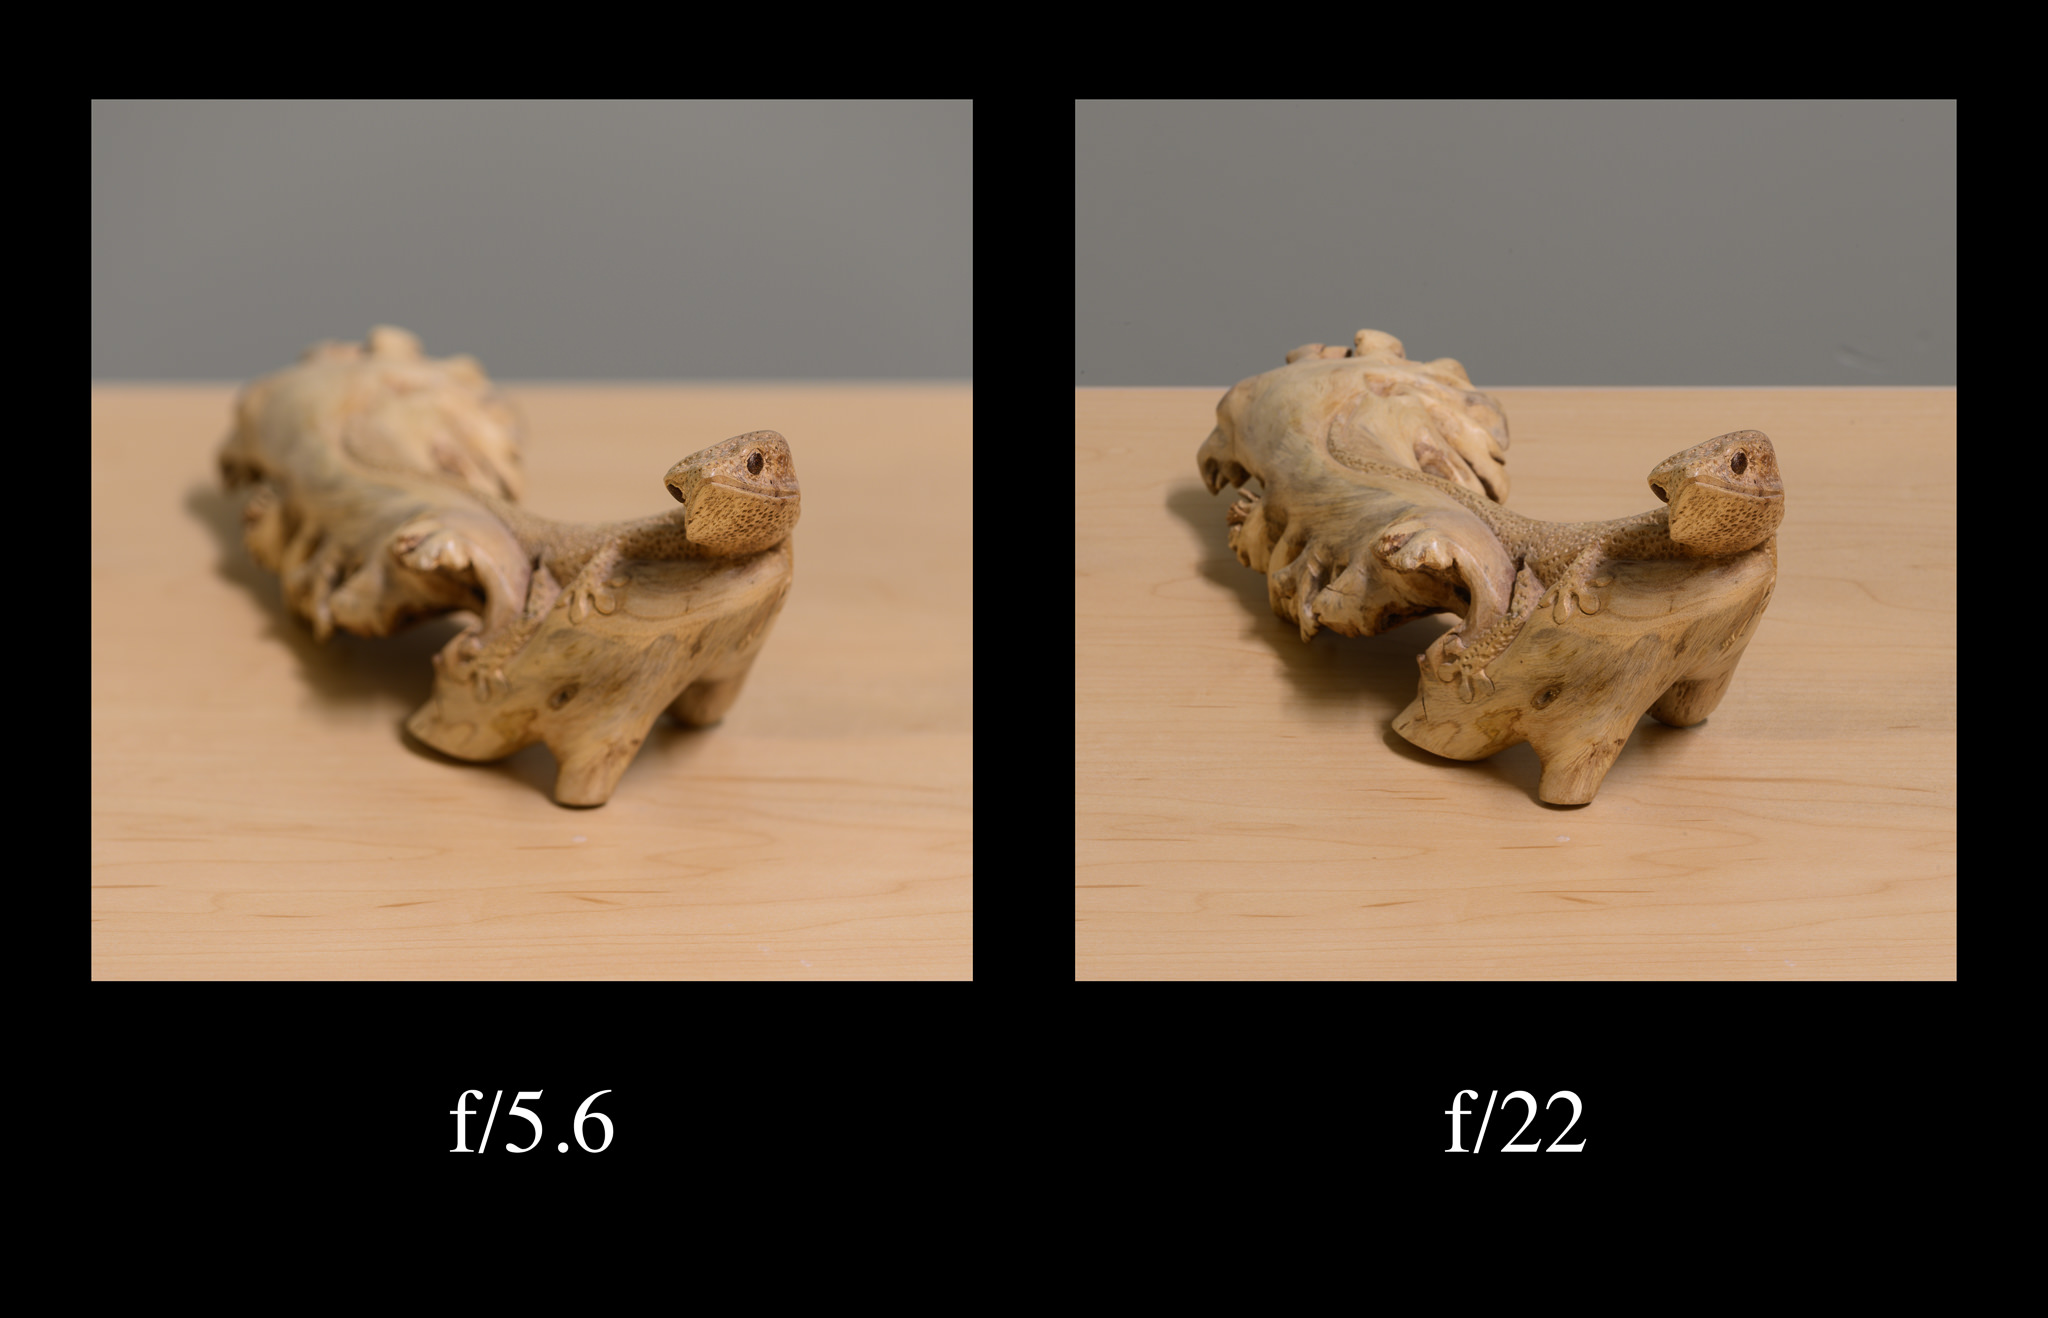
As you can tell, the f/22 photo has much more of the scene within its depth of field. If I want this entire subject to be sharp, it is far better than the photograph at f/5.6. However, let’s look at the point of focus more closely:
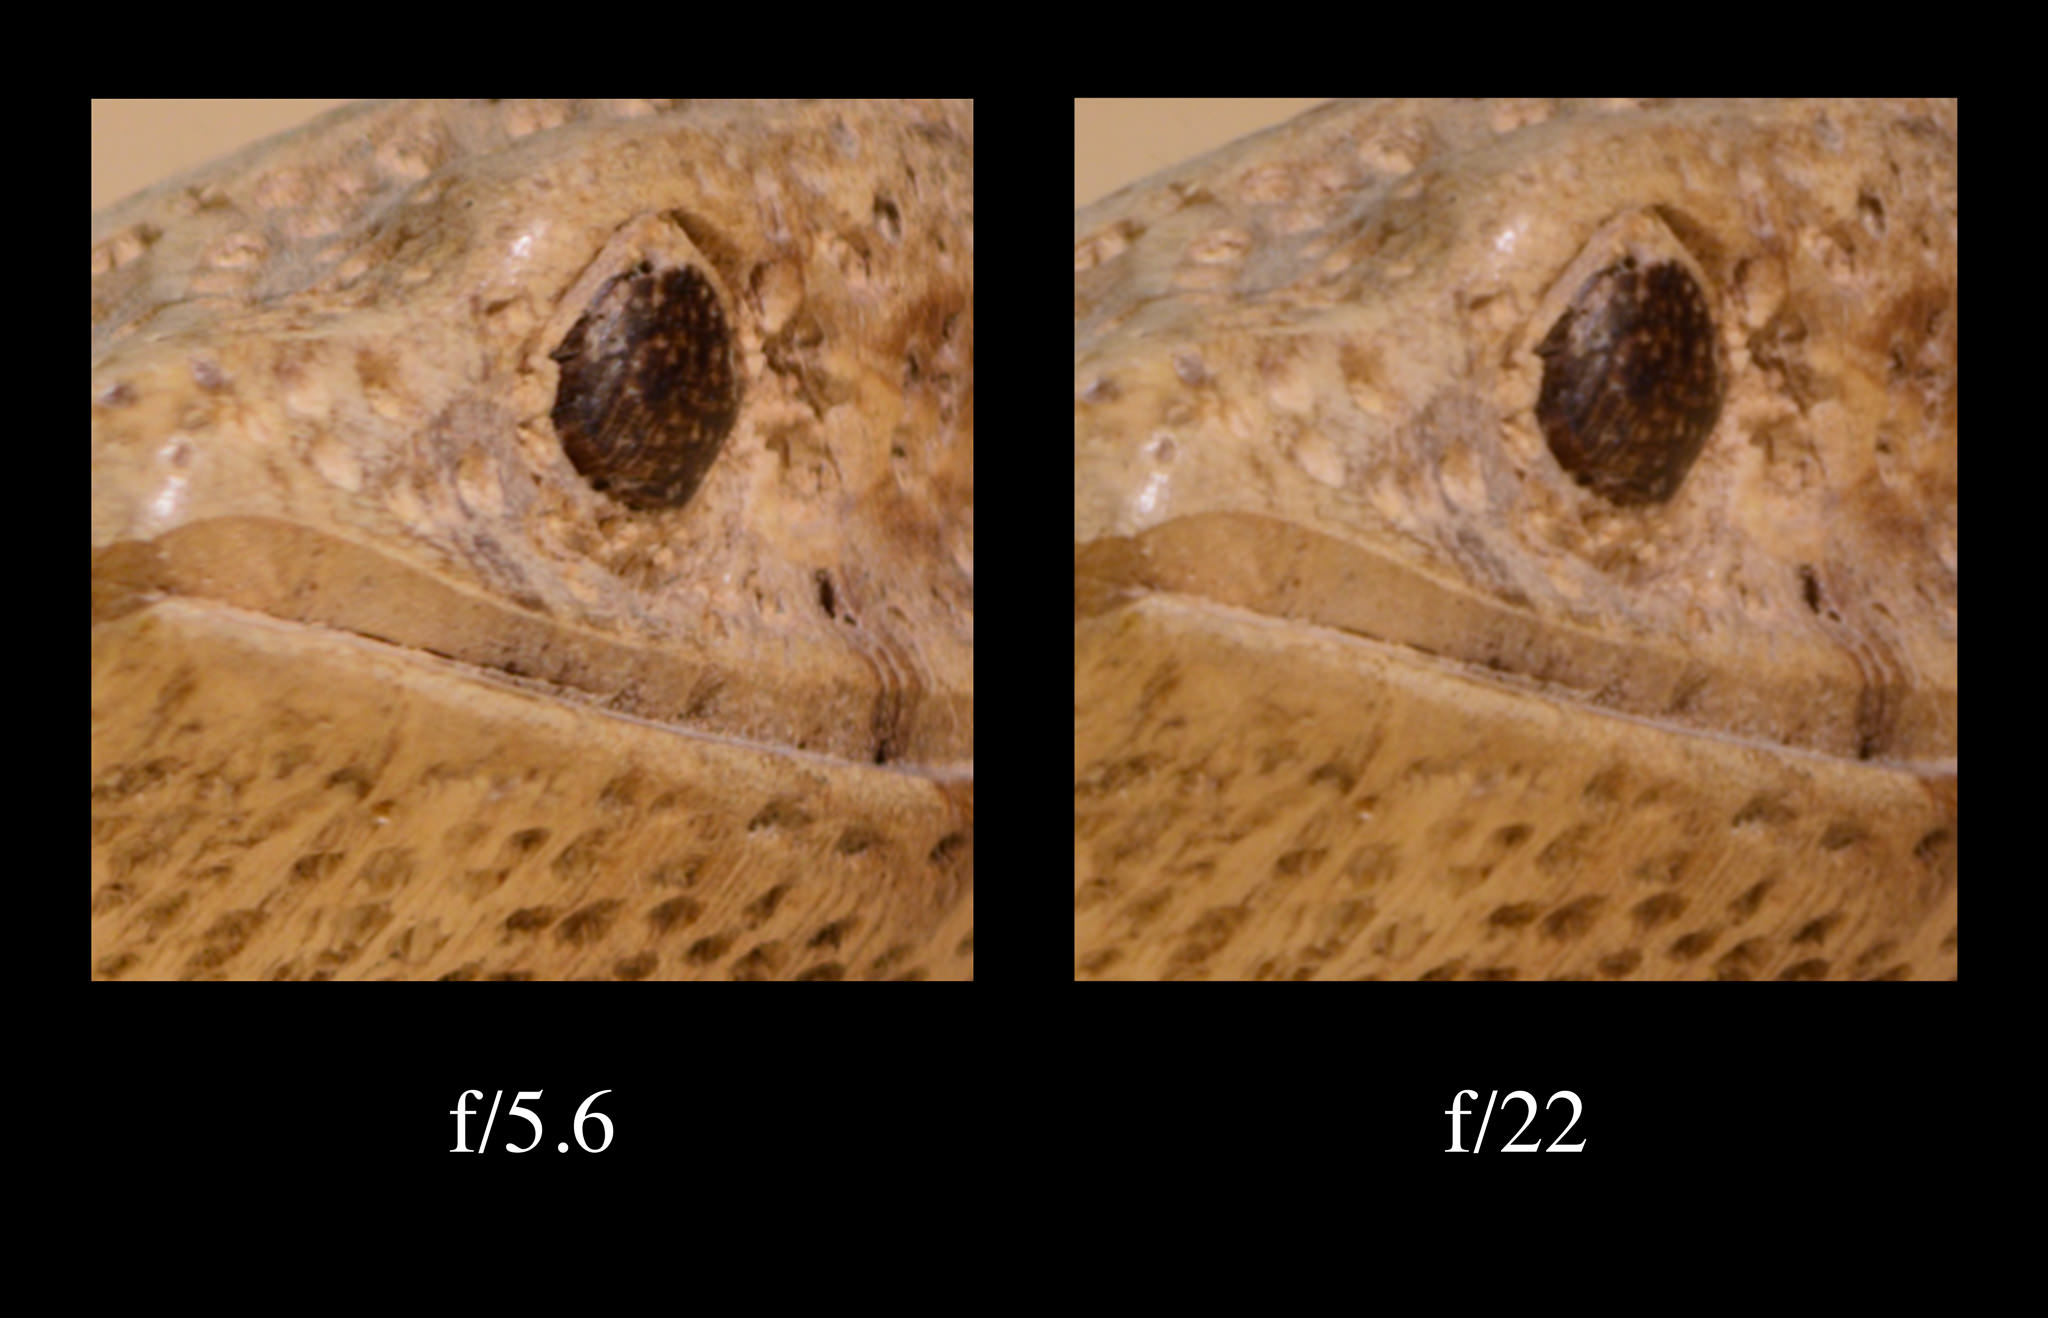
As you can see, the f/5.6 photo is significantly sharper. (Click on the image to see it more clearly.)
This, of course, does not mean that you should shoot every photograph at f/5.6. If you need a large depth of field, feel free to use smaller apertures; sometimes, it’s worth the slight reduction in sharpness from diffraction.
Choosing the Sharpest Aperture
There is always diffraction at every single aperture of your lens. This has to be true; light always needs to bend through an aperture, even if it is very large. However, at wide apertures like f/2.8 or f/4, the Airy disk is much smaller than the pixels in your photograph. This means that diffraction is essentially impossible to see at such large apertures.
However, this doesn’t mean that large apertures are the sharpest on a given lens. As you likely know, a lens tends to be at its sharpest when its aperture is slightly stopped-down. For example, my 20mm f/1.8 lens is sharpest in the center at f/4. Below is a sharpness chart for such a lens:
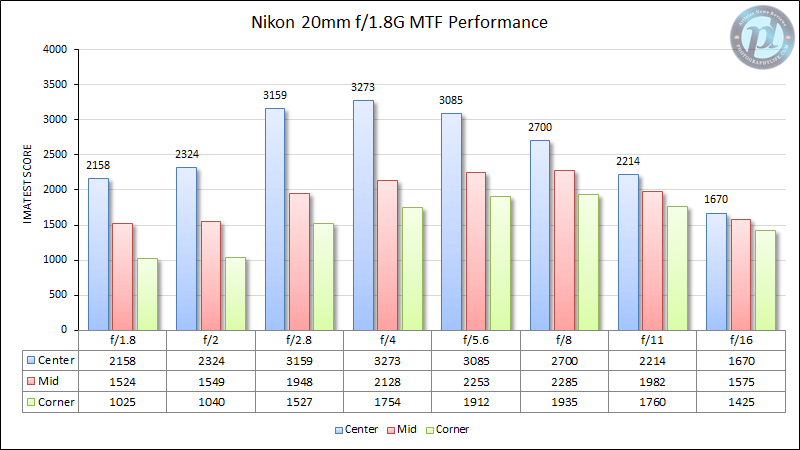
So, why is the peak at an aperture of f/4 rather than f/1.8? That is slightly beyond the scope of this article, but the essence is that – at larger apertures – more light travels through the edges of a lens. Since the center of a lens is the best-corrected region, this decreases the sharpness of the photograph (and increases its spherical aberration). A smaller aperture actually blocks light that has traveled through the edges of a lens, which improves the sharpness of a photograph.
This effect, balanced with the decrease of sharpness from diffraction, is the reason that f/4 gives the greatest sharpness on a lens like the 20mm f/1.8.
How do you tell which aperture is sharpest on your lens? Simply look at the tested results online. However, don’t stress too much about always shooting at the “perfect” aperture. For one, even these test results can be ambiguous. In the chart above, for example, the corners of the lens are actually sharpest at f/8. So, depending upon your subject, you may prefer sharper corners rather than the sharpest possible center.
At the same time, even suboptimal apertures aren’t horribly blurry. I have made a few large prints from photographs taken at f/16, and their quality is more than enough for my needs. If you need an aperture like this – generally to increase your depth of field – don’t be afraid to use it.
(If you need the largest possible depth of field in a photograph, like many landscape photographers, I recommend reading about hyperfocal distance. There are many similarities between these two properties of photography.)

Avoiding Diffraction
Now that you understand diffraction, how do you make sure to avoid it in your photographs? Unfortunately, the simple answer is that you can’t. Diffraction is a result of physics. It doesn’t matter how good your lens is; diffraction will rob sharpness at smaller apertures no matter what.
Even though you cannot circumvent the laws of physics, there is one way to avoid diffraction in your photographs: use a larger aperture. If you need the absolute sharpest photograph, this is the only way to avoid the effects of diffraction. Are you photographing a scene that needs a large depth of field? Try focus stacking at an aperture of f/5.6 or f/8, where diffraction is minimal.
At the same time, if you did use a small aperture (say, f/16 or f/22), you can improve a photograph’s apparent detail by sharpening in post-processing. This doesn’t actually eliminate the effects of diffraction, but it is a simple way to improve photos taken at small apertures.
In theory, it is possible to correct for diffraction through a sharpening process known as deconvolution sharpening. This type of sharpening is most effective when one has a perfect model of the lens in question, including its exact optical characteristics. For this reason, generic deconvolution sharpening does not reduce the effects of diffraction to a meaningful degree; NASA, however, is known to use such a method to improve the sharpness of Hubble Telescope photographs. (Some camera manufacturers, including Pentax, may have a diffraction-reduction menu option; however, this is nothing more than a standard unsharp mask cooked into your RAW file.) If you want to test deconvolution sharpening, increase the “Detail” slider as much as possible in either Lightroom or Camera Raw. Of course, it will not be specific to your lens, which would be necessary for true diffraction reduction.
However, although you can sharpen your photographs in post-processing, the best way to decrease diffraction is simply to use a larger aperture.

Extra Information
Aperture is a technical topic; so is the interaction between light and your camera sensor. Some of the information above is presented as a best-case scenario, and the reality can be slightly more complex. Most of the following information will not affect the actual appearance of your photographs, but it is worth covering some of these special cases.
For example, light with large wavelengths will diffract more readily than light with shorter wavelengths; this means that red light (with a wavelength of about 650 nm) leads to a larger Airy disk than blue light (about 475 nm) at the same aperture. So, in theory, you will see slightly less blur from diffraction if you are working in extremely blue light; in practice, this effect is small enough that it has little impact on your photographs.
Also, in most cameras, the pixels that combine to make a photograph do not all detect the same wavelengths of light. For sensors with a Bayer array of pixels (including Nikon, Canon, and Sony DSLR/mirrorless cameras), the number of green-sensing pixels is twice the number of red and blue pixels. This means that the pixel diagram presented earlier is a slight simplification; however, this does not change the fact that blur from diffraction increases due to the size of the Airy disk.
Finally, the depiction of the Airy disk in this article is bit simpler than it would appear in the real world. Above, I showed it as a series of concentric rings; in reality, though, that would only occur if the aperture were perfectly circular. Most lenses have seven, eight, or nine aperture blades, which (even when curved) are not quite circles. So, the “Airy disk” becomes an “Airy octagon.” However, there is no practical difference in the appearance of diffraction in your photographs; your photos will be just as blurry as you stop down the lens.
If you have any questions about the finer points of diffraction, please feel free to ask a question in the comments section; a single article is too short to explain everything that there is to know about such a complex topic.

Conclusion
Given all of these technical caveats, diffraction can seem like an out-there, unusual topic to be discussing. However, its effects are clear and significant in your photographs, and they are well worth considering while you are taking pictures. Especially for landscape and architectural photographers – or anyone who wants to take sharp photos with a large depth of field – it is important to understand the trade-offs that come from shooting at a small aperture.
Diffraction is present in all your photographs, and – if you aren’t careful – it can rob some sharpness from your favorite images. However, once you see its effects in practice, diffraction will become second nature.
This statement is incorrect: “Finally, note that a “small” opening is relative. In fact, the opening only causes diffraction when it is similar in size to the wavelength that passes through it.” Diffraction is caused by the presence of the aperture edge. The light bends around this edge regardless how far away the opposite edge is, which is typically thousands wavelengths away. For example, a 50 mm lens at f/22 will have aperture diameter of about 2.3 mm. For green light with the wavelength of 550 nm, that is (2.3 mm) / (550 nm) = 4181 wavelengths! It is hardly “similar in size to the wavelength”, isn’t it?
Yes indeed. The diagrams and text start by explaining the near‑field Fresnel diffraction at a narrow slit; whereas the Airy pattern is the result of far‑field Fraunhofer diffraction from a circular aperture, focussed by the rear section of the lens onto the camera image plane.
QUOTE Fraunhofer diffraction, Wikipedia
In optics, the Fraunhofer diffraction equation is used to model the diffraction of waves when plane waves are incident on a diffracting object, and the diffraction pattern is viewed at a sufficiently long distance (a distance satisfying Fraunhofer condition) from the object (in the far‑field region), and also when it is viewed at the focal plane of an imaging lens. In contrast, the diffraction pattern created near the diffracting object and (in the near‑field region) is given by the Fresnel diffraction equation.
en.m.wikipedia.org/wiki/…iffraction
Very interesting and useful article, thankyou for posting!
I’ve started using a step-down ring at the front of my lens to create a circular aperture,
wondered what your thoughts are regarding how this would affect diffraction in terms of the narrowest useable aperture in situations where i’m looking to achieve sharpness across the frame?
The step-down ring stops the image down by around 1 & 2/3 stops, so if i shoot at f2.8 it gives roughly the same depth of field as shooting at f5
Sorry if the question is poorly worded, basically wondering whether setting the camera to f8 would still be ideal for sharpness across the frame, or whether i would need to adjust the aperture
Not sure how relevant this is, but i have noticed that with the step-down ring attached, the narrower apertures create a very apparent vignette, not a huge concern for me, just mentioned it incase it is useful info. re. my question
Best regards,
Jamie
Jamie wrote “I’ve started using a step-down ring at the front of my lens to create a circular aperture…”
In optics, an aperture stop limits the solid angle (cone angle) of rays passing through the system that emanate from an on‑axis object point. Adjusting the aperture stop affects the light transmission and the depth of field but it does not affect the angle of coverage nor the field of view.
A field stop restricts the angle of coverage, and may also reduce the angle of view, aka field of view.
So, a step-down ring fitted to the front of a lens, that causes a circular vignette, is primarily a field stop, not an aperture stop.
Excellent read, thank you!
Curious what your thoughts are about diffraction in regards to lenses that don’t contain a diaphragm such as Canon’s 600mm & 800mm ƒ/11 lenses. Thanks!
Hi Terry,
The amount of diffraction from the f/11 lenses you mentioned will be the same as that of a wider-aperture lens stopped down to f/11. However, their precisely circular, rather than polygonal, aperture will not produce the diffraction spikes known as the starburst effect or sunstars:
photographylife.com/what-…ar-effects
Pete A, I appreciate the input, but I’m wondering if you can explain further… If there is no diaphragm for light to pass through, what is there to cause diffraction?
Thanks!
Regards,
Terry
The Canon f/11 lenses do not contain an iris diaphragm, but they do contain an aperture stop, which is a diaphragm:
“In optics, a diaphragm is a thin opaque structure with an opening (aperture) at its center. The role of the diaphragm is to stop the passage of light, except for the light passing through the aperture. Thus it is also called a stop (an aperture stop, if it limits the brightness of light reaching the focal plane, or a field stop or flare stop for other uses of diaphragms in lenses).”
en.m.wikipedia.org/wiki/…m_(optics)
If you look into the front of one of these lenses (when unmounted) you will see an image of its aperture stop, which is its entrance pupil. Similarly, looking into the rear will reveal its exit pupil
These lenses are no different from a variable aperture lens having its iris diaphragm set to its fully open (wide open) position.
Thank you Pete! That was just what I was wondering. I don’t own the 800mm ƒ/11, but I have rented it, but wasn’t paying attention to whether or not it had an aperture stop.
Thanks again.
Thank you for giving us a more in-depth explanation of lens diffraction than I have yet to come to across, bravo! Really helpful concept to understand
Hello Spencer, your article seems to be a translate of another photography blog (or vice versa highly possible) :) you can check, also visuals are mostly the same.. www.arthenos.com/isik-…ffraction/
Can, thanks for letting us know. Thieves are everywhere, and our content sadly gets stolen a lot. I will try to reach out to the person who runs that website, but not sure if they will do anything about content theft…
thank you for this detailed explanation! It is really helpful and understandable.
Thank you so much for your explanation. I never comment on posts like this but I really appreciate how in-depth and clear you are. Thanks for the info!
Recently came across your website and hooked to all the nicely detailed reviews and articles.
Would love to see location details as well along with the photos :)
DX versus FX: For a moment I thought this might be a reason to upgrade to FX, since FX is approximately one stop sharper at higher apertures (from a diffraction perspective).
…but then I realized FX needs that extra stop of higher aperture to have the same depth of field as DX. ..So it’s really a wash.
Very helpful. Thank you so much.