Depth of field (DoF) is one of the most important concepts in photography. Understanding what DoF is, and knowing what factors affect it, are things all photographers should master. Many photographers know that you can control DoF by adjusting aperture. But did you know that DoF is influenced by other factors too? In this article, I want to explain in simple terms what depth of field is and talk about the ways you can control it.
Depth of Field
What is Depth of Field?
Depth of field is the distance between the closest and farthest objects in a photo that appears acceptably sharp. Now your camera can only focus sharply at one point. But the transition from sharp to unsharp is gradual, and the term ‘acceptably sharp’ is a loose one! Without getting too technical, how you will be viewing the image, and at what size you will be looking at it are factors that contribute to how acceptably sharp an image is. It also depends on how good your vision is!
Scientifically, it is based on something called the circle of confusion. This involves more physics than I’m going to get into here! Spencer talks about it in his article “Hyperfocal Distance Explained.” So check that out for more of the technical details if you are so inclined.
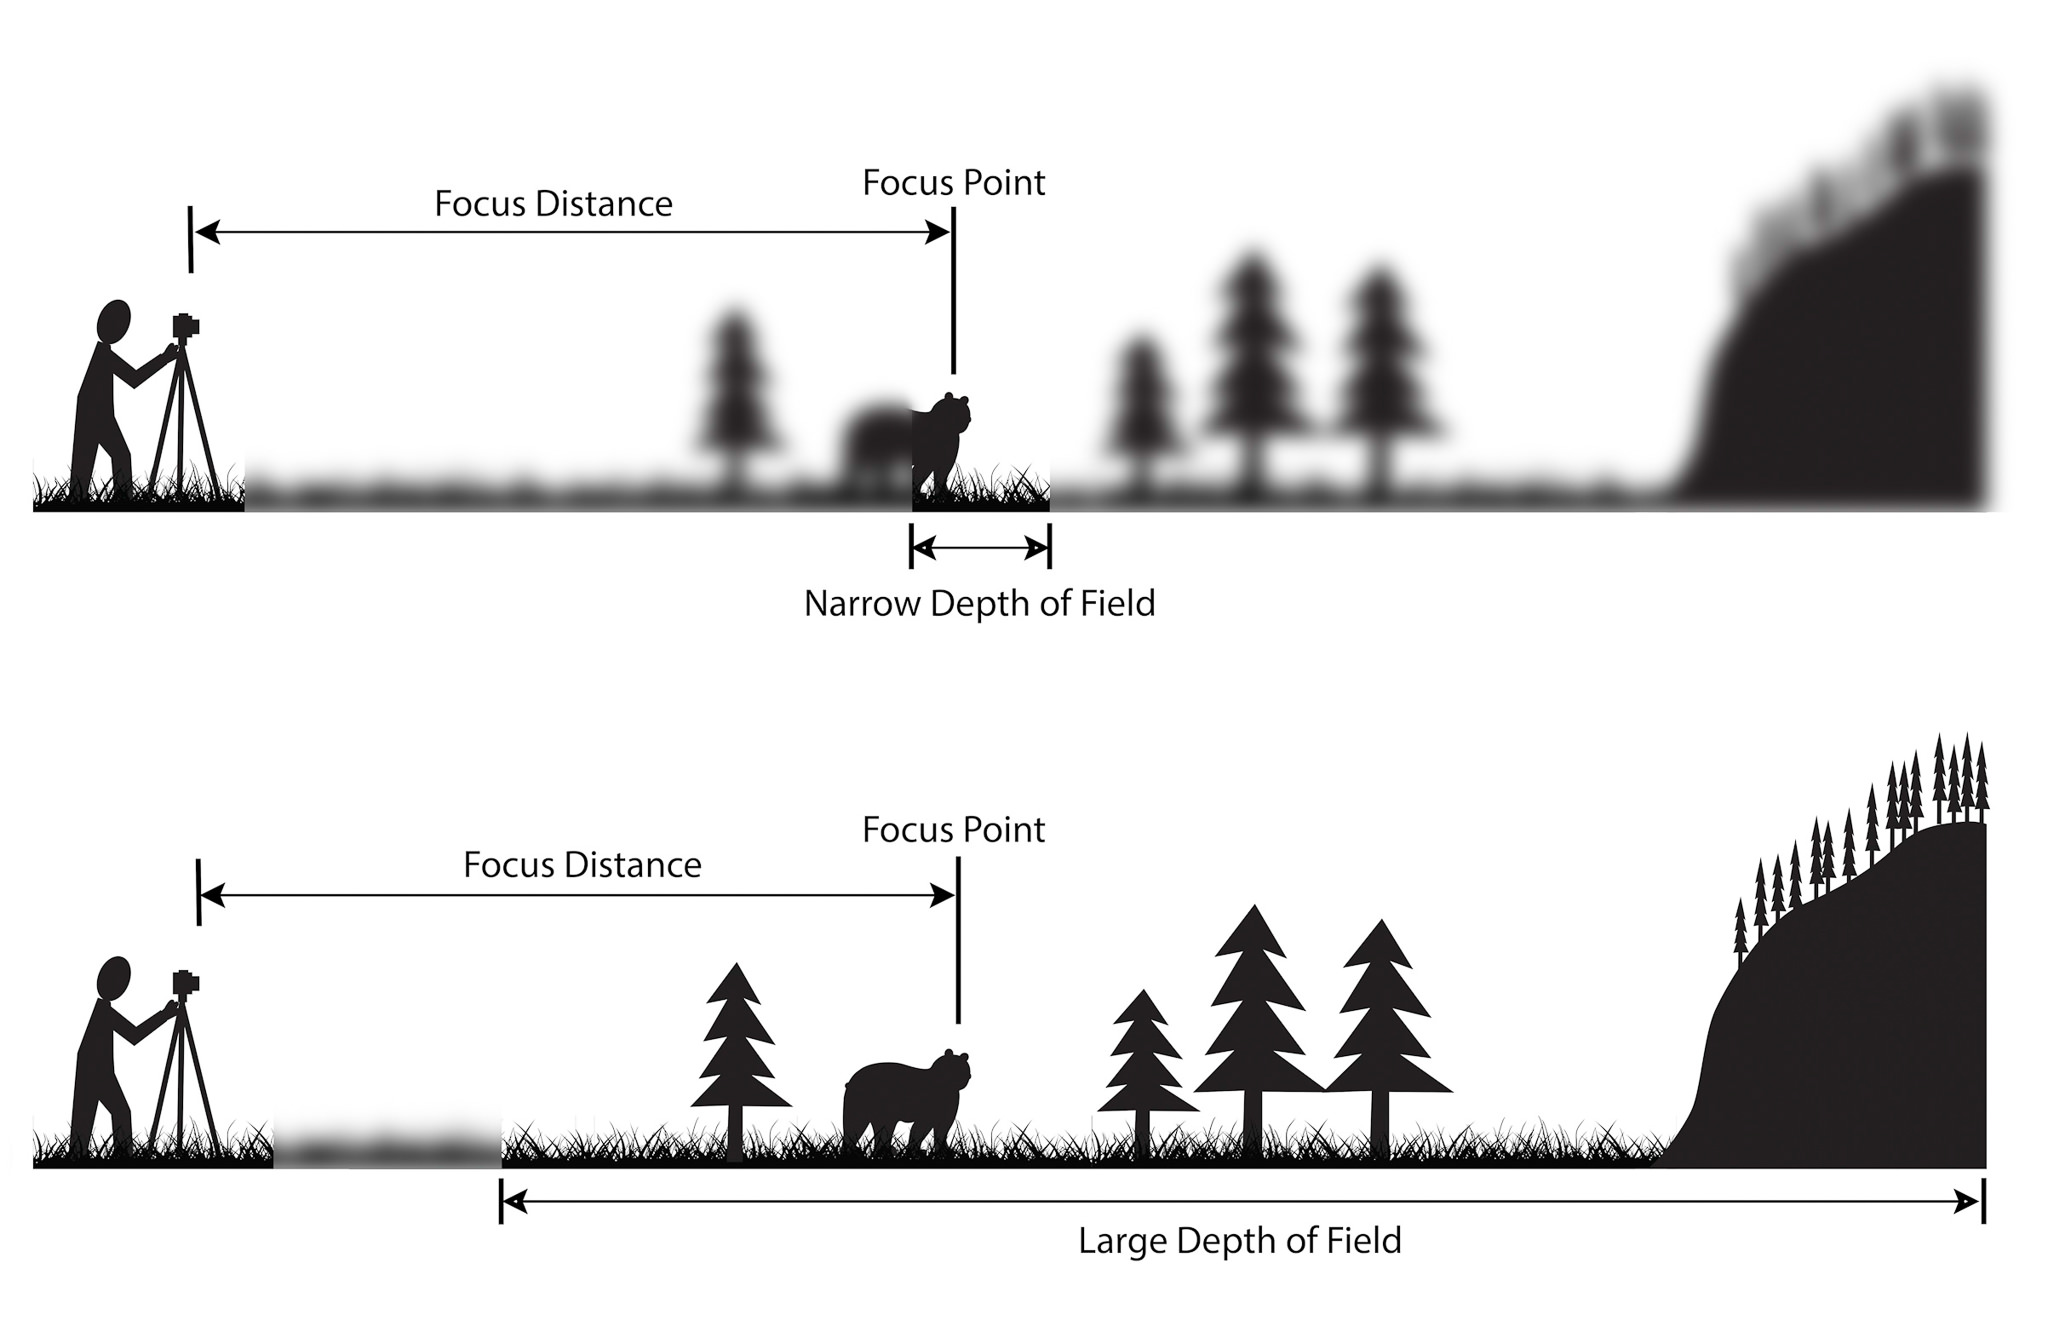
In these two sketches, I have tried to illustrate what is meant by a narrow and large DoF. In a photograph with a narrow DoF, only a small slice of the image is in focus. Conversely, with a large DoF, much more of the scene is sharp.
Video Demonstration
Although this article has a lot of real-world example photos, if you’re the type of person who prefers to learn via video demonstrations, we have filmed a complete depth of field tutorial that you may find useful. You can watch it here:
Photo Demonstration
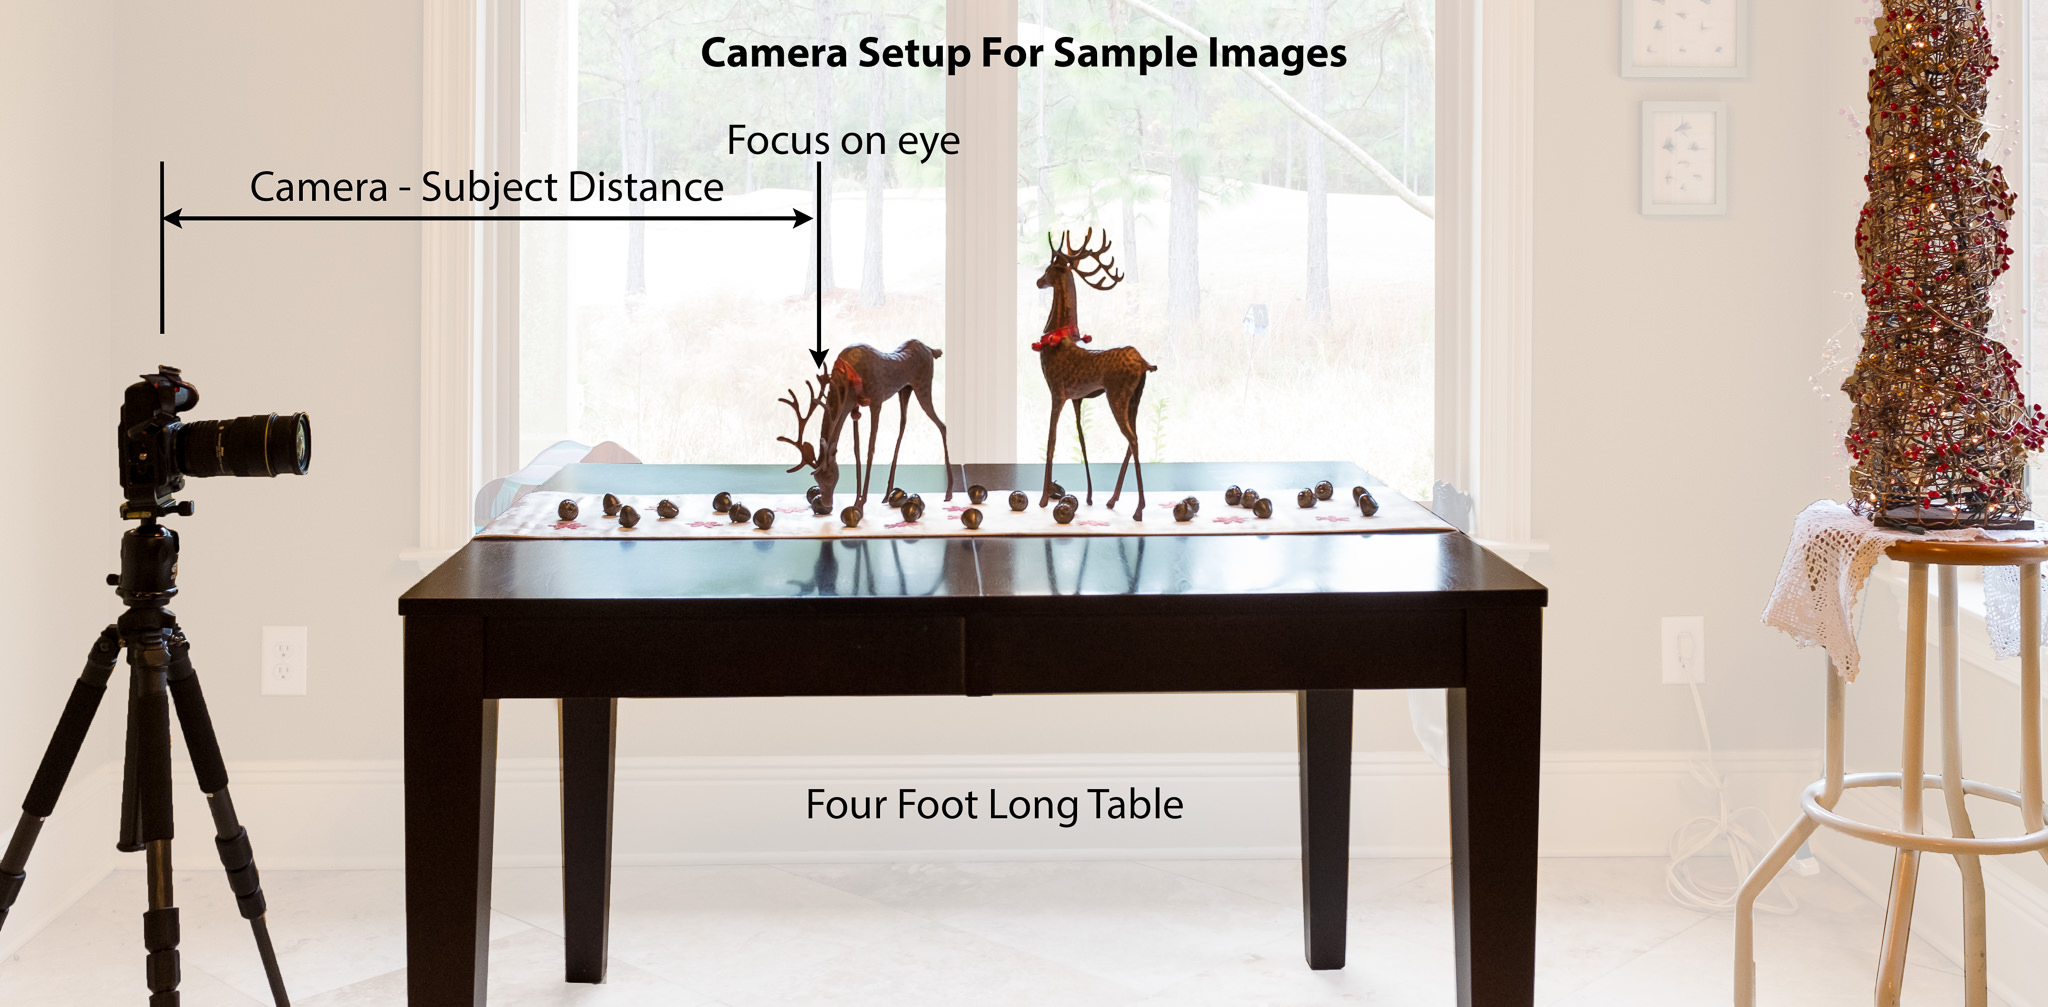
Now let’s show some example photos of how to change depth of field for a given scene. Before everything else, I wanted to show you the setup I used to take the sample images in this article. Hopefully, this will give you a bit more insight into the photos and a better feel for the distances between the objects I was shooting. To change the camera-subject distance, I moved my tripod closer/farther away from the props. All of the test images were shot with the same camera, a Nikon D500.
Aperture
Aperture is the opening in your lens that lets light pass through to the sensor. Think of it as a pupil for your lens. It dilates to let more light in, and contracts to restrict light when it is bright. Aperture is probably the first thing most photographers think of when they want to adjust the depth of field.
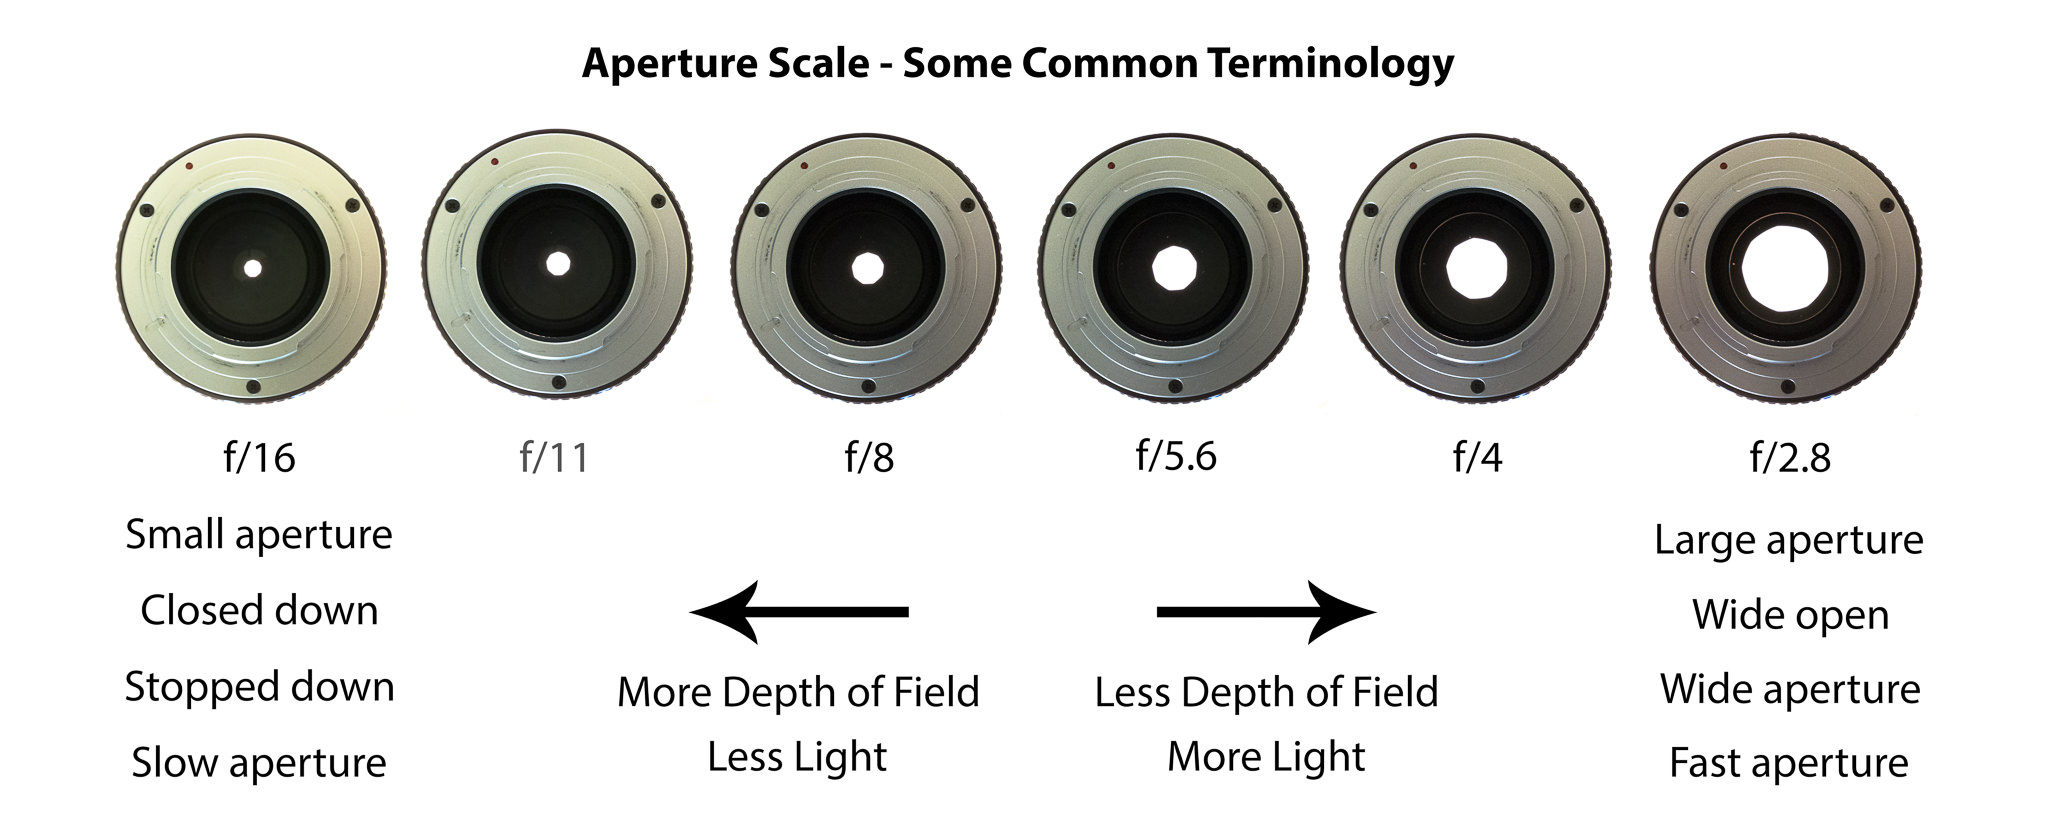
Large apertures, which correlate to small f-stop numbers, produce a very shallow depth of field. On the other hand, small apertures, or large f-stop numbers, produce images with a large depth of field.

This image has a large DoF. I focused on the rocks about 5m ahead of me. The foreground rocks and the distant clouds are all in focus.

This image has shallow DoF. Here I focused on the boxing gloves. They are sharp, but the background is blurred.
Camera-Subject Distance
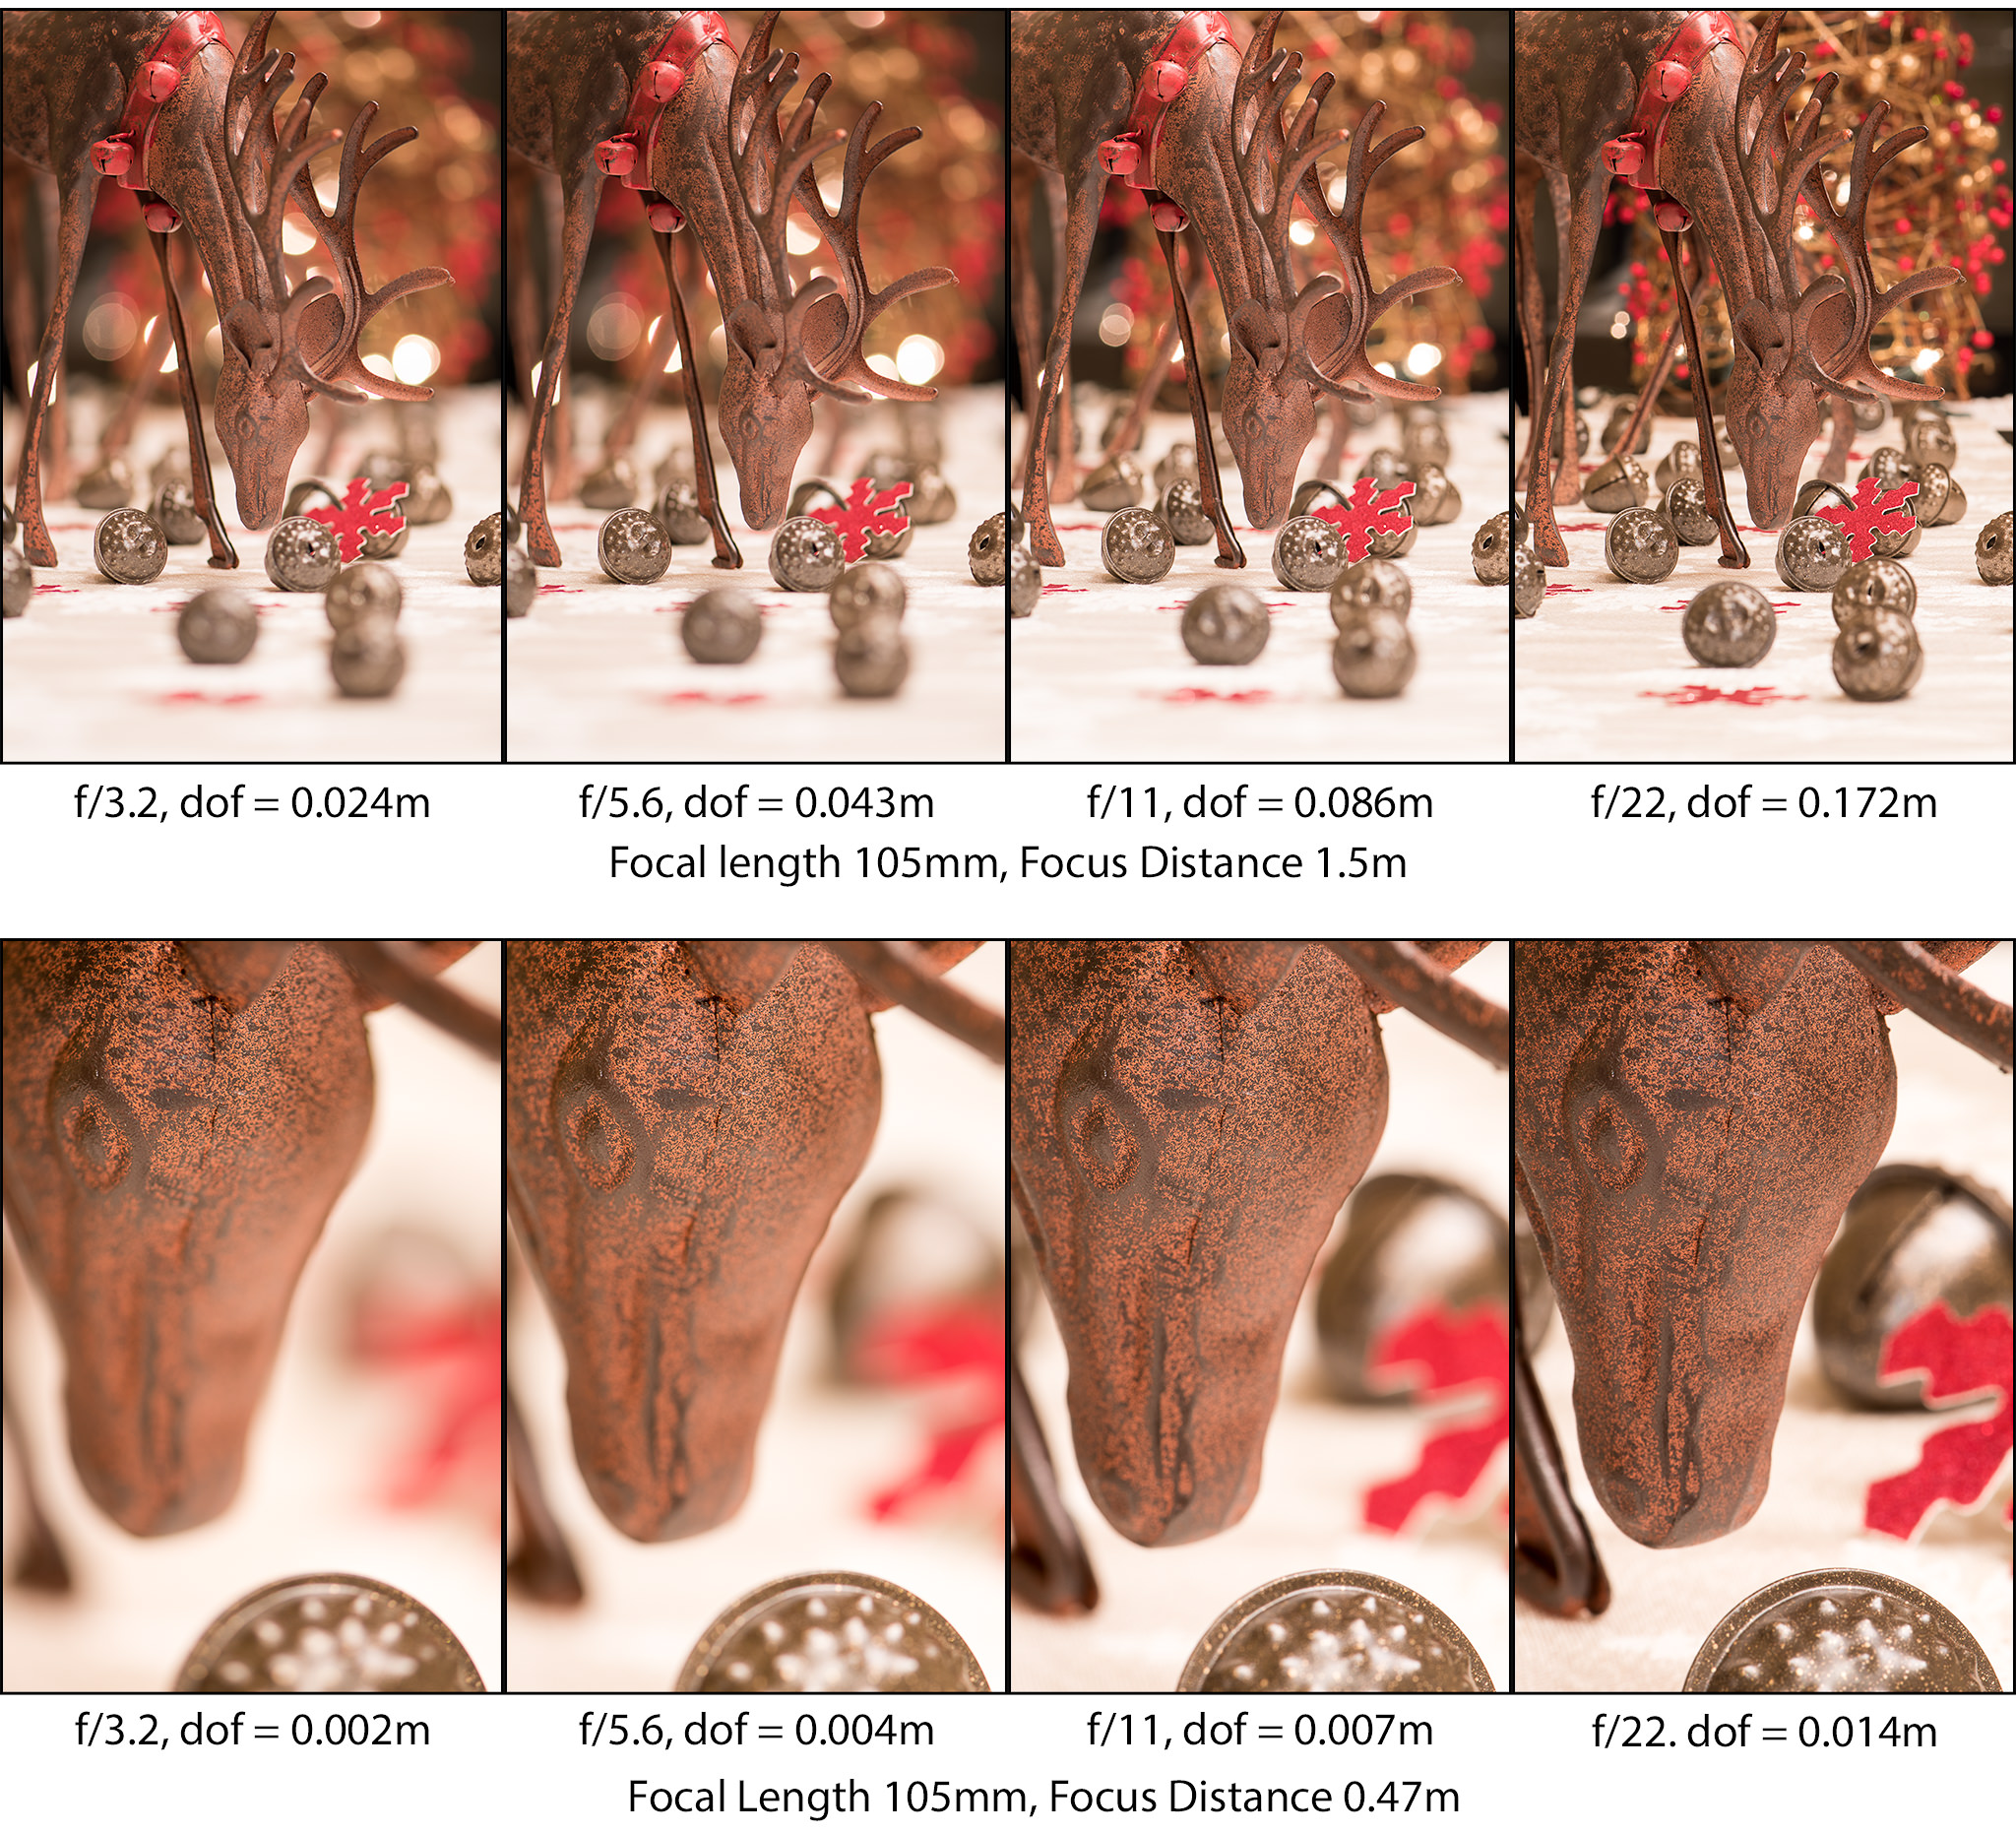
Another important factor affecting depth of field is the distance between the camera and the subject. The shorter that distance, the smaller the depth of field. Have you ever tried to take a close-up shot of a flower or insect, but can’t get the entire subject in focus, even with a small aperture? This is because the closer you are to your subject, the shallower the DoF.
Look at these two sets of images. The camera-subject distance in the first group of pictures is 1.5m. After each shot, I stopped down the aperture. The second set has a focus distance of just under a half a meter. Notice two things. In each set of pictures, as the aperture narrows, the DoF increases. In addition, for each pair of photos shot at the same aperture, there is more depth of field when the camera-subject distance is greater.
Just a quick note. A variety of depth of field calculators are available online. You can also download DoF apps to your phone. All the DoF values mentioned in this article were calculated using the application Simple DoF Calculator for my iPhone. If you are interested in the actual formulas for calculating depth of field, you can find them here.
Focal Length of the Lens
Wide-angle lenses (short focal lengths) have a deeper depth of field than telephoto lenses (long focal lengths). Well, not exactly! It isn’t quite as cut and dry as that. If you take an image and do not change the camera-subject distance, this is true. You can see this illustrated in these two sets of images below. The top set is shot at a focal length of 70mm. The bottom set at 105mm. Both sets were taken at a distance of 2m from the subject. Notice how for each pair of images shot at the same aperture, the DoF is larger for the narrower focal length lens.
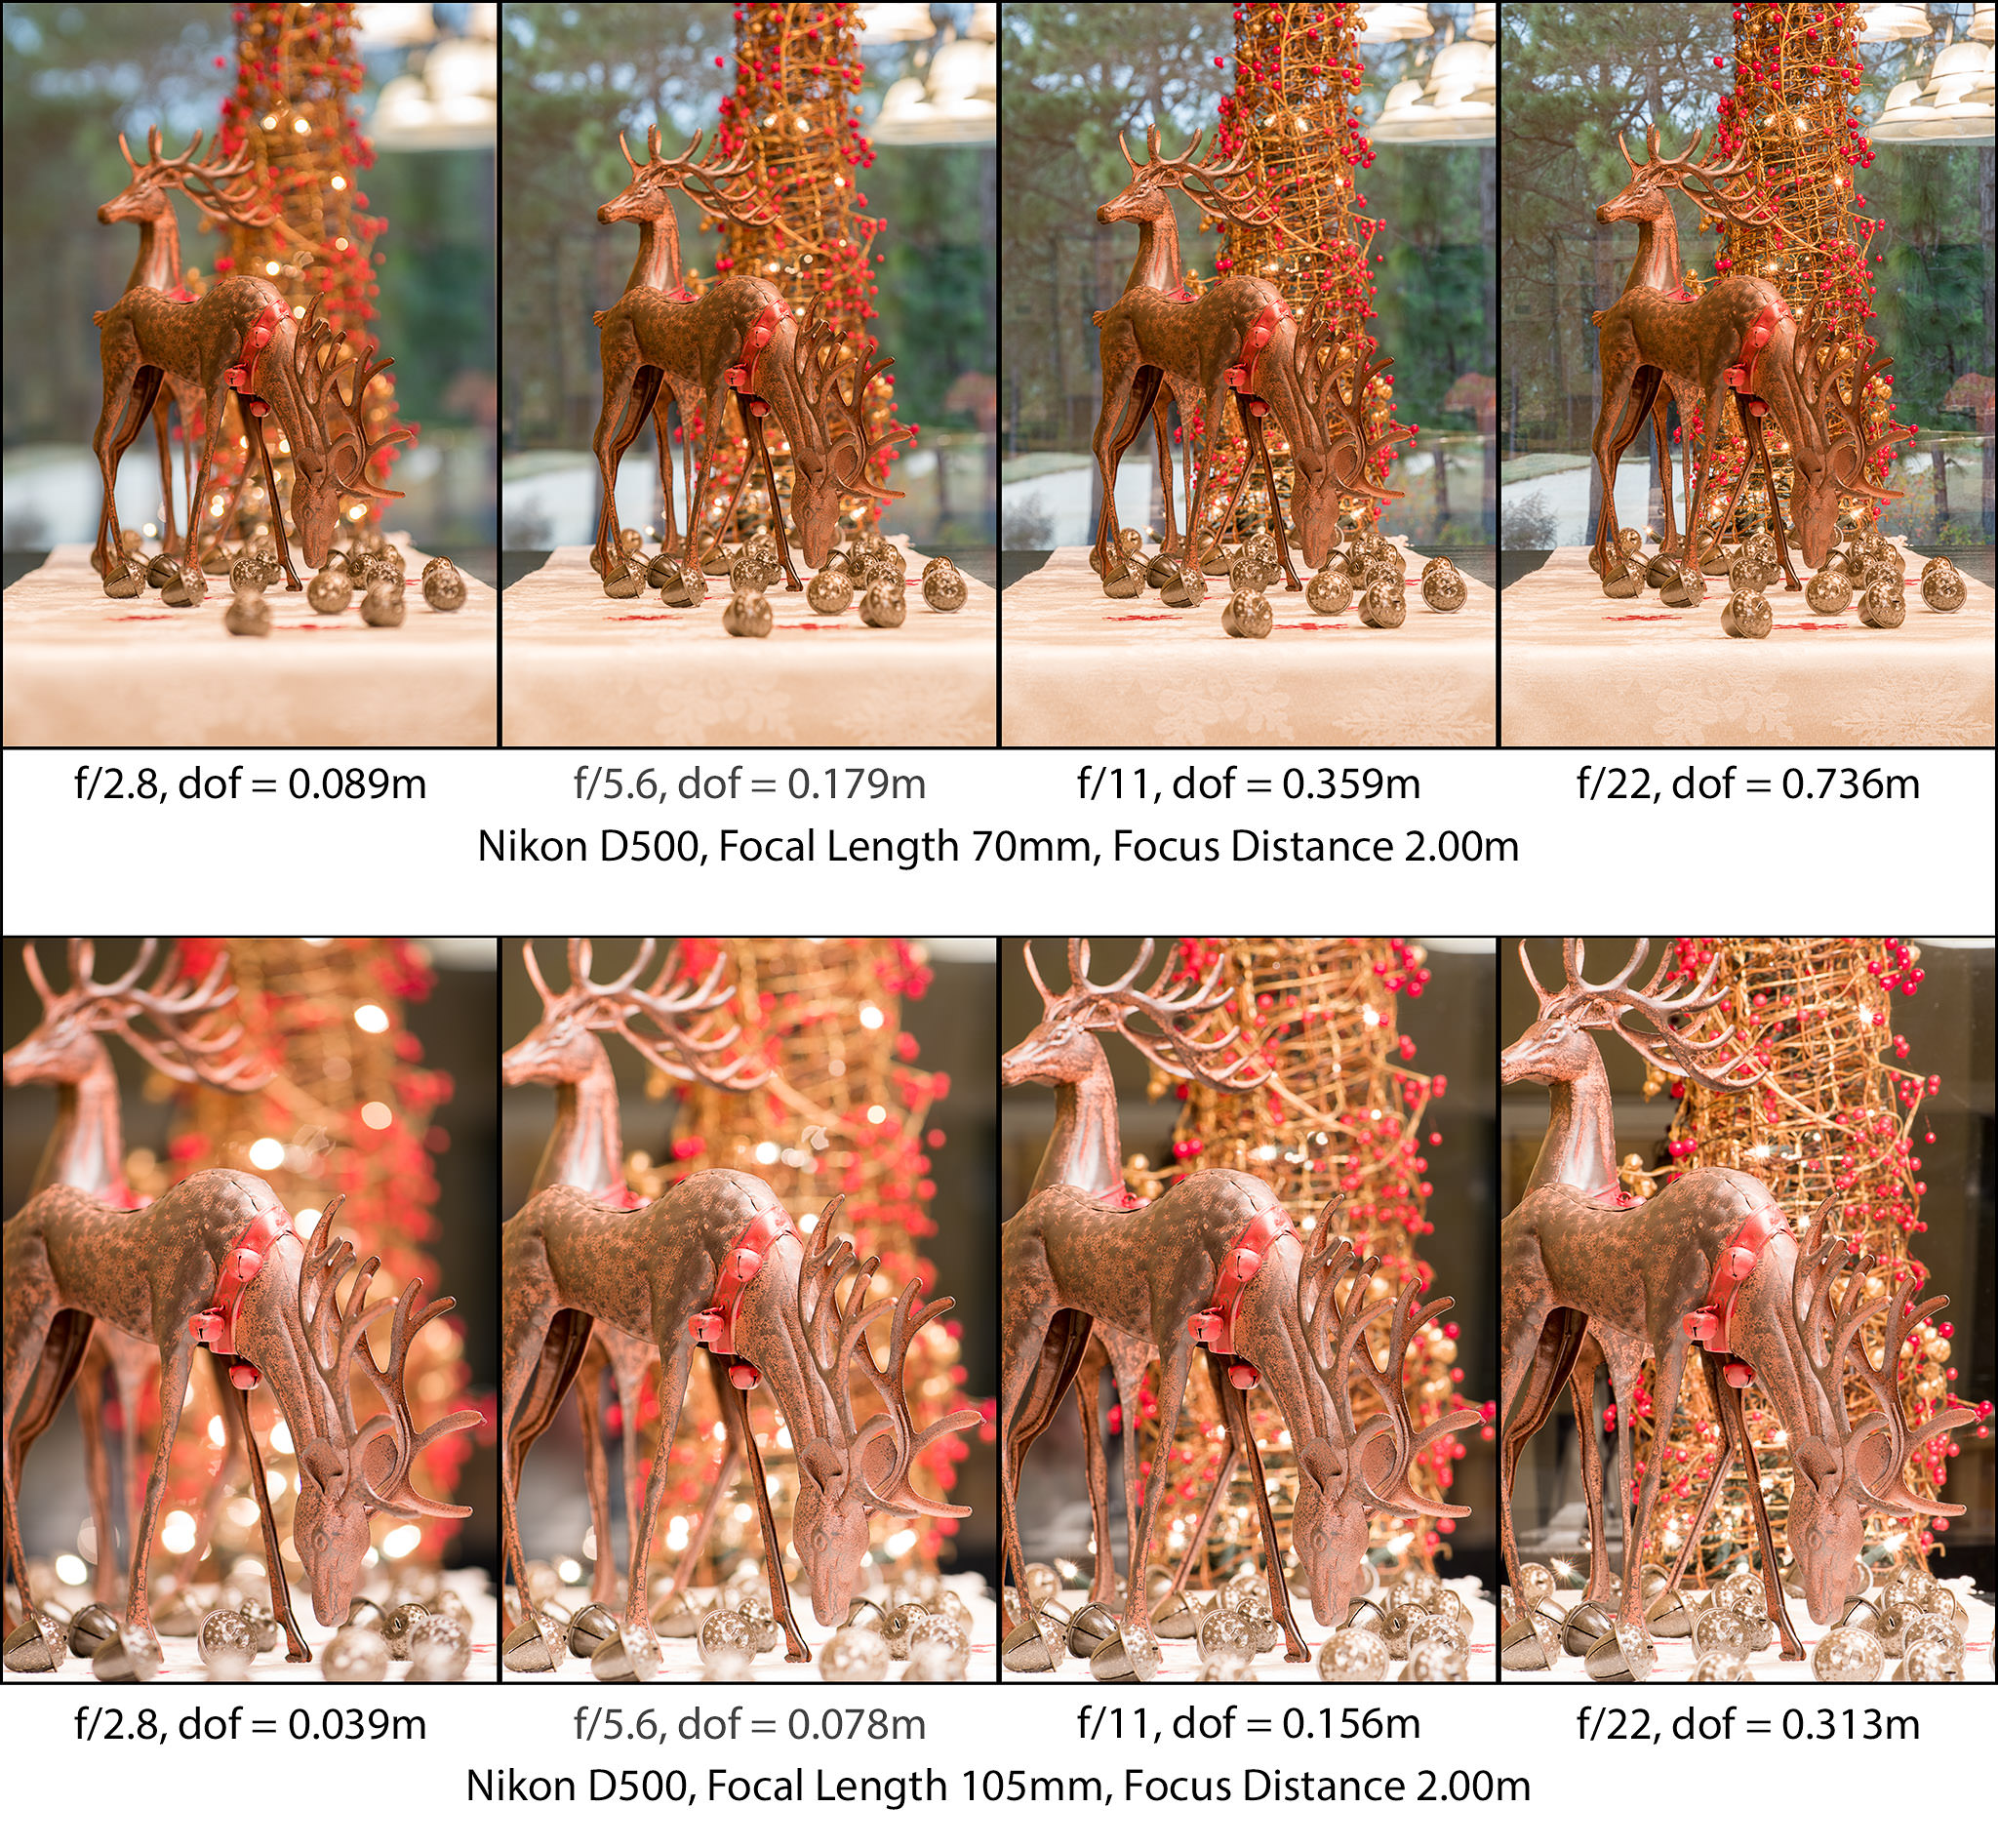
However, it isn’t fair to compare these two sets of images. The field of view in each collection is very different. The top group of images has taken in much more of the surroundings, and the reindeer are much smaller in the frame.
To make the comparison fair, I took two more shots. The first was taken at a focal length of 35mm and approximately 0.6m away from my focus point (still the eye of the nearest reindeer). For the second image, I moved the camera back, so it was 1.2m away from the subject. Then I zoomed into 70mm and framed the shot so that the head of the deer was approximately the same size and location as in the first shot. It turns out the DoF in both these images is the same. You can see this looking at the acorn in front of the deer’s nose and the snowflake and acorn just behind the nose. In both images, they are equally sharp.
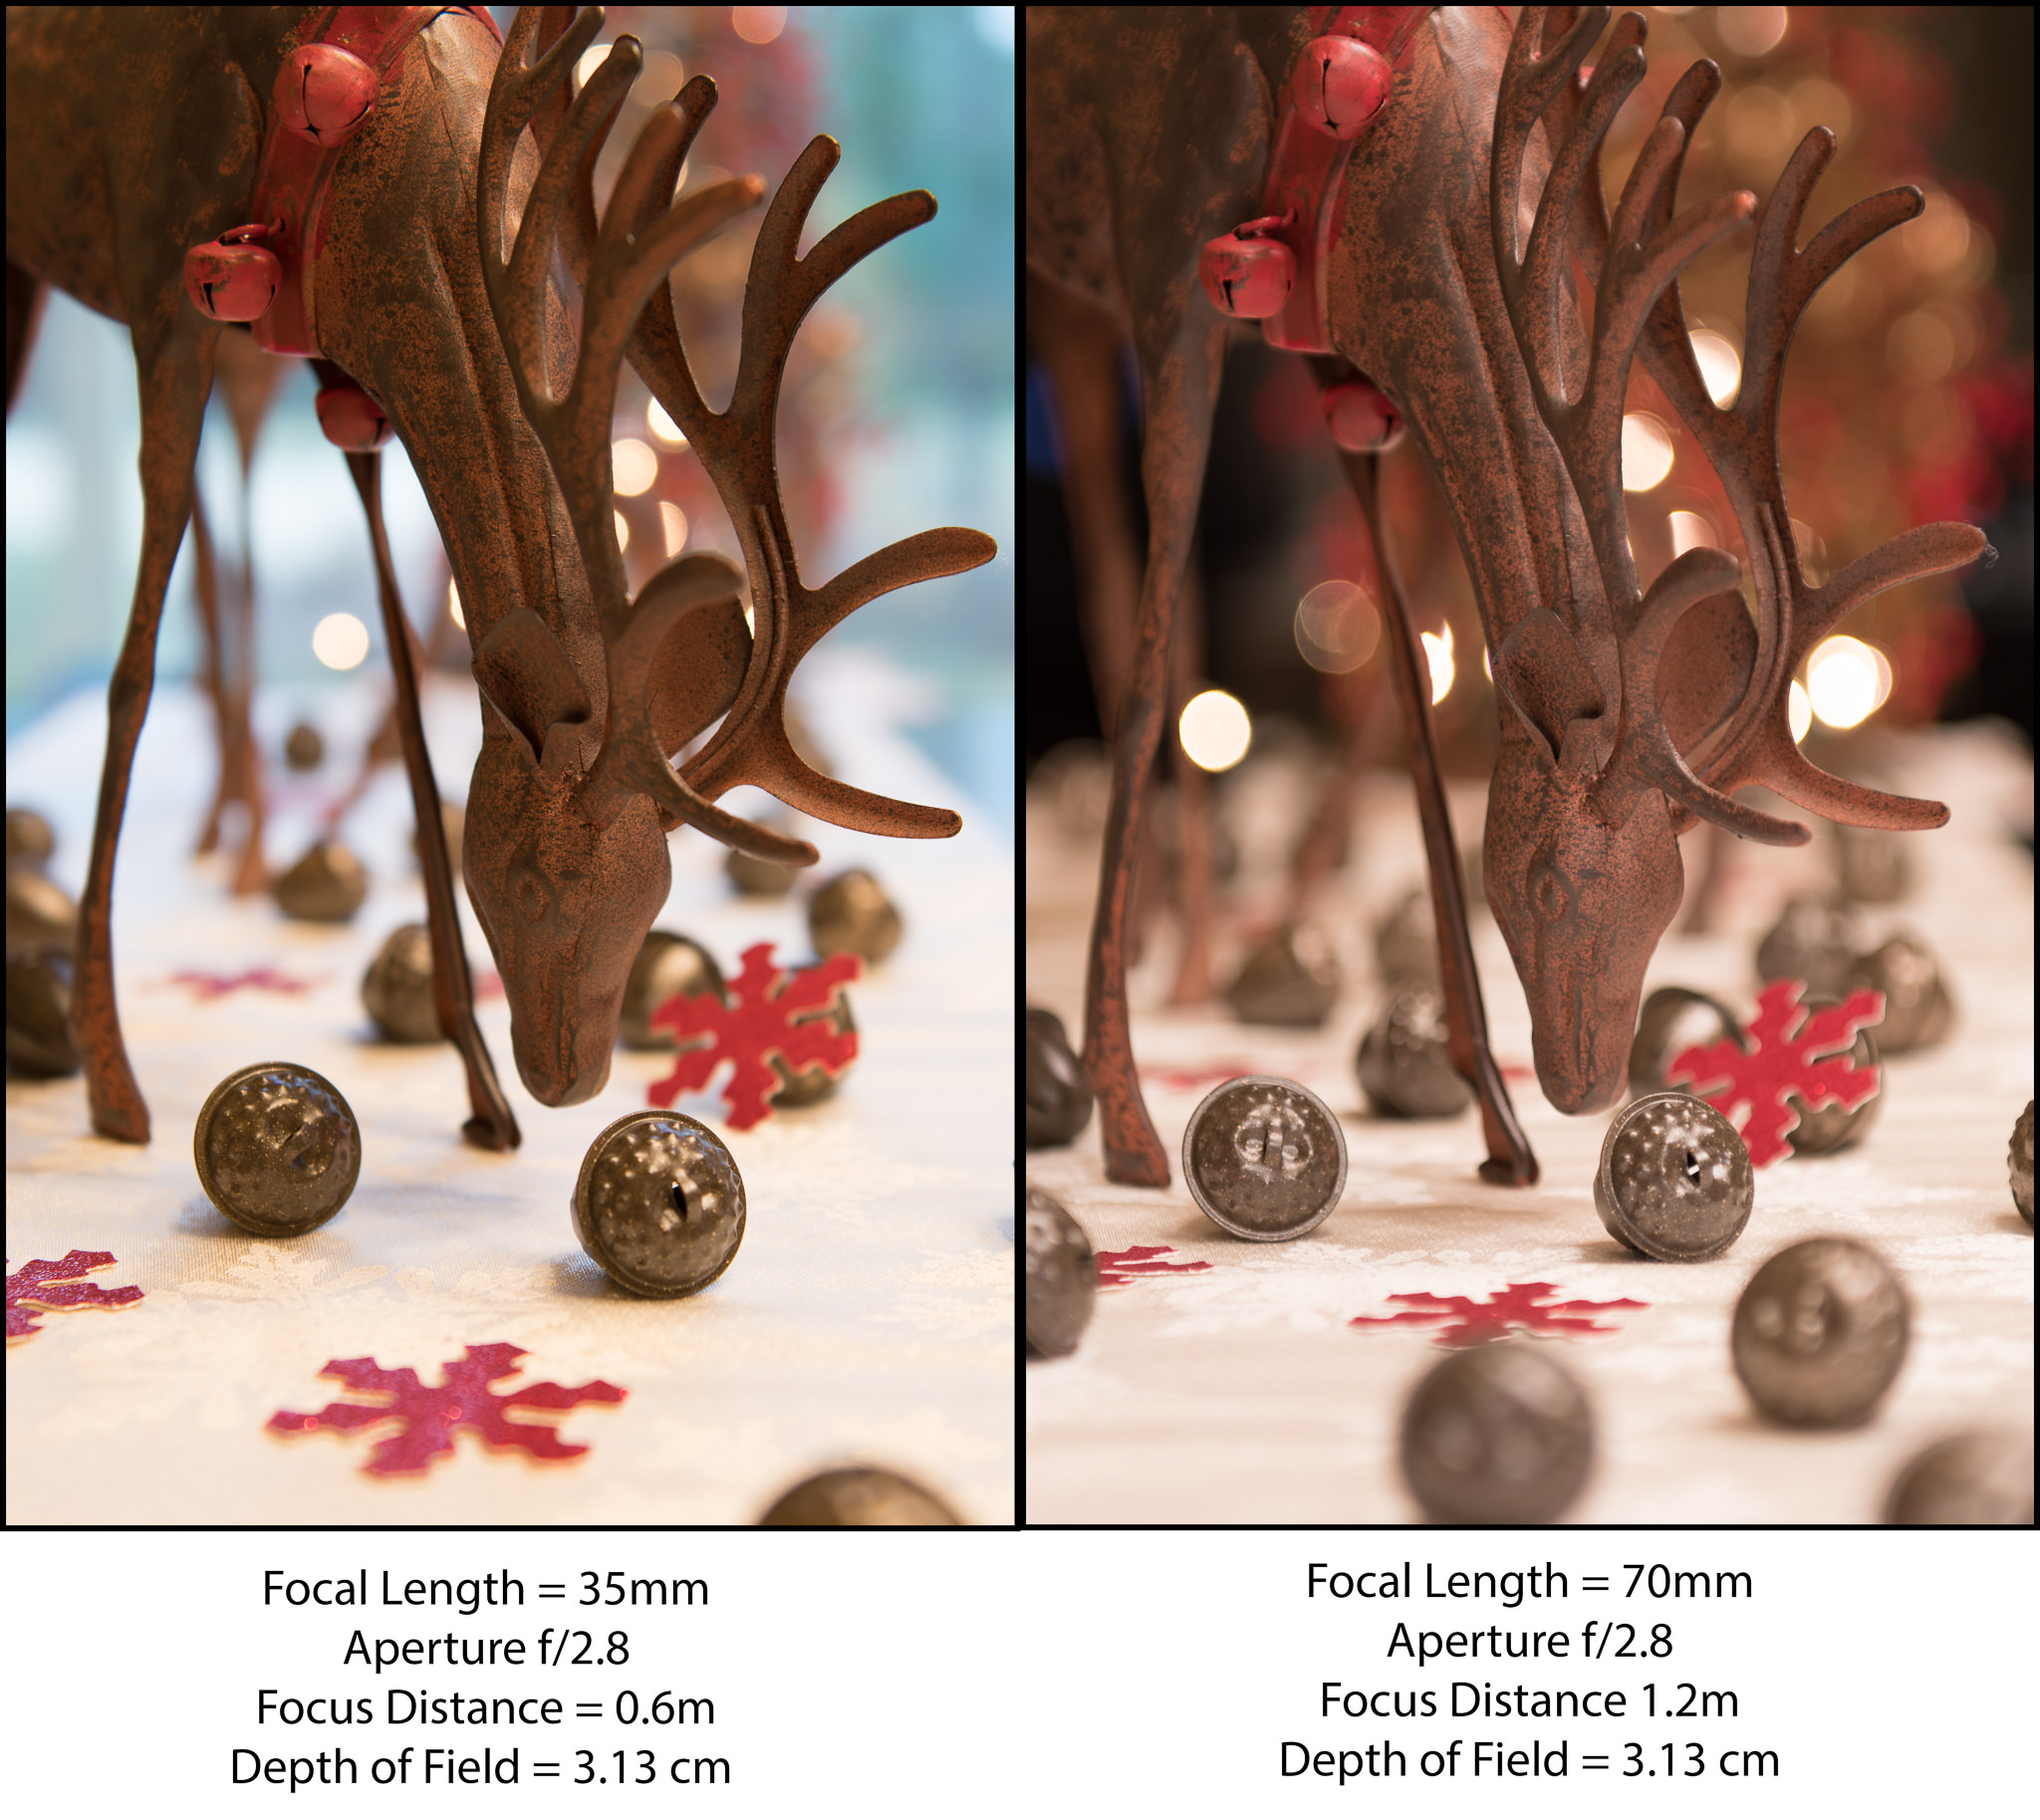
So why do the two shots look different? Well, two reasons. The first has nothing to do with depth of field. I’m afraid that while I was composing and shooting, the sun went down! So, you must ignore the fact that the background is darker in the second photo. I do apologize for this! Apart from that, the difference lies in the fact that the longer focal length has a narrow angle of view. Thus, a smaller portion of the background fills the frame. The apparent magnification of the background gives the sense that the blur is larger in the photo shot with the longer lens. My article “What is Lens Compression and How to Use It In Your Photos” talks about this in more detail.
So focal length does not actually influence DoF if you adjust the camera-subject distance so that the magnification of your subject is the same.
Sensor Size
Sensor size also affects depth of field – in a sense – with bigger camera sensors having shallower depth of field. Technically, it is not the sensor size directly, but rather, the longer focal length that you must use for a given composition. The article “Sensor Size, Perspective and Depth of Field” goes into quite a bit of detail on this topic. So for more of an explanation follow the link.
But in a nutshell, cameras with smaller sensors have more depth of field, while larger sensors tend to offer more of a shallow focus effect. However, you have to be careful how you make the comparison. You must look at cameras with lenses that have the same effective focal length so that the fields of view are the same. If you shoot at the same camera-subject distance, with the same apertures, you will find that the larger sensors have a shallower DoF. That is why many professional portrait photographers like to use full frame cameras. Here is an example. A full frame camera with a 120mm lens, an APS-C camera with an 80mm lens, and a Micro 4/3 camera with a 60mm lens (all the same field of view) are each set to an aperture of f/9 and a camera-subject distance of 5.0m. This table summarizes how the DoF will look in each image.
| Camera | Crop Factor | Physical Focal Length | Effective Focal Length* | Aperture | DoF |
|---|---|---|---|---|---|
| *Effective Focal Length = Physical Focal Length x Crop Factor | |||||
| Full Frame | 1.0 | 120mm | 120mm | f/9 | 0.92m |
| APS-C | 1.5 | 80mm | 120mm | f/9 | 1.42m |
| Micro 4/3 | 2.0 | 60mm | 120mm | f/9 | 1.91m |
A common question though is can you take similar images, with the same DoF’s, using cameras with different sensor sizes? The answer is yes. However, you must divide the apertures by the crop factor in order to get the same depth of field. Using the same cameras and lenses in the above example, but setting an aperture of f/18 on the full-frame camera, f/12** on the APS-C sized sensor and f/9 on the Micro 4/3 camera, you will end up with images that not only take in the same field of view but have approximately the same DoF.
| Camera | Crop Factor | Physical Focal Length | Effective Focal Length* | Physical Aperture | Effective Aperture** | DoF |
|---|---|---|---|---|---|---|
| *Effective Focal Length = Physical Focal Length x Crop Factor **Effective Aperture = Aperture x Crop Factor *** although f/12 would be the mathematically correct physical aperture, you would have to select either f/11 or f/13 on your camera. | ||||||
| Full Frame | 1.0 | 120mm | 120mm | f/18 | f/18 | 1.89m |
| APS-C | 1.5 | 80mm | 120mm | f/12*** | f/18 | ~1.91m |
| Micro 4/3 | 2.0 | 60mm | 120mm | f/9 | f/18 | 1.91m |
Determining Depth of Field
Many DSLR’s have a depth of field preview button. If you press this button while you look through the viewfinder, the camera will stop down the lens, and you will see how the actual image will look. However, at small apertures, the viewfinder will get very dark, and it will be hard to see the preview!
Live view can also be used on some camera models to preview how the DoF will look. Check your instruction manual to see if your DSLR can do this.
Mirrorless shooters potentially have an advantage over DSLR shooters because what they see through the digital viewfinder, or on the LCD is how the photo will typically look.
Conclusion
In my opinion, it is not worth getting hung up over how many inches the DoF is in a picture. That would completely take away from the enjoyment of photography. It is much more important to know when you need a small DoF and how to create it. And the same is true when you need a large DoF. The beauty of digital is that you can take a shot, and then review it on the LCD. Quickly reviewing your image is much easier than pulling out your phone and calculating DoF! If you don’t get the result you are looking for, change your camera-subject distance or the lens aperture to get the desired effect.
To achieve a shallower DoF you can either move closer to your subject or open up your aperture. For greater DoF, move away from your subject or close down your aperture. You can also use a longer focal length to achieve a ‘perceived’ shallower depth of field.
Understanding what factors affect the depth of field in a photograph will give you the artistic freedom to make the images you want to create. You will learn the most from practicing. Take time to experiment with your camera; get to know it better. Try different focal length lenses, change apertures, move your feet to change your perspective. Analyze your photographs so you know how your gear performs. Then when it comes time to take pictures that really count, you will be ready.
Well explained !
uuhh
yes23
huuuuuuuiiiiiii
my gyat
your to skibbie
I was kinda following this article, and then I read this statement. Would it be possible to clarify this? I’m really struggling with dof concepts.
So focal length does not actually influence DoF if you adjust the camera-subject distance so that the magnification of your subject is the same.
John, I hope the following helps; my apologies if it doesn’t…
DOF ≈ 2⋅N⋅c⋅(u/f)² where
DOF is depth of field
⋅ means multiply
N is f‑number
c is circle of confusion
u is camera–subject distance
f is focal length
For a given magnification (image height on sensor / height of subject), we need to keep u/f constant. In other words, if, say, we double the camera–subject distance then we must double the focal length of the lens to maintain the same magnification.
Because u/f is now constant, the DOF is proportional to N, and independent of focal length.
QUOTE Depth of field, Wikipedia
For a given size of the subject’s image in the focal plane, the same f‑number on any focal length lens will give the same depth of field. This is evident from the DOF equation by noting that the ratio u/f is constant for constant image size. For example, if the focal length is doubled, the subject distance is also doubled to keep the subject image size the same.
This observation contrasts with the common notion that “focal length is twice as important to defocus as f/stop”, which applies to a constant subject distance, as opposed to constant image size.
en.m.wikipedia.org/wiki/…s_aperture
I believe dof use is almost “everything” to a good photo . But using IT to its use case is the everything . Compose the shot and use the dof to its use case to create the most pleasing for it’s intended use . This becomes the art of using composition and dof to get across the images meaning or feeling .
Thank you Elizabeth. Really well written and show your passion and dedication to photography.
idgaf
nika
wonderful explanatıon, thank you.