Working on your photos in Photoshop, you might have come across the situation where you begin to see weird lines appear in places where they shouldn’t be and weren’t before. This issue is especially common for very smooth gradients, such as skies, and can undoubtedly destroy even the most beautiful photo. And unlike other problems, this issue doesn’t seem to be triggered by anything particular; one moment it’s not there and the next time you look at the image – there it is. So, let’s figure out what this is, why it happens and how to fix it.

Table of Contents
What is Color Banding?
This issue is called “color banding” and it happens when values within a gradient get pushed so much that there is no color/value in the file to actually represent the mathematical change you’ve applied with a tool in Photoshop. Basically, when this happens it means you are hitting the boundaries of your file. So, every time you see banding happening, you know you have pushed too far. But you need to push things that far to get the desired result, otherwise you wouldn’t have been doing it in the first place, right? So, the next step is to see how this could’ve been avoided and how you can get the most out of your file.
How to Avoid Color Banding
The first and the most important step in making sure you won’t face this banding issue is to not push values too much during post-processing. And this means getting as much as you can “right” during your photography. Obviously, the best thing to do is shoot uncompressed RAW and nail the exposure. And for the cases when there’s too much dynamic contrast in the scene, bracket your shots, so that during the post-processing you can use additional exposures to suit your creative vision, instead of pushing the highlight or shadow sliders to 100% values. Following these recommendations alone will ensure you’ll hardly ever encounter color banding again. But that’s not all…
Next, perform as many of your adjustments as possible in the RAW file in a raw converter (etc. Adobe Lightroom, Capture One) including plug-in adjustments before bringing it as TIFF into Photoshop. It will render better results this way as RAW files have much more information and values are unclamped. This workflow delivers better results even with external plug-ins that require you to export file as TIFF, such as NIK Collection for example. I’m not sure why Lightroom + stand alone plugin renders a better result than plug-in ran from within the Photoshop but I have a theory.
My theory why you get more out of your photos with Lightroom + NIK Collection than PS + NIK
When it comes to photo file values there is not only bit depth but also dynamic range. Some file formats support only 8-bit, others do 16-bit and some support 32-bit. Then there is floating point and integer file formats and that’s where all this becomes unpleasantly complicated.
Basically bit depth is the number of colors/values you have at your disposal. Integer file formats clamp values at 0 (black) and at 1 (white). No additional information is being stored (as in JPEG). Floating point file formats save the additional information captured by the camera going above 1 and below 0 to play around with. TIFF is a complicated file format that can be both 16-bit half float (half precision floating point) and 16-bit integer. As soon as you import a 16-bit file into PS it will be integer, not a floating point. My theory is that PS can only do 16-bit TIFFs as an integer format and therefore clamps values. But as soon as you use a true 32-bit Full Float EXR or HDR file you have full dynamic range in PS, but lose the ability to use most tools and adjustments that make Photoshop so great… Also neither LR nor Capture One Pro have an option to export as 32-bit, sadly. That would force PS to load it in 32-bit mode and preserve the floating point “status”.
So, I think the difference and degrading in an image’s dynamic range are due to a limitation in PS. Color Efex Pro might be able to work with 16-bit half float as well as Lightroom while PS cannot. And once you’ve taken away values (by opening your file in Photoshop) you can’t add them back into the file and when you try to push too hard you get banding.
This all is only a theory and I doubt a NIK or an Adobe developer will shed some light into this but if someone knows more about this I am happy to learn.
And lastly, when at the last stage you can export from a RAW converter to Photoshop, use the uncompressed TIFF file with the widest color space – ProPhoto. This will give you the maximum flexibility with Photoshop.
“Well, all this advice is great, but what do I do with files that I already have” – you might ask – “how do I fix those?” We’ll get into this in a minute, but first let’s talk about how to know for sure if color banding is there or not.
How to Check for Color Banding
Sometimes even though color banding is present, it might not be very apparent on your computer screen because the skies are usually blue and bright so it’s hard to see, but once your image goes into print – those nasty lines come to life. If you want to make sure this will not happen with your image, you can do the following.
How to deep check if the color banding is present:
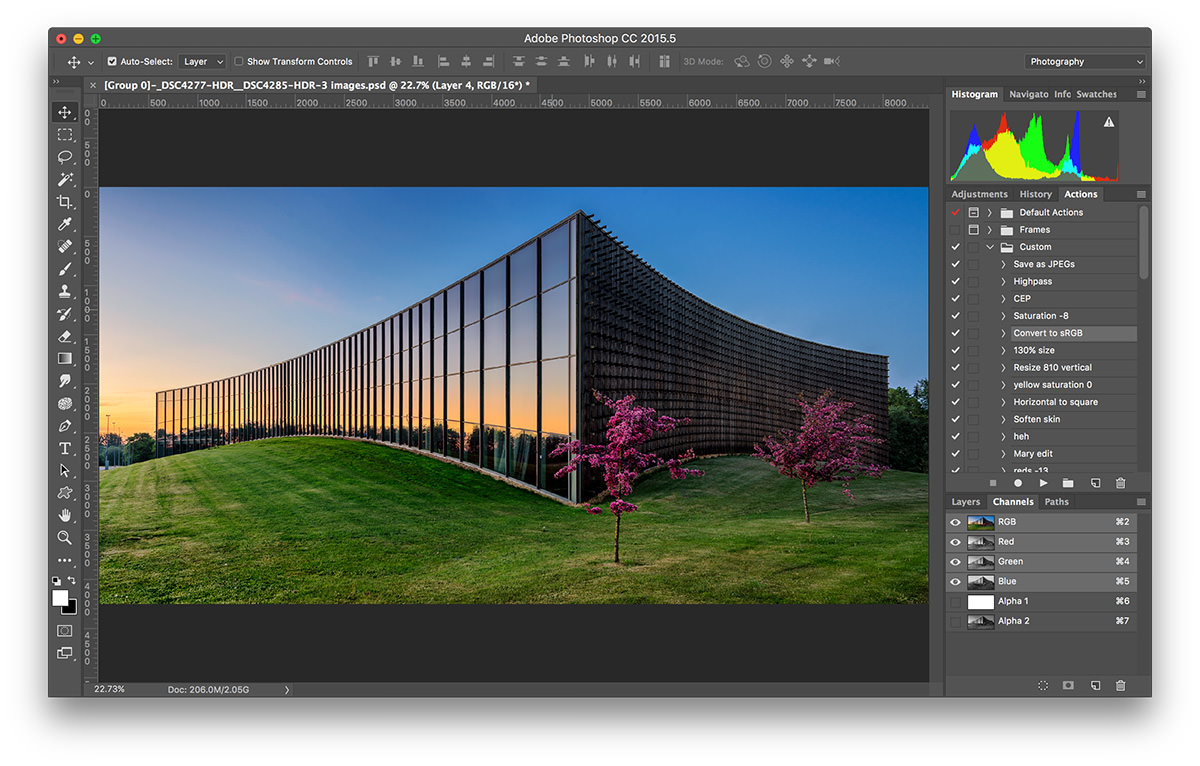
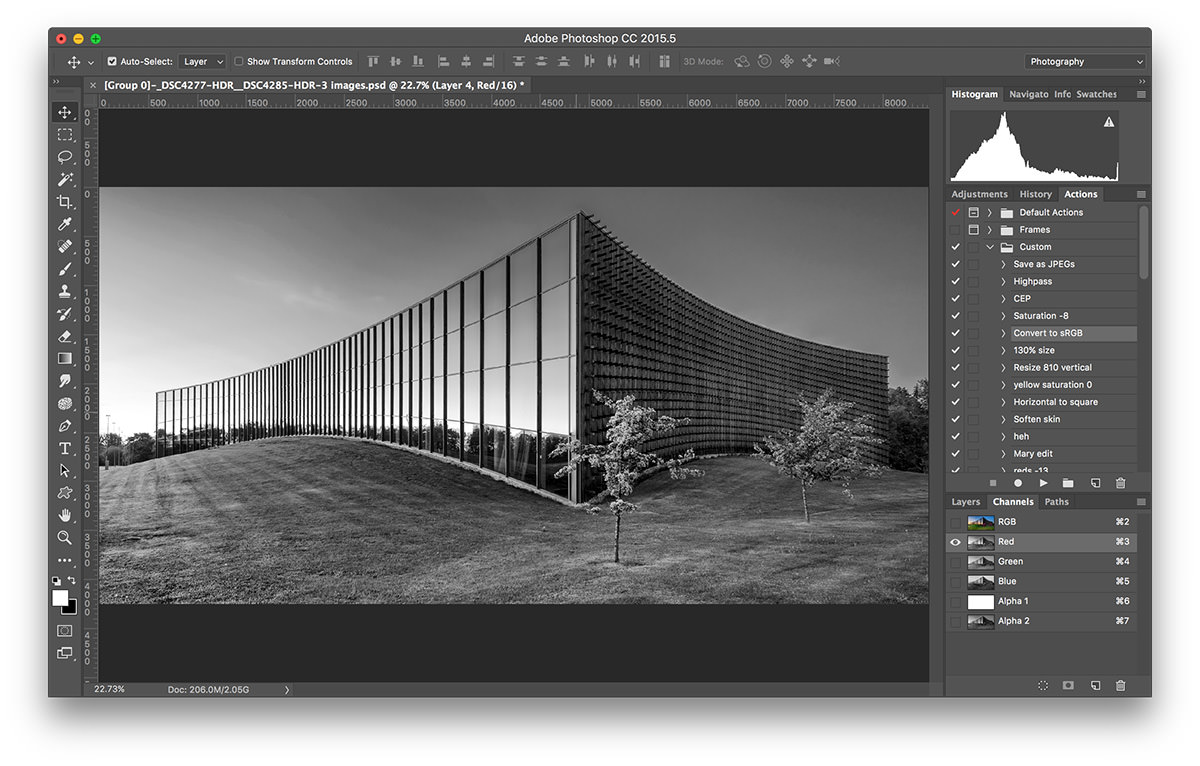
- Take a look at each of your channels. In Photoshop go to the channels tab and then look at each of Red, Green, Blue channel representation separately. Banding, if present, will be much more noticeable in this view than in full color RGB. If you see banding – you’d better fix it.
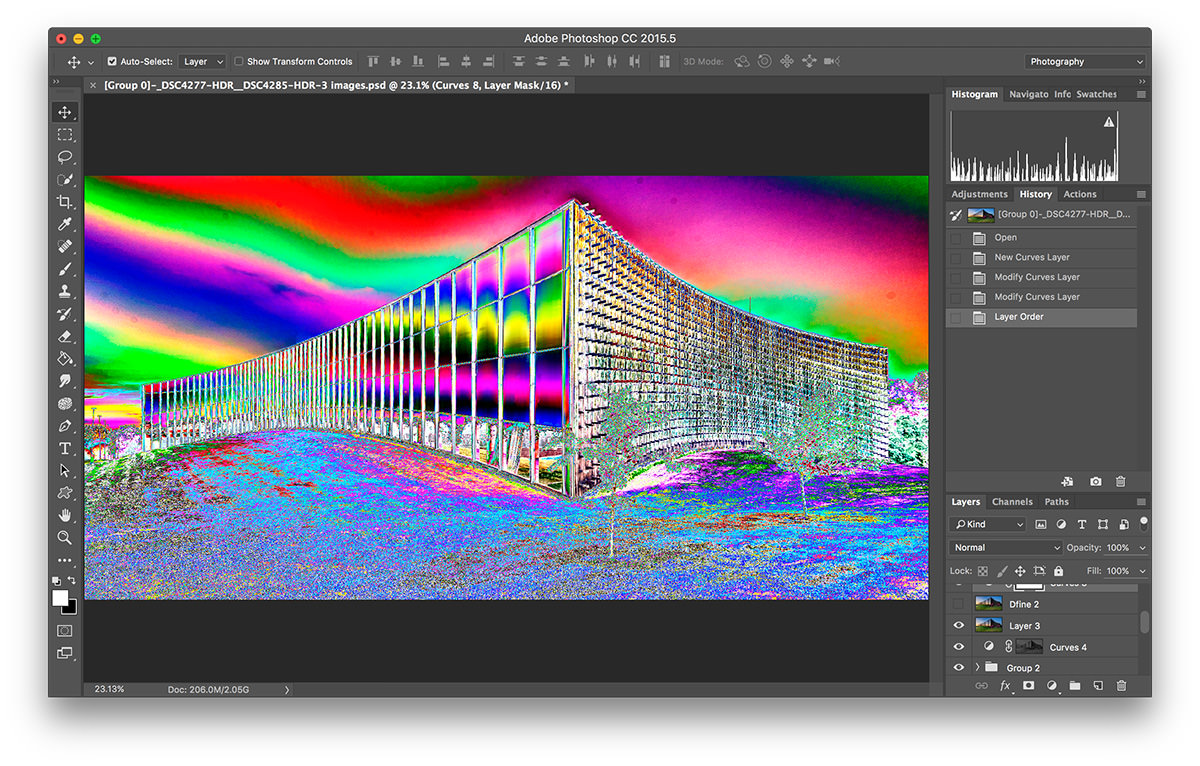
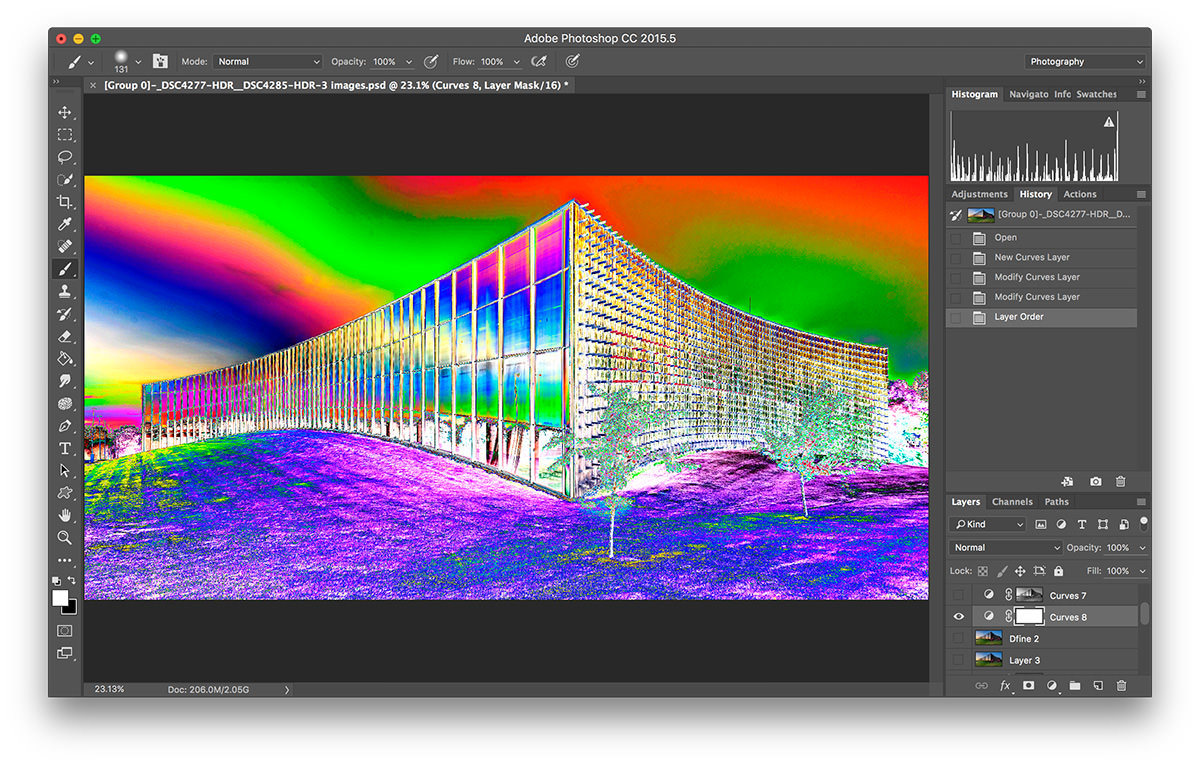
- Another way is to create what is known as Solar Curve. To do this in Photoshop you should create a new Curves adjustment level and place a bunch of points along it. Then, start pulling those points up and down, so it creates a very steep wave-like pattern. It should look like this:
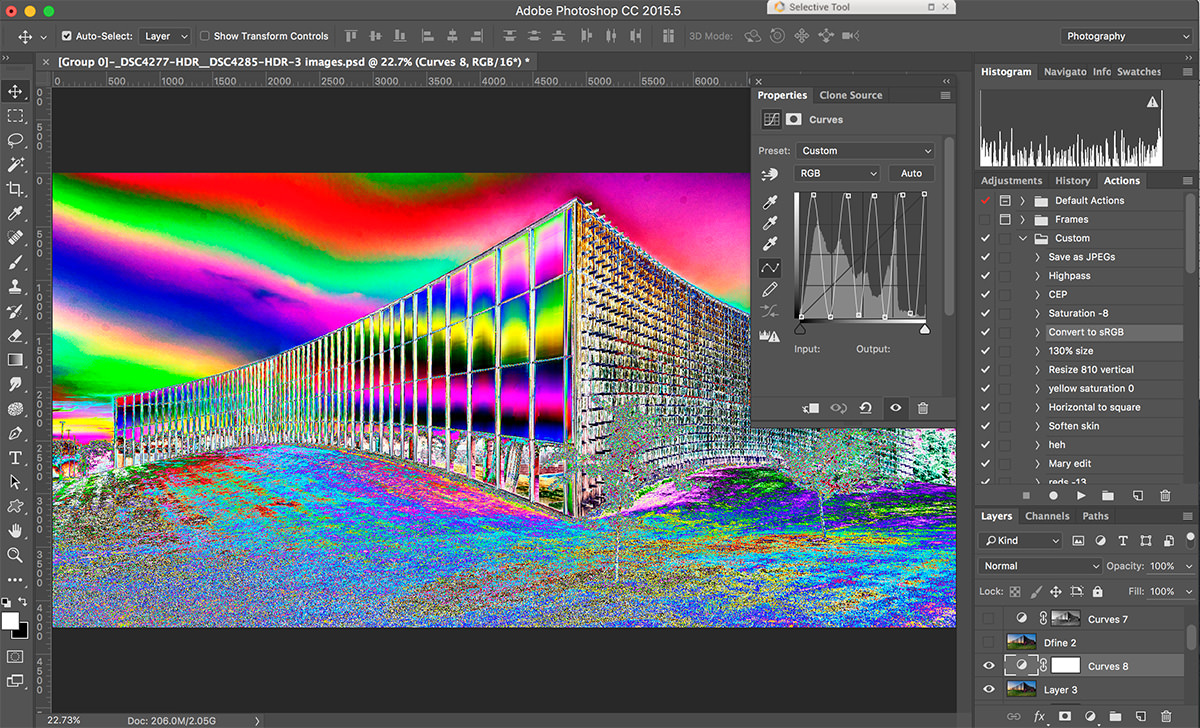
Or you could spare this work for yourself and download the Solar Curve preset we made for you.
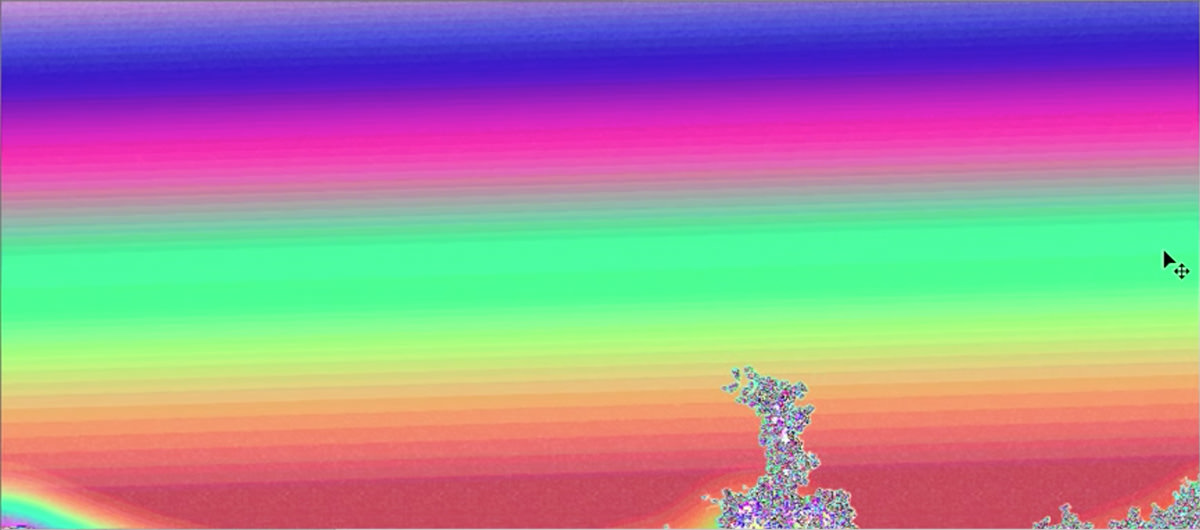
Now, as you can see, the transitions in the sky in our sample image are not smooth at all and you can be 100% sure the image will band in print. With solar curve it takes some getting used to before you can reliably tell which transition is smooth enough and which isn’t but it’s the most reliable way to check whether the image will band or not before printing it.
Here’s two examples, one image is banded (left) and the other is not (right):

How to Fix Color Banding
While it’s best to avoid the issue altogether and think about it at the moment of capture, we all understand that sometimes you make a mistake in the field or you already have some archived files with no additional exposures. But you still want the results from those files that would suit your creative vision, right? So, there is a way to mitigate color banding even if it has already happened. In fact, there are two:
Method One: For 16-bit Files
So, if the file you’ve encountered banding issue with is a 16-bit file, the only way to fix it is to add noise. Here’s how do it most effectively:
- Create a new Overlay layer filled with 50% gray by clicking Control+Shift+N and setting mode to Overlay and checking “Fill with Overlay-neutral color (50% gray).
- Add noise to this overlay layer by selecting Filter => Noise => Add Noise. Make sure that distribution is set to Gaussian and the amount of noise needed will depend on how severe the banding in your particular image is, but usually it’s in the range of 1-5%. It’s very easy to see how much noise is needed with Solar Curve applied.
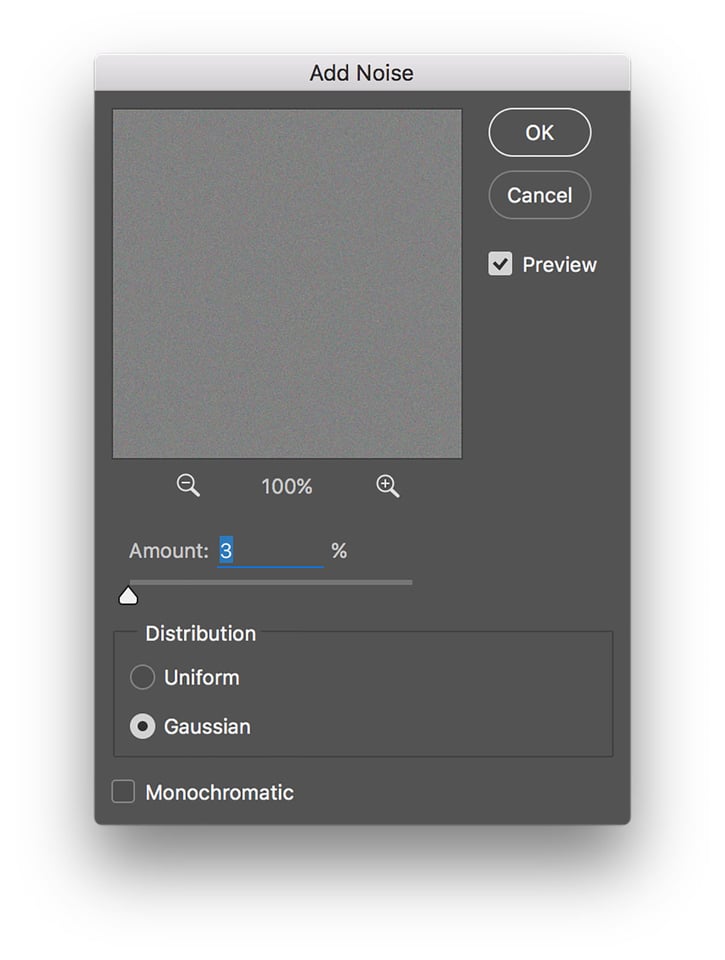
Noise settings - Mask out this Overlay layer from the image parts that didn’t have banding issues, so it’s completely noise free.

Method Two: Best For 8-bit Files
If your file is 8-bit, there’s a more effective way to mitigate banding then by adding noise. As a nice bonus, it will also keep your image cleaner.
- Select the part of the image that suffers from banding. If it’s sky, the easiest way is probably to use a Magic Wand.
- Make a new layer from that selection by pressing Control+J, make any other layers invisible and lock transparent pixels on our newly created layer by clicking the appropriate icon in Layers pallet
- At this point you can turn our solar curve adjustment layer back on to better see banding, if you wish. Now, even though it might be somewhat counter-intuitive, go to Filter => Filter Gallery. Now go into Brush Strokes group and select Spatter. You’ll need to adjust Spray Radius so it’s very high, maybe all the way to max value of 25 and Smoothness all the way down to 1. Now hit OK.
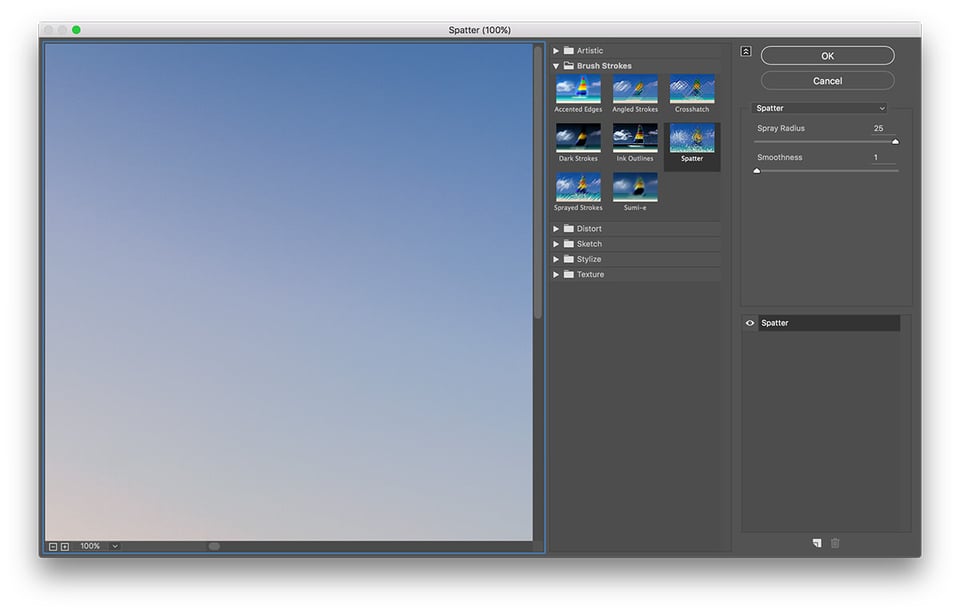
Filter settings - Now you can see your banding has dissipated and now you can turn back all the layers you need. Sometimes, if your image has very bright objects next to the problematic area, you might notice some bright speckles picked up on banding reduction layer. You can fix this by simply masking those off.

There it is, we just learned everything there is about color banding and how to fix it. Hope you found this information useful and it helped you achieve the result you were after.
This guest post was contributed by Denis Protopopov. Please visit his 500px page to see his work. Also, you can visit mediamaker.tips for more information.
Great….my issue is when i processed image in lightroom and export it to laptop it dont hv any such banding issue, but on posting it to fb it got such absurd banding, i hv tried with lower dimensions and ppi (1200×1800 by 72ppi) as well, but unfortunately result is same
Excellent article!!!
Very, very useful!
Thanks a lot!
These options are great if you have Photoshop and/or Lightroom. I have neither. All I can do is clone out the banding which is time-consuming or deftly apply gaussian blur in Paint.net.
Hi, I recently purchased a Fujifilm GFX and used it on a trip to the high mountains – all my images containing cloud seem to have very noticeable rainbow colour banding across the smooth areas of cloud, these are the RAW unadjusted files imported to Lightroom. What could be the cause of this? Could it be an issue with the camera/lens or more likely the RAW conversion? Any suggestion as to how I can find the root cause?
I can’t help you, but I’ve started to notice this color banding only when I bought a Fuji X-T2 (before I had a very noisy Canon 760D and when reading through the article it would actually be the noise in the Canon files that prevented the banding. I wonder.)
Hi,
I’m getting more and more gray hair because of this color banding in photos with slow color gradients. My usual workflow: shooting RAW (NEF), opening the raw files in Lightroom where I make most of the changes/adjustments. In “develop” mode, there are never any visible bandings, and also when I save edited image from Lightroom to my photo folder, usually there are no visible bandings. If I transfer photo (edited or not) from LR to PS (tiff, 16bit, no compression), it is fine in PS just until I started editing that file, then the banding appears. Even if i directly open raw photo in PS, after the ACR edits there are no problems, as soon as I started working on such photo in PS (adding adjustment layers,..) the banding appears. I’m working in 16bit sRGB. When saving photos from PS as jpeg, the banding is horrible. I tried with noise etc, but i doesn’t do much, the banding is still visible.
I said that if I exported jpeg from LR, there are usually no bandings, but of course, when I upload such jpeg to Facebook, Instagram, or any other page that uses compressed photos, the images are ruined as the color banding is very bad. I even tried to resize photos in Lr to a suitable (smaller) resolution, but that makes the banding right after saving such resized image.
Have no idea how to avoid this bloody thing :/
Same issue
It’s perhaps worth pointing out that even in 16-bit/channel mode Photoshop processes layers for display at 8-bit level, unless the display zoom is 66.7% or higher. This means below 66.7% banding can become very apparent. However, this banding is only present on the display rendering and not in the final output. It also disappears when the image is flattened (because the artefact is caused by the layer processing). Perhaps one advantage of the latest high resolution displays is being able to edit at higher zoom factors and avoid this display banding problem.
Also, when converting to 8-bit/channel for output, it’s usually worth having dither enabled in Color Settings, so as to preserve some of the 16-bit information in the form of spatial dithering and reduce the perceived quantisation banding.
interesting article, specially on how to turn the banding more visible before your already wasted some expensive ink and papar!!
I personally use a totally different method, witch for me works very well as I don’t need any extra processing step of the image. The reason is that the banding disappears when I do my sharpening at the end, using ‘unsharp mask’.
to do that I make a copy of all layers by hitting cmd+alt+shift+e (mac user), than make the desired sharpening adjustment using unsharp mask tool and voilà, the banding will be gone with this extra sharpening layer added on top of the others!
curious to know what you guys thing about this and if of anyone ever did it this way!
One other source for banding I have noticed can come from adjustment layers, particularly if they have a layer mask with a smooth gradient of some kind. I have found unexpected banding when using, for example, a curves layer and radial later mask to create a vignette. Quite often, banding can be seen in the corners around area of blue sky where the vignette is most noticeable.
But what’s interesting is if the image is flattened or exported, there’s no banding to be seen. So, I *think* that adjustment layers are applied to an image in Photoshop as somewhat of a preview. What we see before flattening / exporting is a lower quality / higher speed preview of the adjustment layer. Flattening / exporting must cause the adjustment layer to be applied with full quality.
This won’t be the cause of all banding, but it is one to watch out for. It had me fooled / frustrated for a while.
Yes, I’ve seen color banding before. Great suggestions on how to deal with it! Some observations:
1. Color banding will be the result of having your histogram clipped. Your histogram should show you this, and which colors, before you save to TIFF.
2. Always save your RAW. If you screw up your TIFF you can go back to the RAW and fix it.
3. Evidently solar curves are a great way of finding dust spots (Image 5). :-)
Thank you. I’m a novice about this but would like to see the comments.