Aperture is one of the three pillars of photography (the other two being Shutter Speed and ISO, which are two other chapters in our Photography Basics guide). Of the three, aperture is certainly the most important. In this article, we go through everything you need to know about aperture and how it works.

What is Aperture?
Aperture can be defined as the opening in a lens through which light passes to enter the camera. It is an easy concept to understand if you just think about how your eyes work. As you move between bright and dark environments, the iris in your eyes either expands or shrinks, controlling the size of your pupil.
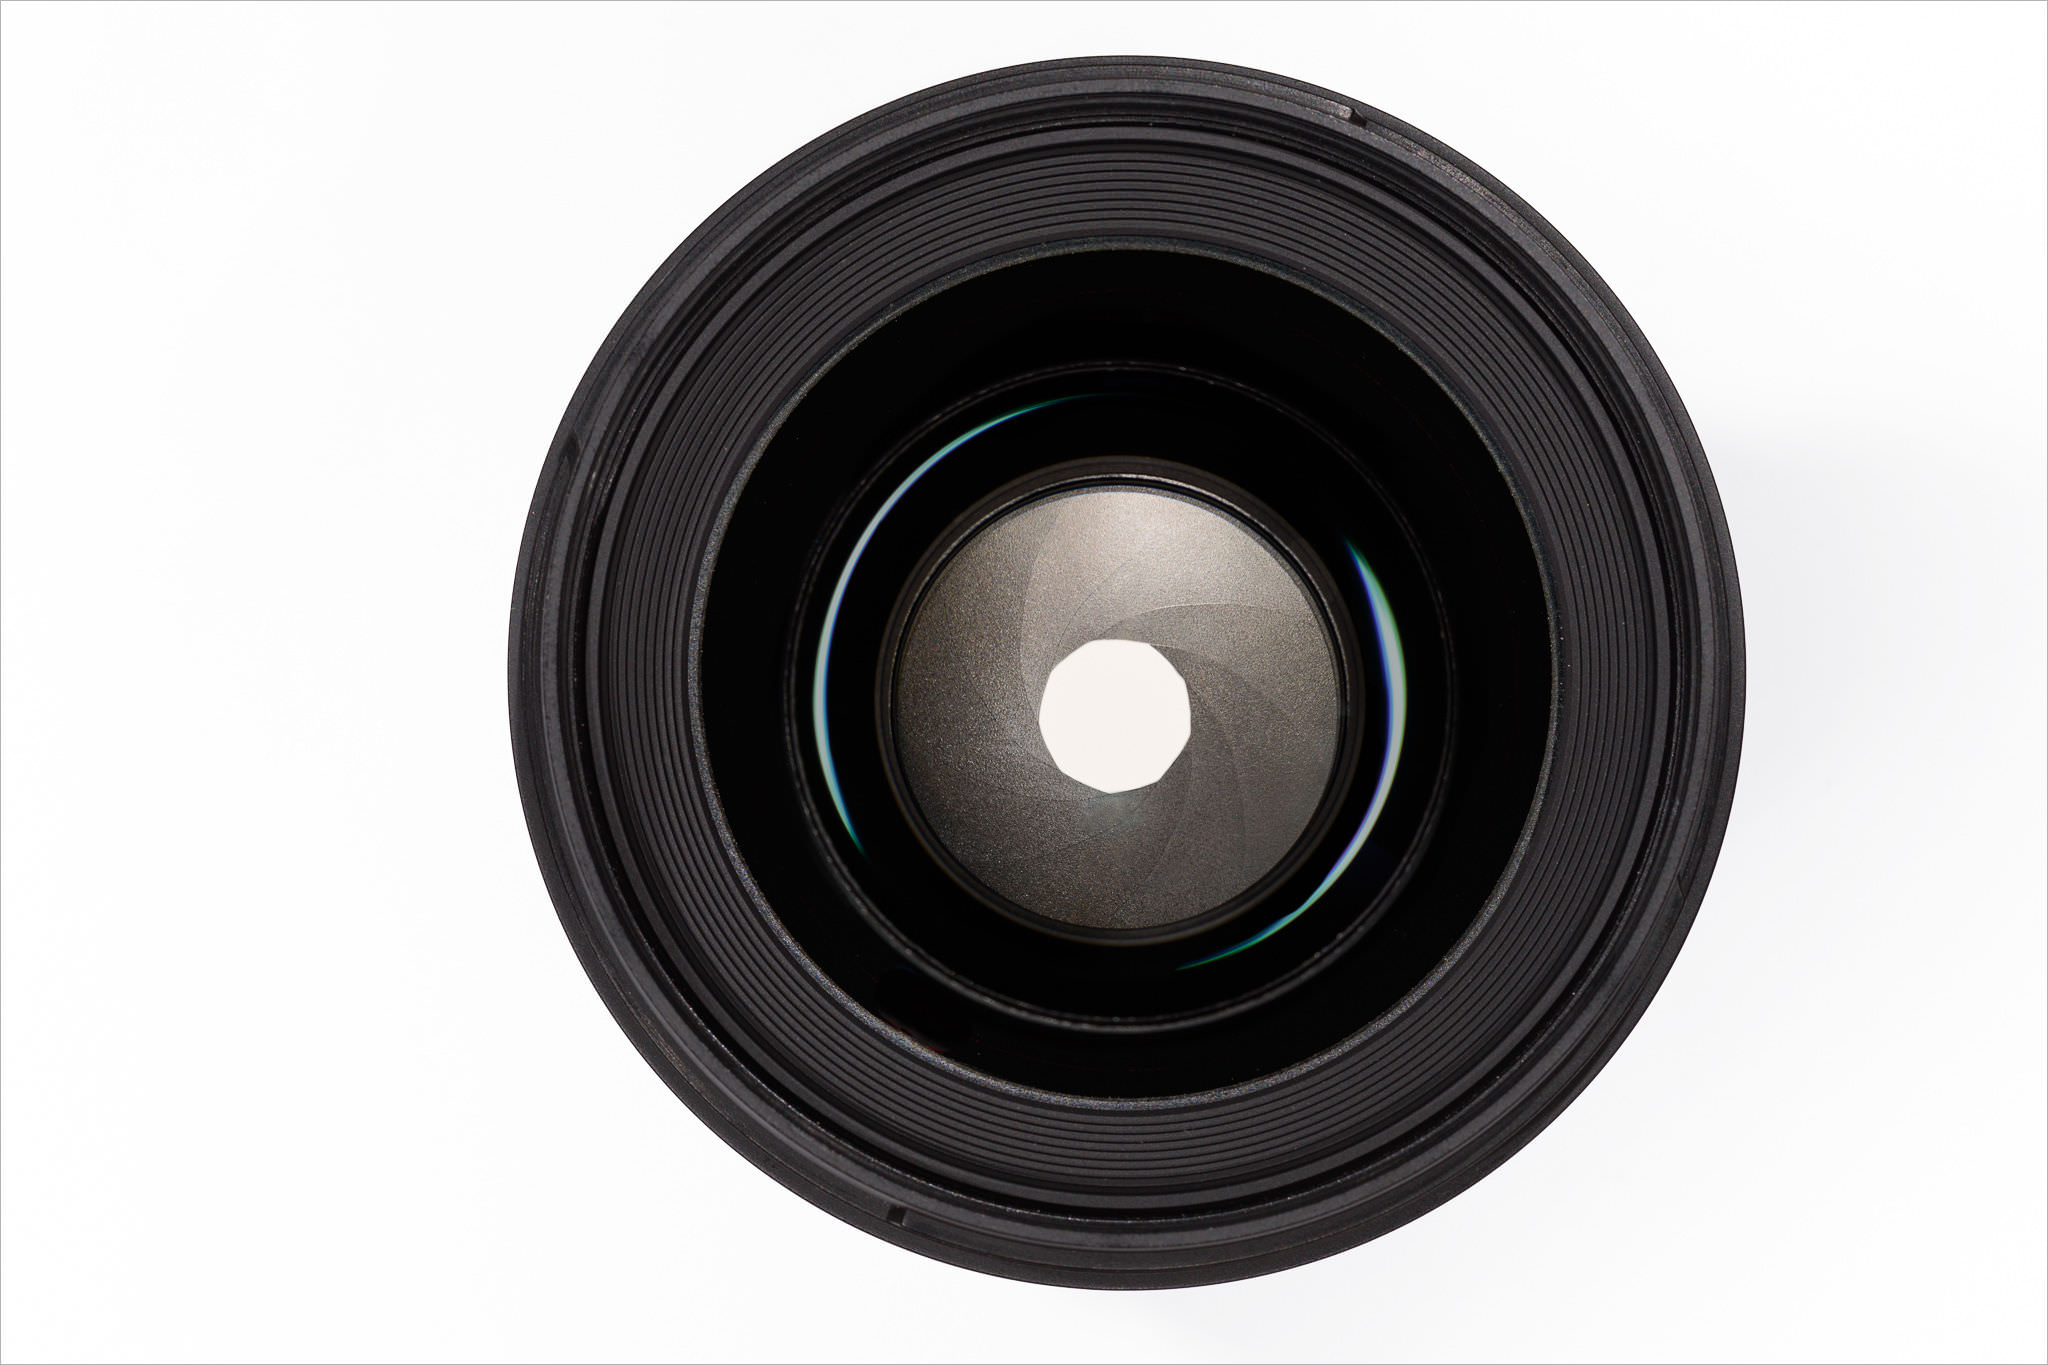
In photography, the “pupil” of your lens is called aperture. You can shrink or enlarge the size of the aperture to allow more or less light to reach your camera sensor. The image below shows an aperture in a lens:
Aperture can add dimension to your photos by controlling depth of field. At one extreme, aperture gives you a blurred background with a beautiful shallow focus effect. This is very popular for portrait photography.
At the other extreme, it will give you sharp photos from the nearby foreground to the distant horizon. Landscape photographers use this effect a lot.
On top of that, the aperture you choose also alters the exposure of your images by making them brighter or darker.
How Aperture Affects Exposure
Aperture has several effects on your photographs. Perhaps the most obvious is the brightness, or exposure, of your images. As aperture changes in size, it alters the overall amount of light that reaches your camera sensor – and therefore the brightness of your image.
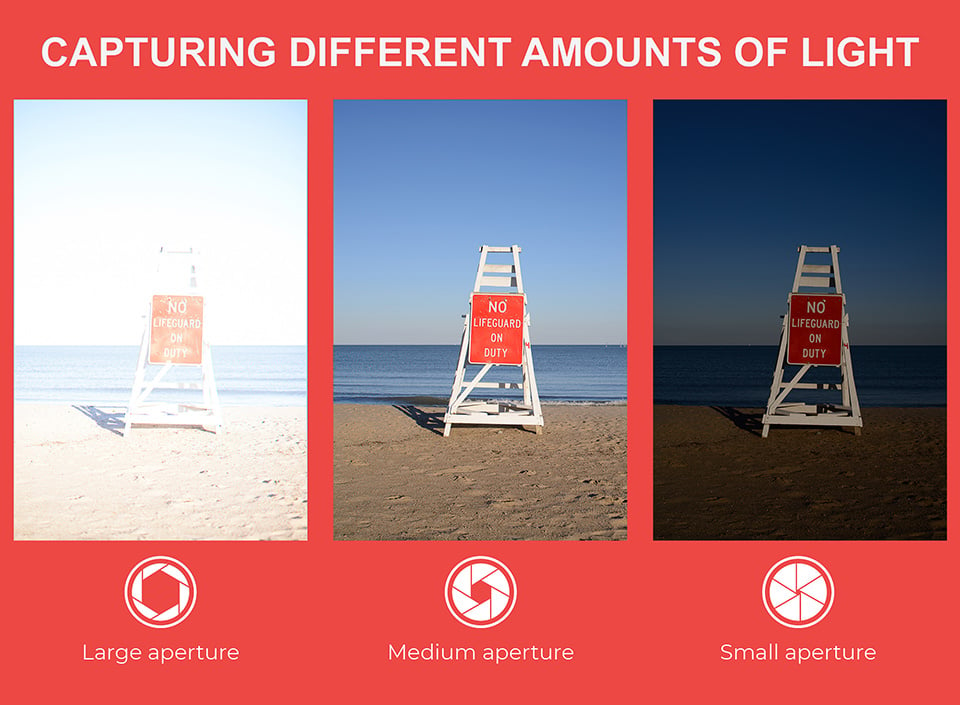
A large aperture (a wide opening) will pass a lot of light, resulting in a brighter photograph. A small aperture does just the opposite, making a photo darker. Take a look at the illustration below to see how it affects exposure:
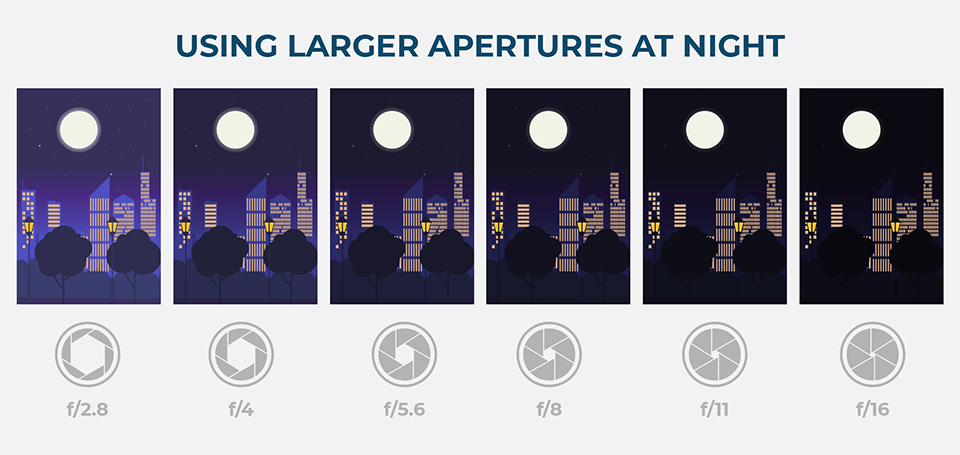
In a dark environment – such as indoors or at night – you will probably want to select a large aperture to capture as much light as possible. This is the same reason why people’s pupils dilate when it starts to get dark; pupils are the aperture of our eyes.
How Aperture Affects Depth of Field
The other critical effect of aperture is depth of field. Depth of field is the amount of your photograph that appears sharp from front to back. Some images have a “thin” or “shallow” depth of field, where the background is completely out of focus. Other images have a “large” or “high” depth of field, where both the foreground and background are sharp.
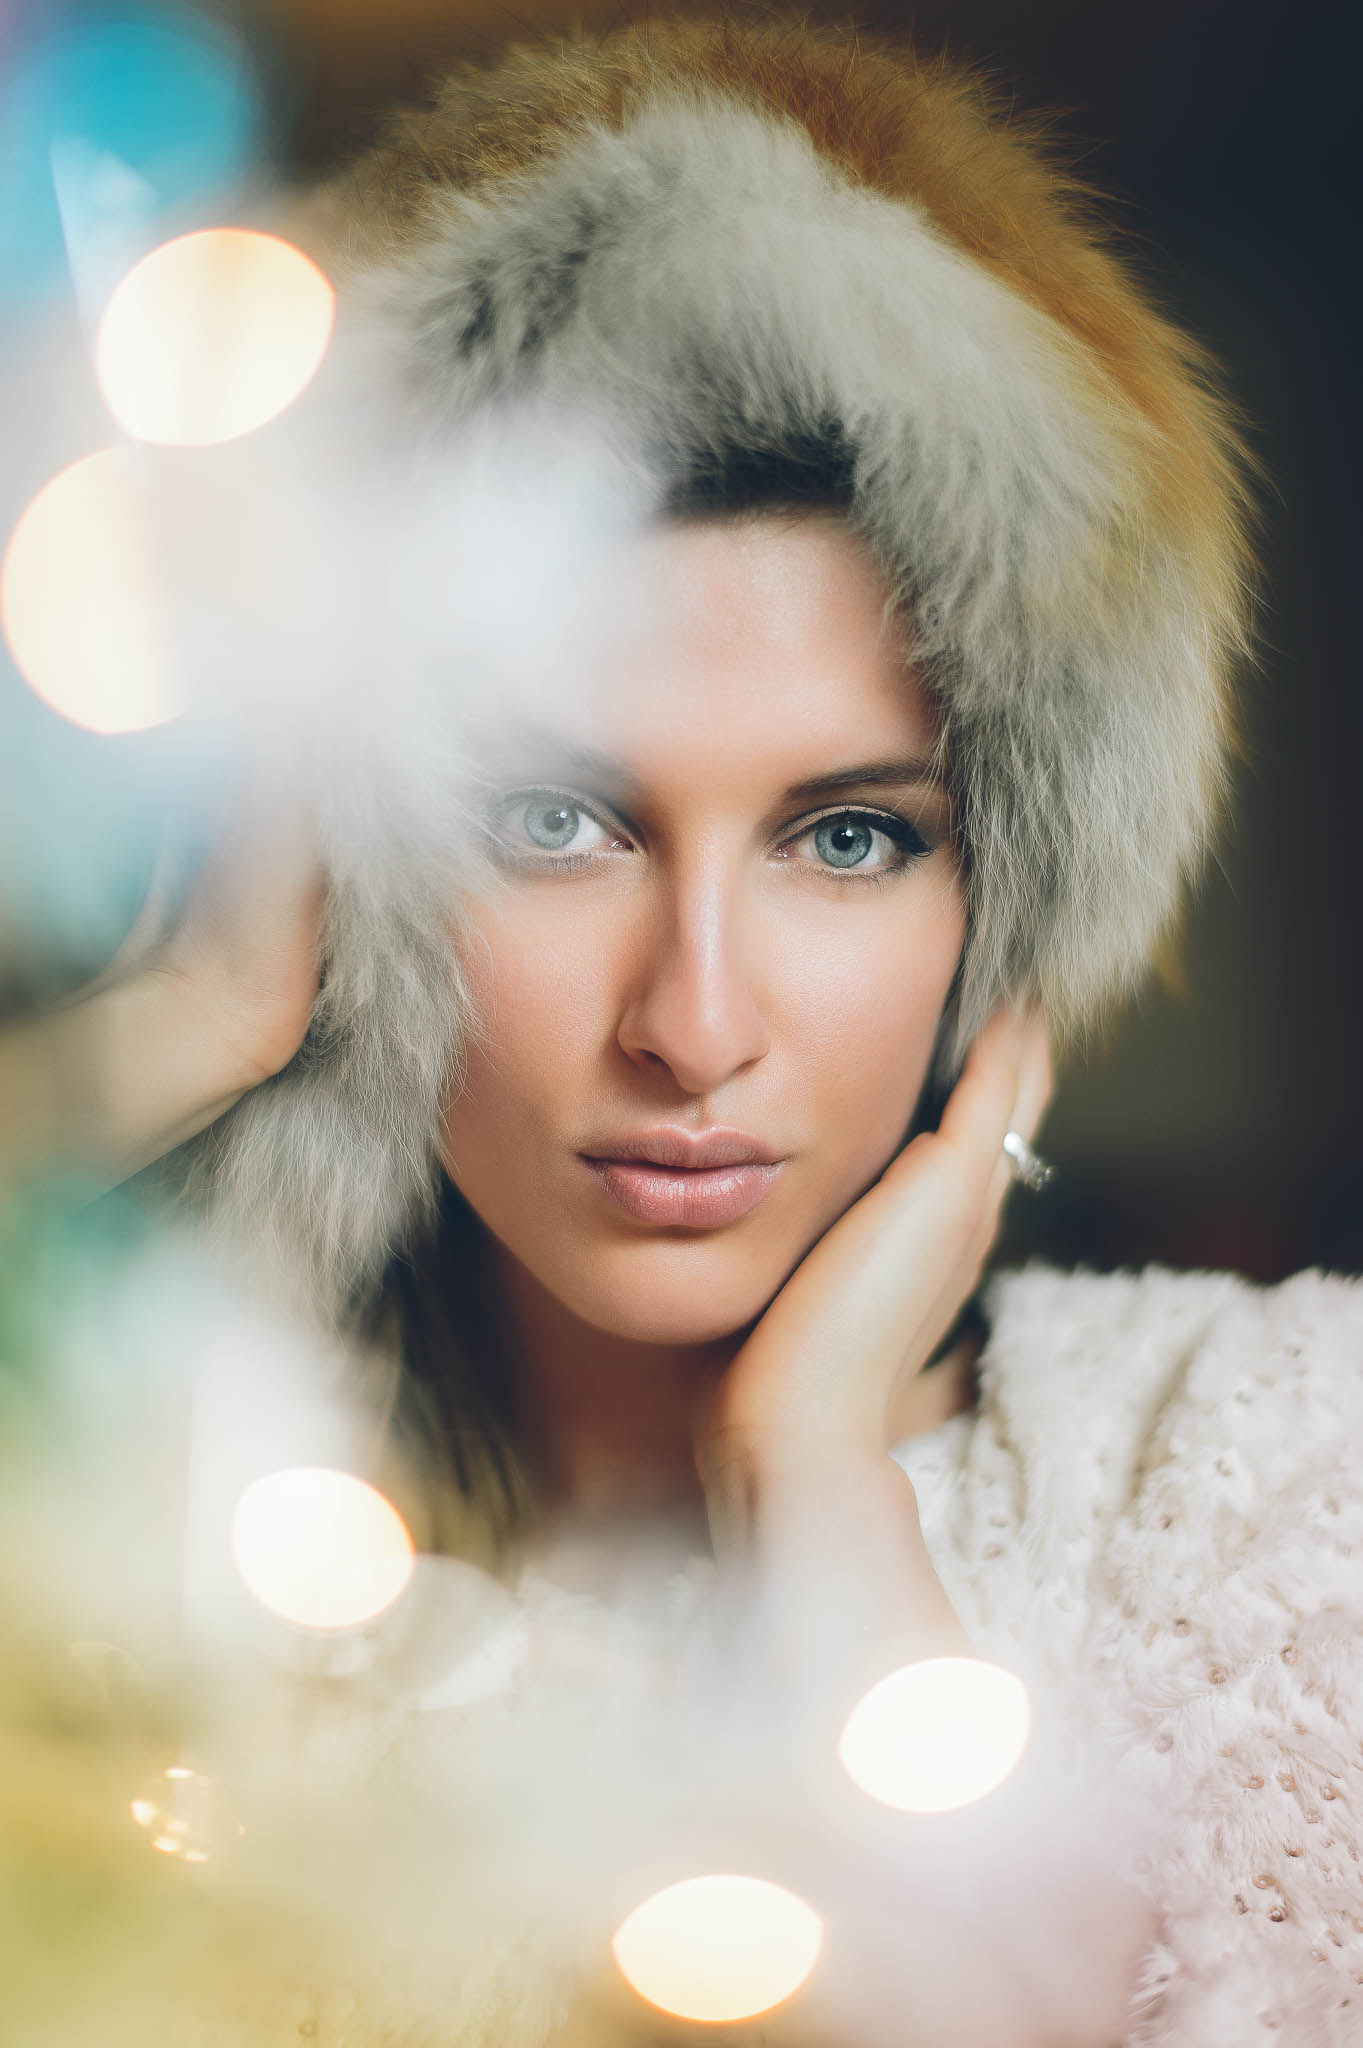
For example, here is an image with a shallow depth of field:

In the image above, you can see that the girl is in focus and appears sharp, while the background is completely out of focus. My choice of aperture played a big role here. I specifically used a large aperture in order to create a shallow focus effect (yes, the larger your aperture, the bigger this effect). This helped me bring the attention of the viewer to the subject, rather than busy background. Had I used a narrower aperture, the subject would not be separated from the background as effectively.
One trick to remember this relationship: a large aperture results in a large amount of both foreground and background blur. This is often desirable for portraits, or general photos of objects where you want to isolate the subject. Sometimes you can frame your subject with foreground objects, which will also look blurred relative to the subject, as shown in the example below:
Quick Note: The appearance of the out-of-focus areas (AKA whether it looks good or not) is often referred to as “bokeh“. Bokeh is the property of the lens, and some lenses have better bokeh than others. This article explains how to get better bokeh as a photographer. Even though some lenses are better than others, almost all lenses are capable of a nice shallow focus effect if you use a large aperture and get close enough to your subject.
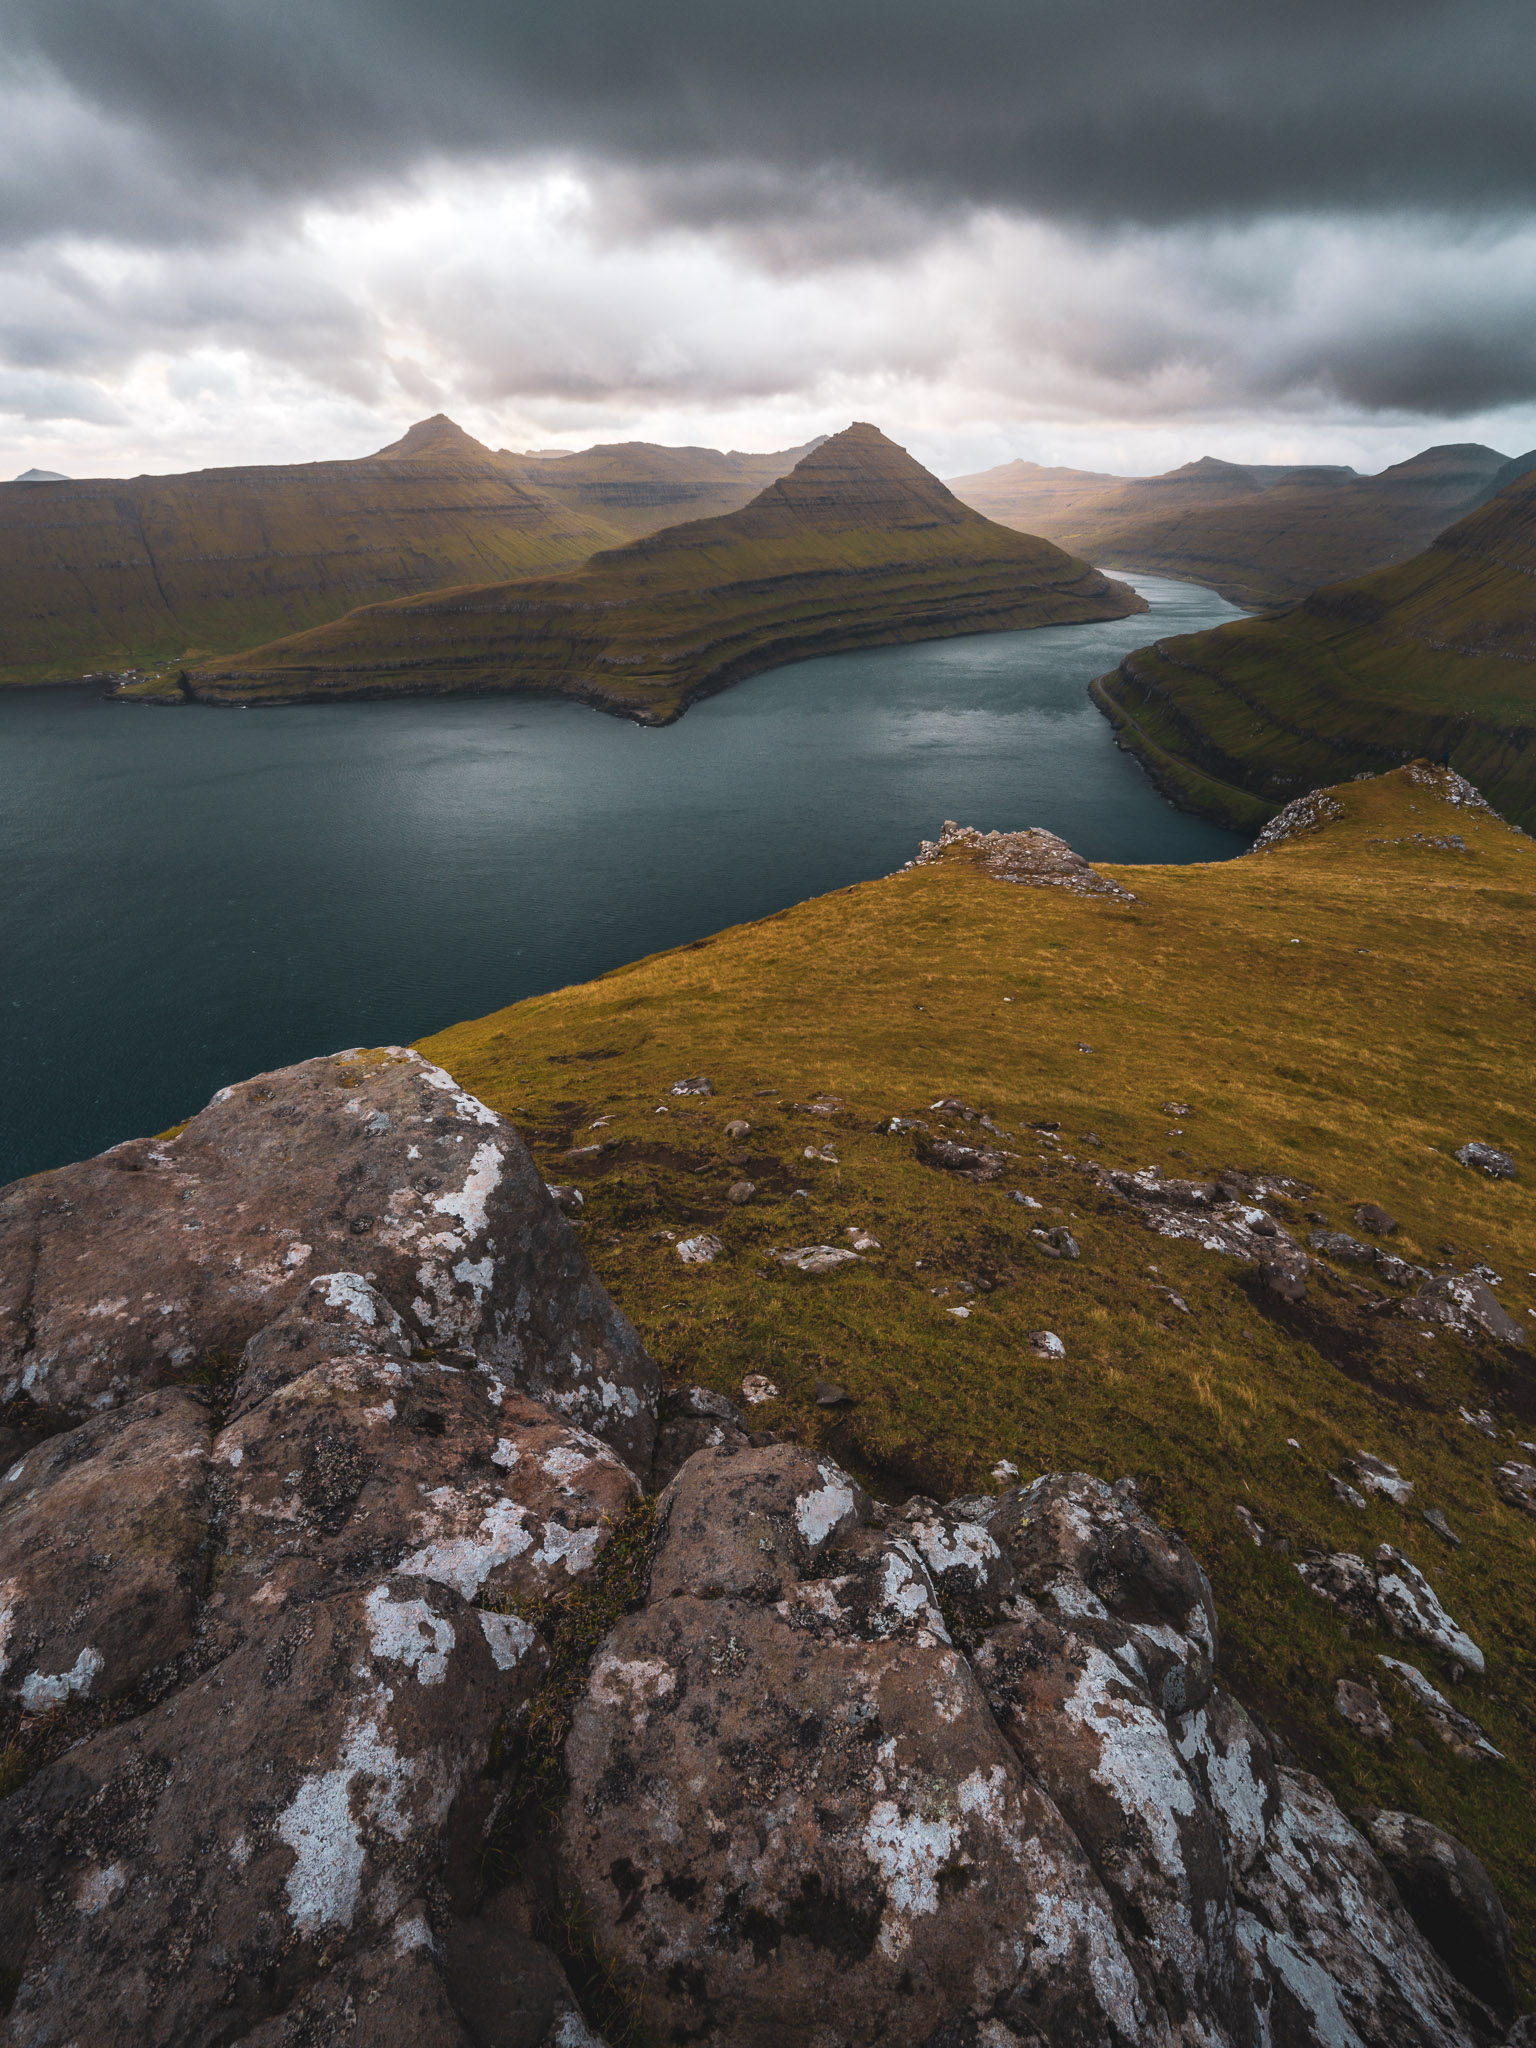
On the other hand, a small aperture results in a small amount of background blur, which is typically ideal for some types of photography such as landscape and architecture. In the landscape photo below, I used a small aperture to ensure that both my foreground and background were as sharp as possible from front to back:
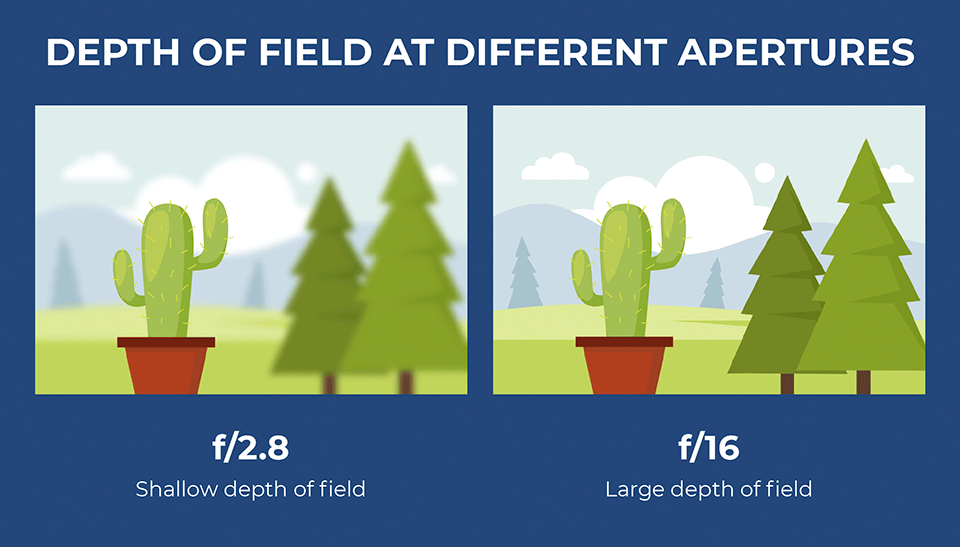
Here is a quick comparison that shows the difference between using a large vs a small aperture and what it does to your depth of field:
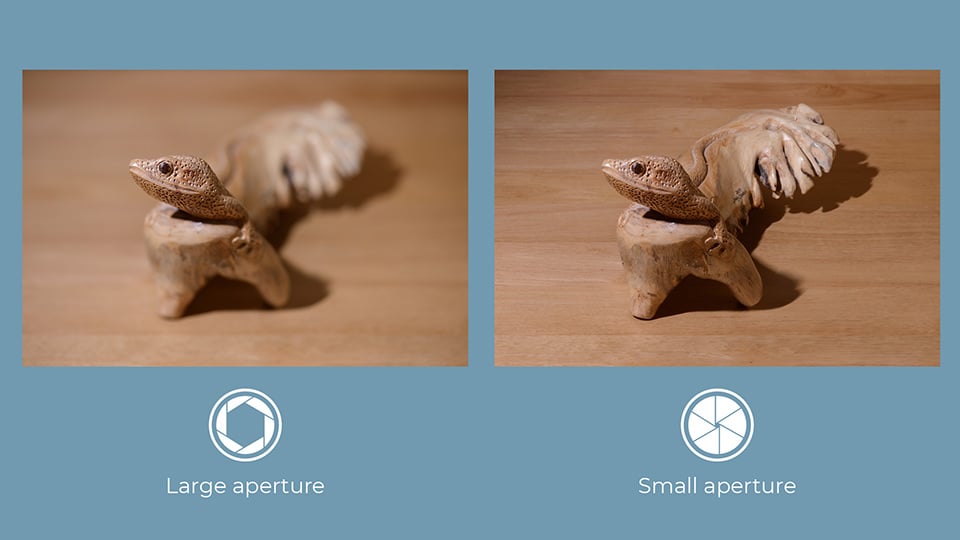
As you can see, in the photograph on the left, only the head of the lizard appears in focus and sharp, while the background and foreground are both transitioning into blur. Meanwhile, the photo on the right has everything from front to back appearing in focus. This is what using large vs small aperture does to photographs.
What Are F-Stop and F-Number?
So far, we have only discussed aperture in general terms like large and small. However, it can also be expressed as a number known as “f-number” or “f-stop”, with the letter “f” appearing before the number, such as f/8.
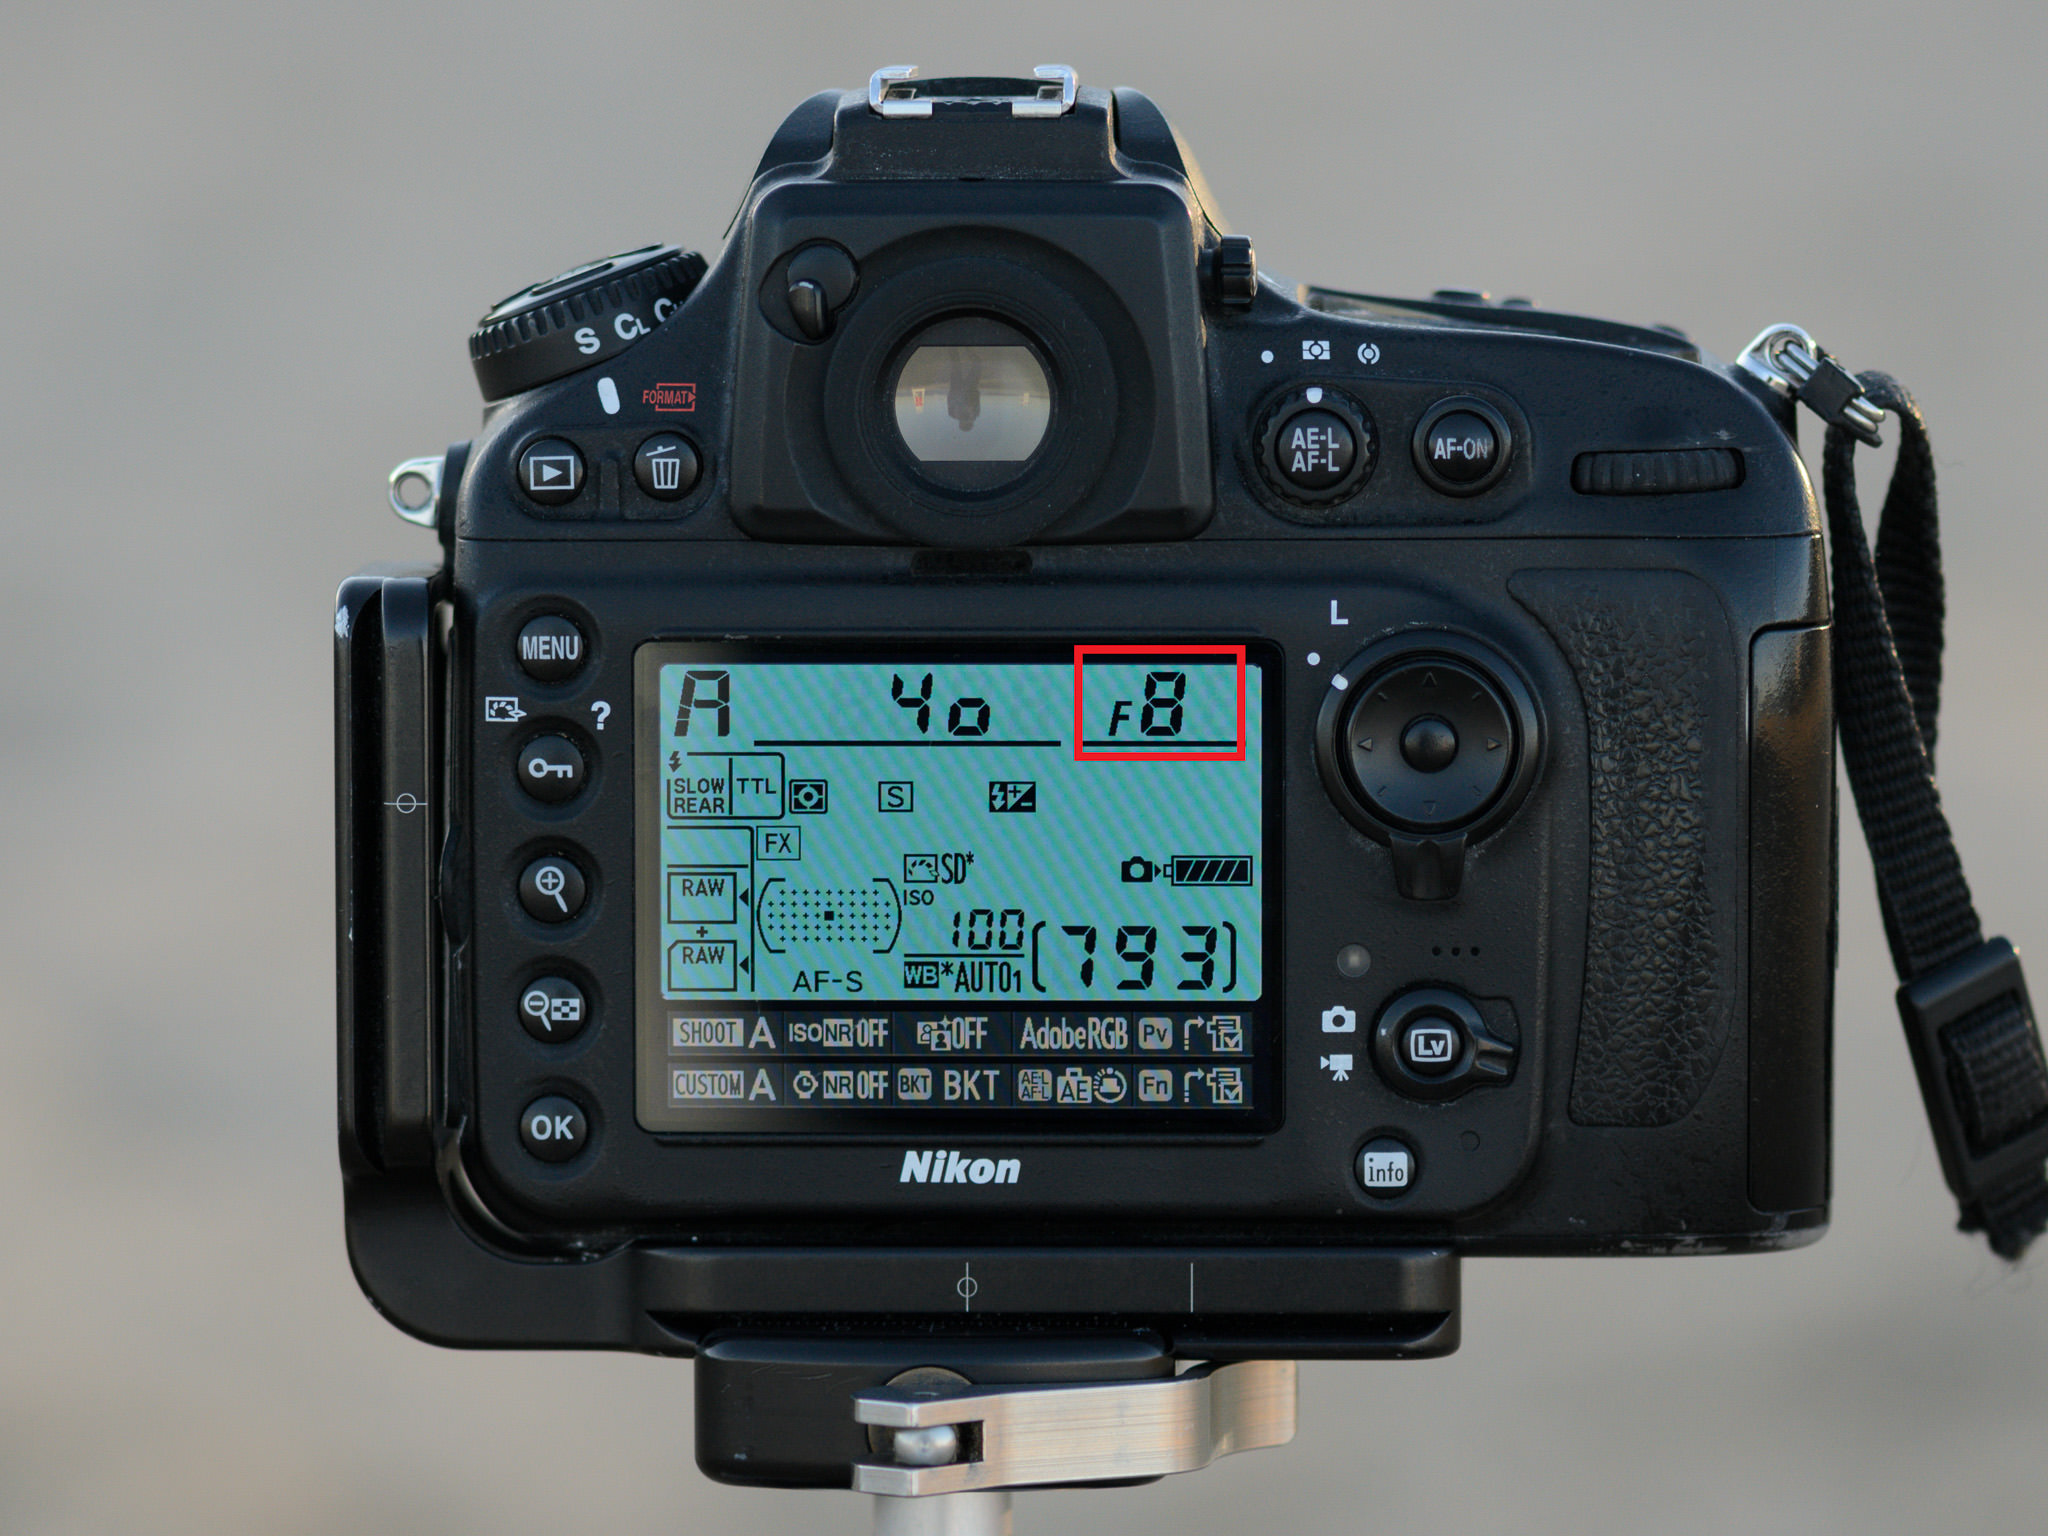
Most likely, you have noticed aperture written this way on your camera before. On your LCD screen or viewfinder, your aperture will usually look something like this: f/2, f/3.5, f/8, and so on. Some cameras omit the slash and write f-stops like this: f2, f3.5, f8, and so on. For example, the Nikon camera below is set to an aperture of f/8:
So, f-stops are a way of describing the size of the aperture for a particular photo. If you want to find out more about this subject, we have a comprehensive article on f-stop that explains why it’s written that way and is worth checking out.
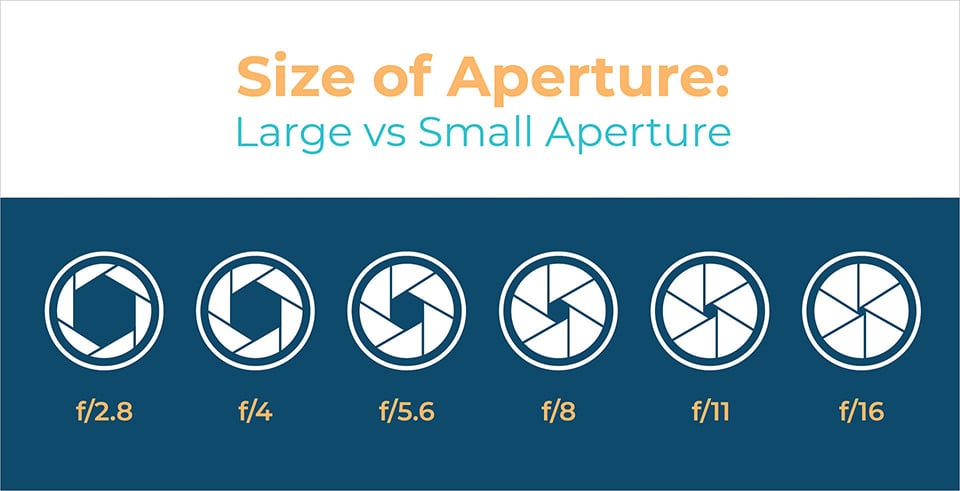
Large vs Small Aperture
There’s a catch – one important part of aperture that confuses beginning photographers more than anything else. This is something you really need to pay attention to and get correct: Small numbers represent large apertures, and large numbers represent small apertures!
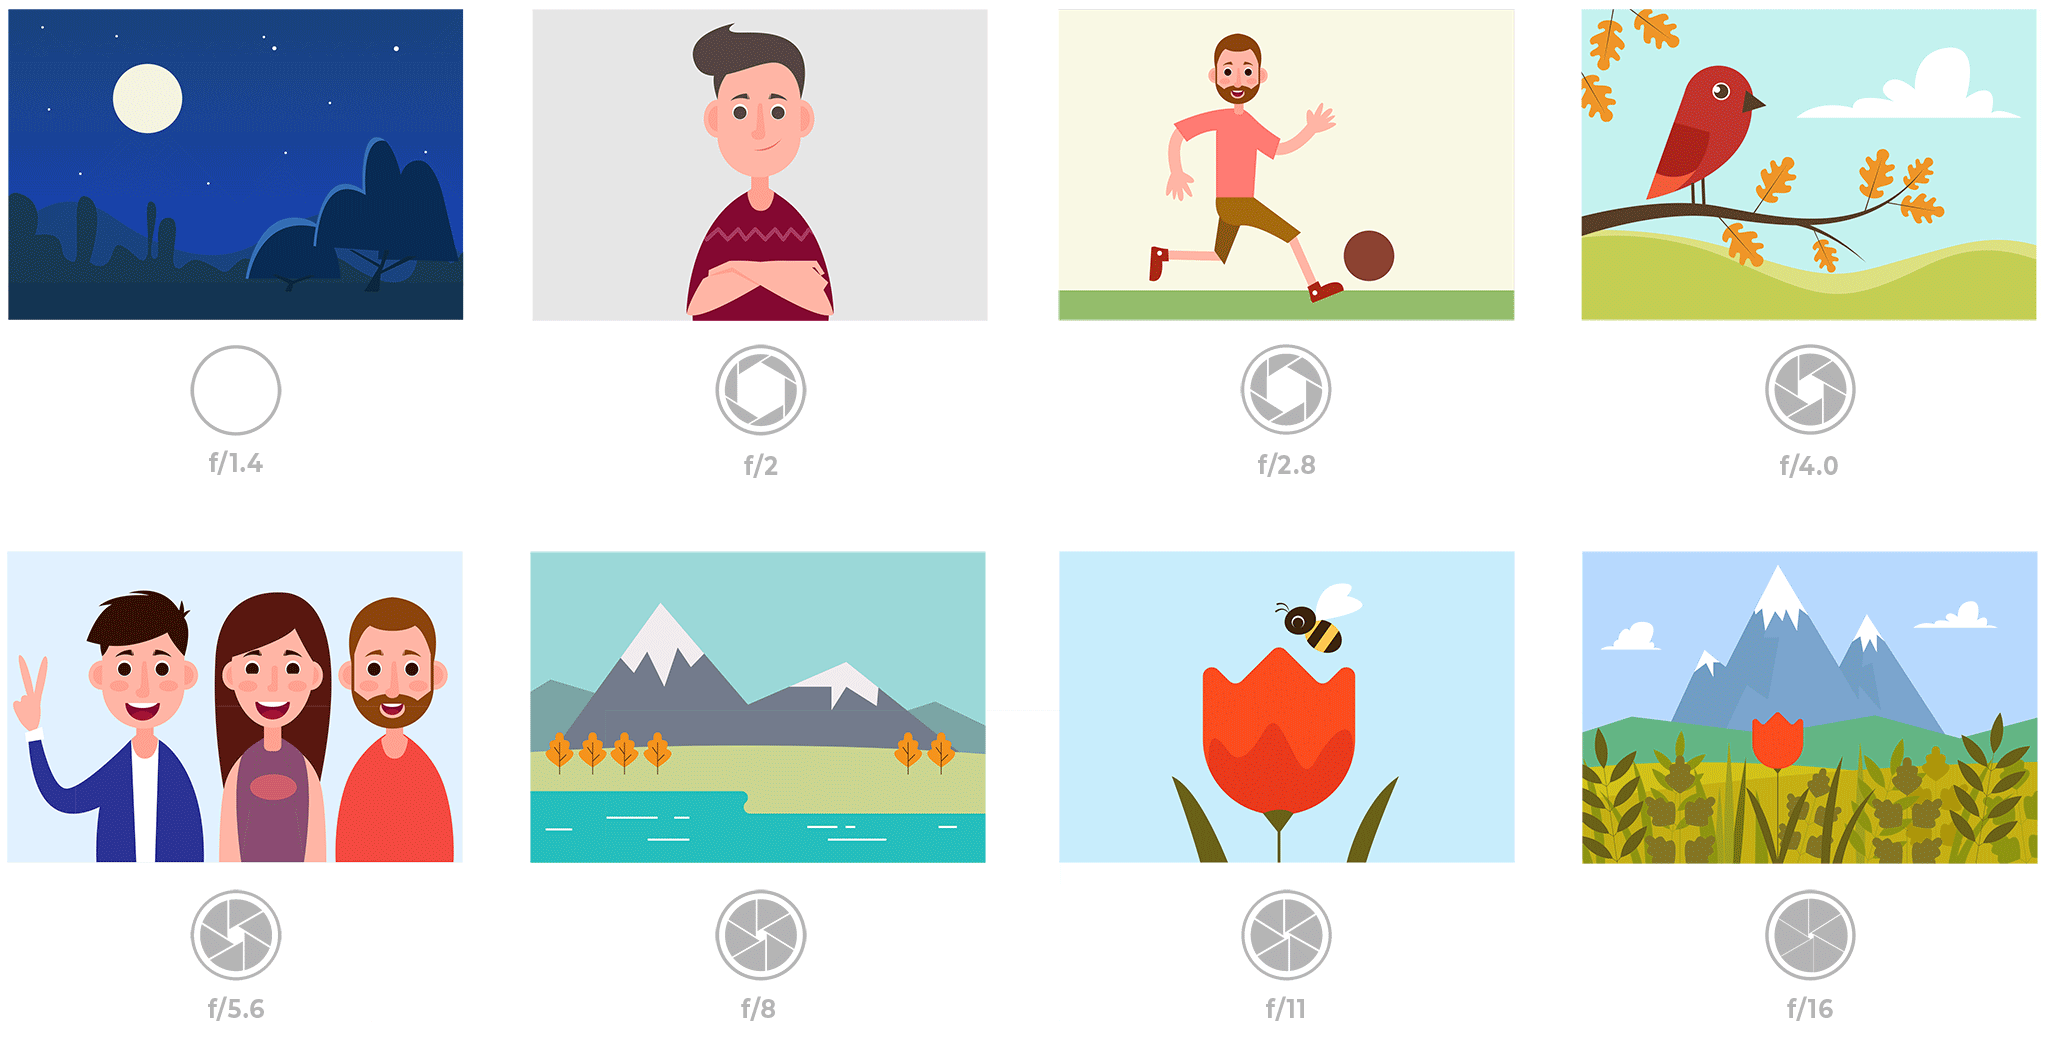
That’s not a typo. For example, f/2.8 is larger than f/4 and much larger than f/11. Most people find this awkward, since it goes against our basic intuition. Nevertheless, this is a fact of photography. Take a look at this chart:
This causes a huge amount of confusion among photographers, because it’s completely the reverse of what you would expect at first. However, there is a reasonable and simple explanation that should make it much clearer to you: Aperture is a fraction.
When you are dealing with an f-stop of f/16, for example, you can think of it like the fraction 1/16th. Hopefully, you already know that a fraction like 1/16 is clearly much smaller than the fraction 1/4. For this exact reason, an aperture of f/16 is smaller than f/4. Looking at the front of your camera lens, this is what you’d see:
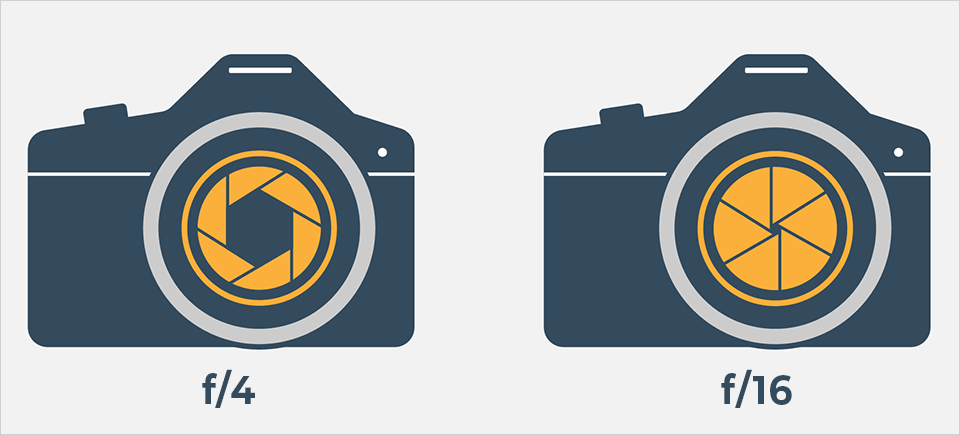
So, if photographers recommend a large aperture for a particular type of photography, they’re telling you to use something like f/1.4, f/2, or f/2.8. And if they suggest a small aperture for one of your photos, they’re recommending that you use something like f/8, f/11, or f/16.
How to Pick the Right Aperture
Now that you’re familiar with large vs small apertures, how do you know what aperture to use for your photos? Let’s revisit two of the most important effects of aperture: exposure and depth of field. First, here is a quick diagram to refresh your memory on how aperture affects the exposure of an image:
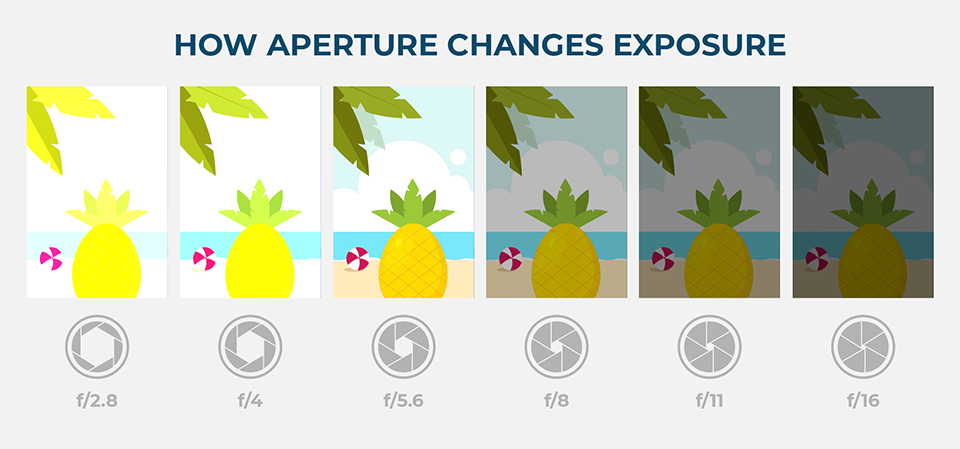
If you’ve read the prior chapter in our Photography Basics guide covering shutter speed, you already know that aperture isn’t the only way to change how bright a photo is. Nevertheless, it plays an important role. In the graphic above, if I didn’t allow myself to change any other camera settings like shutter speed or ISO, the optimal aperture would be f/5.6.
In a darker environment, where you aren’t capturing enough light, the optimal aperture would change. For example, you may want to use a large aperture like f/2.8 at night, just like how our eye’s pupils dilate to capture every last bit of light:
As for depth of field, recall that a large aperture value like f/2.8 will result in a large amount of background blur (ideal for shallow focus portraits), while values like f/8, f/11, or f/16 will give you a lot more depth of field (ideal for landscapes and architectural photography).
In fact, depth of field is the part of aperture that I recommend thinking about the most. My process for almost every photo I take goes like this:
- Ask myself how much depth of field I want
- Set an aperture that achieves it
- Set a shutter speed that makes my photo the proper brightness
- If that shutter speed leads to unsharp photos thanks to too much motion blur, dial back the shutter speed and raise my ISO instead
- Win photo contest :)
Here is a quick chart that lays out everything we’ve covered so far:
| Aperture Size | Exposure | Depth of Field | |
|---|---|---|---|
| f/1.4 | Very large | Lets in a lot of light | Very thin |
| f/2.0 | Large | Half as much light as f/1.4 | Thin |
| f/2.8 | Large | Half as much light as f/2 | Thin |
| f/4.0 | Moderate | Half as much light as f/2.8 | Moderately thin |
| f/5.6 | Moderate | Half as much light as f/4 | Moderate |
| f/8.0 | Moderate | Half as much light as f/5.6 | Moderately large |
| f/11.0 | Small | Half as much light as f/8 | Large |
| f/16.0 | Small | Half as much light as f/11 | Large |
| f/22.0 | Very small | Half as much light as f/16 | Very large |
Setting Aperture in Your Camera
If you haven’t guessed it already, we highly recommend selecting your aperture manually as a photographer. If you allow the camera to set it automatically, you are likely to end up with the completely wrong depth of field in your image.
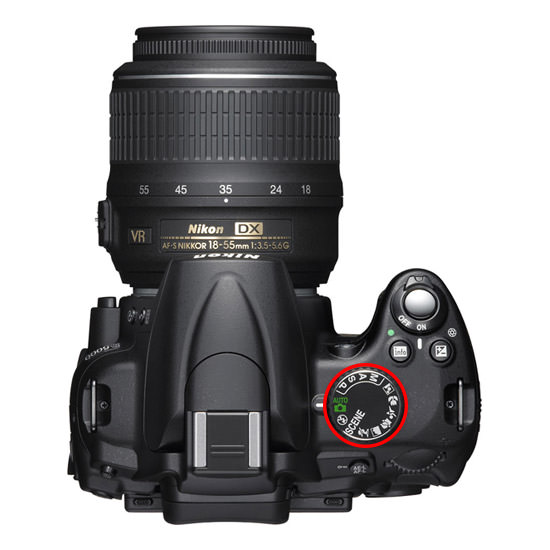
There are two modes in photography which allow you to select the aperture manually. These are aperture-priority mode and manual mode. Aperture-priority mode is written as “A” or “Av” on most cameras, while manual is written as “M.” Usually, you can find these on the top dial of your camera (read more also in our article on camera modes):
In aperture-priority mode, you select the desired aperture, and the camera automatically selects your shutter speed. You can select ISO manually or automatically. Aperture priority mode is great for everyday photography, where you rarely need to worry about any camera settings other than aperture. It’s what I use 95% of the time even for professional landscape and portrait photography.
In manual mode, you select both aperture and shutter speed manually. (ISO can again be manual or auto.) Manual mode takes more time and usually gives you the same results as aperture priority anyway. It’s only needed in special situations where you need a consistent exposure from shot to shot, or when the camera’s meter is messing up. I use it for Milky Way photography and for portraiture with flash.
Minimum and Maximum Aperture of Lenses
Every lens has a limit on how large or how small the aperture can get. If you take a look at the specifications of your lens, it should say what the maximum and minimum apertures are. For almost everyone, the maximum aperture will be more important, because it tells you how much light the lens can gather at its maximum (basically, how dark of an environment you can take photos – and how much of a shallow focus effect you can achieve).
A lens that has a maximum aperture of f/1.4 or f/1.8 is considered to be a “fast” lens, because it can pass through more light than, for example, a lens with a “slow” maximum aperture of f/4.0. That’s why lenses with large apertures usually cost more.
By comparison, the minimum aperture is not that important, because almost all modern lenses can provide at least f/16 at the minimum. You will rarely need anything smaller than that for day-to-day photography.
With some zoom lenses, the maximum aperture will change as you zoom in and out. For example, with the Nikon 18-55mm f/3.5-5.6 AF-P lens, the largest aperture shifts gradually from f/3.5 at the wide end to just f/5.6 at the longer focal lengths. More expensive zooms tend to maintain a constant maximum aperture throughout their zoom range, like the Nikon 24-70mm f/2.8. Prime lenses also tend to have larger maximum apertures than zoom lenses, which is one of their major benefits.
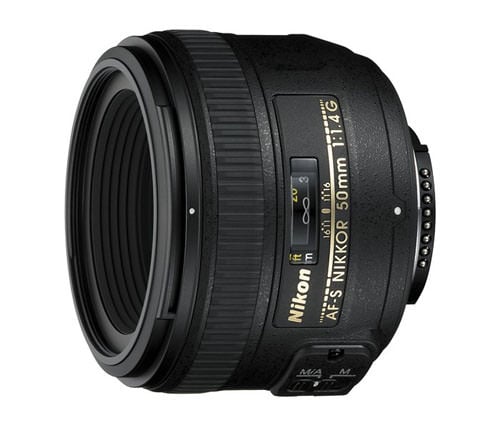
The maximum aperture of a lens is so important that it’s included in the name of the lens itself. Sometimes, it will be written with a colon rather than a slash, but it means the same thing (like the Nikon 50mm 1:1.4G below).
Examples of Which Aperture to Use
Now that we have gone through a thorough explanation of how aperture works and how it affects your images, let’s take a look at the situations where you’d want to use various f-stops.
- f/0.95 – f/1.4 – Such “fast” maximum apertures are only available on premium prime lenses, allowing them to gather as much light as possible. This makes them ideal for any kind of low-light photography (such as photographing the night sky, wedding receptions, portraits in dimly-lit rooms, corporate events, etc). With such wide f-stops, you will get very shallow depth of field at close distances, where the subject will appear separated from the background.
- f/1.8 – f/2.0 – Some enthusiast-grade prime lenses are limited to f/1.8, which still has very good low-light capabilities. Also, if your purpose is to yield aesthetically-pleasing images with shallow focus, these lenses be of tremendous value. Shooting between f/1.8 and f/2 typically turns your backgrounds nice and creamy for portraiture and other similar types of photography.
- f/2.8 – f/4 – Most zoom lenses are limited to a maximum aperture of f/2.8 to f/4 at best. While they are not as capable as f/1.4 lenses in terms of light-gathering capabilities, they are still enough to shoot in reasonably low light conditions, especially if the lens or camera has image stabilization. You’ll get some subject separation at these apertures, but usually not enough to make the background completely fuzzy. Such apertures are great for travel, sports, and wildlife photography.
- f/5.6 – f/8 – This is the right starting point for most landscape and architectural photography. It’s also ideal for documentary and portrait photography where you don’t want a blurry background. Also, most lenses are sharpest around f/5.6, which doesn’t matter as much as getting the right depth of field, but is still nice.
- f/11 – f/16 – Typically used for photographing scenes where as much depth of field as possible is needed, like macro photography or landscape photography with a nearby foreground. Even though these apertures offer more depth of field, they do lose some low-level sharpness due to the effect of lens diffraction.
- f/22 and smaller – Only shoot at such small apertures if you know what you are doing. Sharpness suffers greatly at f/22 and smaller apertures because of diffraction, so you should avoid using them when possible. If you need to get more depth of field, it is usually best to move away from your subject or use a focus stacking technique instead.
What Else Does Aperture Do?
Technically, aperture affects more than just exposure and depth of field. Those are certainly the biggest effects, and they are the main ones that you need to know for now. However, if you want to dive deeper into this topic, I have a full article on everything else aperture does, which covers things like diffraction and other characteristics in detail.
A Chart of What Aperture Does
If it helps, I compiled the main information in this article into a chart. This chart covers the most important effects of aperture in photography, as well as common terms that photographers use to describe their settings.
Note that to make this diagram easier to see, I did not darken or lighten any of the sample illustrations (as would occur in the real world). Instead, I simply wrote “brightest” through “darkest”:
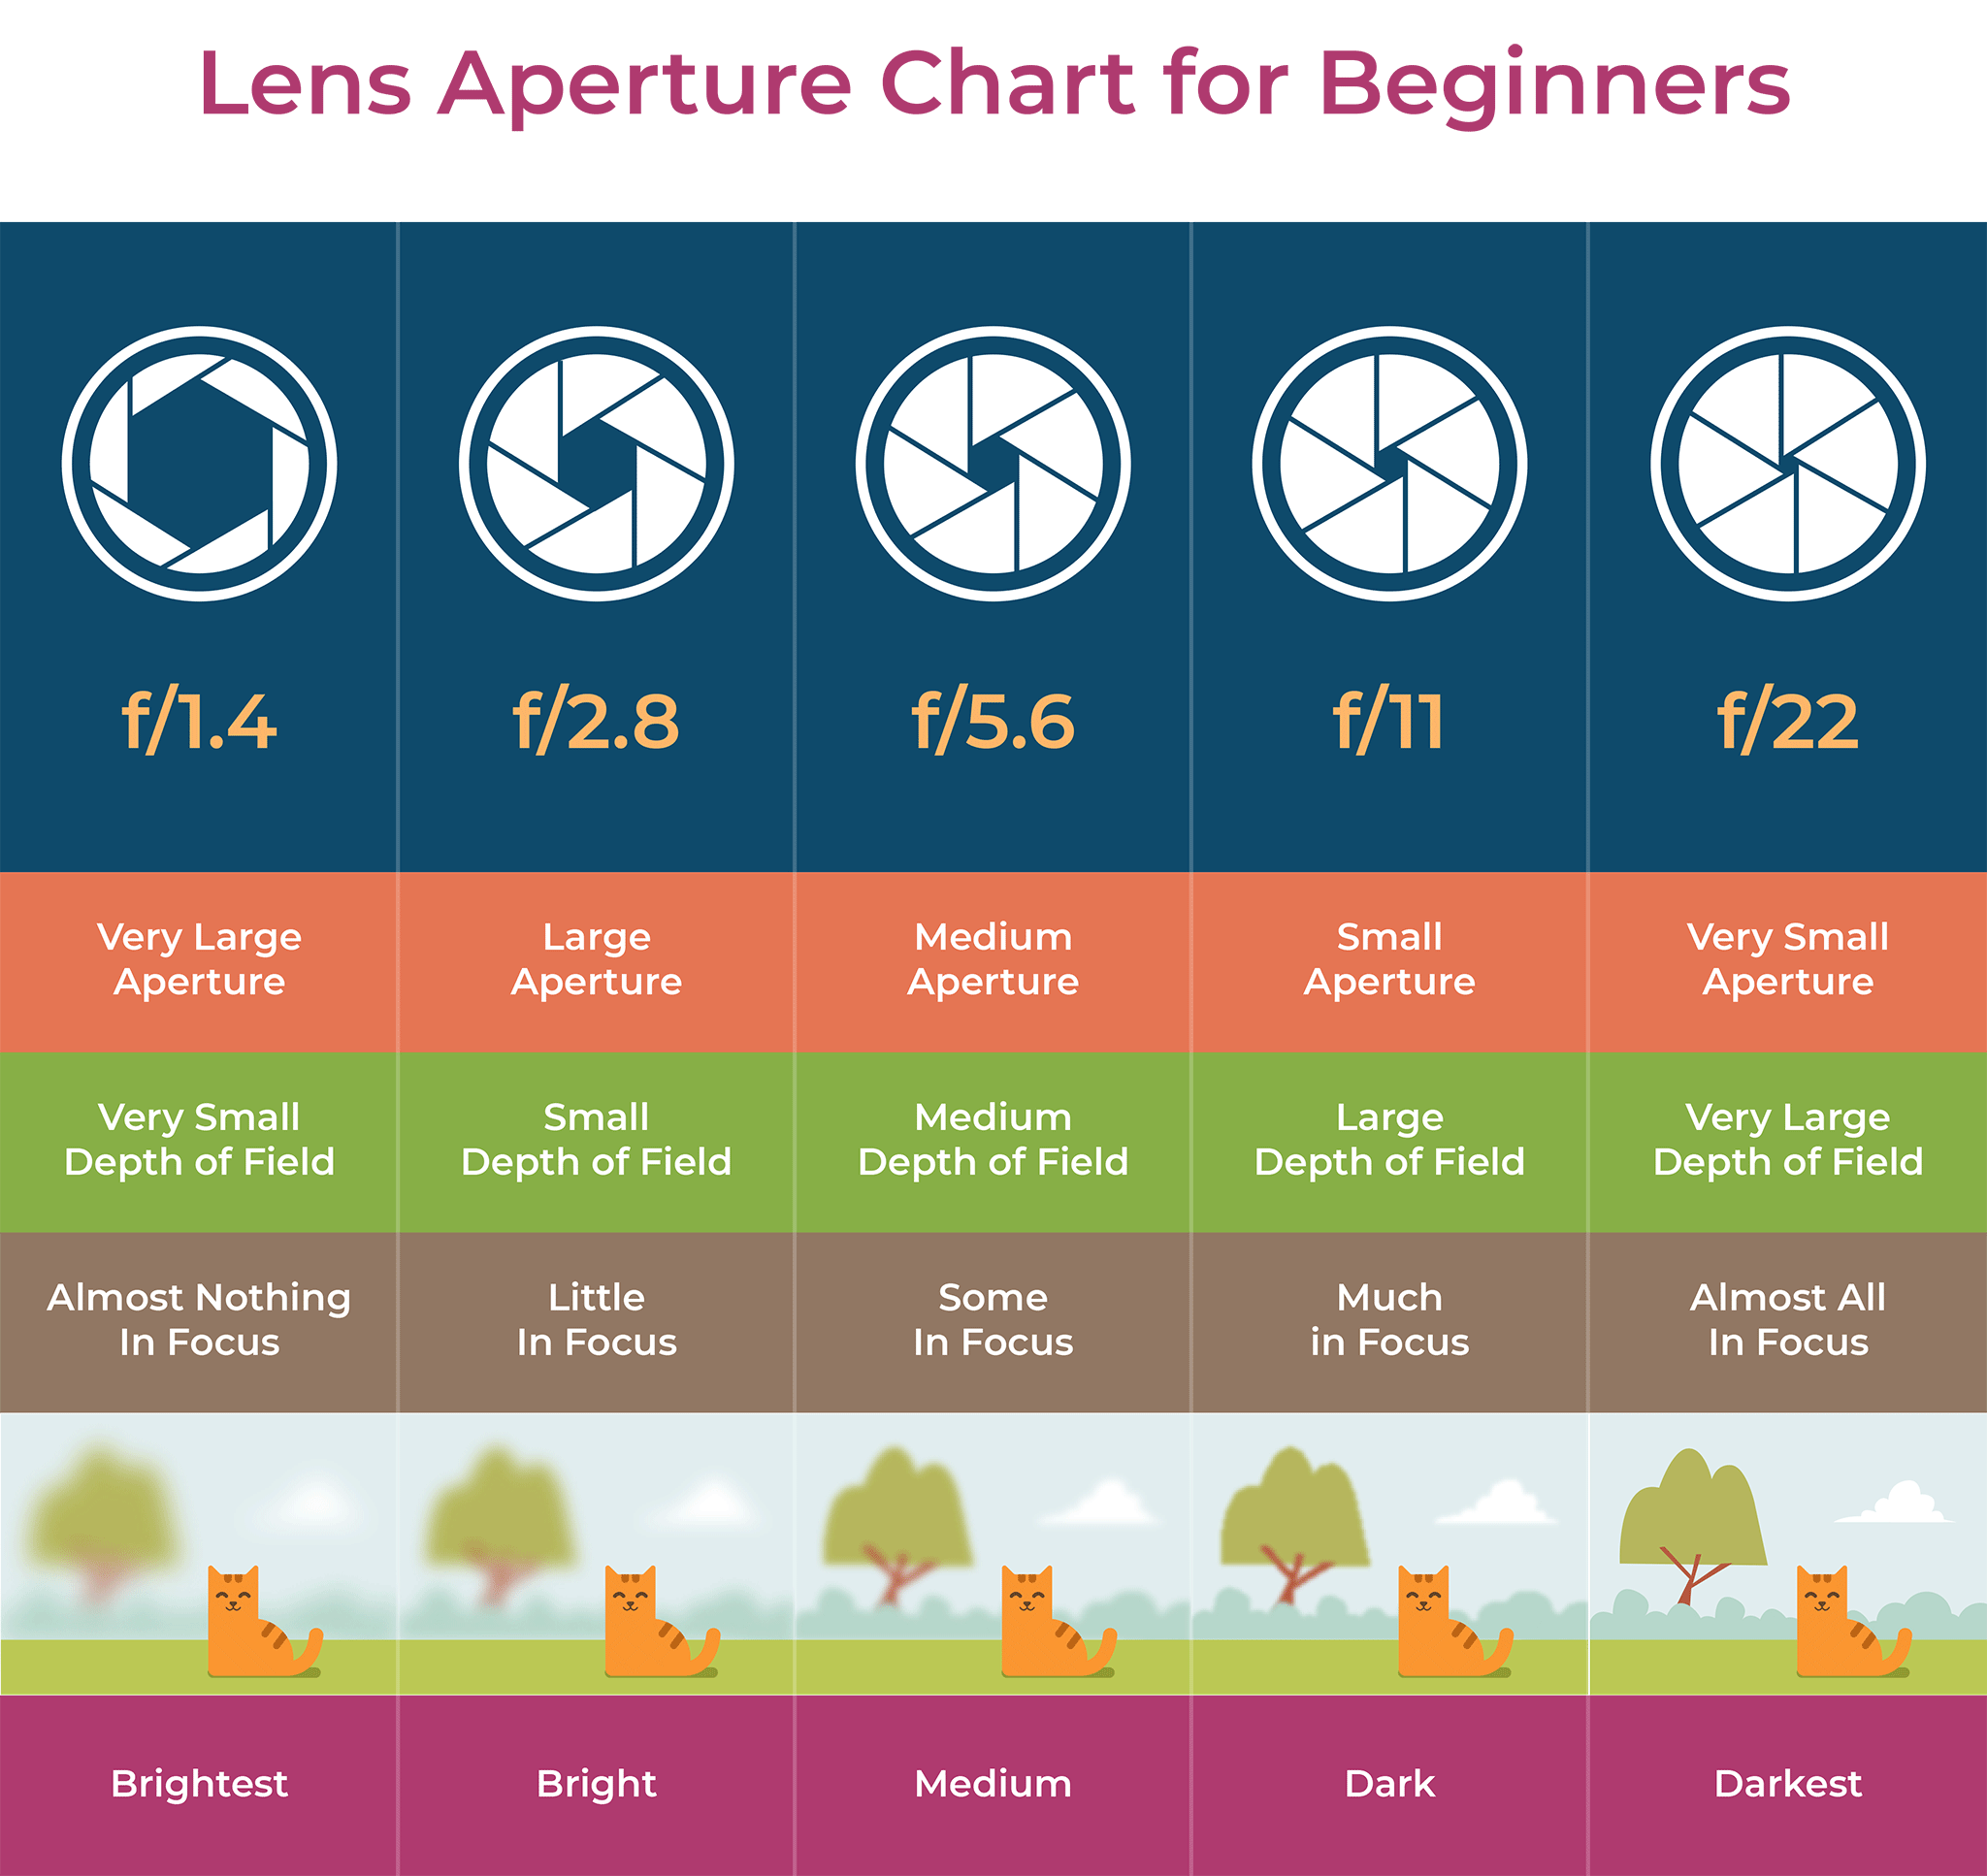
Although this chart is intentionally simplified, it covers all the basics that you need to know. Feel free to download and print this chart if you find it useful. Just right-click on the image, then select “save as,” and pick the location where you want to store it.
Aperture Explained in Video
If you prefer to understand how aperture works visually, I put together a video for you that goes through most of the basics. In the video, I’ve discussed what aperture is, how it works, and every effect that aperture has in photography (including a few smaller effects beyond just exposure and depth of field).
Summary
Aperture is clearly a crucial setting in photography and it is possibly the single most important setting of all. Aperture affects several different parts of your photo, but you’ll get the hang of everything fairly quickly.
With how important aperture is, it shouldn’t be a surprise that, at Photography Life, we shoot in aperture-priority or manual mode all of the time. We simply never want the camera to select the aperture for us. It’s just too important, and it is one of those basic settings that every beginner or advanced photographer needs to know in order to take the best possible images.
Hopefully, you found that this article explains the basics of aperture in a way that is understandable and straightforward.
If you are ready to move on, the next important camera setting to learn is ISO, which we explain in Chapter 5 of our Photography Basics guide.
Download as an eBook
I’ve received many requests over the years to download Photography Basics for offline viewing. As of 2025, I’m excited to announce that I now have a dedicated eBook version of Photography Basics! The eBook covers the same information but is optimized for offline reading/printing, with a beautiful design and updated text. Photography Life members get this eBook included with their membership ($5/month, cancellable any time) alongside a lot of other benefits – including a Q&A group if you have questions about the topics I’ve covered in these articles. You can read more information about our memberships here.

I cannot overstate how much you have helped me take better photos, both technically and aesthetically. I attended an in-person class here in Denver over a year ago, and while it was helpful, your information and tutorials has given me much more confidence and determination to (I hope) become a great photographer. Thank you.
thanks for the awesome information
Incredibly helpful. Just getting back into photography after years away and this was a great refresher. I look forward to reviewing your reviews for equipment as I hope to upgrade from my cellphone camera.
BEST article.
Thank you very much. This is one of the best tutorials 🙏👍
Thanks for the writers.
Thanks for the article; even when facts aren’t new to me, I find it useful to read them anyway, as doing so cements my understanding. What I don’t understand, given what you and everybody always say about f/22 and smaller (the reason I turned to your article) is: given the sharpness problems, what uses does it have, and why do the manufacturers go that small if nobody is going to use smaller than f/16 due to diffraction issues. Surely it has some good purpose. Or????
Brilliantly comprehensive but digestible at the same time. Not to mention a fun read as well.
Thank you so much.
I have been taking photos for a few years and recently recognized that my photography is getting sloppy and that I am frequently just taking snapshots. Therefore, I decided to go back and review/relearn the basics. I found your site by happenstance and just completed “Understanding Aperture in Photography”, which I found it to be excellent 👌 and am looking forward continuing my re-education by completing additional modules in the course of learning you have provided. Thank you!
Thanks a lot for your work and technical information support.