Anamorphic lenses can offer a unique look both for photos and videos, but they’re unusual to work with and require special post-processing care. Some recent anamorphic lenses have made them less expensive than ever before. So, is now the time to look at adding an anamorphic lens to your bag?
In this article, I’ll explain everything you need to know about anamorphic lenses for videography and for still photos.
Table of Contents
What Is an Anamorphic Lens?
Typical photographic lenses are designed to minimize distortion. One exception is a fisheye lens. Another exception is an anamorphic lens.
Unlike a fisheye, anamorphic lenses keep straight lines straight. Instead, anamorphic lenses “squeeze” an image from left to right. Uncorrected photos from anamorphic lenses look like this:

Notice how the photo looks like it’s been squeezed from left to right? That’s a feature of anamorphic lenses, not a bug! It’s the whole reason to get one of these lenses in the first place.
After correcting the image by stretching it back out, you’d have more of a panoramic aspect ratio on your hands:

Unlike the distortion you’d commonly read about in lens reviews, anamorphic lens distortion is purposeful – it essentially allows you to film or photograph with a different aspect ratio from the camera sensor itself. (There are a few other unique effects of anamorphic lenses on your photos, which we’ll discuss later.)
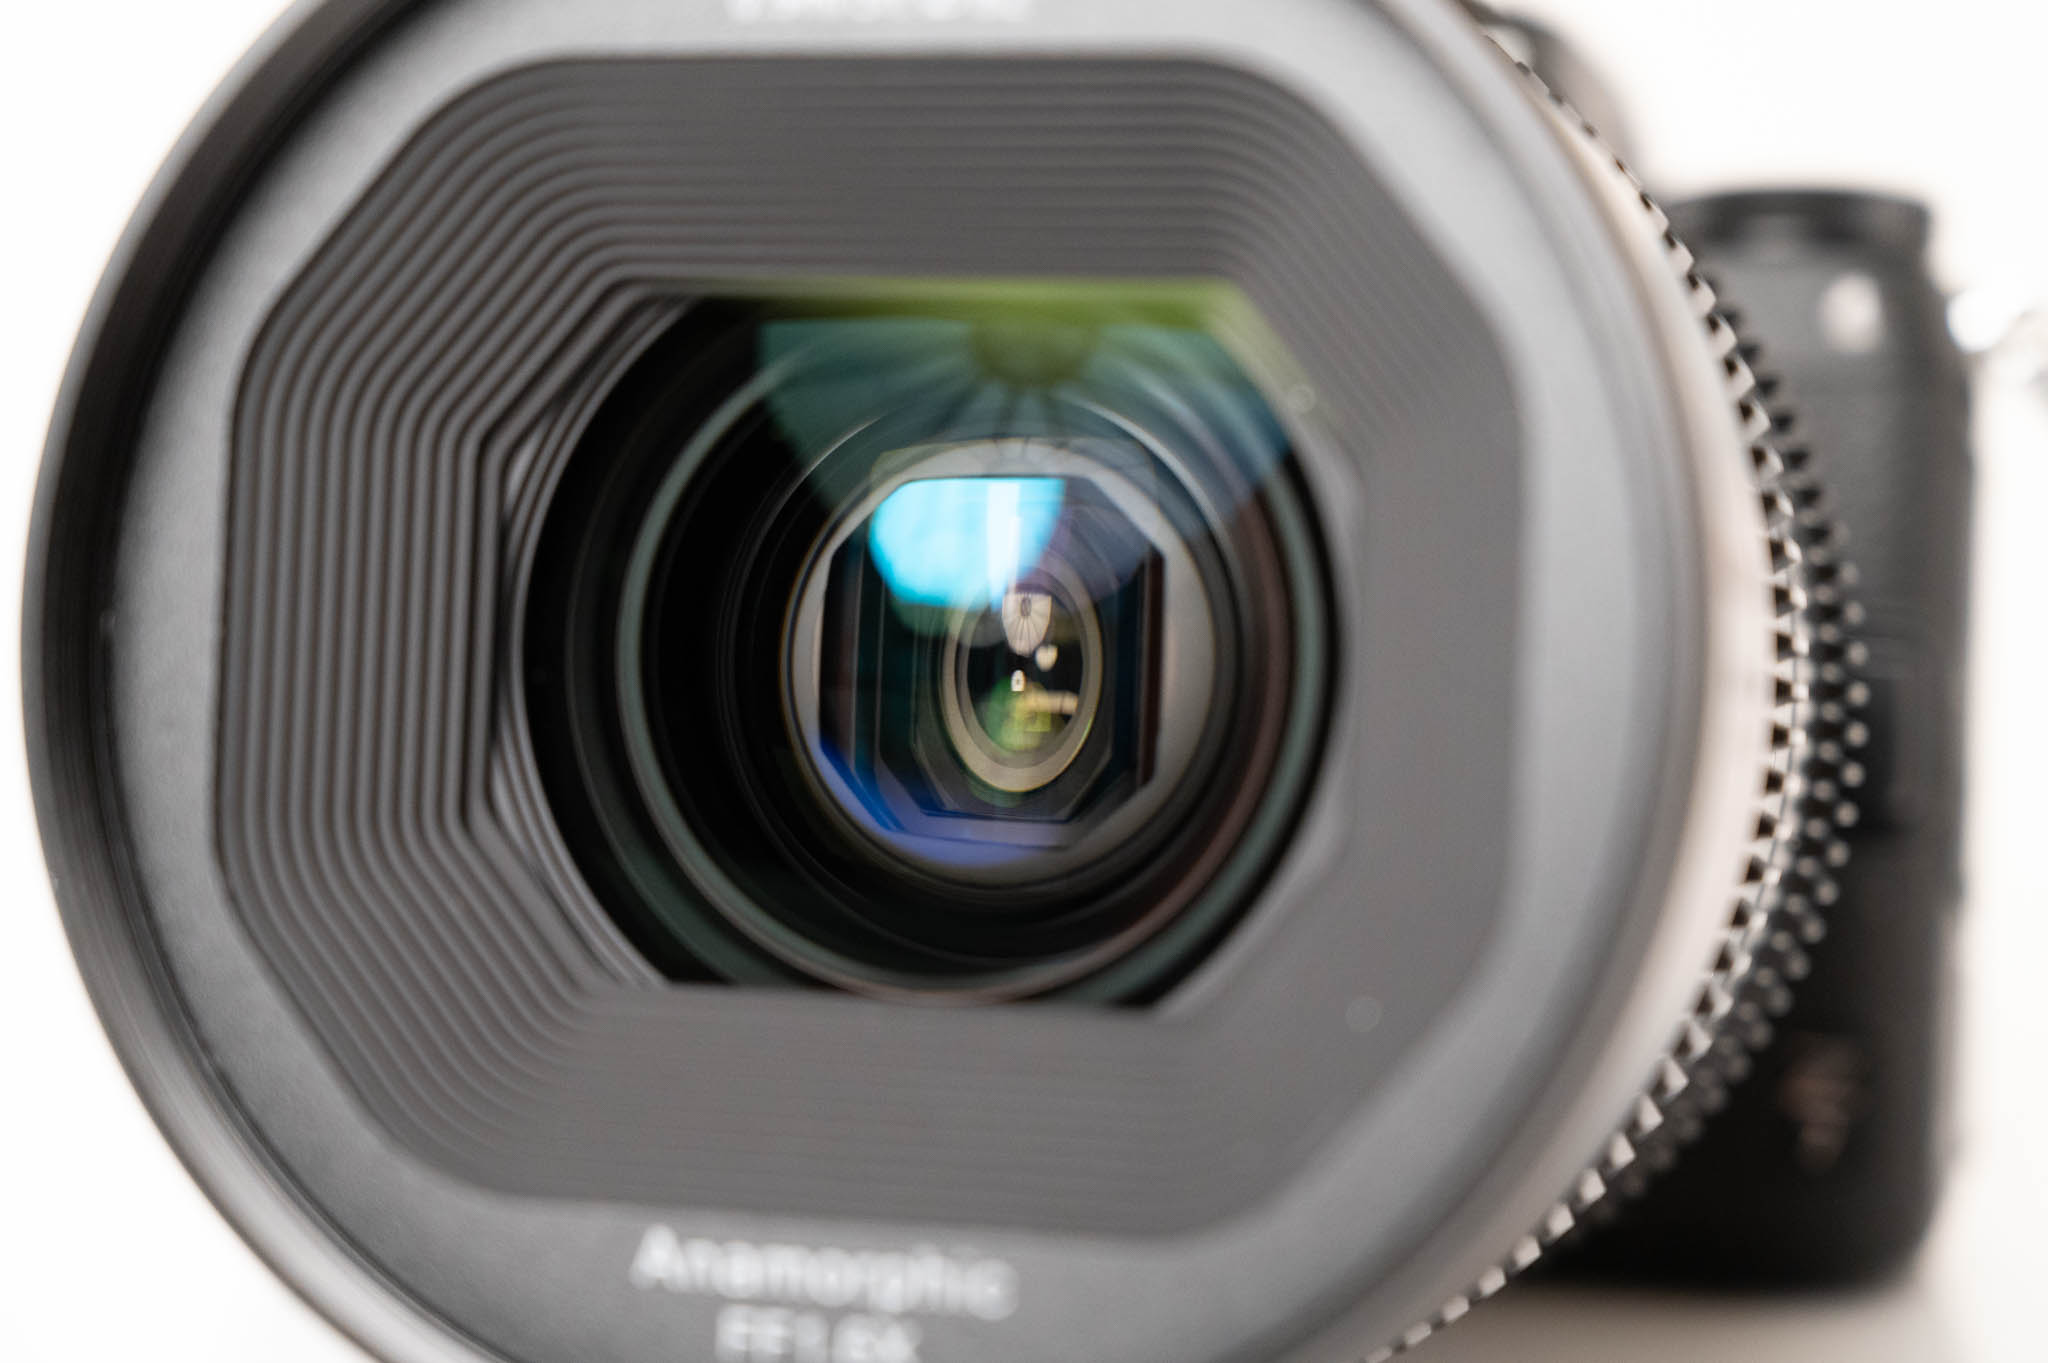
Compared to normal, spherical lenses, anamorphic lenses have differently-shaped lens elements. An anamorphic lens element is shaped more like a cylinder.
To display photos from anamorphic lenses properly, you must de-squeeze them. In the film days, de-squeezing could happen by projecting the film through a projector with an anamorphic lens of its own. These days, the de-squeezing is usually just done in post-processing software.
The amount of squeeze the lens applies to the image is typically denoted by a multiplication factor, like 1.33x, 1.6x, or 2x. This refers to how much the image must be de-squeezed later.
Often, anamorphic lenses – particularly those for video and cinema use – are sold as parts of a set. The lenses in these sets usually have the same multiplication factor and similar designs/handling, while they differ in their focal lengths.
Unique Qualities of Anamorphic Lenses
Aside from the stretching factor that I just demonstrated, there are a few other defining features of anamorphic lenses compared to regular lenses: lens flares, bokeh, and depth of field. I’ll go through them here.
1. Lens Flares
One of the most distinctive aspects of an anamorphic image is the lens flare. These lenses have bright, horizontal streaks spreading out from sources of light. You can see an example below:
For many anamorphic lenses, these streaks will be tinged blue, although some lenses have coatings to enable different colored flares. Various anamorphic lens designs are tailored to minimize or emphasize these flares, although most of them have it to some degree.
The presence of these flares can be a love-it-or-hate-it effect. It’s popular in cinematography, but the effect is usually less desirable in still photography. (Even for cinematography, it’s becoming a bit of a cliché and isn’t favored by everyone.)
Aside from these linear flares, anamorphic lenses can also have a less-contrasty look. While not exactly “veiling” flares, the interaction of the light paths and lens design tends to promote a softer and less contrasty look. This was particularly prominent on older anamorphic designs.
2. Bokeh
Anamorphic images can have unique bokeh / background blur. In particular, out-of-focus highlights are stretched into ovals instead of appearing circular. The greater the factor of the anamorphic lens, the thinner that out-of-focus highlights will look.
3. Depth of Field
Your depth of field will often be a bit different with anamorphic lenses. That’s because (for example) a 35mm anamorphic lens is wider than a regular 35mm lens, once you de-squeeze it. So, you often end up standing closer to your subject, which is one of the things that gives you thinner depth of field.
The result is that anamorphic lenses in practice give a bit more subject/background separation than normal lenses. Of course, the root cause is that you’re standing closer to your subject, but that’s the result.
How To Desqueeze Anamorphic Photos
While some video cameras (along with some on-camera monitors) are capable of de-squeezing in the field, I’m not aware of any still camera that offers this functionality. If you’re reading this article with the thought of using an anamorphic lens on a mirrorless camera, keep in mind that your view through the viewfinder will be squeezed.
Fortunately, the distortion isn’t particularly problematic for composition. After all, everything you see in the viewfinder is captured – you’ll just end up stretching it in the final image. For this article, I was shooting with a 1.6x squeeze lens and had no issues with framing. Even more aggressive 2x anamorphic lenses should still be legible.
Anamorphic lenses are typically fully-manual lenses, requiring you to set aperture and focus manually. As such, I found that my mirrorless cameras paired very well with an anamorphic lens, thanks to features like focus peaking and the ability to preview the exposure in the viewfinder.

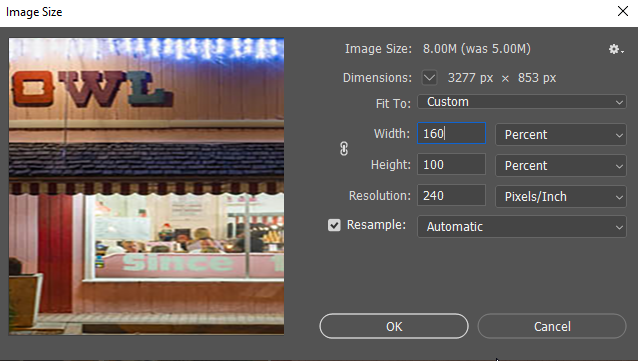
If you’re planning to use anamorphic lenses for still photography, I recommend de-squeezing them in Photoshop or similar software. You can de-squeeze either before or after doing the rest of your processing, although I recommend sharpening and noise reduction after de-squeezing.
Here’s the process in Photoshop:
- After opening your photo, select “Image > Image Size” or press Alt + Ctrl + i (Option + Command + i on Mac)
- Deactivate the “Constrain Aspect Ratio Lock” that links the height and width fields
- Assuming that you shot horizontally, select the “Width” field, and leave the current pixel value in place. At the end, type an asterisk (the “*” symbol) followed by the de-squeeze ratio. For example, the Width field would say something like “8256*1.6” when you’re done.
- Press OK, and your new image will now be de-squeezed
- If you’re planning on shooting a large number of anamorphic images, don’t forget about the Action function. By creating and recording an action that performs these steps, you can easily de-squeeze a large number of images in Photoshop. You can further combine this with the Image Processor option to bulk process an entire folder of files, which can be helpful for de-squeezing an entire shoot.
How To Desqueeze Anamorphic Video
Anamorphic video can be approached a few different ways, depending on your desired output. For instance, some prefer their anamorphic video presented with black bars above and below the image, essentially keeping the original aspect ratio. Others might want to stretch the footage out to the full, semi-panoramic aspect ratio.
For some combinations of editing software, recording systems, and lenses, you may have additional options. Some capture solutions allow for setting an anamorphic aspect ratio right at the time of capture, while some editing tools allow you to mark individual clips or timelines as having non-square (read:anamorphic) pixel aspect ratios.
In any event, I’ll go through my exact process in DaVinci Resolve. Whatever post-production software you use, the process is likely to be similar to this:
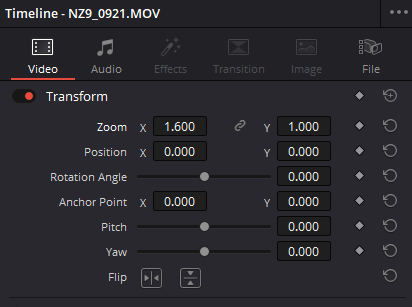
- First, set your timeline in File > Project Settings. In the custom timeline resolution fields, type a width that’s multiplied by the squeeze factor. For example, a video shot in 1080p (normally 1920 x 1080) would be set to a width of 3072 and a height of 1080 if your squeeze factor is 1.6x.
- Add your clips to the timeline
- Edit the clip attributes to adjust the zoom along one axis. In Resolve, you can just input the squeeze ratio in the X field in the Zoom option. Unlink the X and Y fields by clicking on the lock icon, then enter (for example) 1.6 in the X field.
- Your clip should now reflect the correct aspect ratio and be de-squeezed. If desired, you can choose to create a compound clip to “lock in” the adjustment.
Anamorphic Lenses for Still Photography
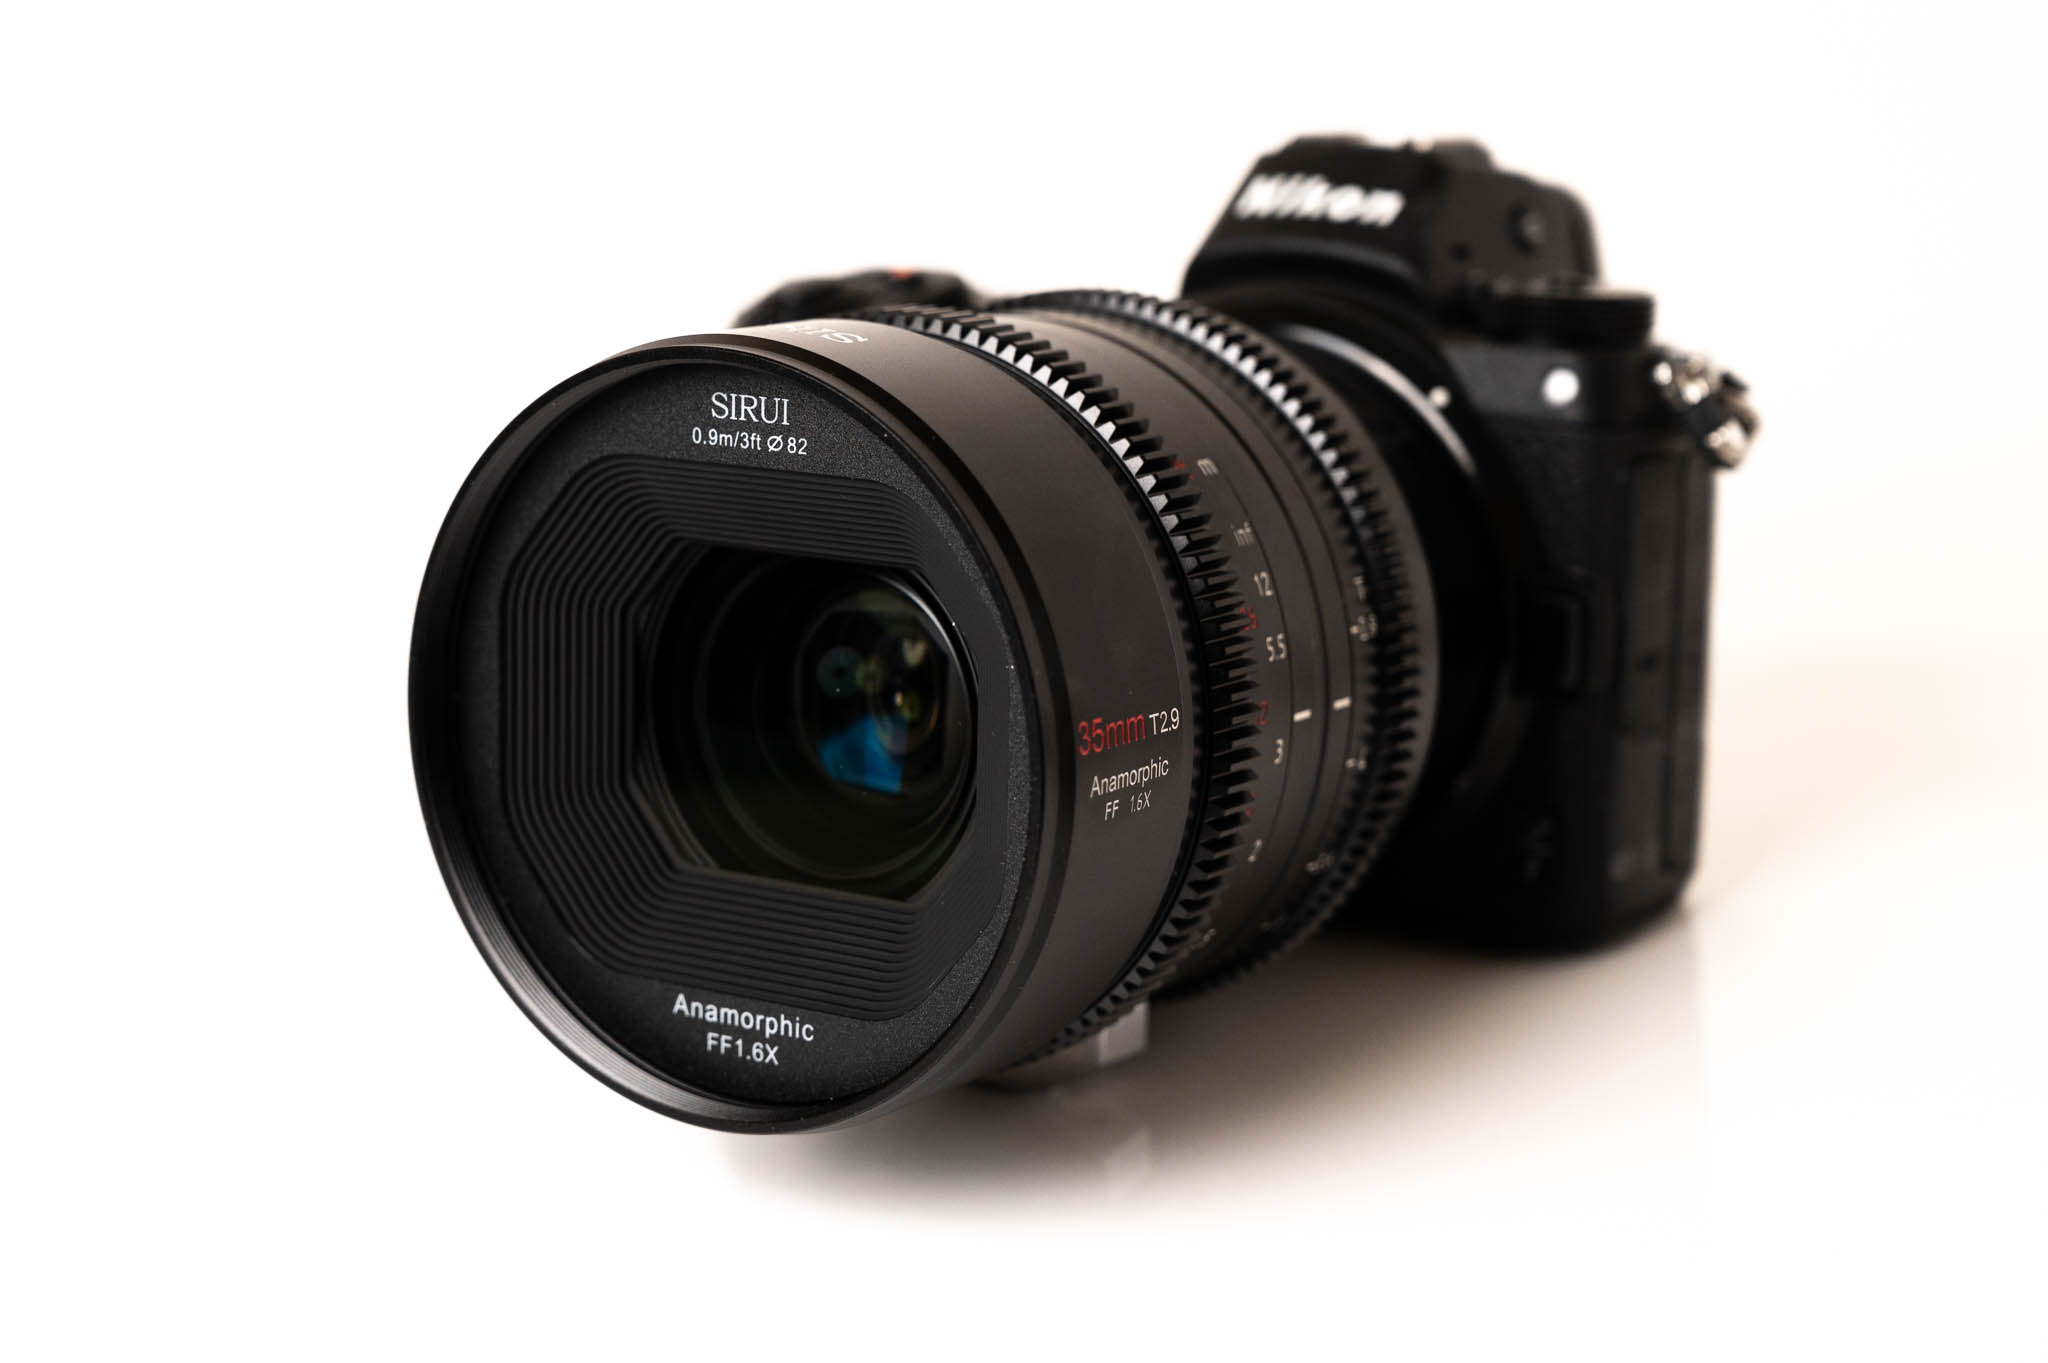
While you absolutely can use “cinema” anamorphic lenses for still photography, just like how I’ve been using my Sirui 35mm 1.6x, you might want to consider a less expensive option if you’re just looking to try out anamorphic photography.
At the very cheapest level, an anamorphic adapter for your phone can be a fun way to experiment with anamorphic compositions and lens flares. Smallrig makes an adapter for camera phones that provides for a 1.55x squeeze and anamorphic style lens flares.
Some older, used anamorphic lenses are available on the market, but availability is going to range widely based on the lens mount. While these could be hidden gems, it’s tough to make any specific recommendations. One thing to watch for is that the lens is actually anamorphic. A quick look at ebay reveals some lenses with an oval aperture, and while this can contribute to anamorphic-style bokeh, other aspects (most importantly, the stretching effect) won’t be replicated.
Entry-level anamorphic lenses are a bit of a misnomer, as even APS-C anamorphic lenses can be somewhat expensive. For the least expensive entry point with a new lens, consider Sirui’s APS-C 1.33x lineup. Lenses like the 50 f/1.8 1.33x are available in E-mount, MFT, and X-mount, while the 75mm adds availability in Nikon Z and Canon EF-M.
Lastly, the larger, cine-style lenses listed below can be used to great effect for photos, even if they’re technically designed for video use and tend to be more expensive.
Anamorphic Lenses for Video
For most videographers shooting on mirrorless cameras, Sirui’s 1.6x lineup is going to hit the sweet spot of features, design, and performance. The lineup includes 35mm, 50mm, 75mm, and 100mm focal lengths, all with a 1.6x squeeze ratio and identical ring placement, making for easy interchangeability on your video rig.
The lenses are available in Canon RF, Sony E, Leica L, and Nikon Z mount.
I was able to do hands-on testing with the 35mm 1.6x and found that it performed incredibly well, even when shooting 8K video on the Nikon Z9. In both still and video use, the content produced was gorgeous. The anamorphic characteristics were pronounced, without being overbearing.
Beyond Sirui’s line, anamorphic lenses quickly become rental options, not purchase options, with entries from Cooke or Arri/Zeiss costing tens of thousands of dollars per lens.

Overall, shooting anamorphic images or videos can be an interesting experience, and certainly a way to set your work apart from others. Anamorphic lenses are also far more accessible than in the past.
Have you ever used anamorphic lenses for stills or video? Let me know in the comments what you think about the look of these lenses, and feel free to ask if you have any questions.
These are not something I need, but I’m very grateful for what is the clearest explanation of the concept I have ever come across. It’s always better to know something about a subject…
You are missing a month of articles.
Sorry: You fixed this just before I posted.
Hi Jeff, that’s a really odd issue. Were there articles missing on the homepage, or did you not see older articles properly when you clicked on page 2, 3, etc. at the bottom of the homepage?
I know understand what anamorphic lenses are, but not why to use them. Or why they exist (for photography) at all…
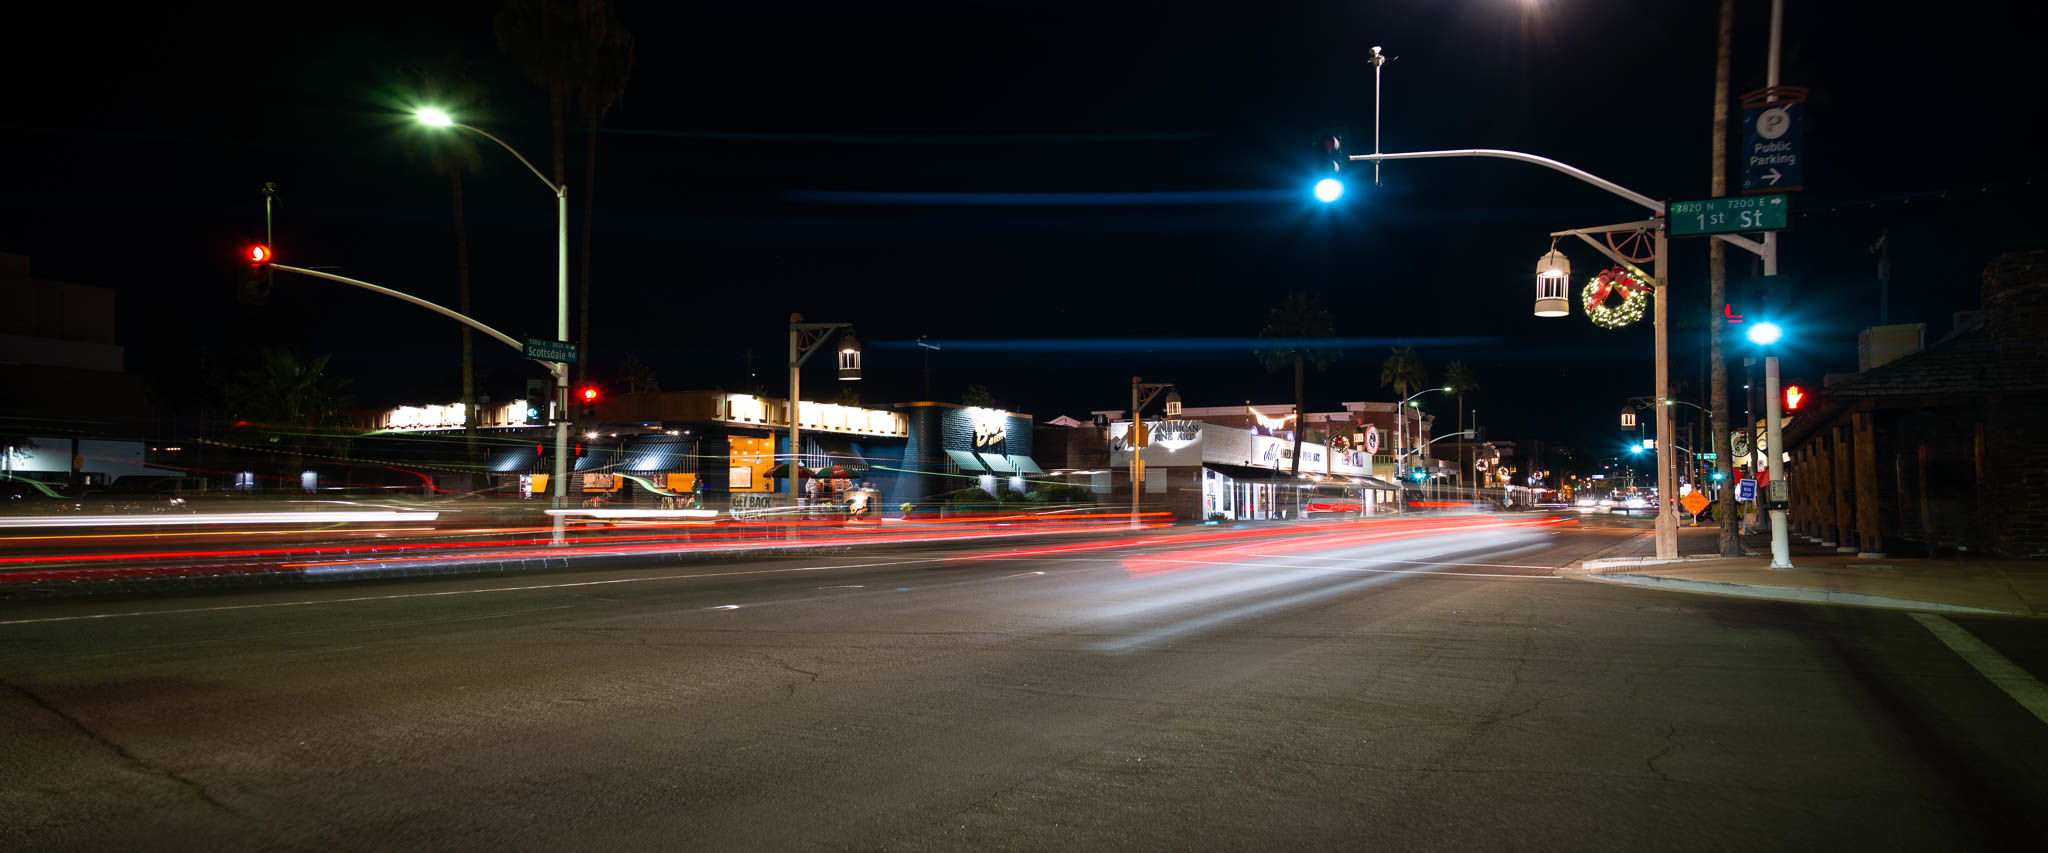
They’re not lenses for everyone, and historically they’re mostly used for video. But for stills, anamorphic lenses give you a panoramic image (plus the unique bokeh and flare effects) without requiring cropping or stitching photos.
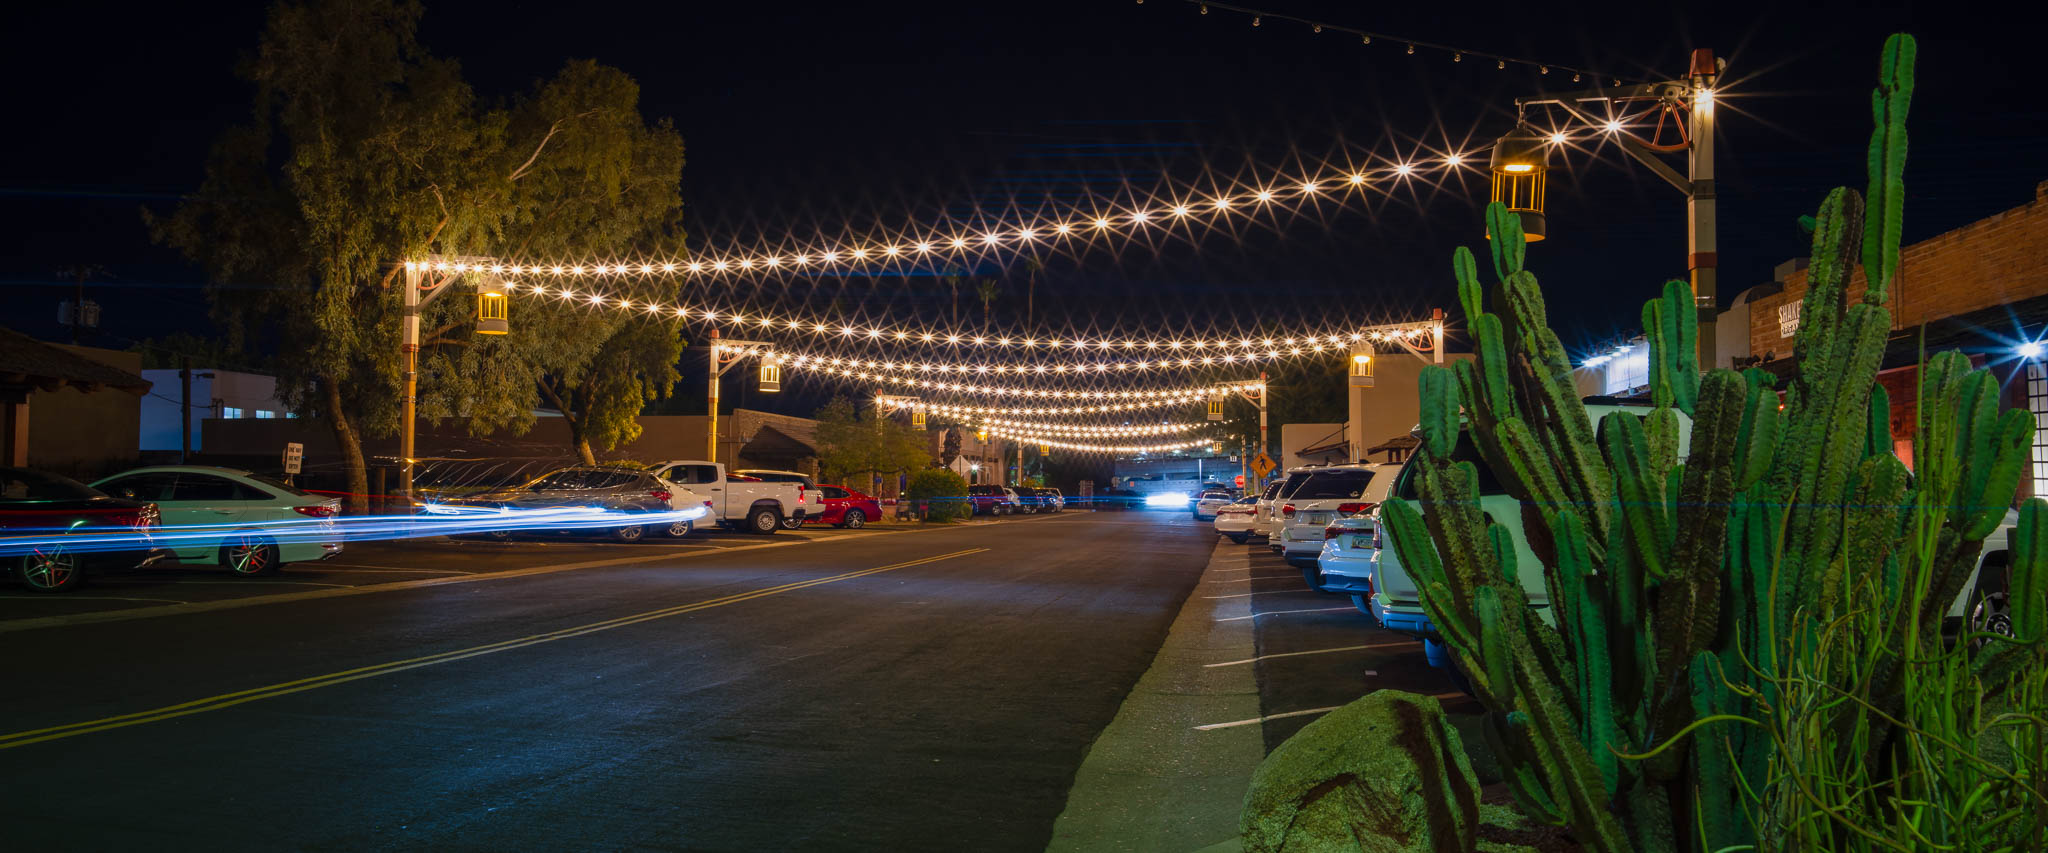
Alex’s nighttime sample photos are good examples of when to use such a lens. They’re out-of-camera panoramic images, no cropping needed. He couldn’t have just stitched together two photos because the car trails at the bottom wouldn’t have stitched properly.
Are the MTFs of the lenses anisotropic such that you have isotropic image detail after stretching of the image, or will you have better resolution in the vertical direction than in the horizontal direction? Reason for asking is that I am wondering how much information you really gain compared to just cropping it to the panoramic format.
Thanks for this article. Very clear. I’m (still) pretty sure these lenses are not for me, but it’s good to be properly informed. ;)
Nice article: thanks for writing it!
Another option which is still within reach of ordinary consumers is the Venus Optics nanomorph series.
I’ve not had the chance to test those out yet, but I’ve liked designs from Venus in the past. Good thing to mention!