A decentered lens contains one or more optical lens elements that are either moved or tilted from the principal axis of the lens. Such shifting or tilting of lens elements can potentially lead to blurring / softness of parts of the image due to divergence of light rays. While very slight decentering of optical elements can be observed in many lenses, especially on superzooms, severe decentering and tilting can render the whole image blurry, with the lens unable to achieve good sharpness across the frame.
When purchasing a lens for my own personal use, I always take the time to first test the lens before I decide to keep it. As explained in my things to do after buying a new lens article, it is always a good idea to test lenses you buy, even if they are brand new. Unfortunately, despite efforts by manufacturers to make every lens superb out of the box, many things could go wrong by the time you receive yours. In some cases it is the fault of the manufacturer (poor quality assurance / low standards) and in some cases it is the fault of the delivery guy that carelessly throws the box containing your expensive lens. Other times, it is our fault or just bad luck, with lenses getting bumped and dropped. Sadly, these issues can negatively affect the performance of lenses and create all kinds of problems. Decentering of lens elements is one of them and it is a fairly common one.
Table of Contents
1) Lens Decentering
When testing lenses for my in-depth lens reviews, I come across lenses with all kinds of optical problems. One of the most common issues that I see is when sharpness is uneven across the frame. In some cases it is just one corner of the frame that stands out and in other cases, more than half of the image is soft. Although such optical aberrations as field curvature can cause softness outside of the focused area, a decentered lens exhibits different sharpness patterns. When a lens suffers from field curvature, if one were to focus in the center of the frame, areas outside of the focused area would appear evenly soft. In the case of simple curvature of field, one would observe sharpness dropping away from the center of the frame, with the corners being the softest. In more complex cases of “wavy” field curvature, sharpness could drop towards the mid-frame, then pick up again in the corners. In both cases, sharp and soft areas would appear even across the frame – if one corner is soft, the other three would also appear similarly soft.
A decentered lens, however, could show some corners to be visibly sharper than others. Depending on the angle of tilt, sharpness could vary greatly from one side of the frame to another. Having tested hundreds of different lenses, I have seen all kinds of lens decentering. Some decentering can be compensated by moving the camera away from the center (up, down, left or right), while in other cases nothing can be done to achieve even sharpness throughout the frame.
Here is an illustration of a “perfect” lens (not that one exists):
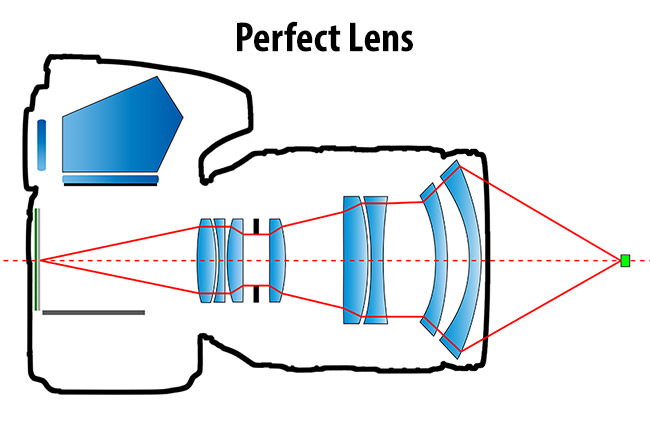
As you can see, light rays that enter a perfect lens are bent normally, per original lens design, converging correctly. Now let’s take a look at a lens with a severely decentered lens element:
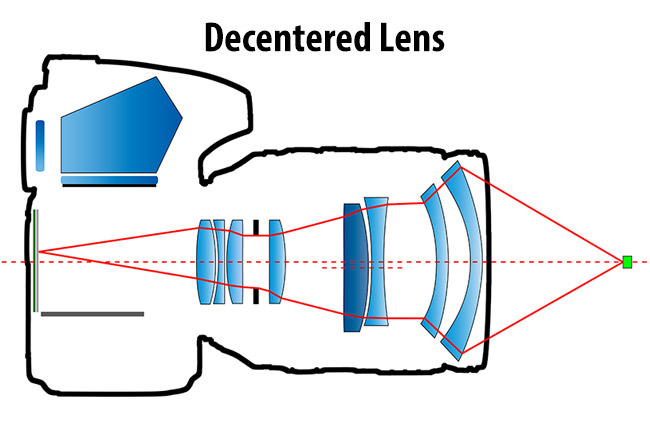
When a lens element is decentered, its axis is no longer aligned with the principal axis of the lens. This results in light rays getting bent differently, which can drastically reduce the sharpness of the image.
And here is an illustration of a lens with a tilted element:

For illustration purposes, I over-exaggerated both the decentering and the tilt of lens elements (the darker ones). As you can see, the light rays here are not perfectly converged and deviate quite a bit, causing severe blur in images. It is important to note that such severe tilting of an element is highly unusual and most likely would lead to unusable, soft images. In reality, most decentering and tilting issues are very minor, with lens elements being decentered / tilted by less than a millimeter from edge to edge. At the same time, even a millimeter can cause very noticeable blur in images, so you can imagine how complex lens assembly and quality control are.
Cheaper zoom lenses (especially the superzoom types, as noted in the beginning of this article) are more prone to decentering, because they have plastic barrels that often have some “play” when zoomed in / extended. Optical elements are secured by plastic components, which can shift or even break overtime. You can imagine that such lenses can be extremely difficult to test using flat charts. It does not mean that decentering never occurs on prime lenses though – the example presented below is from a high quality prime lens.
2) Test Chart Sample
How does decentering look on a test chart? Take a look at the below image, which I captured with a brand new Fuji XF 23mm f/1.4 R lens at f/1.4:
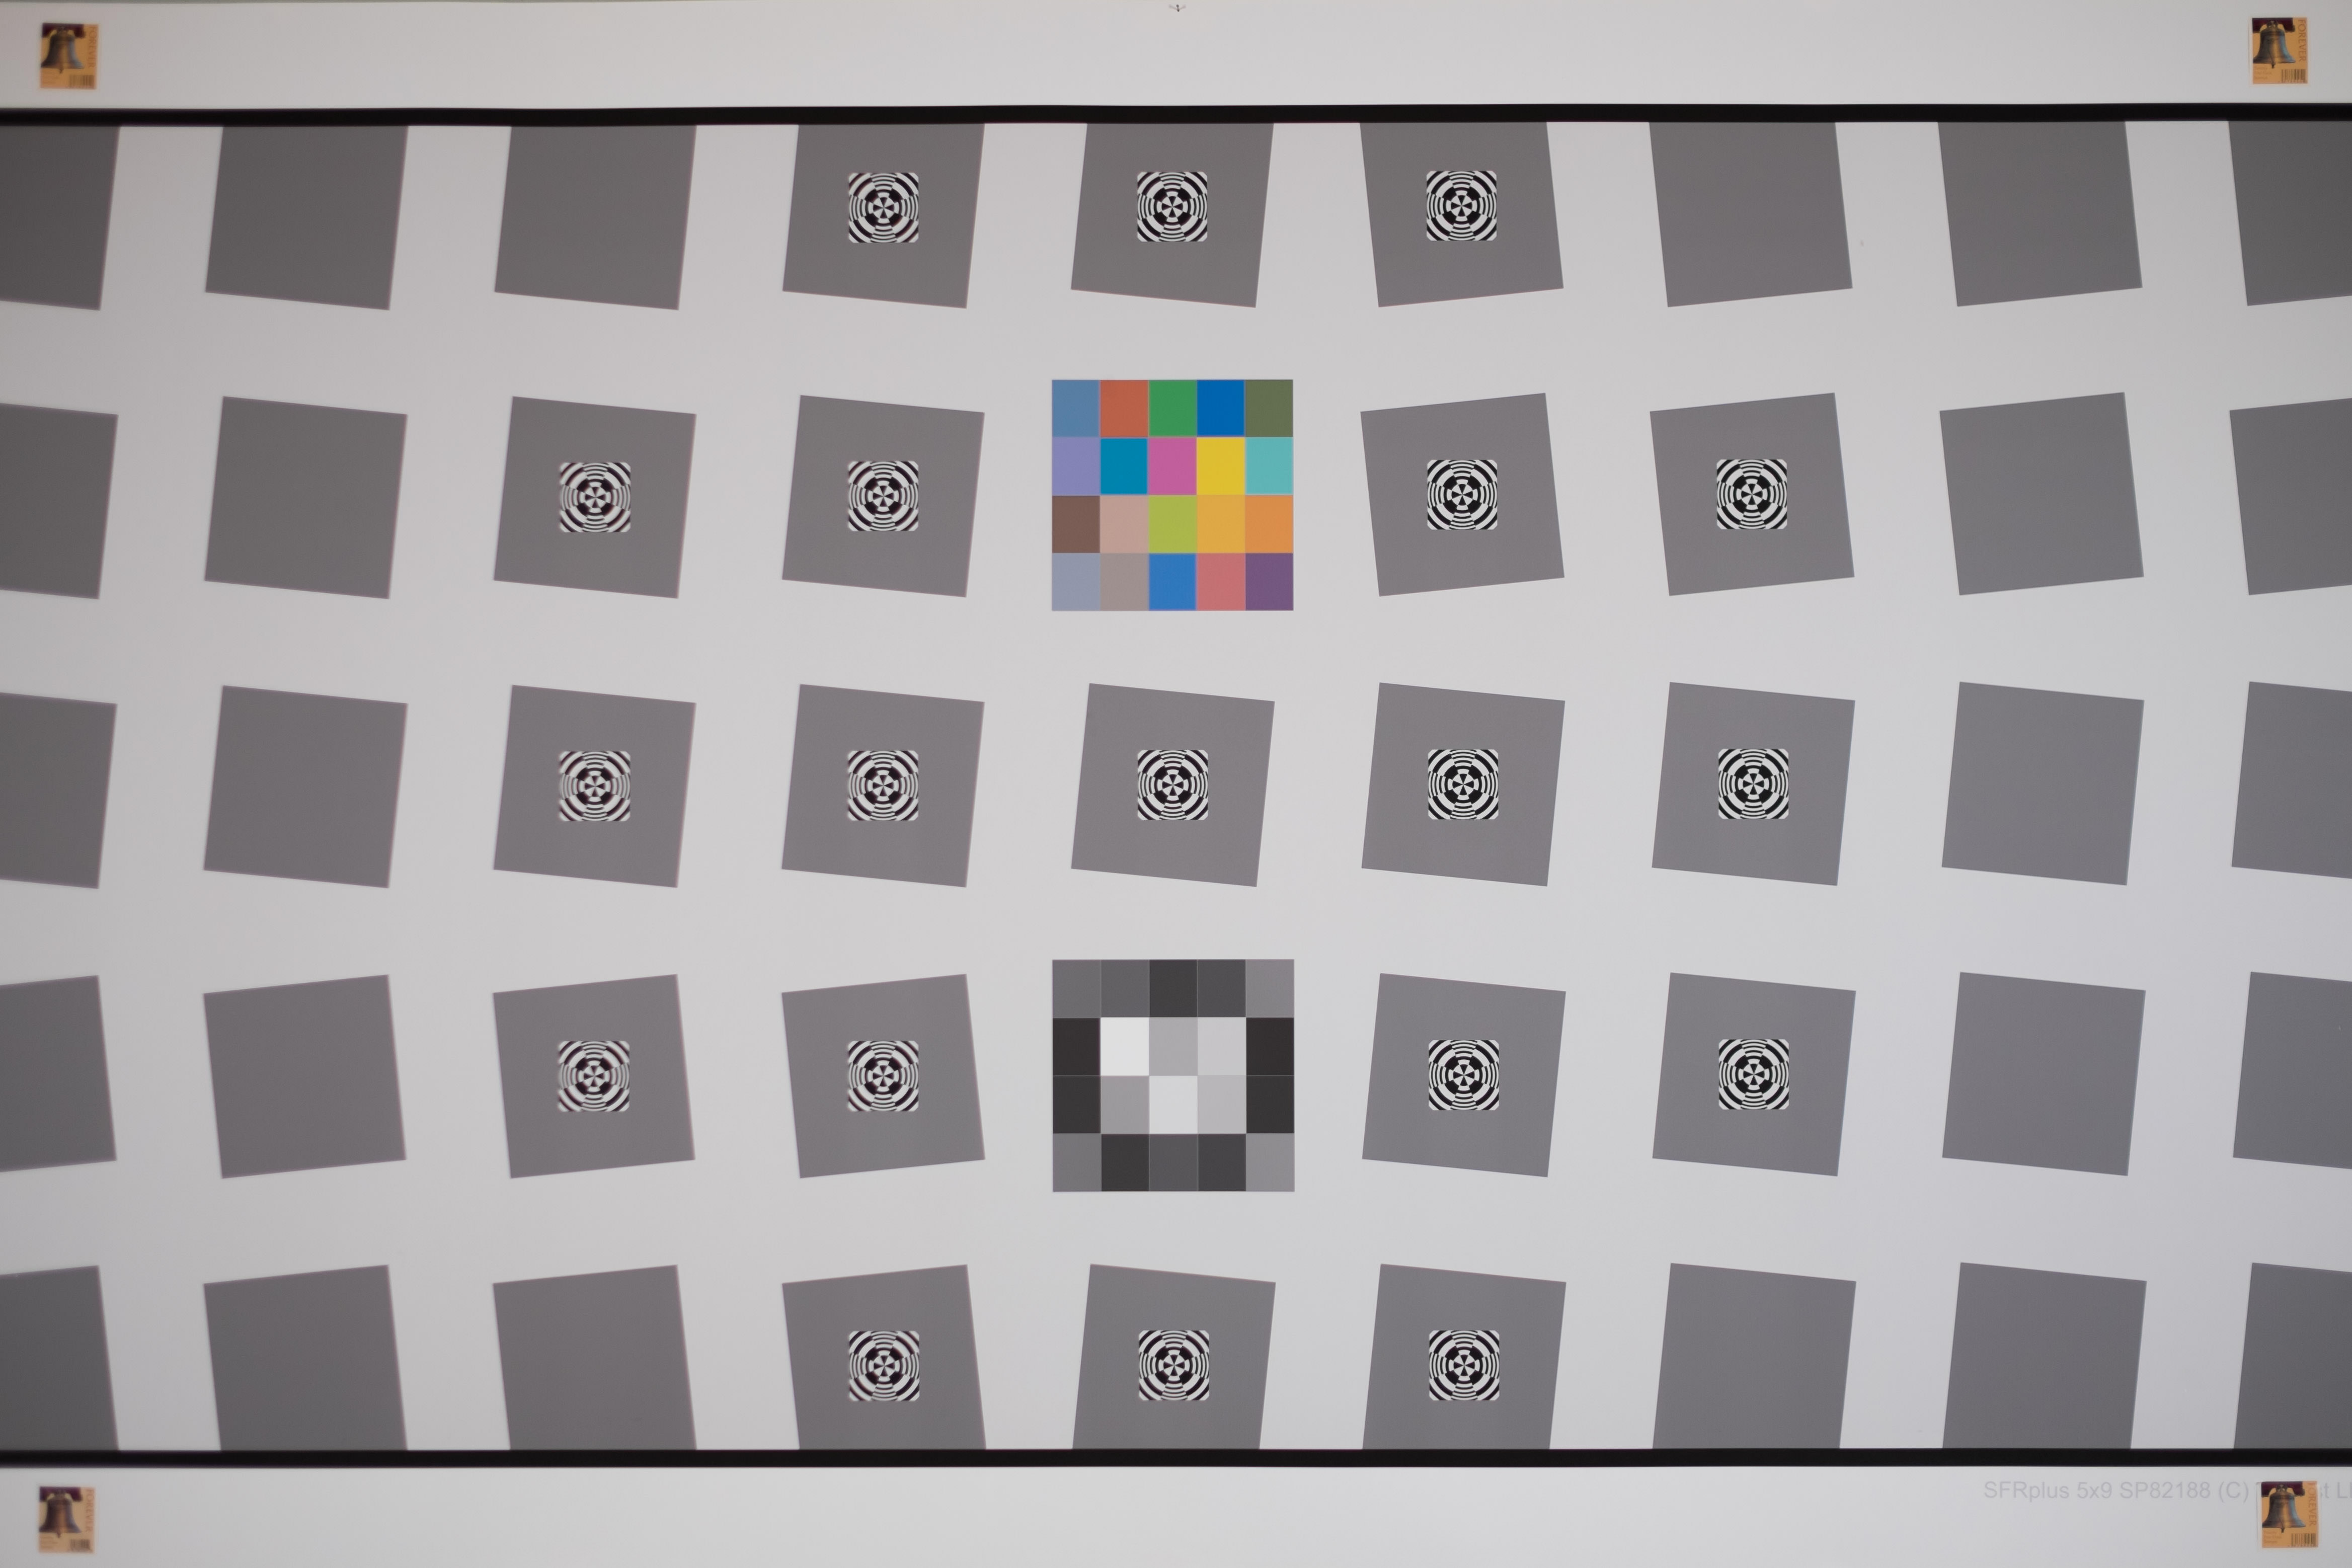
Even without seeing the high resolution version of the image, it is pretty clear that something odd is happening here – take a look at the postal stamps on the left side of the frame and compare them to the ones on the right – they appear noticeably softer. If you open up the whole image, you will see that the sharpness of the lens quickly degrades right off the center of the frame to the left. The borders of the squares are very soft. Now take a look at the right side of the frame. You will notice that the right side does not suffer from sharpness loss as badly as the left side. This is a pretty bad case of lens decentering, because I could not achieve even sharpness across the frame even after moving 3 feet from the dead center of the chart. The lens is defective and had to be exchanged.
3) Reducing Lens Decentering
If an element is only slightly decentered, usually stopping down to a smaller aperture will take care of the problem. In the case of the Fuji 23mm f/1.4 lens above, softness was reduced substantially by f/4 and was not visible to the eye at f/5.6. So if you strictly shoot landscapes and architecture at small apertures, this might not be as big of a problem for you. However, for a 35mm equivalent prime that is expected to perform well in low light situations, stopping down is not really an option. Although I would rarely photograph flat subjects, judging by how bad sharpness dropped just a little bit away from the center, I would not want to have a partially sharp face.
If a lens suffers from severe shift of optical elements, it could lose its ability to focus at infinity. If a lens element is tilted a bit too much (and by “too much” I mean as little as one millimeter!), even stopping down aggressively would not necessarily improve sharpness. There is no post-processing fix for decentering either.
So the only real option is to either return and exchange the lens for a different sample (if you are within the return grace period), or to get it serviced by a technician.
4) Testing for Decentering
If you have a “suspect” lens that shows uneven sharpness as explained above, there are different ways you could test it. The ideal case scenario would be to use a proper setup with a large test chart with the camera perfectly parallel to the chart, but that is a very costly solution and not something I would personally recommend. The easiest, cheapest and simplest method of testing decentering is shooting very fine detail at infinity. Here is what you need to do:
- Make sure that both the front and the rear lens elements are clean
- Find a bunch of trees / bushes / grass, i.e. anything with very fine detail that is located relatively far away for you to be able to focus at infinity. An overlook with no close objects is ideal for this. If you live in a high rise apartment complex, focusing on distant trees and architecture would work great as well.
- Frame your camera so that the details cover the entire frame. If you cannot fit everything, at least cover from bottom left to bottom right of the frame
- Set your lens to maximum aperture (for example f/1.4)
- Focus in the center of the area that contains the fine detail using live view (to get good focus)
- Take a picture
- If the fine detail does not cover the entire frame and you only did the bottom two corners, then reframe your shot so that it now covers the two top corners and take another picture
- Analyze images at 100% on your computer. Focused at infinity, the area that you focused on is going to be sharp. Now look at the fine details from left to the right side of the frame. The extreme corners should be very similar on both sides (whether looking at top or bottom) – similarly sharp or similarly blurry. If one side is sharp and the other is noticeably blurry, you have a decentered lens
What if you do have a decentered lens? Should you send it to the manufacturer for repair or return it? It depends on how bad the decentering really is. As I have noted above, I find that many lenses have decentering issues – some are worse than others. If the problem is minor and you can only see slightly more blur, don’t worry about it. But if you see a drastic difference, then repeat the above test at apertures that you actually use. If you are a landscape photographer, stop down to f/5.6 and see if the blur is noticeable or not. If it is not, don’t worry about it. If you can still see a huge difference, then it is probably a good idea to return the lens or get it serviced by an authorized service center. Don’t try to open the lens and do this on your own, since it would void the warranty and you could actually make it much worse.
5) How bad can it be?
If you are wondering what lens decentering could potentially do to your images, take a look at the below image that I captured of the Delicate Arch in Utah, with the Nikkor 24-70mm f/2.8G that I dropped on the carpeted floor a few weeks earlier (it was mounted to a pro-level body):

See how blurry the image is on the right side of the frame at f/5.6? The lens looked fine from the outside, but the drop did tilt one of the lens elements. I had no idea how bad it was until I came home and looked at images. It cost me $650 to get Nikon to repair it and get it properly aligned back to its specifications (Nikon had to replace the mount too).
Very useful explanation. Thank you
I have a new Tamron 28-200mm RXD Sony e mount.
It has mild decentering effect from 120-200 mm, from f5.6 thru f16, on the right 30% of the RAW image. Worse in the upper right corner, but both right side corners worse than the left.
Adorama is sending me a new lens to check. This lens was not dropped and shipping box was not damaged.
I bought a new Tamron 17-28mm for Sony E at same time and it checks out fine.
Some of the best explanations I have seen of photography issues for photographers. Excellent. Thank you! Now I know what to look for in decentering. I had a small multi step drop, broke the fall with my outstretched tennis shoe.
I appreciated your explanation of relative merits of DX vs FX lens.
One area that I have not seen much explanation, though, is in regard to video mode at 4K or 8K and DX and FX lens. If the camera can support these modes at DX, it seems the relative performance difference and value of the lens narrows considerably. Adjustments for field of view of course would need to be made. The pixel count would be the same either way. Also oversampling techniques come into play.
Manufacturer processing of sensor data is another area of interest. You may have sections on this, I am still exploring. Thanks again!
Hello! This a great article – there isn’t much info about this out there. I have a question regarding field curvature. I realise many lenses exhibit this as a “design flaw” but is it possible for this to be caused by a lens element being out of place? I would imagine that it wouldn’t be a de-centered element as the effect is symmetrical, but perhaps if an element has moved forwards/backwards?
Nasim, thank you for this very informative article on lens decentering! I am considering moving to a FF system like the Nikon Z7, with a few Nikkor S lenses, i.e., 24-70 f/4 and 50 f/1.8. Have you heard of an unusually high number of decentering issues with either these lenses or the Canon EOS R system and RF lenses? Thank you sir!
Many bridge cameras with big zoom ranges seeem to have this issue, as I have seen with ones I have owned and also in uploaded user samples to various photo web sites. I then bought a Sony SLT-a58 APS-C with kit lens and found the same issue. I sent the camera back to Sony for servicing but as above they said it was “within spec” (no charge/under warranty). I then bought a Sony 18-135 zoom for it: same issue. I then suspected it was more an alignment issue between the body’s lens mount and the CMOS. I recently bought a Sigma 1010 EX zoom: same issue, so can’t be that all 3 lenses are decentered. The effect is mild and photos are usually viewed here at “full screen” size on computer, not 100% and on a 40 inch LED TV at 1080p. In those instances, the effect is very hard to see.
Forgot to mention: the area of unsharpness is usually in a corner, lower right or upper left and varies (I think) depending on how close to the camera the focus point is. Would have to do a day’s testing, recording the distance the focus point was from the lens in each shot to see if my theory is correct.
Hi Nasim,
your website is an amazing source of knowledge for amateur and professional photographers. Many times when I have googled for a information ended up finding it on your website. Thank you for doing great work!
But I must admit that you went too far with the adds. Especially with fraudulent website advertisements. I presume you do not know about last one, but on every update some new browser window pops up waring me my Mac is full of viruses. When I try to close it, it warns me again. Being a power user I am just annoyed. But for any less experienced user it could be big headache.
I kindly ask you to be a bit sensitive in this regard.
Kind regards from Azerbaijan!
Your knowledge and information is excellent. I recently purchased a Nikon D500 in December. Great camera. I was on assignment when I foolishly dropped my camera. . I did check test out the camera in image look fine but on my next assignment I saw the problem. Blurry on the left and sharp on the right. I was totally upset. I was just thinking to get the whole system checked out, camera and lens, since camera is under warranty but I was using was a used 18-200mm and the image in the left is blurry while the right is tack sharp. I will have to go to my backup system till I get this resolved. I would think the lens is the culprit since the camera fell on the lens as the lens shade was pushed back to the camera body. The camera was loaded with a battery pack, flash bracket and Nikon speed flash that make up a lot of weight. That whole setup fell from a height of a dinner table. I normally carry that camera and it never leaves my shoulder. Big mistake. Any other suggestions would help. Thanks.
NASIM MANSUROV,
Thanks for the excellent discussion on decentering. And timely for me. My nephew warned me about decentered optics, but I had not read this article yet so I did not know how to test for it.
I’m in the market for lenses for my Sony a6500, and just bought a Sony Zeiss FE f4 24-70 OSS off of Craiglist ($750).
I purchased the lens at nighttime and did not have my computer so I would not have been able to test the lens. I will later today. I’m hoping for no issues.
Tomorrow, I’m meeting someone (also from Craigslist) for a Zeiss Touit 1.8/32mm ($400). The price seems a bit low for the lens based on used listings at B&H and Adorama. I will be testing it.
Thank you for a great read.
Great article thanks.
Very informative article, thank you! I bought a 24mm f/1.8 G in 2015 – upper top center of horizontal photos/ center focus point/ self-timer, is much less sharp while the the bottom of images reveals blades of grass, etc. I tried adjusting for front focusing – as long as I use small pastures and more distance, no problems; the same D800e with a used 85mm f/1.4 G has no problem focusing at f/5.6 – so it seems to be a lens problem and not my camera. Time to put your information to work…