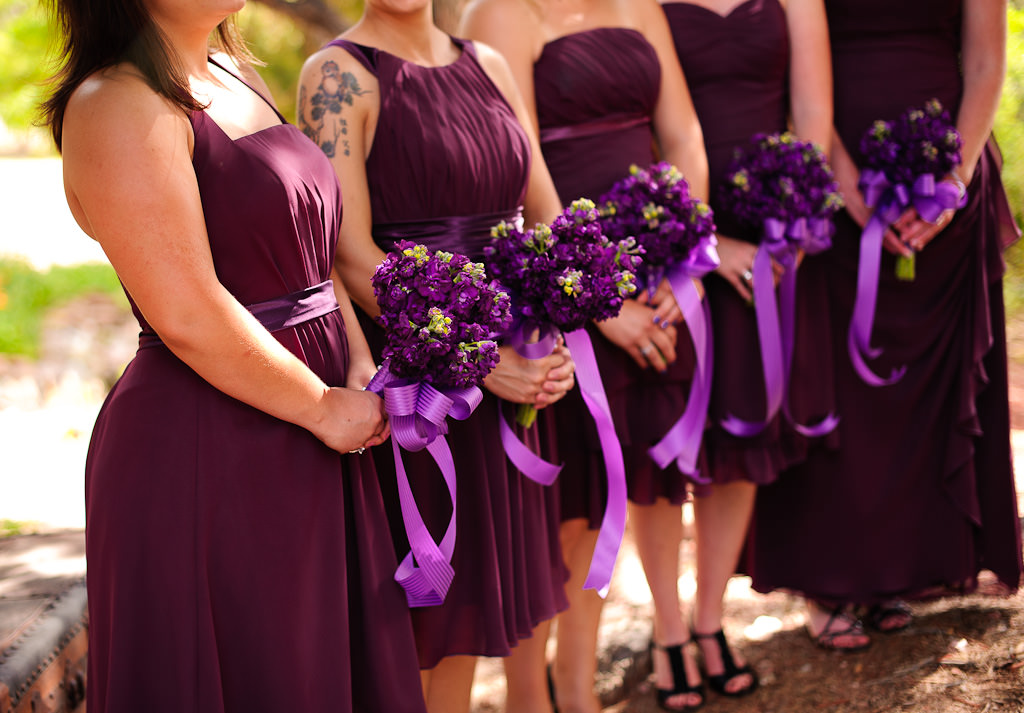
Due to popular demand, we are starting our new series of articles on commercial wedding photography. Since I have been helping out my wife with her wedding business, being a second shooter during weddings and engagement sessions, I have been writing down some helpful tips, which I am planning to provide on Photography Life. These tips range from very basic things like preparing for the wedding day, to complex setups involving specific situations, like setting up flashes indoors. Our first wedding photography tip is about properly synchronizing time on cameras when working with second shooters and assistants. If you have been commercially photographing weddings, you might have already been frustrated to see photographs from multiple cameras get mixed up when you import them to an Aperture or Lightroom catalog. It is not pleasant to see ceremony images mixed with images from the dance floor and it is certainly not fun to try to go through hundreds, if not thousands of photos and sort through them one by one. Gladly, there are workarounds to situations where it had already happened, which I will share with you in this article. First things first, let’s talk about the proper way to synchronize time between multiple cameras.
How to Properly Synchronize Time Between Multiple Cameras
The easiest method that works every time for us and many others, is to have each person hold his/her camera, get into the camera menu and set specific time. On Nikon DSLRs, for example, time can be changed via “Setup Menu”->”Time Zone and Date” or “Setup Menu”->”World Time”->”Date and Time”. Once time is set to an exact hour, minute and second, everyone in the party must press the “OK” button at the same time. This will make sure that the timer starts at that exact time on every camera. If you use two cameras yourself, just set the time on each camera, then press the OK button simultaneously. The idea is to have the time set exactly the same, second to second, across all cameras, so that shots appear in proper order later. The set time does not have to match real time. As long as all cameras have the same clock time, your images will appear in correct order when post-processing them later.
Another method is to photograph a clock that displays hour, minute and second. You don’t have to do this on all cameras at once and time settings do not matter – just point each camera at the same clock and take a picture. Since you have an image of the actual time in every camera, you can then re-adjust the recorded time in images later.
The last method, which is slightly more cumbersome, is to shoot an image across all cameras at the same time at some point during the wedding. This could be during a lunch break or at the end of the wedding when you are packing your gear and getting ready to leave. Just point all cameras at the same subject, so that you know which frame you will use as a reference. Time differences between cameras then won’t matter, because you will be able to adjust the time later (read on to see how).
Adjusting Time in Lightroom
If you forgot to sync time between different cameras or used other methods to “sync” cameras, there is a relatively quick way to adjust time across many photos at once via software. Lightroom has a built-in functionality to adjust time, whether you shot in RAW or JPEG. If you do not use Lightroom, you can use other third party tools such as ACDSee Pro (my favorite image viewing software) and EXIF Date Changer to adjust / offset time. Many third party tools, however, won’t be able to adjust time in RAW files and require JPEG images instead, which is why I prefer to do it in Lightroom.
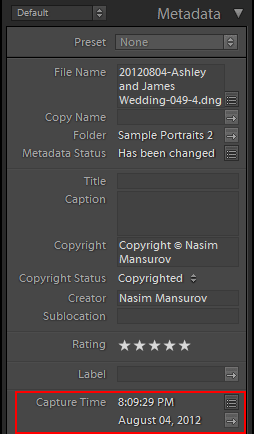
The first step is to identify the time offset for each camera that needs to be adjusted. Locate the image of the clock you photographed, or the subject that you used to sync different cameras. Look at the time shown in the photo and determine by how much you need to adjust all photographs. The clock method is easy, because you just look at the time on the clock and adjust the time to be exactly the same. For the subject sync method, you will have to use your camera as the reference for accurate time. If you forgot to sync, you will have to look for photos that appear to be shot at the same time. Perhaps it is the first kiss during the ceremony, or some other important event that all photographers shot at the same time. Then you use the time in your photos as a reference and calculate time differences between all other cameras. To locate recorded time on photographs, simply press “G” to get into the Library Mode, click on the image you want to view time for and locate the “Metadata” sub-module on the right panel. It will look like this:
For now though, we don’t need to worry about this. Before we start looking at time and thinking about adjusting it, we first need to filter images by camera type or camera serial number (if the camera model was the same) in Lightroom. If you do not already have the filter panels turned on, go to “View”->”Show Filter Bar” or press the “\” shortcut button. Once the panel is there, click the “Metadata” link and you will see something like this:
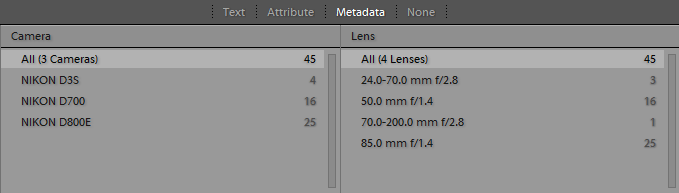
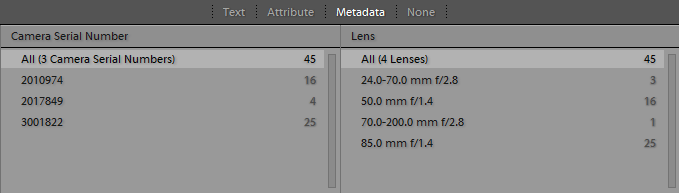
To filter images by a specific camera, simply click on the camera model and Lightroom will only show you images for that particular camera. But what if cameras were of the same make and model? In that case, you can filter out images by the camera’s serial number. Simply click the “Camera” link and select “Camera Serial Number” from the drop down list and it will show images sorted by serial numbers:
Now you can click on individual serial numbers to make Lightroom only display images from a specific camera.
The next step is to select all photographs that need to be adjusted. You can do that by going to “Edit”->”Select All” in the main menu or by pressing CTRL+A keyboard shortcut.
With all the images from this particular camera selected, you can then edit the time by going to “Metadata”->”Edit Capture Time”. A window will come up that looks like this:
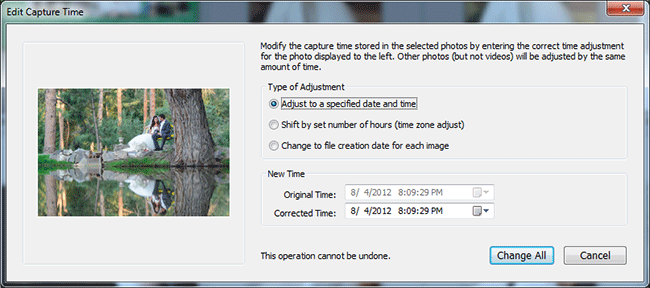
As it says on the top: “Modify the capture time stored in the selected photos by entering the correct time adjustment for the photo displayed to the left. Other photos (but not videos) will be adjusted by the same amount of time”. This means that for the photo that is displayed on the left side of this window, the time will change to whatever time you specify under “Corrected Time”. However, all other images that you selected earlier will be adjusted differently, by looking at the time offset between the original and the corrected times. This is exactly what we want. If the photo that appears on the left is not your reference clock or subject sync photo, then close this window and left-click the reference window. With all the photos already selected, Lightroom will still let you pick the starting photo. Bring up the “Edit Capture Time” window again, make sure that the selection is set to “Adjust to a specified date and time”, then adjust the time under “Corrected Time”, as shown below:
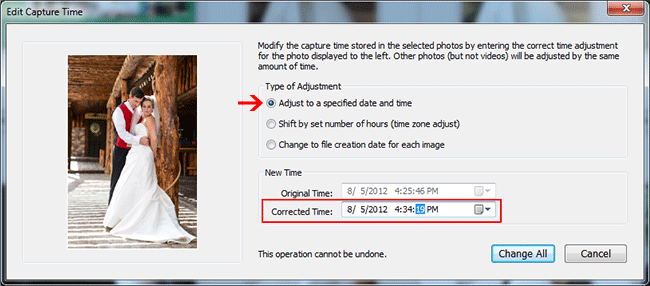
Before you click the “Change All” button, which will kick off the time change process, make sure that the new date/time information is correct. Keep in mind that this process cannot be undone – it will permanently overwrite the date/time data stored in each image.
Once the date and time changes are written, you can go back to the filter bar in Lightroom and select “All”, so that Lightroom shows you all images. Now make sure that your view is sorted by capture time (“View”->”Sort”->”Capture Time”), then review the order of the images – they should appear correctly for the images that we have just adjusted.
Repeat the process for each camera that was used.
Adjusting Time in ACDSee Pro
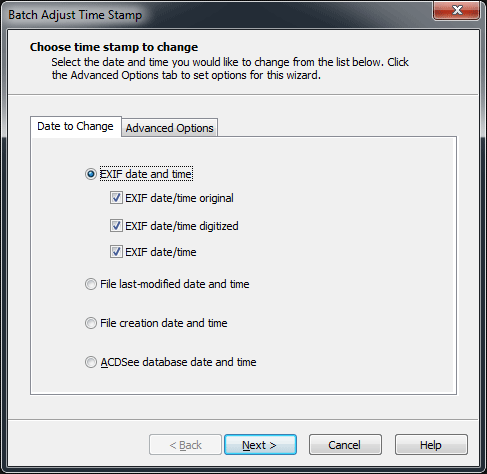
If you are an ACDSee Pro user, you can perform a similar task to adjust the time. First, filter images by the camera’s model number using the “Organize” sub-module (“Organize”->”Auto Categories”->”Photo Properties”->”Camera Model”. Then select all applicable images and go to “Tools”->”Batch”->”Adjust Time Stamp…”. Under the “Date to Change” tab, select “EXIF date and time”, as shown below:
Click the “Next” button. Then select “Shift date and time by a specific number”, which will allow you to just specify the offset of all images. Select either “Shift Forward” or “Shift Backward” and then specify the difference in hours, minutes and seconds. Once done, click the “Adjust Time Stamp” button, as shown below:
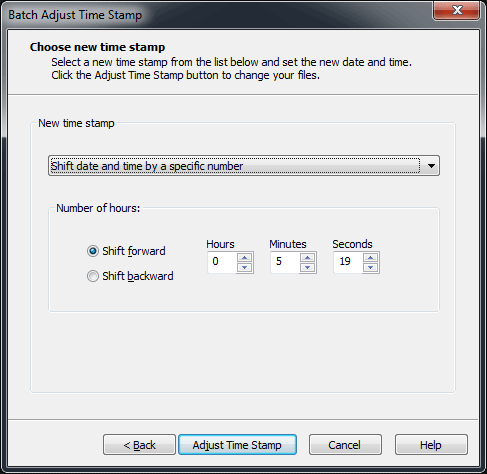
ACDSee will then go through each file and modify the time by the specified offset.
Hope this helps! Please let me know if you have any questions.
Thanks. I used EXIF Date Changer. If you filter by camera using windows explorer first and divide the photos into separate folders, then you can just use the free version.
I shot a whole wedding with one camera an hour ahead of the other, being able to change the capture time in LR like this saved me a huge amount of time in manually re-ordering them!
For Canon and Nikon cameras you can sync them with the world clock using EOS Utility or Nikon Transfer (2).
I wrote how to do it here
blandfordstudios.com/cgi-s…edpage.cgi
Hello Nasim,
great tips. But how can I avoid that the number of the pictures will cross each other?
For example I have a D600 (stands about picture number 950) and a D810 (stands at picture number 640). In the near future it could happen that when I shoot with both cameras the numbers will cross. And if that happens I will run into big trouble when importing into the same lightroom folder.
Do you have any suggestion???
Many Thanks
Christan
Set one camera to CH1 and the second camera to CH2 to distinguish the filenames. I am now experimenting with a 3rd camera, so my imagenames start with PJ1, PJ2 and PJ3 rather than DSC.
I will soon release an open-source free software that will allow you to do this even more easily, without having to manually work out the time difference between albums (no more confusion like “which one is before the other one”, “oh, the hour changed between the two photos”, …)
Stay tuned @phototimesync or phototimesync.oviles.info
I was just trying to set the time right on my holiday pictures. I forgot to set the right time zone. But Light room doesn’t save the changes as soon as I go to another picture. I am using RAW files instead of DNG. Is that the problem?
OK I found the problem I need to select them all in the Grid View instead of the Loup view
I didn’t know about this feature in Lightroom. Thanks Nasim!
This is a great tip. I have been shooting with time sync cameras on weddings for a while. Once I forgot and found it a nightmare. Glad to know I can change the time to sync in Lightroom.
Tim, you are most welcome!
Tim,
That’s the very reason why, as I said in my earlier post above, I don’t bother messing with the times. I have a “master camera” and all my other cams are set to the time on that camera and the time-zone set on that “master camera” is GMT.
I never bother re-setting them for summer/winter daylight savings or different time zones as there is just too much opportunity to forget to reset times, or set some and not the other.
What’s good about the tips in this blog, Nasin’s and Niklas Morberg’s, is that I can continue to steadfastly refuse to change my cam clocks knowing that i can either change the time in post-production or the person/s I hand my images over to can do it themselves. I think this is a much more secure way of doing things than relying on one’s memory to fiddle with camera clocks back and forth and I would much rather batch-process the time on a series of images than muck around with the clocks on five cameras.
And like you, I have suffered the nuisance of not having all my cams in sync (when I changed the time on some but forgot to on the others)
Regards,
plevyadophy
Adjusting time in post will not change the time stamp on RAW files.
If you lose LR catalog we have to start allover.
That is why I prefer method 1 where we set the clocks to correct time.
When I am traveling I change the clocks before I reach the destination.
Chris, if you check the option to write changes to RAW files, Lightroom will either do this in a sidecar XMP file or will overwrite the date in the DNG file. I import images as DNG files, so it will change the date.
But you are right – setting the clock to correct time is better.
Easy way to sync cameras is using Control Camera Pro, it works for Nikon, it is not necessarily cheap but let you sync camera clock with computer clock.
Nestor, the idea is not just to sync time with a single camera – this article is for situations where multiple photographers with multiple cameras are involved :)
Hi Nasim, I understood that you work with multiple cameras and individuals, my idea and what I do when I travel with multiple cameras is sync time on all of them with computer time. As I told it works with CCPro if you use nikon DSLR gear. I found it easier than looking at one camera clock, setting the other and waiting to press enter at the camera itself. I am not a wedding photographer, I don’t know if all cameras belongs to one individual or if the assistant provides his (her) camera, but if you OWN ALL the cameras this method is less time consuming and more expensive (CCPro is not free). In addition CCPro works with any Nikon DSLR you connect, at least the new ones. It is not limited to just one camera per license. Thanks for your reply.