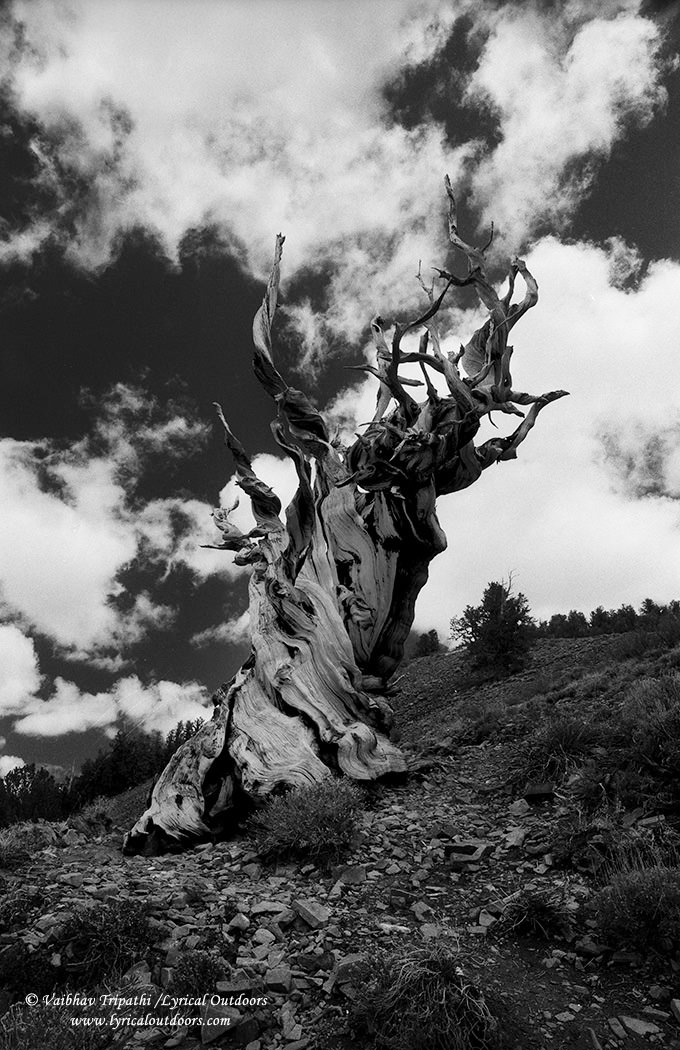
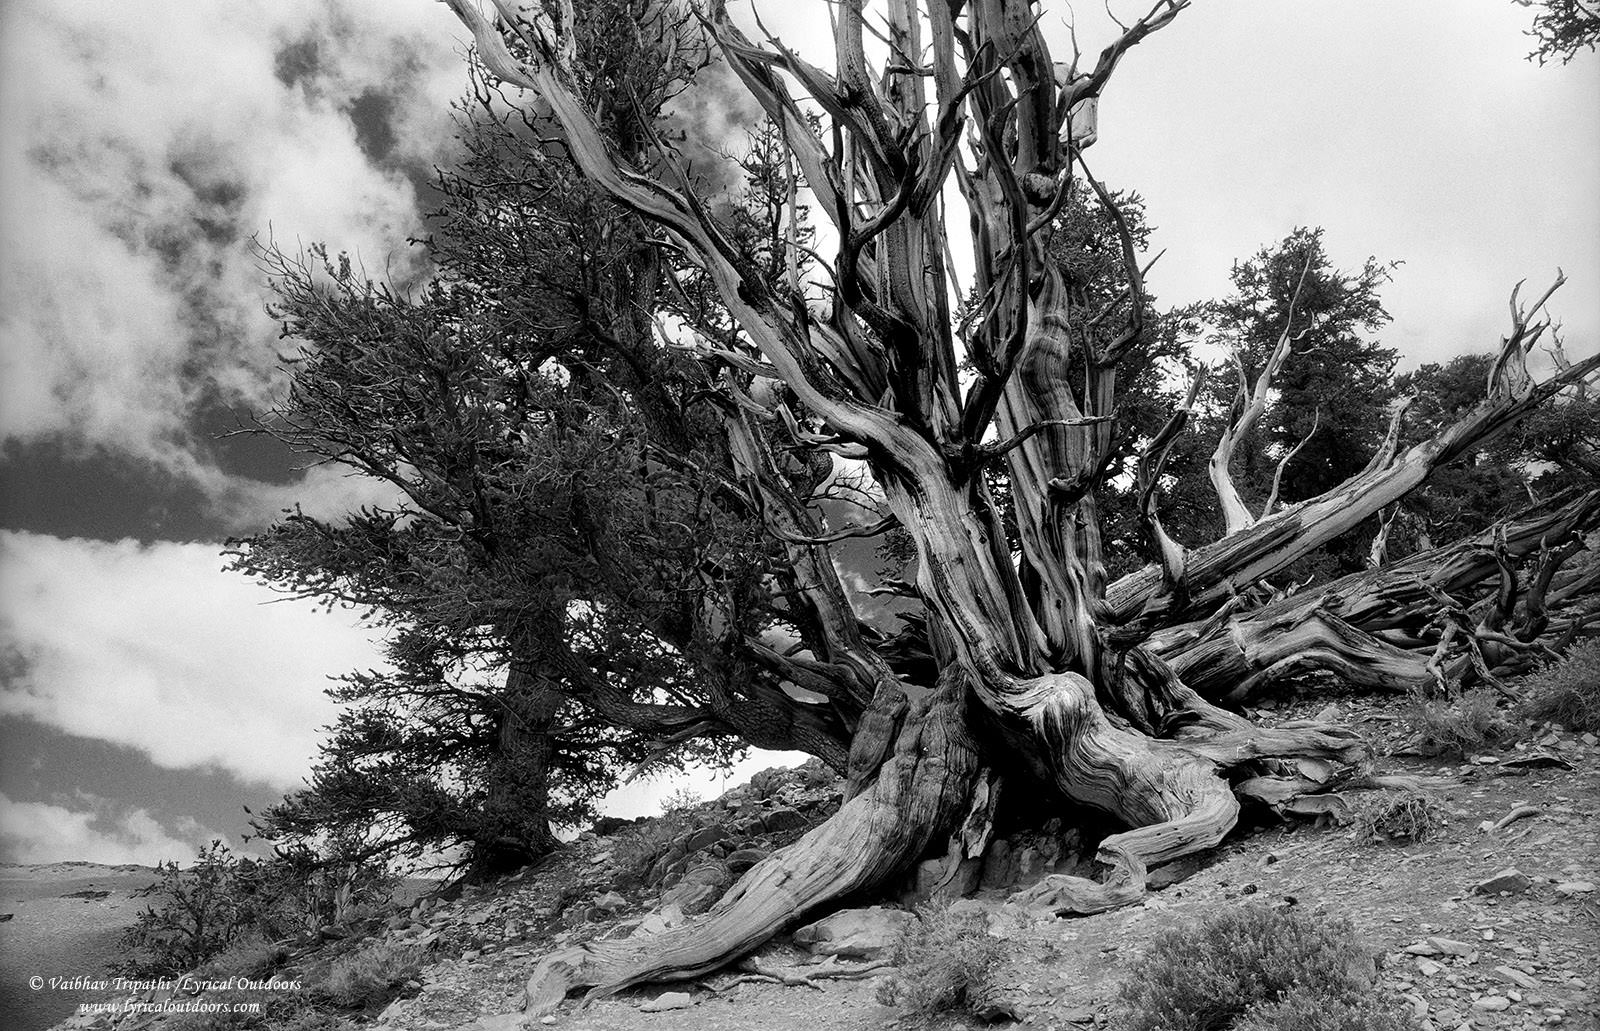
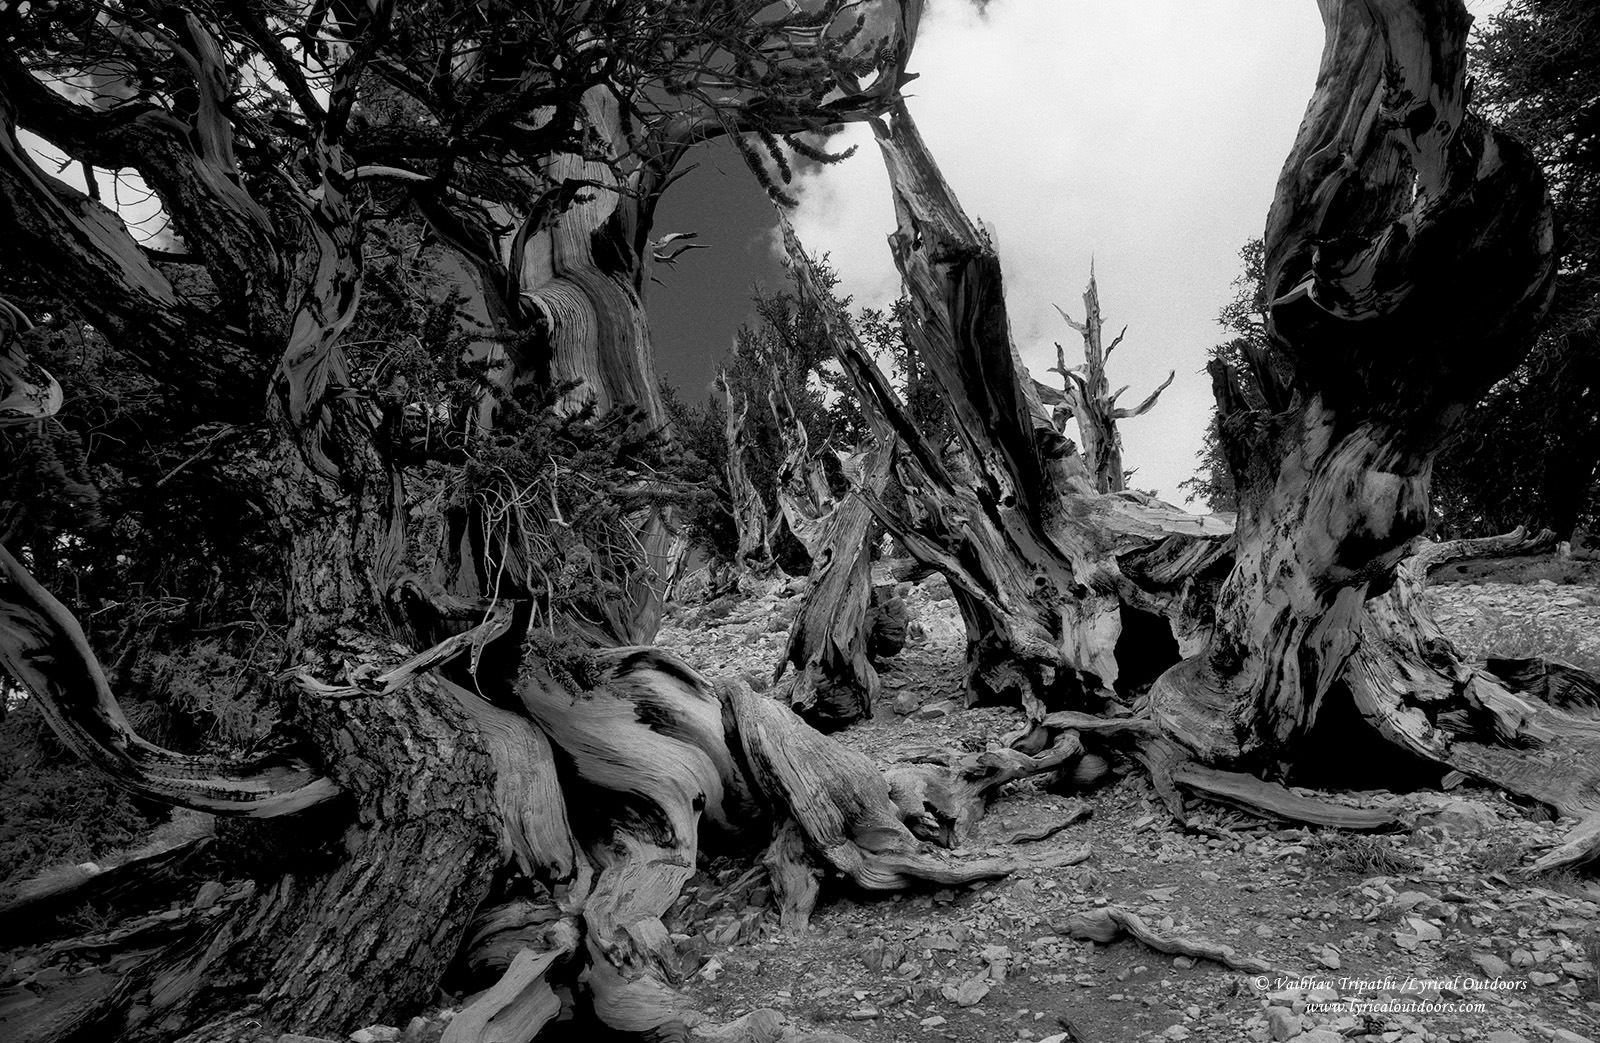
At this time when many of us are excited by the new camera announcements, I thought it will be intriguing to do a write up describing my first time shooting 35 mm black and white film. Last summer, I found some time to swing by the Ancient Bristlecone Pine Forest in White Mountains near Bishop, California. I knew that the timing of my trip will not coincide with the best lighting for photography, especially in color. So, I decided to photograph these ancient trees in B/W. Why B/W film? Well, I have always wanted to enjoy the aesthetics of it as well as I thought it will force me to think in terms of highlights, shadows and texture. All in all, a good learning experience.

Since this was a side trip, I wanted to keep my equipment fairly simple and light. I chose my trusted Nikon FE together with Nikon 24mm f/2.8 AI and Nikon 75-150 f/3.5 E AI lenses. This trio can be acquired used in very good condition for about $250! Both these lenses are very sharp when stopped down to f/8 and hold reasonably well upto f/16 (they also make an excellent backpacking combo with Nikon D610 or D750). Also, the common 52 mm thread meant that I can share a polarizer and an orange filter between them. Orange filter? Now why is that needed?
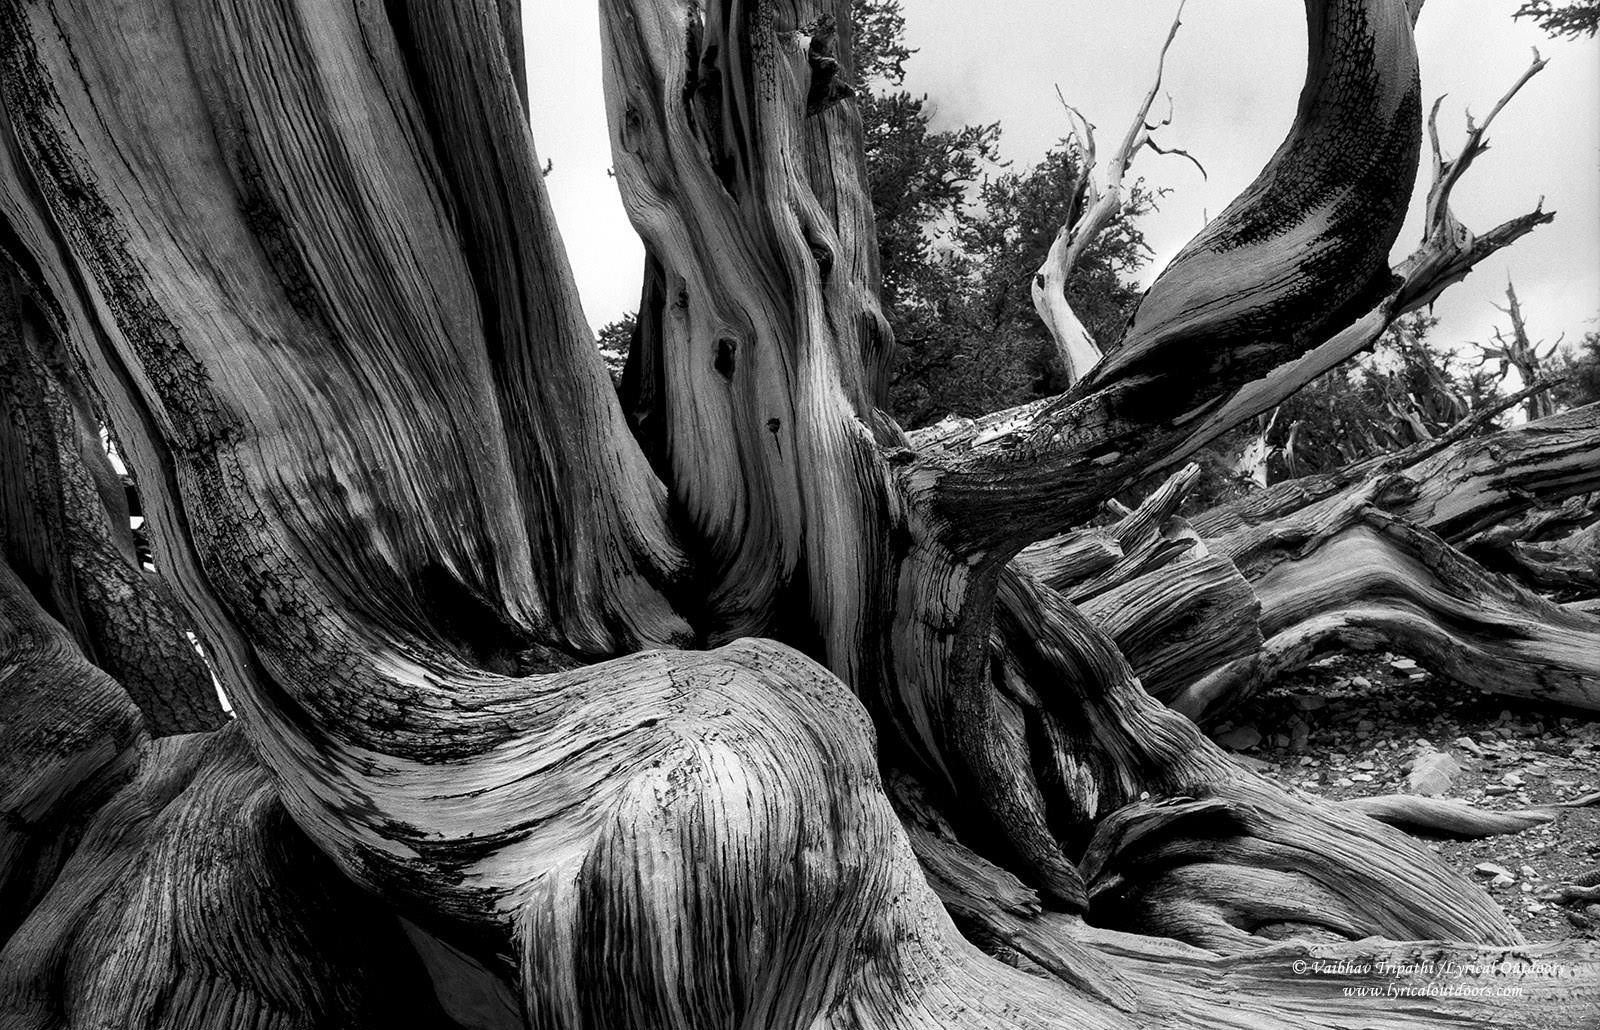
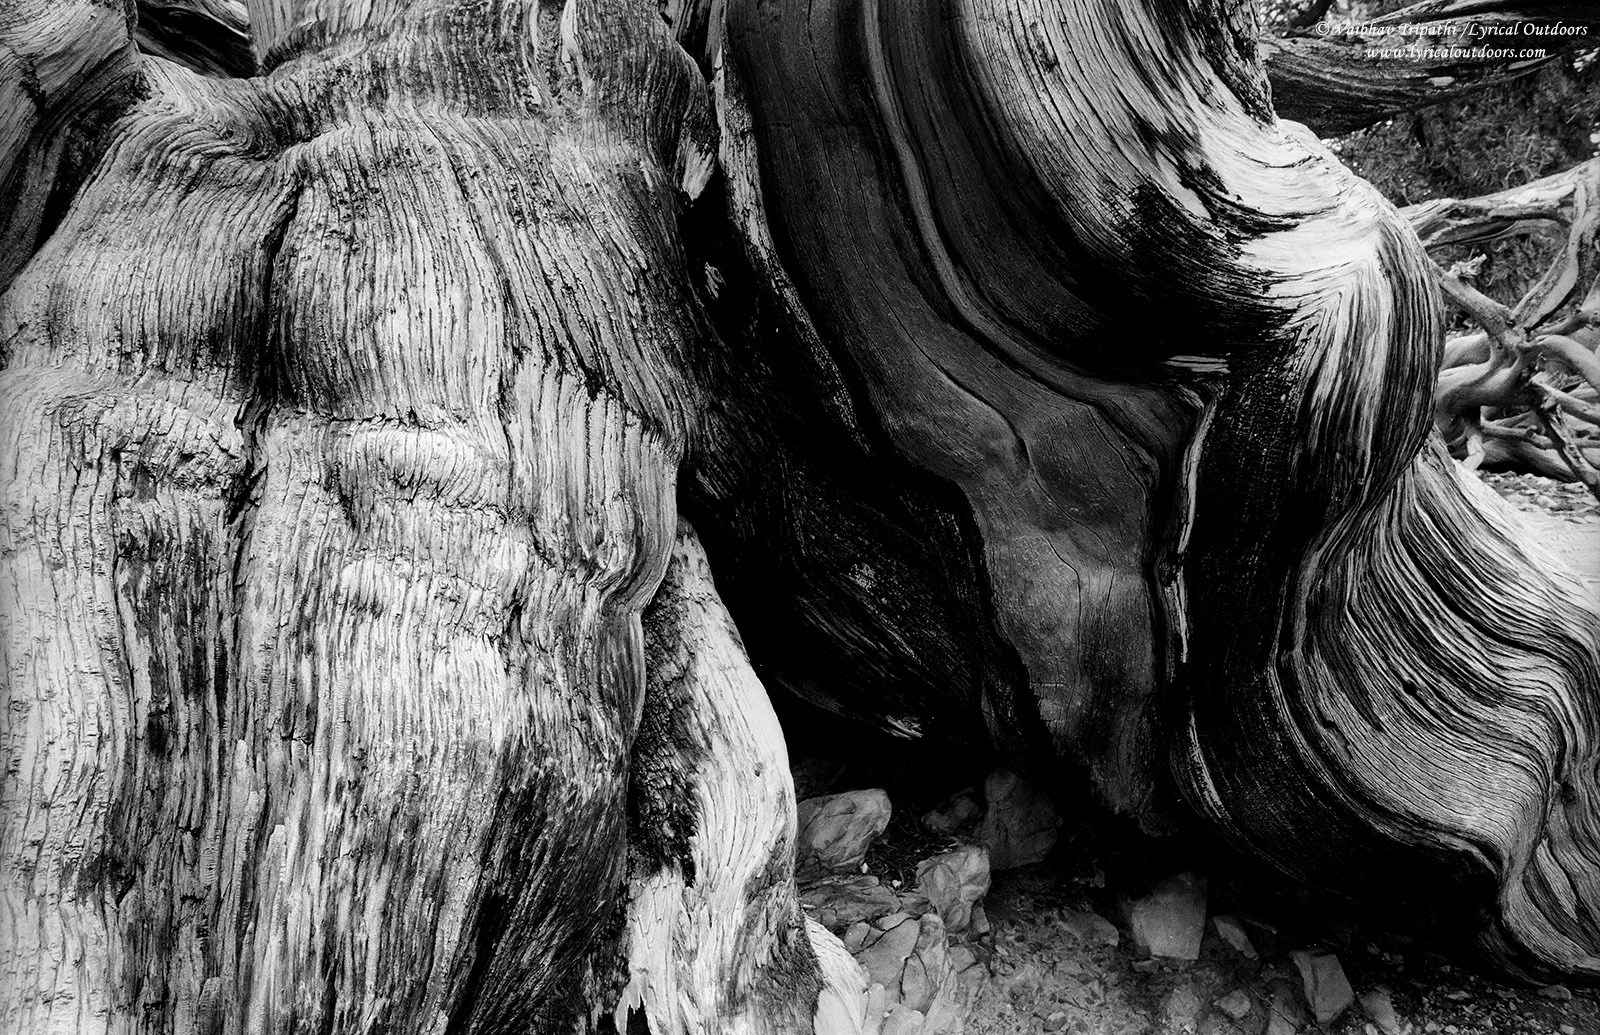
An orange filter as the name suggests allows orange-red wavelengths to pass and blocks violet-blue light. This darkens the blues and helps the clouds to stand out more in the sky. Moreover, the bristlecone pines have orange barks. These will be rendered as white (or comparatively brighter), which will increase contrast in the texture. It should be noted that a red filter will do the same and even more so. I chose an orange filter to play a little safe for it was the first time for me shooting B/W film with filters.
Since, orange filters alter the luminosity selectively, which in turn may also modify the response of b/w film, there is a consensus among photographers that some exposure compensation is required. I spend some time reading about this and found a variety of recommendations- from +0.5 EV to +3 EV, which left me confused. In the end I decided to bracket exposures and draw a conclusion of my own. I found that about one-third to two-third of positive exposure compensation works well for an SLR camera that uses TTL metering. This is easily accomplished by setting the ISO (ASA) speed appropriately. For example, I was using Ilford FP4+, which has a box ISO speed of 125. In my Nikon FE, I set the ISO dial to 80, thus allowing +2/3 stop of exposure compensation. I chose ILFORD FP4+ because of its pleasing tonality and almost endless highlight headroom. This film takes overexposure with such an aplomb that with careful scanning one can recover highlight details from a scene overexposed by 2-3 stops (maybe more!).
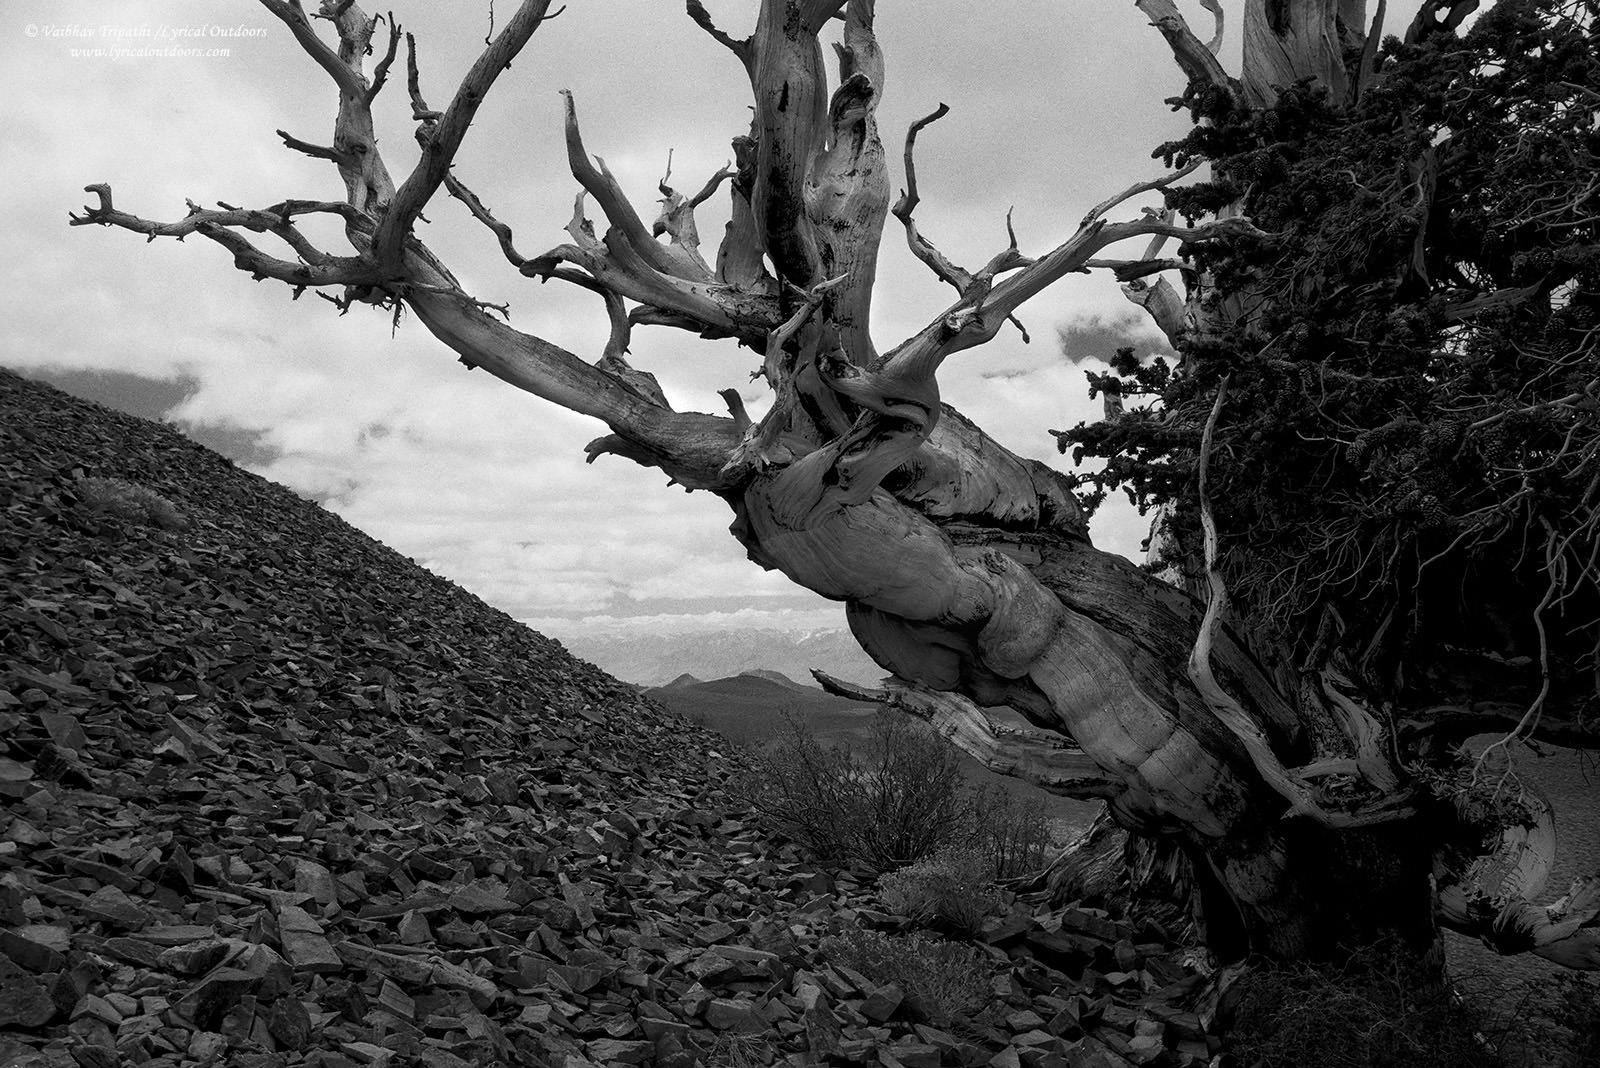
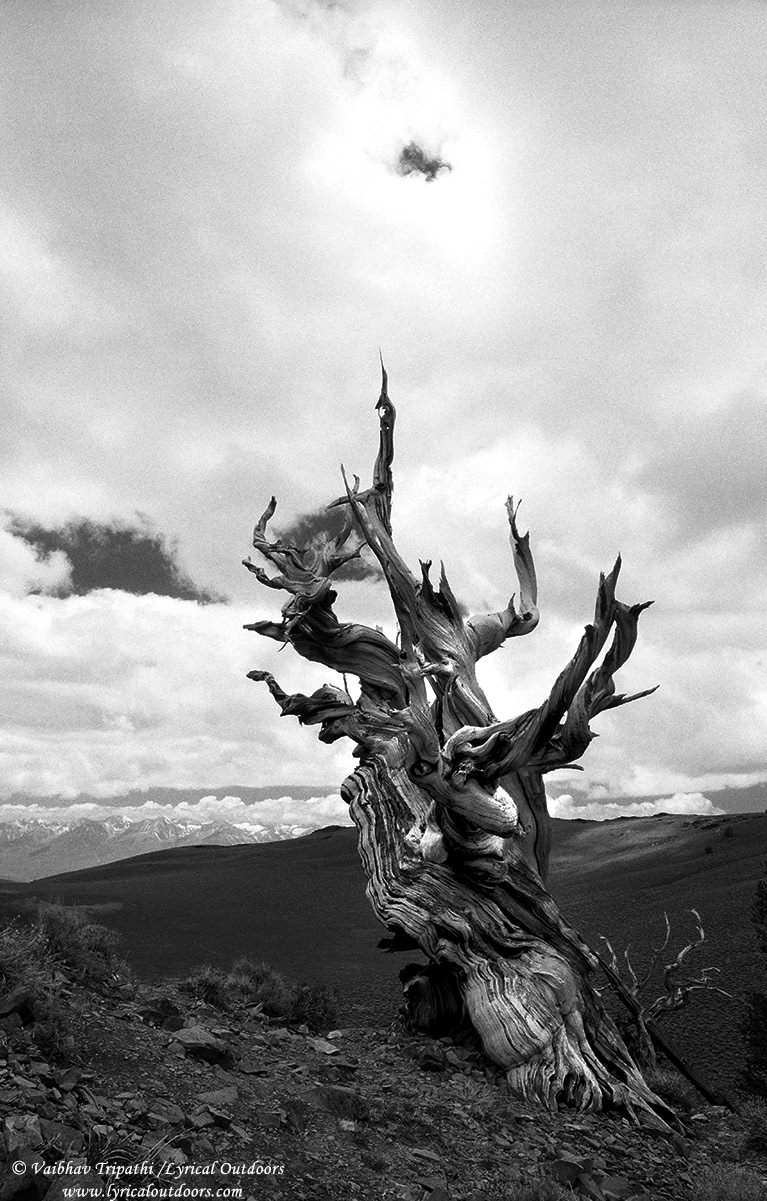
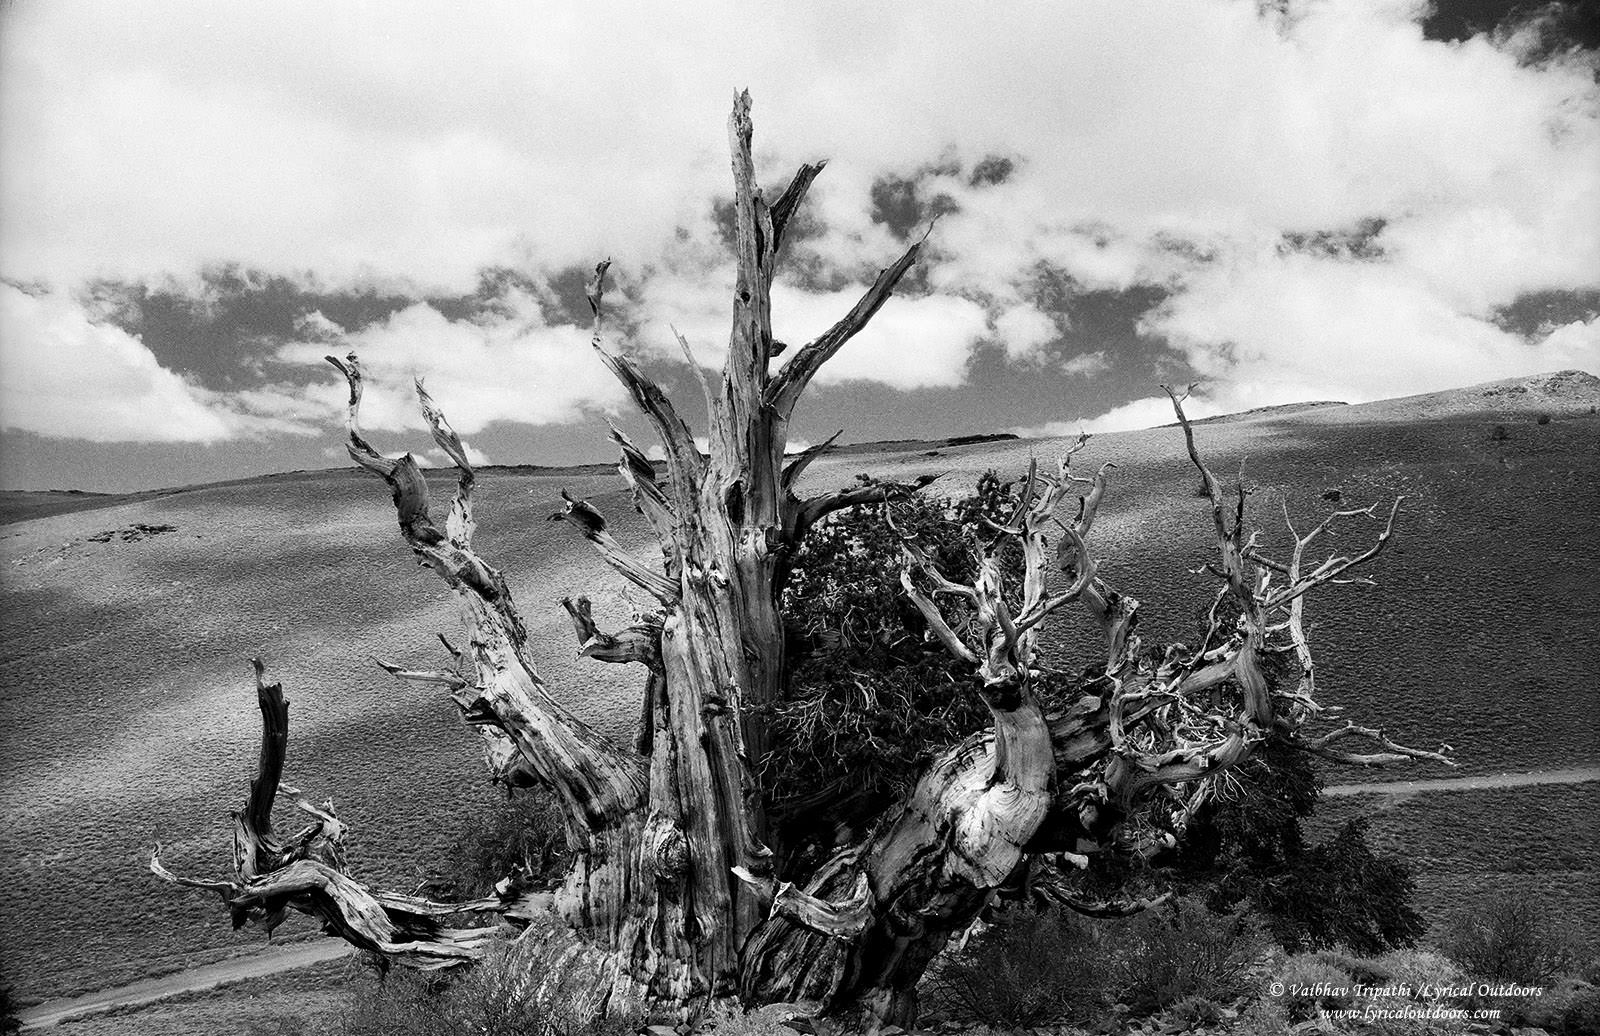
At the Ancient Bristlecone Pine forest, I hiked the Discovery loop at the Schulman Grove. It is a one mile trail that saves the best for the end if hiked in a counter-clockwise fashion. I spent about two hours here, stopping several times, looking for compositions and making photos. The bristlecone pines are very photogenic and each tree has a character of its own. I recall myself being enthralled and completely absorbed on the trail. It is fascinating to imagine that several of these trees were already thousand(s) of years old when Jesus Christ was born.
Fl
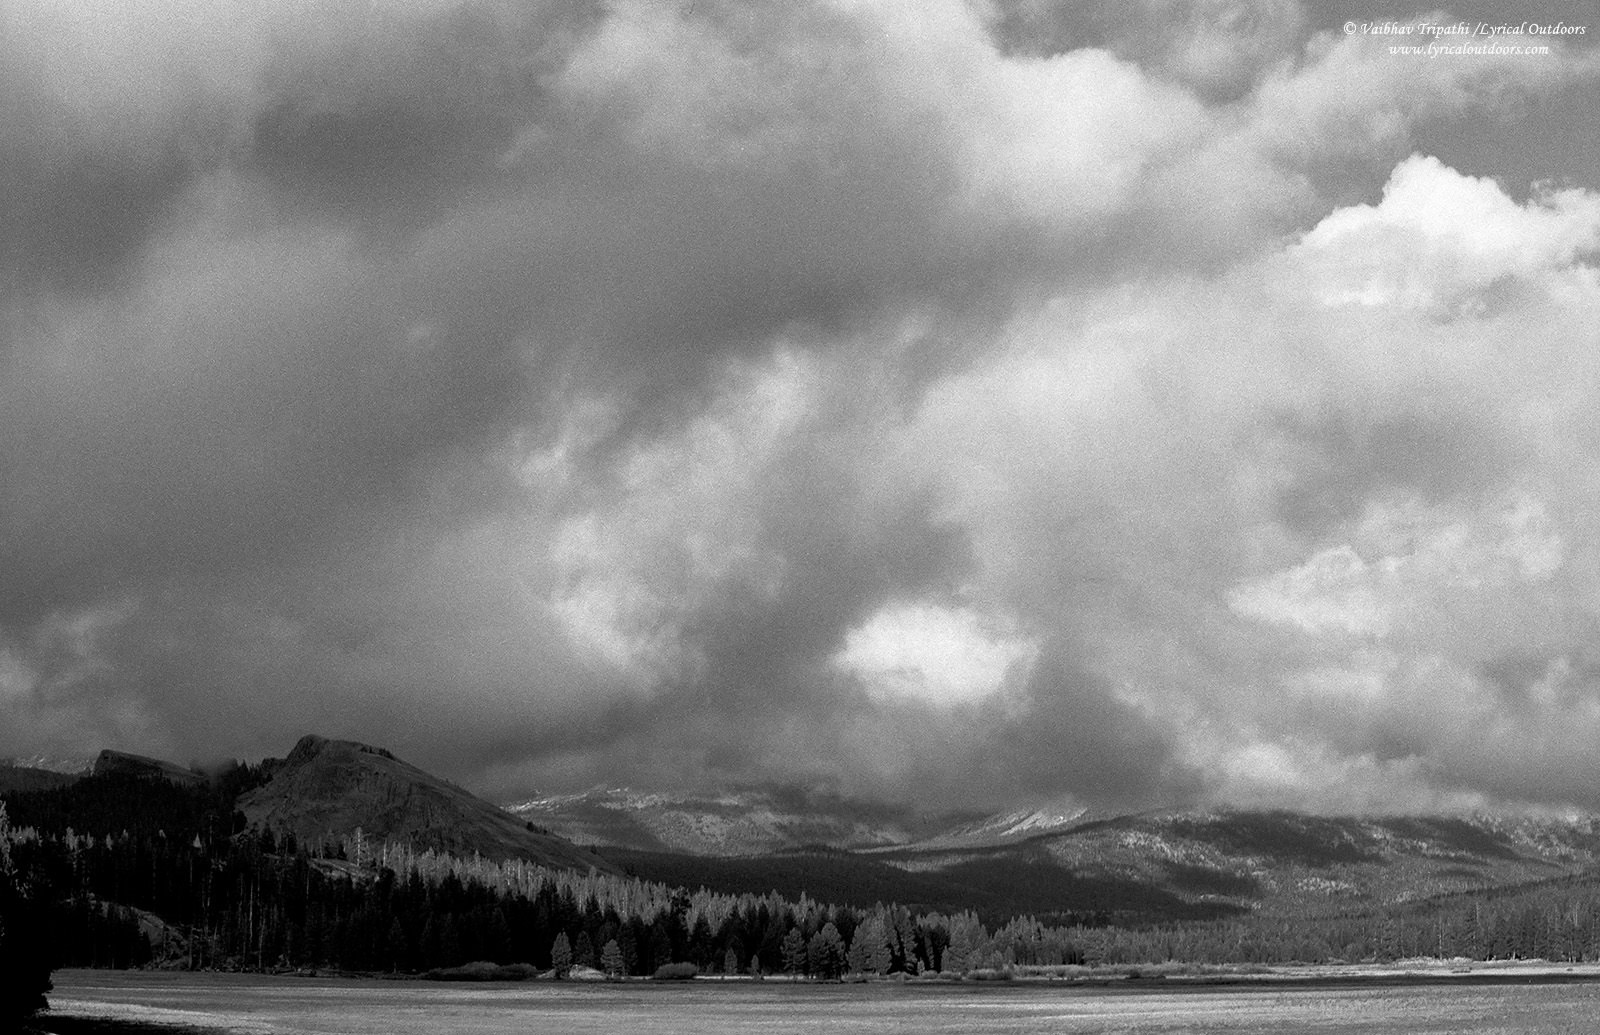
The film was developed at ILFORD LAB DIRECT and I scanned it using my Nikon Coolscan 5000 (the b/w mode works quite well). Since the digital ICE (scratch and dust removal) tool in the scanner is not suited for traditional B/W film, dust spots and scratches need to be removed manually, which adds to the scanning time and effort. I also used contrast curves and minor dodging and burning in Photoshop to reach these final selected images. I hope you enjoyed them it will be great to hear comments/feedback. In the end, I will share a photo of Tuolumne Meadows in Yosemite National Park that I clicked while driving to Bishop.
I think it’s a shame that people who want to use film don’t work in darkrooms any more and do the printing directly from the negative. I’ve tried converting digital color images to digital black & white, with disappointing results. The latitude in film differs greatly from that in digital.
Latitude in B&W film is the difference between blacks and whites in both the film and print images, and the range of midtones between the blacks and the whites. Working in a darkroom with a good enlarger and polyconstrast paper with polycontrast filters enhances whatever you created in the process of shooting the film.
Frankly, a good polarizing filter is usually sufficient for film use if you want to darken the sky and increase the contrast between sky and clouds. There isn’t any need for the orange filter, which, as you’ve pointed out, eliminates the orange tones in the bark of the pines. You can also fool around with infrared film for interesting results, if you want to do that.
I’ve been disappointed film scanned to digital because of the manipulation required to get the results you expected. The benefit to digital cameras is that you can control the color temperature in the camera, which you really can’t do with film, especially with reversal film unless you want to spend a major amount of cash on filters for that purpose.
There should not have been any scratches or spots at all on your film, unless you mishandled it somehow. If it came back from the lab with scratches and spots, I would complain about it. Retouching the images should not be necessary. But this is why we learned long ago to process our own film: if it’s scratched, we did it. If it has spots on it, it wasn’t cleared properly in the hypo (sodium thiosulfate) solution. Try shooting again in black & white, use only a polarizer to improve the midtones, and find a different lab to process the film for you. Also, check the inside of the camera body itself before you load the filim. If there is dust or lint, you can easily blow it out with a can of air.
That said, thanks for this photo essay. I was a medical photographer in the 1960s, where I got my start, and went on with photography in the Navy. While digital imaging has great advantages that film doesn’t have (immediate results, for example), the use of film is much more challenging. I have mountains, literally, of film images in all formats that go back to the 1960s.
You made me want to revisit the past with this essay. Thank you again.
I respectfully disagree with your comments on the orange filter. Increasing contrast between sky and the clouds with a polarizing filter requires orienting the polarizer as close to 90 degrees from the sun as possible, whereas orange filters (and yellow and red filters, for that matter), increase contrast between sky and the clouds regardless of the angle between the sun and the lens. That’s a big difference . . . Black and white contrast filters do not eliminate tones per se; they either lighten them or darken them, depending on the position that the color in the scene lies on the color wheel relative to the color of the filter to be used. And polarizers do not improve midtones. Midtones are placed where ever the photographer chooses to place them using the Zone System – during the exposure itself.
– Rick
Well, perhaps I wasn’t clear about the filters I referred to.
Polycontrast filters were used in the darkroom when printing black & white prints from black & white film. They were designed specifically to reduce muddy tones in prints. They didn’t work on printing color negatives to black & white prints, because there was a print paper (Pantone) specifically designed for black & white prints from color negs.
Polycontrast filters were used in the enlarger, in the darkroom, with a single or double weight black & white emulsion-specific paper labeled polycontrast. They were NOT attached to the camera. The papers available for this were either warm-toned or cold-toned. Sorry if I was not clear about that.
The problem with converting black & white film to a digital format is that the midtones in very light-colored objects such as clouds may be lost by the conversion. Clouds are very seldom a flat white.
If you look at the first picture in this group, the whites of the clouds are almost glaringly white, which can easily be resolved in a darkroom by burning in the white areas. If there is detail in those clouds, it is blown out and lost by the scanner. It’s more difficult to resolve this with a digital scan, which may not capture the details in the film. It would make more sense to spend time in the darkroom making the best prints possible and scanning those to a digital format.
If you look at some of Ansel Adams’ landscape prints, especially with those vast skies, e.g., Unicorn Peak and Thunderclouds (1967), you’ll see that there is no bright flat white anywhere. There is detail in everything, even in the snow. He was a master at printwork.
Mind you, I’m not faulting the effort and the desire to do something different. I think it’s a good idea for everyone unfamiliar with film to explore this. But I found when scanning some of my own color transparencies and negatives to a digital format that I lost a good percentage of the detail in the film image. That was disappointing by itself. But you are going from clumps of silver grain to pixels, which may or may not pick up those subtleties in film.
Sorry if I wasn’t clear about this. I didn’t want to take up too much room
I really love images 1-3. The others are not that strong, 4 and 7 could be great, but the (very interesting) main subject is too small and to 2d, I guess because of the distance and the bad background. The last one could be great too, but the clouds weren’t that interesting that day. Anyway, thanks for the essay, I enjoyed it as a whole and hope, you continue to post your work here (love to read a film post from time to time and I like a lot of your images)!
Daniel
This is a wonderful place to be sure. I shot color slides there years ago using a polarizing filter–big mistake. At approx. 6000′ altitude the skies were rendered almost black. By the way, thank you for pointing out the benefit of overexposing slightly when using an orange filter with TTL metering.
Vaibhav,
This is beautiful photography. In particular, the composition, detail, and 3-dimensionality captured in the first three images are stunning. It is almost as if you can reach out and feel the contours and textures of the bark. I really enjoy your choice and rationale for the orange filter, which can serve as an excellent tool for the landscape photographer. Well done! :)
– Rick
Great shots Vaibhav. I think some of the photo compositions are an inspiration from Galen Rowell’s work.
I’ve been to see the bristlecone pines twice; I was hoping to go for a third time last November, but the road was closed due to snow. It’s a fascinating place and a great place to shoot. The trees are great subject matter, up close, as well as from far away with wide views of many trees. I also have some nice images shooting west across the Owens Valley at the Eastern Sierras at sunset. My images have all been digital, though. I highly recommend this place.
I noticed Vaibhav that in your bio, you mention Galen Rowell. Right on the main road in Bishop is Galen Rowell’s gallery, Mountain Light, where I also have been twice. The images in that gallery are fantastic….they are way better in person than seeing them on the gallery’s website which I don’t think does them justice. If anyone is in this area, you definitely should plan a stop at Mountain Light Gallery.
These are very very nice photographs. Nice write-up too.
Thank you for the images. However, I did not find them compelling. The compositions where interesting but the light was lacking. I found some images missing in details, some in too much shadows and others lost in over-bright backgrounds. If others disagree and I am completely wrong, I would sure like to know what I missed.
I agree with you fully.
A hybrid analogue/digital workflow is dependent on good hardware – scanner, and in the case of these shots, which I think are generally good, it might be that the photographer scanned using a flatbed of some description. Not all dedicated film scanners have good dmax either for extracting shadow detail from a negative. Partly the reason I gave up shooting color film – a high end film scanner can cost tens of thousands of dollars.
He said the negatives were scanned with a Nikon Coolscan 5000.
He did? Maybe I should read the article next time. It does take a lot of trial and error to get the best out of a scanner though.
Yes, agree, getting a good scan can be difficult.