One of the greatest features of single-lens reflex (SLR) cameras is the interchangeability of their lenses. From super-wide fisheye to ultra-telephoto, interchangeable lenses have given SLR cameras the versatility to tackle almost any photographic challenge, and enabled 35mm film SLRs to dominate the market for “serious” photography for decades, until the advent of digital SLRs (DSLRs) beginning around the year 2000.
Digital SLRs are all autofocus cameras, most of which have evolved from the autofocusing 35mm film cameras of their respective manufacturers. They use the same lens mounts, and often, the same lenses as their film-based predecessors. However, the history of the development of autofocus film cameras shows that only two camera companies have preserved their lens mounts from the days of manual focus film cameras to today’s digital SLRs. These are Pentax and Nikon. When Canon switched to autofocus for its film cameras, it introduced an entirely new lens mount – the electronic EF mount – and essentially abandoned its manual focus FD mount. Minolta did the same thing when it switched from its manual focus SR mount in favor of the electronic Maxxum mount. Olympus abandoned its OM mount for the Four-Thirds system. In addition to adding electronic features to the camera/lens interface, the physical dimensions of the mounting hardware are different, making the new lenses incompatible with the old cameras, and vice-versa. Only Nikon and Pentax retained their bayonet mounting hardware while adding the electronic features required for automatic focusing. This means that the old manual focus lenses will mount on the new DSLRs (with certain restrictions) and can be used for photography (also with certain restrictions, which we will discuss shortly.)
One of the advantages of retaining the lens mount is that it allows photographers who own the older lenses to continue using them on the newer cameras, and it opens up the possibility for today’s photographers to avail themselves of the literally millions of older lenses that were produced for film cameras and are still available in used condition.
My own experience is with the Nikon system and I currently own a number of manual focus Nikkor lenses. For this reason I will limit my discussion to the Nikon system. I have no experience with the Pentax digital SLR system, although presumably many of the issues and concepts involved with using manual focus Nikon lenses on DSLRs will be the same for Pentax users.
All manual focus Nikkors are what we now call FX lenses – they were designed for use with 35mm film, and produce an image circle that will cover the “full frame” sensor of FX DSLRs. Of course, they will also work with Nikon DX cameras, subject to the normal 1.5X “crop factor” that is well-known to DX photographers. One advantage to DX users of this situation is that the smaller DX sensor only utilizes the central region of the image circle produced by the FX lens. This central region is generally the area of highest image quality. One disadvantage is that because of the 1.5X crop factor, the field of view of any given lens is narrower on a DX body, and a wide angle lens is never as wide on DX as it is on FX.
These lenses are manual focus only, of course. This is not a crippling disability – billions of wonderful photographs have been taken using manual focus – although it requires techniques that may not be familiar to many photographers who have grown up using only autofocus cameras.
When camera manufacturers made the switch from manual focus SLRs to autofocus models, changes were made in the cameras’ viewfinders which optimized them for autofocus, often at the expense of the ease and accuracy of manual focus. The old film cameras had excellent viewfinders with manual focusing aids, such as split-image rangefinders and microprisms, that enabled very accurate focus. These aids were dropped with the advent of autofocus and are absent in digital SLRs, making manual focus more difficult and less accurate.
To replace these manual focusing aids and improve photographers’ results when manually focusing, camera manufacturers incorporated “electronic rangefinders” into their DSLR viewfinders. These basically use the camera’s autofocus system to tell the photographer when the image is in focus. A circle or dot lights up in the viewfinder to indicate correct focus; some cameras include arrows to tell the photographer which way to turn the focusing ring on the lens in order to improve focus. The inclusion or omission of such arrows is shown in the following table:
| Focus Assist | Nikon DSLRs |
|---|---|
| Nikon DSLRs with directional focus assist arrows | D1 / D2 / D3 / D4 / D5-series, D8XX, D7XX, D6XX, Df, D500, D7XXX |
| Nikon DSLRs without directional focus assist arrows | D40-series, D50, D60, D70-series, D80, D90, D100, D200, D300-series, D3XXX, D5XXX |
Even though they are very different in construction, the focusing rings of both manual focusing and autofocusing lenses turn in the same direction to make the same changes in focus – that is to say, camera companies have preserved the direction of turning the focus ring from their MF lenses to their AF lenses. With Nikon lenses, for example, you turn the focusing ring clockwise (as seen from the camera) to focus further away from you (i.e., at a greater distance.)* The directional arrows in the viewfinders (of cameras equipped with them) tell you which way to turn the top of the focusing ring to attain focus of whatever is under the focusing point in use.
The accuracy of such systems is variable. You can often detect a range of focus ring positions in which the “in focus” dot is illuminated. The accuracy may also be affected by the brightness of a scene, the amount of contrast in the subject, and which autofocus sensor is in use – central focus points are generally more accurate than peripheral ones.
One technique to achieve more accurate manual focus is by using Live View on the rear LED screen rather than by focusing through the optical viewfinder. Live View gives you a real-time view of what the camera’s imaging sensor is seeing, and it’s possible to zoom in very closely on the image for critical focusing. Many mirrorless cameras are starting to include a feature known as “focus peaking,” which highlights the areas in the Live View image which are in sharpest focus. This is a very useful aid for manual focusing, and I expect it will be included in more and more future Nikon cameras, but at the moment it seems that only the D850 incorporates this feature.
Modern interchangeable lens cameras – both mirrorless and SLR – utilize electronic contacts to exchange information between the camera and the lens. This information includes the lens in use, the focal length, aperture, and focused distance, and it aids the camera in determining exposure and other values. Lenses that have this capability have a central processing unit (“CPU”) built in. The older manual focus lenses lack these electronic contacts and processors, and have very limited information exchange with the camera body. These are called “non-CPU” lenses. One piece of information that is required for the camera to provide exposure metering is the aperture value set on the lens. This is reported automatically to the camera by the CPU if the lens has one; in fact, the camera itself sets the aperture electronically. For non-CPU lenses, this is reported by the meter coupling lever on the camera.
In 1977, Nikon altered its lens mount (which had been introduced in 1959) to make it easier to use. The change was called “auto indexing,” or AI. Before the advent of auto indexing, photographers had to manually index each lens to the camera’s meter when the lens was mounted. Auto indexing made this process automatic. Most Nikon film cameras made after 1977 had a meter coupling lever on the lens mount to read the position of the aperture ring; in the digital age this mechanical coupling has been dropped from many cameras, since they are designed to function primarily with CPU-equipped lenses (see Figures 1 and 2 below).
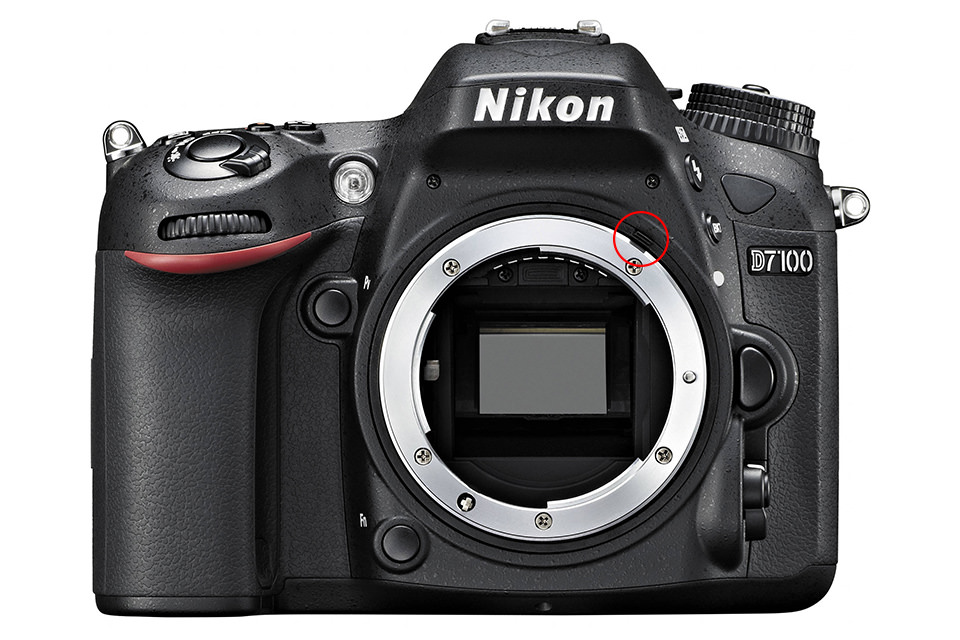
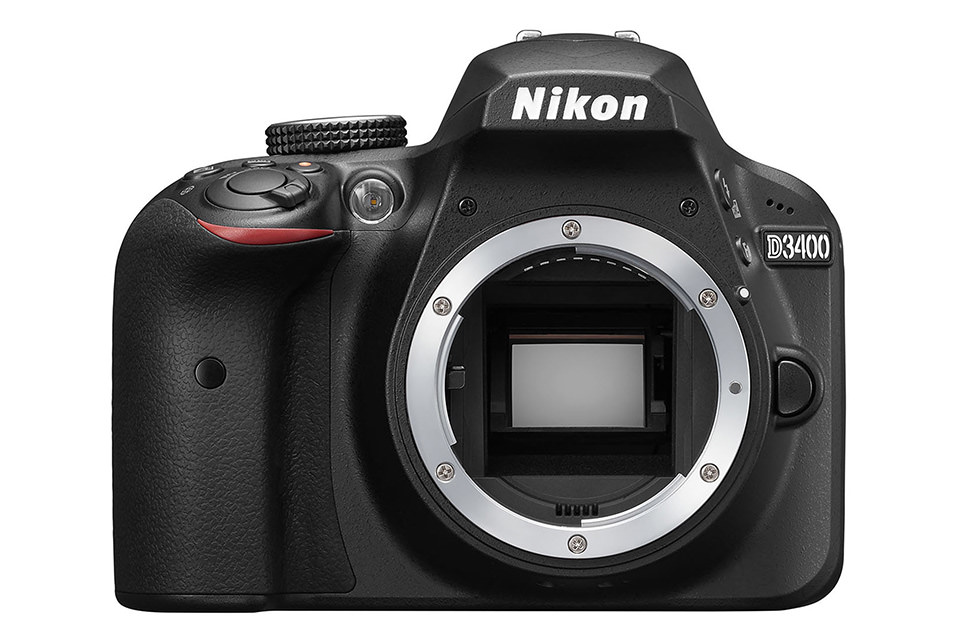
Most of the higher-end Nikon DSLRs have this meter coupling tab (a notable exception being the D7500); most of the lower-end cameras do not. If you use a non-CPU lens on a camera without the lever, the light meter will not operate. You can still mount and focus the lens, but you must estimate the exposure yourself, or use an external light meter. You must set the camera to manual exposure mode and set the aperture and shutter speed manually – no automation.
For DSLRs that do have the meter coupling tab, you must still give the camera some information in order for the exposure metering to work properly. The camera needs to know both the focal length of the lens, and its maximum aperture. The Nikon AI lens mount has a mechanical linkage to report the maximum aperture of the lens to film camera bodies, but the digital bodies do not use it. Instead, you must set the focal length and maximum aperture of the lens manually, using the camera’s menu system to input “Non-CPU Lens Data”.
The Nikon Df is unique among digital SLRs in that not only can it meter with manual focus AI Nikkors, but also with older non-AI Nikkors! It does this by using a folding meter coupling lever which can be moved out of the way when mounting non-AI lenses – something that would damage a non-folding lever. The earliest cameras designed for AI lenses, such as the Nikon FM, FE, and F3 film cameras, all had such folding tabs, but the feature was dropped over the years as the use of non-AI lenses became less common. In keeping with its role as a “legacy” camera, the Df is the only recent camera to incorporate this feature. This is the only Nikon digital camera on which you can safely mount a non-AI lens.
| Metering | Nikon DSLRs |
|---|---|
| Nikon DSLRs that can meter with AI manual focus lenses | D1 / D2 / D3 / D4 / D5-series, Df, D8XX, D7XX, D6XX, Df, D500, D200, D300 series, D7000, D7100, D7200 |
| Nikon DSLRs that cannot meter with AI manual focus lenses | D40-series, D50, D60, D70-series, D80, D90, D100, D3XXX, D5XXX, D7500 |
The basic technique for mounting and using AI-NIkkors is the same from camera to camera, although the exact details varies by model. For those cameras that have an AI-indexing tab and can meter with these lenses, you must go into the menu system of the camera and manually input the focal length and maximum aperture of the lens:
- Press the MENU button on the back of the camera.
- Scroll down to the SETUP menu (the wrench icon).
- Highlight Non-CPU lens data and press ENTER.
- Choose a lens number (typically between 1 and 9). The lens number merely means that the camera can store data for up to 9 different lenses; it’s not an intrinsic property of the lens.
- Enter the focal length and maximum aperture. You choose these from a list. If the exact focal length is not listed, Nikon says to choose the closest value greater than the actual focal length of the lens.
- Select DONE
You can do this for typically up to 9 lenses. Zoom lenses present a bit of a challenge for this system, since the focal length, and sometimes the maximum aperture, vary as the lens is zoomed. Nikon says that the data for different focal lengths can be entered as separate lens numbers, or the data for a particular lens can be edited to reflect the new values for focal length and maximum aperture each time the focal length is adjusted. Admittedly this is a cumbersome system, but it’s what is necessary to use these older lenses on newer cameras.
Now that your camera knows your non-CPU lens data, to use it you must tell the camera you’re mounting a non-CPU lens and which one it is. You do this by assigning the selection function to one of the control buttons on the camera, typically a function (Fn) button, the depth-of-field preview button (if your camera has one), or the AE/AF lock button (AE-L/AF-L). The exact buttons available vary by model and you should consult your instruction manual for the particulars of how to do this with your particular camera. Here’s how to do it on a Nikon D7100, and let’s use the Fn button:
- Press the MENU button.
- Choose the CUSTOM SETTINGS menu (the pencil icon).
- Choose CONTROLS and press OK.
- Select ASSIGN FN BUTTON and press OK.
- Select PRESS + COMMAND DIALS and press OK.
- Select CHOOSE NON-CPU LENS NUMBER and press OK.
Back out of the menu system. Now when you mount a non-CPU lens to your camera, you can press the Fn button and view your lens choices on the camera’s top LCD or by pressing the i or info buttons to view them on the rear LCD screen. While holding the Fn button, rotate either one of the camera’s command dials to scroll through all the non-CPU lenses in the camera’s database, and select the one you have mounted. At this point, you can use the camera in A (aperture priority) mode or in M (manual exposure) mode. If you choose A, you can select your desired aperture by turning the aperture ring on the lens; the camera will choose a shutter speed to give you proper exposure. If you choose M, you select the aperture on the lens and adjust the shutter speed using the main (rear) command dial on the camera.
If you’re using the Nikon Df, you have the additional flexibility of using a non-AI lens on your camera. Since these lenses cannot communicate the position of their aperture ring to the camera using the AI-indexing system, you have some additional steps: When you input the non-CPU lens data into the camera, you must add a third value in addition to maximum aperture and focal length. This is the type of exposure meter coupling. Select AI or non-AI, as appropriate.
Now when you use a non-AI lens on your Df, you select the lens number as you would any other non-CPU lens, but you have a little more work to do. When you mount the lens, you must make sure the AI indexing tab is flipped out of the way. FAILURE TO DO THIS COULD DAMAGE THE CAMERA OR THE LENS, so be very sure you have the lever in the appropriate position. Mount the lens in the normal way, select its data from the non-CPU lenses you have encoded into the camera, select exposure mode A or M, and set the aperture value you want on the lens aperture ring. Once you have done this, you must now select the same aperture on the camera using the sub (front) command dial. This is because the camera has no other way of knowing what aperture you’re using. You must set the new aperture on the camera in this way each time you change the aperture setting on the lens.
As I mentioned earlier, the Nikon F-mount dates from 1959. Because Nikon has made lens compatibility a priority over the decades, lenses made decades ago can still fit cameras being made today, and if you know how, can still make wonderful photographs.
* With the exception of one lens, the 45mm f/2.8 GN Nikkor, a specialty lens that was manufactured from 1968 – 1977. The focusing ring of the GN Nikkor turned in the opposite direction from all other Nikkors, i.e., counter-clockwise to focus further away.
This guest post was contributed by Dr. Steven J. Schiff.
This information was extremely helpful. I am learning the ropes.
Very well written article and so thoughrough. Everything that needed to be said was said here, case close !
This was incredibly helpful, thank you!
Loved this read, Just bought an old 70-210 f4 and found everything i should know right here, thanks
That was great information. Easy to follow. Thanks
If only my d3400 had this option to use a 6.5mm fisheye i scored from b&h. It fits and works allright. Great lens gets almost 180 degrees but ive got to monkey with it and take so many test shots. The focus ring doesnt seem to do anything as everything looks in focus always Good thing im not wasting film.
Thank you.
What about non Nikon lenses? I have a Nikon D5600 and have just purchased a Kelda 500 mm f6.3 lens (totally manual of course). It works very well but will it do any harm to the camera?
So many variables and models listed it is confusing. Very simply, I have f type lenses from my F2 (50 mm, and 43-86 and 50-300 zooms} and want to know what model Digital Nikon would accept them.
Will a Vivitar 135mm f2.8 with a Nikon Mount be compatible with my Nikon D200