A strength of Photoshop is being able to perform edits non-destructively. Most edits can be performed on their own layer, preserving the original background layer. The Spot Healing Brush, Clone Stamp, and Patch tools all work this way and they can all be used to remove unwanted objects non-destructively. However, if you have ever tried to remove an object from an image using Content-Aware Fill, you will have noticed that you can’t do this on a new blank layer. This tool requires pixels to work. But if you use Content-Aware Fill on your background layer, you end up changing those pixels permanently. You could create a copy of the background and use the tool here. However, this needlessly increases the size of your document. In this short article, I want to show you an easy workaround, which will keep your original background layer intact.
Steps to use Content-Aware Fill Non-Destructively
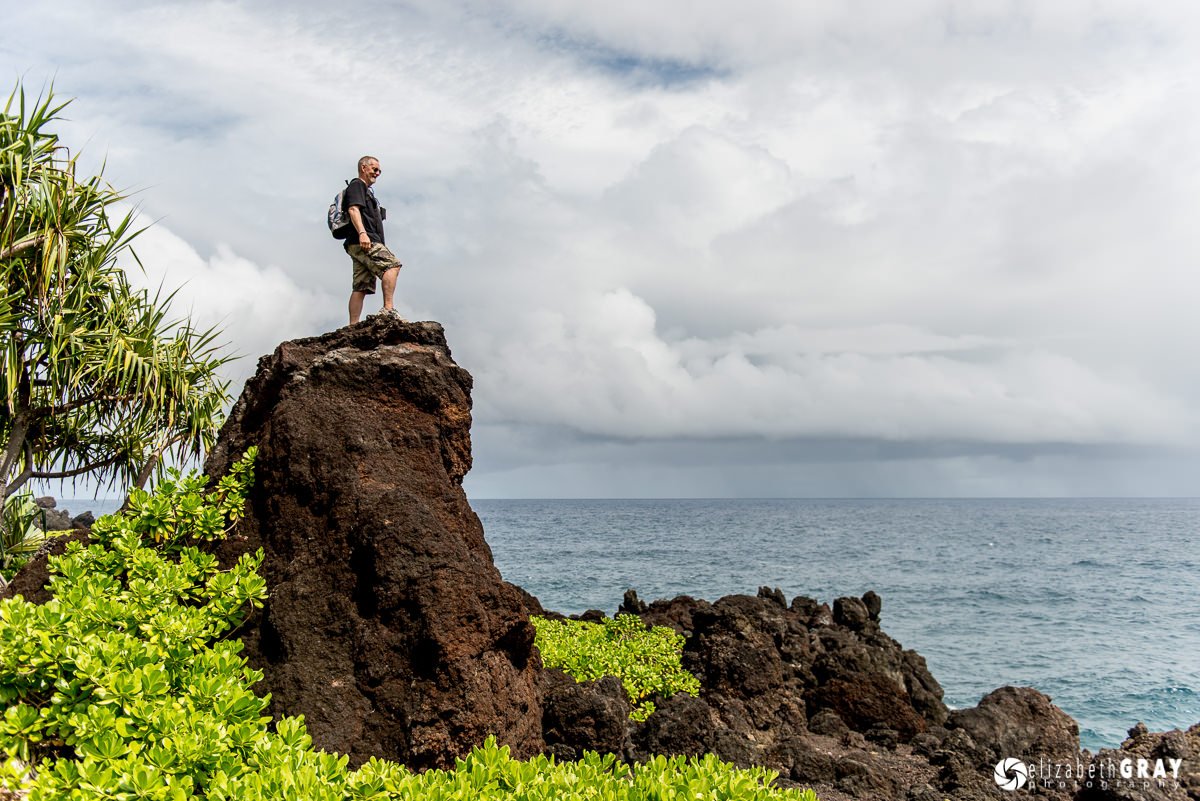
To illustrate the technique, let’s take a look at this image. I shot it last year on the Road to Hana in Maui with some friends. Now whenever possible, I try and get the image right in camera. But sometimes that isn’t possible. So apologies to Keith, but let’s remove him from this landscape!
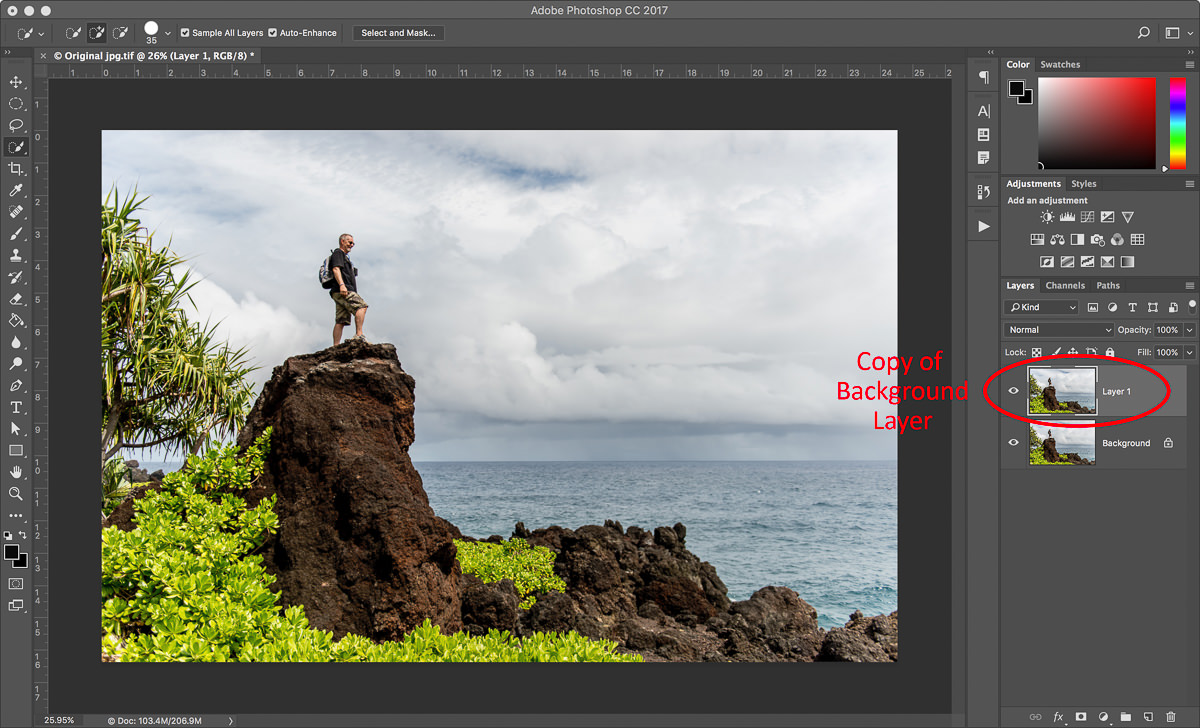
Create a copy of your background layer. To do this, select the background layer and press Cmd+J (Mac) or Ctrl+J (PC). You don’t need to rename this layer because we will be deleting it in the end.
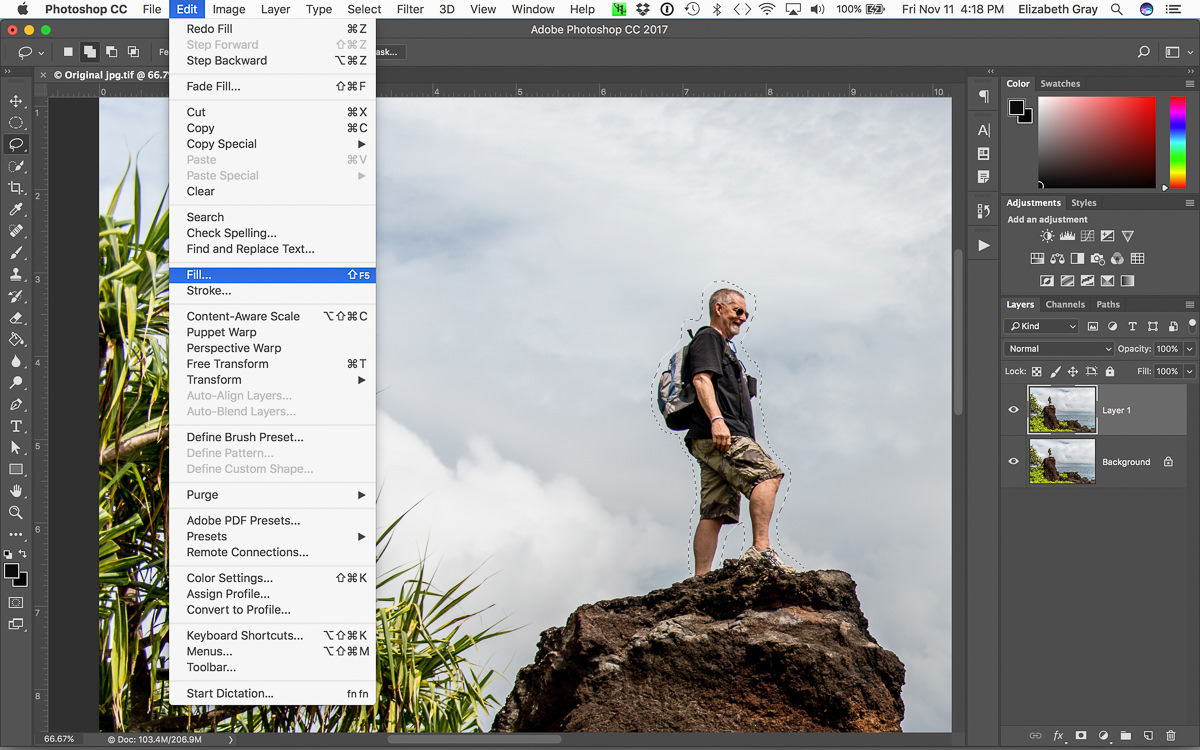
With the copied background layer selected, use the lasso tool and create a rough selection around the object you want to remove. You could also do this using the Quick Selection tool and expand your selection by several pixels. The selection does not have to be perfect.

From the Edit menu, choose Fill.
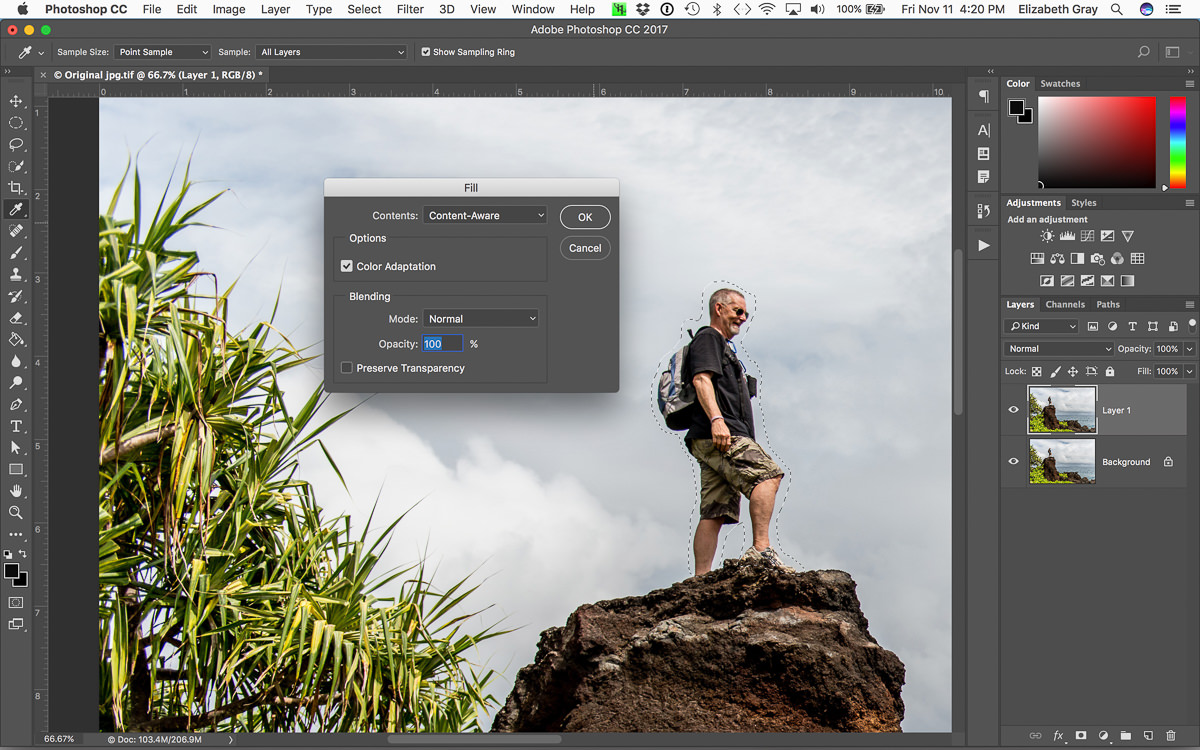
Make sure that Content-Aware Fill is selected from the drop-down menu, that Color Adaptation is selected, and choose Normal as the blending mode. Now click OK.
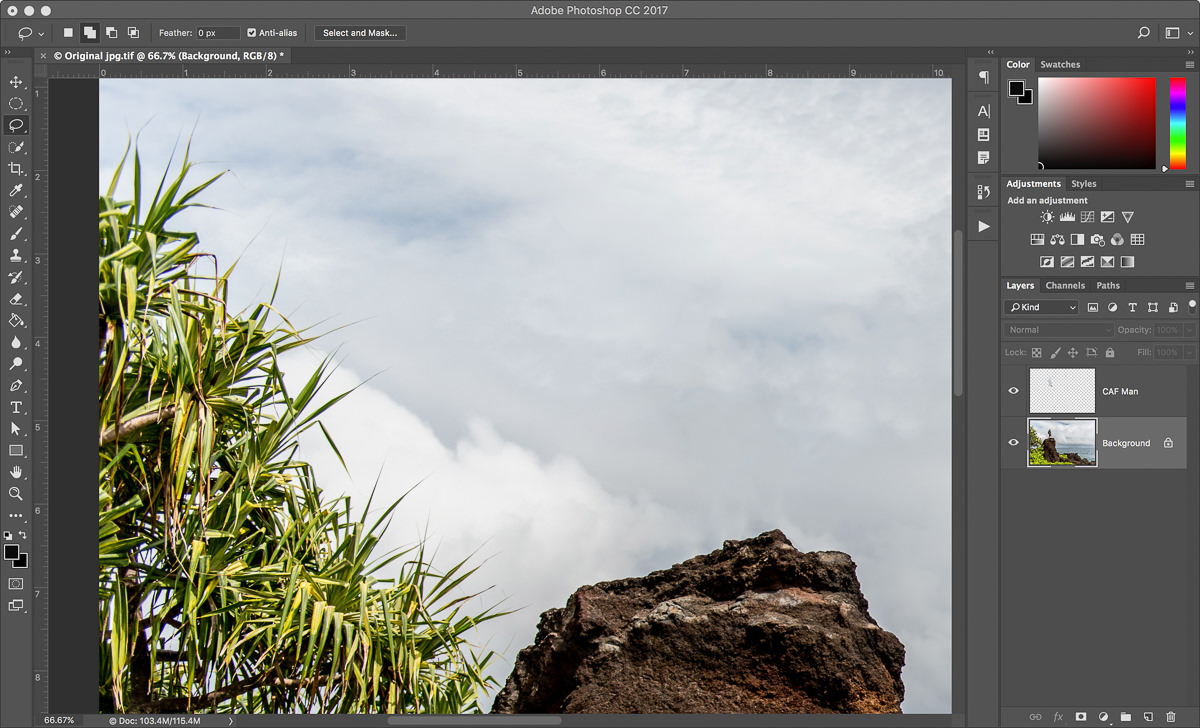
At this point, the unwanted object should have miraculously disappeared and your selection will still be active. This next step is the important one!
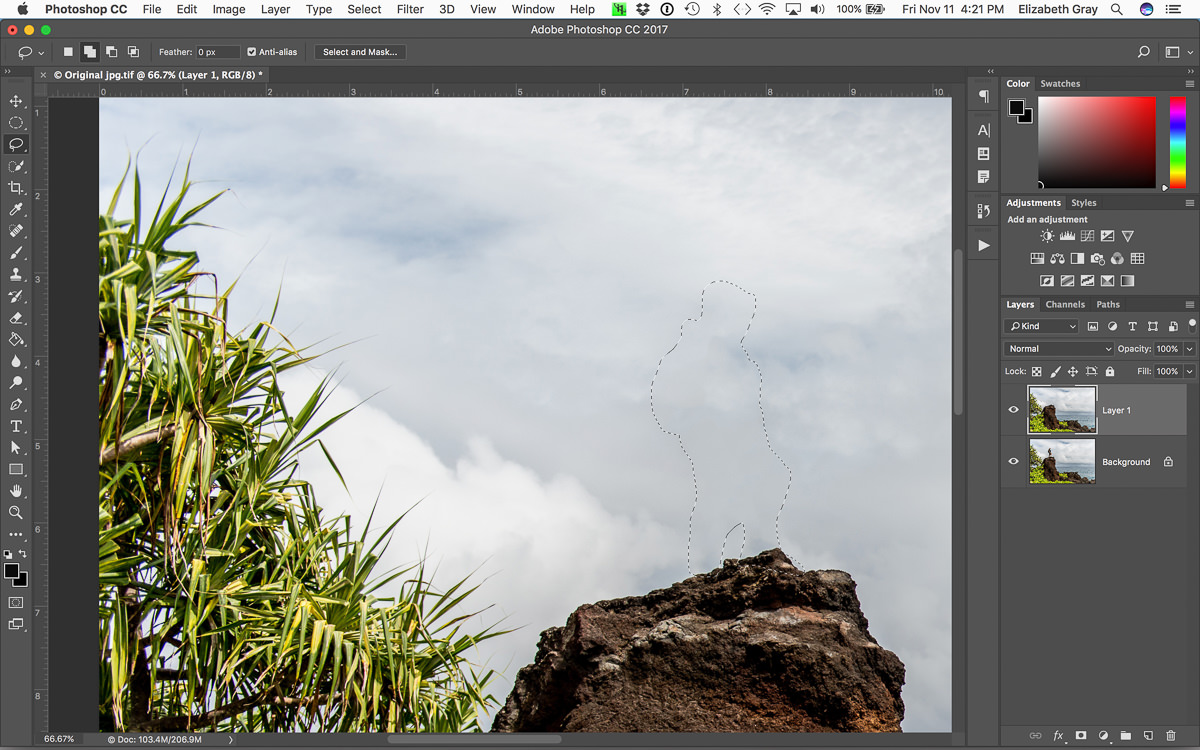
With the selection still active, copy it to a new layer. You can do this in one step using the shortcut Cmd+J (Mac) or Ctrl+J (PC). Now the pixels that Photoshop created to fill in space originally occupied by the object are on their own layer.

You are almost done. Delete the copy of the background layer that you made in the first step and rename the layer with the new pixels on it. Renaming will help you keep track of your layers, especially if your final document contains more than a few.
Finishing Touches
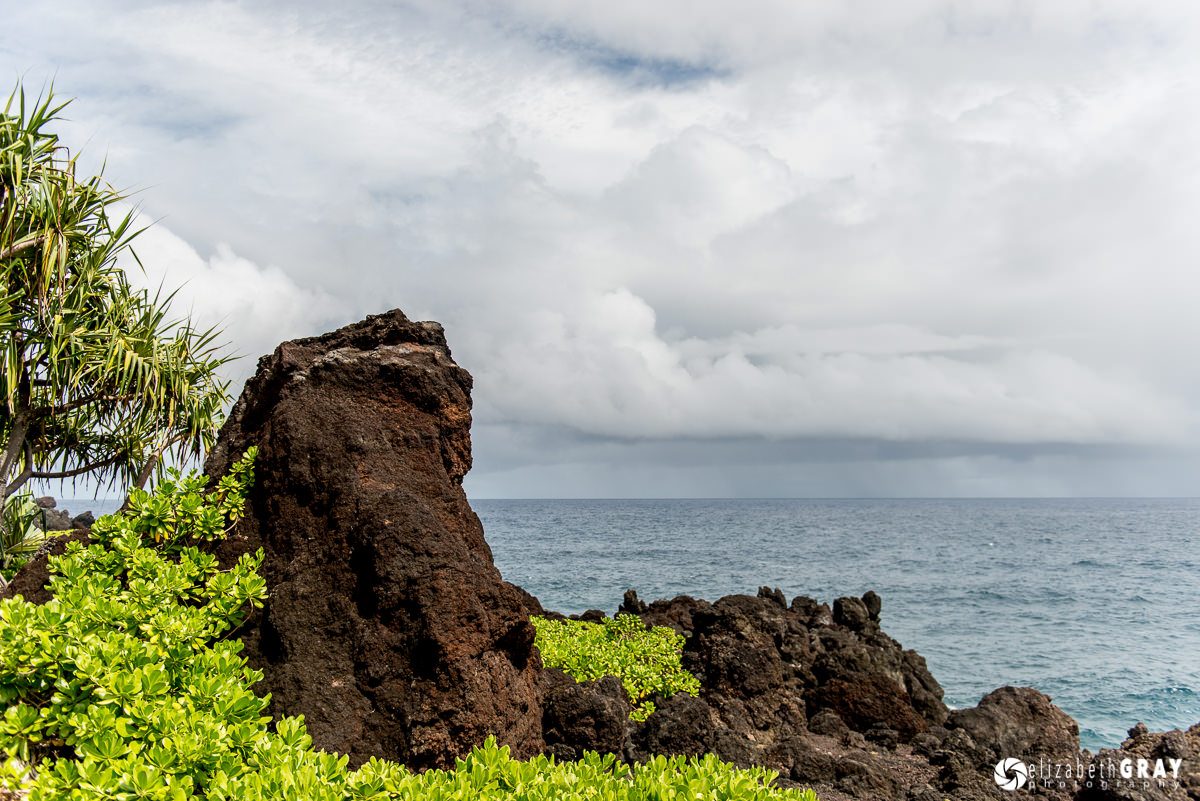
Sometimes Content Aware Fill does a perfect job. Other times, you may need to clean up a few areas, especially if you see any pattern repetition. In this example, I didn’t like the light area on the rocks.
To take care of this I created a new layer and used the clone stamp tool to replace the bright rock with something darker. Make sure you have sample ‘Current & Below’ selected and work from a new layer to continue working non-destructively.

Now you are finished and the original background layer remains untouched. You can turn the layers with the new pixels on and off to confirm this.
Conclusion
Now I realize that each of you will have your favorite way of removing objects in Photoshop, and in no way am I trying to tell you to use Content Aware Fill all the time. What I have found is that if one method doesn’t work, try another. For small spots and blemishes, the Spot Healing Brush usually works well. Sometimes a combination of techniques works best. For large objects, I find Content-Aware Fill usually does the trick.
What I hope you take away here is that there is no one ‘best’ way. But there are ‘smart’ ways to work inside of Photoshop. Whatever method you use, make sure that you are working non-destructively.
It is such an amazing article. I loved the way of working. Is that retouching thing that you did on the man? Whatever it is, is magical. Thanks for sharing this amazing article and sharing very effective tips and techniques.
You could also select inverse and then delete on your working layer to avoid creating a new layer and pasting to it.
Great tip, Mokba! I hadn’t thought of doing it that way. Just goes to show that there are so many ways in PS to get to the same end point.
Great tip! I was bloating my file size with layer copies – no more. My drives will be happy ?
So glad I could help Sceptical and thank you for taking the time to comment!
I’m still fairly new to Photoshop, even after using it for a couple years. I never thought to make the changes this way – so simple – thanks!
Glad you liked the article Photorogr, and thanks for your comment.
Can we do a similarity with Affinity Photo?
I’m really sorry Claude, but I’m not familiar with Affinity Photo. Hopefully one of our readers will be able to answer that for you.
Affinity Photo has an Inpainting tool, which is what I use most of the time. It really works well!
Thanks, Gerald for helping out.
Elizabeth, Thank for for a clear and concise article. AND thank you for “CTRL+J”!
One short is always better than two (CTRL+C, CTRL+V)
Glad you enjoyed the tips Rich! CTRL+J is a great little shortcut. I use it whenever I want to copy a selection to a new layer.
Hi Elizabeth, great tip! Question: could one just copy the background layer, create Photoshop magic, and then flatten or merge the two layers afterwards instead of futzing with a separate layer?
Yes but this would be destructive of the original layer and image, which is what Elizabeth was showing us how to avoid in this article.
My bad: I should have included working on a copy and not on the original. My workflow always includes a working copy. Once satisfied, I make a Save as… for whatever purposes needed. I can always go back to the layered version to reedit if necessary. A bit cumbersome and heavy on file sizes maybe, but it creates the most flexible and versatile method I believe.
Thanks for the comments, Crunch. So let me see if I understand what you are saying. Firstly, make a copy of background. Secondly, make your edits. Thirdly, flatten all but original layer. Lastly, save the file under a different name? Yes, this is non-destructive, but if you ever want to go back and make edits to your edits, you will not be able to since they have all been flattened. Do you save the original document with the layers before flattening so you can go back to it? I guess I would be afraid that I would hit cmd+s instead of ‘Save As’ after I flattened! I have done that before! Also, you now have two files instead of one and are taking up more file space than is really needed.
In earlier versions of Photoshop I was taught to always make a copy of the background layer first, and then start doing my edits. However, with the latest versions of Photoshop (CS6 and CC), this really isn’t necessary. It took me a while to get used to this, so I can understand where you are coming from.
I never flatten my documents. When I need to print a copy or send one electronically, I do that from within the export module in Lightroom. I export as either a tiff or jpg, depending on where the file is going and what it will be used for. This keeps my original layered file for later edits if I ever choose to do so. But do what works best for you. There are so many ways to get to the same endpoint in PS. Just try and find ways to keep your doors open for future edits!
Thanx for your reply Elizabeth; always good to learn a new method. It’s said that there are innumerable ways to achieve the same results when using Photoshop.
Yes, I always save the working copy with layers and all so I can go back to it if resizing, cropping, changing the resolution or color space, etc.
Thank you for sharing this tip, Elizabeth.
Thanks for your comment Ikhlaque