Flashes, as most of us know them, are small devices that are designed to fit into a camera’s hot shoe. They have a mounting foot on the bottom for that exact purpose – you slide it on, secure it, turn on the flash, and shoot. But more often than not, the results this way are disappointing.
A typical photo taken with an on-camera flash something like this. In front of the camera was your beautiful wife or handsome husband. But in the photo, they have turned into a shiny vampire with blood-red pupils! It’s a photo that quickly gets deleted, lest you earn their ire.
Today, I’ll show you that this terrifying result doesn’t need to be your reality – I’ll show you how to free the light by using off-camera flash.
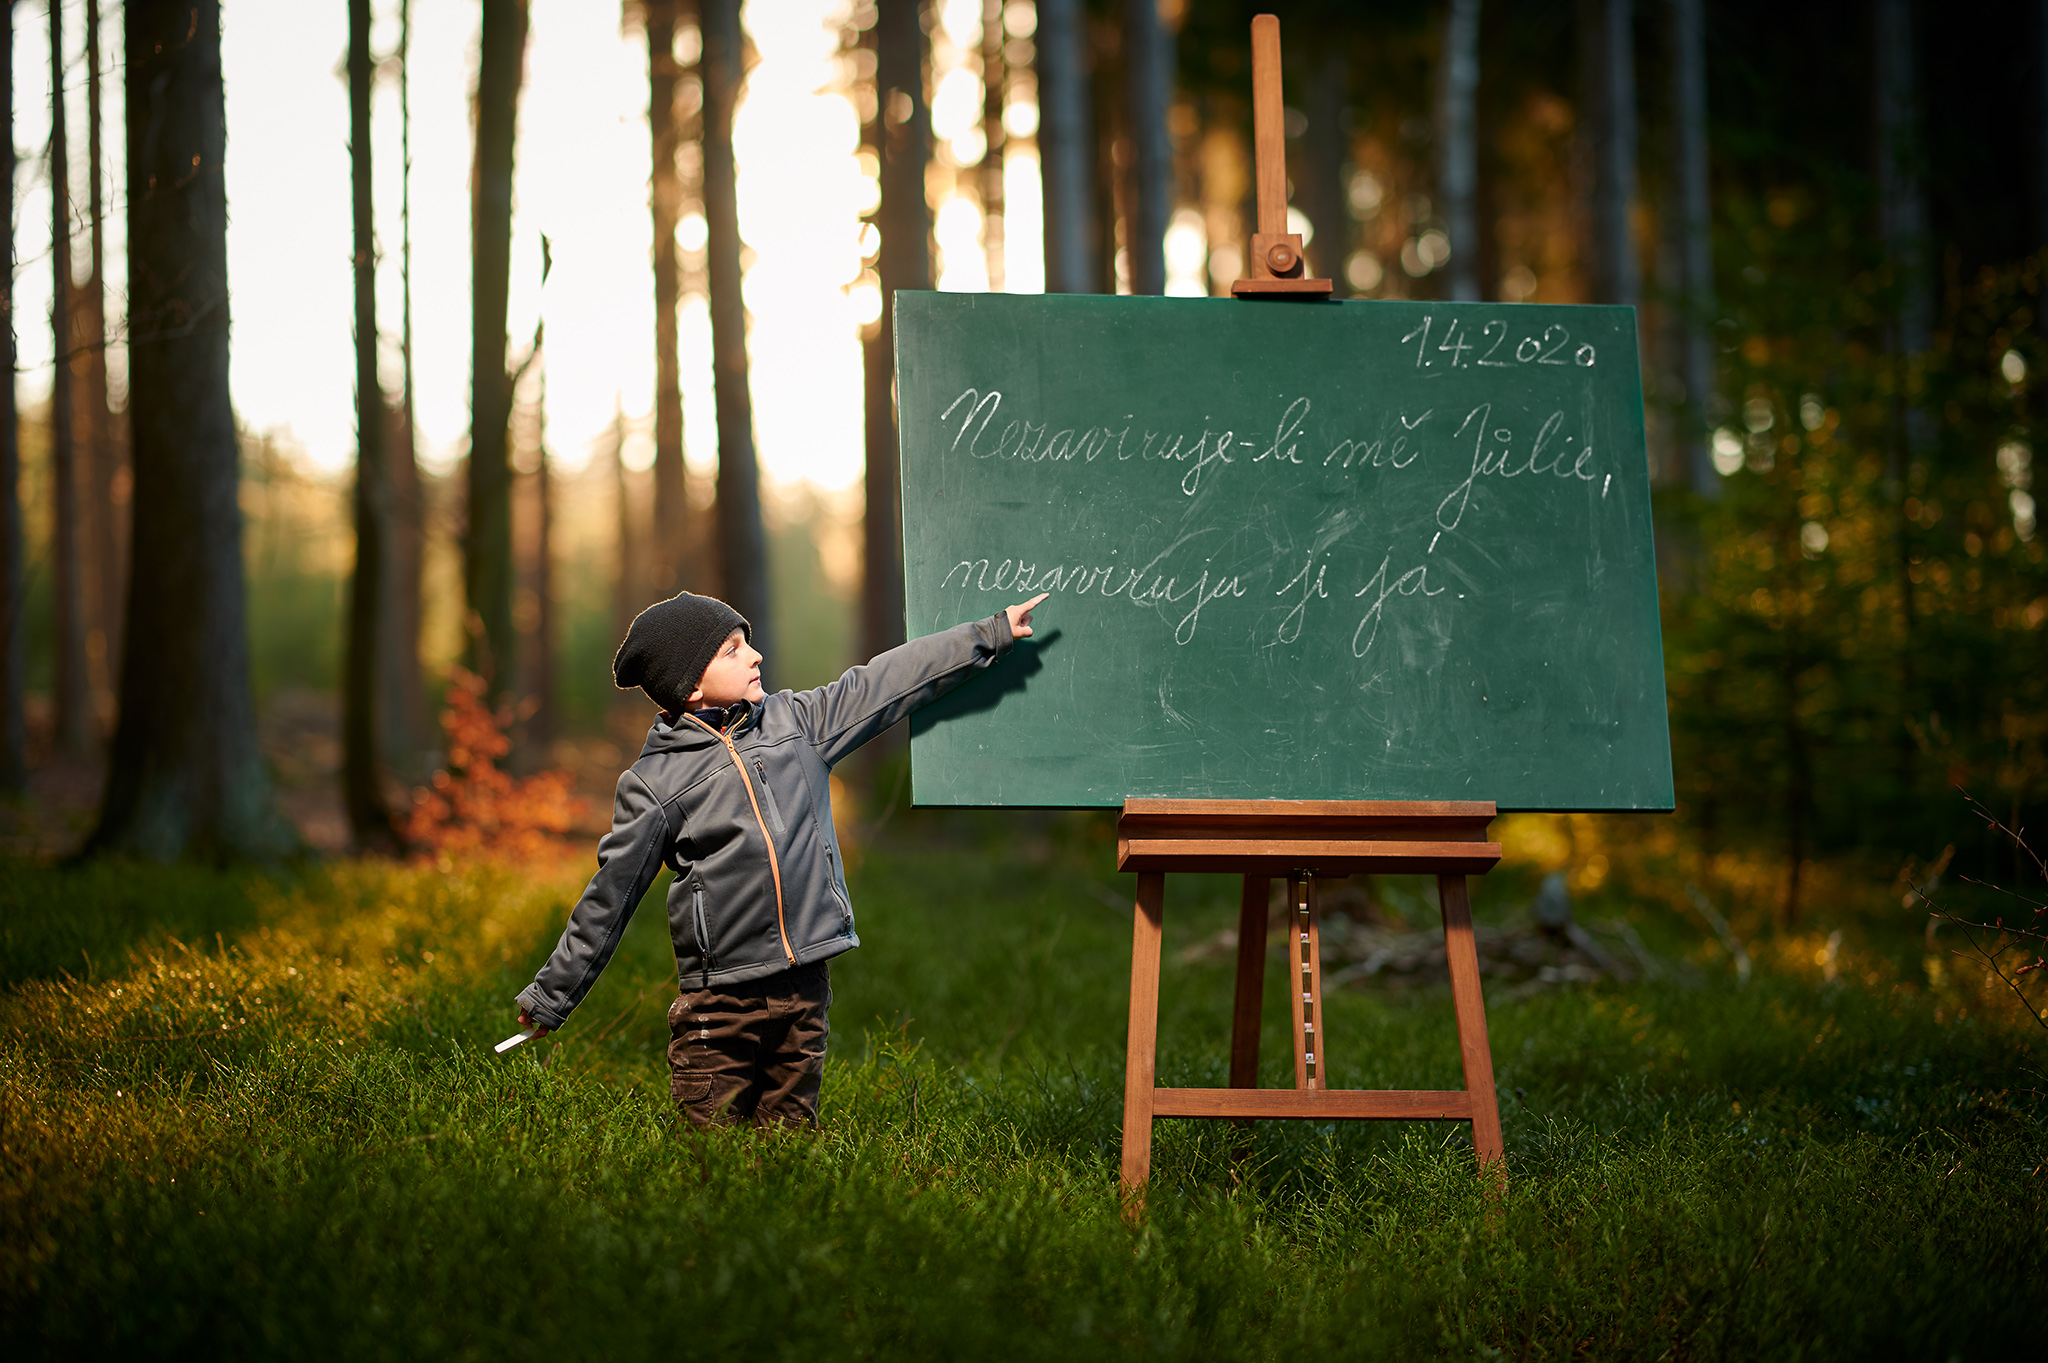
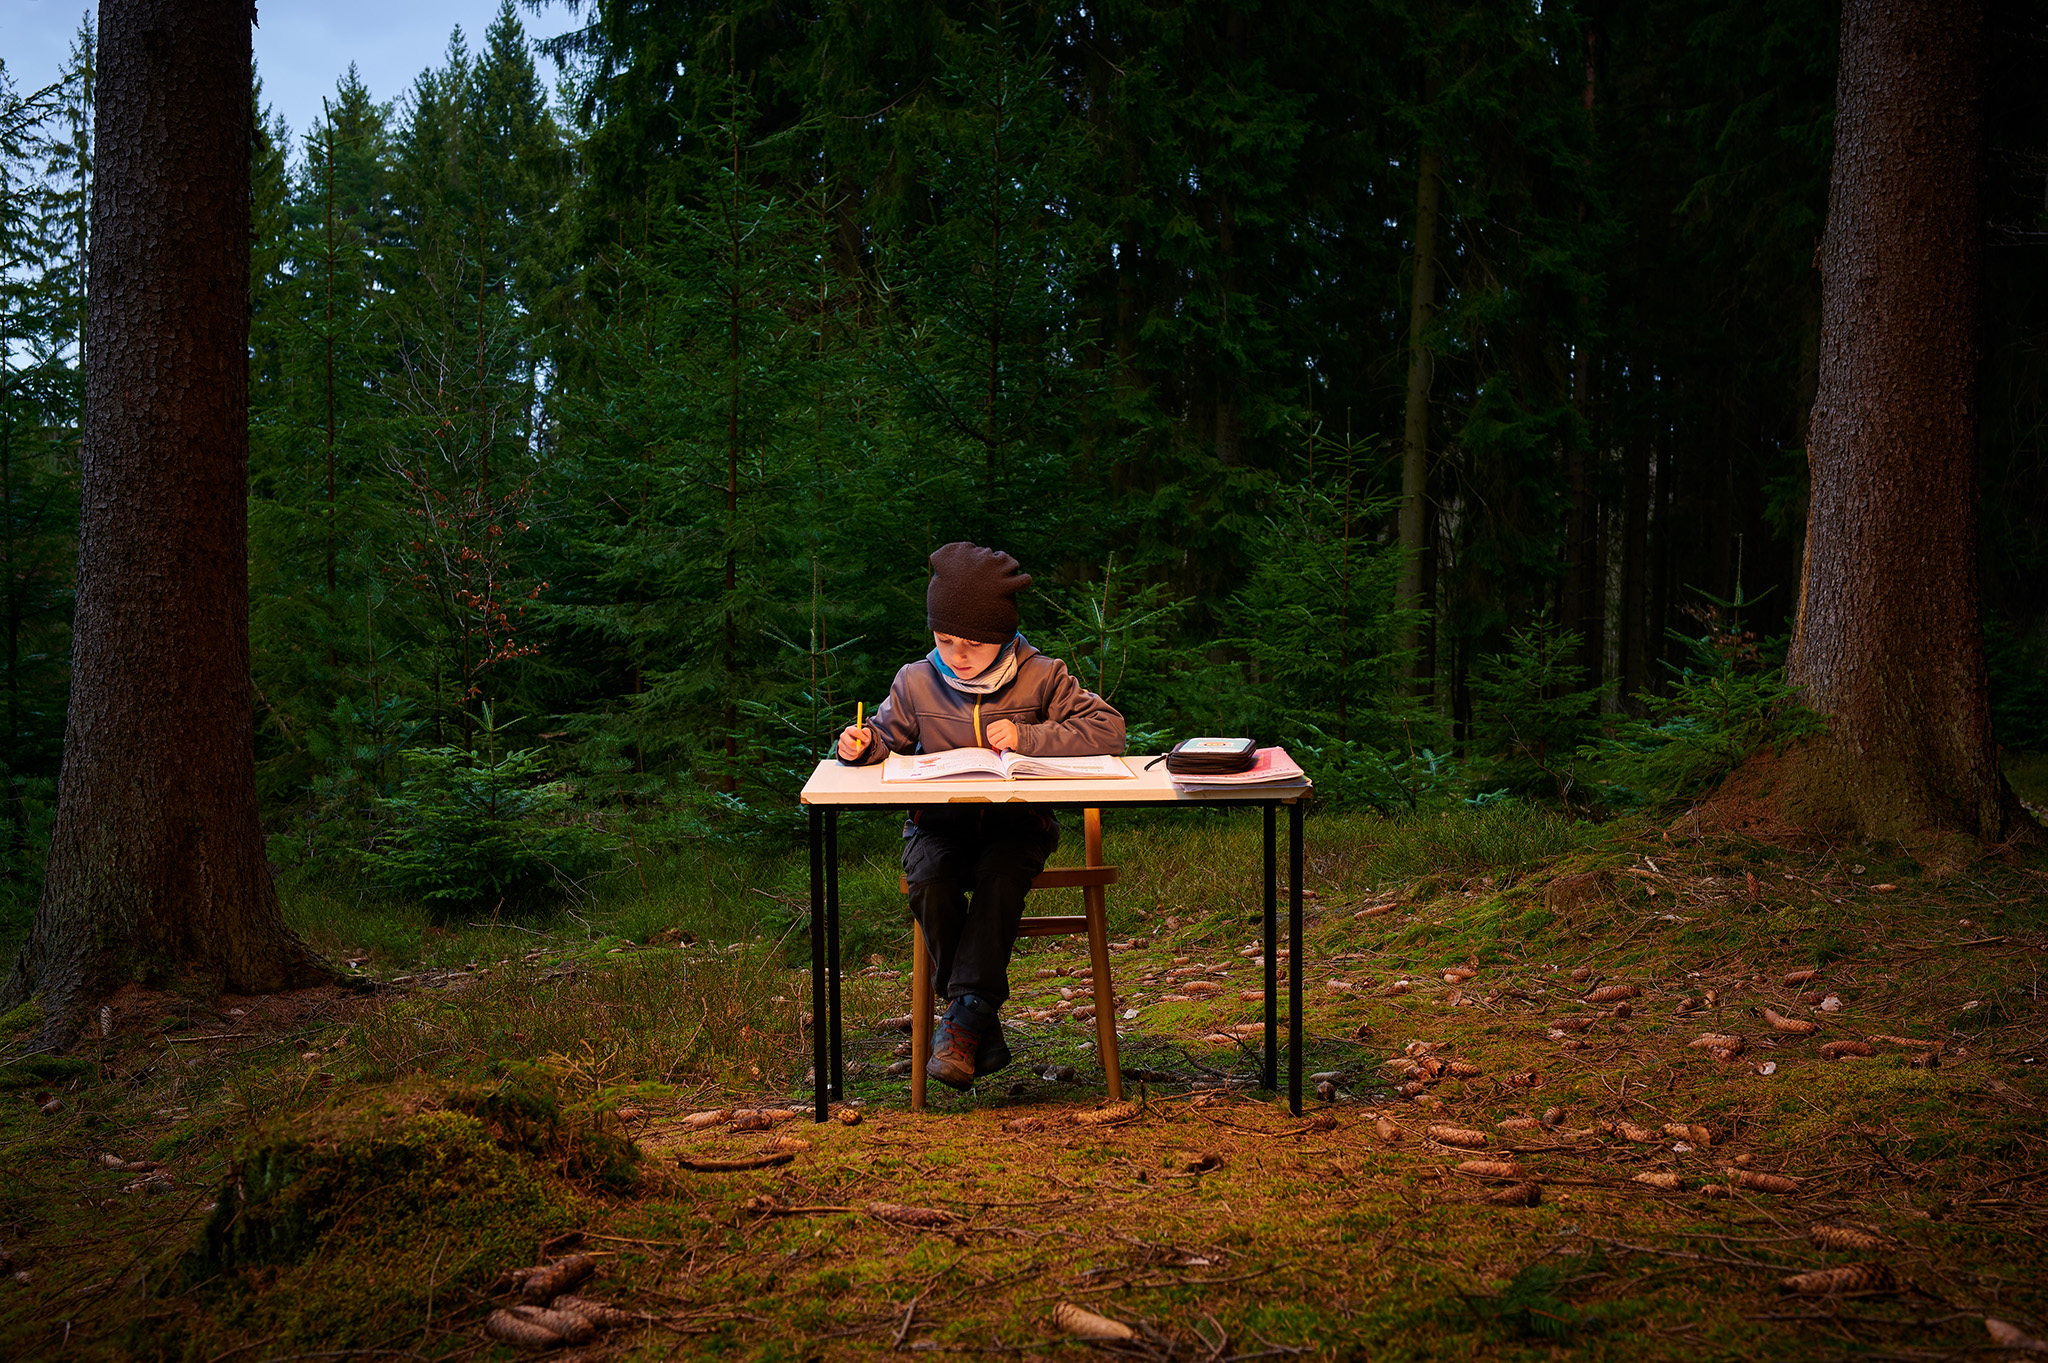
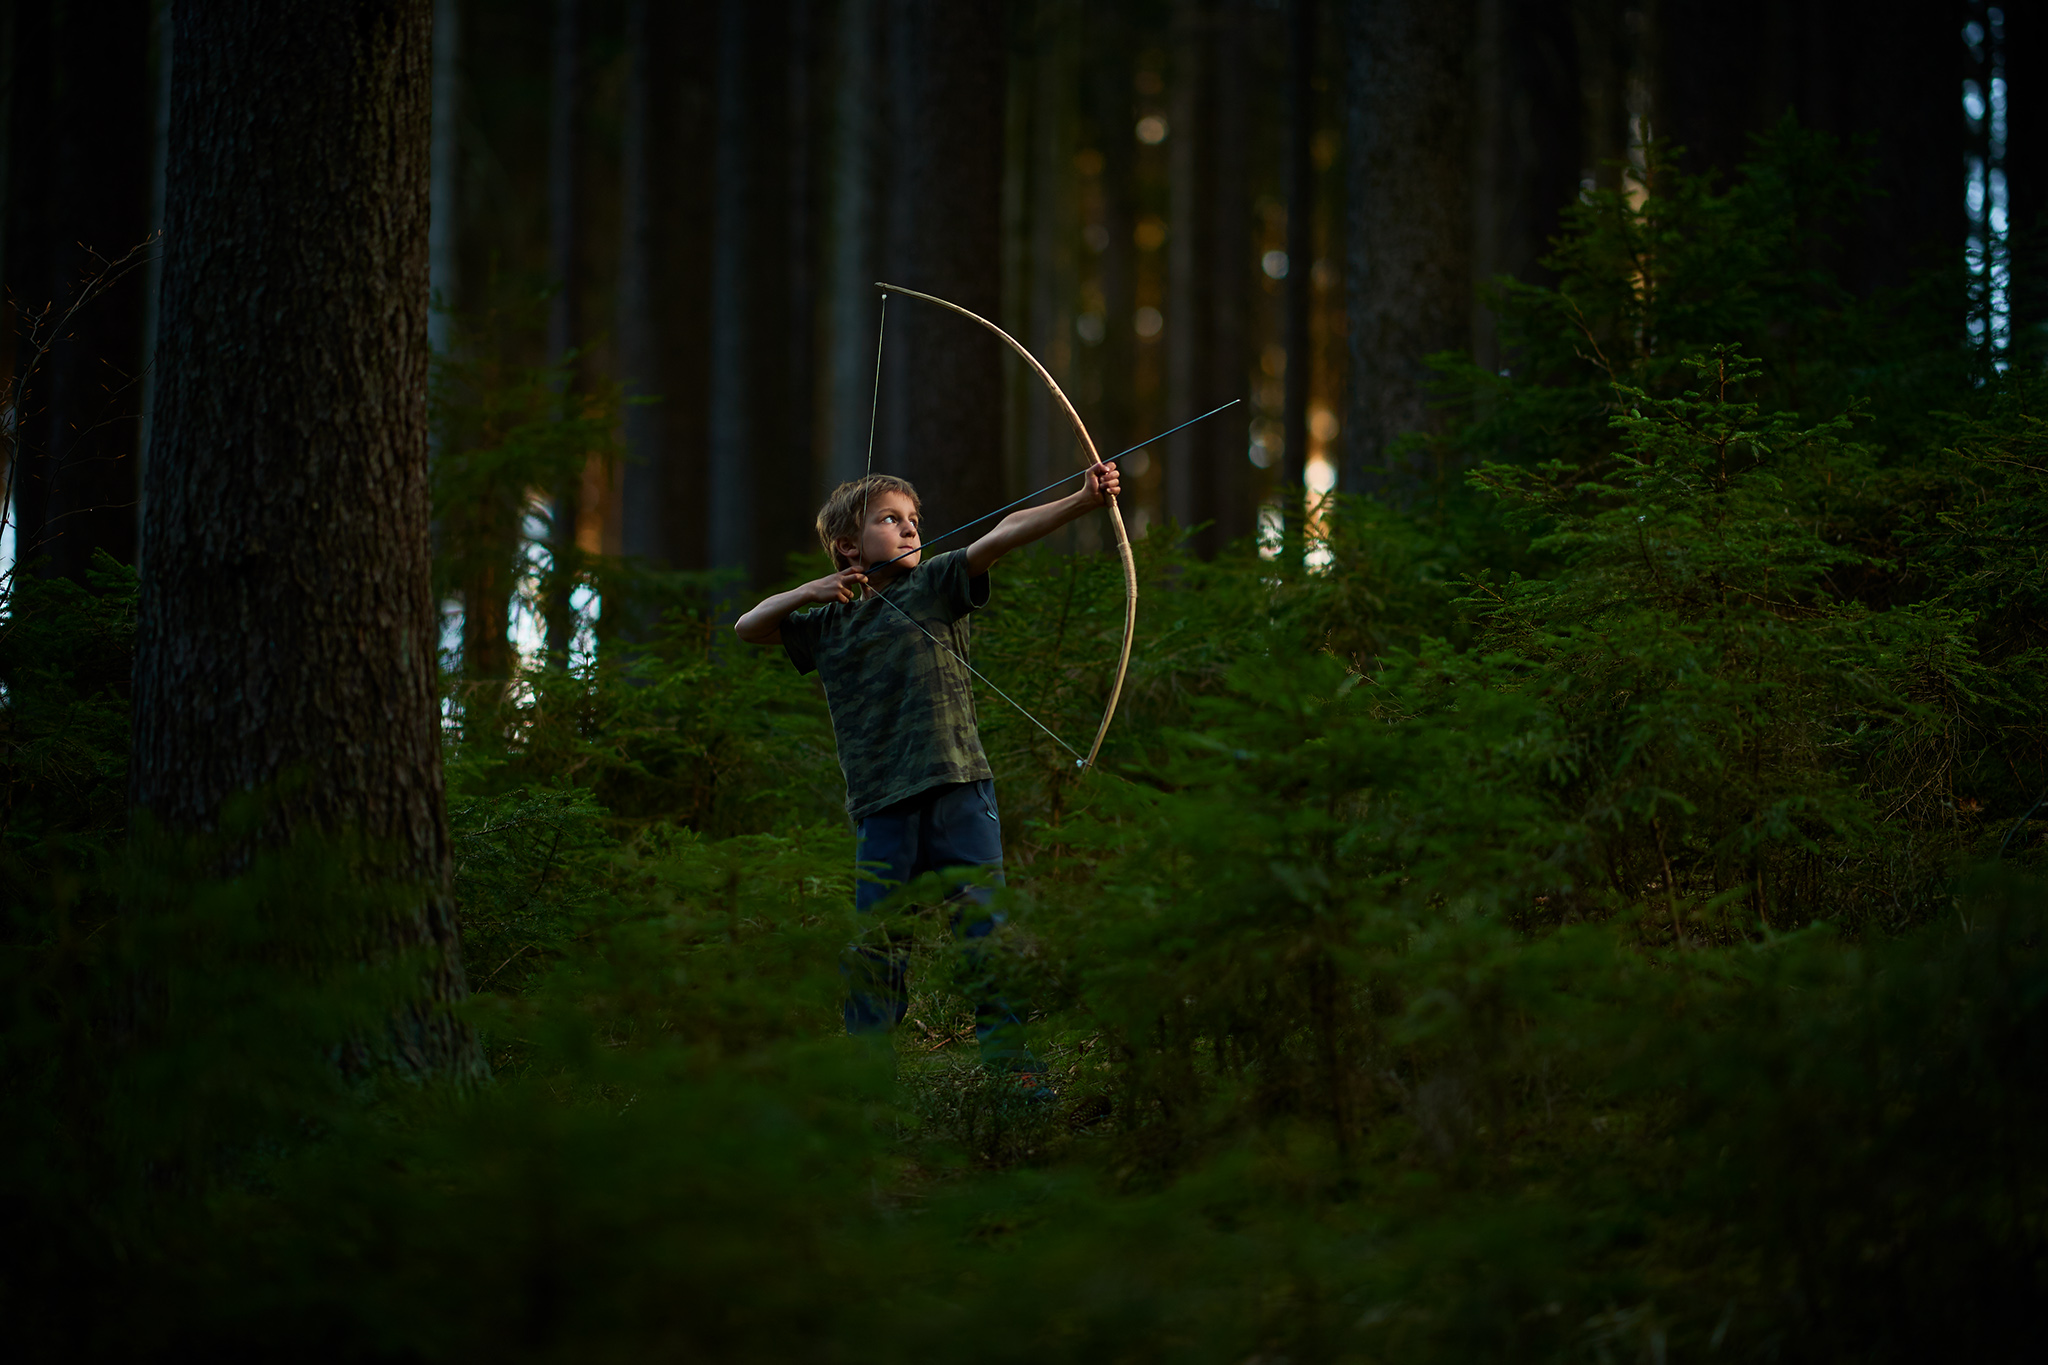
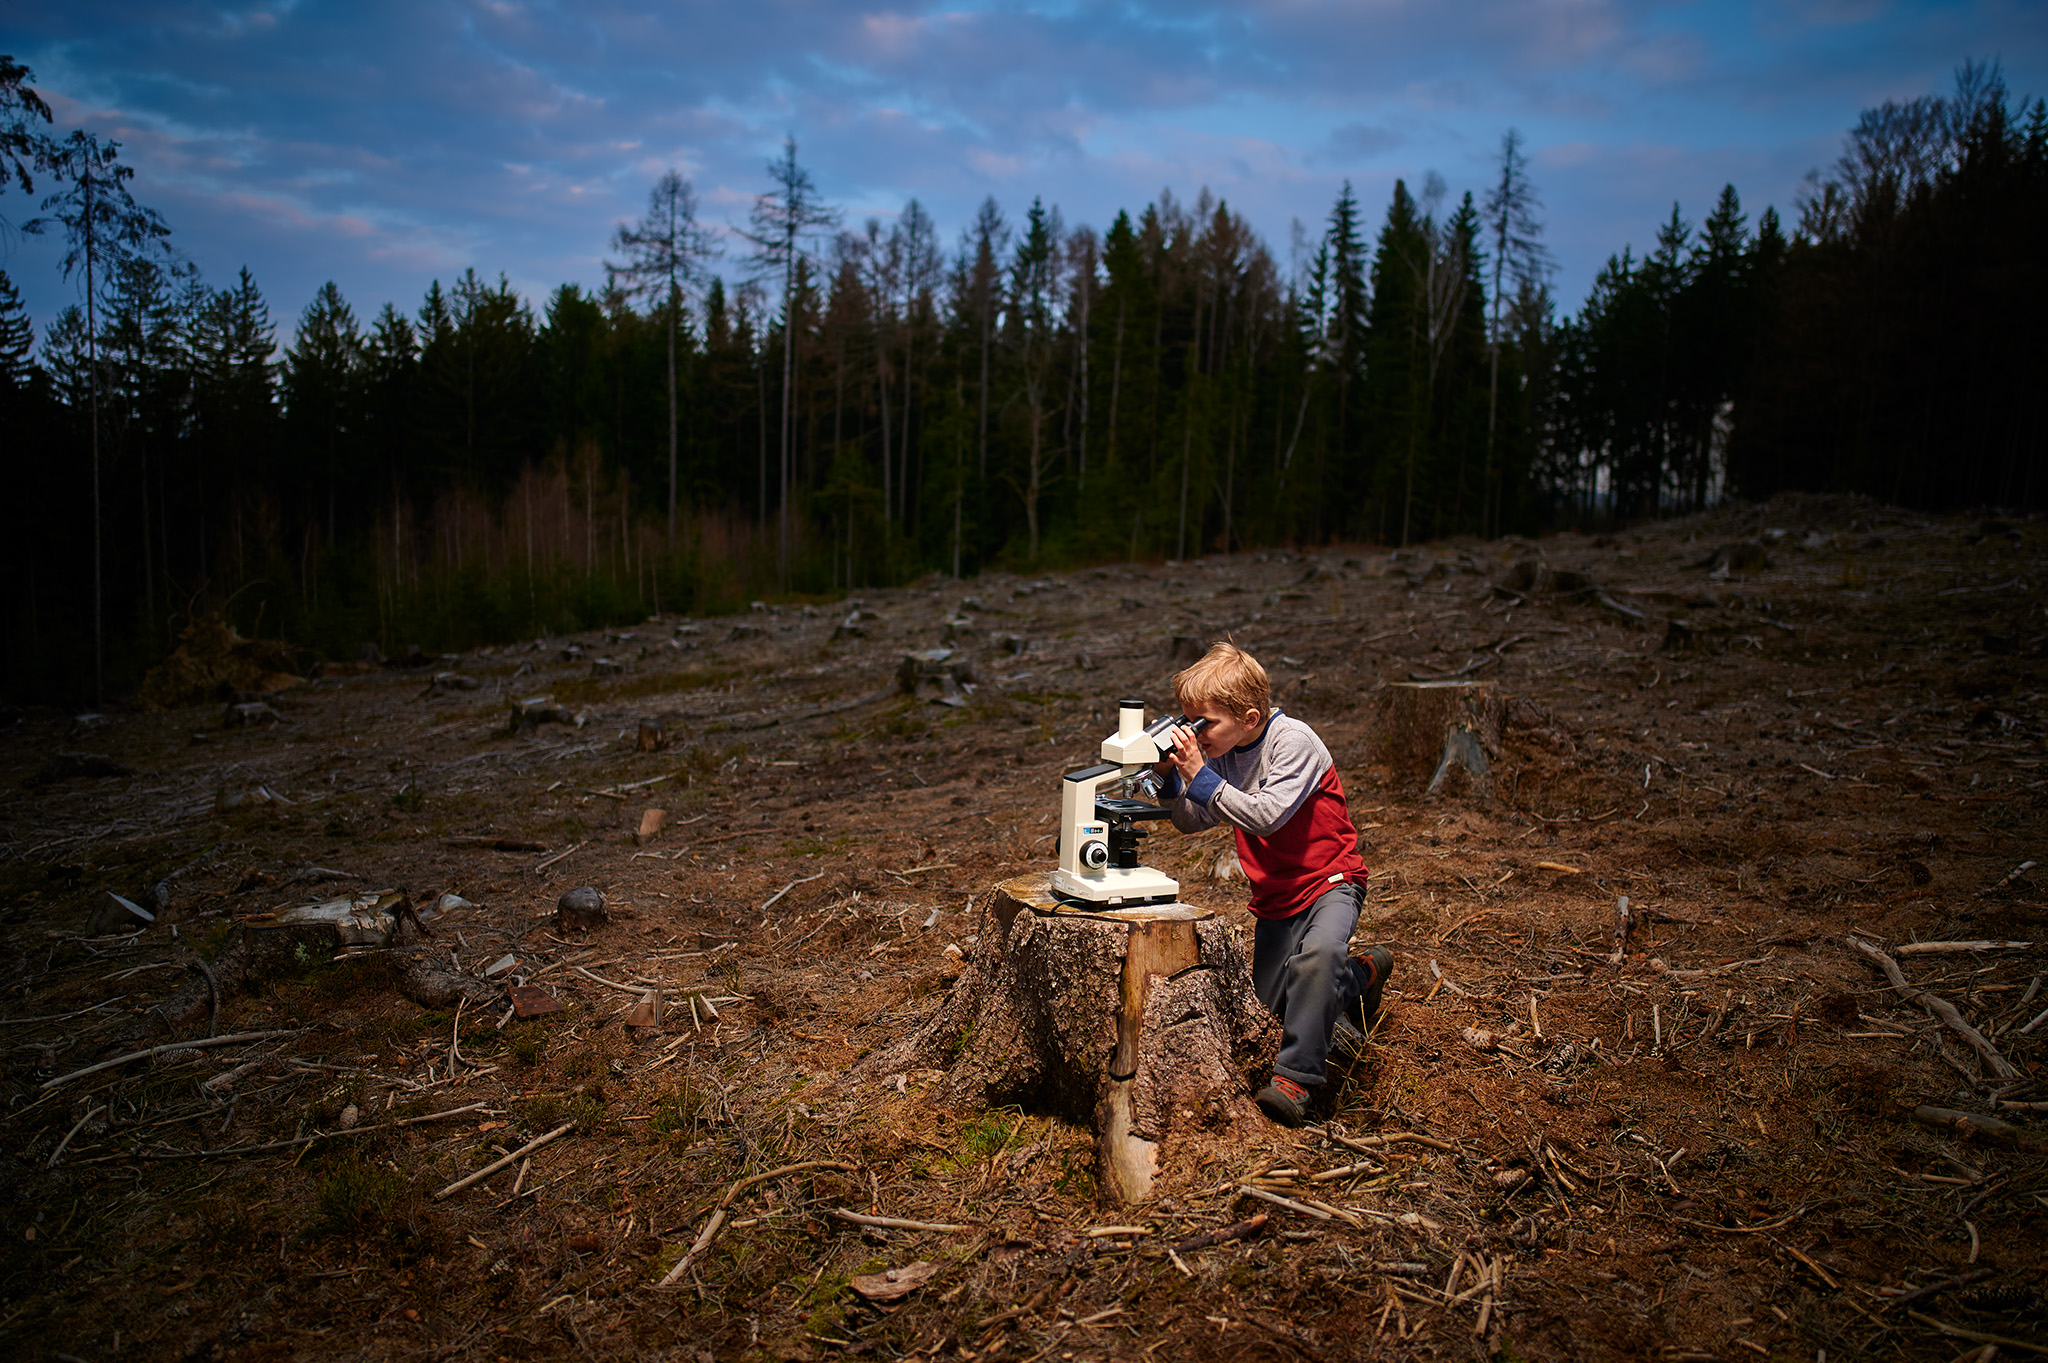
I took the photos in this article during the quarantine period of the pandemic, when my family and I took refuge in our cabin in the forest. As a teacher, I was now working remote instead of in-person. I felt the need to somehow visualize these months of teaching from the woods. And so, a photo series with off-camera flash was born.
Table of Contents
Why You Should Consider Using Your Flash Off-Camera
The simplest way to improve the light from your flash is to tilt the flash head and bounce the light off the ceiling or wall. This works so long as you’re indoors. However, although it reduces the vampirish nature of the light, it still isn’t very interesting. And this article is about freeing your flash, not just pointing it a different direction!
When you remove the flash from your camera’s hot shoe, you gain enormous creative freedom. Now you have full control over which side the light will come from, how far away the light will be, and how many sources of light you want for the photo.
Even if you have just one flash rather than a multi-flash setup, taking it off-camera can be a revelation. Rest assured that the example photos in this article were taken with just one single flash.
Necessary Equipment for Off-Camera Flash
What would you need for such photography? The main ingredient is the flash itself. Ideally a more powerful model. Personally, I use the prior version of the Nikon SB-5000 flash. Godox also makes excellent flashes with a great price/performance ratio. The high power of the flash will come in handy, because you’ll likely be using a diffuser to soften the light (more on that shortly). Plus, a powerful flash lets you work on a sunny day more easily.
Next up is a way to synchronize the flash with the photo you take. Let’s leave the cables aside – we wanted to free the flashes, didn’t we? One option is to use two flashes – one as a commander, and one as a receiver. I call this flashception. You put the commander flash on your camera, and it triggers the off-camera flash to fire when you take a photo.
However, a pair of radio transmitter and receiver works even better. Unlike the previous solution, the flashes can be placed further away, and the two flashes do not have to “see” each other. Their function on a sunny day is also more reliable. Some flashes, like the Nikon SB-5000 or the above-linked Godox VING V860IIN, even have the receiver integrated.
To make the light of the flash pleasantly soft, I recommend using one of the many types of diffusers. As Nicholas covered in his article on diffusers, you won’t get much softness with a small diffuser. A larger area will give you softer light and work better for large subjects (AKA people). Keep in mind that a diffuser also dims down the light from the flash, hence why I recommended a powerful flash. And, unless you have a very willing assistant, you’ll need to get a sturdy light stand to hold the flash and diffuser.
Quality of Light and Recommended Settings
Now that you have the necessary components – the flash, transmitter/receiver, diffuser, and light stand – most of your work is done, in terms of buying equipment. That said, you might want to get a set of gels for your flash to change the color of the light. That way, you can match the flash’s color to the ambient light (or create interesting moods with unusual flash colors).
In terms of setting the camera, it’s relatively straightforward. That said, you need to be comfortable working in manual mode, so check out our Photography Basics guide if you need help there. In manual mode, set your aperture to give you the desired depth of field, and then set your shutter speed and ISO. Your shutter speed will brighten or darken only the “ambient light” portion of the exposure. Meanwhile, your ISO will brighten or darken both the “ambient light” and the “flash light” portion of the exposure (so will your aperture).
A trick that I like to use is to take the photo without a flash first, to see how I like the contribution of the ambient light. Generally, this involves underexposing the photo by 1 to 2 EV, to give the flash some room to be added to the exposure.
Now it’s time to adjust the flashes! This is usually done on the radio transmitter. You can use TTL flash metering, i.e. automatic mode for the flash. However, I find that I get more consistent results when I set the flash power manually. The principle is simple. 1/1 means full flash power and 1/128 is usually the minimum power. In daylight, my values are usually very close to full power.
Finally, you can also change the intensity and character of the light emitted by varying the distance of the flash from the subject. The closer you are, the brighter and softer the light will be on your subject, and also the more of a “spotlight” effect you’ll get, with darker surroundings.
Conclusion
Do you have everything set up for off-camera flash? Then you can let your imagination run wild. I hope you can see by the photos in this article that you can do impossible things with an off-camera flash… well, impossible if you keep the flash chained to your camera..
It doesn’t need to be terribly expensive, either. A third-party brand like Godox with one of their radio transmitters can be less than the cost of a name-brand Nikon or Canon flash. You can also buy this equipment used to save money. At the end of the day, the important thing is the creative process – and where there’s a will, there’s a way.
I hope this article helped you along the path of freeing the light. Whether you have a single off-camera flash or many, you’ve now changed from the passive role of accepting the light to the active role of taming it. I wish you a lot of fun with this process, and also good (artificial) light!
Just bought a D750 with onboard flash.
Should I just ignore it (except as a commander)?
BTW, great shots !
That’s right, Don. You’ve nailed the exact purpose of the onboard flash. Just make sure the flash “sees” the off-shoe flash sensor. Otherwise, the flash would not fire. Sometimes this system fails in full sun. In any case, this is the easiest way to control the flashes. That is, if you don’t mind not being able to shoot fast sequences. The onboard flash recharge time is the neck of the bottle here.
I use my SB-910 on my D810 and D3s. Iset the flash at -2.7 and I get great images I use this when I’m photographing birds.. When I photograph people I left the flash at 45 deg and I get great images.
It’s been quite a while since I’ve used an in-shoe flash for bird photography. But you’re right that if the flash power is reduced and the exposure values are left at virtually the same numbers as without flash, then flash can be beneficial. It’s actually a pretty good subject for an article. Just a question, do you use something like a better beamer to modify the light? And how do you solve the birds not having a steel eye? Just by power reduction, or do you have the flash mounted on some sort of arm further away from the lens axis?
while the photos are great, I would have appreciated for each photo, an accompanying “behind the scenes” photo, to show us where the camera was, how the flash was positioned relative to the subject.
That’s what came into my mind too
Thank you for your suggestion John and Rick. I will look in my archives and it is possible that I will find some “behind the scenes” photo. I’m more likely to find some test photos without flash in there though. If I find something meaningful, I will add to the article.
These are some well-lit beautiful photos, Libor. Thanks for writing this because I do want to incorporate some more lighting control in some of my work in the future.
Hi David, thank you for your comment. I am very glad that you found my article useful.
Thank you Libor for your article. Thanks to it I am now considering implementing what you shared. On a miscellaneous note, are there light-weight sturdy light stands (you could recommend)? And any recommendation on how to attach a flash to said sturdy light stand?
Hi Fabrice, I’m glad if I inspired you. About the light stands. This model (www.bhphotovideo.com/c/pro…Light.html) is probably the closest to what I use in the field. This stand is perfectly stackable thanks to the flat profiles. Plus, I have the best experience with the Manfrotto brand. I also often use the microphone arm to get the flash off the axis of the stand.
Like the article; while there is much scope on technical stuff and pixel peeping, most camera’s and lenses are more than good enough to make beautiful photos.
With some fantasy and usage of light one can make real art…
Having said that – the image quality of the 105mm f1.4 Nikkor really shines in these images.
I agree. I love my 105mm macro S but that f/1.4 glass is special.
Thank you for your comment, Pieter. Some of my articles are more focused on the stories around, others are more technical. I’ll balance that with a different type of article soon. I agree with your point that “most camera’s and lenses are more than good enough to make beautiful photos.” On the other hand, it’s a joy to have something in your hands that allows you to achieve your vision. And that is exactly the case with the Nikon 105 f/1.4. I had this lens borrowed for a while and I have to say that I really liked it. Too bad I can’t justify its purchase to myself. If I were a wedding photographer, it would have been in my bag a long time ago.