Underwater photography is filled with technical challenges, hidden expenses, and potential horror stories if something goes wrong – and it all starts with your camera housing. In this guide, I’ll explain what you need to know about underwater housings for your camera, including the crucial accessories you’ll need in order to safely bring your photography equipment underwater.
The first step is to understand the terminology of underwater housings. Otherwise, it can be tricky to do even basic research on the topic. For example, what’s a vacuum valve or a dome port? Both of them are crucial parts of a camera housing, but neither one will sound familiar to most photographers.
That’s why I wrote this guide. My hope is that I can help make the process easier for you than it was for me. Below, I’ll cover all the components of an underwater housing and what accessories are necessary before you can take your DSLR, mirrorless, or compact camera underwater.
Table of Contents
Introduction
Bringing an expensive camera of yours underwater can be a daunting task. And there might be a voice in your head saying “what if it leaks?” – so, you may be wondering if there are alternatives to a full underwater housing setup. There certainly are! I consider there to be three levels of underwater photography equipment, with different price ranges and complexity:
- Shooting with a camera that’s already waterproof out-of-the-box
- Using a ready-made underwater housing with a good compact camera, like a Sony RX100-series camera
- Doing advanced underwater photography with mirrorless/DSLR cameras and a custom underwater housing
Whereas the first two types of underwater photography equipment are fairly intuitive, it’s the third one – bringing a DSLR or mirrorless camera underwater – that takes some research. Dedicated underwater housings for such cameras are large, complex, and expensive. You usually need to buy the various components separately and assemble a working underwater housing yourself.
Unfortunately, underwater photography is not cheap. It’s about 3x as expensive as regular photography, and as the gear increases in quality, so too does the price.
You may be tempted to try to find the cheapest route possible – but that’s something you’ll almost certainly regret. If there is only one thing you take away from this article, let it be this: don’t cheap out on your underwater housing! There certainly are ways to take underwater photos on a budget (see my article on cheap underwater photography), but going with a low-quality housing is not one of them.
On one hand, if the cheap underwater housing leaks, suddenly you’ll need to replace your camera, making it a very expensive housing. Even if it doesn’t leak, it will have other issues – easily scratched glass, bad reflections, stuck shutter button (talk about missed shots), challenging interface, and more. I’ve experienced all of these personally! I could write a whole article just on why you shouldn’t buy cheap underwater gear. But let’s get into the good stuff now.
In this article, I’m going to cover the following topics:
- The items necessary to complete your underwater housing
- Lens ports and how they work
- Keeping your housing watertight with a vacuum system
- How to maintain your housing to prevent flooding
- Additional gear that can improve your underwater rig
And then I’ll try to answer any questions in the comments section if you have them.
What Is an Underwater Housing?
As the name implies, an underwater housing for your camera is simply a waterproof case that allows you to keep operating the camera underwater. Usually, housings are built for a specific model of camera. Even then, the housing may not be 100% operational and allow access to every button and dial on the camera. The more operation it has, the more expensive it tends to be.
In a perfect world, you would buy an underwater housing, it would show up, and you could just stick your camera inside and be ready to shoot away. Unfortunately, that is not the case with more advanced rigs for better cameras.
Similarly to how when you buy a camera body, it doesn’t always come with a lens, when you buy an underwater housing, it doesn’t necessarily come with a lens port (more on exactly what that is soon). This is because the dome port you need depends on what lens you will use. There are additional important components to the underwater housing you must also get.
So I guess a better question would have been, what all is part of an underwater housing, and what do you actually need to buy? That’s what I’ll cover next. It all starts with the lens port.
Lens Ports Explained
Just like how a lens attaches to your camera, a lens port for underwater photography attaches to the front of the underwater housing. It’s a necessary piece of equipment that must be purchased separately. Without a lens port, there would be a massive hole on the front of the camera housing. I don’t think that’s very waterproof!
Finding the right lens port is usually the hardest part of conceptualizing your underwater photography setup. This is because there are so many lenses out there, multiple underwater housings on the market, and different lens ports available. Not to mention that one lens port can sometimes work for multiple different lenses – whereas other lens ports are incompatible with certain housings.
So, let me go through some of the most common questions and considerations next.
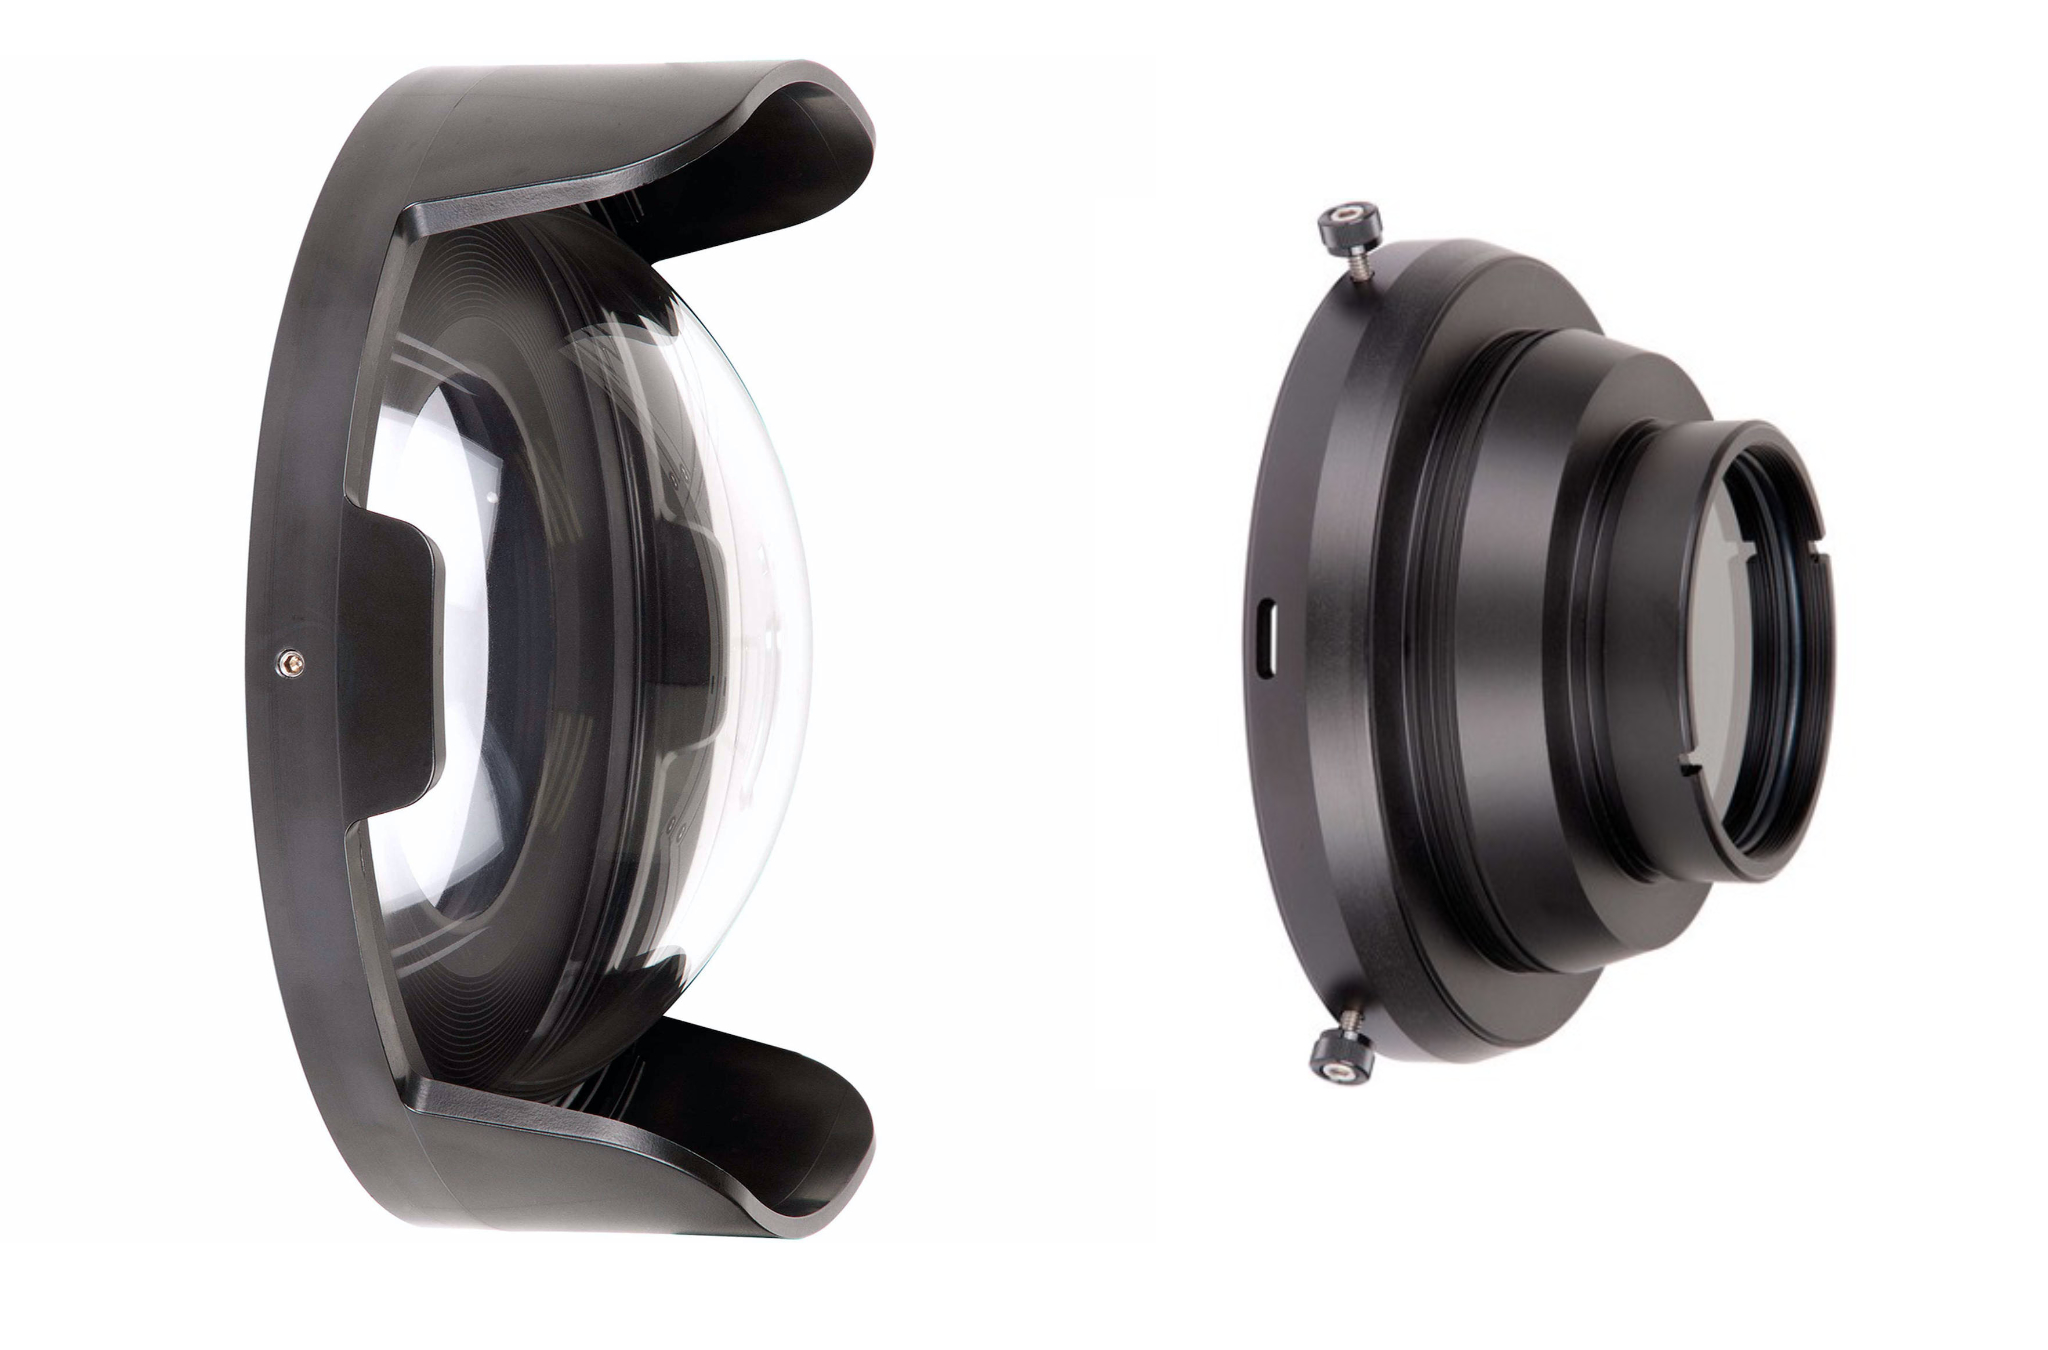
1. Dome Ports vs Flat Ports
There are two main types of lens ports for underwater photography: dome ports and flat ports.
Dome ports have a rounded, “dome-like” front and are used for wide-angle photography. On the other hand, the front of flat ports are, unsurprisingly, flat. They’re used for photographing with narrower focal lengths – which, for underwater photography, almost always means macro photos.
Due to the nature of how water affects light, specifically at the interface between water and air, the lens port acts as an extra lens element. It plays a major role in the optical system and image quality of your underwater photos.
If you have ever been to an aquarium or looked into any fish tank, you may be familiar with how objects can look very distorted behind flat glass. This is because of the way flat glass refracts light. A flat water-air interface is not ideal for underwater photography because of the severe refraction. In photos, this is evident with chromatic aberration and severe distortion. The issue becomes increasingly prominent with wider lenses.
That’s why dome ports are used for wide-angle underwater photography – they combat the refraction caused by flat glass or acrylic. Maybe at an aquarium you can remember sticking your head into a little dome-shaped viewing hole, inside which you get a much wider field of view, and the fish look smaller and less distorted. This is the idea behind dome ports, too. They drastically improve the sharpness, distortion, chromatic aberration, and other refraction-induced issues when using wide-angle lenses.
As a rule of thumb, any lens with a focal length wider than a 35mm full-frame equivalent should be used with a dome port, while flat ports are better for macro photography.
You may be wondering if you can use a dome port for macro photography, too. The answer is yes – but the magnification of your photos will be reduced somewhat. Even more importantly, it’s easy to scratch the expensive dome of the dome port if you get close to your subjects for macro photography. This is why flat ports are more commonly used for close-up underwater photos.
Given all that, I hope you can see how important it is to put together the right underwater housing and not just buy one without thinking. The lens port isn’t just a waterproof piece of clear glass or acrylic – it’s a new front element for your lens, and it should be treated just as importantly as one.
2. Extension Rings and Zoom Gear
Sometimes, the perfect dome port doesn’t exist for the lens you want to use underwater. After all, there are many more lenses on the market than lens ports. The biggest issue is that the lens may protrude too far into the dome (especially if your lens has an external zoom or external focusing).
Do you just give up and use a different lens at that point? Not at all! Instead, you can use extension rings to push the lens port further forward to accommodate almost any lens. Usually, on the underwater housing company’s website, you can find information on the right extension rings for various lenses.
Also keep in mind that you’ll need extra gear in order to use any of the zoom or focusing rings on your lens. This gear generally needs to be bought separately from the lens port itself, and since it depends on the exact lens you’re using, it’s another thing you need to buy carefully. Again, check the recommendations on the underwater camera housing company’s website.
3. Diopters
There is one more element (no pun intended) at play here. For the optics of some lenses to function properly underwater, they require an additional diopter. The optical reason is that the lens may not usually focus close enough to focus on the image projected by the dome port (which is really how the dome port works at the end of the day).
Specifically, the diopter allows your lens to focus closer. This is less commonly necessary, but it may come up! You’ll want to research your lens ahead of time for underwater use. It’s usually easy to find information about whether it will require a diopter or not.
4. How Do You Find the Specific Lens Port for Your Lens?
The thought of finding the right lens port, extension rings, zoom gear, and diopter for your specific needs may feel overwhelming and seem like an impossible task. Thankfully, housing manufacturers have made it easy to know exactly what lens port you need for your lens by providing “port charts” which contain all the necessary port information for most lenses. After all, it would be a terrible marketing strategy to leave all of this to the customer!
The port chart provided by the manufacturer should be accessible on the camera housing product page. The manufacturer will tell you the exact products you need for your lens and housing. You’ll still need to buy them separately and build the kit yourself once it ships, but it’s not so hard once you know what you need to get in the first place. Hopefully this article has already helped you understand the role of each item.
The good news is that the whole lens port process is the most challenging part of building an underwater housing. Still, it’s not the only thing you need to understand before buying a housing. Next up, I’ll talk about vacuum systems.

A Vacuum System for Underwater Photography
Unlike lens ports, vacuum systems don’t stay attached to your underwater housing – instead, they’re a way to create stronger seals on the housing, and also to tell if your rig is completely waterproof. The last thing you want is for water to destroy your expensive camera. So, I consider a vacuum system to be a crucial part of any underwater camera setup.
The principle behind a vacuum system is pretty simple. Most underwater housings have a dedicated valve which can connect to a vacuum pump. Before going underwater (but after putting the camera in the housing), you use the vacuum system to pump air out and decrease the pressure inside the camera housing. This tightens all the seals.
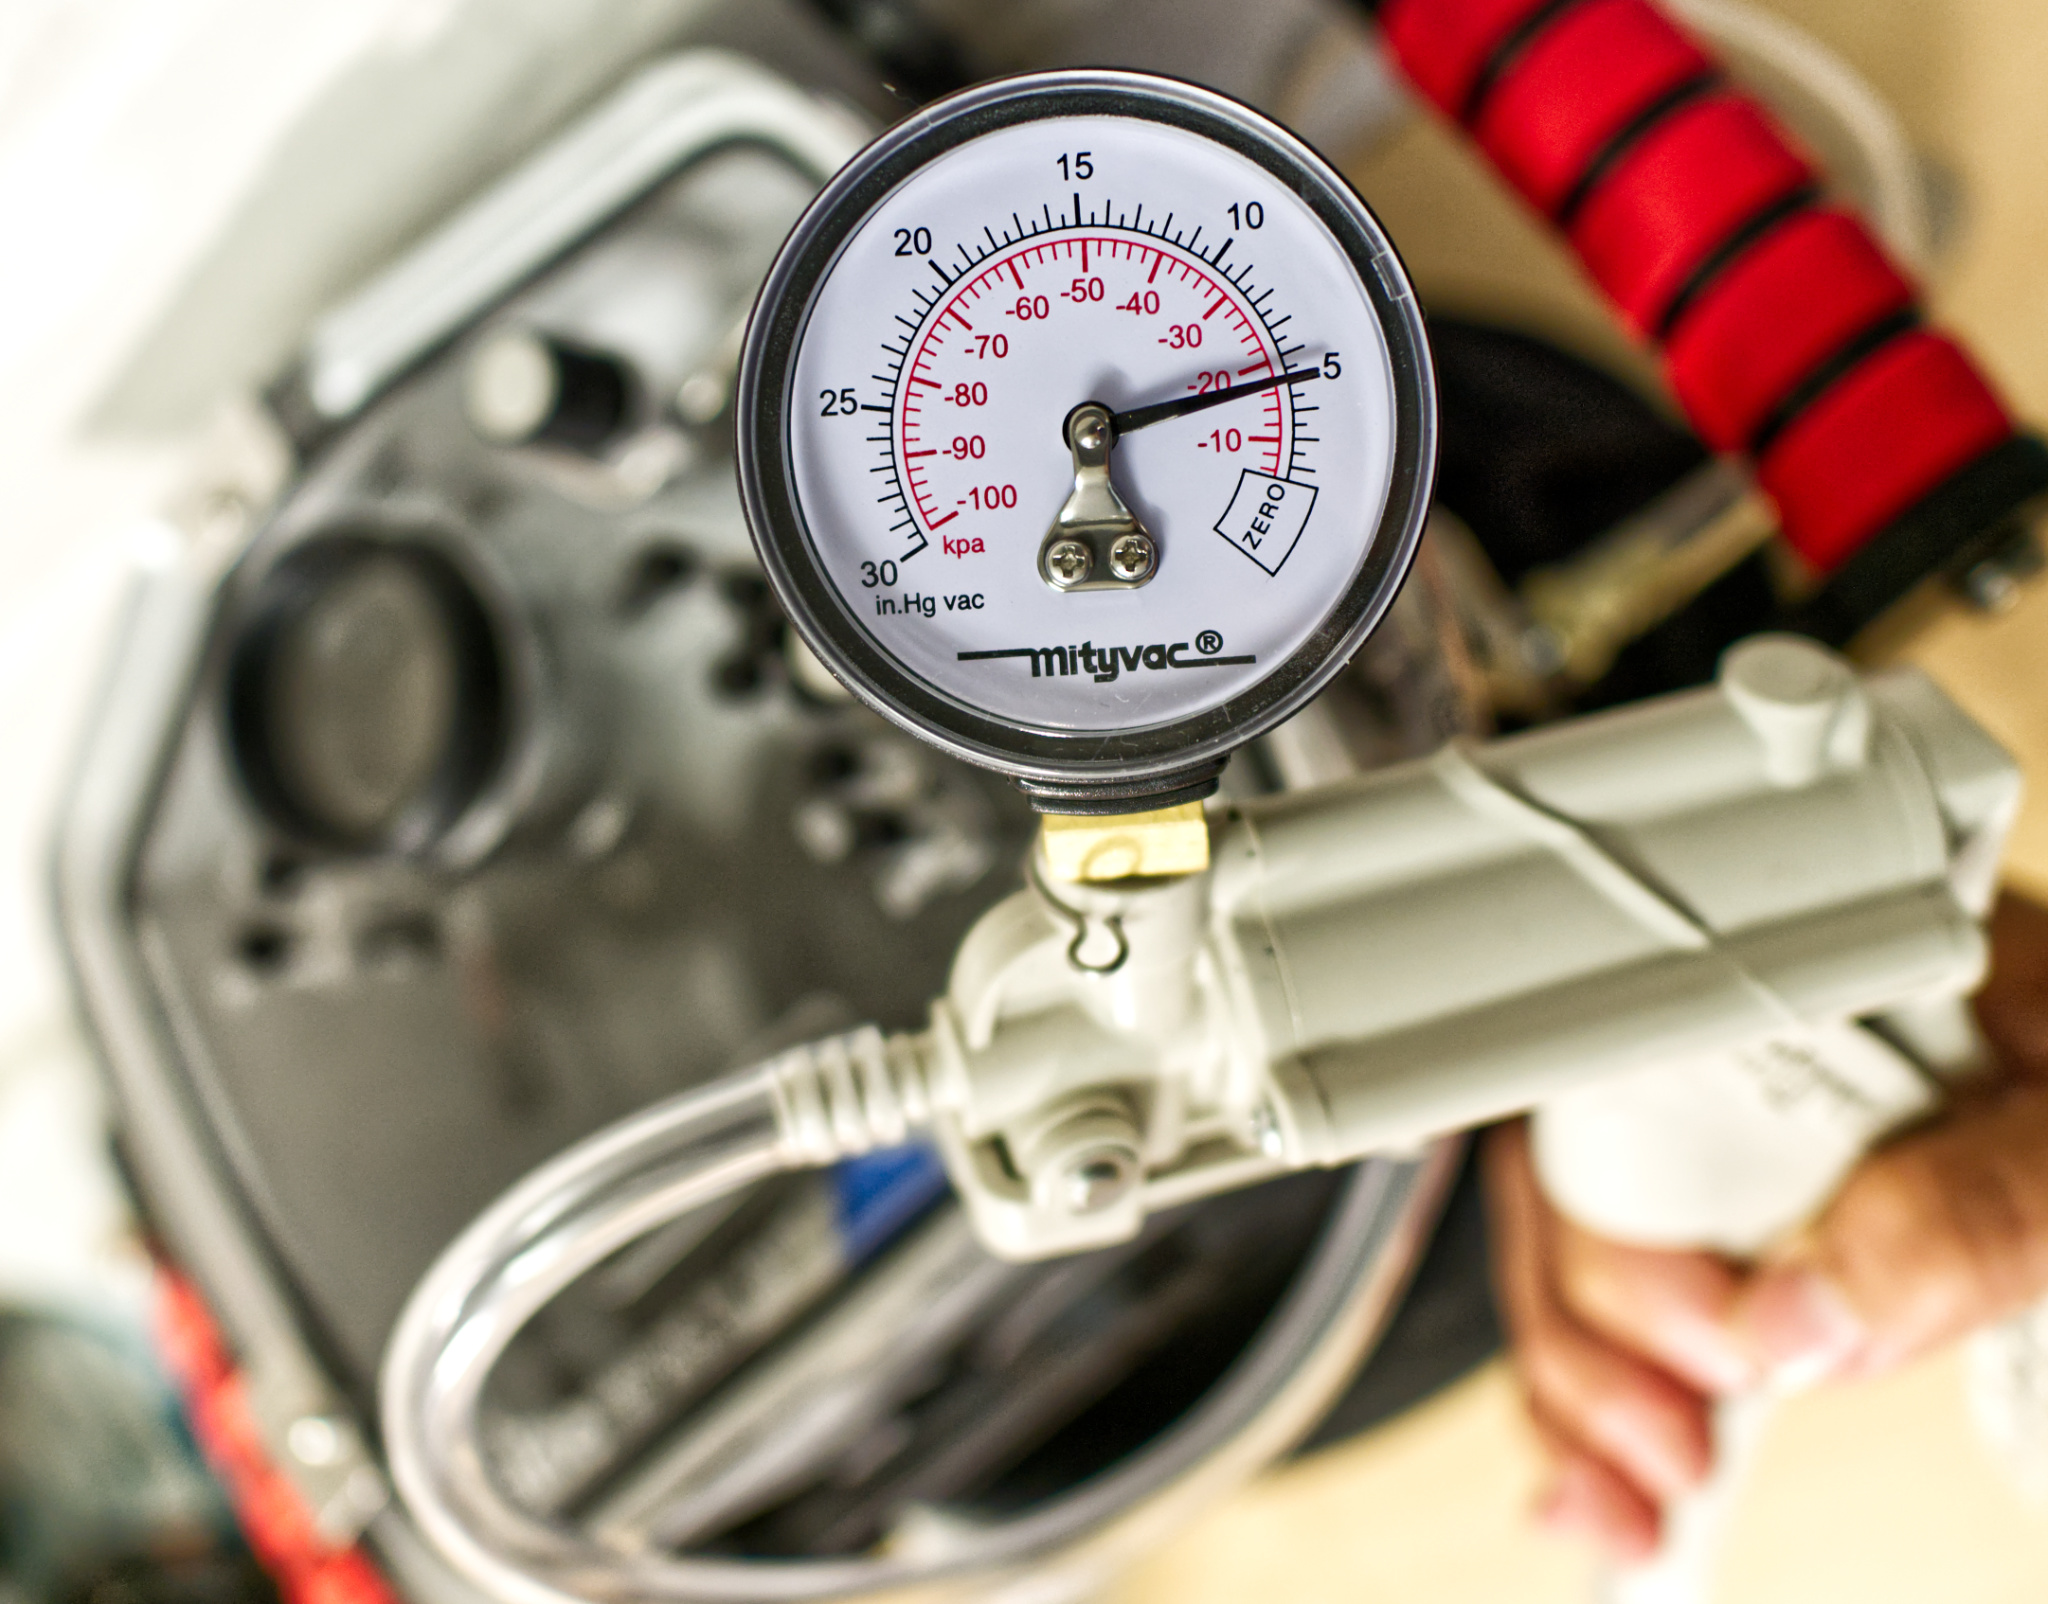
Beyond that, you can use a simple pressure gauge (shown below) to see if the pressure stays steady, or if air starts to leak in over time. If the pressure changes over time, you know the housing isn’t sealed, and therefore isn’t watertight! On the other hand, if the pressure remains the same after at least 15 minutes, you can be confident that your camera is safe inside. (Some underwater photographers will leave it overnight to be extra cautious, and make sure the needle hasn’t moved by morning.)
Most underwater camera housings will have the valve built-in, but the company will sell the vacuum pump and pressure gauge separately. Both are absolutely crucial for your underwater rig, or a disaster is just waiting to happen.
Accessories for Handling the Camera More Easily
If you’re using an interchangeable-lens camera underwater, the waterproof housing will be big and bulky. It’s just part of the territory for underwater photography – your camera is trickier to work with. However, you can make things substantially easier with two other accessories for your underwater housing: counterweights and handles.
1. Counterweights
Even though underwater housings are large, they aren’t heavy at all (at least once you get underwater). That’s because they become buoyant – sometimes a little too buoyant! The front dome port, where there’s more air, will have a tendency to pitch upwards. This can make composition challenging by putting a lot of pressure on your wrist simply trying to keep the camera flat.
To counter this issue, underwater housing companies will sell counterweights that can attach to the housing and stop it from pitching upwards. If you want to save money, homemade counterweights are also easy to make. At a minimum, you should zip-tie a weight to the bottom of the housing to help make it neutrally buoyant, rather than pulling you upwards when diving.
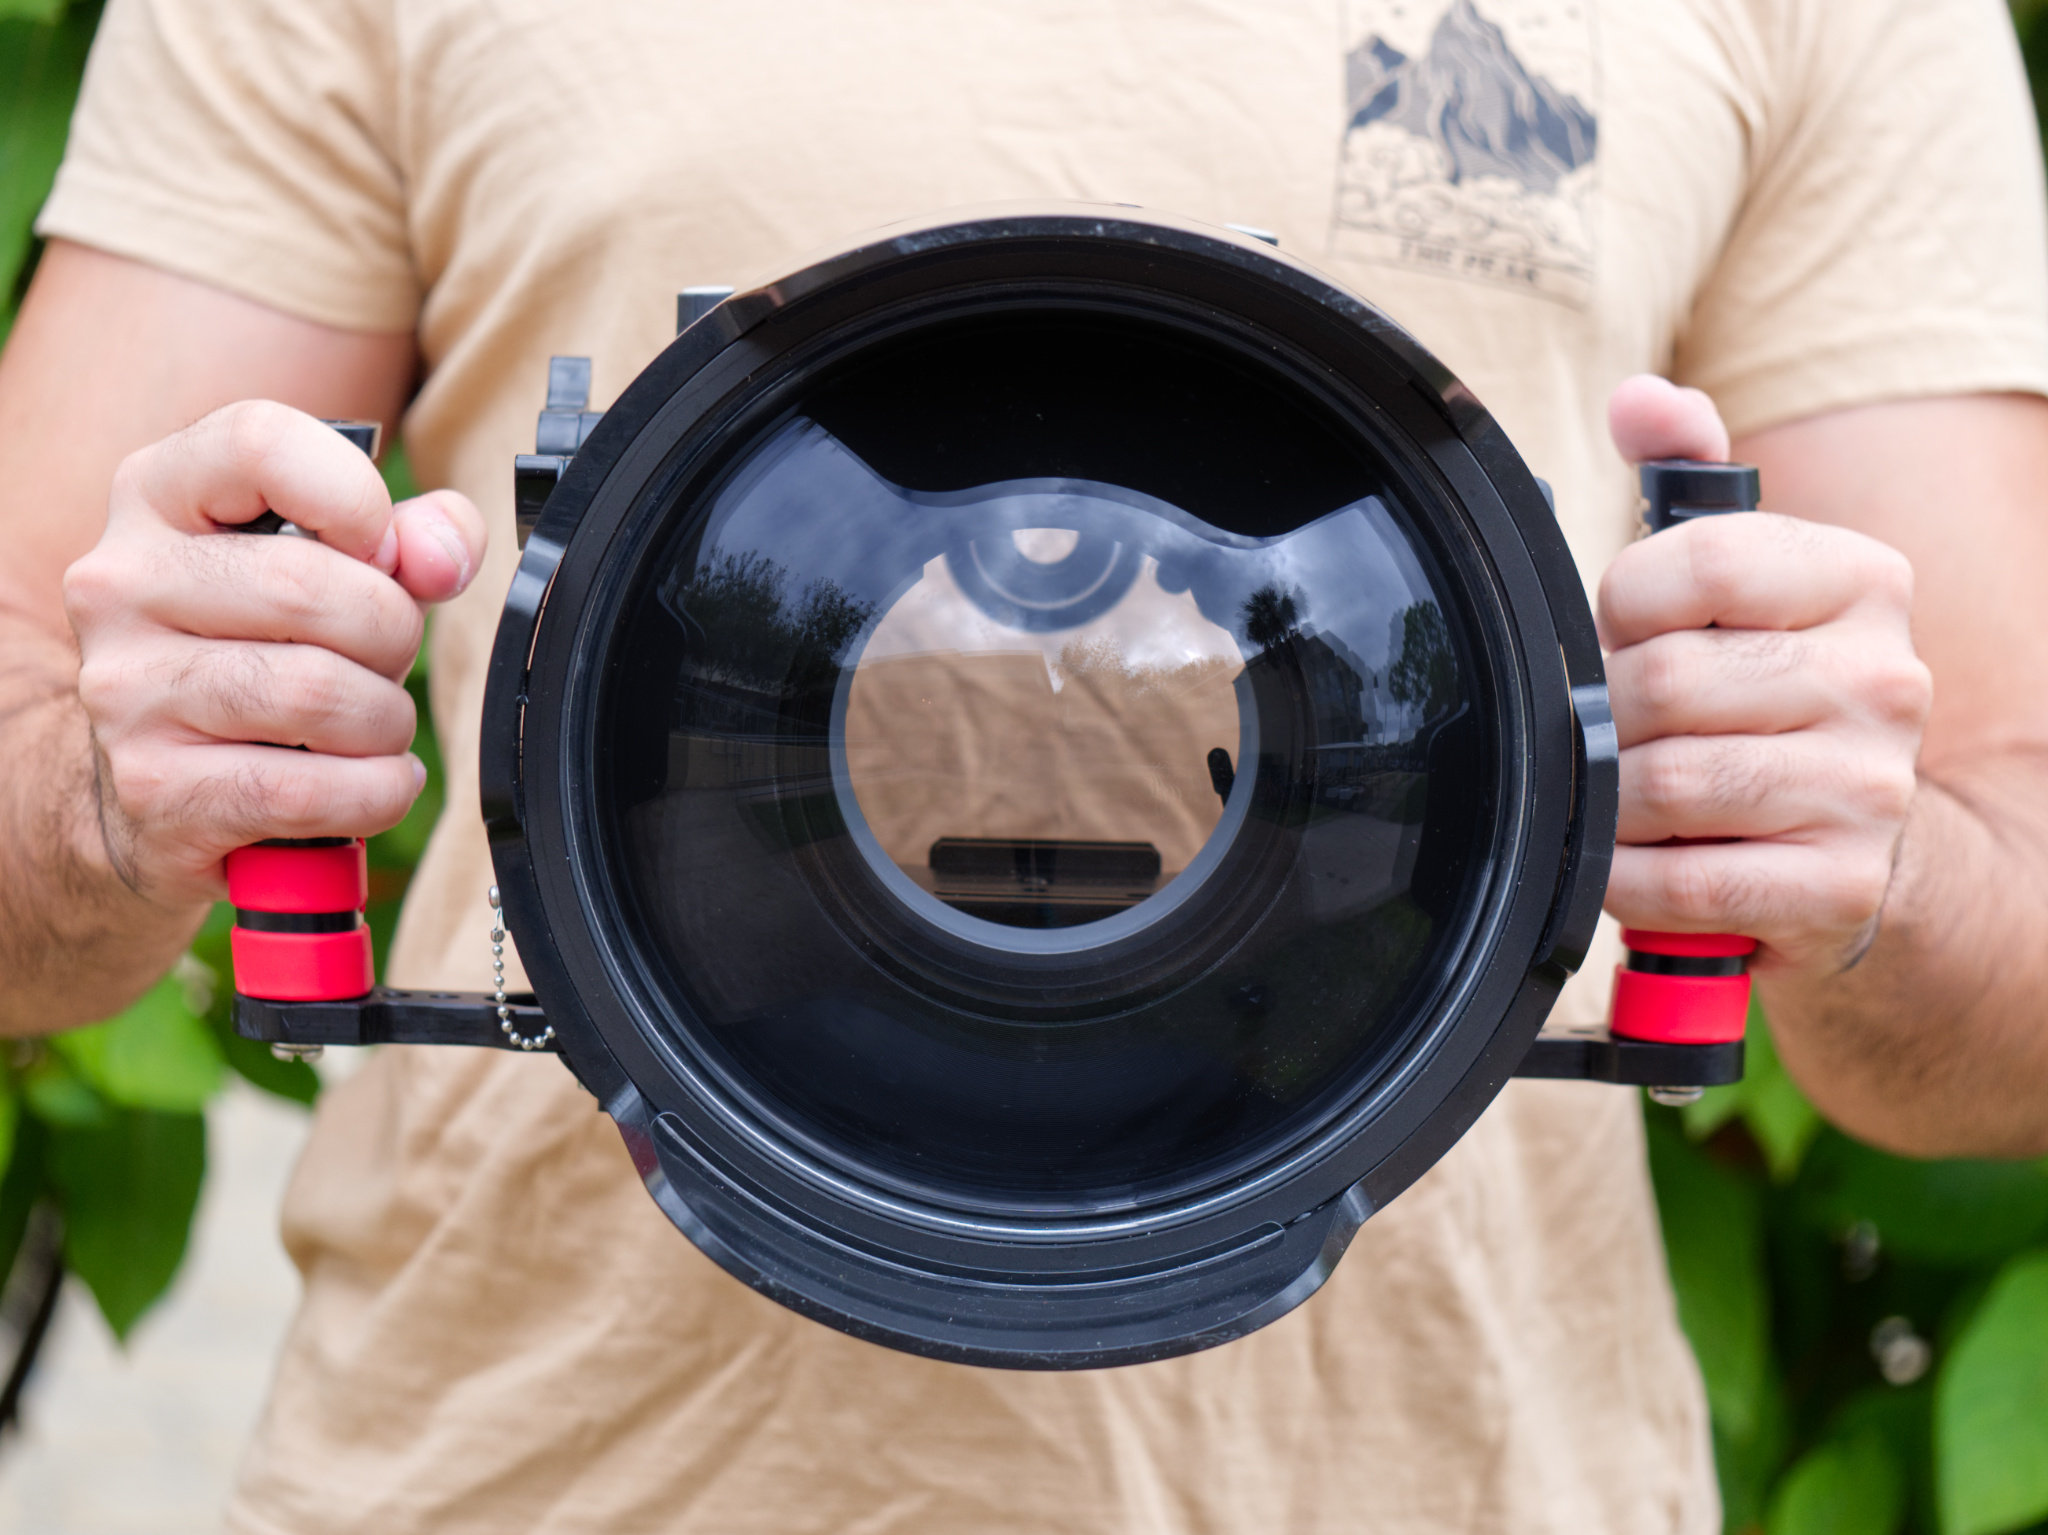
2. Handles
Handles are a necessary add-on for an underwater camera rig. This is because the housing is so bulky and tough to grip, making it challenging to compose images underwater or even just hold onto the camera comfortably. Considering that the housing is buoyant, you definitely want a firm grip.
I believe that one handle isn’t enough; it’s worth the investment to have both a left-hand and right-hand handle. There will be times when you’ll want one hand free or the other, even just to change camera settings or take the picture. You don’t want to make things more difficult than they already are underwater!
Lastly, handles can act as an attachment point for underwater lighting setup such as strobes or video lights. As with most of the gear I’ve covered so far, the handles are usually sold separately and are an additional cost. Because they’re so crucial, you need to take their price into account when calculating which underwater housing to buy.
Flash and Lighting Equipment
It is possible to use artificial light underwater by using strobes or video lights. In fact, it’s something I highly recommend – bringing artificial light underwater immediately improves the quality of your underwater images.
You cannot easily use the same flash that you usually use on dry land; instead, you should get dedicated underwater strobes. Most housing manufacturers offer strobes which are compatible with the housing.
Even if you don’t plan on getting a lighting setup immediately, it is still important to understand how strobes can be connected to your camera. Broadly speaking, there’s an electronic cable that connects the strobe to your camera’s hotshoe via a bulkhead on the outside of the camera’s underwater housing. Since this whole system needs to remain waterproof, it becomes expensive fast.
Video lights are a cheaper option to bring artificial light underwater. The difference is that video lights do not flash like strobes, but rather sustain constant illumination. One perk of video lights is that they do not require an electronic connection to the camera, making them cheaper. Naturally, they’re also the only option for underwater video. However, they are much dimmer than flashes. Still photographers should strongly consider going with a flash instead.
Either way, I highly recommend finding a way to bring artificial light underwater. Unless you’re diving right at the surface, there’s just not much light to work with underwater – and the colors will be much better with artificial light, since you’re countering the deep blue effect of water.
Maintaining Your Underwater Camera Housing
Underwater housings require consistent upkeep and maintenance to ensure they do not leak. This also requires a couple more accessories, although at least they’re much less expensive this time. For starters, you need to grease the O-rings in your housing before each use (or however frequently the manufacturer recommends). This requires purchasing a little extra O-ring grease from your manufacturer.
The use of O-ring grease is simple: You just add a thin layer of grease to the O-ring before sealing the camera. This ensures the rubber does not become prone to cracking and improves the seal.
I would also recommend purchasing extra O-rings in case one becomes damaged. You don’t want to miss out on an opportunity on an expensive dive trip because your O-ring is in bad shape. Worse, you don’t want to notice an anomaly in your O-ring and take your camera underwater anyway out of fear of missing out on something cool. Having a spare O-ring will save you from both situations.
Additional Gear
There’s a near infinite number of additional products you can add to your underwater camera rig to improve it. Just to name a few, there are external monitors, flooding alarm systems, focus lights, floats, snoots, and lighting modifiers. Not all of it is necessary – most of it isn’t – but a shocking amount of things are possible underwater.
However, I don’t recommend buying too much else until you’ve actually taken your underwater camera rig underwater and seen how it works. There will always be a way to slightly improve your rig with this or that product, but you can gradually figure out what you need over time. The key is to have fun in the process – and not to cut any corners when it comes to flooding prevention.
Conclusion
I hope this article has made the process of developing an underwater rig less daunting! There are a few key takeaways:
- Get the right lens port for your lens (by reviewing the chart port from the housing manufacturer)
- Always get a vacuum system and pressure gauge to check waterproofness
- Add two handles to the rig to make it much easier to use underwater
- Maintain the housing over time according to the manufacturer’s directions
- Think about your plan for underwater lighting even if you’re not buying underwater lights immediately
- Upgrade over time according to your needs; don’t buy more than you need up front!
Taking your camera underwater is a big step and can be nerve-wracking. With the right gear and knowledge, though, it is much easier to tackle. At the end of the day, it may not be a cheap process, but the results are priceless.
I used the same DSLR for 10 years with my underwater photography moving up from the Nikonos V cameras and lenses that I used for the prior 10 years. With digital I spent $3000 for a housing for the Nikon D100 cameras. When I went to replace the D100 with a D2x camera I found I was going to need to buy another $3,000 housing. I decided that underwater still photography had become much too expensive.
Informative article and cool photos!
(One more typo: “you should zip-tie a weight to the bottom of the to help make it neutrally buoyant”)
Fixed, thanks Bill! As the editor, any typos are my bad, not Nicholas’s.
“…specifically at the interface between light and air,…”
I think you mean WATER and air
Peter
Good catch, thanks, Peter – fixed it!
Thanks for this series on underwater photography. I realized it was a lot of work and expensive, but I didn’t realize just how much work and how expensive. You’ve made it clear why my own halting attempts with a TG-6 have turned out so garbage. I didn’t know what I didn’t know.
I’ll have to try again some time.
Yes, underwater photography is inherently gear heavy. However, I shot with the tg series for quite a while with good results. Definitely worth continuing. The TG-6 is a very powerful little camera!