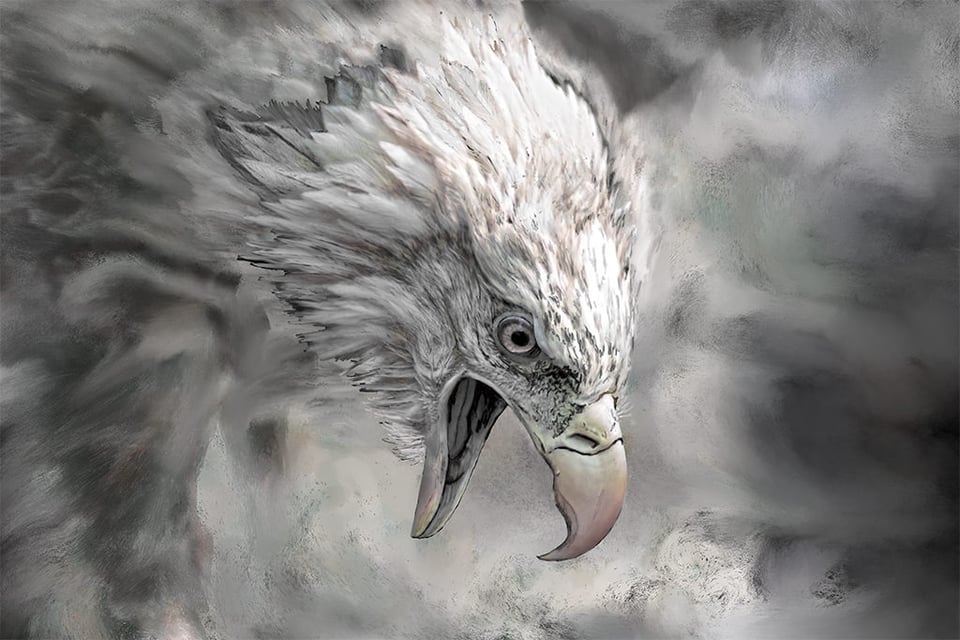
Have you ever wanted to do something a little different with your photographs? Not stop with the simple click of the shutter and turn it into an actual digital painting? That is what I am going to teach you in this article. I know not everybody is a painter and while painting skills would be beneficial, you really don’t need to be an artist to do this. The photo below is the result of me using Corel Painter to turn one of my photos into a digital painting. This tutorial contains some creative ideas and methods a photographer can use, even if they are not artistically inclined or have access to the same software as me. The idea is to open your mind to the possibility of using your images in an artistic manner. I am using a bird in this tutorial, but it could be a pet, your friend, a family portrait or anything else.
Note: By using the word “Artwork”, the author is not claiming to transform images into “Art”. We understand the true meaning of the word “Art” and we did not want to offend anyone with this article. If you find the word “Artwork” offensive, please replace it with the word “Painting”.
This isn’t the exact frame I used to create the artwork above (I don’t seem to be able to find the original NEF file), this is a few frames after, but its close enough that you can see what kind of photo the artwork was created from.
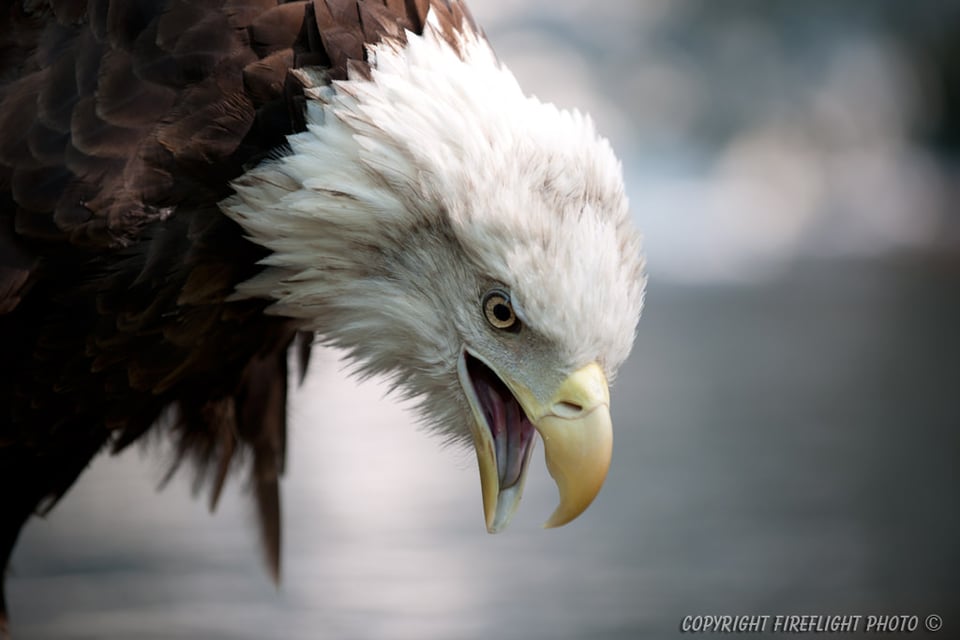
This tutorial goes through the process I use to turn one of my photos (sometimes a non-keeper or below grade photo) into a digital painting of that photo. The techniques here can be used on family portraits or pet or any kind of photography. Get creative and give it a try. I originally created this tutorial for a friend of mine who has since passed away, so I think it’s only fitting this knowledge gets shared once more.
Table of Contents
Introduction
I have been toying with digital paint programs for many years and have never really been totally satisfied with the results. Originally, I started using a program called Gertrudis which later became known as GMX PhotoPainter. The pros of GMX are its cost and ease of use, it is really easy for someone with very little experience to turn a photo into a piece of artwork and as you get comfortable with the basic tool set and brushes, eventually you will move to custom brush strokes and brushes.
Below is a wildlife example of photographic artwork created using GMX. You will likely need to see the image at full resolution to see the strokes, seeing an artwork image downsized to a thumbnail blurs the distinction between photo and artwork as the strokes almost seem to disappear.
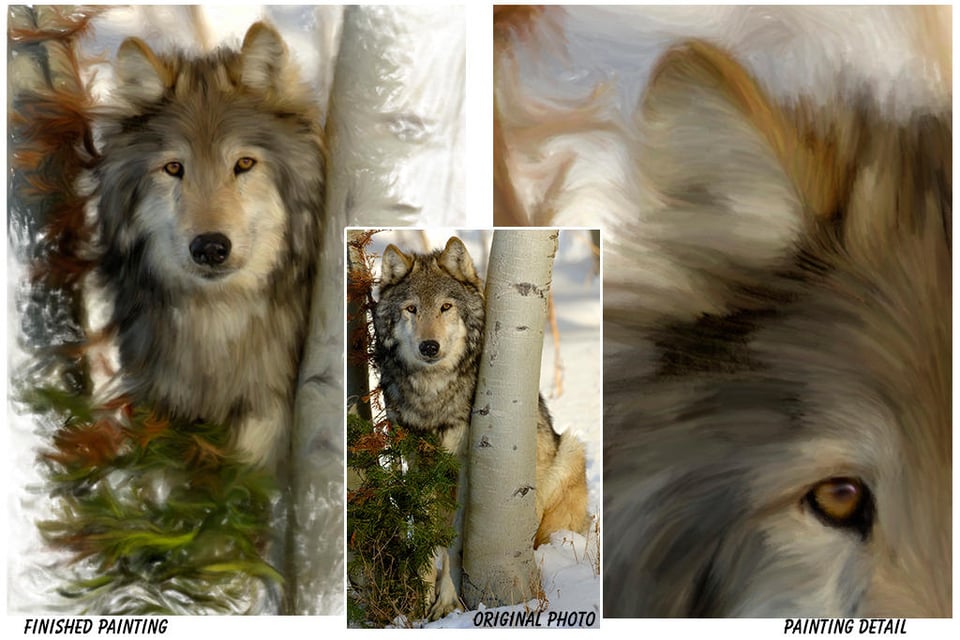
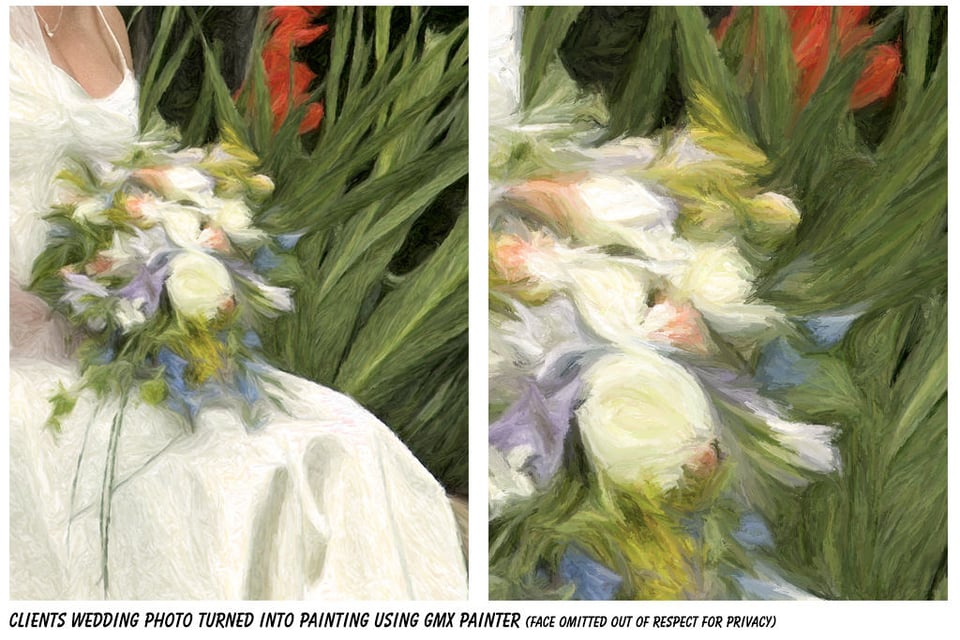
So GMX does a good job at turning images into artwork, I have used it many times to take photos of people and convert them to artwork which we would then print on canvas. Like I hinted at earlier, the benefits of GMX are some of its auto stroke and auto painting-like features, which are great for people who don’t quite feel so comfortable with their painting skills. And yet GMX also has a lot of power for those that want to control the stroke and color. Below are two more samples from GMX. I would show the whole sample except I don’t want to post the face part of the painting, but this section of the painting shows enough detail to give you an overview of the results you can expect with GMX Photopainter. We will be using Corel Painter in this tutorial. I spent the time on GMX because it is much cheaper than Painter and great results can be obtained with it.
At some point I wanted more control over my strokes and more features, of course these features means purchasing higher priced software. The program I have always heard about as being outstanding for digital painting was Corel Painter. I purchased it and after at first being overwhelmed with all its features, I soon got to know it. I have since upgraded to the latest version by Corel which is an extremely powerful tool. You don’t have to buy Corel Painter and a Tablet, they just make the process easier.
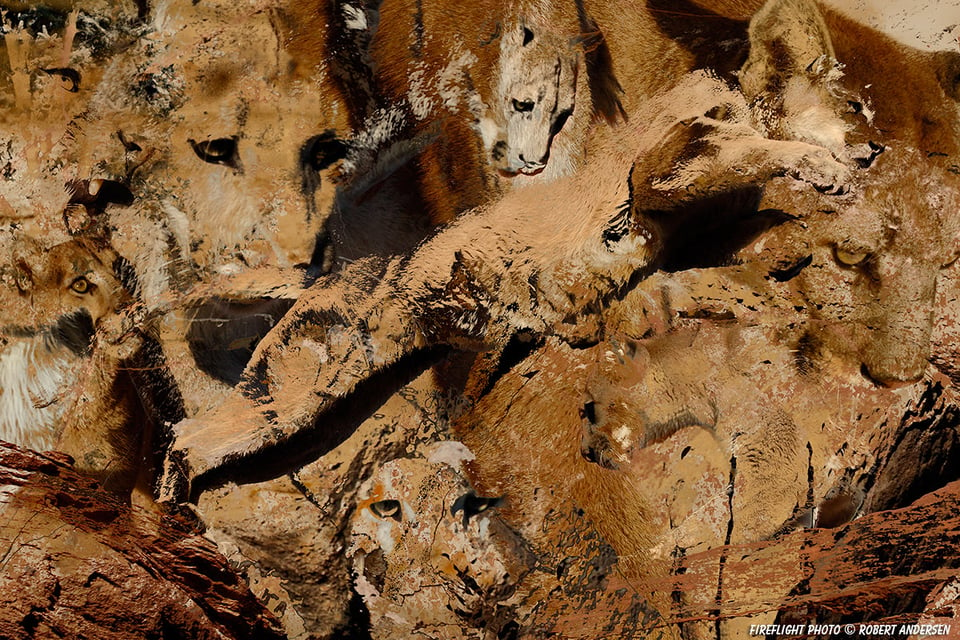
Just to show you what can be done creatively with a photograph, the following cougar collage has no painting involved at all. This collage was created by me from several of my cougar photos and all I did was use the threshold and selection and color removal tools of Photoshop to create this collage.
Photographers can Help Painters
Even if you decide to stop reading this article at this point and decide you don’t have a painter’s bone in your body, you can still do something to help these artists. One of my main problems growing up and trying to draw was getting good quality reference images, I am one of those artists that needs to look at something to draw it. Over the years I have had many denials of permission from photographers too worried about their image and copyright issues. Why not consider giving permission to use your photograph as a reference image? You don’t have to give away the full resolution digital photograph. As an artist, I was quite happy to pay a fee to a photographer who let me use their images. Also keep in mind it doesn’t have to be the complete image. If, for example, I am asking for permission to draw a moose photo you have, I just need to reference the moose (the animals themselves), which you can crop tight or block out/delete the surrounding background before giving a smaller version to an artist. Anyway, just keep in mind that many digital painters struggle and can use all the help they can get. Painting was actually one of the main reasons why I got into photography, I needed images I could use that I didn’t need to beg, borrow or steal for. Of course, photography has become my prime passion since then.
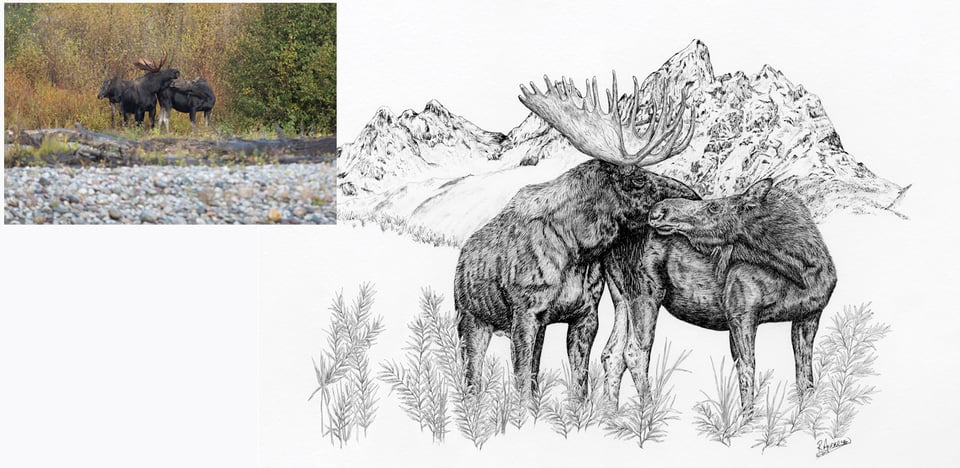
The above image shows what is possible, even from a sub quality photograph. Obviously you need painting skills for this particular example as it was drawn using traditional pen and ink. I took an image I had photographed in Grand Tetons that was too far away for my liking and lacked the detail I needed in a photograph, and turned it into a drawing. I have met many photographers who are out there to get great reference images, give them a hand if you get the chance.
Tools
I am not going to say that everyone who wants to convert photos to artwork needs a tablet, but I will say owning a tablet gives you ultimate control over the paint strokes, the direction they take, the final result. Using a tablet and tablet pens combined with Corel Painter is almost like using a real paint brush.
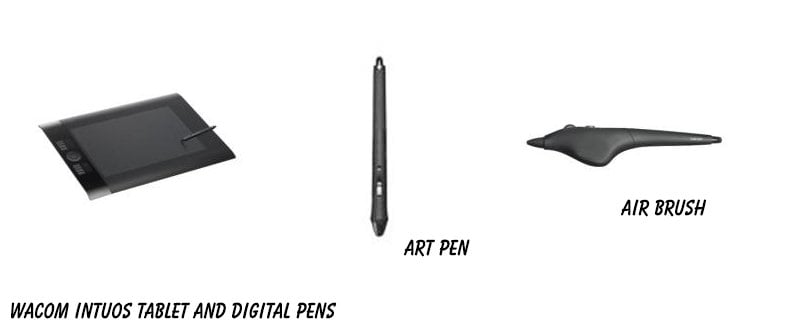
The tablet of choice I use is a Wacom Intuos 4 (I recently upgraded from the Wacom Intuos 3). I also have two extra pens, the airbrush and art pen. The extra pens are not absolutely needed, you can draw great with the basic tablet setup and it doesn’t have to be a Wacom, but in my opinion Wacom make the best tablet on the market.
What you decide to use is up to you, but a tablet and pen make doing some tasks so much easier and intuitive than not having one. Not just in painting, but everyday use as well while working with such programs as Adobe Photoshop.
Let’s Get Started
The way I use to get started is to find a photo with character or something different about it, some action or beauty that inspires me to paint it. The photographs don’t have to be perfect. I actually regret deleting some of the photographs because I thought they were not good enough to post or sell. Many of those photographs would have served as a great base for digital paintings.
Let’s clear something up – I am not a painter and I don’t have true painting skills outside of the digital world. I have done ink drawings and have some drawing skills but I am not an acknowledged artist of any type. I prefer to mostly work in black and white since I am just drawn to the way black and white looks, but if you prefer to do things in color, go for it. This tutorial is just to get you started, ultimately you need to find your own style, which is when you will become comfortable and produce paintings you are happy with.
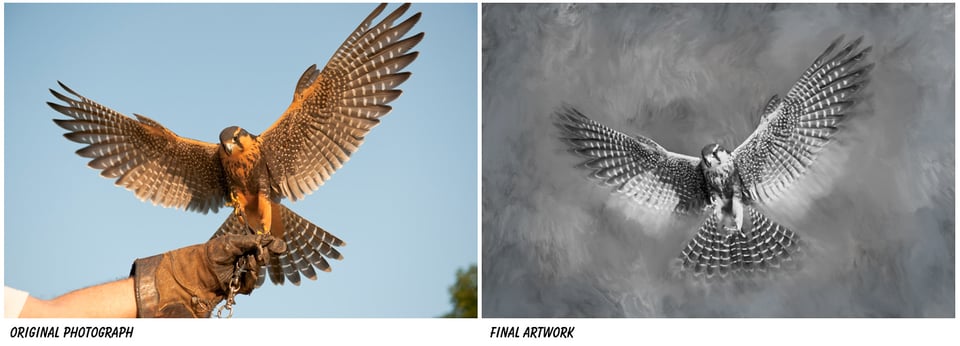
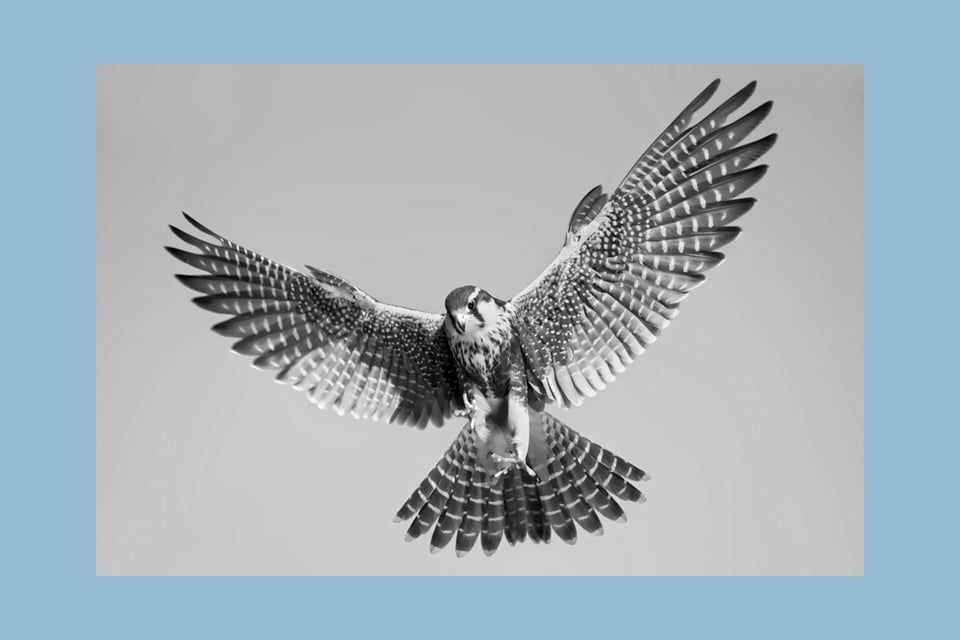
For this tutorial I am going to paint an Aplomado Falcon. I chose the photo because I love the wingspread and because it was not a photograph that could immediately be painted, it needed some editing to make it paint-ready. This helps show what can be done with a photograph you may think is not much good for anything.
So here is the original photograph and the finished artwork beside it. It was taken while working with Jonathan Wood from the Raptor Project. It is not a photo that I would ever use otherwise because of the arm and glove and all the unnatural objects in it. Hoowever, when painting I can get rid of those and it is not a problem. The end result is an artwork which will never be classified as photographically realistic. Remember, I chose a difficult initial photo to show you what can be achieved.
Preparing the Photograph
Lets circle the problems to show what sort of editing and where is needed. You can bypass this section if your photograph has nothing that needs fixing, obviously.
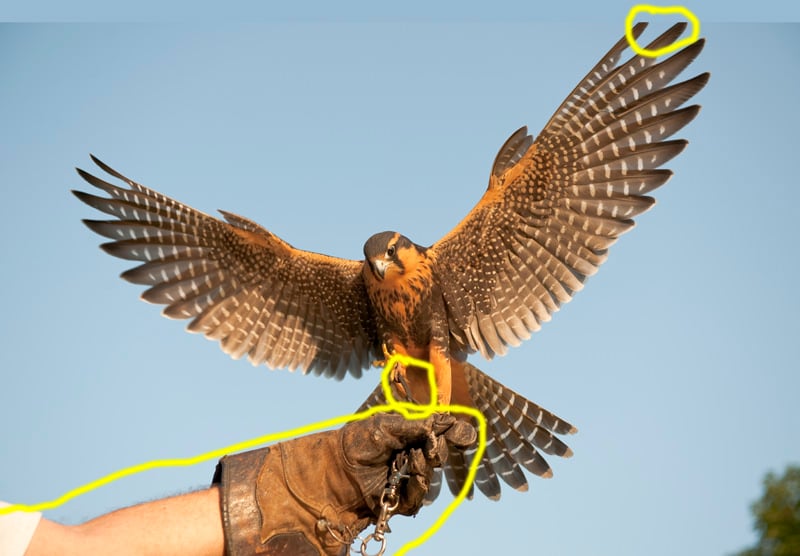
And here is what I found needs to be done with the photograph:
- Extend wing tips to complete where they are cut off, which also requires extending the canvas
- Remove strap on birds left leg
- Remove the arm and glove (big edit)
- Removing the tree bottom right corner
Let’s Start the Editing Process
- Extend the canvas at the top of the image to give you the extra space to complete the wing and also have some clear space towards the edge of the artwork. Fill the extra space with sky color, sample a color close to the edge so you won’t have to blend it in too much.
- Using the clone stamp tool on Photoshop or similar program, stamp in the remainder of the wingtips as you would imagine them.
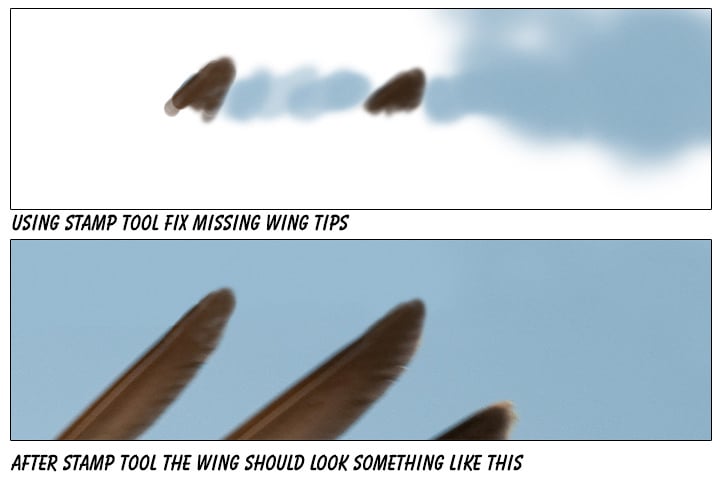
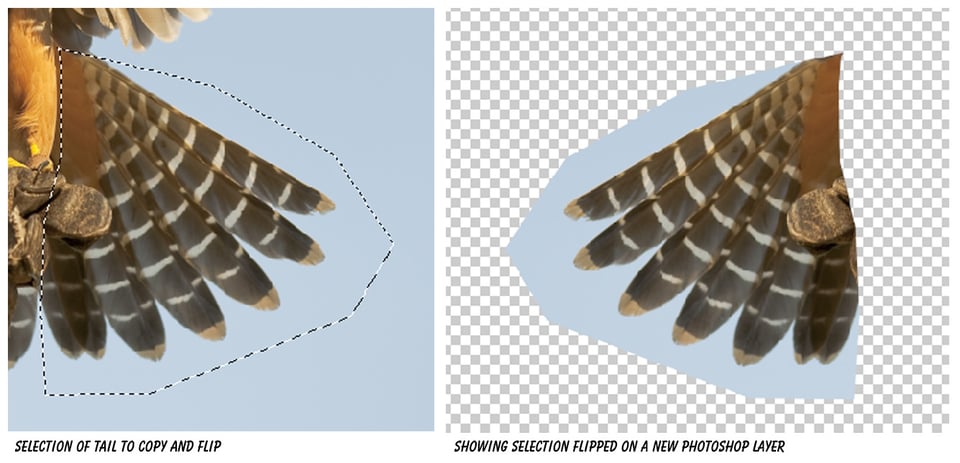
Aplomado Falcon Tutorial Steps 01 - Now let’s get rid of the arm and put most of the tail in place.
- Select the right part of the tail and use the Polygonal Lasso Tool in Photoshop, we are going to copy that tail section, flip it horizontally, rotate it slightly to match the angle and place it in position. This will create the left side of the tail.
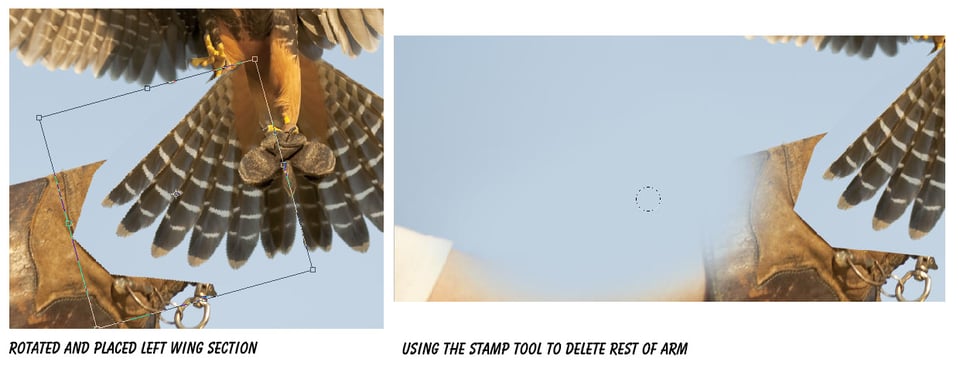
- Now rotate and position the newly created left wing, place it where you think it looks the best.
- Next we will get rid of all the background junk, the arm and the tree on the right, use either the clone stamp tool or just use the paintbrush tool in Photoshop to paint over the arm. Select the blue sky color close to the arm so it matches; leave a little transparency on the tool so it blends with the rest of the sky.
- Continue removing the arm and tree until you are satisfied. The final result will look something like the following:
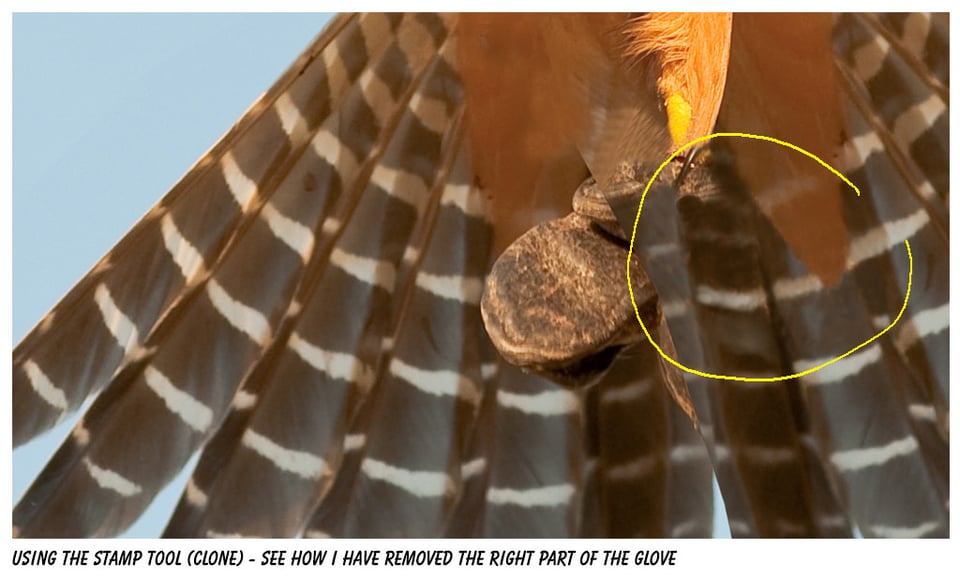
- Now it gets a little tricky, we need to remove the final remnants of the glove and draw in the right foot, it can all be done with the clone stamp tool in Photoshop, remember this is just a reference picture to paint from, it doesn’t have to be perfect.
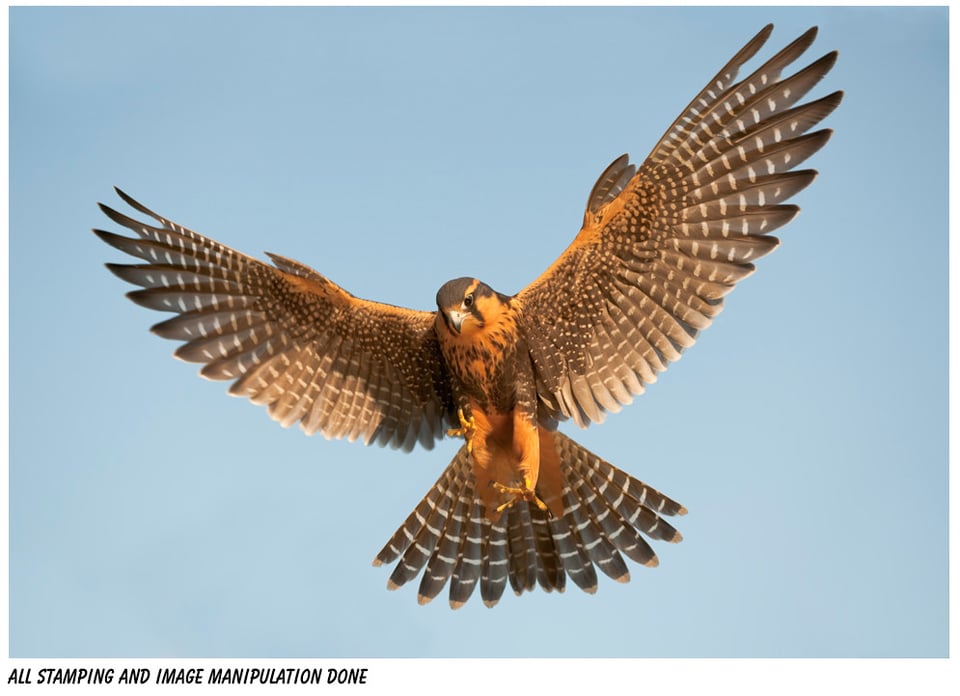
- Just continue stamping and cloning until you are happy, even though the steps are not shown here, I used the good foot to create the missing foot. I just copied, placed, manipulated it until I was happy.My final result of stamping and manipulating of the image looks like this:
- At this point if you were painting in color you could now save this as a jpeg and bring into Corel Painter or GMX Painter or whatever paint program you are using. There are two things I want to do before painting, enlarge the canvas to give me more room to the edge (more work area) and turn the image into black and white. I like to paint or work in high contrast black and white, when the white pops out, it makes the final print look awesome.
- Below is my black and white image after conversion and adjustment of contrast and brightness, also you can see in this image how much extra room I gave myself for the background. The blue border represents how much I enlarged the canvas for that extra working space.
Let The Painting Begin
Now I am going to bring the image into Corel Painter 11 so I can start painting. Note that this isn’t a tutorial on how to use Corel Painter 11, that would make this document impossibly large and long. Please remember it doesn’t have to be Painter, it can be many different programs you use to paint the photo, including Photoshop or the likes. Painter has some nice cloning features and brushes that make it my choice of tool. Having said this is not a review, I will touch on a couple items I use in Painter and the basic tools, just to help you along.
The photo below shows my image imported into Corel Painter and ready to go:
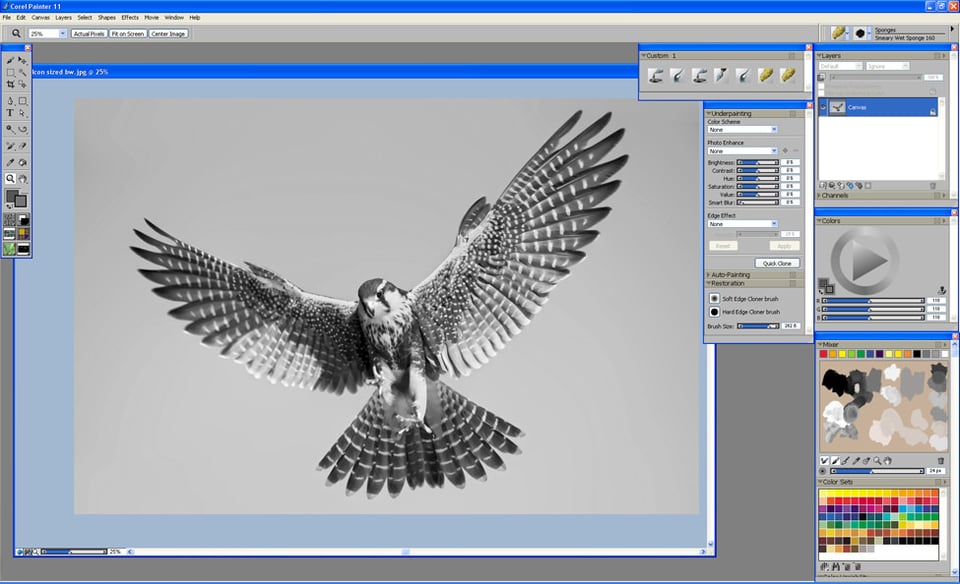
I am painting in mostly black and white, and have created a mostly black and white color palette. At this point it doesn’t matter if you are painting in color or black and white, the process is the same.
The photo below shows the colors I like to use for my black and white series, occasionally I will let a little original color show through in the image as I did for the angry eagle painting, it had hints of yellow in it. The yellow tones were sourced from the original photo.
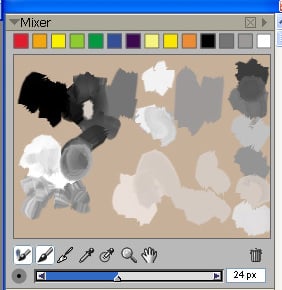
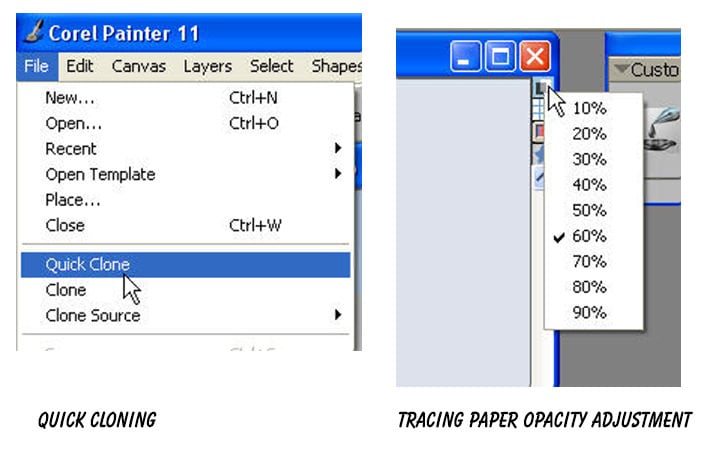
Open Corel Painter and load in your final JPEG image, the one you are ready to use as your reference file for the artwork. Once open you need to quick clone it, then adjust the tracing paper transparency to suit what you like to work with. The transparency is allowing you to see the original photo as an under layer to the layer you will paint on. Kind of like how Disney did it with the old see through transparencies.
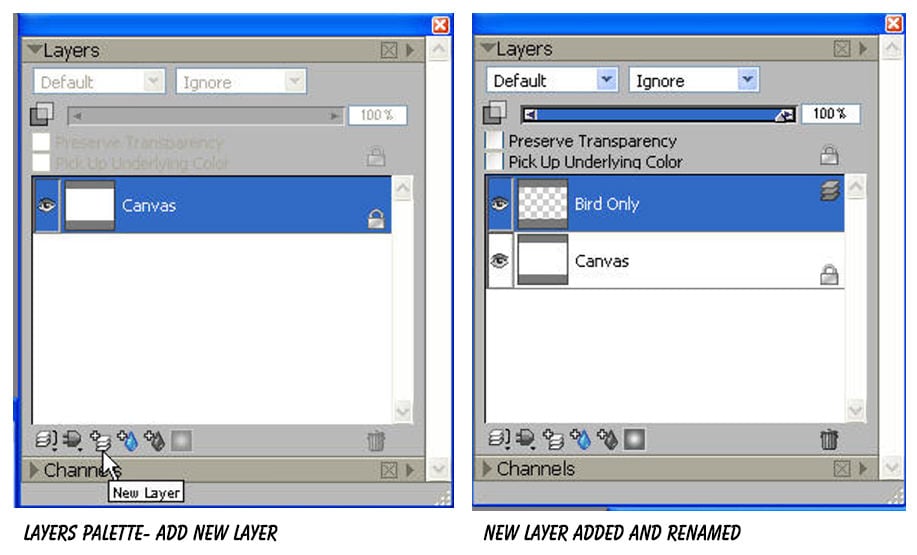
Setup a new drawing layer; don’t draw on the white canvas background. Rename it to something meaningful.
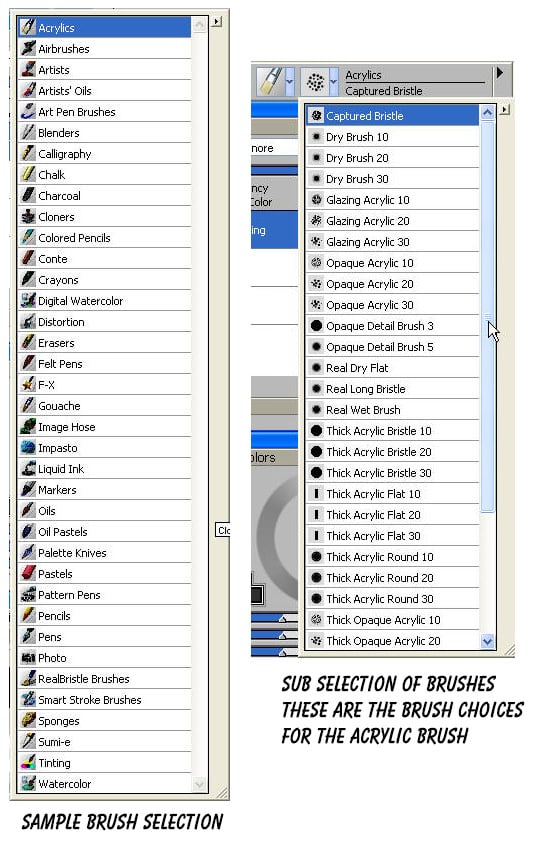
Now, before you begin, set up a new layer to play on and just delete it when you are done. Go through all the various brushes that Corel Painter offers, find one or two where you like the strokes and the strokes suit the style for the subject. Then copy them to custom brush window so you can easily select them during the painting process.
Corel Painter 11 offers a huge selection of paint brushes and pens, these brushes combined with a tablet produce awesome and realistic results. The newer versions of Painter are even better (I used 11 to create this tutorial). I firmly believe Painter is the best software in this category, which is probably why Corel can charge a premium price for it.
If you think the selection of brushes is huge, wait until you see all the sub selections for brushes available for each brush and pen. The photo below the available brushes and also shows some of the sub brushes available in the acrylics section.
I often use a mixture of colors from my palette (in this instance mostly black and white) and cloned colors from the original image, the tool that allows that choice is shown on below. When the little stamp tool shown is depressed and the color selector grey then Corel Painter is going to try and pick up the colors for the brush from the original source image. When tool is not depressed and there is color in the selector you are using the selected color. By alternating between the two methods you can create some really cool artwork.
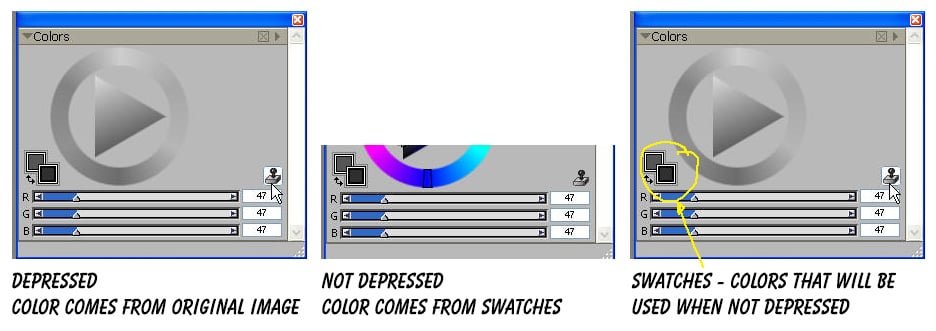
I use the Sample Color tool to select from my mixer palette (shown left). I usually leave it on that and have the main tool bar (shown below) set to painting. The other thing to consider when using cloned color or your palette colors is the transparency of the brush, this will affect the look on screen, below I show the same brush and color painted with different transparency settings. Adjust this to the look and feel you want.
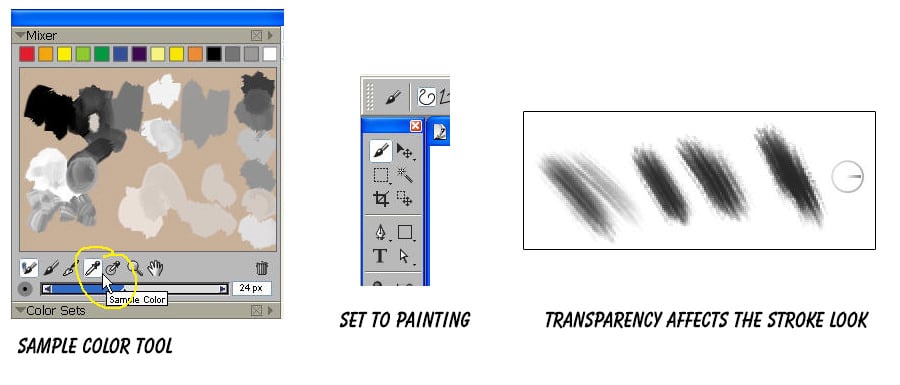
The transparency setting for the brush can be found in the top toolbar as shown below.

I am going to use one of the acrylic brushes and start at the head. When you paint try to follow the natural flow of the reference image, turn the tracing paper on and off often to check your result. The image below shows the tracing paper toggle option.

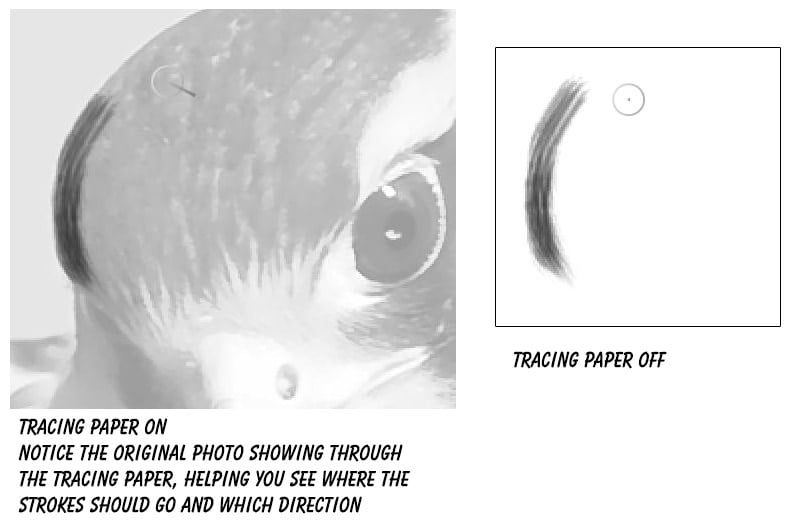
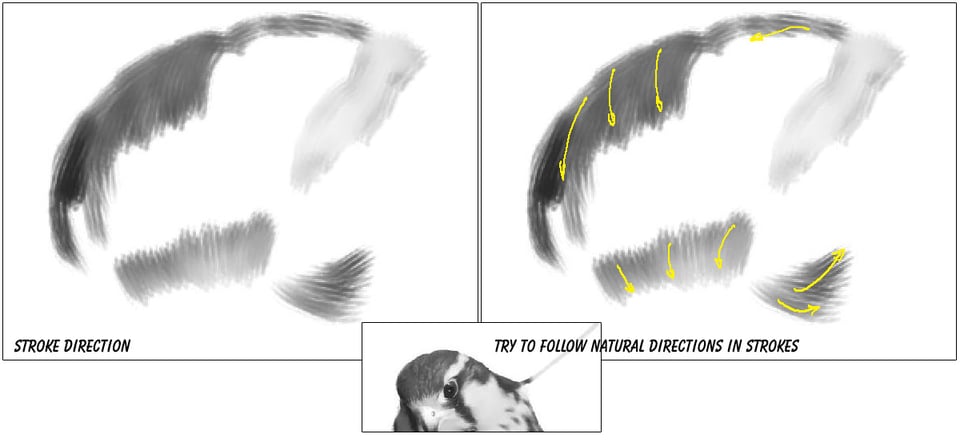
OK, get to painting, work it, work the angles, occasionally use clone color, try to pick up the details. Make it artistic and realistic, get creative. I started at the head, worked my way down the body and I followed the stroke direction I see in the source. I follow the direction of the feathers and details.
After painting a section I occasionally switch to an acrylic dry brush to bring back some of the detail from the original photo, set the brush to pick up the color from the source image.
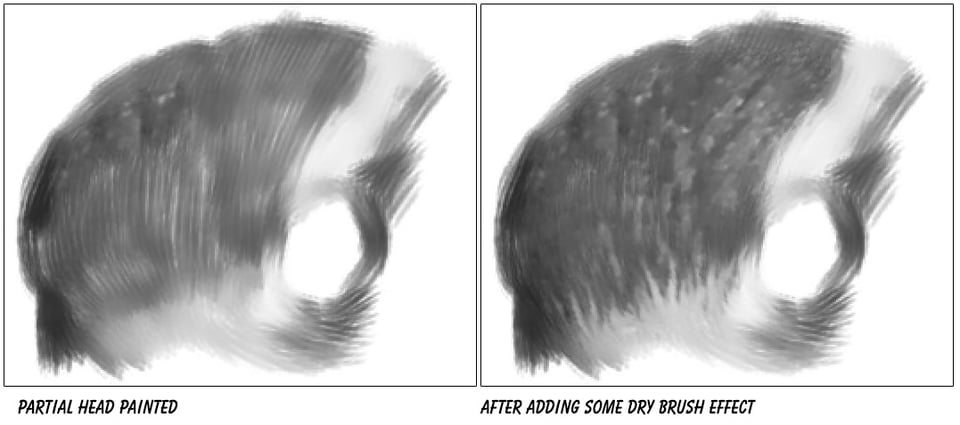
I am going to go ahead and paint a large section of the bird using the same techniques as explained above. So this is what it looks like with most of the body painted; now let’s branch out and do some of the wings.
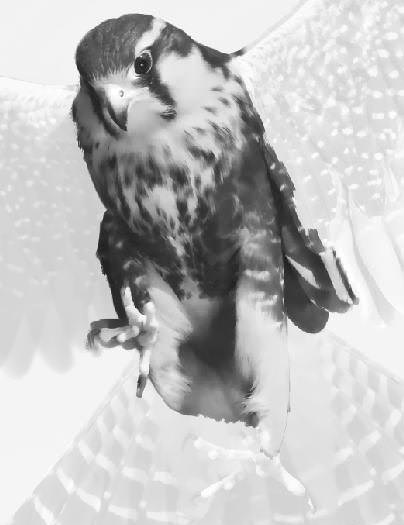
I am pretty much going to follow the same pattern as above to do all the wing sections and the rest of the bird. Remember to try to determine the best direction of your strokes, follow natural directions you see in the underlying image.
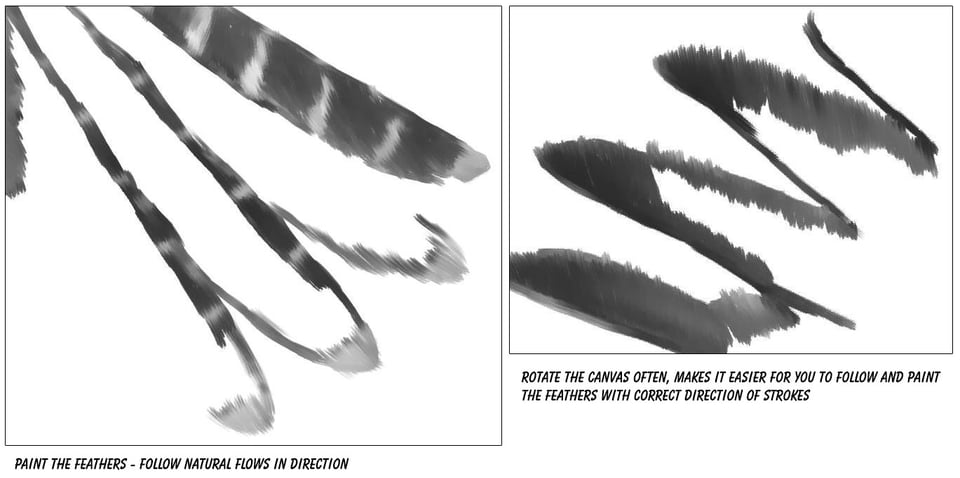
Rotate the canvas often to make your stroke flow, follow your natural hand movement and produce better results. It will be easier for you to follow along the edges.
Essentially you are going to use the same technique to finish the whole bird, which I won’t go through here. Why don’t we add a bit of background to the painting, start to get a feel for how it’s going to look. Add a new layer for the background, fill it with a main color, I used a medium shade of grey.
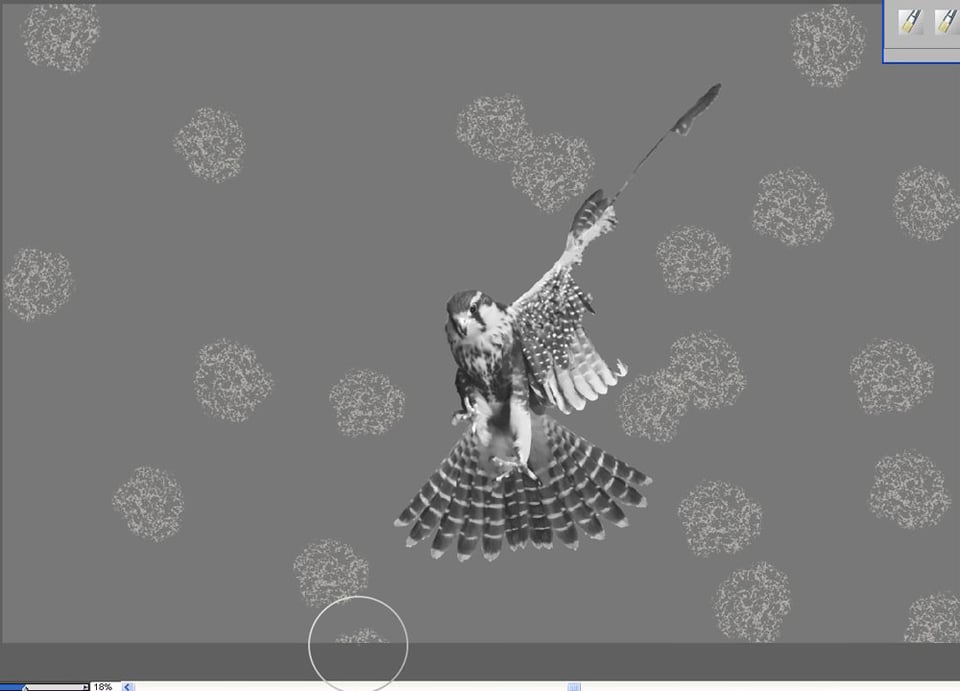
Then randomly paint some sponge blobs around the place, vary the color, select colors you think suit the mood you are trying to create. Also vary the size of the brush. Below is the way I did it.
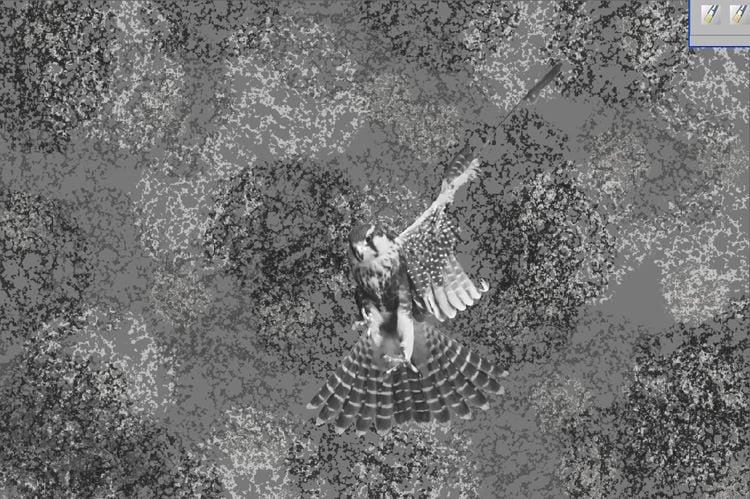
At this point you may think it looks a bit busy or overwhelming, but we are going to tweak it. Now I am going to use a wet smeary brush to blend and distort the background, you can see the result on the left hand side of the image below. Essentially continue playing with the background until you are happy with the look.
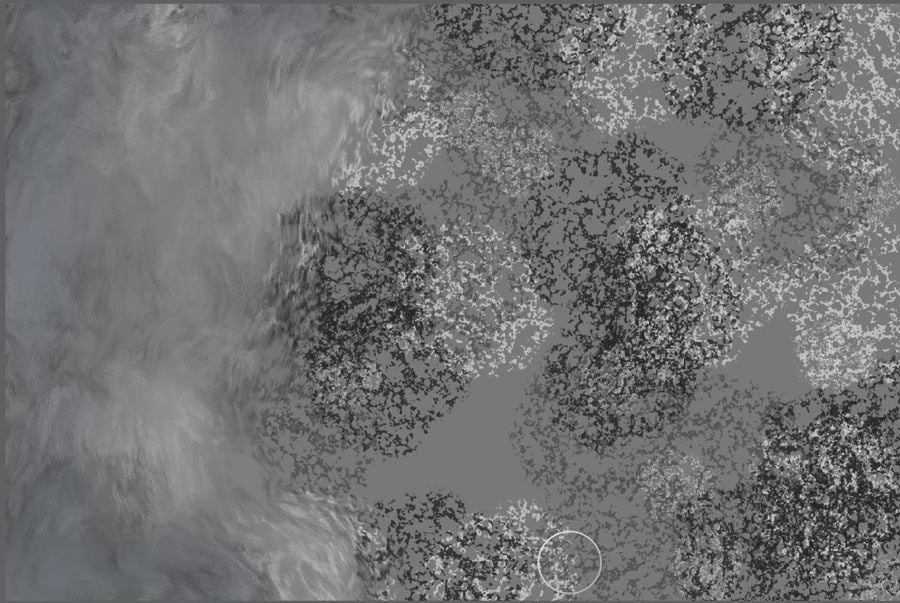
Once I have the background looking the way I want it, I am done with that part. Now I want to add a bit of a lighter color near the edge of the wings to separate the bird from the background and also just because it is an effect I like the look of.
Enable tracing paper so you can see the full outline of the bird or subject you are painting, lets add some white paint strokes in strategic areas along the edges of the wings. The images below show the idea. The left image is tracing paper enabled and I am painting white strokes along the wing tips. The middle image with tracing paper disabled better shows what I have done with the white strokes. The final image on the right shows the strokes after I have smudged them to blend in better with the background.
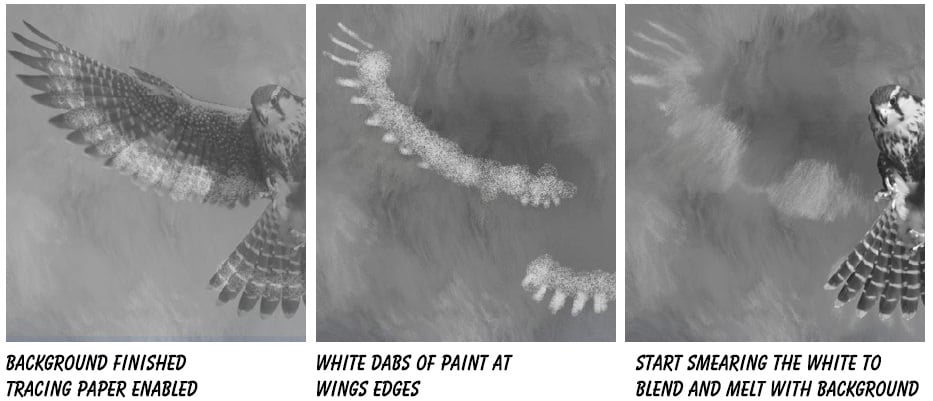
The effect I was going for was to have a slightly lighter color along the wing tip edges as shown below.
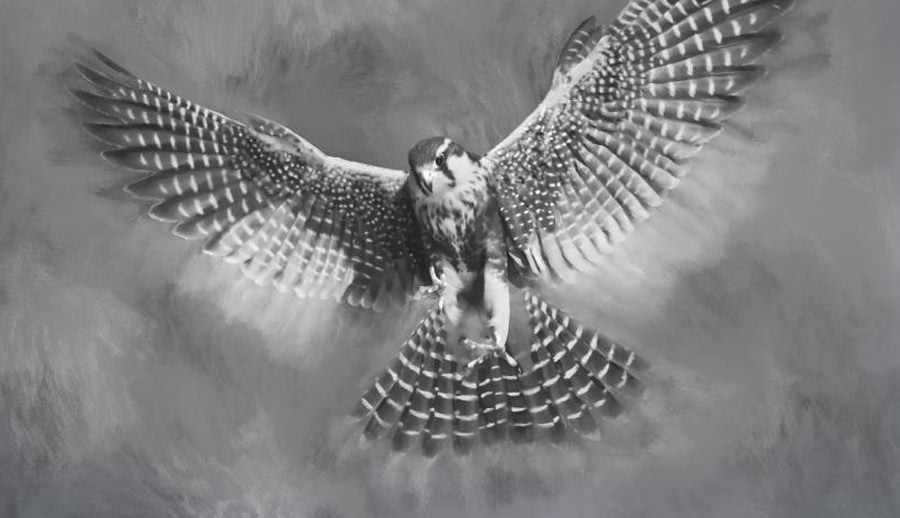
At this point you could be satisfied with the final image and leave it at that, I am going to use Photoshop to add motion trail to the edge of the wings to convey the effect of movement in the picture. It might be over doing it to some, but remember this is art and there are no rules, just like in photography, right?
Motion Trail Effect using Photoshop
Now lets go through the steps needed to add a motion trail like effect to the wings of the bird.
Create a new layer in Photoshop above your painted image. Paint solid white lines along the bottom edges of the wings where you want the motion trail effect from, use a solid edge brush, we don’t want any transparency in the white line.

Now we need to add noise to those white lines, add noise, select Gaussian and Monochrome and you can pretty much set amount to full.
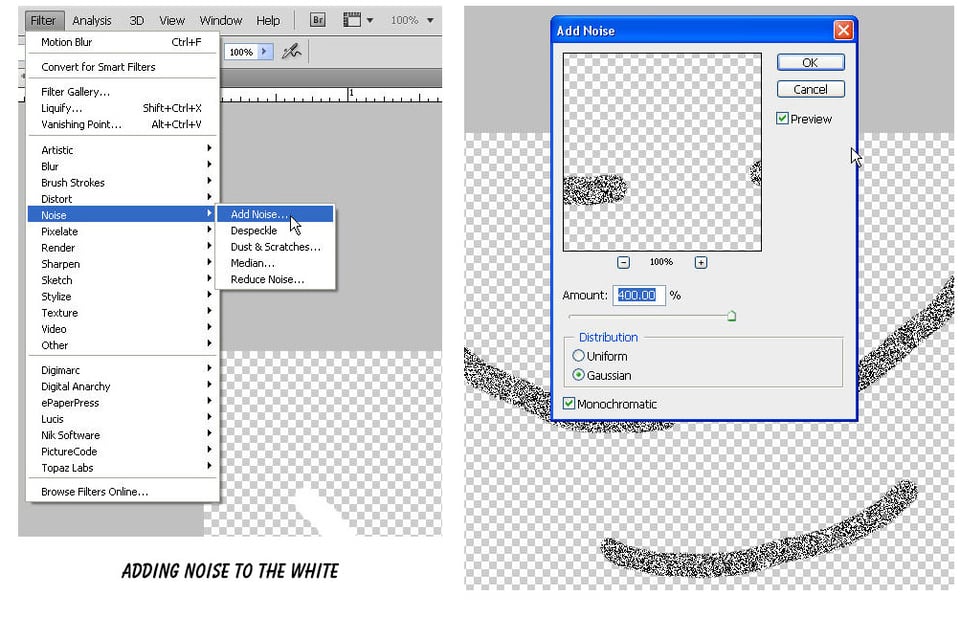
Next we are going to make that noise a little chunkier using the Crystallize filter from Photoshop.
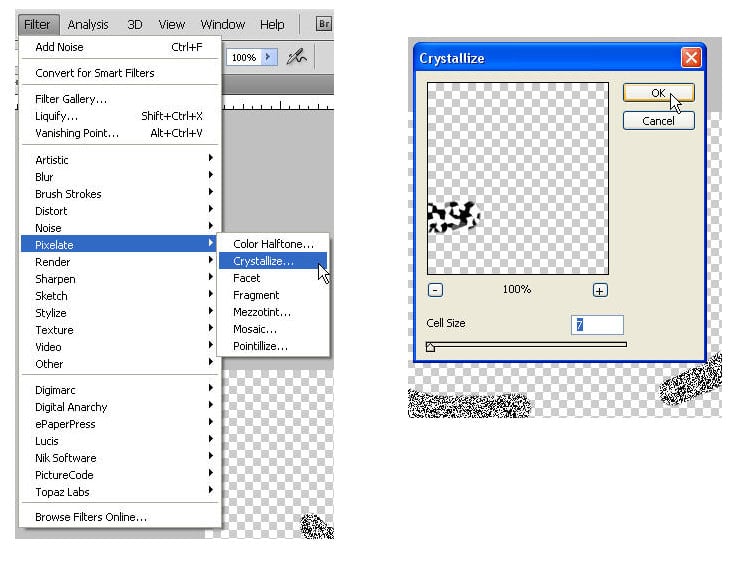
The cell size setting will depend on the original size of your image, in this case I set mine to seven. We need a sharper separation between the white and black in the crystallized result, we can do this with the threshold filter in Photoshop.
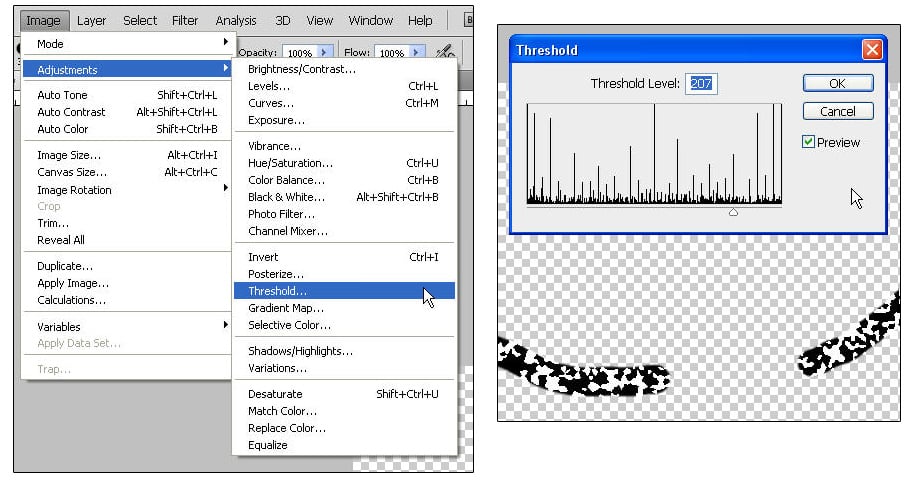
You can see the difference between the non crystallized and crystallized versions in the two images below.

Now we need to get rid of the black and just leave the white portion using the select color range tool in Photoshop.
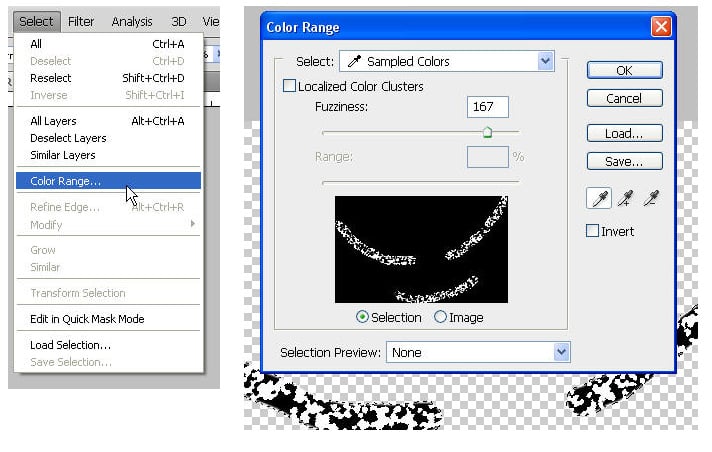
Select the black portion of the image and delete it, just leaving the white.
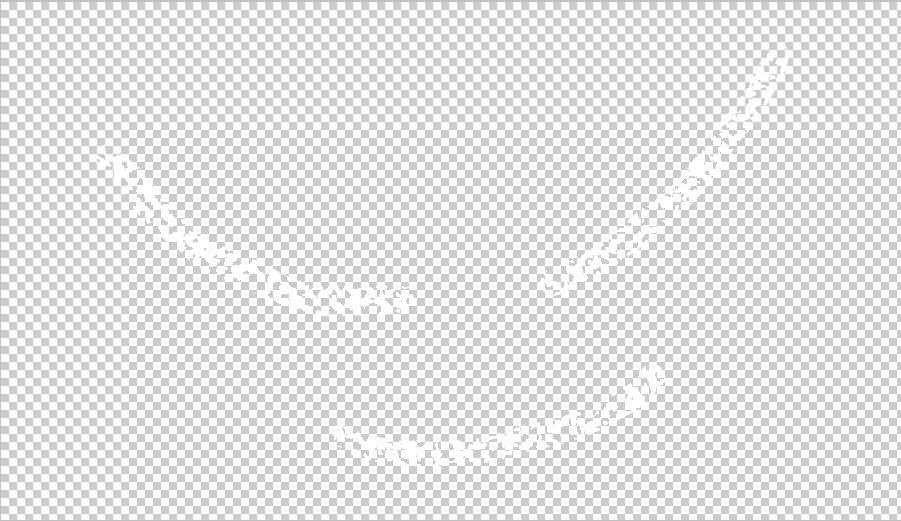
The image above shows the result after removing the black, its hard to see with the squares of the transparent background, but we got what we wanted which was to just leave the white.
Now it is time to turn those white lines into a motion trail using the motion blur tool in Photoshop.
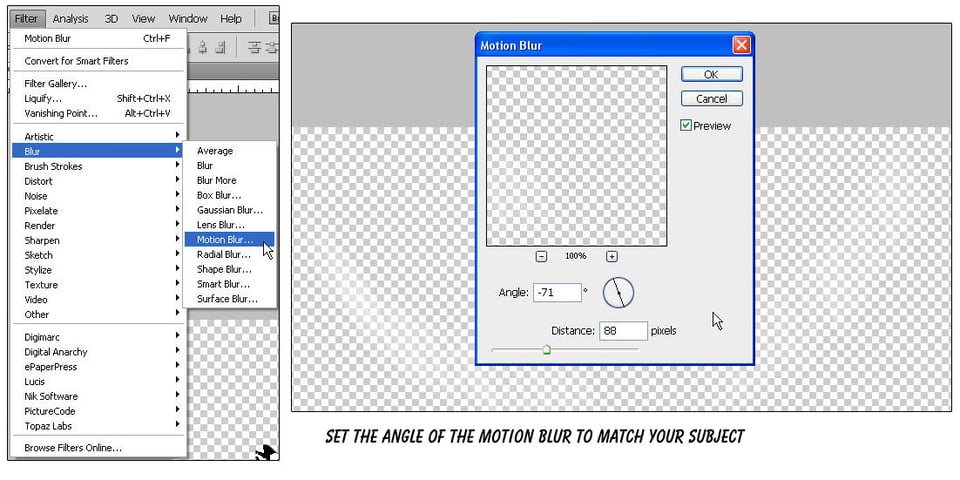
Set the angle of the motion to match your subject, adjust the length (distance) to the effect you are looking for, and then click ok to apply. That’s it, we are almost done.
Here is the end result with a black background (temporarily added), just so you can see the effect better.
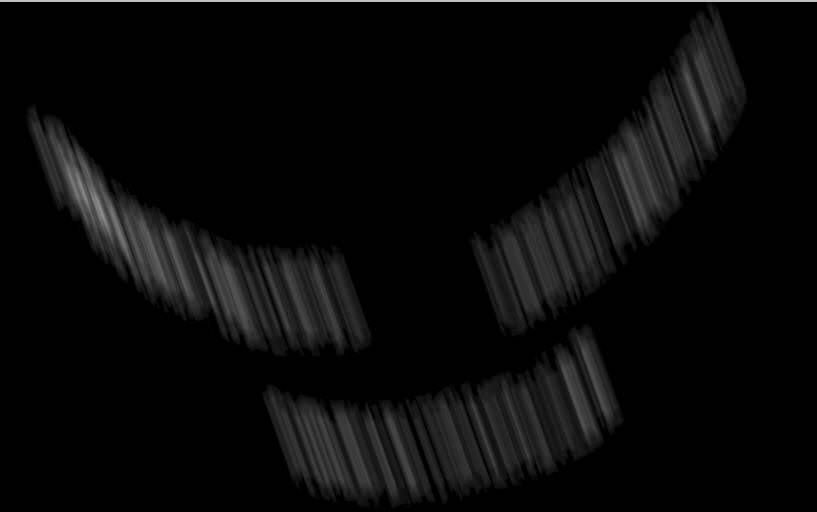
Move the trail into the best position, just at the edges of the wings. We need to do some tidy up, the motion trail is in places we don’t want it. We can either create a mask from the bird layer in the original Painter file or just use the delete tool in Photoshop. For this exercise I am just going to delete the troublesome areas.
Here is my corrected result, notice I deleted the areas where the motion would go over the top of the wings. The black background is just so you can see the trails better.
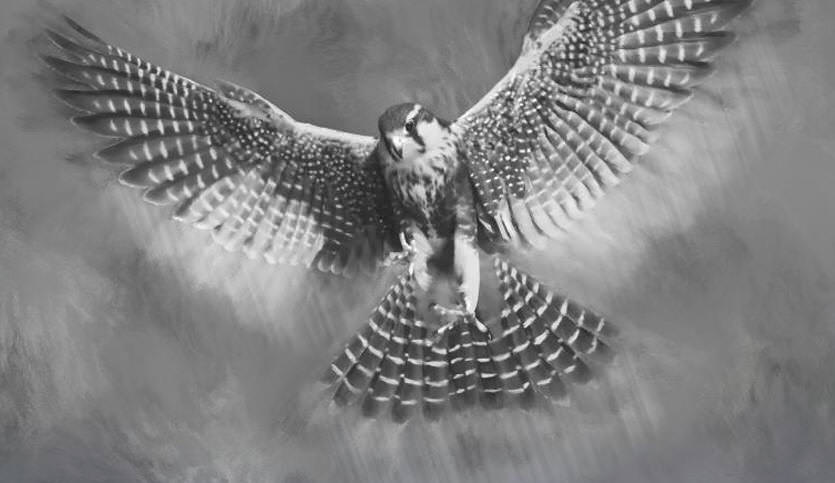
Now we need to soften the effect a little so it is not so defined, adjust the transparency of the layer containing the motion trails until you are happy with the final look. I ended up adjusting my layer transparency to 47 percent.
This is where I am going to leave the tutorial at, I hope you have enjoyed it and found it of some use.
For my final image, I added a ghost-like effect to the wing tips, I did this by enlarging the image slightly, masking out everything but what I wanted to be seen, adjusting the transparency to the level I wanted. There is nothing special about how I did it, I just figure I will leave something out of the tutorial and let your imagination do the work.
Lets finish by showing the before and after images one last time, happy painting everybody.

And finally a higher resolution image of the final artwork.
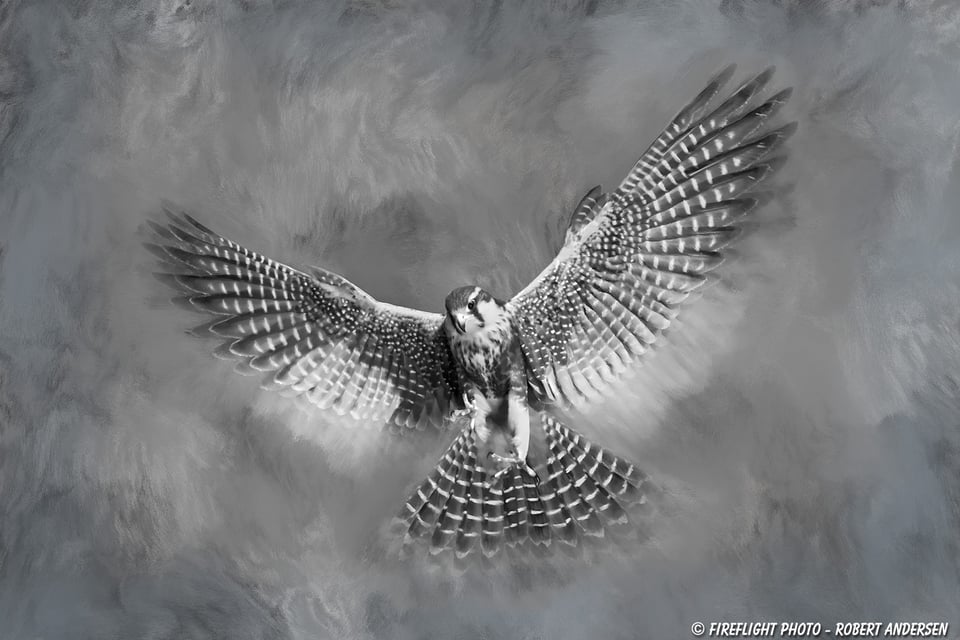
Remember, this kind of creative painting can be done to any kind of photo, let your imagination run wild and maybe even use some of those ‘cry shots’ for some terrific artwork. Have fun.

Cool tutorial, enjoyed it. For those who are not that artistic there is an app called duup (duup.bytrx.com) for iOS to automate the process. The app is free and comes with some very different and gorgeous filters. Converted pictures look great as Zoom background, profile pictures or just for decoration purpose.
Yes good tutorial really, other websites can done this automatically like www.cartoonize.net/ and many other. Great work!
This is great. We too have a FREE webinar going on for converting photos to digital paintings in Photoshop attendee.gotowebinar.com/regis…1400142340
Have you tried Impression by Topaz Labs? It’s a one click paint job.
Here’s one l example I did
plus.google.com/brows…3VgF6cCpwU
Hi Robert, thanks very much for the great article – I am going over it again many months later as I want to get started. I have an Apple iPad Air 2 tablet that I want to use for the photo painting, but am battling to find apps, especially Corel Painter, to suit. Can you help me here ? I have very little experience with this sort of app. I have Photoshop and Lightroom 5.6 – will either of these work and what should I be looking for – I am not sure where to start.
I’d really appreciate your help.
Nice article, but you really should have a look at Synthetik’s Studio Artist, which beats Painter by 1000 – 1 in features and control
www.synthetik.com
DM
Great article!
I have not yet thought about doing digital paintings of my photos, but thank you very much for sharing the knowledge, I’m hopeful to using it whenever the photo-painting light sparks on me. :)
Cheers
Rafael
One day when the creative juices find you, you know where to find the information :)
Regards
Rob
Mr. Andersen,
Just wanted to say how much I enjoyed your ‘process’. Thank you for sharing with the rest of us. I have a snake pic I’d love to try this on…wish me luck!
Hey Susan
A snake photo has amazing details fine the texture of the skin – try and enhance the contrast and bring out those details. If you are going for the black and white style, strong blacks and bright highlights really make the image pop. Try and get creative – remove and create your own background – remember to have fun.
Good Luck
Rob
Thank You Robert for the quick reply and wonderful information. Do you have a FB Page??
Judy
Hello Judy
If you need more help, just ask :)
FB page – Yes – h t t p s://www.facebook.com/fireflight.photo
Robert
Hi Robert,
I bought Painter X3 , a wacom tablet last Christmas and am a little timindated
to use it. Looks confusing. What do you think is the best way to start learning this style? Should I grab the GMX first and go with that, then go on to Painter X3??? I will try this wonderful instruction first???
thank You
Judy
Hello Judy
You are a long way ahead of many, you have bought the tools – Painter and a tablet – both are powerful and useful tool – the Wacom is also nice for making small touchups on your photos.
The style I am presenting here isn’t outright painting – you have the photo you are trying to turn into artwork and an underlayer – kind of like the old days when Disney animators did the key frames on transparencies then junior animators filled in the movement frames. In other words they could see the subject to be drawn through the transparency, which helped them.
I think the idea of this tutorial was to present options for creating an artistic representation of a photo, eg: someone says to you “hey, can you make a canvas print of my dog and make it look more painterly” – I take it a step further and create more complex artistic representations of my photos that actually sell quite well. They also help make you different and stand out from a crowd.
Having said all that, if you have painter already then you might as well take the time to learn it. The key topics you need to learn are about quick cloning a photo, setting up a palette of colors (in my case grays), learn to use the various brushes and cloning tools, switch between using the color from the clone photo or your custom palette, you have to spend some time just playing with the cloning brushes and play with the settings. I actually spent a few night just learning the various brushes – but its mainly the cloning brushes, the oils, acrylics and air brushes I find most useful. So I would concentrate on those. GMX is very simple to use and creates very good results – it is an option, but try with corel first. if you get past the starting to learn the software hurdle you will have that skill for a lifetime :)
Regards
Rob