Say that the sun just set, and you’re trying to take photos of the blue glow that now sits on the horizon. Seems like the perfect backdrop for a beautiful landscape, doesn’t it? But in order to capture the photo you want as well as possible, there’s one piece of camera equipment that is absolutely essential: a tripod. Landscape photography and tripods go hand in hand, but there’s a lot of important information about them that many photographers don’t know. In this article, I’ll cover the ins and outs of tripods, including what you need to know if you’re buying one yourself.
Table of Contents
Why Photographers Hate Tripods
Tripods are large, cumbersome, heavy, expensive, and time-consuming to use. If you’re trying to carry as little camera gear as possible, a huge tripod hanging off your backpack just feels like a bad idea.
Landscape photographers never enjoy carrying the weight of a tripod, and we certainly don’t enjoy paying hundreds of dollars (or more) for a good one. They’re large, expensive accessories that don’t do anything except hold your camera steady. In that sense, tripods may be the most annoying camera gear that you can own.

Why Photographers Love Tripods
Tripods are fantastic. Mine is quite possibly my favorite piece of equipment, bar none.
Yes, tripods only do one thing: they hold your camera still. For landscape photography, though, that’s worth a lot – it’s worth carrying a heavier backpack, as well as a lighter wallet.
What makes a steady camera so valuable?
First, it lets you achieve the best possible image quality. If your tripod is as stable as possible, camera shake becomes far less of a concern. On top of that, in most cases, you can stay at your camera’s base ISO and sharpest aperture values to capture the highest technical quality possible. Without a tripod, that often won’t be the case. (You can read more about important exposure settings if you don’t yet know how to set your camera.)
Second, it gives you a solid platform to create your composition. Even ignoring image quality, your composition will change from moment to moment if you shoot handheld. That makes it tougher to capture the exact framing that you want, down to the exact millimeter. Personally, I find that my tripod-based compositions are almost always stronger than my handheld photos, simply because I can step back and arrange everything exactly how I have in mind.
After a few years of photography, I made it a habit to carry a tripod wherever I went. Before that decision, I used terrible camera settings at several beautiful landscapes simply because I was shooting handheld. Even worse, my compositions suffered because I didn’t frame everything as carefully as possible. A tripod was a huge upgrade.

I was so close to these corn lilies that my framing changed drastically every time I moved, even slightly. A tripod made things much easier.
Tripod (and Head) Basics
Everyone has seen a tripod before, but not everyone knows all the details of how they work. So, I’ll go over some of the basic information that you need to know before picking one for yourself.
What Makes a Tripod?
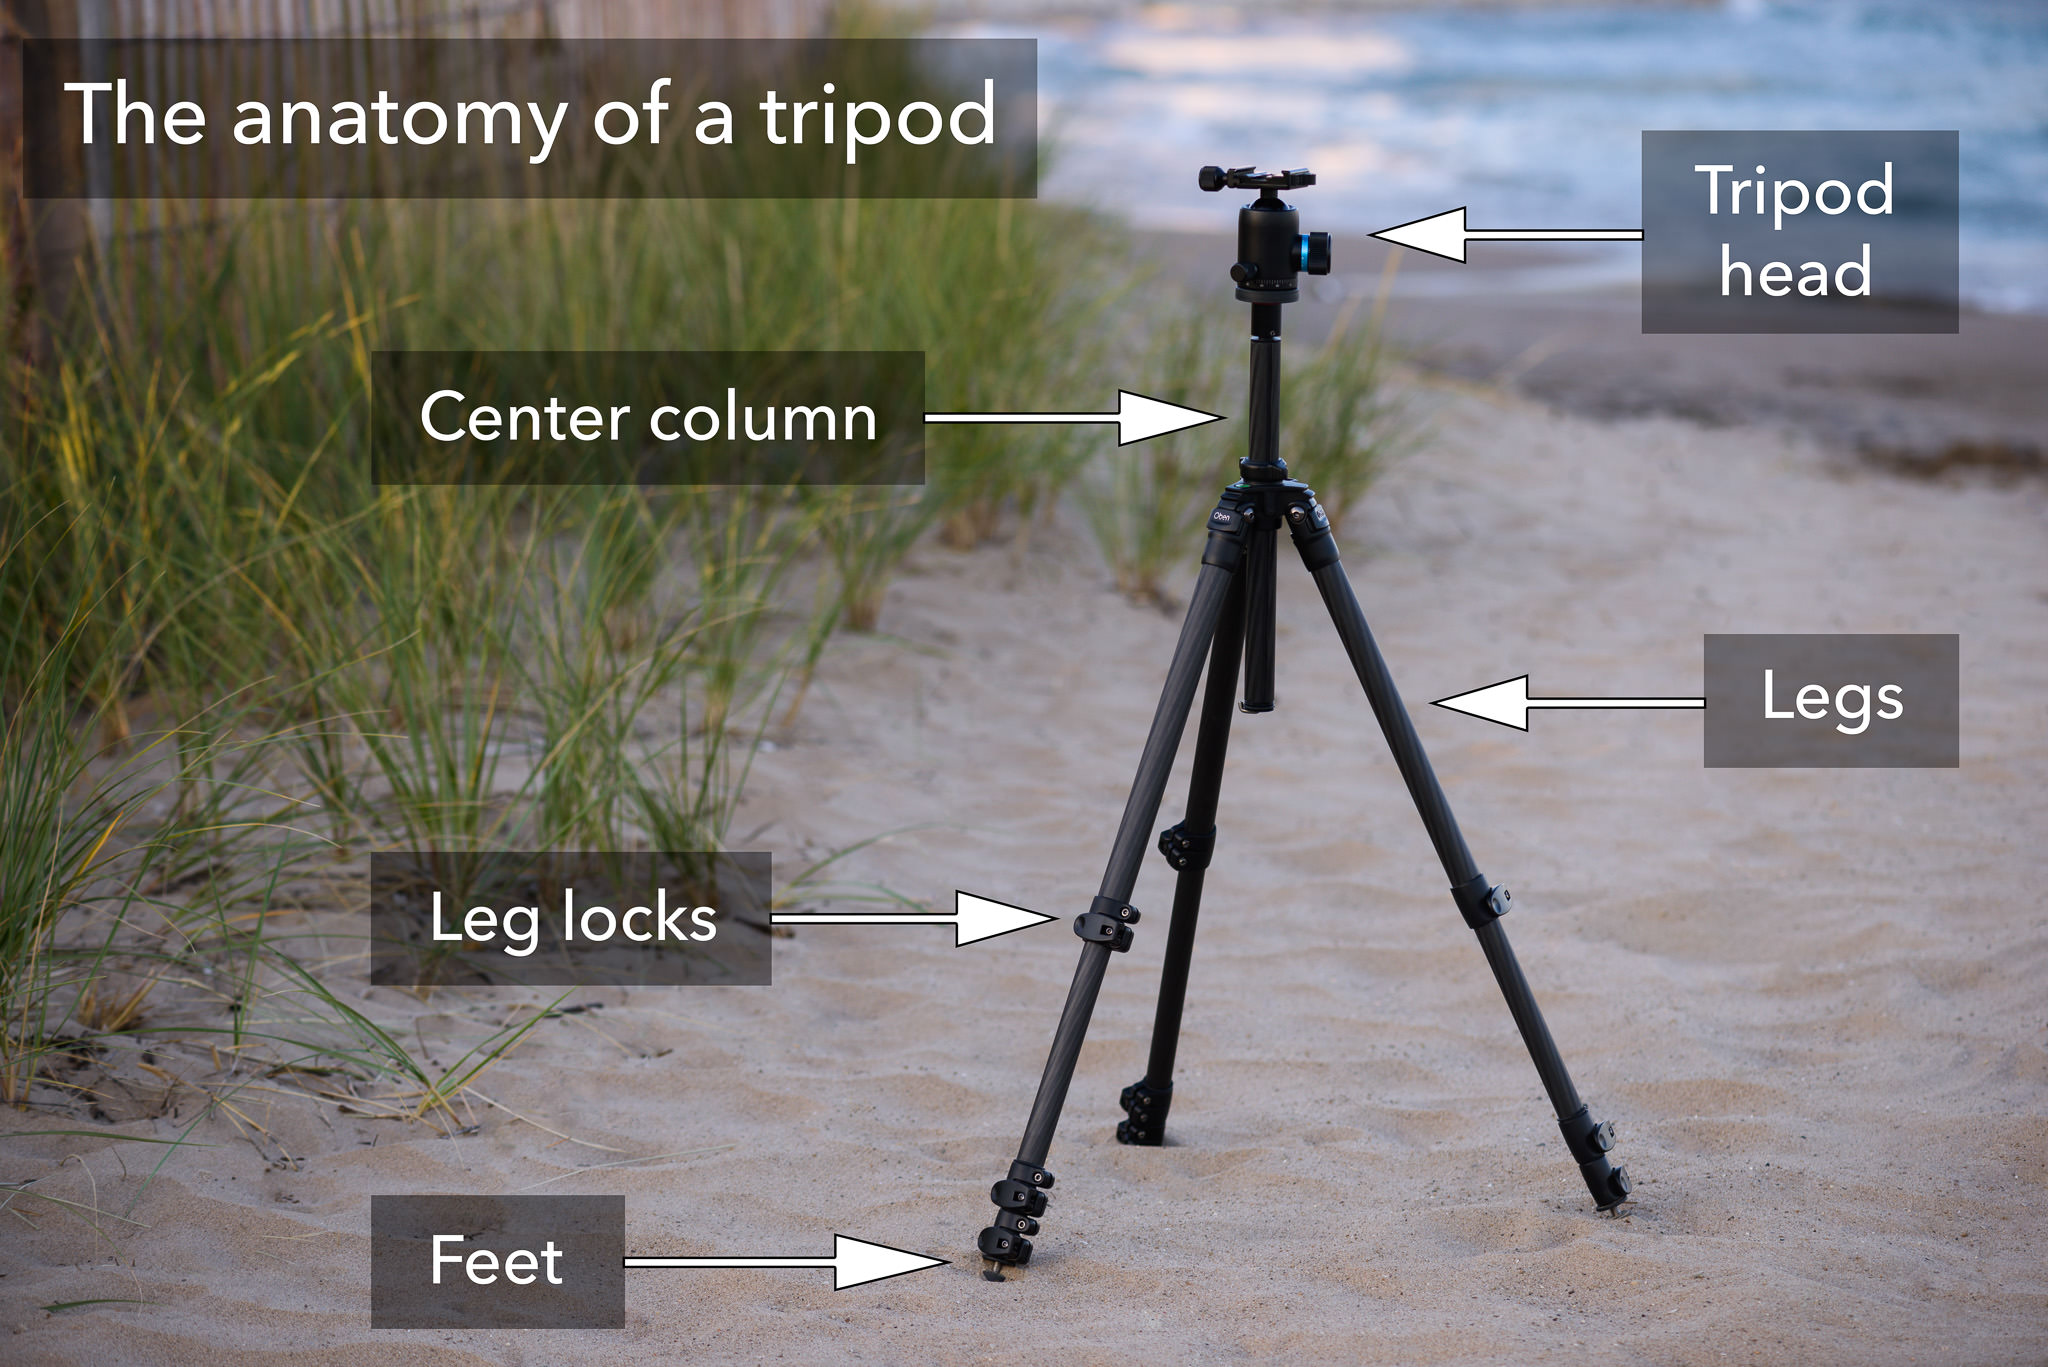
Each tripod has several components, but most share the same basic form.
- Legs: Your tripod’s legs are the three sticks that hold it together. Without them, it would just be called a “pod.”
- Leg locks: Once you’ve raised or lowered your tripod, you need to tighten the leg locks. That’s how you prevent the sections of the tripod from slipping in on each other, which could cause your camera to fall over.
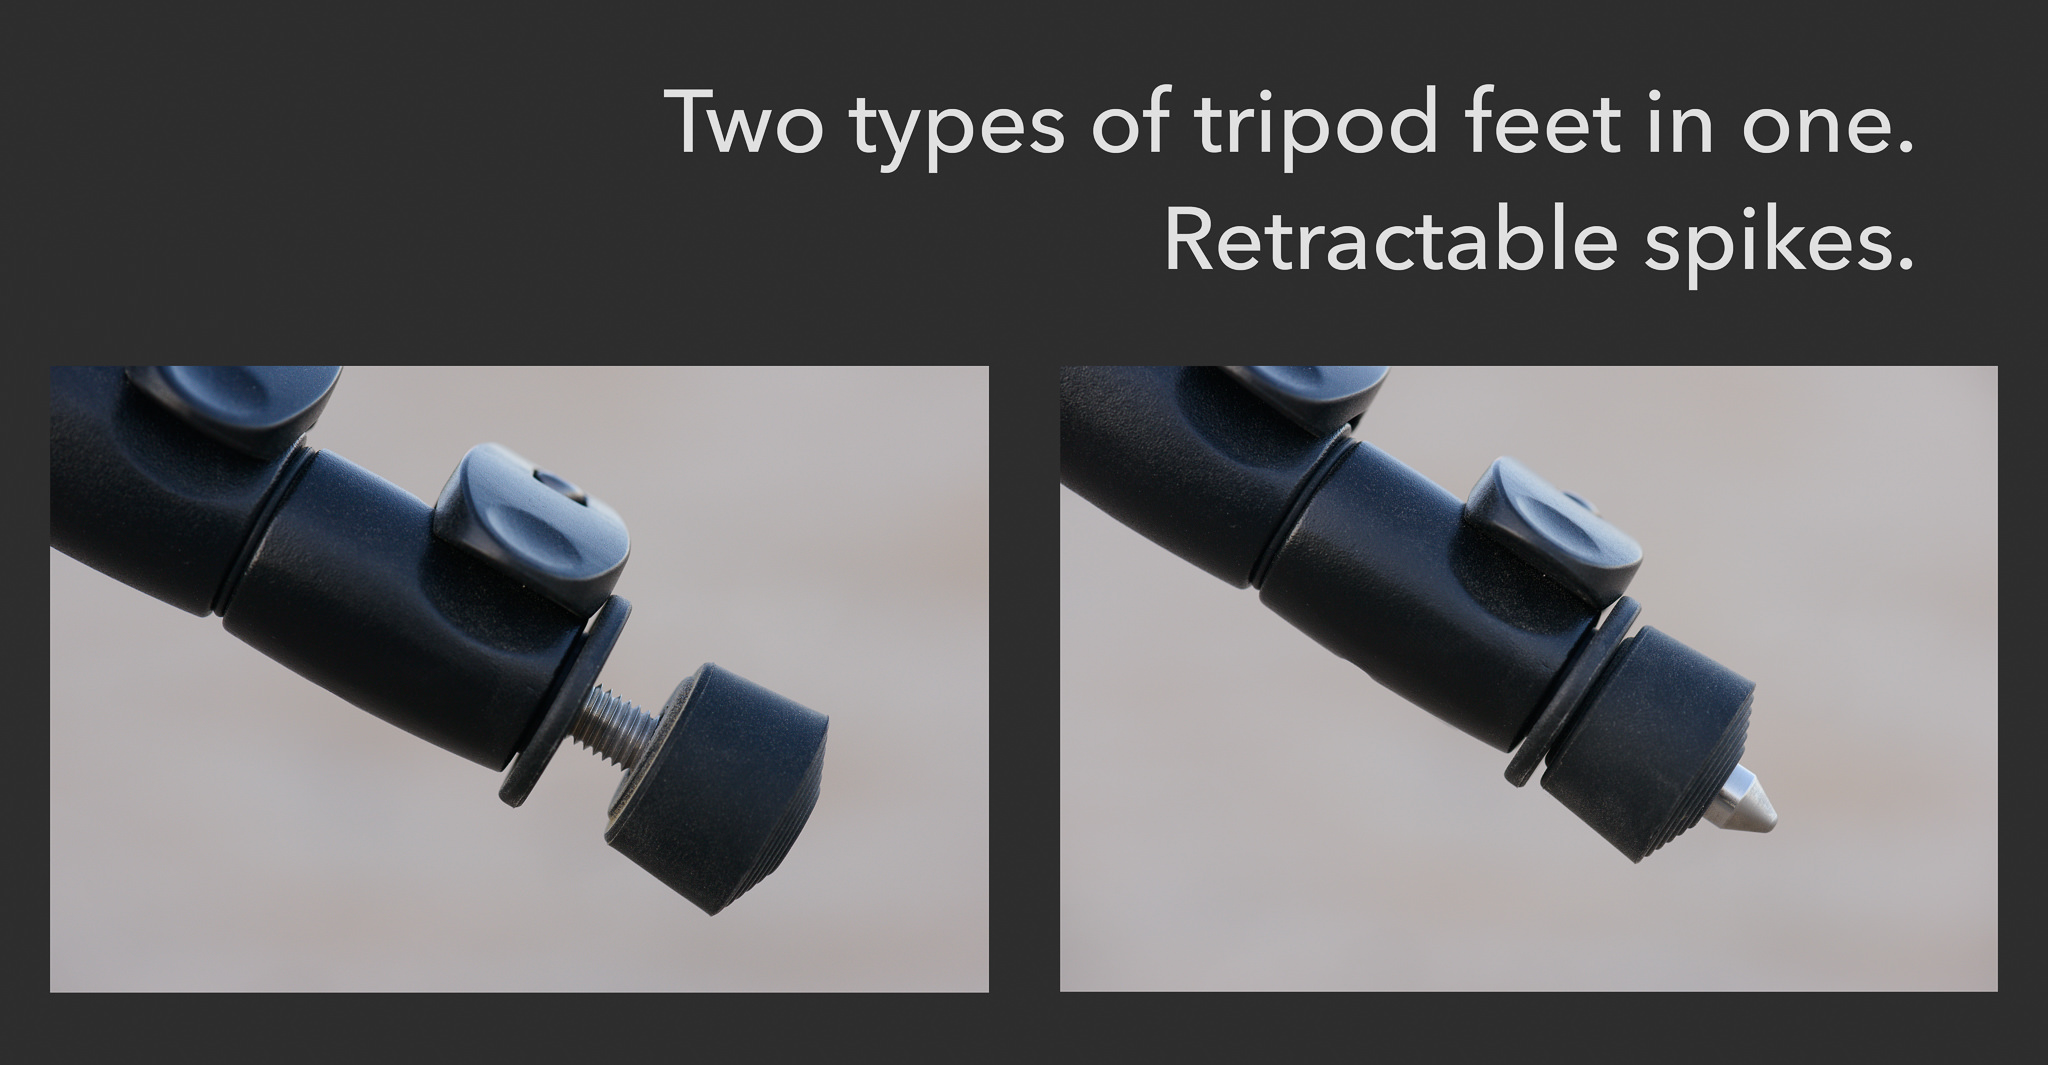
- Feet: The end of every tripod leg is called its foot. They’re typically made of rubber, although some tripods let you swap out the rubber feet for other types. This mainly includes spikes (for digging into the ground) or claws (for gripping on rocks).
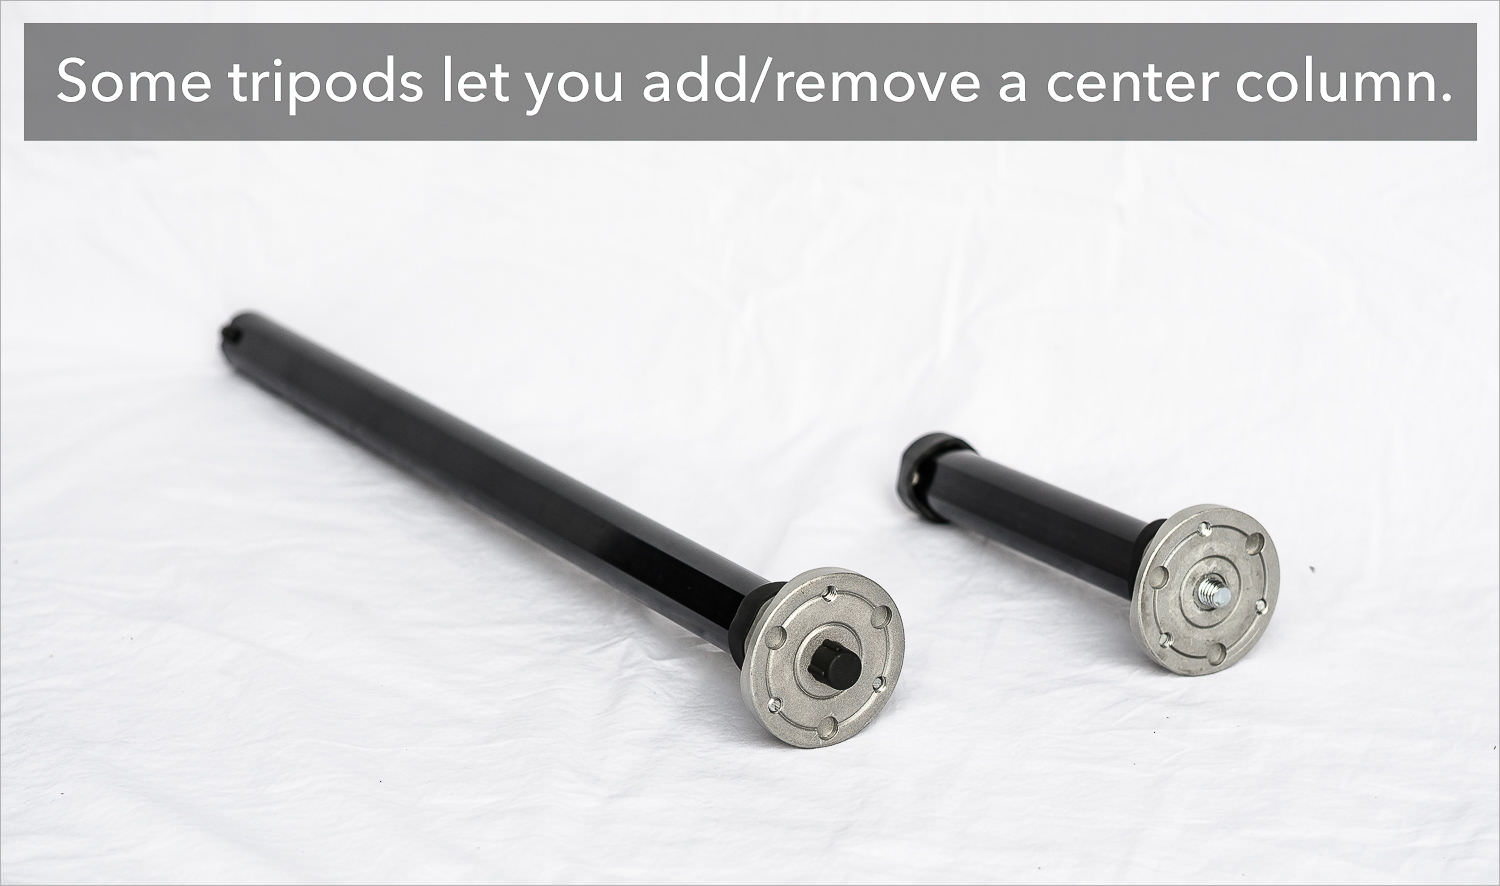
- Center column: Many tripods have a built-in center column. You’ll notice that some higher-end models don’t come with a center column by default, but they’ll typically let you add one later if you choose.
- Tripod head: Although you’ll typically buy tripods and head separately, you need both in order to have a workable kit. The head lets you position your camera and frame your composition.
This is just the beginning, though. Depending upon your needs, you can add various components and accessories to most tripods. Whether you’re into panoramas, wildlife, astrophotography, or nearly any other genre of photography, you’ll find extra gear to fit your needs.
Materials
If you’re looking at tripods on the market, the first thing you’ll notice is that they’re all made of totally different materials. Which types are the best, though? Here’s a summary of the most common materials you’ll find:
- Plastic: Dollar store tripods are typically made of plastic, or they have many plastic components. This was true of my earliest tripod, too, which broke halfway through the first trip I ever took with it. That’s a fairly common fate for plastic tripods. If you buy one, don’t expect it to last through any harsh environments.
- Aluminum: Aluminum is a bit of a sweet spot. It’s cheap – you can find aluminum tripods under $100 – and it’s much less likely to break the first time you use it. This is the most common material you’ll find on the market, so there are countless options to choose from, even into the medium-end range. However, aluminum isn’t especially lightweight, and it won’t break any records for dampening vibration. It’s a good place to start your tripod journey, but many landscape photographers will end up wanting something more.
- Wood: I’ve owned a wooden tripod before, and that’s surprisingly unusual. Wooden tripods are a rare sight, since only a few companies in the world manufacture them. The issue is that wooden tripods are quite heavy, and the best ones are fairly expensive. I bought mine at a reasonable price, but its maximum height was only three feet tall, and it weighed about two kilos (4.5 pounds). Not surprisingly, I sold it a few months later. I don’t recommend wooden tripods unless weight is of little to no concern, and you’re willing to pay for one that is tall enough for your needs.
- Magnesium: At this point, we’re starting to get into the high-end, lightweight materials. Magnesium tripods are lighter and more stable than aluminum, which, in theory, would make them an attractive choice. However, there are relatively few magnesium tripods on the market, and they aren’t much more affordable than carbon fiber (which, as far as weight-to-stability ratio, is a better tripod material). So, they aren’t as popular as you might think.
- Carbon fiber: This is the top dog of the tripod world. Carbon fiber is lightweight, and it does a great job dampening vibrations. Almost all of the highest end tripods on the market are made of carbon fiber, and, as you would expect, it’s also a very expensive material. If you’re looking for a carbon fiber tripod, you’ll find plenty of options out there, but not all brands are equally good (as I’ll go into later). Be sure that you buy one with a good reputation.
Tradeoffs
Every tripod out there has some tradeoffs. You can’t expect to pay $100 and get a tripod that’s just as good as a top-of-the-line carbon fiber model. However, material isn’t the only thing you need to consider when searching for the right tripod. Here’s the dilemma:
- Well-priced
- Lightweight
- Stable
- You can only have two.

The lower the price of your tripod, the more compromises you’ll make in other areas. The same is just as true for weight and stability. Any time you improve one aspect, you inevitably harm another.
There is no perfect answer here. You have to decide what works best for your situation. Do you want a lightweight tripod that is as stable as possible? It will be very expensive (such as a high-end carbon fiber model). Or, would you prefer a sturdy tripod for a lower price? Inevitably, it will weigh quite a bit (like a heavy aluminum or wooden tripod). Look through the different options, and pick the area that you’re most willing to compromise.
Features
When you’re looking for a tripod, you also have to consider the features that it offers. Different tripods, even aimed at the same audience, will have their own pros and cons.
For example, the first thing you’ll notice is that tripods all have separate lists of specifications. One that a lot of people look at is maximum height. Many landscape photographers want the tallest possible tripod so that they can keep it at eye level. However, this does bring a few issues – extra price, weight, and instability – so be careful not to overdo it. Instead, you might care more about transport size, which is the size of the tripod when it is collapsed as small as possible. As a landscape photographer who does a lot of hiking, I tend to prefer tripods that are smaller and lighter, even if they aren’t as tall. However, your needs could be different.
You’ll also see that different tripods have their own “ratings” for how much weight they can support. These are totally unscientific, and they don’t matter at all in the long run. In fact, different manufacturers all have their own systems for determining this number. A tripod rated to 10 kilos by one manufacturer could be vastly more stable than a tripod rated to 15 kilos by another. Although this number can be somewhat valuable for comparing options within the same brand, it’s useless for looking at tripods from several manufacturers to see which one will be the most stable.
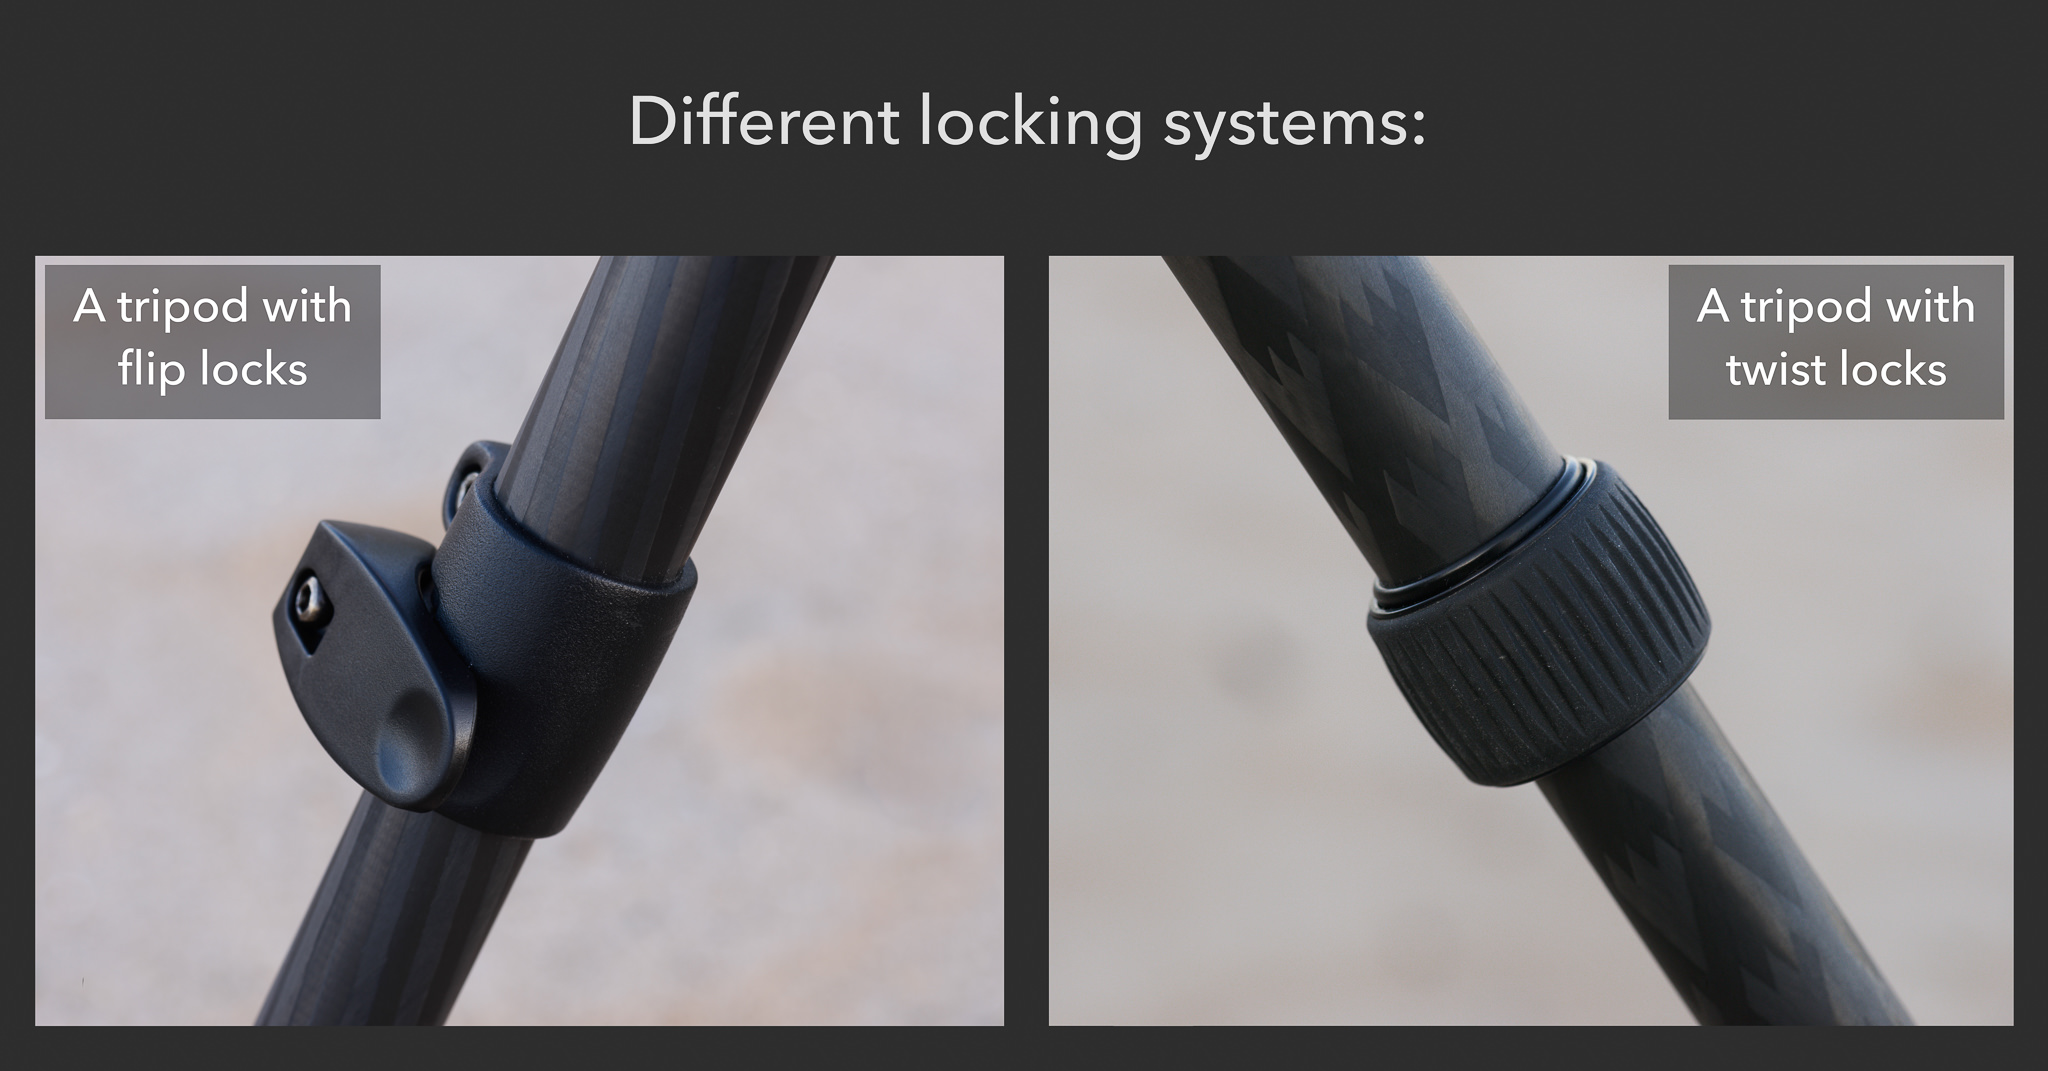
Other differences, though, are a bit more visible. For example, tripods all have different leg locking systems, although most fall into one of two categories: flip or twist locks. These are simply different ways to unlock the tripod legs. However, some photographers will have a preference for one over the other, and it’s something that many people overlook when buying a tripod for themselves. (I prefer twist locks – I find them quicker to use and easier to clean – but not everyone agrees here.)
This is just a minor difference, though, and some factors matter more. For instance, can you take apart your tripod and clean it? That is one of the most important considerations when you’re buying a tripod for the long haul. If you can’t clean it, there’s no way it will last through years of photographing oceans, deserts, and other harsh environments.
On top of that, does yours let you change or swap out its different components? Most high-end tripods are very modular. You can add or remove a center column, change out the feet, and replace broken components. All of this goes a long way to making your tripod last as long as possible.
Others on the market might have features that are more unusual. For example, some tripods let you flip the center column upside down, or rotate it to face horizontally. Others come with retractable spiked feet, so you don’t need to buy anything separate if you frequently shoot on softer ground.
Although some of these options can be nice, it really depends upon your personal situation. Personally, I’d never buy a tripod specifically for features like these, because they generally add compromises in other areas: price, stability, or weight. However, you might already know that some particular feature is necessary for the work you do. If that’s the case, go for it.
Tripod heads
Last up are tripod heads, and these are incredibly important.
There are several different types of heads available on the market, and not all of them work equally well for landscape photography. Here’s a quick list:
- Pan-tilt heads: These are the typical tripod heads you’ll see videographers use. The good ones are absurdly large and heavy. Pan-tilt heads let you rotate the head through just one plane at a time (horizontal, vertical, and tilt). Many low-end plastic tripods have these built in by default. The higher-end versions well for video, but they’re overkill for landscape photography.
- Ball heads: The most popular option on the market is a ball head. These are very elegant in design: Your camera sits on top of a rotating ball, which you can tighten or loosen in order to make it stay in place or swivel freely. When the ball is loose, you can move it around in search of a good composition, then tighten it down. Ball heads are small, light, and – if you get a good one – quite stable. This is what most landscape photographers end up buying, including me.
- Gimbal heads: If you’re a wildlife photographer, gimbal heads will be your bread and butter. They allow for smooth panning motions and have a wide range of movement for tracking a fast-moving subject. However, they are heavy and expensive, and they don’t provide many benefits if landscape photography is your main goal.
- Geared heads: Geared heads are intense. They’re built to hold your camera steady at all times, and you can change your composition by twisting a dedicated knob for each plane of direction. They’re expensive and often heavy, but they’re very stable. Geared heads also offer a major benefit over ball heads: You can make microscopic adjustments to your composition much more easily, without worrying about your framing slipping in any direction.
- Specialty heads: There are other types of tripod head out there, too: pistol-grip heads, reverse ball heads, double ball heads, and so on. If you know specifically why you need one of these, don’t let me stop you. However, my general recommendation for landscape photographers is just to keep things simple and get a ball head. There are tons of options on the market, and most people will find something that works well for them.

Another important thing about tripod heads is that, one way or another, you’ll have to attach your camera to one. The method for doing so varies by manufacturer. However, the typical way is to attach a base plate to the bottom of your camera, then slide it into a quick release on the head.
These base plates come in all different shapes and sizes, but my recommendation is to get something called an L-bracket if you have the option. L-brackets are, not surprisingly, shaped like the letter L. One part of the plate screws into the bottom of your camera, while the other rests at the side. The best L-brackets generally work only with one particular camera model, but they match its dimensions precisely. The benefit of an L-bracket is that you can flip your camera vertically, which is more convenient than rotating a ballhead sideways to take vertical photos.

What Tripod Should You Buy?
Very few people buy tripods correctly.
Even professional photographers who should know how to buy a tripod tend to be clueless on the subject. So, how do you buy a tripod?
First, a painful truth: as a landscape photographer, you will probably want a carbon fiber tripod eventually – and not one of the cheap ones. The best tripods can cost more than a good lens.
Most people cannot afford to spend $1000 on a tripod, or, to put it mildly, they wouldn’t want to. Why spend that much when there are so many cheap options available?
Unfortunately, at many levels, a $50 tripod really is ten times worse than a $500 tripod. This is one piece of equipment where you get what you pay for.
I went through four different tripods – each one more expensive than the last – before finally purchasing the high-end carbon fiber model that I now own. Even after selling a couple of the old ones, I lost plenty of money.
So, yes, a good tripod is worth the money. At the same time, I can’t recommend such specialty equipment to all photographers, since it’s a $1000 tripod, and that’s crazy. So, what should you get?
My best recommendation is to buy a lower-end model that is good enough not to fall apart immediately. Something in the $100 to $200 range is ideal.
Then, stick with that tripod. Use it as much as possible, and see if you find it valuable for your own photography. Don’t replace it just yet, even if you’re pushing against the limits of what it can do.
After spending a while with your lower-end tripod, you’ll have a good sense of whether or not it will be valuable to your work. If you don’t use it as much as you had expected, don’t bother getting a top-of-the-line model. Or, perhaps you like the one you purchased and don’t feel the need to upgrade. In either case, you just saved a lot of money.
But if you’re using the tripod very frequently, and you’re constantly frustrated by its weaknesses (but doing it anyway because of the tripod’s importance to your work), it’s time to upgrade. Don’t upgrade incrementally, or you’ll lose a lot of money. Once you’ve saved for a replacement, get the high-end tripod that you wanted from the beginning, and don’t look back.
Although it’s true that a good tripod is expensive, it’s also made to withstand anything – snow, sand, water, extreme temperatures, you name it. So far, I’ve broken two lower-end tripods simply by using them for day-to-day landscape photography, both by shooting in sandy conditions. One was $50, and the other cost $150. That’s money down the drain.
When you buy the right tripod, it will last for decades. I’ve put my current model through extreme conditions, from wind and ice to sandstorms. Afterwards, I just take it apart and clean it, and it’s back to normal. For that reason, over time, a top-of-the-line tripod can save you money. It’s the cheapest way to get good results for as long as possible.
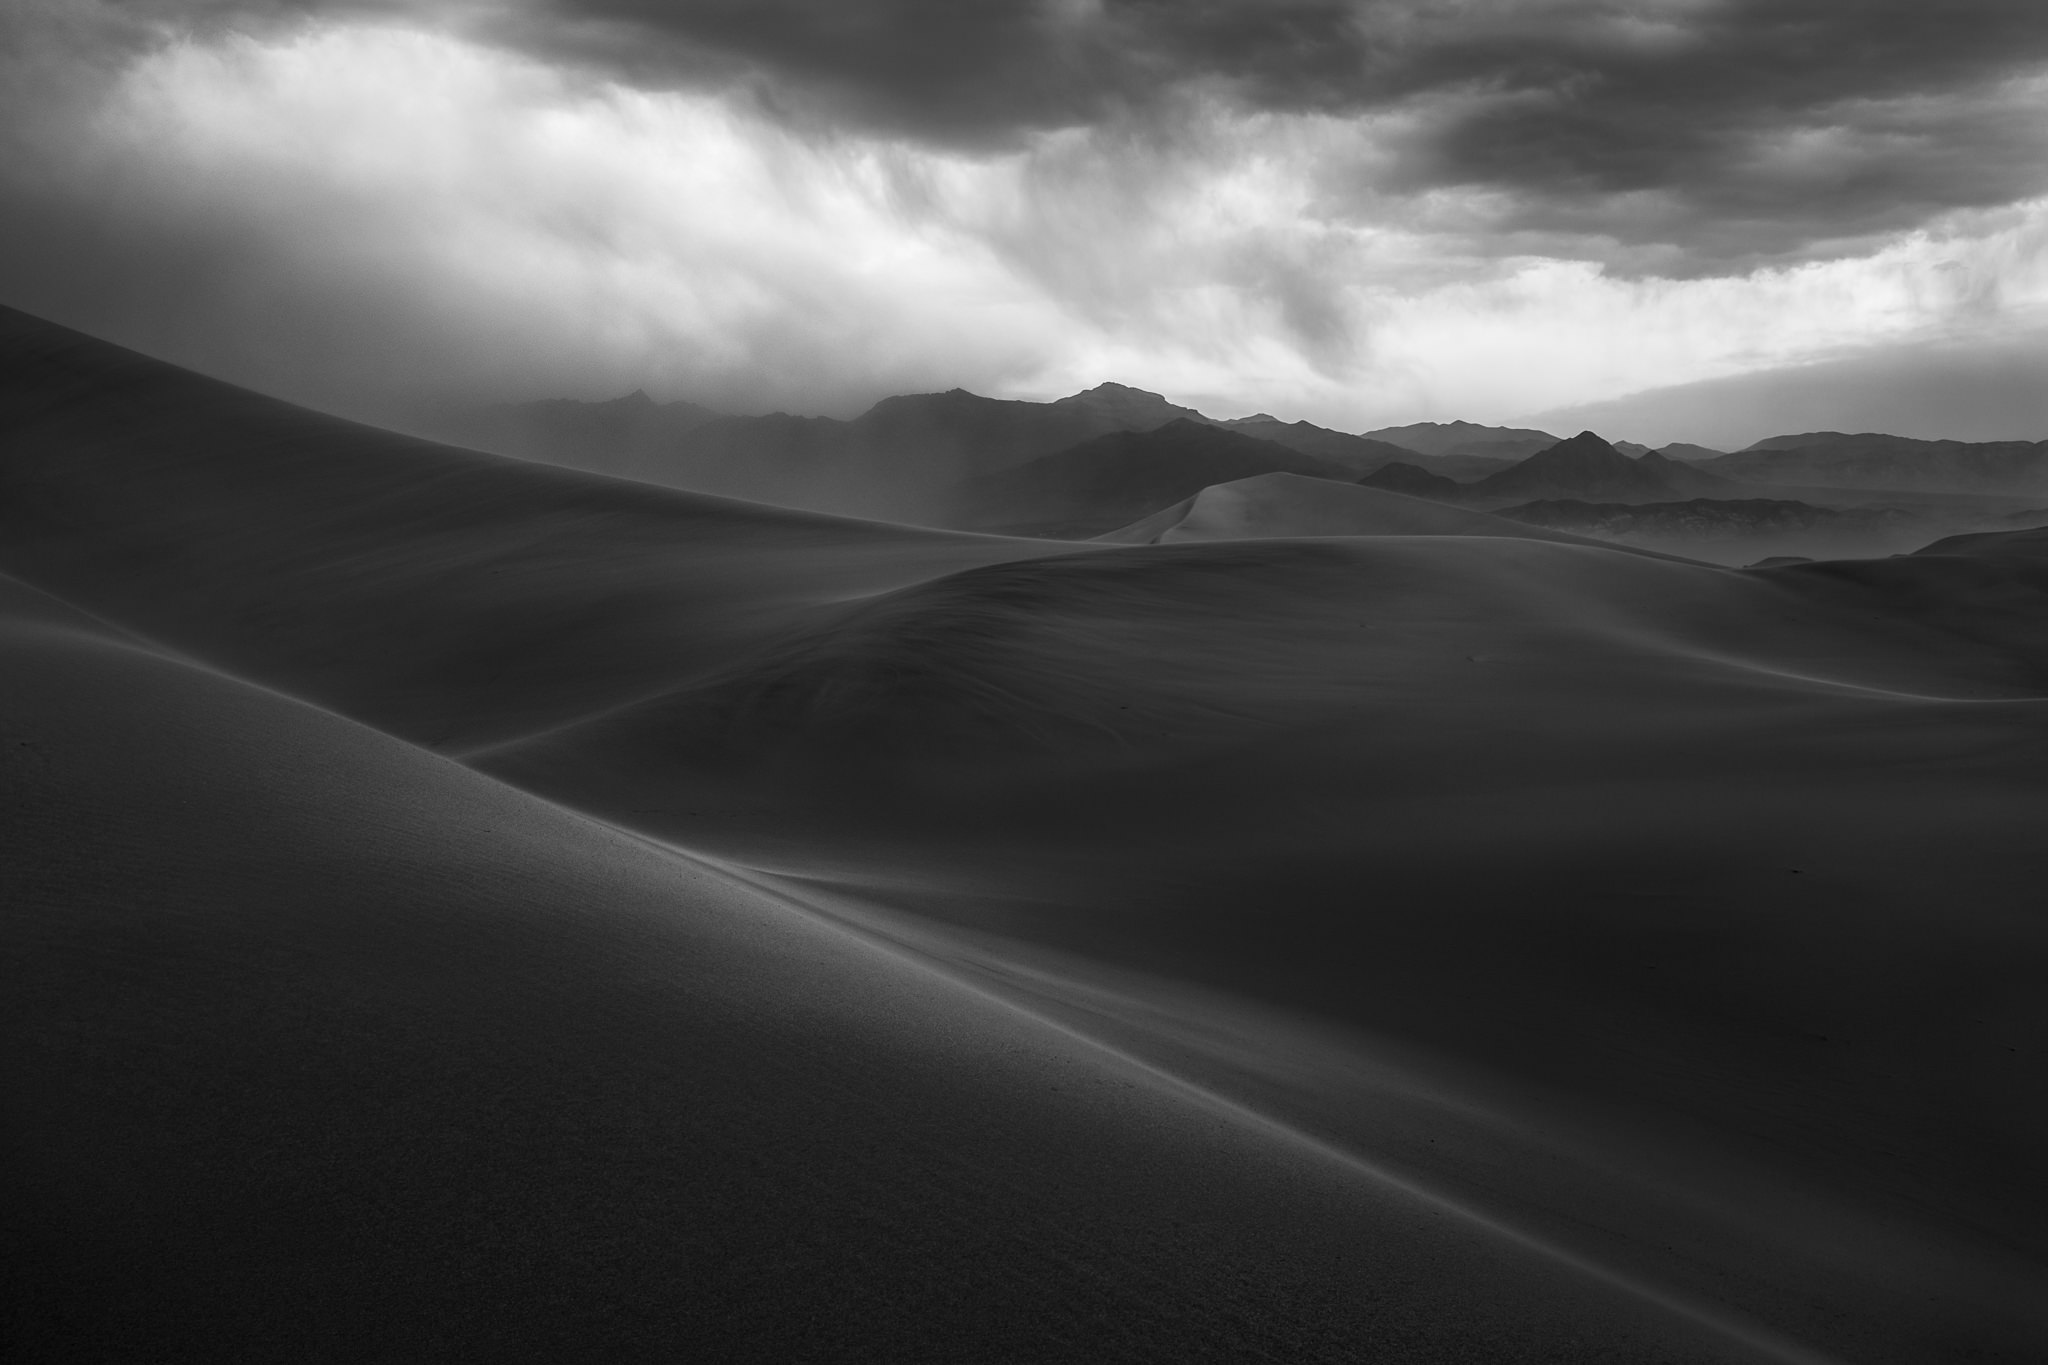
A cheap tripod wouldn’t have survived conditions like this. In fact, immediately after taking pictures here, I had to take my tripod apart and clean everything, since all the legs were filled with sand. Within an hour, it looked brand new.
What Tripod Head Should You Buy?
The other irreplaceable part of your platform is a tripod head.
As I mentioned earlier, these come in all different types: pan-tilt heads, ball heads, gimbal heads, geared heads, and so on. Which one should you get for landscape photography?
It all depends on you. This time, luckily, you don’t need to spend $1000 on a good head (although you can, if that floats your boat). A top-of-the-line landscape photography head can be found in the $300 to $500 range. It’s still expensive, but, once again, this isn’t a piece of equipment that you can skimp on. The weakest link in your kit can bring the whole system down (sometimes literally).
For what it’s worth, I use a ball head for landscape photography. They’re small, strong, and easy to maneuver. The only other type I would consider is a geared head (and I used to own one), but those tend to be heavier, more specialized tools. It’s also not ideal that the best ones cost thousands of dollars.
The important thing, once again, is to avoid upgrading incrementally. Use whatever cheap head comes with your $100 to $200 tripod, or buy one separately for $75 or so. Then, don’t get a new one until you’re ready to buy a top-of-the-line version that fixes all your frustrations at once. There aren’t any shortcuts here, either.
My final recommendation is to get a head that is compatible with the Arca-Swiss system. This just refers to the style and shape of your quick release, and which tripod accessories it lets you attach. For example, you can use a focusing rail that is Arca-Swiss compatible on a tripod head that is also part of t-he Arca-Swiss system. If you ever need a particular accessory, you’ll find more ArcaSwiss options than anything else. (Although the company “Arca-Swiss” invented this system, countless other manufacturers have adopted it over the years. It’s no longer just limited to one brand.)

Comparing the Different Brands
A lot of people have one simple question: Which brand of tripod (or head) is the best?
That’s a tricky one to answer. I’ve owned eight different tripods in my life, from six different manufacturers, and that doesn’t even come close to covering all the products available on the market. Still, it’s clear that some options are better than others.
The two biggest names are Gitzo and Really Right Stuff. Both companies primarily make carbon fiber tripods – good ones, at that. Countless other brands also make carbon fiber tripods, but you’ll be hard-pressed to find any that are less expensive, yet equally good, as these two.
Carbon fiber itself doesn’t guarantee success. I’ve owned one carbon fiber tripod that was unstable and flimsy, and it never locked down properly. I’ve tested a few others that shake significantly in the wind, or weigh far more than you would expect. If you get a carbon fiber tripod, don’t fall short and purchase a cheaper model.
But what if you aren’t looking for a carbon fiber tripod, and, instead, you’re interested in a lower-end aluminum option? In that case, which brand is best? The frank answer is that most of them are quite similar. Unless yours is broken or defective, it won’t be vastly different in stability or quality compared to others targeted at the same buyers. Sure, the feature sets might be not be identical – lightweight versus tall, for example – but it’s quite picky to try comparing things across the different companies. I’ve used brands like Oben and Manfrotto before with some success, but this isn’t as important as you might think. Get one that matches your goal (such as travel versus studio), and don’t pay much attention to the name on the sticker.
In terms of tripod heads, though, there are more than just two high-end brands available, which is great; it gives us more room to make the right decision. The top tripod head brands (all Arca-Swiss compatible) are Kirk, Markins, Really Right Stuff, Arca-Swiss, FLM, and plenty of specialty manufacturers. More are popping up every day.
From brand to brand, you’ll see plenty of different features. Some heads may have extra locking or rotation options that let you swivel along just one axis (such as tilting it from side to side) while keeping every other direction locked tightly. Others will focus on low weight and streamlined design, and so on. Brands matter here in terms of their features, but, at the highest end, they’re very similar in terms of overall stability. Look for the one that meets your needs. It’s better to focus on overall features than on specific companies.
How to Use a Tripod
I mentioned earlier that tripods give you two main benefits: image quality and compositional flexibility. When you start using a tripod in the field, you need to keep both of these in mind. I’ll cover each of them here.
The Technical Side
Your goal when setting up a tripod is to maximize stability. How do you do that? Simple: by extending only the most stable parts of the tripod, and by minimizing the total number of open connection points.
If you’re planning to set up your tripod at a lower angle for an image, open the thickest sections first. Thinner tubes are much more prone to vibration and instability, so it’s best to extend them only when necessary. This is especially true if it’s windy, or if some of the tripod’s feet are underwater. (One exception is if you’re worried about getting grit in the tripod’s leg locks, such as at the beach. In cases like that, it could be a good idea to open the lowest leg section so that you avoid sticking the leg locks under a pile of sand.)
Also, collapse your center column. Unless you absolutely need the extra height, there’s no reason to raise it. I’ve seen countless photographers taking pictures with their center column as high as possible, while some of their leg sections are still collapsed. That’s just bad practice, and it’ll catch up to you when conditions are harsh.
Lastly, if it’s windy, I don’t recommend hanging your backpack or anything else on the tripod in order to stabilize it. You’ll hear conflicting information here, but I’ve tried this in the past, and it seems to make the platform less stable rather than more. The issue is that your bag can sway in the wind very easily, and a shifting center of mass is very likely to move the tripod around with it. Just let the tripod stay as it is, and do your best to stand in a position that blocks the strongest gusts of wind.

I took this photo under extremely heavy wind, and I was using a telephoto lens. How did I get a sharp image? I lowered the tripod quite a bit, and I stood in a position that blocked the strongest gusts.
The Composition Side
In terms of framing and composition, it seems pretty easy to use a tripod. Just set it up, attach your camera, and start composing a photo, right?
Actually, that approach is completely wrong.
Instead, before you pull out your tripod, you already should know exactly what photo you want to take: your composition, perspective, lens, camera settings, and everything else.
Then – the real secret to using a tripod – match the tripod’s height and position to fit the composition you’ve already found. This is crucial.
I see a lot of photographers pull out their tripod, open it as high as possible, attach a camera, and then swivel the ball head around in search of a good photo.
No!
If that’s what you do, you’ll end up capturing all of your photos at exactly the same height, leading to uninspiring compositions.
Instead, move around your camera without a tripod. Search for the exact composition that you want to capture. Once you find the perfect spot, pull out your tripod and match its height to the photo you just framed. That’s all – but this tip will improve the quality of your compositions several times over.
The whole point of photography is to plan your photos ahead of time. If you set up your camera at the same height every time, then take pictures without moving around or trying something new, you’re unlikely to capture the best possible image. Instead, by matching your tripod to the composition you already have, you’ll force yourself to find the best possible framing for a particular scene. It isn’t hard to see why this technique improves your photos.
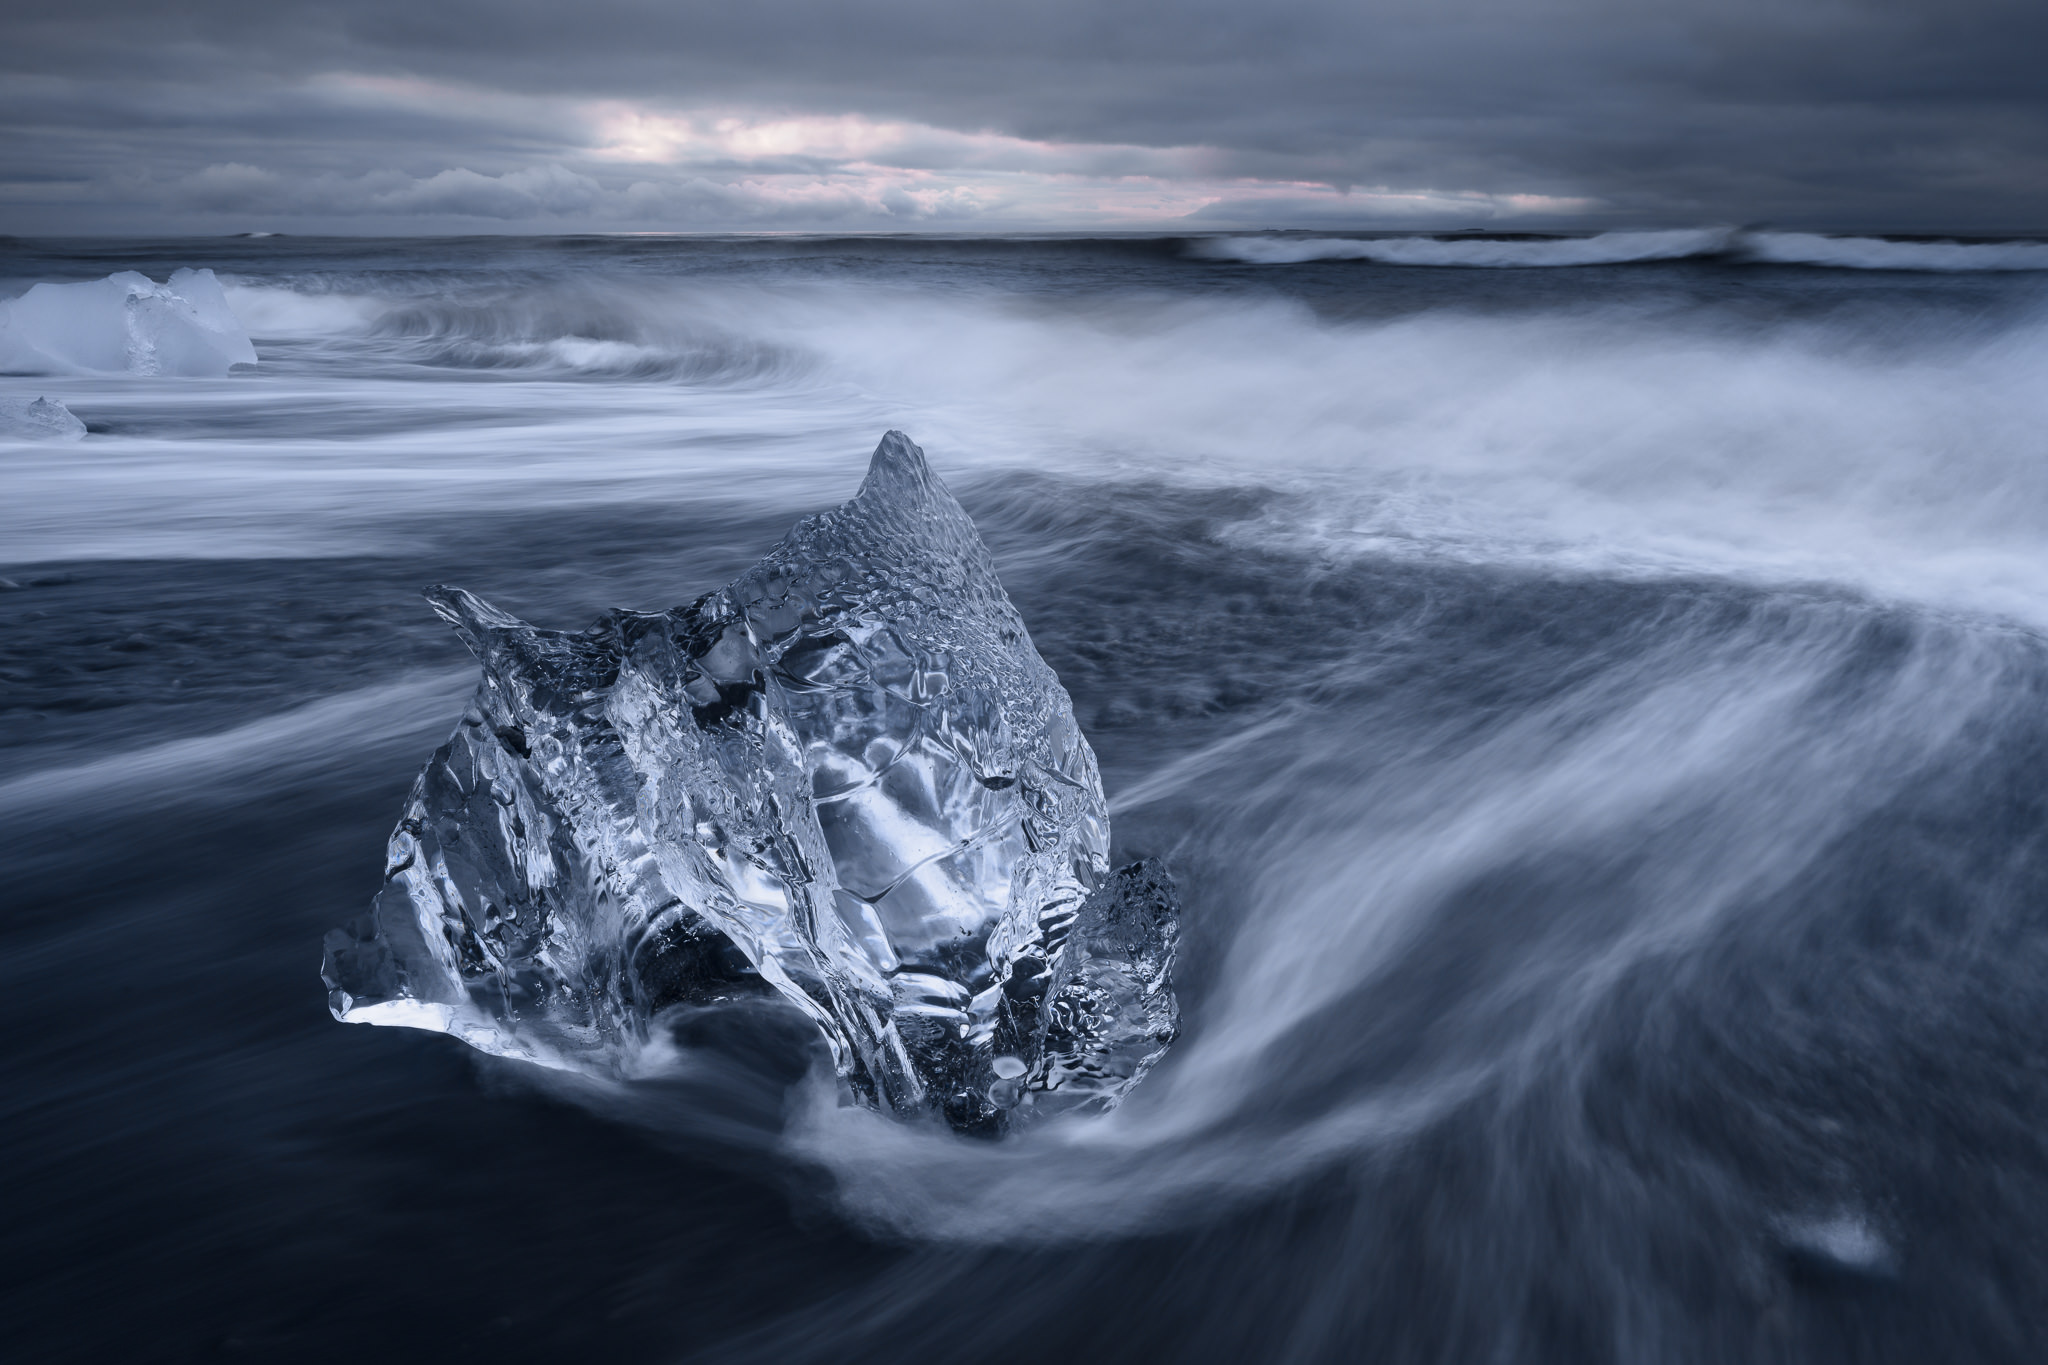
This crazy iceberg was only as tall as my knees. Most people think it looks much bigger than that. If I had set my tripod to its maximum height, the photo would look completely different. The iceberg wouldn’t take up as much space, and the overall image wouldn’t have been nearly as dynamic.
Conclusion
For landscape photography, except in the most unusual of circumstances, use a tripod.
In all my time as a landscape photographer, I can think of only two cases when I shouldn’t have used one. For the first, I was on a boat; for the second, I was in a helicopter. Tripods don’t help if you’re on a quickly moving platform.
In all other cases, across every landscape photo I have ever taken, I should have used a tripod. They’re simply a necessity.
It’s okay if you don’t have a top-of-the-line version, too. Although carbon fiber is ideal, even a $10 plastic tripod is a thousand times better than nothing at all. Even a rock and some duct tape is better than handholding your camera.
The important thing to remember is that tripods will never hurt the quality of your photos. Quite the opposite. They give your camera a stable platform, which means that you can use the best possible settings and capture the highest quality images. On top of that, they let you compose your images more carefully, providing a solid base of consistency from photo to photo. No matter which one you have, a good tripod is perhaps the most important piece of camera equipment you can own.
I got a tall tripod (8-foot height at ball head) for a specific project (shooting down to photograph brick paving patterns) and found that it was very useful in both urban and nonurban settings to shoot with sightlines over vehicles, pedestrians, fencerows and roadside brush. Does require a sturdy ladder with wide base as part of the support system, which of course means a larger vehicle, and a last-mile transport cart . . .
So I’m looking to buy a new tripod and came across this article….lots of good points but I’m no where closer to figuring out what I need. I have a cheap Induro ball head tripod which can’t make any slight adjustments which I hate and it’s also doesn’t support my Nikon D850 camera very well. I take mostly landscapes with some wildlife shots as well. I don’t do a ton of hiking but have walked a pretty good distance carrying it. Looking for a carbon fiber base and a tripod head that I can make some fine adjustments if needed. What would you recommend for me?
Hi Cathy, happy to help. What budget do you have in mind? There are a lot of good carbon fiber options, but they range in price pretty significantly.
For Gitzo series 4 systematic tripod: Does adding the center column contribute to a less stable system with potential vibration even when it is used at the lowest height of the centre column?
I appreciate your input. I enjoy the site.
It will not improve the stability, for sure, so by that token the answer is yes – it will contribute to a less stable system and add some potential for vibration, even at its lowest height. But the amount of difference it makes should be minimal in most conditions; if you think you’ll find value in the center column, I recommend getting it. Perhaps in windy conditions with a telephoto, you would see a small improvement without any center column, but that’s about it.
Dear Mr. Cox: thanks for the article, very informative. Just quick question: Is it true whenever use a tripod, I should always turn off IS/VR on the camera. I was told if I leave it on, it actually causing vibration and less sharpness. Thanks in advance.
It’s generally a good idea to turn off VR on a tripod, but it isn’t really a big deal either way. You certainly won’t ruin the sharpness of a photo by using VR in cases like that. It also depends on the camera and lens; some have a tripod sensing mode that turns off VR automatically. And if you’re using a lighter tripod in windy conditions, using VR can actually help!
Enjoyed this article. Except for the last two paragraphs, it was great advice (I understand there was a bit of tongue in cheek with your comment). But it is probably better to have no tripod then a cheap one that will shake as soon as you step outside.
I enjoyed your article very much! I have a veritable museum of tripods that I have accumulated over the years and have now settled with two carbon tripods from the oddly-named MeFoto range. Their Globetrotter Classic Carbon Fibre weight 1.7kg but fits my 1.9m frame and the centre column can be used as a monopod; while the Roadtrip Classic Carbon Fibre, while a bit lower folds up to fit in a carry-on bag if I need to and weight 1.4kg. Both take a decent DSLR and heavy lens.
On the subject of stability I have had, on occasion, issues with stability in the wind and I came up with the following solution. I found a light, sturdy mesh draw string back (about 20cm x 15cm). When I need to have more stability I put a stone or some other mass-dense object object in the bag and hand it just above ground level. I found it kept the tripod very stable in most conditions.
Oops poor editing, I had a sturdy draw string BAG! {:-)
How do you handle a situation where you want to photograph a subject from above?
I use a RRS BH-40 ball head which allows the camera to point down but that often leaves the tripod legs in the frame.
Seems like a horizontal arm extending from the tripod would be even worse than a center column for damping vibration. Does this situation require two tripods with a truss rigged between them?
I reverse the center column. Leaving one leg a bit longer extended than the other two, there’s plenty of space between this longer leg and the frame. The same assymetric setting without reversed center column, but some weight at the end of the longer leg while the other two legs are close to perpendicular to the ground. If a gimbal is at hand, it’s usually more stable than any of these horizontal columns – exceptions from Gitzo (GT2451EX Explorer) or Sirui (SIRUI HA-77 Telescopic extension) or a Benbo (www.bhphotovideo.com/c/pro…ripod.html) (This is surprisingly cheap for what it is…)
I wonder if there are beginners with minimal set, who use a “chickenfoot” style monopod? (Like Sirui-P series) That could really minimalize the weight, you carry, and maybe useful? Though Im sure its not for photographing in tough environment.
I dont own one, but as I checked some reviews its more fix than other monopods with shorter legs.
I can only reiterate on previous commentators that Sirui are a good deal. Discussions on “best” tripods pepper forums and tripods and accessories consume much research time – and do not lack for magpies, who keep on buying and trying :-)
I have the waterproof (and dustproof) W2204 Sirui. Use this with K20X ballhead and sometimes with the LH-10 video-head.
For hassle-free leveling the LE-60 base is well worth all the $$. Using the latter just the once reveals why it’s a bargain. Above all, the spring loaded safety lock on the arca-swiss style plates is a v good reason why I use Sirui gear where it really matters. The only reason I got a Gitzo GT5543LS (and not a Sirui 5214 – their heavy spec model) was because a bargain came my way in Gitzo legs. In fact, I found that focus-tuning the 200 f2 and 300 f2.8 telephotos (especially with TCs) was impossible on the lighter tripods I tried even with a heavy sandbank “on the hook” for ballast. Only the big Gitzo has the stability
I use the Jobu HM-J3D gimbal, which is remarkably light but can handle a 400 prime or heavy zoom tele. But with the Sirui VH90 video plate built into the Gimbal because of its quick release safety lock – anti-slip security is CRUCIAL. Safety is especially vital for telephoto rigs. Together with the locking pin in the platform base, the lock on Sirui video plates has an adjustable locking arm that’s quick but solid and works. Obviously, the ultimate precaution is not to topple the rig!!
Many landscape and outdoor shooters in southern Africa are using sirui – good feedback all round. The inability to get RRS locally must be one reason but the gear has proved itself. Here are some links fyi:
www.landscapegear.co.za/blog/…why-sirui/
www.landscapegear.co.za/blog/…ght-gitzo/
Finally, to paraphrase Mark Twain…. Them things that one reads in Manufacturer’s specs, well they ain’t necessarily so – cf www.tobiashjorth.com/sirui…s-a-beast/
to qualify… using the autofocus-tuning telephotos on a Nikon D850 is one acid test of tripod stability :-)
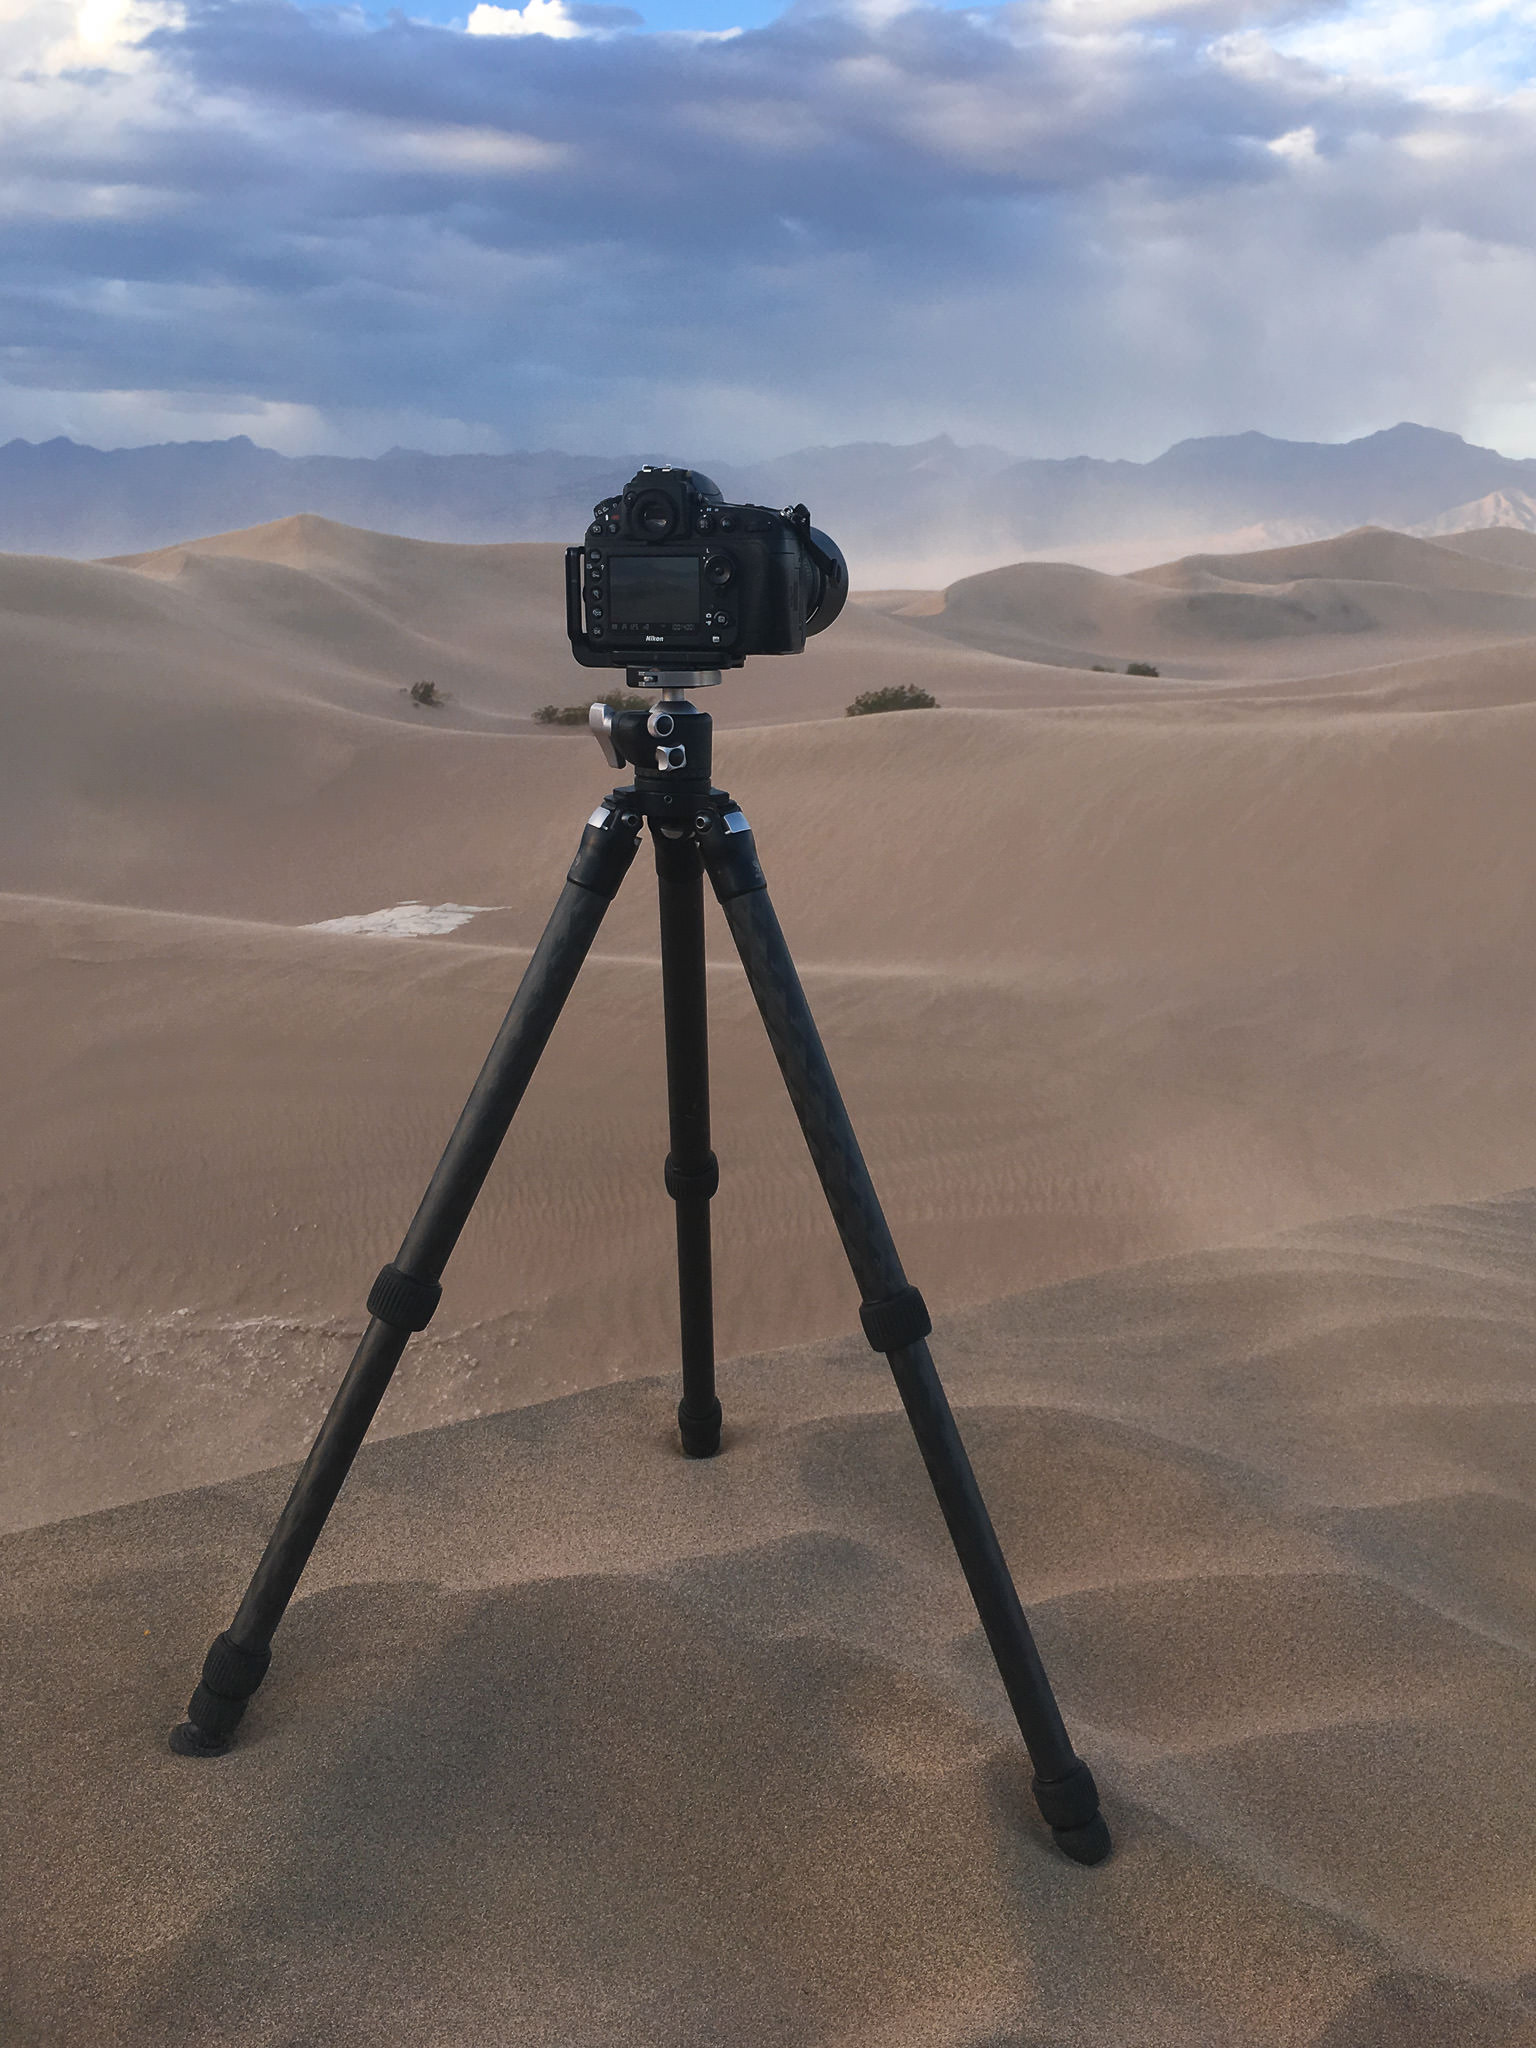
Spencer,
The image of your camera in position on the dunes (looks to be Mesquite Flats) violates one of my cardinal rules of using a tripod in sand.
NEVER EVER bury lock joints in the sand. ALWAYS
leave the lowest tripod leg section extended to avoid getting sand in the lock sleeve. Other than that…nice job.
Thank you, Jack, I’m glad you stopped by. Yes, this was Mesquite. I hesitated to post that photo because I knew I’d be called out, but you’re absolutely right. I needed to take apart and clean the tripod immediately after that trip (though in those conditions, it was going to be necessary to clean it either way)!