Recently I returned to one of my enduring passions: shooting film. I’m Italian and I recently moved to California. In Italy, it’s really hard to find a good lab to develop film and it’s even more difficult to find rolls of film of the brands I like. Here in the US, I felt reborn with new joy: everything is so much easier when it comes to shooting film. All over the world shooting film is getting more popular, it’s in fashion again, and it’s even possible to find photographers returning to analog, ditching digital for paid jobs. In Italy, the business of photography completely revolves around shooting digital: almost no one thinks about film anymore. So for me, it was amazing to take my four 120 rolls to the lab to discover they could be processed only after the order for the previous customer was finished… the lab told me a well-known company with a blue logo based in the Bay area had just delivered a big batch of 70 rolls for processing! I was kind of sad when I discovered my batch was delayed by 48 hours (beyond the usual 24 hours needed for developing, printing the contact sheet and scanning everything in high resolution), but I finally received my processed rolls and you can see some results in the images of this article.
As a consequence of my return to shooting film more frequently than in the past, and the priceless commodity of having a lab around the corner, I finally decided to focus on medium format, but without going all-in. I bought a Mamiya 645 AF, a Phase One 645 AF, three film backs, a Polaroid back and my three lenses in my favorite focal length range: 35mm, 55mm and 150mm (about 20mm, 35mm and 95mm respectively in the 35mm format). I have a couple more projects brewing that I’d like to develop with this gear, maybe we will talk about this in a following post.
One thing I love about shooting film is the opportunity to do some experimenting with real black and white, the silver halide one, not digital simulation! I have a pretty strong opinion about black and white and it might not be the most common one: I think shooting black and white it is so much easier than color! I would even say an excellent method to make any mediocre color picture interesting… is to convert it to black and white! I know… you might disagree with me.
Black and white photography is extremely simple. It’s simple for our brain to decipher and understand. In digital, it becomes slightly more complex to create, retouch or edit in black and white. In my opinion it’s more challenging to create really stunning images using color photography, as color adds many more complex layers for interpretation. And, things get much more complicated when you try… to do color photography with black and white film! But, I like challenges and this is my current one!
It might sound weird, but what I’m talking about is not only possible, it is a concept theorized just after the invention of photography itself by the physicist James Clerk Maxwell. In 1855, Maxwell was the first to suggest the possibility of creating a color image using the additive RGB color space through the combination of three different black and white images using projection through colored filters (you can see some examples of my interpretation of this method in the article’s pictures). This technique was used also commercially (frankly without huge success) starting in 1897, after Frederic Eugene Ives‘ invention of the Kromscop projector in 1894, a method he used to document the disastrous effects of the earthquake in San Francisco in 1906. Until then, color photography was created by taking three separate shots in three different moments and then combining them. The first real camera to take pictures with this method in one single shot was invented by the Russian photographer Sergey Prokudin-Gorsky in 1902.

Capturing the moment through three separate shots was never easy. Already at that time, the world of photography was dominated by the need for speed and the request to take images of quickly moving subjects. This was the main reason this process never became popular. Ironically it was in the field of cinematography, however, that this principle was applied very successfully. In 1916, Technicolor invented a post-production process that combined two different reels shot on black and white film through a green and red filter respectively (Technicolor Process 1 – RG). Obviously this process allowed the rendering of only a very limited color palette and they even employed specialized professionals to assure make-up and clothes respected the available gamut on the set of movies. Only in 1924 was the process finally perfected to include the whole color spectrum which was called the Technicolor “process 4 – RGB”. That was the process which was to give Technicolor the prestige it enjoyed and would lead, even today, to most people associating Technicolor as a synonym for colorfulness. The process 4 was a post-production technique that involved the binding of the separate black and white film footage to get color projection in theaters. The film was exposed using a custom cinecamera running the three rolls of film simultaneously through a complex series of color filters, mirrors and prisms.
By this point you might be asking yourself “Why is this guy taking me back through the history of photography?”
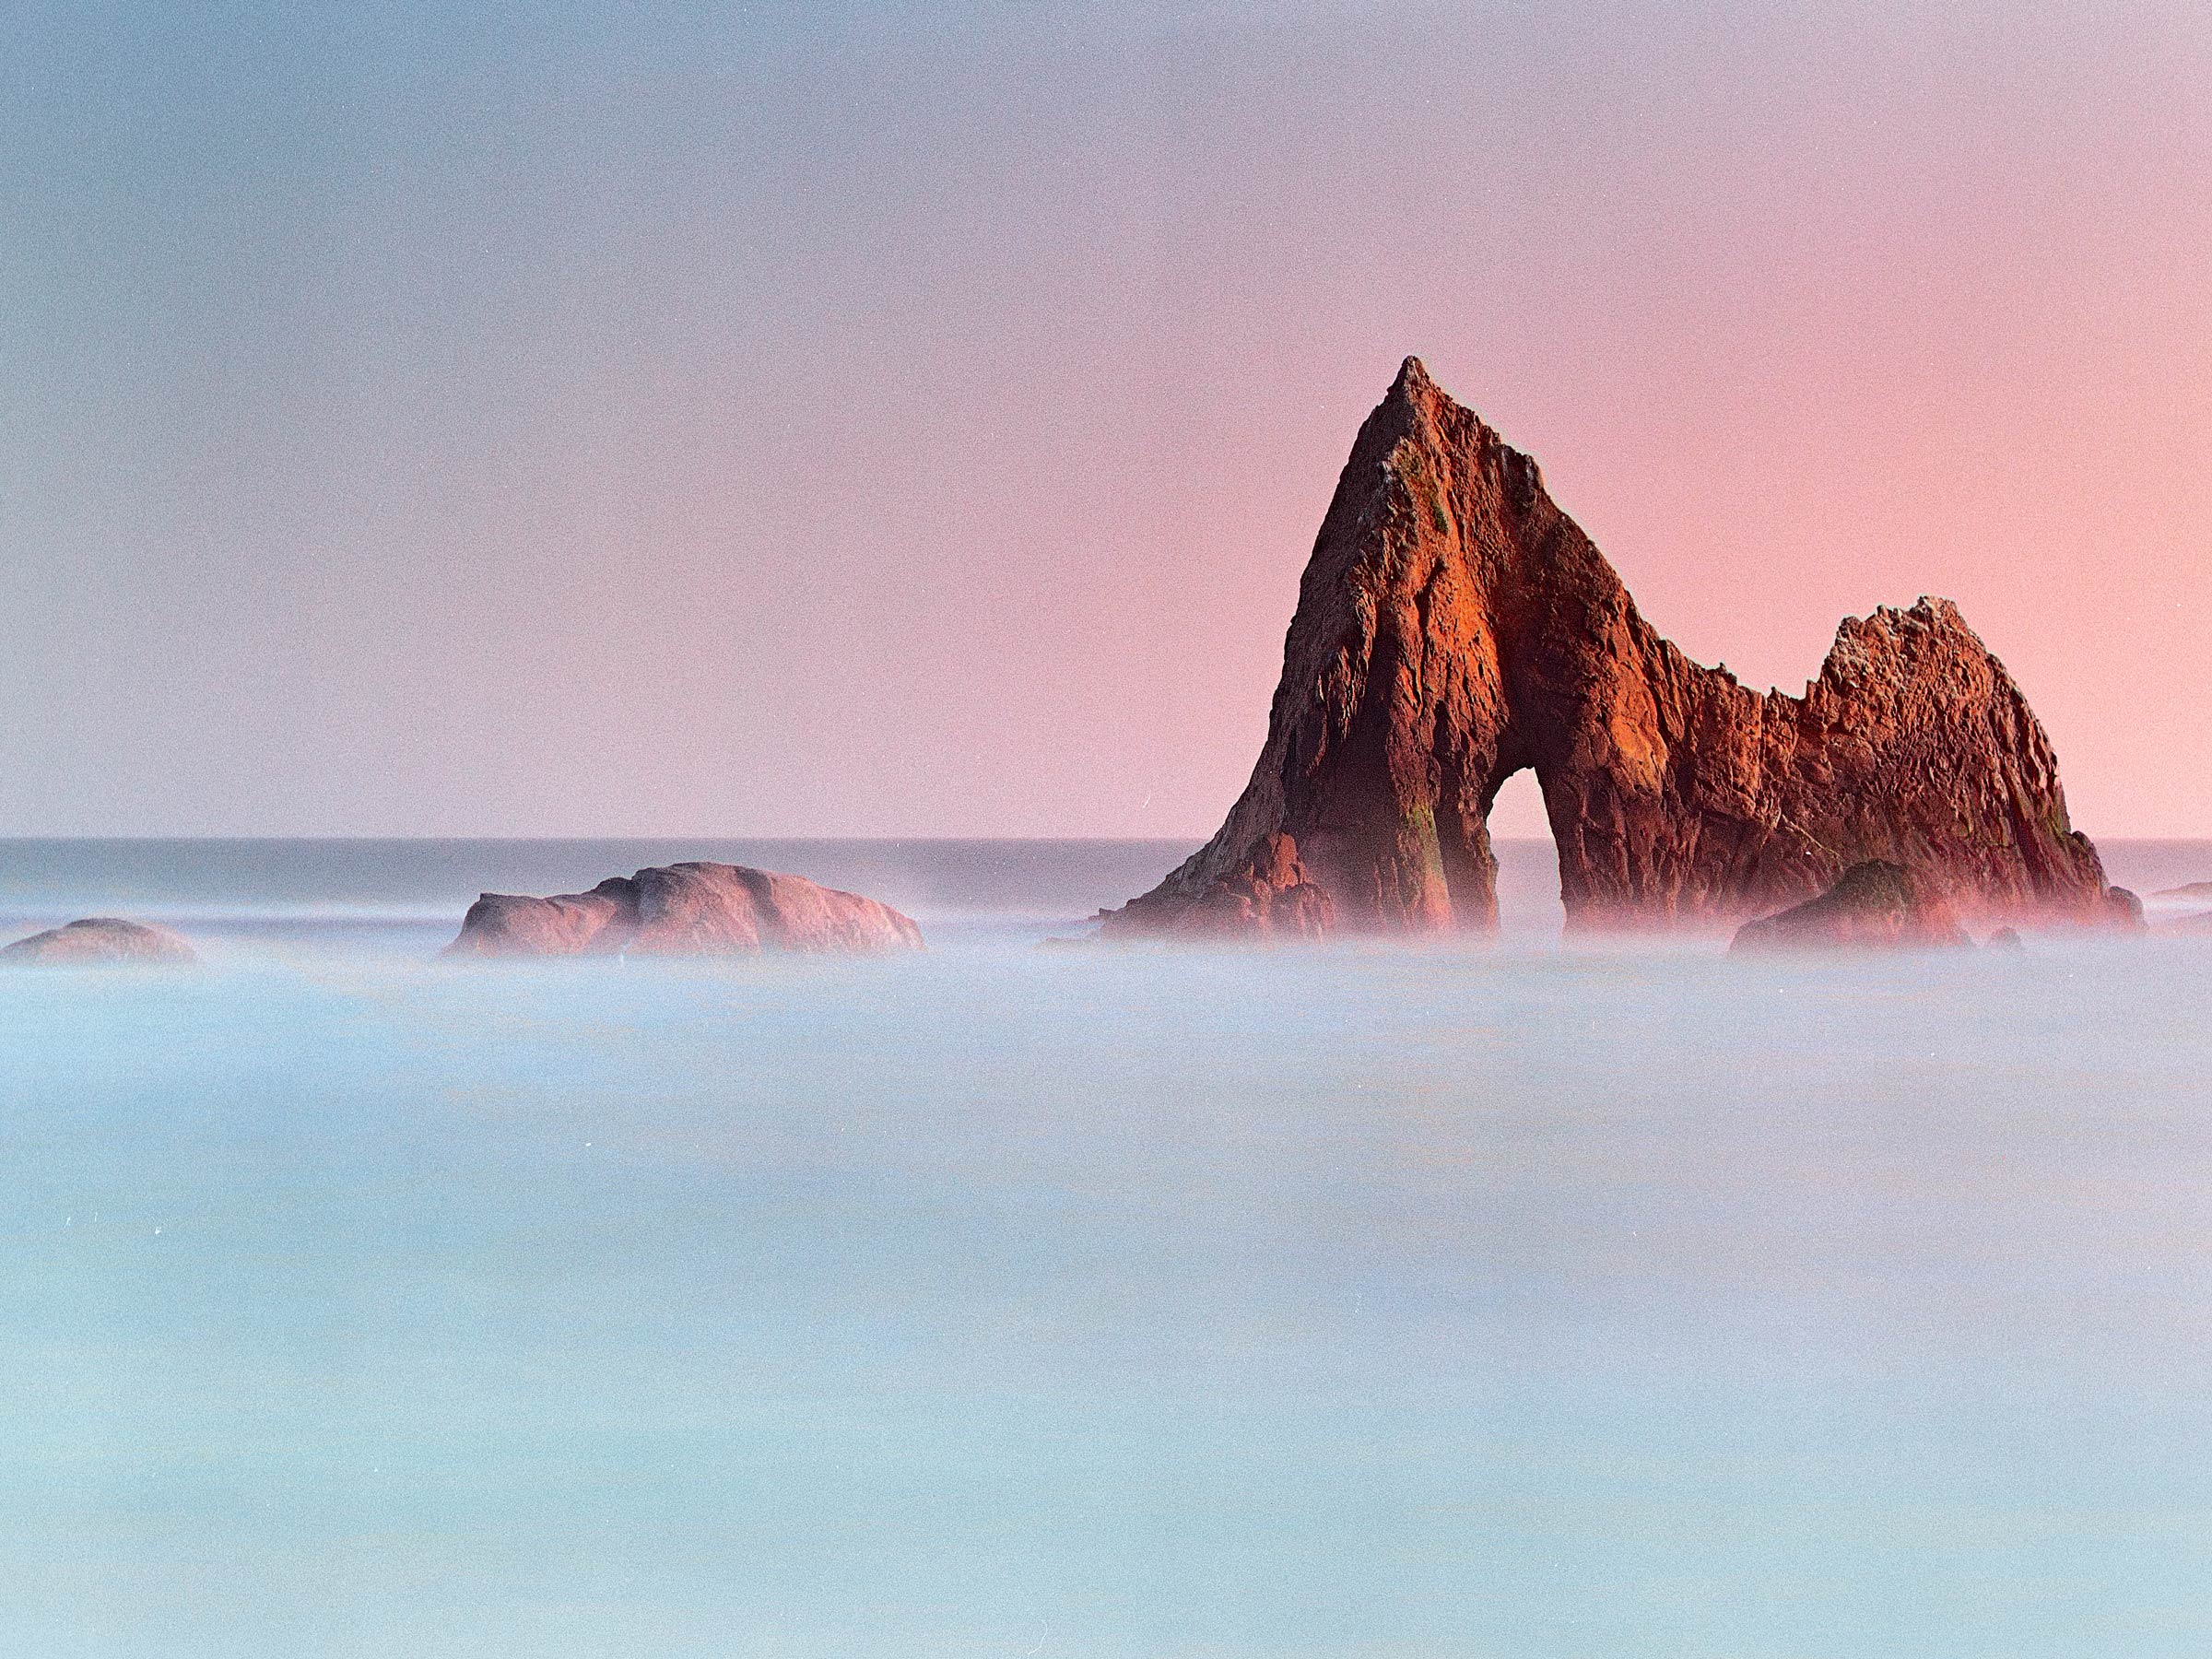
The answer is easy! I’m so fascinated by color photography and by this amazing analog technique that I decided to study it more and tried to replicate it with a twist of modernity, which I would like to share with you. I’ve just started, but the results so far are definitely encouraging and interesting!
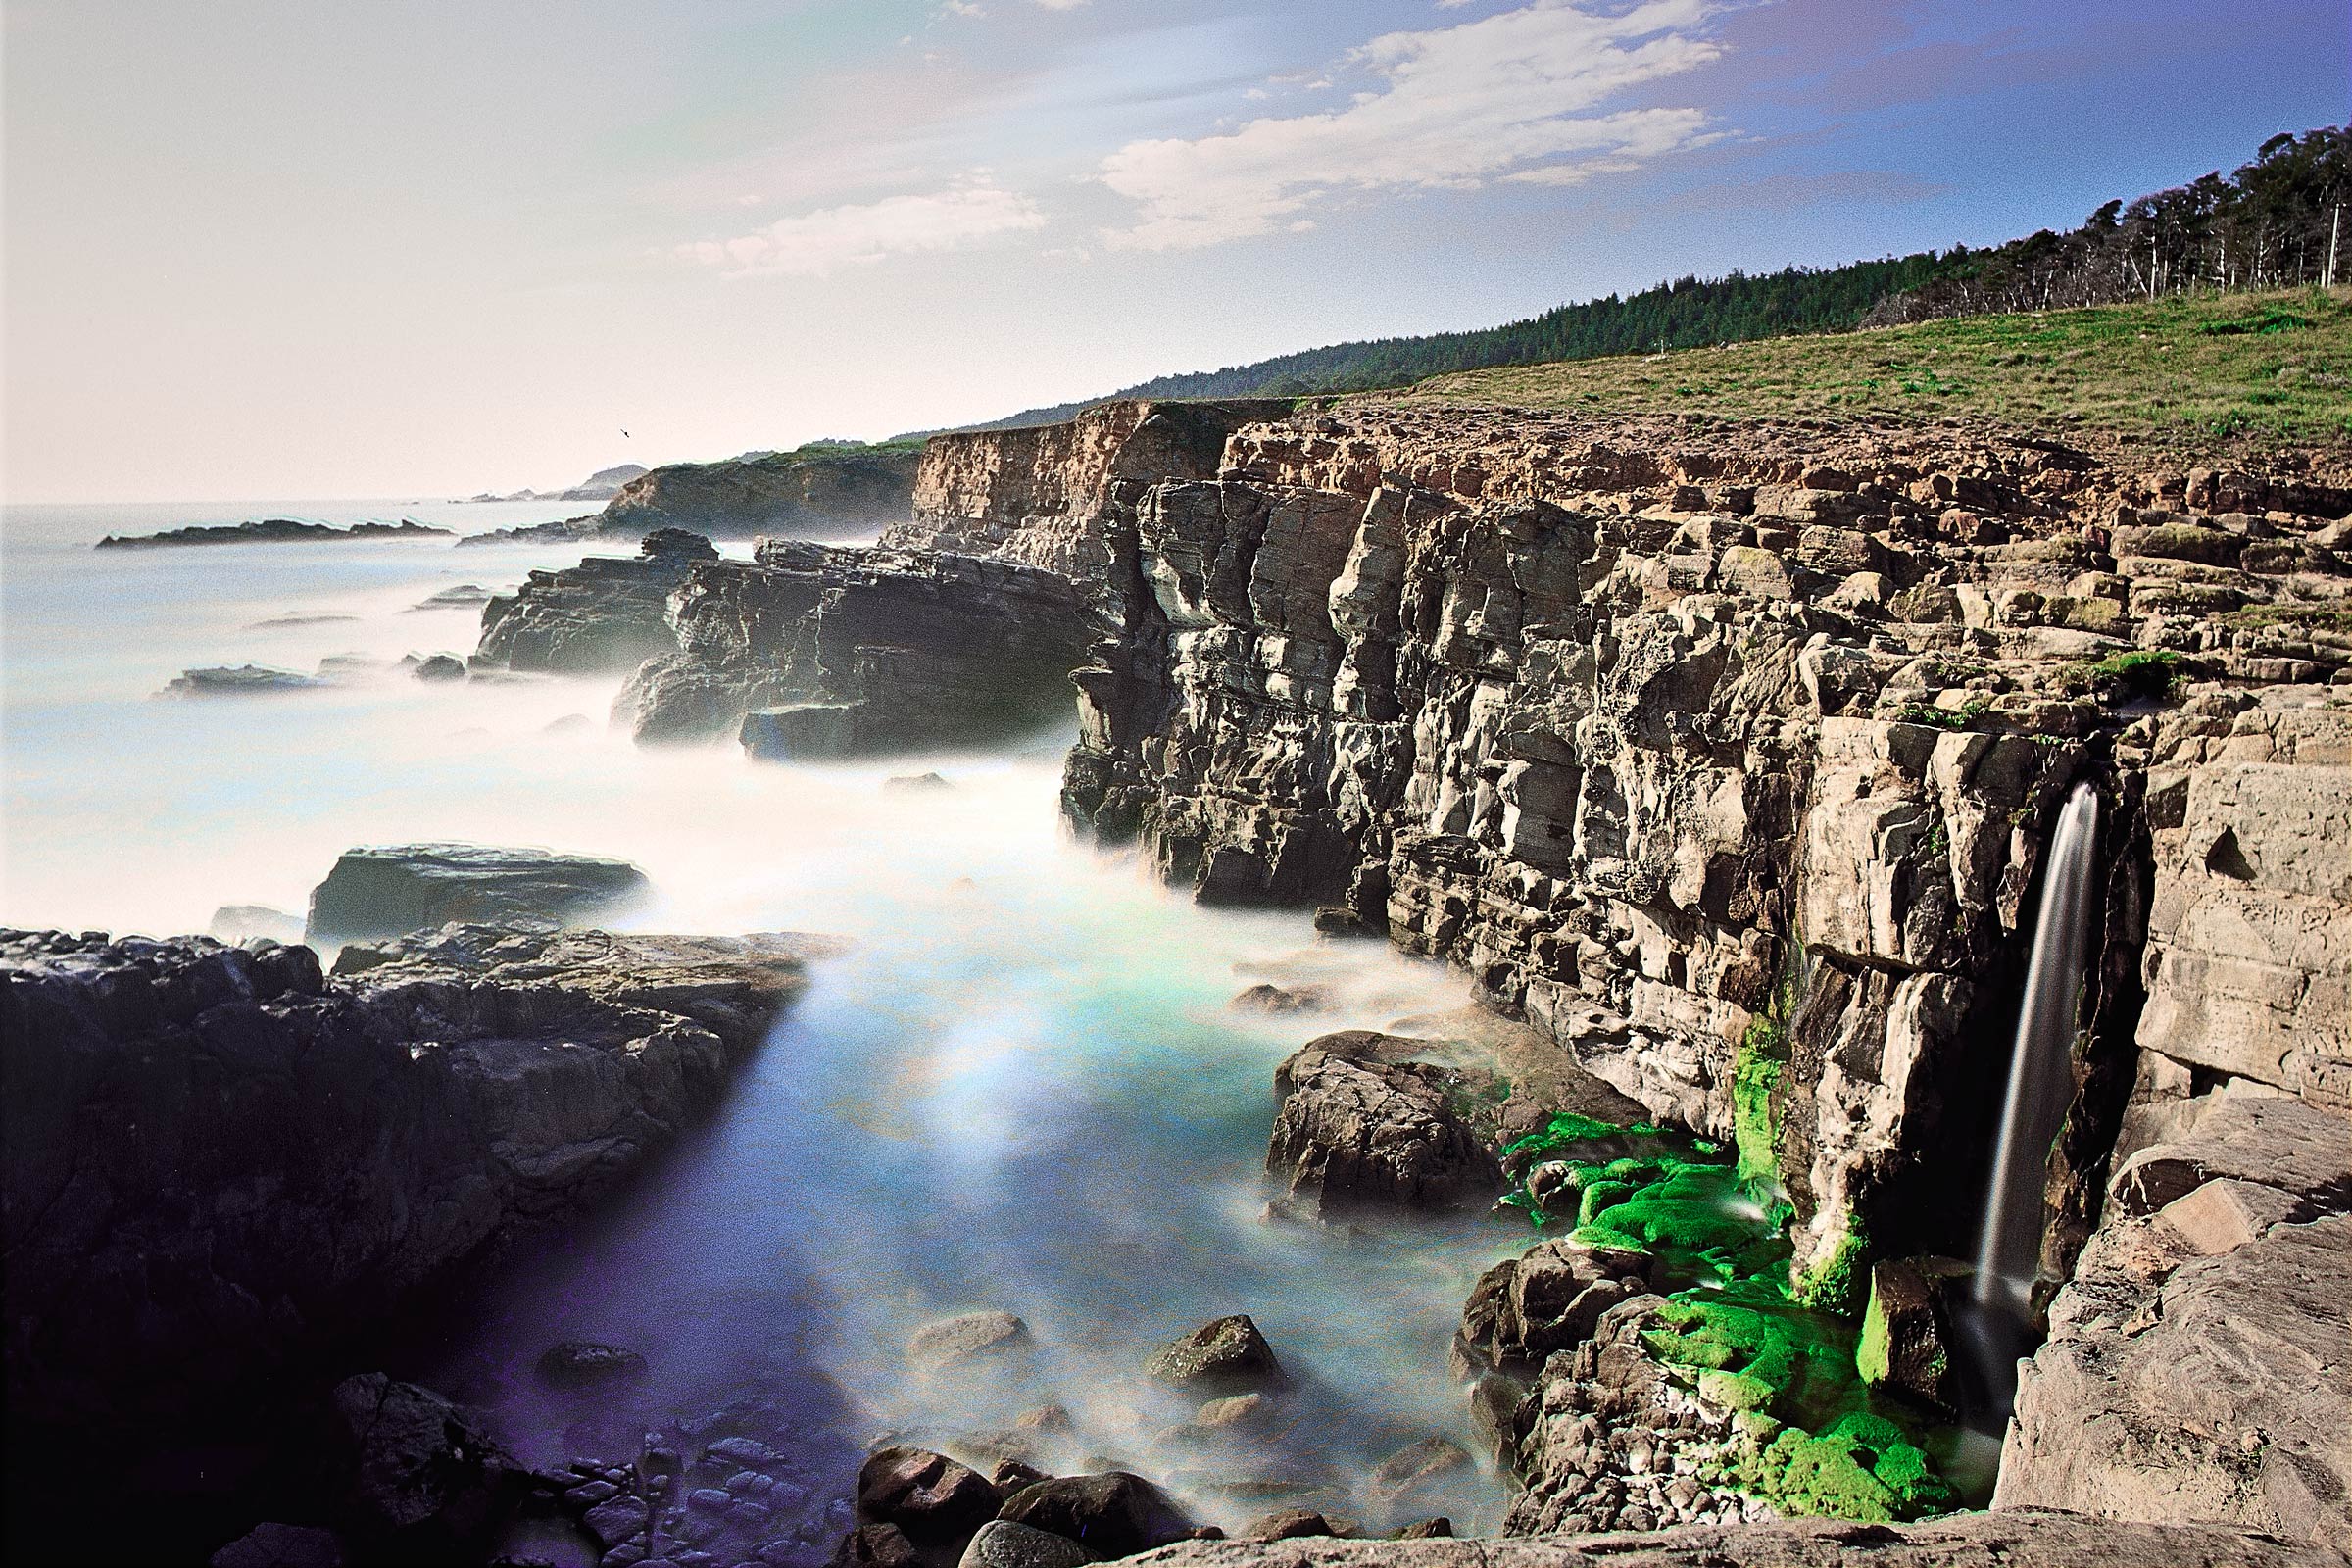
I decided to combine this personal research with another passion of mine: long-exposure landscape photography. Landscape photography is really ideal for this purpose because the subject tends to be amazingly steady, or it doesn’t move at all, especially if you “erase” any movement using long-exposure techniques you get the perfect conditions!
If you are familiar with the concepts behind film photography you know the problem the reciprocity failure brings when using film for long exposures: as light becomes more scarce, the silver halide grains residing in the film will be less uniformly struck by photons, causing a steep drop in density after a few seconds of the needed exposure. Sometimes after just a second you have to operate corrections and with some color films you can have a noticeable color shift. Luckily a fantastic film made by Fuji is still available on the market which requires no compensation at all until it’s exposed more than 120 seconds: the FujiFilm Neopan ACROS 100, I’m in love with it!
Today, everything is much easier and, thanks to Adobe Photoshop, complicated gear and projectors are no longer needed to enjoy these kinds of images. The only thing you need is to assign each black and white shot taken through a colored filter to one of the RGB channels of an image! Take three black and white pictures using a red 25, green 58 and blue 47B filter respectively. My favorite filter brand is NiSi, particularly their V5 filter holder (this, combined with their glass ND IR filters, produce exceptional images). However, NiSi do not produce these kinds of color filters, so I had to get the Formatt Hitech ones (cheaper than Lee resin filters and better overall quality in my own opinion).
Not satisfied by the results of the classic process known as “Tri-Chrome” and annoyed by some ghost effects on my pictures, I evolved the technique a little bit and am now using a process I call “Technicolor Frequency Separation”. For my shots, I separated high frequencies from low frequencies, and processed color and luminance separately. It’s something quite popular in photo retouching for beauty shots, but I took advantage of it in pre-production while shooting! I usually shoot four pictures on FujiFilm Neopan ACROS 100 and got the results you can see in the picture below. Isn’t it cool?!
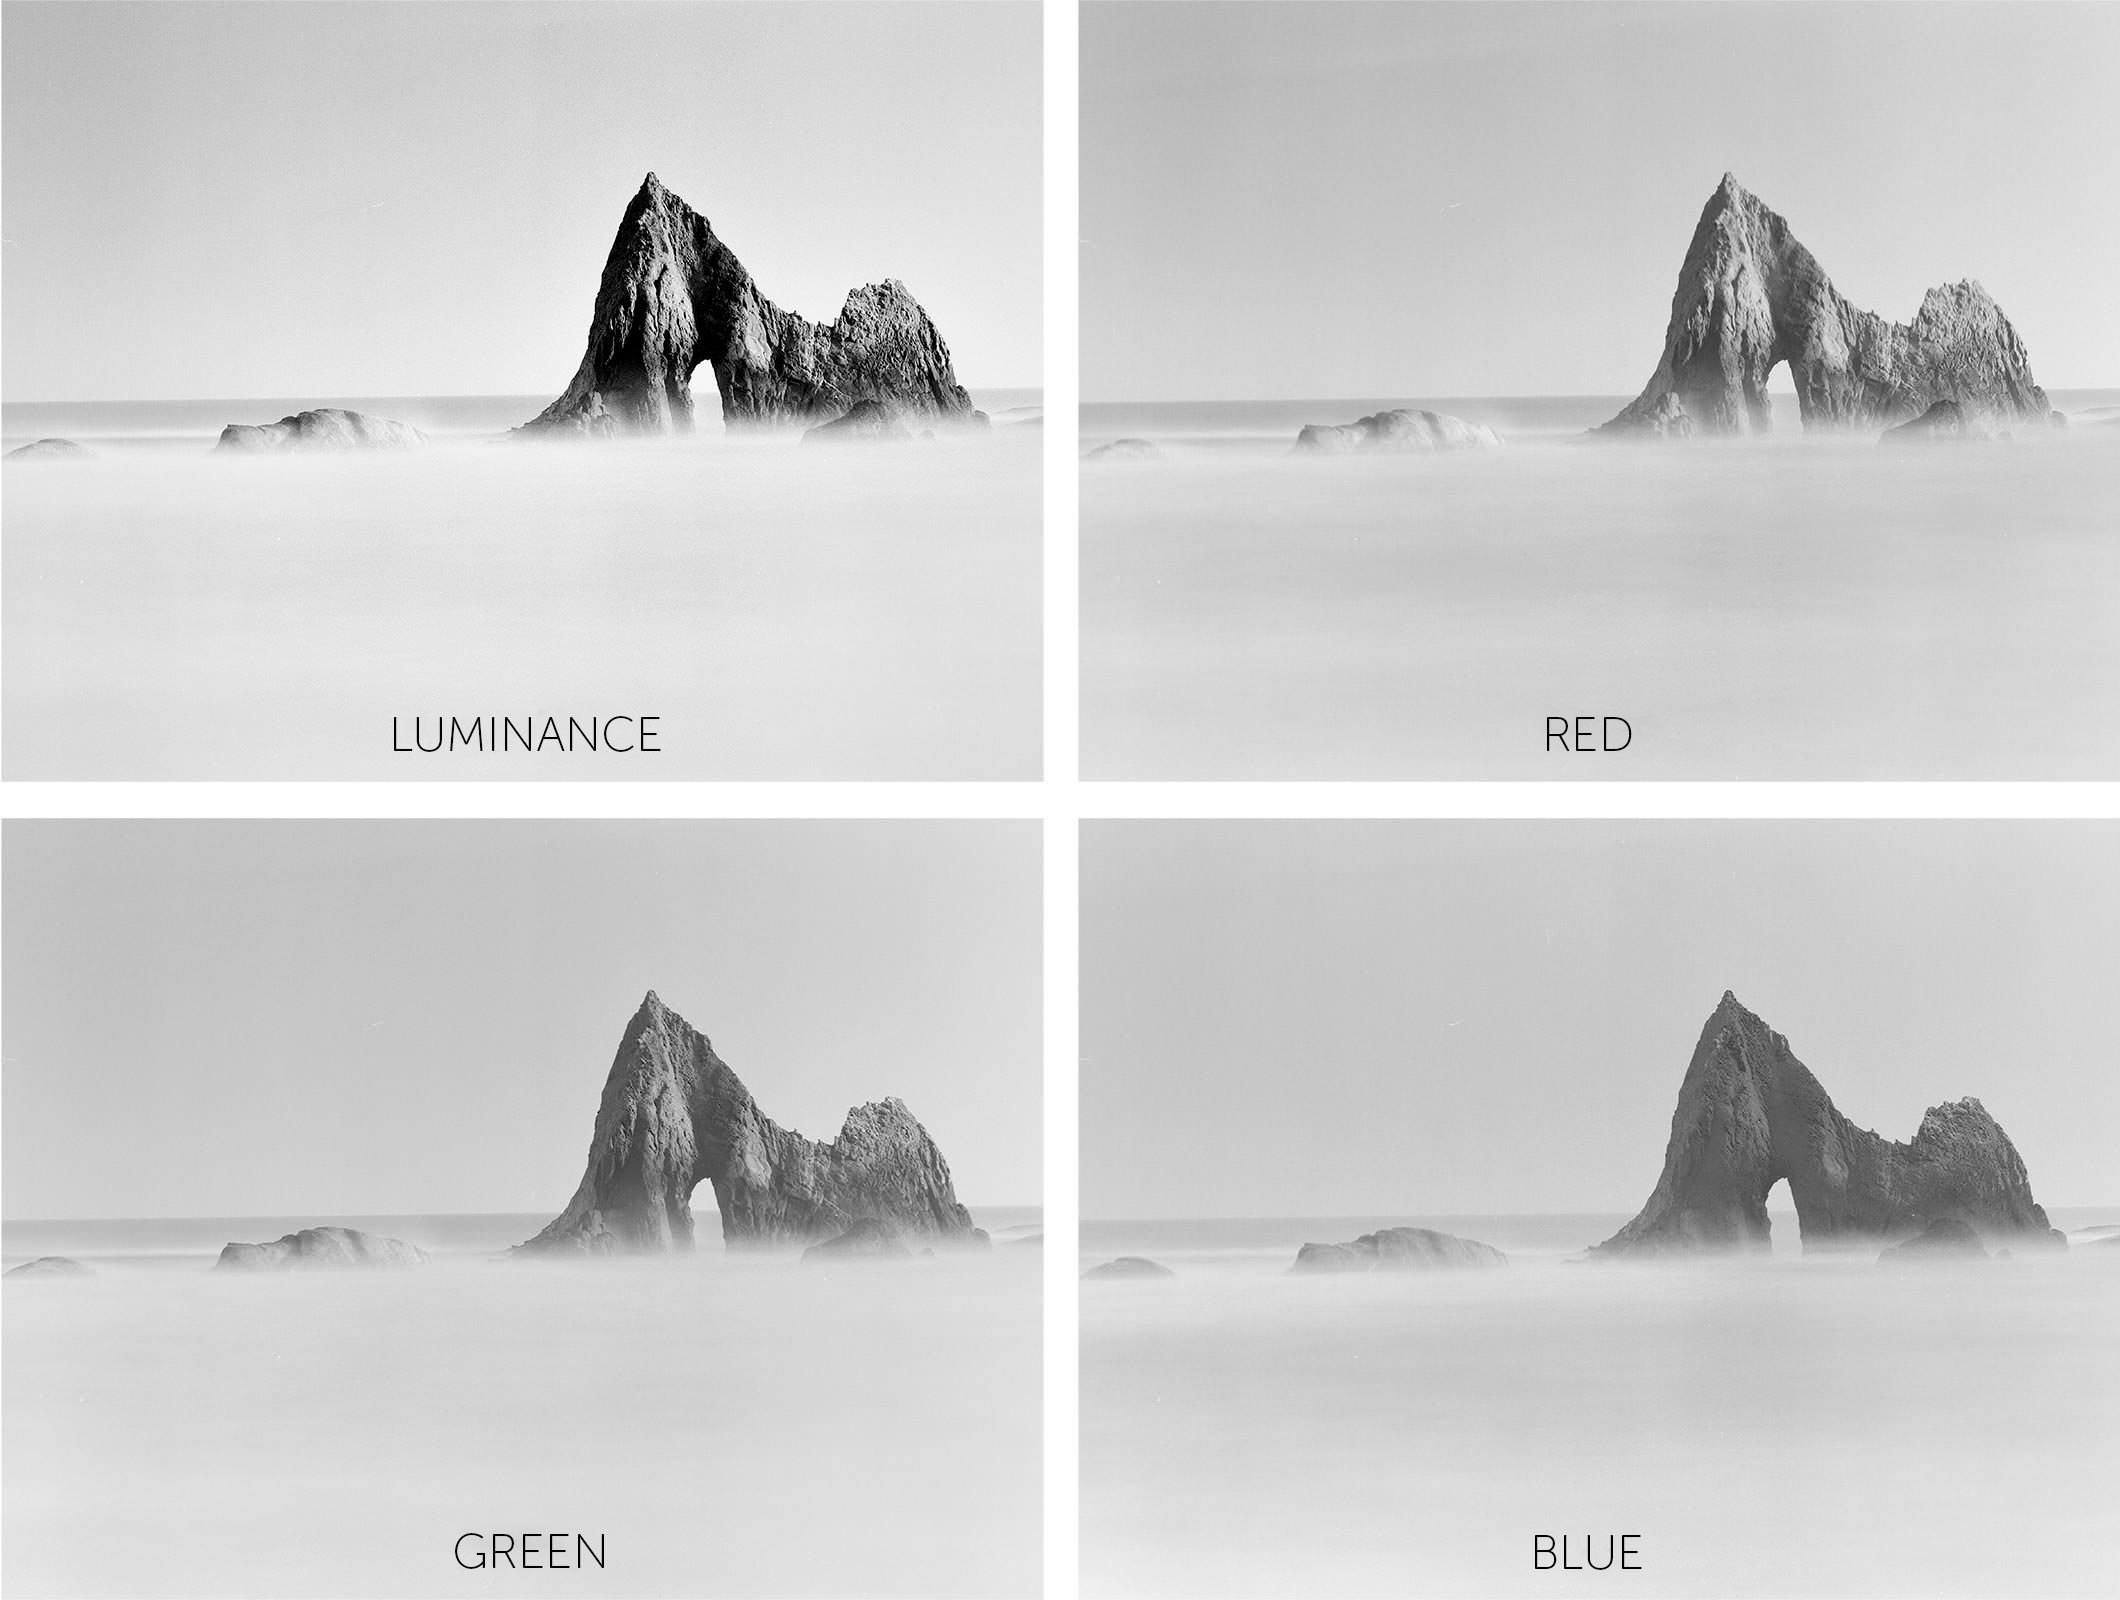
The first shot (for sunset shots) is used for the luminance channel (or the last shot for sunrises). I process my images in a mix of RGB and LAB and I use the other three shots, taken through color filters, to create the RGB color mix. The process is done in Photoshop after I develop and scan the negatives.
What do you think about this technique? Isn’t incredible what you can achieve processing four separate black and white film frames? Isn’t it magical how you can get color out of pure black and white silver halide film? If you are curious about this technique or you’d like to share something about similar experiences you might have had I’d be happy to answer questions in the comments below! I’m can’t wait to shoot some more 120 rolls to refine this technique!
Happy shooting,
Simone Conti
This guest post was submitted by Simone Conti, a professional photographer from Italy, currently living in California. You can see more of his work at his website.
Dear Simone, how did you manage the exposure for each frequency/wavelegth you separated with the red 25, green 58 and blue 47B filters relative to each other? As my understanding, a 3-strip technicolor camera resulted in different exposures: green would receive 1/2 of the light entering and blue and red would split the other half resulting in 1/4th of the light entering. Do you adjust with ND filters for this? Or do you adjust in post? Do you overexpose, for example green filter in comparison with blue filter?
Also, does the UV affects the wavelength separation? Do you use a UV filter (at least with the blue 47B filter? Or there is no effect?
i want to be a photographer so so bad i am 13 right now but i love taking pictures.
Simone,
You mentioned that you separated high frequencies from low frequencies, could you elaborate on this? At what stage did you separate the frequencies, how did you do it, and why?
Also, did you use any kind of filter for the luminance shots?
For anyone who wants to do black and white in digital, there are some places that remove or replace Bayer color filters, e.g. to convert DSLR cameras for IR use. I suspect that they could easily convert a camera (like an old camera that you no longer use) by removing the filter. They should replace it with a plain piece of glass though to keep the filter stack thickness the same (this has an effect on lens performance in some cases, see Roger Cicala’s articles on lensrentals).
Brian,
Fuji NEOPAN 100 ACROS (120) film has a sharp cut-off in spectral sensitivity starting at wavelengths longer than circa 630 nm: it isn’t sensitive to infrared or to dark red.
A Wratten number 25 filter is a longpass filter that passes infrared, red, and orange; and it has a sharp cut-off that blocks wavelengths shorter than circa 580 nm (yellow): it removes green, blue, and violet.
I see, you’re talking about light frequency. For some reason I was thinking of frequency in terms of resolution or detail, i.e. if you had less detail in the color channels and more in the luminance channel, similar to what Sigma does with their foveon quattro lenses.
Oops, that’s foveon quattro camera sensors, not lenses.
Brian, When I first read Simone’s article, I thought that “frequency” was referring to spacial frequency, because I sometimes process the low and the high spatial frequencies separately; and because light it usually referred to by its wavelength, not by its frequency.
When I read the article a second time, this paragraph enabled me to spot my error:
“Not satisfied by the results of the classic process known as “Tri-Chrome” and annoyed by some ghost effects on my pictures, I evolved the technique a little bit and am now using a process I call “Technicolor Frequency Separation”. For my shots, I separated high frequencies from low frequencies, and processed color and luminance separately. It’s something quite popular in photo retouching for beauty shots, but I took advantage of it in pre-production while shooting!”
The filters are providing the “pre-production while shooting” light frequency separation. It’s true that some people (and some editor plug-ins) process the skin tones in the image differently from the other colours.
You asked Simone: “Also, did you use any kind of filter for the luminance shots?” The Wratten number 58 green filter would most closely represent the luminance of the scene. Using instead the native (unfiltered) spectral response of the film [which dips rather than peaks in the green region] to represent the luminance is, I think, part of that which gives Simone’s images their exquisiteness.
Hey Brian and Pete,
thank you for showing so much interest about my technique and thank you Pete for adding some details about Acros and colored filters specs. I think it really add some important details to help other people to get a better grasp on the matter.
By the way, when I referred to frequency separation I was actually referring to two different things:
– splitting light frequencies thanks to colored filters;
– using a techniques which remind me of the well known “Frequency Separation” retouching technique for beauty shots and portraits.
Basically separating colors (low frequencies) and luminance (high frequencies) in LAB I do something similar to the “Frequency Separation” technique.
About filters Brian… for the “luminance shot” I never used any filter other than the NDs or polariser (which are present in every other shot by the way!)
Thank you for the comments and for your contribute in unraveling more details about the topic!
Hi Simone,
Thank you very much for taking the time to reply and, of course, for writing your article and sharing your wonderful images with us.
I started learning the basics of human vision and colour theory five decades ago, during my young childhood. But, I was frequently told that art isn’t science and science isn’t art, and that the only thing that I needed to learn was to accept everything that I was told by adults and to stop asking difficult questions! Those adults hid from me the truth that my deep childhood curiosity was is something that I later discovered to be the multidisciplinary academic field named “cognitive neuroscience”.
Both art and photography span an axis that ranges from: a modern state-of-the-art scientifically-calibrated accurate and precise recording and reproduction system; to the most profoundly-disturbing forms of surreal art. The latter is, obviously, the ultimate goal of deliberately mis-calibrating the recording and reproduction system to the furthest extent possible while using currently available materials and technologies; and it has always been one of the main drivers for the development of new materials and technologies.
Along this axis there are many peaks and troughs, in terms of its popularity with the global audience; and the position of these peaks and troughs varies with time. What is currently fashionable may quickly fade, but history shows us that many forms of artistic fashion have either a cyclic popularity, or a steady trickle of popularity (a small but stable niche market), rather than being ‘one-hit wonders’.
Your technique is possible to achieve using a single frame from a digital camera, but I don’t know of anyone who has both the skills and the free time to painstakingly develop the digital signal processing software required to emulate it. And if they produced the software then everyone could quickly and easily emulate your technique, which is something that I hope never happens.
Sincerest best wishes,
Pete
Hello! I am very excited about this idea. I would love to take photographs that resemble the bright saturated colors you can only find with Technicolor. I don’t have PhotoShop but I used Paint.net which is very good. I took your above black and white photos, divided them up, gave them the appropriate colors and tried to put them together but it didn’t come out right. I’m not sure which tool to use.
I put each image into a new layer and then made each layer blend-mode “overlay” but this didn’t work. Using the color balance I made the four colored images into the right color by maxing out the channel for each and minimizing the remaining channels, e.g. 100 for the appropriate color and -100 for the other two.
Somehow, I still couldn’t achieve the image you did.
Simone:
I used to shoot film all the time (including, obviously, Kodachrome). I even had my own custom-built darkroom in my home. I did mostly B&W, but I also did some color stuff (slides & prints). All I remember from those days is that it was SUCH a hassle to shoot and process film, compared to digital nowadays.
I’ll miss Kodachrome, but as you say, it’s never gonna happen again. I can’t see bothering with film any more (but I love what you did with it).
Hi Allan, I agree with you it is such a hassle(blad… Oops, I couldn’t resist!) to develop and scan film. That’s why I don’t do it anymore and I’m happy to pay a small price to have some great professionals do it for me.
Actually I think nowadays it’s definitely easier to shoot film rather than digital. To shoot digital and obtain great results your level of proficiency must be much higher and outsourcing the post processing part to professional retouchers is much more expensive!
I personally find refreshing focusing on the shooting part and enjoy the outcome with little or no effort at all in the retouching phase when I shoot film.
But yes, I know… no more Kodachrome… so sad about that! :(
I’ll start shooting film again the day they bring back Kodachrome.
That’s tough Allan!
It’s like saying you’ll start ride a horse again when on the highway there will be dedicated lanes for horses: it’s never going to happen! (:
It’s so bad Kodachrome is no more around, but I think there are many more ways to enjoy and take advantage of film photography.
Progress is what always happen and we all have to deal with it! (:
I love your photos! Will never use this technique though :-)
Hey Mario, thank you for appreciating my work!
It’s somehow good you’ll never use this technique… It’s good to focus on a specific niche… and it’s good if it’s not crowded! (:
Congratulations Simone, thank you for the wonderful knowledge and storytelling as well as wonderful images. Its so interesting, I look at the rock formation and see so many different shades of brown and yellow. you said you took 3 black and white slides though red,green and blue filters to create this effect. These 3 colours are prime colours and contain all spectrums of light, but who would have thought this could be done. shoot black and white through 3 filters and get such an image with such a range of colours. makes for a very interesting coffee table discussion with my friends this evening.
Simone, thank you for sharing your article and photographs with our Readers. I immensely enjoyed not only your narrative, photos, and technique, but your enthusiasm for exploring film photography and as well an interesting method in photography that ranks among the oldest photographic processes ever invented.
If I may suggest, it might be interesting for your viewers to compare your color results to a single color film exposure on both slide film and color negative film. To my eyes, your lovely results resemble the appearance and quality of slide film, but not entirely. I just can’t put my finger on it . . . : )
I have been photographing with film for only 5 years, but I have known about the classic Tricolor process as well as the incorporation of digital techniques to film exposures to create color from black and white negatives. Very fascinating . . . Some day, I may want to explore this alternative process myself. : )
On a historical note, if I am not mistaken, the dedicated “Tri-color” camera that you mention in your narrative that could make three “color” negatives in one exposure was actually invented by Louis Ducos du Hauron in 1897. Here is a modern-day version of such a Tri-color camera, which appears to simultaneously throw three separate 645 image circles onto a single sheet of 9×12 cm or 4×5″ film. Wild!
Congratulations on your purchase of the Mamiya 645 AF! How do you like it? I also own this camera, along with a slew of lenses, including the 150mm f/3.5 N. It’s a fantastic system.
If I may ask, what lab do you use in San Francisco for your film development, scanning, and printing? In the near future, I may be relocating to the Bay Area and may be in need of 35mm scanning services close by.
Great job!
Hi Rick,
I’m happy you like my work and it’s great to meet other people passionate about what photography is… and was!
Usually I do not shoot other color film while on my “Tri-Chrome Duty”, but I definitely have some digital images taken with my DSLR I could show for comparison.
Thank you for pointing out about Louis Ducos du Hauron! I should definitely do some more research about him. My bad! I missed that piece of history…
About field cameras and simultaneous Tri-Chrome… I would definitely ask Mr. Ghibellini (Ghibellini Projects) what he thinks about building a modern carbon fiber and aluminium one… I’m sure he would end up with the coolest design possible!
The Mamiya and Phase One system (before the XF body!) is definitely a little bit bulky and slow, but I’m totally in love with it. I wish it would be easier to find some sharp lenses… like the new blue ring by Schneider Kreuznach (maybe something cheaper would help too!).
In San Francisco I’m a happy customer of Dickerman Prints and Light Waves Imaging. They are very close (one block) to each other.
Great article, bookmarked :-)
Man, there are some very intelligent and thought provoking articles appearing on this site. To all the contributors, thank you.