After deciding to take my photography a little more seriously about three years ago, I came up with a strategy (a somewhat loose one) for how I might improve. My end goal was to find myself as a photographer and improve my skills along the way. In the back of my mind, I still harbour hopes of turning professional, but for the moment I am content with just spending some of my spare time learning and developing my skills. At that time, a majority of my photography was wildlife based, and it generally still is.
I had become comfortable with my wildlife photography workflow. Having learnt all the local haunts for many of the more charismatic native species in the UK, I could head out on any given day safe in the knowledge that something would appear. If I was lucky, I would capture an interesting image.
My photography, however, had become stale. I recognised that the quality of my images was lacking. Up until this point, my usual approach had been to use this as an excuse to purchase a new piece of camera gear. This time, I decided to take a different approach: I would deliberately seek out ways to get outside of my comfort zone and challenge what I was doing in my pictures. It was not so much about doing uncomfortable things – more about doing things differently compared to the way I had been up until that point.
Table of Contents
1) Black and White

First up was an easy technique to try: simply set the camera to take black and white pictures and crack on. I can’t remember where I first read about this technique, but my experience with it has always been both unsettling and liberating. The initial shock of seeing images on the screen of the camera in black and white soon passes. Images become simplified; the distraction of colour is removed, and the true lighting and texture of a scene is revealed.
There are some subjects that translate well into black and white. Architecture with harsh lines and dark shadows always seems to work well.
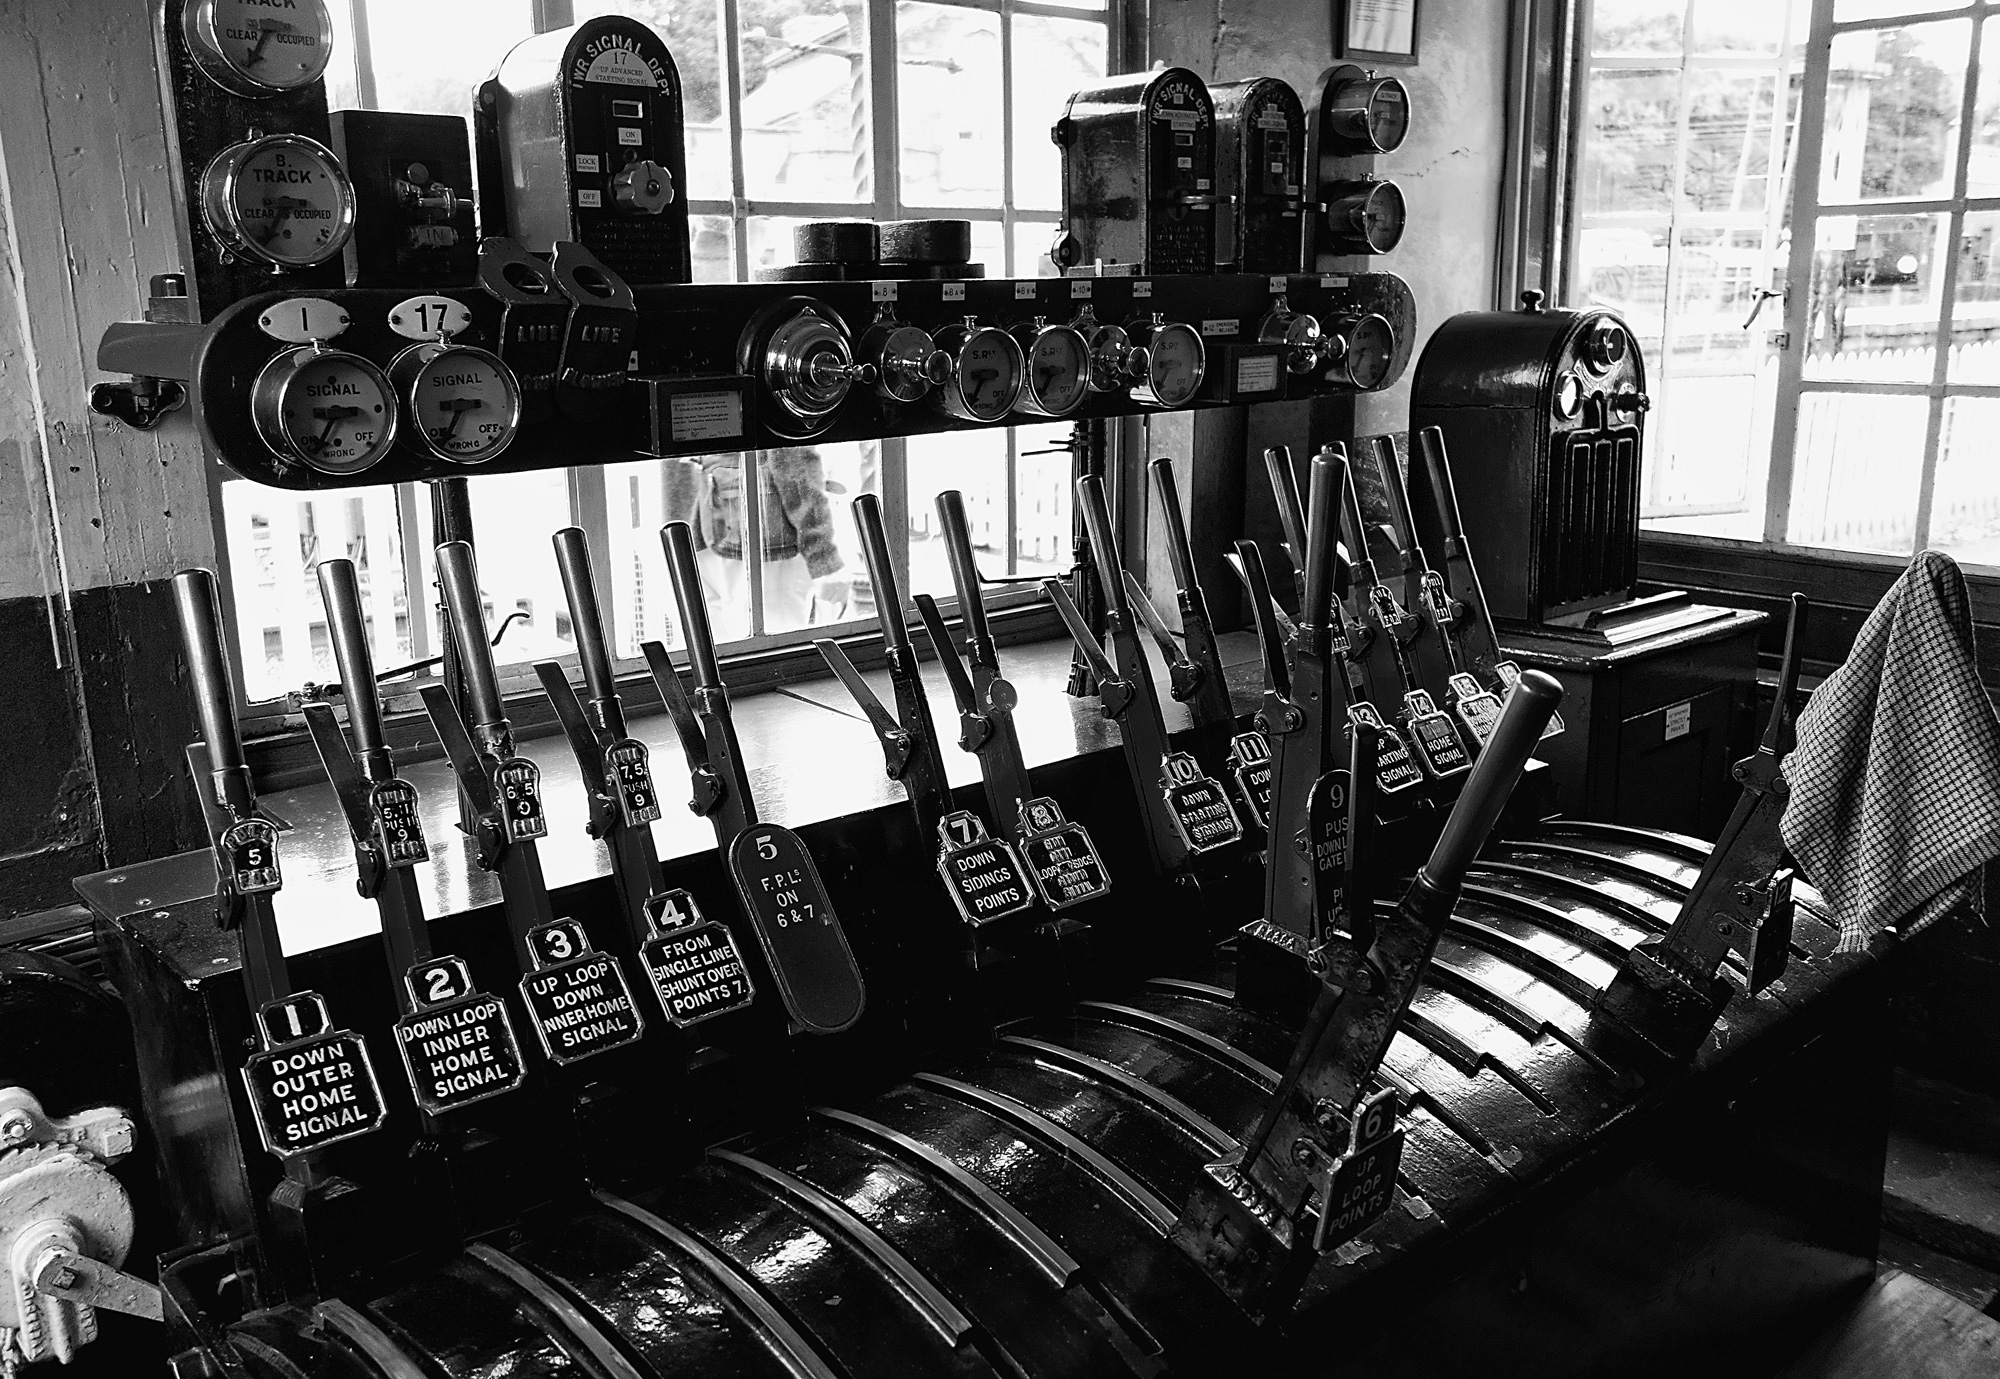
Vintage scenes or objects can be given a sense of nostalgia and in monochrome. Portraits especially benefit from the simplification of how light is represented (more on that later).
I found that shooting black and white on my Nikon DSLR I could set the picture control to monochrome, this meant that I got black and white images on the camera screen but all the colour information is retained in the RAW file so I could always check out what the image looked like in colour once back at my computer.
2) Portraiture
Portraiture was not part of my portfolio (unless you include wild animal portraits or family snaps). I wanted to try something I would never normally do, so in 2016 I booked myself on a studio portraiture course. It was a one-day course in London that covered the basics of strobe photography, including how to use a light meter and a selection of textbook lighting techniques to get you started.
Out of my usual rural habitat, it felt strange carrying my camera gear around whilst not wearing a Gore-Tex jacket and walking boots. Arriving at an even more alien environment, a photography studio, I had to start talking about photography and portraiture with other people! The course was very well organised with worked examples and supporting literature. Although I didn’t come away with any “killer” shots on that day, I certainly learnt a lot.
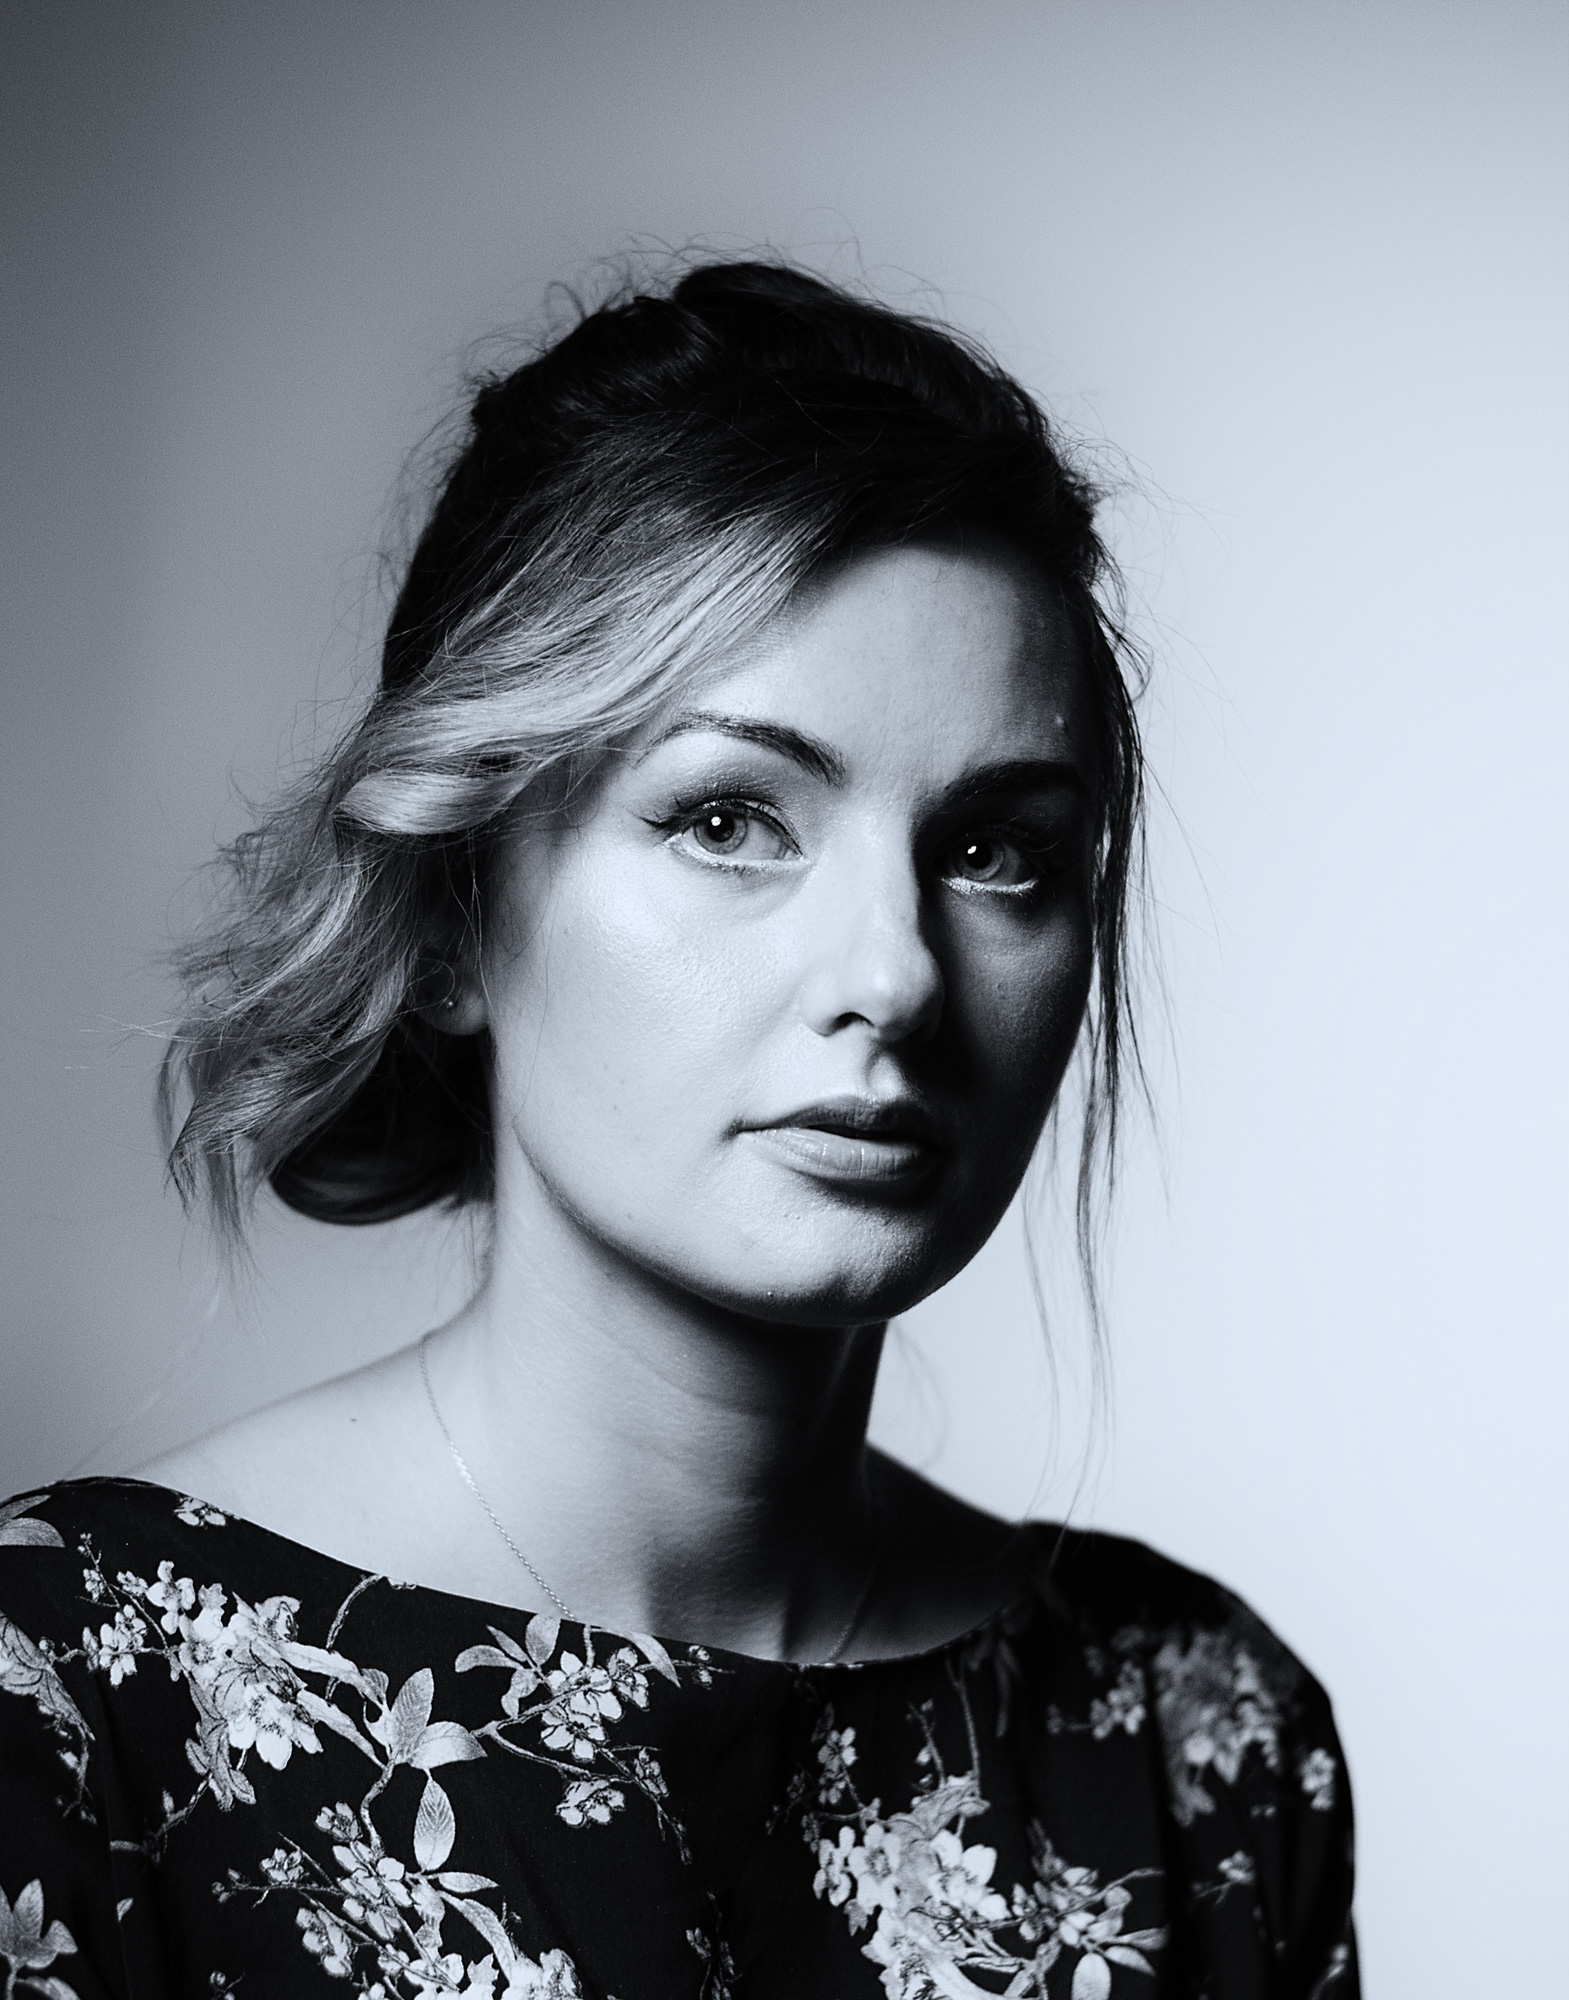
Probably the biggest lesson was to look at how light was playing a part in my composition – learning how it could change the feel of my subject. The image above was one of the more successful ones from the course. Rembrandt lighting added drama without becoming too harsh.
Following the course, the way I looked at portraits had changed. I could unpack how someone had created a studio image by looking for the clues in the lighting. Just like learning to read, this was something I couldn’t unlearn, and that understanding started to follow through into my everyday photography.
Sometimes, however, it’s not just about controlling the lighting, but knowing when natural light is good. In the case above, the combination of loop lighting and hair light was pretty special, and it was important to realise I should capture the moment before the light changed.
3) Street Photography
I have long admired street photography. I find pictures of people in everyday life really captivating. As someone who struggles in confrontational situations, I had heard many horror stories of photographers being challenged for taking pictures uninvited. I dreaded the thought of asking someone if I could take their picture. With a sense of trepidation, I booked myself on a street photography course. I knew a day of wandering around the bustling markets of East London, camera in hand, would either make or break me.
The course tutor had a great, relaxed approach, which helped calm my nerves and inspire me to give things a go. The eye opener for me was that – asked nicely – many people were happy to have their picture take. A little bit of flattery can go a long way to eliciting a photograph. Also, if the environment was busy enough, you could often capture remarkably candid shots without people noticing.
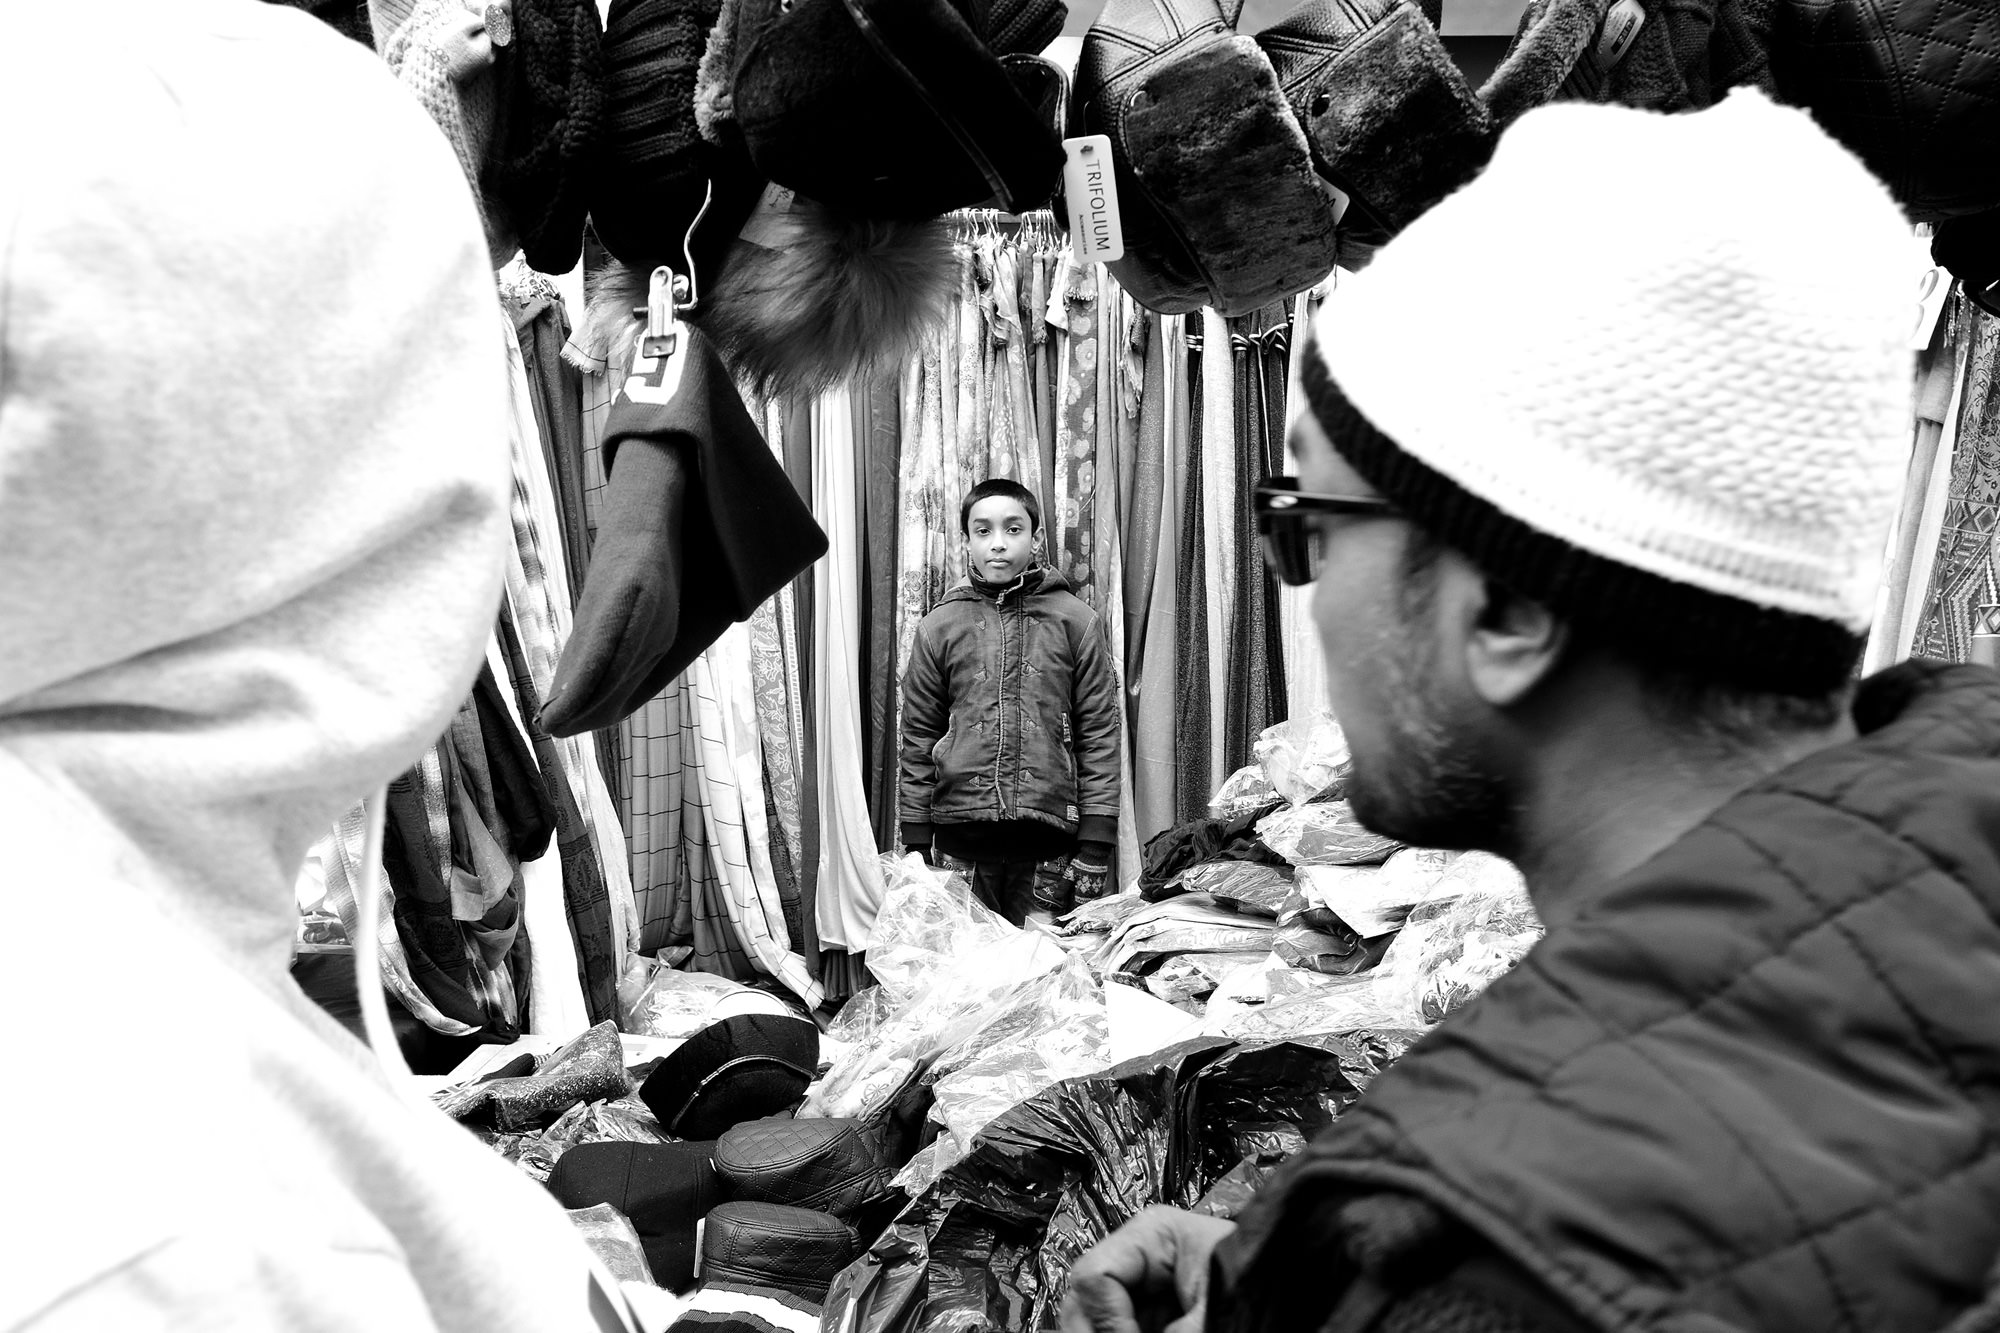
You certainly had to be ready for things, though. If I hadn’t been in shutter priority mode with centre single point focus I never would have got this shot. The young lad was seated at the back of this hat and scarf stall in Petticoat Lane market and stood to attention for me as I pointed my camera his way.

Passing this vibrant looking kitchen after the excitement of the market, I was completely in the zone and had no qualms asking the chef if I could take pictures of him working. The blue window made a great frame for the image.

The selfie generation had no qualms about posing for photos. These teenage girls just oozed confidence as they chilled out on an old sofa at the Brick Lane community garden. It took me 5 minutes however to build up the courage to ask for their picture!
4) Slowing Things Down with a Manual Focus Lens
Wildlife photography for me was rarely a slow process. Generally, my shots were captured on the way to work, cycling with my camera on my chest. If the wildlife was obliging, I would typically have a few short minutes to capture the scene before either the animal moved away or I had to get going myself.
To break out of this somewhat frantic style, I had to do something to help me think differently. I started putting an old wide-angle manual focus lens on my DSLR and taking just this with me on trips. Suddenly, my world was transformed from a 300mm (or more) telephoto with VR stabilisation and autofocus – to a 24mm lightweight lens with manual focus and manual aperture. I had to completely change my approach to taking photographs.
I started planning things more carefully. This went beyond just the initial “what aperture is appropriate for this image?” and “is the right element in focus?” questions I had. I started asking other things instead: Is there a better angle to take the picture? Is a wide angle really appropriate for the subject in front of me?
With no other lens options in my bag, if the image wasn’t going to work, I would simply move on and look for the right image elsewhere.
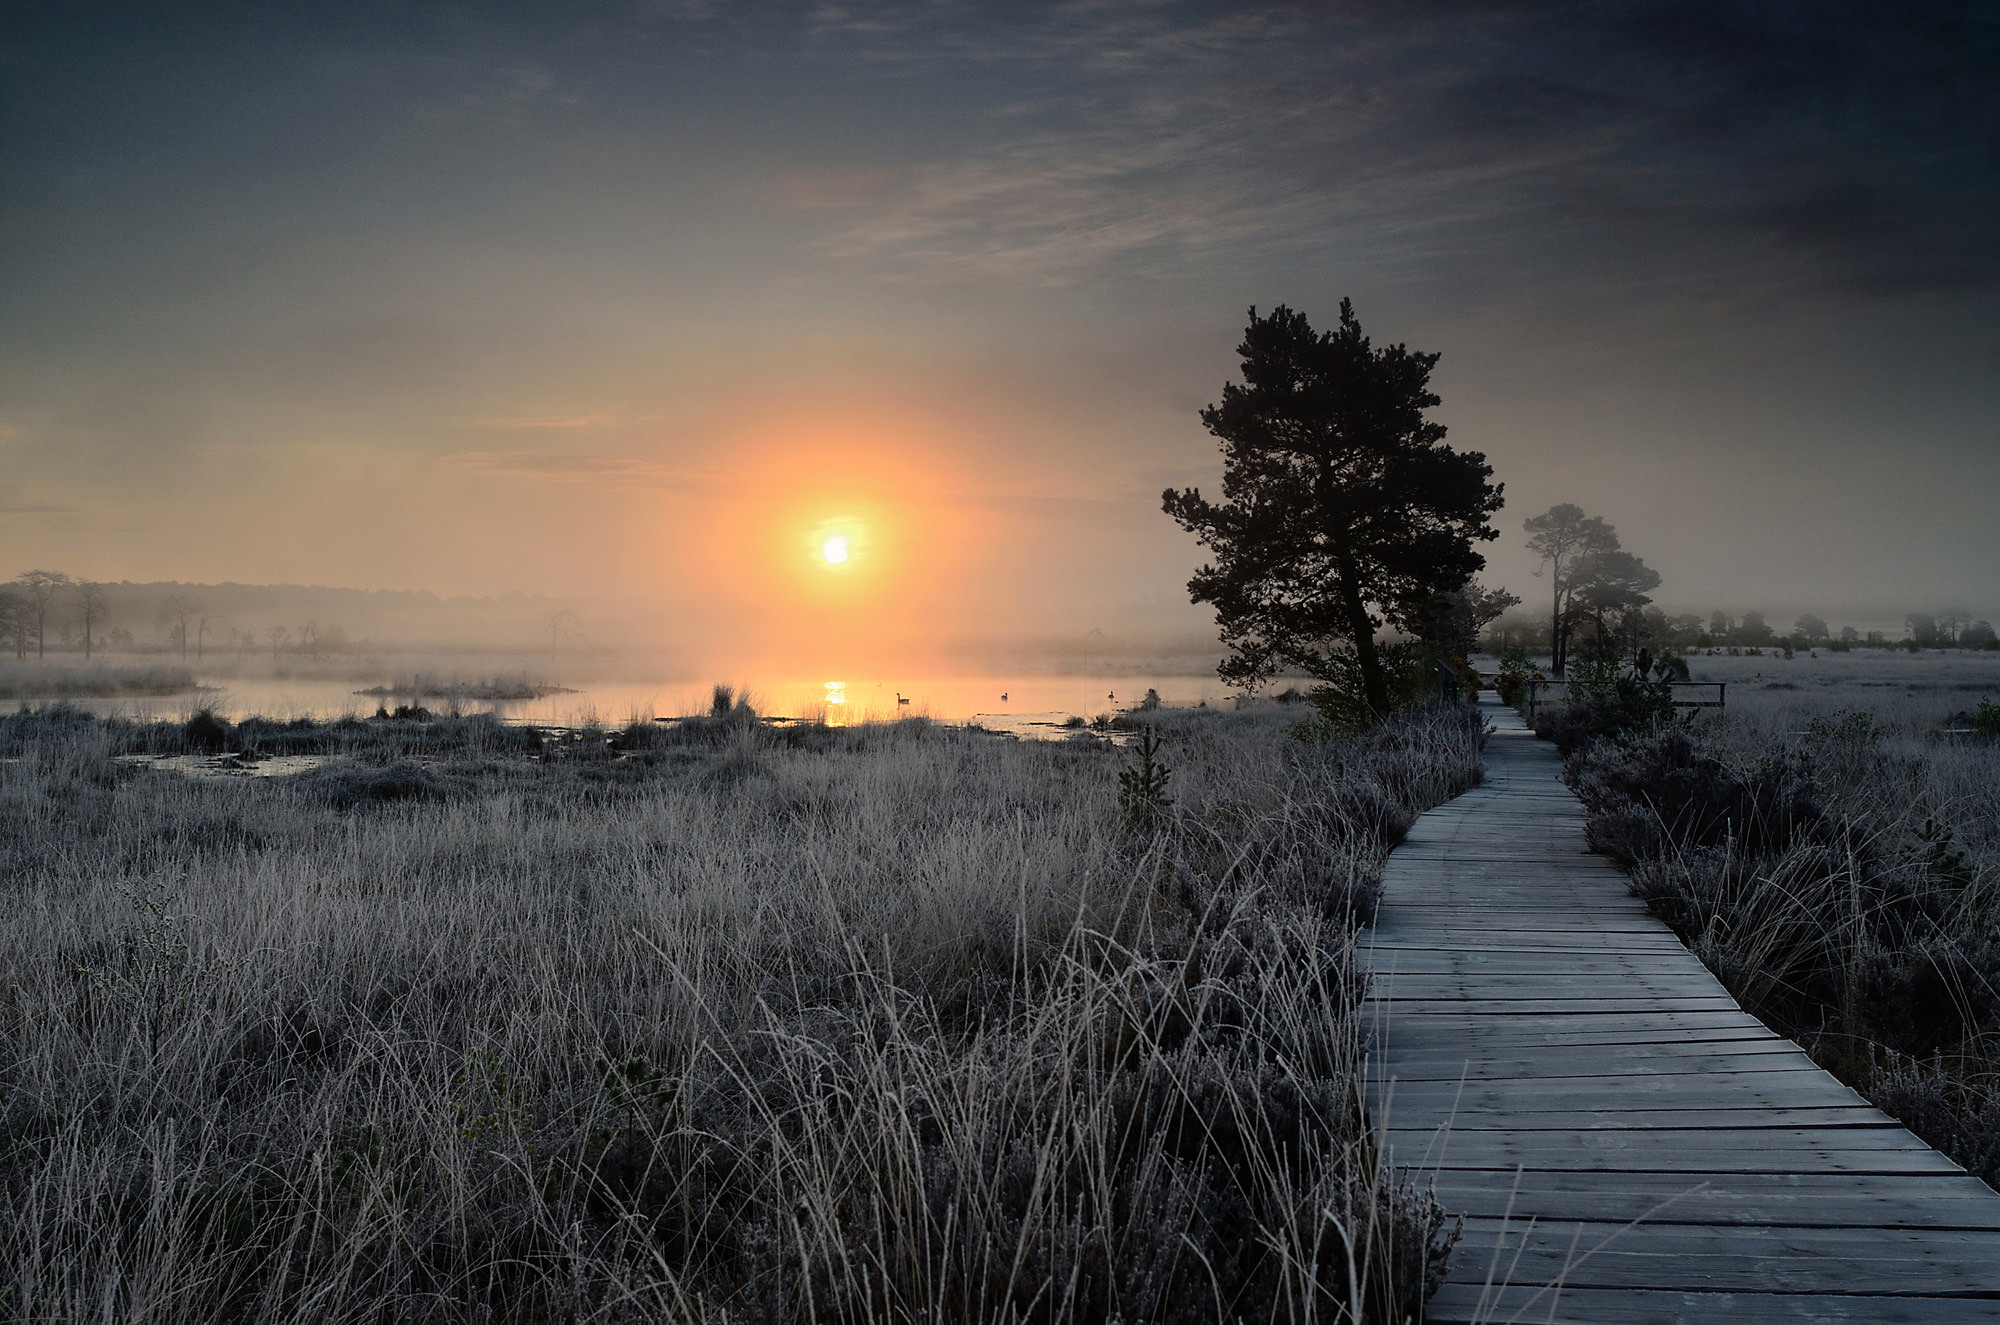
It took two visits to this location before I managed to capture an image that did it justice. Having been disappointed with my results previously, when the right weather conditions were forecast (cold and frosty), I knew exactly the type of image I wanted to capture. The 24mm was my lens of choice, and I executed the image with clarity and decisiveness, giving me time to relax and enjoy the sunrise.

On a trip for work, I decided to forgo my usual lens selection and travel light, only taking my manual focus lens on the D7000. In downtown Chicago, I took my time to decide which angle I liked best of the Trump Tower. After plenty of wandering around, this view seemed to appear out of nowhere. The overhead railway created an almost claustrophobic effect, whilst the tower stands out as a starkly different imposter in its surroundings. If I hadn’t been in the calm frame of mind bestowed by my manual focus lens, I doubt I would have spent the time exploring the options. My image could well have ended up as just another waterfront skyline.
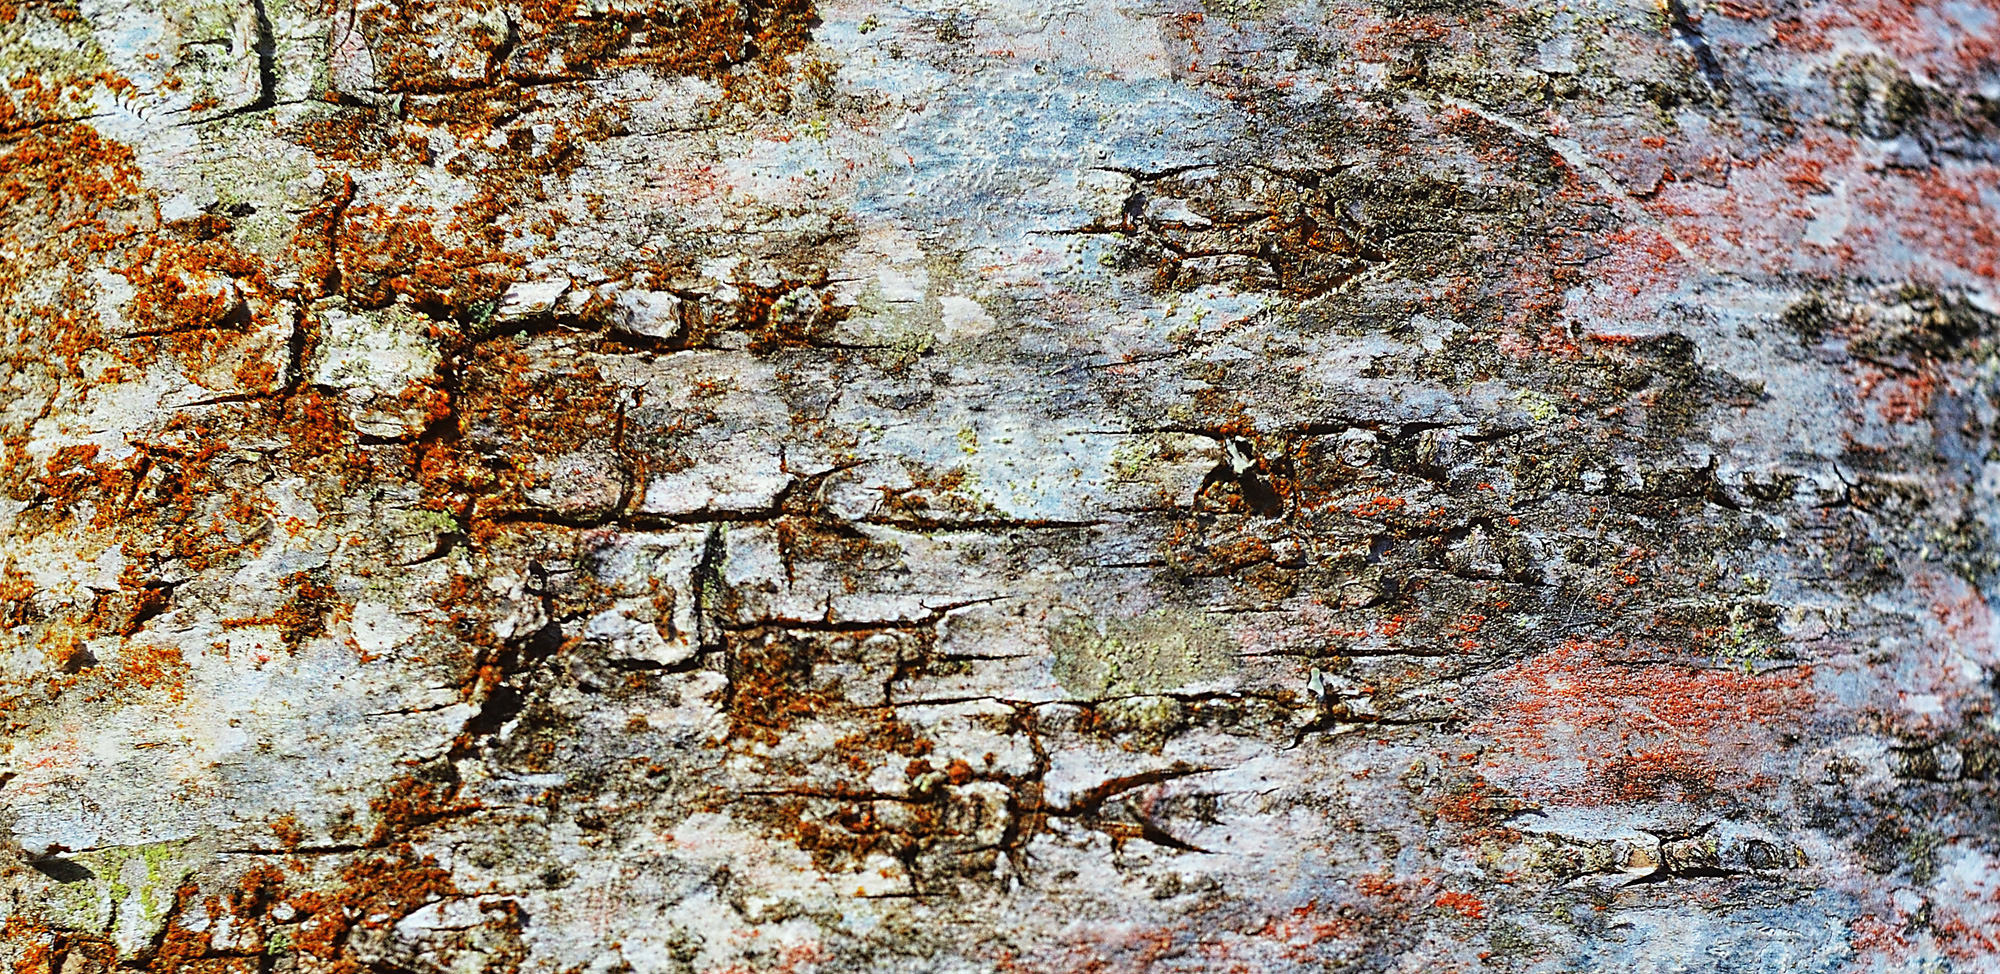
Slowing down allows me to spot things that might otherwise stay hidden, like how amazing the colours were on the bark of the trees at a local forest. If my usual walk-around telephoto lens had been on my camera, there is no way I would have been able to capture the detail so well, let alone be in the right frame of mind to spot it.
5) Really Slowing it Down
Nothing says calm photography to me quite like film. With film, there is no quick fix – no instant gratification of an image on the back of your camera, and no constant refinement of a shot until you perfect it.
Shooting with film forces you to visualise how you want the shot to look. You need to have a deeper understanding of the impact of aperture, exposure, and the film you are using. You have to be intimately familiar with your equipment and your skills to get the best possible results. I don’t profess to be an expert in any of these things, but shooting film is a steep learning curve and one that has seriously helped improve my technique.
I have acquired a small selection of secondhand cameras, ranging from a lightweight Konica SLR to professional level equipment like the Nikon F4. I have even started to explore medium format photography with a recently acquired Bronica S2a.
You start to think very differently about the pictures you take when the act of setting off the shutter is no longer throwaway. With each medium format Velvia shot costing £2-£3 (depending on scanning resolution) you really want to be sure you’ve got it right before pressing that button. For the first time since the 1990s, I have actually gone out with my camera and only taken one picture!
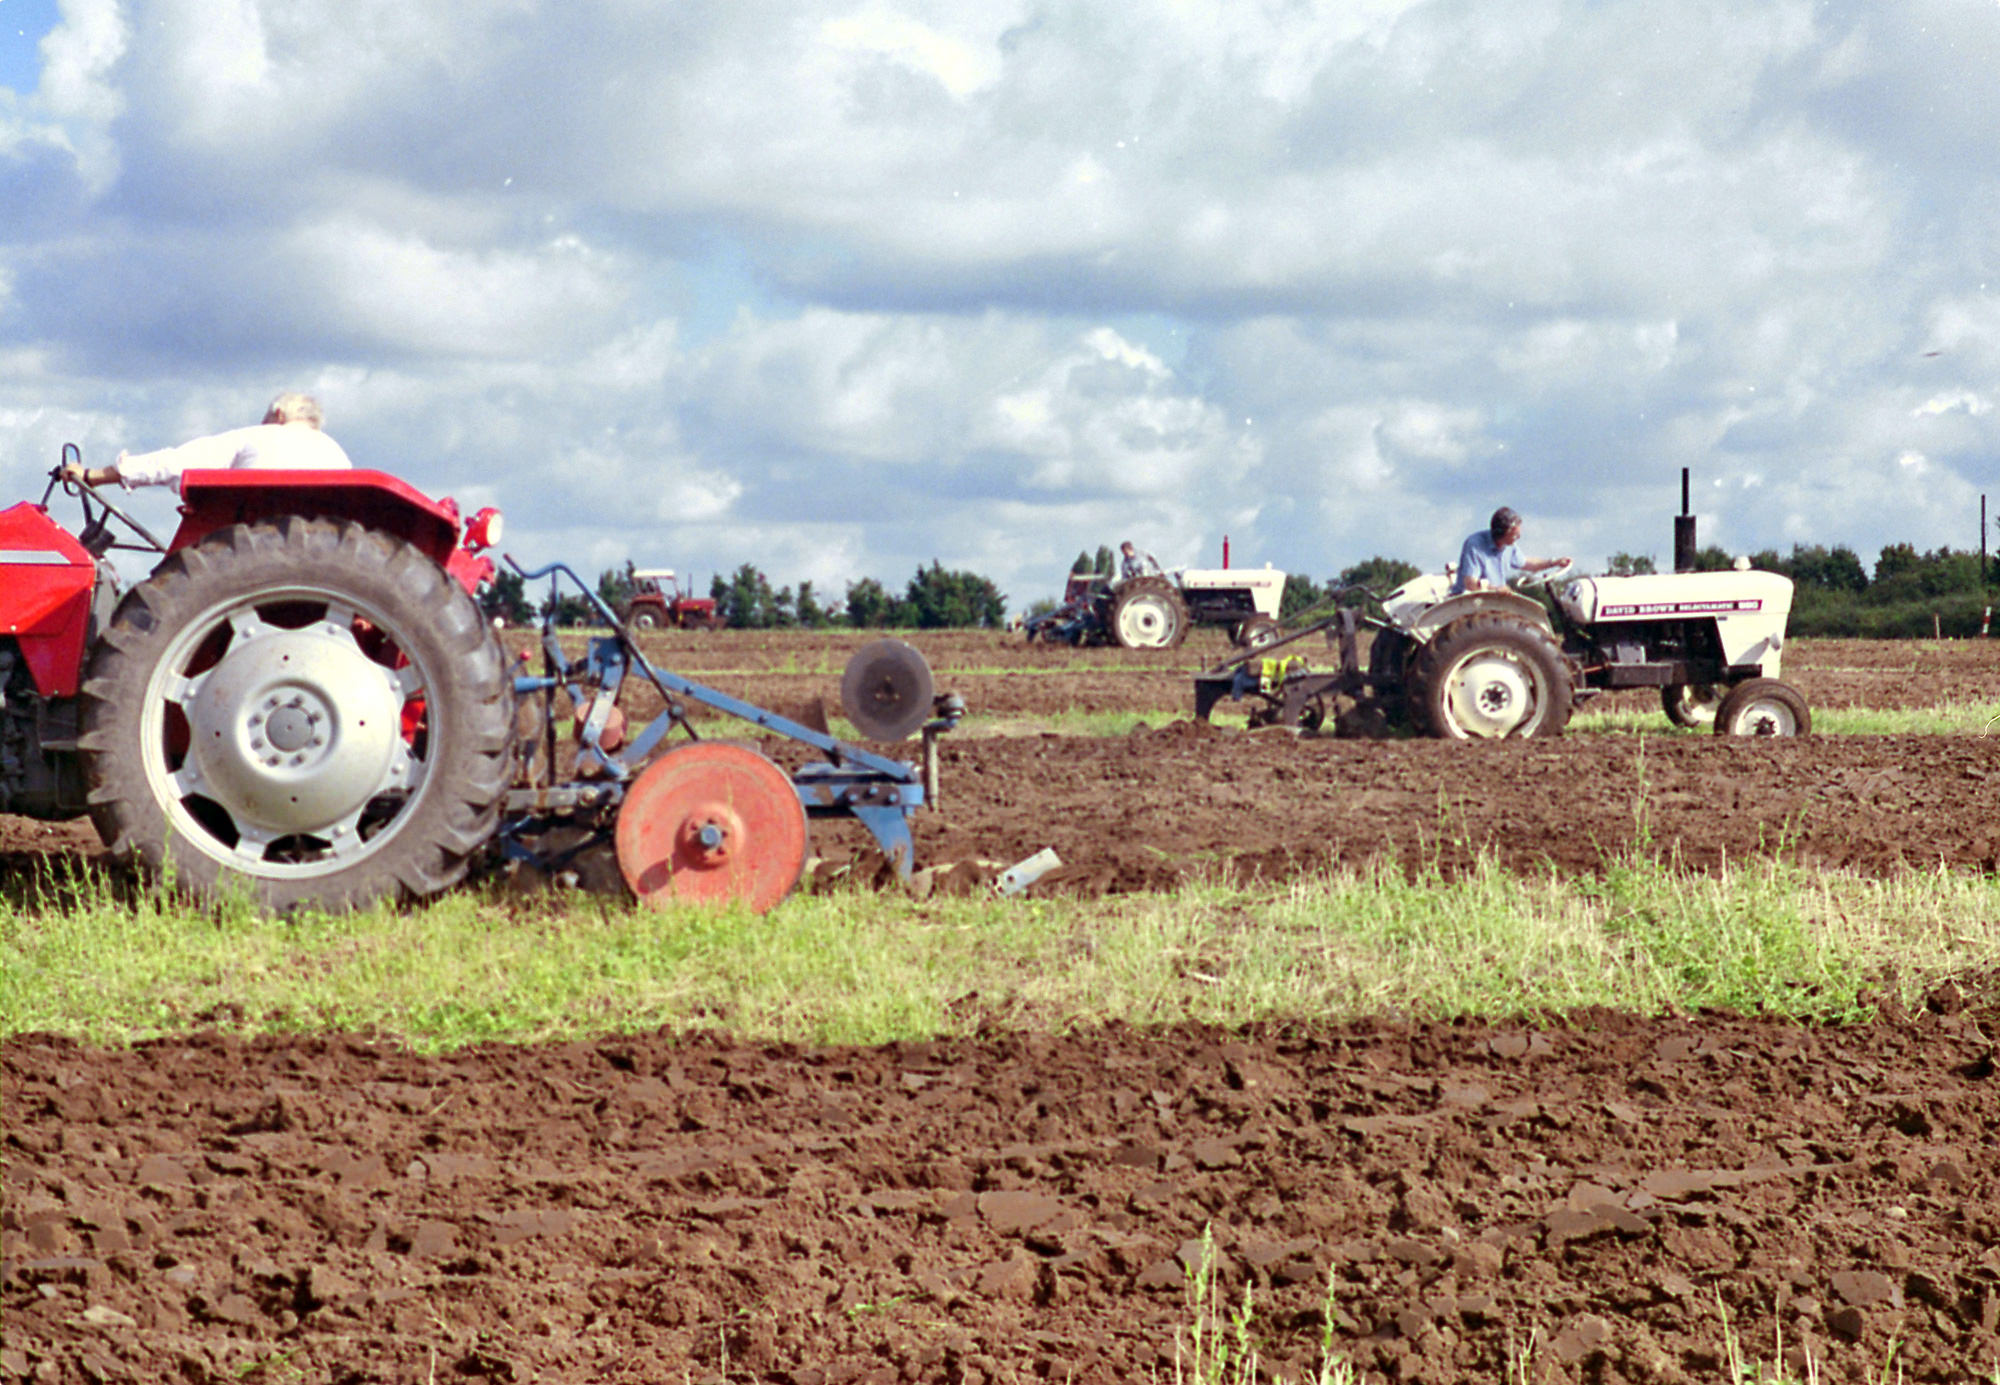
The first roll of film, from my charity-shop Konica FP-1, contained this gem from a local ploughing contest (yes, that is such a thing). I had tried to taking pictures at the same time with my DSLR but they didn’t excite me half as much as the processed film. Film photography has been a guilty pleasure ever since, always rewarding and often inspiring.
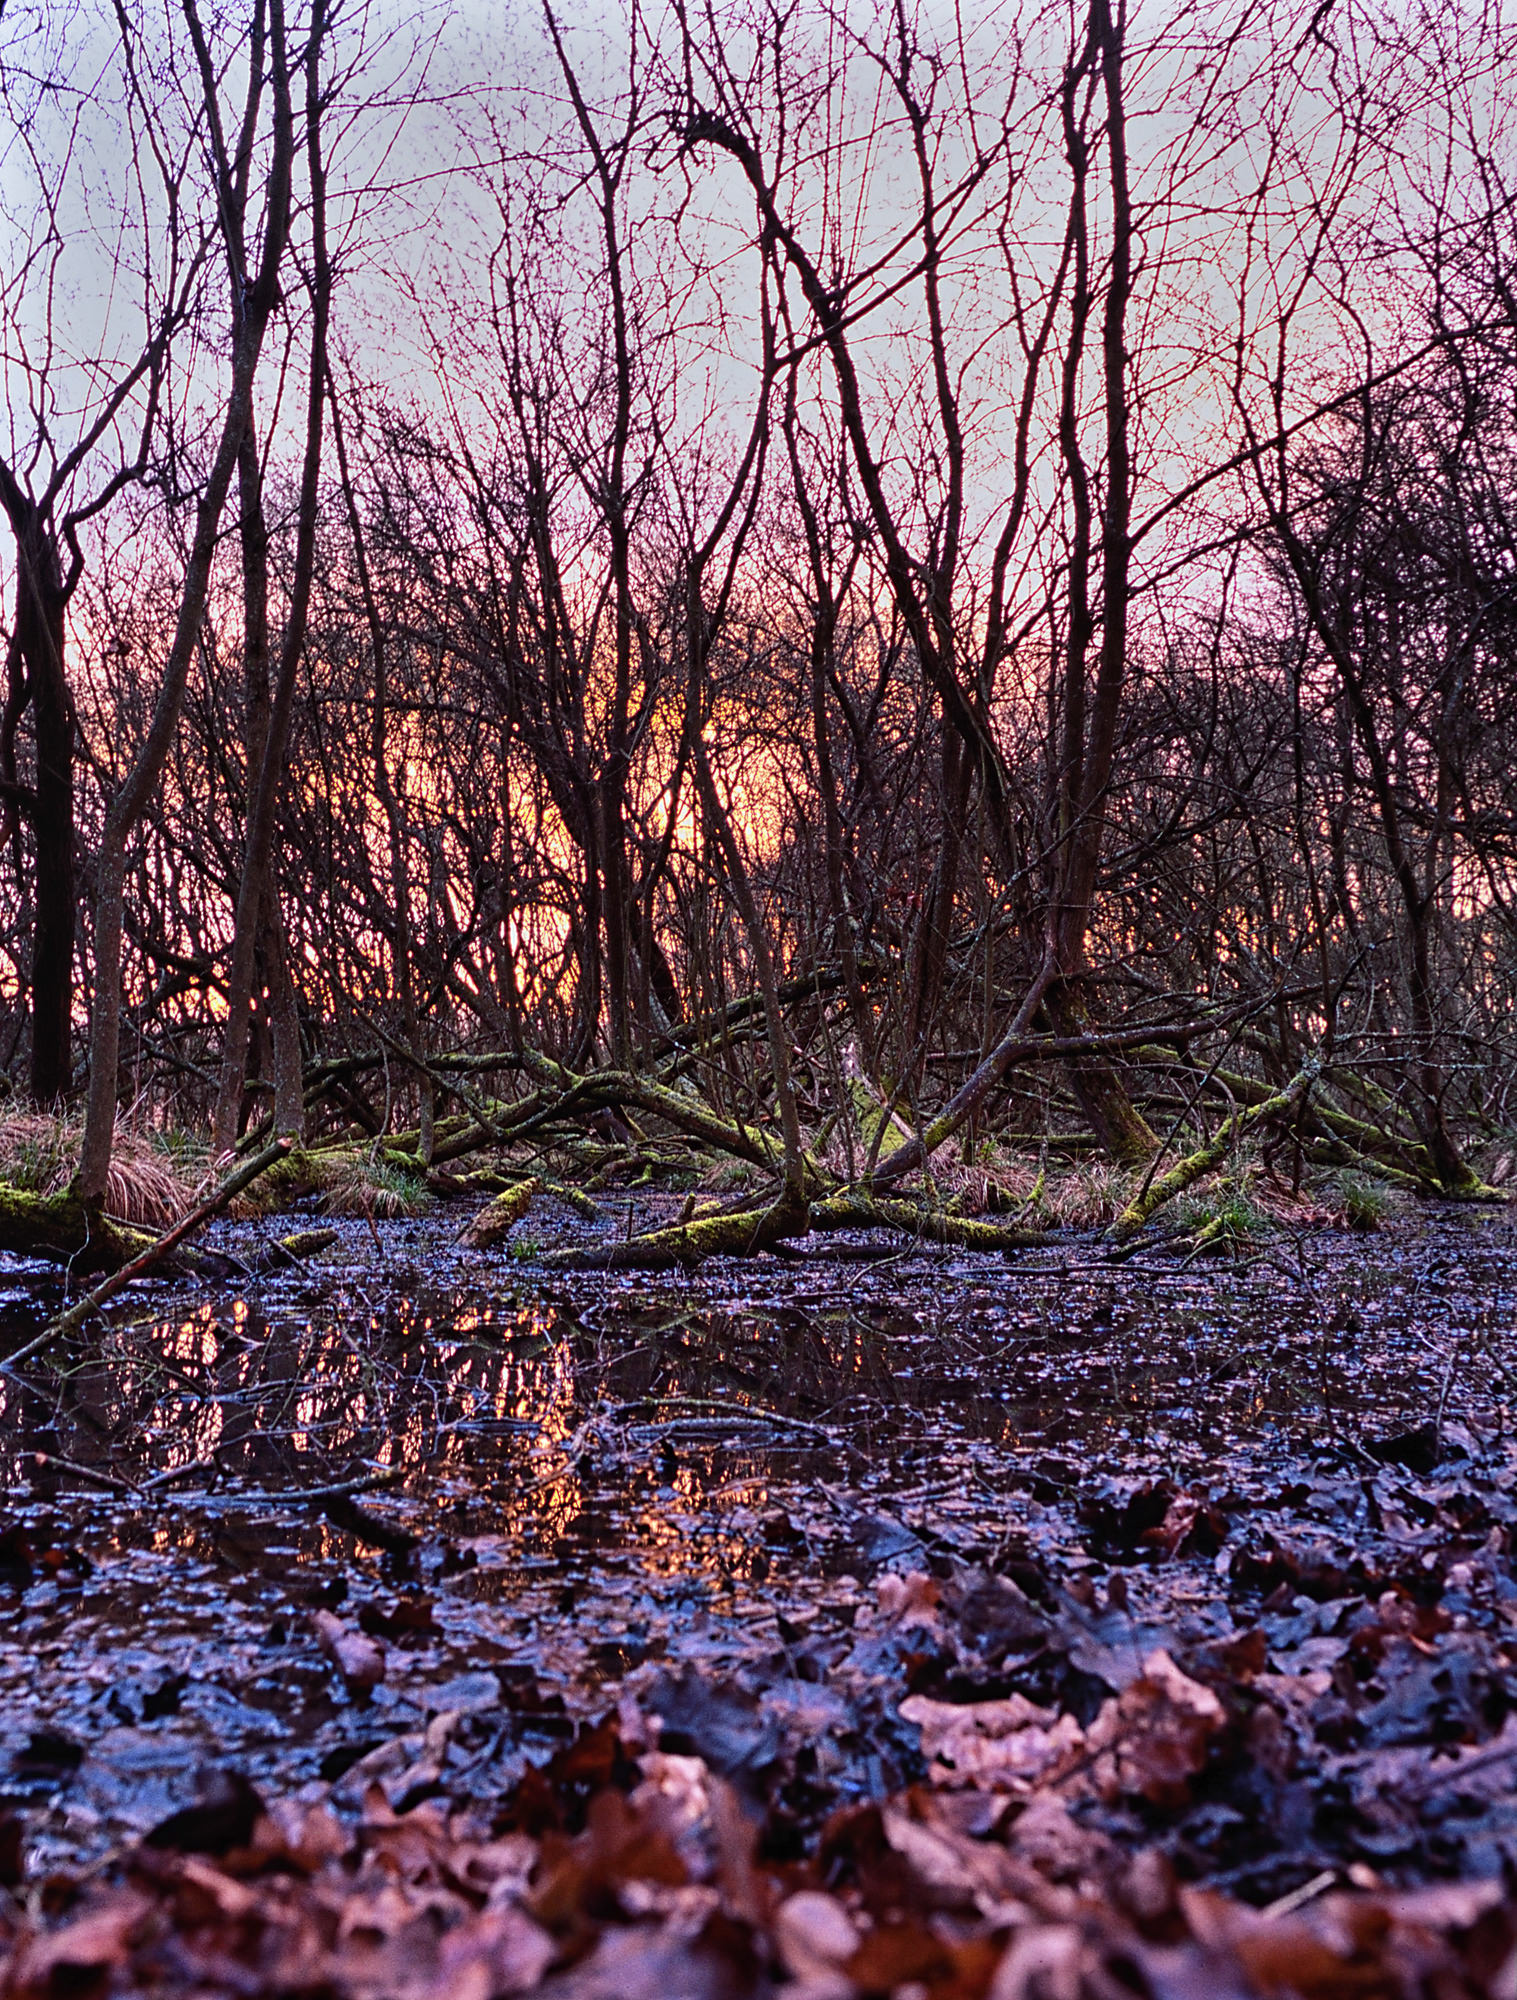
I had cycled past this area of forest on my way to work for over 2 years. It was only after starting to shoot with Fuji Velvia film that I noticed the colours present on the moss covered trees and fallen leaves. I wondered what it would look like with a nice sunrise spilling through the branches. A week later my sunrise arrived and the image came together.
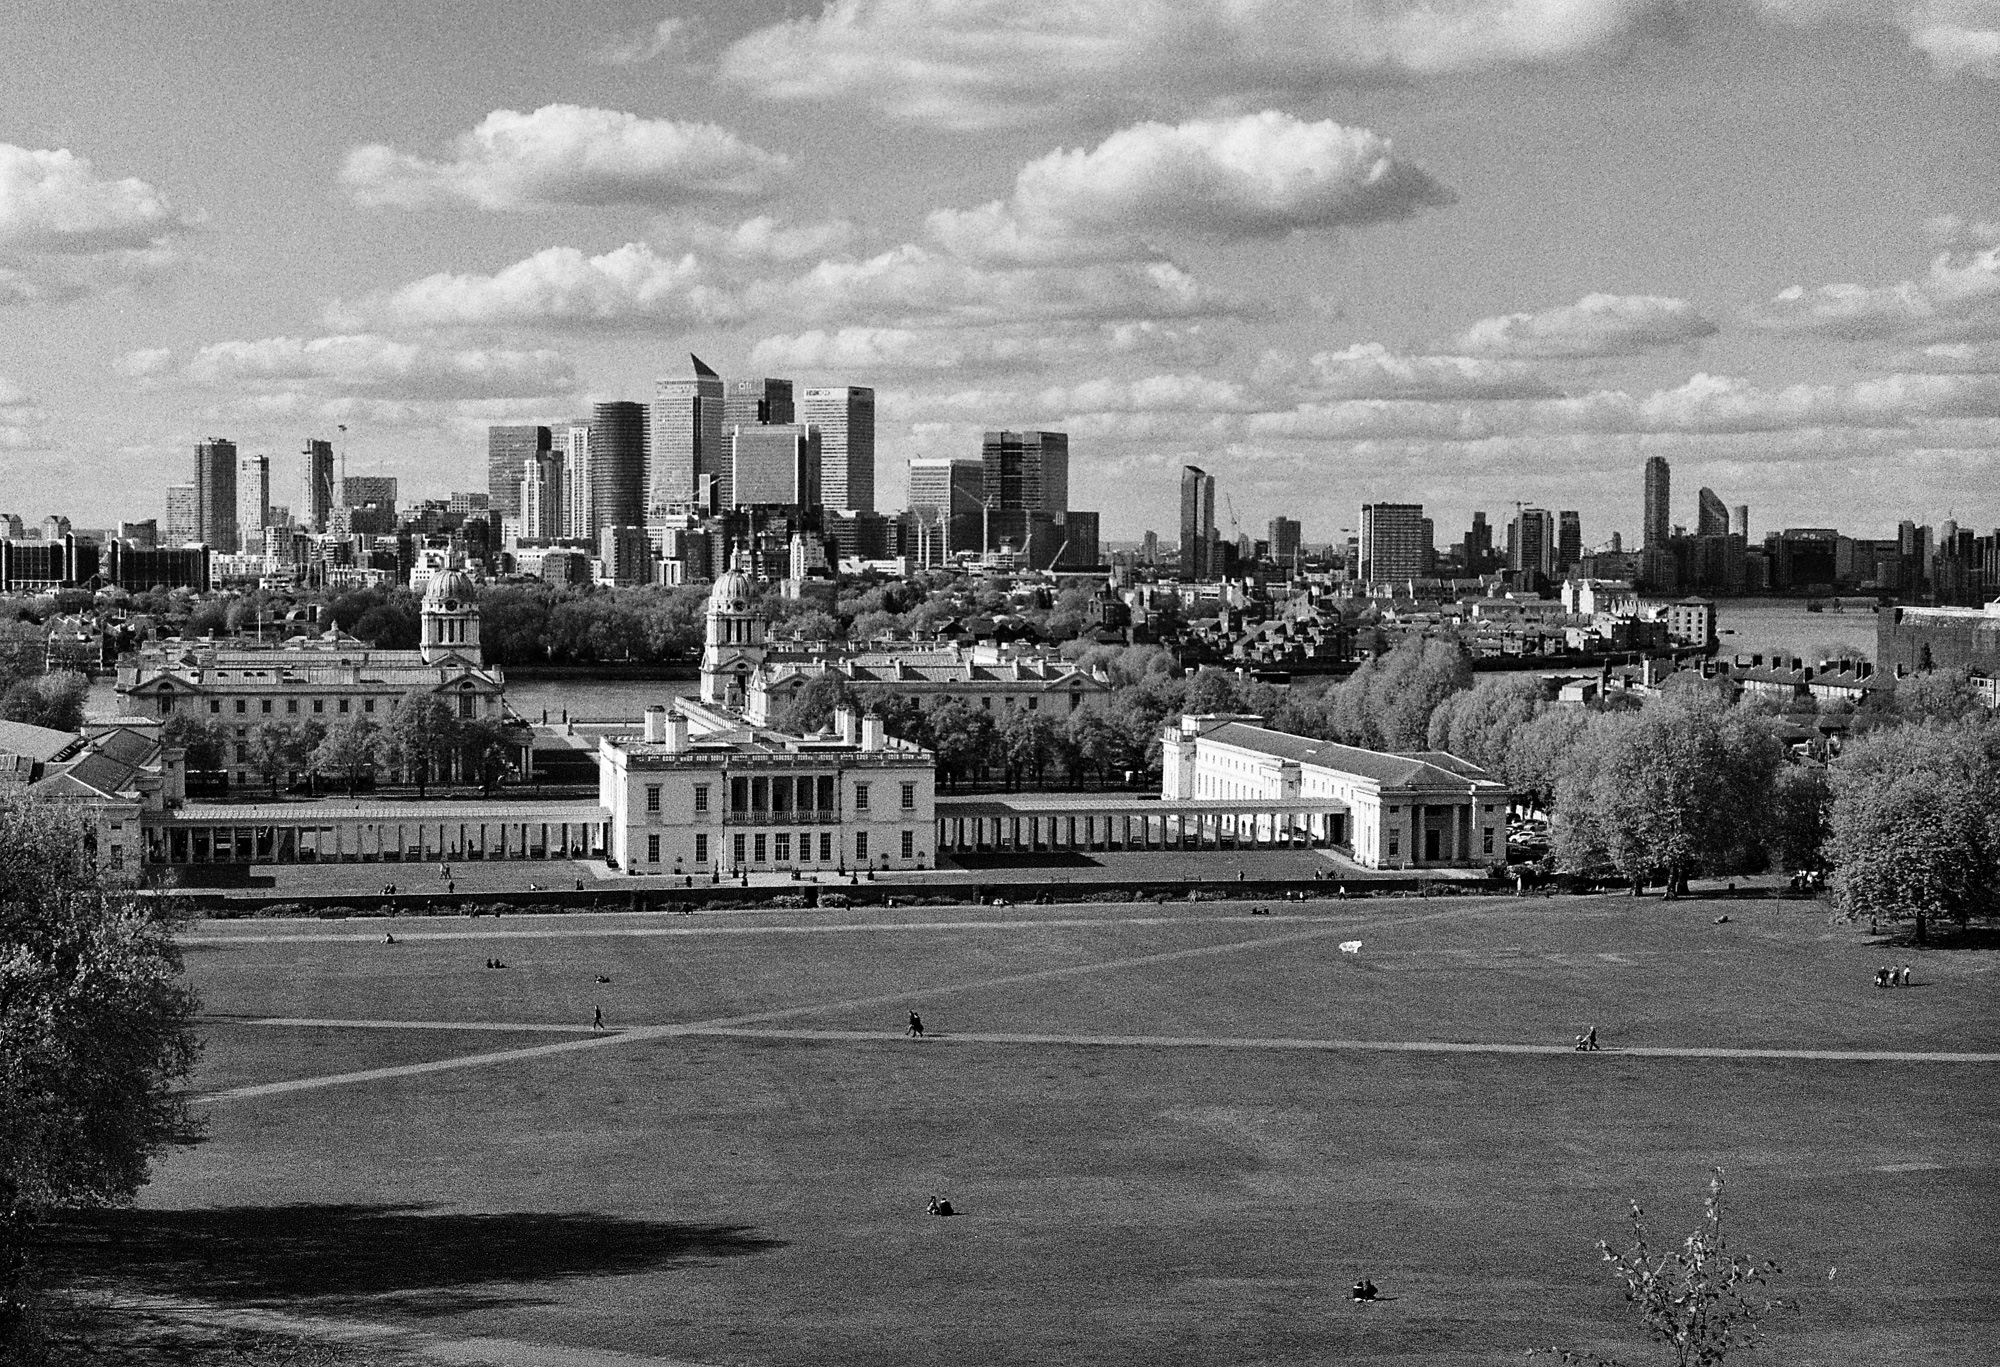
Even under pressure not to spend too much time taking photos on a family outing, I managed to seek out a quiet space away from tourists to get a clear view of the Docklands skyline from the roof of Greenwich Observatory. I knew at the time that taking the shot would lead to a result worth keeping.
6) Conclusion
So, what is the net effect of all my “out of your comfort zone” photography experiences? After making such a conscious effort to change what I was doing, it was somewhat surprising to realise that changes to my original wildlife photography were happening in an almost subconscious way.
The portrait photography course has made me think much more carefully about lighting; Where are my light sources coming from? What is the quality of the light? Would things look better at a different time of day? What would happen if I added light by using a speedlight?
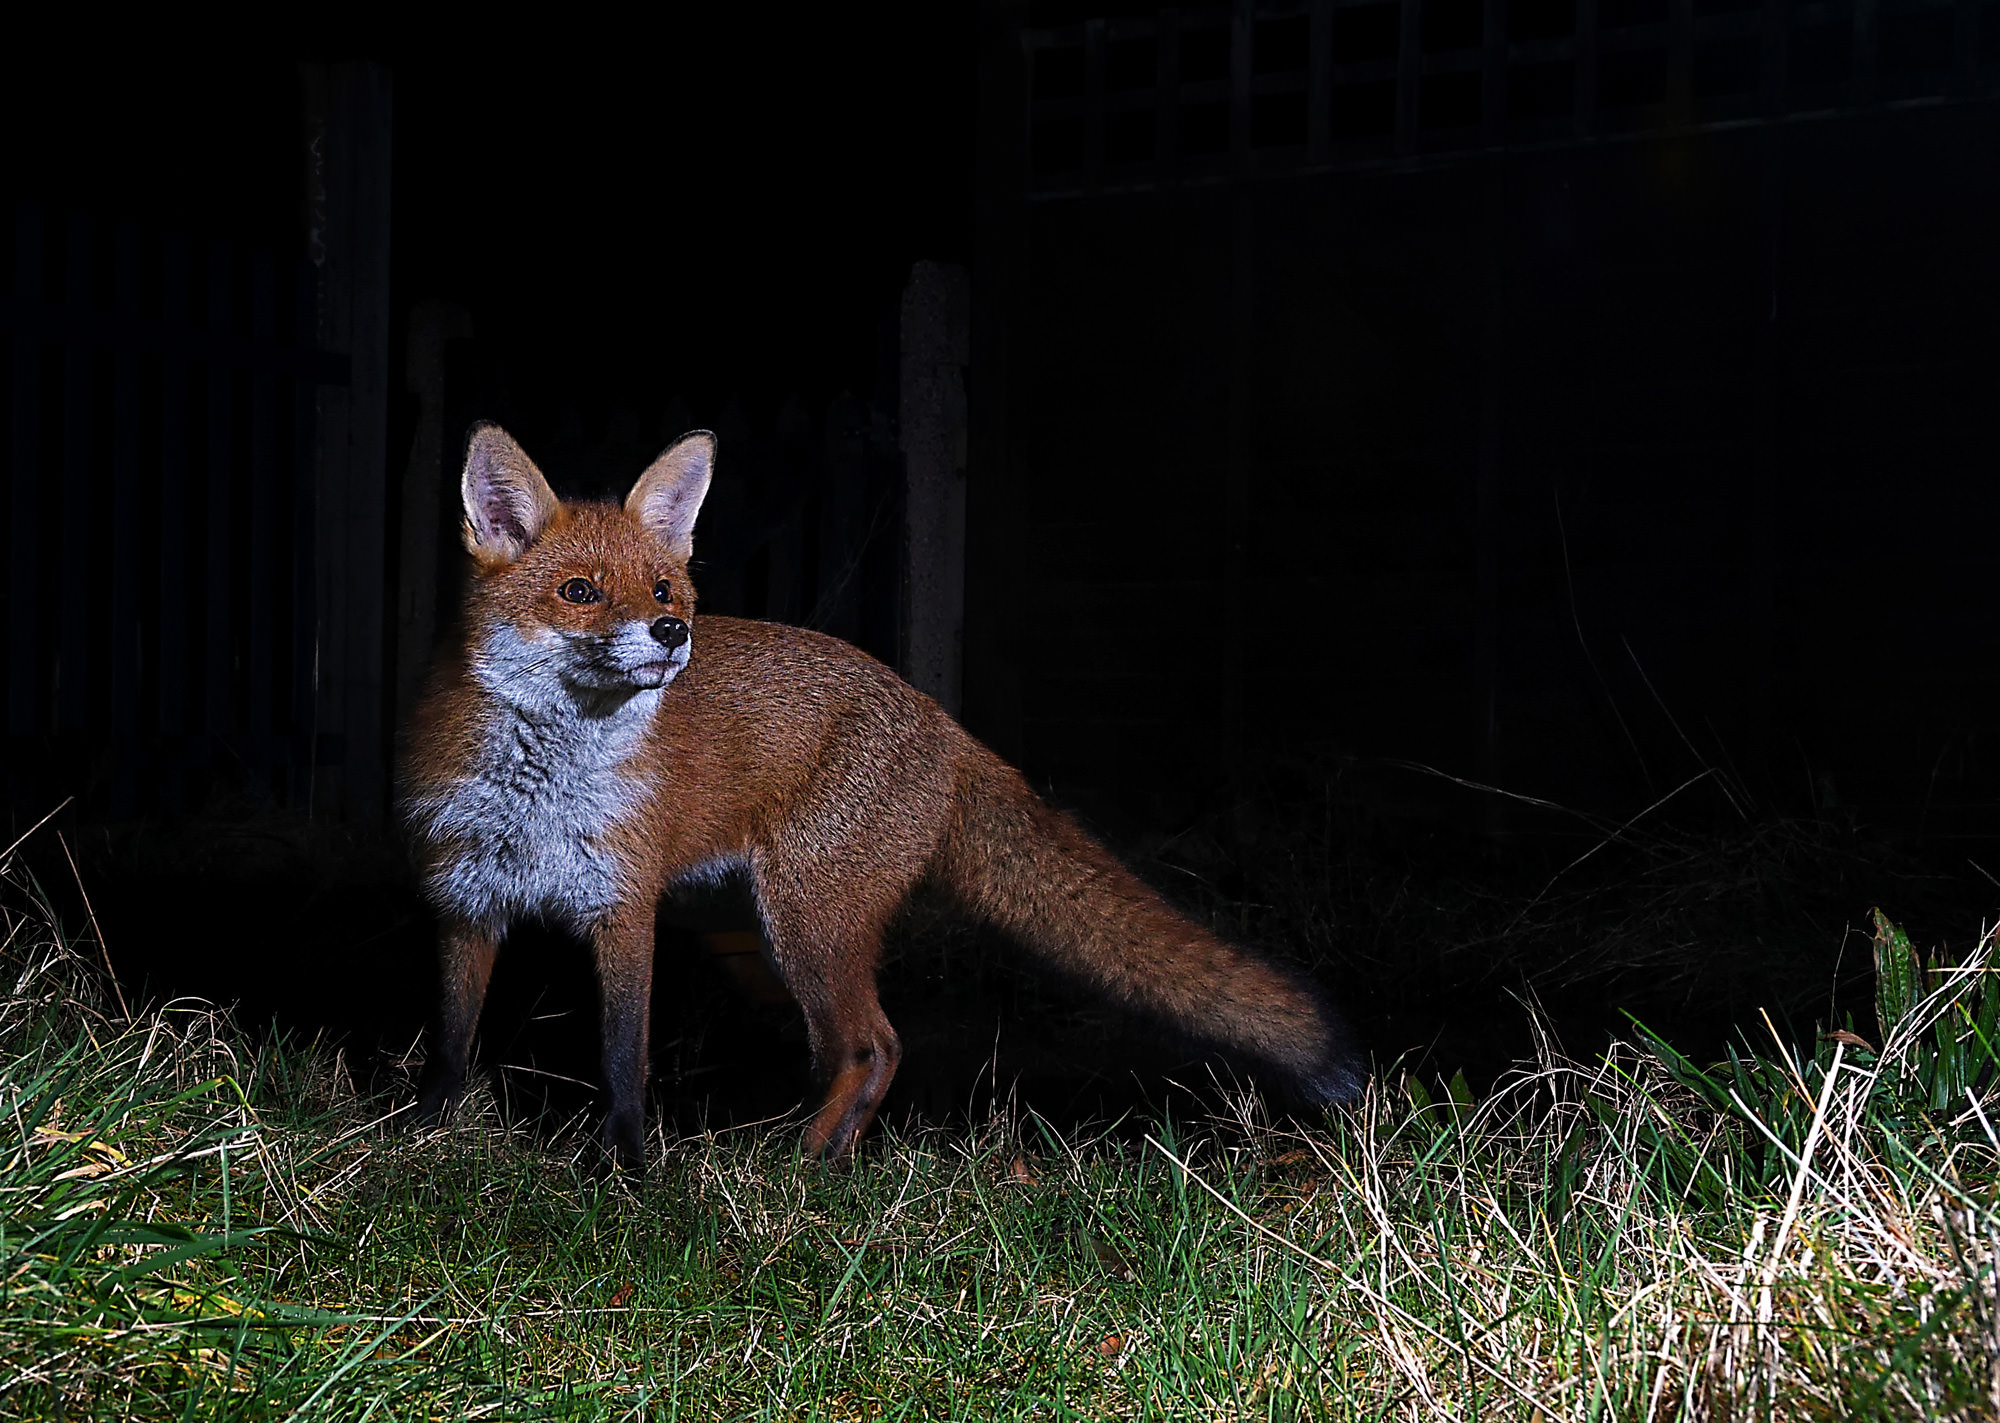
This urban fox in my front garden required some serious planning, not least of which was the lighting. I used two off camera speed lights to supplement the street lighting and allow me a smaller aperture and lower ISO.

Taking more black and white images has helped me see other composition opportunities. Where before I had always been looking for the animal to be just right in the shot, now I consider how the whole image works. What other elements are in the picture? Do they add to or detract from what I want the image to say?
This American Bittern was in amongst a busy environment of grasses and dead wood. The only way to truly capture the subject was to get in close and remove the clutter from the scene. Getting low in the boat and waiting for the bird to emerge from its less-photographically-pleasing cover was well worth it.
Street photography has taught me to be ready for the moment. You might have just one chance for a striking image. Also, there is no need to take 100 pictures where one will suffice, if the image is not working move on taking 20 more of the same picture is unproductive.
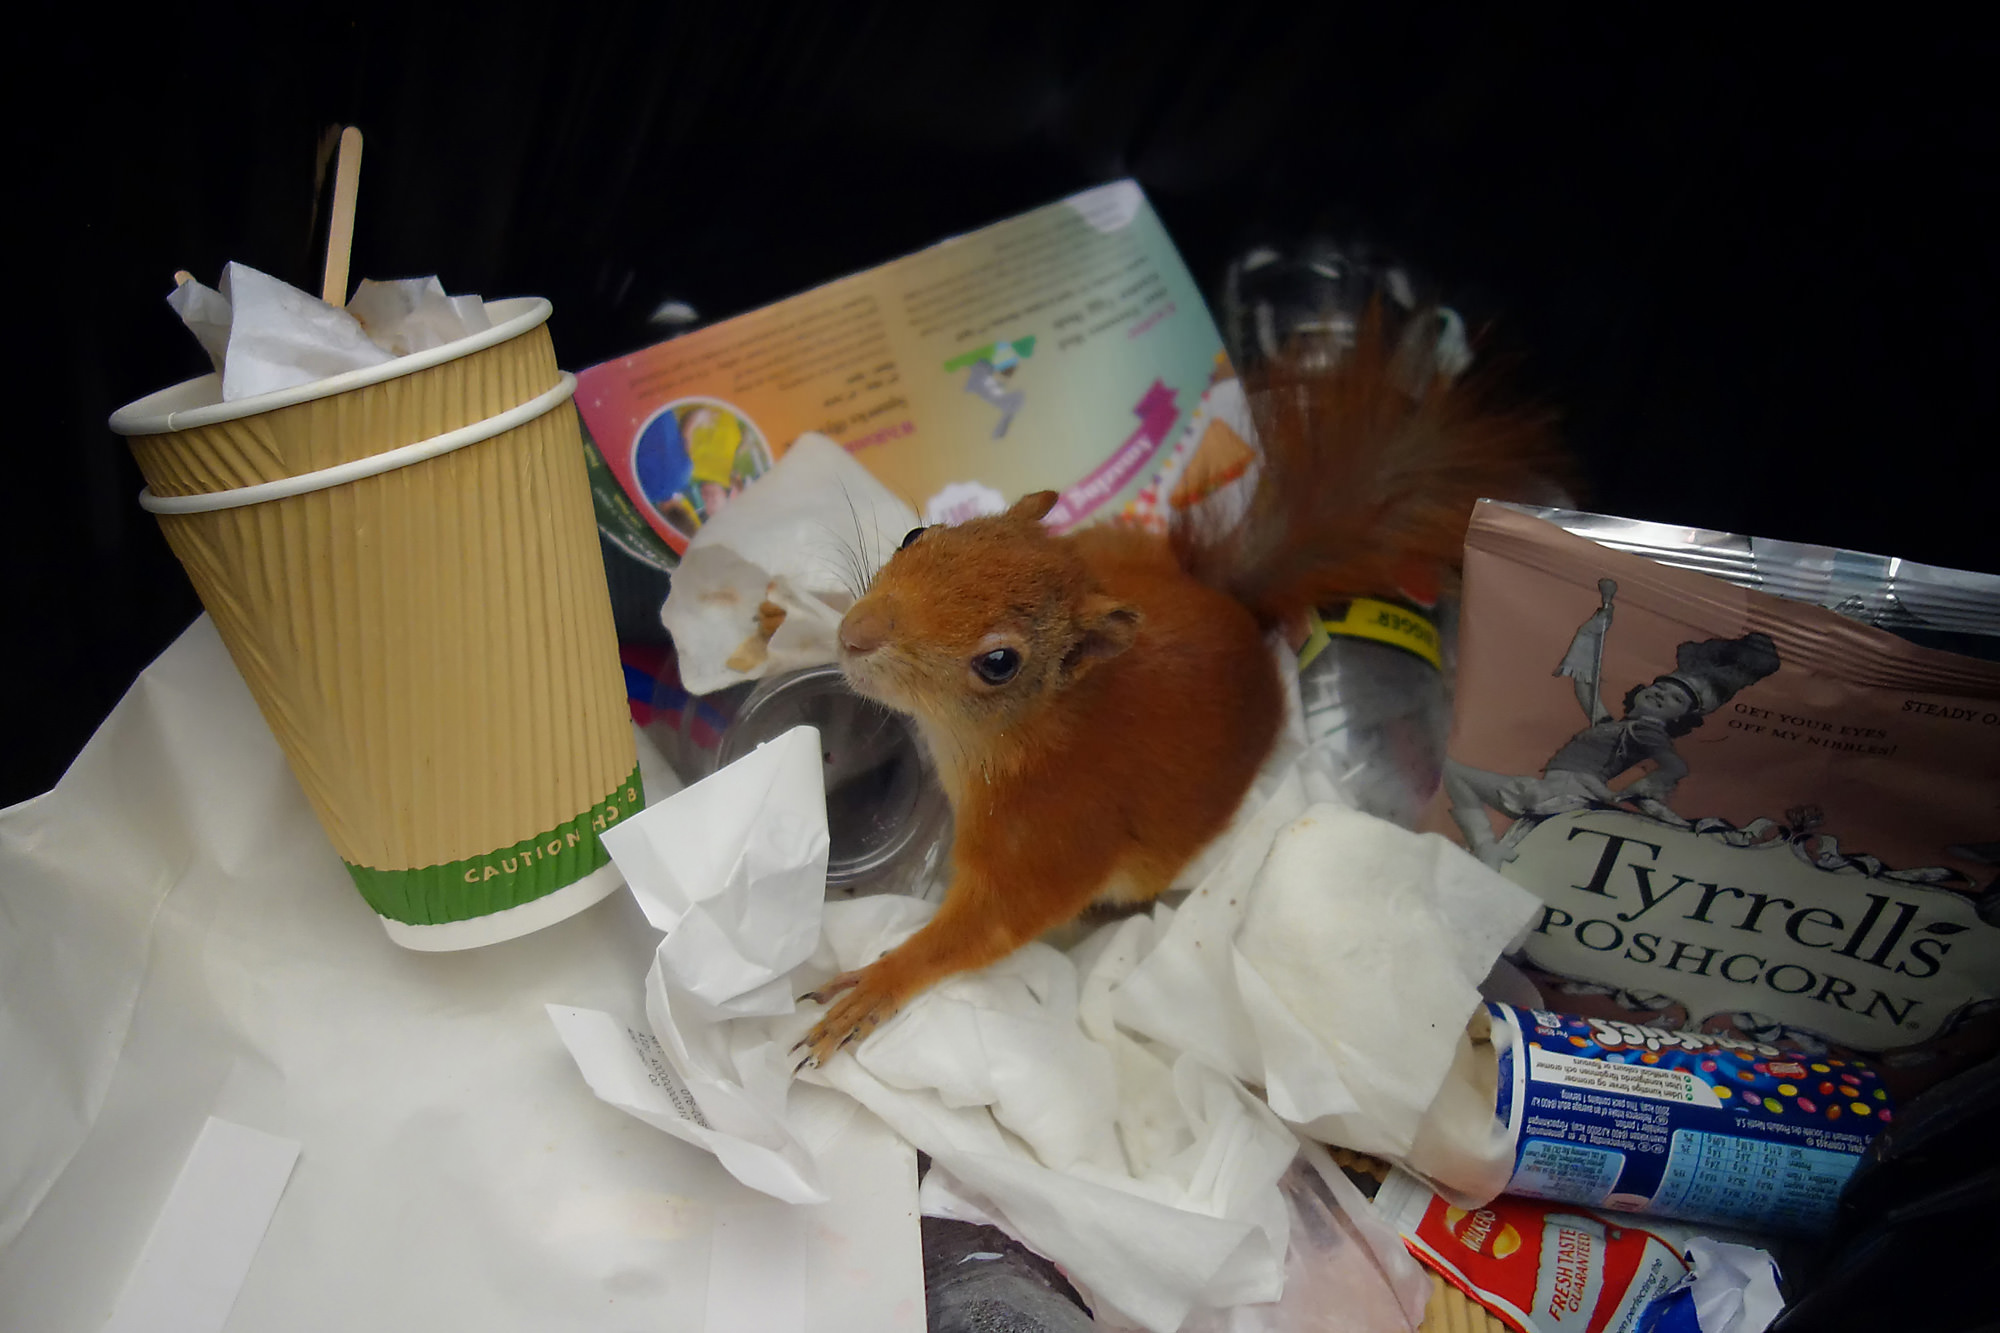
A cheeky red squirrel on the Isle of Wight was busy looking for a snack in a rubbish bin. I had to set the camera manually before flipping the lid of the bin. I had about 5 seconds to take the shot before he dove for cover under the litter.

Slowing things down has done wonders for my photographic thought process. This is especially evident when it comes to landscapes. I am now content to place myself in a landscape at the right time of day, set the camera up and just see what evolves.
Bembridge on the Isle of Wight is a photographer’s delight. With accessible beaches and an enormous variety of scenery, you can shoot here all day and not get bored. I prefer now to find a quiet spot at sunrise or sunset and let nature do its work.

Film photography has helped me plan my shots for success – visualising a scene before it has happened then work towards that goal. It’s all about tweaking elements until you have the best result possible with the tools and scenery at your disposal.
This monster mushroom had been knocked over by a clumsy walker or wild animal. I had to re-plant it in its original spot and then fill the underside with a burst of off camera flash during a 10 second exposure.
If you are looking to change the way you take photographs, I can only encourage you to get outside of your comfort zone and try something you wouldn’t normally do. I continue to look for new things to try and where possible feed the new skills back in to my wildlife photography. I am pleased with the results so far. You never know – maybe I will turn pro one day.
Dave Faulkner is a keen amateur wildlife photographer from Hampshire, England. To see more examples of his work, you can visit his blog at Wild About Photos.
Awesome article…You inspire me even more. I have been stepping outside my comfort zone by detailing and composing pictures carefully…it’s so rewarding…?
Great article. I fully identify with your sentiments. Wonderful photos. Especially the street scenes. If any genre puts me out of my comfort zone, it’s street photography. So uncomfortable. So hard to do well. So satisfying when you get a memorable shot. I started with sports, added landscape and continue to add Street and Wildlife (bird). Switching between genres always renews my interest.
Happy shooting.
Thank you Sandy. Kudos for getting out on the street with a Polaroid 250! I would love to see some of the images you have been creating with it. I have a sx-70 folding Polaroid land camera which is a work of art, unfortunately I have been frustrated with the quality of film available from the impossible project (now Polaroid Originals). The black and white film is not bad and I have a pack in the fridge waiting for some warmer weather.
It is very tempting to get a camera that takes peel-apart film, but I am reluctant with Fuji stopping manufacture and prices already creeping up. What is your plan regarding film for the 250 once it becomes unavailable?
Great article and amazing examples! Thank you for sharing.
Thanks for your kind comments Sharon
Such a great article. Thanks for this. I’ve been spending a lot of time lately trying to step outside of my comfort zone. I’ve also found that using film leads to more thoughtful photography. Using instant film and trying b&w has really got me thinking about light and how it helps or hinders my photography. I hate to ever be “seen” taking photographs, so I’ve been walking around town with a big Polaroid 250. No blending in with the scenery with that camera. I’m getting more comfortable doing my own thing in a crowd.
Not sure why but my reply posted as a new comment below \/
Nice to see someone trying a different tact. One day I will go out with just my 35mm f1.8 prime and leave every other lens at home. One idea I read about was to walk for say 10 minutes, stop and you have 30 seconds to seek, compose and take a photo.
Arthur, sounds like a nice exercise. Could set a timer on your phone for the 10 minutes so you have no idea when the photo slot is coming.
Great article. I love street photography but it makes me feel uncomfortable. However, pushing myself to do it and later on going back to see the photos I took makes me happy, and that is the greatest reward for me.
Thanks Jay, I find I have to be in the right frame of mind for street photography. If I am feeling a bit low I lack the confidence to ask people. Taking some stealth shots to warm me up seems to help especially if the location is bustling with people.
Very nice article, thanks for posting this! I was especially glad to see your use of changing picture control to monochrome. I shoot mostly color but having black and white on my screen is so useful for composition.
Very inspiring, thank you! I just needed to read something like this to kick me up ;)
Agree with you. Travelling in the same path again and again will teach nothing new. Excellent article and beautiful narration. Thanks for sharing.
Thanks for the nice comments Suresh, really enjoyed writing the article and the chance to get a wider audience on Photographylife.