Landscape photographers work primarily in natural light, which presents a few problems – for starters, the most beautiful lighting conditions each day last for no more than a few hours. Other times, sunsets will be lost behind cloudy skies, making it impossible to see a landscape at its best. When the sky is gray or the sun is directly overhead, it can be tough to find inspiration for high-quality photography. My hope with this article is to share some tips that have worked for me when I photograph in bad lighting conditions – something which every photographer experiences at some point.
Table of Contents
1) Look For Colors
The beauty of the light at sunset and sunrise is that it sculpts the landscape with saturated hues — in other words, the lighting provides the scene with color. When skies are overcast, though, natural lighting doesn’t offer the hues necessary for a richly-colored photograph. Instead, to create a colorful image, you must search for a vivid subject.
With an overcast sky, your light will soft and gentle. Take this opportunity to look for muted colors that would not be visible in the saturated light of sunset — soft purples and blues, perhaps. These colors may be too subtle to appear at sunset or sunrise, but a cloudy day allows them to shine.
After a rainstorm, too, it is possible to take beautiful images of deeply-saturated colors. Even with the dreariest of skies, a rainforest will always look vivid and green — a wonderful recipe for a landscape photographer. Remember to bring your polarizing filter!

2) Isolate Details
Although a grand landscape may look its best at sunrise, some detail-oriented photographs work just as well in cloudy conditions.
In part, this is because overcast skies are so drab — photos rarely benefit from having a featureless blob across the top. And even though some overcast skies still have texture in the clouds, it is important to ask yourself if they are helping your composition. If the sky is not interesting, it will not add interest to your photo.
On a cloudy day, my telephoto lens is nearly always glued to my camera. This brings the added possibility of wildlife photography, as well — another subject which can look beautiful under overcast lighting. Although I tend to stick with landscape photography when the sky is gray, I am careful to watch for other details to isolate as well.
3) Focus Closer
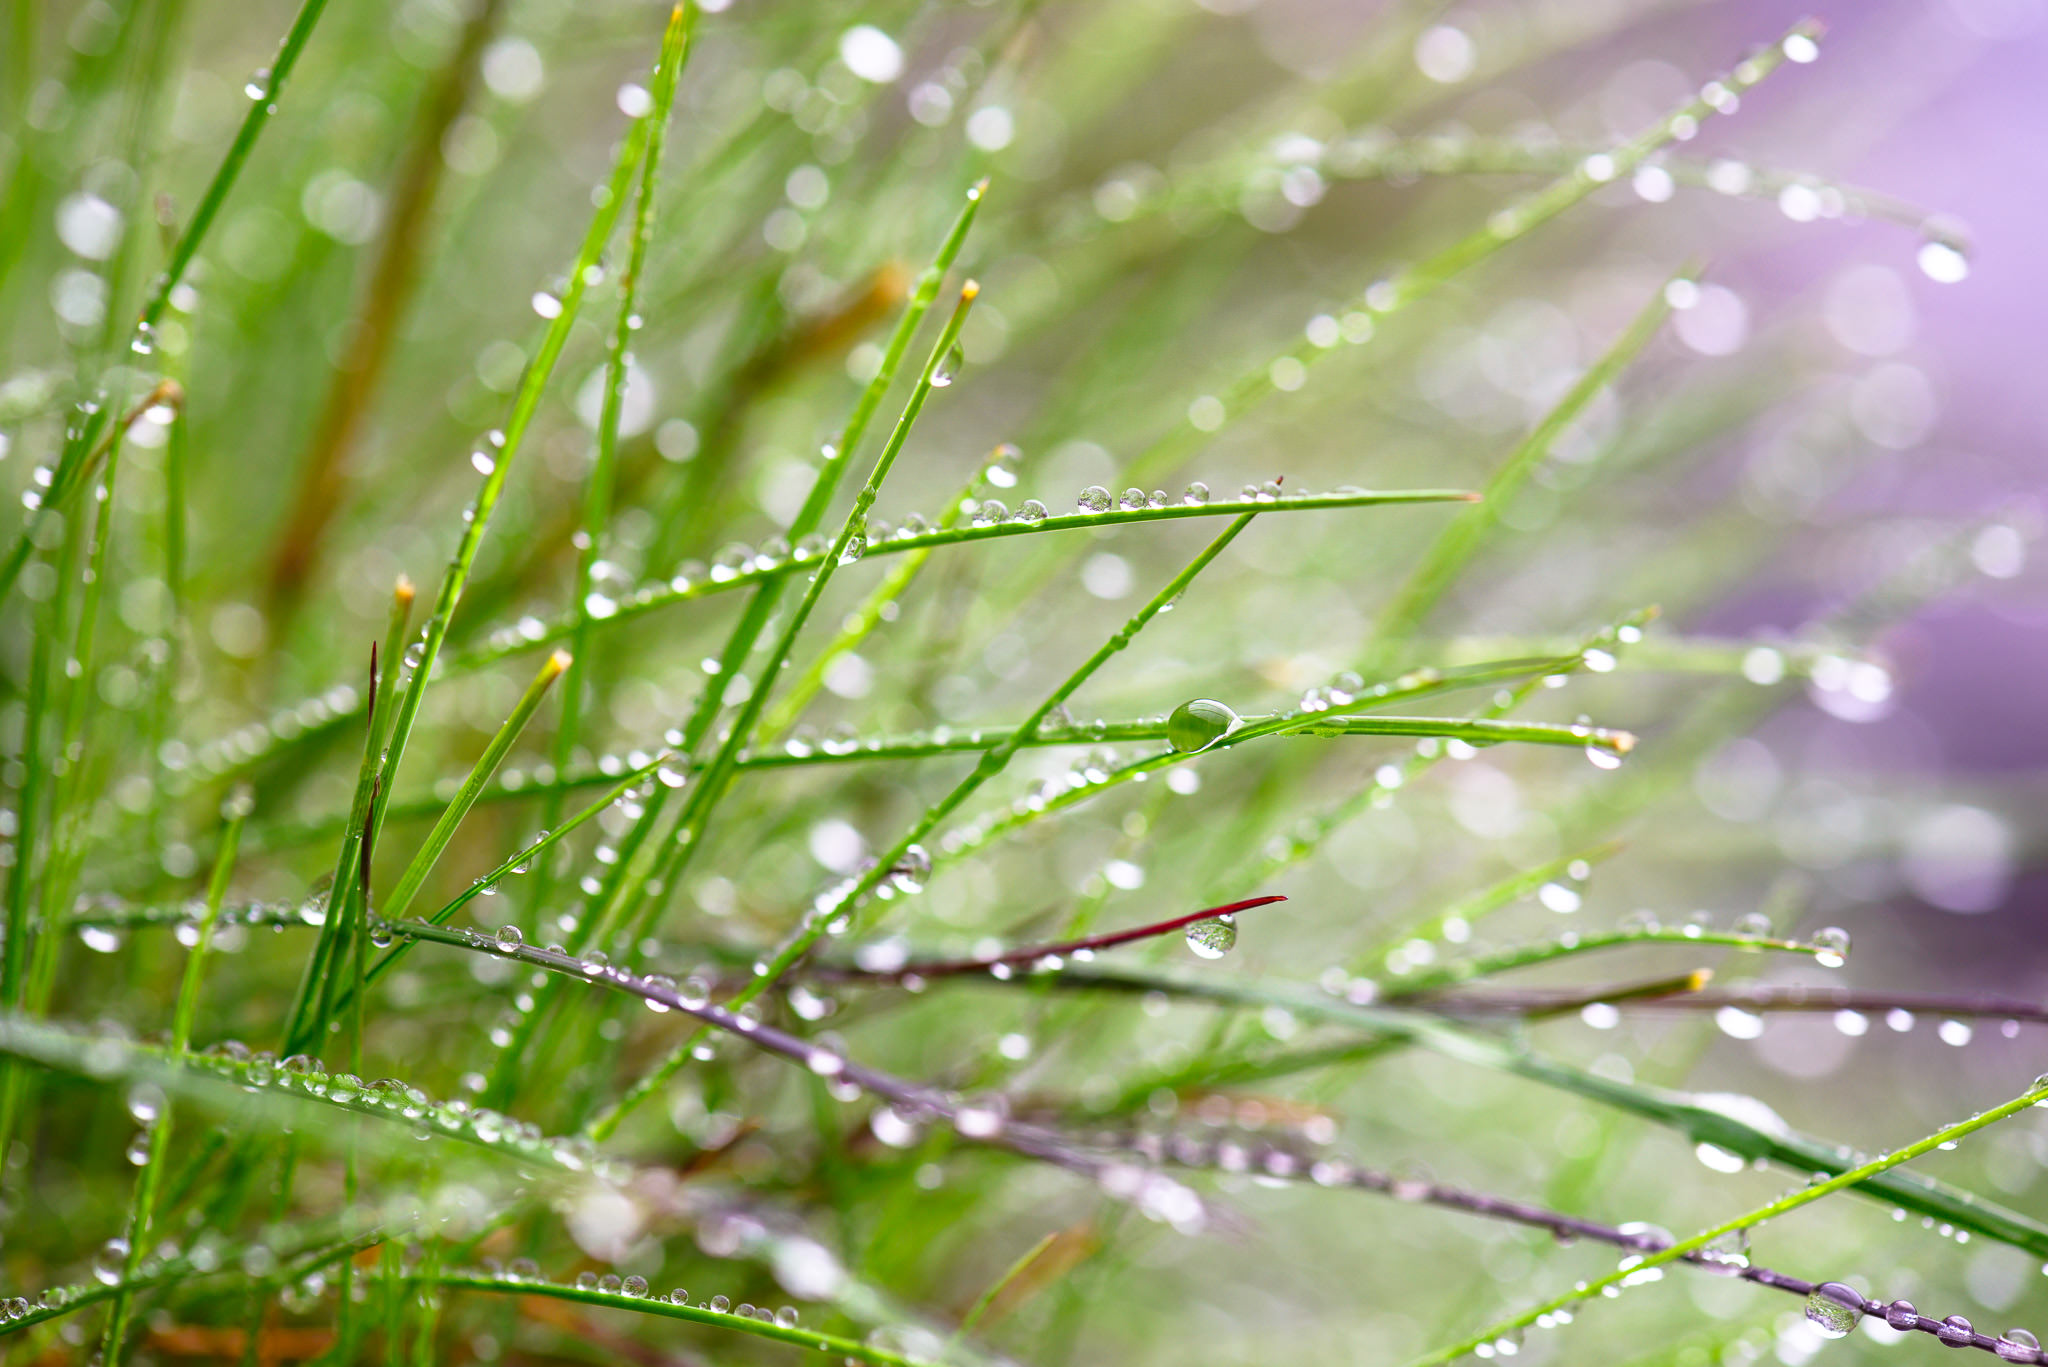
Another type of detail to keep in mind for gray days is the world of macro photography.
Overcast skies provide soft shadows, which makes it possible to see the true colors and tones of a close-up subject. Some macro photographers prefer to use a flash, of course, but clouds can lead to wonderful light as well.
The colors of macro scenes are naturally more saturated than distant scenes, since there is little atmospheric haze between your lens and your subject. Take advantage of this fact by searching for vivid objects to photograph — the macro world is full of color.
Often, following a rainstorm, you will be able to find drops of water to photograph as well. The geometric patterns of water droplets can be beautiful, and they are ideal subjects under overcast lighting.
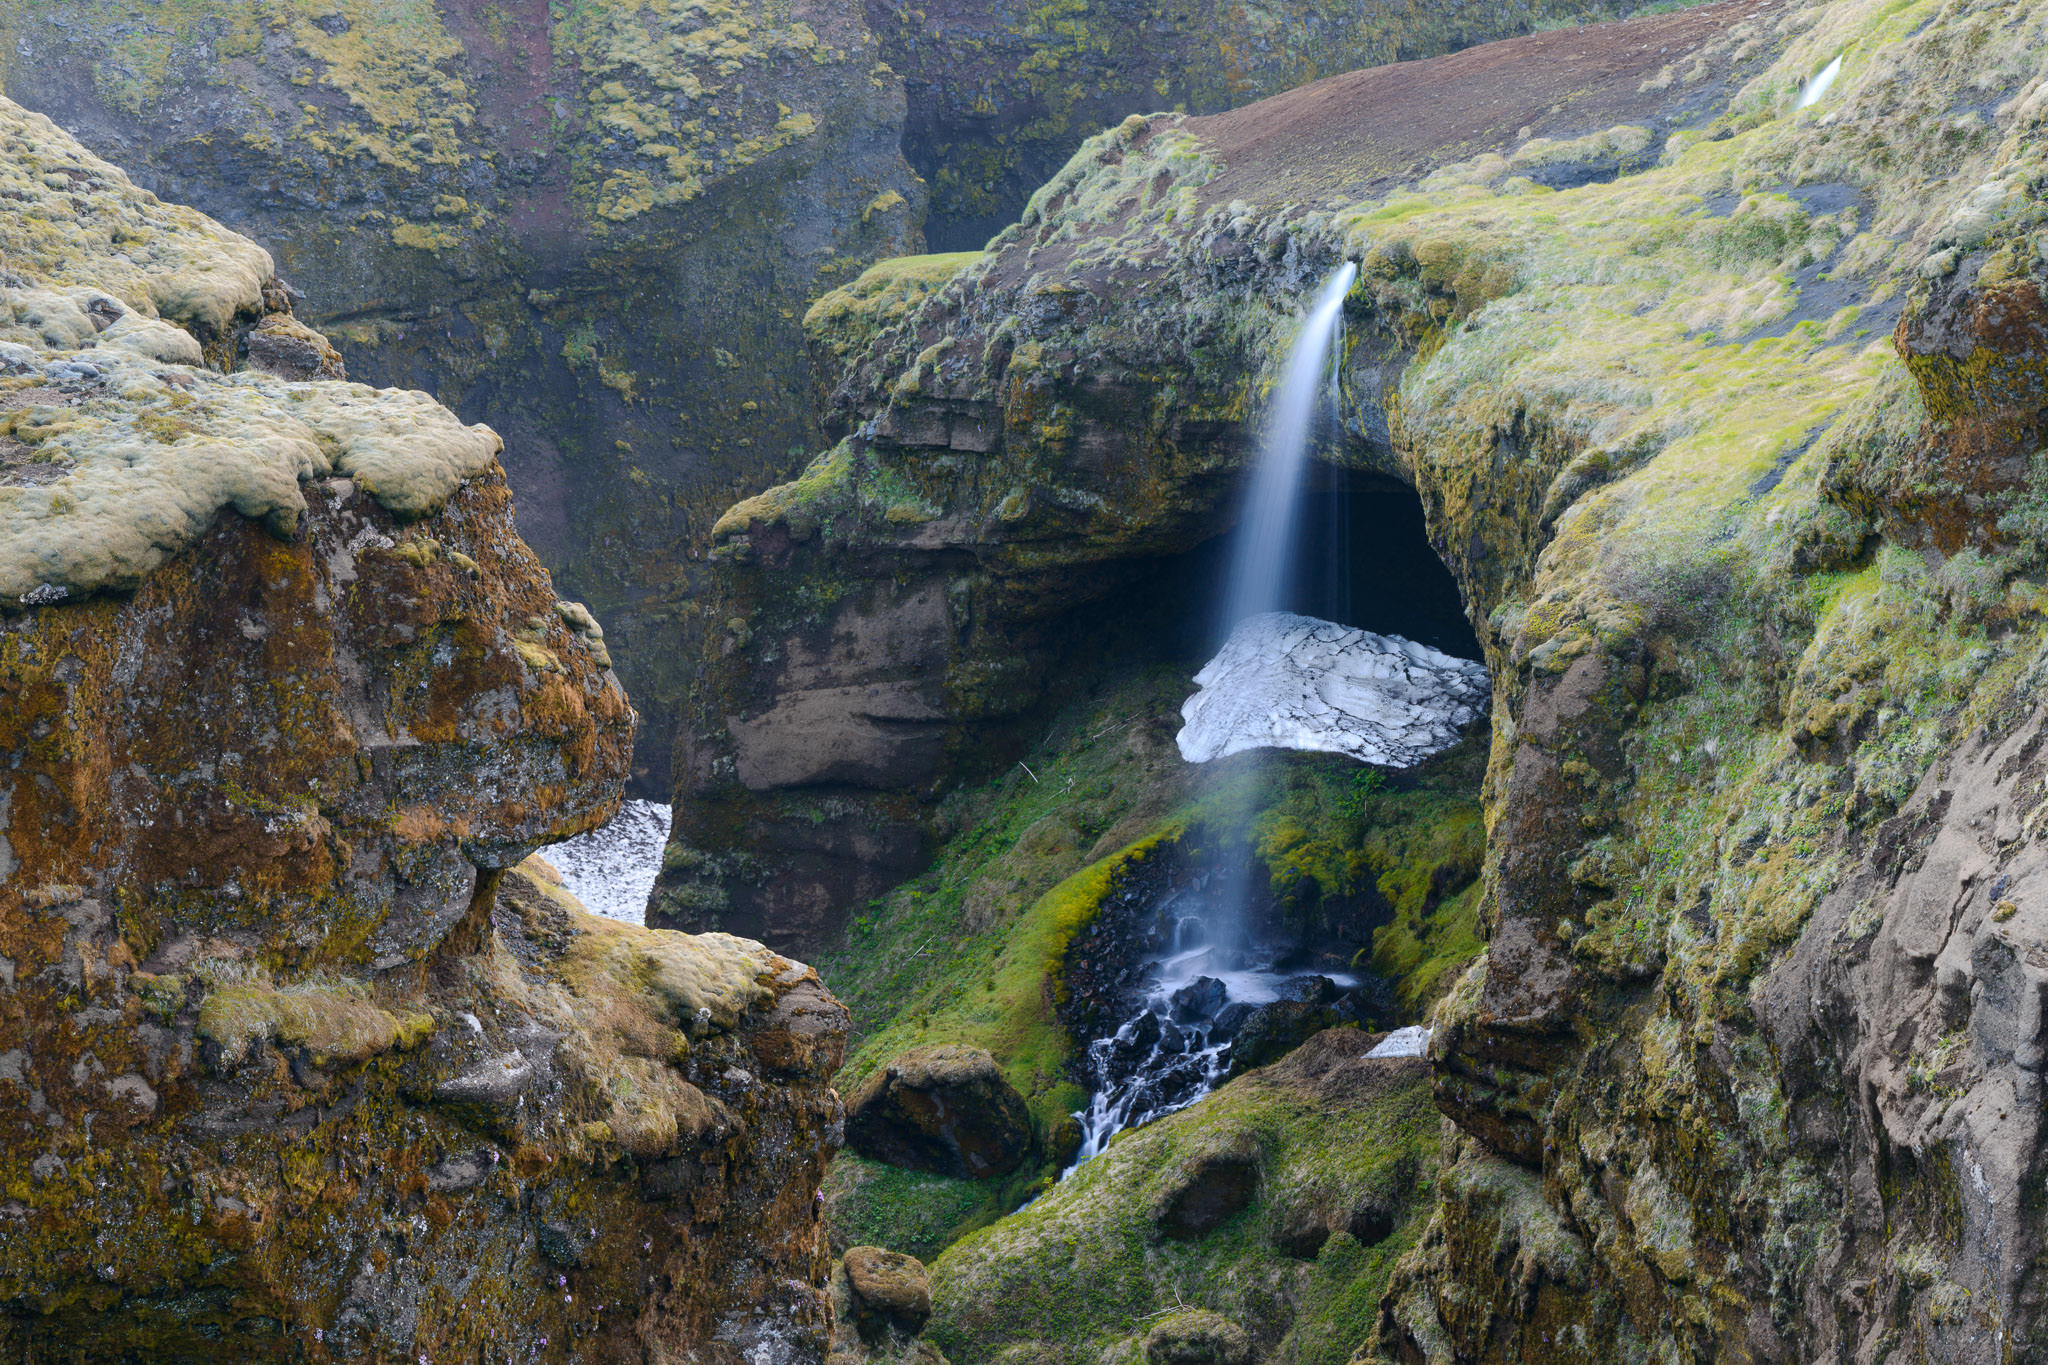
4) Long Exposures
With an overcast sky, a crucial issue is that your photos will lose a sense of uniqueness. This problem is easy to fix, though — use a neutral-density filter.
As explained in our landscape photography filter guide, a neutral density filter is a darkened plate of glass that allows you to use a long (multi-second) shutter speed, even during the day.
Of course, such a filter does not help in every scene; for many, in fact, it has almost no effect. But when you have anything moving — clouds, water, people — a long exposure can provide an out-of-the-ordinary image regardless of the light.
Long exposures also tend to emphasize colors that are hard to see with the naked eye. If you set your camera to take pre-dawn long exposures, even on an overcast day, you could be pleasantly surprised by the amount of color in your photos.

5) Convert to Black and White
When the color in a scene is drab, I usually remove it. I don’t mean to downplay the importance of black and white photography — I often find it more effective and poetic than color photography — but many of my best monochromatic images would look bland in color.
With a cloudy sky, high-contrast monochromatic photos can still convey a sense of drama and beauty that would be impossible with the dull colors from overcast lighting. In part, this is because black and white photography is inherently surreal.
People tend to like landscape photos that show the world in an unusual way — more beautiful than they encounter day-to-day. Sunsets, of course, fulfill this requirement by showcasing landscapes with rarely-seen colors. Monochromatic photography does not have the same vividness, but high-contrast black and white photos can stand out just as much as their saturated counterparts.
Perhaps this is why high-contrast black and white photography remains so popular in the fine-art world. Such photos are simple by nature, yet they can be just as eye-catching as color images.

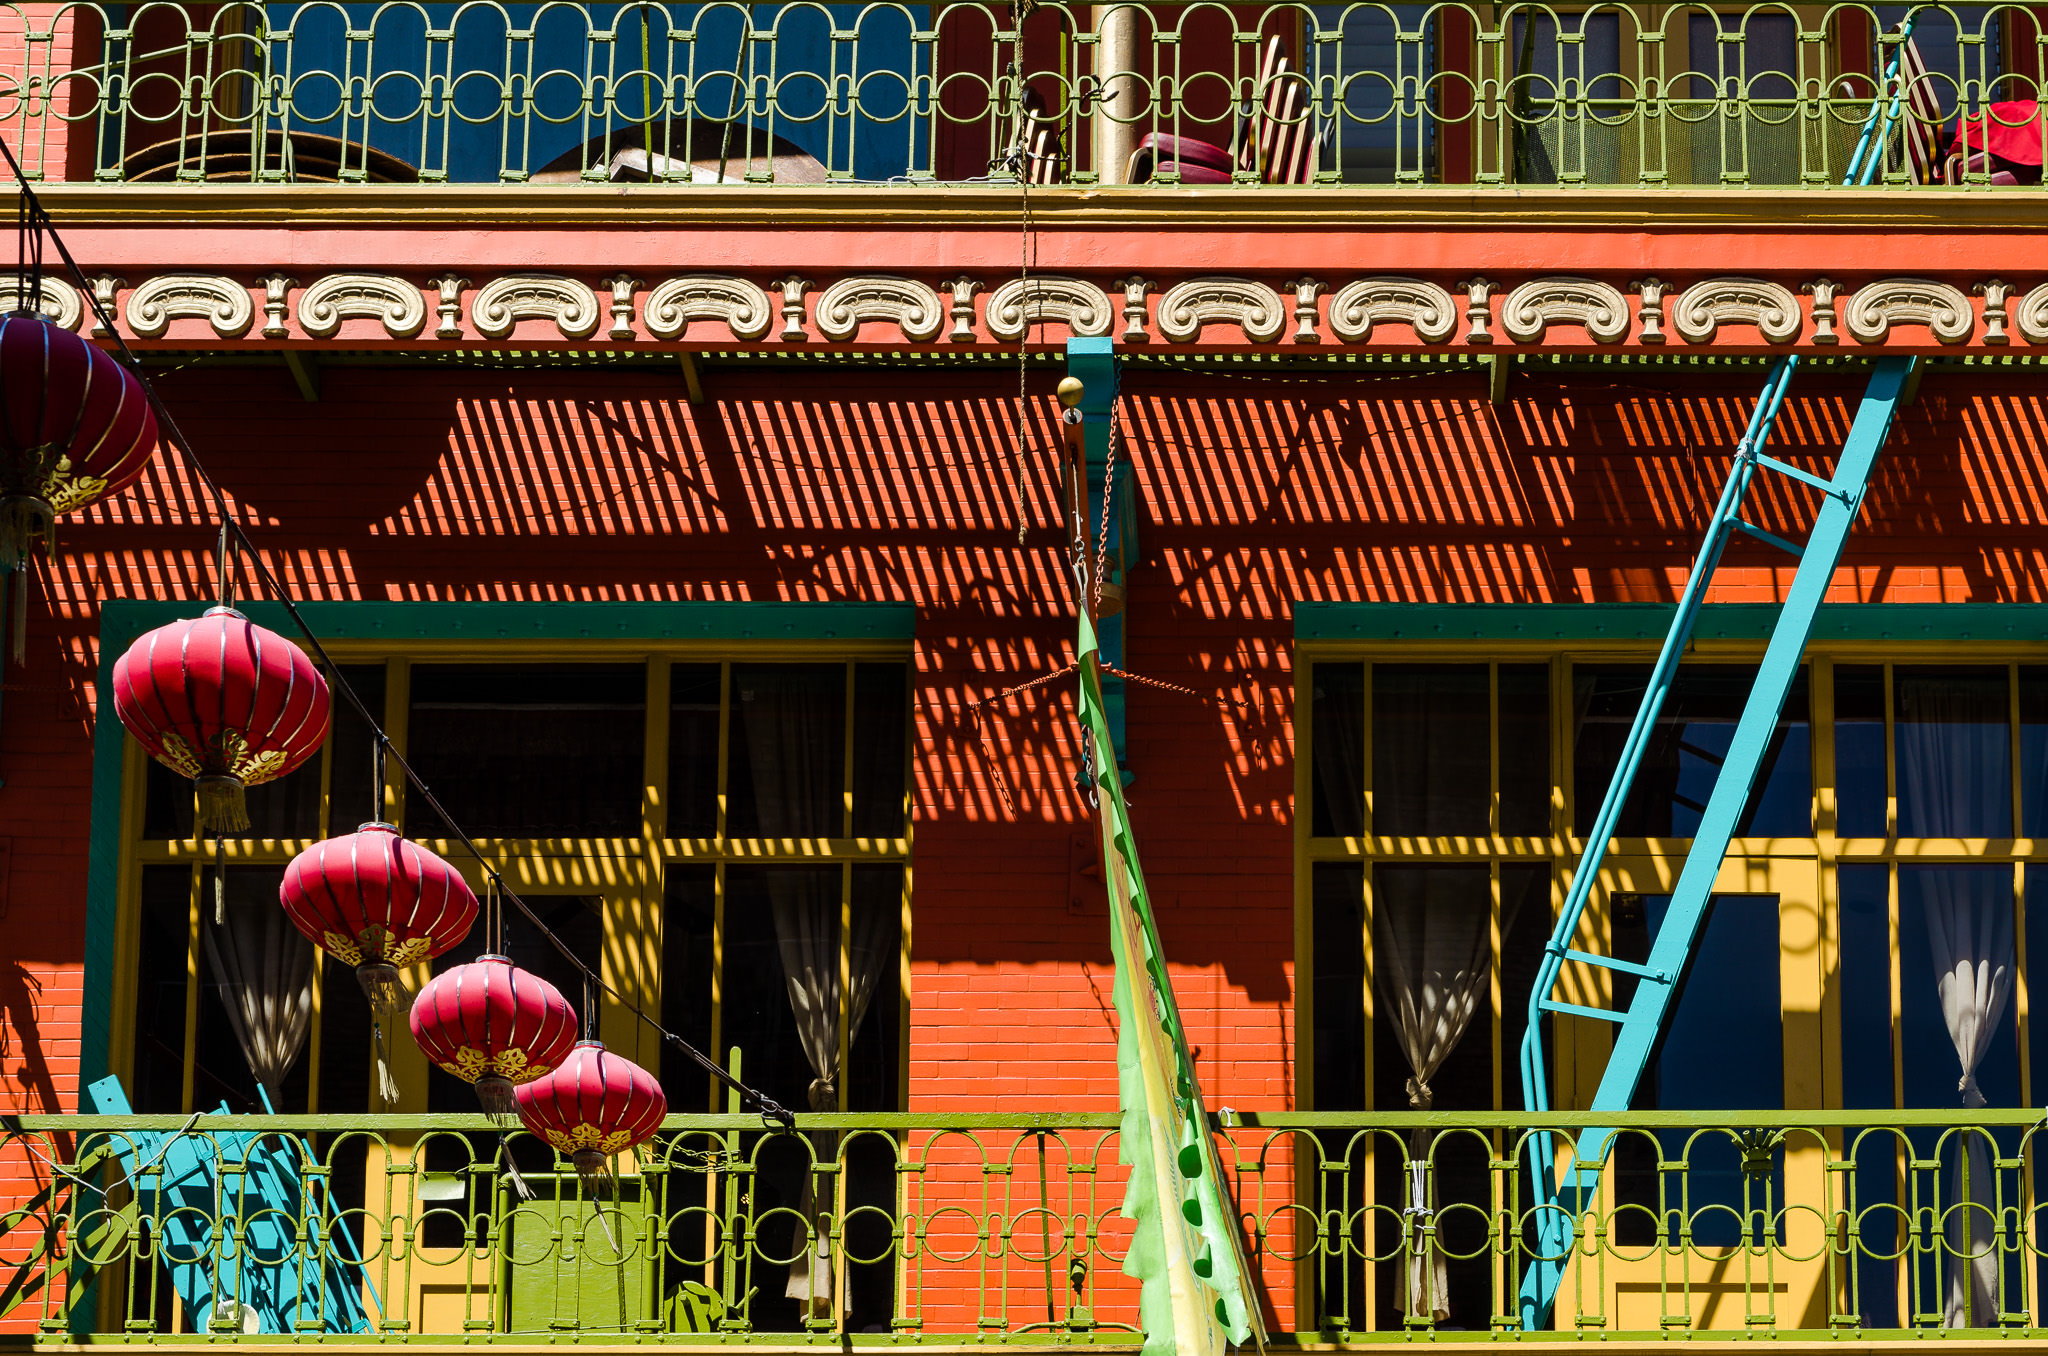
6) Mid-Day Light
So far, all of these techniques have been suggestions for photographing on overcast days. However, a landscape photographer also fears the complete opposite: the harsh sunlight of mid-day.
Such lighting is not as gloomy as an overcast sky, but it can be just as frustrating. On one hand, it becomes difficult to avoid harsh shadows and bright highlights, potentially rendering your photo as a contrasty mess. On the other hand, mid-day lighting is not particularly unique — few people will be awed by a landscape in its most typical state.
This isn’t to say that you should avoid photography when the sun is overhead, though. You just need to use the strengths of harsh sunlight to your advantage.
Personally, my first instinct with mid-day lighting is to look for shadows that can lead to an interesting composition. This technique may be tough for grand landscapes, but it works well for detail-oriented shots or cityscapes — shadows can give a scene personality.
Keep in mind that you want to retain highlight detail as much as possible, even at the expense of darkening your shadows. Feel free to dial in some negative exposure compensation — many famous street photos were taken at mid-day, with much of the image near-black.
7) Summary
At some point, all photographers will find themselves in amazing locations with sub-optimal light. Although everyone wants to photograph a scene with beautiful lighting, few people can wait for days or weeks to see a scene at its best.
Of course, a gray day can be a great time to edit old photos or scout new locations — indeed, many landscape photographers search for their next treasures when the light is dull. Many people, though, especially traveling photographers, do not have the time necessary to plan a shot so far in advance. However, although good lighting beats drab lighting by definition, photographers still can take wonderful images when the conditions are not ideal.
The takeaway is that you need to recognize the lighting conditions in a scene, then target your photos to take advantage of that light. In mid-day sun, look for strong shadows to fill your composition. In flat, gray lighting, search for saturated subjects to provide color to your images, or consider converting to black and white. No matter the lighting conditions, there are always good pictures to be made.
In a sense, there’s no such thing as bad light — but there is a such thing as incompatibility between your light and subject. When you take a photo, you should ask yourself about the emotions that you want to covey, and then confirm that the light in your scene is on the same page. I certainly hope that this article will help you make the most of whatever lighting conditions you encounter, but there’s no denying that this is an area where a huge number of photographers still struggle — including many who are very talented.
If you want to go into more detail on some of these topics and learn other techniques for dealing with bad light, you may enjoy the video I created on this topic:
I regularly take photos of horses jumping and on the flat ect but in the sand school it’s quite dark
Any tips ⭐️
Such an excellent and helpful tutorial.
Thank you, Taposy! I am glad you found the article helpful.
For the past 10 years I’ve been taking local landscape photos in New England in all kinds of weather. As the light and the weather vary so does the feeling of the scene no matter how many times it has been photographed. One method I’ve used that seems to handle most variations is HDR photography. Combine that with panorama and you get a view of a scene most people seem to appreciate. If you’re lucky, like I am, there are lots of good painters in town that I learn from about changing light.
Bottom line, as you imply, is that photography is all about light.
indeed a nice article, one of those that remind us to stop the technical discussions where they served a purpose, and go out and shoot, exercising imagination and talent and tricks instead of whining.
I’m really starting to dislike this kid Spencer for reminding me of things I used to cherish about photography ;)
Thanks, Spencer!
Spencer
Where’s the 14EV of the D800. I thought you would have done post processing and pushed the shadows +6EV to bring out all the shadow detail and make the photo flat and un-constrasty.
Anyone can point and shoot, post process and then complain on the internet about sensors.
Thank you for the great photos!! Thank you for showing and stating that shadow contrast is a good thing in photos. Thank you for showing it takes time, imagination and to look for a good photo in any light. Implying to use whatever camera and lenses you have to use!
Proper exposure can make a world of a difference compared to point and shoot tactics.
People seem to forget that photography isn’t DR, color bits, FPS or ISO, it is LIGHT. How you use the light to bring photos to life.
Using the light you had to work with, you made the photos come to life. Very good job.
I am looking forward to getting home and trying some of things in the article.
Thanks for the tips and inspiration Spencer. IMO a good photographer should be able to capture a good photo no matter what the lighting condition is. A bad light is a source of light too. The main reason why I visited this site is to learn something new, to be inspired and to read someone else’s thoughts and views. Thanks again.
Thank you, Remi! Indeed, I have learned over time that there is no “bad” light — only light that doesn’t work for the specific image I’m trying to take. And when that’s the case, I just need to focus on taking different photos.
~Spencer
Gotta chime in here, sorry, but I don’t particularly agree that a good photographer can get good pictures in any light. There is a reason that every really good outdoor photographer I know take the vast majority of their pictures during the golden hours. You can get good pictures anytime assuming you can manipulate the light. Sometimes you don’t have the gear on hand to do that. Lights, filters, and diffusers are your friends, but you might not be able to carry what you need to the place you want to go.
So much of getting great shots is perspiration, not inspiration. I get up earlier, pack in the night before, hike in the heat of the day etc to make sure I am there during the best light. It just makes things so much easier.
sceptical1, I fully support your two statements: “…sorry, but I don’t particularly agree that a good photographer can get good pictures in any light.”; and “So much of getting great shots is perspiration, not inspiration.”
A ‘good photographer’ is perhaps best defined as a person who:
1. Will wait for more suitable natural light;
2. Adapts their style(s) of photography to the available light when they are in a situation in which they cannot manipulate the light;
3. Suitably manipulates the light whenever possible;
4. Understands when to pack up and go home rather than flogging a dead horse.
sceptical1
Your first paragraph is mostly right, it is your first sentence that is wrong. Your second paragraph is only right if you have scouted before hand. Which isn’t always practical or a good idea not take your camera while scouting.
I have my sons Blue Heeler from 8am to 4pm. Not the golden hours. According to your second paragraph I should just leave my camera at home when I take the dog for a hike into the mountains, to scout for the golden light?
According to Spencer’s article I should take the dog for a hike into the mountains, with my camera and look for those photos in the not perfect light!!!!!
Thank you for the good article Spencer. Great ideas to try.
Hi Spencer
What are the difference in choosing an ND filter vs a Polarizer, can we substitute one for the other ?
Luc,
Usually, you cannot substitute one for the other.
A polarizer is a filter that removes glare from certain surfaces, such as leaves or wet rocks. It also makes your photos look more saturated, and it causes the sky to darken. As you may imagine from these benefits, landscape photographers rely heavily on polarizing filters.
An ND filter is simply a darkened piece of glass. As a landscape photographer, your main use for an ND filter is to force you to use a longer shutter speed (to compensate for the darkness of the filter). You would want a long shutter speed in some scenes because it eliminates detail in moving subjects. For example, if you are photographing a river, you can turn the water extremely smooth by using an ND filter. Likewise, if you are photographing the ocean, breaking waves will begin to look misty rather than sharply-defined.
The only similarity between a polarizer and an ND filter is that a polarizer is also darkened — but not nearly as much. Whereas most polarizers let in about 1/4 the light that hits the lens, some ND filters let in just 1/1000 of the light that hits the lens. So, if you want a longer shutter speed, you should use an ND filter rather than a polarizer.
~Spencer
HI Spencer
That was also my impression, but a well known phoptographer was making this claim that if you don’t have an ND filter use your polarizer (without saying anything about the difference between them)………….
Thanks for your answer
If you absolutely need an ND filter but you only have a polarizer, the polarizer may be your best option — it still does cut down the light to about 1/4 the original level. Still, it’s no substitute for a powerful ND filter.
Happy I could help!
Once again, Spencer has very kindly shared his expertise with the readers of Photography Life.
His images are all wonderful, but I was particularly struck by “Shadows.jpg” because Spencer resisted falling into the trap that so many digital photographers fall into: using an image editor to reveal lots of detail in the deep shadow areas.
Just because state-of-the-art cameras can record 14-15 EV of detail doesn’t mean that the whole range *should* be used. High-quality transparency film (that records only 4-6 EV of detail) was, and still is, fully capable of rendering stunning images captured during midday sunlight, when exposed correctly.
I often wonder if the modern fad of revealing as much shadow detail as possible has been fuelled by the fact that so many LCDs have appalling colour rendition and contrast ratio (a black level that renders as not even very dark grey!)
A main part of my experience in photography was gained over the decades by learning how to master transparency films and the Cibachrome printing of them. I’ve never had a photo shoot ruined because the film/sensor didn’t have enough dynamic range for the job :-)
Very interesting take on the article, Pete! Thank you for sharing.
Modern cameras certainly allow for drastic, HDR-ish edits to most photos — as you said, this was not really possible with film. I’ve always tried to edit my images to look believable, and dynamic range can be a double-edged sword to that effect. Despite the temptation to recover shadows “too far,” some of my photos would have been impossible without a wide dynamic range.
I would imagine that shooting transparency film is a great way to learn the technical side of photography : )
~Spencer
Spencer, in my opinion, your images do indeed look totally believable and natural, rather than processed.
Your horse image has reminded me that the second-hand lenses I bought for my first SLR camera didn’t have enough contrast for capturing that scene. I doubt that any of the colour negative films around at the time could’ve captured it even with a superb lens. (More recent colour, and especially monochrome, negative films are capable of capturing it.)
Shooting transparency film was a great way to learn the technical side of photography. However, the delay involved in seeing the results made the whole learning process frustratingly slow and laborious. I wouldn’t recommend this way of learning, unless the person is also in desperate need of learning extreme patience!
Digital photography isn’t really any easier or less painful than mastering film photography: the digital photographer has to purchase an image editor then painstakingly learn its plethora of highly complex technical controls. This learning process never ends because the vendors of image editing software keep changing not just its functionality, but also its image rendering (especially of camera RAW files).
Thanks for the photo tips! A polarizer is a valuable tool for capturing those bright sun, ultra-contrast, mid-day images. When the sun is directly overhead, all horizons are at a 90 degree angle from the sun. Hence, you get a strong polarization effect no matter which horizon you point the camera to. Some of my favorite Southwestern photos were taken in this way. After all, a bright, harsh, hot mid-day sun is a chief quality of that environment. The incredible dynamic range of recent Nikon DSLRs such as your D800e also helps tame such extreme contrast. There is little or no lens flare because it is easy to shade the lens.
That’s a great point — several of my favorite photos from the Southwest were taken in “bad” light. A polarizer is a wonderful tool for bad light, whether it darkens skies or removes haze.
Thank you for sharing your comments.
~Spencer
This is certainly a very useful article for me who most of the time work in low light conditions. The basic reason for that is that I focus on wildlife (most of them 4-legged) I have to accept that the animals “choose” the time of day and seldom let me wait for better light.
But with time I’ve found that I take more end more photos on other objects than animals ( e.g.landscape ) and for that reason this article come in very handy.
My primary lens for wildlife photo is the Canon 200-400mm/4 with built in 1,4x extender and this could be much more usable for other objects than wildlife. The only problem is the lack of most types of filters.
In the future I will most certainly come home with other objects than I was out for! Other animals than expected too.
A couple of years back I spent two days and nights in an old camper in the hope to see brown bear. No bear showed up but soon after my arrival a small mouse sowed itself inside the camper. As time went by we became really good friends resulting in some good photos and video with a 85mm/1.4.
Thank’s a lot for a very informative article with as usual nice photos!
Thank you, Rolf! I am glad you enjoyed the article.
Good point about the animals — even if you’re out in good light, they may not be!
~Spencer