It seems only a short while ago when I was undecided on the RAW processing software that would replace Lightroom. I shortlisted several potential alternatives – Capture One Pro, RawTherapee, DxO Optics, and Darktable among others – but was able to try out only Capture One Pro properly. A demo version 10 of Capture One gave me 30 days to test it, after which I was able to continue evaluation by signing up for a beta copy of version 11. After using Capture One for several weeks, I made a decision to stick with it despite its hefty price tag. Now seems to be the right time to publish this, with the last standalone version of Lightroom 6.14, having just been released. Needless to say, my attempts at using other software I listed earlier were quite lukewarm. So to the reader who is here expecting a comparison between different alternatives to Lightroom, this post is unfortunately not it. Instead, this post documents my migration from Lightroom to Capture One.
Table of Contents
Why Capture One Pro?
Several aspects of Capture One swung my decision its way.
The first impression Capture One made upon launching it was great. Its UI looks great and feels crisp & polished. Unlike Lightroom, Capture One doesn’t have fixed modules – instead it has so-called Tool-tabs, which are freely definable. Different tools, like exposure adjustment, color editor, histogram etc. can be freely placed within these tool-tabs. This gives Capture One a level of customizability that just isn’t possible in Lightroom. I should note however that although some tools in Capture One behave differently than their counterparts in Lightroom, they were intuitive enough for me to pick up rather easily – a prime example of this being the Levels tool.
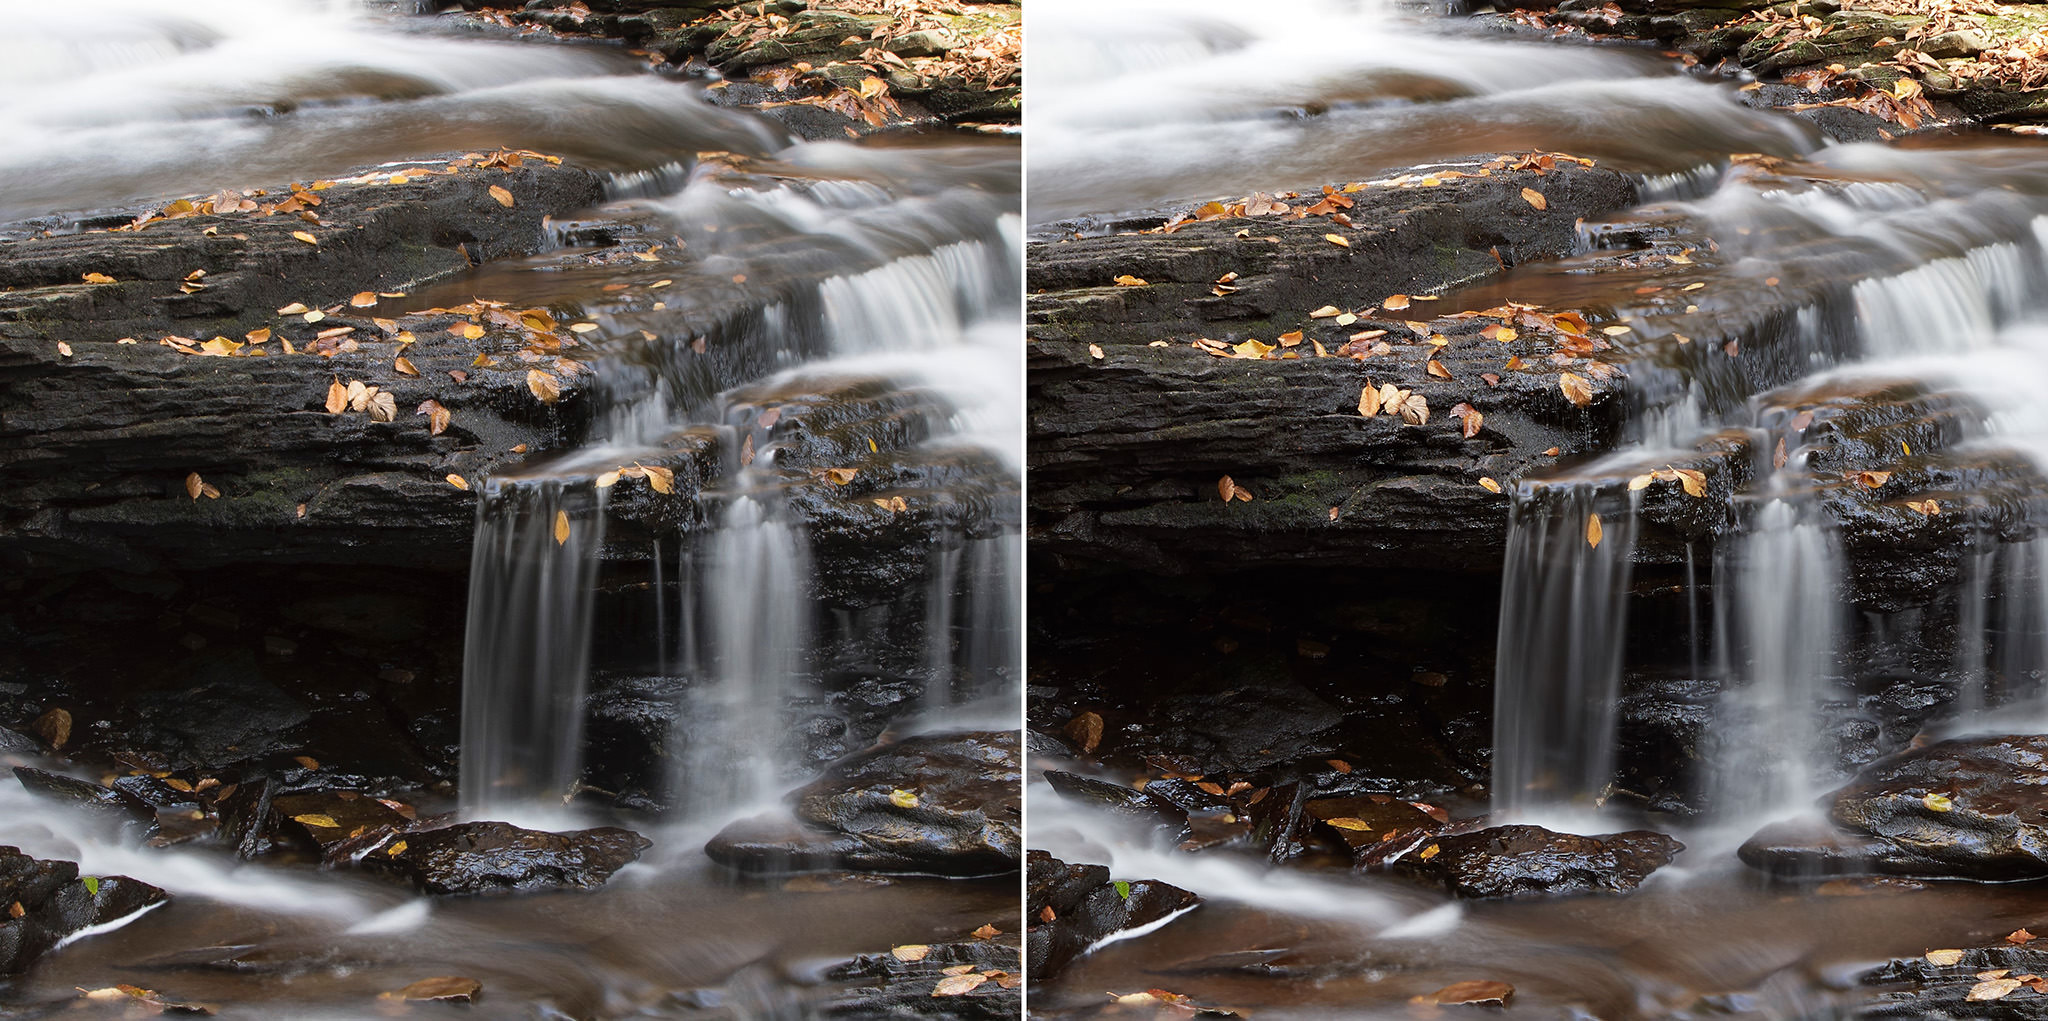
I also found the initial rendition of photographs in Capture One to be better than Lightroom. Despite having read about this in several articles, I was pleasantly surprised and impressed. This, in general, meant I spend a little less time making adjustments in Capture One than in Lightroom. In the comparison below, on the left is a crop of the default preview from Lightroom and on the right is that from Capture One. Capture One is clearer and sharper which makes the overall photograph look more pleasant, which in turn means I spend less time editing it.
Besides my trusty DSLR, I own a mirrorless Fujifilm X100S. Lightroom has a known problem with Fujifilm RAWs – the way it processes them makes heavily textured photographs look like they’ve been painted on. Worse still, when sharpening Fujifilm RAWs, Lightroom introduces wormy artifacts rendering them unusable. Capture One absolutely blew Lightroom out of the water in the way it handled these RAWs. Take a look at the comparison below, the crop on the left is from Lightroom and on the right from Capture One.
Lastly, in my experience, Capture One is faster than Lightroom 6. In general use, the initial import is faster (and doesn’t consume as much memory as Lightroom), jumping from one photograph to the next is quick and switching between tool-tabs is snappier than switching between the Library and Develop modules (the two I spend most time switching between) in Lightroom. Responsiveness when making adjustments is better in Capture One than in Lightroom – this is especially apparent when working with layers and drawing masks. The one step, admittedly critical, where Capture One is slower than Lightroom is the export of edited photographs. In a quick test I conducted, Lightroom took 293s to export 139 RAWs (Nikon, so .NEF files) to JPEGs while Capture One took 561s, almost double the time! But since I’m usually not sitting in front of the computer while exporting, I can live with it.
Having been thus enamored by Capture One, I started the migration of old projects from Lightroom. But this is not yet complete – my catalog in Lightroom is far too big to bring over to Capture One in so short a time. So I now use Capture One exclusively for new projects. When I have to refer back to some old photographs or when I get the time, I bring over projects one at a time from Lightroom.
Sessions or Catalogs?
This was the first decision I had to make. Capture One has two ways to store and work with photographs – Sessions and Catalogs. A Session is a self-contained mini-library with its own folder structure to store captured, selected, exported, and rejected photographs. Each Session has its own database which tracks changes, edits, etc. to the photographs in it. A Catalog in Capture One is conceptually the same as its namesake in Lightroom – a single master database that tracks multiple projects and albums.
The self-contained aspect of Sessions initially appealed to me. I could copy sessions across disks without having to worry about Capture One not reading them correctly or back them up offsite and not have to worry about reimporting them into Capture One for rework later etc. In fact, several resources I looked up recommended using Sessions instead of Catalogs.
However, after a few days of testing, mostly by importing a few albums into a Catalog and into multiple Sessions, I knew that Sessions wouldn’t work for me – a Catalog it would have to be.
Capture One seems to be used more by professionals rather than enthusiasts (like myself). Professionals typically do a shoot for a client, select potential keepers, process them and generate final output photographs to hand over. They rarely revisit their photographs. They almost never have ‘smart albums’ pulling photographs dynamically from different shoots based on keywords or other metadata. Capture One’s Sessions work wonderfully well for this use case – they are self-contained, well organized, and easily ported.
I don’t work that way – I don’t have shoots, I photograph places or for occasions. That is how I manage them too – by where the photographs were taken or by the occasion they were shot in. I use keywords, color tags, and sometimes even camera metadata to create Lightroom Smart Albums. A single unified library, such as Lightroom’s catalog, lends itself well to this way of photography and management. A freebie in terms of folder management afforded by Lightroom is in the way it organizes photographs. I typically create a folder for an event/place/occasion and within this folder Lightroom creates sub-folders by the year and date. So when I want to look at all my, say, Memorial Day vacation photographs, I just click on that folder and all my photographs, across years, show up. The way Capture One’s Sessions work breaks this – since there is no central database holding all my photographs, I’d need to jump across sessions when I’m looking for that one photograph I’m after. Sessions also render keywords pretty much useless.
Catalogs
Having decided on Catalogs, I now had to build one. The easiest option was to point Capture One to the parent folder that houses all my photographs and import them in one go. This I tried. However, a seemingly insignificant difference in the way Capture One displays folder contents than Lightroom forced me to change plans.
My Lightroom catalog is on my local SSD but all of my photographs are stored on an external drive. The folder hierarchy for these photographs on the external drive is Event -> Year -> Date. For example, my Memorial Day vacation pics from earlier this year are in Memorial Day -> 2017 -> 2017-05-29.
To avoid duplicating photographs on the external disk, when I first imported a few folders of photographs into Capture One I chose Destination as ‘Current Location’. However, unlike Lightroom, when Capture One looks at a folder it doesn’t read all the way down the folder hierarchy to display photographs from nested folders. For example, within the Memorial Day folder, I have 2017 -> 2017-05-29 and 2016 -> 2016-05-30 as two branches of nested sub-folders. Clicking on Memorial Day in Lightroom shows me all my vacation photographs from 2016 and 2017. However, the same action in Capture One doesn’t display anything since these folders themselves do not have any photographs. To see them, I’d have to expand Memorial Day and control-click on 2017-05-29 and 2016-05-30 and select them both. This isn’t workable for me.
This told me two things:
- I’d have to flatten out the folder hierarchy in my library. Because of this, I couldn’t continue to store my photographs in the Lightroom-created folder hierarchy and simply reference them in Capture One.
- I’d have to migrate one folder into Capture One at a time as I couldn’t find an easy way to automate this process for all folders at once. My approach now is to name folders as Date – Place/Occasion. So the Memorial Day vacation photographs are now stored as two separate high-level folders 2016-05-30 – Memorial Day and 2017-05-29 – Memorial Day. This is a painful manual step, and a regression from Lightroom where it was basically a given.
On the performance front, I should note that Capture One version 10 seemed quite slow at opening catalogs. As a test, I imported several folders, containing about 35000 photographs in all, into Capture One. After generating the catalog database and image previews, I quit Capture One and relaunched it. It took Capture One about a minute to launch completely; a similarly sized catalog in Lightroom opens much faster, in about 10s. This was my experience with Capture One version 10. I did not try this with version 11, and anecdotally I’ve had no such performance issues opening my new, in process, a catalog that contains about 12000 photographs as of this writing. On the positive side, however, the catalog was much smaller – 7.5GB as compared to 30GB in Lightroom. This is great news for me since I always store the catalog locally. My hunch is there are a lot of cruft and cobwebs built in my Lightroom library over the years and that a new similarly sized library would have a much smaller catalog.
Capture One Setup
My workflow to process images is pretty much standard – Import, Cull, Select, Edit, Export. I set up dedicated tool-tabs in Capture One, with the right tools to help me run through this workflow as quickly and efficiently as possible. That Capture One allows the same tool to be put into multiple tool-tabs is a feature I leverage.
- During import, I copy all photographs from the camera or from a Lightroom folder into a new target folder on an external drive. The first tool-tab has the Folders and Keywords tools. Neither helps me directly with the import, but helps me navigate through my library before moving on to other tasks.
- Culling photographs is the next step. The main idea here is to get rid of out-of-focus photographs, hopelessly exposed photographs, and poorly framed photographs. Another use case for culling, one that has become increasingly critical in the year past, is to choose the one in-focus shot out of 10, 15 burst shots. The first tool-tab, helpfully named Cull, has the tools Histogram, Focus, Exposure and Keywords. Histogram allows for a quick exposure check. The Focus tool works like the loupe in erstwhile Aperture, giving a magnified view of a section of the photograph which helps in checking critical focus. The Exposure tool comes in very handy while culling, since I can quickly increase the exposure by a stop or two to check focus in dark and moody photographs. The Keywords tool is here so I can start adding keywords to related photographs en masse. Rejected photographs are sent to the catalog trash with a tap of the ‘X’ key. This works just like rejecting photographs in Lightroom, so I don’t have to relearn an often used shortcut.
- Next, I select the photographs to process further – a quick scan of the remaining photographs is all it takes. Selected ones are tagged Green (mapped to ‘7’). Usually, when I’m doing this, I have the Library tool-tab open. It shows me an overview of the folders in my library, so I can switch between them. I also have the Filters tool here, which I use after selecting photographs, to narrow down to only the ‘Green’ tagged photographs. The Keywords tool is duplicated here.
- I Edit photographs in three broad stages – Cropping & Exposure, Color Adjustment, and finally Sharpening/Clarity/Noise Reduction. Each stage gets its own dedicated tool-tab. Exposure has the Histogram, Exposure, Levels, HDR, Curve, and Layers tools. Color has the Histogram, White Balance, Base Characteristics (I’ve not needed to play around with this yet, maybe I’ll remove it and reduce clutter), Black & White, and the Color Editor tools. Finally, the Adjustments tool-tab houses the Sharpening, Clarity, Noise Reduction, and Vignetting tools. Often I’ll interchange the sequence of edits, depending upon the photograph and what I consider to be the best starting point. Once I’m satisfied with my edits, I change the color tag to Blue (mapped to ‘8’ on the keyboard). Instead, if the edited photograph doesn’t quite make the cut, I remove the color tag entirely (mapped to ‘9’).
- Capture One’s exporting options are more powerful than Lightroom’s – I can kick off multiple export batches for a set of photographs, each with it’s own group of settings, at the same time. This comes in very handy when I’m exporting an album for backing up (full resolution, highest quality), and for web uploads (smaller file size, with watermark). I use the default Output tool-tab for this.
Besides these, I use two other tool-tabs on an ad hoc basis – Lens and Metadata. Both are untouched and are mostly used for informative purposes only.
Cropping and horizon leveling are such common actions that Capture One keeps them accessible at all times, outside of tool-tabs.
Adapting to Capture One
All things considered, my transition to Capture One has been quite smooth. The decision to migrate over time seems to be working…so far. However, given the differences inherent between Capture One and Lightroom, I knew there would be some give and take in terms of usability, flexibility, and features.
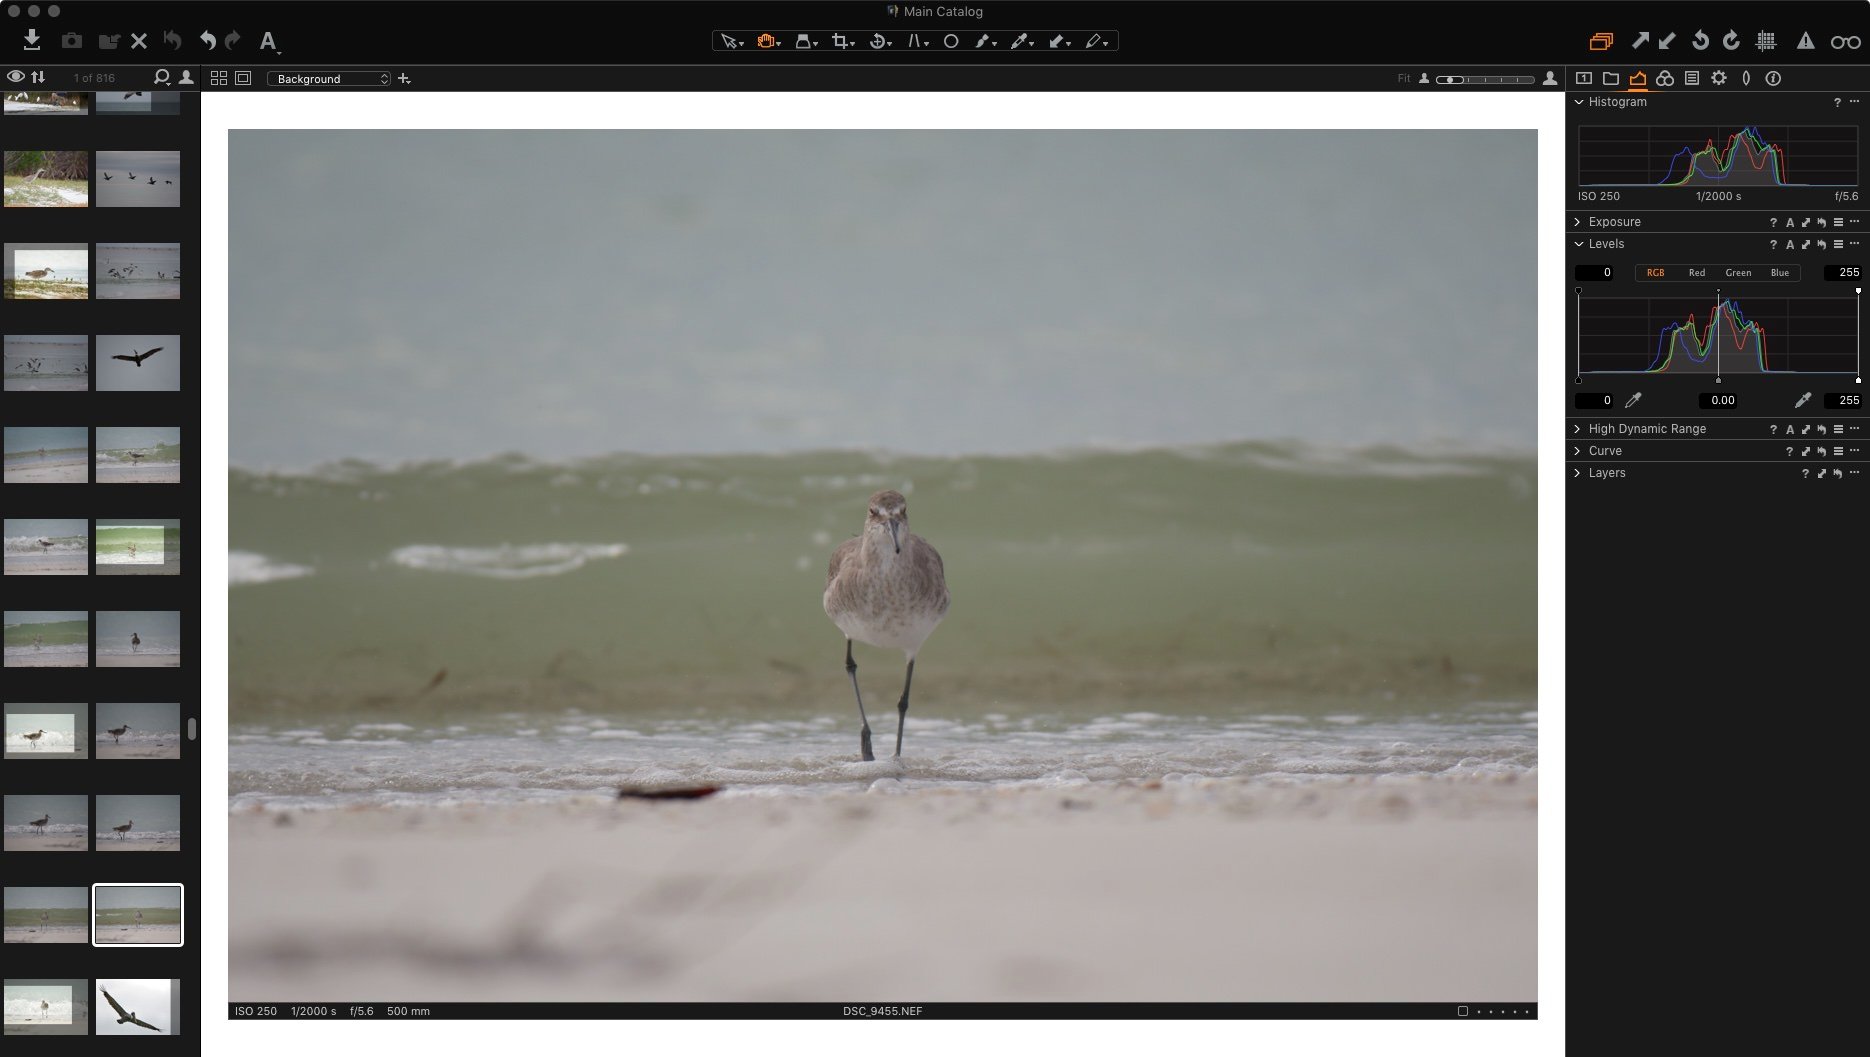
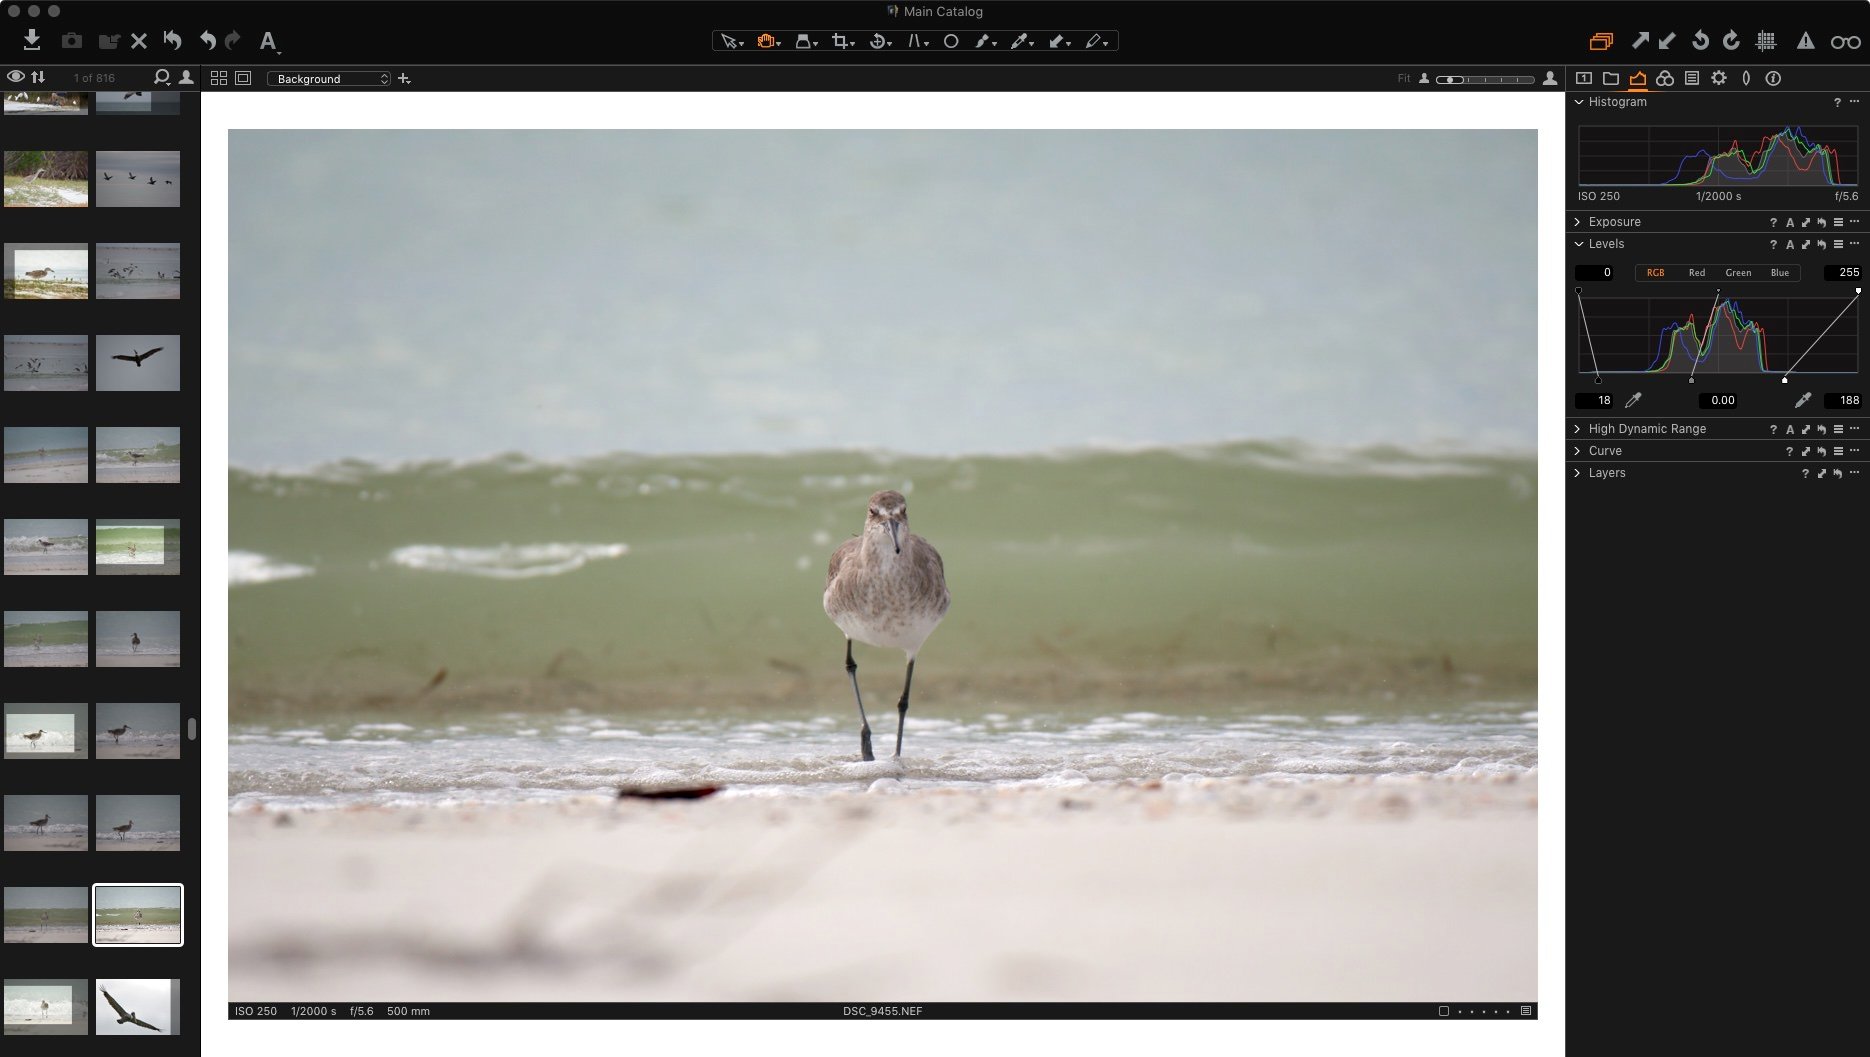
The Levels tool in Capture One is a definite positive. This is among my favorite and most often tools in Capture One, one that doesn’t have a direct equivalent in Lightroom. Levels allows you set cut-offs for Black(0) and White(255) levels in a photograph. Changing them allows me to stretch the histogram, in a way adding dynamic range to the photograph. The example below shows how adjusting the black and white levels to 17 and 188 respectively changes the look of the photograph. Note how the histogram, in the top right, spreads out. The Levels tool has been especially useful to me because a lot of photographs I’ve been taking in recent times don’t have a great dynamic range, to begin with.
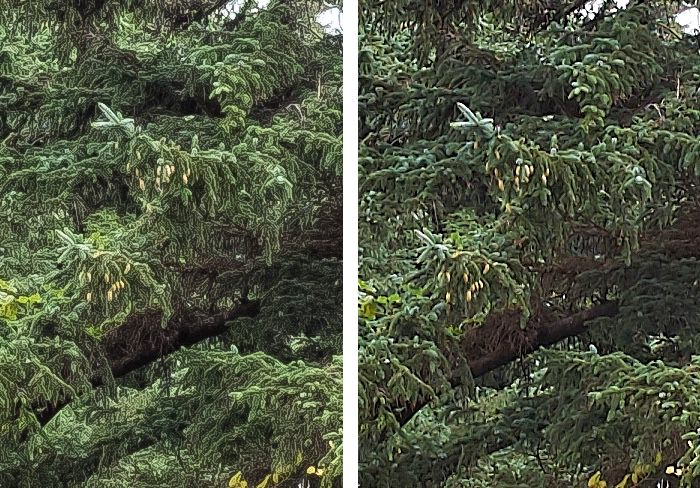
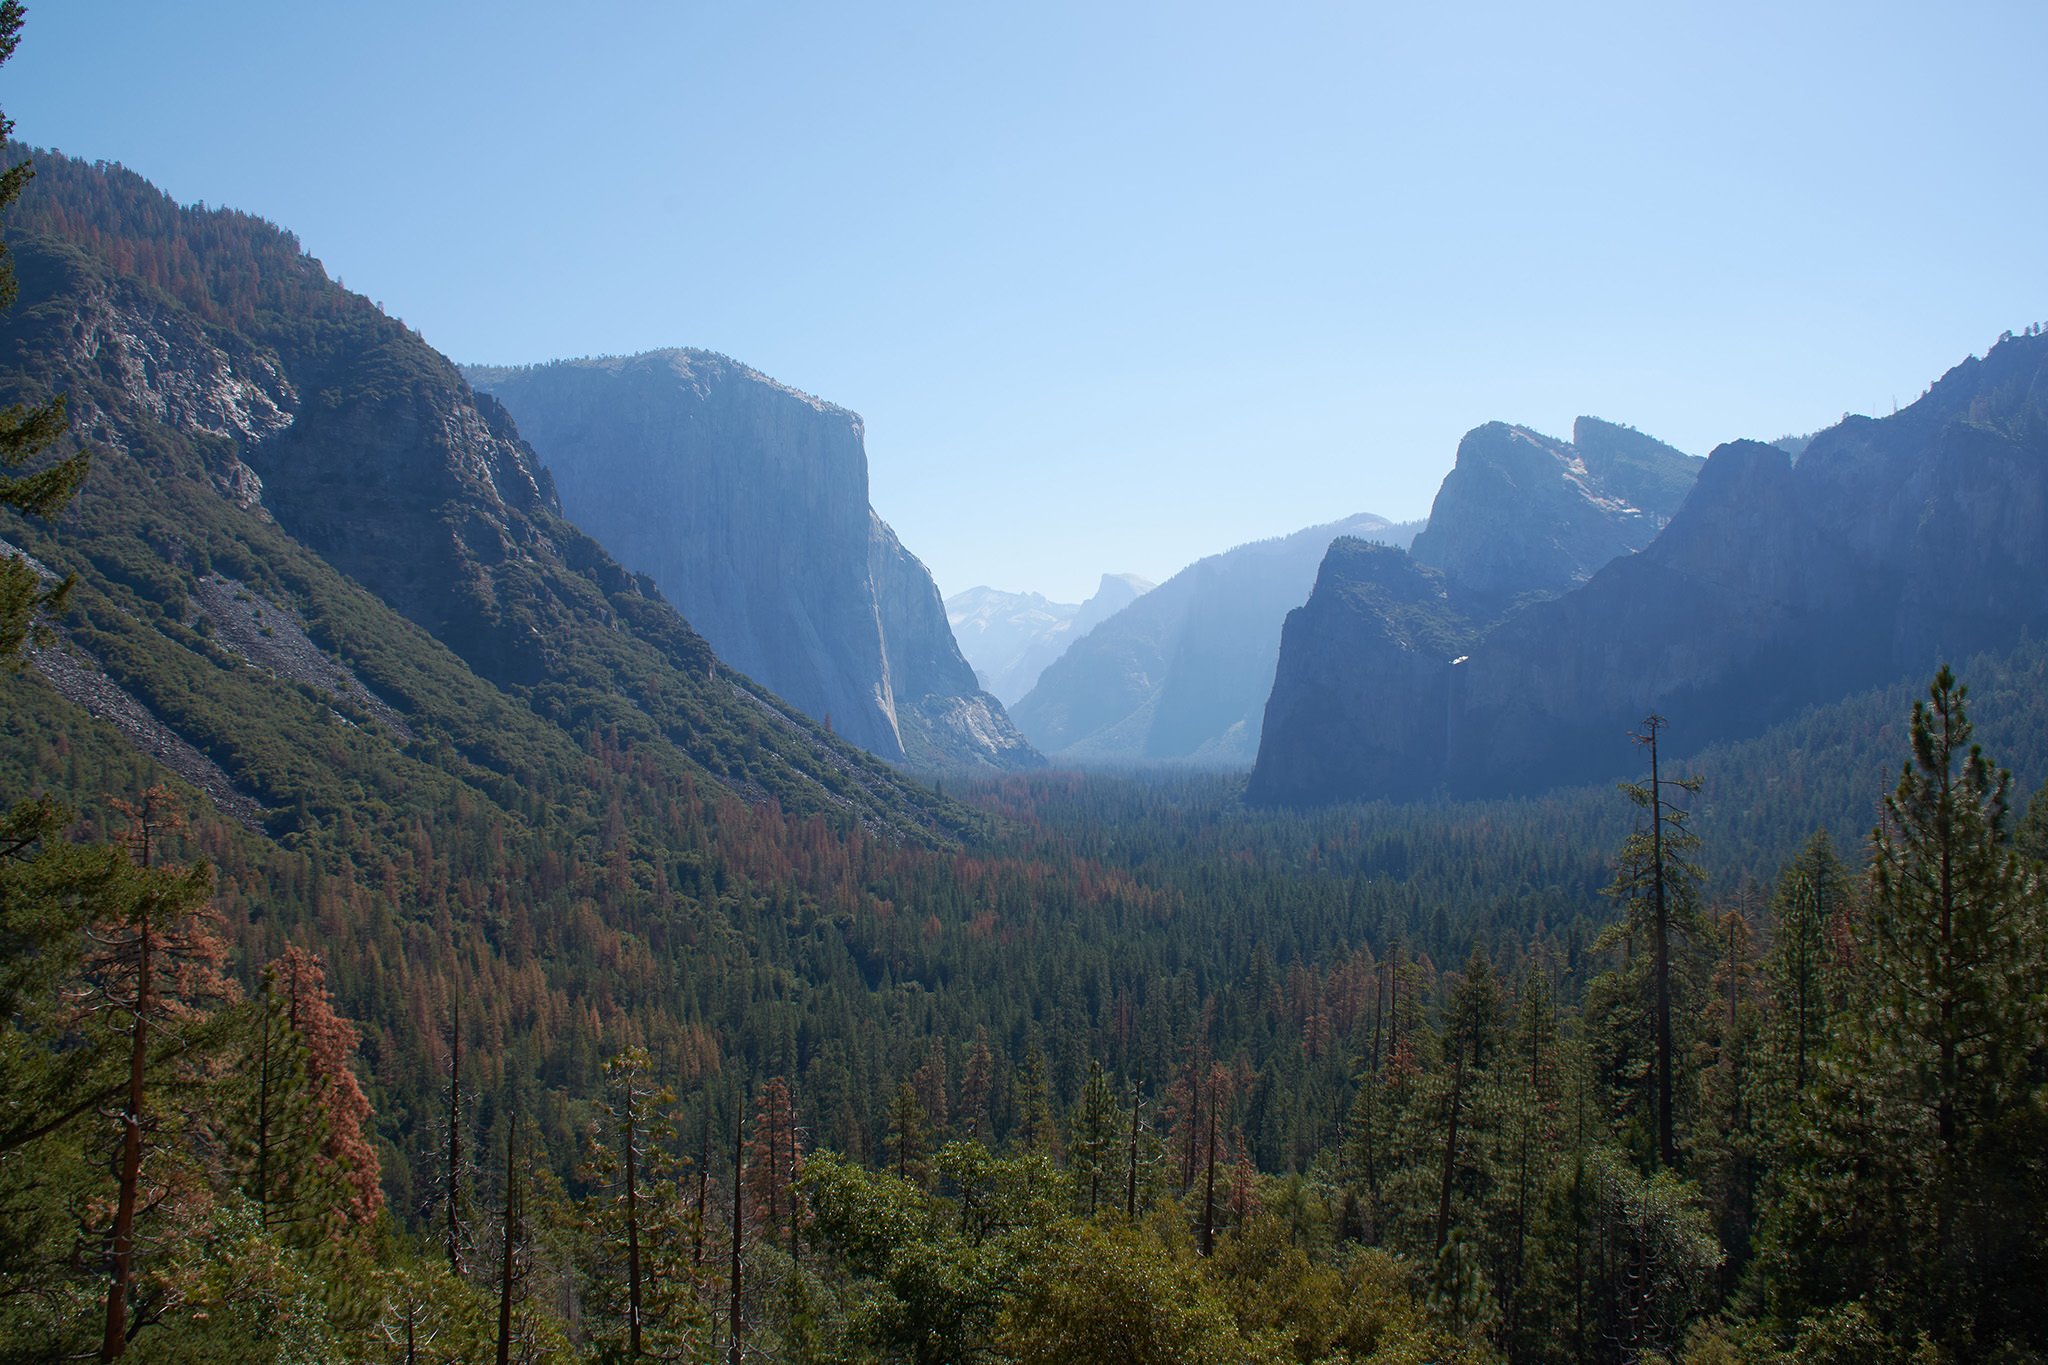
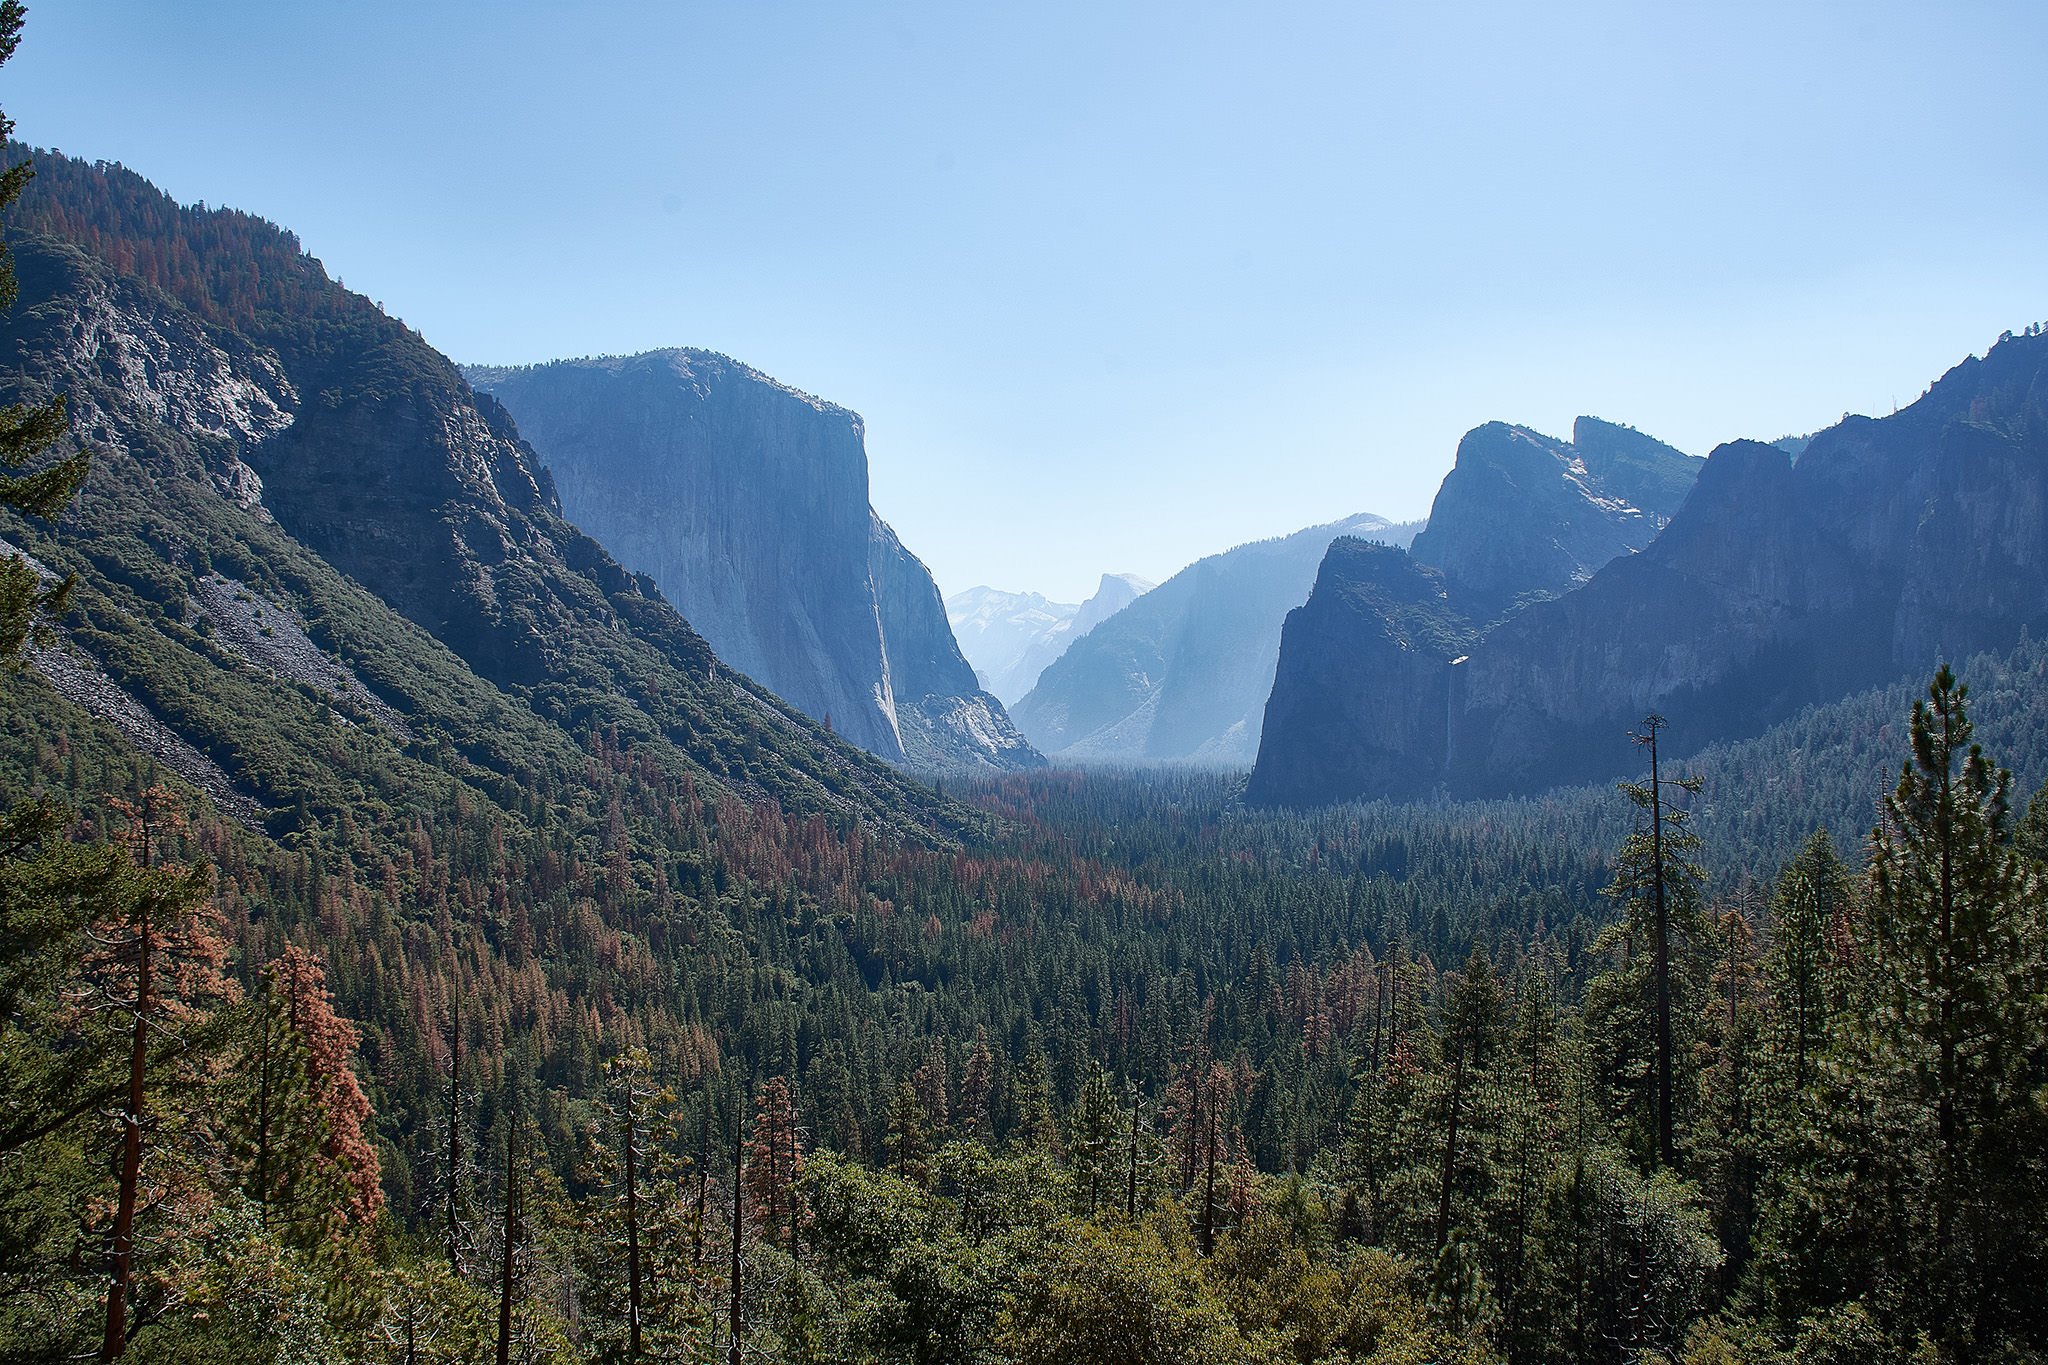
The Clarity tool is quite different in Capture One from Lightroom. For starters, there are different kinds of Clarity adjustments. It will definitely take some getting used to, but I already like this tool in Capture One more than that in Lightroom. Besides being more restrained in its application, Clarity in Capture One is better in its processing of photographs. This is a good thing. Take a look at the comparison below – while Lightroom’s clarity makes the photograph look artificial, Capture One truly makes the distant mountains clearer.
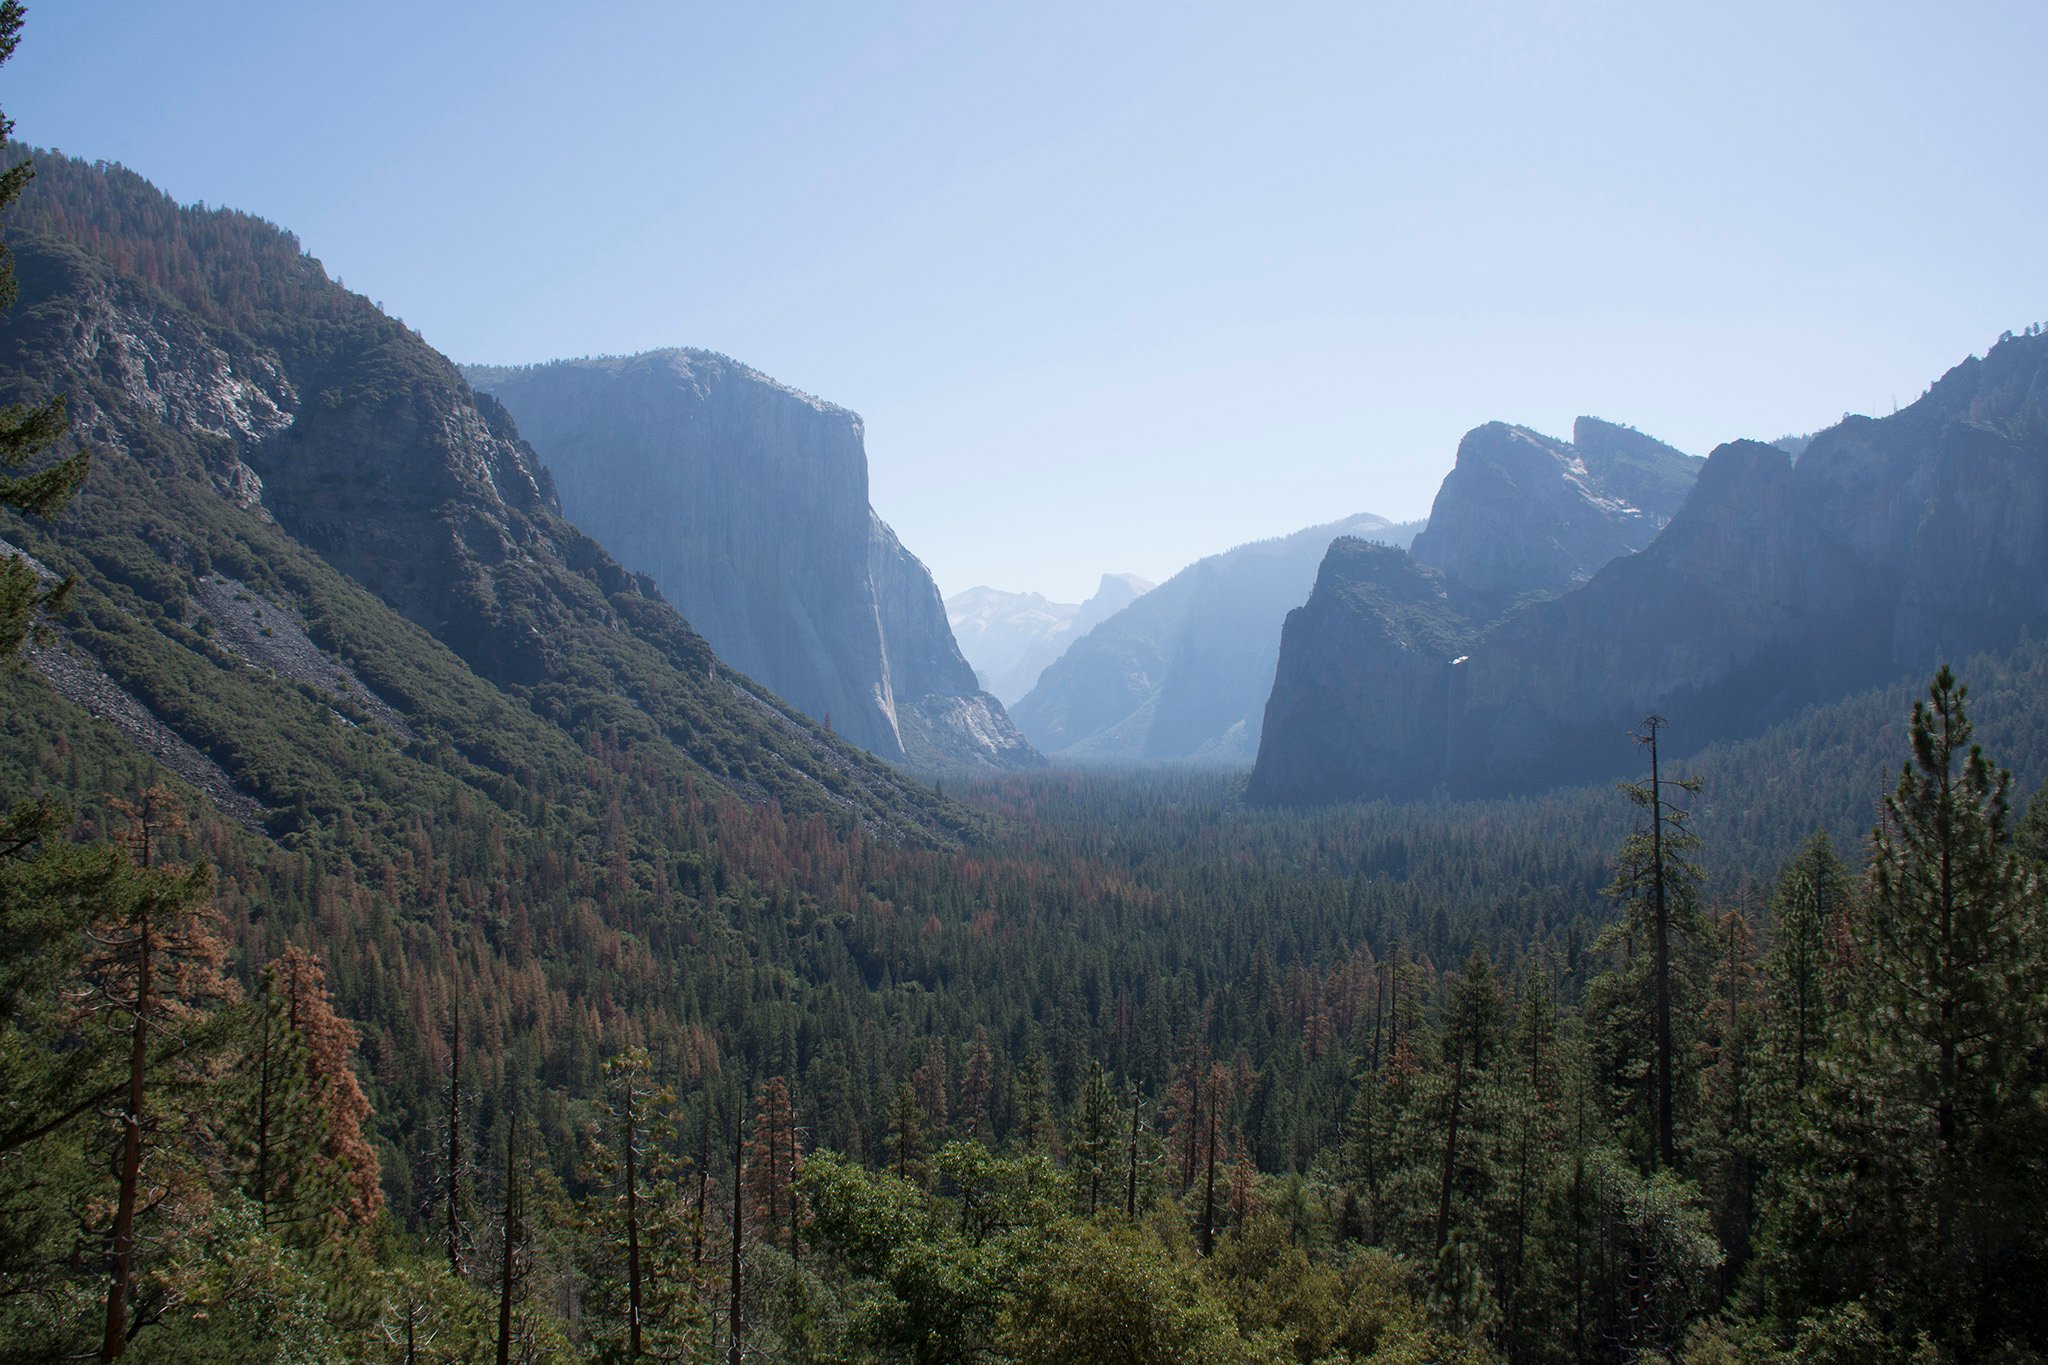
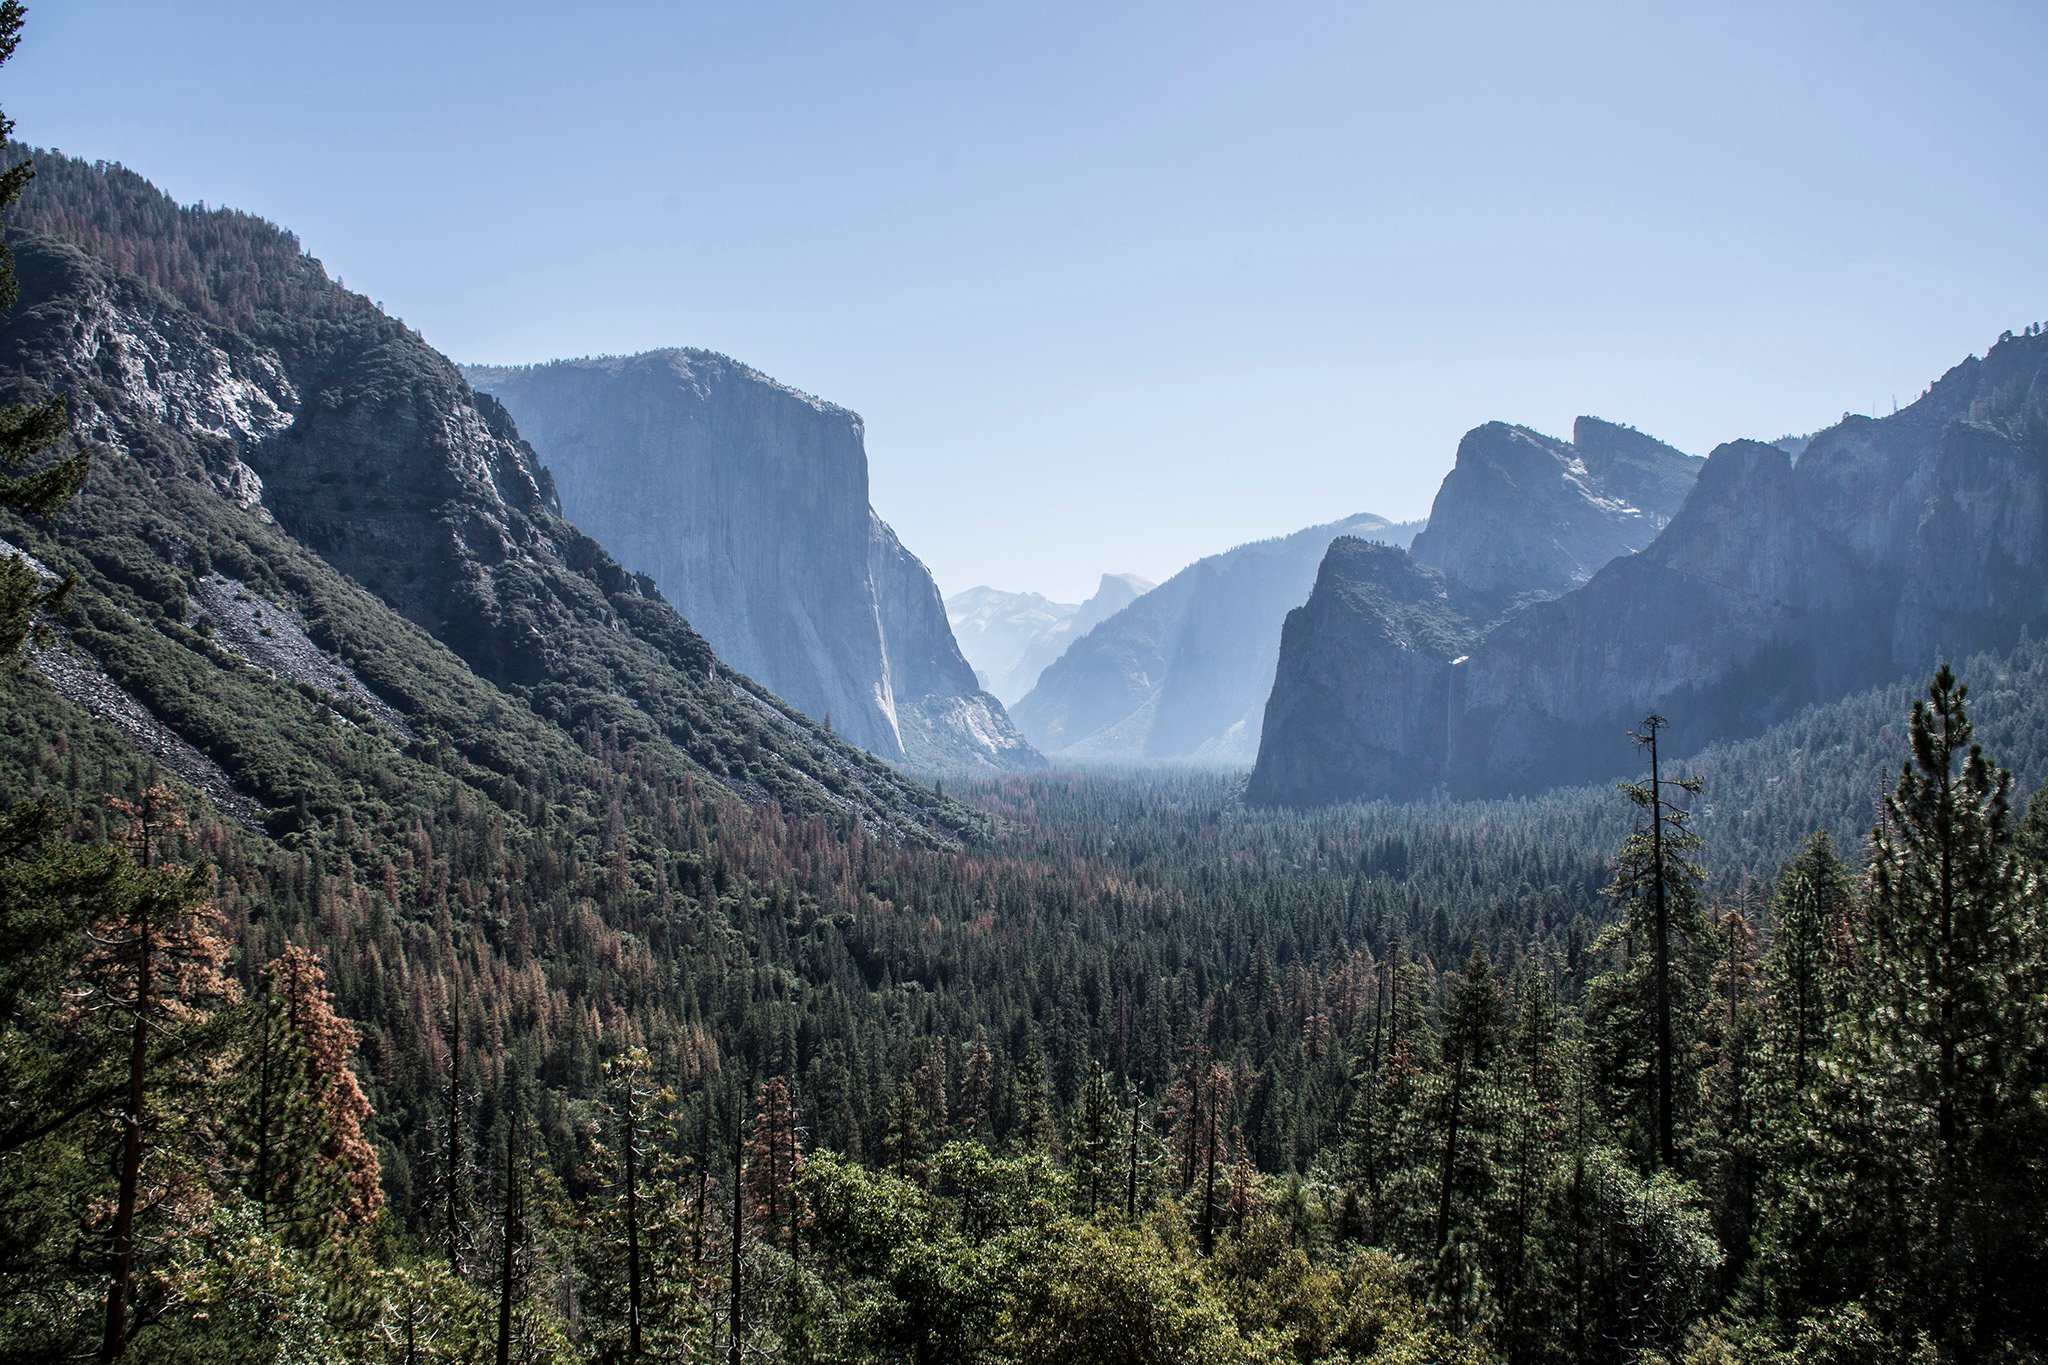
And here is how Lightroom handles it:
Things aren’t all rosy though.
Watermarking photographs upon export is an area where I’m struggling a bit with Capture One. There isn’t any way to scale the watermark depending on the degree of cropping, there don’t seem to be options to save different watermarks and its application in the exported file isn’t quite as good with strong aliasing around the watermark text.
In Lightroom, Highlight Recovery works by reducing highlights which makes sense. In Capture One, however, you increase the Highlights to recover them which is not intuitive. Overall recoverability in Capture One seems reduced too. A -100 Highlight in Lightroom recovers way more than a +100 in Capture One. Shadow recovery is comparable.
There isn’t any way to create Panoramas in Capture One. Stitching multiple photographs into a Panorama or creating an HDR photograph was a headline feature of Lightroom 6 and I’d come to rely on it heavily over the years. I suspect this is the feature that I’ll miss most in Capture One. Thankfully I have my still-working copy of Lightroom to load when I need it.
This article has been submitted by Adarsh Hatwar. To see more of his work, please visit his Instagram page.
Given the latest move of Adobe through their TOS, it might be time to give this article an update. How’s it going with the switch? Or did you move back to Lightroom?
Presumably the problem with the highlights recovery not being as stron as in LR could be remedied by using layers in C1. With three layers you could apply 300% of recovery. Is that right?
Spok.
I’m using Capture One Pro version 11. I have used various Adobe products except lightroom. The Sony A7R3 I purchased recently includes a limited functionality version of Capture One and I quickly upgraded for a fraction of the retail price. The learning curve is significant, but not unreasonably so. Once you master the basics, Capture One is very easy to use and then continue to build on what you know. My most significant complaint is the program crashes quite often. Every day. Sometimes, many times in a day. A crash report is sent to Capture One, but so far I have not received any feedback from the company on any of the many crash reports sent. This does not leave me with a positive feeling that the reports are being analyzed and resolved. The database gets corrupted when the program crashes, but so far the repair tool has been effective so far. These crashes do impact my workflow, however. I am wondering if other readers are having the same problems.
Can you provide some info on your machine? Mac or PC? Processor / RAM? What steps have you taken, i.e., have you reinstalled Capture One?
I’ve run Capture One Pro 10 and now 11 without incident on a pretty robust PC but also a Surface Pro 4.
Hi Adarsh –
Great article I found while researching Lightroom! I’ve had Phase One backs for several years starting with the P45+ and now up to the IQ180, and thus have been using C1 for a long time. It has been improved significantly over time and until recently was the only RAW conversion and complete image editor I’ve been using. But then last year I bought a Hasselblad (X1D) and found C1 will not even recognize Hassy files much less allow for editing, and likewise, Phocus will not recognize/process P1 files. I assume because Phase One and Hasselblad are direct competitors in the medium format space.
So given the limitations I found in Phocus I recently started using LR Classic CC to edit and process the Hassy files and started searching to determine if I wanted to revise to LR CC and utilize the cloud – I’m still not sure about that. But, I can say that LR Classic CC handles both the Hasselblad .3FR and PhaseOne .IIQ files really well, and includes the camera and lens profiles for everything I’ve tried in my kit thus far. In fact, I’ve found LR handles the Highlights and Shadows of a P1 .IIQ file better or more easily than C1.
That said, C1 is a much more robust program in terms of customization (especially for workflow), layering for local adjustments, and many other detailed tools and capabilities, but other than the customization of workflow being unavailable in LR, and because I must use something other than C1 to process Hasselblad .3FR files, I’ve been pleased with LR’s capabilities.
In the end its like most tools, nothing is perfect and fits every circumstance, so having a quiver of programs provides more potential options.
Maybe LR CC provides the ability to create a custom workflow in the Develop panel??? If so that might help move me toward its cloud-based system.
Thanks for the article :)
Klaus:
I’m using Capture One Pro 10 on a PC having switched from the Mac six months ago. The Mac and Windows applications seem exactly the same to me. I’m not aware of any features unique to the Mac version.
Thanks. Taking the plunge. New hardware and software it is!
thanks for a great review. I’m currently on LR5 on an older Macbook Pro. I have issues with Adobe’s Cloud tax, and I have issues with Apple’s lack of focus on the MacBook, so I’m now considering moving to C1P on a PC. There’s a few comments on C1P for Windows to be lacking features or functionality. Is that something you’ve come across?
Thanks again / Klaus
Hi Adarsh,
I had problems importing my LR (6.14 standalone) catalog into C1 10. I have a lot of sub-folders, and sub-sub-folders and they all had to be added one by one after importing my LR catalog. I finally got it all worked out but it was a challenge. I’m still adjusting to C1 after years of LR. I moved to C1 after Adobe made LR subscription-only after years of telling us that they had no plans to do so despite the rumors.
Since C1 doesn’t show the contents of sub-folders when you select a folder (unlike LR), I thought I’d try creating a (virtual) album in my catalog and searching for all items, for example, the keyword “Texas” (which I had already added in LR over the years). This would let me see all of my Texas images in one place without having to search all the Texas sub-directories each time I wanted to browses those images. Unfortunately, when I started dragging-and-dropping images into my album, C1 would eventually crash. This happened numerous times. I may try Smart Albums instead and see if they work better. I agree with those who say C1’s catalog management leaves a lot to be desired.
You mentioned the highlights slider in C1. It is a little weird since you can only reduce the highlights with it. If you need to increase the highlights, I guess you have to use some combination of exposure, brightness, and shadows adjustments. I do find that the highlights slider works better for me than the one in LR. If I adjust the highlights in LR to reduce the brightness of the sky, it also seems to adjust brightness everywhere else too, including my subject. It seems like LR divides the light range into highlights and shadows. If it’s not one, it’s the other. In C1, I can reduce the brightness of the sky via the highlights slider without affecting much of anything else in the picture.
I fairly often use the “Auto Adjust” feature to adjust exposure, contrast, dynamic range (but not white balance) to get a starting point on images that need some extra work. I find that it gets very me very close to a finished product much more often than LR. LR’s auto-adjust ends up with heavily over-exposing my image about 99% of the time when I use it.
Despite the problems I’ve run into, I like the way C1 works. It drove me crazy when I first switched from LR since the UI and workflow are quite different but I really like how it works now and love the image quality!
Hii,
First of all, happy new year! That said, i would like to know how can i enable a flat profile in Capture One Pro. Several months ago, i found out how to emulate Nikon Flat Profile in LR6 by using the “Flat Profile” at “Camera Calibration” section. So, if i find the way to enable a Flat Profile that emulates Nikon Flat Profile, i will probably switch from LR6 to C1.
Hope to hear from you soon.
Thank you very much in advance.
Best regards,
Javier
Great article and one of increasing importance. One topic I wish were added to this great article was a caveat that CO does not support all cameras or brands; especially those that compete with Phase One (e.g. Fuji GFS, Hasselblad). If anyone is looking to move into medium format in the future, they will have to think twice about migrating to CO in the short term.
Many thanks, Adarsh!
I am also experimenting with LR alternatives due to their policy change.
Also more or less narrowed it down to CO.
Findings so far:
* CO produces better image quality!
* CO catalogue/ image asset management sucks–or I don’t get it. I also use LR to manage my (big) library of photography assets and it’s pretty good at that. What would I use with CO?
* I am missing good film presets. The ones I found are not so good…