Today’s mirrorless cameras typically come with two displays: a viewfinder and a rear monitor. Both displays can be useful for still photography, but the rear monitor is almost always preferred for video recording. And really, if you’re serious about making video, you would typically invest in a dedicated recording monitor, either on-camera or otherwise.
However, high-quality monitors with good displays can be quite pricey. In this article, I’m going to show you a solution that could cost you a small fraction of the price. After all, most of us carry a high-quality display in our pockets all day – our smartphone. And with a little effort, you can use it (or a tablet) as an impromptu monitor.
Why Use an On-Camera Monitor?
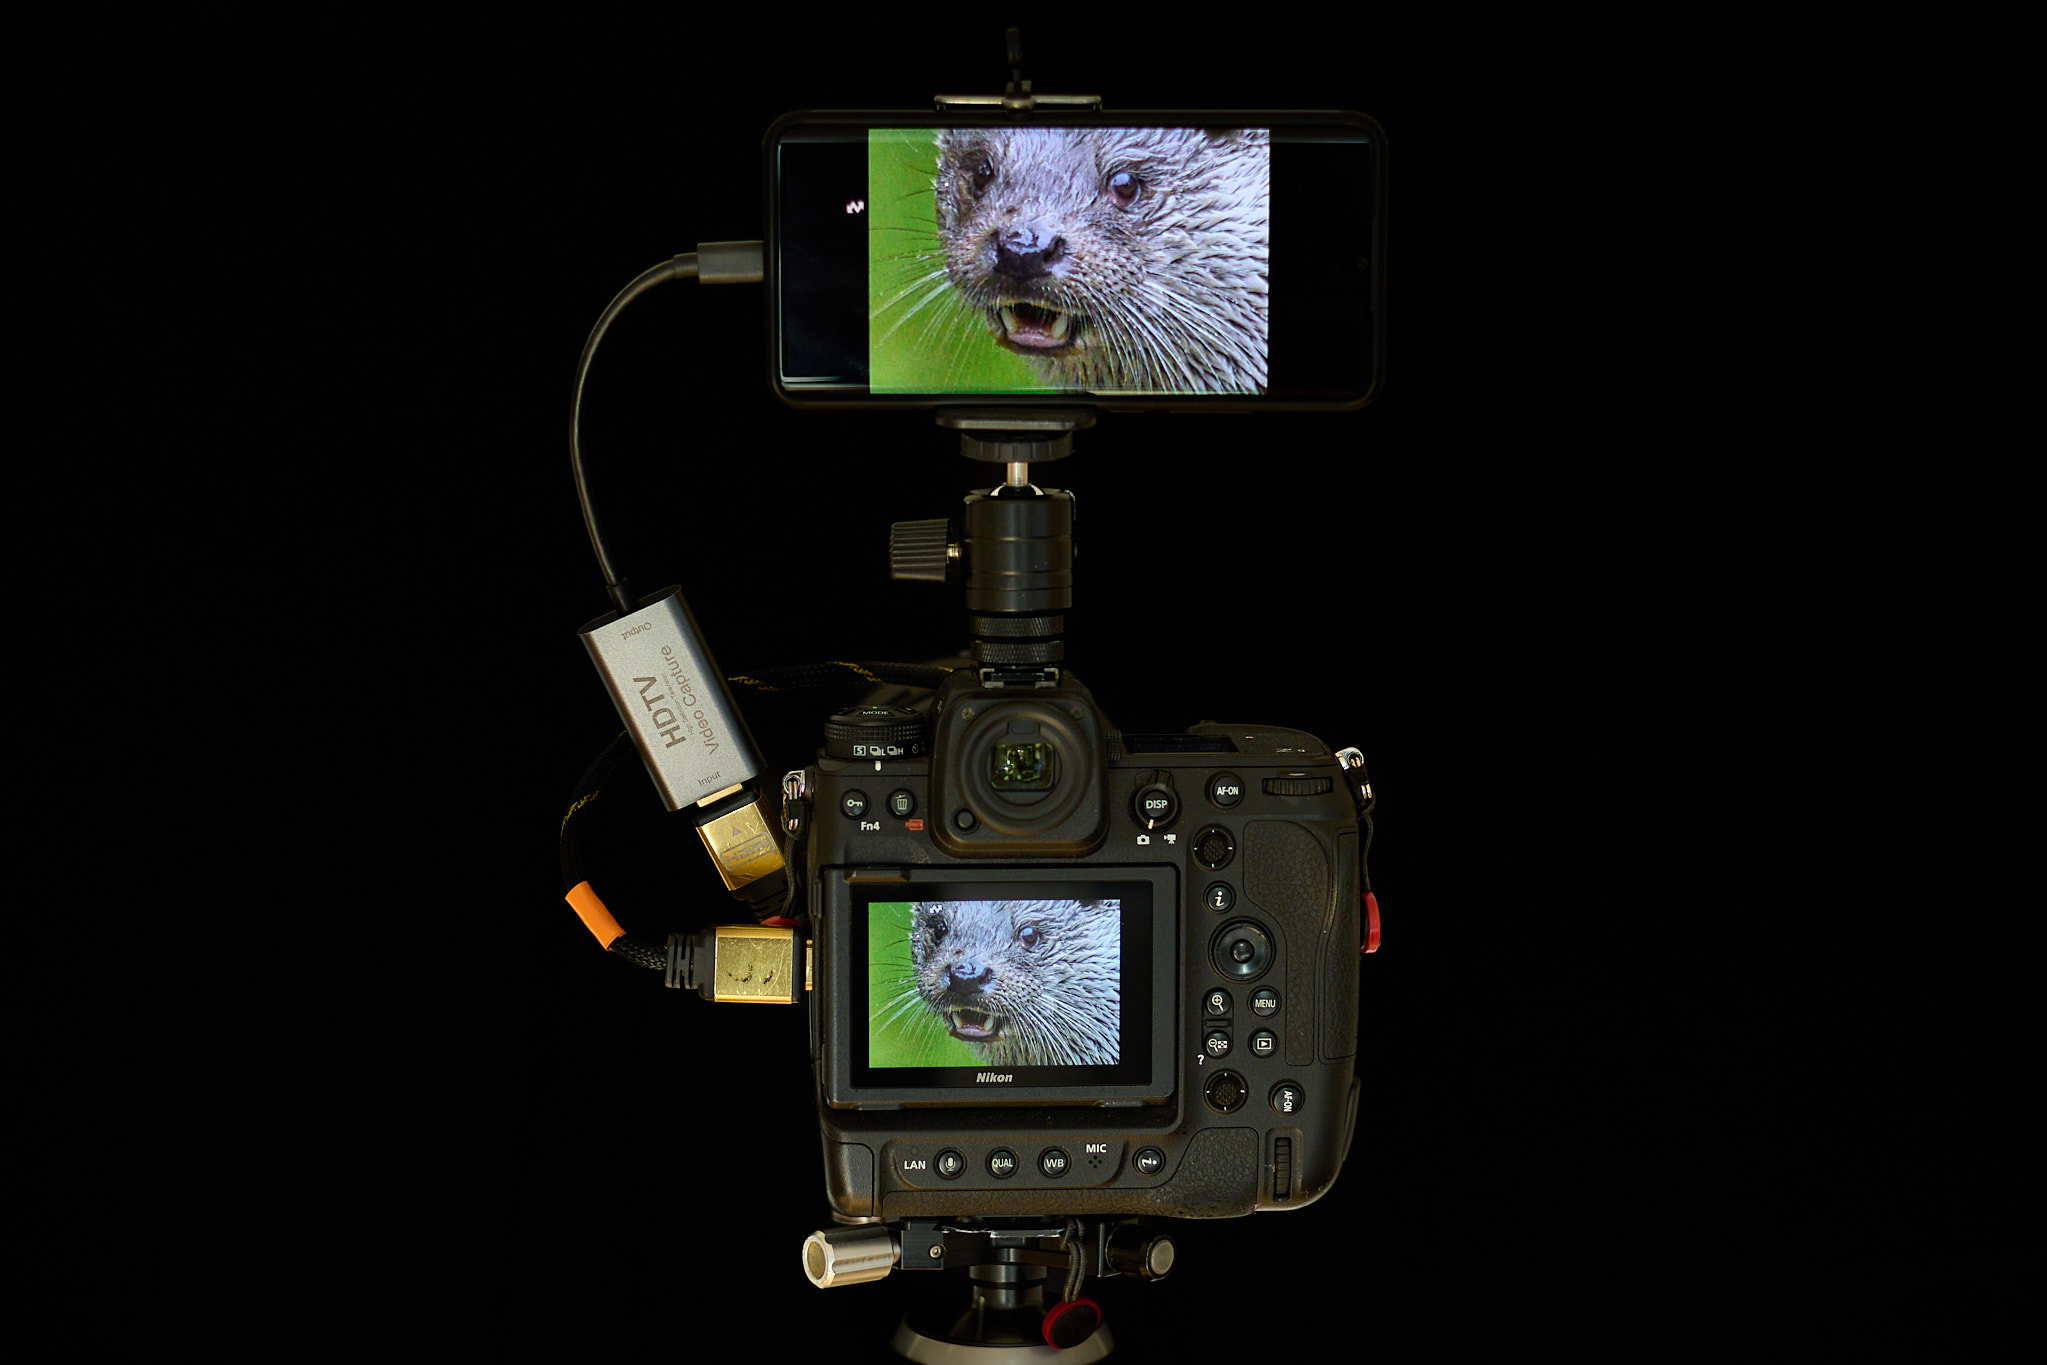
Think of an on-camera monitor as a duplicate of your camera’s electronic viewfinder or rear LCD. All the information typically displayed on your camera can be shown on a larger, often high-resolution screen instead. This applies to all mirrorless and DSLR cameras with an HDMI output. For example, for Nikon users, this includes their interchangeable lens cameras released since 2007 (starting with the Nikon D300).
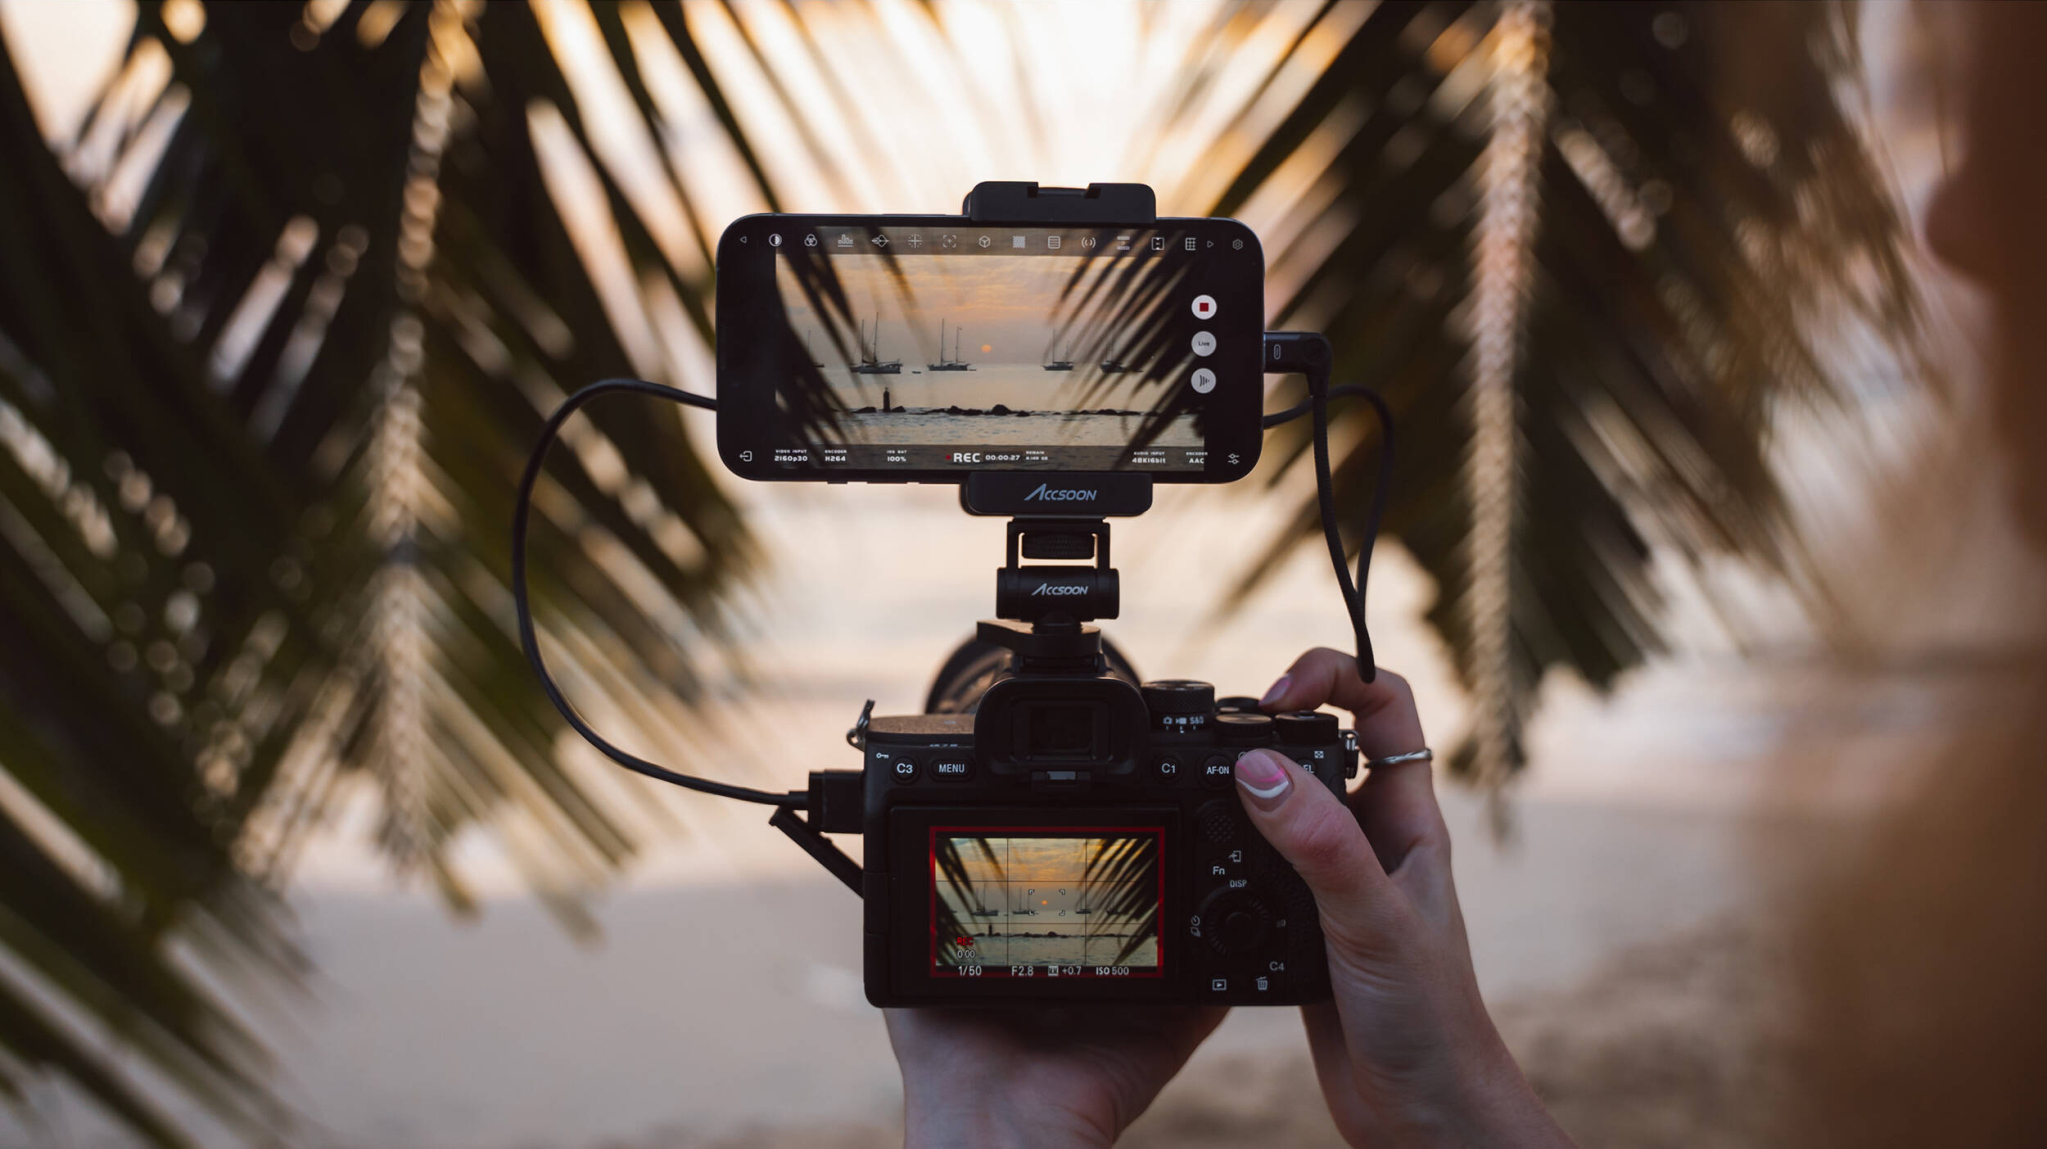
On-camera monitors are most commonly used when shooting video. Since manual focusing is often used for video, having a larger screen is a clear advantage. Because the monitor mirrors whatever is shown on your camera’s screen, you can continue to use tools such as focus peaking, but on a larger screen.
You can also use an on-camera monitor to make it possible to film yourself more easily. You can point the monitor forward so that you can easily align the framing. Of course, cameras like the Nikon Z30, Canon EOS R5, Fujifilm X-M5, and Sony ZV-E10 II already have a fully articulating LCD that can be used for a similar purpose. But the size of the screen is still limited by the camera.
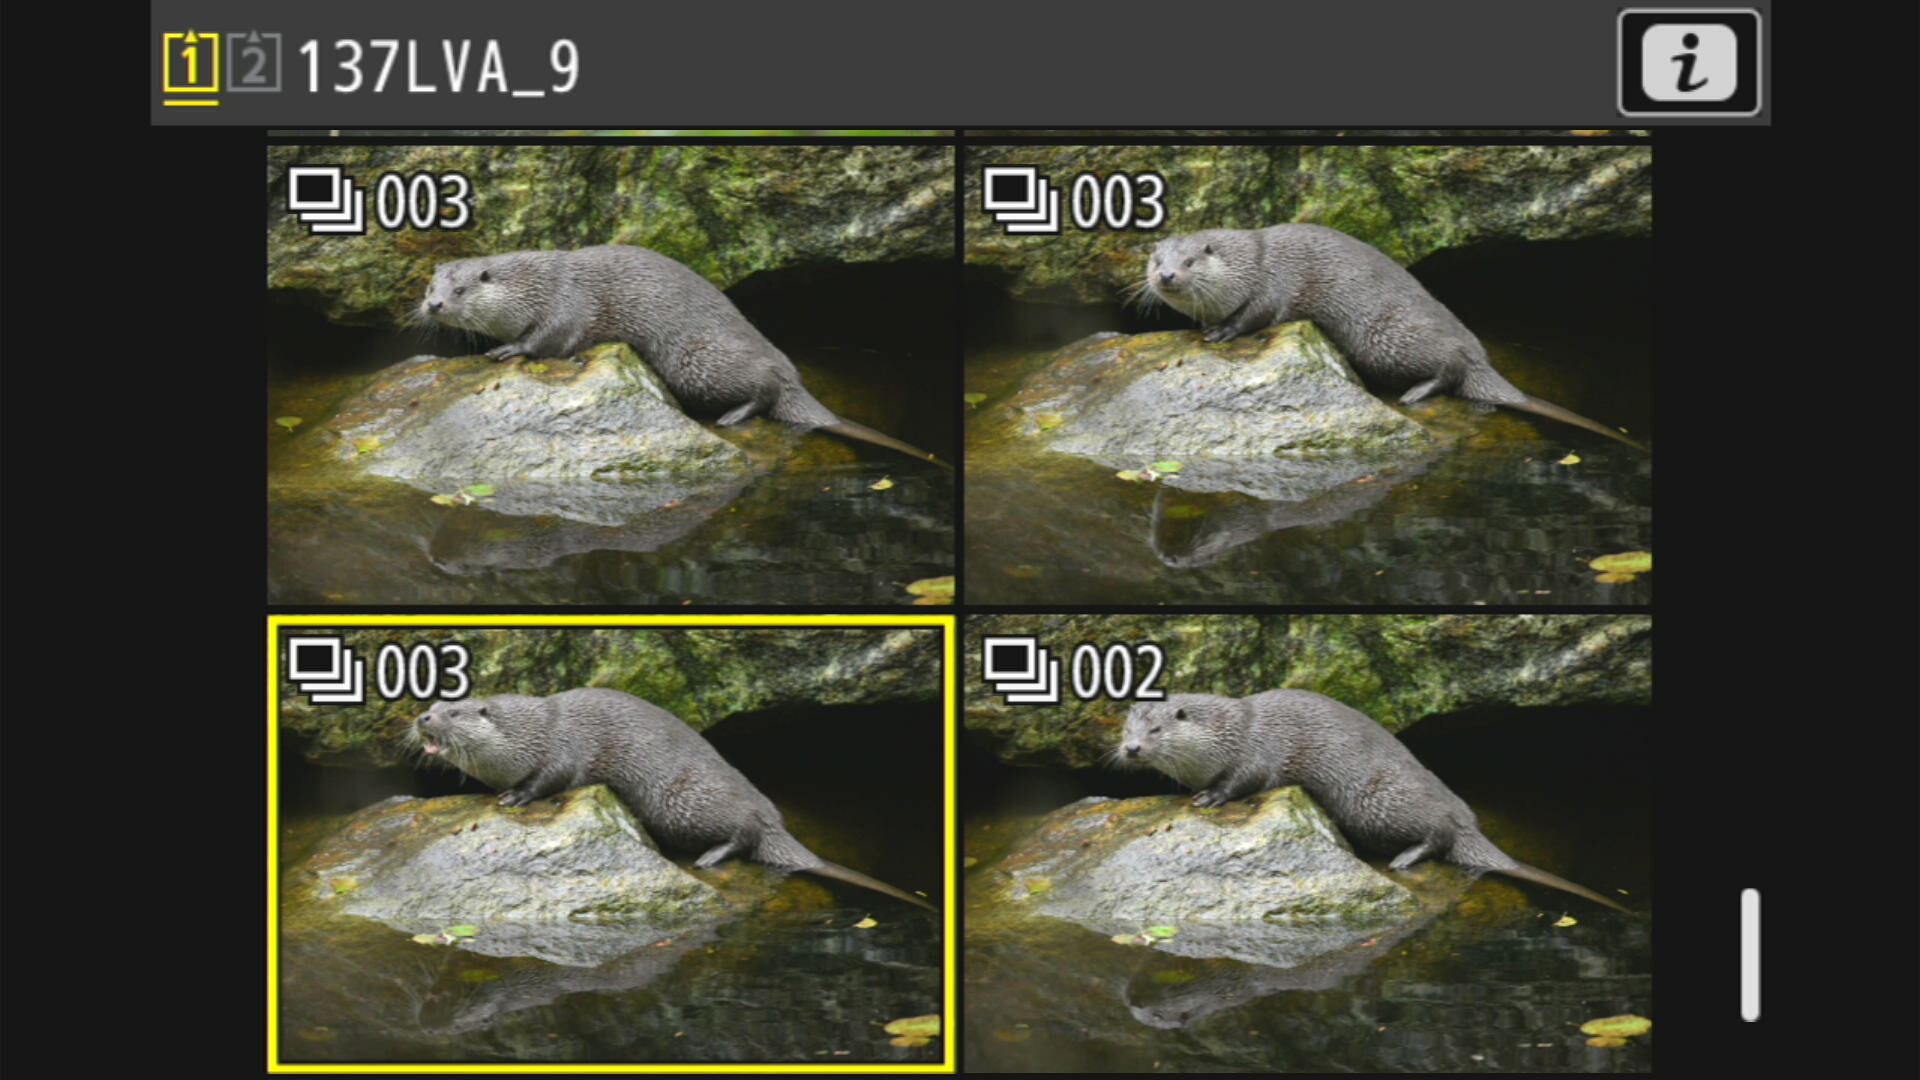
There’s another reason to use an on-camera monitor, and it applies to photographers, too. Any time that you’re composing photos or culling your images in-camera, you can do a more effective job if the screen is simply larger.
Personally, I like culling photos directly on the camera, especially when I’m on the go and have some downtime. It’s quick, doesn’t require a computer, and saves space on the memory card. However, sorting through photos on a small rear screen requires good eyesight. It’s also more pleasant to scroll through your phone or tablet rather than holding the camera.
An on-camera monitor also has educational potential. Want to show your clients or friends some camera settings? Or record a behind-the-scenes video of your process? It’s so much easier when everyone can see your camera’s menu on a big screen in front of them, or when you can record exactly how the screen looks as you shoot.

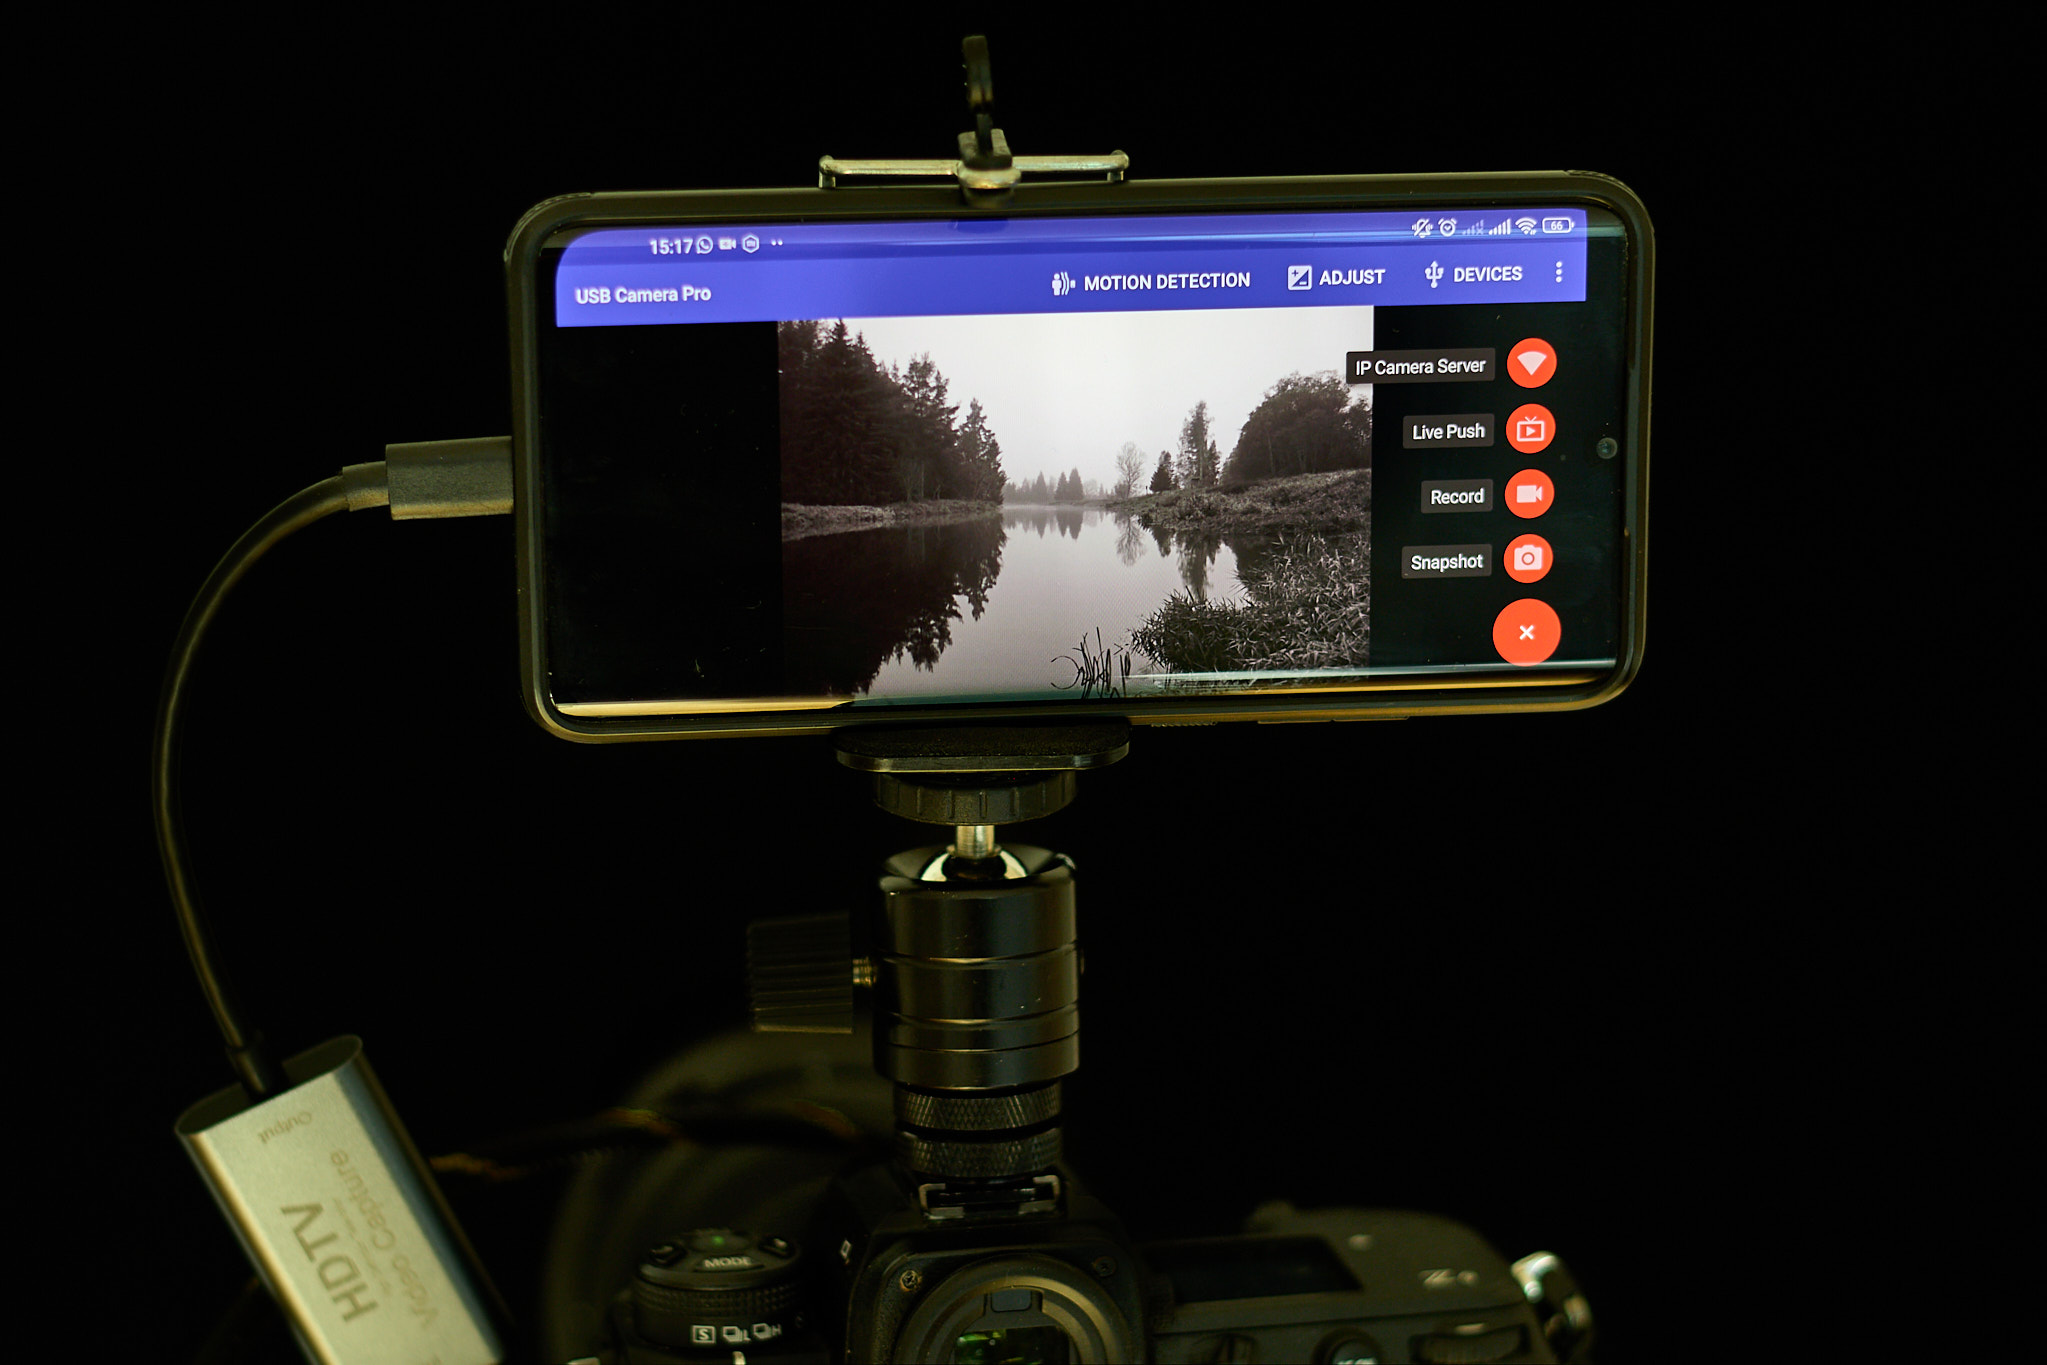
How to Use Your Phone (or Tablet) as a Camera Monitor
When it comes to this question, it’s important to distinguish which operating system your mobile device is running. If you’re using an Apple phone, your hardware setup will end in just a few sentences. You only need the Accsoon SeeMo 4K HDMI Smartphone Adapter (for $179) and an HDMI cable. Install the app, connect your iPhone, and you’re good to go. (It’s the same for the iPad, although I don’t know of a way to attach a tablet directly to your camera, so you’ll want a longer HDMI cable and somewhere to put the iPad.)
If you’re using an Android device, the range of options is much broader, as you’ll need to purchase individual components separately (including the app). It’s not complicated, and the advantage is that you can customize your setup to match your specific needs and budget. Another benefit is the easy ability to connect larger Android tablets. So, what will you need? Here’s a list to get you started:
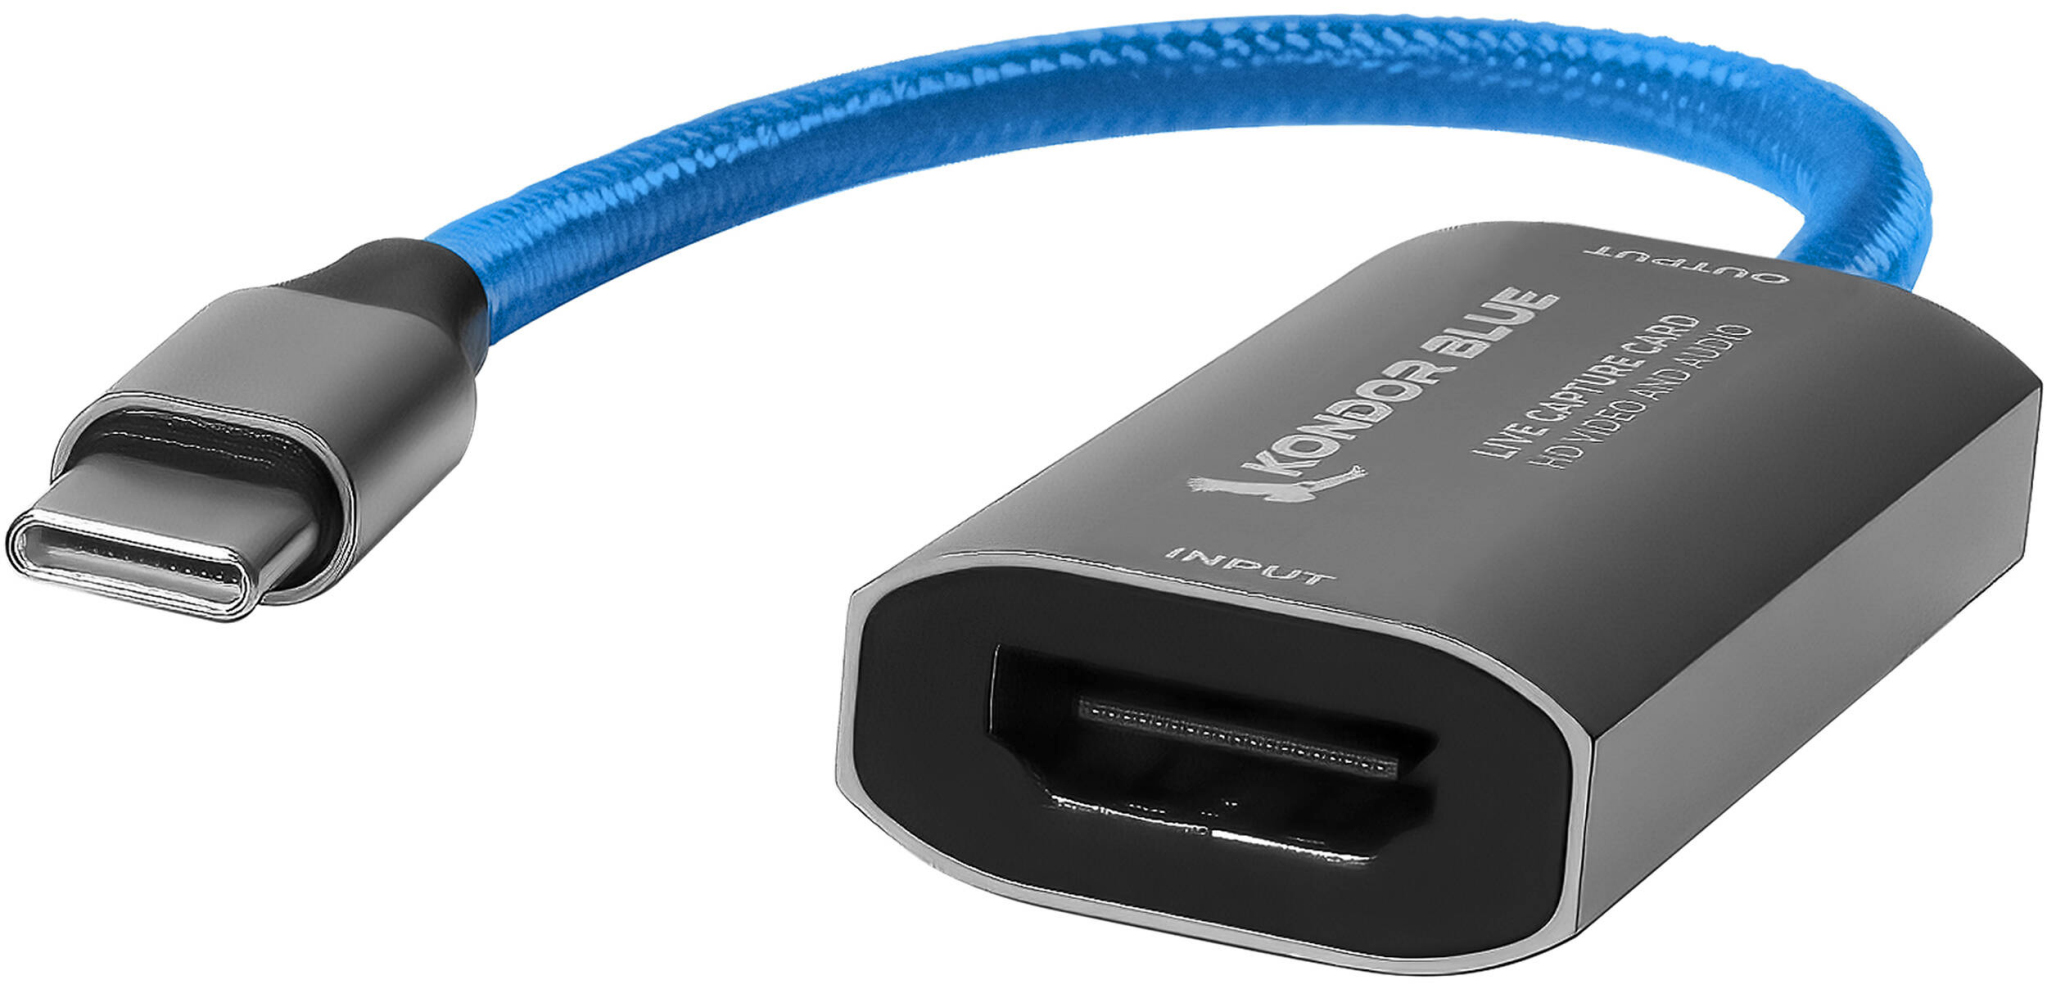
Video Capture Adapter
This device is essential for transferring the display signal from your camera to the monitor on your Android device. On one end is a standard HDMI port, where you can attach a cable and plug it into your camera. On the other end, most of these adapters have a USB-C port that plugs directly into your phone or tablet. However, some higher-end models will feature multiple inputs, such as a microphone port. Due to their larger size and weight, they are better suited for studio use.
Below, I’ve selected a few models you can consider:
- Ulanzi USB-C Multifunctional Capture Card ($33)
- IOGEAR HDMI to USB Type-C Video Capture Adapter ($25)
- ATEN CAMLIVE HDMI to USB Type-C UVC Video Capture Adapter (normally $55, temporarily $25)
- Kondor Blue HDMI to USB-C Capture Card for Live Streaming Video & Audio ($35)
- ANDYCINE HDMI to USB 2.0 Video Capture with Audio ($40)
- Pengo Technology HDMI to USB Type-C 4K Grabber (normally $90 temporarily $50)
- Z CAM IPMAN Gemini ($60)
- ANDYCINE HDMI to USB 3.0 Type-C Video Capture ($99)
- Magewell USB Capture HDMI Gen 2 ($299)
- Magewell USB Capture HDMI Plus ($359)
HDMI connection cable
Check what type of HDMI port your camera has. On Nikon cameras, it’s usually either a standard (Type A) or mini (Type C) HDMI. Shorter cables (up to 1 meter in length) are usually recommended, though I’ve had no issues with signal transmission with a 2-meter cable. Here are a variety of options:
- SmallRig 2956B 4K Ultra-Slim HDMI Cable ($10)
- Pearstone HDA-501UTB Ultra-Thin High-Speed HDMI Cable ($10)
- Kondor Blue Coiled High-Speed HDMI 2.0 Braided Cable ($20)
- Atomos Coiled HDMI Cable ($29)
- Atomos AtomFLEX Coiled HDMI Cable ($61.50)
Smartphone mount for camera attachment
This is optional hardware for those who want to attach their smartphone to the camera. Prices start at around $10. Some mounts can also be attached to a tripod via a 1/4″ thread. Below, I’ve selected a few models ranging from basic to more advanced, but all of them will do the basic job of holding your phone in place.
- Ulanzi ST-06 Smartphone Tripod Mount ($13)
- Ulanzi ST-06S Multi-Function Cold Shoe Smartphone Holder ($16)
- Leofoto Phone Clamp with Cold Shoe ($35)
- Leofoto Multipurpose Clamp Kit ($82)
For tablets, there are a variety of options that can hold it anywhere from a tabletop to a light stand. You can see a list of tablet holders on B&H.

App for Android devices
The last thing you’ll need is an app to install on your mobile device. I use USB Camera Pro, which is available for both Android and iOS (iPad only). This app allows you to mirror your camera’s display on your mobile device. You can take screenshots, record videos, or even stream directly to YouTube Live. I found the app easy to use. Once installed, connect your phone or tablet to the camera, open the app, and it will start working as a monitor right away.
Summary
An on-camera monitor can be a valuable tool not only for traditional videography but also for vlogging, photo culling, screen recording, or sharing your camera’s display. The best part is that the priciest component of the setup is probably already in your pocket – or you’re reading this article on it right now!
While high-end videographers will certainly stick to traditional monitors, it’s pretty impressive what you can get for as little as $50. Let me know in the comments if you have any questions about how this setup works or any recommendations from your experience.
With Apple devices, there is a split between iPhones and iPads.
As long as they’re running iPadOS 17 or newer, iPads can access UVC devices for video input, that is, some of the low-priced HDMI-USB grabbers depicted above.
Then, an app like “Genki Studio” is all you need (and it’s free) to use your iPad as an external monitor.
With an older iPad that doesn’t have a USB-C port, you’d need a USB-Ligthning OTG adapter for this to work.
With the iPhone it’s different, even if it is an iPhone 15 or newer, that comes with a USB-C port. For some reason, Apple has decided not to support UVC devices on iOS, which clearly sucks. Hopefully they’ll change that decision, as they did with iPadOS17.
Thanks a lot for this article and the reminder to tackle this topic again.
Obviously the Acssoon solution was made for videographers rather than photograohers just needing an external screen, so I am interested in whether “for us” the solution just provides a duplicating of the viewfinder or also includes the emulation of the rear camera display’s touch function on the phone/tablet (e.g. placing the AF field, moving the image when using a magified view, etc.) and what your experience with it is like.
Something I really like is the support for older iDevice models like my iPad Pro 9.7″.
That said, I recently found an article saying that Apple’s own Lightning-to-HDMI-Adapter stopped working from a certain version odf iPadOS onwards (need to search for the details). Whether or not this would have any relevance to the Accsoon solution, I don’t know – as they use an own app in combination with the hardware the owners of older devices might be lucky …
Apple’s Lightning-to-HDMI-Adapter is an HDMI *output*, not an input. Whoever wrote that article got that confused.
See my other posting for the state of things with iPadOS 17 or newer.
What an interesting article, and I now have my own question. I am presently in the process of copying a vast collection of negatives for eventual conversion to digital images, however having my Nikon Z9 and 105mm macrod lens set up on a copy stand and using a negative supply carrier mounted on a lightbox, I find it difficult to focus on some of the images using the rear viewfinder, and reading this article gave me the idea that I could use a tablet to produce a larger image for my manual focusing needs.
The tablet could sit on the desktop alongside the copy stand and allow me to view and focus the camera for each negative, but what I am unsure about is the equipment that I would need to facilitate this set up, I would need to obviously purchase an android tablet to obtain the app, as I doubt the Kindle Fire 8 that I have would be suitable.
I look forward to any comments.
One more question – when not shooting video in 4K/30 i.e. in a better format 4/K60 or 8K/60 would the recorder still record 4k/30 or would it scale down to the typical sizes of the proxy file when recording ? The question is what do we record when we have an internal high-quality recording on one of the Nikon Z9/Z8/Z6III and use the HDMI port as backup recording ?
Cheers Michael
This is a really useful article – thank you for adding it Libor !!
Good article and helpful.
I’ve limited experience in this area, so please take the following as an observation looking for a correct answer!
Surely you don’t need the HDMI to USB adaptor for most recent cameras.
It should be possible to do all of this with a USB C connection (or wireless, possibly with limitations) and avoid the need for the HDMI adaptor. Existing examples include:
– I use Adobe Lightroom tethered, including control of exposure and focus. Works well with my Nikon Z5.
– Nikon Webcam Utility with Zoom and a Z5 over USB C. I’ve also used Canon camera. (I used to have to use an HDMI adaptor with earlier cameras.)
– Nikon also provide Nikon NX Tether (www.nikonusa.com/content/nx-tether) for Windows and Mac which works over USB, wireless or ethernet, though I’ve not used it. I don’t think it is available for Android or IOS.
A quick search on Google Play finds a number of apps claiming to work over USB and WiFi. Can anyone recommend a good one to try?
Hi Clive, thank you for your comment. You’re right that with Nikon NX Tether you can skip the HDMI video capture adapter. You can use a USB cable or an optional wireless transmitter for those purposes. Unfortunately, if you want to use your mobile device as an on-camera monitor or record your display (e.g. in OBS Studio), you’ll still need one of the mentioned adapters. Be aware that this is not just a simple adapter you might have on your hub. On a standard hub, the HDMI port is an output. With an HDMI video capture adapter, the HDMI port is an input.
Libor, A quick search for “camera monitor” on Play Store finds the app “Camera Connect & Control” by Rupi Apps. There are a number of others (can anyone recommend any) and I only tried this one as an experiment – I’ve no connection to the product and others may be better.
I connected my Nikon Z5 by USB C and the app found it immediately. It displays the image from the camera, superimposed by all available controls in the current mode. The control icons can be turned off, leaving you with a simple monitor.
You get a few days free trial, after which there are two levels of capability you can purchase, including a one off purchase for about £11.
Anyway, this is just to give an example that it is possible to connect via USB (avoiding the need for an HDMI adaptor) and use a mobile as a monitor, as well as getting reasonable control of the camera.
I do have an HDMI to USB adaptor (similar to the ones you recommend) that I used to use with cameras that would not output video over their USB ports. Video over USB seems to be available with many recent cameras.
Clive
Use Nikon Snapbridge.
Well, Snapbridge does work over WiFi, but it’s a bit of a pain to get going, rather clunky and I’m not sure about the resolution it’s working at. But the article was about how to get a fast, high res connection to a monitor over USB, via an HDMI adaptor, which is what I’ve been responding to. As far as I know Snapbridge only works over WiFi or Bluetooth (I only use it for GPS data over Bluetooth) and doesn’t offer any capabilities over USB. I’d love to be corrected.