Although I am primarily a landscape photographer, I have recently found a great deal of enjoyment in photographing plants, both in botanic gardens and in the wild. Photographing these kinds of smaller scenes feels more meditative than photographing landscapes, as the process often includes slowing down, seeking out details, and taking time to craft photographs of sometimes tiny subjects. Another primary benefit of seeking out these kinds of subjects is their prevalence. Plants like those featured in this post can be found in almost any landscape or garden, which means it can be easy to find compelling subjects close to home. And, since many photographers pass by these kinds of scenes without a second thought, you have ample opportunity to make unique, creative photographs.
In terms of gear, all of the photographs discussed below have been created using a 100mm macro lens, a helpful but not essential tool. In my case, I use the Canon 100mm L f/2.8 lens but a basic macro lens or moderate telephoto lens from any manufacturer can work (the shorter the minimum focusing distance, the better). For the photographs with sharpness throughout, I selected a smaller aperture like f/16 or f/22 to get all of the main elements in focus (whereas smaller apertures on other lenses can degrade image quality, I have found that my particular lens still performs well at its limits). For those photos relying on low depth-of-field as a key technique, I selected a wider aperture like f/2.8 or f/4 to help pleasantly blur some of the details.
For all of the photos, I set up my lens quite close to the subject, often only inches away. In some cases, like the photo above, I set up a tripod and experiment with small changes until I find the composition I like most since small changes can often make a big difference with these types of photographs. For other photos, like the low depth-of-field examples below, I hand-hold my camera so I can freely move back and forth to experiment with small changes in position. In addition to these basic techniques, another six tips for taking these kinds of photographs of plants are shared below.
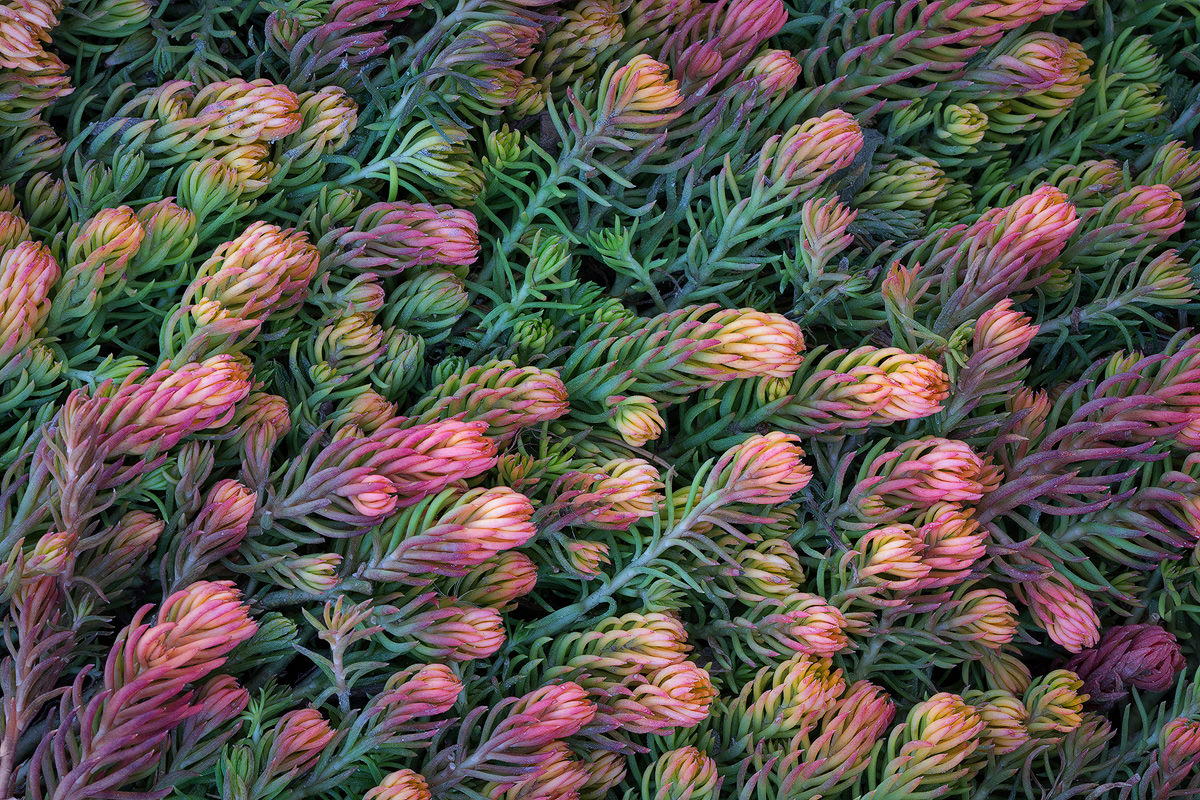
Table of Contents
Look for Year-Round Opportunities
Both natural places and manicured gardens can provide opportunities for photographing plants year-round. While winter and early spring will often require more diligence in exploring for subjects, opportunities can still abound if you bring an open mind. In the case of this photograph, taken at the Denver Botanic Gardens in the middle of winter, the weight of the snow flattened the plants and made them a better subject than their more perky summer counterparts. Also, the cold of winter brought some lovely pastel colors that I had not seen any other time of year, as these plants are usually bright green, yellow, and orange. In addition to these plants, I also found grasses, cactus, succulents, and coniferous trees on the same winter day, all creating excellent but unexpected options for photography.
Look for Patterns and Textures
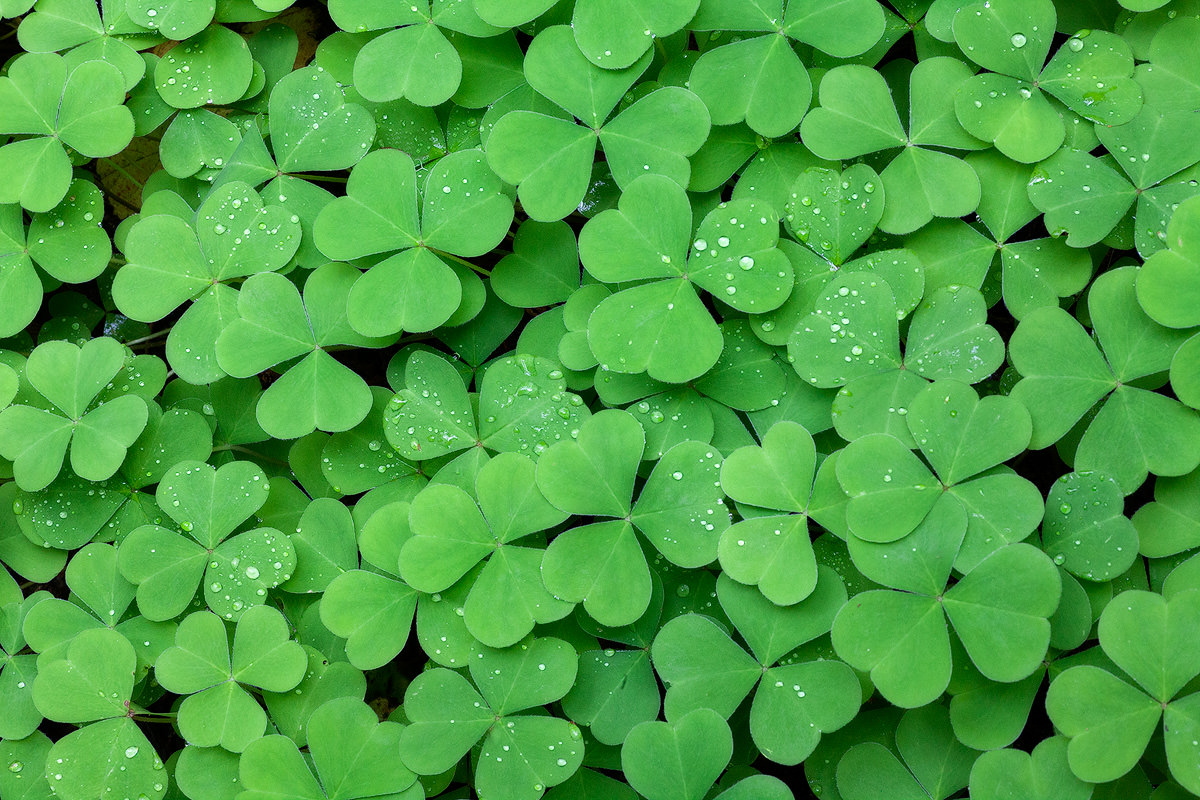
Nature offers up all sorts of patterns and textures for the careful observer. By taking the time to explore and notice the details of a place, photographers can identify all different kinds of small scenes worthy of photographing. Above, the repeating patterns and consistent color in this patch of wood sorrel are the two primary elements I used in composing this photograph. This plant is common along trails in the Pacific Northwest but it took some time to find a patch in good condition with the plants growing at a similar height, which makes getting all of the main elements in focus in a single exposure much easier. Next time you are out with your camera, set aside some time just to look for these kinds of patterns in nature. Groundcovers, bark, cactus, and all different sorts of plants can offer up interesting patterns and textures once you start looking for them.
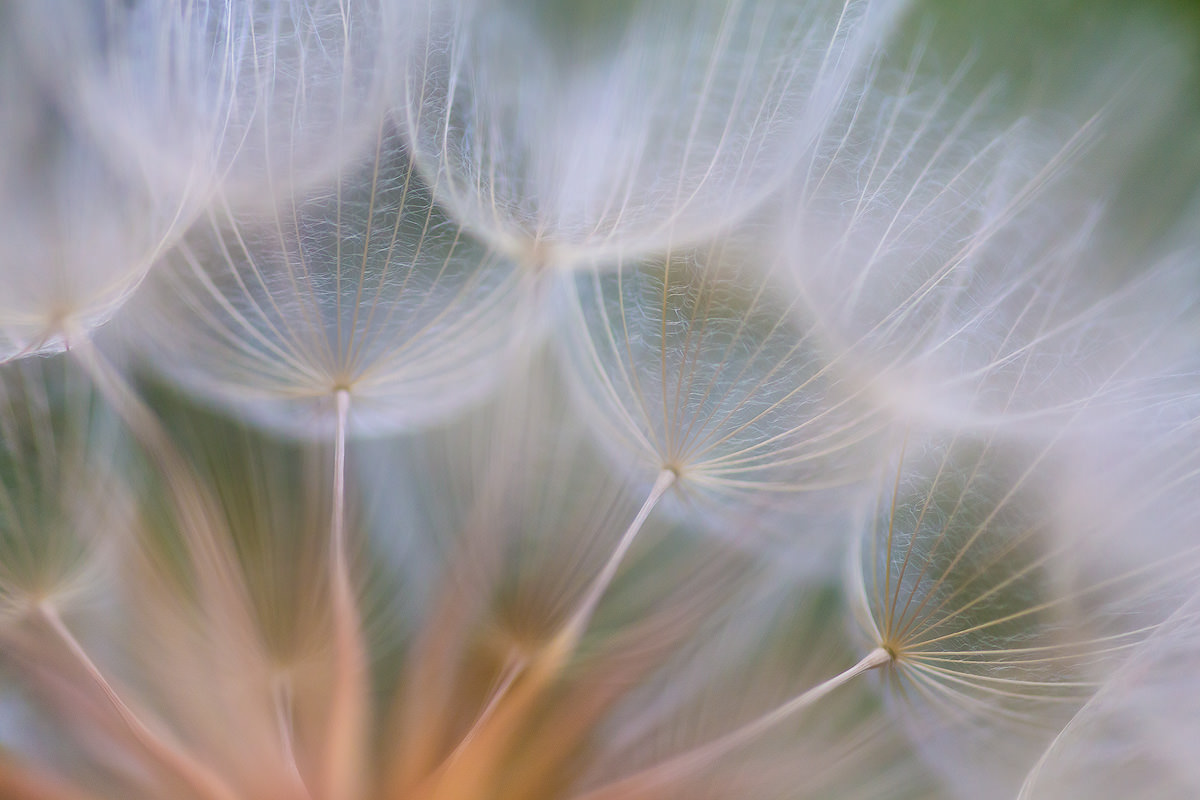
Embrace Low Depth-of-Field
At least for landscape photographers, embracing low depth of field and the out of focus elements that come with it can be a major shift in mentality. When photographing small subjects like plants or flowers, low depth of field can often transform a subject from the literal to the abstract. Instead of photographing petals or stems or leaves, you are instead photographing lines and shapes like seen in the images above. These abstracts that can emerge make low depth of field an excellent creative technique when photographing plants.
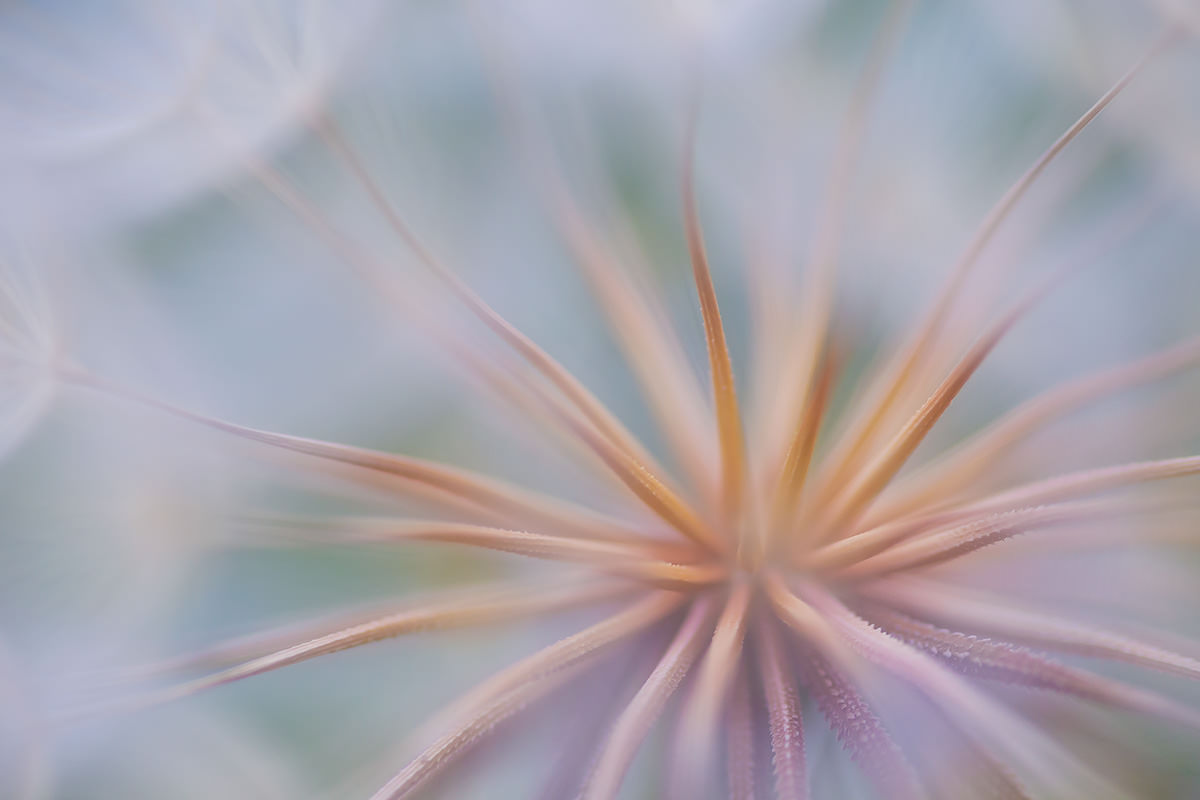
In the case of the top photograph of a seed pod (about two inches in diameter), getting close, using a wide aperture like f/2.8, and experimenting with different focus points, I could emphasize the radiating nature of the plant’s center. The same plant looks entirely different with a slightly shifted focus point and different perspective in the second photograph, with the seeds looking like upside down umbrellas. Comparing these two images of the same subject taken within minutes of each other demonstrates the difference that a slight change in focus, depth of field, and perspective can make when working close to a subject using a wide aperture.

Experiment with Light
Although it is one of the more difficult types of light to photograph, backlighting – when the light source is behind your subject – can often add interest and mood to a photograph. For this photo, I laid on the ground eye-level with these bare winter bushes and faced into the low sun, using shallow depth of field to render bits of the light and bushes out of focus. Fuzzy subjects, like these pussy willows, cactus, and many flowers, catch backlighting well, giving a subject a natural glow that can translate well into a photograph. These images can take a lot of experimentation, persistence, and perfecting your technique to come together so be prepared to try again if your first attempt does not work out as you might have hoped.
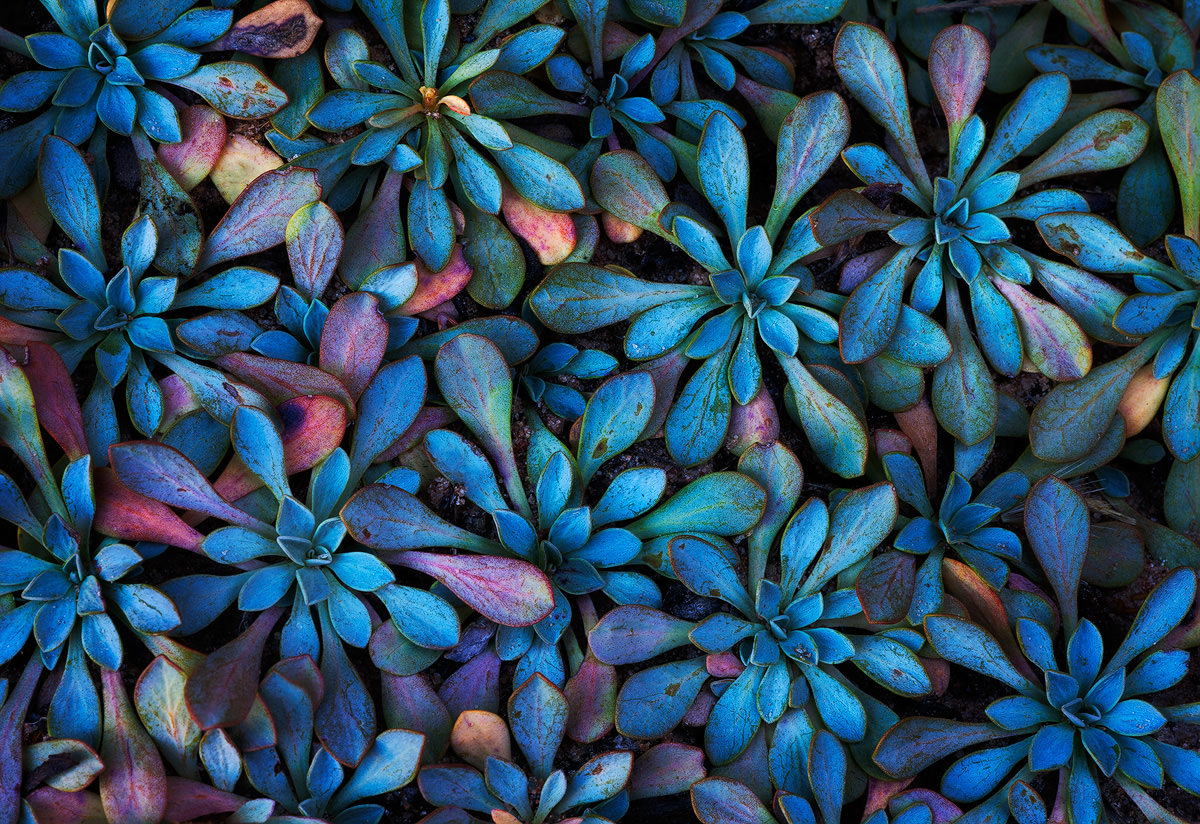
Get Close
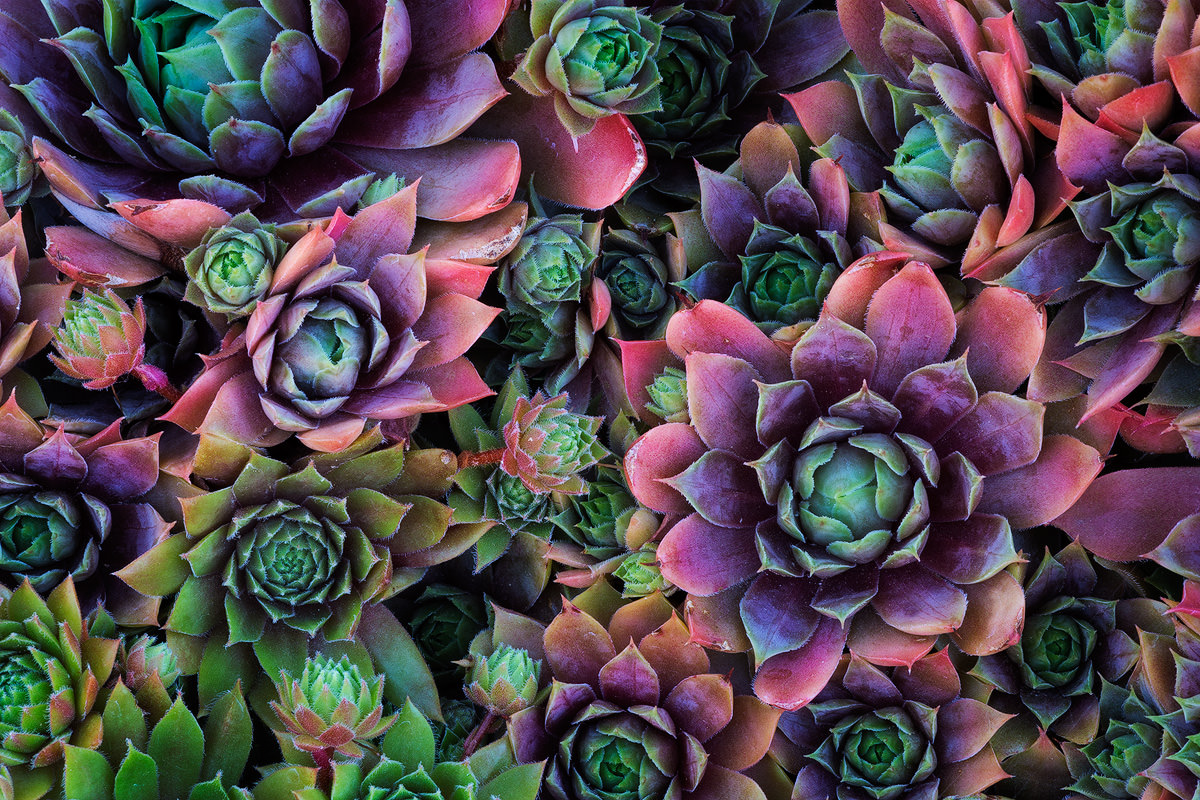
In almost all cases when photographing plants, I get quite close to my subject (often right at my lens’s minimum focusing distance). Getting close can help eliminate distractions, isolate your subject for a better composition, and emphasize the abstract elements of your subject. In the case of the subject above, each small rosette is about the size of a pencil eraser and the fist-sized plant itself was surrounded by rocks and dirt. A closer perspective helps eliminate all of those potential distractions, allowing the subject t of the photograph – the repeating rosettes – to fill the frame. This photograph also highlights the importance of looking around for details. These plants grow in tiny patches on canyon walls and slickrock in Zion National Park and without some effort to seek them out, most people will walk right by without a second thought.

Don’t Be Afraid to Look a Tiny Bit Foolish
Last summer, the Denver Botanic Gardens hosted a glass exhibit and the popularity of the gardens dramatically increased. The exhibit attracted large crowds which meant that setting up a tripod and leisurely photographing would not be possible. Still, on one particular visit to the garden, I saw this beautiful succulent rosette plant and felt like I had to photograph it before leaving. The plant was growing at an odd angle in a potted planter, right in front of the entrance that all visitors passed through upon arrival. Because of the location of the plant near the ground and its odd angle, I had to kneel down and contort my body to get the right angle. I heard a few snickers from visitors passing by, wondering what I could possibly be photographing. This general experience has repeated itself quite a few times and while I never want to get in the way of other visitors, I am willing to look a little foolish in public for a photograph. So, forget about what others will think and as long as you are not impacting their experience, feel free to embarrass yourself for a better photograph!
If you have any of your own tips on photographing plants, please share then in the comments below.
This guest post was submitted by Sarah Marino, a professional landscape photographer based in the Rocky Mountain West. She is the co-author of a popular e-book, Beyond the Grand Landscape, which you can check out on her Nature Photo Guides website, along with more of her work.
Thank you for a very inspiring article. I am a hobbyist and have focussed on landscape, cityscape and macro.This morning I started thinking of trying out portrait and plants photography. I read your article while waiting to board my flight The part I find particularly interesting is about feeling free to embarrass yourself for a better photography.I remember that feeling once, I had to be on my knees to take pictures of a spiderweb wet with early morning dew in a botanical garden.It felt awkward as many walkers stopped momentarily in their walks, look down, chuckle and then move on.it was hilarious, strangely though, I felt a sense of major accomplishment afterwards!
Love these images and the explanations that go with them. I have never owned a camera (bought my daughter a very good one instead for college) and have only just got a mobile phone with a ‘decentish’ camera, but boy have I been having fun with it! I am even quite proud of a few. I enjoy the close ups and am finding succulents to be one of my favourite to photograph along with gazania.
I purchased an upper end point and shoot as I got tired of carrying my dslr around to events where i am doing other things. My canon s90 will be in my shirt pocket when i am not shooting. Any suggestions about using these for garden festivals/shows?
I Hope that someday i can be a like this i love taking photos of plants most peoplw say you need to live some where amazing but thats not true i live down a small lane and i can find some amazing things to take photos of on my phone … You can do what ever you want if you just try xxx
These are such gorgeous photographs. Someday I will graduate to a “nice” camera and hope to do better. I love taking photos of all my plants. Your details stand out so well. Love those little “hairs” on the succulents.
My Looking-Foolish moment came while photographing in Olympic National Park, Washington. I was sprawled next to the entry road waiting for the wind to pause so that I could press the shutter as my 105mm Micro lens was focused on a fingertip-size bluebell flower.
The wind was quite content to leave me motionless on the ground. Eventually there was the sound of footsteps behind me. Turning to see who was approaching, I saw a rather embarrassed-looking Park Ranger. He then explained that a motorist had reported a lifeless body beside the road. Got a nice close-up though ;- D.
That motorist probably still wonders what happened! That is a good story, Art. :)
Sarah, lovely photos. Question–did you use a neutral density filter for some of these shots?
Thank you for the comment, Cindy. I did not use an ND filter for any of these photos. I may have used a polarizer on a few of them. I typically only use an ND filter when I want to slow down my exposure time which was not a technical goal for any of these photos.
Finally! an article about using a lens I already have and doing things I’ve already done! Yay me! ;)
Lovely pictures, and some great tips here :-)
Thanks! I hope you enjoy the ebook.
Great post, great pictures
Thank you, Georg!