The way I see it, sand dunes are among the most wonderful places in the world. They’re the very definition of a windswept landscape — the product of our planet’s most fundamental forces. They also exist everywhere, from coastal regions to deserts that span entire continents. Below, I’ll offer some of my top tips for photographing sand dunes and getting incredible images.
Before I begin, here’s a quick summary of the most important tips for sand dunes photography:
- Pack weatherproof camera equipment.
- Don’t change lenses if it’s windy.
- Use a clear filter to protect your lens.
- Bring a tripod that you can clean.
- Look for small patterns in the sand.
- Simplify your composition.
- Pay attention to footprints in your image.
- Don’t fixate on just one subject.
- Pay attention to the light and color.
Below, I’ll go into some more detail and real-world examples of how to apply these tips in practice.

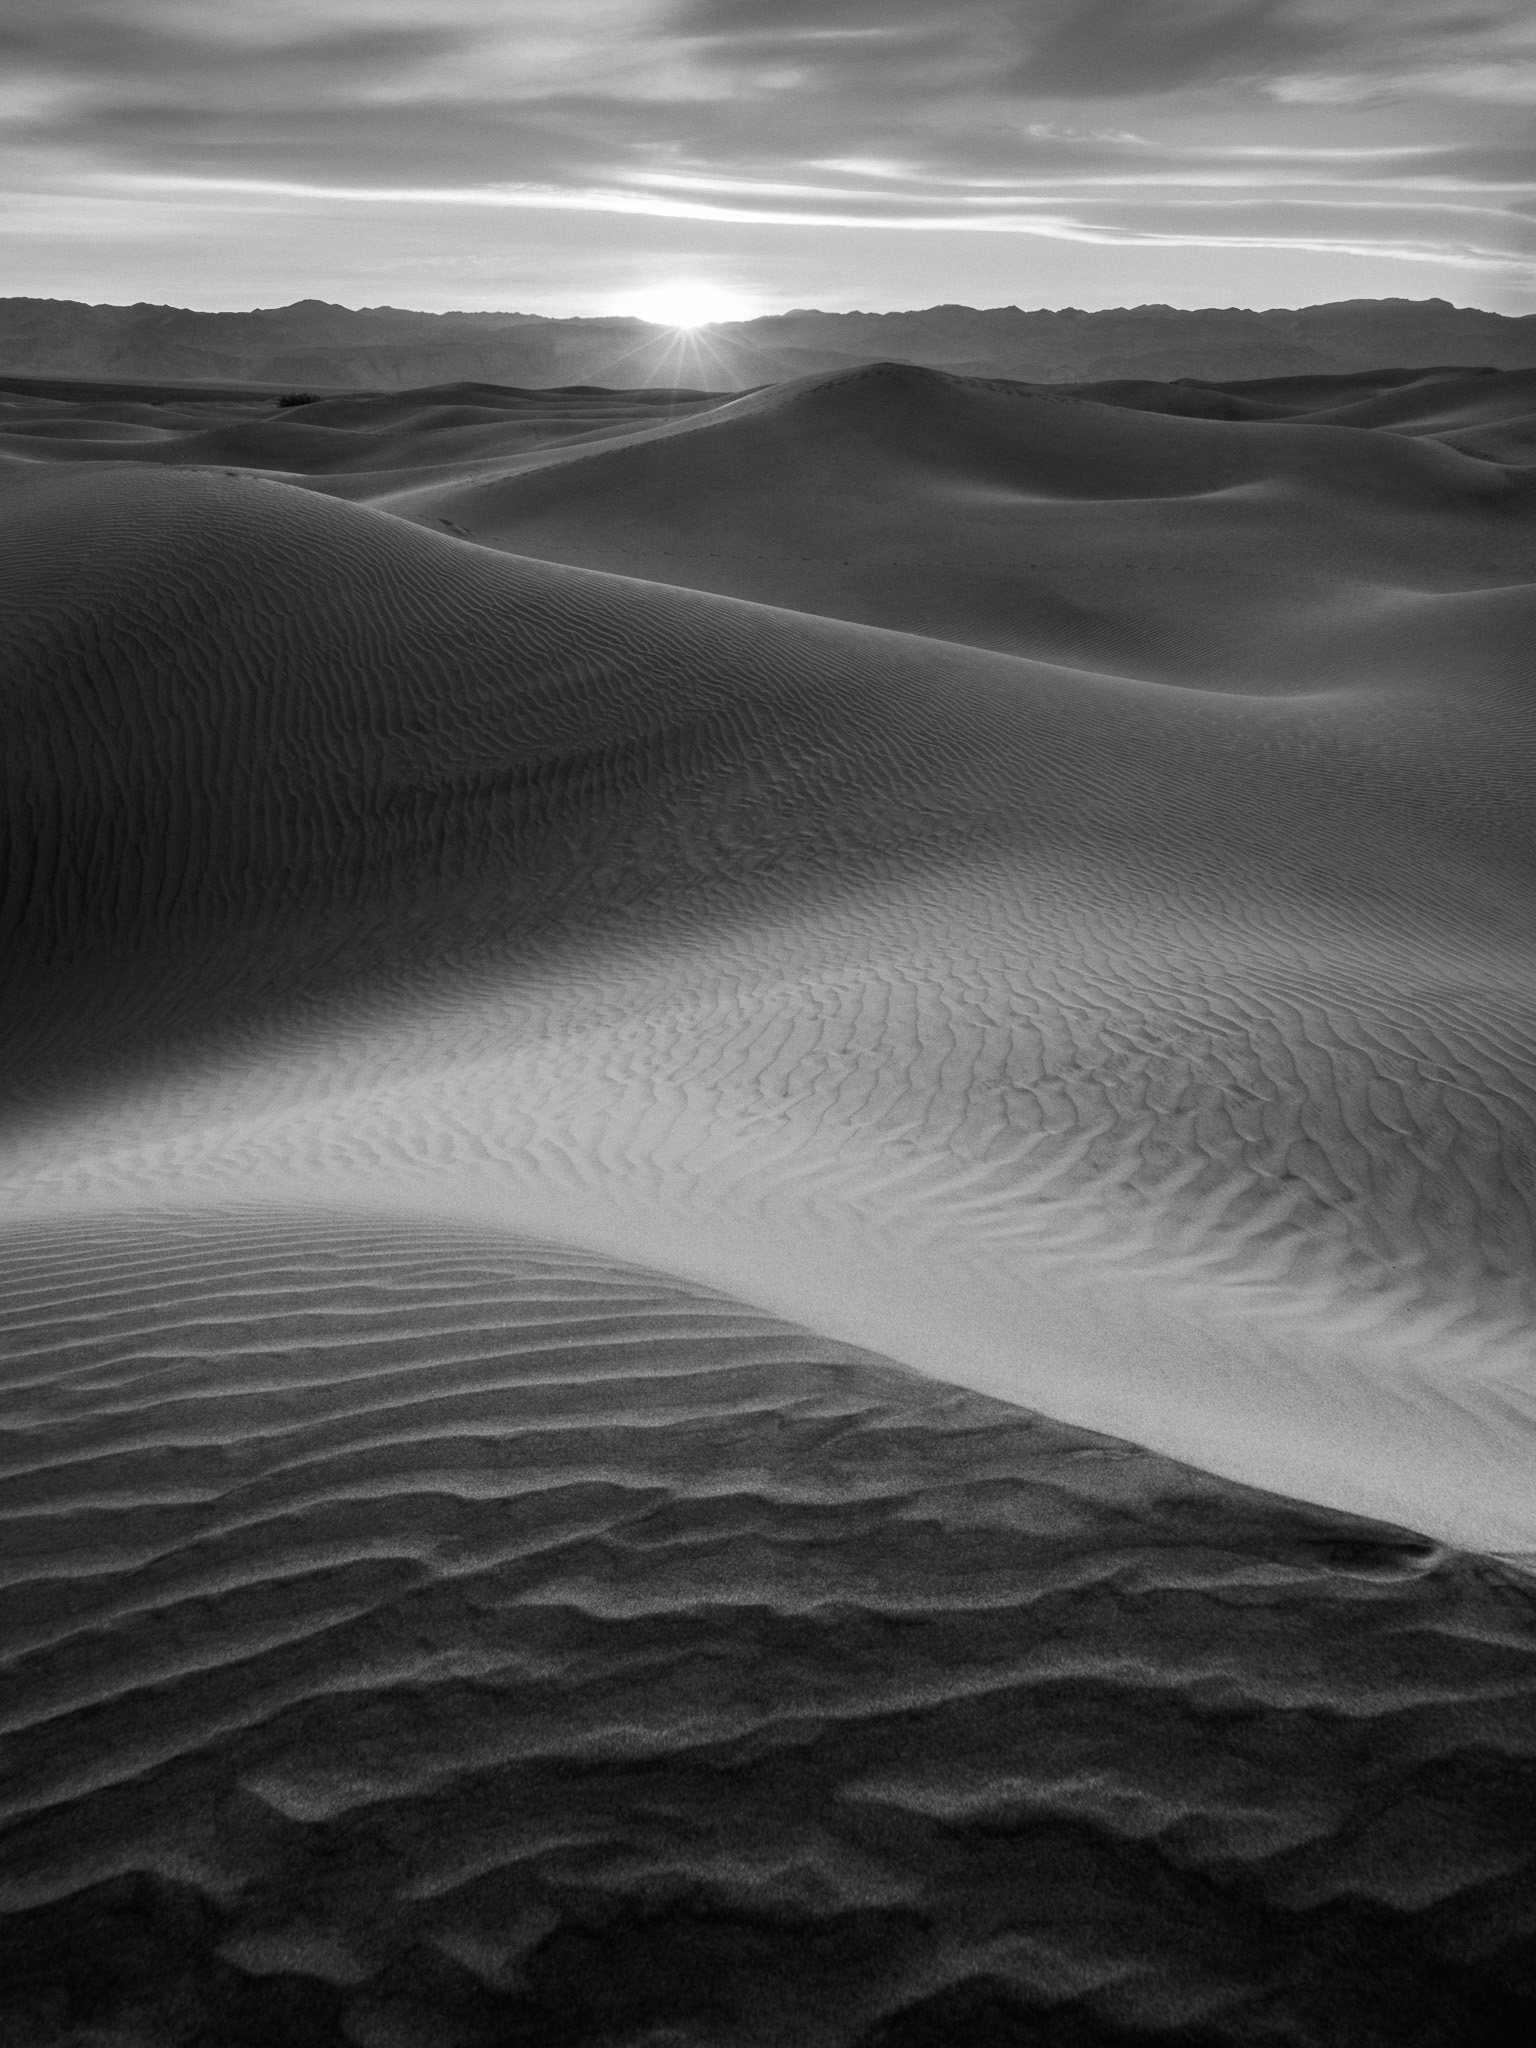
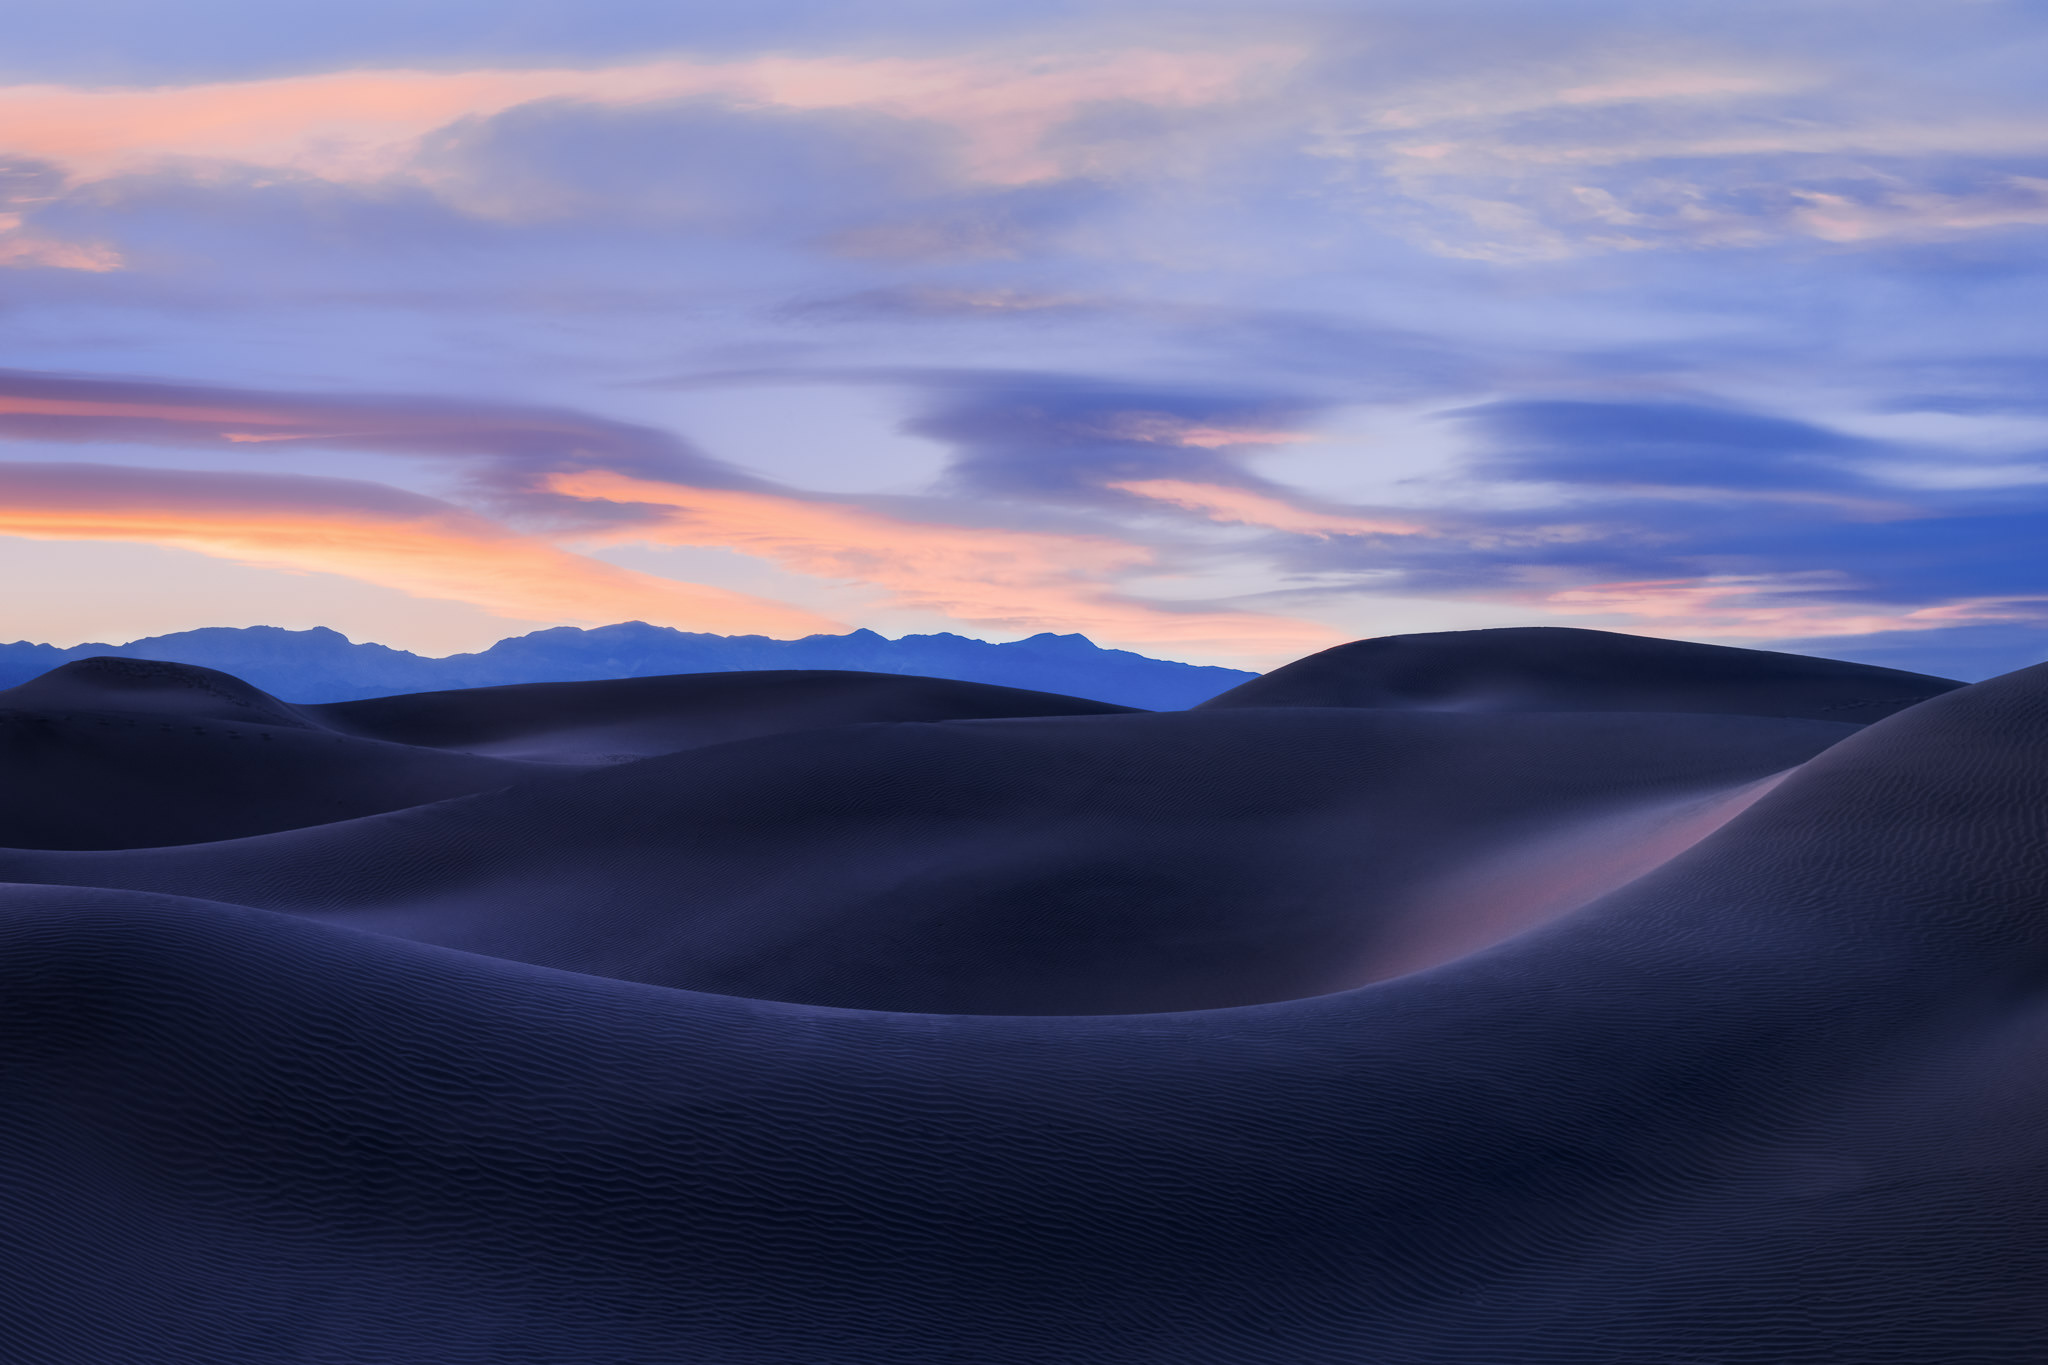
Mesquite Sand Dunes, Death Valley National Park.
Table of Contents
1) Finding sand dunes
The first step is simple: Find some sand dunes. It might sound hard if you don’t live in the desert, but there are more dunes around the world than you might think. You probably have a good place in mind already. If not, you might be able to find amazing dunes somewhere that you travel.
Whatever the case, do some research ahead of time. For example, a lot of people know that Death Valley has beautiful sand dunes, but did you know that there are five separate dune fields across the park, ranging from popular to rarely visited? Each one has unique qualities for photography, and you might prefer one over another depending upon the type of photos you want. That’s something you should know before you visit.
The Mesquite Sand Dunes in Death Valley National Park are some of the best dunes on the planet. However, these aren’t the only dunes in the park.
I probably don’t need to tell you that the best option here is just to search online. As early as possible, figure out everything you can about the dunes: their size, height, accessibility, and so on. Along with that, search Google Images to figure out how they might look when you arrive. The important thing is to be prepared and ready to capture the photos that you want.
2) Make your equipment sand-proof
This one’s a bit more difficult. Most camera gear isn’t built to hold up perfectly in sandy conditions. If you’re not careful, you could end up damaging or even ruining your equipment.
The good news — if it’s not windy, you’ll usually be fine. Unless you actually drop your camera, you probably won’t get too much sand in it. (And even if there is a little, you can just wipe it off without worrying too much.)
The bigger problem is that wind is very common on sand dunes. That’s usually why they formed in the first place. So, how can you keep your equipment safe when you’re walking through a swirling ocean of sand?
If you’re taking pictures in the wind, it’s very easy for sand to damage your equipment. So, take the proper steps to keep your gear safe. It’s worth the effort, too — done right, sand dune photography is spectacular.
The best place to start is with your lens. Many lenses out there aren’t sealed for conditions like this. If enough sand lands on the focusing ring, for example, the ring could become rough and gritty afterward. That happened to me once, and it took a few months before the lens was back to normal.
Worse — some lenses move in and out as they zoom or focus. If that’s true for your equipment, it’s a recipe for disaster. Even if just a few grains of sand fall on the lens while it’s extended, they might get stuck inside. This causes a scraping sound every time you zoom your lens in the future. That’s not good.
So, if possible, bring a lens that doesn’t move externally as you use it. This is the case for certain zoom lenses and a majority of prime lenses.

I took this abstract photo with the Nikon 70-200mm f/4. Luckily, this lens doesn’t move externally while it zooms, which makes it great for working on the dunes. Other options on the market are similar.
3) Should you change lenses?
If your camera lets you change lenses, a lot of what I said above is even more relevant. If sand is flying around, never expose sensitive parts of your equipment. So, changing lenses on a sand dune — if it’s windy, at least — is not something I recommend.
Of course, this does present a bit of an issue. If you can’t change lenses, and you also can’t use a moving zoom lens, are you stuck with just a single prime lens? Do you have to take every single photo at the dunes using the same focal length? Not necessarily. There are some lenses — usually more expensive options, but not always — that don’t move while you zoom them. Or, if you have multiple camera bodies, this is an excellent time to use a different lens on each one.
But, if these aren’t options for you, all is not lost. Unless you’re in the middle of a sandstorm, you can probably get away with using a zoom lens and homemade weatherproofing. Take a plastic bag, cut a hole for the front of your lens, and seal any sensitive areas off with rubber bands. Even as you zoom the lens in and out, you shouldn’t get any grains of sand falling onto the exposed part of the lens barrel. Again, this won’t work in the most extreme conditions, but it’s far better than nothing.
If you absolutely need to change lenses, wait until the wind dies down as much as possible. Turn your back to the wind and change lenses as quickly as possible, ideally pointing the camera at a downward angle while you do so (in order to minimize the amount of time sand can fall into the chamber). However, there’s no good solution if it’s a windy day, and the best route is to avoid changing lenses if possible.
4) Weatherproofing your other gear
Along with lenses, you also have to protect your camera and your tripod.
Cameras are easy. In general, you don’t need to take any extra steps to protect them from sand. That’s especially true if you have a weather-resistant DSLR or mirrorless camera. Chances are good that it’s already sealed for the level of sand that you’ll encounter. Still, if you have the chance to choose between multiple cameras, pick the one that is better sealed. You can never be too safe.
Great Sand Dunes National Park, Colorado.
Tripods are bit more difficult. Even if it’s not windy, you’ll probably get plenty of sand on the lowest leg sections, just because they’ll be resting on the dunes. And, if you haven’t heard, sand is the number one killer of tripods. You might have experienced this before; I know I have (twice).
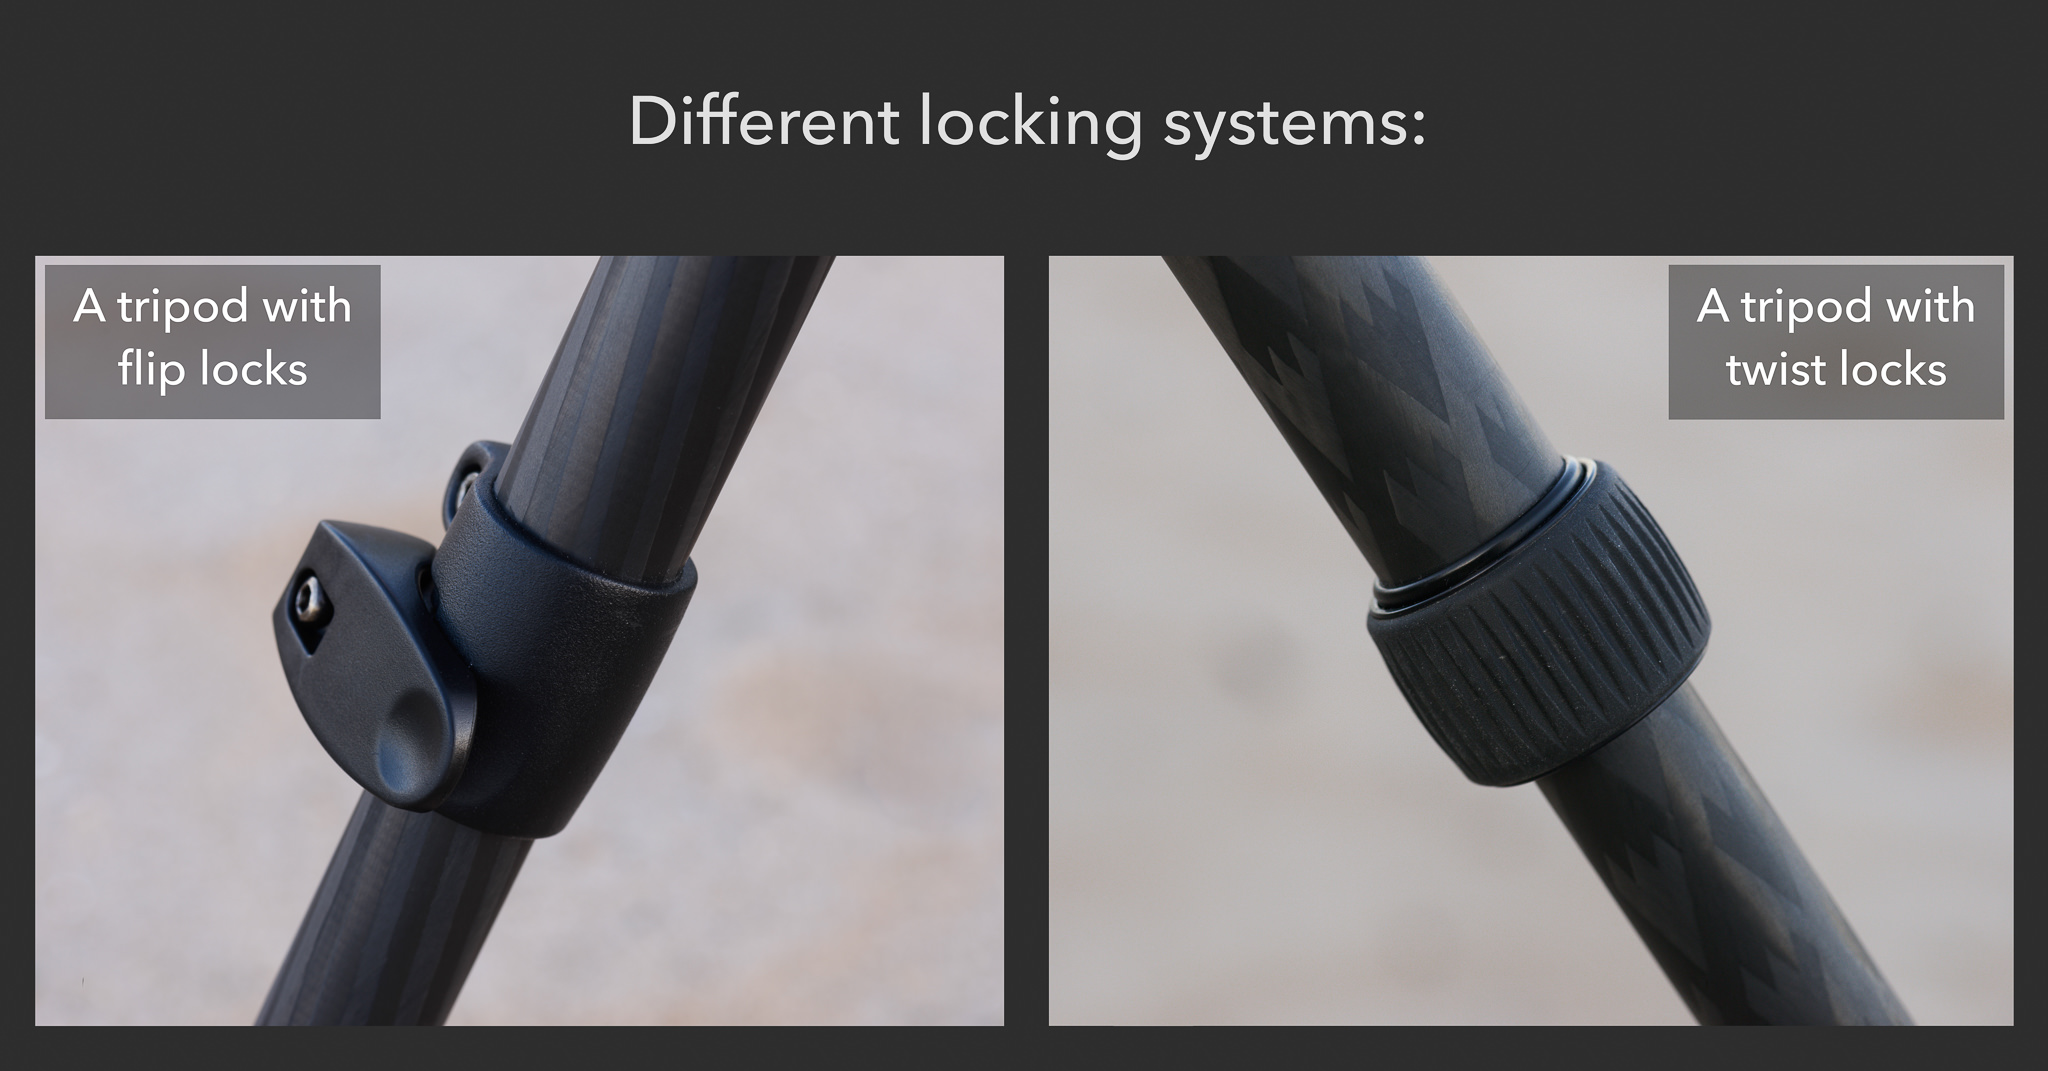
So, what can you do to avoid this fate? My top suggestion is not to bury your tripod’s locking mechanisms under the sand. More than any other part of your tripod, those are highly susceptible to damage.
For example, if you have twist locks or flip locks on the tripod legs, be sure that they stay above ground. The best thing you can do here is to extend the bottom, thinnest section on your tripod before any of the others. (And this is one of the few times where I recommend doing so, since it’s the least stable section on your tripod.)
Then, when you’re collapsing your tripod after you’ve finished taking pictures, make sure that there aren’t any grains of sand on the tubes before you close them. If there are, you might end up scratching the tripod or making the legs stick in the future.
Also, if you can take apart your tripod and clean it, do so as soon as possible. High-end tripods will have this ability. It’s the best way to extend the life of your tripod and minimize any damage. (If you’re interested, you can read more about using your tripod properly for landscape photography.)
5) Use a clear filter
The last equipment-related tip I have is to use a clear filter.
If sand is flying around everywhere, especially if you’re at a low angle, you’ll want to protect the front element of your lens. Even on modern lenses, it’s very possible to scratch the coatings on the front. And if that happens, it’s permanent. There’s nothing you can do to fix it except to send it out for repair.
I normally don’t use a clear filter for landscape photography. This is simply personal preference, but it’s rare to be in a situation where I’m especially worried about damaging the front element of my lens. Sand dunes are the exception. If you’re taking pictures in the dunes, and it’s windy, some sand will hit your front element. It might not scratch your lens — there’s no way to be certain — but it’s certainly not ideal, especially for prolonged periods of time.
So, do yourself a favor and use a clear filter (and make sure it’s a good one, or you’re at risk of losing significant amounts of sharpness). You might be using a clear filter already, but, if not, this is one time when it really helps.
Great Sand Dunes National Park, Colorado.
6) The creative side of sand dunes photography
Photography is all about the creative side of things, and there are more opportunities to flex your artistic muscles at sand dunes than nearly any other type of landscape.
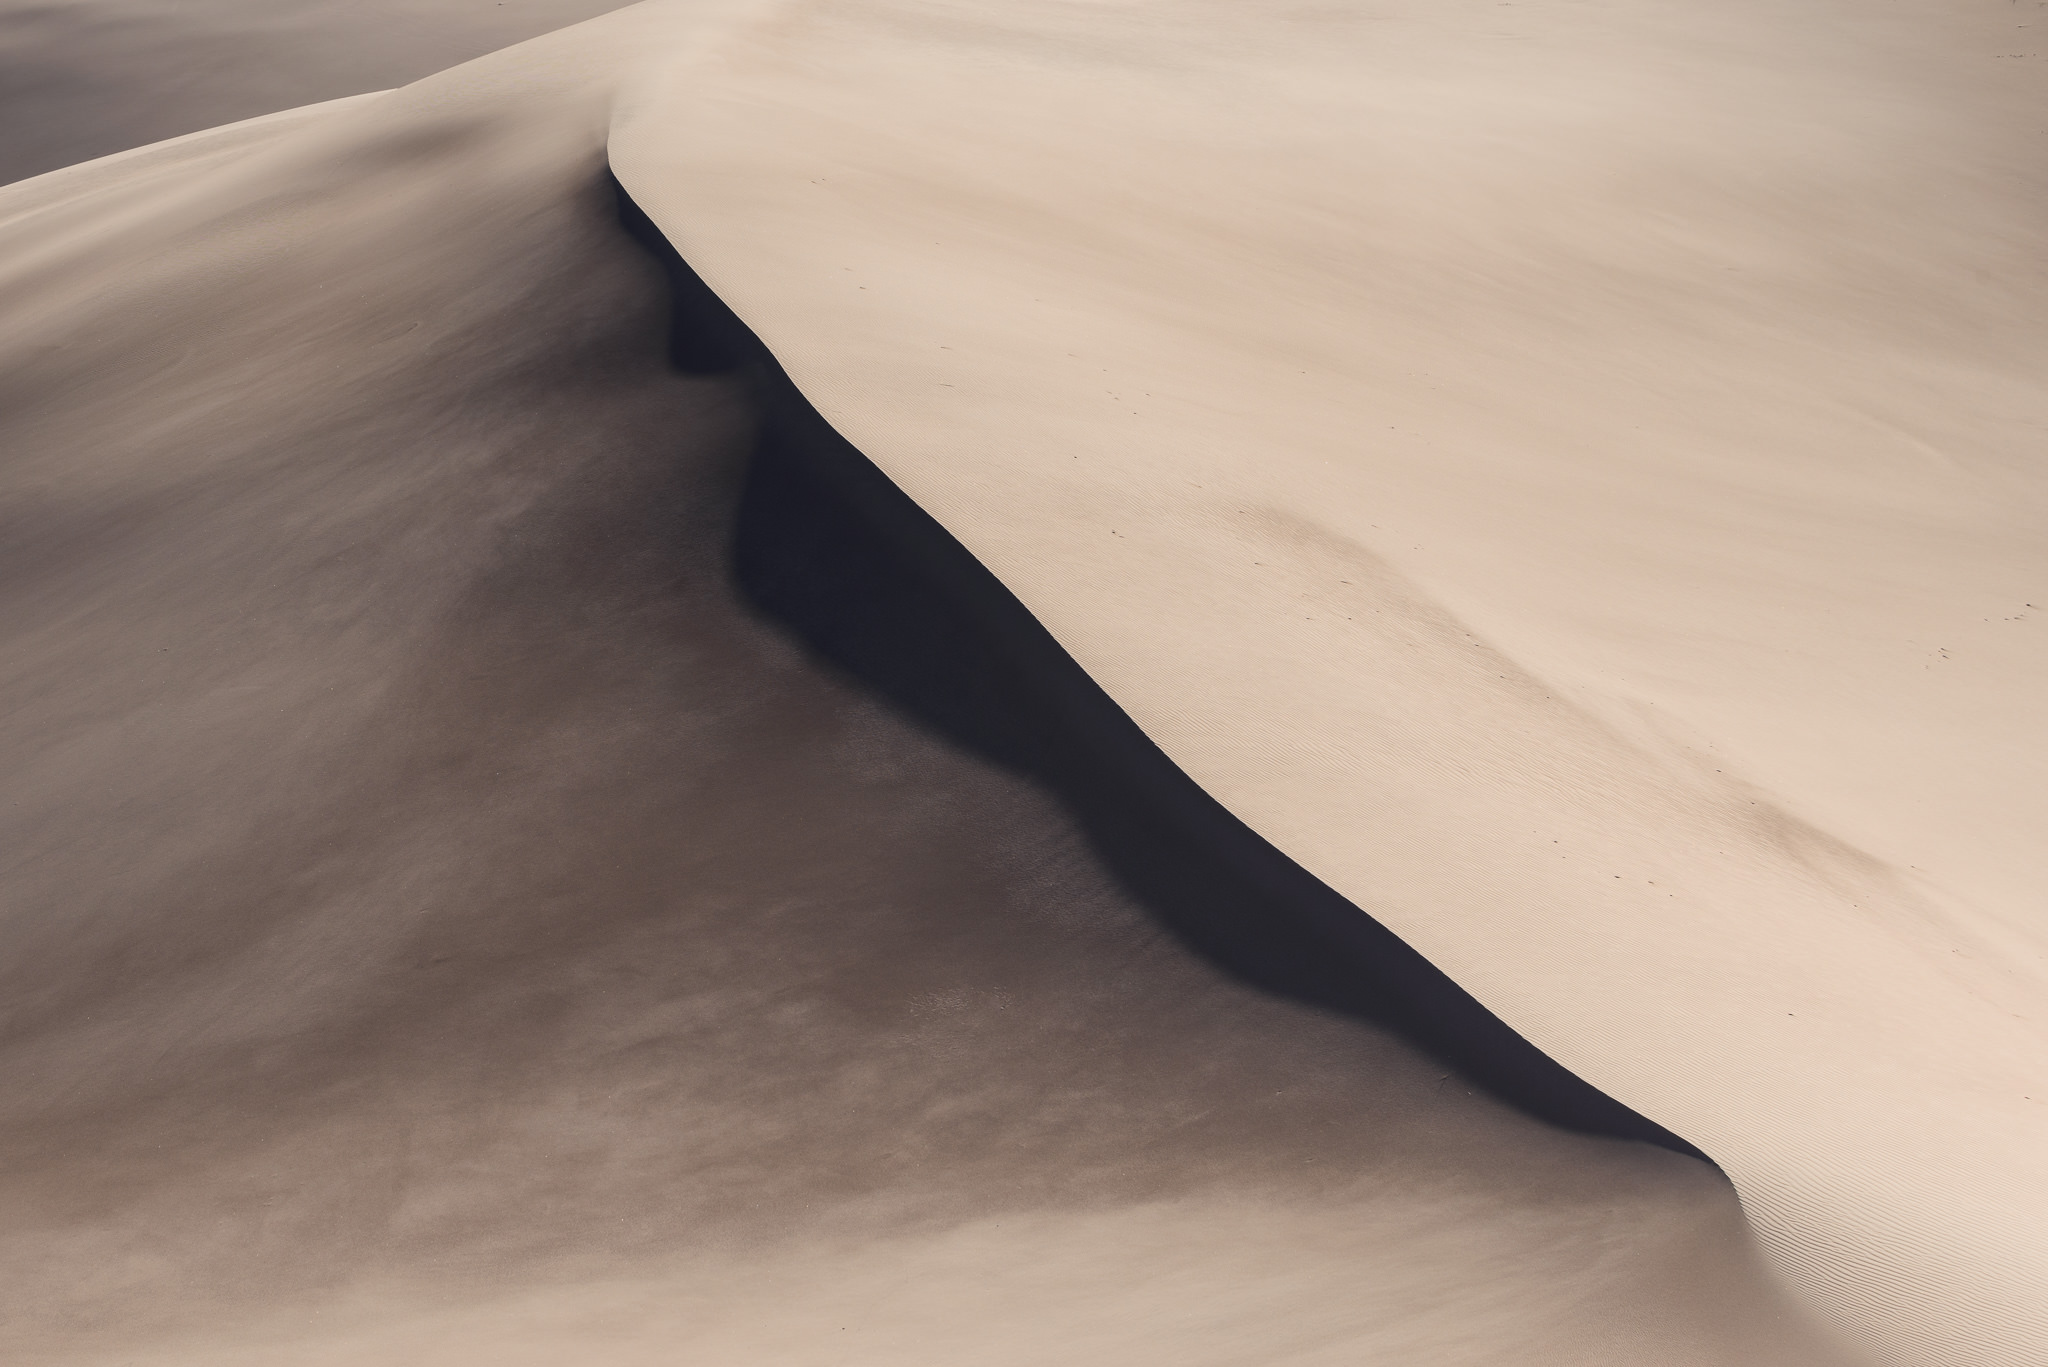
Why is this? It’s all about lines and shapes. Fundamentally, sand dunes are nothing but the pure elements of composition. Where else will you be able to find so many examples of diagonals, curves, patterns, repetition, harmony, and balance? It’s like walking on an abstract canvas. Use that to your advantage.
Sand dunes give you a huge opportunity for creative photography. My first recommendation is to pay attention to any small details and patterns that you see. You’ll find plenty, and some work quite well for photography.
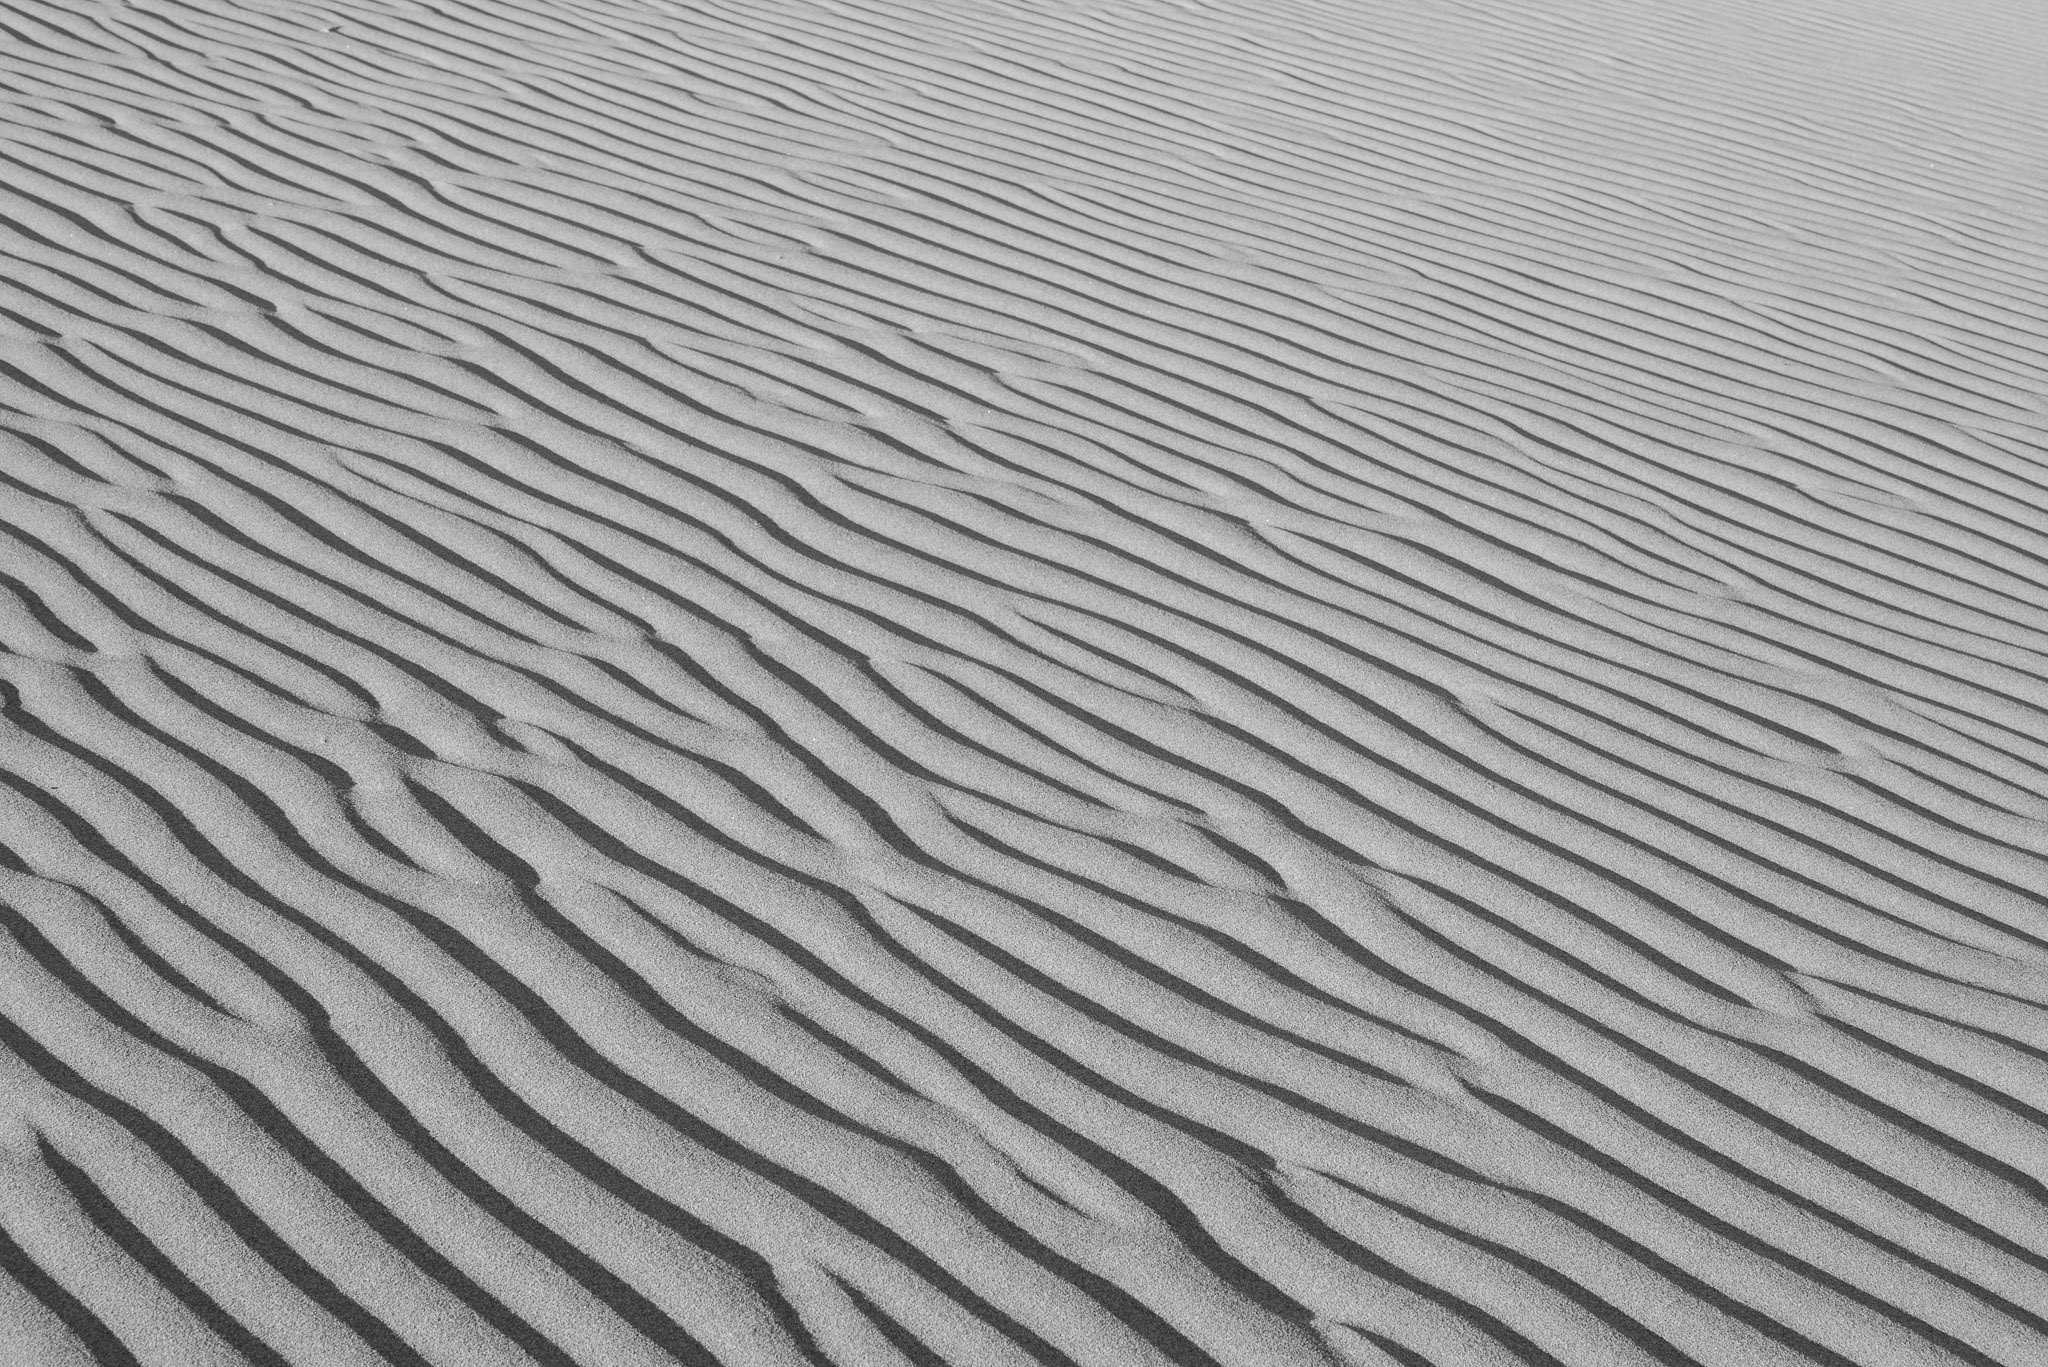
Small patterns in the sand can be perfect for photography.
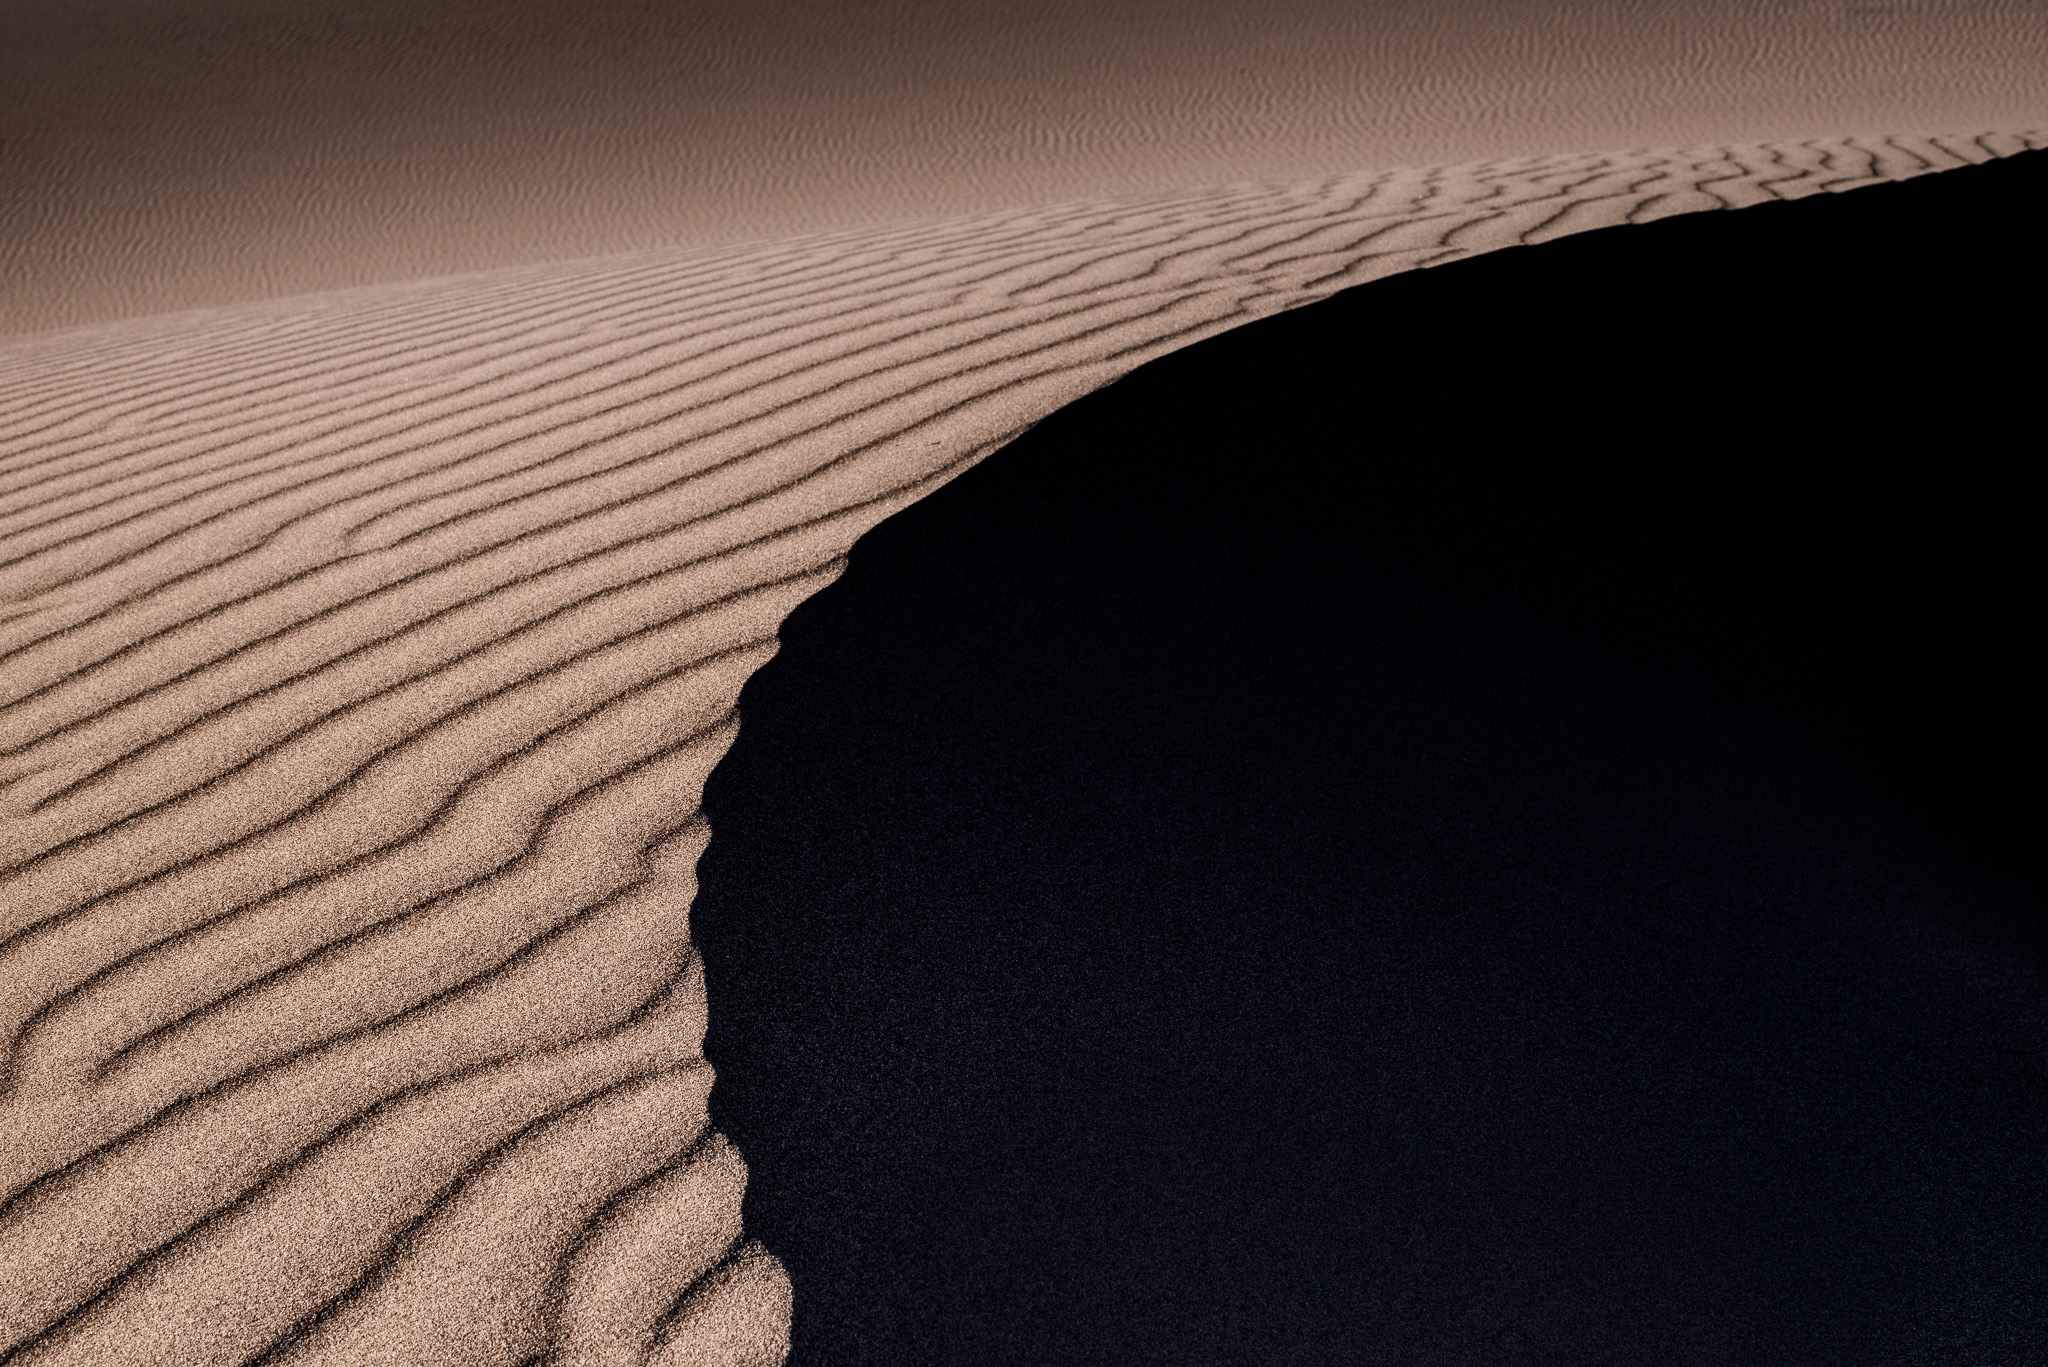
Also, this is a wonderful opportunity to practice the art of simplification. Good landscape photos have a clear, strong, direct message. They say what you want them to say, and nothing more. No element of the image speaks counter to your message.
Because of the nature of sand dunes, simplification is very natural. You aren’t working with complex, chaotic landscapes in the first place. It’s very different from something like a rainforest, or even a city.
So, pick out the elements that you want, and eliminate everything else. This goes for plants or shrubs that you might see, as well as objects in the background. It’s easy to create very deliberate compositions. You have a lot of flexibility.
Simplification was crucial for this photo. I’m not overwhelming the viewer with too much information.
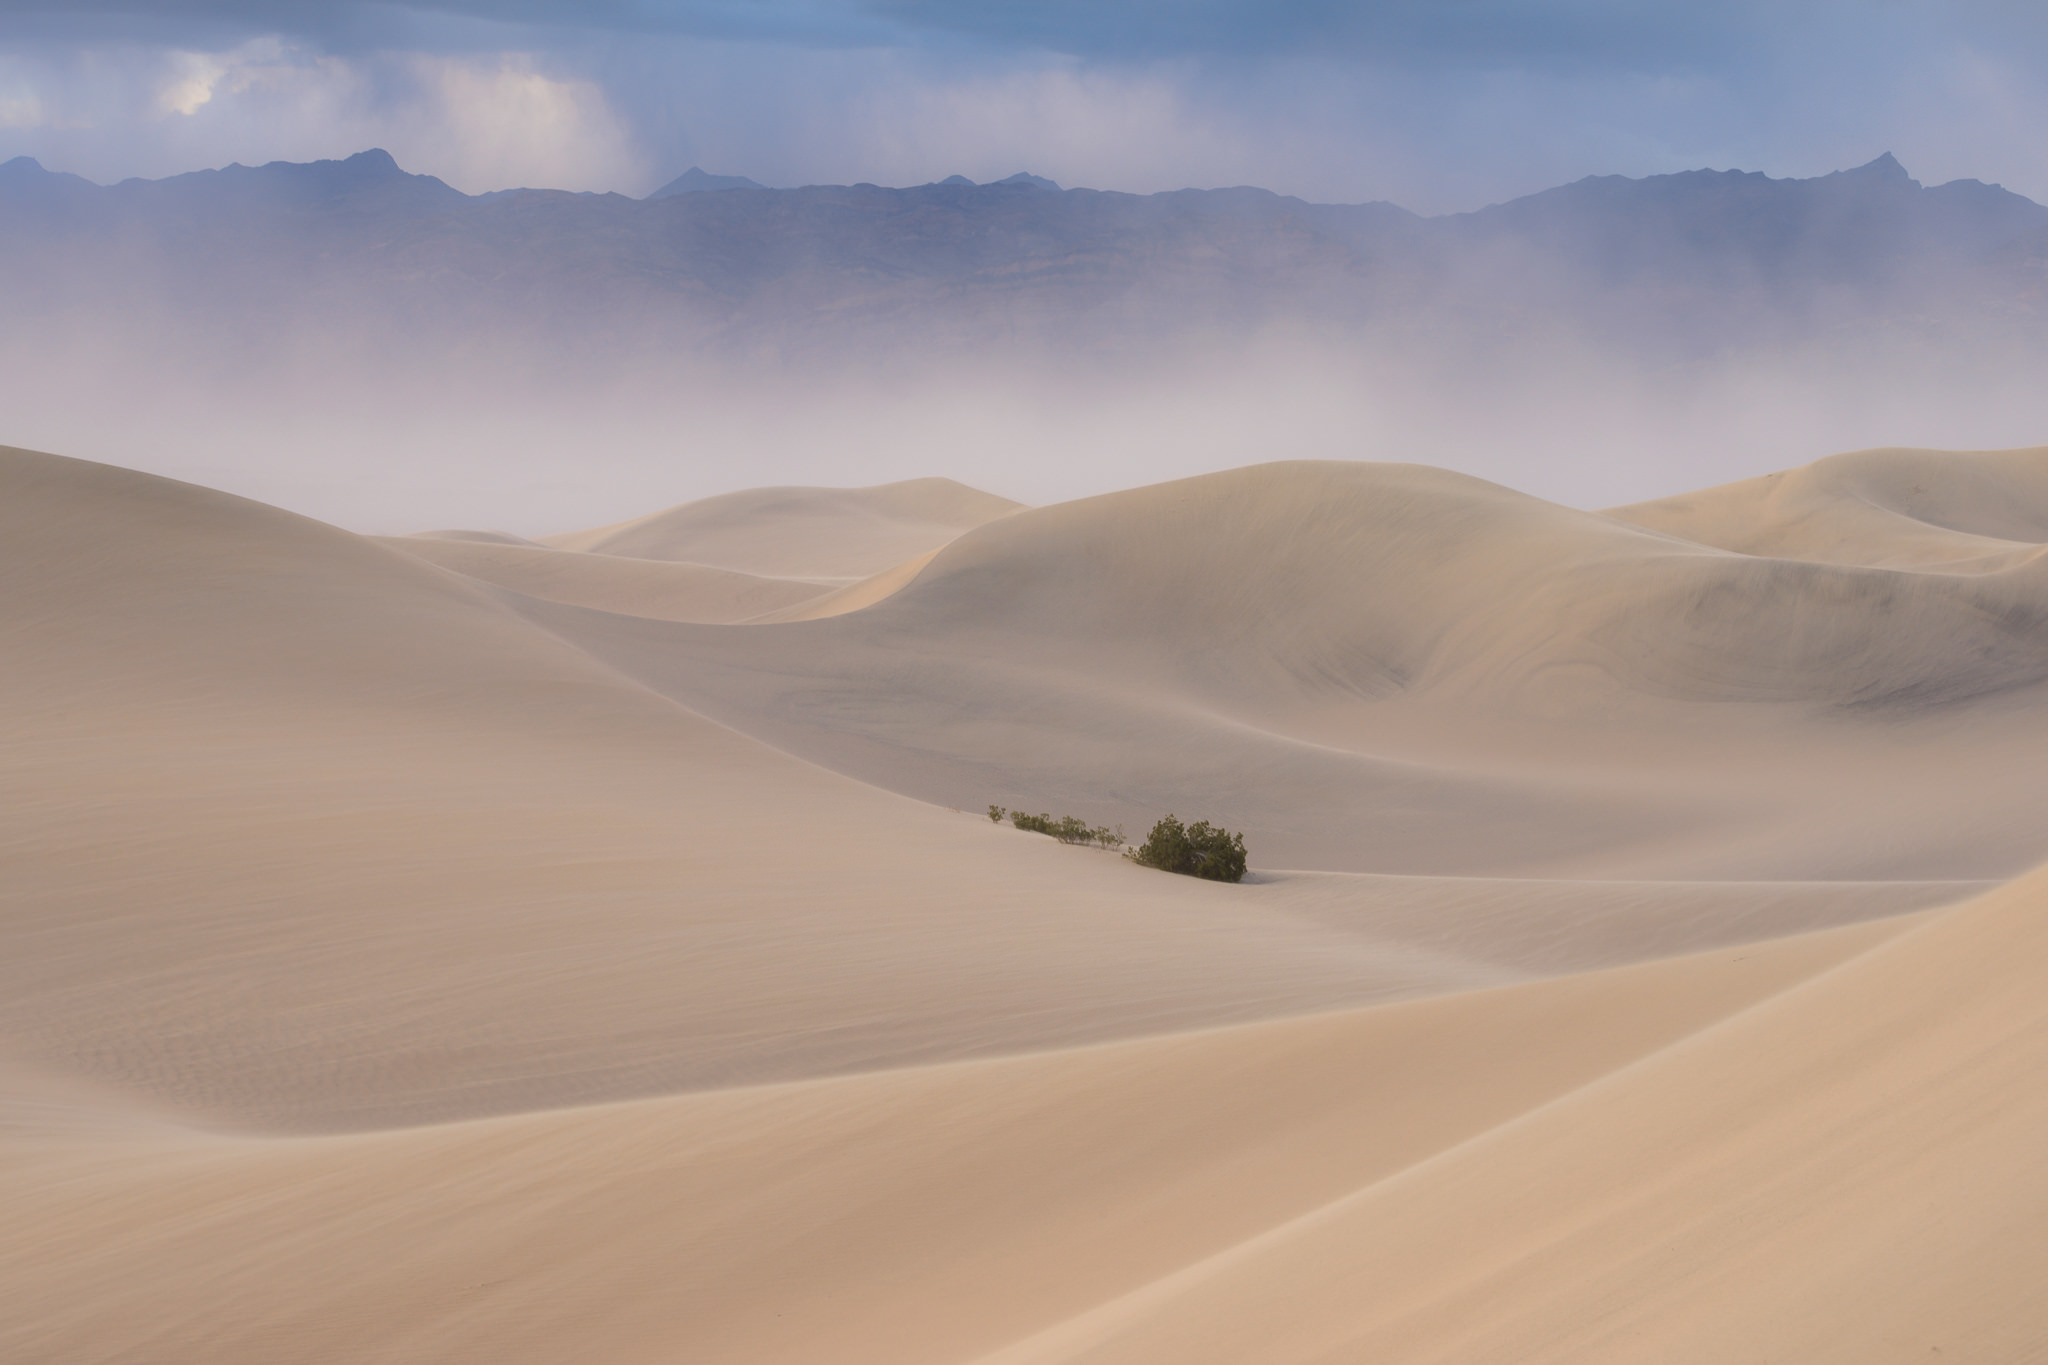
I also recommend moving around and searching for different subjects. There aren’t many landscapes with such a range of possible foregrounds and backgrounds that you can find just by moving around a little. Sand dunes are great for exploring.
Personally, when the light is good, this is one type of landscape where I’m always running around. There’s just so much stuff to photograph. You might come back with several good and unique images from one or two hours at the dunes.
So, don’t fixate just on a single subject and avoid moving. Normally, that might work in landscape photography — finding a good composition, and waiting there for the light — but I don’t recommend it here. Sand dunes simply have too many opportunities for photography.
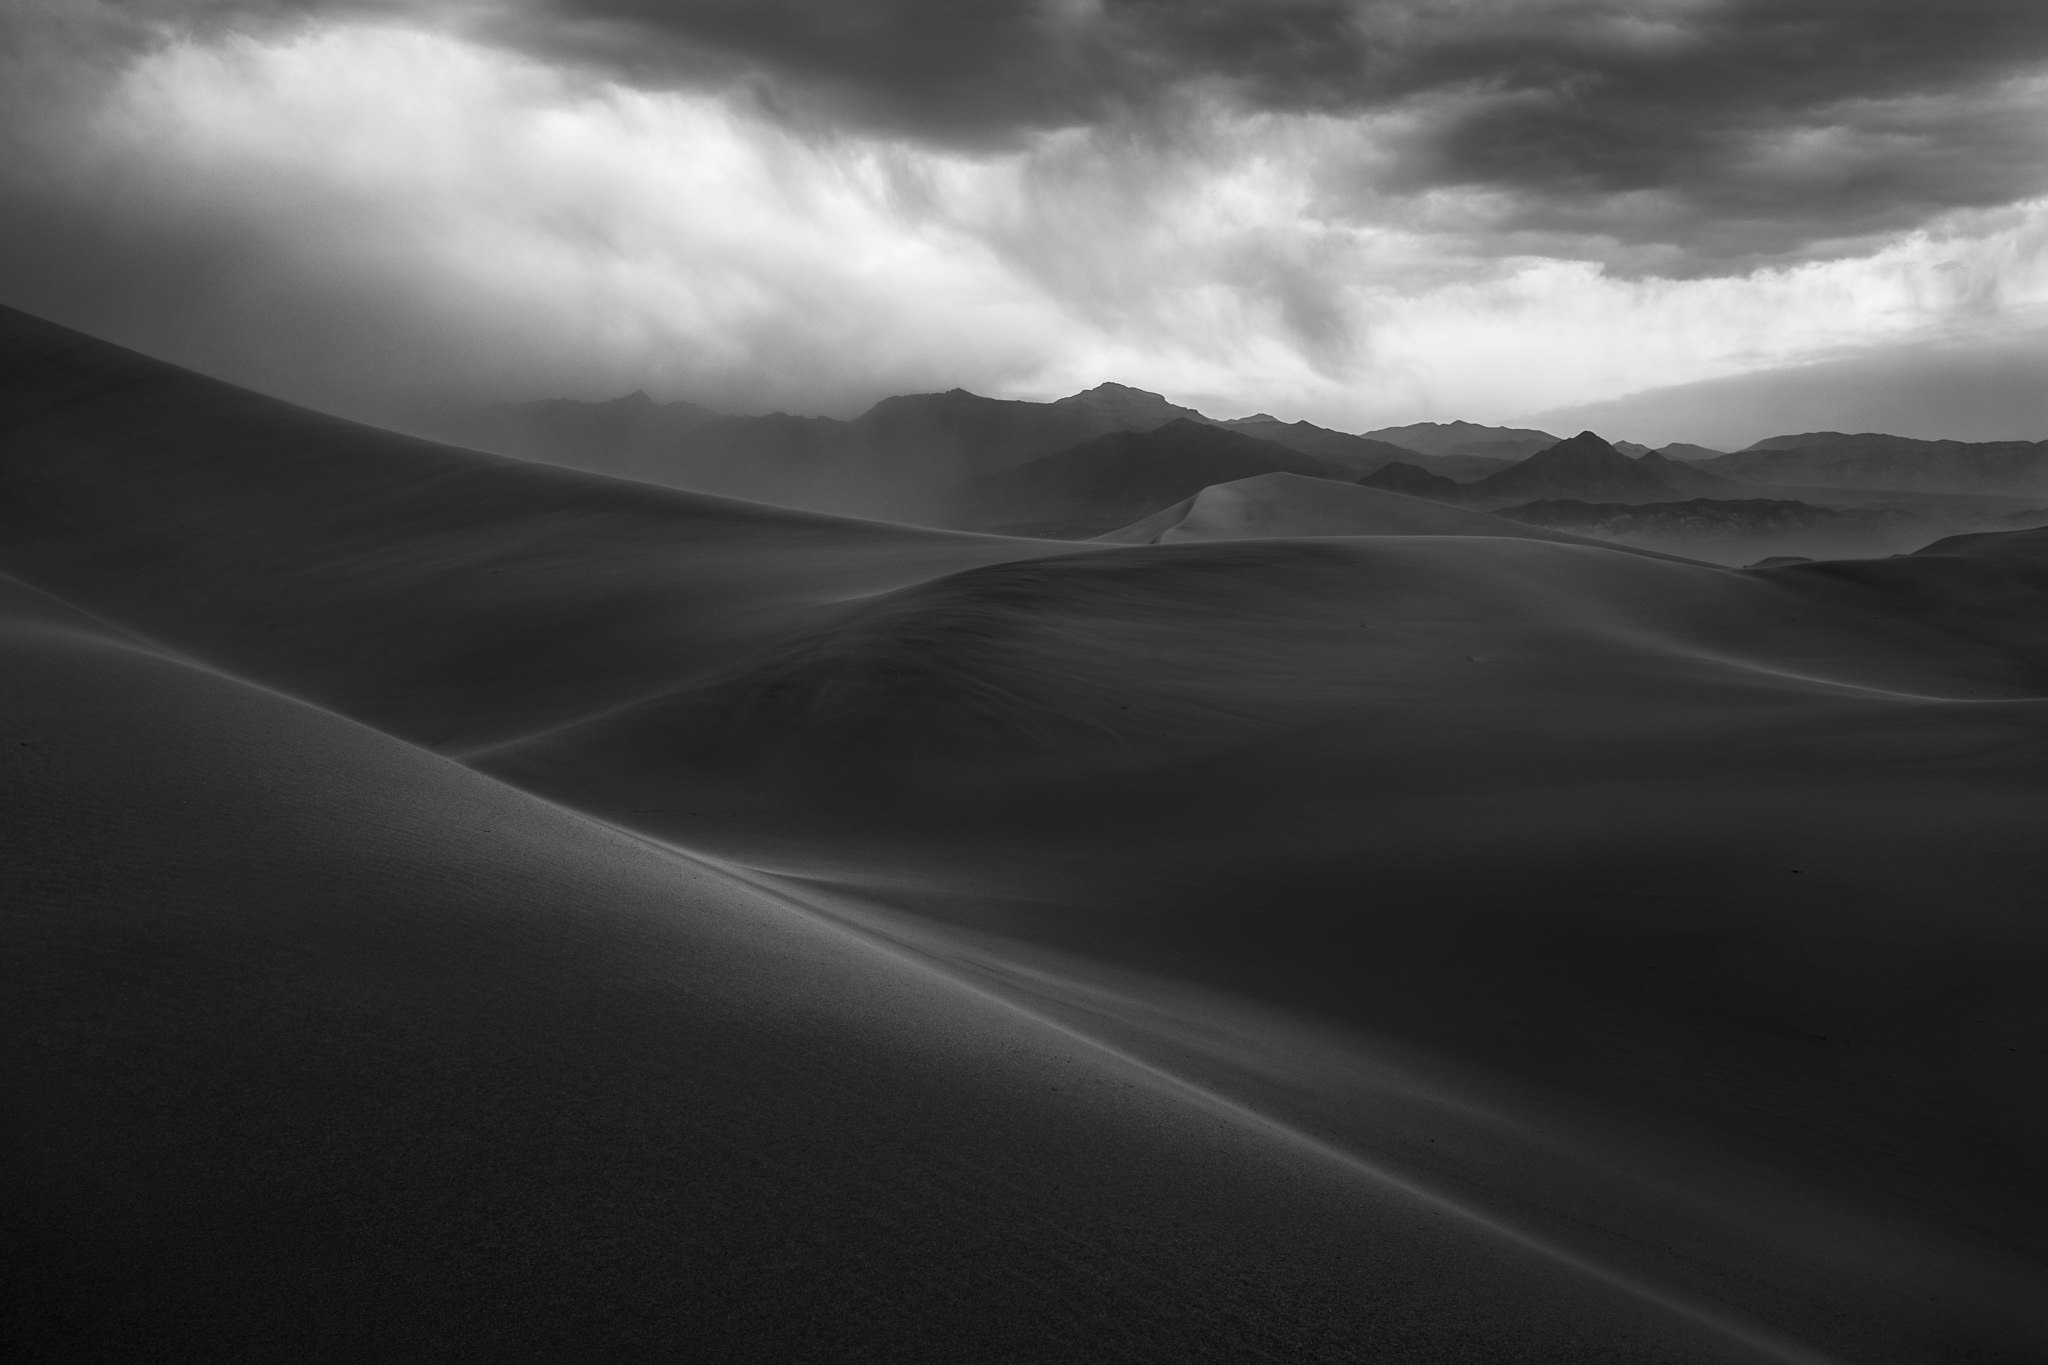
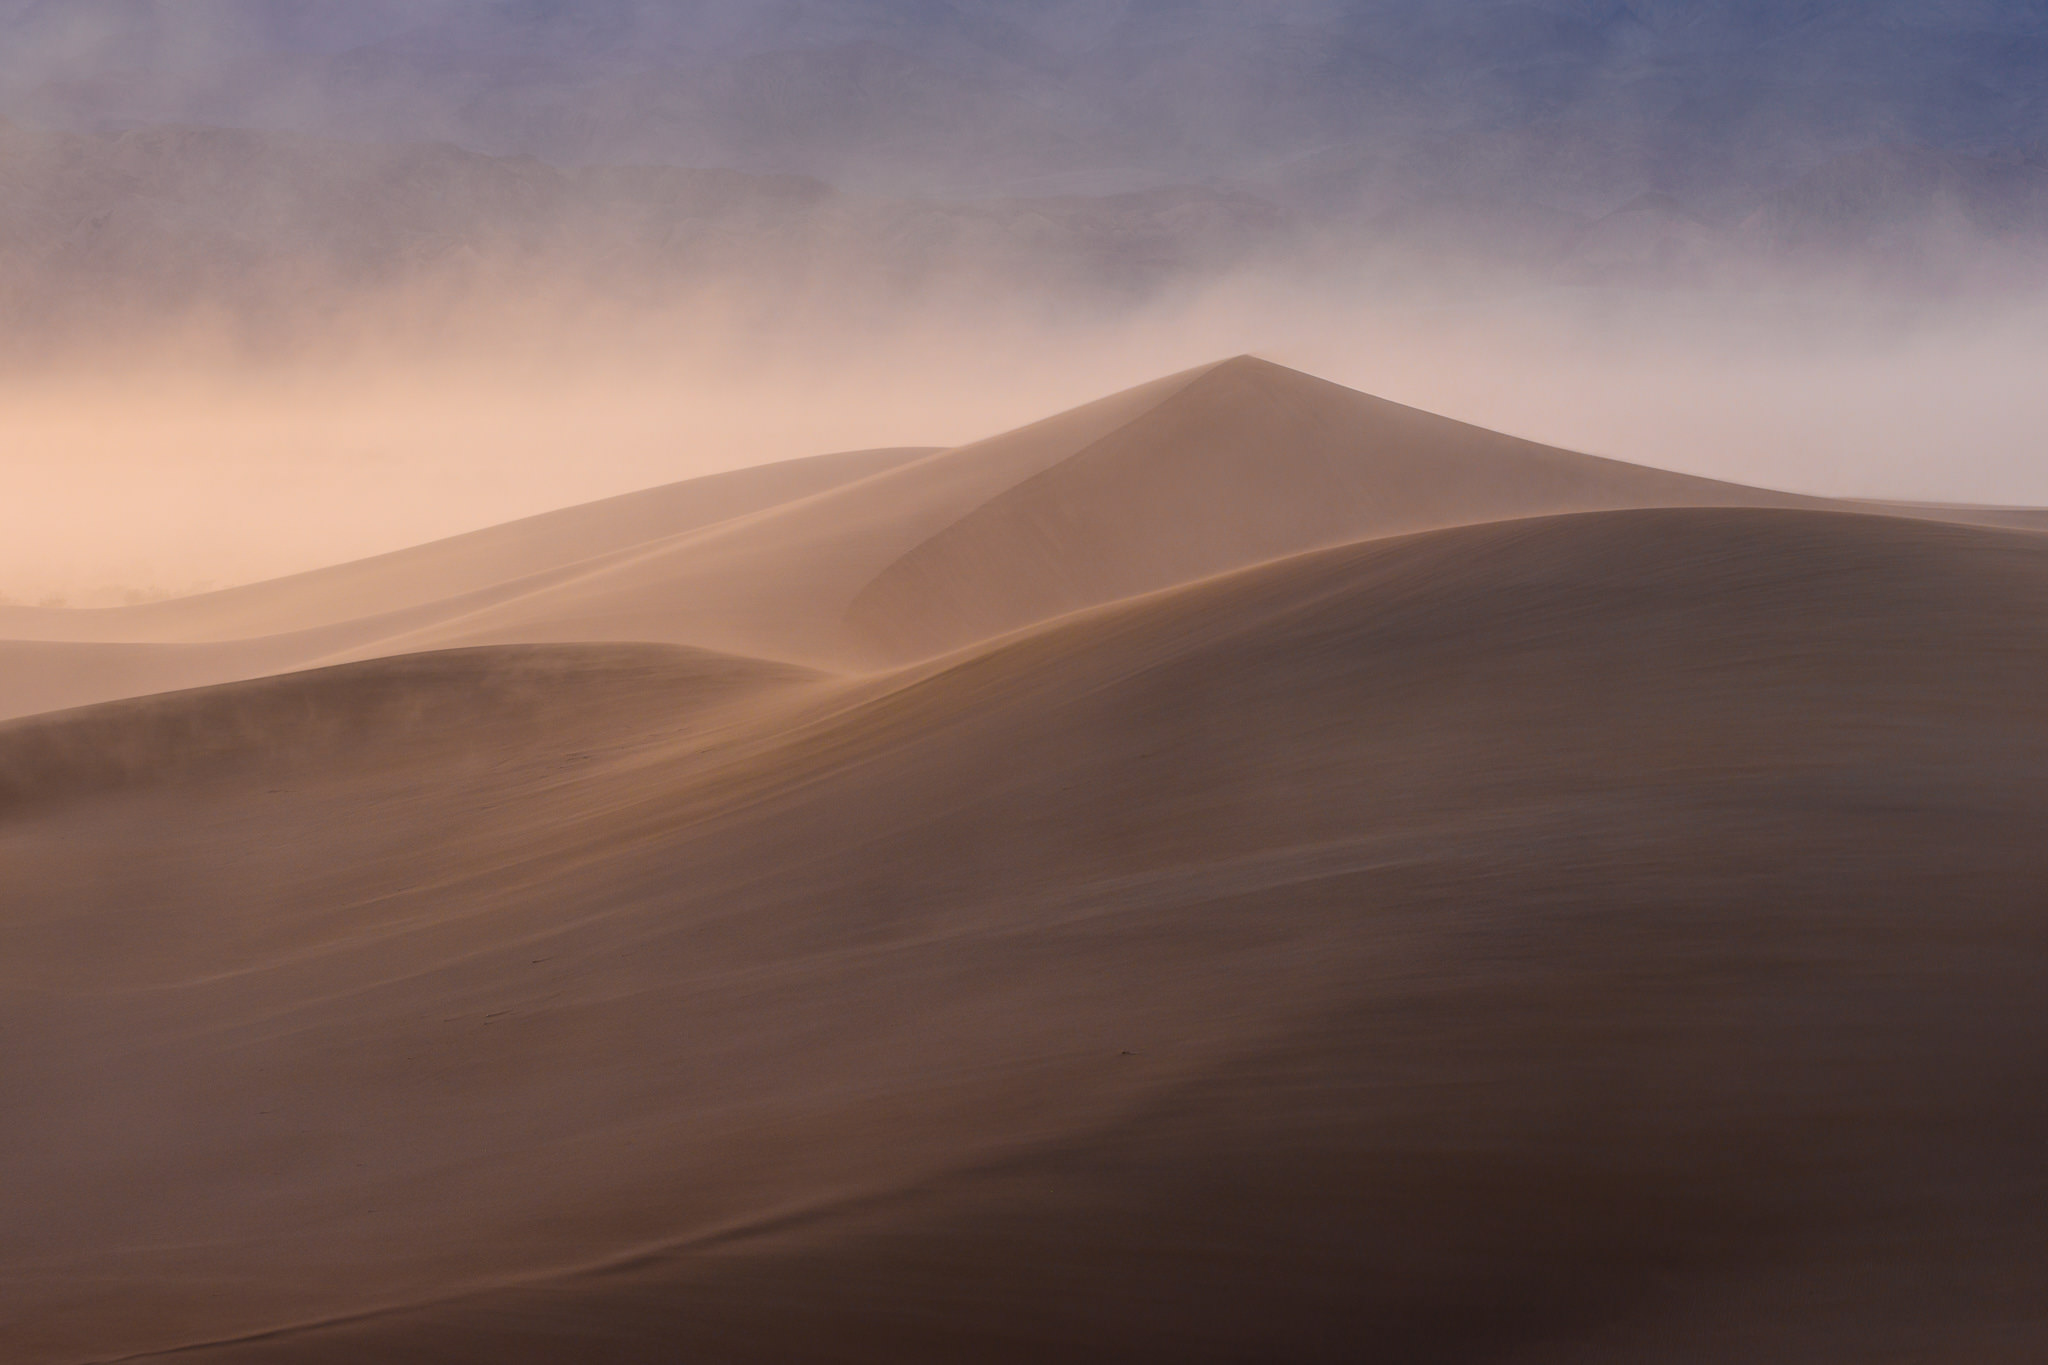
I took this photo the same night as the prior photograph, right before a huge sandstorm hit. They have completely different moods, but both are successful in their own right.
On the same note, when you’re moving around, pay attention to your footprints. If you’re taking pictures on sand dunes, it’s very easy to run around from one composition to the next — and then ruin all of them because your own footprints are in the photo. So, whenever possible, tread carefully.
And, lastly, search for good light and color. In certain cases, the sand might reflect some colors in the sky, just like snow. Or, if the sun is low on the horizon, it can create interesting shadows that might work well as an abstract. There’s no end to the interesting lighting conditions you might encounter while taking sand dune photos, and it’s important to keep your eye out for whatever may occur.
7) Conclusion
Sand dunes are magnificent for photography. If you’ve taken pictures of them before, you know what I mean. If you haven’t, you’re in for a treat.
It definitely takes some planning to photograph sand dunes. You can’t just go in unprepared, or you might end up damaging your equipment. However, it’s not as difficult as you might think. If the light is right, and you’ve found some good dunes, you’ll come home with amazing photos.
Mesquite Sand Dunes, Death Valley National Park.
We’re heading of to Nambia soon so these tips have really come in handy.
The aspect of dune photography that really attracts me is the landscapes are always changing, making every shot unique, no one else will have the same one!
Beautiful images and really valuable advise. What time of year did you shoot this images?
Thank you and keep up the great work.
Great article. Using tape on the locking mechanisms helps keep out the sand although not convenient if you are constantly changing height.
Regarding weatherproofing, after damaging a camera during a squall in the Atacama Desert, I now carry gaffer’s tape and wrap a narrow strip over the lens mount, where sand penetrated my camera. When traveling I keep a few feet of gaffer’s tape wrapped around a water bottle. Gaffer’s tape leaves no residue after removal.
That seems like a pretty excellent decision. Even “weatherproof” lenses usually have enough of a gap for small particles to pass and fall onto the lens mount (or, in your case, into the camera). I need to get some gaffer’s tape next time I go out onto the dunes…
Great advice and a reminder of an unfortunate incident of mine which I’ll not discuss here.
Don’t forget the sand dunes around the Great Lakes especially the Indiana Dunes National Lake Shore on the southern end of Lake Michigan. Though not nearly as large as dunes in California, Texas, and New Mexico it does present interesting sandscapes. Very easy to find,, near Valparaiso, IN.
Indiana Dunes is a great place for people to go if they live nearer to that area of the US! The number of places with great sand dunes is far larger than many people think, and that’s just one example. Thanks for adding it.
Great article and images! For anyone photographing in sand (or snow for that matter), I strongly recommend you get a set of tripod all-weather shoes. They prevent the tripod from sinking. Ansel Adams made his own from plywood, back when he was doing dune photography. I have these and they work great: www.bhphotovideo.com/c/pro…/KBID/6400
Mark
Mark McCarvill Photography | www.markmccarvill.com
Old CDs
Thanks for the info! I hadn’t thought of something like this before, but it makes a lot of sense. Waiting for my tripod legs to sink into the sand (or pushing them down) isn’t really a winning solution. I’ll probably pick up a set!
You’re very welcome!
If you do a lot of long exposures (as I do), these tripod shoes are a must in situations involving sand, snow, wet ground, etc. I keep mine in a zip-lock bag in my camera bag, along with an old toothbrush, which I use to clean the sand and dirt off the tripod shoes when I’m done. The zip-lock bag keeps any bits of sand (or melted snow, etc.) from touching the other camera gear in the camera bag.
Mark
Mark McCarvill Photography | www.markmccarvill.com
When you suggest a “clear” filter, what kind do you actually suggest?
My recommendation is to get a good clear or UV filter rather than going for a budget option, because it will have an impact on every photo you take. The best clear/UV filters have the most minimal effects, but they’re still there. A good clear filter is something like the B+W XS-Pro MRC-Nano: www.bhphotovideo.com/c/pro…/KBID/6400
Even then, I don’t recommend using a clear filter unless you need it. My baseline is that I don’t use one unless conditions also require protective eyewear.
Another place is Mohahans Sandhills State Park in west Texas. I recently went out there for camping and photography. I was blessed with almost no winds and good weather.
Yes, thank you for adding this! It’s easy to think of places like Death Valley that are hugely popular for sand dune photography, but countless others exist. Mohahans Sandhills State Park is a great example. I visited Oregon a few months ago and was amazed by the miles and miles of dunes they have, which I somehow had never heard of before.
It sounds like your visit to Mohahans was an excellent one. It’s hard to beat a wind-free day on sand dunes.
Just photographed White Sands National Park in New Mexico, I am hooked. What a terrific experience. Now we are off to Death Valley! Your article was excellent!
White Sands! That’s near the top of my to-do list — I haven’t been there yet, but I would love to explore it. You’ll certainly love Death Valley. It’s one of the most interesting and intense places on the planet.
Terrific images and interesting article.
Thank you, Shmuel!