One of the coolest sights I’ve seen in a long time is a desert landscape immersed in fog, which I photographed from the perspective of a drone. Hopefully this article gives you a better understanding of how the photo came to be.
Table of Contents
Conditions
The single location that I was most excited to photograph on our UAE and Jordan workshop was the Liwa Desert in Abu Dhabi. With the tallest sand dunes I’ve ever seen – stretching for miles and miles in each direction – it’s my idea of a perfect landscape photography subject.
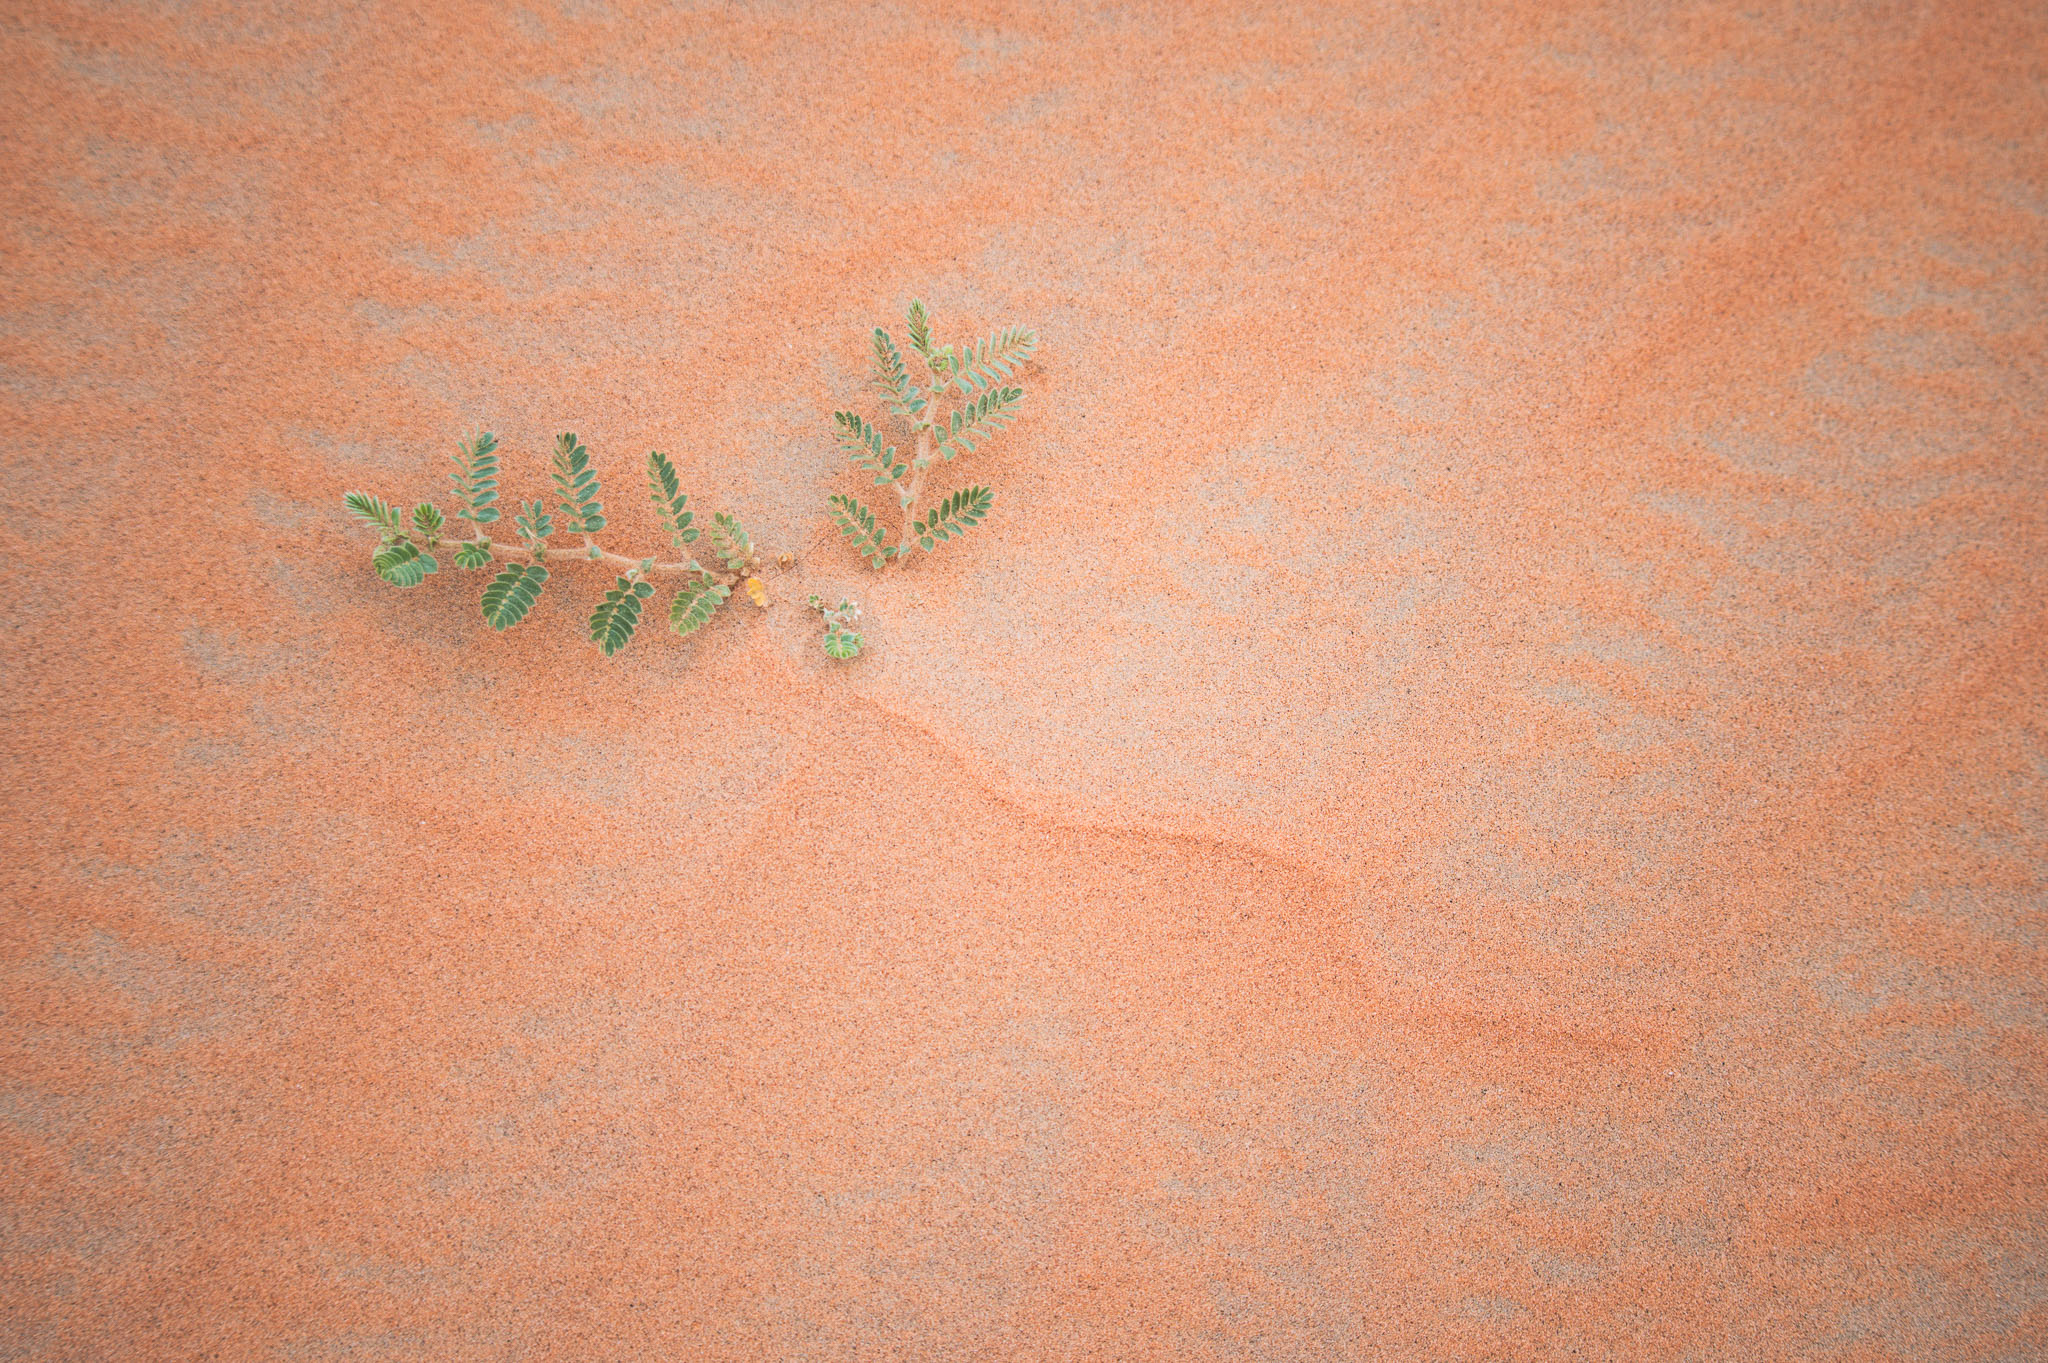
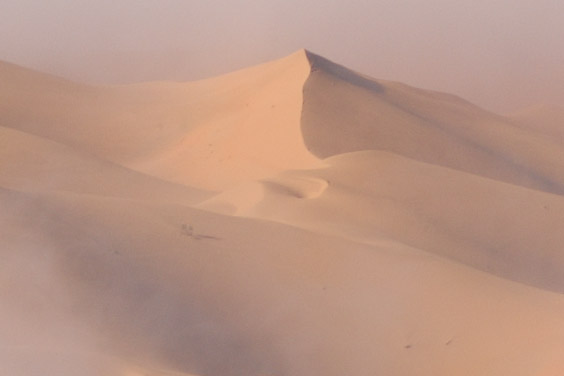
The first morning we went out for photography was extremely foggy, to the point that we had to drive at half speed just to stay on the road. Sunrise, if you can call it that, crept up slowly and without any color. I spent most of the morning photographing camels, along with small details in the sand like this:
My hope was to fly the drone I’d brought along, since Nasim and Tareq had put a lot of effort into getting the proper permits to fly in the Liwa Desert (not an easy feat, I later learned). But with such a thick fog, it just wasn’t practical.
As time passed, little hints of blue sky opened in the clouds above. I still didn’t think that the drone would see anything interesting, but it’s always worth taking a chance when you don’t know for sure. For all I knew, there was a clearing nearby with some interesting sand dunes.
Taking off, nothing changed. Blank clouds in all directions, no landscape visible. It didn’t take long before the drone was level with the top of the clouds, and then above them.
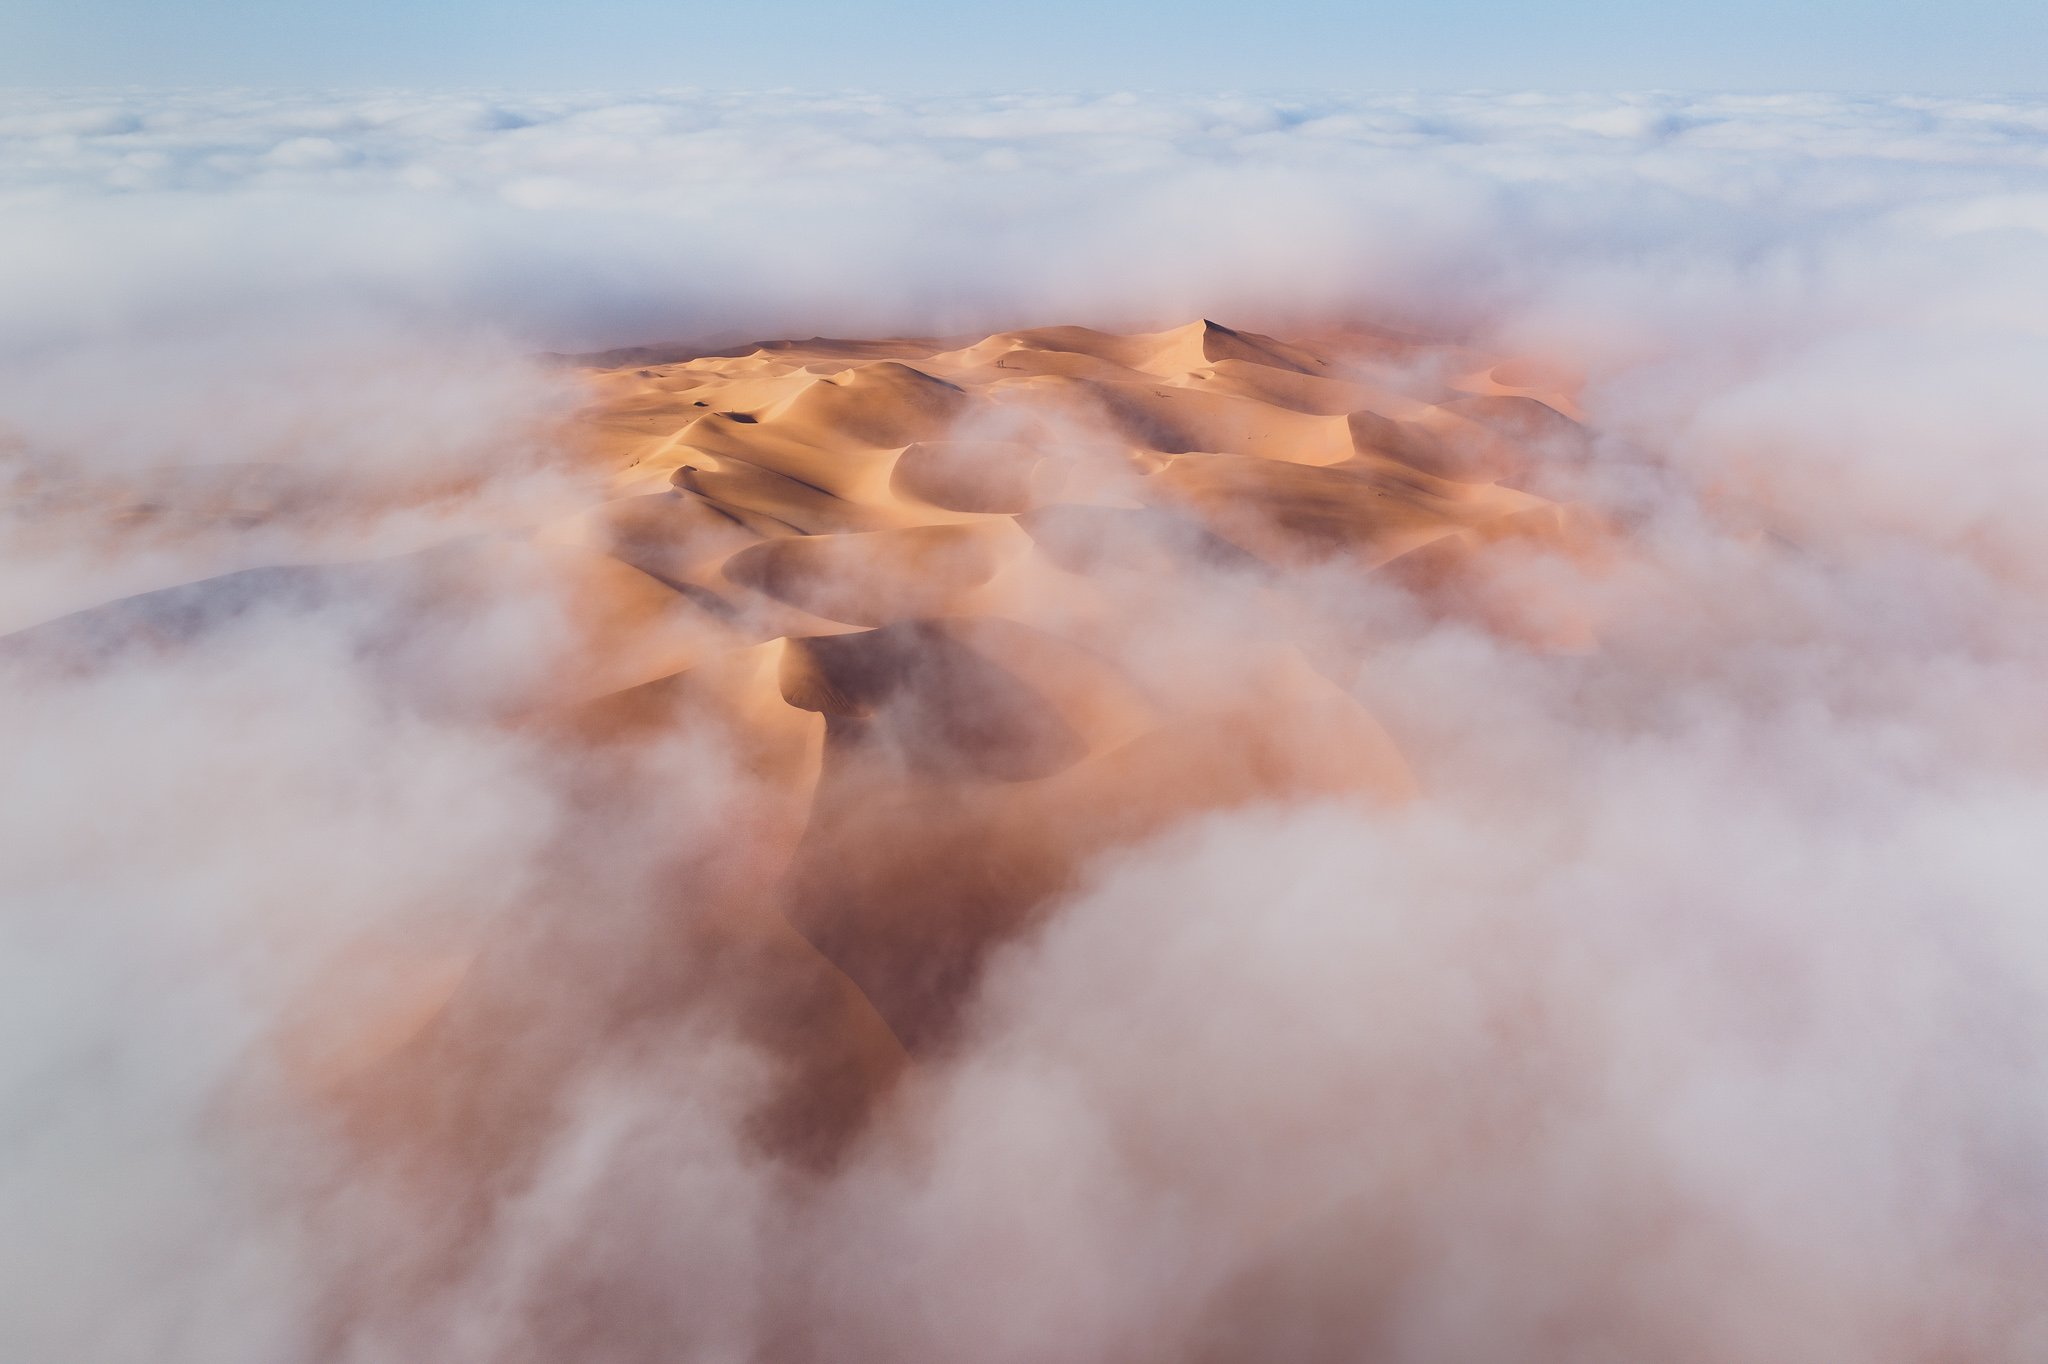
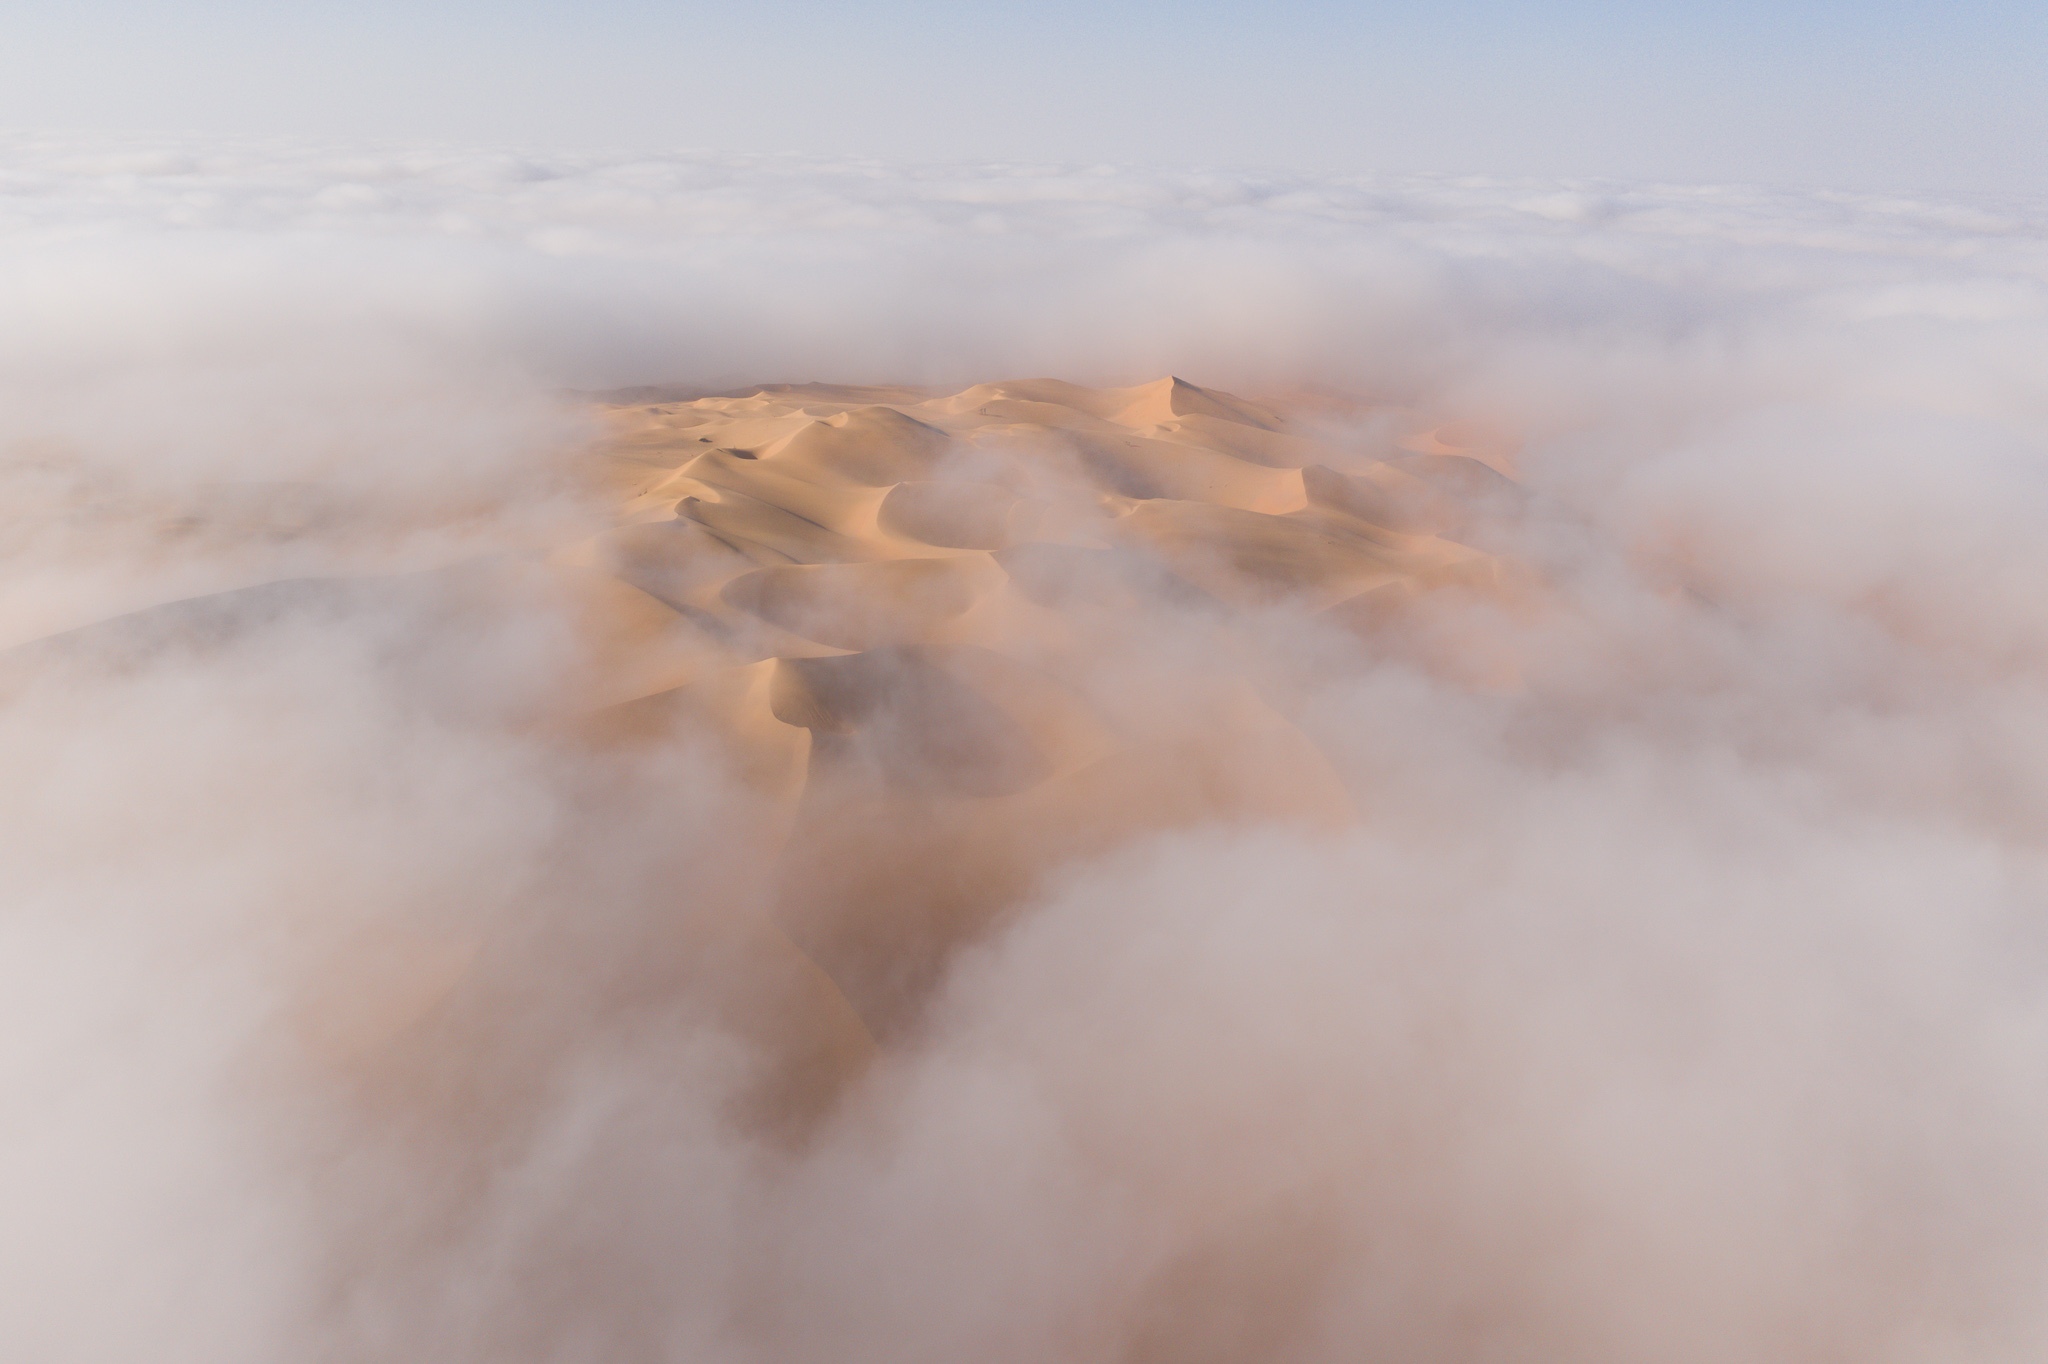
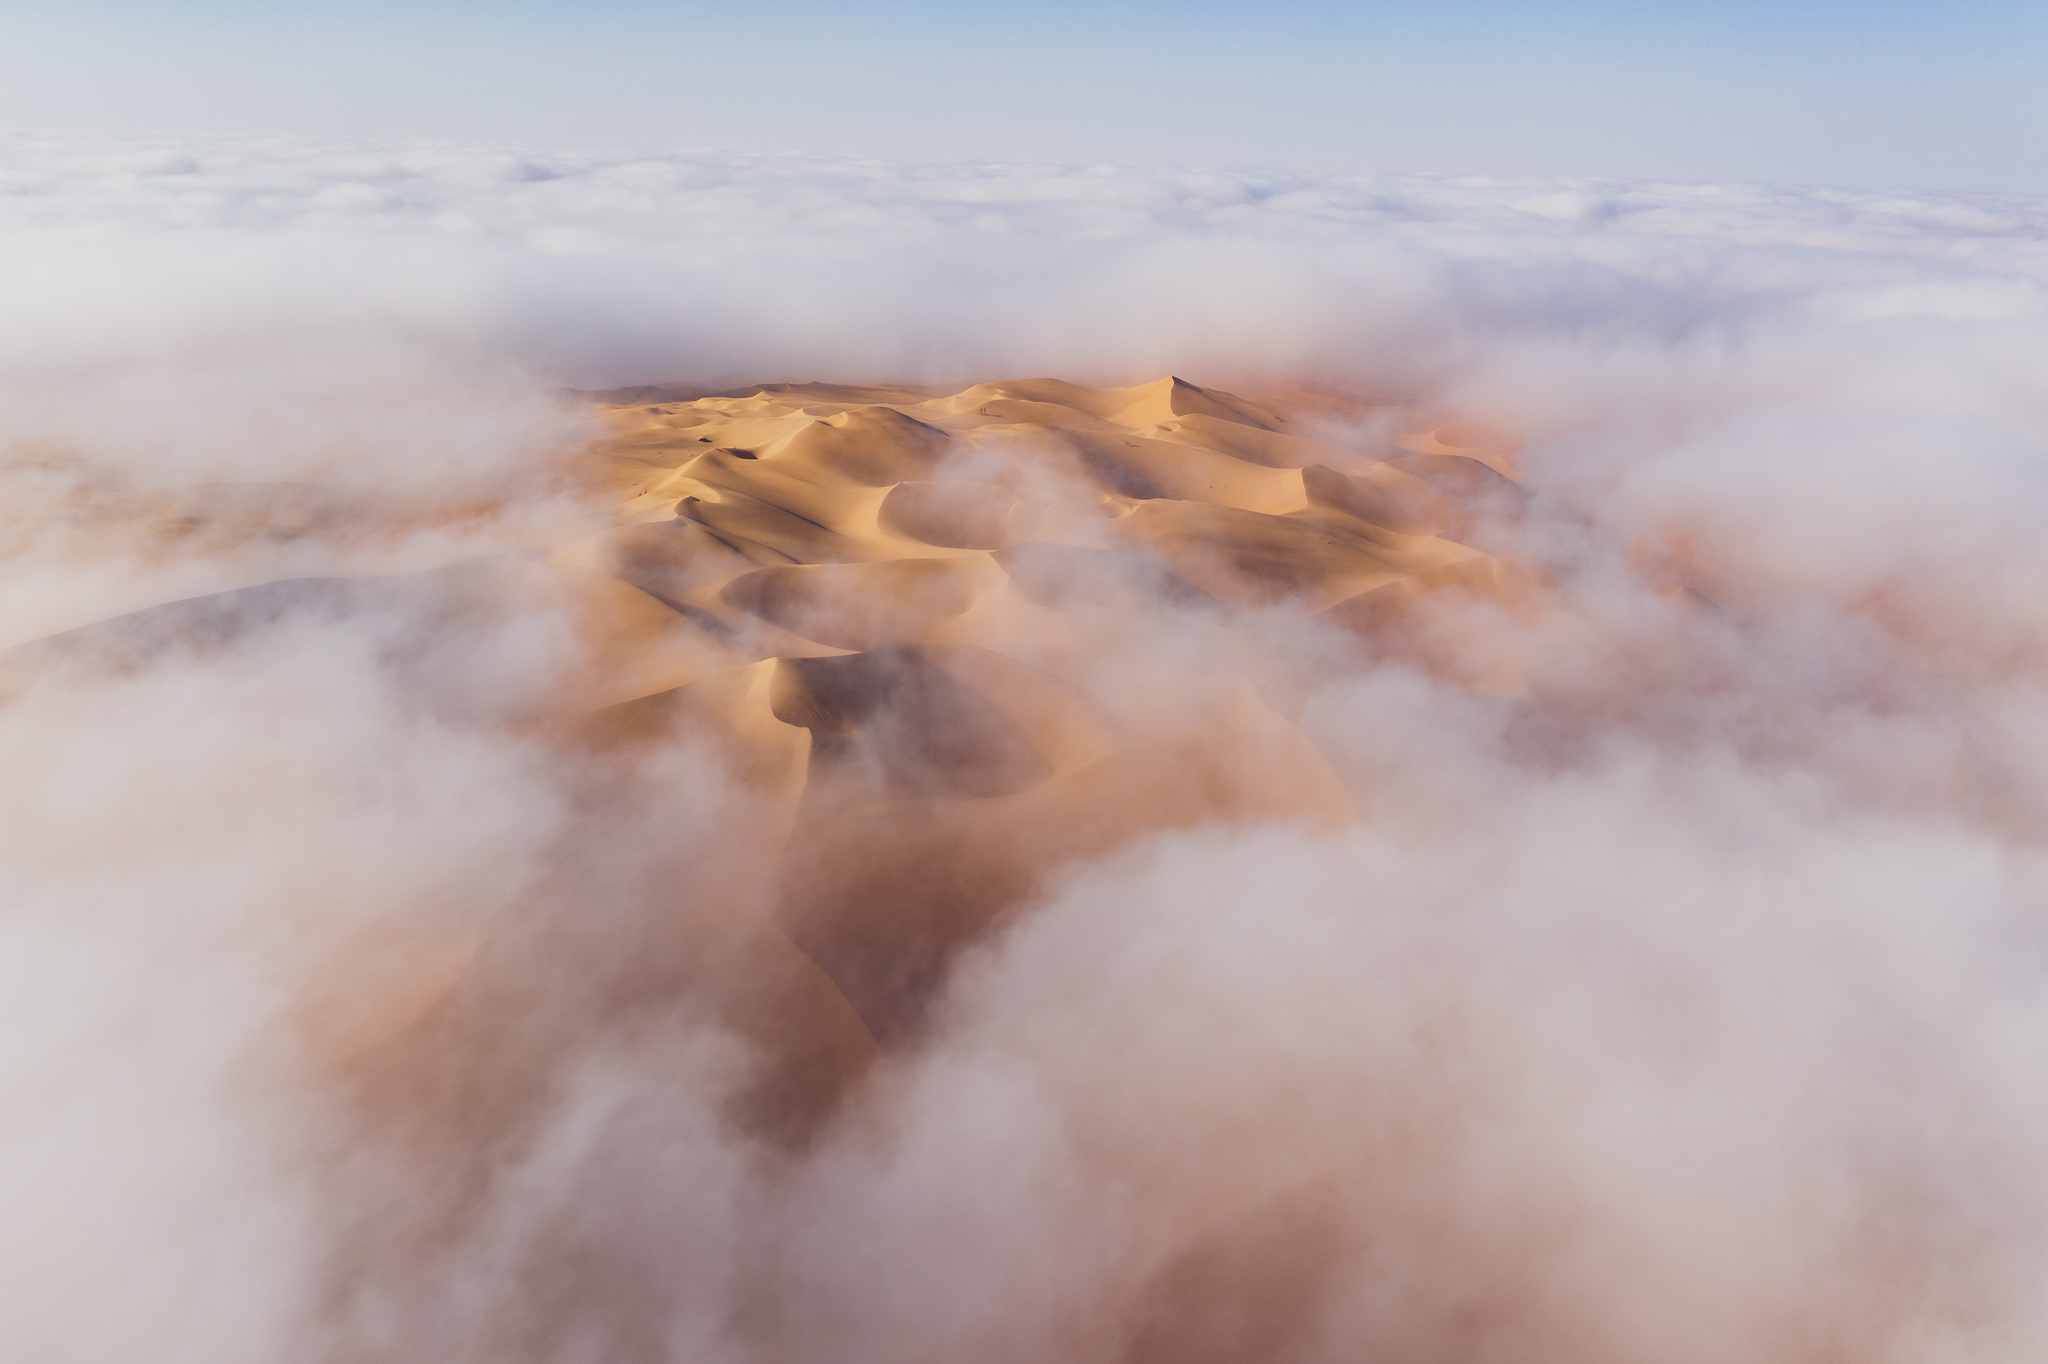
At first, I thought that was all there’d be – clouds all around. But when I turned the drone to face the opposite direction, I saw the most extraordinary clearing of sand dunes below. I truly cannot recall ever being so excited as a photographer.
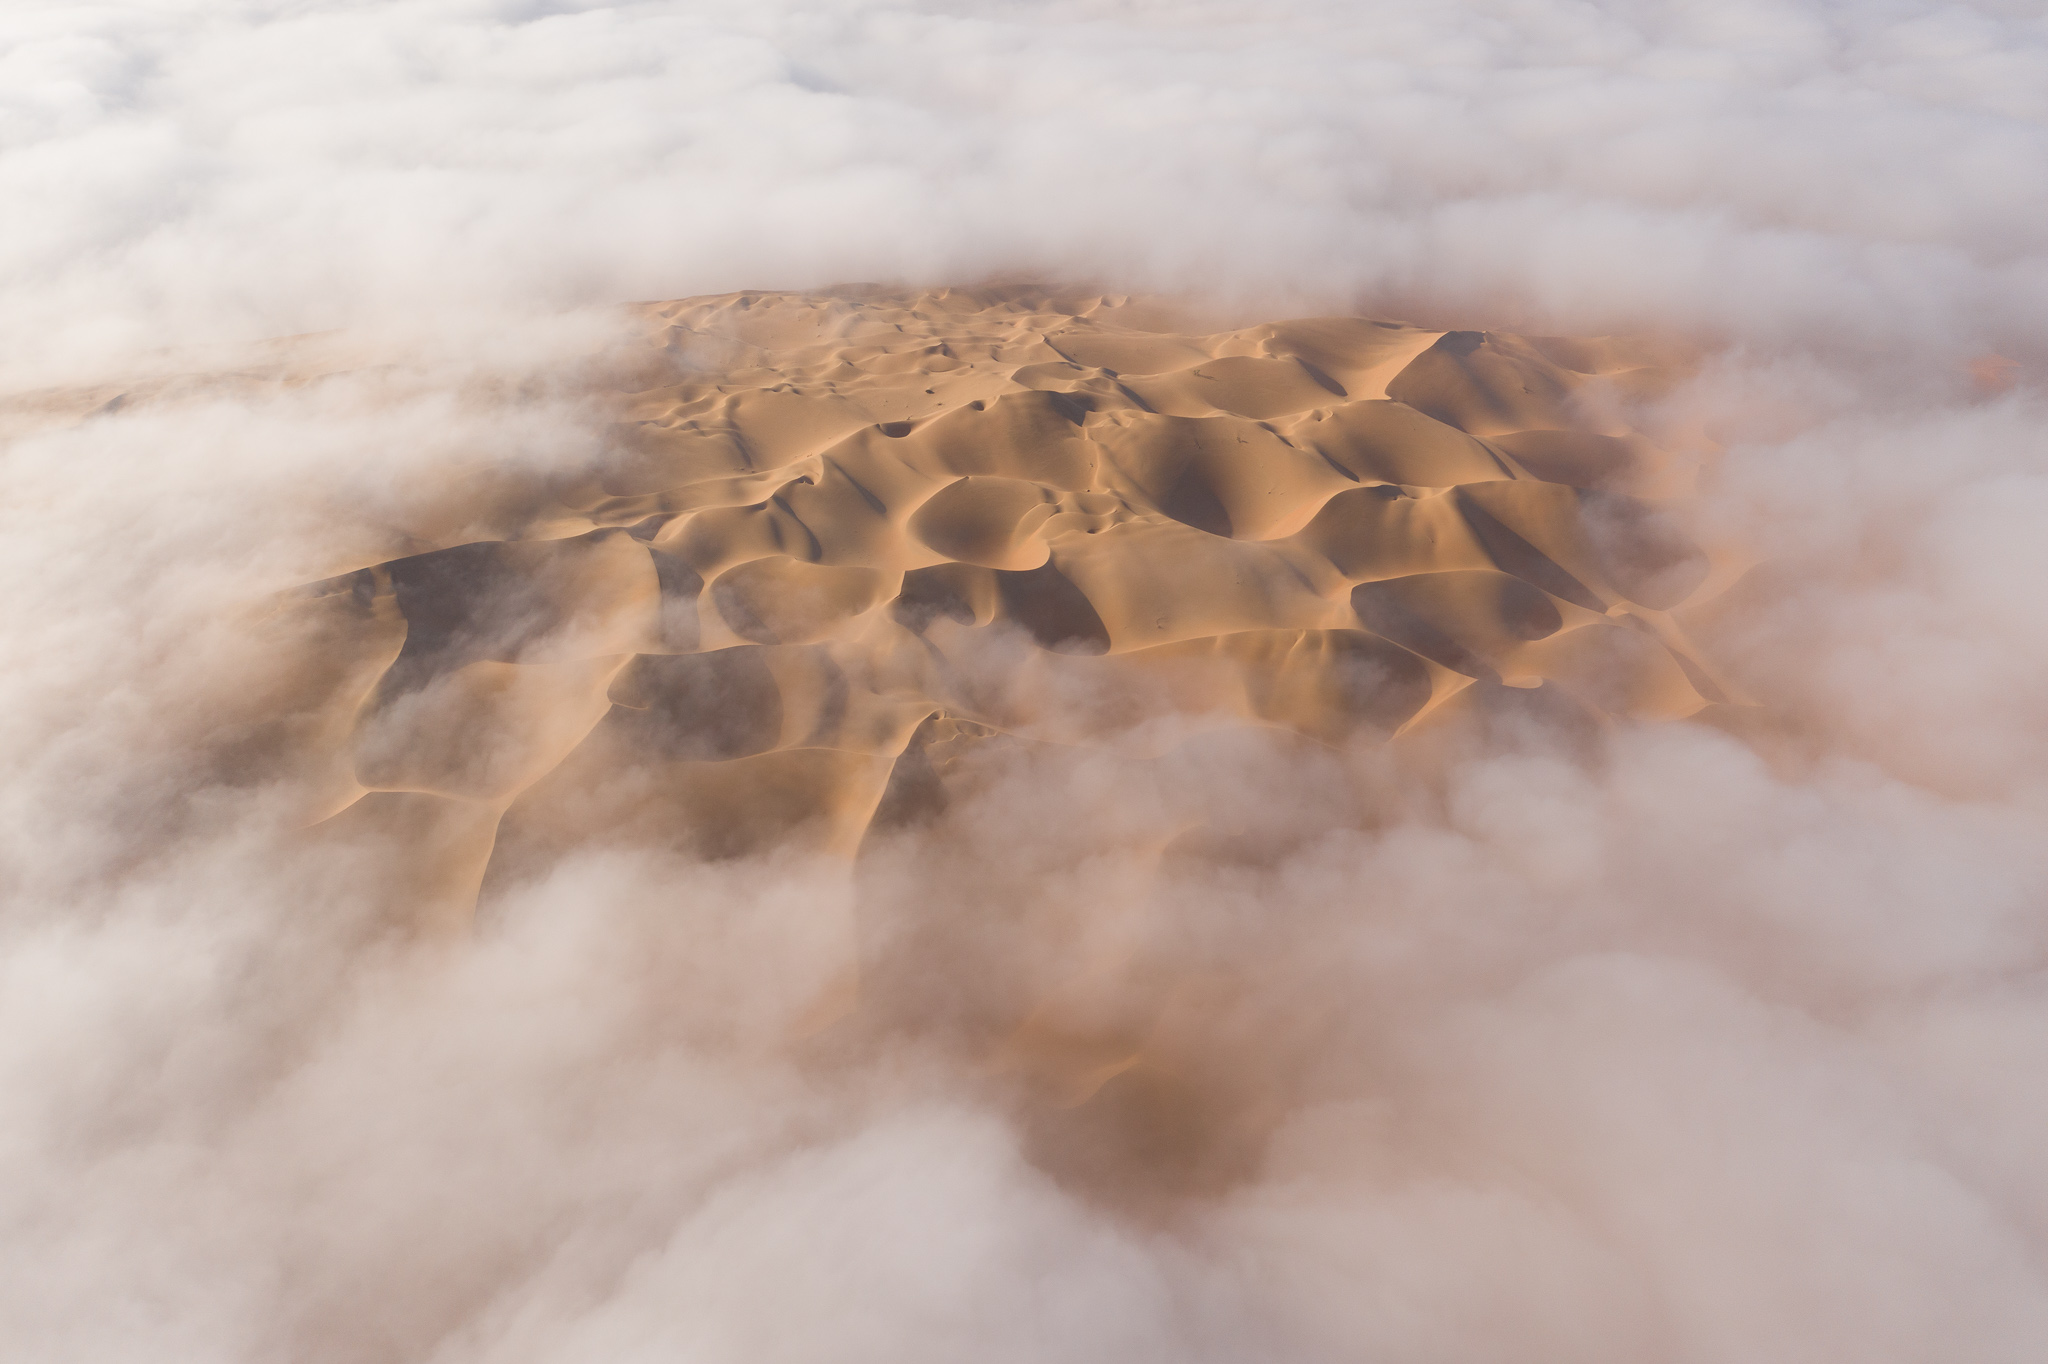
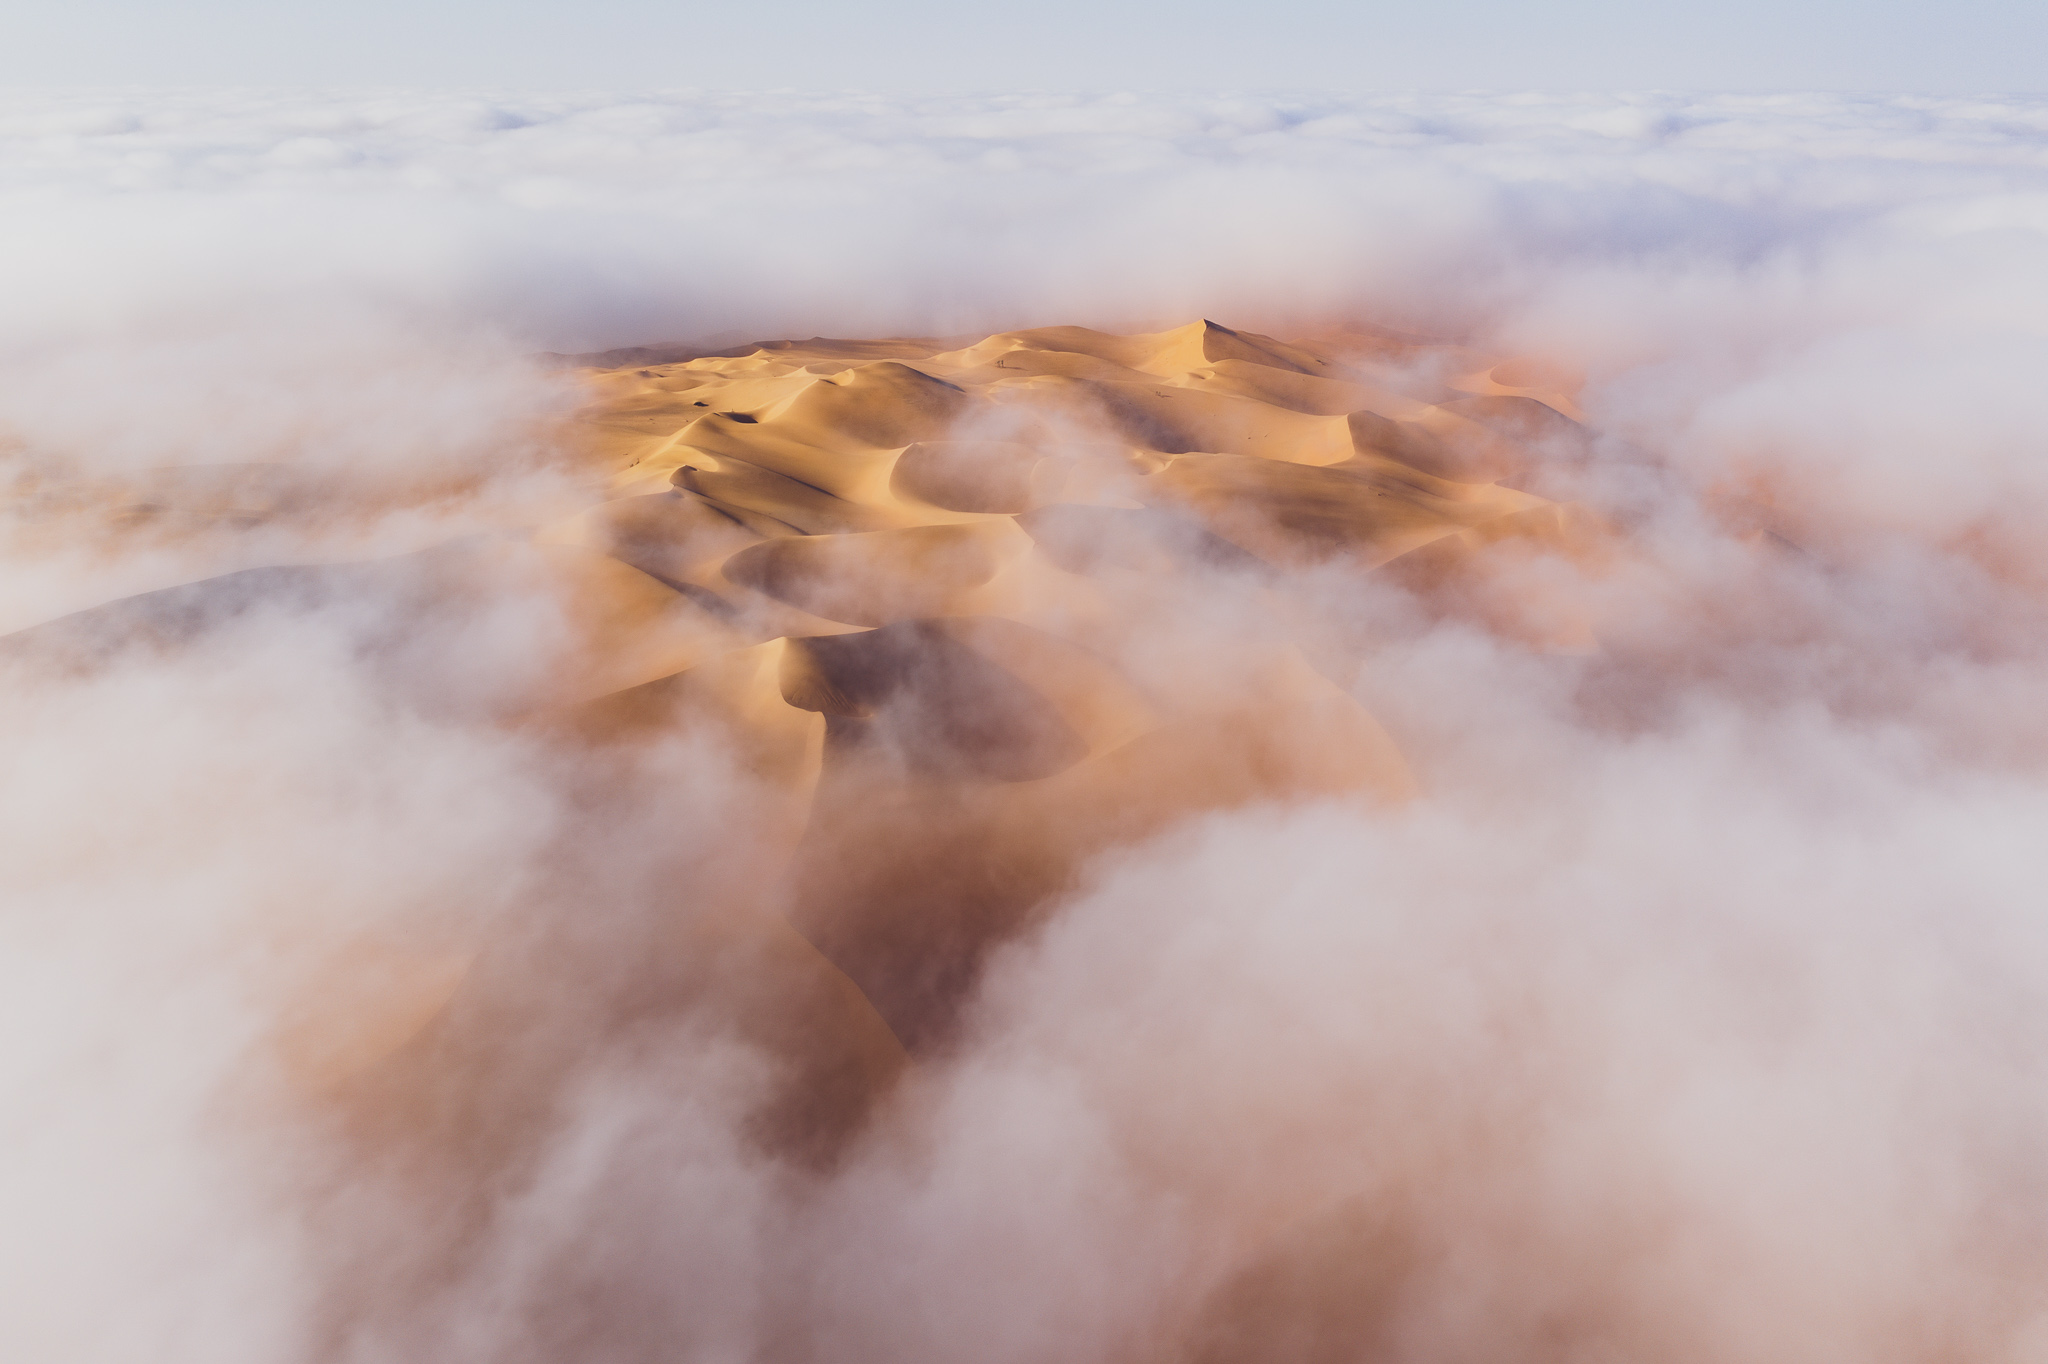
This is the photo I ultimately took, and the one I’m going to discuss today:
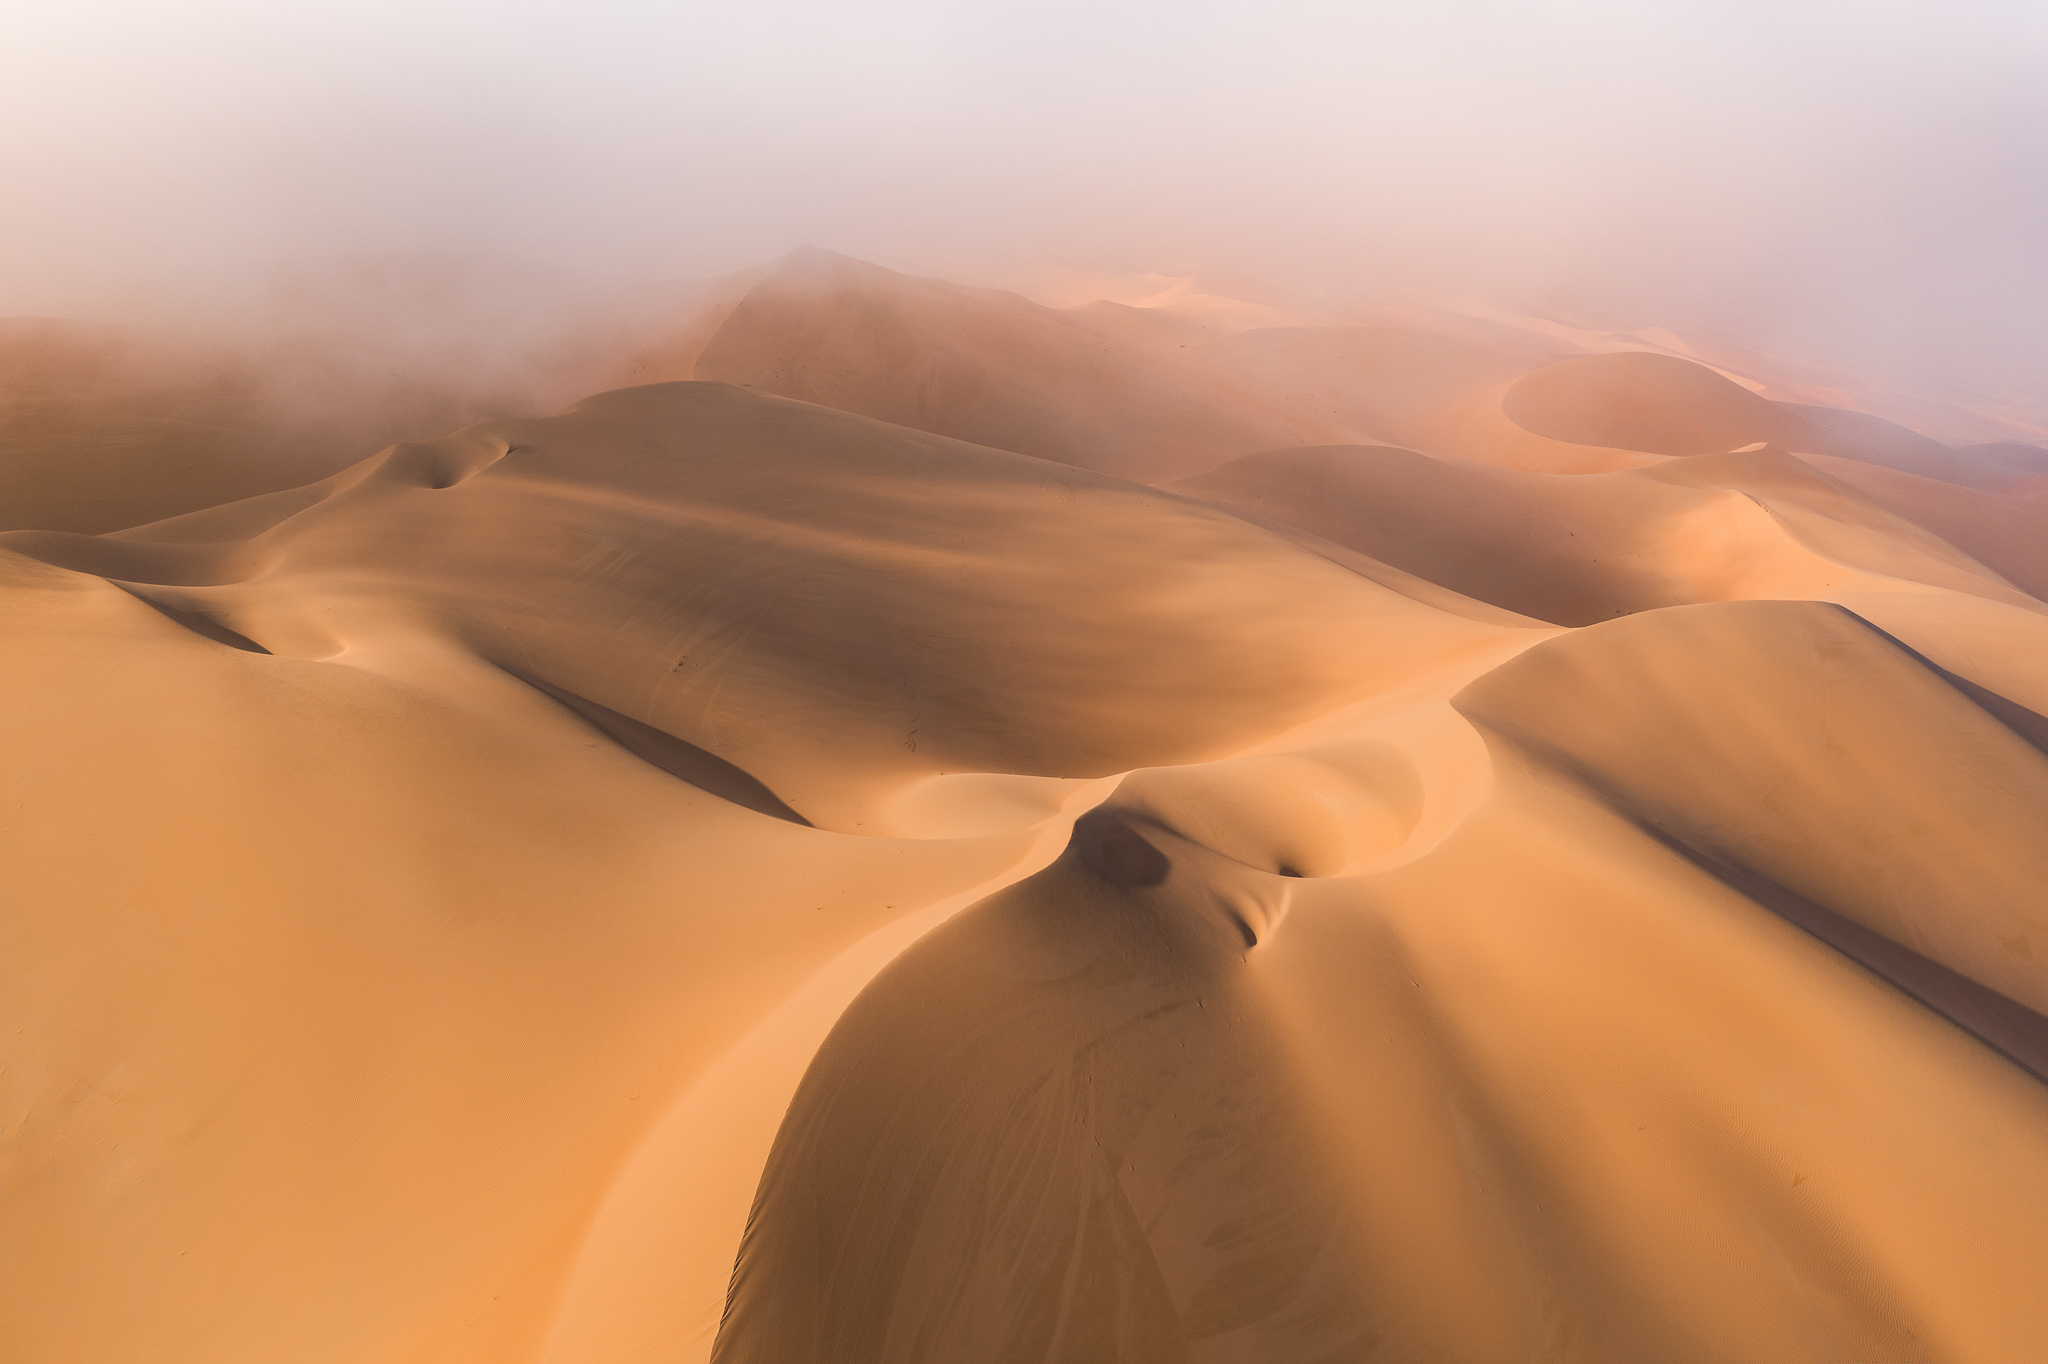
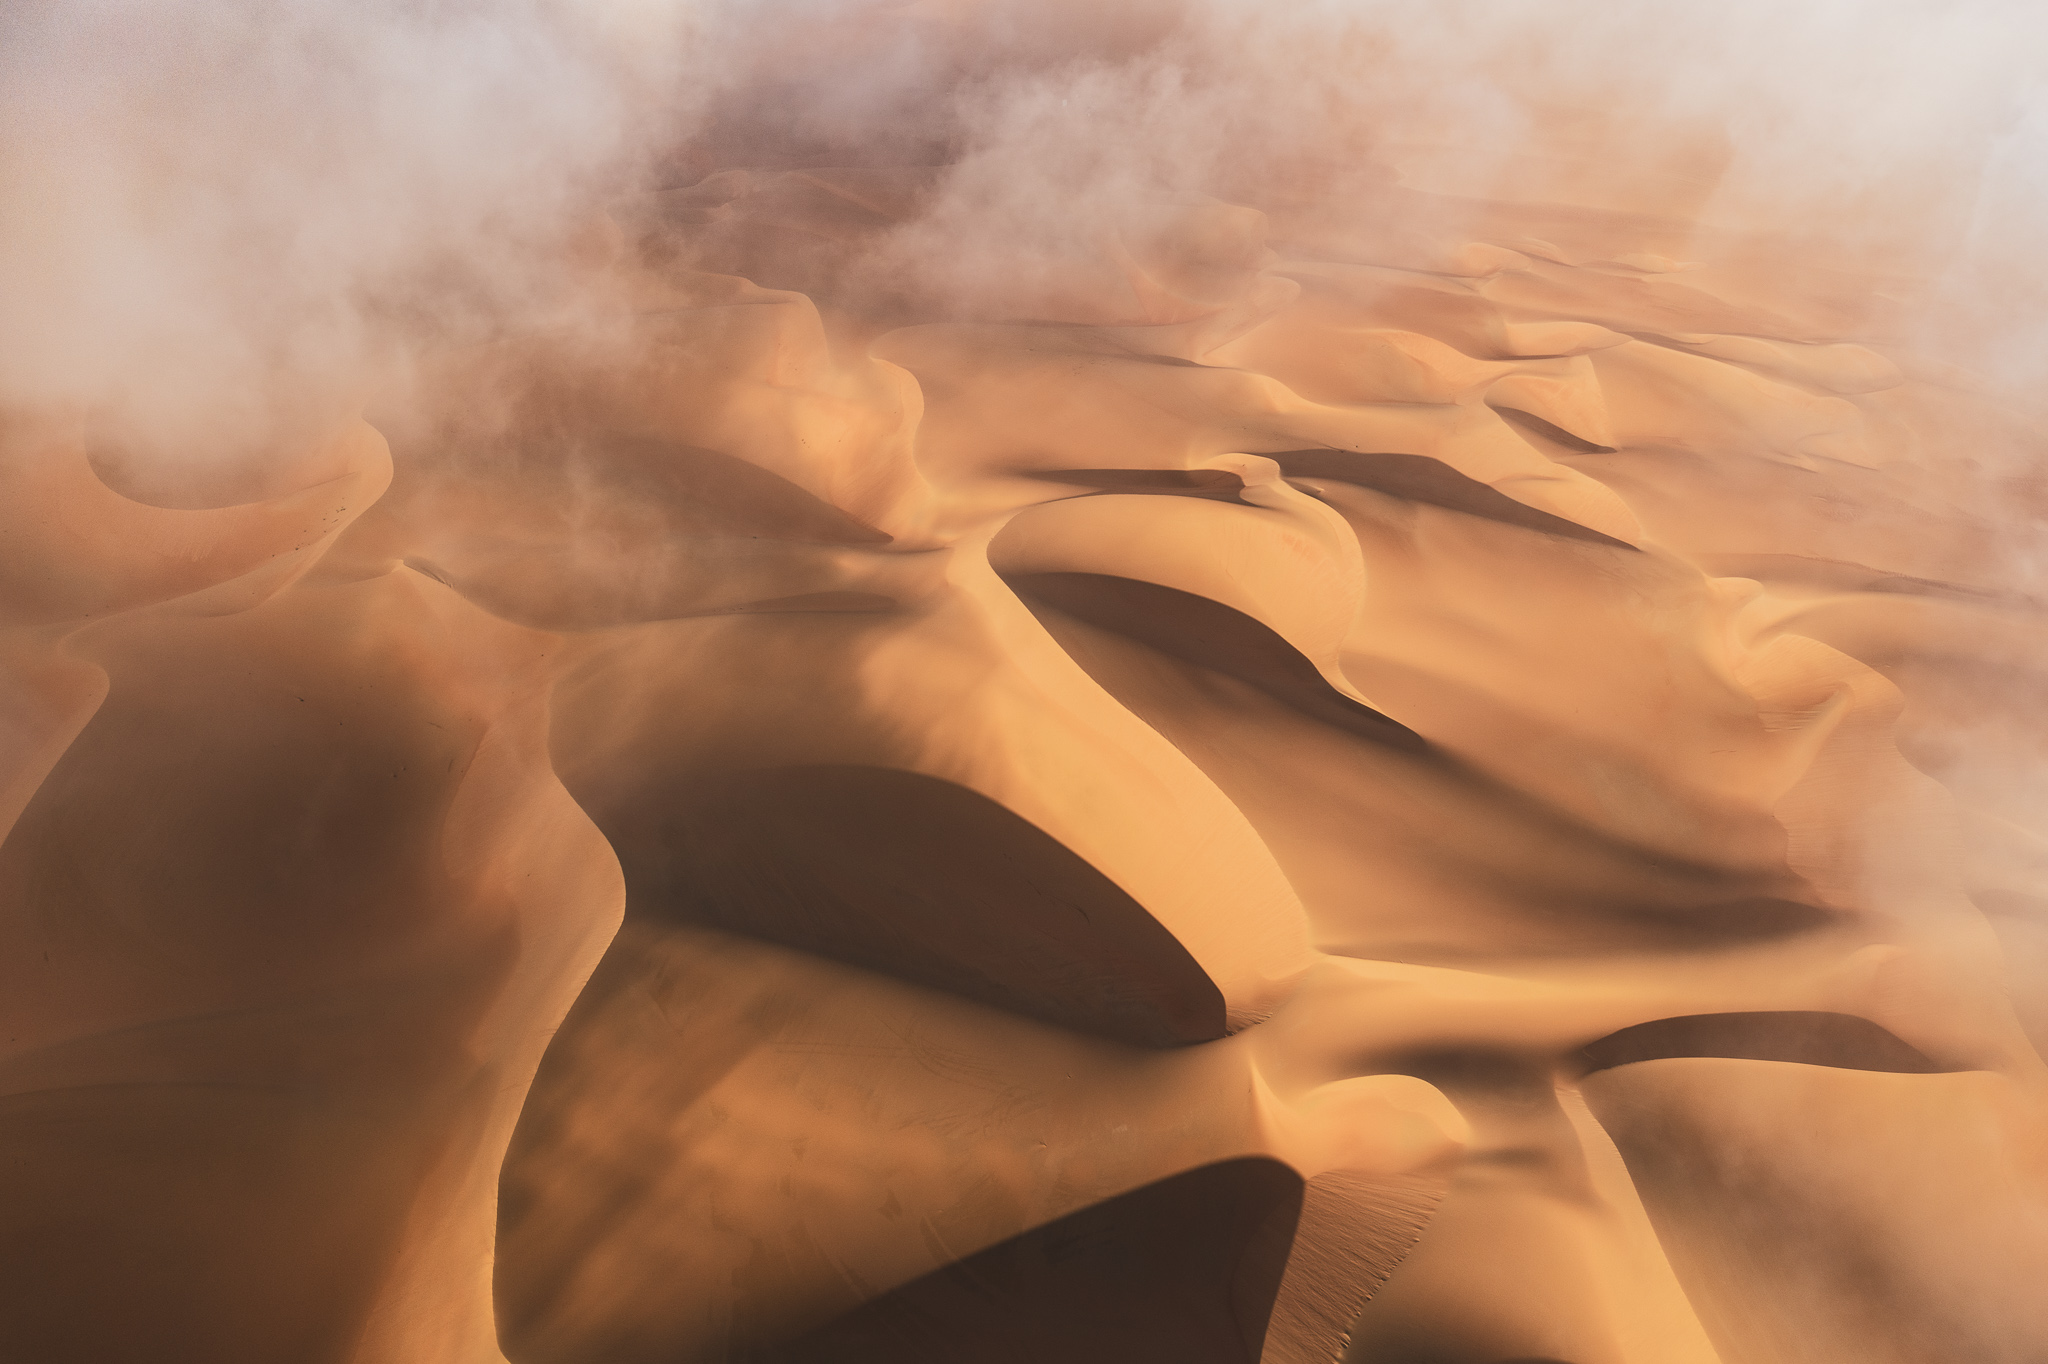
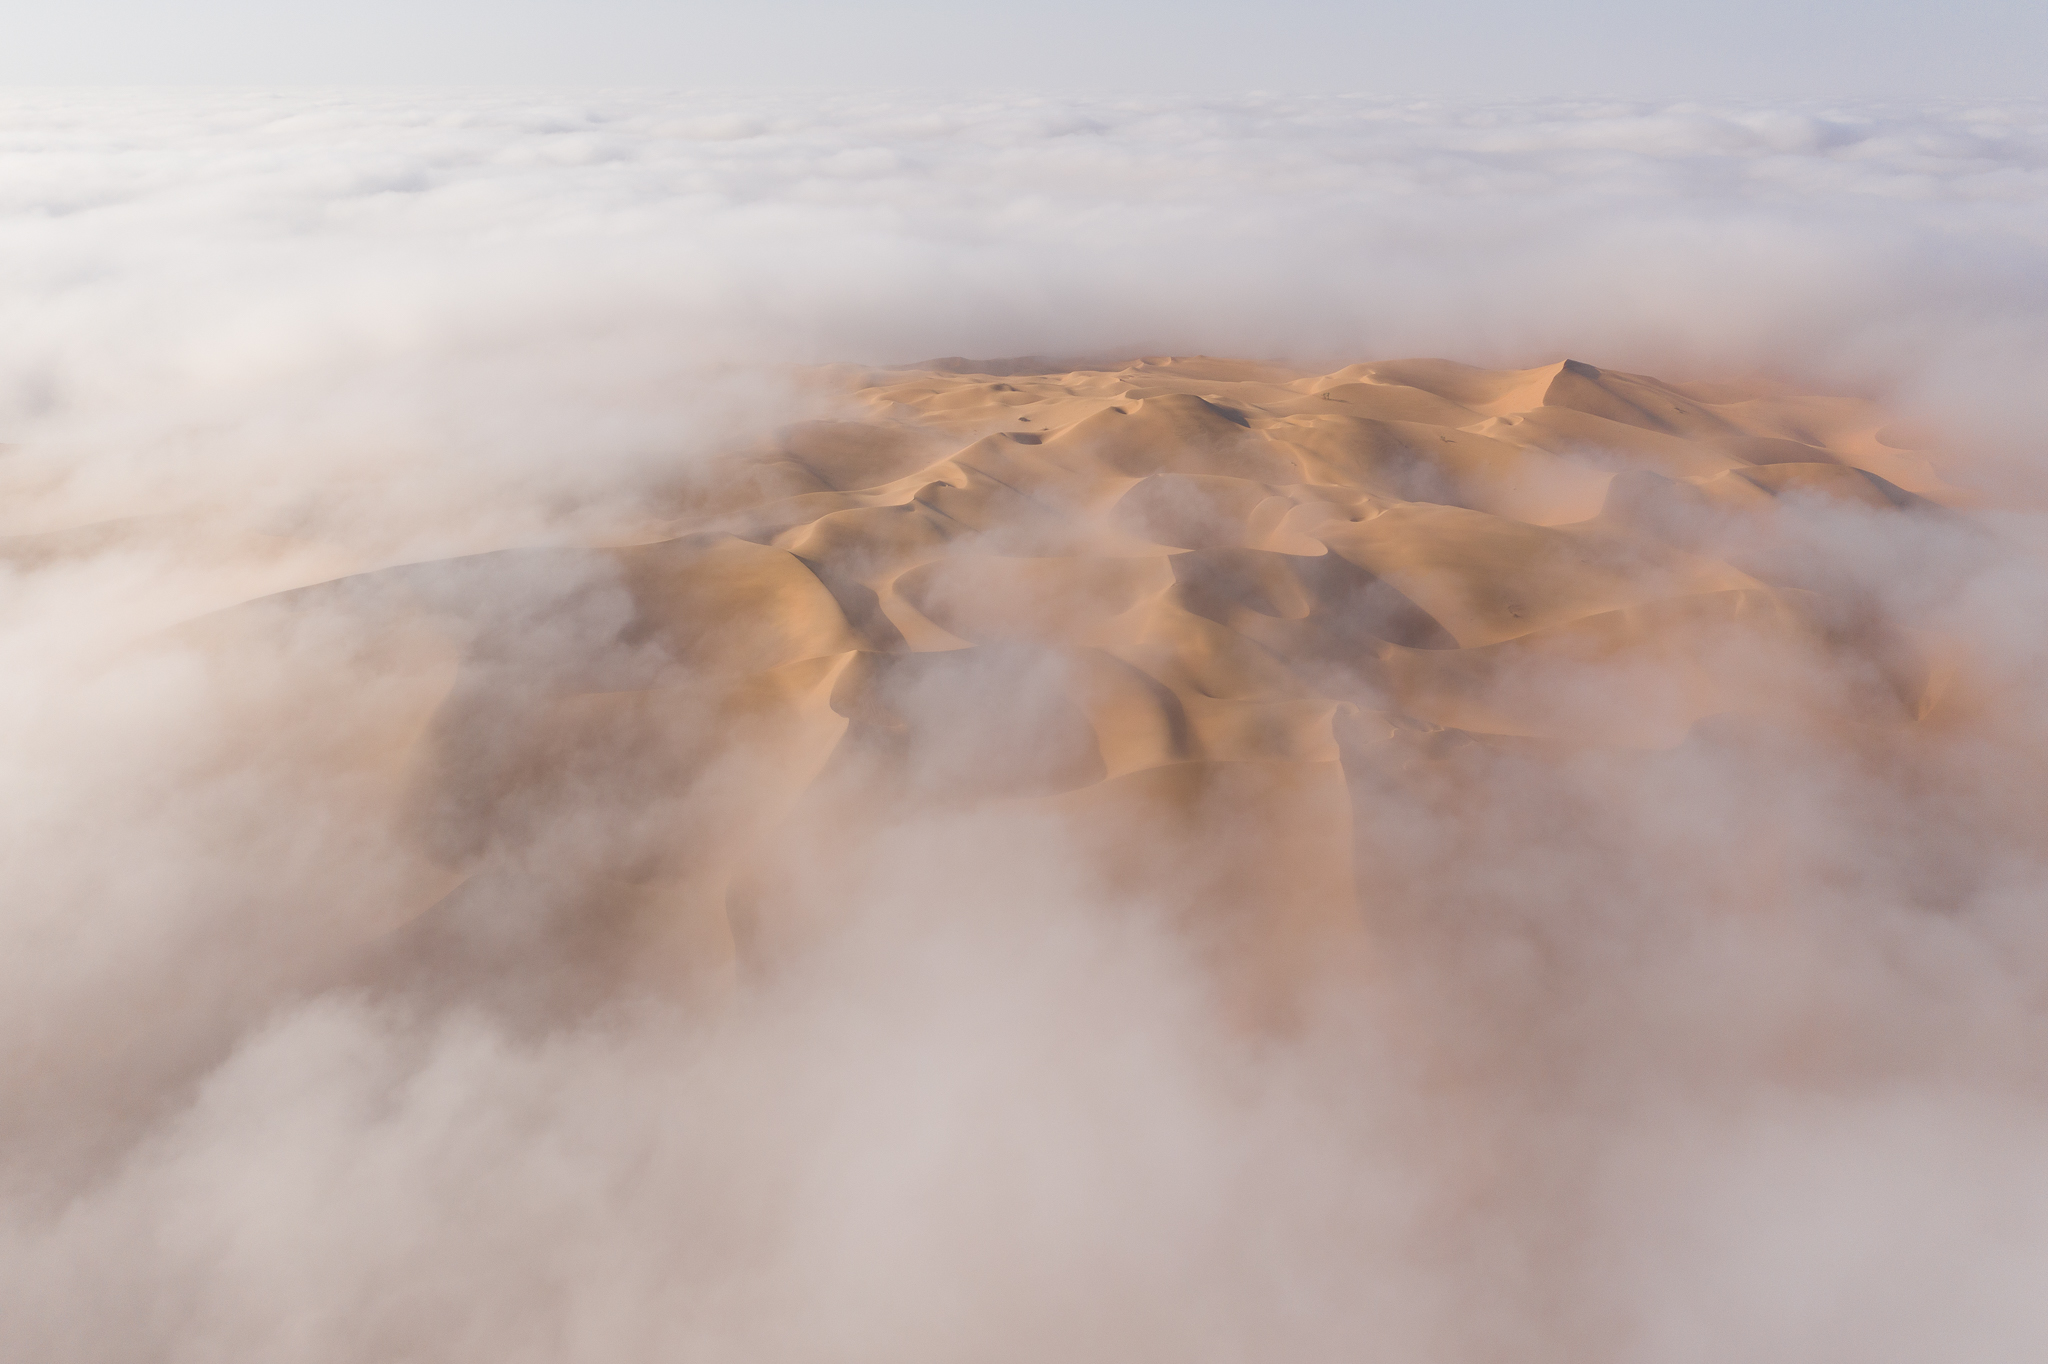
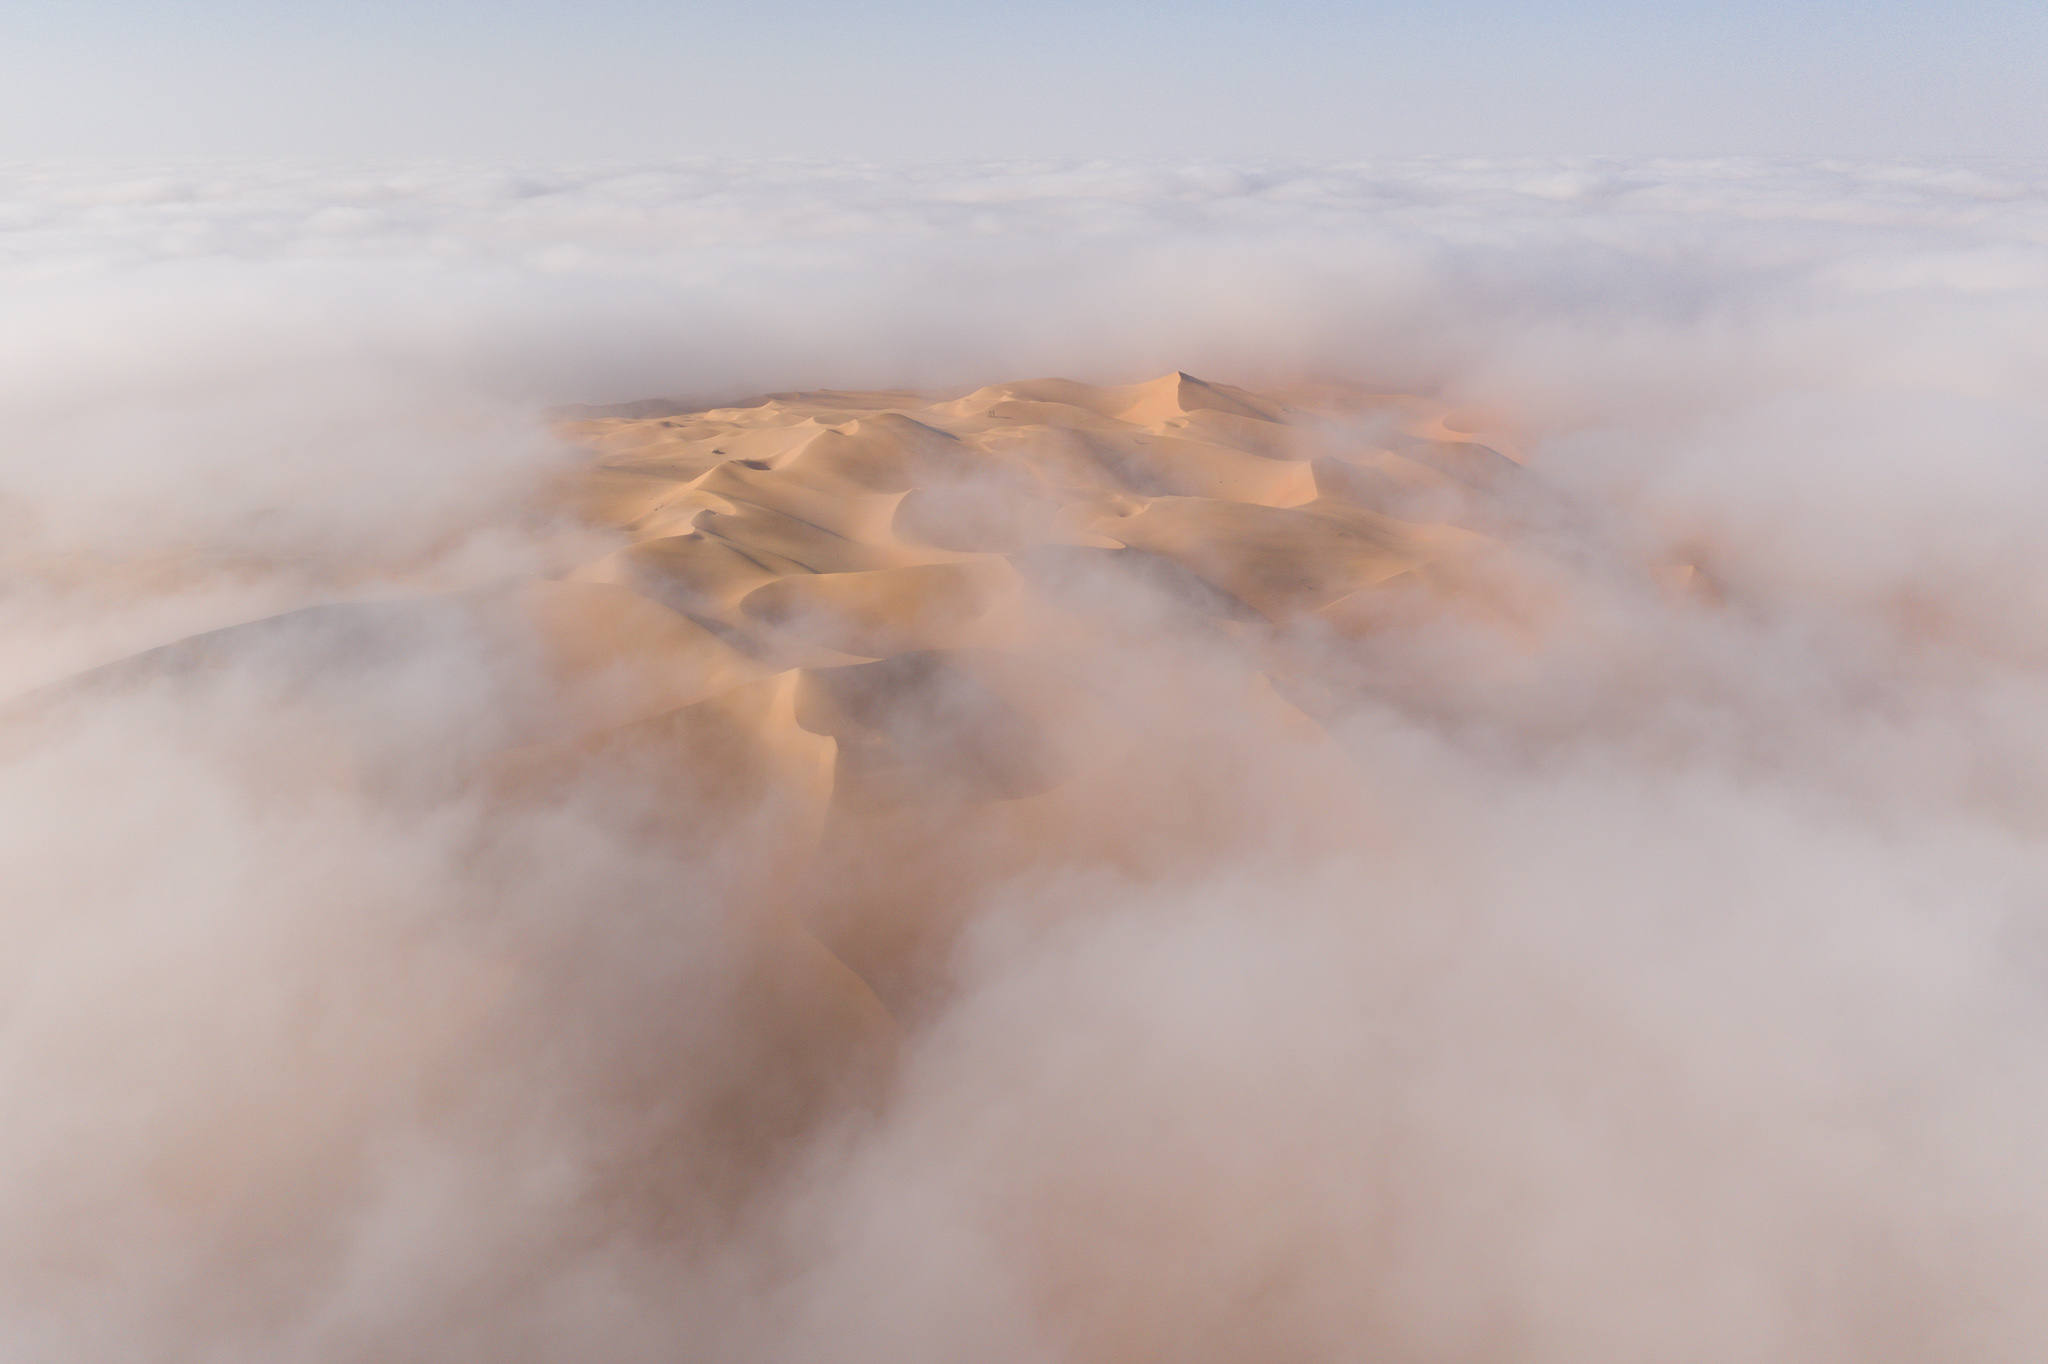
I also took a few other drone photos with more of a close-up/abstract feel. This article would be too long if I went into all the steps I followed for each of those images as well, but everything is essentially the same, from camera settings to basic post-processing.
Here are my three favorites among those variations:

Camera Equipment and Settings
I used the Mavic 2 Pro drone for all of these photos (see our review), which has a one-inch type sensor and a fixed 28mm equivalent focal length.
I could talk all day about how much I love that drone (and DJI does not sponsor us – if they did, I’d probably never shut up about it), but there’s no denying that a one-inch type sensor is pretty small. It’s large for a drone, but a full-frame sensor has almost 8× the area by comparison. So, even at base ISO, you’ll see some noise on the Mavic 2 Pro, especially once you start post-processing.
My preferred solution is to take a burst of several images, stack them together in Photoshop, and average out the noise. We have a full tutorial on how to do that here.
Even if you’ve never done image averaging before, it’s quite easy to learn. The Mavic 2 Pro (like other high-end drones) has a built-in burst mode that captures 5 photos in a fast sequence. From the technical perspective, averaging those photos reduces noise by about 2.3 stops! That’s like the difference between ISO 200 and ISO 1000.
So, of course, I set the drone to take a 5-image burst (and I was shooting DNG, the raw file format from DJI). Other than that, all my settings were quite easy:
- Base ISO of 100
- An aperture of f/4, which, to my eye, is the sharpest aperture on this particular drone
- Aperture priority mode with +1/3 exposure compensation, resulting in a shutter speed of 1/1600 second
As you can see from my histogram, I wasn’t quite properly exposed to the right in this case, and could have gotten away with an additional +1/3 of a stop (or possibly an additional +2/3 of a stop) exposure compensation:
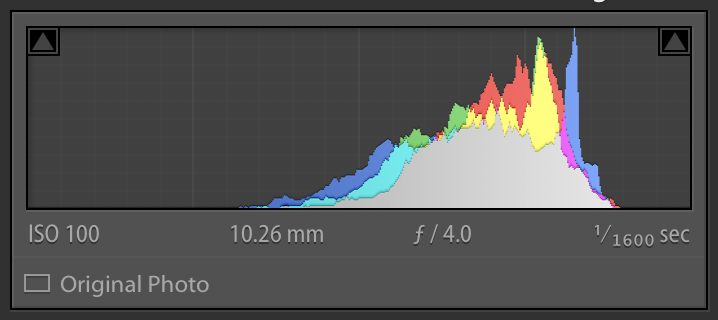
That said, drone photography does require a bit more caution with your exposure compared to ground-based photography. You’re working with a limited amount of time, and the app-based interface isn’t designed for fast reviewing or histogram inspection. I’d still rather have used +2/3 or potentially +1.0 EC, but it’s not the end of the world.
Image Culling
As I often do, the first moment that I saw the subject in front of me (or in front of my drone, as the case was), I took a quick-and-dirty photo. Here’s how that image looks, unedited:

The composition here is obviously quite rough. The basic premise of the shot – a clearing of sand dunes amid a sea of clouds – is a good one. But the dunes don’t take up enough of the photo, and the camera angle makes them look somewhat flat. (My horizon is also skewed, but that’s the fault of my gimbal calibration and is very easy to correct in post-processing).
I initially decided that a better way to capture the same message was to fly above the sand dunes and point my lens straight down. That’s how this photo came to be (also unedited):
I do think it’s an improvement, with the sand dunes taking up the proper amount of the photo this time. But it still lacks a sense of three-dimensionality, and the angle of the shadows is kind of awkward to my eye.
As I moved the drone a bit to the left and tried to figure out an alternate composition, I realized that the dunes now seemed to have more depth to them (unedited):
Part of this is because of my lower angle, as well as the better positioning of the shadows. Also important is that a triangular dune at the back-right of the photo has become more distinct, giving my photo a clearer subject (which almost always is a good thing in photography).
I kept circling to the left and found the ideal vantage point, with a good view of that distant triangular dune (unedited):
This is almost the photo that I chose to process. In fact, until very recently, it’s the picture I edited and posted on my website and Instagram page. But I took another photo from practically the same spot, and I ended up deciding on it instead:
Can’t see much of a difference? I don’t blame you. To make them easier to compare, I fixed the tilt on both photos and did some very rough editing. Here they are again, with the first photo on the left and the second on the right. Click and drag the before/after slider to get a better sense of how they differ:
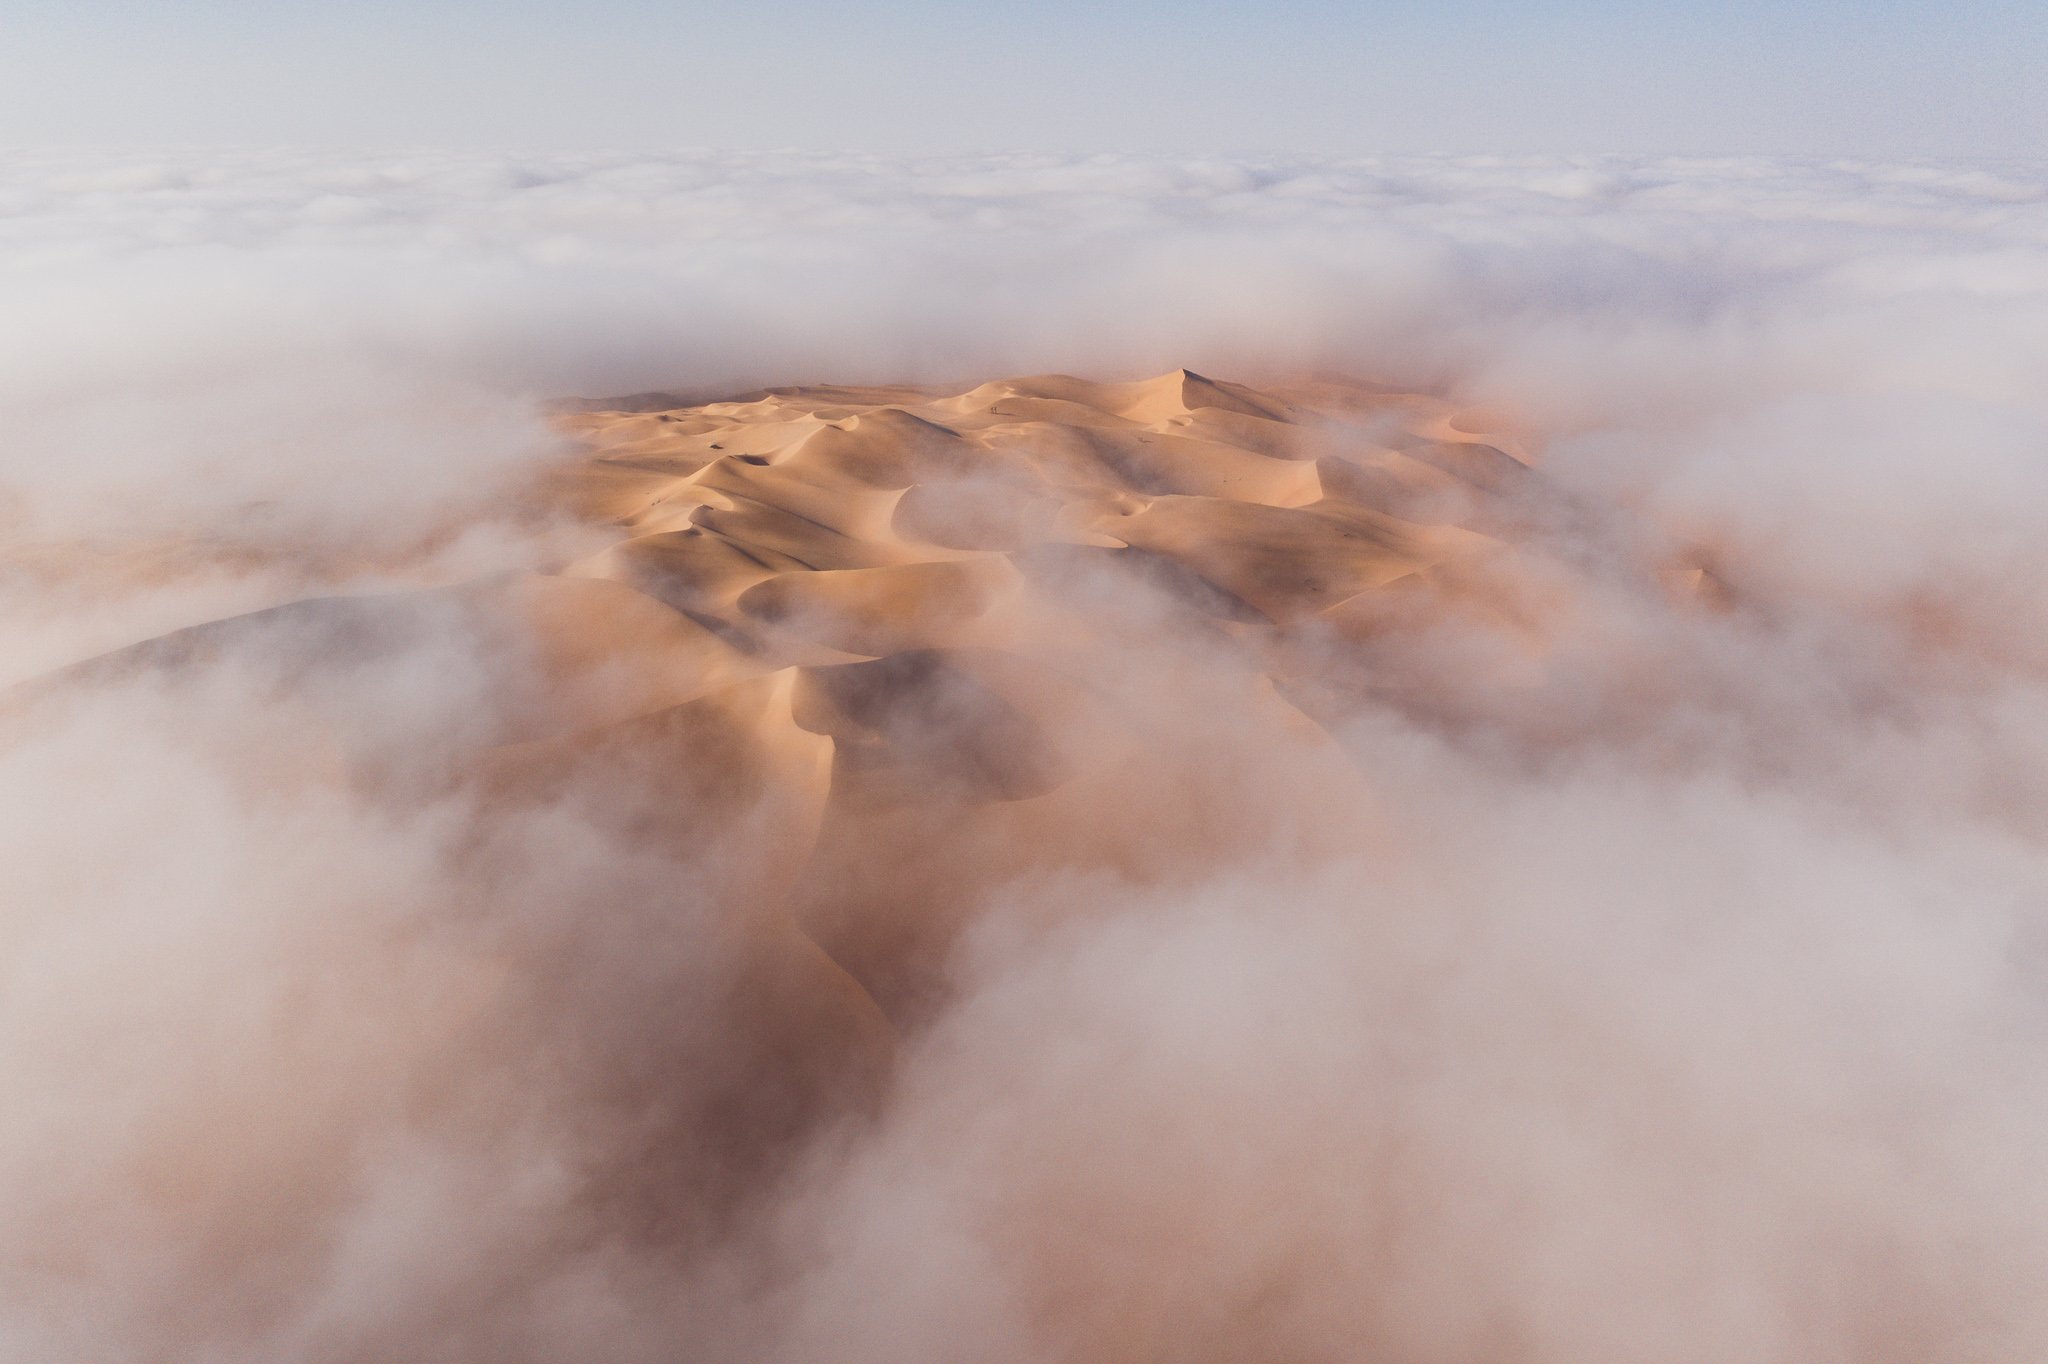
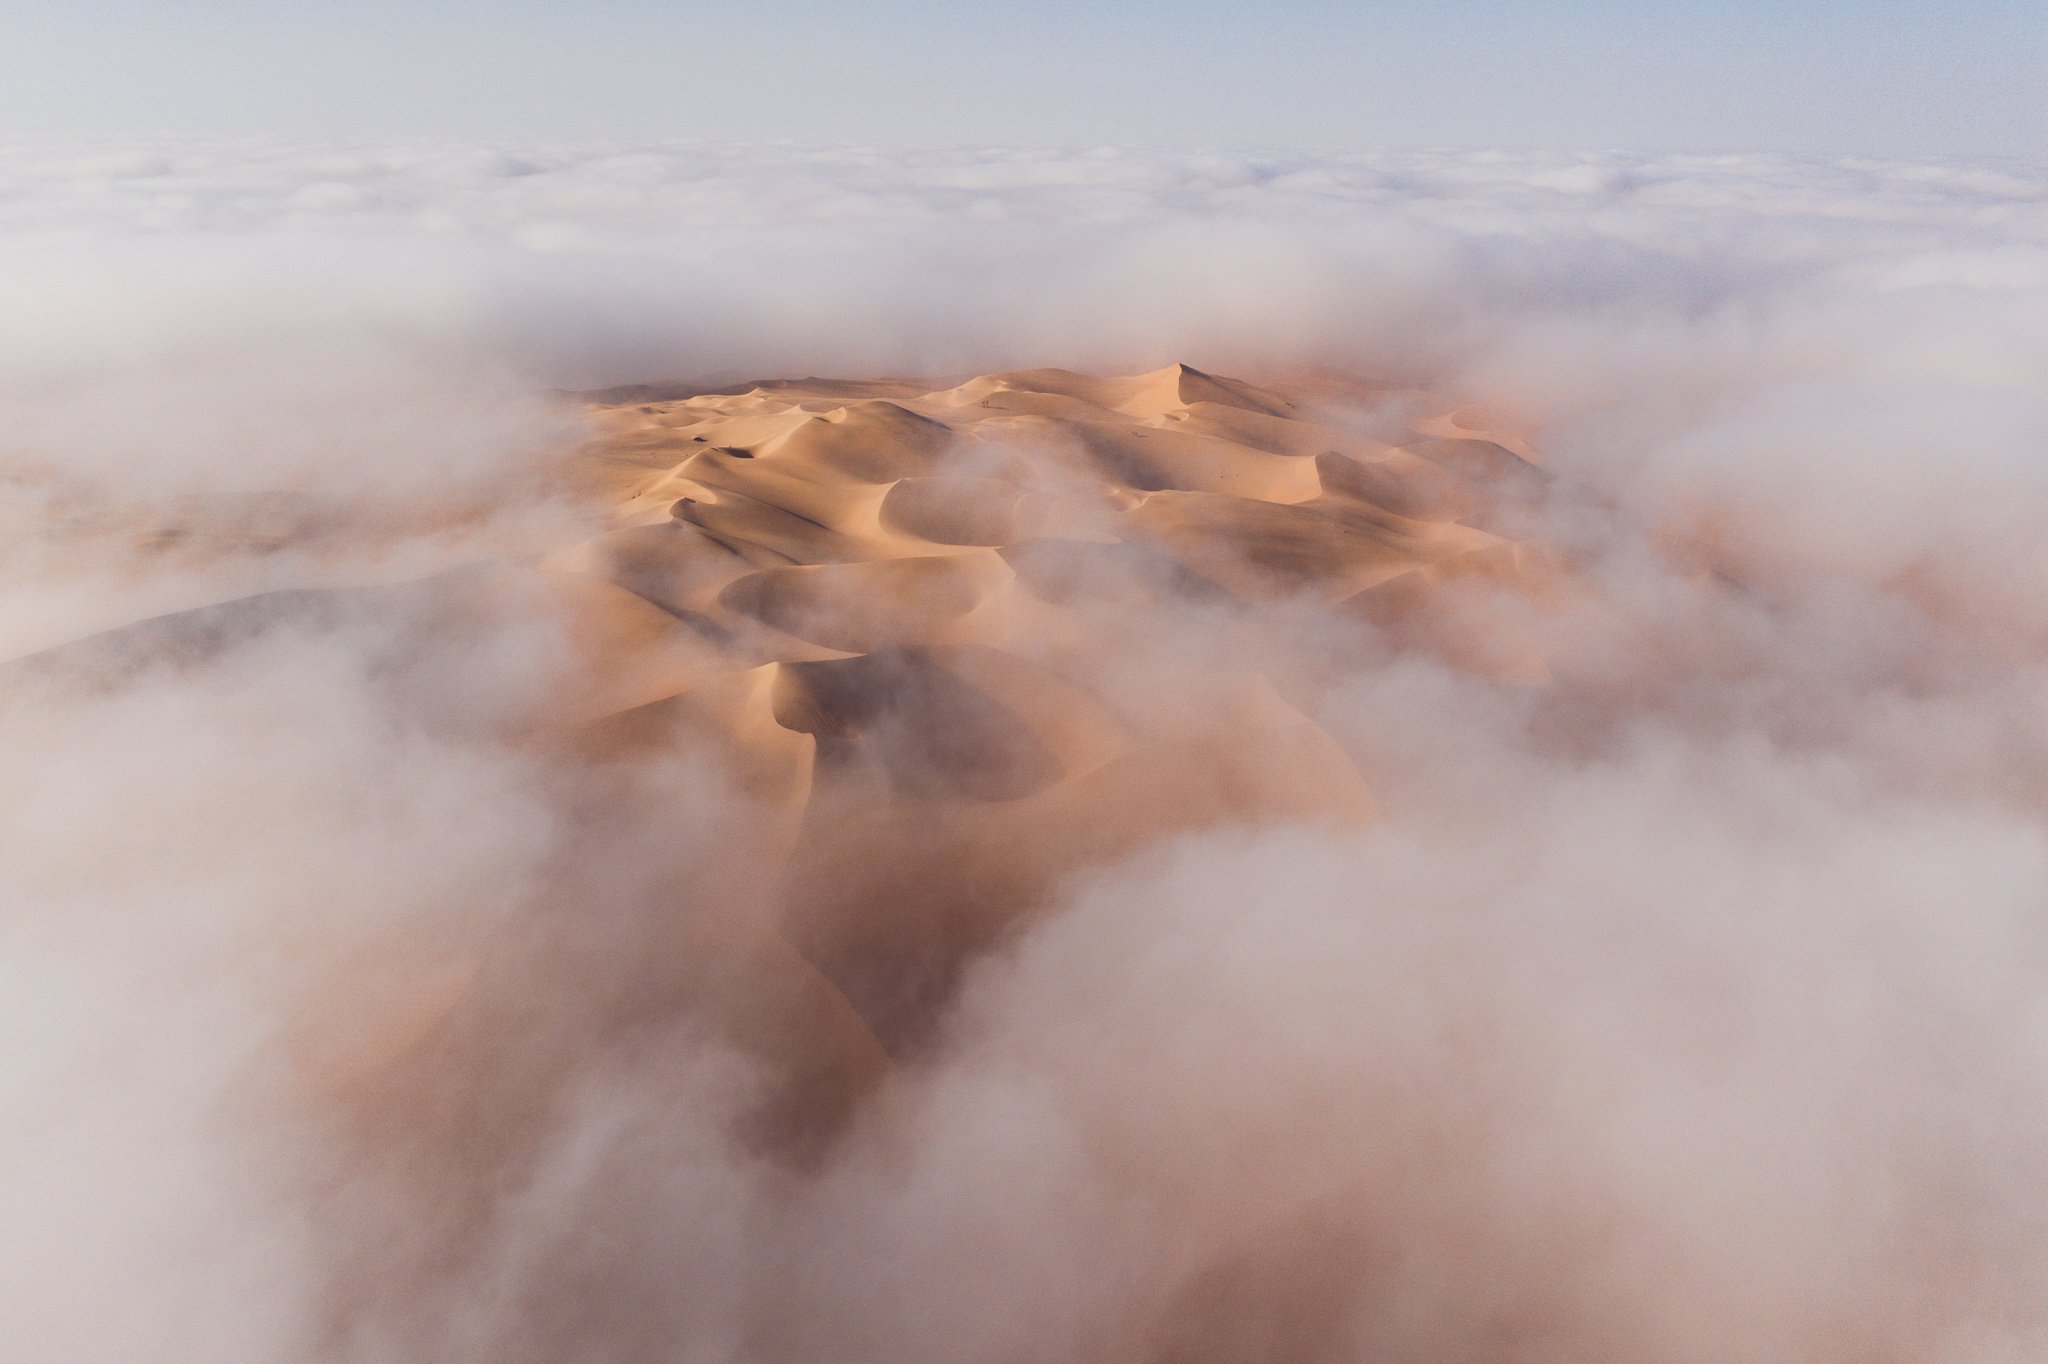
The cloud patterns certainly look a bit different, but – at least to me – they’re not obviously better in one or the other. Only after a lot of back-and-forth did I begin to prefer the second photo, and even now I’m only barely convinced it’s the better shot.
The reason that I ultimately decided on the second version comes down to clarity of message. Again, my goal here is to tell a fairly simple story – an island of sand dunes in an ocean of clouds. The cloud pattern in the second image wraps just a little more tightly around the dunes, especially on the right-hand side of the image. So, in the end, it’s the photo that I decided to process.
Sometimes photography comes down to tiny decisions like that, where neither answer is right or wrong. The one you pick depends on your personal style as a photographer – along with all the other subjective decisions you make in photography, like your post-processing decisions. In the end, that’s why two photographers using identical camera gear at the same location will end up with very different results most of the time.
Post-Processing
The most noteworthy part of my post-processing for this photo is that I blended the five-shot burst together in Photoshop to reduce noise.
It’s a very easy process. Just open the five DNG images as layers in Photoshop, highlight your layers, and convert to a smart object:
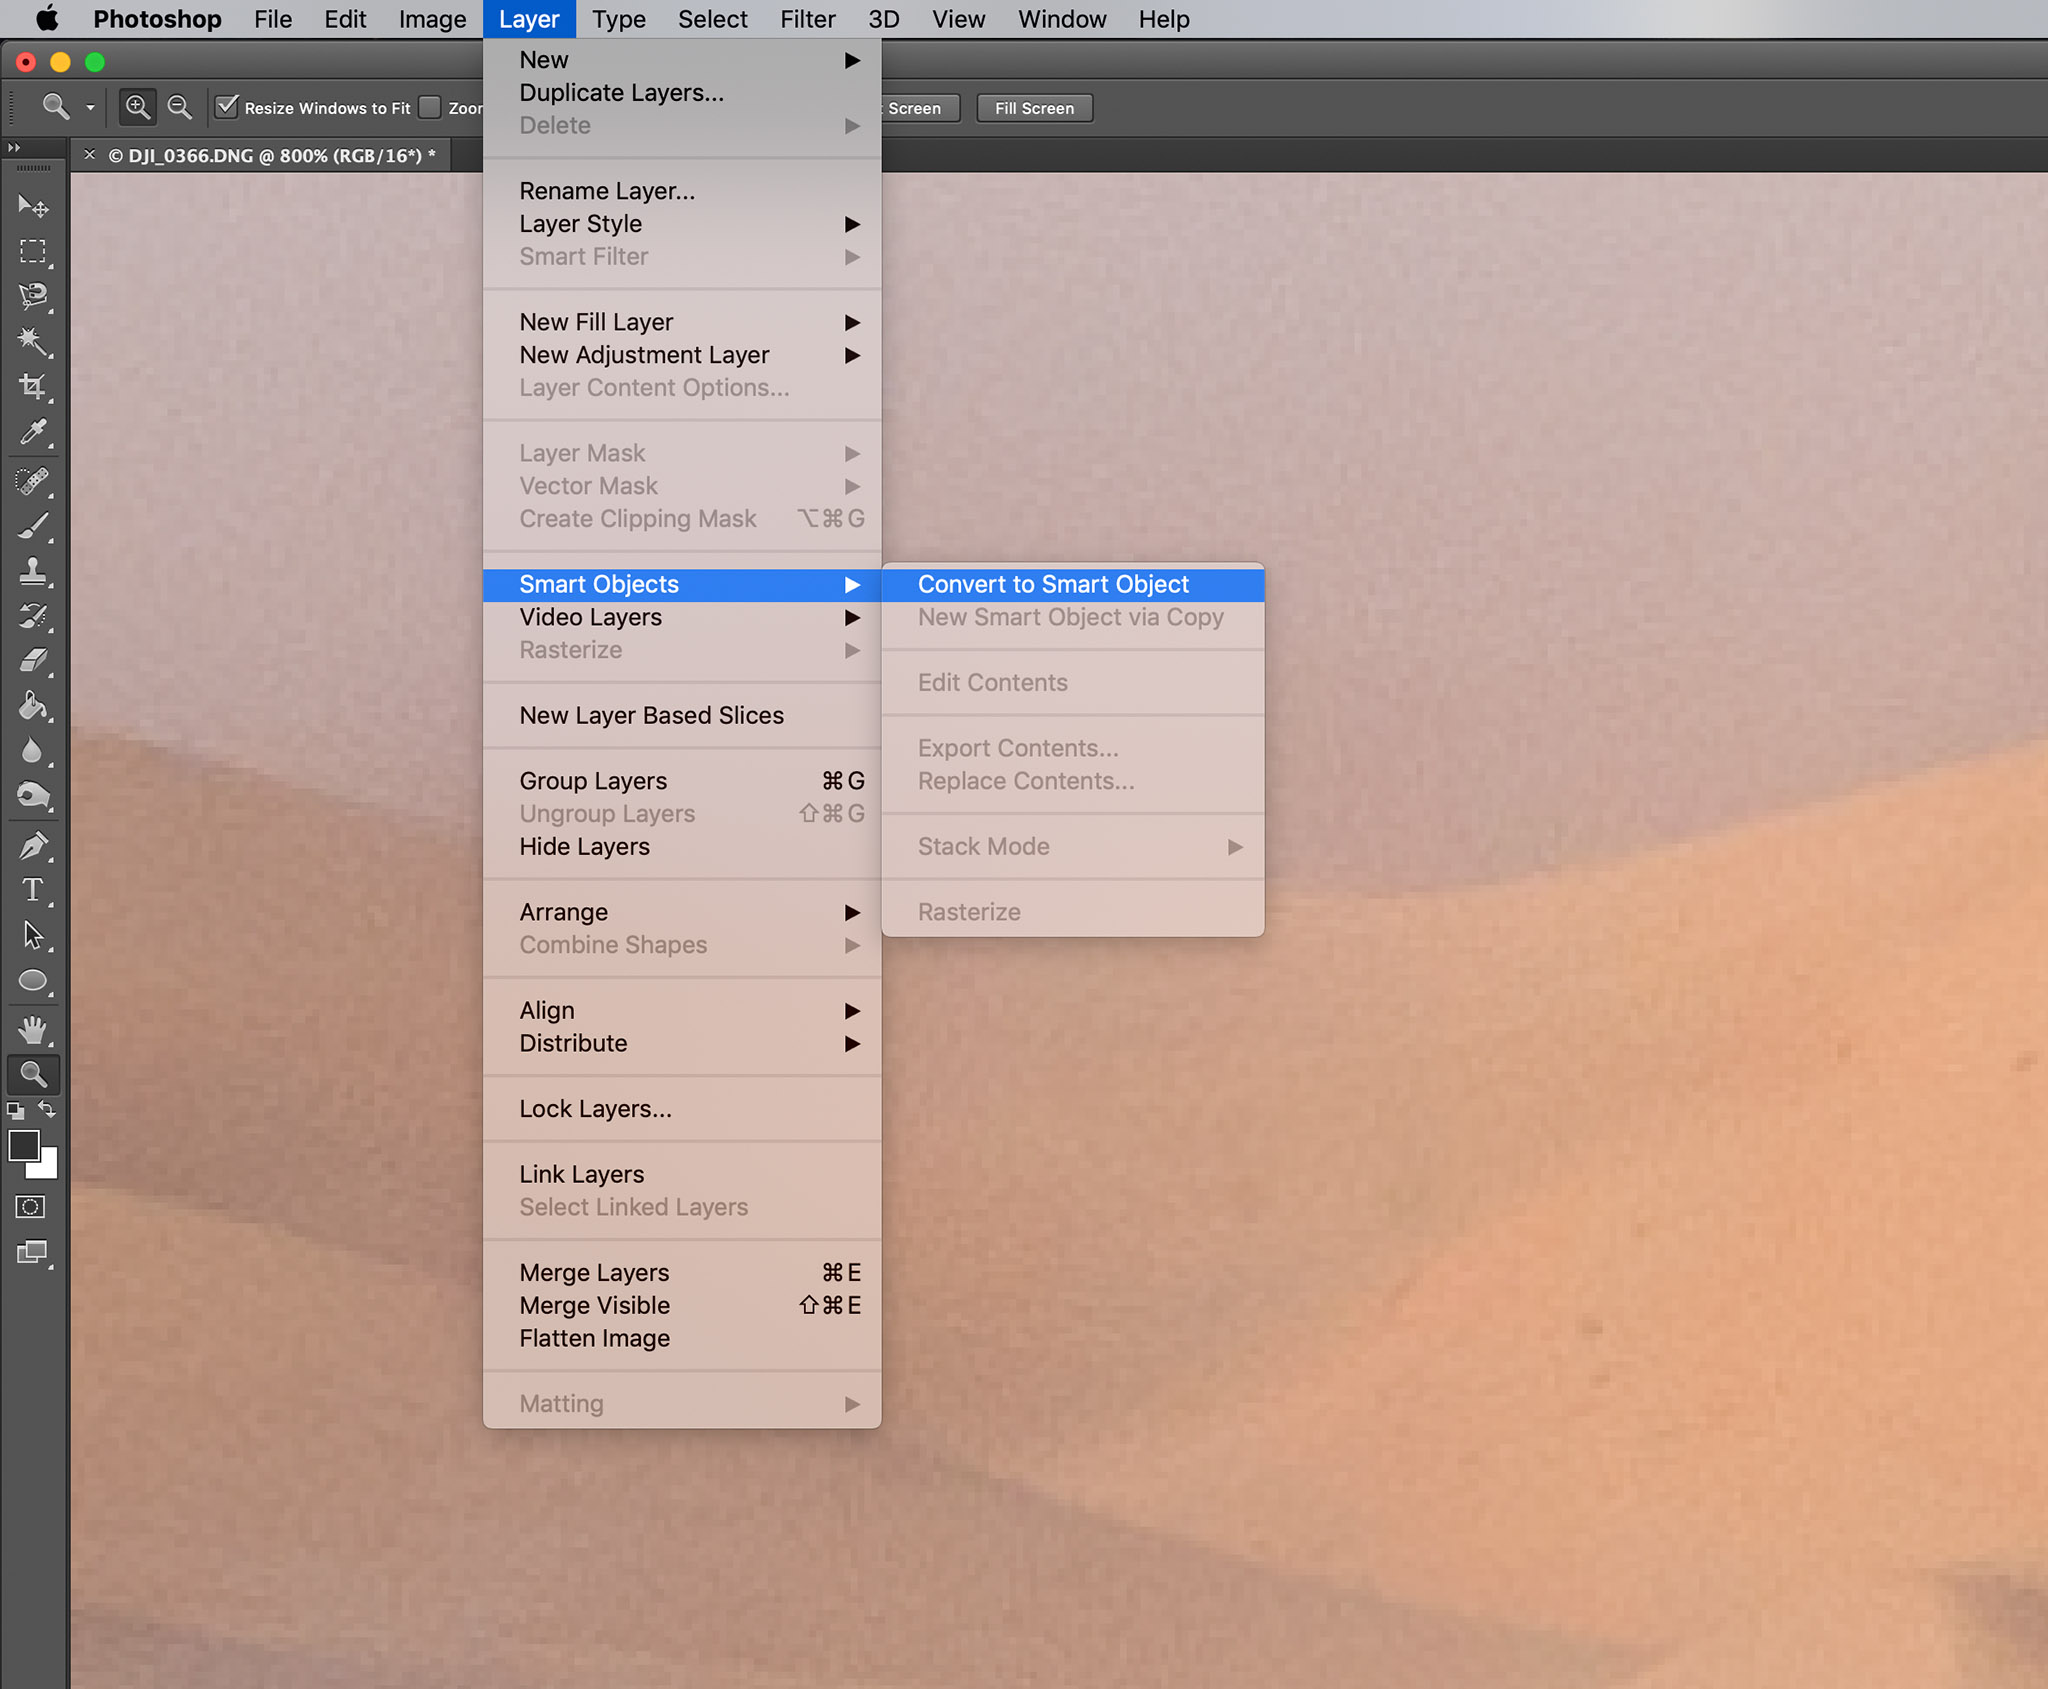
Then, blend the smart object using “mean” or “median” blend mode (I generally find that “mean” reduces noise a bit more):

This results in a clear improvement in noise, as you can see in the two images below:

Much better!
The one really critical thing is to make sure that the photos you’re opening in Photoshop all have sharpening and noise reduction turned OFF in Lightroom. This is extremely important! You should only ever do sharpening and noise reduction after averaging the images together. (The same goes for other edits, especially things like cropping and spot healing.)
Basically, blend your photos together as the very first step in post-processing, or at least before you do any cropping, spot healing, noise reduction, or sharpening.
Now that I’ve reduced noise, I saved the photo (as a ProPhoto RGB TIFF file) and started editing it in Lightroom.
1. Basic Panel
The first thing I noticed about the TIFF photo in this case is that it has very low levels of contrast. That’s because my drone was in a thin cloud while taking this picture; there’s going to be a lot of haze no matter what.
So, my Basic Panel sliders aim to correct that. Here are the settings I used:
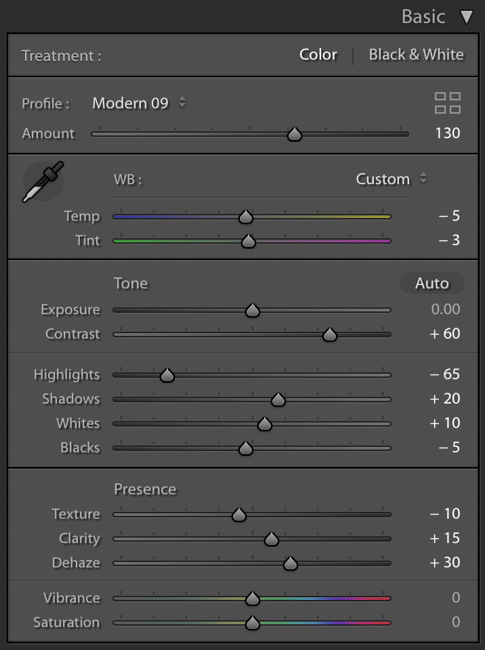
Note the fairly high level of dehaze, +30, which is higher than I almost ever use. But, in this case, it was necessary to pull out some of that low-lying detail in the dunes and surrounding clouds.
Also worth mentioning is the “Modern 09” color profile that I used here. We haven’t written about it much at Photography Life, but the relatively new “Profile Browser” in Lightroom Classic is actually a very interesting and powerful tool. It lets you apply many more color profiles than you could in the past, and even change the amount of effect you apply. (“Modern 09” fades both the shadows and highlights in a way that I liked for this photo.)
This is the result of those early edits:
2. Tone Curve
The next step for me is almost always the Tone Curve (especially the “lights” slider), since I like the added pop that it brings to many of my photos. Here are the settings I used this time:
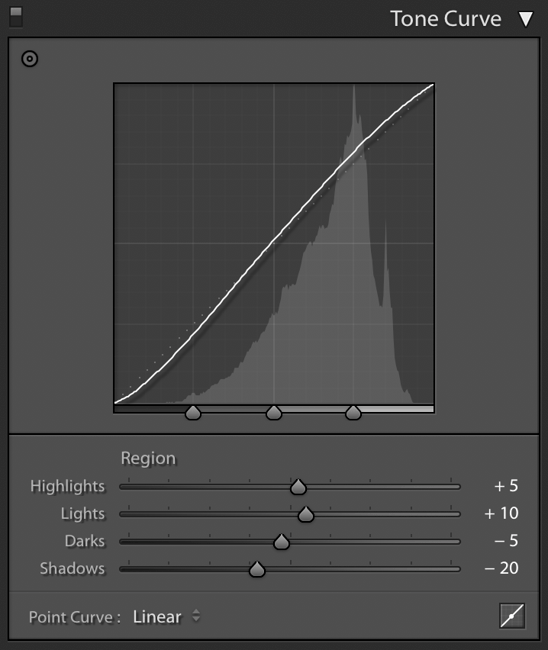
And that translated to adding some additional contrast:

3. Cropping
I’ve done enough edits at this point that I have a good idea of how to crop it. The horizon is quite tilted, so I ended up needing a correction of -1.75 degrees. I also cut out some excess sky and empty areas on the left and right side of the frame. Here’s a screenshot of the crop in Lightroom:
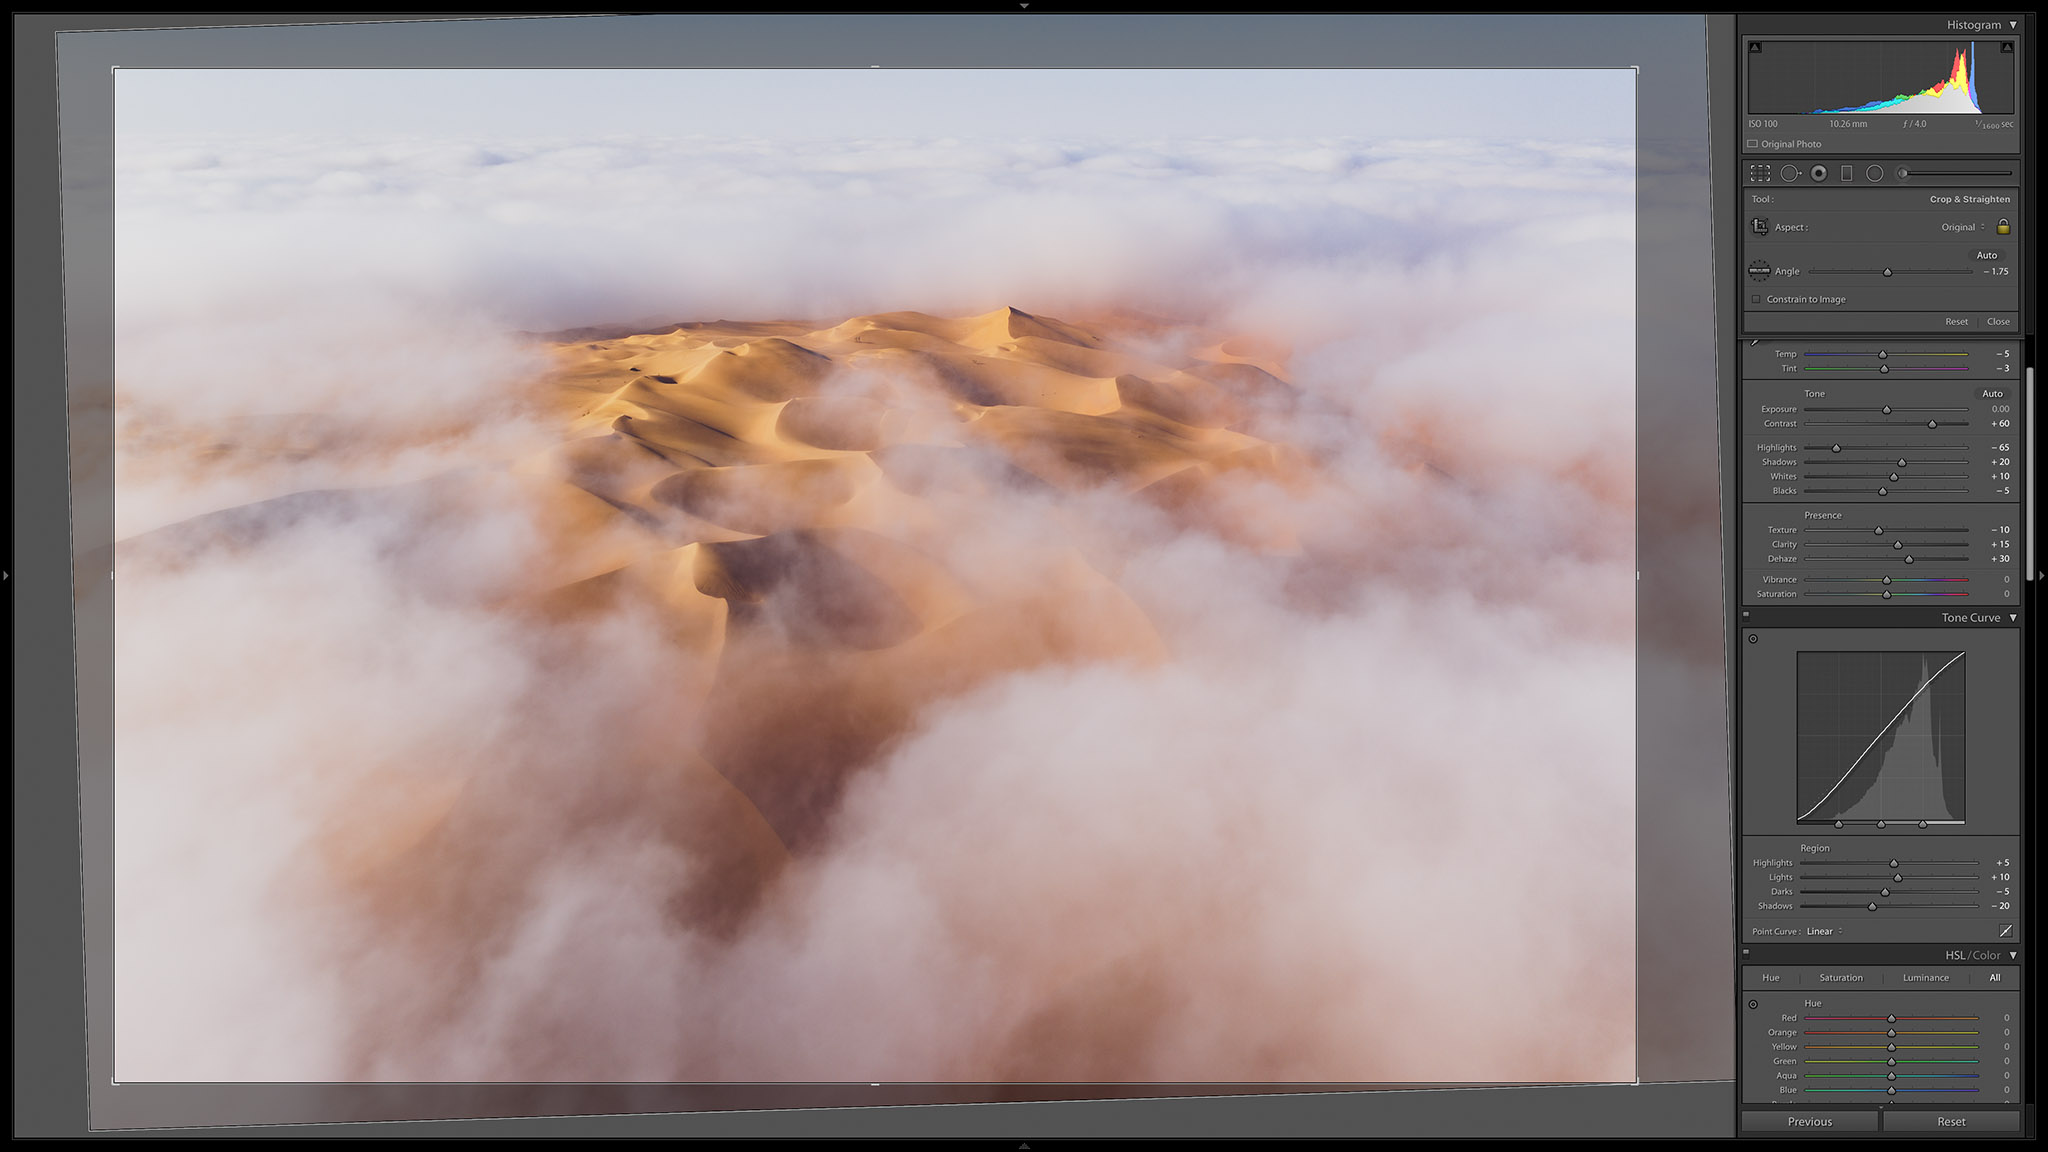
Which left me with this result:
4. HSL Panel
I’m basically done with global adjustments at this point, so it’s time to do some more targeted adjustments. In this case, that involves the HSL (hue, saturation, lightness) panel, because the colors here definitely need some improvements.
The HSL panel targets specific colors and allows you to shift them in various directions. It is very powerful, but also somewhat risky, because extreme adjustments to any of these sliders almost guarantees that you will end up with high levels of color noise when you zoom into an image.
You can see the values I chose here for the various sliders:
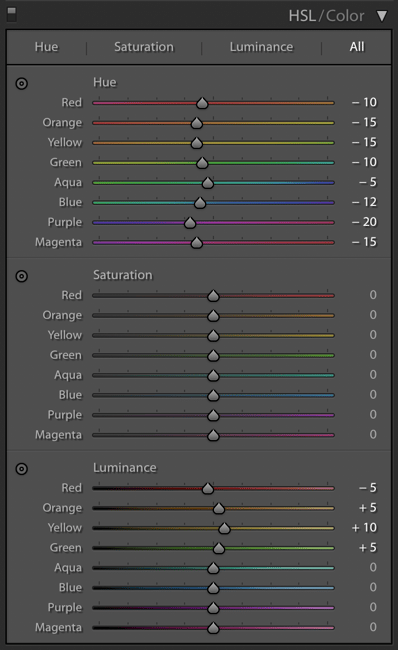
It’s always safest to leave HSL unchanged if you don’t need to adjust it, which is why I didn’t mess with the saturation sliders at all. For the hue and luminance sections, all of my slider values are within 10 points of one another at most. As a result, I avoided introducing too much color noise.
My main goal with these adjustments was to get rid of the overly green color cast in the dunes and the purple cast in the clouds. I also boosted the brightness of the dunes just a bit in order to help them stand out.
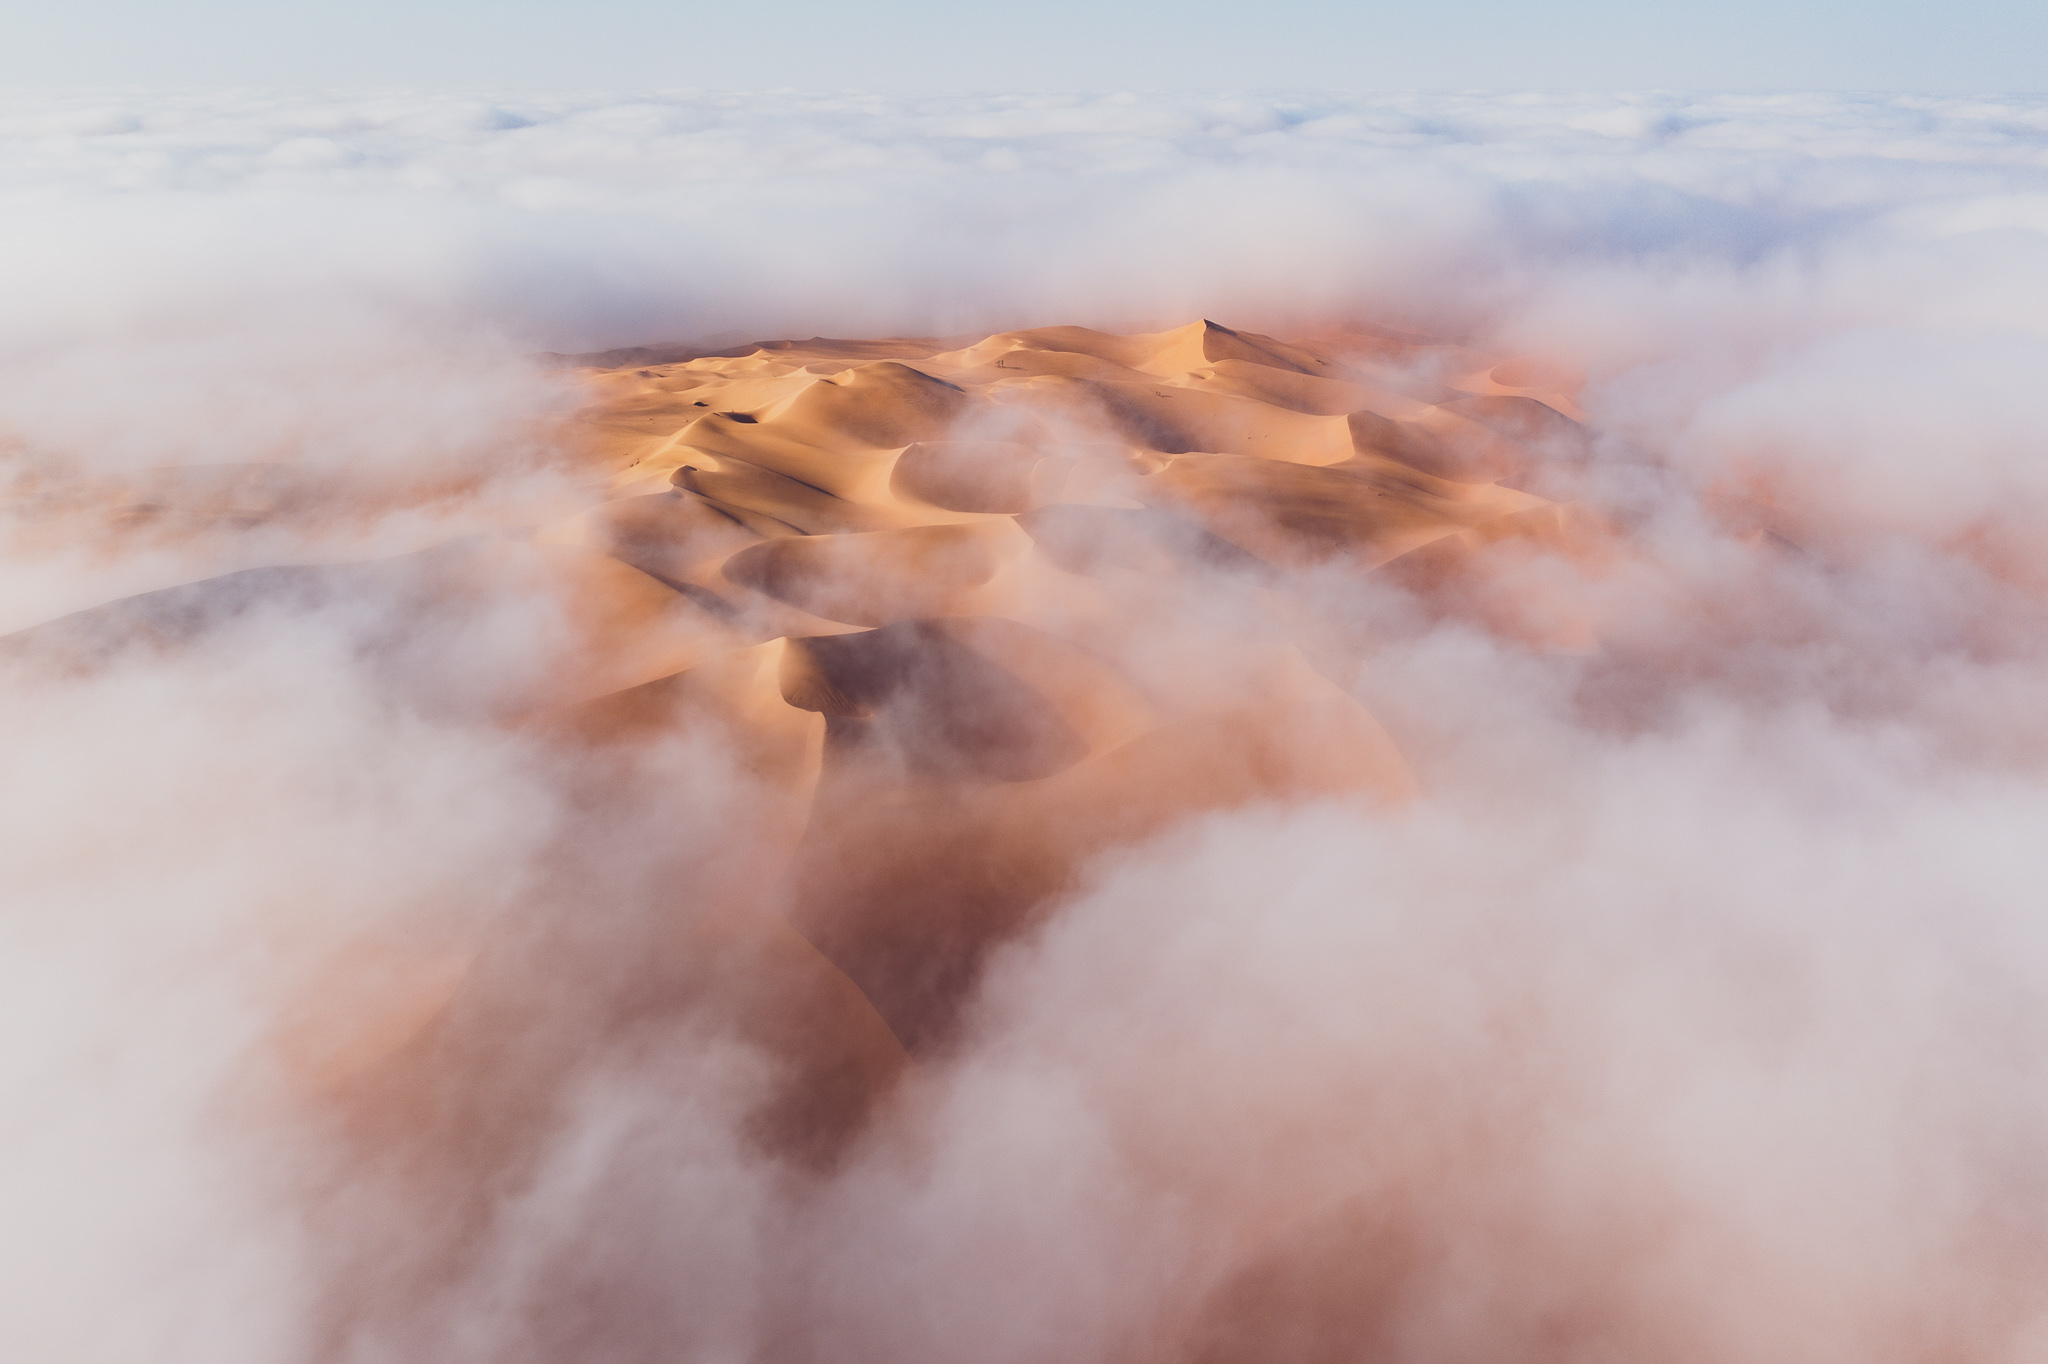
Here’s how that looks:
5. Gradients and Brushes
I think the photo so far is a big improvement, but it still could do with some local edits. Thanks to the different layers of clouds, this wasn’t a quick process. I won’t bore you with all the details, but I ended up using seven gradients, ten radial gradients, and two brushes.
The gradient tool is the broadest of the three. With that one, I largely focused on darkening the clouds and making them a bit bluer. This added a bit of a vignette around the image and helped separate the clouds from the dunes.
The radial gradient tool is a bit more specific. With this one, I individually dodged and burned certain clouds that stood out to me as distracting. I also added a small contrast boost to the triangular sand dune in the background, in order to make it stand out more.
My two brushes served a similar effect: darkening one cloud and brightening another, both of which had a bit of an irregular shape and didn’t look right with the radial gradient adjustment.
All of that led me to this version of the photo, which – coupled with my usual sharpening for low-ISO photos – is my final result. Click to see full size:
Conclusion
Sometimes, conditions blend perfectly with luck and preparation in photography, and you’ll end up with once-in-a-lifetime moments like this. Regardless of this photo, it was an amazing morning that I’ll not soon forget!
We also already published a short YouTube video about this photoshoot, which you may have seen a few months ago. There’s no new information in the video compared to the article above, but I’ll add it here because it features some pretty awesome (if I do say so myself!) drone video footage of the whole scene – that footage starts at 1:30 in the video:
Hopefully you found the story behind this photo to be illuminating. If you have any questions or comments about the process I used, please let me know in the comments section below.
What an amazing experience that must have been and to be in the right place with the right conditions (and equipment) provided magical results. Also, I very much appreciate learning from your technique and process too. Thanks for sharing!
Thank you, John – I’m glad you liked it!
Spencer your images and your commentary are absolutely first class. I just wish I was not 62 so I could run to get the best light!
Much appreciated John! Running is an important tool in my arsenal, because I always seem to be one minute behind the sunrise no matter how early I set my alarm. But for more disciplined photographers, walking should be just fine :)
Thank you Spencer for another wonderful article. I deeply enjoy the quality of the mentoring you are providing. Your humanism is very needed.
Thank you, Fabrice, I really appreciate the kind words.
Spencer
Great picture, the fog was a bonus that day, made for some interesting pictures.
Patrick
Pat, very glad you could be there for it! Good to hear from you.