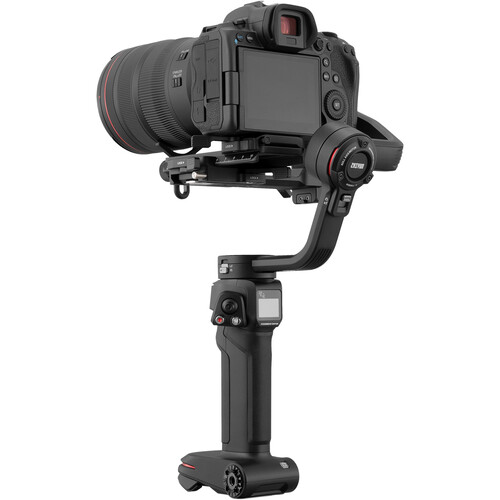
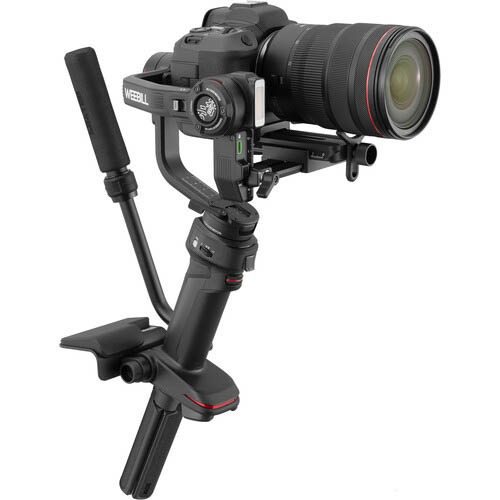
The Weebill 3 gimbal from Zhiyun is a compact yet powerful gimbal, capable of stabilizing mirrorless and DSLR cameras with large, fast lenses for video usage. I’ve spent the last few weeks testing the Weebill 3 stabilizer on a number of video shoots, comparing it against my past experiences with other gimbals from Zhiyun and DJI. In this review, I’ll be exploring what sets the Weebill 3 apart from the competition, as well as showcasing some of the innovative features.
If you’re looking for a smaller gimbal for shooting video, perhaps to stabilize a compact camera or smartphone, you can check out our guide to the top 8 video gimbals on the market, which explores a variety of other gimbal product lines.
Table of Contents
Why You Need a Gimbal
If you’re filming video with your DSLR or mirrorless camera, a gimbal is essential for getting smooth handheld footage. Thanks to the use of motors, a video gimbal can hold your camera steady and minimize most camera shake. This can help you get steady footage when standing still, as well as delivering buttery-smooth pan and tilt movements. Gimbals also make a variety of specialty shots possible, allowing you to position or move the camera in ways that just wouldn’t be possible otherwise.
While a gimbal won’t automatically make your footage perfect, unsteady footage tends to be immediately off-putting. If you’re shooting real estate, events, weddings, or filming for commercial or stock use, a gimbal is essential. I’ve been using a gimbal for a number of years now, and in that time have upgraded as my video rig has grown heavier.
The Weebill 3 sits at the top end of the mirrorless camera weight class, able to accommodate the largest cameras and heavy lenses like the 24-70 f/2.8. If your kit is smaller, constituting lighter bodies and f/4 or slower lenses, you may be able to save some money with a gimbal like the Crane M3 or M2-S, which work with medium and lightweight mirrorless cameras respectively.
Gimbal Hardware
What’s in the Box
The Weebill 3’s standard gimbal kit includes all the basics: the gimbal itself, plates to connect the camera to the arm, and the cables necessary for communication between the gimbal and camera. The Weebill 3 also has some filters for the light that’s built into the gimbal (more on that later in the review).
There’s also a combo kit that upgrades the standard carrying case into a more deluxe nylon bag, along with adding a sling grip and wrist rest. At the time of review, the wrist rest is being offered as a free add-on to the standard kit, as well.
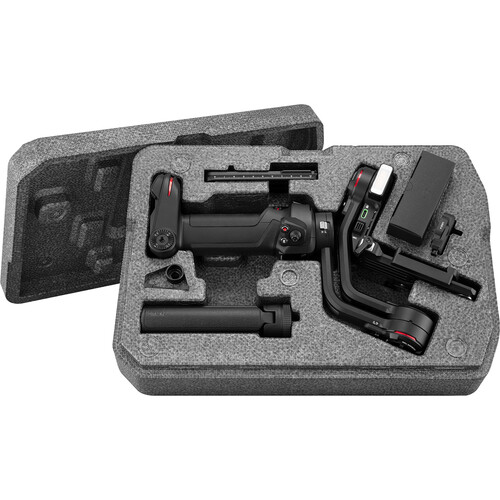
With either kit, everything you’d need to get started filming is available in the box. When my gimbal arrived, I was unpacked and ready to shoot in just a few minutes. This ease of setup is thanks to a couple of factors, including the mounting mechanism, smart cable placement, and the surprising inclusion of a mic and light built directly into the gimbal.
Available Accessories
Of course, it wouldn’t be a piece of camera gear without additional accessories available for purchase. In the case of the Weebill 3, these accessories include an image transmitter and wireless controller, for wireless operation at range.
Accessories like these really come into play in specialty situations, like shooting with the gimbal mounted on a car, or in larger productions. They’re a nice upgrade path but not something most videographers will need immediately.
Weebill 3 in Use
My primary use case for the Weebill 3 is capturing real estate videos. A gimbal is a great option for filming walkthroughs, and I’ve now shot a number of videos on the Weebill 3 using my Nikon Z7, typically with the 24-70mm f/4 and f/2.8 lenses, along with the 14-30mm. Before the Weebill 3, I was using DJI’s Ronin SC, which targets a lower payload figure.
The difference in payload capabilities between the two gimbals is immediately apparent, with the Weebill 3 better able to accommodate sloppy balancing (including just the extension of the 14-30mm as it zooms). The Weebill 3 does still require balancing, like any gimbal. But at least with my payloads, it didn’t require millimeter-level precision, as the motors still had plenty of torque left in them.
Another big factor for my situation is the resistance of the motors to overheating. Like any electric motor, the gimbal motors produce heat in operation. Having a heavier load (or a poorly-balanced one) produces more heat. Together with the scorching temperatures in Arizona’s summers, overheating the motors can be a worry. I’ve not experienced this on the Weebill 3, despite shooting in 105+ degree conditions and the fairly heavy 24-70mm f/2.8.
Stabilization Quality
The most important job of a gimbal is to stabilize your footage. This is another area where the Weebill 3 delivers. Footage has been perfectly stable, across a whole range of camera moves. To test performance, I let the Weebill 3 “auto-tune” the motors to match the payload. This process takes about 10 seconds, and can be performed directly from the gimbal’s controls, with no app needed.
I shoot most of my video with the 14-30mm, which doesn’t pose the largest challenge to a gimbal. For this review, though, I did test specifically with the 24-70 zoomed in, and continued to get great stabilization. The gimbal can accommodate even longer lenses, like an 85mm prime. The results hold up, but careful balancing plays a bigger role at longer focal lengths.
One last attribute of stabilization that I think is overlooked is how the default values translate into actual footage. Gimbals have a lot of controls for things like motor speeds, and while these can often be adjusted via the accompanying app or gimbal controls, having a good starting point makes a huge difference. I thought the Weebill 3’s defaults worked well, but if you need to change them you have access to speed, smoothing, deadzones, and tracking options in the menu.
Ergonomics
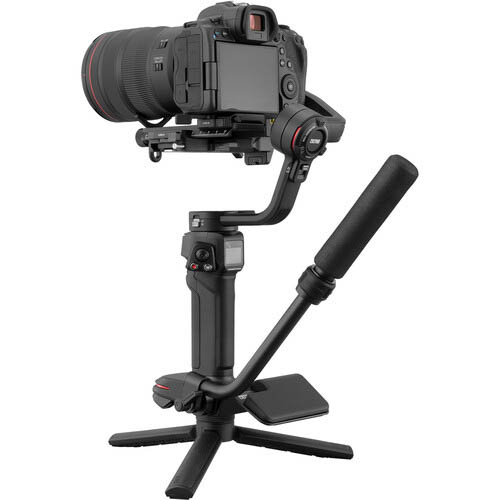
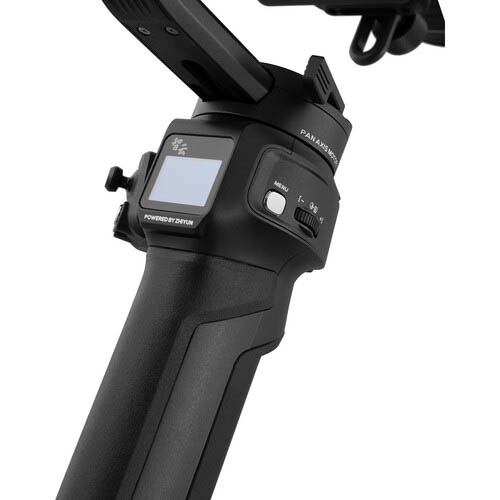
It’s clear from Zhiyun’s marketing materials that they feel the largest differentiator of the Weebill 3 is its ergonomic operation. The marketing heavily promotes the sling grip, as well as the ease of use of the wrist rest. In real world use, I agree with these claims: the gimbal really is comfortable to use, even over long periods of time.
The sling grip unlocks with just a twist, letting you extend or retract it to the most comfortable height, while remaining securely attached with a separate thumbscrew. The wrist rest is adjustable through a large range of positions, although the actual discrete stops are enforced by a locking tooth and plate system. While this makes the wrist rest feel more secure, it translates to only about three or four actual “positions” that work for how I hold the gimbal, reducing some of the adjustability.
As a side note, I think it’s a bit odd to base so much of the marketing around the ergonomic accessories, but then to lock the accessories behind a separate purchase. While the wrist rest is currently being bundled into the standard kit for free, it’s not clear if this is a limited time promotion. Either way, I’d consider these accessories to add a lot of value to the setup, so consider picking them up if your kit doesn’t include them.
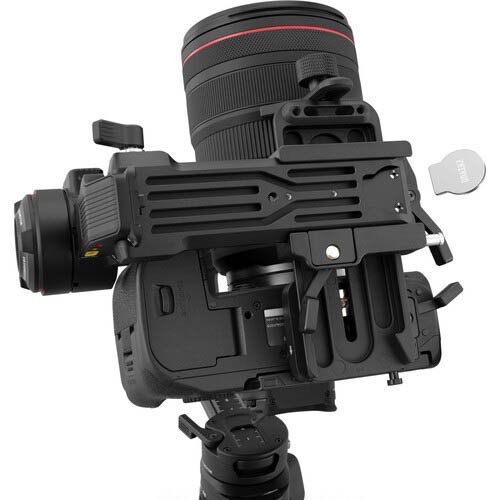
One last ergonomic and usability benefit is the quick release plate setup. Most gimbals have a plate that just mounts to the camera, requiring you to balance the camera each time you attach it to the gimbal. The Weebill 3 handles things differently, with a two-plate system. With this system, one plate can be locked on the gimbal in the right spot for perfect balance with a particular camera/lens combo. Then the other plate (attached to the camera) always ends up in the right spot. Granted, you still need to rebalance the first plate each time you change lenses, but this is still a big time-saver.
Other Features
Besides the ergonomic accessories, the Weebill 3 also has a unique light and microphone. Built right into the arm of the gimbal, the light can be controlled directly from the grip, while the mic connects to your camera via 3.5mm cable.
The light has an adjustable color temperature, ranging between 2600K and 5400K. Additionally, even the standard kit comes with a blue, red, orange, and yellow filter, which mount directly to the light. To enable the light, you just have to press and hold the side-wheel, which then opens an interface for controlling brightness and color temperature. Based on the location and output, I think this light is most useful for short distances like vlogging, and it’s just a nice inclusion that might be helpful in some scenarios.
The mic is a little more versatile. Like the light, it too is mounted on the arm, and is reasonably insulated from motor or camera noise. The mic is a clear upgrade over the built-in mic on most cameras. While I’d still stick with an external or wireless mic, the Weebill’s mic can offer better quality for a scratch or safety track.
Verdict
For stabilization, the Weebill 3 is an excellent option. Despite being smaller and less expensive than some of the big gimbals, it’s still capable of handling f/2.8 zooms with great results. Usability is very good, but not perfect. Fortunately, the few issues I have with the gimbal don’t affect the core usability.
One issue is a poorly-designed mobile app, which requires users to jump through a number of hoops, including setting up a separate account and providing location access, just to use the gimbal. After seeing that, I gave up on the app, and evaluated the gimbal just on the basis of built-in controls, which it fortunately still offers.
The side wheel for controlling the gimbal’s more advanced functions and menus is located in an odd position. To manipulate it with my index finger requires bending it far back, while using my thumb leaves me grasping the gimbal with far less confidence. As an improvement, I’d love to see those controls move over to the left hand, perhaps above the record button and panning thumbstick. While the options covered by these controls aren’t needed constantly, they should be more accessible.
One last complaint is about the documentation. While gimbals don’t need a massive manual, the small physical size of the included manual makes some of the diagrams difficult to read. For new gimbal users, getting proper balance is key to a good experience, and these steps in the manual could be easier to follow.
Other than those control quibbles, the gimbal’s other aspects are all quite good. Build quality, battery life, and the included accessories are all very nicely done, with the gimbal offering a lot of performance for the price. The dual-plate setup and comfortable add-ons (the sling grip and wrist rest) are great usability features. For smaller-scale productions, having a built-in light and mic can potentially be useful, too.
The Weebill 3 is available from B&H as both the standard kit and as a combo with the sling grip.
Weebill 3 Gimbal : Powerful and Ergonomic Image Stabilization
- Features
- Build Quality
- Handling
- Stabilization
- Battery Life
- Size and Weight
- Packaging and Manual
- Ease of Use
- Software
- Value
Photography Life Overall Rating
Hi Alex, I have a gimbal releated question which I can’t get answered.
I am going on a trip aboard a three mast bark crossing the Atlantic and will do a lot of sea photography. Making photos on the always moving ship I sometimes need something, a gimbal I suppose?, so the horizon stays horizontal, straight.
I use I Nikon D800 and a sturdy Manfretto tripod.
Is the Weebil 3 Gimbal from your review usefull to keep the horizon straight? Or do I need another (if possible mechanical) Gimbal.
Thanks for your advice!
Sounds like you’d need a different type of device, if one even exists. If I understand, you’re wanting to shoot photos from the ship while removing, but keep a level horizon. While a gimbal might work initially for this, I think you’d run into issues with drift and calibration quite quickly.
My suggestion might be to just rely on software after the fact. Shoot slightly wider compositions and level the horizon in post.
Looks like a great choice for videographers using a variety of lenses from light to heavy! Nice review.
Thanks!