If you don’t get out to take photos when it’s raining or snowing, then you are missing some great opportunities! In this review of the Think Tank Hydrophobia 300-600 v2.0, I will go over the features of this protective cover, talk about its use and how it helps me capture unique photographs of wildlife in the most difficult weather conditions.
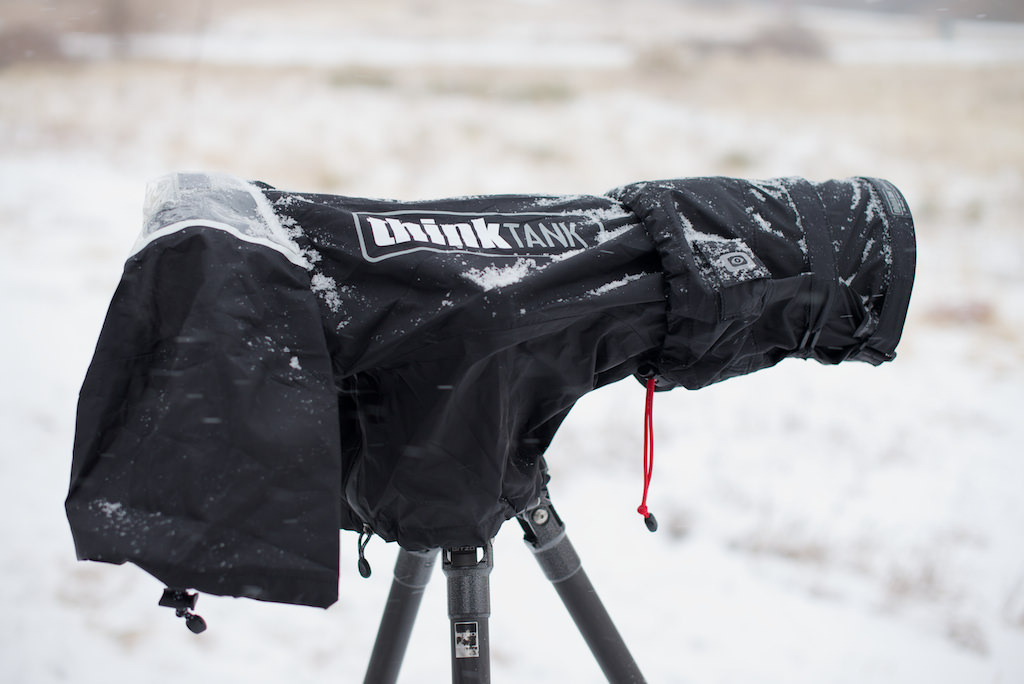
When it comes to protecting your gear in inclement weather, you can go the cheap route with a plastic bag, or if your gear fits, really “go big” with a plastic protector with cinch closure such as the Optech Rain sleeve – better than a plastic trash bag, but still not the best option. I have used the Optech Rain sleeve in the past and while it is light, takes up almost no room and is cheap, it isn’t very durable and isn’t as easy to use as the more expensive rain covers. For instance, one limitation is the single opening that your hand has to go up to control the camera. I tend to keep one of these available in a backpack if I am not planning on bad weather but want to be prepared just in case. They work in a pinch and for brief showers so they are good for the unexpected, but for real protection, you’ll want to invest in a dedicated rain cover that will allow you to fully operate the camera and still protect it from rain, snow, dirt or sand. If you are likely to run into bad weather or harsh conditions such as wind blown sand or dirt, consider a more complete system such as the Hydrophobia from Think Tank, a complete system that is built like its manufacturer’s name – a tank. To suit your needs there are 3 different sizes to choose from: one to fit a 70-200mm lens, one to fit a 70-200 with a flash mounted and lastly, the Hydrophobia 300-600 v2.0, designed to fit lenses from 300mm to 600mm f/4 and which we will review here.
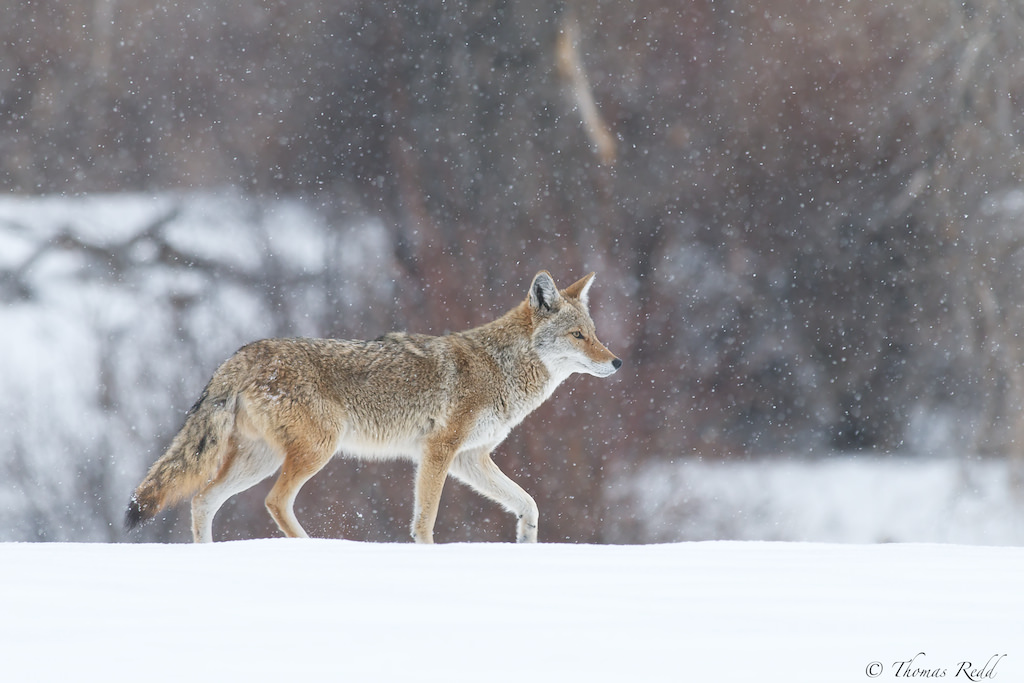
Table of Contents
1) Specifications
• Dimensions: 25” L x 8.5” Diameter (63.5 x 22 cm)
• 600 MM Lens Extension Sleeve Dimensions: 7.75” L x 8.5” D (20×22 cm)
• Weight: 0.7 lbs (0.3kg)
• 210 T Seam-sealed taffeta rip-stop + Polyurethane (PU) film + 70D nylon tricot, PU seam tape, clear PU (non-PVC), weather resistant zippers, high-density shock cord, nylon webbing, neoprene, 3-ply bonded nylon thread.
• Eyepiece sold separately and required for proper use
• Compatible with super telephoto lenses (300mm f/2.8 up to 600mm f/4)
2) Materials and Construction
Think Tank has used durable materials to protect your gear. The cover is made from 70 Denier Nylon fabric tough enough to resist tears but thin enough to not be too big when folded for storage and flexible enough to allow movement of your arms when in the sleeves. The seams are all taped to add strength as well as extra seal for waterproofing.
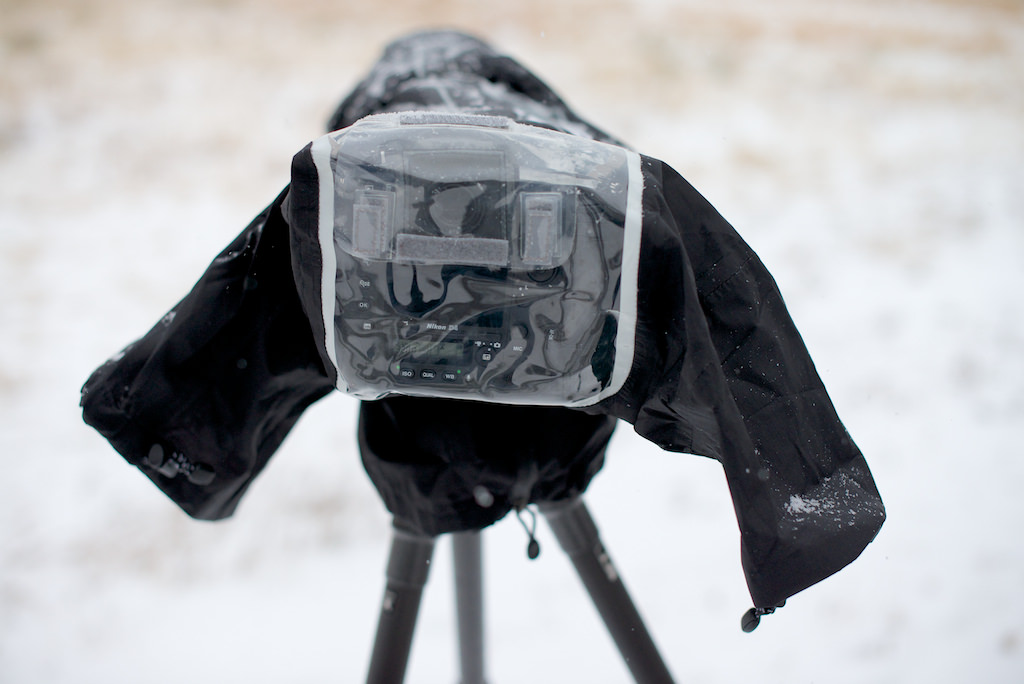
Think Tank prides itself in using environmentally friendly materials and so it uses no PVC in its products. Instead of using PVC, it uses more eco-friendly Polyurethane or PU for short. The clear plastic that covers the camera back is PU and it can fog up some. To combat this, they give you some plastic polish or you can also use a Mr. Clean magic eraser as needed to keep it clear.

3) Handling
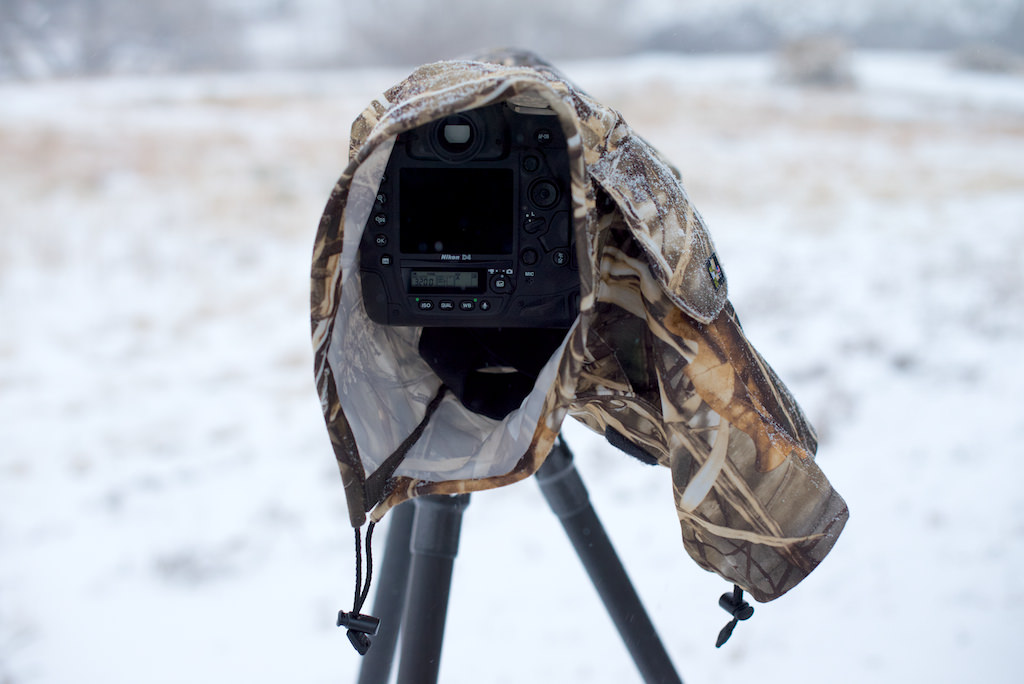
When you first remove it from its mesh carrying bag, it can be a bit intimidating with zippers, Velcro bands, drawstring cinch cords and multiple openings. After placing it the first time, it really is simple and not that big of a deal – put it on once and it all makes sense.
First, you will need to replace the OEM eyepiece with one from Think Tank to match your camera body. The eyepiece is made to allow the neoprene gasket on the cover to form a seal and in order to keep from misplacing the OEM eyepiece or the Hydrophobia eyepiece, there is a dedicated pouch to hold the eyepiece not currently in use.
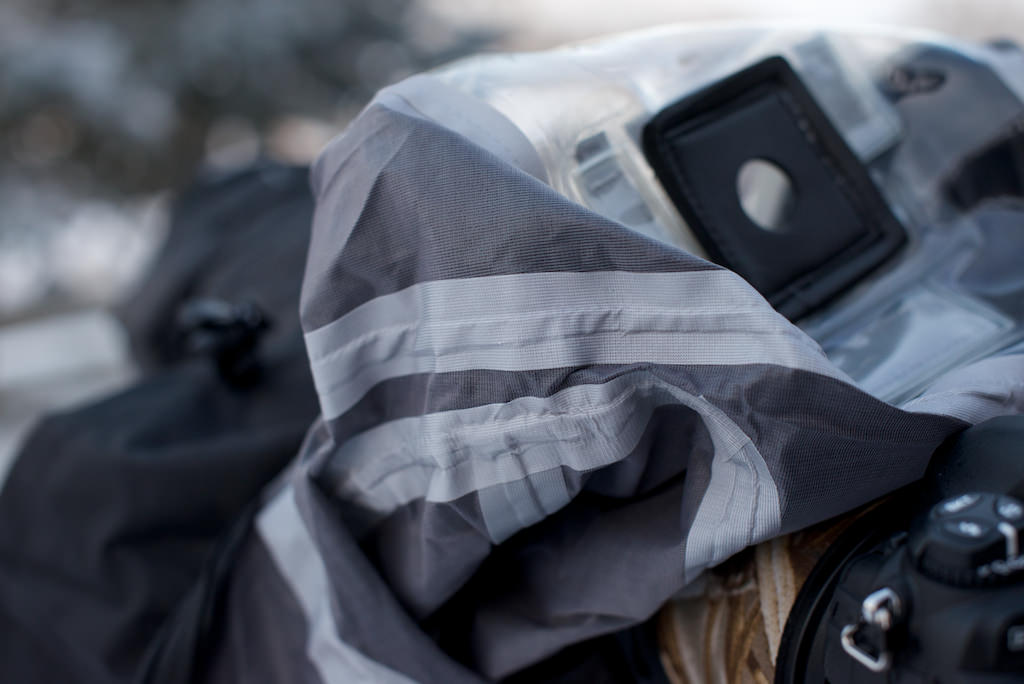
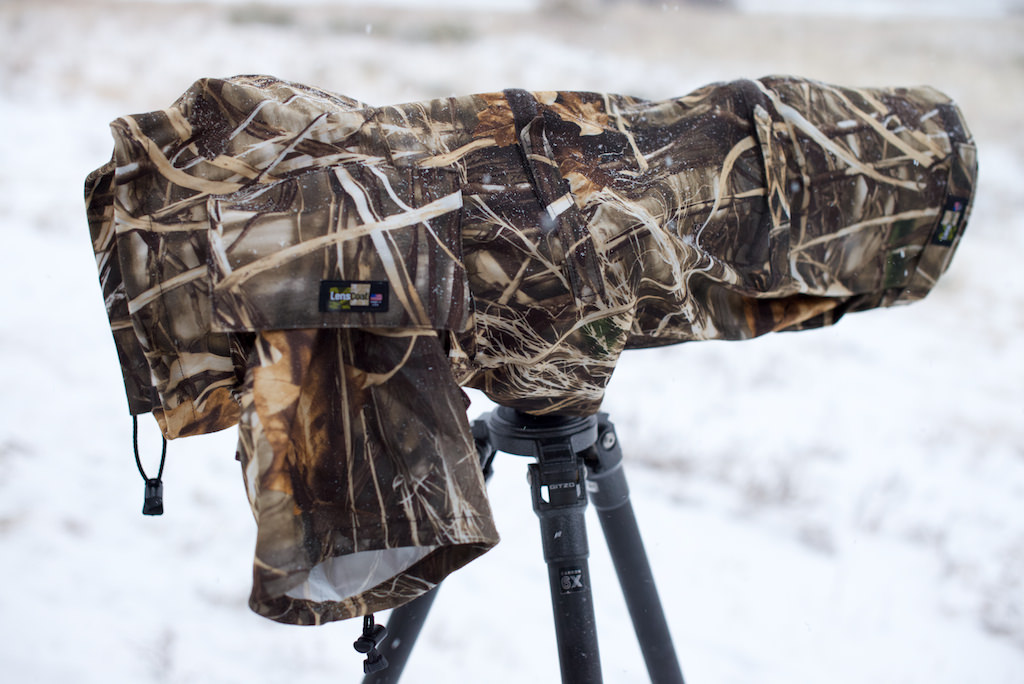
Then, after unfolding the cover, slip it over the lens and the camera. There is a white line on the top that you align with the top of the lens and the front end with its large opening and the back with its clear plastic window. After the lens opening is tightened with the two Velcro straps, the back of the rain cover is rolled forward and tucked into a compartment and closed with a drawstring pulled tight. It is now pre-installed and ready for quick deployment as needed.
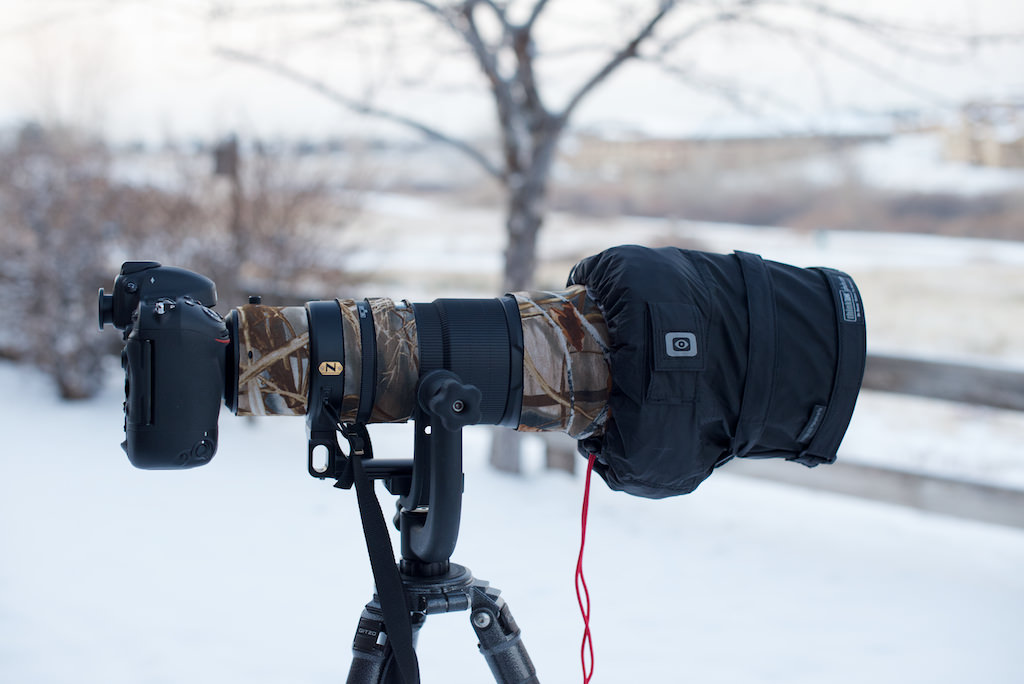
Once the inclement conditions arrive, simply loosen the red drawstring and unroll the cover over the lens and camera body. Pull the neoprene gasket over the eyepiece, zip up the opening around the tripod and you are ready to go with the entire process only taking 30 seconds, maybe less. If you like, you can roll the camera lens strap into a strip of elastic webbing to hold it out of place. Also, there is a cap which stores in its own side pouch that fits over the end of the lens should there be times that you are not shooting and you want to keep rain, snow or dirt out of the lens hood.

Going from horizontal to vertical orientation is a bit of a challenge, you have to unzip the bottom of the jacket and loosen the cinch cord around the tripod to allow it to rotate. Even then, it is a bit tight trying to get it fully vertical. It would be nice if they would make the zippered skirt portion of the jacket a bit larger so it would be looser and easier to make the transition between orientations.
The Hydrophobia, unlike many rain covers, has two arm sleeves/openings allowing you to fully operate the camera and keeping your hands dry and warmer at the same time. Most rain covers, like the RainCoat Pro from LensCoat, have one arm sleeve on the right side but nothing on the left side.
4) ThinkTank Hydrophobia v2.0 vs LensCoat RainCoat Pro
While both of these raincovers work well, there are some differences that are worth mentioning:
1. There is no extra eyepiece needed with the LensCoat because it has no rear cover like the Hydrophobia.
2. The LensCoat is slightly smaller when folded up in its case.
3. The Hydrophobia is a bit more complicated to attach but can be pre-mounted for quick deployment without being in the way.
4. The Hydrophobia has two arm/hand openings which keeps both hands dry and warmer and gives easier access to all controls and focus ring without exposing the camera body to the elements as much.
5. The Hydrophobia can be premounted and deployed on short notice. The LensCoat cover can be premounted but it will always be deployed if mounted.
6. The Hydrophobia covers the tripod head better.
7. The overall protection is better with the Hydrophobia.
The LensCoat RainCoat is a nice rain jacket, and with the large opening in the back it is easier to see the LCD monitor, but it is less protective. While the Hydrophobia is better at keeping the gear dry regardless of the direction of the wind due to the clear back panel, it is a bit harder to see the monitor as clearly. Both manufacturers make multiple sizes to fit your kit needs.
My overall recommendation between the two, is based on the weather you are most likely to shoot in. If you have to shoot in the rain, I definitely would go with the Hydrophobia, as it is a much more complete system and better sealed. If you rarely shoot in the rain or if it is a light rain, then the LensCoat RainCoat Pro can work for you. If you are only shooting in the snow then either could work as long as it is a drier snow. Aren’t sure of the weather type you will encounter and you want to be prepared for anything? Then go with the Think Tank Hydrophobia – it has got you and your gear covered, literally.
5) Value
As for value, at $159 plus $35 for the eyepiece, judging its value is not easy. Considering the substantial investment in a camera body and a large lens, the price for peace of mind may not be inexpensive but that peace is valuable. When considering the additional cost of the eyepiece, the total cost of the hydrophobia and eyepiece approaches double that of the LensCoat. If the eyepiece were included in the cost, I would have placed the value higher. That being said, this is a most complete protection system.
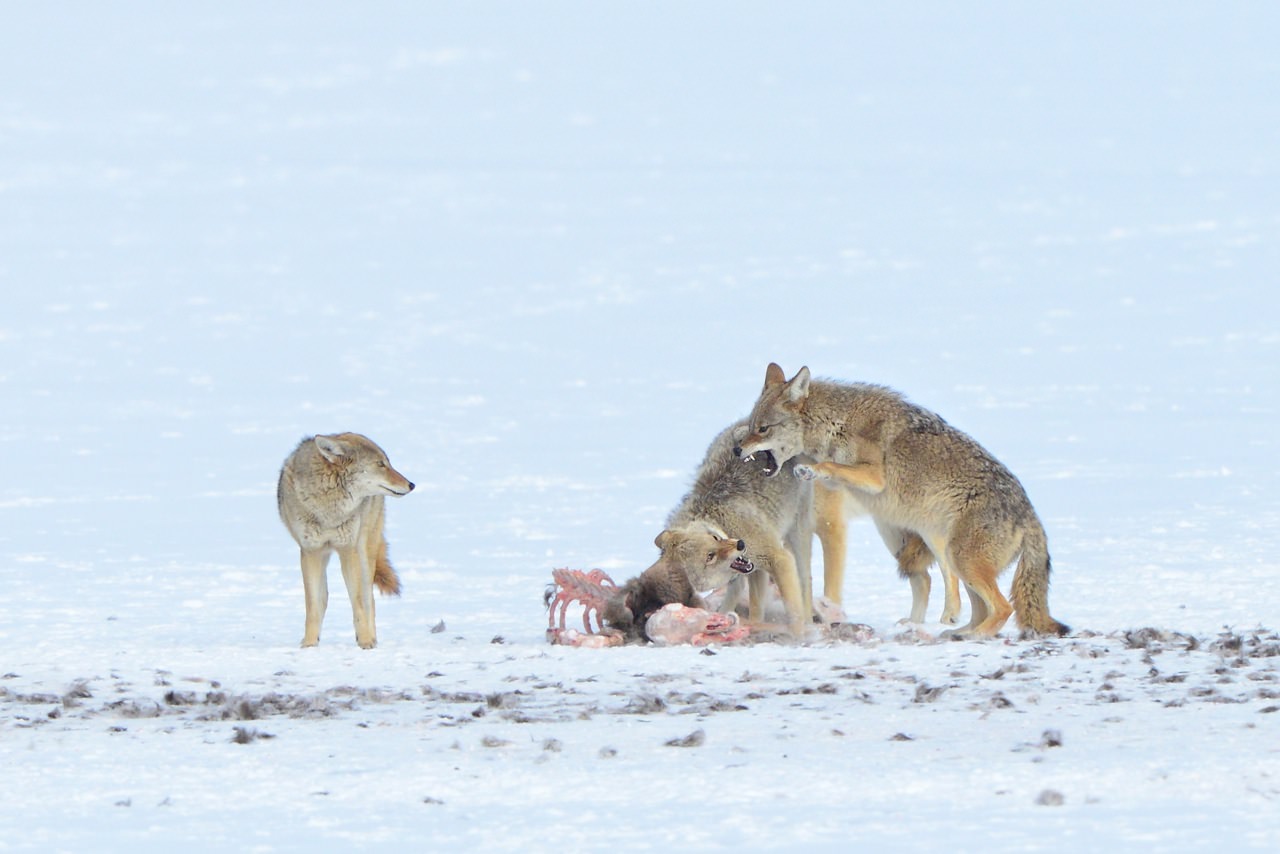
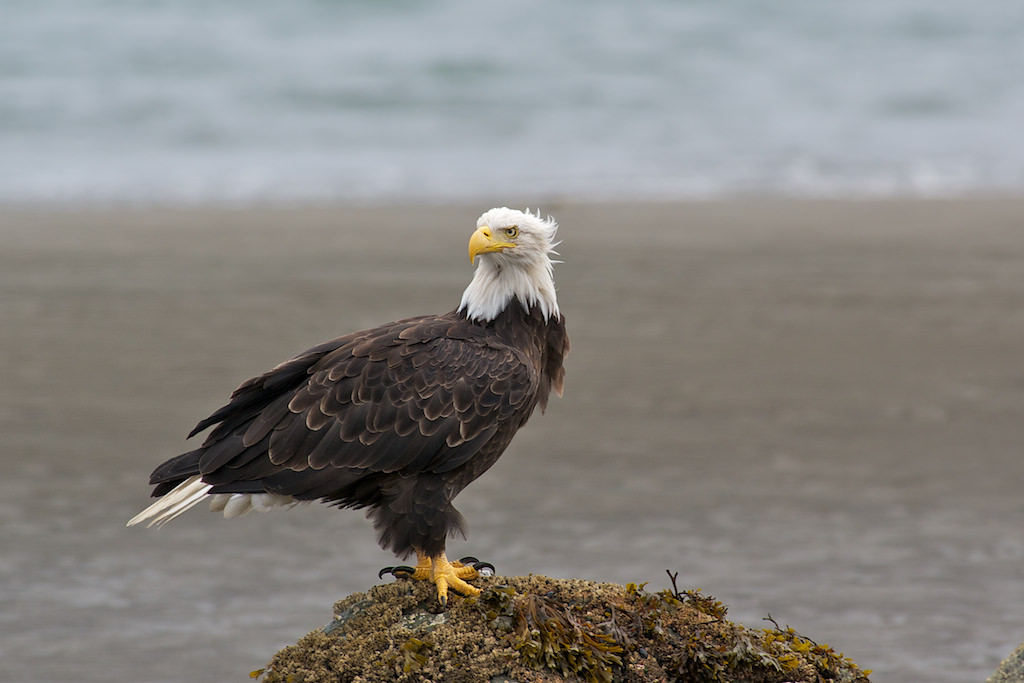
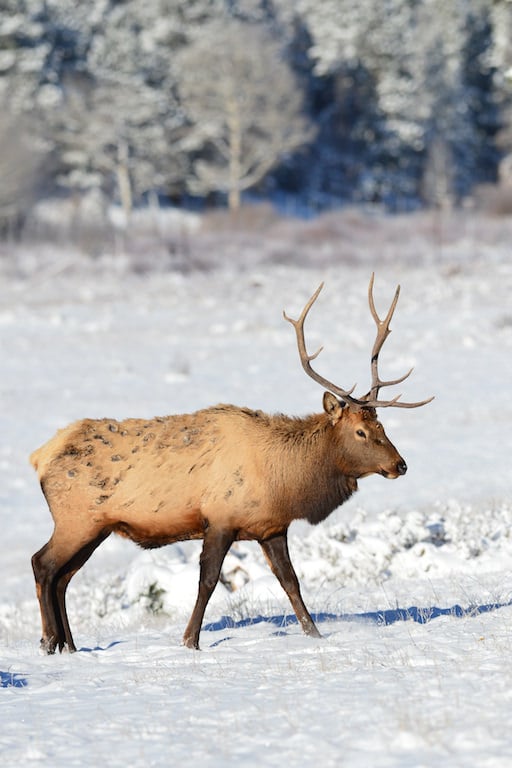
6) Sample Images
The below images were all shot in cold and snowy/rainy weather conditions.

7) Summary
I know that some of you may think that you don’t need protection of your gear, because manufacturers of the higher end equipment weather seal their products. While they do a good job with the sealing, they don’t waterproof them. Personally, I don’t want to push my luck with the cost of equipment replacement and I find the cost of the hydrophobia rain cover is worth the peace of mind to allow me to get out in the elements and take photos without the worry of ruining my gear.
7) Where to Buy
You can buy the Hydrophobia 300-600 v2.0 from our trusted partner B&H Photo for $159.75 (as of the time of this post) and the separate eyepiece for $35, or you can purchase them directly from Think Tank’s website.
Think Tank Hydrophobia 300-600 v2.0
- Features
- Build Quality
- Handling
- Value
- Size and Weight
- Packaging and Manual
Photography Life Overall Rating
I have a Mk1 version (well I have a 70-200mm and a 300-600mm). I’ve used them more in snow than rain and found them invaluable.
One minor problem I had in Japan was that I accidentally changed settings from RAW to JPeg when operating with gloves and the raincover on and it took me a few days to notice. At least it was fine Jpeg and I was bracketing.
Luke, thanks for the feedback, we always like to hear the experiences of our readers.
i love mine, it is a little pricy though, but worth the investment…
Nice review Tom, I need to consider something like this for when I am shooting over on the Oregon coast where the wind is always blowing and rain is a given most of the year. If you purchased one of these for a 300mm would it be to bulky to also use on a 24-120 zoom?
Thanks, Jason
Thanks Jason, yes, this is way too big for the 24-120. The 70-200 version might be too big as well, but might work in a pinch. There are smaller rain jackets that might fit your lens better. You might consider one from Vortex or Aquatech. They don’t have the rear “window” but still protect the rest of the gear. I like the complete system from thinkTank, as it covers everything regardless of which way the wind is blowing.
Yep, good review. What is the weight, or did I miss that in the article. I’m from Missouri and am pretty sure those are Coyotes. Lots of them here.
John
John, you are correct, they are coyotes and the weight is 0.7 lbs or 0.3 kg. I hope that helps. It is slightly heavier than the LensCoat and when folded and packed it takes up slightly more room than the LensCoat – but that makes sense since there is more material coverage.
Thanks for the outstanding review, Tom. Having had my D700 flood while shooting cyclists climb a mountain in cold, rainy conditions, which cost around US$500 to repair, I know very well the limits of “weather sealing.” I do have a rain cover with double sleeves and a transparent back – in fact in might be a LensCoat – but it is a super pain to use and I have found that it doesn’t really keep the camera and lens dry. I’ll now be looking into acquiring a Think Tank cover for 70-200 with flash.
Your photos are superb, and the owl amidst the snowy field is simply a stunner. I sure hope you get to share them with lots of appreciative viewers. I’m curious what the wolves had eaten in that image third from the bottom.
Bitanphoto- thank you. Sorry about the mishap on your D700 – bummer. The coyotes were eating a deer on a frozen lake.
Tom,
Helpful Review. May I ask what lens you used for the shots. Tried to look at your EXIF info but it is not there. Thanks in advance
Darrell
Darrell, it varied for the shots but it is either a Nikkor 300/2.8 or a Nikkor 500/4 lens.
The coyote walking in the snow – 300 with a 1.4x TC
The owl – 300 with a 2x TC
The coyotes fighting over the kill – 500 with a 1.4x TC
The eagle – 300 with a 2x TC
The elk – straight 300
Darrell – the burned valley with snow was a 70-300 nikkor, sorry forgot to include that
Thanks. May I ask if you had to choose and you had a 70-200 which of the 300 or 500 would you take with you . Thnks.
Darrell, if the 70-200 is f/2.8 and you have a 1.4x teleconverter, I would take the 500.