Face it – tripods aren’t as sexy as lenses or camera bodies and shelling out a bunch of dough on a tripod just isn’t that satisfying. After selling my left kidney to pay for my Really Right Stuff tripod to support my super-telephoto wildlife lenses, I wasn’t real eager to cough up ~$900 to get a Gitzo Traveler for my landscape work. But I wanted a lightweight compact tripod I could take on hikes. A tripod that would fit inside my daypack, weighed under 4 pounds and had a working height that on level ground would let me (6’2”) work at eye level when I wanted. Enter the Oben CT-3481 4-section Carbon fiber Folding Tripod and BE-126T ball head. It’s a 3.9 pound, full-featured tripod that folds to 19 inches long and has a working height of 68 inches. As well, it has plenty of adjustments to allow you to work low to the ground or on uneven terrain.
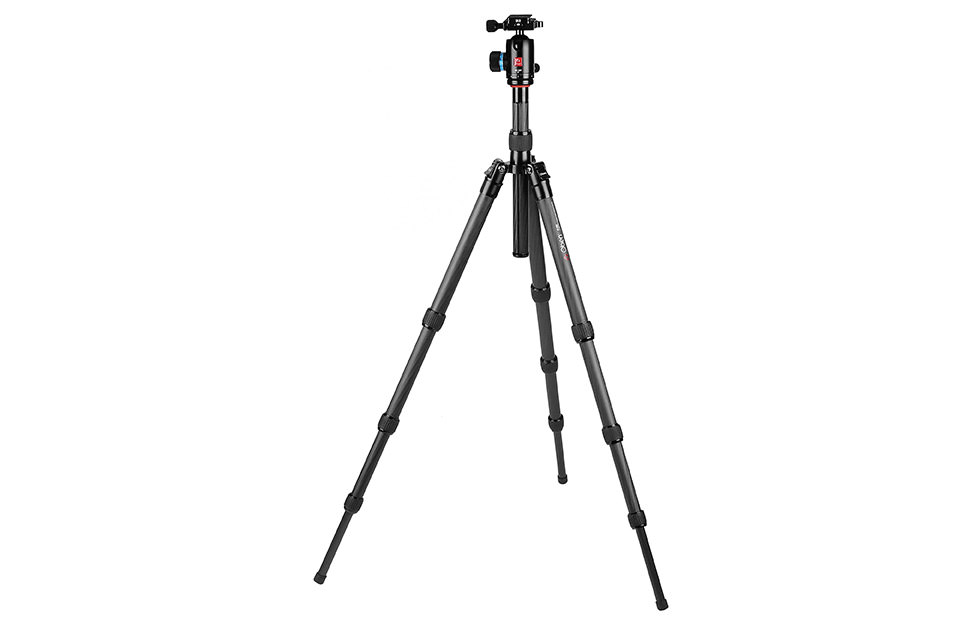
At $499.95 MSRP (currently discounted to $439.95 from B&H) the Oben seemed like it might be a good deal. But I couldn’t help thinking, if RRS and Gitzo are the Ferraris and Lamborghinis of the tripod world, might Oben be the Ford Fiesta?
First off, the full disclosure – I just wear this ring to keep the photo groupies at bay. Oh, the other full disclosure – I got to keep this tripod after testing and reviewing so you can keep that in mind if you think I’m gushing too much or being ungratefully harsh.
It matters not how much a tripod costs or how great it specs out, if it fails to hold your camera steady it’s worthless. Fortunately, the Oben CT-3481/BE-126T did fine in this regard as you’ll see in the scenarios below. If it passes the steadiness tests, then assuming it has the features you want, ease of use becomes the judging criteria. In this respect the CT-3481/BE-126T as it comes out-of-the-box suffers from overly stiff joints and controls, but I’ll discuss some adjustments you can do to remedy this.
The CT-3481 legs fold up on themselves as you can see here.

It takes me about 30 seconds to unfold the tripod and get it set up, minus putting the camera on the ball head. It takes roughly the same amount of time to break it down and stow it. It comes with a nifty little bag that I can’t figure out what to do with. I’m trying to save weight and bulk, why would I pack this in a bag and not just in my pack? I’d rather have no bag and the price knocked down a few bucks.
Let’s evaluate the features, starting from the ground up.
The rubber feet screw in to expose metal spikes for use on ice or other surfaces where the rubber might slip. For my shooting the rubber feet worked fine and I didn’t need to use the spikes. I could imagine the threads getting fouled with grit or salt but you’re going to want to keep these feet clean anyway as when you stow the tripod they rest right next to the ball head and dirty feet could easily rain grime into the ball head.
At first I found the leg collars to feel less precise than those on my RRS tripod. Instead of just a quick single twist to lock and unlock it would take two or three to extend or collapse the legs. However after several days of working with the Oben I got the hang of the different feel and could usually adjust the legs with a single twist (about 1/3rd revolution).
The legs themselves seemed adequate for supporting camera/lens combinations up to say a Nikon D4s with a 70-200/f2.8. I could grab the tripod, twist and get them to flex, but this was an unrealistic test as it would be near impossible for a camera properly mounted and triggered (cable release, remote, self-timer) to create such torque.
The thumb levers at the top of the legs used to adjust the leg angles work easily and well. In fact, much easier than the fidgety hard-to-grasp adjusters on my RRS legs. The Oben thumb lever does feel a bit wobbly and cheap though. I didn’t have any issues with them, but would guess they might be the first part to fail. Other than this one item, I was impressed with the parts used in the Oben, especially at its price point.


Next up would be the leg axle joints themselves, which are darn stiff right out of the box. Spreading the legs is a slow and frustrating process reminiscent of my high school romances. Even if you tear phone books in half with your bare hands like I do every morning for fun, this stiff leg action slows you down and if timing is critical, you might miss some shots. On the plus side, the stiff leg action meant I could adjust the legs between stops and have the tripod still feel stable. Fortunately, the Oben comes with a pair of allen keys, the bigger of which can be used to adjust the tension of the leg joints to your liking. In less than a minute I had the tensions adjusted so operation was much quicker.
The center column adjustment collar takes at least half a revolution to lock or loosen hence for me I needed a double twist to secure adjustments. There were several times I didn’t get it cinched down all the way (even with the column fully lowered) and ended up with a wobbling head. When it comes to stability, the center column is the weak link in the system – the design invites user error, but even when cinched tight there is some play in the system because the hole machined into the chassis is too wide. This center column play is the biggest weakness of this tripod and the one place you’re most likely to foster instability. I achieved substantially better stability when I lined the inside of the chassis hole (below the clamping collar) with a piece of duct tape – not a good permanent solution, but shows that this can be fixed.
With no camera mounted, the center column adjusts easily. With a camera mounted it’s a jerky frustrating process. I’ve found this to be the case with other twist collar center posts so no surprise here. For that matter, you’re way better off not extending the center post as it effectively puts your camera atop a monopod atop a tripod – not the steadiest scenario. Nevertheless, I did shoot some shots this way and got acceptable results.


This set-up was a bit off-center, so I used the spring-loaded, extendable hook on the bottom of the center column to hang my pack on and add some mass. If it didn’t change the composition, this would more effective with the center post lowered (moving the pack mass even lower), but beware your pack doesn’t act like a sail if it’s windy.
Reversing the center column is one of those pesky tasks lazy folks like me try to avoid – after-all it takes 35 seconds away from my life that I will never get back. But when you want to get in-situ shots of owl puke, you’ve got little choice.

Now this is a setup that would challenge most tripods. I’ve got some wide leg spreads, a reversed center column, a macro focusing rail attached to the ball head and the camera attached vertically to the macro rail. Add a Micro-Nikkor 105mm that could easily double as a brick and shoot an 11-shot stacking sequence and I didn’t expect much.

Lo(w) and behold, the Oben proved capable.
Table of Contents
BE-126T Ball Head
Onto the BE-126T ball head. On the plus side, it locks down securely and with only minor tilt-down creep. I got a lot of good sharp shots with this ball head. But out-of-the-box, the darn thing drove me crazy. All the adjustments are super stiff. This is not much of an issue for the ball lock itself – I shoot with heavy bodies (D4s and D810) and some heavy lenses (24-120mm, 150-600mm, etc) so the stiff ball action was often welcome. If I was using this with a lighter setup, say a mirrorless system, I think it would irritate me. What bugged me most about this tripod/head combo was the panning adjustment. Even loosened fully, it was so stiff it, the head would unscrew from the center column instead of pan to the left. I had to make it a practice to always pan to the right (which works best for photoshop when stitching anyway). Nevertheless, you couldn’t work quickly, and clouds could move significantly while you tried to rotate the head to line up your next exposure. What do they lubricate this joint with – bubble gum and molasses? Worse yet is that this could lead to the head unscrewing itself while you walk about with your Hasselblad in tow. Fortunately, if you don’t mind a bit of DIY action, these problems can be fixed. I removed the ball head from the center column, then unscrewed the three allen screws and removed the ball head’s bottom plate. There was a thick smear of what looked like sticky silicone grease. I cleaned this off from the bottom plate, but not the other surface, then put a peppercorn-sized dab of much lighter Phil Wood Waterproof Grease in the joint and voila, it panned smooth and quick. I then applied a drop of blue Loctite to the threads to secure the head to the column. The clamping mechanism for the camera plate is similarly stiff and slow to manipulate. I had minor success trying to re-lube this with Phil Grease. The ball itself sits on a lubricant-free plastic cup. It seemed to loosen a bit with use, otherwise I did no adjustments.

Thankfully, the clouds were sluggish here as this 3-shot pano was shot before I re-lubed the panning mechanism.
Topping it all off is the camera plate itself. I’m leery of those rubber-padded plates – all my Bogen camera plates didn’t work worth poop. However the one supplied with the Oben surprised me and held my D810 with either 16-35mm, 24-120mm or 105mm just fine in vertical orientation with no twisting. That said I’d recommend L-plates as a better alternative. The clamp is Arca-Swiss compatible and because it’s a screw down clamp accepts my RRS L-plates. The Oben plate however does not fit into my RRS quick-release clamps due to overly thick heads on the stop screws.

The CT-3481/BE-126T ball head combo is advertised to hold 26.4 lbs. How they arrive at this figure is a mystery – perhaps the weight at which the ball head will no longer turn? Whatever the case it is a gross overestimate to the realistic working capacity of this combo. For kicks, I tried mounting my D4s with the Nikkor 500mm f/4G VR on it at 11.2 lbs combined weight, and the amount of twist and wobble around the center column, chassis and legs themselves made this impractical. Sure, it supported the combo without the legs busting off, and if I was shooting a static subject and triggering remotely it could yield a sharp image, but if you have your hands on the camera and pressing the shutter release with you finger you’re much better off with a heavier tripod.
Most of the shots in this article were triggered by using my D810 in live view, setting the exposure delay mode to 2 or 3 seconds, and using the electronic front-shutter release. My remote died on me so I used my finger to initiate each shot and counted on the 2 or 3 sec delay to let the camera shake stop before the shutter fired.

It even worked in this crazy setup. I didn’t want to mar the dirt in front of the Double Delicate Arch in the foreground so I splayed the legs and rested them on in-situ rocks so nothing touched dirt. The spread of the legs and the way they rested on the rocks created a trampoline effect – add a raised a center column and it couldn’t get worse, but the 3 second delay was long enough the system stopped bouncing and I got the shot.

Monopod
You can turn the CT-3481/BE-126T into a monopod by removing the center column, unscrewing one of the legs, then screwing the two together. I tried this out and found I could get about two stops advantage over handholding with VR on. I wish the tripod had two legs that unscrewed so you could use them each as hiking sticks (add a rubber hand grip), leave the other poles at home and save a few pounds.

When it comes to taking selfies of taking selfies, a tripod is essential.

This shot of the Wave was focus stacked from 7 exposures.
Summary
I got good results using the Oben CT-3481 4-section Carbon fiber Folding Tripod and BE-126T ball head. Once I convert all these shots to B&W and tweak to my Lik-ing, they should sell for millions – especially the uber-generic Wave shots. I like the tripod part of this combo – it’s got good stability for it’s size and weight, folds compactly, and even though the center column displays some wiggle, this shouldn’t be a problem if you trigger by cable, remote, self timer or exposure delay (or add a shim to the center column hole). Not a problem for landscape photographers. If you trigger with your hand on the camera and no delay, you might want to look for a different tripod. The ball head’s build quality seems fine, but out-of-the-box, its ease of use is hampered by overly stiff panning and clamping adjusters. If you don’t mind investing a half hour in the DIY fixes I mentioned, then this ball head should work fine. Currently, the tripod and ball head are only offered as a package together. If Oben comes up with a better center column design, then this would be an awesome value. As it is, I still think it’s good deal in its price range if you’re willing to do the DIY tweaks.
Where to Buy
You can purchase the Oben CT-3481 carbon fiber tripod with BE-126T ballhead for $369.95 from B&H Photo Video.
All content © John Sherman
Oben CT-3481 Tripod Kit
- Features
- Build Quality
- Handling
- Value
- Size and Weight
- Stability
Photography Life Overall Rating
BE-126T Ball Head ; Very Stiff
I removed the ball head from the center column , but where are the three allen screws ?
A great tripod for macro photography .
Hi John, I have an older version of this type of oben carbon tripod and have found it to work quite well. My biggest complaint is with the monopod. I wish I could just unscrew the monopod leg and use it without having to screw on the center column. Without the center column the monopod leg would fit in my shoulder bag when collapsed and I could just take the leg to use as a monopod when needed. With the center column it takes up too much space and I have to carry more weight. I have been looking for some sort of adapter screw/plate that goes from the larger threads on the tripod leg and decreases to the size of the screw needed to attach the ballhead but so far unsuccessfully. I saw a Promaster carbon tripod that has the monopod feature already set up for this. It would be nice if Oben could design an adapter plate for this purpose.
What place is this verm? Where you took the photos.
Most were shot in the Vermillion Cliffs region of Northern Arizona.
I had recently purchased this tripod before I had seen any reviews. It was something I needed quickly and got it in time for a week long trip to Zion. One of the big selling features for me that I didn’t see you mention (or maybe I am just blind) was that you can remove the center column all together from this tripod. That was the first thing I did when I received it. Even without the center column, the eye level for the camera comes just below my eyes (I am 6’2) which is plenty tall. Already though, I noticed some of the twist locks losing their grip and makes twisting them a little more of a chore. Debating sending it back or just using some stronger adhesive to keep them from slipping. It has been quite a solid tripod though and you mention the stiffness of the ballhead and legs which is something I too have noticed. I think overall it seems to be a decent tripod from the tests I have put it through. I am not sure though if you also have problems with the carbon fiber or rubber twist locks rubbing off blackish stuff on your hands? Could be from using the tripod in very sooty water and needs a good proper cleaning. Anyways, very nice in depth review of this tripod.
Your reviews and articles are always the funniest and I really like your style of humor. Im also looking for a travel tripod I already have an alta 255 ct with a vanguard SBH-100 ball head that served me well for the past 3 years even tough they have stiff parts like you mention. My biggest problems with travel tripod is their center column. I mostly do wildlife photography so im more often than not laying flat on my belly so I need to remove the center column most of the time and with my alta 255 CT I get to use that little cheap plastic part that is on the bottom part on my center column unscrew the hook and screw my ball head (on the part where the screw was) then I get this wobbly cheappy pice of crap that holds my camera . I dont have access to any camera store where I live and rarely go to the big city and ebven when I go shopping tripods is a headache. As store dont have half of the brands and theres so many different models with soo little différences. Anyways id like to have some advice and to know the best travel tripod without a center column or with a center column that is fast and easy to remove (and put only the ball head) , so I can spend more time on my belly. Thanks in advance
You can unscrew a set screw to remove the center column on this Oben tripod so it will do what you want.
In a way, I find your description of this tripod very similar to what I get from the one I got my hands on after much research (Traveller NT-6294CK Carbon Fibre from NEST). The price tag, though, is a bit different. Of course, one needs to put their hands on the product to make a true comparison.
Anyways, great review and photos