Autofocus Speed and Accuracy
The Z 24-70mm f/2.8 S was the first Nikon Z lens ever to feature two separate AF drive units – a pair of synchronized stepping motors that allows the lens to focus incredibly fast. In practice, we found the lens’s autofocus to be quiet and almost instantaneous, with excellent accuracy and consistency even in low light.
The lens’s minimum focusing distance of 0.38 meters (1.25 feet) is enough to allow close-up photos with a maximum magnification of 0.22x (also written as 1:4.5 magnification). This isn’t quite macro photography territory, but it’s still good – and definitely better than a lot of non-macro lenses. With a full-frame sensor, you can fill your photo with a subject that is approximately 16.3 centimeters (6.4 inches) wide.
Finally, similar to the other high-quality S-series lenses, the Nikon Z 24-70mm f/2.8 S is designed to minimize focus breathing. Focus breathing can be painful to deal with if you’re a videographer or if you’re creating a focus stack, because there is a visible change in your photo’s field of view while focusing.
Distortion
What about lens distortion? Take a look at the following chart:
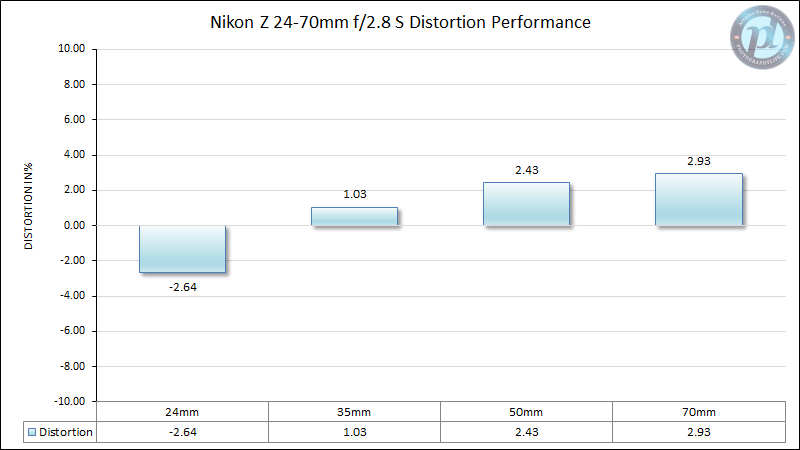
The lens has a moderate amount of barrel distortion at 24mm. It’s a little better than what we saw with the previous-generation Nikon 24-70mm f/2.8G and 24-70mm f/2.8E VR lenses, both of which yield over 3% barrel distortion. However, the Nikon Z 24-70mm f/2.8 S has more distortion at longer focal lengths by comparison, with roughly 3% pincushion distortion at 70mm. Unless you’re shooting around the 35mm mark with this lens, you’ll usually want to keep distortion corrections turned on if there are any straight lines in your photo.
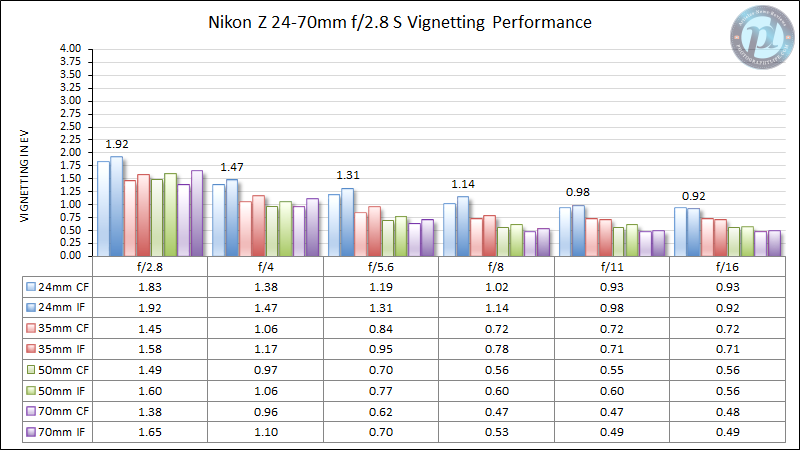
Vignetting
One of the biggest issues with most 24-70mm f/2.8 lenses is the amount of vignetting they yield at wide focal lengths. Nikon promised much better vignetting performance with the new Z 24-70mm f/2.8 S design, and our test results prove that the vignetting is handled quite well:
By comparison, here’s how the previous generation AF-S 24-70mm f/2.8E VR looked:
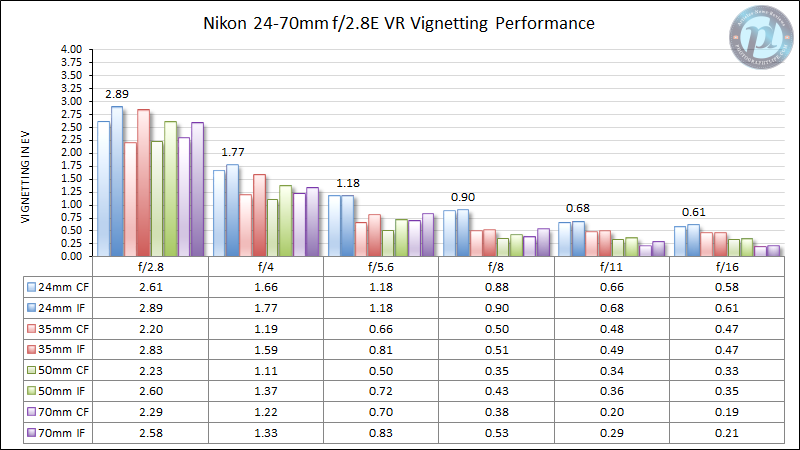
You’re still getting about two stops of vignetting on the wide end (at least when shooting at f/2.8), but it could be a lot worse. At the level seen on the Nikon Z 24-70mm f/2.8 S, vignetting is not that big of an issue; it only takes a single click in most post-processing software to correct, and it’s not strong enough to cause excessive noise to appear in the image corners.
Lateral Chromatic Aberration
The Nikon Z 24-70mm f/2.8 S keeps lateral chromatic aberration well under control, yielding a little over 1 pixel in our Imatest measurements at the highest (which occurs at 24mm and f/5.6 through f/16). At 35mm and 70mm, it is even less pronounced, but the best focal length is 50mm, where there is practically no sign of lateral chromatic aberration present.
Here’s a full chart of chromatic aberration levels:
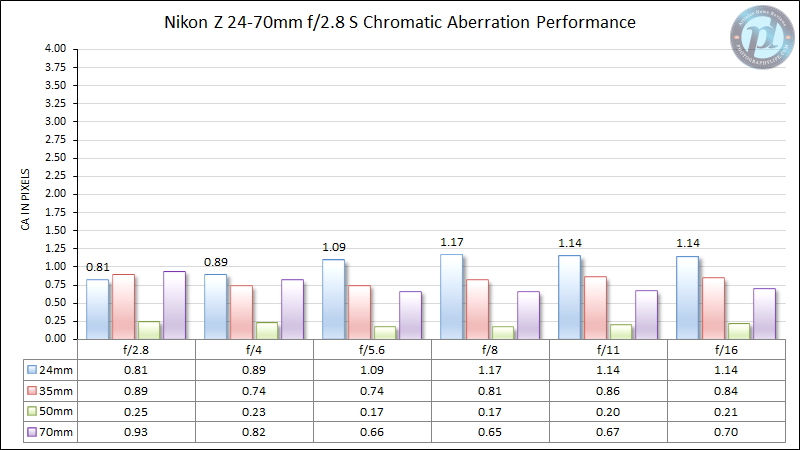
Compare this to over 2 pixels on the Nikon AF-24-70mm f/2.8G, and over 3 pixels on the Nikon AF-S 24-70mm f/2.8E VR, and you will realize how excellent the Nikon Z 24-70mm f/2.8 S is in handling chromatic aberrations. At this level, you will rarely see it in your photos, even when corrections are turned off. And if you do notice some mild fringing, you can correct it in one click without leaving behind any noticeable artifacts.

Sharpness
The question on everyone’s mind is how sharp this lens is! In real-world photos, it gave the impression of being a tack-sharp lens at almost every aperture and focal length. In order to put numbers to our observations, we measured the sharpness of the lens in our lab using Imatest. Below are our findings.
First, here’s 24mm:
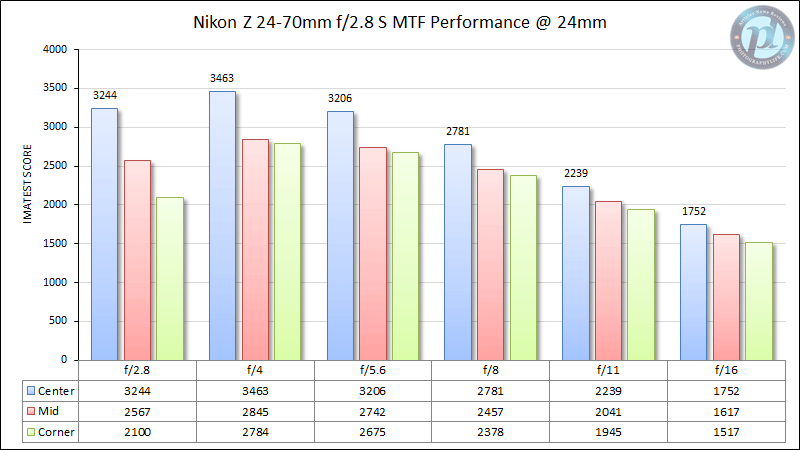
As you can see, the lens looks surprisingly good in the center frame at f/2.8. There is a decline of sharpness toward the edges of the frame, but much less than we usually see in f/2.8 zooms. The sharpness improves as you stop down, with the performance at f/4 being the highest – so long as f/4 offers the depth of field that you need for your photo, of course. Stopping down further leads to less sharpness due to diffraction, but this is true of any lens and is not the fault of the Nikon Z 24-70mm f/2.8 S.
What about 35mm?
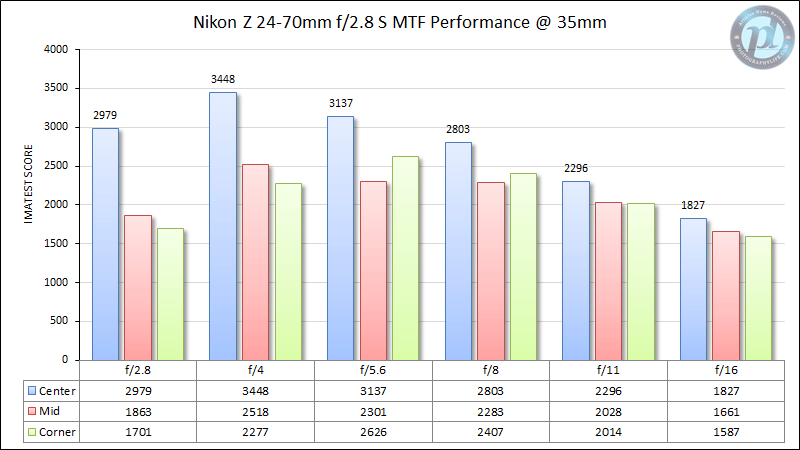
Zoomed in to 35mm, we can see that the center performance drops down a little, but it is still quite strong at f/2.8. Again, we can see that the lens yields best sharpness in the center frame at f/4, but if you want to get the best results in the corners, you will need to stop down to f/5.6. Note that this lens has some wavy field curvature, which is why the midframes are a bit worse than the corners at f/5.6 and f/8. Field curvature is not always relevant in real-world photos, but it matters any time you’re photographing a flat subject, such as a scene where everything is at infinity focus.
Here’s 50mm:
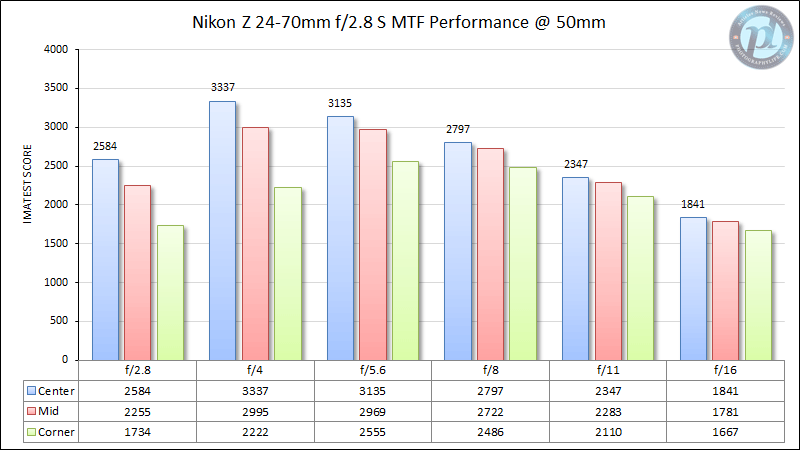
This time, there is a define drop in sharpness at maximum aperture, including in the center of the frame. However, stopping down to f/4 is enough to give this lens a strong appearance of sharpness throughout the frame. Meanwhile, the corners maximize their sharpness at f/5.6. For landscape photography, you’ll usually want to be at f/5.6 to f/16 with this lens, depending upon how much depth of field you need.
Finally, here’s 70mm:
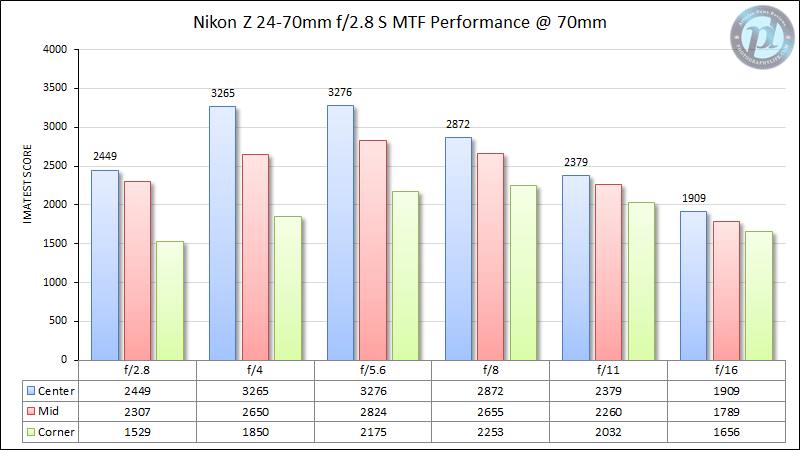
The Nikon Z 24-70mm f/2.8 S does look a bit worse at the telephoto end. You can see that the wide-open performance is visibly weaker compared to the wider focal lengths. Although stopping down certainly improves the sharpness levels, it never gets quite as strong as it was through the rest of the zoom range.
Overall, however, the Nikon Z 24-70mm f/2.8 S is one of the sharpest midrange zooms that you’ll find today. Even taking into account the 70mm performance, you won’t be able to meaningfully beat this lens in sharpness unless you use a prime lens. That will become clearer on the next page of this review, where we’ve compared the Nikon Z 24-70mm f/2.8 head-to-head against competing lenses.
Finally, I’d like to mention that we encountered almost no signs of focus shift during testing, which is great.
Early Access:
See all of our sharpness tests weeks (or months) before we publish the full review when you become a Photography Life Member. Photography Life Members can also access our Online Workshops, monthly photo critiques, Creative Landscape Photography eBook, and more. Get more information here, or you can join today!

Bokeh
Few zoom lenses are optimized to yield beautiful bokeh, and the presence of aspherical lens elements makes things even worse, because aspherical glass often causes onion-like textures to out-of-focus highlights. As you can see from some of the sample images of this review, the bokeh of the Nikon Z 24-70mm f/2.8 S is a bit harsh overall. There are some textures and visible outlines to any specular highlights that you might catch in the background.
That said, a large part of good-looking background blur is simply how far out of focus the background is in the first place. By zooming into 70mm and shooting at f/2.8, you’ll throw the background far enough out of focus that you’ll still get great subject separation, even if the bokeh itself is a little on the harsh side.

Ghosting and Flare
The Nikon Z 24-70mm f/2.8 S is coated with three different coating technologies to reduce ghosting and flare: ARNEO, Nano Crystal Coat, and Super Integrated Coating. While the latter two are common to see on modern high-end Nikon lenses, the Nikon Z 24-70mm f/2.8 S was the first lens ever to have Nikon’s ARNEO coating. (It’s since appeared in many of their other high-end lenses, of course.)
With so many different types of coatings present, you might be wondering how the Nikon Z 24-70mm f/2.8 S performs when shooting bright sources of light. Nikon pointed out that the new ARNEO coat is supposed to significantly reduce flare when used in conjunction with Nano Crystal Coat.
So, how did the lens do? The two-word summary would be “amazingly well.” When shooting bright sources of light, unless the bare sun takes up a large portion of the frame, you will rarely encounter ghosting and flare in your images. Take a look at this shot, where the sun is directly in the frame, but there is no meaningful flare at all:

As you can see, the results are very impressive. Keep in mind that the amount of ghosting and flare will depend upon where the bright source of light is in the frame, as well as your choice of aperture. For example, if you put the sun towards the extreme edges and shoot at f/16, you will start to see a few more dots of flare.
The next page of this review dives into the sharpness numbers a bit more, with some comparisons against other lenses that Nikon users may be considering. So, click the menu below to go to “Lens Comparisons”:
Table of Contents