This is an in-depth review of the Alien Skin Exposure X3 software for culling, managing and post-processing images. A couple of weeks ago, Spencer wrote the first article of our “Lightroom Classic vs. Other Software” series. In his article, he compared Lightroom to Alien Skin’s Exposure X3. I’m following his article up with a more detailed take on Exposure X3. Here I will dive a little bit deeper into the user experience I have had with the program while using it exclusively for the last four weeks. And since Spencer’s article, an update to the software was released, so I’ll fill you in on those details too.
Like many of you, I have become frustrated with the speed of Adobe’s Lightroom. Moreover, I am not exactly enamoured by the fact that Adobe has adopted a subscription-based platform. I have used Lightroom since 2008, back when Lightroom 2 was introduced. I have a lot invested in the platform. I know it like the back of my hand. I work quickly with keyboard shortcuts and know exactly how to move through my edits quickly and efficiently, at least from a workflow point-of-view. So although my frustration with Adobe is mounting, I feel too tired (read, can’t teach an old dog new tricks) to invest massive amounts of time learning entirely new software. I feel like Adobe has me between a rock and a hard place.
I have looked at Capture One, but feel overwhelmed by its cost and learning curve. I have a copy of On1 Photo Raw 2017 but rarely use it. And, I have looked into Skylum’s Luminar, but without DAM (Digital Asset Management) it is a no go. Although to be fair, Skylum has plans to include DAM in a “soon to be released” upgrade to their software. Then I came across Alien Skin’s Exposure X3. Alien Skin is probably best known for their Lightroom and Photoshop film simulation plugins. However, with their recent release of version X3 of their standalone application, Exposure, I became intrigued. What caught my attention was its similarity to Lightroom’s user interface. Maybe the learning curve would not be as steep here.
So firstly, let’s get the disclosure out of the way. Alien Skin was kind enough to set me up with a licensed copy of Exposure to test for this review. Moreover, they were very helpful, taking the time to show me some of the ins and outs of using the program. I want to stress that at Photography Life we endeavour to bring you completely impartial reviews. In no way did Alien Skin influence my impressions of the software.
Table of Contents
1) A Brief History of Exposure
Exposure started out as a plugin for Photoshop 10 years ago. At its conception, it brought the ability to add the characteristics of popular analogue films to digital image files. As Exposure evolved, it incorporated darkroom effects and general editing abilities. In 2015 Exposure X was introduced. X was a stand-alone application which allowed for browsing, organizing and RAW editing of photos. Fast forward to late 2017, and X3 was released.
2) Features
Exposure X3 is a non-destructive, feature rich, stand-alone program. It can also be used as a plugin for Lightroom and Photoshop. Outlined here is a summary of the features found in Exposure X3. A more detailed breakdown, including supported cameras and lenses, can be found on the manufacturer’s feature page. All items with an asterisk are new to version X3.
2.1) Complete Photo Manager
- Apply keywords
- Create Virtual copies to edit and export multiple variations of a single photo, without taking up additional disk space
- Use Collections and quick collections for quickly grouping images
- Side-by-side image comparison view
- Review and edit photo metadata
- Search and filter photos using text, metadata, ratings, or keywords
- Flexible watermark (text, images or text from metadata) capability when exporting images
- Support for many compact, DSLR, and mirrorless cameras
- Lens distortion correction for a variety of popular lenses
- Supports a variety of file types (RAW, TIFF, JPEG, DNG, PSD)
2.2) Non-destructive Editing
- Catalog-free workflow
- Copy from card
- Send a photo to an external editor and then bring back the results
- Flexible File Export
2.3) Presets
- Over 500 Presets, including a huge variety of film simulations, vintage looks, cinema looks, black and white, border overlays, and more!
- Selective Presets
- Audition Presets lets you compare up to four presets at once.
2.4) Editing Effects
- Basic operations such as exposure, contrast, saturation, and other common adjustments
- Advanced Nondestructive Layers
- Brush Tool
- Linear and Radial Gradient Tools
- HSL Tools
- Spot Heal Tool
- Creative focus tools for adding bokeh and vignettes
- Overlay borders, textures, and light effects
- Grain tools
- Infrared tools
2.5) User Interface
- Customizable User Interface
- Edit photos side-by-side
- Ability to view up to six images at once in side-by-side view
- Shortcut Keys
- Auto Updater
2.6) Printing
- Ability to print photos directly from Exposure
- Apply watermarks to prints
- Print a grid of images as a contact sheet
- Apple sharpening appropriate for particular paper selection
- Preview window and easy adjustment of print parameters
As you can see above, Exposure X3 has many of the features found in Lightroom. Let’s take a closer look.
3) Interface
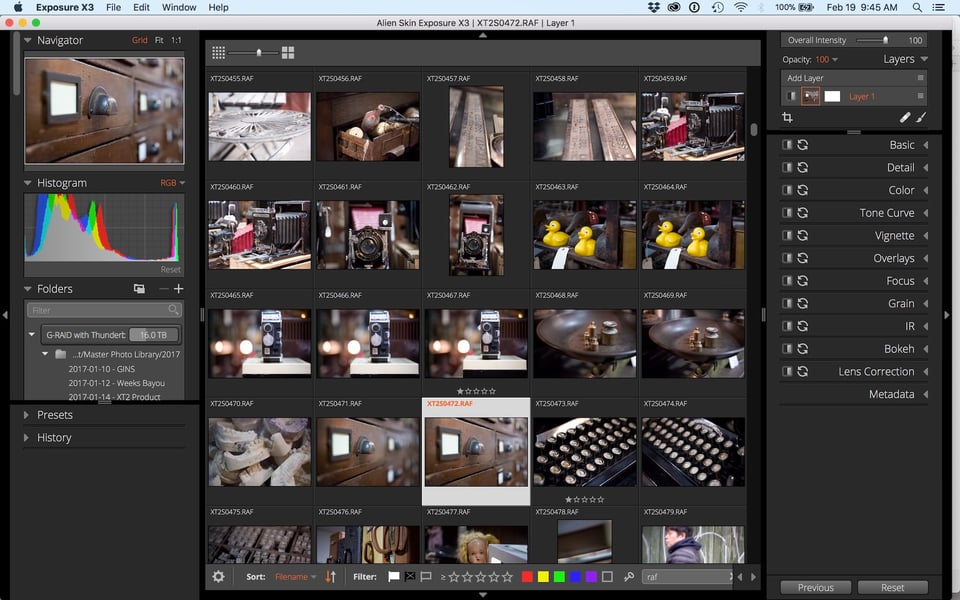
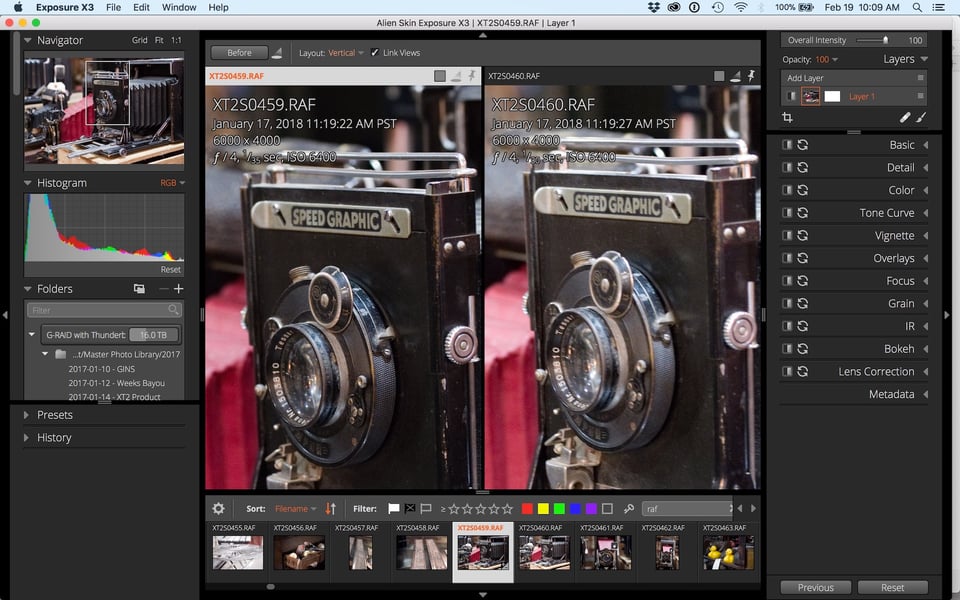
For those of you coming from Lightroom, there is an immediate familiarity when opening X3. Three panels divide the screen. The two side panels each contain two docks. Out of the box, the left panel includes the Navigator, Histogram, Folder, Presets, and History tabs.
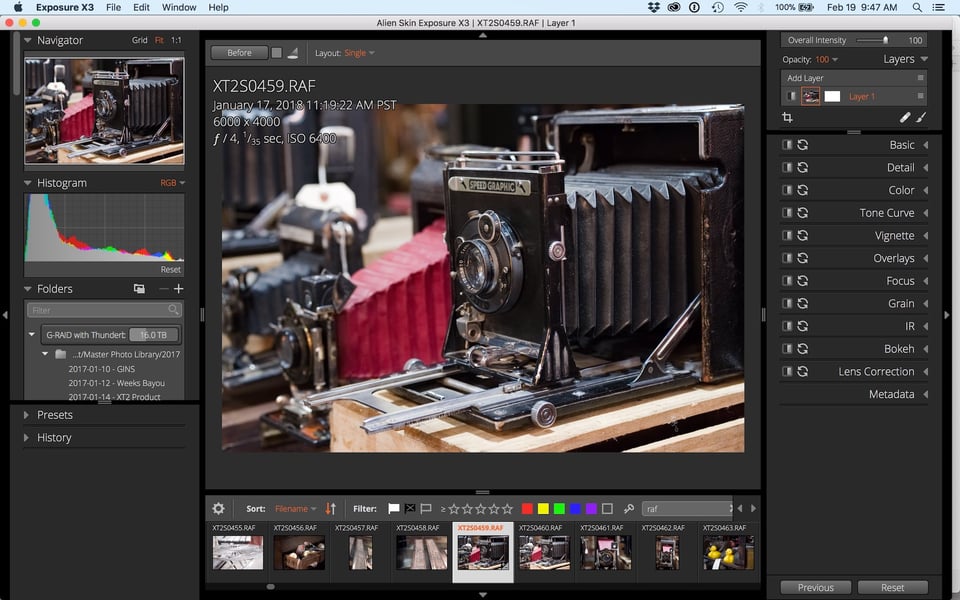
The centre panel displays images. You can choose to arrange images in a grid format, see a single picture, or you can compare up to four photographs at once. This last feature is handy for examining focus in similar images.
The right panel contains the layers tab and the image editing tabs. More about layers and image editing in a moment.
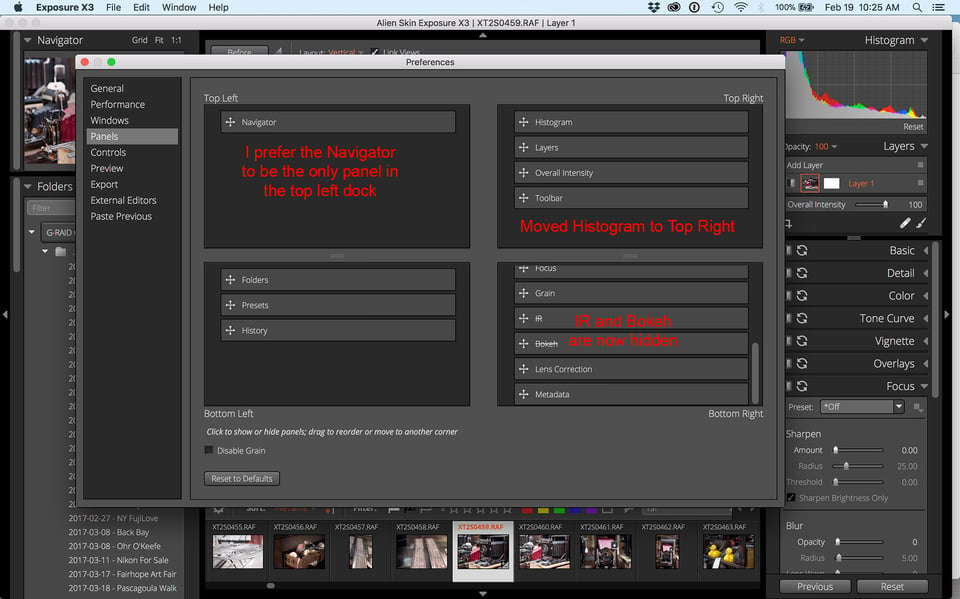
One feature that I particularly liked was being able to customize the layout of the panels to accommodate the way I work and to mimic what I am used to in Lightroom. This customization made the transition from Lightroom to Exposure easier. I like having the histogram in the top right corner and the navigator in the top left. The panels can also be collapsed to allow you to see more of your image when editing.
4) Where is the Catalogue?
One of the significant differences between Exposure X3 and Lightroom is that Exposure does not use a catalogue. You access images through the folders panel which works just like the Finder on a Mac or Windows Explorer on a PC. A small sidecar file, which resides in a subfolder of the image folder, is used to store edits. You do not need to “import” images into Exposure, just navigate to the folder where the images reside, and you can begin working on them right away.
With the sidecar files stored in a subfolder within the image folder, it is easy to move and share folders without running into the dreaded “file not found, would you like to relocate it?” message from Lightroom. Uploading an image folder to a system drive or Dropbox facilitates collaboration between multiple users.
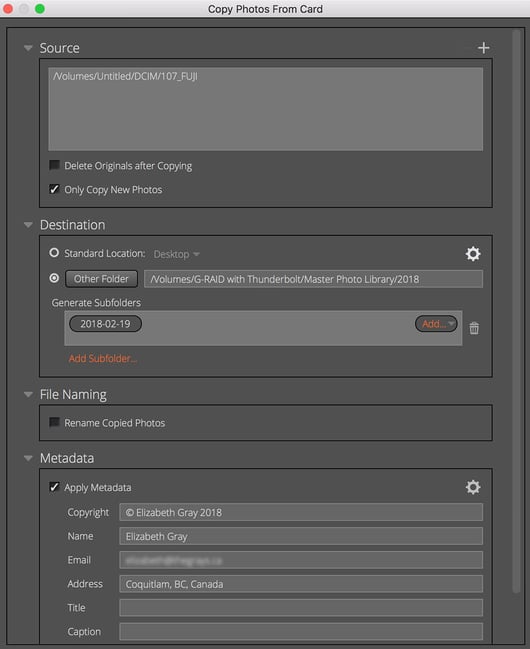
If you have images on a card, Exposure can copy those images to a folder on your computer or external drive for you. While copying, you can specify a destination (including a subfolder), rename files and apply metadata (including keywords).
Another difference between Exposure and Lightroom is the lack of modules. Viewing, searching, applying keywords, editing and exporting are all done from the same location and can be done at any time, even from within the grid view.
5) Editing
Let’s take a look at the editing features in Exposure. There are two approaches to editing images in X3. The first approach is what I would call the “purist” method. Here adjustments are made in a very similar manner to Lightroom. You control which sliders to adjust, and how much to move them. You have complete control over your image edits. The second approach is a more “artistic” one. In this instance, you start with one of X3’s incredible film emulation presets. The presets gives you a starting point from which to edit your image, and you still have full control of your edits. Any of the preset effects can be dialed back, or revised entirely if not to your taste. And of course, all of your edits can be done on individual layers in either approach.
Here is a rundown of Exposure’s editing panels.
5.1) The Basic Panel
The basic panel contains the same edit sliders you find in Lightroom. At the time of Spencer’s writing, the temperature slider was missing the Kelvin scale. And settings for specific lighting temperatures, such as daylight, cloudy and tungsten were also missing. This is no longer the case! Another unique feature of X3 is the way the eyedropper tool works. It updates the image in real time as you hover over a neutral colour in the image, not just in the navigator as is the case in Lightroom.
One thing I noticed when applying edits in X3 is that the sliders seem more sensitive than those in Lightroom. For example, adjusting a slider by a certain amount in X3 produces more of an effect than adjusting the corresponding slider in LR the same amount. Here is an example. In this image, I adjusted the Whites and Blacks sliders until I just began to clip the image. In X3 I did not need to be quite as heavy handed with the sliders. This takes a bit of getting used to. At first, I found that I was over-doing my edits. However, once I realized that it was easier to make fine exposure adjustments using the shortcut keys, rather than using a mouse or even using a stylus and tablet, I did not have any issues.
I also found that my images appeared to have more contrast in X3 than in Lightroom. You can see that in this image as well. Sometimes this was to my advantage, but sometimes I had to open up the shadows a bit to create the same look in both programs.

So does this matter? It’s my feeling that you have more latitude with edits in X3. Combine this with the fact that you can dial back the opacity of any layer, and you can make very subtle refinements to your edits.
5.2) The Detail Panel
I had much better luck sharpening Fujifilm’s RAF files in Exposure. I did not experience the same wormy results I often get from Lightroom, even in areas with foliage. Here is a 100% crop of an image. On the left side is X3’s result with Lightroom’s on the right. In both instances, I increased the Amount slider to 85 without adjusting Detail or Masking. Make sure you click on the image to see the full resolution image.

X-T2 @ 16mm, ISO 500, 1/125, f/13.0
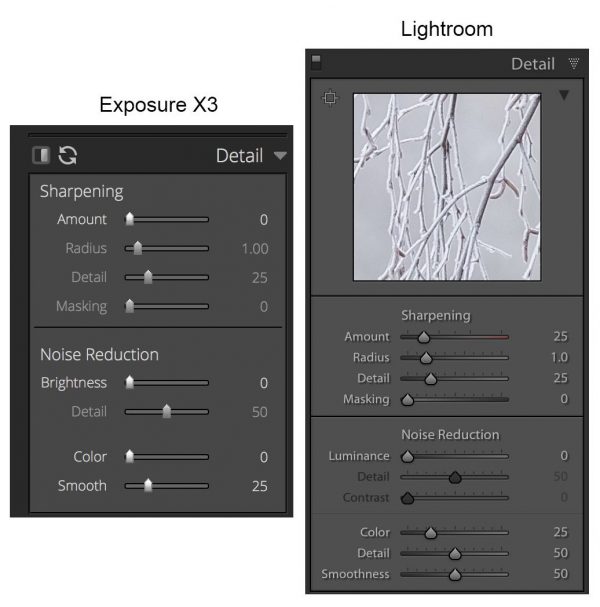
Here are Exposure’s and Lightroom’s Detail panels side by side for comparison.
5.3) The Tone Curve Panel
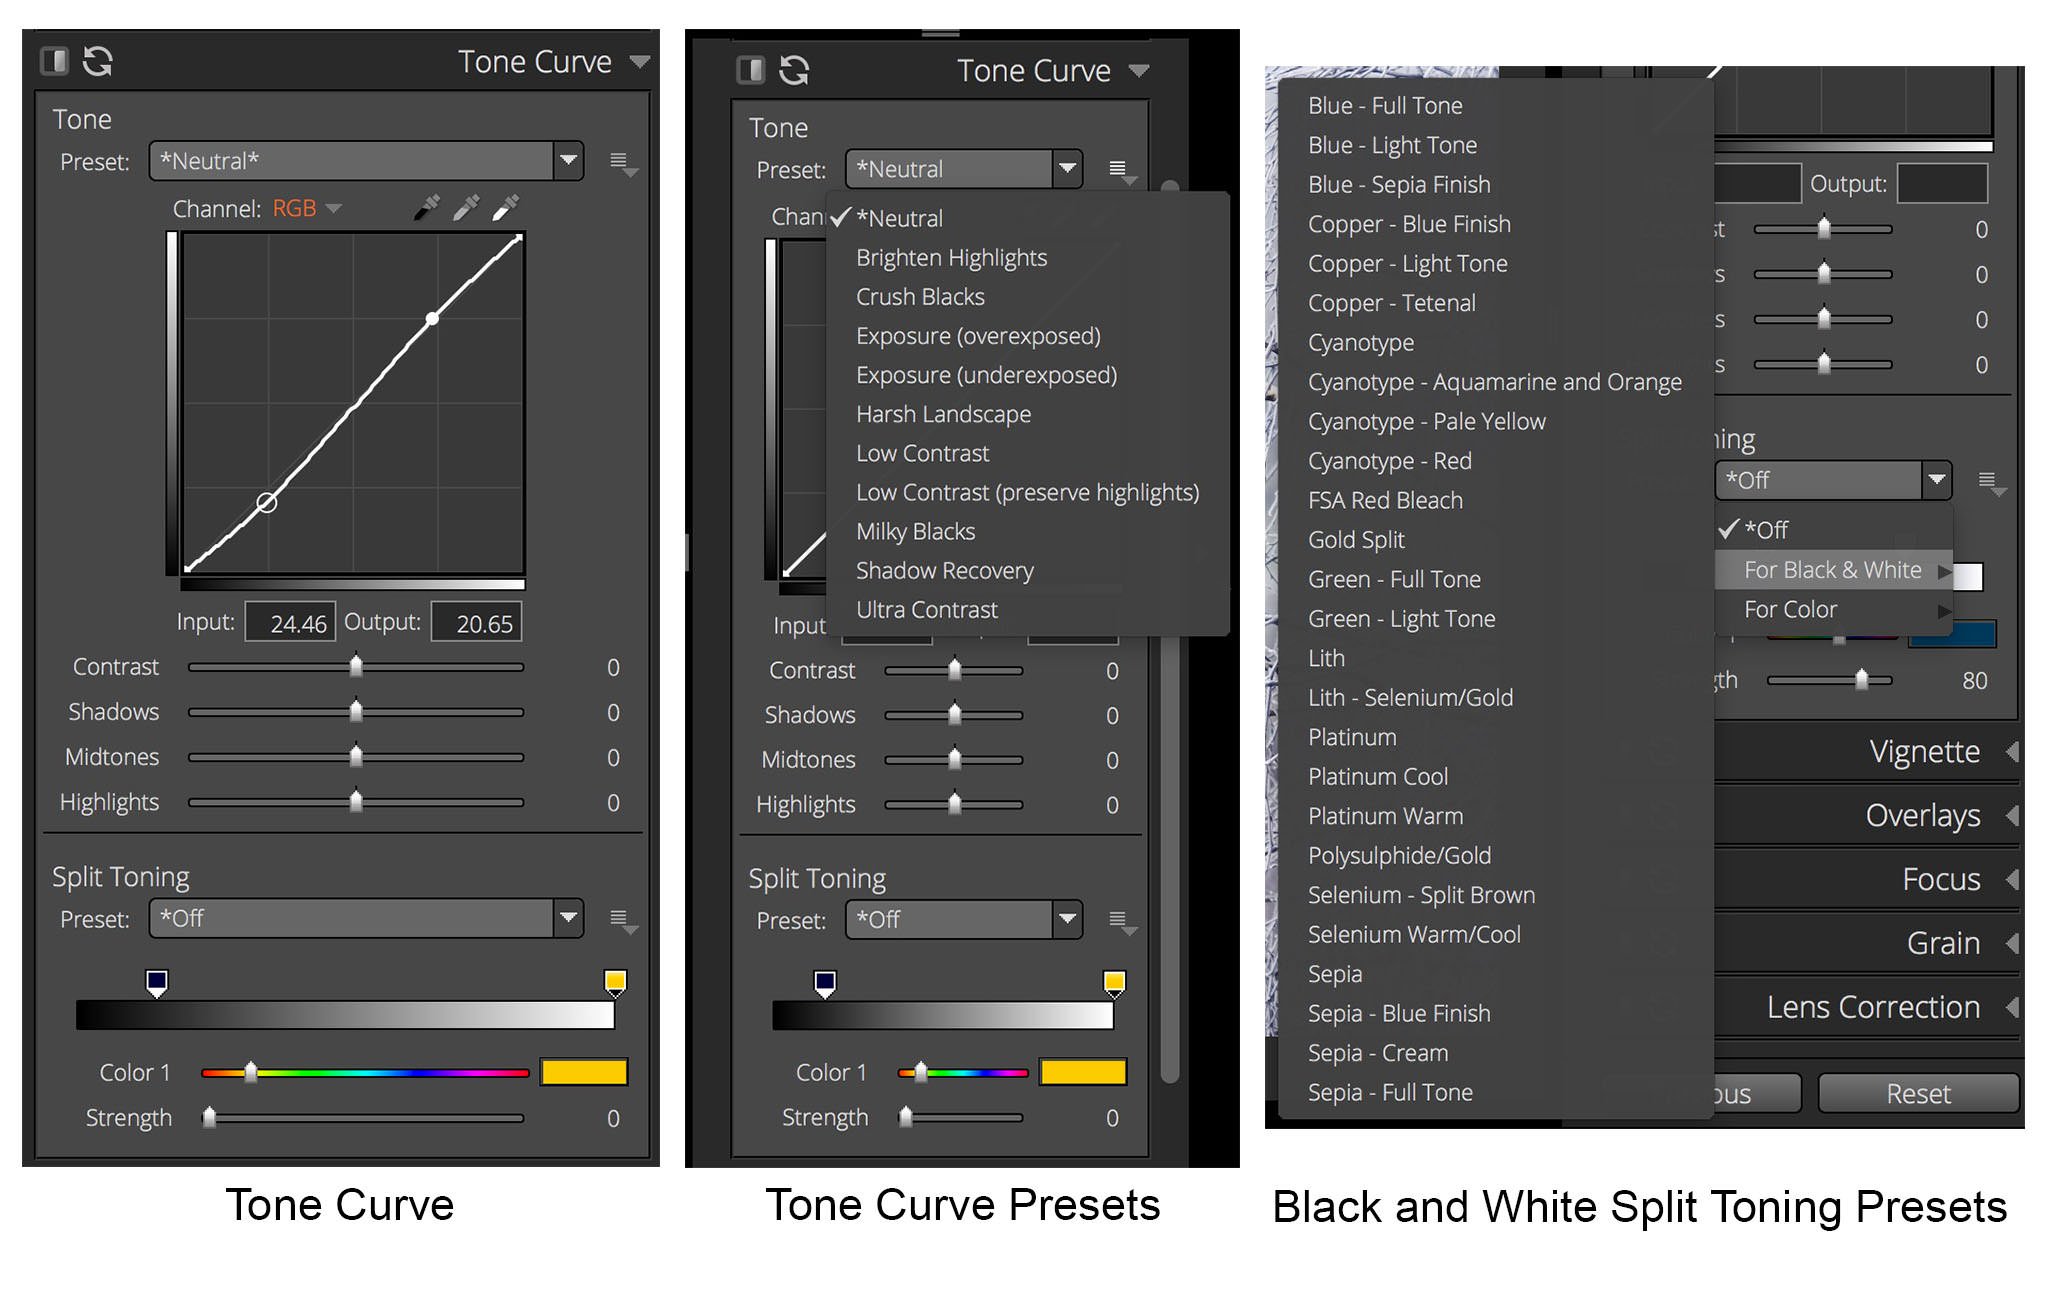
In X3 the Tone Curve and Split Toning are combined into a single tab. And for each one, there are a large number of presets to select from. For a photographer who does not want to spend a lot of time on their post-processing, or who wants a place to start from, the presets offer a great jumping off point.
While both Lightroom and Exposure have the ability to adjust the color channels individually using the Tone Curve, Exposure goes one step farther. In X3 you can also use the eye-dropper tool to select a black point, white point, and a point that is neutral grey in your image. This feature is similar to what you find in a Curves Adjustment layer in Photoshop.
5.4) The Color Panel
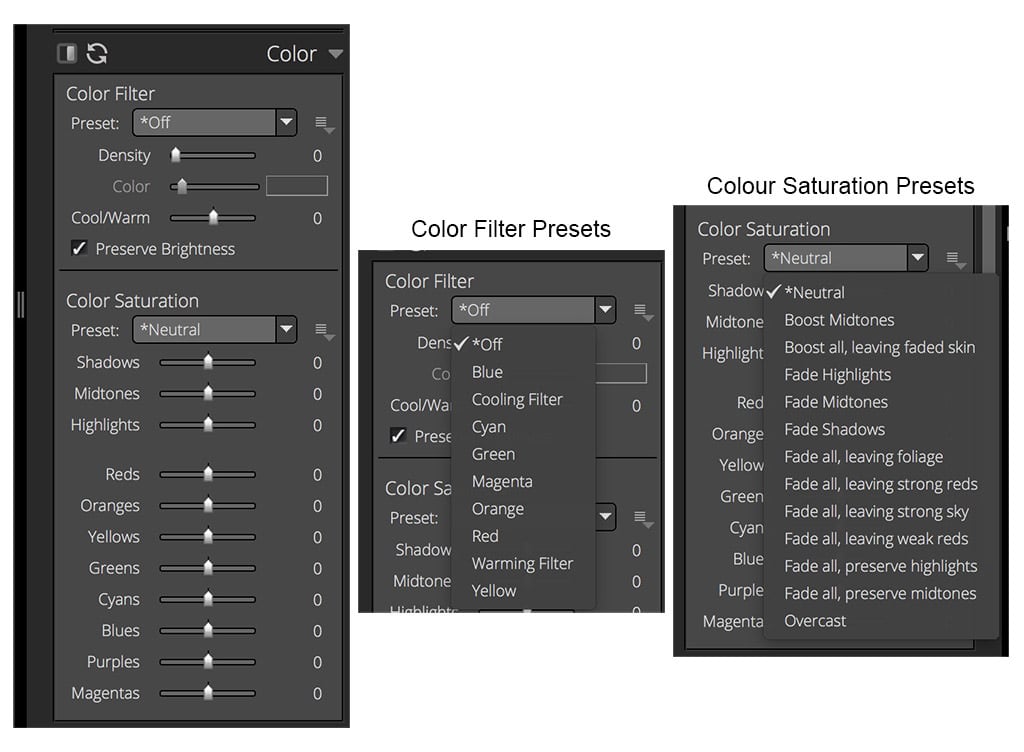
In the Color panel, you can apply a color filter, or adjust the hue, saturation or luminance in a particular channel. This is a new feature that became available with the latest software update (and was missing at the time Spencer wrote his piece). The panel works in much the same way as LR’s. However, in combination with layers and masks, this tool becomes much more powerful than Lightroom’s version. For example, I could adjust the hue of a blue t-shirt, while masking out the effect in the sky. Also of note is the ability to target how overall saturation adjustments are applied. You can limit your modifications in the shadows, midtones, and highlights independently. In addition, there are many presets available in the Color panel.
5.5) The Vignette Panel
The Vignette panel has a few more options than those available in Lightroom’s vignette tool. Firstly, there is the ability to move the location of a vignette anywhere within the frame. This is very handy if your subject is off centre. Secondly, besides the typical round and rectangular shaped vignettes, you can create a randomly shaped one using the Lump Size and Distortion sliders. It is probably easiest to see how these sliders affect the vignette looking at the two images below. To exaggerate the effect, I’ve created a hard-edged black vignette. You can alter the shape of the vignette by changing the Random Seed value. It is a case of pure experimentation!
Once I was happy with the vignette shape, I dialed back the amount to 58, size to 29, softness to 60. I left the values for roundness, distortion, lump size and the random seed unchanged. I feel the final result has a much more organic feel than what you would achieve with a standard shaped vignette.

5.6) The Overlays panel
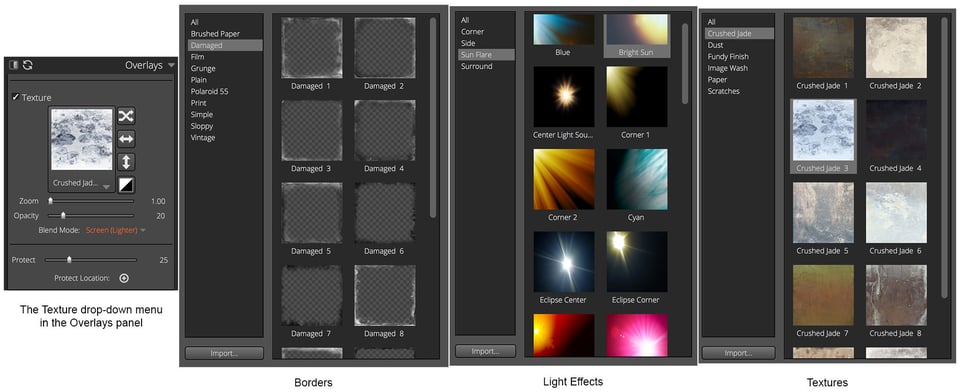
The Overlays panel is strictly for creative effects. You can add borders, light effects, and textures. You can vary the blend mode and opacity of each and protect areas you do not want to be affected by texture overlays. While kind of fun to fool around with, beware, this panel will take you down a rabbit hole, consuming large quantities of time! I can not see myself using the Overlays panel very often for my style of photography. In fact, I found it very difficult to find a shot to illustrate these tools! However, for some people, this trio of tools may prove useful.
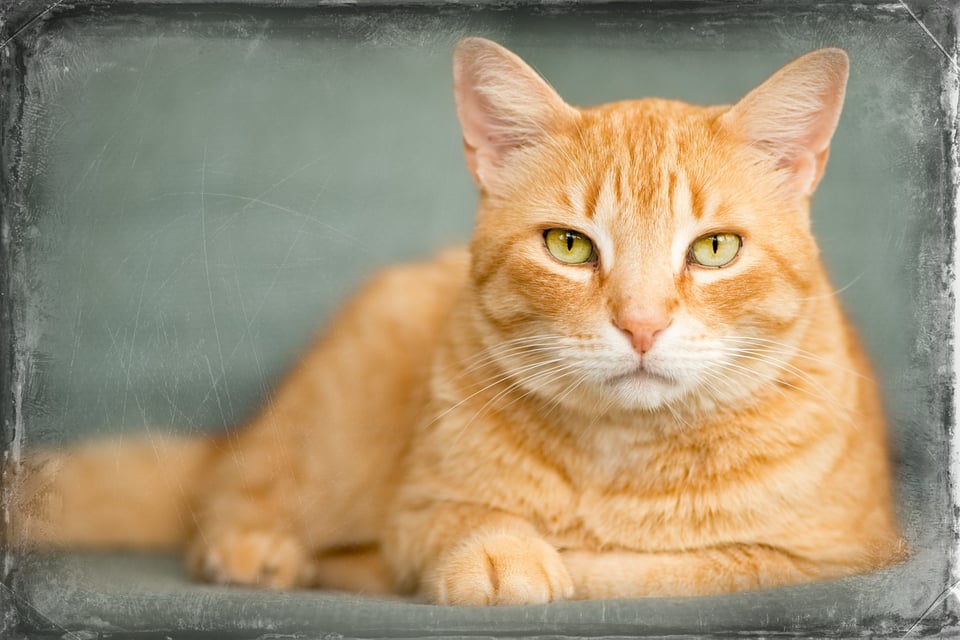
NIKON D800+ 105.0 mm f/2.8 @ 105 mm, ƒ / 4.0, ¹⁄₁₀₀ sec, ISO 400
5.7) Focus Panel
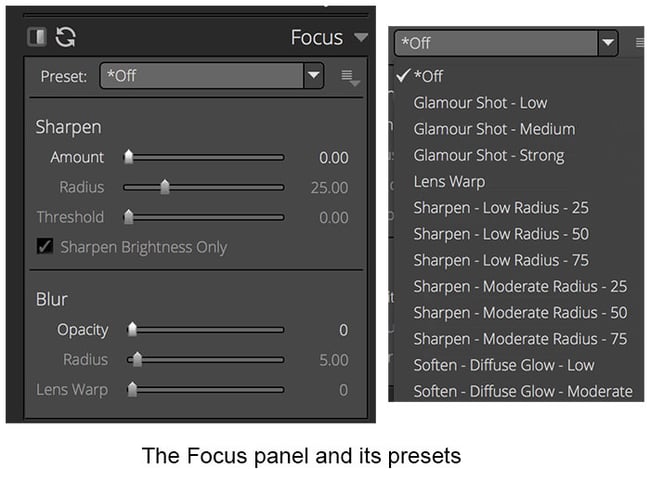
Both the detail panel and focus panel are used for sharpening. However, the detail panel is used for overall image correction and refinement. Here the sharpening controls are included to balance the noise reduction adjustments. The focus panel, on the other hand, is used more for localized artistic effects. The focus panel has adjustments to sharpen or blur the image and can be used to simulate lens focus or set a specific mood. Because the controls here are for creative use, the sliders produce stronger effects. As with so many of X3’s other panels, there is a wide range of presets you can choose to start your edits from.
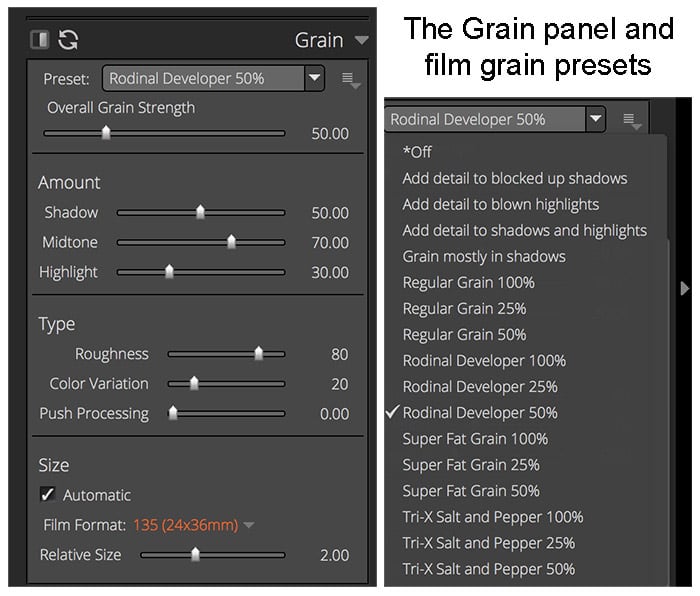
5.8) The Grain Panel
The grain panel lets you customize grain behaviour to simulate vintage film grain effects. Alien Skin has taken much effort to create realistic film grains. Through the panel, you can adjust grain in the shadows, midtones, and highlights independently. This allows the creation of much more realistic effects. And the amount and type of grain can also be adjusted independently.
5.9) IR and Bokeh Panels
Finally, the IR panel is for adding infrared effects to images and the Bokeh panel allows you to mimic lens blurring effects. There is a huge range of lens blurring presets to select from. The presets include collections for creative aperture, motion and traditional lenses including lenses from Canon, Nikon, and Zeiss.
6. Local Adjustments with Layers and Masks
A considerable advantage of Exposure X3 is the ability to use layers. You can apply presets, basic edits, and special effects to individual layers in X3. Moreover, each layer contains a mask so effects can be locally painted in with the brush or gradient tools. In addition, the opacity of each layer can be adjusted so that edits can be toned down and more subtly blended in.
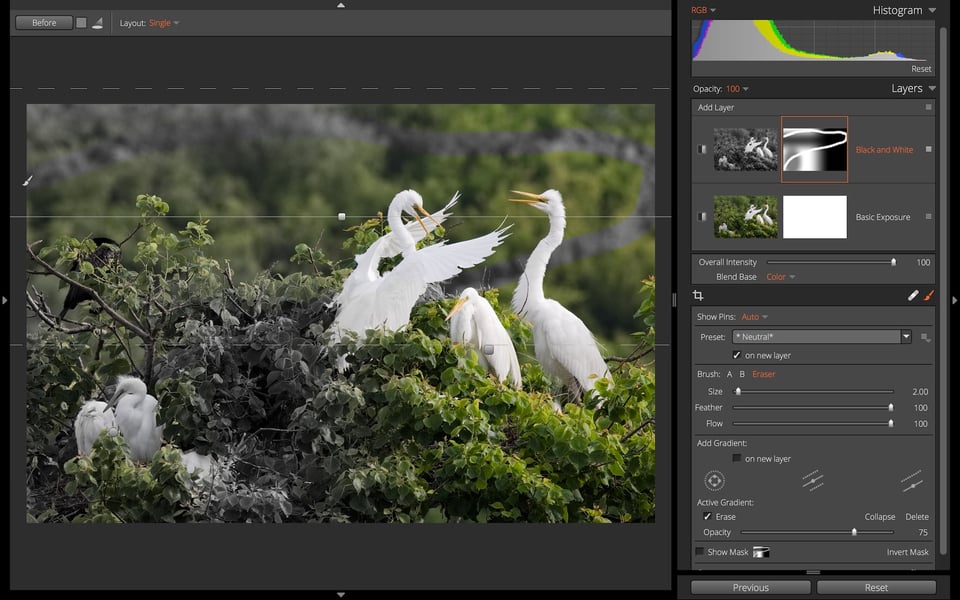
You can modify a mask using any combination of the brush tool, or three different gradient tools (radial, planer and half planer). And the opacity of the active tool on any mask can have its opacity adjusted independently. To illustrate this take a look at the screenshot here. After doing some basic edits for exposure on the bottom layer, I added a black and white layer. To this layer, I created a mask by applying an oval radial mask reduced to 50% opacity, added a horizontal planer mask and dropped its opacity to 75%, added a vertical half planer mask to the right side of the image and finished the mask off by painting with a brush in eraser mode. Not something I would normally do, but for illustrative purposes, it works!
A feature missing in X3 is the ability to mask based on luminosity values and color. Although this is a feature which is new to LR, it is an extremely powerful way to make local selections. And I find it much more accurate than simply painting with a brush. If Exposure wants to compete with Lightroom, this ability must be added in an update. On a side note, in X3 you can zoom into images to the pixel level. While this does make brushing on masks easier, it does not make it easier to mask out fine, dark tree branches against a light sky!
7) Presets
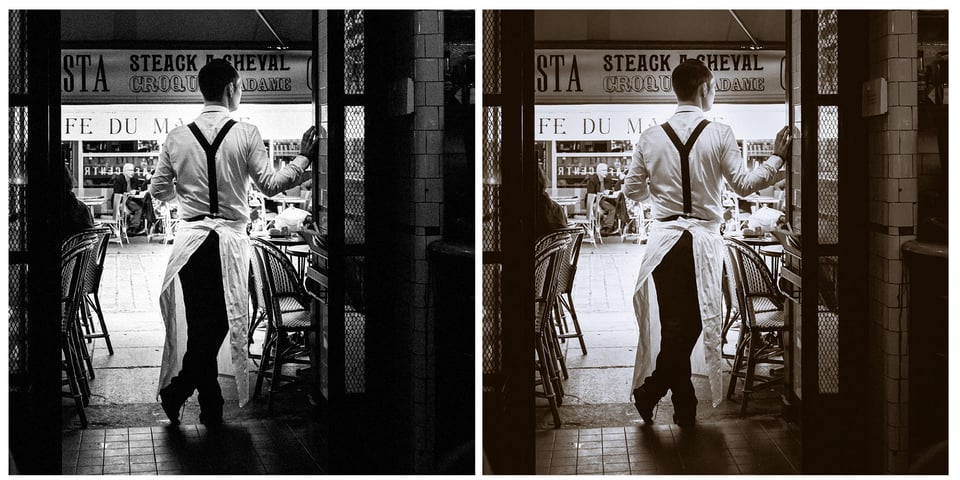
Apart from the drop-down presets found in many of the editing panels, Exposure features presets which give an overall look to an image when applied. Each one incorporates several adjustments (grain, texture overlays, the tone curve, amongst other artistic effects) into a single preset. These presets can be used as is, or as a starting point for editing. There are 27 different categories with over 500 presets to choose from. This list contains film emulations that span the entire history of film photography, in addition to utility presets and modern looks that go beyond film. You can choose from a variety of black and white, color, cinema, cross-processing presets, and more! For a full list, take a look at Alien Skin’s presets page.
Here I’ve applied two different presets to the same image to create completely different looks. On the left is Kodak Tri-X – Pushed 2 stops, and on the right is the Toning – Selenium (Fuji Neopan 1600) preset.
8) Exporting Images
I found the way that Exposure handles exporting images to be quite different from how Lightroom’s Export dialogue box works. Lightroom uses one dialogue box, with presets on the left and details regarding export location, file naming, and settings on the right. On the other hand, X3 has both an Export and Quick Export command. The latter is analogous to LR’s export presets. At first, I found this frustrating (remember that old dog- new tricks thing I mentioned at the start of this article). However, once your presets are set up, exporting files is rather straight-forward.
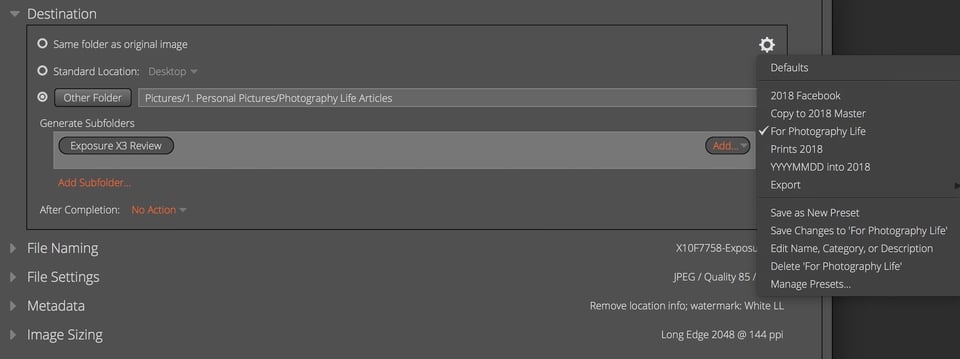
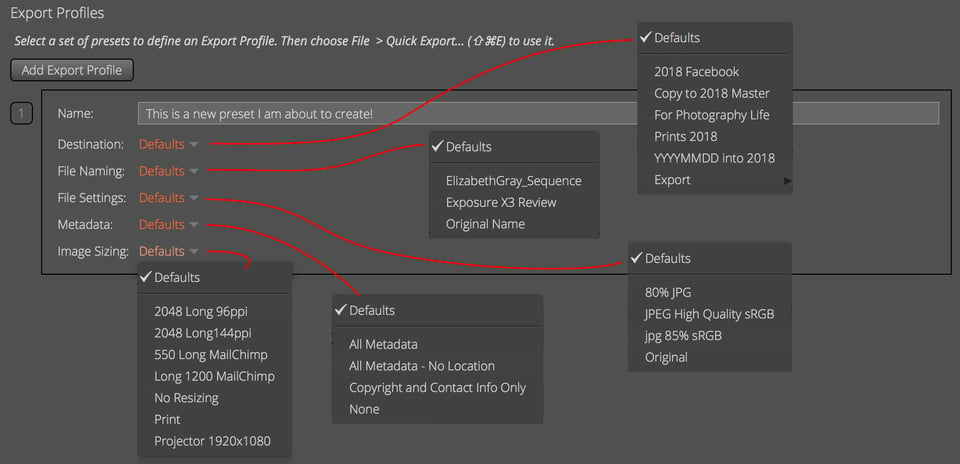
To make the best use of presets, you need to set up ‘pre-presets’ first! Here is a screen-shot of the Export dialogue box in Exposure. For each of Destination, File Naming, File Settings, Metadata, and Image Sizing you create presets. For example, here is the preset I have created for exporting images for articles I am writing for Photography Life. I have created a subfolder for images I will use in this review.
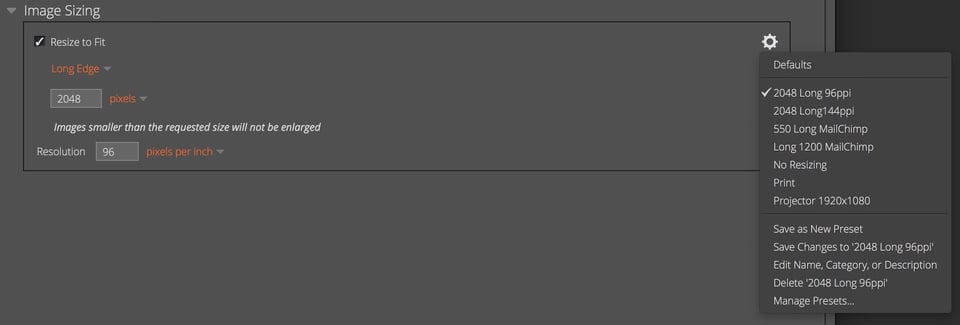
In a similar manner, I created presets for each of the other variables. For Image Sizing, I have created several presets based on how I plan to use my final images.
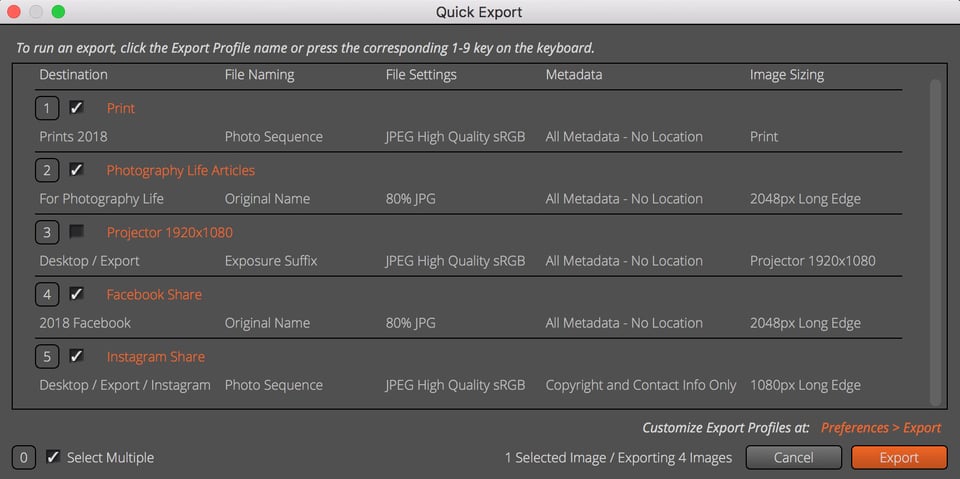
Once you have created your pre-sets for each of the export components, you can combine these into recipes which are accessed via Quick Exports. Here I have started to create a new Quick Export preset.
An advantage of Quick Exports is that once you have presets organized, you can send images to several different locations and in several different file formats at once. You can see here that I have five presets in my Quick Export library, and I am sending images to four locations at once. However, I do not like that you can not see the complete destination path. In Lightroom, I can select a preset, and easily change the destination folder without affecting any of the other variables. With X3 you must go to the export preferences, create a new destination, save it as a new Destination preset, then edit an existing Quick preset or create a new one. These extra steps completely negate the advantage of presets!
As with Lightroom, you can add watermarks (as text, images or metadata). And watermarks can be moved, resized, have a shadow added and their opacity adjusted.
Missing from X3’s export features is the ability to add output sharpening (as of update 3.5 on March 20th, output sharpening has been added to the export dialog) and to enlarge images. Instead, you must use Alien Skin’s software Blow Up, which must be purchased separately.
9) Missing Features
Noticeably missing from Exposure is chromatic aberration correction. As Spencer mentioned in his article, there is no easy or fast way to correct for chromatic aberration apart from painstakingly painting over any signs with desaturation on a new layer. I see this as a major setback for the software!
Also missing is a perspective correction tool like Lightroom’s Transform tab. This is a feature I rely on heavily in my workflow, and I miss it here. You can straighten images using the ruler in the crop tool, but actual corrections for distorted vertical or horizontal perspectives is sorely missing.
And as I mentioned above, the inability to create luminosity and color masks is also a drawback of the program.
Exposure’s Lens Correction panel lacks vignetting corrections. And the list of supported lenses also has some holes, particularly for Fuji shooters! Fujifilm’s 23mm f/2 (now supported with new update!), 50mm f/2 (now supported with new update!), and 100-400mm f/4.5-5.6 are noticeably missing. These are lenses that I frequently use, especially the first two! If you are a Nikon or Canon shooter, you will have more luck. I did not notice any common lenses missing within these brands. You can check out their list of fully supported cameras and lenses on Alien Skin’s website.
Lastly, Exposure cannot create panoramas or HDR images. While I don’t use these features often in Lightroom, it is a considerable time, and file size saver when I do.
10) A Quick Word on Speed
Let me start by prefacing that I have an old, slow computer (we are kindred spirits). I am using a mid-2012 MacBook Pro. It does have 16 GB of ram though, which helps muscle through my edits. On the whole, I found X3 to be marginally faster than the latest update to Lightroom Classic in some areas, while not as fast in others.
When it comes to starting up and loading a folder with images, X3 wins hands down. So for culling images, I could work through large folders of images in no time. As an example, I pointed X3 towards my entire 2014 image folder. That folder has 89 subfolders and just over 16,400 images. And yes, I am a pack rat when it comes to my image files! I like to use shots that don’t work out as teaching tools. Luckily I have lots of material to work with, but I digress! As soon as I selected my first image I could tab through subsequent images without having to wait for X3 to catch up to my clicks. I could start looking at images in one subfolder and then switch to another at whim without any issues.
I also found that while editing images, I did not see any lag while working with masks, adjusting sliders and jumping between layers.
However, X3 does not keep rendered files. Every time I zoomed or panned around an image, I saw a “rendering” warning. I found this annoying, especially when I was moving around an image at 1:1 applying sharpening. I did see a noticeable relief after adjusting the sliders in the Performance Preferences menu though. Because the rendered files are not stored, the sidecar files remain small. This is a definite plus when storage is an issue. So, all in all, there are tradeoffs depending on how you look at it.
I did not do an export speed test, as Spencer found that Exposure and Lightroom ran pretty much neck and neck in this respect.
11) Conclusion
Overall I was very impressed with Alien Skin’s Exposure X3. And I believe that it is well suited for folks who are not power-users of Lightroom. If you are looking for a RAW image processor that does not require a subscription and can perform some pretty powerful edits, I would highly recommend you give their 30-day free trial a try. X3 is intuitive to use, especially if you currently use Lightroom. And X3’s presets and film simulations are a real bonus.
However, for professionals and for users who depend on features such as chromatic aberration corrections, perspective control corrections, and more robust lens corrections, then Exposure is not up to the task, at least quite yet. I am hopeful that Alien Skin will address many of these shortcomings in future updates. And to give them full credit, they appear to be listening to what users are asking for. At that time, Exposure will become a real contender in the RAW processor race. Until that time though, I am saddened to say that I will have to maintain my tempestuous relationship with Lightroom for a bit longer.
Alien Skin Exposure X3
- Features
- Value
- Ease of Use
- Speed and Performance
- Stability
Photography Life Overall Rating



As a Fuji X user I contacted AlienSkin with regard to Fuji lenses, since their software does not currently support two of my lenses (14mm, 16-55mm). Their response – very prompt I have to say – was, unfortunately, not helpful: they wanted me to supply them with a series of shots so they could do whatever they have to do to establish the lens support. I questioned the suggestion that this was my job if I wanted these lenses supported and that the responsibility for this was AlienSkin’s and Fuji’s surely? No reply.
What does anyone else think?
Hi Trever,
I ran into the same thing when I was using the 30day trial, before writing this review. I asked them about support for several Fuji lenses and was also asked to send in images. I agree that this is not the job of the end users. On the other hand, it does show Alien Skin’s commitment to listening to what customer’s want and trying to update their software as quickly as possible. But I tend to agree with you that this is not my job!
Thank you for these reviews. As an amateur I have been using photoshop elements (PE) for about 2.5-3 years. I like the ability to us layers, panarama feature, group photo feature and have also be experimenting with many of the other tools. However I have been wondering, what have I been missing from other software, and what should I upgrade to? I have also wondered, with certain features, PE forces me to change to 8-bit, and am I losing some important details?
Will you be reviewing updated versions of photoshop elements, or is this considered to be in a separate lower league?
Thanks, G. I will pass on your request to Nasim regarding Photoshop Elements.
Excellent review! I am on Day 15 of the 30 day trial. Thank you for pointing out the random shaped vignette feature. Learnt something new.
For me, as a hobbyist, having switched to Fuji and Jpeg primary (Raw backup), I am mainly looking for a LR replacement that will let me import, cull, do some adjustments (if needed), and export. X3 fits all of that very well. The non-catalog design will simplify multi-computer work on same photos. Not having to switch modes (Library/Develop) is a welcome relief.
I have stopped my LR subscription this month but I am yet to buy into X3. Have tried ON1 and moved past it already. Might wait for more in your series before deciding. X3 is the front runner now.
Few things that bother me:
1) Price (US -> CAD$ makes it even harder)
2) Missing Transform (vertical edge correction). ON1 has this but still not as sophisticated as LR.
3) Doesn’t treat RAW+Jpep files as one. So I have to filter out RAW, cull Jpeg, and manually delete RAW with missing Jpeg (this could be scripted)
4) Pick and Reject keyboard short cut is = and – instead of P and X and I have to hold down Shift to go to the next photo. ON1 is similar to LR in this.
5) Fujifilm Simulation incomplete and the ones there aren’t close to what I get in-camera. I do have Silkypix so there is an external solution.
Glad you like the review, Richard, and thanks for your comments. I am hopeful that the transform feature will be implemented in an update soon. The latest update does have good Fuji film simulation support, have you tried it yet? It will be interesting to see what Alien Skin comes up with in future releases, and how Adobe reacts!
Just got an email that X3 is on sale for US $99 till Jun 5. Didn’t hesitate and bought it!
With Fuji’s latest X-T20 firmware, I can use X Raw Studio to get the ‘original’ recipe film simulation so don’t think I will be using X3’s Fuji simulation.
So one big feature that seems to be missing is photoshop’s content aware fill (one of the few things that actual works as advertised (most of the time)).
I would so love to get off Adobe so I will look at X3 and hunt around for other solutions to the remaining bits.
The Healing Brush tool in X3 is surprisingly effective, but it is not quite as powerful as Adobe’s content aware tool and even less so than Affinity Photo’s Inpainting Brush.
Hi, Paul. To be fair, we are looking to find comparable programs to LR not PS! I would put LR’s spot removal tool on par with X3’s spot healing tool. PS’s content aware fill is in a whole different league!
Cheers, and thanks for your comment.
As a non-professional, I suppose I have the luxury of being a post-processing software dilettante, prizing the user experience over the availability of a breadth of ‘power’ tools all in one suite.
Of the four software packages that I utilize (Capture One, Lightroom, Iridient Developer, and X3) I find X3 the have the most pleasant user experience, as well as the shortest line between import and export of most pictures, *if* (as stated in the review) you do not have perspective corrections or chromatic aberration fixes to make.
From the perspective of speed, nothing beats Capture One. From the perspective of control over the toning and sharpening of an image, nothing beats Iridient Developer.
Still, I find that I default to X3 probably 90 percent of the time.
Thanks for your comment, Fred.
Two questions:
1) Is there the auto-mask ability of lightroom’s local adjustment brush that automatically detects borders of an area? Make teeth-whiting and similar tasks very easy
2) Can you export maintaining a folder structure? So for example you can export a root folder in your RAW area and have it create the JPEGs in the same folder structure?
1) Additional masking tools are planned for future releases. The current release only has hand-brushed, radial, and gradient masks.
2) Export can create a folder structure based on various bits of image metadata, such as capture time. This probably isn’t exactly what you’re asking for, but it might be sufficient for your particular goals.
Thanks!
I think you should keep an eye on On1 raw 2018. Its is improving very fast and gives me the best colors (better than C1 and Lightroom) although you have to make your own color profiles. The corrections are very easy to make. I have C1 and Lightroom but On1 is taking it over. Only noise reduction and highlightrecovering needs some improvement.
Cees, On1 Raw 2018 is on our list of software to review. Stay tuned!
Thank you for the review. I also come from Capture NX + Nik Software, and it was so easy to get good results with that system…. I’d like to read in the future your review about the new DXO Photolab software, that include U-Point from Nik Software and has interface and commands very similar to Lightroom. Thank you.
Hi, Franco, and thanks for your comment. I will pass this on to Nasim and Spencer. Unfortunately, DxO does not process Fuji RAF files. Since I am shooting with this gear now, I will not be able to review this software!
no catalog = no database. I suppose that the research/filter performances are quite poor, or … am I wrong?
Exposure creates a database behind-the-scenes to make search/filter fast. This database is transparent and does not impose anything on you, unlike Lr’s catalog.
Hi Mauro, I didn’t have any issues speed wise searching by keyword or metadata. However, X3’s search feature can only be used one level deep. What I mean by this is that I can search for the keyword “birds” or I can search for pics taken with my “xf100-400” but I can’t search for all bird photos taken with the Fuji XF 100-400mm lens. In addition, I can search a folder, or a folder and all its subfolders. However, I can not search in three subfolders only. LR’s search capabilities are much stronger at this time.
Great review, thanks a lot. As soon as perspective correction tools are added, I’ll be giving this software a try.
I migrated from Nikon’s Capture to LR6 and stayed there, I haven’t changed to the ridiculous subscription rip off, and never will. Just recently I opened some RAW files edited in Capture and tried to reproduce the results with LR, and noticed a lack “depth” in the results, that I couldn’t achieve with the clarity tool or anything else in LR. Kind of frustrating, since I’ve been otherwise rather happy with it. Is that the case with Exposure X3?
Glad you liked the review, Martin. I did not find my images flat at all with X3. In fact, I would say that my raw files had a bit more punch than what I see in LR.