You’ve probably heard of Adobe’s new Super Resolution feature, which doubles a photo’s linear resolution (quadrupling the total pixels) with better results than any other upsampling algorithm – at least, that’s the claim. I recently got around to testing it, and here’s how it measures up.
Table of Contents
What Is Adobe Super Resolution?
In the 13.2 version of Camera Raw, Adobe added a new option called Super Resolution that can upsample any image to 4× the original number of megapixels – in other words, doubling the width and height of the original image. A 12-megapixel original image would become 48 megapixels; a 48-megapixel original image would become 192.
Rather than using a traditional upsampling algorithm such as Preserve Details or Bicubic Smoother, Super Resolution uses an artificial intelligence upsampling algorithm that Adobe says was trained on “millions of photos” in order to give better results than usual.
How to Use Super Resolution

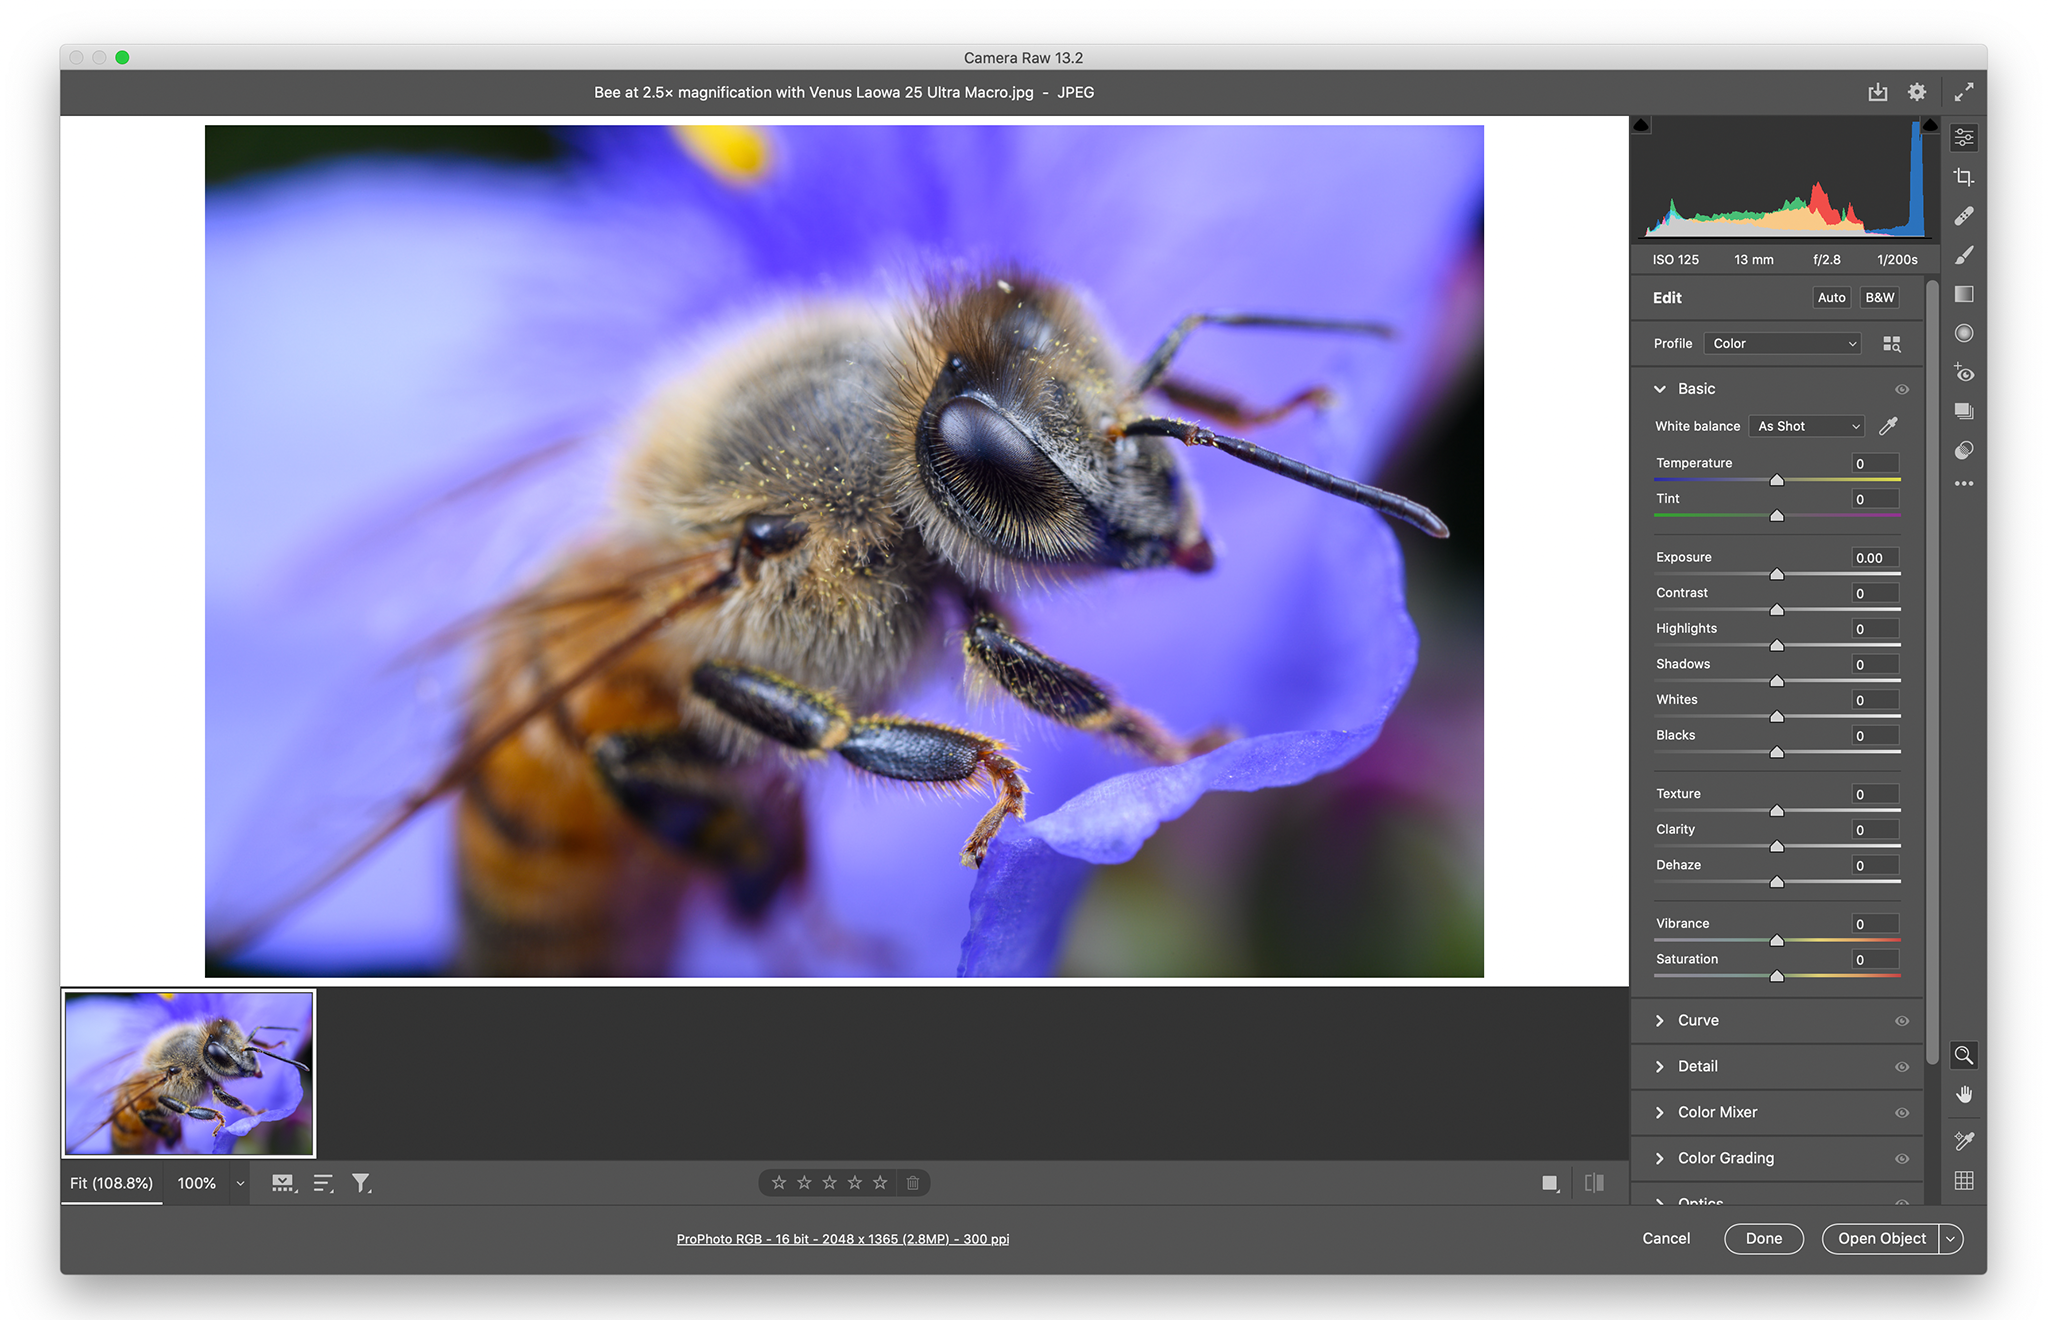
It’s easy to apply Adobe’s Super Resolution to any raw file that you have. Open the image in Photoshop’s Camera Raw dialog, right-click on the image, and click “enhance”:
The Super Resolution options appear as follows:
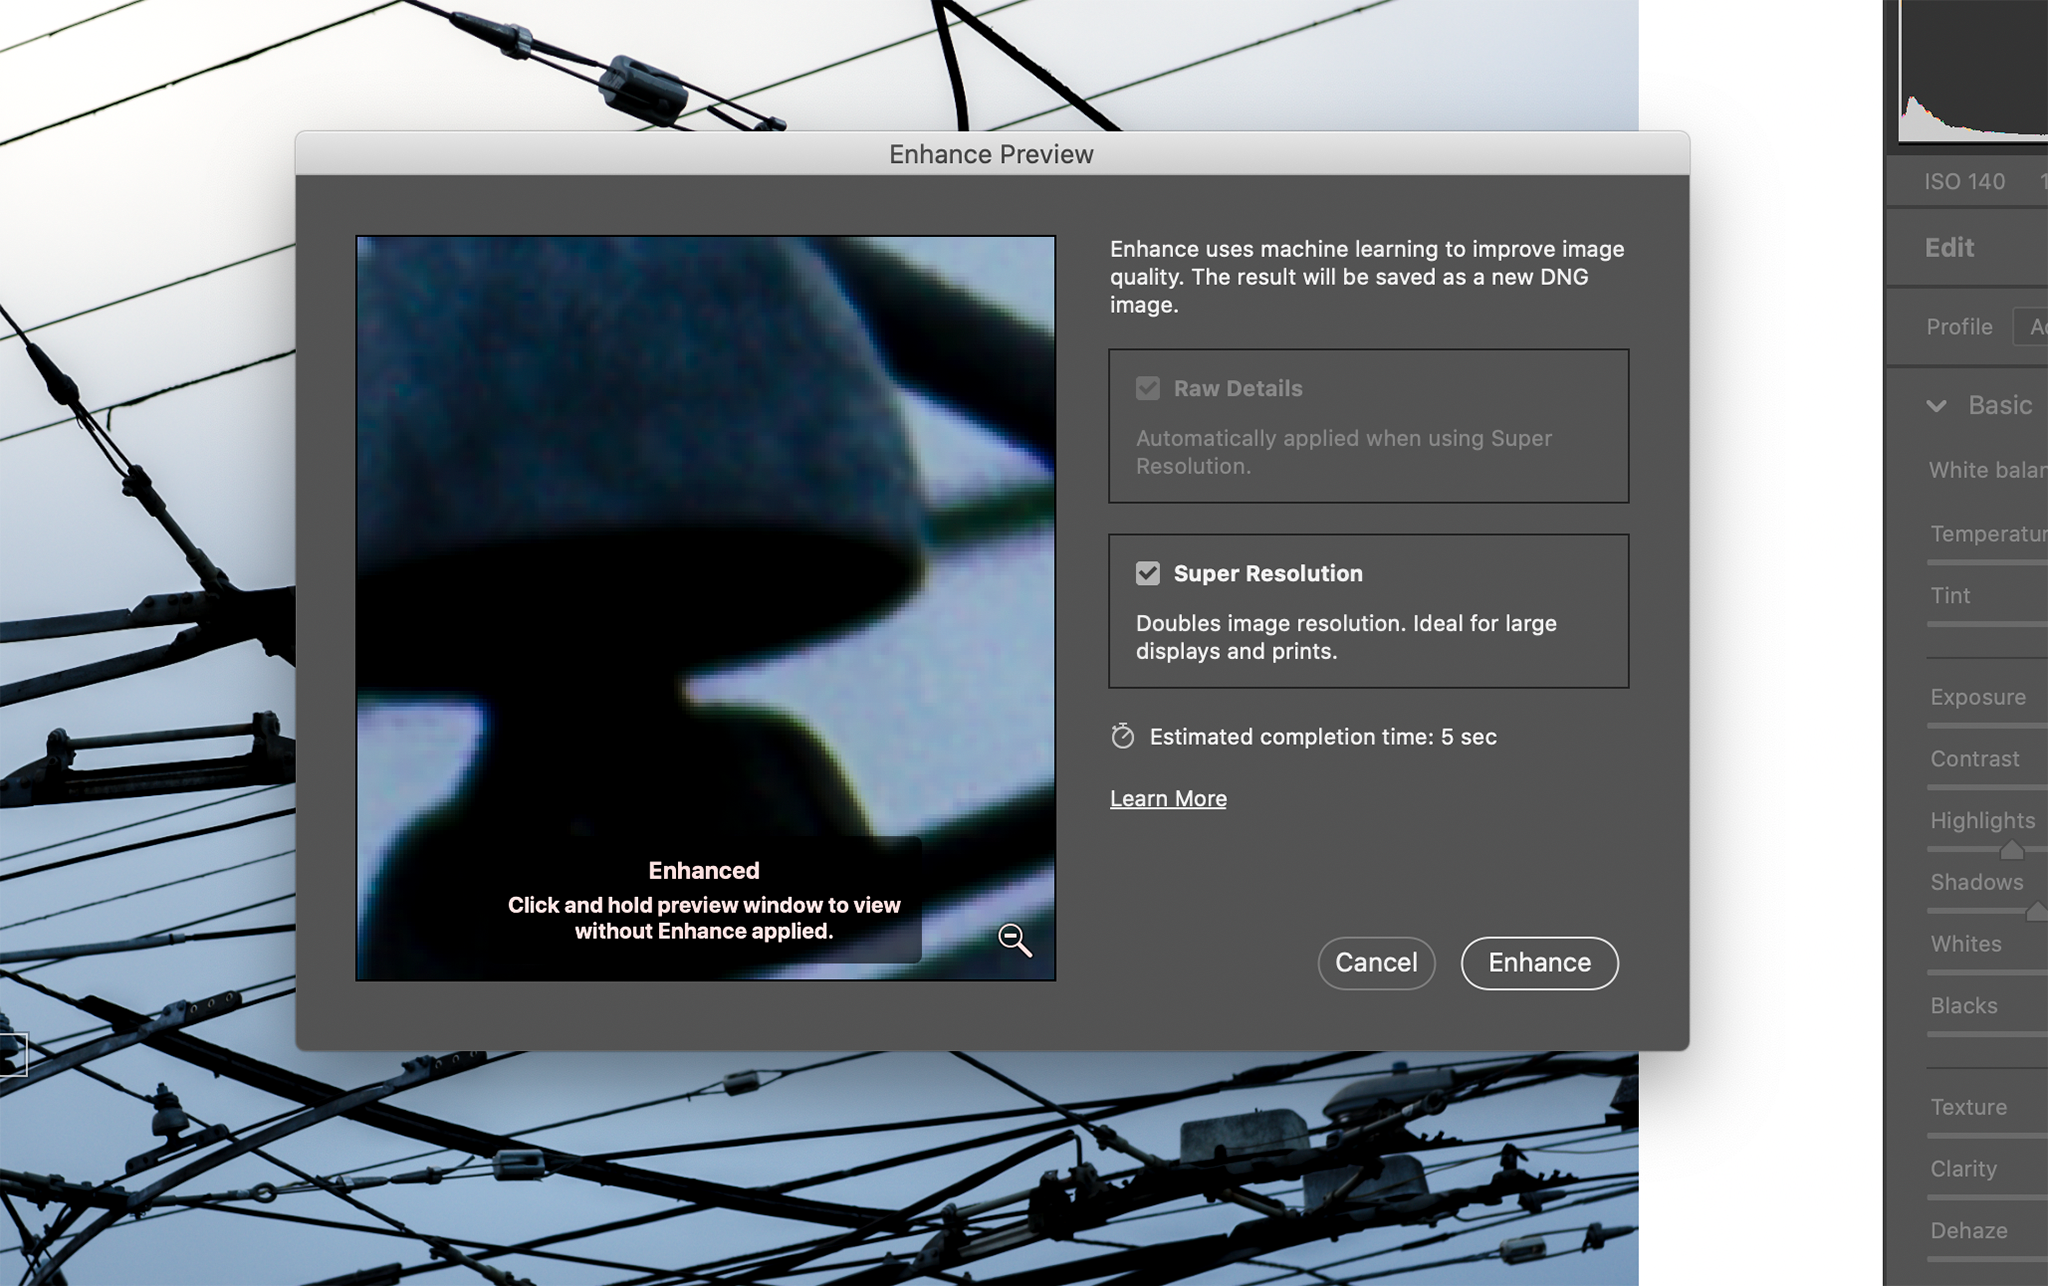
It’s a simple dialog, and once the Super Resolution box is checked, Camera Raw will give you an estimate of how long the upsampling will take. Click Enhance, and after some time, the higher resolution image will pop up as a second version of the image:
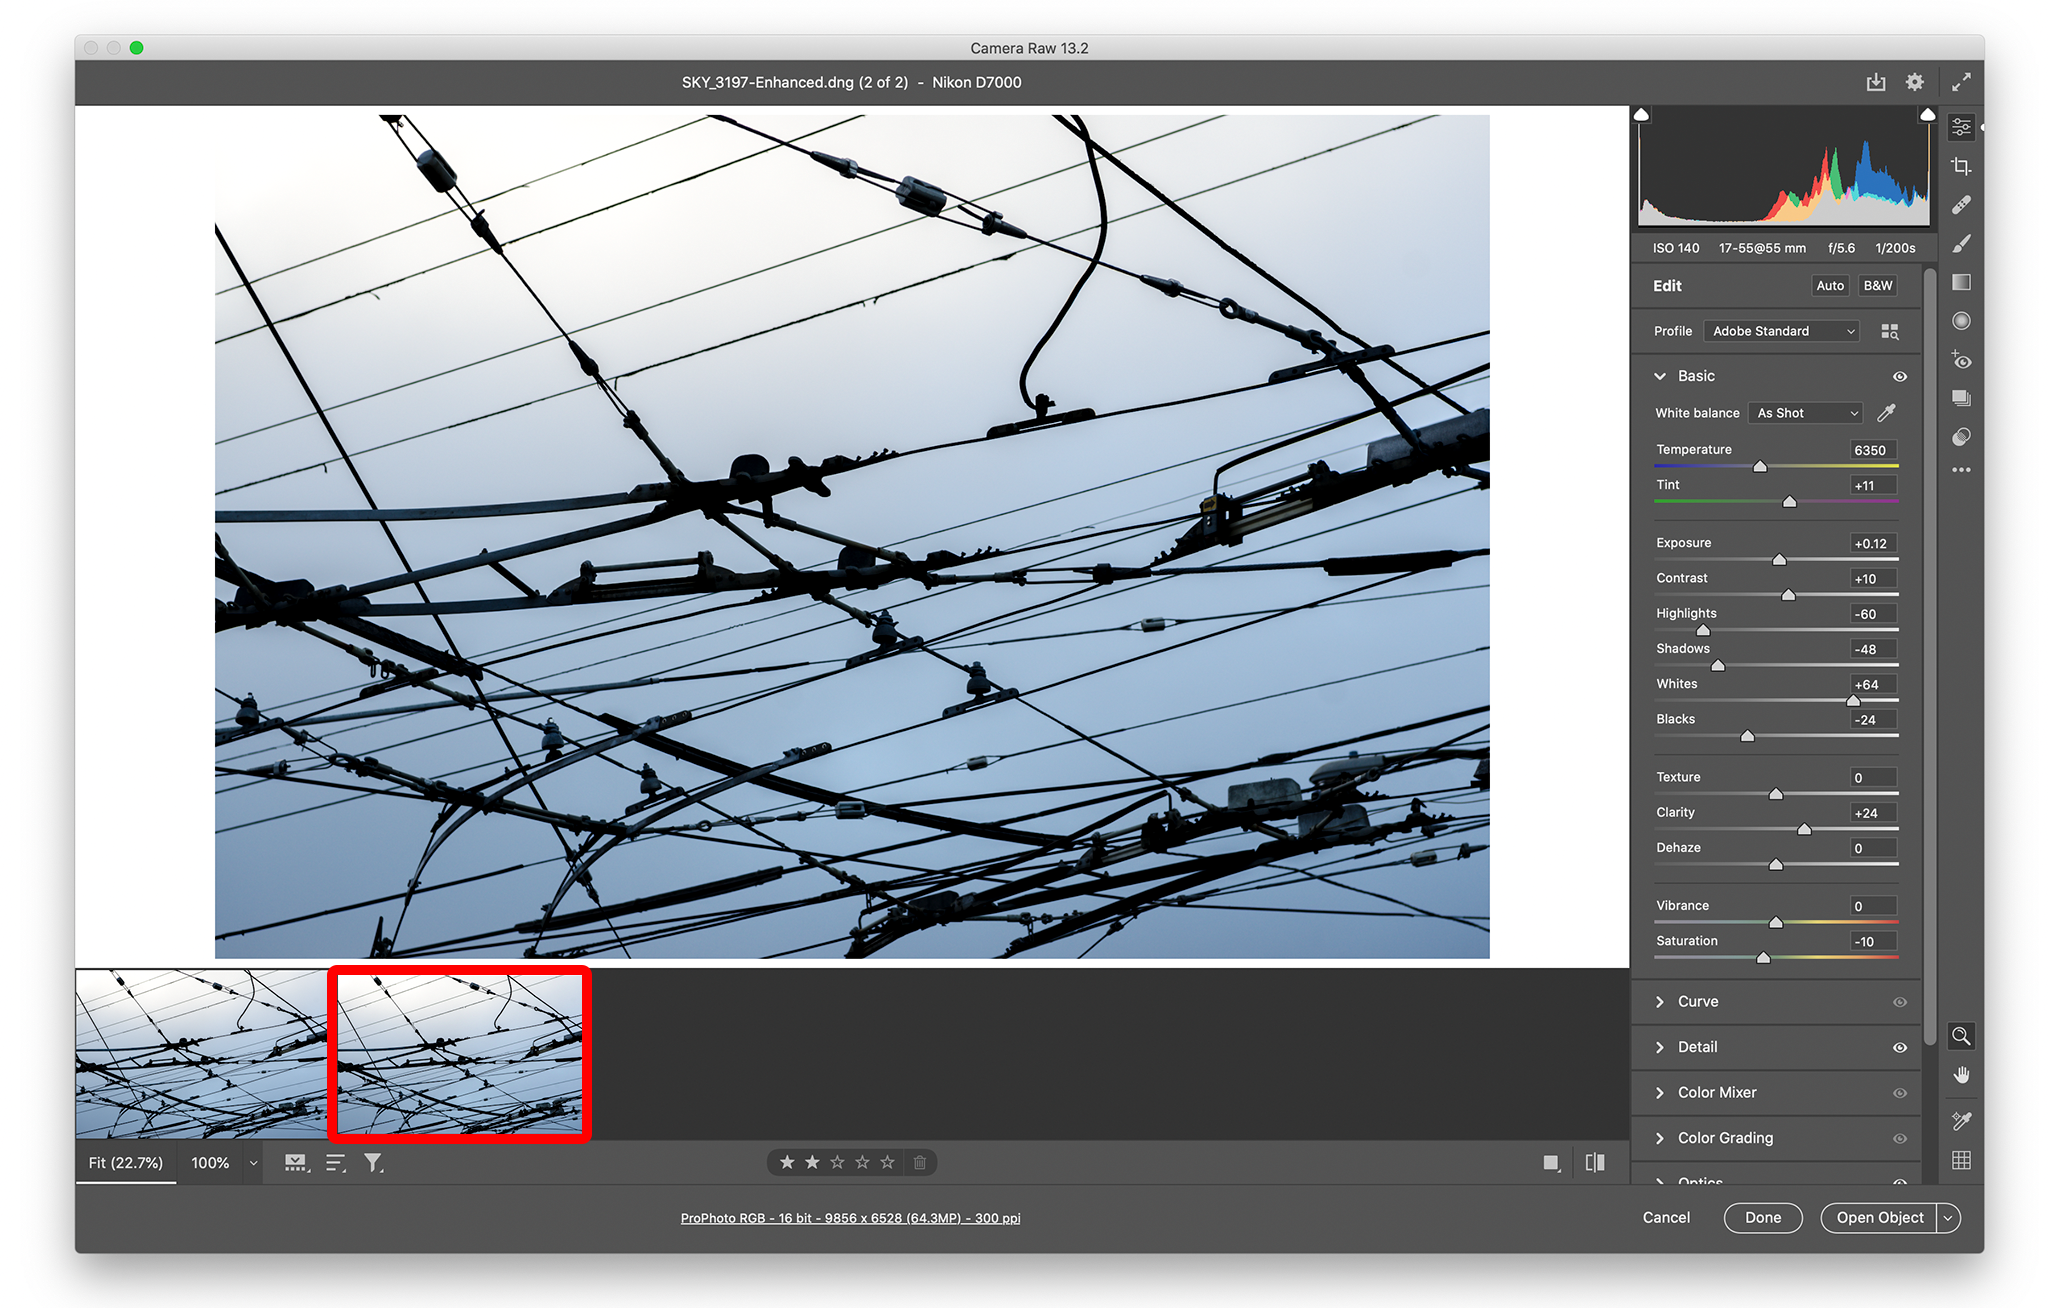
I’ve highlighted the second image in red in the screenshot above. That’s the high-resolution version; the other one is the original. Make sure to click the second image, or you’ll just keep editing the prior, low-resolution version.
Once you’ve done that, you can edit the photo to your heart’s content in Camera Raw or Photoshop itself.
Applying Super Resolution to JPEGs and TIFFs
Even though Super Resolution is only a feature of Adobe Camera Raw, it’s still possible to apply it to JPEG and TIFF files. Here’s how.
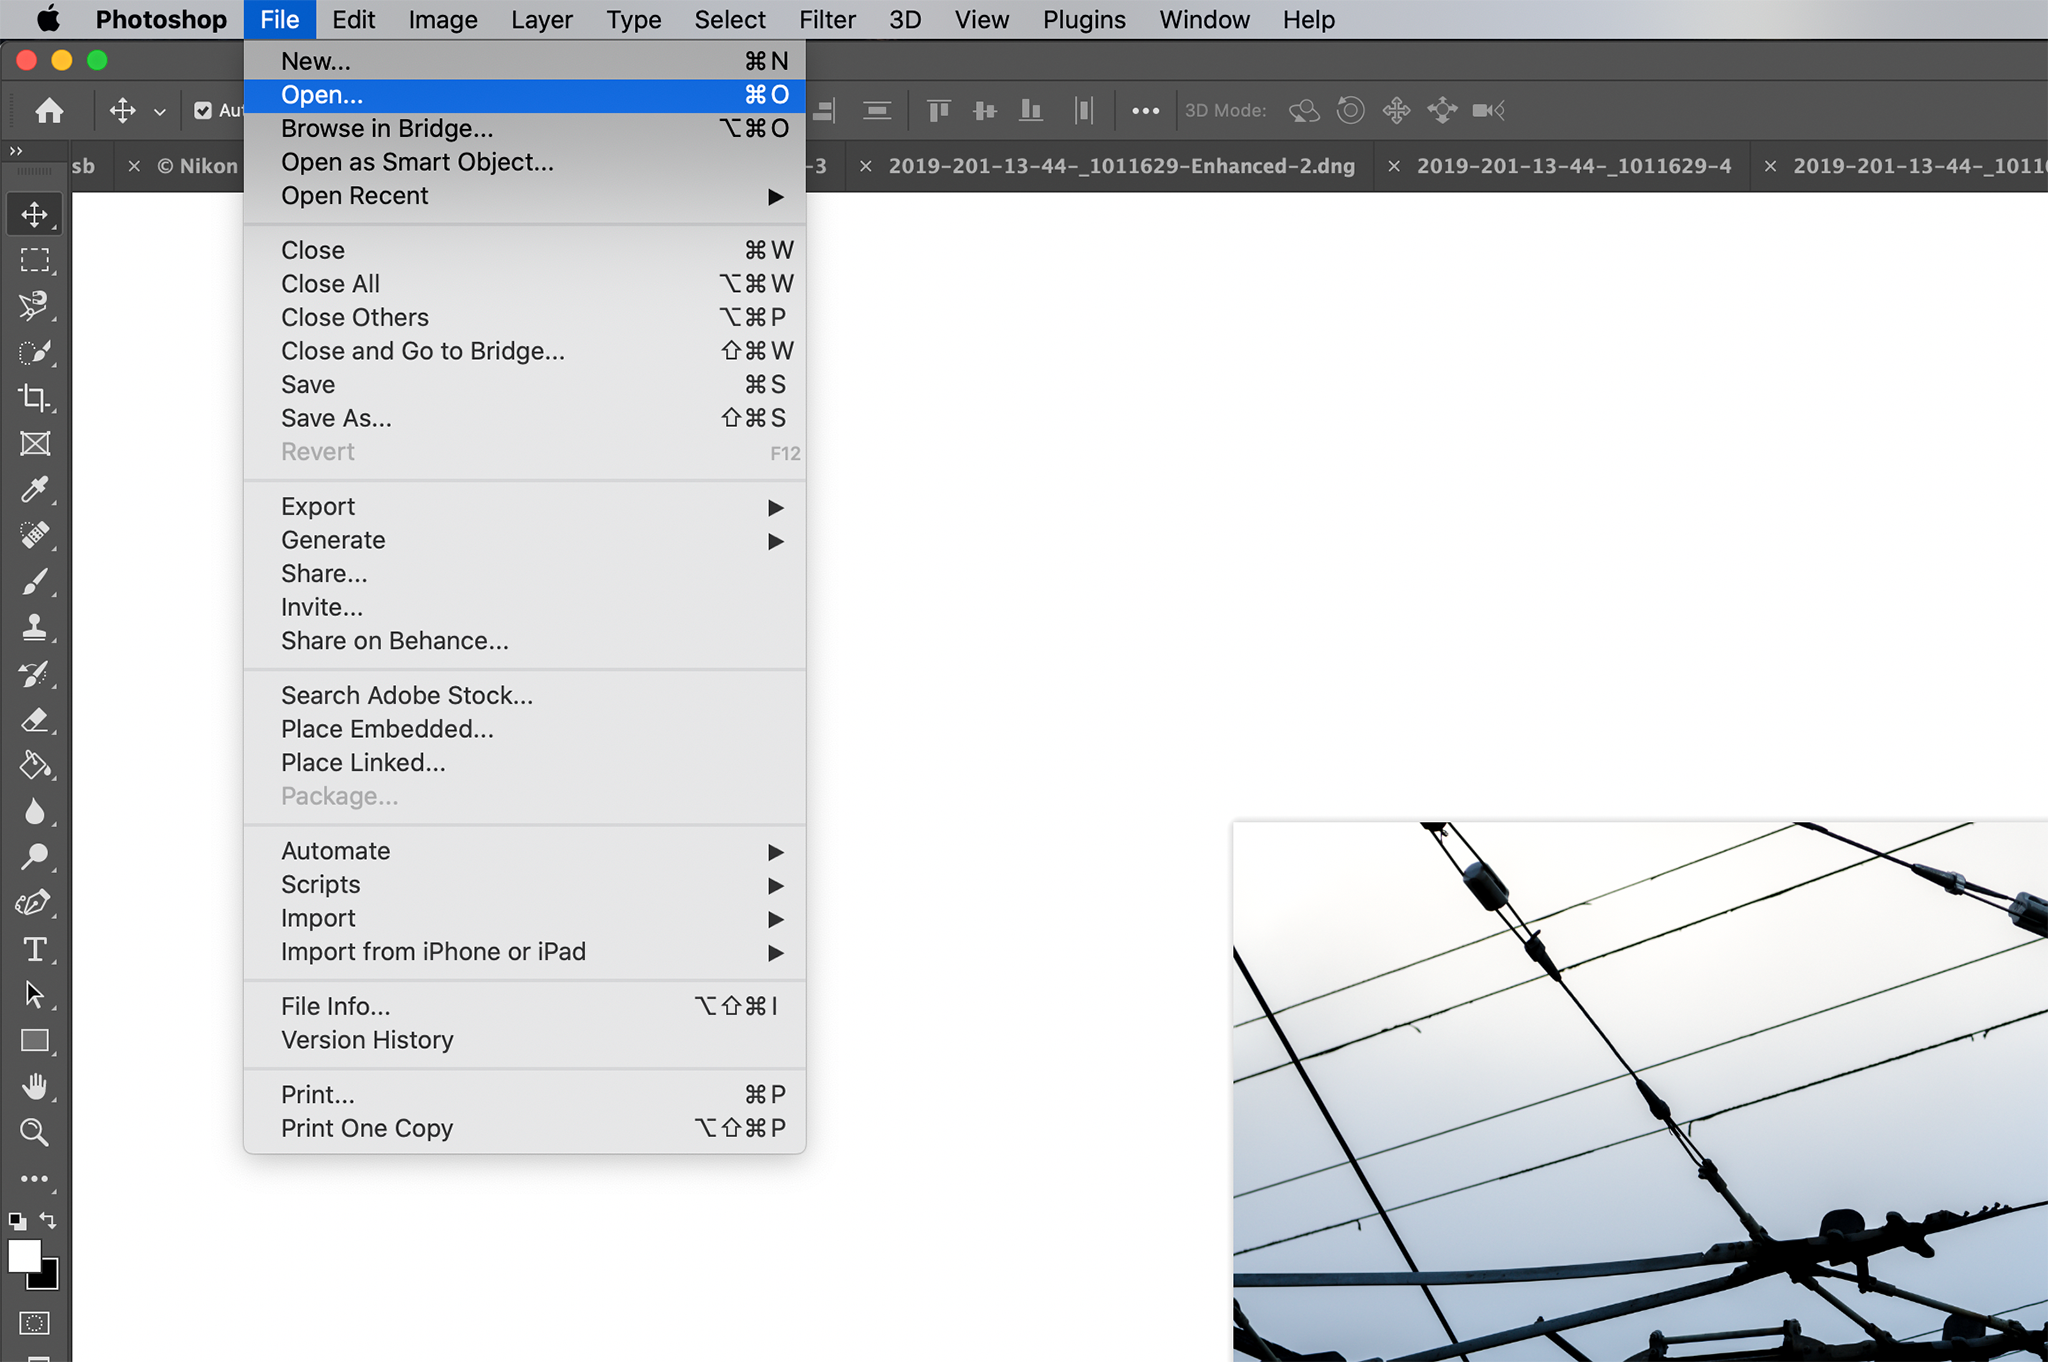
First, in Photoshop’s top menu, go to File > Open.
Then, click on the JPEG or TIFF image you want to edit.
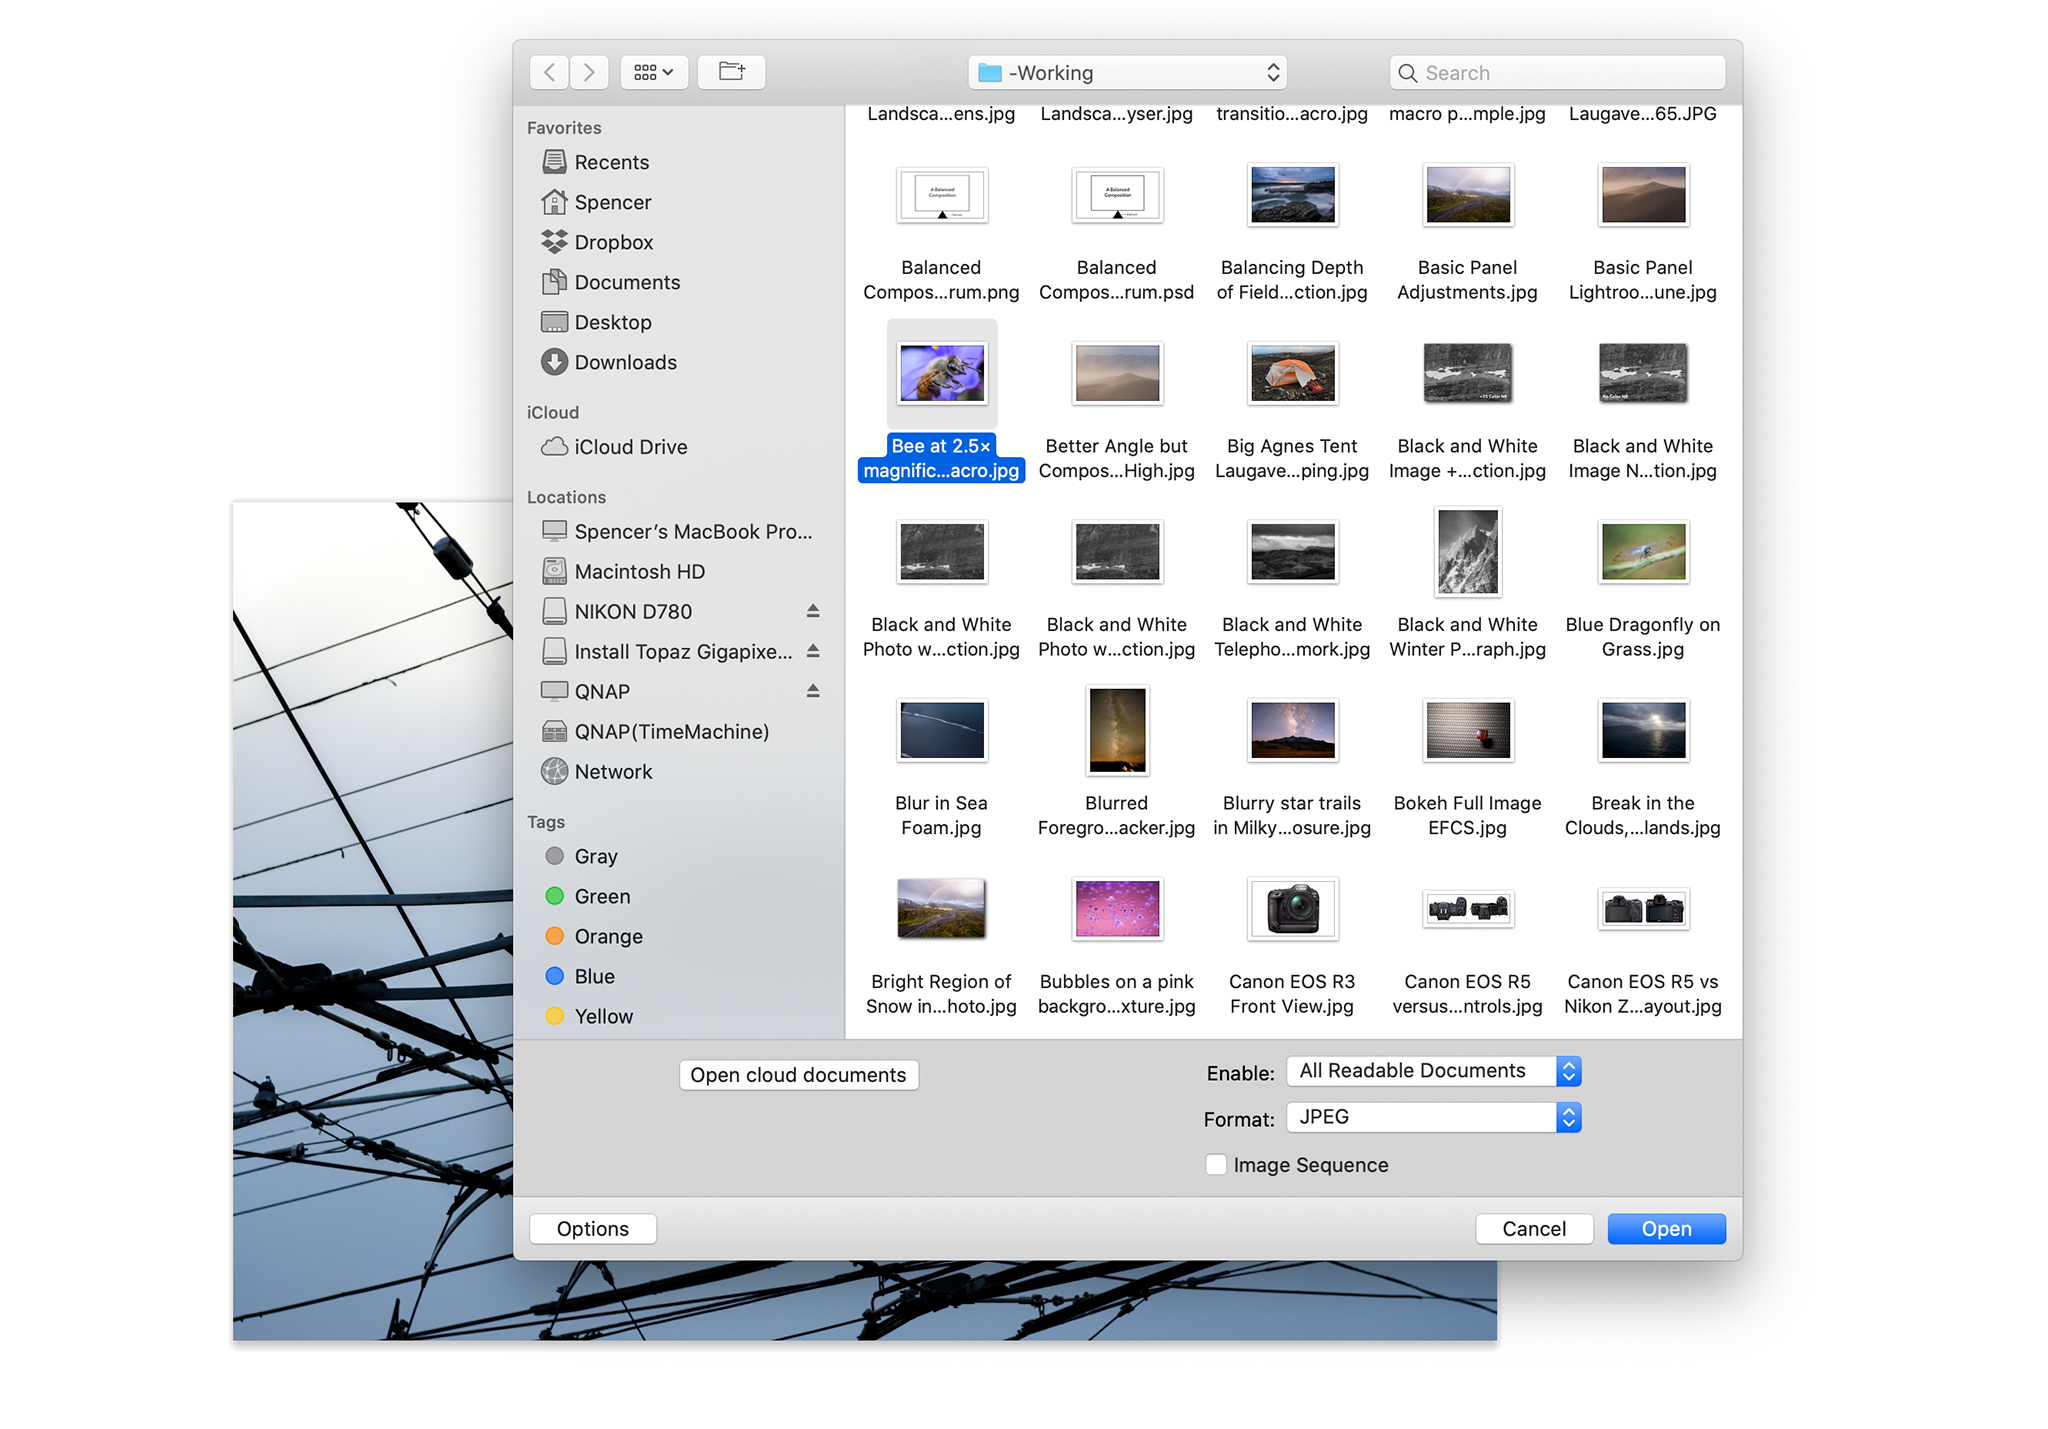
Before clicking “Open,” take a look at the screenshot above, where the bottom menu says “Format.” It’s most likely going to say JPEG by default. After clicking on the image you want to edit, you need to change the Format menu to “Camera Raw”:
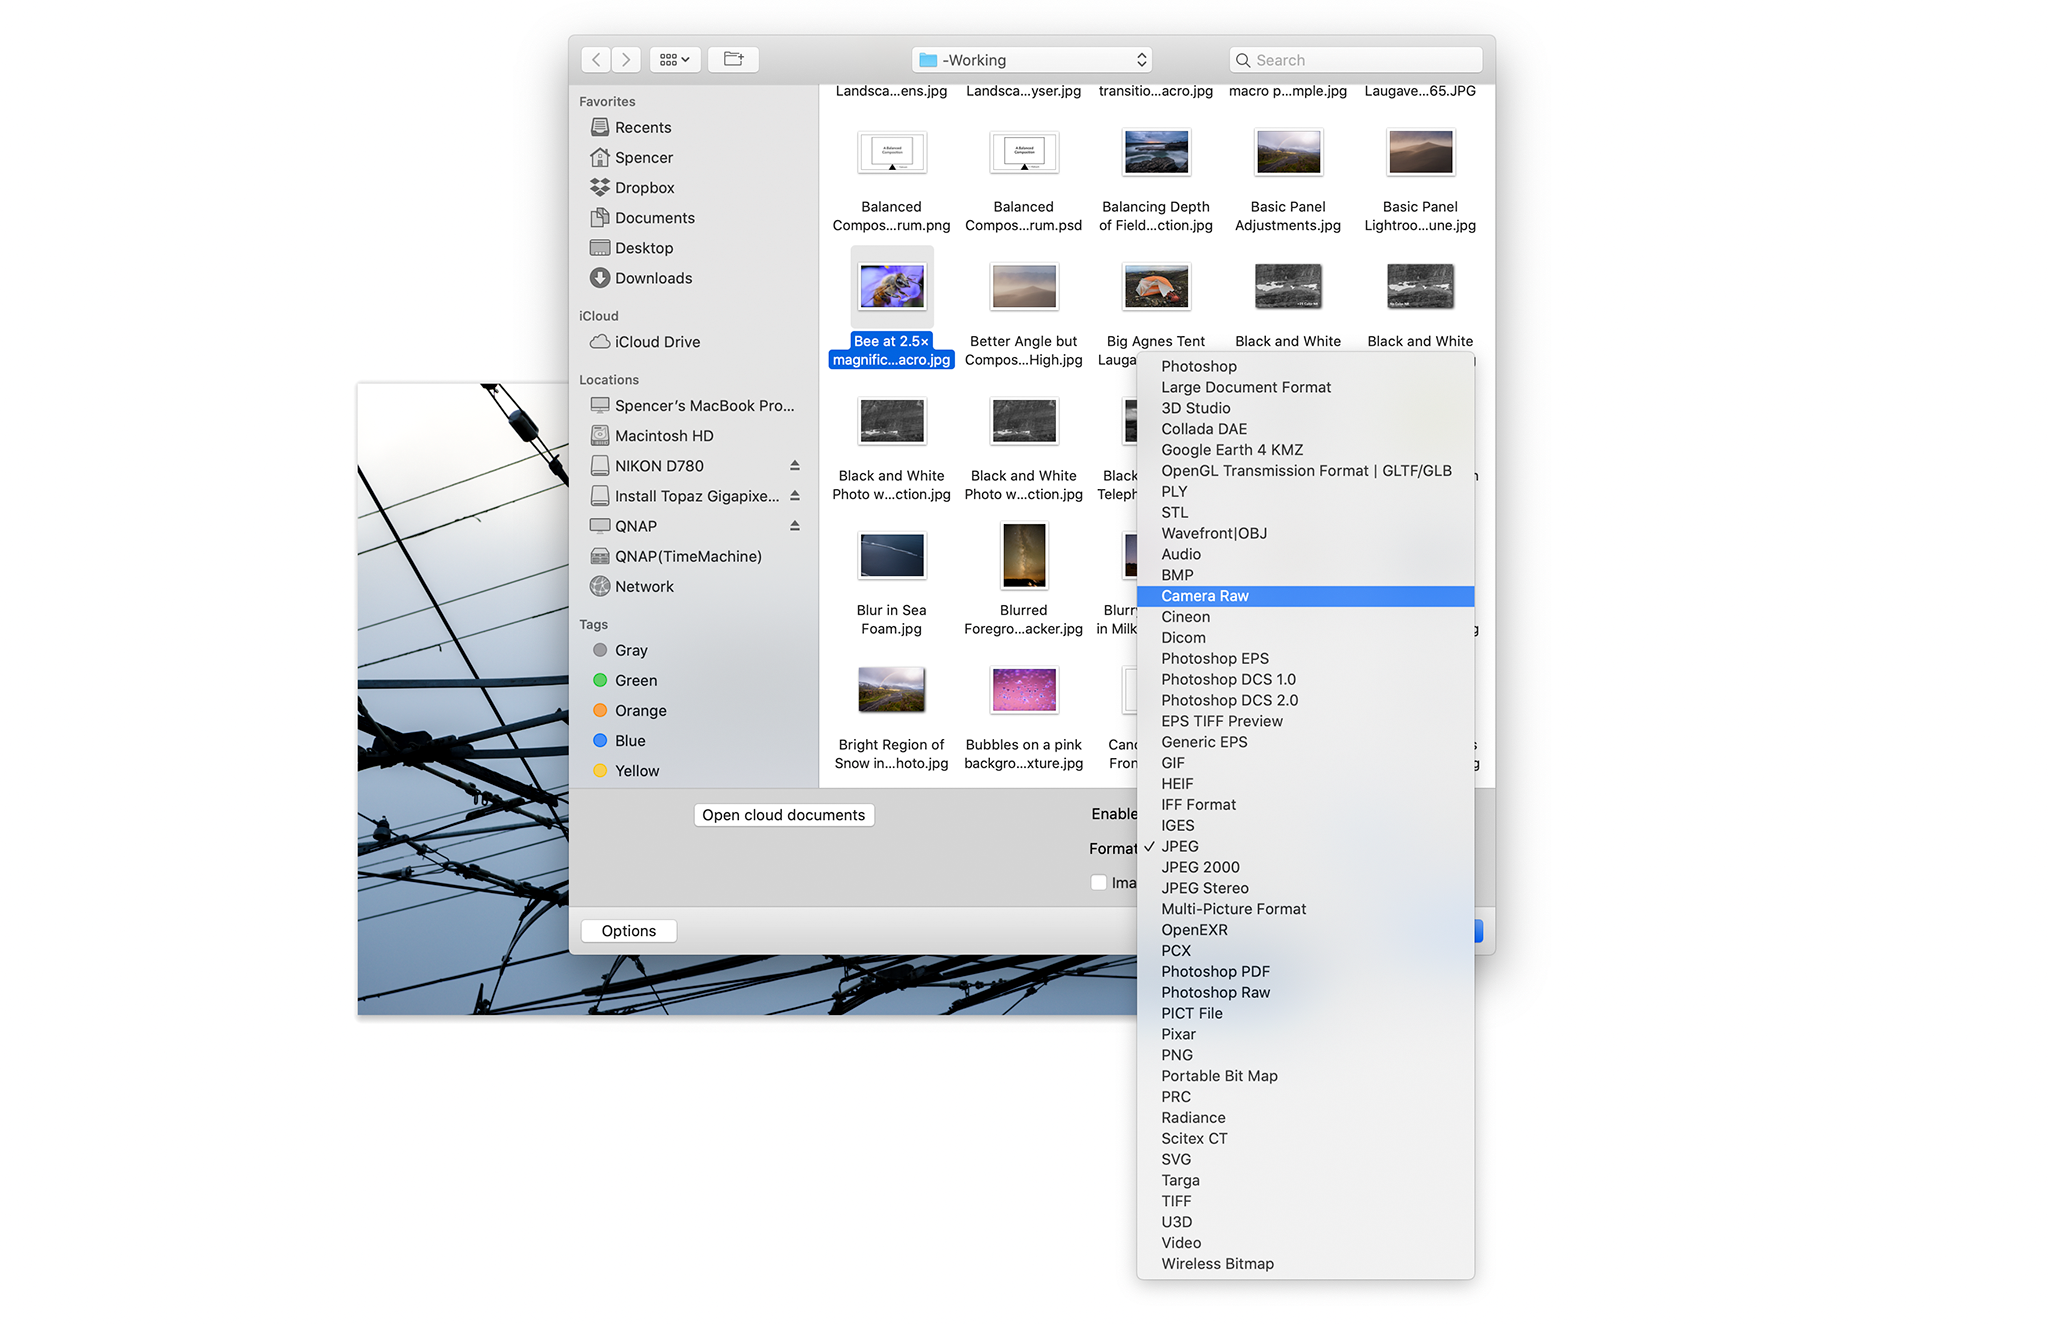
Then, when you click to open the image, it will appear in Camera Raw, and you’ll be able to apply Super Resolution just like before. Keep in mind that this doesn’t change the image into a raw filetype like DNG, but simply opens the JPEG or TIFF in Camera Raw.
Note that if you are working with a compressed JPEG file, it’s likely that JPEG compression artifacts will be exaggerated upon applying Super Resolution.
How Good Is Super Resolution?
Everything above is nice to know, but it won’t matter if Super Resolution isn’t any good. So, how does Super Resolution stack up?
The answer is in the title of this review: good, but don’t expect a miracle.
A 12-megapixel image that has been enhanced to 48 megapixels with Super Resolution won’t match an original photo from a 48-megapixel camera, or even get especially close. If that’s what you were hoping for, you’ll need to temper your expectations.
Super Resolution also isn’t drastically better than the Preserve Details 2.0 upsampling algorithm that Photoshop has already had since 2017. Don’t get me wrong – I’ve been impressed by Preserve Details 2.0 for years, and any improvement is welcome. But don’t read too much into headlines claiming that Super Resolution is a revolution. (Say that five times fast!) Instead, it’s a solid advancement to impressive technology that already existed.
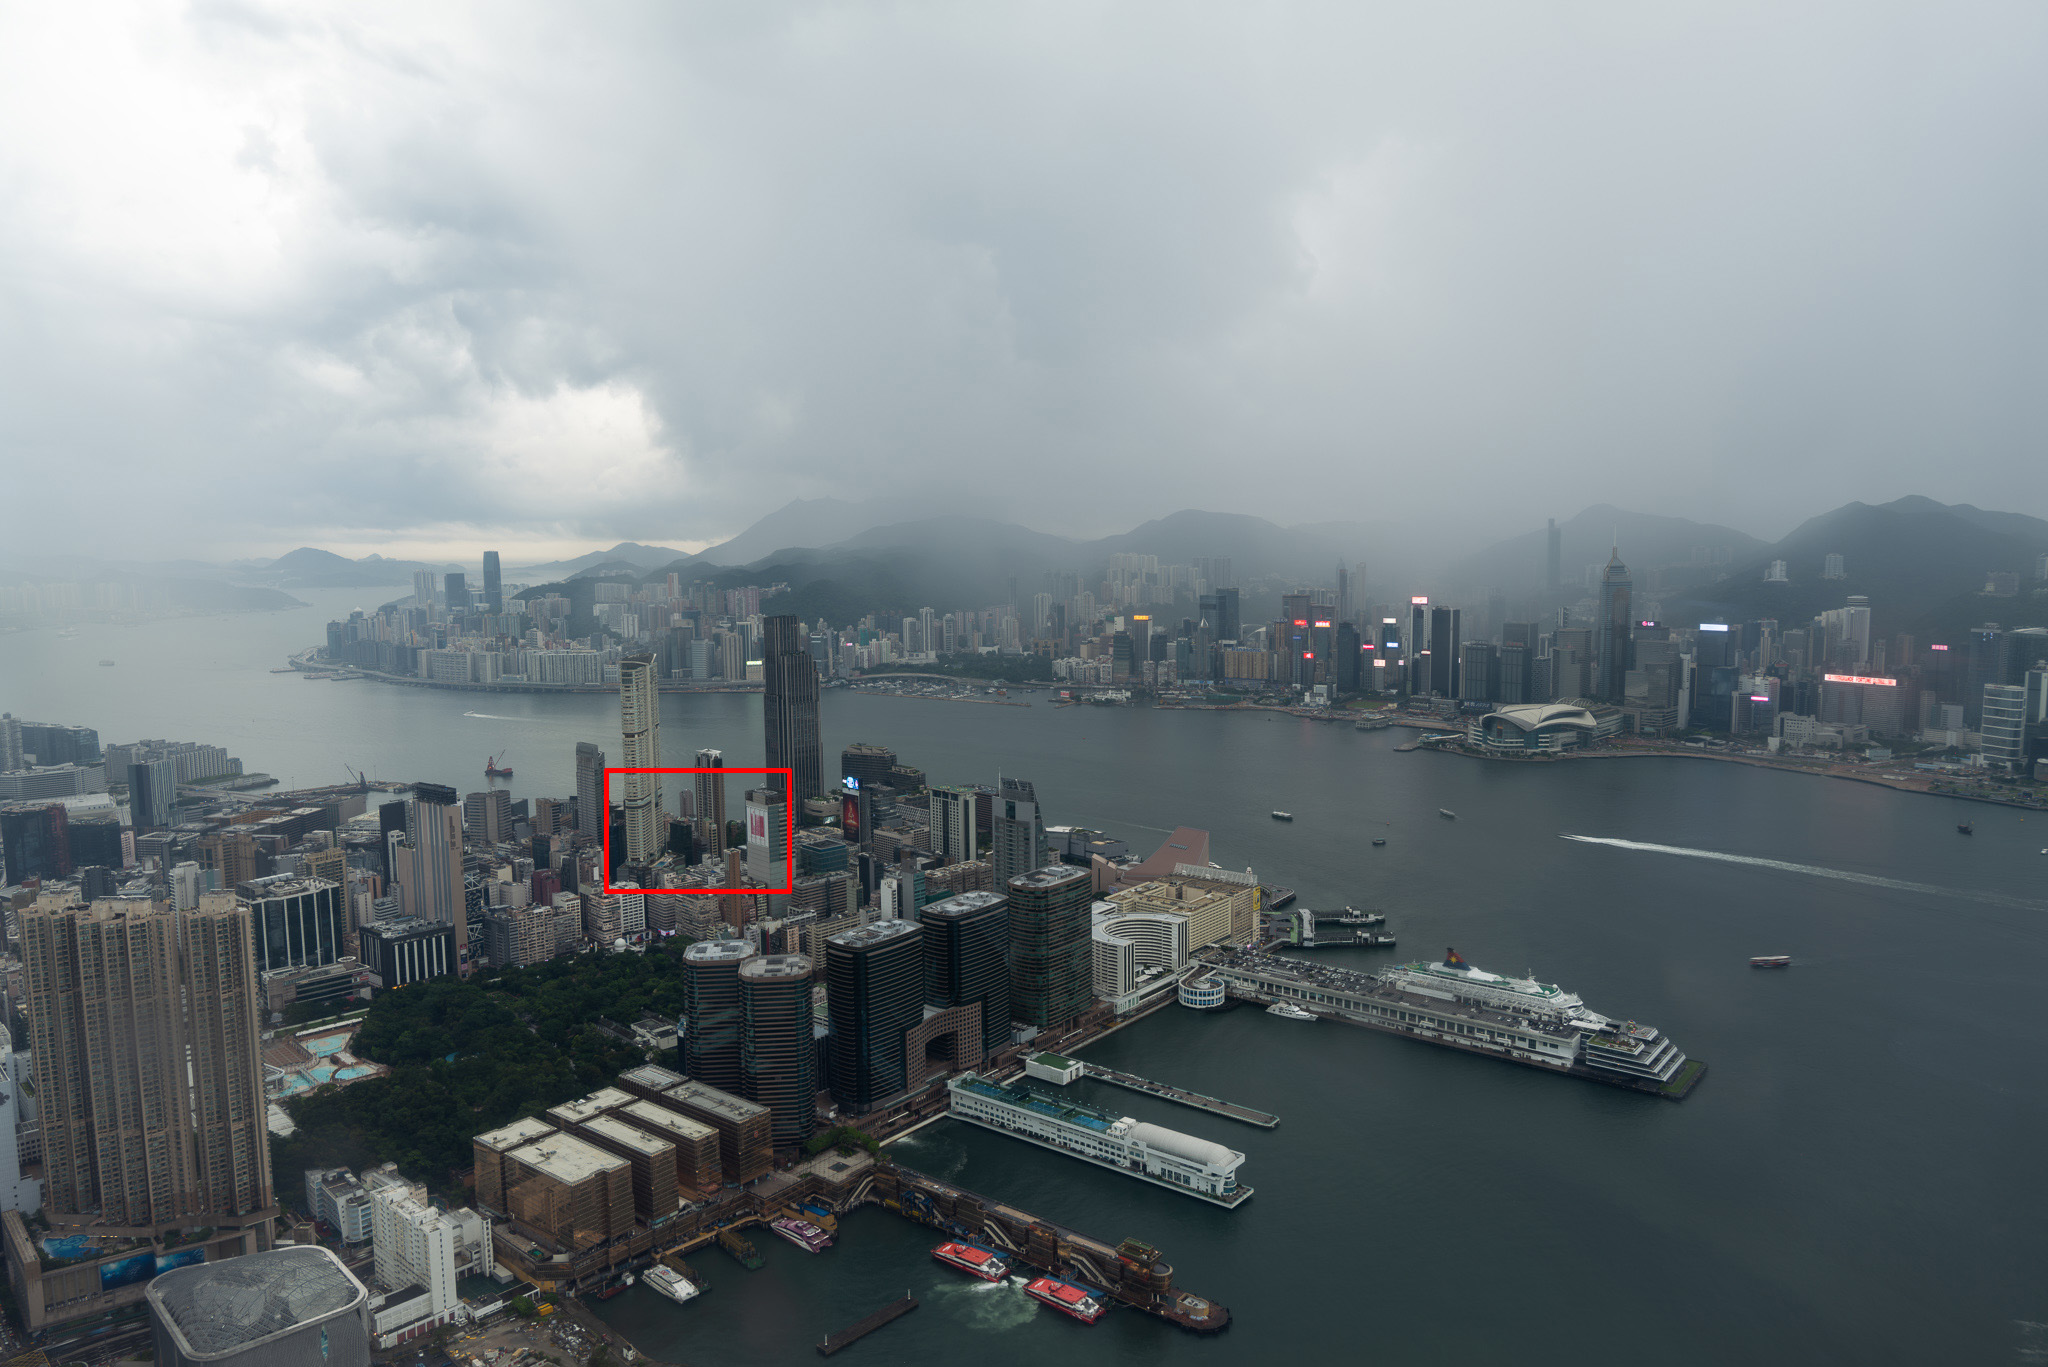
Ah, you won’t believe me without tests. Here they are. First, this is the uncropped image I’ll be using. The original is a 47-megapixel image from the Panasonic S1R, and all the crops you’ll see in a moment are from that small red rectangle:
The upsampled images we’ll be comparing are 188-megapixel behemoths – four times the original photo’s resolution (AKA twice the linear resolution). First, acting as a control, is the basic upsampling algorithm of Bicubic Smoother. Click to see full size:

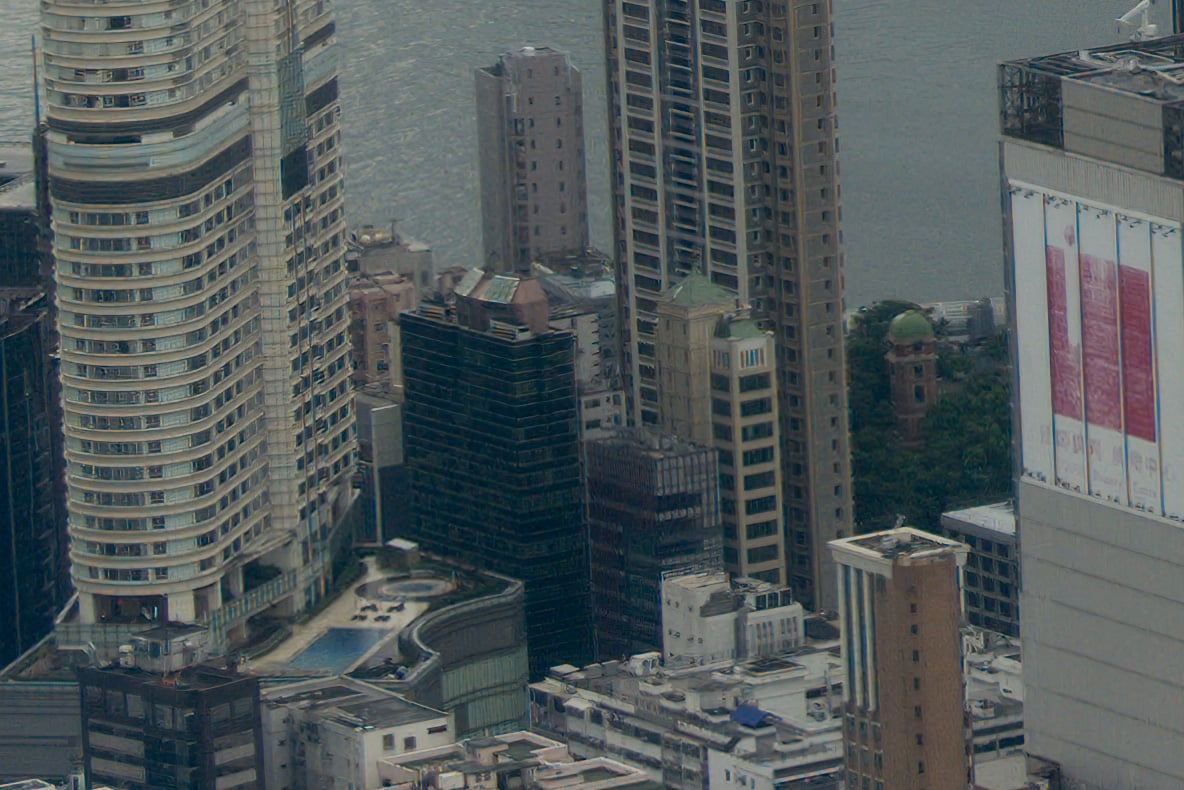
Now let’s take a look at Preserve Details 2.0, the artificial intelligence upsampling algorithm that Photoshop has had since 2017:
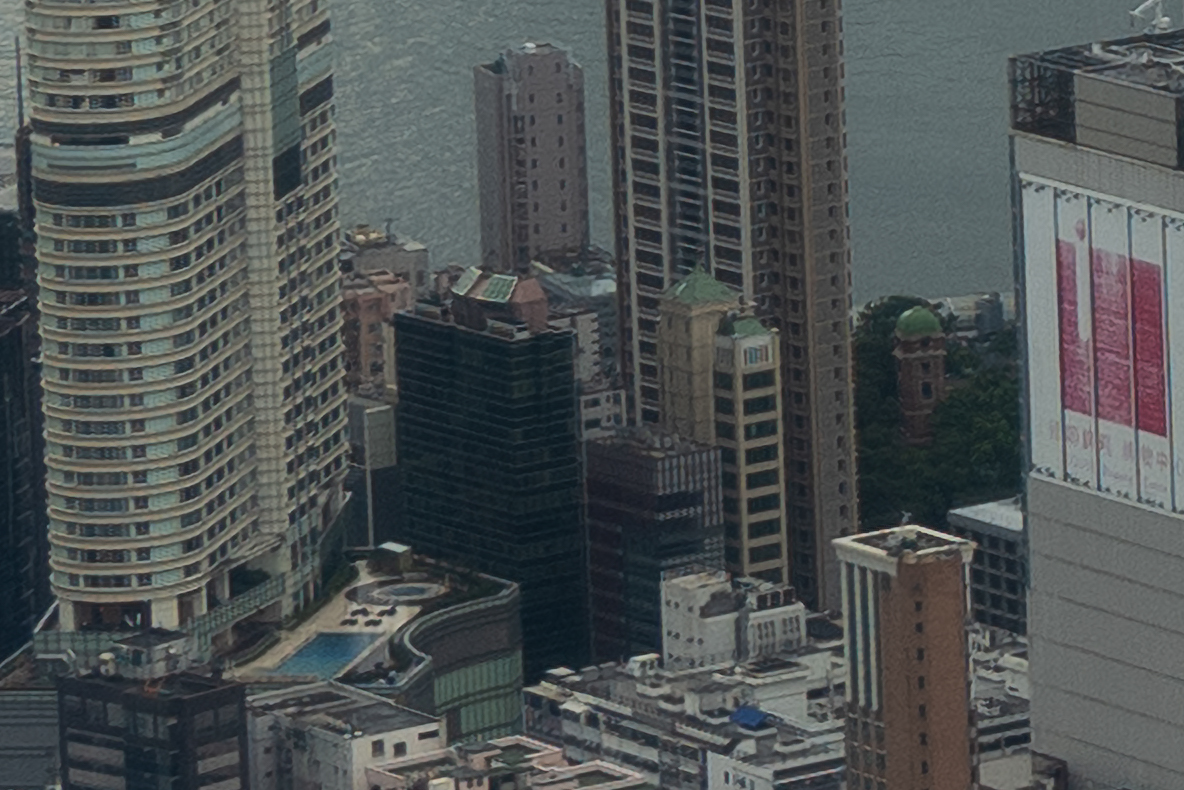
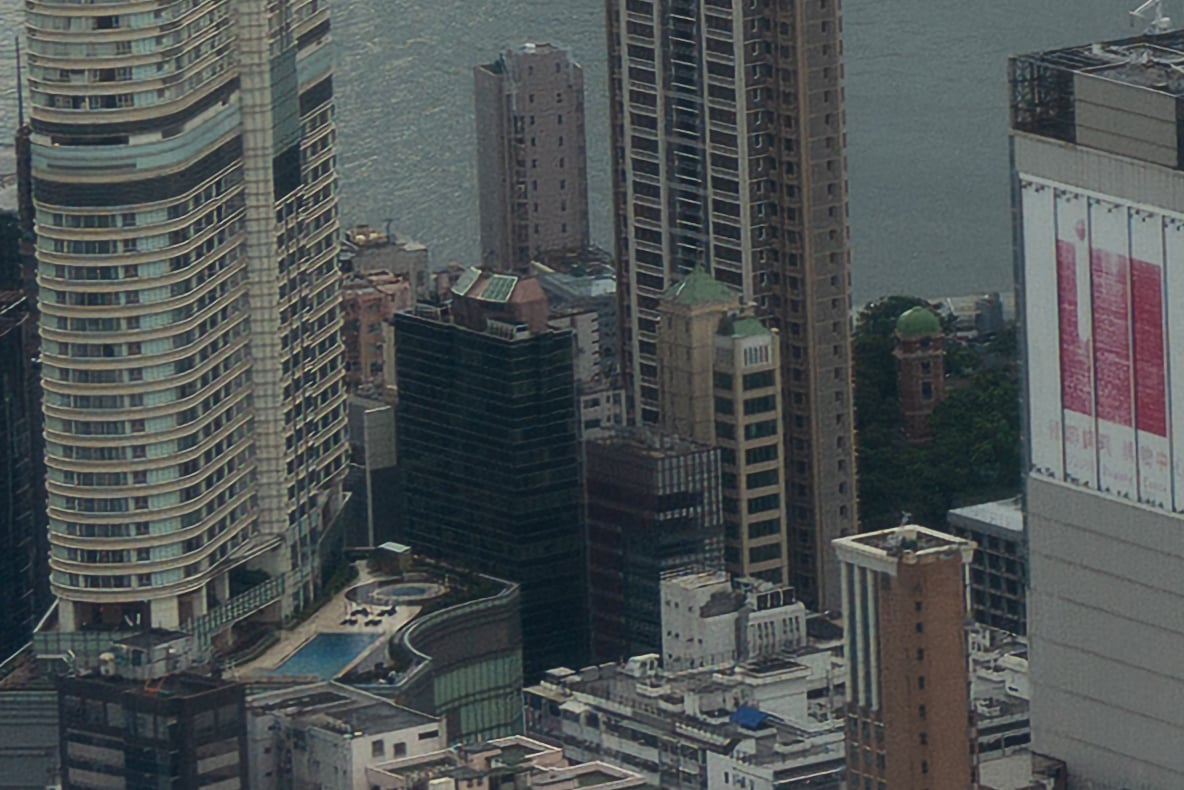
And then Super Resolution, the newest of the three methods, and the subject of today’s review:

Super Resolution is indeed better than Preserve Details 2.0. If you’re not seeing it, pay attention to the building on the left, which is crisper in the Super Resolution image. Both of them are clearly better than Bicubic Smoother throughout the image, particularly in areas like the trees and red advertisement on the right, and the same building on the left.
For comparison, here’s how an actual 188-megapixel image looks:

I took this photo using the Panasonic S1R’s sensor-shift mode, so it’s as close as you’ll get to a “real” 188 megapixel shot of this scene. There are so many finer details in this image, and the non-detailed areas have substantially less noise as well. In short, it’s much better than any of the upsampling algorithms.
That’s not exactly a surprise. Adobe would have to do some absurd wizardry behind the scenes in order to double a photo’s linear resolution without losing much apparent image quality. Perhaps they’ll manage something close, one day – after all, the current iteration is better than almost anyone would have expected back in 2010 or so. (Though something similar can be said of Preserve Details 2.0.)
Regardless, I’m happy Adobe has figured out a way to improve their existing upsampling algorithms even further, and hope they can continue down that path. It’s pretty amazing what artificial intelligence algorithms can do today, not just for upsampling, but also for things like noise reduction and fixing motion blur. Any issues I have on this topic are not with Adobe, but with the coverage on various sites that makes Super Resolution seem like never-before-seen technology, when it’s more like a nice iteration of something that’s been around for a few years already.
Adobe Super Resolution vs Topaz Gigapixel AI
Another company that’s using artificial intelligence upsampling algorithms is Topaz, with their Topaz Gigapixel AI software. I figured it would be helpful to add a Super Resolution vs Gigapixel AI comparison so you can see what the state-of-the-art is from more than just Adobe.
Here’s Topaz’s attempt at the same image:
For comparison, here’s a slider between the Adobe Super Resolution image (on the left, “before”) and the Topaz Gigapixel image (on the right, “after”):
(There’s a framing difference because Adobe applied a non-removable lens profile, while Topaz didn’t.)
To me, each image has its pros and cons. The Adobe Super Resolution version on the left doesn’t have as many strange color artifacts or waxy-looking areas. The Topaz image on the right has smaller, finer details overall, as well as less noise and crunchiness. Between the two, I lean toward the Topaz image, but they’re pretty close. As with the other samples in this review, I leave it to you to judge which one you like better and by how much. Personally, given that Topaz Gigapixel AI costs $80, and I already have the Adobe bundle, I’m sticking with Super Resolution.
Conclusion
With Super Resolution, Adobe has done a good job building upon their existing Preserve Details 2.0 algorithm to allow better upsampling than before. Still, it’s arguably a bit behind the results of Topaz Gigapixel AI, and all of these upsampling algorithms are, unsurprisingly, far behind an original, high-resolution image. So, I take issue with reviews that claim Super Resolution drastically reshapes… well, much of anything.
Not that it needs to. Any improvement to a good foundation is welcome, and Super Resolution is indeed better than Adobe’s prior best upsampling algorithm. I’m hopeful that they can push the envelope even further in the future. Upsampling isn’t something that most photographers need to do very often, but when it’s necessary, it can make or break a print. Adobe is pushing things in the right direction with Super Resolution, and even though I’d say the hype grew a bit beyond the reality, the reality is still very good.
Adobe Super Resolution
- Image Quality
- Ease of Use
- Speed and Performance
- Stability
- Value
Photography Life Overall Rating
Thank you so much for your explanation and How-to! I have been trying to find out how to work with jpg images using Super Resolution, and your’s is the first article that actually gave me the information I needed to get the job done. Great Article! Great step-by-step! And it produced great results. Thank you again!!
I tried to enhance a TIFF file but when I click on ‘open’ and then select a file I don’t get a ‘format’ option as shown on your screen shot but I am using ACR on a PC. Is there a way to do as you suggest with my PC
I tried the Super Resolution with a 12MPx Leica X1 photo and the result was absolutely super.
That’s great! I think a camera like the X1 which is on the lower side of resolution will benefit the most from it. Cameras with high resolution require too much perfection in lens and technique to get the full benefit – you need the shot discipline of 150+ megapixels, rather than 48 MP in your case.
Thanks for the review. I tried the Enhanced option on JPEGs and NEFs but it could not surpass the result I got by using LrC, Aurora and Luminar. Using three apps is somewhat of a hassle but the results are better in my opinion. I’ll try the Enhanced option a few more times but I did not see any real difference in NEF files from my D810.
Good to know, thanks for adding this!
Topaz Gigapixel created a big problem on my computer. When trying to export an image (D810 full size NEF) the cooling fans on my processor and my graphics card suddenly went into full speed. When I say the computer started to sound like a hovercraft, I am barely exaggerating. The fans stayed on full power for 3 minutes by which time the ‘progress’ bar had moved to about 15%. I was not happy to thrash my computer just for one image so I aborted. This was the trail version, I got in touch with Topaz when they nagged me to buy it and in fairness the tech support looked at it but at no time did they suggest an underpowered computer or graphics card was the culprit. After downloading system files and all kinds of stuff, we had three or four exchanges before the conclusion was, they didn’t know what was wrong.
On Friday I accessed Camera Raw 13.2 and installed it. The results were so different. When doing the ‘enhancements’ the computer barely changed pitch on the fans. As I run SSD cards anyway, the computer is never noisy normally. When I closed the image, and re-opened the DNG file, as the familiar ‘reading RAW file’ progress bar moved across the screen, the fans went to about half power, and that took about 12-15 seconds. Once loaded (into Camera RAW of course) any further editing caused no such problems. When clicking open, to get the image into Photoshop, again, a few seconds with elevated fan activity, but much lower speed and duration. Adjustments in Photoshop beyond this point did not provoke a hardware reaction, save for the NIK software ‘define’ which caused a little pitch increase for 15 seconds or so.
Save as JPEG the final step, took five seconds and no hardware reaction.
As to results, well, I can’t speak for Topaz, I never got that to run properly. I am on a pretty powerful Dell Windows 10 machine with 32Gb Ram and fast SSD drives. That was a shame. However, the results from Camera Raw 13.2 blew my socks off. For example, when pixel peeping an image with chrome handrails in a small part of the shot, the processed image had a stepped appearance as we got into close pixel peeping – the enhanced was smooth and sharp, not smooth and fuzzy.
Looking at the image that Spencer kindly put up here, with the buildings, I don’t know if it is my eyes but when you move the slider, I prefer the adobe version more, it looks crisper and sharper.
The only thing I would warn you about is the sharpening of your images. My sharpen slider when working on an image I intend to ‘enhance’ is never set further over than a quarter from the left hand side. If you move it more, you may have to move the noise slider to half the distance of the sharpen one. On some images you may need to move the ‘colour noise’ slider an equal amount to the noise slider too.
I discovered noise in images which had a tad too much sharpening = and when using Nik Define to tame the noise, I discovered the hardware reaction as described above, so it is better not to sharpen too much. If you have Nic software, you can use the raw presharpener in that, AFTER saving the file to a DNG in it’s enhanced state, and then re-loading it. That works better and creates less noise.
Hope this helps some of you get to grips with it – my overall reaction is that I want the person in Adobe who came up with this to marry me and have my babies – which for a reserved British person, is quite a reaction! Happy editing!
Wow, that’s wild to hear about how slow Topaz was for you. It was much slower than Adobe for me, too, but nothing like that.
The Adobe and Topaz samples here have enough differences in their pros and cons that I’m not surprised you like the Adobe shot better. Either way, considering how many people already have the LR + PS bundle, it’s a no-brainer to use Super Resolution when upsampling is required.
“Looking at the image that Spencer kindly put up here, with the buildings, I don’t know if it is my eyes but when you move the slider, I prefer the adobe version more, it looks crisper and sharper.” — AutofocusRoss
I was so glad to come across this comment because I also see the SuperRes version (slider left) as significantly crisper and brighter than the Topaz version (slider right). Is it at all possible that you reversed the left/right on the slider?!
Anyway, great info and it makes me feel even better about LR SuperRes. Thanks.
Spencer, Thanks for the nice review. I have been practicing with the super resolution feature but not really blown a way. I have been using it on nature landscapes images taken with D800e and D850. Would the improvement be more apparent using images from my 12 MP D3s than from later generation high MP cameras? Thanks and good hunting.
Glad you found it useful. In theory, with perfect technique, there should be little to no difference depending on the starting resolution. However, it’s easier to get near-optimal 12 megapixel images than near-optimal 45 megapixel images. That gives Super Resolution an easier starting point. You may find that a 12-megapixel image upsampled to 48 megapixels looks closer to a true 48-megapixel shot, whereas a 45-megapixel image upsampled to 180 megapixels doesn’t look as close to a real 180-megapixel photo shot with optimal technique, by comparison. Hope that makes sense.
Thanks for doing the analysis and posting the results, Spencer. It helps us a lot in making an informed decision about the various other reviews and what they are claiming.
Sure thing! I was curious myself.
How much computing power do you need for this? For hobbyists on a budget buying used cameras and lenses and with computers they are trying to make last (thus reducing ‘throwaway’) – my laptop is 10 years old – is this software something to aspire to or ignore?
Given that it’s something you’ll only need to do every once in a while – while making large prints – even an old laptop should be fine. It may take a couple minutes to upsample, depending on the original picture’s resolution. I wouldn’t use Topaz Gigapixel AI on that laptop, though. Even on my reasonably fast computer, it took several minutes to upsample the 47 megapixel S1R photo, when Adobe Super Resolution took about 10-15 seconds.
I tested it out on some product photography and found that it handles in-focus areas reasonably well but can get confused in the transition zone. On landscapes taken of the same scene in this article but from a different side, hit and miss. Some buildings would look excellent, sometimes it would add patterns of pixels on edges it wasn’t sure about and not have them on edges next to them.
For me, its there is some merit for sharp focus photos but I’d almost need to have it side by side with a bicubic enlarged version and mask out the bits that go wrong.
It’s definitely better for scenes like landscapes and cityscapes where everything is meant to be sharp. It can add a good bit of noise to out-of-focus backgrounds.
I guess a question could be why you’d want to upscale your images in the first place? Printing very large comes of course to mind. But I remember a time where you’d use a specialised software RIP to upscale and prepare a file for printing. On the more affordable end of the scale you still have QImage which had supposedly class-leading upscaling algorithms. I guess Lightroom’s print module is now good enough for most uses, but should one upscale the image before processing, or before printing, taking the target print resolution in account? Or both?
I don’t know what the norm is, but whenever I print large enough that my PPI drops below 300, I’ve always upsampled to get to at least that point. In the past, I used Photoshop’s Preserve Details 2.0 as my final step in the process, after all other edits (aside from a final output sharpening).
I haven’t made a big print since Super Resolution came out, but next time I do, I’m planning to use it instead and otherwise keep the process the same.
Printing is the only reason I’d bother upsampling. If you’re displaying on the web, there’s almost never a need for it.