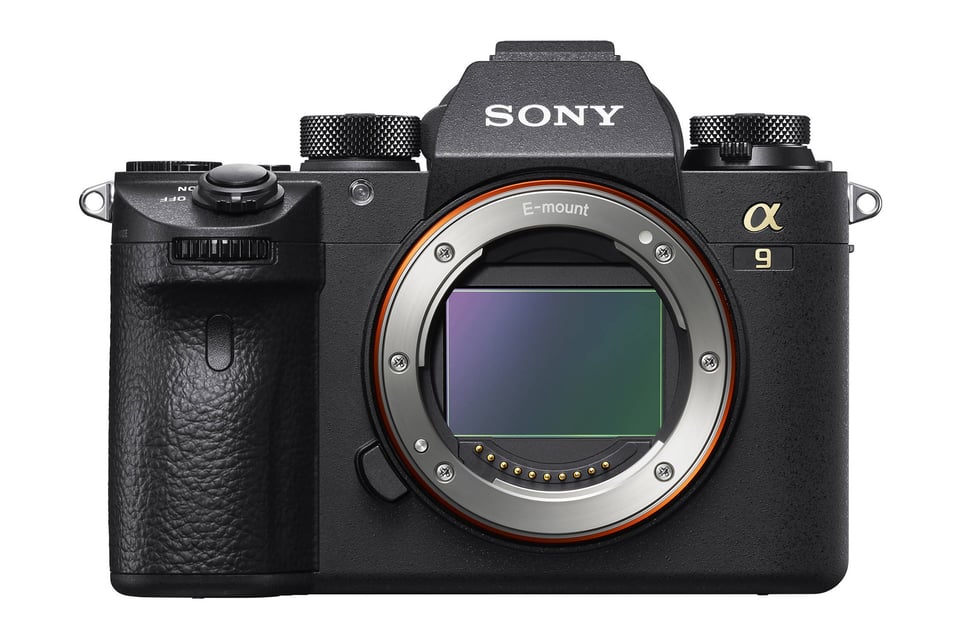
Sony’s first professional-grade sports-oriented camera, the A9, has created quite a stir ever since its introduction last year. It’s a 24MP, full-frame mirrorless camera that takes up to 20 frames per second with no viewfinder blackout, native 4K video recording, silent operation, and a price that massively undercuts the competition. The result is a camera that is designed to compete with the best of Canon and Nikon’s offerings. In this article, I will provide information on how to best set up the A9 for photography, especially action, and explain each of the important settings.
Top Dials and Buttons
At first glance, the Sony A9 shares much of the same DNA with the Sony A7 series of cameras, but a closer inspection shows that Sony has introduced some meaningful changes. The first difference is on the top panel of the camera. The surface on the left of the viewfinder hump – which previously lay empty on all A7 bodies – is now home to independent and dedicated Drive and Focus Mode dials. With the Drive dial, you can directly choose between Single Drive, Self-Timer, Bracketing, or one of the three continuous burst modes (Low, Medium, and High). With the Focus Mode dial, you can choose between Single AF, Continuous AF, Manual Focus, and Direct Manual Focus or DMF. This welcome change means that you won’t need to scroll through menus or set a custom function for switching the focus and drive modes. Both dials are also lockable as well to prevent accidental changes to settings during shooting.
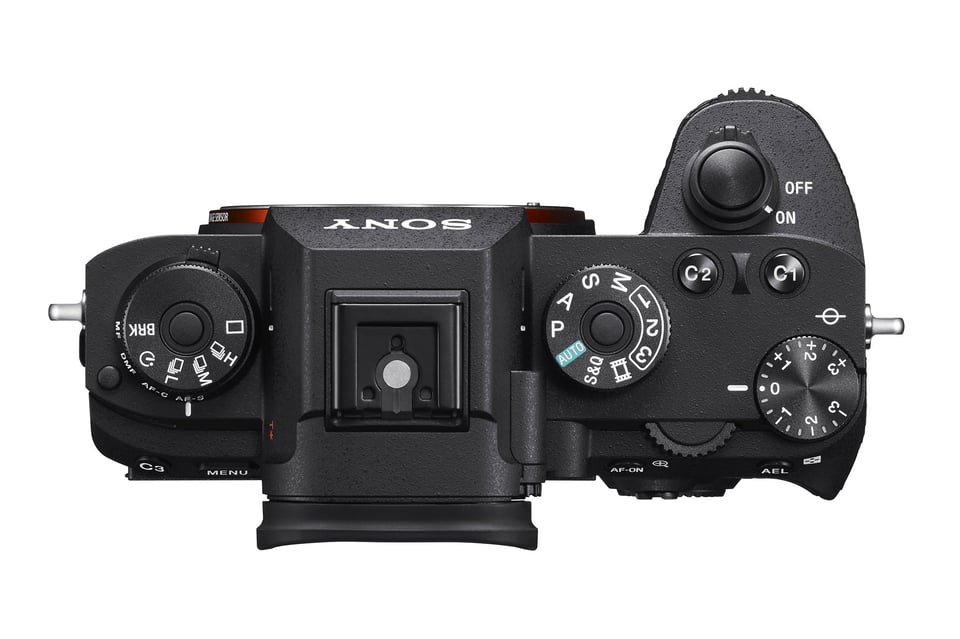
The upper-right surface of the A9 is like previous models, with a lockable mode dial (which has been simplified to only include essential options), a shutter release with an ON/OFF power collar, a dedicated exposure compensation dial, and a pair of custom buttons.
The camera mode dial is where you set the main camera operating modes. The options are as follows:
- P – Program
- A – Aperture Priority
- S – Shutter Priority
- M – Manual
- 1 – User Set
- 2 – User Set
- 3 – User Set
- Video
- S&Q – Slow Motion Recording
- Auto – Full Auto
Of these different modes, there are three which I find very useful: Manual, Aperture Priority, and Memory Recall (labeled as 1, 2 and 3). I usually work in Manual Mode as this gives me the most control over the camera settings. This mode is made a whole lot easier to use on a camera such as the A9 due to the beautiful electronic viewfinder which enables you to see the exposure in live time. The Memory Recall (MR) is a feature enables you to store specific camera settings for different situations and assign them to one of the three Memory Recall options on the dial. This is very useful for quickly changing the camera to specific pre-defined settings.
The second dial is the exposure compensation dial. This dial is used in conjunction with the Aperture Priority, Shutter Priority, or Program modes and allows you to adjust the exposure manually by dialing either a negative (darken) or a positive (brighten) value. You can go from -3 to +3 on the dial. The dial turns too easily and should have been given a locking feature. You should keep an eye on it to ensure that no unintended turns of the dial occur, especially when taking the camera out of the bag.
The C1 and C2 function buttons next to the mode dial are by default used for setting White Balance (C1) and Focus Area (C2). Since I mainly shoot in Manual Mode, I like to change C1 to ISO while I keep C2 on the default of Focus Area. Further down in the article, I will walk you through the process of customizing the different custom buttons on the A9.
Rear Buttons
The back of the A9 sees some welcome changes and additions. First, the Custom 3 button joins the Menu button on the left side to make room for a repositioned movie record button, which moves next to the EVF. The C3 button is programmable just like the other custom buttons, and by default is set to change the camera’s focus mode (AF-S, AF-A, AF-C, DMF and MF).
I dislike the automatic EVF/LCD switching on the Sony Alpha 9, as I find the sensor in charge of automatically switching between them too jumpy. The best solution is to have a directly accessed manual two-way (EVF/LCD) toggle button, and this is where the C3 button comes in. Later I will show you how to change this in the Custom Menu. The menu button right next to the C3 button is used for accessing the camera menu, and it is where you make changes to many of the camera settings.
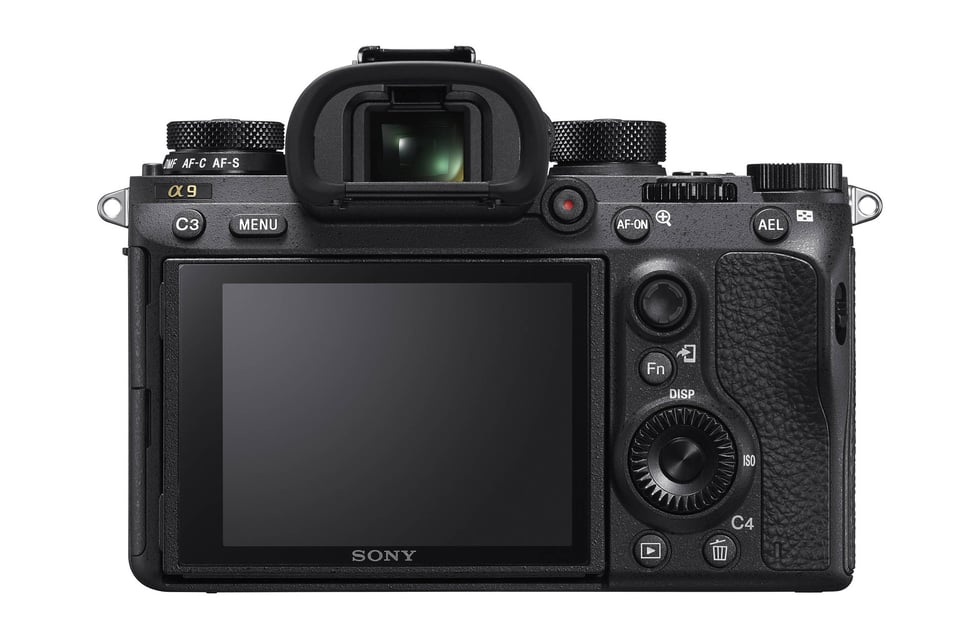
Sony has moved the video recording button, and it is now much more accessible while hand-holding the camera. This button shuffle also permits for more room on the right-hand side, where there are two very welcome additions of dedicated AF-ON and AEL buttons. The AF-ON button is an essential feature for photographers wishing to employ back-button focus techniques and I personally always set my cameras for back-button focusing. The AEL button is useful for locking exposure.
Below the AF-On button and to the right of the display is a new multi-selector joystick. The joystick grants immediate control over moving the cameras autofocus points. The new AF joystick replaces a great source of frustration on previous Sony mirrorless cameras and gone are the days of endless clicks and menu searches when trying to move an AF point.
Further below is a multi-functional selector wheel which allows for quick scrolling through menus, quick exposure changes, as well as access to specific functions by pressing each of the four corners. Pressing “DISP” switches between different views on the camera LCD; “ISO” allows changing camera ISO; pressing the left side allows access to camera drive modes, while the bottom part of the wheel is configurable.
There are two extra buttons beneath the multi-functional navigation dial in the form of the Playback and C4 / Trash buttons. Playback enables you to play back images on the LCD, and the C4 / Trash button can be used to delete unwanted images during playback. When the camera is not in Playback mode, the C4 serves as another programmable function button.
Fn/Function Button
The Fn (Function) button is a useful button that allows you to make quick changes to the most important camera settings, such as ISO, White Balance, Drive and Focus modes. You can modify and customize the function menu to your liking through the main menu, though I kept mine as-is.
The settings available in the Fn menu are as follows:
- Drive Mode: Due to the A9 having a dedicated Drive Mode Dial on the top left of the camera, the drive mode setting in the Fn menu is blacked out. If you wish to change the drive mode, you should turn the dial to the desired setting. Given that I mostly shoot wildlife, I usually have this set to either H (high) or M (medium).
- Focus Area: This mode allows you to select one of the different focus area types, such as Wide, Zone, Flexible Spot (small, medium, and large), along with Expanded Flexible Spot and Lock-On AF. The choice of which focus area to select depends on the subject. For tracking moving subjects, I found that Lock-On Focus works beautifully on the A9, but I also used Zone and different Flexible Spot variants while taking photos of still subjects such as landscapes.
- Exposure Compensation: 0.0, I generally use Manual Mode, so I don’t often need to use exposure compensation. If I am in Aperture Priority, I will use the dedicated exposure compensation dial.
- ISO: I tend to like selecting my ISO value, but you can also employ Sony’s excellent “ISO Auto” so that the camera automatically chooses the ISO for you. The “ISO Auto” feature works very well with the Sony and has all the advanced features available on Canon and Nikon DSLRs. I usually leave Minimum ISO at 100, while setting Maximum ISO to 6400. While you can only see the minimum and maximum ISO options within the ISO setting, you can also navigate to the camera menu and set the minimum shutter speed in ISO Auto mode (ISO AUTO Min. SS option in Exposure1 sub-menu).
- Metering Mode: Multi, but sometimes I use spot metering with more difficult subjects.
- Flash Mode: AutoFlash Comp: 0.0
- White Balance: AWB (Auto White Balance)
- Creative Style: Standard. Don’t bother with creative styles, as they are irrelevant when shooting in RAW.
- Quality: RAW
- Select Rec. Media: Slot 1. Since the A9 is equipped with two SD card slots, you can choose which SD card to write to by default.
- Shoot Mode: Manual
Camera Menu
Menu1 (Camera Icon 1)
Tab 1/13 Quality/Image Size1
- Image Quality – RAW
- RAW File Type – Compressed and Uncompressed. Unfortunately, Sony has yet to implement a “Lossless Compressed” option, so you will have to live with either losing some image quality in your RAW files by choosing “Compressed” or end up with huge files by choosing “Uncompressed RAW”. Personally, I like to shoot “Uncompressed”, as I want to make the maximize the quality of the files and ensure that I have the most latitude when I post-process. That said, there is a difference in the frame rate between the two options with the A9 capable of taking 20 FPS with “Compressed RAW” vs. 12 FPS with “Uncompressed RAW”. This is a big deal when shootings fact action or sports and in such situations I recommend going with “Compressed RAW”.
- JPEG Quality – Extra fine. Not relevant for RAW.
- JPEG Image Size – L:24M.
- Aspect Ratio – 3:2
- APS-C/Super 35mm – Leave on default of Auto.
- Long Exposure NR – OFF, greyed out in RAW
Tab 2/13 Quality/Image Size2
- High ISO NR – Default (-), grayed out in RAW
- Color Space – AdobeRGB. While color space does not matter for RAW files, I use AdobeRGB because it gives a more accurate histogram to determine the correct exposure (since the camera shows histogram based on camera-rendered JPEG image, even if you shoot exclusively in RAW).
- Lens Comp – Irrelevant when shooting RAW
- Shading Comp.: Auto
- Aber. Comp.: Auto
- Distortion Comp.: Off
Tab 3/13 Shoot Mode/Drive
- Self-timer Type – Self-Timer (Single)
- Bracket Settings –
- Bracket Type: Cont. Bracket
- Selftimer during Brkt: 2 Sec
- Bracket order: – -> 0 -> +
- Memory Recall – Only available when MR 1, MR2 or MR 3 mode is selected on the camera mode dial on top
- Memory – Allows quickly saving current settings to a memory bank. An excellent way to create different presets for different shooting conditions.
- Reg Cust Shoot Set –
- Recall Custom hold 1 through 3: On the a9, what allows one to activate any AF mode along with numerous different settings quickly is the ‘Recall Custom hold.’ This function instantly overrides your chosen camera settings, including Shoot Mode, Aperture, Shutter Speed, Drive Mode, Exposure Comp., ISO, Metering Mode, Focus Mode, Focus Area, and AF-On (whether or not to engage AF). You can choose to override or leave alone any parameter by checking or unchecking the box to the left of each of the settings. After you choose your parameters, you click on the “register” button at the bottom and create one of three potential recall options. This allows you to create three wholly unique recall options with different settings and assign each one to any number of buttons. You can read more about this feature in my Sony Alpha 9 review.
Tab 4/13 AF1
- Priority Set in AF-S – Balanced Emphasis
- Priority Set in AF-C – Balanced Emphasis
- Focus Area – Expanded Flexible Spot
- Wide – Camera chooses AF over all sensor
- Zone – Camera offers a cluster of focus points
- Center – Spot in Center of the Frame
- Flexible Spot (S,M,L) – Spot in Center of the Frame
- Expandable Flexible Spot
- Lock-on AF: Expand Flexible Spot Tracks Area Object Tracking
- Focus Settings – Allows moving and changing focus points
- V/H AF Area – AF Point + AF Area. This allows you to store focus points by orientation, a useful feature when switching from landscape to portrait mode.
- AF Illuminator: Auto
Tab 5/13 AF2
- Center Lock on AF – Off
- AF Track Sens – 3 (standard) If you are photographing faster moving subjects using Lock-On AF, I recommend setting to a faster setting like 4.
- AF System – Default
- AF w/ shutter – On or Off depending on if you employ Back Button Focus. If you want to use the back button focusing (AF-ON) as I do, set it to Off and use the AF-ON button on the back of the camera.
- Pre-AF – Off
- Eye-Start AF – Off
Tab 6/13 AF3
- AF Area Regist – Off – Allows you to save a focus point to a particular area of the frame
- Del. Reg. AF Area – Allows you to delete the registered AF point.
- AF Area Auto Clear – Off
- Disp. Cont. AF area – On
- AF Micro Adj – For calibrating a lens
Tab 7/13 Exposure1
- Exposure Comp. – 0.0
- Reset EV Comp. – Reset
- ISO – Your selected ISO value or ISO AUTO
- ISO Auto Min SS – Standard, but you can change it to “Fast” or “Faster”.
- Metering Mode – Multi or Center
- Spot Metering Point – Focus Point Link
Tab 8/13 Exposure Mode2
- Exposure step – 0.3EV
- AEL w/shutter – Auto
- Exposure Std. Adjust – Only use if you understand the function and it’s purpose
Tab 9/13 Flash
- Flash Mode – Flash Off
- Flash Comp. – 0.0
- Exp.comp.set – Ambient&Flash
- Red Eye Reduction – Off
Tab 10/13 Color/WB/Img. Processing
- White Balance – Auto or desired White Balance depending on the light.
- Priority Set in AWB – Standard
- DRO/Auto HDR – Off
- Creative Style – Standard or Neutral
- Picture Effect – Off, greyed out in RAW
Tab 11/13 Focus Assist1
- Focus Magnifier – Used for zooming in while focusing
- Focus Magnif. Time – No Limit
- Initial Focus Mag. – x4.7
- AF in Focus Mag – On
- MF Assist – On – a neat feature that automatically zooms in when you move the focus ring in manual focus mode. I set it to Off if I feel I can manual focus without any assisting.
- Peaking Level – Off
Tab 12/13 Focus Assist2
- Peaking Color – Red, but you can experiment with any color you feel best suits you.
Tab 13/13 Face Detection/Shoot Assist
- Face Detection – Off or On depending on if you will be taking photographs of people.
- Face Registration
Menu 2 (Camera Icon 2)
Tab 1/9 Movie1
- Exposure Mode – Aperture Priority, greyed out if not in Movie Mode
- Exposure Mode – Aperture Priority, greyed out if not in S&Q mode
- File Format – XAVC S 4K
- Record Setting: 24p 60m
- S&Q Settings –
Record Setting: 24p
Frame Rate: 120 fps - Dual Video REC – Off
Tab 2/9 Movie2
- AF Drive Speed – Normal
- AF Track Sens – Standard
- Auto Slow Shut.- On
- Audio Recording – On
- Audio Rec Level – 25 (change depending on needs)
- Audio Level Display – On
Tab 3/9 Movie 3
- Audio Out Timing – Live
- Wind Noise Reduct.- On
- Marker Display – Off
- Marker Settings – All Off
- Video Light Mode – Power Link
- Movie w/ shutter – Off
Tab 4/9 Shutter/Steady Shot
- Shutter Type – Electronic Shut. – Important: needs to be turned on to access most of the A9’s fast shooting features.
- e-Front Curtain Shut. – On.
- Release w/o Lens – Enable
- Release w/o Card – Disable
- SteadyShot – On
- SteadyShot Settings –
SteadyShot Adjust.: Auto
SteadyS. Focal Len.: – grayed out in Auto
Tab 5/9 Zoom
- Zoom – Default (-), grayed out in RAW
- Zoom Setting – Optical zoom only
- Zoom Ring Rotate: Default
Tab 6/9 Display/Auto Review1
- DISP Button –
- Monitor: “No Disp Info”, “Histogram”, “Level” and “For viewfinder” checked. Display All Info is too cluttered and Graphic Display occupies too much of the screen.
- Finder: “No Disp. Info”, “Histogram” and “Level” checked.
- FINDER/MONITOR – Monitor Manual – I am not a big fan of the Auto switching between the monitor and viewfinder. I set the C3 button to switch between them when it is clicked.
- Finder Frame Rate – Standard
- Zebra Setting – Off
- Grid Line – Rule of 3rds Grid
- Exposure Set. Guide – Off
Tab 7/9 Display/Auto Review2
- Live View Display – Setting Effect ON
- Shoot. Start Disp. – Off
- Shoot. Timing Disp. – On: Type 1
- Cont. Shoot. Length – Not Displayed
- Auto Review – Off
Tab 8/9 Custom Operation1
- Custom Key (Shoot.) –
- Control Wheel: Not set
- Custom Button 1: ISO, given that I use Manual Shooting Mode, I prefer to have quick access to the ISO setting
- Custom Button 2: Focus Area
- Custom Button 3: Finder/Monitor Sel.
- Custom Button 4: Not Set
- Multi-Slc Center Btn: Recall Custom hold 2 (I set Custom Hold 2 for birds-in-flight scenarios. To do this I set it to Manual Mode, 1/2000 of a second shutter speed, F/5.6, Auto ISO, Wide Focus Area. Everything else is left unchanged)
- Center Button: Recall Custom hold 3
- Left Button: Not Set
- Right Button: ISO
- Down Button: Not Set
- AEL Button: Recall Custom hold 1 (I set my Custom Hold 1 for panning and motion blur scenarios. To do this, I set it to Shutter Priority Mode, 1/25 of a second shutter speed, Auto ISO and my desired focus mode. Everything else is left unchanged).
- AF-ON Button: AF On
- Focus Hold Button: Focus Hold
- Custom Key (Video): The custom buttons can be set to behave different when recording videos on the camera. I personally don’t care for these, so I leave them at their default values
- Custom Key (PB): The custom buttons can be set to behave differently when playing back images on the camera. I personally don’t care for these, so I leave them at their default values
- Function Menu Set.: Default, this is what controls what the menu looks like when you press the “Fn” button on the back of the camera
- Dial Setup: This is to control what the dials do in Manual Mode. Front Dial SS (Shutter Speed) and Back Dial F/no. (Controls for aperture)
- Dial Ev Comp – Off
- MOVIE Button – Always
Tab 9/9 Custom Operation2
- Lock Operational Parts – Off
- Audio Signals – Off or All depending on your preference
Network1
Tab 1/3 Network1, Tab2/3 Network2 and Tab 3/3 Network3
Personally, I don’t care much for this menu as it deals with image transfer to your smartphone. To save battery I recommend turning Airplane Mode to “on”.
Playback1 (Play Icon)
Tab 1/3 Playback1, Tab 2/3 Playback2 and Tab 3/3 Playback3
- Display Rotation – Off
- Select PB Media – Slot 1 or 2, selects from which card slot to playback media.
Setup (Toolbox Icon)
Tab 1/7 Setup1
- Monitor Brightness – Manual
- Viewfinder Bright. – Auto
- Finder Color Temp. – 0
- Gamma Disp. Assist – Off
- Volume Settings – 5
- Delete confirm – “Cancel” first
Tab 2/7 Setup2
- Pwr Save Start Time -1 Min
- Auto Pwr OFF Temp. – Standard
- NTSC/PAL Selector: Don’t touch unless you know what you are doing
- Cleaning Mode – Cleans camera sensor
- Touch Operation: Off or On (change depending on your requirements)
- Demo Mode – Off, Greyed out
Tab 3/7 Setup3
- TC/UB Settings – Don’t touch unless you know what you are doing.
- Remote Control – Off
- HDMI Settings –
HDMI Resolution: Auto
24p/60p Output: 60p
HDMI Info. Display: On
TC Output: Off
REC Control: –
CTRL FOR HDMI: On - 4K Output Sel. – –
- USB Connection – Auto
- USB LUN Setting – Multi
Tab 4/7 Setup4
- USB Power Supply – On
- PC Remote Settings – PC Only
- Language – English
- Date/Time Setup – Set up Date/Time
- Area Setting – Set up Timezone
- Copyright Info – For adding copyright info metadata to images
Tab 5/7 Setup5
- Format- for formatting the SD memory card in one of the card slots
- File Number – Series
- Set File Name – DSC
- Select REC Media – Slot 1 or Slot 2
- Recording Mode – Standard
- Select REC Folder – Greyed out
Tab 6/7 Setup6
- New Folder – unimportant
- Folder Name – Standard Form
- Recover Image DB – unimportant
- Display Media Info. – Shows what’s on the card
- Version – Displays firmware version
Tab 7/7 Setup7
- IPTC Information – Skip This
- Setting Reset – will reset the camera settings or reinitialize the camera
My Menu (Star)
- If you have certain menu options that you access often, this is where you can add them. I put Focus Setting, Focus Area and AF System in here for good measure.
Conclusion
That covers all the most important camera settings you need to know in order to set your Sony A9 properly! If you have any questions about the suggestions above, feel free to ask in a comment below.
Hi, I have just moved over to Sony from Nikon where I have always been able to set my dual card slots to choose slot 1 for stills and slot 2 as an overflow for stills once card one is full. I have looked at the set up menu on the A9ii and cant see a way to do this. Can you please tell me if I’m missing something simple or do Sony cameras not allow this setting. TIA Bryan
I would like to set my A9 as follows with v6 firmware.
Eye AF without setting a custom button so it operates direct from the shutter button or the AF-On if it can do both.
The latest Real time tracking to be always on, so when the camera loses the eye because the model has turned her back on the camera, the camera will track the rear of her head as she walks away, then pick up the eye again when she turns to face the camera.
Is this possible, I find the Sony menus very complex so would appreciate a little help.
I believe the A9 has an AA filter installed, how much sharpness do you lose? Is it a problem?
Hi
In Manual mode can you set iso to auto and apply exposure compensation ?
This is how I normally shoot with Canon 1DX/5dmk4 etc.
Thanks
Yes.
Hello, You mentioned in your comments on ISO settings that the minimum SS can be set using the Exposure sub menu “ISO Auto Min.SS” however that option is “Greyed out” on my A9? I have the camera set in manual mode and ISO Auto min 100 and max 6400.
Hoping you can help please.
In manual mode “ISO Auto Min.SS” is meaningless as the camera does not adjust the shutter speed. Try A or P modes.
In my opinion the exposure compensation dial is too small, hard to rotate and the serrated edge is a painful to use. I tried to use that function assigned to the left push function in the back rotating wheel but again the wheel is also small and when rotating, the finger tends to slip. Also when using this function, an additional small orange area appears in the viewfinder indicating the compensation that I find annoying; the compensation bar also appears at the bottom and is all that is needed. Somehow Sony over-engineered the menu in a9 but forgot about ergonomics. Hope the next a9 grows in size if it really wants to become a full professional camera.
I am/was in the process of moving to Sony but recent experience with the AF system performance in tropical forest
environment was not to par with the Canon 1DxII. I will stop transition and see what Canon will offer in mirrorless cameras.
You mention the left arrow on the back right dial is by default to change the drive mode. I think you are referring to the a7 not the a9. On the a9 you can’t change the drive mode via a custom button as you can on the a7 you have to unfortunately change the physical dial each time. The only exception is you can change the drive mode momentarily via a custom shooting mode button but 1) that has the be held 2, a9 doesnt allow you to set the left, bottom, right or top of that dial to be a custom shooting hold button oddly. Hopefully a lot of that will be fixed in a future firmware update.
I find the hump on the left not very practical when I am shooting (when my eye is at EVF). I think the reason is the locking mechanisms.
Yes, as I stated in my review, the locking mechanism, which involves the use of two fingers, is too fiddly and involved for my taste. It makes quick adjustments more of a hassle than it needs to be.
Looks like there is nothing left for Sony to incorporate in their next alpha DSLR model !
Yes, in many ways the A9 encapsulates the best that Sony has to offer and that is what makes it such a wonderful camera. It would be nice to have the same specs in a DSLR-like body, such as the A99II, but I am unconvinced that Sony will ever go ahead and give the Sony A mount users the camera that they deserve for their Alpha lenses.