The Nikon D7500 is a complex camera with more than 100 menu options, and it isn’t easy to know how to set everything properly. This guide covers the most important settings and how to pick them for your own photography. Keep in mind that these are personal preferences, and you may end up setting some of them differently, but this is a good place to start. The information below should help you understand how to use the D7500 to its full potential if you are feeling confused about some of the settings and menus it has.
Table of Contents
Buttons and Dials
The Nikon D7500 has a number of buttons, switches, and dials that are worth learning before you dive into the menu. Ideally, you will only enter the menu on rare occasions, and you’ll set as much as possible via these external controls simply because it is faster.
D7500 Front
To start, let’s take a look at the front of the camera, where you’ll find a number of important settings: a dial at the top, two custom Fn1 and Fn2 buttons, a flash button, an autofocus vs manual focus switch, a button within that switch, a “BKT” button near the top, and an unlabeled button in the middle. You can see all those in the diagram below:
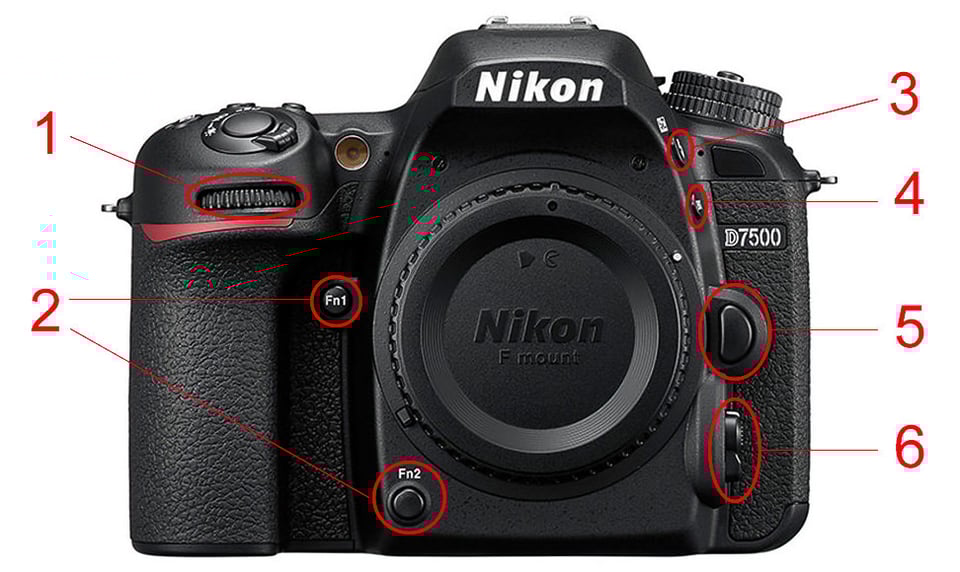
What do each of these settings do? I’ll cover each one briefly:
- The dial (called the “Sub Command Dial”) does a huge range of tasks, and it depends upon the mode you’re in and the buttons you’re pressing. Chances are good that you’ll be adjusting this a lot.
- The Fn1 and Fn2 buttons are completely programable. They also let you do a host of tasks, and I’ll cover all the options under the “Custom Setting Menu” section below.
- The flash button pops up the flash when you press it. (To put it down, you just push the popup flash itself.) Also, by holding this button and spinning the sub command dial on the front of the D7500, you can adjust your flash exposure compensation.
- The BKT button stands for “bracketing,” which means that a series of photos you take will be (intentionally) metered differently. People use this so they can automatically take a series of photos from dark to bright, either to combine into an HDR or make sure that they are capturing good exposures. Press this button and rotate the command dials to change your bracketing settings. Personally, I leave this turned off; I typically adjust exposures manually if I need to bracket a series of shots. But if you do a lot of bracketing, you might find it useful.
- The large, unlabeled button is what you use to switch lenses. Press this button and turn the lens to the left (looking down on it) to remove.
- The autofocus vs manual focus switch does exactly what it sounds: It’s a way to switch from one to the other on your camera. There’s usually no reason to switch this to manual focus, since you can do the same thing on most lenses – but if you prefer to switch via the camera itself, there’s nothing wrong with that. Also, the button within the AF-M switch is an important one. By pressing this button and rotating one of the two dials on the D7500, you can switch between different autofocus modes. This is a very common adjustment to make. (We have a whole article explaining autofocus modes and the best ones to use.)
D7500 Back
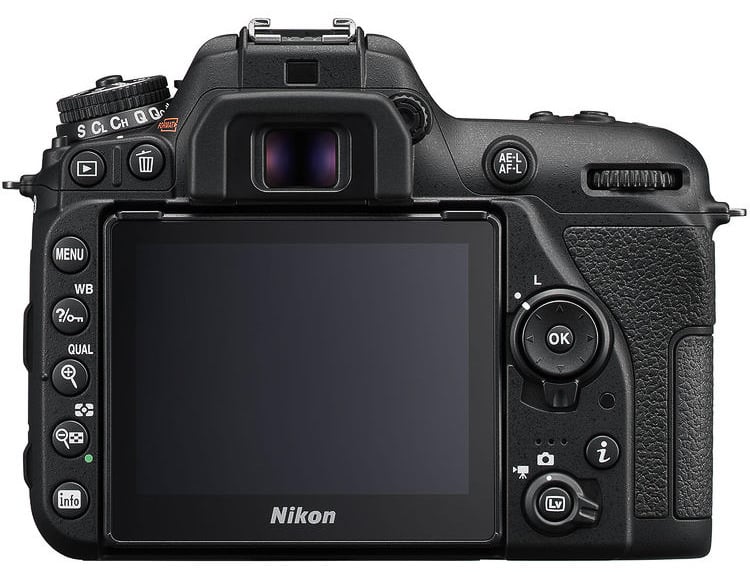
You’ll find most of the D7500’s main buttons and options on the back. Many of these are intuitive, and you can find the answers in the Nikon D7500 manual if you are unsure what each one does. Still, I will cover the most important of these below:
- The AE-L AF-L button at the top is another one you can program to do several tasks. By default, it locks the exposure while you hold it down. However, I strongly recommend assigning this to AF-ON in the menu (which I’ll cover later in the “Custom Setting Menu” section).
- The direction pad with OK in the middle is how you’ll select everything from menu options to focus points. You often can click the right-hand arrow rather than the OK button itself to select something, which is highly useful if you are wearing gloves.
- The switch around the direction pad, which goes between “L” and “•,” will lock your autofocus point in place so that you don’t accidentally move it. This can be useful in certain conditions, but it’s also the first setting you should look at if your autofocus refuses to move!
- The dial on the back is called the “Main Command Dial.” It’s extremely useful, since you’ll spin it to adjust nearly every setting on the D7500. Often, you’ll press down a button on the camera and spin this dial to change something quickly rather than resorting to a menu.
- The LV button at the bottom opens live view, which switches from the viewfinder to showing everything on the camera’s rear LCD screen. The benefit of live view is that you have a better idea of what your sensor is seeing, but the downside is that it takes up more battery and makes autofocus slower. I tend to use live view for landscape photography, and I use the viewfinder for things like wildlife and portraits.
- The switch around the LV button changes you from stills to video mode. It only impacts things when you’re in live view; you can’t film video while looking through the D7500’s viewfinder.
- The button on the bottom left with the green dot next to it, right above the “info” button, is useful if you want to change metering modes – though, personally, I rarely use this, since I stick to matrix metering most of the time.
- The “i” button pulls up different menus whether you are in video live view, photo live view, or the viewfinder. It is just a small menu to do brief tasks; for example, in the viewfinder, it simply pops up your seven most recent menu settings. I typically do not press the “i” button while taking pictures, but this is a personal preference.
- The magnifying glass buttons will magnify your live view screen or zoom in on images you’ve already taken.
All the other buttons are self explanatory or less important day to day. If you need additional info, you can find it all in your D7500’s user manual. At this point, it’s time to look at the buttons on the top.
D7500 Top
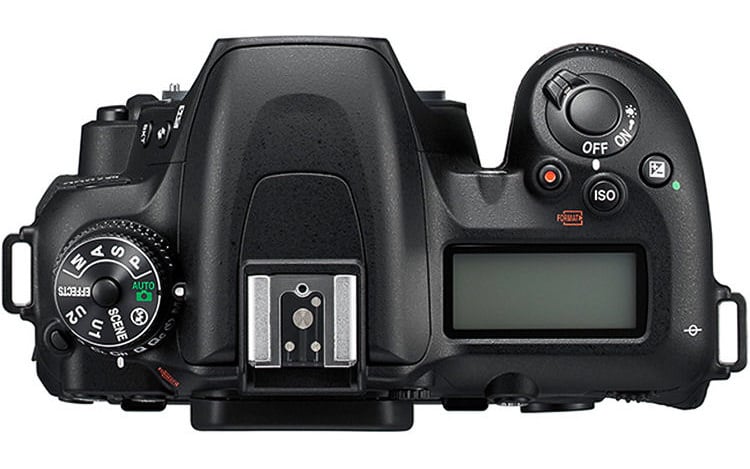
On the left-hand side, you can see clearly that the D7500 has a double-layered dial. To rotate the top dial, press down on the center button. To rotate the bottom dial, press down on the button to the side of it. On the right-hand side of the D7500, you’ll also find a number of useful buttons for day-to-day photography. I’ll cover all those here.
- The shutter button is what you press to take a photo. Half-press to wake up your camera’s meter, as well as activate vibration reduction. Also, by default, half-pressing will autofocus, although I recommend turning this off, since there are situations where it isn’t ideal to have autofocus coupled to the button that takes a photo.
- The switch around the shutter button turns the D7500 on and off.
- The +/- button with the green dot nearby will adjust your exposure compensation. Press it down and spin the main command dial. This is a very important way to help avoid overexposure or underexposure in your images.
- The ISO button adjusts your ISO when you hold it down and spin the main command dial. Also, hold it down and spin the sub command dial to turn Auto ISO on and off.
- The button with the red dot will start recording video when you’re in live view video mode. It also can be programmed to perform a few other functions in photo mode if you so choose.
- The top dial on the left is how you change between your various camera modes. You’ll end up doing this a lot, especially if you use the power of U1 and U2 modes (more on that below). For advanced photography, you’ll likely stick to the A, M, U1, and U2 modes.
- The lower dial on the left lets you change the camera’s firing behavior. It includes things like switching from single-shot to continuous-shot modes (where the camera just takes one photo if you press the shutter button, or it takes a burst as you hold it down). This also is where you’ll go if you want to use the D7500’s quiet shutter mode, self-timer, or electronic front curtain shutter (via mirror lockup mode).
Next, I’ll cover the menu settings that you will find most useful on the D7500, starting from the top of the menu (the Playback options) to the bottom. Note that you also can press the “?” key on the back of the D7500 to learn more about certain settings in your menu, although this isn’t available for all of them.
Most of these are personal preferences, and you can leave most of them at their defaults. However, there are a few playback settings that can make a big difference, so I will cover those here:
- Playback display options
- Focus point: Not checked
- None (image only): Checked
- Highlights: Checked
- RGB histogram: Checked
- Shooting data: Not checked
- Overview: Checked
- Image review: ON (this determines whether or not your photo pops up immediately after you take it)
- After delete: Show next
- Auto image rotation: ON
- Rotate tall: OFF
Those are all the playback settings that matter most, or aren’t one-time things (like creating a slide show). The “Payback display options” are useful, because they enable you to scroll through a few different pieces of information about a photo when you review it and press Up on the direction pad. However, the two settings that I consider most important are Auto image rotation and Rotate tall. The first is important to keep ON so that your post-processing software knows to flip vertical photos to the proper orientation. The second is useful when turned OFF so that you can review vertical photos more easily, where they take up the entire LCD rather than flipping and appearing quite small.
Next up is the Photo Shooting Menu, which has several options. First, I’ll list the settings I use, and then I’ll explain some of the more important or confusing ones afterward:
- Reset photo shooting menu: —
- Reset photo shooting menu: —
- Storage folder: default, don’t change
- File naming: DSC (default), don’t change
- Flash control
- Flash control mode (built-in): TTL
- Wireless flash options: Off
- Choose image area
- DX (24×16), not 1.3x (18×12)
- Image quality: NEF (RAW)
- Image size: grayed out
- NEF (RAW) recording
- Type: Lossless compressed
- NEF (RAW) bit depth: 14-bit
- ISO sensitivity settings
- ISO sensitivity: 100
- Auto ISO sensitivity control: ON
- Maximum sensitivity: 3200
- Maximum sensitivity with flash: 3200
- Minimum shutter speed: Auto -> Center option
- White balance: AUTO (AUTO1 Normal)
- Set Picture Control: SD (Standard), Default values
- Manage Picture Control: —
- Color space: Adobe RGB
- Active D-Lighting: OFF
- Long Exposure NR: OFF
- High ISO NR: OFF
- Vignette control: OFF
- Auto distortion control: OFF
- Flicker reduction
- Flicker reduction setting: OFF
- Flicker reduction indicator: ON
- Remote control mode (ML-L3)
- Remote mirror-up
- Auto bracketing set: AE & flash bracketing
- Multiple exposure: OFF
- HDR (high dynamic range): OFF (grayed out)
- Interval timer shooting: OFF
That’s a decent number of options, but the good news is that you will not change most of these very often at all.
You will almost certainly want to shoot your photos in RAW for most situations (see RAW vs JPEG), which renders many of the other settings irrelevant, since they are specific to JPEG (see “Which Camera Settings Affect RAW Photos?”). One that I will mention briefly is color space, which I have set to Adobe RGB, even though it is also a JPEG-only camera setting. The reason is that setting Adobe RGB can make the preview on the back of your camera slightly more accurate, since that preview is indeed based upon a JPEG (same goes with the Picture Control settings, and many of the others).
On occasion, I will enable “Long Exposure Noise Reduction” if I am taking a picture in the range of 20-30 seconds and I am particularly worried about the digital noise my sensor might generate during that time. However, this will double the length of time it takes to capture a photo, since the camera takes two images in succession. If I have the time, that’s fine, but I leave it off by default because of the extra time it takes.
The last setting I’ll mention is something I change quite frequently, and that is “ISO Sensitivity Settings.” For handheld photos of nonmoving subjects, I leave this at the settings listed above. By setting the minimum shutter speed to “Auto,” and keeping it at the center, the D7500 will automatically avoid using shutter speeds longer than 1/(twice the focal length). So, if I have a 20mm lens on the D7500, the Auto ISO function will not use a longer shutter speed than 1/40 second unless the ISO reaches above 3200. However, it is important to note that you may need to change this to be faster – biased toward the fastest possible setting, or manually selecting the longest shutter speed you allow – if you are shooting something like sports or action. And, for images on a tripod, I always leave Auto ISO turned off and select my ISO (usually base ISO 100) manually.
Because of the importance of the ISO Sensitivity Settings option, I chose to put this as the top item in My Menu, and (as I’ll cover later) I also set one of the Custom Function buttons on the front of the D7500 to access the top item in My Menu. So, I can change these ISO settings very quickly rather than hunting back through the menu to find them each time.
Some of Nikon’s cameras group the movie-related settings under the photo shooting menu, but the D7500 has a separate set of options for this purpose. I will cover those here as well.
- Reset movie shooting menu: —
- File naming: DSC (default, unchanged)
- Choose image area: grayed out because I’m shooting 4K videos, but left at DX when I shoot 1080p videos.
- Frame size/frame rate: 3840×2160; 24p
- Movie quality: grayed out because I’m shooting 4K videos, but left at HIGH when I shoot 1080p videos
- Movie file type: MOV
- ISO sensitivity settings
- Maximum sensitivity: 3200
- Auto ISO control (mode M): OFF
- ISO sensitivity (mode M): 100 in good light, but changes frequently via the ISO button on the camera
- White balance: Same as photo settings (AUTO1)
- Set picture control: Usually, “same as photo settings,” but FLAT if I plan to do a lot of editing to the video
- Manage picture control: —
- Active D-Lighting: Greyed out, but off
- High ISO noise reduction: Low
- Flicker reduction: Auto
- Microphone sensitivity: Manual sensitivity > 10
- Frequency response: Wide range
- Wind noise reduction: OFF
- Electronic VR: grayed out because I’m shooting 4K videos, but left OFF when I shoot 1080p videos
- Time-lapse move: OFF
Most of these settings are simply the default values. When you shoot at 4K resolution, a few options will be grayed out. You might want to shoot at 1080p or lower due to an increased frame rate (60 fps) or to save space.
As for ISO sensitivity settings, I leave them so that auto ISO will be off by default in manual mode, and I will set the ISO manually. However, this can be useful to keep on if you are working quickly in lower light conditions, and you don’t want to spend the time to find the right ISO setting manually.
Next up is the custom setting menu (the pencil icon) which covers everything from autofocus settings to button assignments. This is an important section of the menu, and it’s where you’ll be most likely to change things from their default values.
- Autofocus
- AF-C priority selection: Release
- AF-S priority selection: Release
- Focus tracking with lock-on: AF 3 (Normal)
- Number of focus points: 51 points
- Store points by orientation: OFF
- AF activation: AF-ON only
- Focus point wrap-around: OFF
- Focus point options
- Focus point illumination: ON
- Manual focus mode: ON
- Built-in AF-assist illuminator: OFF
- Metering/exposure
- ISO sensitivity step value: 1/3
- EV steps for exposure cntrl: 1/3
- Easy exposure compensation: OFF
- Matrix metering: Face detection on
- Center-weighted area: 8mm
- Fine-tune optimal exposure: —
- Timers/AE lock
- Shutter-release button AE-L: OFF
- Standby timer: 30s
- Self-timer
- Self-timer delay: 5s
- Number of shots: 1
- Interval between shots: 0.5s
- Monitor off delay: 1m, 1m, 5m, 20s, 5m
- Remote on duration (ML-L3): 5m
- Shooting/display
- CL mode shooting speed: 3 fps
- Max. continuous release: 100
- Exposure delay mode: OFF
- Electronic front-curtain shutter: ON (although it doesn’t do anything different unless you’re in mirror up, “Mup,” on the release mode dial)
- File number sequence: ON
- Viewfinder grid display: ON
- ISO display: ON
- LCD illumination: OFF
- Flash sync speed: 1/250
- Flash shutter speed: 1/60
- Exposure comp. for flash: Entire frame
- Auto flash ISO sensitivity control: Subject only
- Bracketing order: MTR > under > over
- Controls
- Custom control assignment
- Fn1: Access top item in MY MENU
- Fn2: MY MENU
- AE-L/AF-L: AF-ON
- Fn1 and command dial: OFF
- Fn2 and command dial: OFF
- AE-L/AF-L and command dial: OFF
- BKT and command dial: OFF
- Move record button and command dial: OFF
- OK button
- Shooting mode: RESET – Select center focus point
- Playback mode: Zoom on/off > 1:1 (100%)
- Live view: RESET – Select center focus point
- Customize command dials
- Reverse rotation
- Exposure compensation: unchecked
- Shutter speed/aperture: checked
- Change main/sub
- Exposure setting: ON
- Autofocus setting: OFF
- Menus and playback: ON
- Sub-dial frame advance: 50 frames
- Reverse rotation
- Release button to use dial: OFF
- Reverse indicators: Bottom option, with negative values on the left and positive on the right
- Custom control assignment
- Movie
- Custom control assignment
- Fn1: Power aperture (open)
- Fn2: Power aperture (close)
- AE-L/AF-L: AF-ON
- Shutter-release button: Take photos
- Custom control assignment
That is a huge number of options, so I will not go over everything individually, but it’s safe to say that you also have a lot of individual choice for these things, and some (say, “Monitor off delay,” which simply determines how long your camera waits before turning off the LCD) are entirely personal preference. However, there are a couple things I’ll mention because they are relevant for many photographers, or they are particularly important options.
First, I strongly encourage you to switch “AF activation” (under “Autofocus”) to be AF-ON only, and then switch AE-L/AF-L (under “controls”) to AF-ON. This decouples your autofocus from the shutter button, meaning that your D7500 doesn’t refocus every time you take a photo (given that autofocus is on). Once a photographer tries AF-ON, also known as back button focusing, they rarely go back!
Aside from that, I’ve found it useful to assign Fn1 and Fn2 to access the MY MENU options, since it provides a huge amount of flexibility. Just by pressing one button, you can immediately access the top item in a custom menu you create, or access that broader menu as a whole. This speeds up certain tasks in the field significantly, although you do need to put in some effort and create your MY MENU manually.
Personally, I set AF-C and AF-S (the first two options in “Autofocus”) both to be release priority. The benefit here is that the camera takes a photo every time I press the shutter button rather than only when my subject is in focus and I’ve pressed the button. Some people prefer to set one or both of these to be focus priority, which works, but be aware that your camera may not take photos when you press the shutter button under this setting, simply because it thinks your subject is out of focus.
One setting that I leave OFF above, but which can be useful for landscape photography, is Exposure Delay Mode (under Shooting/display). In this case, the D7500 will raise its mirror, wait the specified amount of time, and then take a photo, minimizing blur from mirror slap. However, because this adds a 1-3 second delay to each photo, I only recommend it when you are photographing something from a tripod.
If you have any specific questions about the other settings, feel free to ask in the comments, since there simply are too many to explain them all in detail here.
This one is generally not something you will touch after setting things for the first time, such as date and time. However, there still are a few settings within the setup menu that are worth covering, and I’ll go into them here. Note that I skip some settings simply because they require a high degree of personalization (such as language or copyright notice).
- Format memory card: Only click “YES” when you are fine with all the photos on your memory card being deleted (or that is your goal). This is irreversible, but it is good to do when you switch the memory card into the D7500 from another camera, or you’ve finished offloading all your images onto the computer and you want a clear card.
- Save user settings: This is a very useful option that will save all your current settings – including things like PASM mode, shutter speed, RAW settings, focus settings, and so on – to the U1 or U2 options on the top Mode Dial. For example, you may want to save your go-to family snapshot settings to U1 and your tripod-based landscape settings to U2 to switch between them easily.
- Reset user settings: —
- Monitor brightness: 0
- Monitor color balance: —
- Information display: Manual > Dark on light
- Auto info display: OFF
- Info display auto off: OFF
- AF- fine-tune: Varies by lens, requires advanced tests to determine ideal values
- Clean image sensor: Clean at startup/shutdown
- Lock mirror up for cleaning: — (grayed out when you don’t have enough battery life)
- Image Dust Off ref photo: —
- Image comment: OFF
- Beep options: OFF
- Touch controls: I turn them OFF, since I often trigger them inadvertently and prefer buttons I can feel, but many photographers will keep them ON.
- Flash warning: OFF
- HDMI
- Output resolution: Auto
- Advanced: Defaults
- Airplane mode: OFF
- Slot empty release lock: LOCK – Release locked
Conclusion
That covers everything! Again, all of these are the settings I personally use, but that does not mean you need to use the exact same ones. Cameras have such a huge number of options for a reason: Not all photographers have the same preferences, or are photographing similar subjects. So, if you have any questions about how to set the D7500 properly, or why I recommended certain settings rather than others, feel free to leave a comment and ask below.
Spencer, Thanks for all the intel. It has been a while since I took a lot of photos on my FM 2. Now the D 7500 is a challenge. What settings would you use to shoot the comet now visible just after sun set? Yes, I have a tripod.
Thanks
Thank you , had to setup after firmware update . Only a few setings different to my choices so it saved me much time .
Good day Spencer. Thx for the valuable info. I bought a D7500 after my D90 broke. I love nature,bird and landscape photography as a hobby. I have a problem with birds however. After picture is taken and i zoom in on qual button i detect loss of detail. Can you help plz
Thanks for this detailed information Spencer much appreciated
It is now May 2022 and all the steps you mentioned are exactly the same in the menu,
Just upgraded after having a D3300 for 4.5 years which i found to be an excellent entry level camera. I mostly do birds/wildlife so may change a few settings as i learn about the D7500
I live in Brisbane Australia which is probably not all that well known in world terms.
However Brisbane has been granted the 2032 Summer Olympics & Paralympics so that may change in the future
Will change to back button focus or at least give it a good trial
Would you recommend the same settings if you were only shooting in jpg? Especially regarding Active D-Lighting, Long Exposure NR, High ISO NR,Vignette control, Auto distortion control, Flicker reduction .etc
Spencer it is quite confusing for new users to use the autofocus by pressing the AE-L/AF-L button. Please dont suggest that. Thats the reason why most of them are not able to achieve autofocus.
I tried it but I can’t figure out how to lock exposure now, which I find quite useful. Any tips?
Even after reset in menu
what is the meaning of the hand symbol on the screen in nikonD7500?
How to clear that one from screen.
Thanks in advance.
The icon is explained in the D7500 User’s Manual: Using the Touch Screen, Touch Photography (Touch Shutter).
See also Nikon Digitutor, D7500, Camera Functions, Touch shutter:
imaging.nikon.com/suppo…utter.html
Hand Symbol indicates that your VR is on. On a non VR lens you dont have this symbol.
hey…good article, thanks!
I’m going to buy Nikon AF-S NIKKOR 24-120mm f/4G ED VR Lens for this camera, what is your advise? what do you think about this len?
Thanks!
See Nikon 24-120mm f/4G VR by Nasim Mansurov:
photographylife.com/revie…0mm-f4g-vr
Buy the Nikon AF-S 16-80 mm f2.8, this will equate to a 24-120 mm in a dx format!
I’ve set up my D7500 according to the recommendations here. I’m curious about the relationship between the auto ISO and shutter speed. In an indoor situation, I chose f/8. My other readings are ISO 2000, and 1/30 second. Does that seem correct? Seems like I can’t hand hold that? Thanks, John.