While reviewing the Canon 7D Mark II, I had to borrow the Nikon D7100 to compare image quality and other camera features. So, I thought doing an article on the recommended settings for the D7100 would be useful to our readers. Although the Nikon D7100 is not a direct competitor to the 7D Mark II (that’s more of the Nikon D500’s role), it is still a solid camera that is used for a variety of different needs by many photographers. And despite its crippled buffer capacity, the D7100 is often used for both wildlife and sports photography needs.
Since the camera is rather sophisticated in terms of its capabilities and features, with many different menu and settings, it can look rather overwhelming for a beginner. In this article, I want to provide some information on what I personally use and shortly explain what some of the important settings do.
Please do keep in mind that while these camera settings work for me, it does not mean that everyone else should be shooting with exactly the same settings. The below information is provided as a guide for those who just want to get started with a basic understanding of the camera and its many features.

Before going into the camera menu, let’s first get started on the exterior controls. The Nikon D7100 has a lot of menu options, but there are some things that you can only control with external controls.
Autofocus Modes, Bracketing and Flash
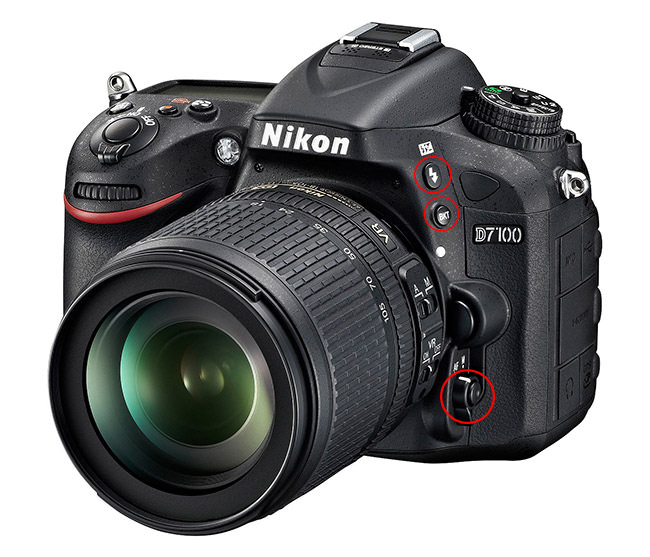
On the front left of the camera, you will find a lever that goes from AF to M, with a button in the middle (big red circle in the image below). Make sure to keep that lever on “AF”, or your lens will not autofocus. If for some reason your lens stops focusing, this is what need to check first. Pressing the button in the middle of the lever allows to choose between different focus modes.
To activate this change, you need to press and hold the button, then rotate the rear dial with your thumb. As you do this, look at the top LCD and the camera will switch between AF-A, AF-S and AF-C. I won’t go into too much detail about each focus mode, since it is all explained in detail in this article that I wrote a while ago. Here is a quick recap:
- AF-S – this mode is called “Single-servo AF” and it is used only for stationary subjects that do not move. When you half-press the shutter button, autofocus lock on the subject and if the subject moves, the focus will not change, resulting in a blurry picture. Only use this mode for photographing stationary subjects (landscapes, architecture, etc).
- AF-C – known as “Continuous-servo AF” in Nikon’s lingo, this setting is used for photographing moving subjects. When you half-press the shutter button and your subject moves, the camera will re-acquire focus. I usually keep my camera in AF-C autofocus mode when photographing people, especially my kids running around.
- AF-A – this mode is only present on lower-end cameras to make it easier for beginners. Basically, it is a combination of the above two modes in one setting. The camera evaluates the subject/scene and automatically switches between the above two modes depending on what you are photographing.
If you don’t know where to start, keep the setting on AF-A, which will let the camera decide on how to focus in different situations.
Now if you rotate the front dial with your index finger while holding the same button, you will get many different options like “S”, “D 9”, “D 21”, “D 51”, “3D” and “Auto”. These settings are there for controlling the focus points that you see inside the viewfinder. Once again, most of these are already explained in detail in my autofocus modes explained article, so I won’t go into too much detail here. If you don’t know where to start, keep it on “S” (Single), which lets you choose one single focus point that the camera will use for focusing. Let’s move on to other external controls.
Right above the AF / M lever, you will find two additional buttons: the Flash button, which allows you to fine-tune flash compensation and set other flash parameters like front/rear flash sync, and the BKT (Bracketing) button to set up bracketing on the camera. Flash settings don’t really matter, but for now just make sure that everything is turned off and shows “0.0” when you press and hold it. Similarly, make sure that bracketing is also turned off by holding the button and checking the rear LCD. It should show “0F” on the left side, which means that bracketing is turned off (the “BKT” letters should also disappear). Using the front dial will allow changing bracketing steps and the rear dial will change the number of frames shot in a bracketing sequence. The D7100 allows bracketing up to 5 frames and up to 3 stops (EV) apart.
Shooting Mode and Camera Mode Dials
On the top left side of the camera you will find a double dial – the top portion allows switching between different camera modes (often referred to as the “PASM” dial), while the bottom part allows switching between different shooting modes. I have my top dial set to “A” (Aperture Priority Mode) 90% of the time, because the camera does a great job in giving me good exposures. Once you get to know the camera better, I would recommend to explore the “U1” / “U2” settings (more on this below under Setup Menu), because they could save you time when switching between different shooting environments (say when switching between photographing landscapes to running kids).

The lower dial has a bunch of shooting modes like “S” (Single), “Cl, Ch” (Continuous low and Continuous High), “Q” (Quiet), “Qc” (Quiet Continuous), Timer and Mup (Mirror lock-up). Mine is usually set to “S” which only fires a single shot when I press the shutter release button. If I want the camera to fire multiple shots when shooting action, I switch to “Ch”. I rarely use other settings, but those can be useful as well, particularly the timer feature that I use when shooting landscapes to reduce vibrations (more on this below).
Aside from the above, don’t worry about any other buttons on the camera. Now let’s move to the camera settings menu.
Playback Menu
I rarely ever touch anything in the Playback menu, since that’s only used for displaying pictures on the rear LCD. The only two settings that I ever mess with are “Playback display options” and “Rotate tall”. The “Playback display options” can be useful when reviewing images. When you press the playback button on the back of the camera, you can press up/down buttons and you will be able to see different types of information. To keep the clutter out, I have three things turned on: “Focus point”, which allows me to see where I focused, “Highlights” to show overexposure in shots (a.k.a. “blinkies”) and “Overview”, which gives me a summary of my exposure (shutter speed, aperture, ISO, focal length, etc). I always turn the “Rotate tall” setting off, because I do not want my camera to change vertical images to horizontal when I review them – it is much easier to rotate the camera to see a vertical image, rather than having to zoom in every single time. Now there is another setting that you do want to keep and it is in the Setup Menu: it is called “Auto image rotation”. That particular feature is what writes the correct orientation into each image, so that when you import the photo into Lightroom or other post-processing software, it will automatically rotate it. If you disable this feature, you will have to rotate each image manually after import.
Everything else is default in the Playback Menu.
Photo Shooting Menu
Let’s now go through the Photo Shooting Menu, which is the first place that I usually go to when checking my settings. I will first provide my values, then talk about the important settings:
- Reset photo shooting menu: —
- Storage folder: default, don’t change
- File naming: DSC (default), don’t change
- Role played by card in Slot 2: Overflow
- Image quality: NEF (RAW)
- Image size: grayed out
- Image area
- DX (24×16): default, don’t change
- 1.3x (18×12)
- JPEG compression: Optimal quality
- NEF (RAW) recording:
- Type: Lossless compressed
- NEF (RAW) bit depth: 14-bit
- White balance: AUTO (AUTO1 Normal)
- Set Picture Control: SD (Standard), Default values
- Manage Picture Control: —
- Color space: Adobe RGB
- Active D-Lighting: OFF
- HDR (high dynamic range): OFF (grayed out)
- Auto distortion control: OFF
- Long Exposure NR: OFF
- High ISO NR: OFF
- ISO sensitivity settings
- ISO sensitivity: 100
- Auto ISO sensitivity control: ON
- Maximum sensitivity: 3200
- Minimum shutter speed: Auto -> Middle of the scale
- Remote control mode (ML-L3): 2s
- Multiple exposure: OFF
- Interval timer shooting: OFF
- Movie settings
- Frame size/frame rate: 1920×1080; 24p
- Movie quality: HIGH
- Microphone: Manual sensitivity 10
- Destination: Slot 1
While there are a lot of different settings here, do not worry – you won’t be changing many settings very often. Let’s go through some of the important settings. The first one is “Role played by card in Slot 2”, which allows you to choose what you want to do with the dual card slots of your camera. If you shoot with multiple cards, you can set the camera to save images in three different ways. You can set it to “Overflow”, which basically saves images to the first card, then when the space runs out, the camera starts saving to the second card. I usually set mine to Overflow, unless I am working on something really important and need to backup images. And speaking of backup/redundancy, that’s what you use the second setting “Backup” for. Once selected, the camera will save photos to both memory cards at the same time. The last setting allows you to save RAW files to one card and JPEG files to another. For your day to day shooting, just leave it on “Overflow” and if you really need to make sure that your photos are not lost if one of the cards fails, then choose “Backup”.
“Image quality” is obviously set to RAW, since I only shoot RAW. “NEF (RAW) recording” is always set on mine to 14-bit Lossless compressed. I want the best image quality the camera can provide. “White Balance” is Auto and all other settings like Picture Controls, Active D-Lighting, HDR, etc. are turned off, since none of them (with the exception of “Long Exposure NR”) affect RAW images. Remember, RAW files contain non-manipulated data and require post-processing, so the above settings only impact two things: images displayed by your camera’s LCD screen (each RAW file contains a full-size JPEG image, which is what is used to display images) and if you use Nikon’s proprietary software like Capture NX, those settings can be applied to RAW images automatically. Since I use Lightroom to store and process my images, the second part does not apply to me. And I also do not care much about how images are displayed on the camera’s LCD, so I leave everything turned off.
Although color space does not matter for RAW files, I now use AdobeRGB because it gives a slightly more accurate histogram to determine the correct exposure (since the camera shows histogram based on camera-rendered JPEG image, even if you shoot exclusively in RAW).
The big menu setting that I frequently change is “ISO sensitivity settings”. Most of the time, I use Auto ISO, because it is a great feature that saves me a lot of time. Instead of specifying ISO for every shot, I just have it set on Auto, with its base ISO set to 100, Maximum sensitivity set to 3200 (my personal limit for “acceptable” noise levels) and Minimum shutter speed set to “Auto”, which automatically changes the minimum shutter speed to match the focal length I am using. When using an image stabilized (VR) lens, I might lower the “Auto” minimum shutter speed to “Slower” and if I shoot with a prime lens and want to have faster shutter speeds (say when photographing wildlife), I move the slider towards “Faster”. When photographing landscapes or architecture with the camera mounted on a tripod, I turn Auto ISO off and use ISO 100 for the highest dynamic range and lowest noise levels. By the way, you can easily turn Auto ISO on and off by holding the ISO button on the back of the camera, then rotating the front dial.
Custom Setting Menu
This is where a lot of people get lost, since there are so many different settings. Here are the settings that I personally use:
- Autofocus
- AF-C priority selection: Release
- AF-S priority selection: Focus
- Focus tracking with lock-on: AF 3 (Normal)
- AF point illumination: Auto
- Focus point wrap-around: OFF
- Number of focus points: AF51
- Built-in AF-assist illuminator: ON
- Metering/exposure
- ISO sensitivity step value: 1/3
- EV steps for exposure cntrl: 1/3
- Easy exposure compensation: OFF
- Center-weighted area: 8mm
- Fine-tune optimal exposure: —
- Timers/AE lock
- Shutter-release button AE-L: OFF
- Standby timer: 6s
- Self-timer
- Self-timer delay: 5s
- Number of shots: 1
- Interval between shots: 0.5s
- Monitor off delay: 10s, 1m, 10s, 4s, 10m
- Remote on duration (ML-L3): 1m
- Shooting/display
- Beep
- Volume: OFF
- Pitch: Low
- Viewfinder grid display: ON
- ISO display and adjustment: OFF
- Screen tips: ON
- CL mode shooting speed: 3 fps
- Max. continuous release: 100
- File number sequence: ON
- Information display: AUTO
- LCD illumination: OFF
- Exposure delay mode: OFF
- Flash warning: OFF
- MB-D15 battery type: LR6
- Battery order: MB-D15
- Beep
- Bracketing/flash
- Flash sync speed: 1/320 (Auto FP)
- Flash shutter speed: 1/60
- Flash cntrl for built-in flash: TTL
- Exposure comp. for flash: Entire frame
- Modeling flash: ON
- Auto bracketing set: AE & flash
- Bracketing order: Under > MTR > over
- Controls
- OK button
- Shooting mode: RESET
- Playback mode: Zoom on/off -> Medium magnification
- Live view: RESET
- Assign Fn button: Access top item in MY MENU
- Assign preview button: Preview
- Assign AE-L/AF-L button: AE-L / AF-L button press: AE/AF lock
- Customize command dials: All default
- Release button to use dial: OFF
- Slot empty release lock: LOCK
- Reverse indicators: – 0 +
- Assign MB-D15 AE-L/AF-L button: AE/AF lock
- OK button
- Movie
- Assign Fn button: OFF
- Assign preview button: OFF
- Assign AE-L/AF-L button: AE/AF lock
- Assign shutter button: Take photos
That’s a lot of options! Once again, I won’t go into details about each setting, so let me just go over the most important ones that you should know about. The “Autofocus” section is pretty important, because it controls the way your camera autofocus is configured. The first two settings “AF-C priority selection” and “AF-S priority selection” are there to assist in shooting in Single or Continuous modes. The “Focus” setting in the “AF-S priority selection” selection forces the camera to acquire focus before taking the shot. Unlike earlier Nikon DSLRs, the D7100 will still let you take a shot if you “focus and recompose” in AF-S mode.
The next setting is “Focus tracking with lock-on”, which I normally keep at the default setting of “3”. This setting controls how quickly your autofocus will re-engage when it detects focus errors. When shooting birds in flight, I tend to reduce that setting to short delays, because I want autofocus to re-engage even with smaller changes. The rest of the time, I keep it in normal and almost never go up to long waits.
“AF point illumination” is used to light up the viewfinder focus point(s) and different grids in red color when you half-press the shutter button. I usually keep this on “Auto”, which does not light up in very bright conditions where I can clearly see everything in the viewfinder, and only does it in darker environments (which helps with identifying my focus point location). I do not like when my focus points roll over to the other side of the screen when I am in the corners and I like to shoot with all focus points enabled, so my “Focus point wrap-around” is turned off and the number of focus points is set to 51.
The “Built-in AF-assist illuminator” is the lamp on the front of the camera that is engaged when shooting in AF-S focus mode. If the subject is dark, the front light will turn on and illuminate the subject you are photographing, which will help the autofocus system to acquire proper focus. I find the light to be helpful in low-light situations, so I keep that setting turned on.
I never mess with any of the “Metering/exposure” settings, so I would just recommend to leave them at default values. I would also skip the whole “Timers/AE lock” sub-section.
Under “Shooting/display”, the first thing I always do is turn off the focus confirmation beep. I often re-acquire focus many times and I would hate to annoy anyone with the beeps coming from my camera.
The “Viewfinder grid display” is a neat feature that creates vertical and horizontal lines inside the viewfinder. I use those grids all the time when composing my shots – they are great tools for aligning the horizon horizontally or vertically and having a better visual look at my framing / composition.
When shooting in modes other than Manual (for example Aperture Priority), the Nikon D7100 allows changing ISO with the rear or front dial, which can be nice when one needs to adjust ISO quickly with one hand. This can be enabled by going to “ISO display and adjustment” and setting it to “Show ISO/Easy ISO”. However, there is a downside to this feature that is rather annoying – once you do this, the camera will no longer show you the number of remaining shots left in your memory card! For this reason, I usually disable this feature and pick “Show frame count” instead. If you do not care about seeing how many shots are left in your card, then I would recommend to use this feature. Nikon has addressed this trade-off in the Nikon D750, which now has a dedicated “Easy ISO” setting – picking that option no longer affects the display of the image count.
The big setting that I often rely on when photographing landscapes is “Exposure delay mode”. This feature is a gem on the latest Nikon DSLRs, because it first lifts the camera mirror (which generates a lot of vibrations), then waits a specified amount of time and only then opens up the shutter to capture the image. The nice thing is, you can specify up to 3 seconds of delay, which can completely eliminate the dreaded “mirror slap”. When I conduct my landscape photography workshops, I often walk around the participants and check how they trigger their cameras. Those, that do not have camera remotes (remote cable release) initially feel frustrated, but once they discover this neat feature, they don’t regret that they did not bring remote triggers anymore (note that remote triggers can be very useful for other uses though). The best part about this particular feature, is that you can actually use it in conjunction with the camera timer! If you set the secondary dial on the top of the camera to Timer, then set the “Self-timer delay” to something like 5 seconds, you can completely eliminate camera shake. Basically, the initial 5-second timer is for the camera to settle after you press the shutter release. After it waits for 5 seconds, the “Exposure delay mode” feature kicks in and the mirror is raised. The camera waits 3 more seconds before the shutter finally opens up and the image is captured. This is a great feature that I highly recommend to use when photographing landscapes and architecture in low light conditions / very slow shutter speeds.
If you dislike the orange flash icon constantly popping up in your viewfinder (I find it annoying), there is a place to turn it off – just set “Flash warning” to Off and you won’t see that flash warning icon again.
I won’t go into Bracketing/flash sections, because that’s a big topic on its own. The only thing that I usually change here is Bracketing order – I like to have my frames underexposed, normal, then overexposed, so I set “Bracketing order” to “Under > MTR > over”.
The “Controls” section is something I always change, because there are some time-saving features there. Let’s first start with my favorite feature on Nikon advanced cameras that allows to zoom in to an image instantly with a press of the OK button in the multi-selector dial. This menu item used to be called “Multi selector center button”, but Nikon has now renamed it to just “OK button”. It is a huge time saver and something I really wish all Nikon DSLR cameras had. Basically, you can set up the center OK button on the multi-selector to zoom in and out to a set magnification level when reviewing images with a single press of the button! If you find yourself frustrated by constantly pressing the zoom in button until you get to the right magnification level, then you will absolutely love this feature. There are three magnification levels to choose from: “Low magnification”, “Medium magnification” and “High magnification”. The best setting to use is Medium magnification, because it allows you to view images at 100% / pixel level. It saves 8 zoom in button presses!
The next important menu option “Assign Fn button” allows programming the “Fn” (Function) button on the front of the camera. Since I shoot in different environments a lot, I like to be able to change my Auto ISO settings quickly (not just enabling or disabling Auto ISO, but actually accessing settings like “Maximum sensitivity” and “Minimum shutter speed”). Unfortunately, Auto ISO is buried in the “Shooting Menu” and takes too long to get to. I love being able to access Auto ISO with just pressing the Fn button and that’s something you can set up very easily. First, go to “My Menu” section of the menu. Then go to “Add items” -> “Shooting menu”. Find “ISO sensitivity settings” and instead of getting into this menu, simply press the “OK” button. The next screen should say “Choose position” and you will see “ISO sensitivity settings” there. Just press “OK” one more time and you will see this on the top of the “My Menu” window. If you already have some favorites saved, make sure to move this one to the very top. Once you do this, go to the “Custom Setting Menu” again and navigate to “Controls” -> “Assign Fn button”. From there, pick “Access top item in MY MENU” and press OK. Now test it out – close the menu, then press the “Fn” button on the front of the camera. If you did everything right, the back LCD should get you right into ISO sensitivity settings! Pretty neat and saves a lot of time when you need to tweak the Auto ISO feature!
If you don’t particularly care for the depth of field “Preview” button, you can program your D7100 to do the same thing from that button instead.
Now let’s talk about another important menu setting, which is “Assign AE-L/AF-L button”. If you have not read my article on the Focus and Recompose technique, now is a good time to do it, because it explains this feature in detail. Basically, you switch the autofocus function from your shutter release (half-press) to the AE-L / AF-L button on the back of the camera, as shown below:
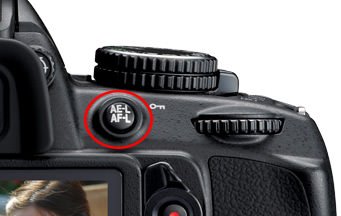
Once you do this, your camera will no longer autofocus by half-pressing the shutter and will only respond to you depressing the rear AE-L / AF-L button. It is a neat feature that I always use by default on all of my cameras (higher-end DSLRs have a dedicated AF-ON button), so I would recommend to explore this feature on your D7100 as well.
Aside from these, I would leave the rest of the settings alone.
Setup Menu
Not a whole lot to cover here, because this is the area that you will only use for particular tasks like setting time/date, adding image comments, adjusting LCD brightness, formatting memory card, etc. Once you learn your way around the camera menu system, I would highly recommend to play with the “User settings”, which allow you to save different settings for two different scenarios (U1 and U2). For example, I have mine set up for two different roles – landscapes and people. When photographing landscapes, I want my camera mode to be Manual. I want “Exposure delay mode” turned on by default and set to 3 seconds. I want my Auto ISO turned off, with ISO set to ISO 100 by default. So I set all those settings on the camera, then go to “Save user settings” -> “Save to U1”. For photographing people, I want my camera to be in Aperture Priority mode, I want “Exposure delay mode” turned off, because I will be shooting hand-held and I want Auto ISO turned on. I then save those settings to the “U2” slot. Once everything is set up, I can simply switch back and forth between the two using the top camera PASM dial and it saves me a lot of time, since I do not have to remember which settings I need to change. I love this feature on the D7100 and really wish Nikon implemented the same system on high-end DSLRs like D810/D4S as well! While Nikon does have a way to store custom settings on the D810 and the D4S, you have to do it for each menu item separately, which is just inefficient. Plus, those cameras do not have an external setting on the dial to be able to change modes quickly.
Other than the above, the only other thing I would do is set an “Image comment” and “Copyright information”. Basically, it is just text that gets embedded into each photograph. If you ever happen to lose your memory card somewhere (which I personally have in the past) and someone finds it (let’s just assume that you have no labels on the card with your info) leaving your Copyright or Name could help big time in finding/locating you. Plus, you are writing data into RAW files, so if you ever needed to prove that you are the author of a photograph, the RAW file along with your contact info could make for great evidence.
I hope you found this article useful. Once again, these are settings that work for me and they might not necessarily suit your needs. It is best that you explore your camera and learn about each setting as much as you can in order to take advantage of all the available features and customizations!
Thank you very much am very new in this sir pls I will you to teach me more
I set my D7000 as you suggested and now even my bright dalight photos are too dark to see! Have tried re-setting to no avil. Thanks for nothing.
Douchebag
Bagaimana Menampilkan Indikator Fokus, Kecepatan Rana, Apertur, Pengukur Eksposur, dan lainnya di dalam Jendela Bidik? Nikon D7100,
How to Display Focus Indicator, Shutter Speed, Aperture, Metering Exposure and more in the Viewfinder? Nikon D7100
Very helpful, Thanks Nasim
Hello,
How do we do that, I mean changing AF-A to AF-S or AF-C? Sorry I very much new to using D7100.
Nasin no longer answers questions :-))))
Many thanks for your advice on settings for my new Nikon, great help, feel better already, much appreciated.
Hi Nasim,
Could you please help as I have been reading your article regarding a D7100. I have been using non DSLR cameras for 10 years now. Canon Powershot cameras and the image quality and colours are 100 times better than my new D7100. Blue sky action and beach photography seem the absolute worst. The colours are not natural!!!!!!!!! I have shot using sRGB and Adobe sRGB. Beach/Snow setting, SD standard, SD vivid, Auto, Programmed, Shutter Priority and Apeture Priority and every shot approx 500 now are terrible. The only beautiful natural colours are when shooting movies. I have a 18-300mm AF-S VR lens in front but after 1 month I am thinking of selling the HORRID THING already.
Any ideas as to why the colours are so awful and un-natural? I can e-mail the photos if you want to see what I am talking about.
Kindest Regards
Great Article, is there one for the 7200 or will most of these for the 7100 suit. Have just upgraded to the 7200 from 5100 and need some help to get the best out of this excellent camera.
On a Nikon D7100. How do I lock the zoom at a certain point when previewing and how do I keep the preview screen on more than a few seconds, is there a button that will do this?
Thanks