Nikon’s professional-grade D500 DSLR is one of the top choices among many sports and wildlife photographers. Thanks to its superb build quality, proven ergonomics, insanely fast autofocus system and a huge buffer, the Nikon D500 earned its spot as a top Nikon DSLR for action photography. Still, despite its strengths, it remains as a complex tool with numerous menu options that can be confusing for some photographers. In this article, I will provide information on what settings I personally use and shortly explain what some of the camera buttons and controls do.
Please keep in mind that while the below settings work for me, it does not mean that they will work for everyone else. The information in this article is provided as a guide for those who struggle with the camera and just want to get started with an understanding of the camera and its many features. Lastly, it is important to note that this guide is written with emphasis on action photography.
Before we delve into the camera menu, we will first go over the exterior controls. Similar to other high-end Nikon DSLRs, the D500 has a lot of menu options, but there are some things that you can only control via specific buttons and controls.
Table of Contents
Autofocus Modes and Bracketing
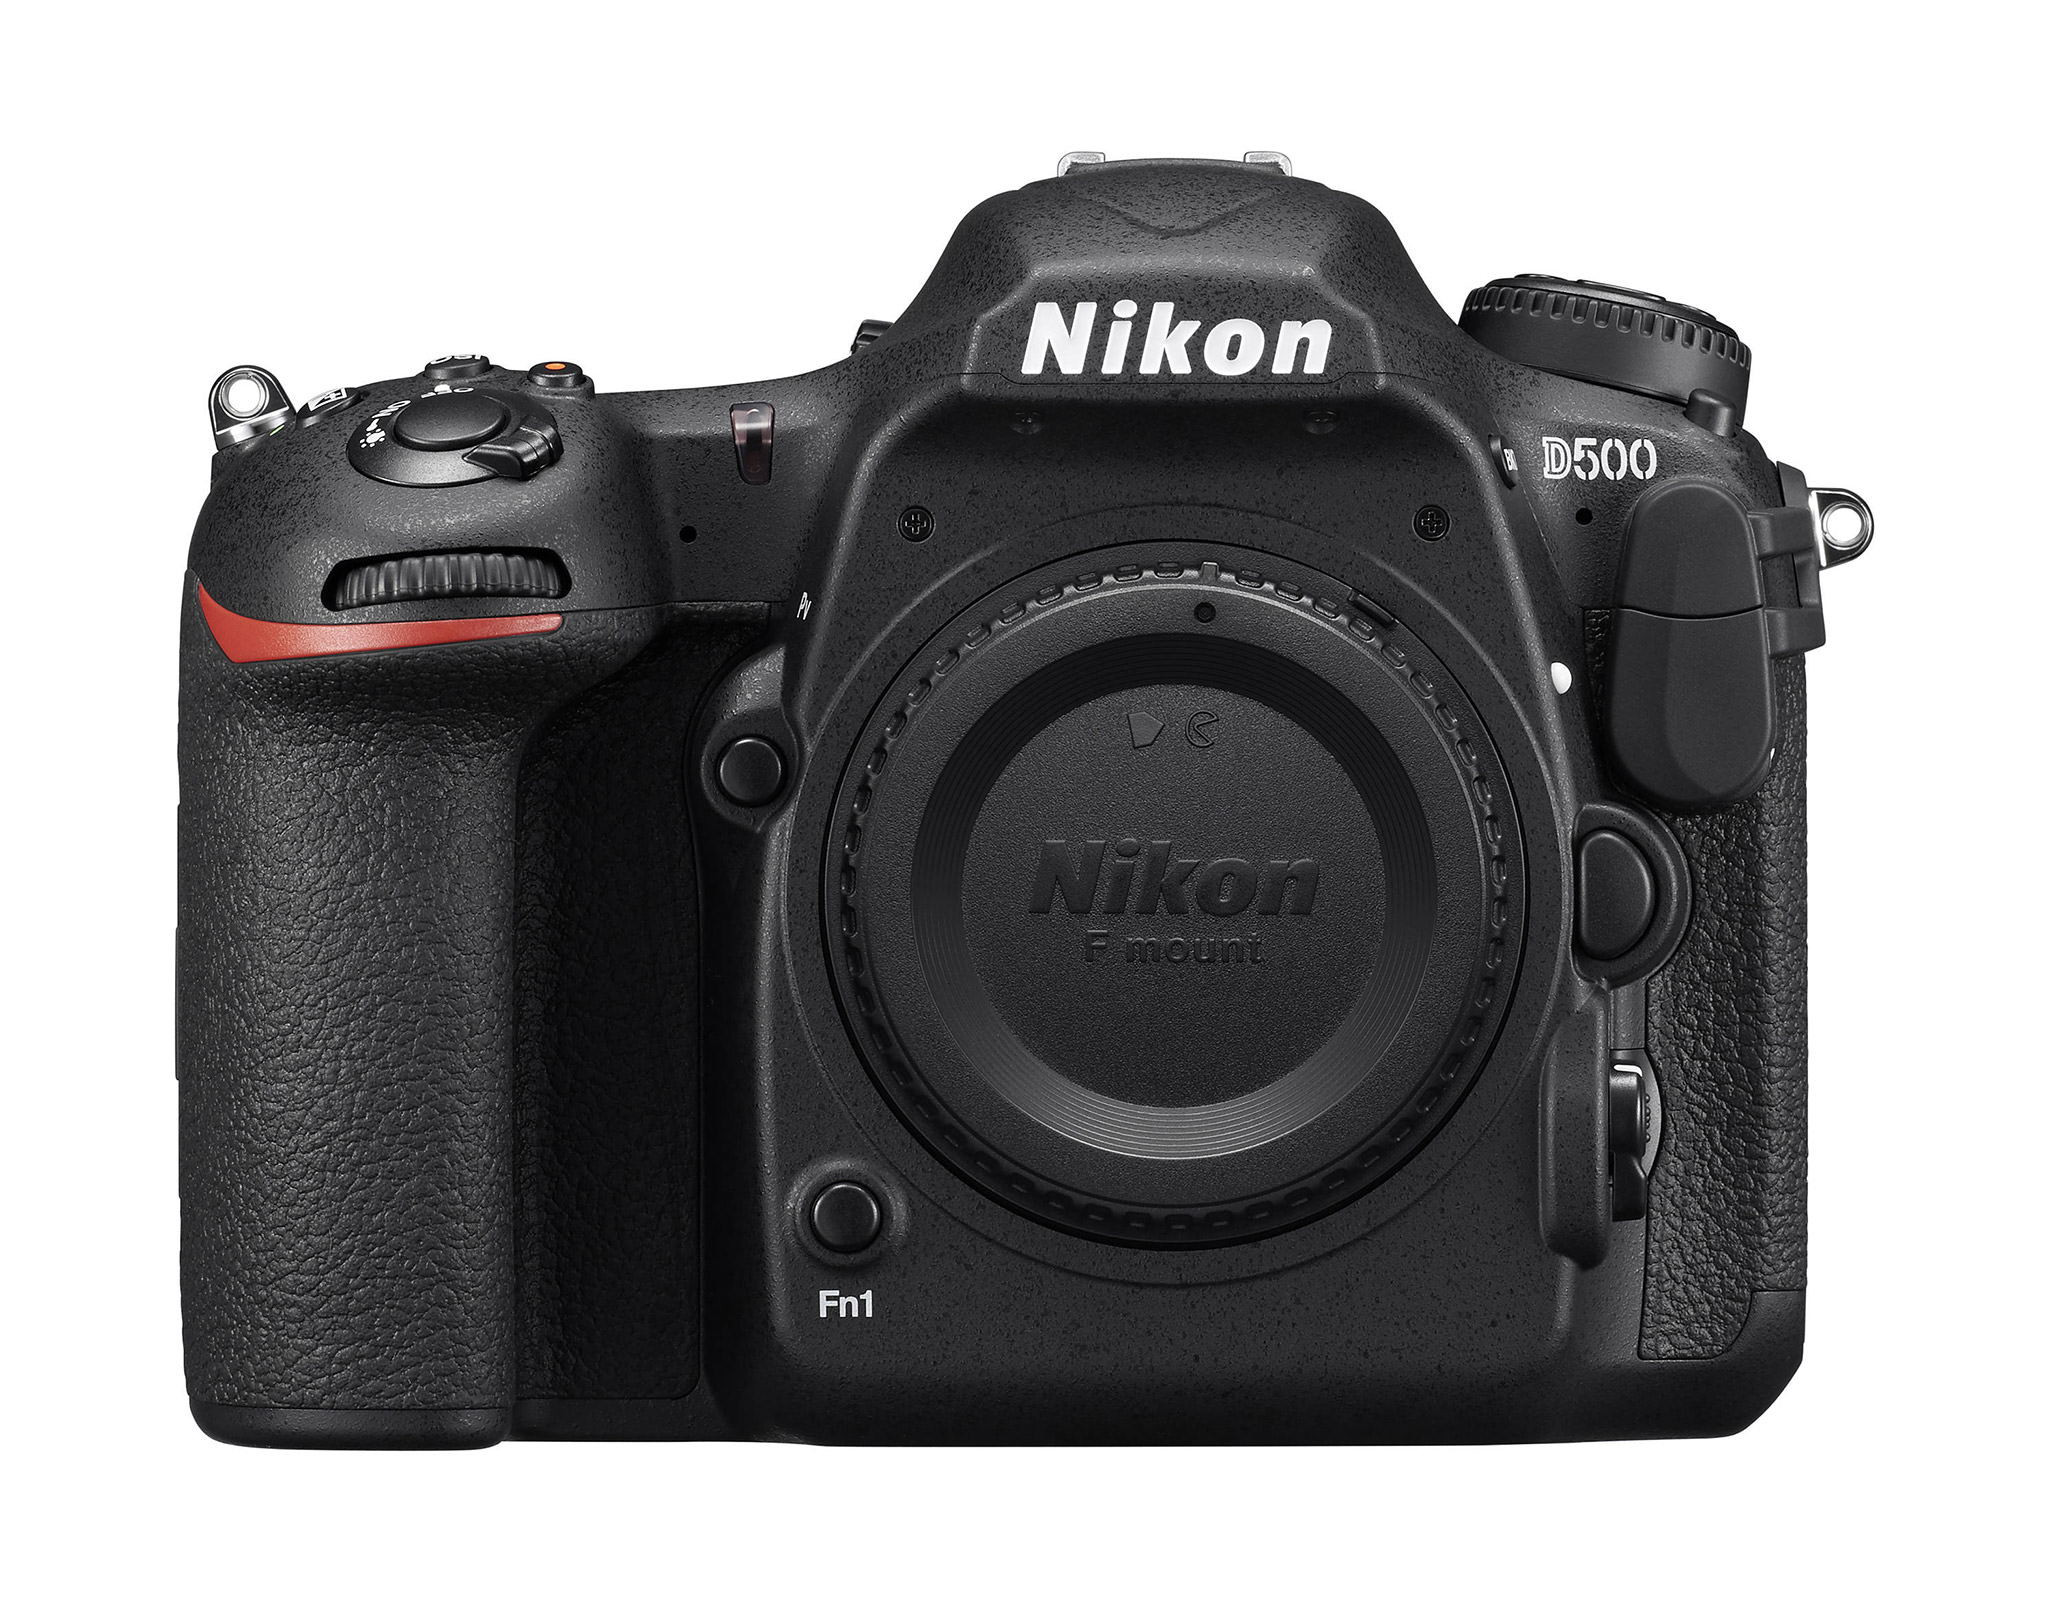
On the front left of the camera, you will find a lever that goes from AF to M, with a button in the middle (big red circle in the image below). Make sure to keep that lever on “AF”, or your lens will not autofocus. If for some reason your lens stops focusing, this is what you need to check first. Pressing the button in the middle of the lever allows to choose between different focus modes.

To activate this change, you need to press and hold the button, then rotate the rear dial with your thumb. As you do this, look at the top LCD and the camera will switch between AF-S and AF-C. I won’t go into too much detail about each focus mode, since it is all explained in detail in this article. Here is a quick recap:
- AF-S – this mode is called “Single-servo AF” and it is used only for stationary subjects that do not move. When you half-press the shutter button, autofocus lock on the subject and if the subject moves, the focus will not change, resulting in a blurry picture. Only use this mode for photographing stationary subjects (landscapes, architecture, etc) and when shooting in extremely low-light situations.
- AF-C – known as “Continuous-servo AF” in Nikon’s lingo, this setting is used for photographing moving subjects. When you half-press the shutter button and your subject moves, the camera will re-acquire focus. If your goal with the D500 is to mostly capture moving action, then keep the camera in AF-C autofocus mode and only switch to AF-S when needed.
Now if you rotate the front dial with your index finger while holding the same button, you will get many different options like “S”, “D 25”, “D 72”, “D 153”, “3D”, “GrP” and “Auto”. These settings are there for controlling the focus points that you see inside the viewfinder. Once again, most of these are already explained in detail in my autofocus modes explained article, so I won’t go into too much detail here. When shooting wildlife, I typically set my AF mode to Dynamic Area AF (72 points) (D 72), but keep my joystick center button to Dynamic Area AF (25 points). This way, I can use both AF modes by pressing two different buttons. The way this is set up is explained below under the Custom Settings Menu -> Controls. Let’s move on to other external controls.
Right above the AF / M lever, you will find the BKT (Bracketing) button to set up bracketing on the camera. Make sure that bracketing is turned off by holding the button and checking the top camera LCD. It should show “0F” on the left side, which means that bracketing is inactive (the “BKT” letters should also disappear). Using the front dial will allow changing bracketing steps and the rear dial will change the number of frames shot in a bracketing sequence. The Nikon D500 allows bracketing up to 9 frames and up to 3 stops (EV) apart. However, in order to do 3 EV bracketing, you can only enable 5 frames of bracketing or fewer.
Shooting Mode and Camera Mode Dials
On the top left side of the camera you will find a large dial with buttons on the top. The primary function of this rotary dial is to set your shooting mode and the buttons that sit on the top are there for making quick adjustments to image format/quality, metering, camera mode and white balance:
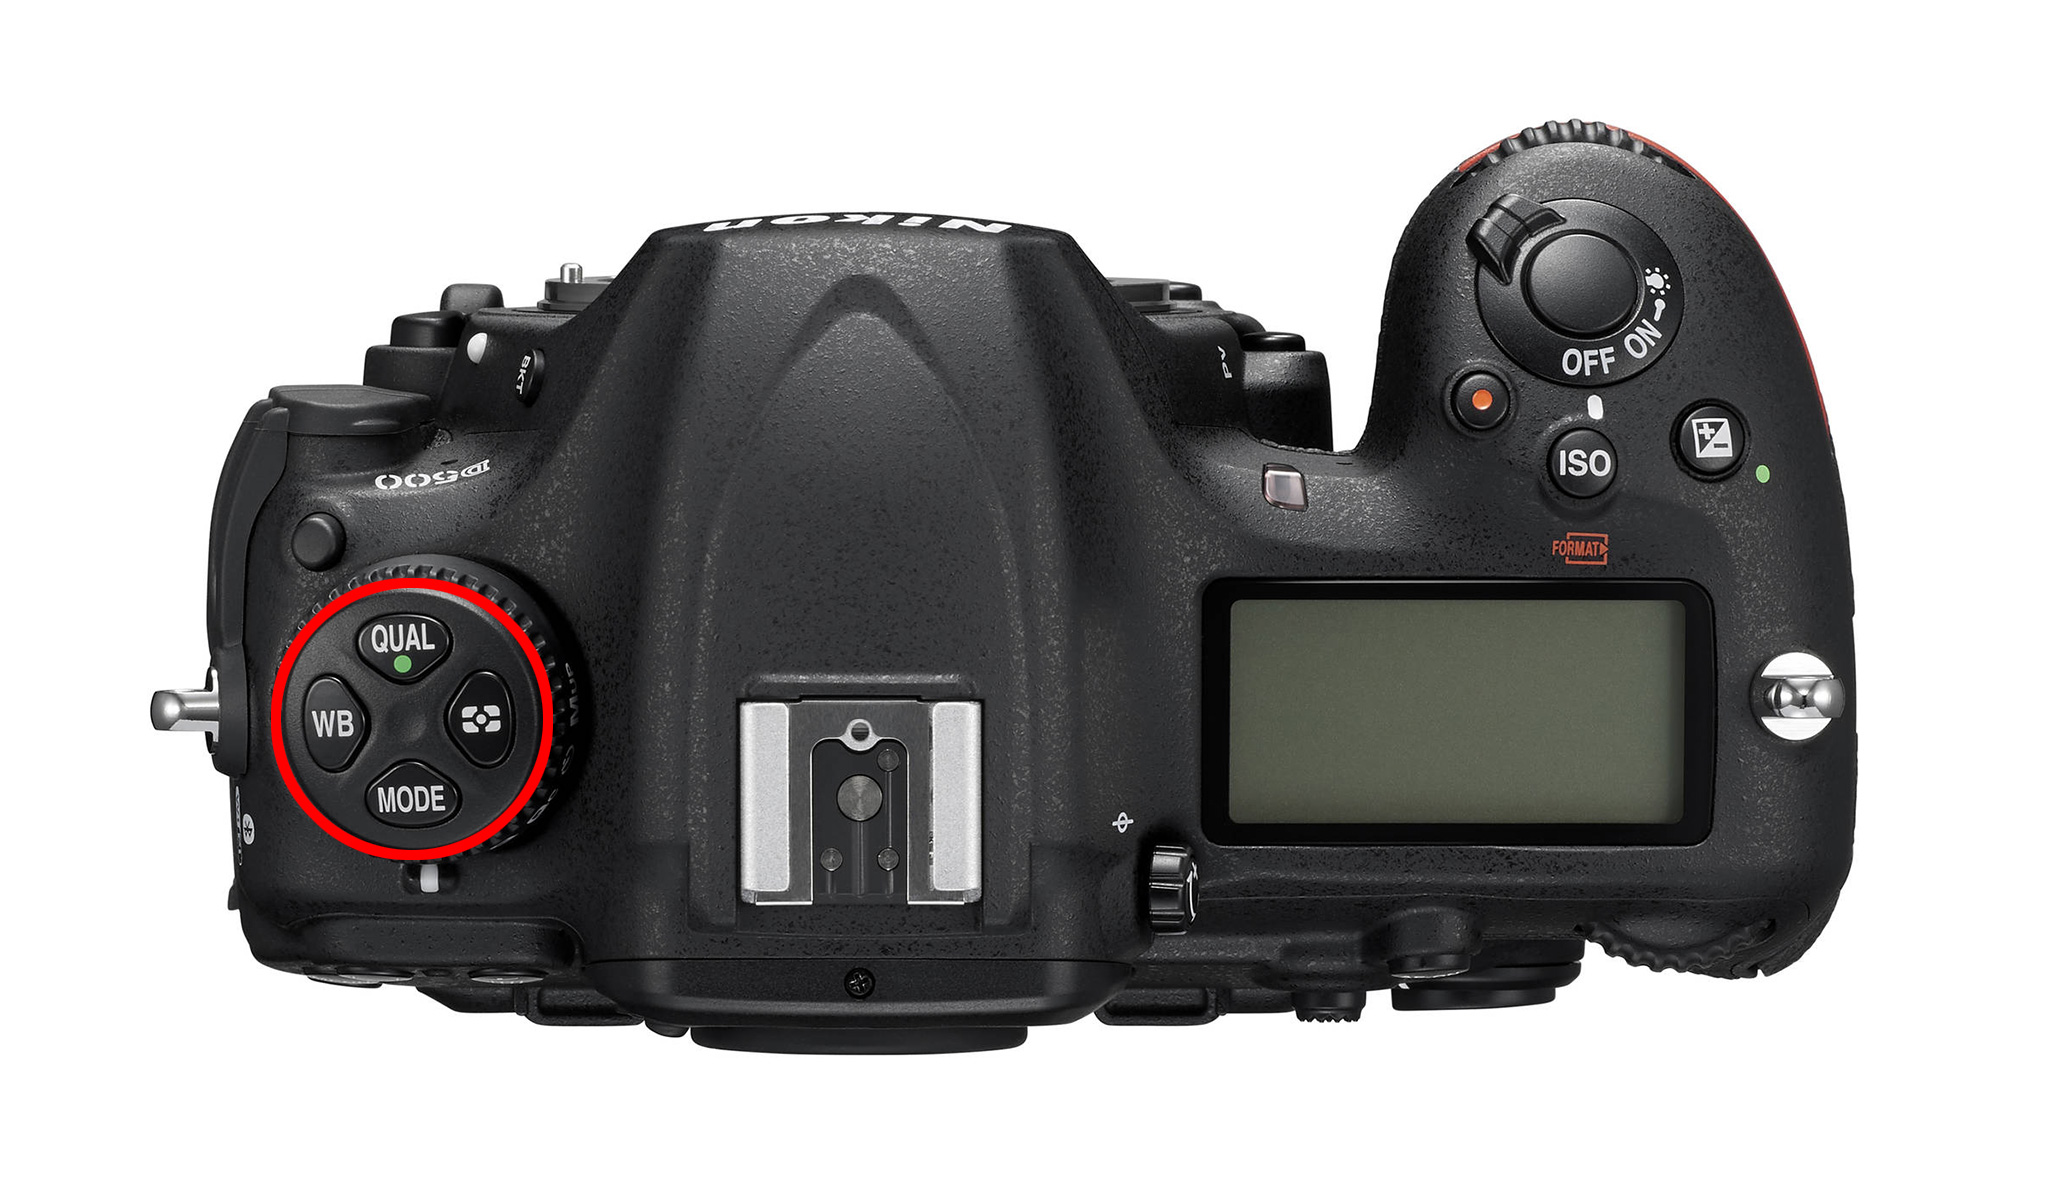
The dial has a bunch of shooting modes like “S” (Single), “Cl, Ch” (Continuous low and Continuous high), “Q” (Quiet), “Qc” (Quiet continuous), Timer and Mup (Mirror Up). Assuming that you are going to be using the camera primarily for sports and wildlife photography, you should set your camera to either “Continuous low” or “Continuous high” mode, depending on how many frames per second you want to shoot. The speed of “Continuous low” setting can be changed through the camera menu. If you want to get the maximum continuous shooting speed of 10 fps, you should set the camera to Ch.
The top buttons are great for quickly changing important settings like Camera Mode, Metering and White Balance. Nikon has moved the “MODE” button from the right side of the top of the camera to this area, so you now have to use two hands in order to change the camera mode (keep in mind that unlike other cameras that typically feature a traditional “PASM” dial, the Nikon D500 does not have such dial and requires using this MODE button instead).
So if you need to switch between different camera modes, you need to hold the MODE button with your left hand, then rotate the rear dial. Doing so will reveal 4 different modes: “P” (Program Auto), “S” (Shutter Priority), “A” (Aperture Priority) and “M” (Manual).
For wildlife photography, I mostly rely on Aperture Priority and Manual modes when shooting with the Nikon D500. The Manual mode in combination with Auto ISO is a particularly great choice for photographing action, since you can set your desired Aperture and Shutter Speed, and let the camera adjust ISO automatically.
The exposure compensation button nicely complements the Aperture Priority mode, however, keep in mind that the D500 no longer has a dedicated AE-L / AF-L button, so if you need to lock exposure, you will need to assign another button such as the joystick to do that (instructions on how to do that are provided below).
The “WB” button is there for setting/changing white balance. The rear dial allows you to change white balance, while the front dial allows fine-tuning it. The Nikon D500 comes with three Auto white balance modes: Auto0, Auto1 and Auto2. Auto0 reduces warm colors, Auto2 keeps warm colors, whereas Auto1 sets it to normal. I personally keep mine at Auto1, but depending on how cool or warm you want your images to be, you might want to look into Auto0 and Auto2 as well.
I am not a fan of the “QUAL” button and its location, since I have accidentally switched my image quality format a few times in the past, so be careful with this one.
Lastly, to change your metering mode, press and hold the metering button (four squares with a dot in the middle), then rotate the rear dial. Unless situation calls for it, I keep mine in Matrix Metering by default. However, if I am photographing a single subject, like a perched bird, I occasionally switch to Spot Metering to properly expose the subject rather than the environment surrounding it.
To the right of the shooting mode dial, you will find three buttons: “ISO” for changing camera ISO, a video recording button (with a red dot) and Exposure Compensation button. I practically rarely ever record videos, so the two most used buttons here are ISO and Exposure Compensation. The ISO button allows quick change of ISO if you use the rear dial, and the front dial allows switching Auto ISO on and off.
While I like the ability to quickly turn Auto ISO on and off, I typically end up mapping the Fn (Function) button on the front of the camera to Auto ISO settings, so that I can make changes to maximum sensitivity and minimum shutter speed (see my notes below under Custom Setting Menu). Exposure Compensation works in a similar way as ISO, except the front dial is deactivated and the rear dial is what you use to tweak your exposure.
I rarely ever touch anything in the Playback menu, since that’s only used for displaying pictures on the rear LCD. The only two settings that I ever mess with are “Playback display options” and “Rotate tall”. The “Playback display options” can be useful when reviewing images.
When you press the playback button on the back of the camera, you can press up/down buttons and you will be able to see different types of information. To keep the clutter out, I have three things turned on: “Focus point”, which allows me to see where I focused, “Highlights” to show overexposure in shots (a.k.a. “blinkies”) and “Overview”, which gives me a summary of my exposure (shutter speed, aperture, ISO, focal length, etc).
I always turn the “Rotate tall” setting off, because I do not want my camera to rotate vertical images to horizontal when I review them – it is much easier to rotate the camera to see a vertical image, rather than having to zoom in every single time. Everything else is default.
Let’s now go through the Shooting Menu, which is the first place that I usually go to when checking my settings. I will first provide my values, then talk about the most important settings:
- Shooting menu bank: A (default)
- Extended menu banks: OFF
- Storage folder: default, don’t change
- File naming: DSC (default), don’t change
- Primary slot selection: XQD (unless you only shoot SD)
- Secondary slot function: Overflow
- Flash control: —
- Choose image area: DX (24×16)
- Image quality: NEF (RAW)
- Image size
- JPEG/TIFF: Large
- NEF (RAW): RAW L
- NEF (RAW) recording
- NEF (RAW) compression: Lossless compressed
- NEF (RAW) bit depth: 14-bit
- ISO sensitivity settings
- ISO sensitivity: 100
- Auto ISO sensitivity control: ON (see the next section below)
- Maximum sensitivity: 3200
- Maximum sensitivity with flash: 3200
- Minimum shutter speed: Auto
- White balance: AUTO (AUTO1 Normal)
- Set Picture Control: SD (Standard), Default values
- Color space: Adobe RGB
- Active D-Lighting: OFF
- Long Exposure NR: OFF
- High ISO NR: OFF
- Vignette control: OFF
- Auto distortion control: OFF
- Flicker reduction
- Flicker reduction setting: OFF
- Flicker reduction indicator: ON
- Auto bracketing set: AE bracketing
- Multiple exposure: OFF
- HDR (high dynamic range): OFF (grayed out)
- Interval timer shooting: OFF
While there are a lot of different settings here, do not worry – you won’t be changing many settings very often. Let’s go through some of the important settings. The first one is “Shooting menu bank”, which allows you to store up to 4 different shooting menu settings. The good news is, you can name each bank with a custom name like “Landscape”, “Portrait”, etc. The bad news is, these shooting banks are practically useless! Many Nikon shooters, including myself, have been puzzled by Nikon’s implementation of the menu banks, which have not been changed for many years now. There are three fundamental flaws with the custom settings banks:
- Menu banks are separate for “Shooting Menu” and for “Custom Setting Menu” sections, which means that one would have to store settings in two places and when a change is needed, also have to remember to change in two places. There is no single place to store all camera settings.
- There is no button on the camera to be able to instantly select a bank. The quickest way is to press the “i” button on the back, then choose a different bank for “Photo shooting menu bank” or “Custom settings bank”. Lower-end Nikon DSLRs like D610/D750 are much better in this regard, because they have U1 and U2 options right on the PASM dial.
- There is no way to save menu banks. Yup, menu banks are supposed to be “memory” banks that allow one to store specific settings. If you pick a specific bank and then end up changing any of the settings, those settings will be preserved, which completely defeats the purpose of memory banks.
I have tried to be organized with my pro-grade Nikon cameras in the past and failed – the above limitations just make memory banks useless for me. The thing is, it is not that hard to get this fixed, as it is just a firmware change. All Nikon needs to do is add a few options like U1 and U2 to the camera MODE button, then allow saving all camera settings into these memory banks (including autofocus settings) and the problem is solved! I don’t know why Nikon keeps pushing the same useless banks over and over again to the pro-grade DSLRs.
Enough of ranting, let’s move on to other shooting menu settings. The next important setting is “Secondary slot function”, which allows you to choose a role for the second card slot when shooting with multiple cards. You can set the camera to save images in three different ways. You can set it to “Overflow”, which basically saves images to the first card, then when the space runs out, the camera starts saving to the second card. I usually set mine to Overflow, unless I am working on something really important and need to backup images.
And speaking of backup/redundancy, that’s what you use the second setting “Backup” for. Once selected, the camera will save photos to both memory cards at the same time. The last setting allows you to save RAW files to one card and JPEG files to another. For your day to day shooting, just leave it on “Overflow” and if you really need to make sure that your photos are not lost if one of the cards fails, then choose “Backup”.
“Image quality” is obviously set to RAW, since you should always be shooting in RAW. “NEF (RAW) recording” is always set on mine to 14-bit Lossless Compressed. I choose 14-bit to get the best image quality the camera can deliver and “Lossless” compression results in much smaller files than “Uncompressed”.
“White Balance” is Auto and all other settings like Picture Controls, Active D-Lighting, HDR, etc. are turned off, since none of them (with the exception of “Long Exposure NR”) affect RAW images. Remember, RAW files contain non-manipulated data and require post-processing, so the above settings only impact images displayed by your camera’s LCD screen (each RAW file contains a full-size JPEG image, which is what is used to display images on the LCD) and if you use Nikon’s proprietary software like Capture NX-D, those settings can be applied to RAW images automatically. Since I use other third party software to store and process my images, the second part does not apply to me. Everything else is turned off.
Although color space does not matter for RAW files, I use AdobeRGB because it gives a slightly more accurate histogram (since the camera shows histograms based on camera-rendered JPEG images, even if you shoot exclusively in RAW).
The big menu setting that I frequently change is “ISO sensitivity settings”. When shooting hand-held, I mostly use Auto ISO, because it is a great feature that saves me a lot of time. Instead of specifying ISO for every shot, I just have it set on Auto, with its base ISO set to 100, Maximum sensitivity set to 3200 (my personal limit for “acceptable” noise levels) and Minimum shutter speed set to “Auto”.
The “Auto” minimum shutter speed setting is great, because it reads the focal length of the attached lens and automatically adjusts the minimum shutter speed to the focal length of the lens. If you have shaky hands, you can change the Minimum shutter speed Auto to be one step closer to “Faster”, which basically uses a twice faster minimum shutter speed.
For example, if I have a 500mm lens mounted on the camera, my minimum shutter speed will go from 1/500 to 1/1000 of a second with one step up. If I move it all the way to the end (Faster), it will speed up the shutter speed again to 1/2000 of a second.
- Reset movie shooting menu: —
- File naming: DSC
- Destination: XQD
- Choose image area: DX
- Frame size / frame rate: 2160 p24 (3840×2160); 24p
- Movie quality: HIGH
- ISO sensitivity settings
- ISO sensitivity (mode M): 64
- Auto ISO control (mode M): ON
- Maximum sensitivity: 12800
- White Balance: Auto1 (Same as photo settings)
- Set Picture Control: Same as photo settings
- Active D-Lighting: OFF
- High ISO NR: Normal
- Flicker reduction: Auto
- Microphone sensitivity: Manual 10
- Frequency response: WIDE
- Wind noise reduction: OFF
- Time-lapse movie: OFF
- Electronic VR: OFF
I am not going to go through the movie recording features, because it highly depends on what you are trying to do. Some of the features won’t work depending on whether you shoot in 4K or 1080p, so if you see anything grayed out or not working, you might need to switch to 1080p video capture in order to enable them.
This is where a lot of people get lost, since there are so many different settings. Here are the settings that I personally use:
- Autofocus
- AF-C priority selection: Release
- AF-S priority selection: Focus
- Focus tracking with lock-on: Blocked shot AF response: 3, Subject motion: middle
- 3D-tracking face-detection: Off
- 3D-tracking watch area: Wide
- Number of focus points: AF55
- Store by orientation: Focus point
- AF activation: OFF – please read below on this setting
- Autofocus mode restrictions: No restrictions
- Focus point wrap-around: OFF
- Focus point options
- Manual focus mode: ON
- Dynamic-area AF assist: ON
- Group-area AF display: Large arrows
- Focus point illumination: AUTO
- Manual focus ring in AF mode: Enable
- Metering/exposure
- ISO sensitivity step value: 1/3
- EV steps for exposure cntrl: 1/3
- Ex./flash comp. step value: 1/3
- Easy exposure compensation: OFF
- Matrix metering: Face detection OFF
- Center-weighted area: 8mm
- Fine-tune optimal exposure: —
- Timers/AE lock
- Shutter-release button AE-L: OFF
- Standby timer: 6s
- Self-timer
- Self-timer delay: 2s
- Number of shots: 1
- Interval between shots: 0.5s
- Monitor off delay: 10s, 1m, 10s, 4s, 10m
- Shooting/display
- CL mode shooting speed: 5 fps
- Max. continuous release: 200
- ISO display: OFF
- Sync. release mode options: Sync
- Exposure delay mode: OFF
- Electronic front-curtain shutter: OFF
- File number sequence: ON
- Viewfinder grid display: ON
- LCD illumination: OFF
- Optical VR: ON
- Bracketing/flash
- Flash sync speed: 1/250*
- Flash shutter speed: 1/60
- Exposure comp. for flash: Entire frame
- Auto ISO sensitivity control: Subject and background
- Modeling flash: ON
- Auto bracketing (Mode M): Flash/speed
- Bracketing order: Under > MTR > over
- Controls
- Custom control assignment
- Preview button: Preview
- Preview button + rear dial: None
- Fn1 button: Spot Metering
- Fn1 button + rear dial: OFF
- Fn2 button: MY MENU
- AF-ON button: AF-ON
- Sub-selector: Focus point selection
- Sub-selector center: AF-area mode + AF-ON -> Dynamic Area AF (25 points)
- Sub-selector center + rear dial: None
- BKT button + rear dial: Auto bracketing
- Movie record button + rear dial: Exposure mode
- Lens focus function buttons: AF lock only
- Multi selector center button
- Shooting mode: RESET
- Playback mode: Zoom on/off -> 1:1 (100%)
- Live view: RESET
- Shutter spd & aperture lock: — (OFF / OFF)
- Customize command dials: All default
- Multi selector: OFF
- Release button to use dial: OFF
- Reverse indicators: – 0 +
- Live view button options: ON
- Lightbulb switch: LCD backlight
- Assign MB-D17 buttons
- Fn button: AE lock (Reset on release)
- Fn button + rear dial: OFF
- AF-ON button: Same as camera AF-ON button
- Multi selector: Same as camera multi selector
- Custom control assignment
- Preview button: Power aperture (open)
- Preview button + rear dial: OFF
- Fn1 button: Power aperture (close)
- Fn1 button + rear dial: OFF
- Fn2 button: Index marking
- Sub-selector center: AE/AF lock
- Sub-selector center + rear dial: OFF
- Shutter-release button: take photos
- Custom control assignment
Once again, I won’t go into details about each setting, so let me just go over the most important ones that you should know about. The “Autofocus” section is pretty important, because it controls the way your camera autofocus is configured. The first two settings “AF-C priority selection” and “AF-S priority selection” are there to assist in shooting in Single or Continuous modes. I personally prefer to keep the “AF-C priority selection” at “Release”, which lets me take pictures of fast moving action without slowing down. However, if you do not want the potential of a bunch of images with a blurry subject, you can set this to “Release + Focus”, which will puts priority on focusing after the first shot.
The “Focus” setting in the “AF-S priority selection” selection forces the camera to acquire focus before taking the shot. Unlike earlier DSLRs like Nikon D700, the D500 will still let you take a shot if you “focus and recompose” in AF-S mode.
The next setting is “Focus tracking with lock-on”, which I normally keep at the default setting of “3” for “Blocked shot AF response”. This setting controls how quickly your autofocus will re-engage when it detects focus errors. When shooting birds in flight, I tend to reduce that setting to short delays, because I want autofocus to re-engage even with smaller changes.
The rest of the time, I keep it in normal and almost never go up to long waits. “Subject motion” is set to the middle by default, which works pretty well, but you might want to change this depending on whether the subject movement is steady or erratic.
I like storing focus points for vertical and horizontal shooting separately, so “Store by orientation” is set to Focus point.
The “AF activation” setting on my D500 is always set to “OFF” (AF-ON only) to allow me to use the dedicated AF-ON button on the back for focusing. If you have not read our article on Back Button Focusing and the Focus and Recompose Technique, now is a good time to do it, because it explains this feature in detail. Basically, once you switch the autofocus function from your shutter release (half-press) to the AF-ON button on the back of the camera, your camera will no longer autofocus through the shutter release button and will only respond to depressing the rear AF-ON button. It is a neat feature that I always use by default on all of my cameras.
I do not like when my focus points roll over to the other side of the screen when I am in the corners and I like to shoot with all focus points enabled, so my “Focus point wrap-around” is turned off and “Focus point options” are kept at their default settings.
If you shoot sports or wildlife, the D500 has a menu setting to limit autofocus modes. For example, if you never shoot in AF-S, you can now turn it off completely to prevent potential focusing issues in the field.
I never mess with any of the “Metering/exposure” settings, so I would just recommend to leave them at default values. I would also skip the whole “Timers/AE lock” sub-section, aside from perhaps the “Self-timer” option, which I normally set to either 2 or 5 seconds.
The “Viewfinder grid display” is a neat feature that creates vertical and horizontal lines inside the viewfinder. I use those grids all the time when composing my shots – they are great tools for aligning the horizon horizontally or vertically and having a better visual look at my framing / composition.
I won’t go into Bracketing/flash sections, because that’s a big topic on its own. The only thing that I usually change here is Bracketing order – I like to have my frames underexposed, normal, then overexposed, so I set “Bracketing order” to “Under > MTR > over”.
The “Controls” section is something I always change, because there are some time-saving features there. Go through the “Custom control assignment” section and pick your favorite selections for each assignable button. For me, the key button is Fn1, which I default to Spot Metering. This way, if I need to quickly switch to a single subject and expose it properly, I just press this button.
Next, I assign the Fn2 button to “MY MENU”, so that I can quickly access anything I need from the MY MENU section (you can add any menu options to that area). Since the AE / AF lock button is now gone, it is best to set the joystick to take over that function – all you have to do is press the joystick button and hold it when you want to lock down the exposure and focus (say when doing panoramas).
I am still a bit too used to having the “MODE” button on top of the camera, so I set the Movie record button to serve that function, which is nice, because I don’t lose the movie recording button anyway if I were to switch to movie mode in Live View. This way, I can still change the camera mode using just the right hand.
The “Multi selector center button” is now set by default to zoom into the image when you press it in playback mode, which is nice! However, make sure that it is set to 1:1 magnification, since the default is 50%. If you find yourself frustrated by constantly pressing the zoom in button until you get to the right magnification level, then you will absolutely love this feature.
A real time-saving feature on the D500 is the ability to shoot in two different autofocus modes with the AF-ON button and the joystick. Basically, you can set up the AF-ON to focus with whatever you set up as your default focus mode. On my D500, I use 72-point Dynamic-area AF by default, but sometimes I prefer to use the 25-point Dynamic-area AF. Instead of having to constantly press the AF button and switching between different AF modes, I program the joystick to serve as both the AF-ON button for starting the focus and an instant AF switch to 25 AF points. This is achieved by programming the “Sub-selector center” section under “Custom control assignment” menu. Once you set it to “AF-area mode + AF-ON”, you can go into an additional sub-menu and set up your desired focus mode. Mine is set to “Dynamic Area AF (25 points)”, but if you prefer some other focusing mode like Group-area AF, you can choose that instead.
I would skip the rest of the Controls section and keep it all in default and if you shoot video, take a look at the Custom control assignment under “Movie” to make sure that the function buttons are set to your liking.
Not much to go over here, because this is the area that you will only use for particular tasks like setting time/date, adding image comments, adjusting LCD brightness, formatting memory card, etc. The only thing I would do is set up “Image comment” and “Copyright information”. Basically, these settings add text information that gets embedded into each photograph.
If you ever happen to lose your memory card somewhere (which I personally have in the past) and someone finds it (let’s just assume that you have no labels on the card with your info) leaving your Copyright and/or Name could help big time in finding/locating you. Plus, you are writing data into RAW files, so if you ever needed to prove that you are the author of a photograph, the RAW file along with your contact info could make for great evidence.
If you are planning to use the WiFi features of the camera to send images to a smartphone or a tablet, you will find all the available menu options here, as well as other options such as enabling touch controls on the LCD.
Make sure to add a few important items under “MY MENU”, so that you can have quick access to them. Personally, I add a few menu options here such as “ISO sensitivity settings”, “Interval timer shooting” and “Exposure delay mode”, but that’s all a matter of preference.
Lastly, don’t forget that you have the feature to automatically calibrate your lenses. You will need your camera set up on a tripod, with a high-contrast subject set to desired distance. Then you need to fire up Live View, press the AF mode button on the side of the camera and the video recording button at the same time, and after holding the two for a few seconds, you will receive a notification on the screen. Press “Yes” and the lens should automatically calibrate. If you want to find out about how AF micro adjustment works, see my article on lens calibration.
If you would like to find out more about the D500, check out my article “11 Things You Need to Know About the New Nikon D500“.
I hope you found this article useful. Once again, these are settings that work for me and they might not necessarily suit your needs. It is best that you explore your camera and learn about each setting as much as you can in order to take advantage of all the available features and customizations!
Just got a D500 and followed your tips for initial setup. Instant results. Thanks!
Thank you very much for all the information. I’m having a problem with the centre press on the joystick to change the AF mode, nothing happens. Would you have an idea?
Nice article
Hi. Thanks for the info it is really helpful and definitely given some improved shots. I take quite a lot of rugby matches.
The bit I am currently struggling with is getting motion pictures whilst they are playing under flood lights.
I get a lot of noise/blurry photos no matter what I seem to change the settings to. Anyone got any set up suggestions it would be greatly appreciated. Using a sigma 70-200mm sport lens
Great article. Was wondering what the advantages would be using D72 in AF when shooting birds-in-flight…?
See How to Photograph Birds in Flight with Sharp Results, Get Familiar with Your Gear, 1. Autofocus Settings by Libor Vaicenbacher:
photographylife.com/how-t…n-flight/2
Thanks
Thank you!!! I was having issues with my focus and used this as a guide, and it worked amazingly!!!
I have a D500. I change the “color space” to sRGB, but in the EXIF Info it says Adobe RGB, then I change to Adobe RGB and the EXIF Infos says Adobe RGB, then I change back to sRGB and double check that it has been correctly selected, but when I take a photo the EXIF Info says Adobe RGB and not sRGB. Why does it not change. Please help. Thank you.
thank you so much for detail explanation
Hi. I went through and used all your recommended settings and suddenly the autofocus is not working (through the shutter button or through the AF-ON button which I had been using ) What have I done wrong?
Thank you!