Without a doubt, the Fujifilm X-T4 is a very advanced, and highly capable stills and video camera, thanks to its excellent image quality, 5-axis in-body image stabilization, and a fast processor capable of handling 10-bit 4K video at 60 FPS. Despite its many strengths, the Fuji X-T4 has plenty of controls and menu options that can be difficult to grasp, even for seasoned photographers. In this article, I will go through most of the camera controls, as well as the menu system of the camera, which will hopefully help our readers in understanding the camera a little better.
Controls and Handling
Just like its predecessors, the Fuji X-T4 has a number of dials, buttons, and controls that perform different functions. Let’s go through each one of them, starting from the front of the camera.
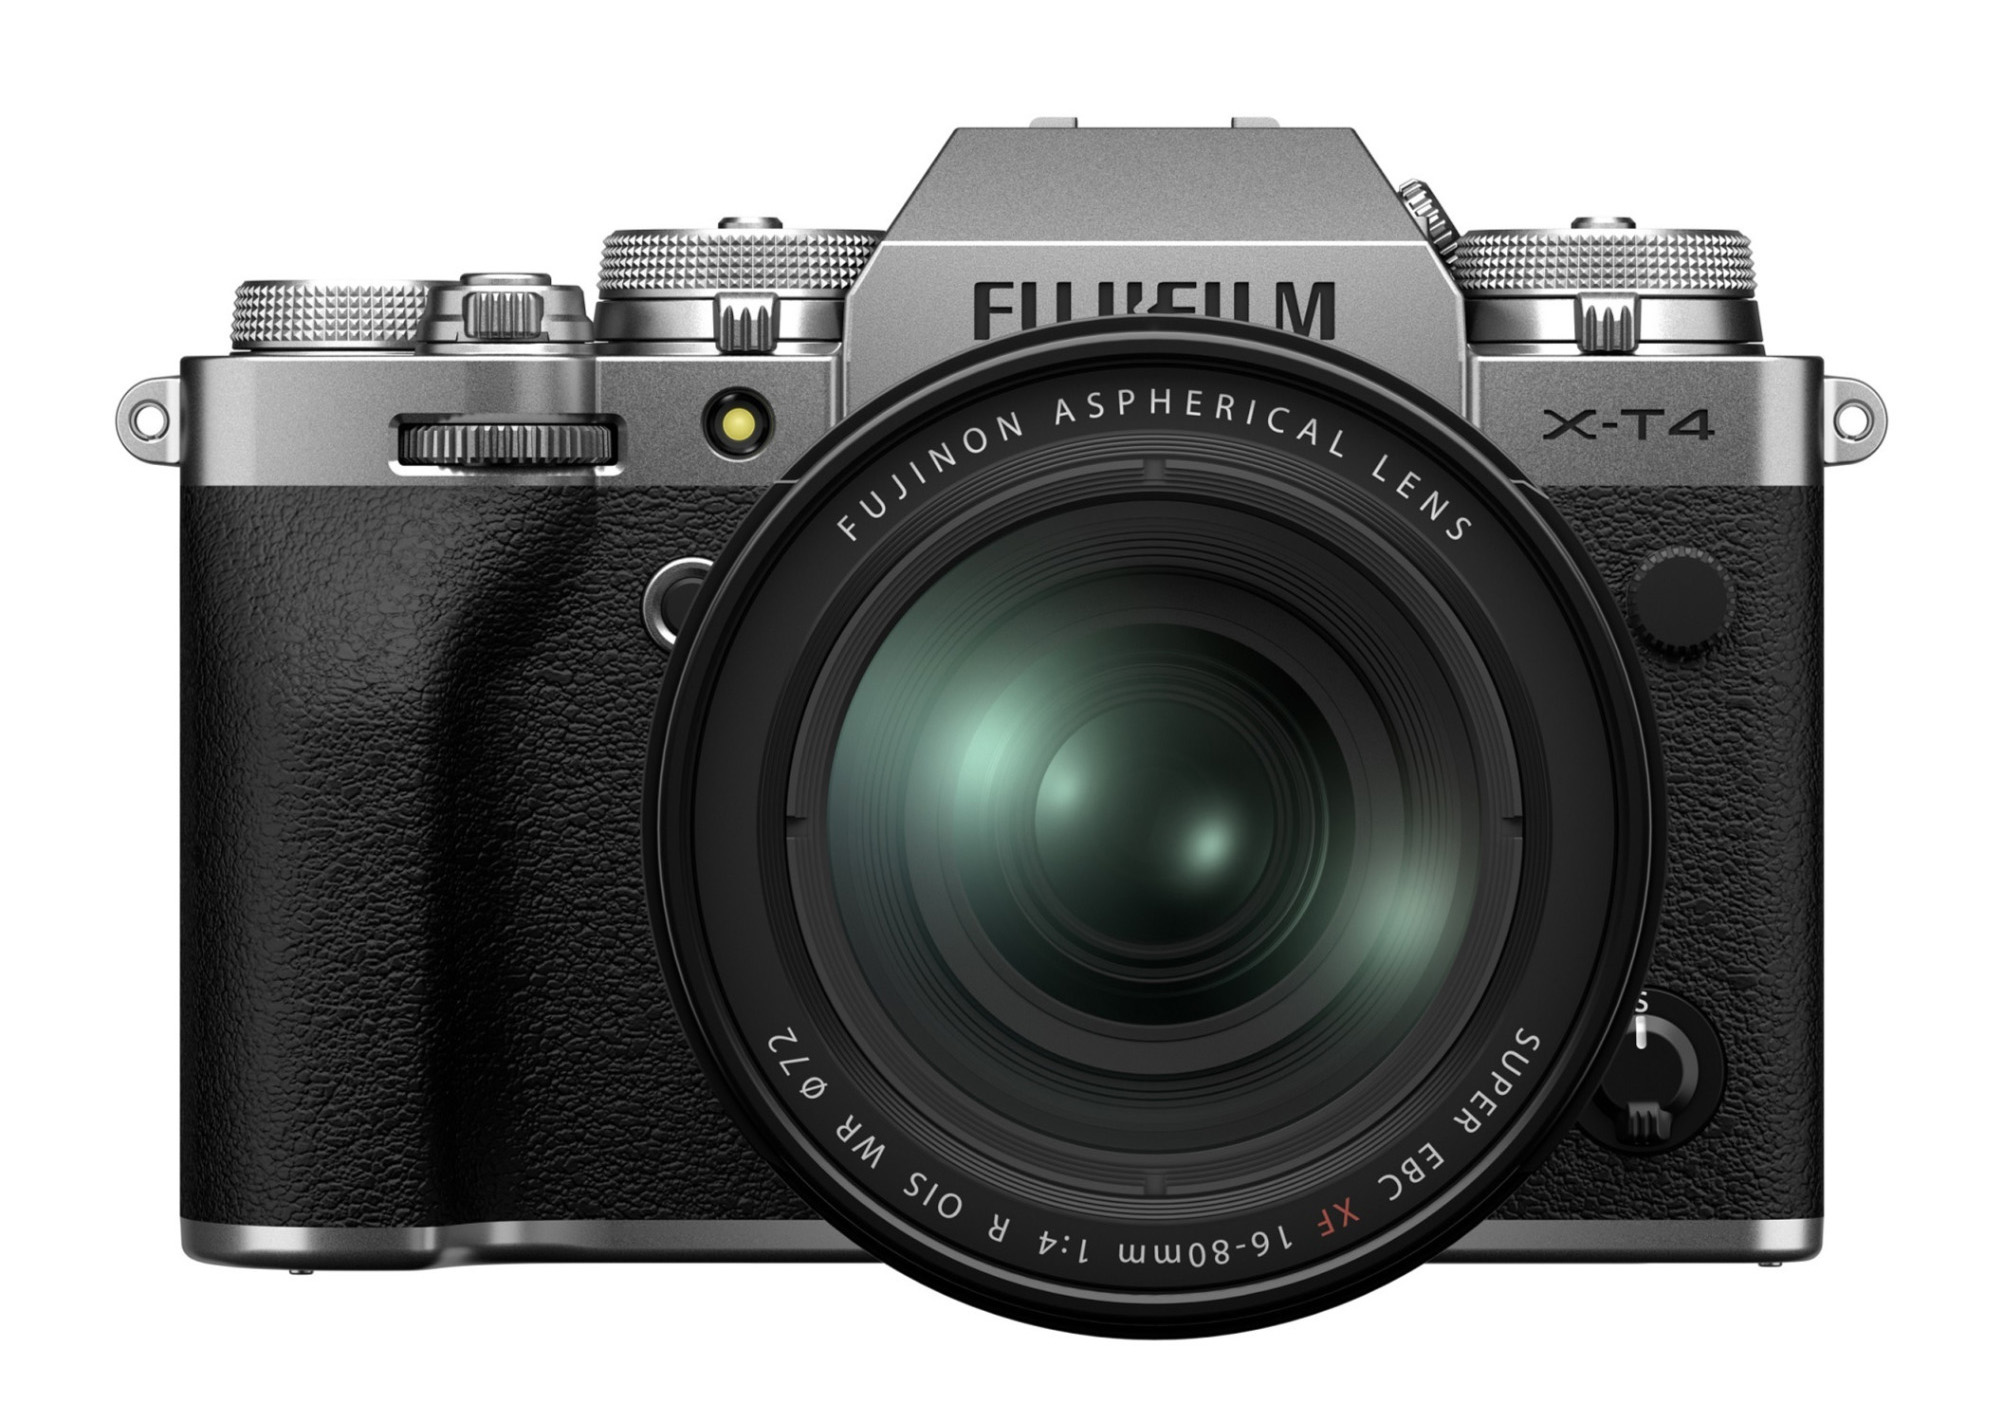
Front of Camera
Below is an overview of all the buttons and features around the mount, as well as the front dial (from left to right):
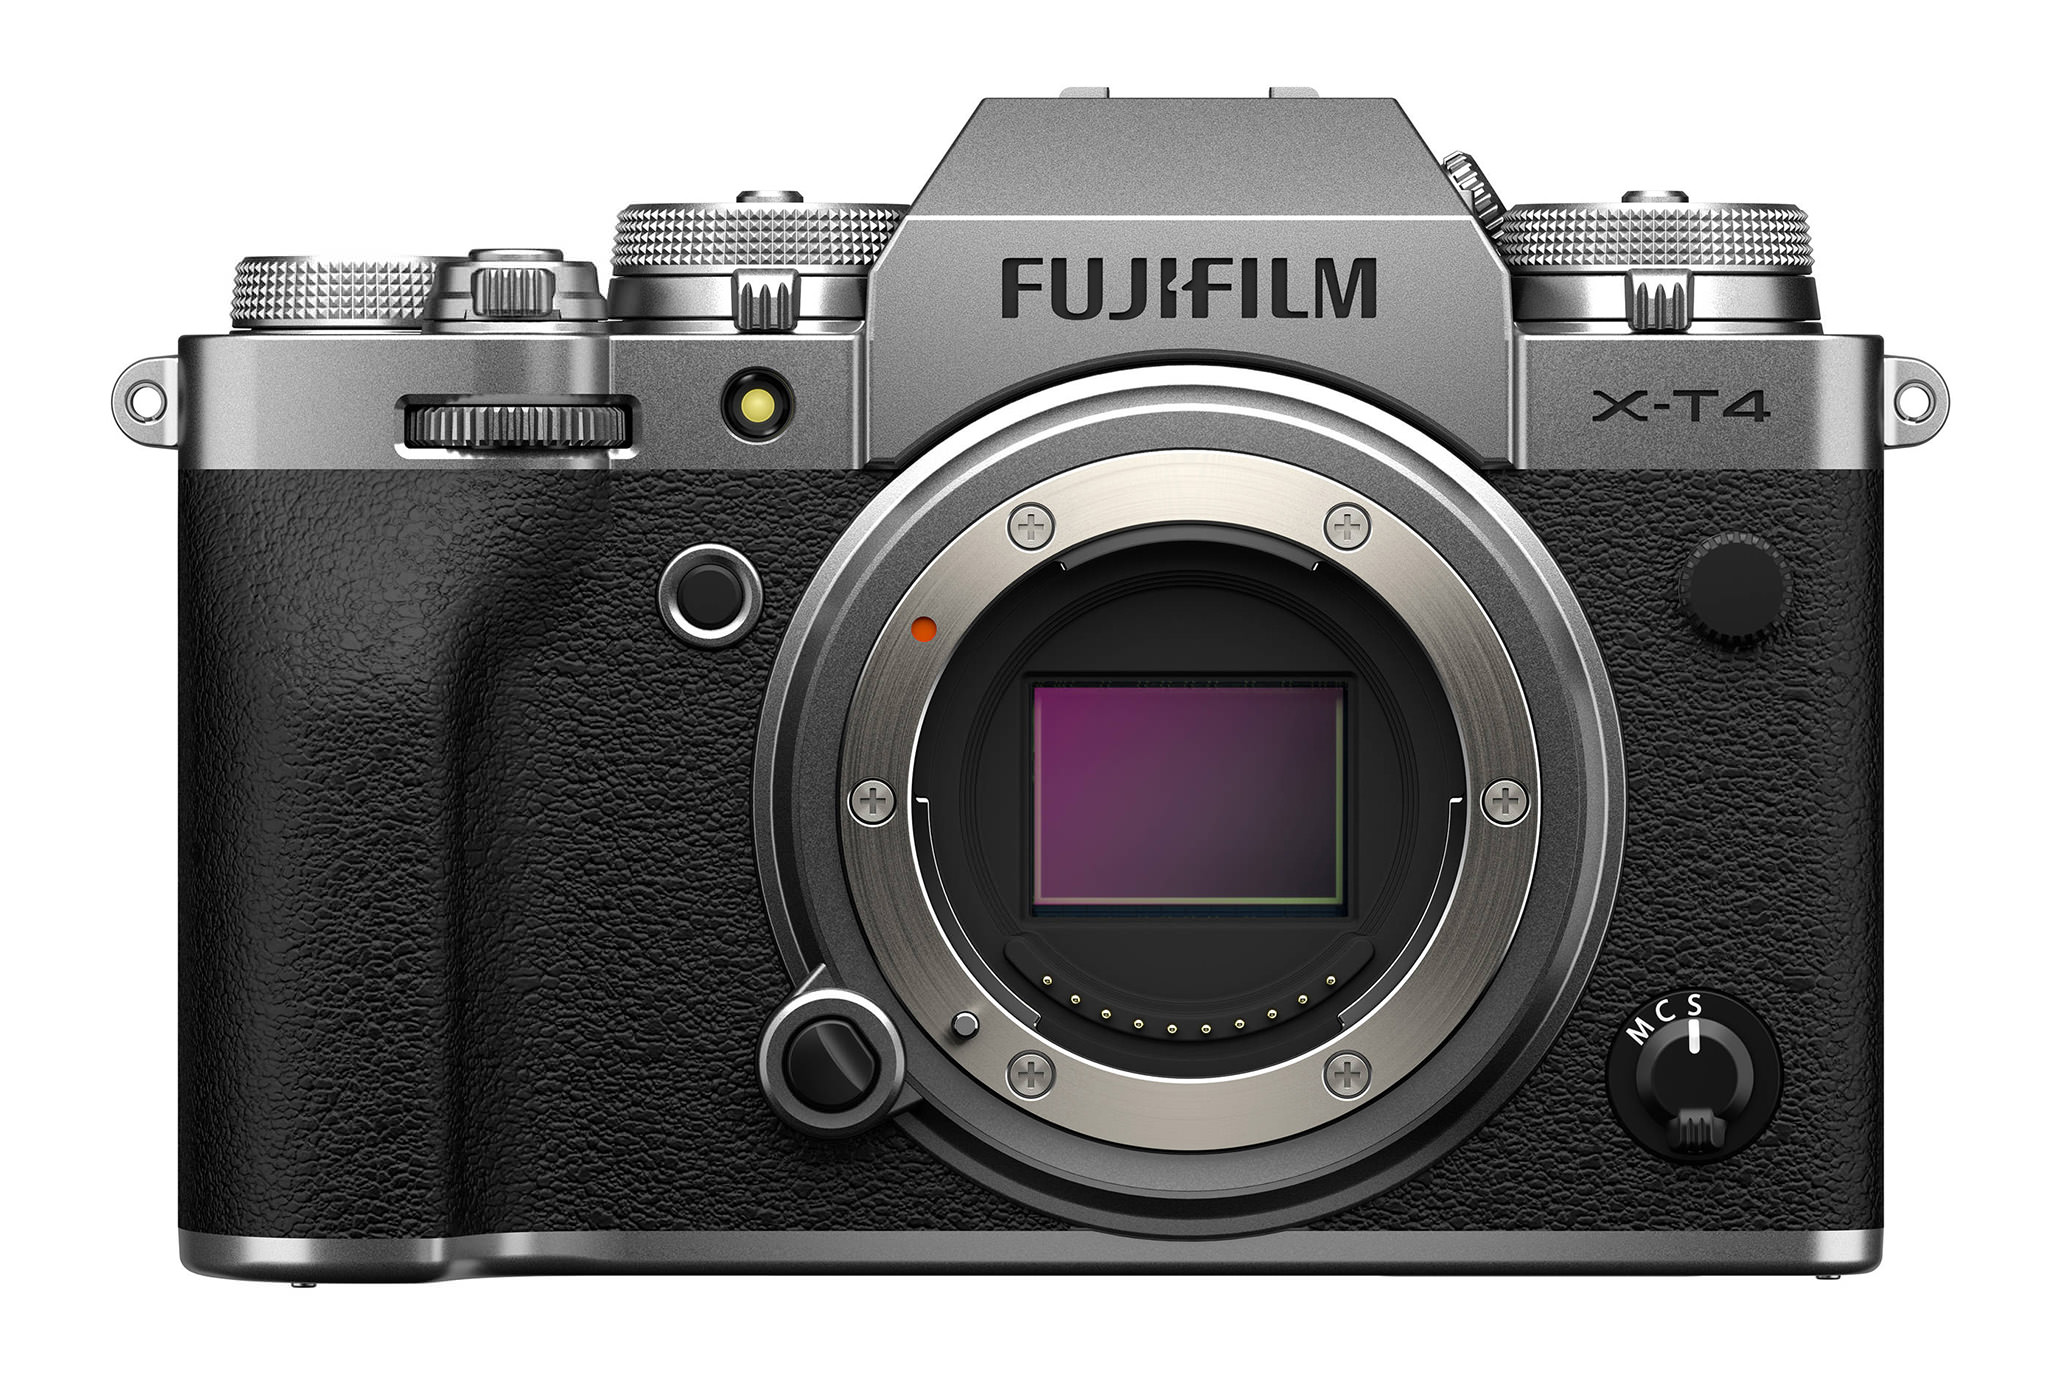
- Front Command Dial: Can control certain settings depending on how you’ve set up the camera. For example, in the Set Up Menu, set “ISO Dial Setting (A)” to “Command” (Set Up -> Button/Dial Setting) and you can use this command dial to change your ISO settings any time you have the top ISO dial set to A (Auto).
- Lamp: AF-Assist Illuminator shines light when there is not enough ambient light for focusing, or when self-timer is engaged.
- Function Button (Fn2): Customizable. I keep it at default “Drive” value.
- Lens Release Button: Hold the button and rotate the lens to detach it.
- M/C/S Switch:
- M: Manual Focus, although you can still press the AE-L button to autofocus, you can’t track a subject across the frame when focusing this way. If you have assigned “Focus Check” to a certain button in the Set Up menu, or enabled the dedicated “Focus Check” option in the AF/MF menu, autofocusing in M mode will magnify your LCD screen or electronic viewfinder view.
- C: Continuous Servo Autofocus, where the X-T4 focuses continuously when you hold down the shutter button and doesn’t stop (unless you press the AE-L button and lock focus). Use this mode when shooting moving subjects. “Focus Check” doesn’t work in Continuous Servo Autofocus mode, and neither does manual focus.
- S: Single Servo Autofocus, where the X-T4 focuses once and locks down after it has acquired focus. This is the best mode to use when your subject is stationary. After autofocus has locked on in this mode, you can spin the focus ring or press your assigned Focus Check function button to magnify your focus point and adjust as needed. This is the mode I tend to use the most on my X-T4.
- Sync Terminal: For connecting external flash units.
Top of Camera
Next, let’s go over the top of the camera:
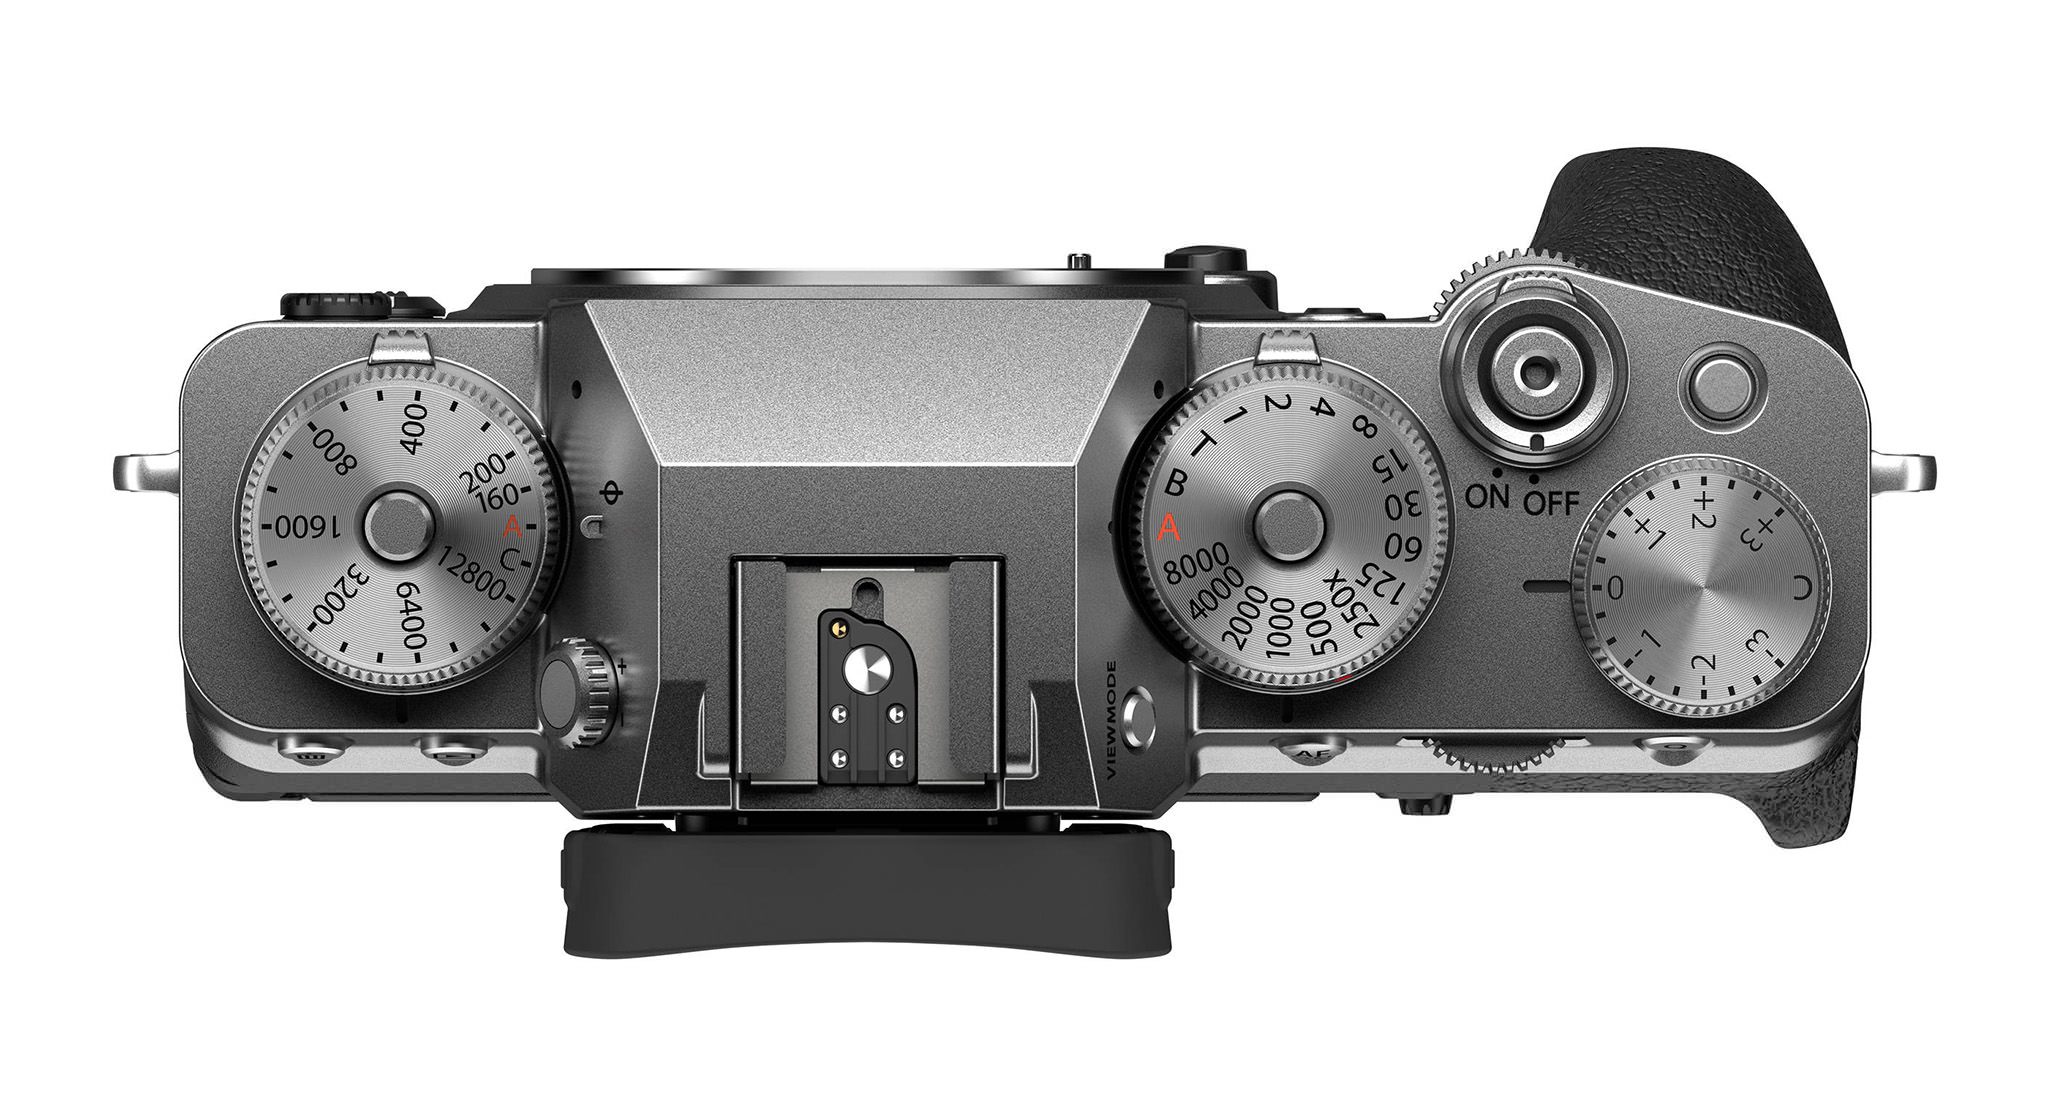
- ISO Setting / Drive Dial: Rotate this dial to change your ISO. By default, I keep it at “A” for Auto ISO. Once you choose a value, you can press the button on the top to lock it. The bottom of the dial allows changing the camera Drive.
- Diopter Adjustment Control: Adjust diopter to make viewfinder clearer and tailored to your eyes.
- View Mode Button: For switching between EVF and LCD. You can disable the viewfinder entirely, or enable it exclusively (disabling the rear LCD). You can also set it to detect your eye, switching between the rear LCD and the viewfinder when you look through the viewfinder, or disabling the rear LCD entirely and only turning on the viewfinder when you look through it. I set mine to Eye Sensor + LCD Image Disp, so that the camera automatically switches between EVF and LCD.
- Shutter Speed / Still-Movie Dial: Use this dial to change your shutter speed. Set it to “T” and use the rear command dial if you prefer adjusting shutter speed that way. I typically set mine to “A” and set aperture through the lens, in order to shoot in Aperture Priority mode. The Still / Movie dial on the bottom is to simply switch between stills and video shooting modes.
- Function Button (Fn1): A customizable function button. I set mine to “AF Mode” to be able to quickly switch between different autofocus modes, as pointed out below.
- On/Off Switch / Shutter Release Button: Use the switch to turn the camera on / off, half-press the center button to focus, and fully release the button to take a picture.
- Exposure Compensation Dial: The dial allows going from -3 EV to +3 EV of exposure compensation. You can also set it to Custom (C) value and go as far as ±5 EV.
Back of Camera
Lastly, let’s review the back of the camera, once again from left to right:
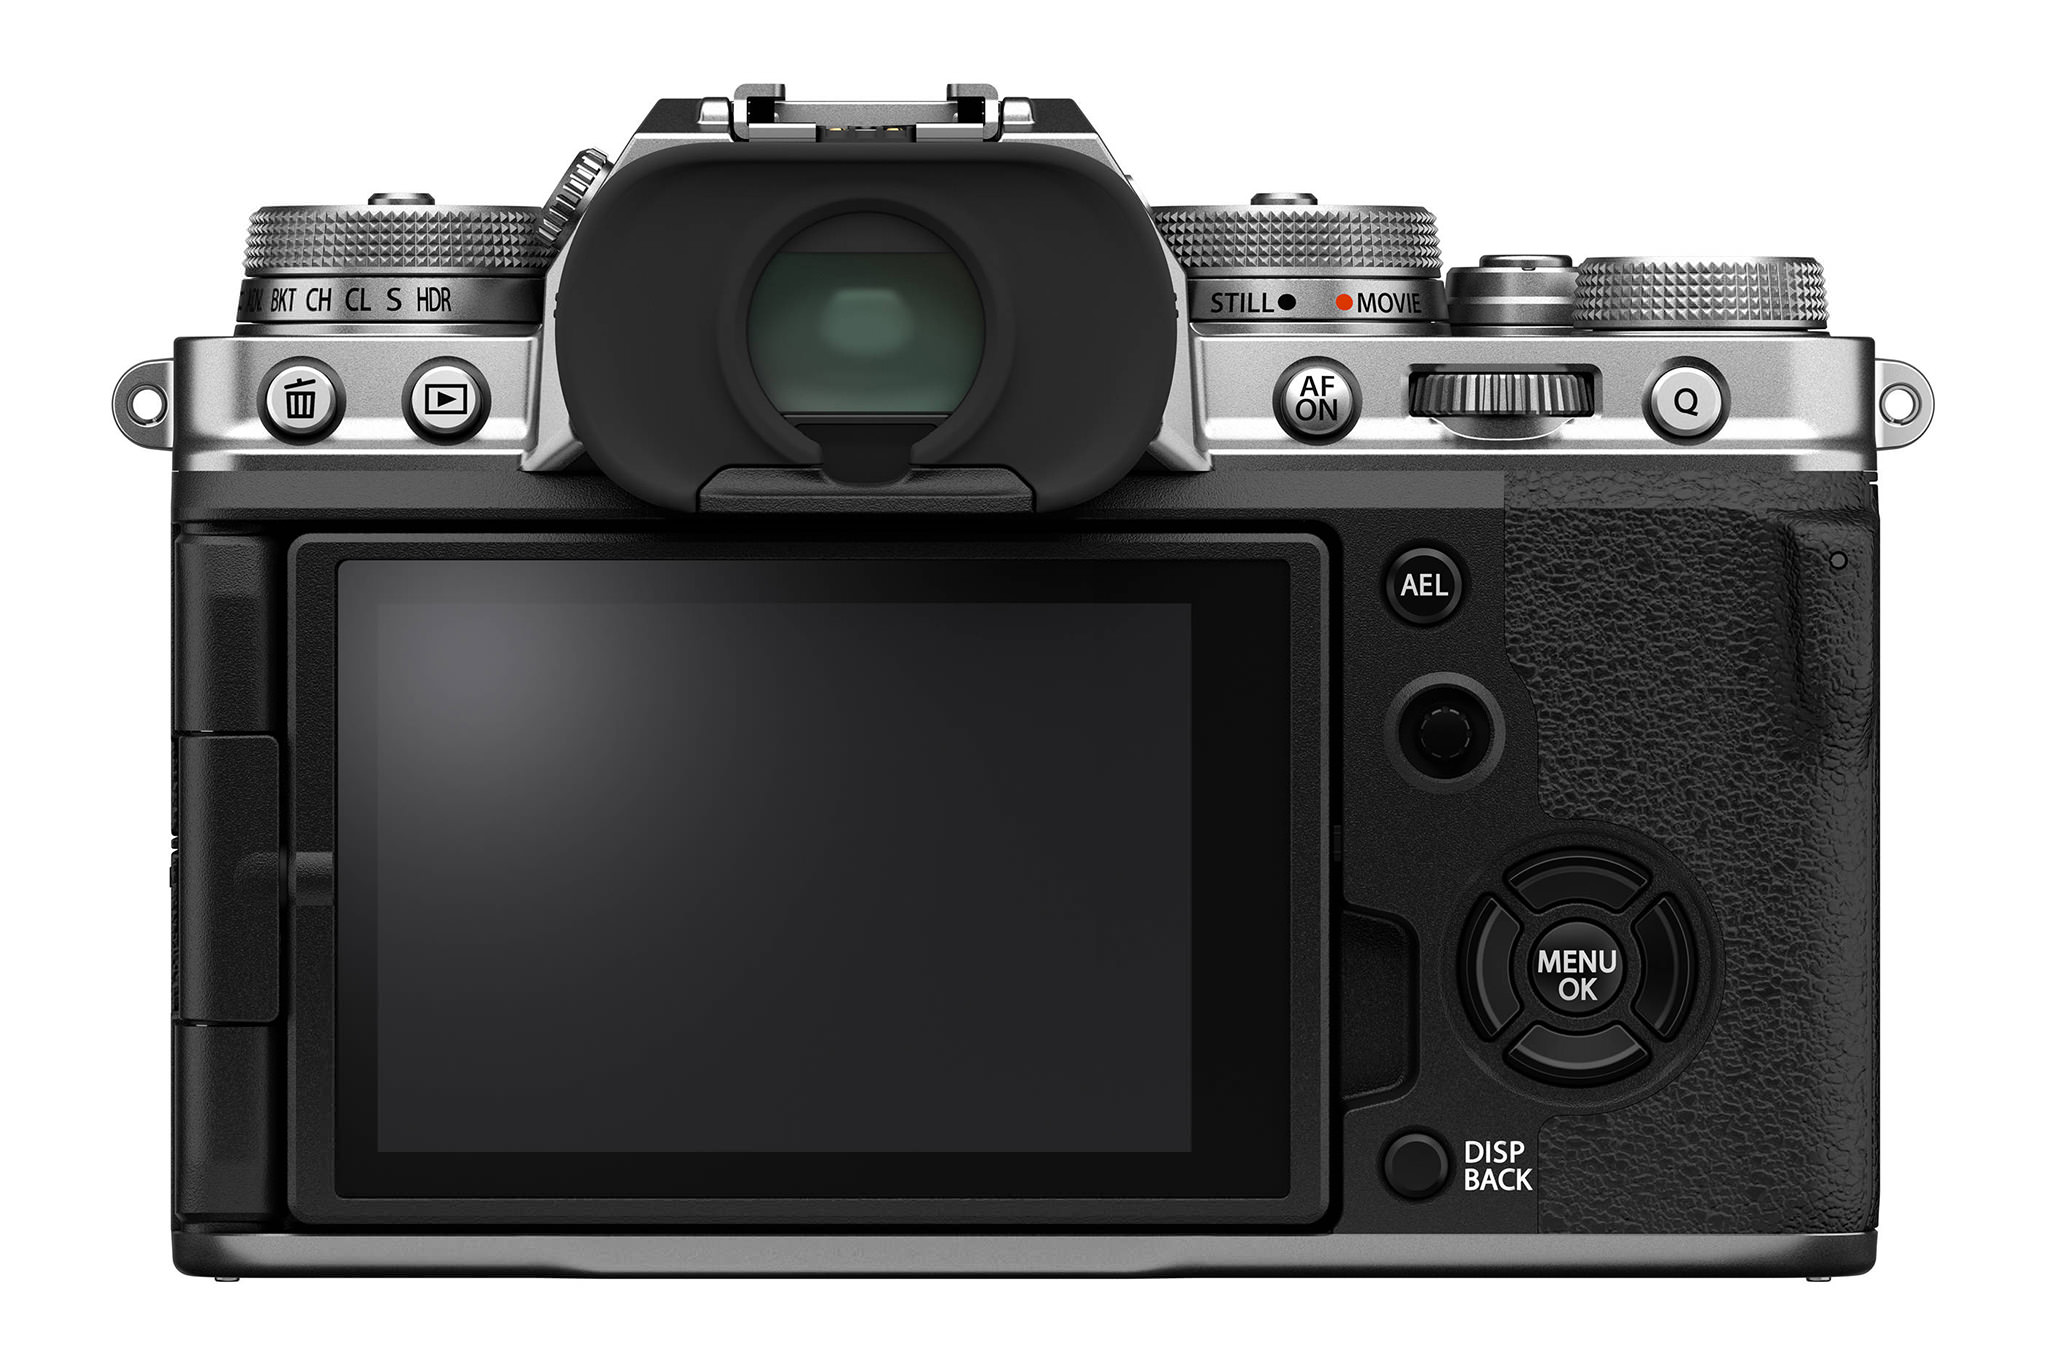
- Trash button: Deletes images.
- Review button: Plays back your images.
- AF-ON button: Dedicated button for back-button focusing.
- Rear Command Dial: Can serve a number of functions, including changing shutter speed if you have the top shutter speed dial set to T. You can also scroll this wheel to change the size of your autofocus zone once you press in the joystick. And in playback mode, push in this dial to instantly jump to magnified view. Note that due to a design flaw on Fuji cameras, you need to be shooting RAW + JPEG rather than just RAW if you want to magnify your photos to 100% in playback mode.
- Q button: Pops up a quick menu where you can change some common settings. You can adjust your personal Q menu in the “Edit/Save Quick Menu” setting in the X-T4’s Set Up menu.
- AE-L button: By default, holding this button locks exposure. You can customize the button in the “Function (Fn) Setting” menu within the Set Up menu (Set Up -> Button/Dial Setting). I prefer changing the menu option “AE/AF-L Lock Mode” to “AE&AF On/Off Switch”, so that simply pressing the AE-L button locks autofocus, without having to continue to hold it.
- Joystick: This is how you move autofocus points. Press in the joystick and rotate the rear command dial to change the size of your autofocus zone.
- Menu / OK button: Enters the menu and selects items.
- Left, Down, and Right Arrow Buttons: Fully customizable function buttons, assigned via the “Function (Fn) Setting” options in the Set Up menu (under the “Button/Dial Setting” header).
- DISP/Back: Changes the information displayed on your LCD or viewfinder while taking photos, or to go back when navigating in the X-T4’s menu system.
Fuji X-T4 Camera Settings
In the next section, we will take a deep dive into the camera menu in order to set it up optimally. Please keep in mind that while these recommendations work for my needs, they might not be suitable for all use cases. There is a good reason why Fuji has so many menu options and customizations. Feel free to use the below as your starting point, and customize, as needed.
Image Quality Setting
- Image Size: Grayed-out (when shooting RAW); when shooting JPEG or RAW + JPEG pick “L 3:2” for maximum size
- Image Quality: RAW
- RAW Recording: Lossless Compressed
- Film Simulation: Standard (doesn’t affect RAW photo)
- Monochromatic Color: Default
- Grain Effect: Off (doesn’t affect RAW photo)
- Color Chrome Effect: Off (doesn’t affect RAW photo)
- Color Chrome FX Blue: Off (doesn’t affect RAW photo)
- White Balance: Auto (doesn’t affect RAW photo)
- Dynamic Range: DR 100% (doesn’t affect RAW photo)
- D Range Priority: Off (doesn’t affect RAW photo)
- Tone Curve: Default (doesn’t affect RAW photo)
- Highlight Tone: 0 (doesn’t affect RAW photo)
- Shadow Tone: 0 (doesn’t affect RAW photo)
- Color: 0 (doesn’t affect RAW photo)
- Sharpness: 0 (doesn’t affect RAW photo)
- High ISO NR: 0 (doesn’t affect RAW photo)
- Clarity: 0 (doesn’t affect RAW photo)
- Long Exposure NR: For long exposures, the camera will take two photos: one of the actual scene, and another with the shutter curtain closed that is simply a “dark frame.” The dark frame will still have some noise and hot pixels, which the X-T4 then subtracts from the actual photo, giving a result with less noise. Turn it on if you don’t mind waiting twice as long for long exposure photos to capture, and turn it off if you’re willing to accept some extra noise in exchange for a faster capture process.
- Lens Modulation Optimizer: Off
- Color Space: Adobe RGB (doesn’t affect RAW photo, but a bit more accurate for histograms than sRGB)
- Pixel Mapping: Tells the Fuji X-T4 to read its own sensor for hot pixels in order to subtract them from photos (including RAW). It’s worth doing this from time to time, especially if you start seeing new hot pixels appear in your images.
- Select Custom Setting: Selects among the custom settings you create from the Edit/Save Custom Setting menu option below.
- Edit/Save Custom Setting: Allows you to create combinations of JPEG-only settings, such as sharpness, noise reduction, dynamic range, and so on, to form a particular look. You don’t need to create these unless you are shooting JPEG, or you want to affect how the in-camera preview of images appear when you review them.
- Mount Adaptor Setting: 21mm.
AF/MF Setting
- Focus Area: Shows all focus points and lets you select yours, akin to pressing in the joystick. Turn the rear dial to change the size of your focusing zone.
- AF Mode: Single Point, since it gives you the finest control for focusing in most cases. If you want to track subjects, it is best to use Wide/Tracking and then enable continuous autofocus via the switch on the left of the camera. To track subjects across a smaller portion of the frame, but not just a single point, use Zone and change its size to suit your needs by pressing in the joystick and then turning the rear dial to change the size of your focusing zone.
- AF-C Custom Settings: The default value of 1 (Multi Purpose) works well for most subjects. Depending on what you are shooting, you might want to adjust this setting.
- Store AF Mode by Orientation: For storing focus points differently when shooting vertical vs horizontal. I set mine to “On”.
- AF Point Display: This only matters when you are in Zone or Wide/Tracking AF Modes, not Single Point. It simply shows your focusing points, which some photographers will find helpful and others distracting. I leave mine Off.
- Number of Focus Points: 425 (only available in Single Point) since it gives you the most control. Some prefer 117 simply because you can switch between them faster, since fewer focus points are available.
- Pre-AF: This is continuous autofocus, prior to taking the photo, on the point you select. Its goal is not to track your subject, but to make it faster to autofocus when you actually want to capture a photo, since your focusing is already close to optimal. However, it can be quite spastic and distracting, so I tend to leave it off.
- AF Illuminator: On, shines a light to help focus on nearby objects in dark environments. Can be annoying if you are photographing people, so you may want to turn it off.
- Face/Eye Detection Setting: Depends upon your subject, but you have plenty of options here. I tend to leave mine at Face On/Eye Auto, which detects and focuses on the person’s face and the nearest eye. If you want special control to only focus on the left or right eye, this is where you would do so.
- AF+MF: On, allows you to manually focus even when in autofocus mode by turning the focusing ring on the lens (only after autofocusing already).
- MF Assist: This one is down to personal preference in terms of which visual aids you prefer when focusing manually. Personally, I tend to leave it either at standard (which does nothing additional to help when you are manually focusing) but sometimes choose Focus Peak Highlight with Red High in order to emphasize the exact parts of the subject that are the sharpest.
- Focus Check: This is only used when you are in manual focus mode (accessed via the switch on the side of the camera) or single-servo autofocus and have already focused. When on, this magnifies your focusing area to make it easier to focus manually each time you turn the lens’s focusing ring. I almost always leave it on, as otherwise, it can be difficult to tell which areas of the photo are as sharp as possible, even with something like focus peaking enabled.
- Interlock Spot AE & Focus Area: On, since it means that your metering system (when using spot metering) bases its reading upon the focus point, not a small point in the center of your frame.
- Instant AF Setting: Even when you are in manual focus mode on the X-T4, you will have the ability to autofocus by pressing the AF-ON button. This setting controls whether you want to focus continuously as you hold down the button, or just once. I almost always keep it on AF-S for single-servo autofocus, but if I am trying to track a moving subject, I occasionally switch to AF-C.
- Depth-of-Field Scale: When a focus indicator is displayed, either with the depth of field preview button or one of the cycles of the DISP button, this option changes what the X-T4 tells you is “in focus.” I recommend selecting Pixel Basis because it is more stringent. Film Basis can be too relaxed about what counts as in focus versus not in focus.
- Release/Focus Priority
- AF-S Priority Selection: Release. I prefer to have the camera take a photo when I click the shutter. Some will prefer this option to be “Focus” to make sure the X-T4 believes it is focused properly before it allows you to take a photo.
- AF-C Priority Selection: Release, same reason
- Touch Screen Mode: AF. I prefer using the touchscreen to select a focus point and focus on it.
Shooting Setting Menu
- Drive Setting: Choose from different drive settings and customize them. I personally set my Bracketing Setting for the following: Bkt Select -> AE Bkt. AE Bkt -> 3 Frames, 1 EV Step. Sequence Setting -> “- 0 +”
- Sports Finder Mode: Off. Use this for shooting fast action. It enables 1.25x crop (shows the crop frame in the viewfinder) and allows capturing images with zero blackouts.
- Pre-Shot ES: Off. When shooting action, the camera will start capturing images when the shutter release is half-pressed. I would recommend keeping this turned off unless you are shooting something critical.
- Self-Timer: Off for taking photos without a delay, 2 seconds for tripod-based landscape work, 10 seconds when you need to run in front of the camera and join a group photo.
- Save Self-Timer Setting: On. This allows you to save the state of the self-timer mode, so that it stays in that mode even after you turn the camera on and off.
- Self-Timer Lamp: On. This blinks the lamp in front of the camera when the self-timer mode is activated.
- Interval Timer Shooting: For taking time-lapses. It lets you select the interval between shots and the total number of photos.
- Interval Timer Shooting Exposure Smoothing: On. Makes sure that the exposure changes don’t happen too quickly when shooting time-lapses.
- Photometry: Allows changing the camera’s metering mode. By default, I keep mine on “Multi”, but occasionally switch to “Spot” when I need to engage spot metering.
- Shutter Type: E-Front + Mechanical + Electronic. The camera automatically switches between different shutter types depending on the shutter speed.
- Flicker Reduction: On.
- IS Mode: Continuous. Engages in-body image stabilization continuously.
- ISO Auto Setting: Lets you adjust the behavior of Auto ISO. This is an important setting, and the X-T4 gives you the ability to set up to three different Auto ISO defaults that you can select depending upon the occasion. “Default Sensitivity” is the ISO that the X-T4 will attempt to use. It will only use a higher ISO if your scene is dark enough that your shutter speed has reached the “Min Shutter Speed” value you set. “Max Sensitivity” is the highest ISO value that the X-T4 will use, no matter what. If you’re taking pictures in such a dark scene that your Max Sensitivity and Min Shutter Speed values have already been reached, the X-T4 will use longer shutter speeds rather than increase ISO any further. I set mine to “Auto 2”, with ISO 160 set as Default Sensitivity, ISO 1600 set as Max Sensitivity and Auto set as Min Shutter Speed.
- Multi Exposure: Off. Used for shooting several images and combining them into a single one.
- Wireless Communication: Lets you sync the X-T4 to an app on your phone.
Flash Setting Menu
- Flash Function Setting: Main flash control. Off when you don’t need flash, typically TTL when you do (through-the-lens automatic flash). Leave at default settings.
- Red Eye Removal: Off
- TTL-Lock Mode: TTL Lock gives you a consistent flash exposure across several images when enabled (which must be done via a custom function button you assign). This chooses whether the exposure is locked at the prior metered exposure or by metering via a set of pre-flashes.
- LED Light Setting: Lets you use the video light on your flash to act as a focus assist beam and/or a catchlight. Keep it off unless you have a need for either of those features. Grayed out except with external flash.
- Master Setting: Choose a flash group for a hotshoe-mounted flash, or turn it off and light the photo entirely with off-camera flash. Grayed out unless using external flash.
- CH Setting: Channel for master and remote flash communication
Set Up Menu
- User Setting
- Format: To format your memory card
- Date/Time: To change the camera’s internal clock
- Time Difference: To tell the X-T4 when you are in a different time zone and adjust the internal clock accordingly
- Language: Select default language
- My Menu Settings (separate for stills and movies): Add, rank, and remove items from your “My Menu” – very useful
- Sensor Cleaning: To clean camera sensor
- Battery Age: Let’s you check the age of your battery
- Reset: Lets you reset all Shooting menu or Set Up menu settings
- Regulatory: Shows regulatory information for different regions
- Sound Setting
- AF Beep Vol: Off
- Self-Timer Beep Vol: Off
- Operation Vol: Off
- Shutter Volume: Off if you want only noises from the mechanical shutter. For 100% silent operation, turn this off and enable electronic shutter only (from “Shutter Type” under the Shooting Setting menu). If it’s disconcerting to hear no noise at all while taking pictures with the electronic shutter, such as when looking through the optical viewfinder, turn the volume to low.
- Shutter Sound: I prefer the first sound because I find it to be the most realistic.
- Playback Volume: For playing back movies. I tend to leave it at 7 or so.
- Screen Setting
- EVF Brightness: Auto
- EVF Color: 0
- EVF Color Adjustment: Default
- LCD Brightness: 0
- LCD Color: 0
- LCD Color Adjustment: Default
- Image Disp: How long your photo pops up on the rear screen or electronic viewfinder after capture. Set it to “Off” if you don’t want any display at all, and 0.5, 1.5, or Continuous if you want some length of post-capture image display.
- Autorotate Displays: Whether or not the EVF information display rotates as you change camera orientation. I leave it On.
- Preview Exposure/White Balance in Manual Mode: Preview EXP/WB, so that you see a preview on the rear LCD and EVF of how bright the photo will be after taking it. Only relevant when aperture, shutter speed, and ISO are all set manually.
- Natural Live View: Off
- F-Log View Assist: On
- Framing Guideline: Grid 9 (personal preference, but I find Grid 24 too distracting and HD Framing unhelpful for stills)
- Autorotate PB: Off. This one is important; left On, your vertical photos will automatically rotate during image review, taking up a smaller portion of the LCD. When Off, you can just rotate the camera to review vertical photos more effectively.
- Focus Scale Units: Meters versus Feet
- Aperture Unit for Cinema Lens: T Number
- Dual Display Setting: R: Focus, L: Frame
- Disp. Custom Setting: Choose the information displayed in the optical viewfinder and the EVF/rear LCD. There are a lot of options here, and it’s all personal preference, but I recommend turning off anything that is unnecessary for your work simply to eliminate distractions.
- Large Indicators Mode (EVF/OVF): Increase the size of information displayed in the viewfinder (both OVF and EVF).
- Large Indicators Mode (LCD): Increase the size of information displayed on the rear LCD.
- Large Indicators Display Setting: Pick which settings and icons will be increased in size when you have Large Indicators Mode turned on.
- Information Contrast Adj.: Standard
- Q Menu Background: Transparent (for both stills and movies)
- Button/Dial Setting
- Focus Lever Setting: Affects whether moving the joystick changes autofocus points. When set to Lock, you can’t move autofocus points with the joystick at all. Set to “Push Joystick to Unlock,” you can only start moving your autofocus points when you push in the joystick once. Set to On, you move autofocus points any time you move the joystick. I keep it On.
- Edit/Save Quick Menu (stills and movies): A very useful option to adjust the layout and content of the Quick Menu (accessed by pressing the Q button). Change this to suit your shooting style and most frequently accessed controls.
- Function (Fn) Setting: Lets you assign custom functions to six FN buttons, four touch controls, AE-L, AF-ON, rear dial and Q button. This is down to personal preference, but it is a good way to access settings you use all the time without entering a menu. Here is what I set to mine, in order: Fn1 (AF Mode), Fn2 (Drive), Fn3 (Photometry), Fn4 (ISO Auto Setting), Fn5 (Face Detection On/Off), Fn6 (Preview Depth of Field), T-Fn1 (Histogram), T-Fn2 (Performance), T-Fn3 (Natural Live View), T-Fn4 (Electronic Level), AE-L (AE-L), AF-ON (AF-ON), R-Dial (Focus Check), Q (Q).
- Selector Button Setting: Fn Button.
- Command Dial Setting: (1) Aperture, (2) Exposure Compensation, (3) ISO, (Rear) SS.
- Shutter AF: AF-S (ON), AF-C (ON)
- Shutter AE: AF-S/MF (ON), AF-C (ON)
- Shoot Without Lens: On
- Shoot Without Card: Off
- Focus Ring: The direction you rotate the focus ring, as viewed from behind the camera, to focus toward infinity. This is another personal preference; I am a Nikon shooter, so I prefer clockwise.
- Focus Ring Operation: Nonlinear
- AE/AF-L Lock Mode: Determines whether the AE-L button must be held down continually in order to lock your settings, or whether it locks after one press and stays until you press the button a second time. I set my X-T4 to On/Off Switch (S) to get the latter behavior, since I don’t like holding down the button in order to lock autofocus.
- AWB-Lock Mode: AWB On When Pressing.
- Aperture Ring Setting (A): Auto
- Aperture Setting: Grayed Out
- Touch Screen Setting: On, Off, On, On, Right Side of the screen. I love the ability to move focus points while viewing through the EVF by moving my thumb on the rear LCD. The right side of the screen works best for this.
- Lock: Default
- Power Management
- Auto Power Off: 2 Min (personal preference)
- Performance: Normal
- EVF/LCD Boost Setting: EVF/LCD Resolution Priority.
- Save Data Set-Up
- Frame Number: Continuous. If you select Renew, the camera will begin file names from 0001 each time you format your memory card or insert a new one, resulting in more photos with duplicate names
- Save Org Image: Off. When On, saves two copies of a photo when redeye reduction is enabled (one without the reduction applied). No other effect on your photos.
- Edit File Name: You can give your photos custom file names to start the image, such as FUJ_0001. I customize this for each camera I own in order to reduce duplicate file names from multiple cameras. The X-T4 lets you choose different file names for sRGB and Adobe RGB images.
- Card Slot Setting (Stills and Movies): Sequential.
- Select Slot (Stills and Movies): 1
- Select Folder: Don’t Change
- Copyright info: Fill in your information in case you lose your camera or it gets stolen.
- Connection Setting: Set your preferences for connecting the X-T4 to other devices, including a phone.
Movie Setting Menu
If you switch the dial under the shutter speed dial to “Movie”, your camera menu options will change accordingly. I am not going to cover these settings, because they are very specific to movie shooting, and can vary greatly depending on your needs.
I hope you find the recommended settings above useful for setting up your Fuji X-T4. If you have any questions about the information in this guide, feel free to ask in the comments section below.
Hi Mr.Nasim, I like your presentation of the content in extreme detail. What camera setting do you suggest for bird in flight for Fuji xt4 camera. Please advise. Thanks.
After I take a photo the Back Screen displays the vertical color bars… I can’t find how to stop this from displaying. Help!
My viewfinder is grainy. Is this typical or is it something that could be changed in the Menus?
This is a useful article, one that I return to, especially when nobody is available at Fujifilm UK to help. One question: I am currently struggling with a pinkish wash to all stills (not movies) and cannot work out how to reset the camera to more natural colouring. I notice the monochromatic colour is greyed out so that I cannot change it. But can’t work out which setting has fixed the ‘pinking’ of the colour… any suggestions, please. I’m using the film simulation in standard so don’t believe it’s that.
Wow, have the same problem with stills, i was comparing raw files with the prehistoric XT1 and i was dissapointed with the results of the 4th generation flagship yada yada sensor, same as you, some pinkish tones that leaves the XT1 on a better position for stills only…the thing video looks so astonishing on the XT4 that the 90% of time i spent with the camera is exclusively fot that…making videos, surely my shutter count is no more than 300 photos and ive been able to get some jpegs directly from video after post…Anyway i dont want to carry two camera bodies so im looking to fix same problem you have…
Great in depth article and very useful to me as a first time owner of x-t4. I will take a lot from it.
Good article. Just so you know, the Dynamic Range setting apparently does affect the RAW file, that’s why you have to adjust the ISO. It basically does some in camera trickery where the shadows are at that ISO, I.e. 320 or 640, and then it drops the highlights to 160. The Pal2Tech YouTube channel goes over it in more detail
Hi, Just got my XT4, upgrading from XT2. Do not seem able to set it up so that my LCD/View finder show that actual shot ( lightness etc ). Moreover while my lens is on manual shutter mode, turning the lens ring does not seem to do anything to what I see, or indeed to the histogram. It all worked well for me on the XT2. Any thoughts what setting(s) need changing ?
Did you ever solve this problem? I’m having the same one!
Screen Settings -> Preview Exposure/White Balance in Manual Mode -> ON.
Hope it helps. When shooting with external flash – turn it off :)
I just noticed a second point I think should be considered differently than you suggested. When using the command settings as stated the ISO-switch should not be set to A (for auto) but preferably to C for command. That way the front command-wheel can be used for any ISO setting as well as all three available Auto-settings. On lenses setting the aperture-setting on the lens to A will make it possible to choose any aperture with the front command-wheel. Lastly, setting the shutter-speed dial to T will make it possible to use the back command-wheel to choose the shutter-speed. This will make it very easy to use the camera in manual mode.
Wooter – Thank you for your comment. I have been struggling with the command dial settings. With regard to using the front command dial to adjust ISO, I don’t understand how to access the three Auto ISO settings. I have set Front Command Dial 2 to ISO. When Dial 2 is selected (which is not exactly obvious), turning the dial will adjust the ISO, but I do not see an option for selecting Auto 1, Auto 2 or Auto 3. I’d appreciate your advice. P.S. Someone needs to do a YouTube video on this subject.
Hi I’m just trying to get used to my new XT4 and have put in all the settings you recommended with the front Dial on (M) manual. Do the setting still work in the same way when the Dial is moved to C or S potision
many thanks
frank
When I set my xt3 to lossless compressed, ……..