I recently wrote an article on hand-holding large and heavy lenses, which attracted quite a bit of attention and some nice comments and questions from PL readers. I am not really a writer, but a few people asked me about my technique for getting those shots. Let me start by saying that I am not an expert and there are many ways to skin a cat. So this is the way I get my shots and you will have to find your own way to achieving what you want. Let’s start with a “money shot”: what I would say is the shot of the day, the shot that made it all worth it.
So how did it happen and how could you prepare yourself to get this type of shot? To answer this question, I will reverse engineer what happened that morning and show you how I got several shots from a seemingly innocent sitting photo.
I arrive at a place I know the owl has been hanging around and find her sitting on a rock wall near the ocean. I know from previous encounters that this bird is not too skittish, but this is not something you will always know. So I start shooting from a reasonable distance and slowly approach in a stop-and-shoot manner, moving closer after each burst of shots. I am hand-holding a 600mm Nikon VR lens here, but a tripod works just as well. I edge my way forward slowly, letting the bird get used to my presence, but respecting it and not getting too close. Here is where it all started, “the sitting shot” so to speak:
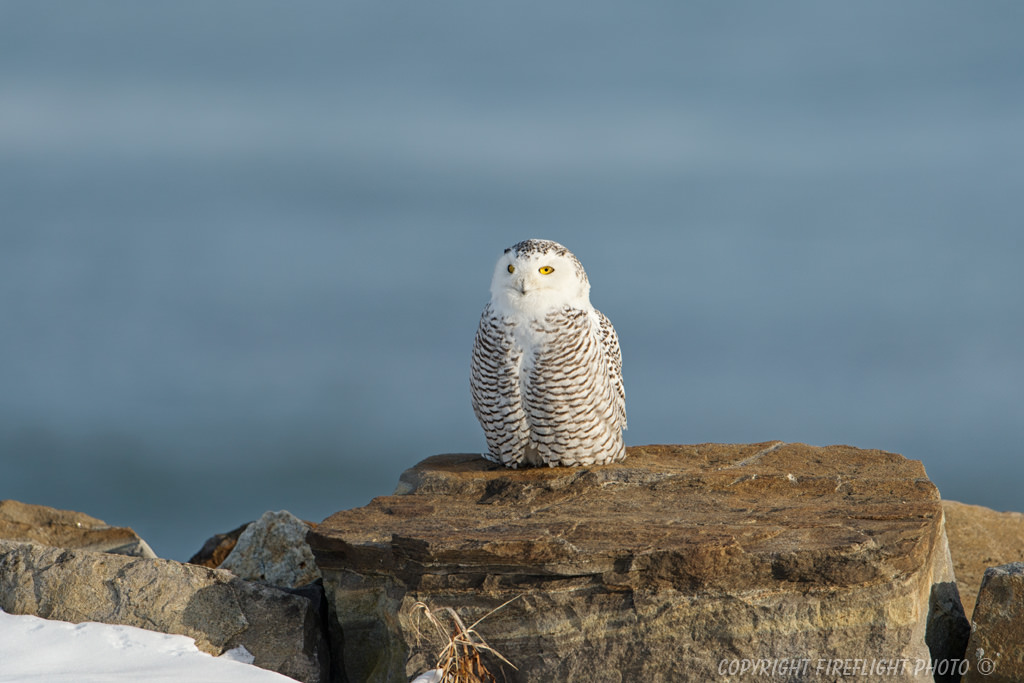
Get your sitting shots first – let the bird settle down after your intrusion into its space, but be ready, as it can fly any time. Observe it while photographing, see the signs that will indicate if it is about to fly or move. Make sure you put yourself on the right side of the light if possible. I was limited in this instance because there is an ocean and stone wall in my way to the perfect side of light, so I positioned myself the best I could.
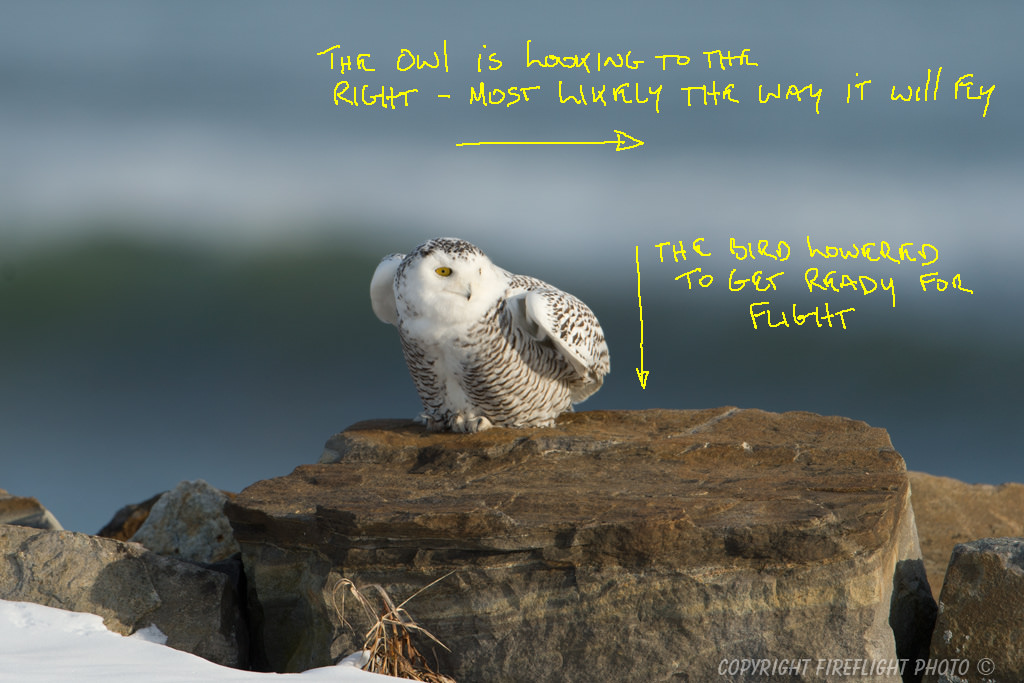
As you can see, the owl is giving signs on what it is about to do. You need to learn these signs, as they vary from animal to animal and you need to be ready when it happens.
You need to decide what kind of shot are you going for: flying or sitting, etc. In this instance, I want flying so I need to make sure that my distance and framing are appropriate for the owl’s wingspan. What looks small in the sensor can become surprisingly big when it launches. In this instance, I didn’t judge it correctly and clipped the wing:

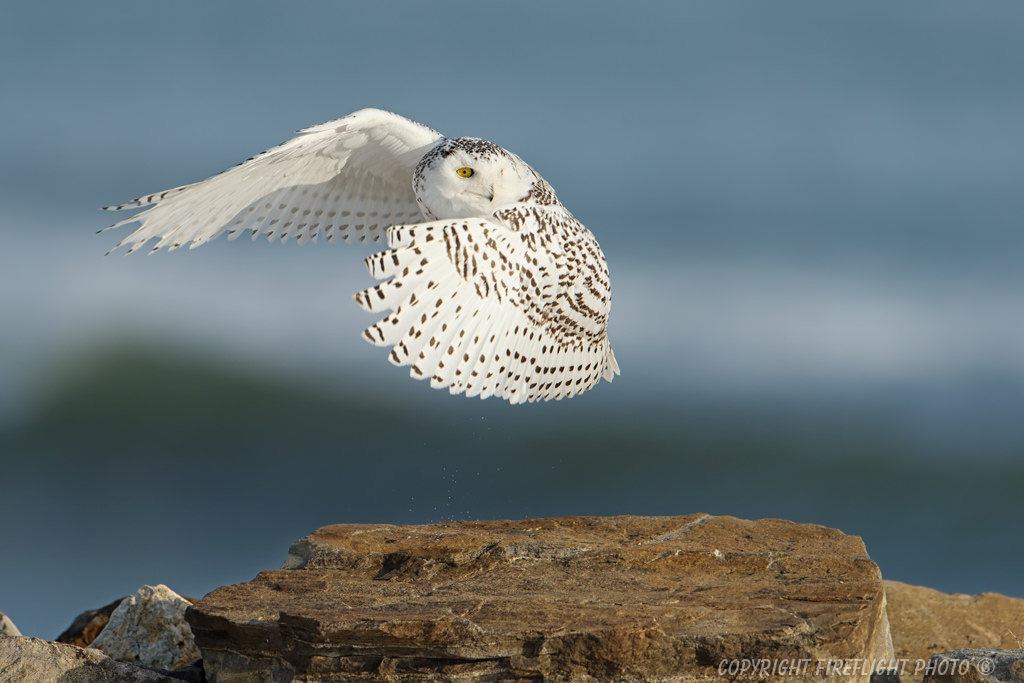
While I did clip the wing, the next shot after the one above turned out to be the “money shot” I showed at the beginning of the article and it was perfectly framed for a 300dpi plus size crop. Because you saw the signs and studied your subject, you are hopefully ready for what is about to happen. The owl is going to go from a calm sitting subject one second, to one launching several feet into the air vertically and then rapidly switching to the direction it indicated it would go. So when you see the signs, you need to be prepared to lift and pan rapidly with the bird. It doesn’t end with the money shot, because you won’t know that until you get home and look at all the photos on your computer screen and judge them for sharpness, composition, placement etc.
In other words, the action isn’t over until it’s over, keep the trigger down and get the whole sequence, there may be some surprise photos in that sequence you didn’t see while all the action was happening.
Here is a sample of such a surprise photo in the sequence:
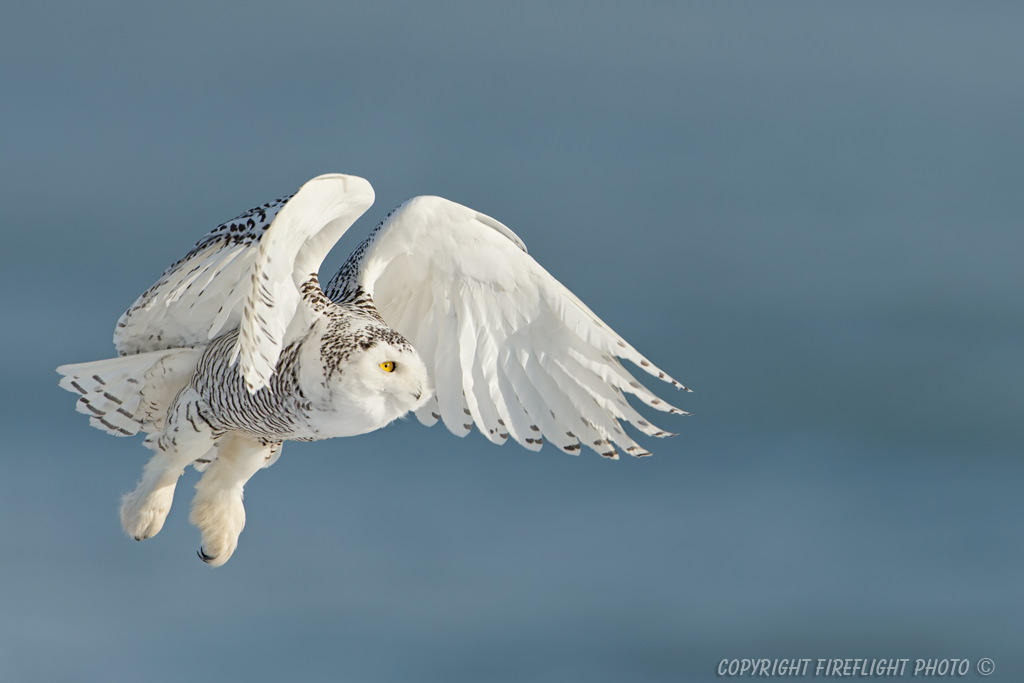
This was a beautiful pose that happened just a few frames into the flight. I did cut off and mess up several full wingspan shots, but you can’t have everything. You have to choose what you want carefully and set your distance from the subject. Too far away and the photo won’t be as detailed as it can be, too close and you’ll miss (crop or cut off parts) all the action shots.
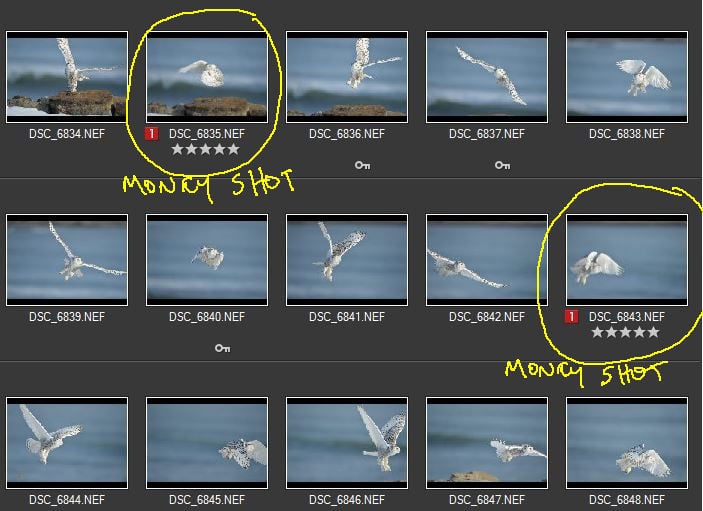
Let’s talk about frames per second as it pertains to this article. You can get great photos at 4 or 5 frames per second, but the slower the fps, the less likely you will have a chance of getting the perfect pose the first time. At 4 or 5 frames per second, you might have to have several attempts to get that perfect eagle getting the fish pose or you might get lucky and get it the first try. For action and bird photography, frames per second matter, the more you have the more frames you will have to choose from. As you can see from the photo below, many frames per second increase your chance of getting that perfect pose you are looking for. I know the sample screen capture is low quality, but you can see all the different poses that are part of this flight sequence and there are some beautiful ones there I wish I had gotten.
That’s why there is always a next time and a better shot, as we, photographers are never happy :)
For those wanting to know about my gear, I was shooting with the Nikon D4 at 10 to 11 frames per second. Also, look closely at the below snapshot and you will see quite a few shots that I missed, because I didn’t pan well enough or just clipped parts of the owl off:
I will finish this article by also mentioning that the buffer size of your camera matters. Before the D4, we had a D3X which shot at about 4.5 frames per second and slowed to an excruciatingly slow speed after the buffer was full. This meant that I had to time when to press the trigger to coincide with the action I anticipated, start shooting too early and the buffer would fill in the middle of the action and slow to less than 2 frames per second while writing to the memory card. The D4 has an amazing, basically unlimited buffer and this means that I can just start shooting whenever I want and follow all of the action to its end. This is something you will have to think about with your camera and be aware of; it may or may not be a problem for you.
I hope you will find the above information valuable. Most importantly, just get out there, get into it and have fun!
Here is a parting photo from the owl’s flight sequence that is definitely a keeper. Remember, this all started from a sitting shot:
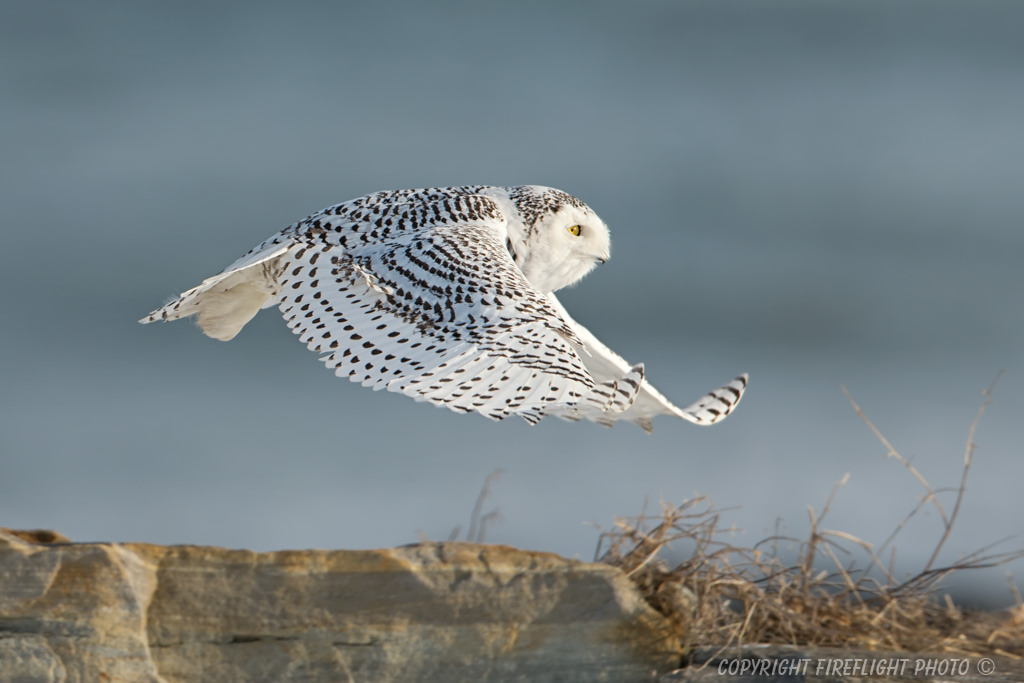
Table of Contents
Focus Point
I am going to start with the focus point and where it should be, and that would be on the eye of the subject. There are many things that can be forgiven in photography, but a blurry eye is not one of them. All the power is in the eyes and your own eye will always be drawn there without you thinking about it. I am shooting with a Nikon D4 so this is Nikon terminology, I use Single Point AF Mode, because I am a control freak and don’t let the camera make the decisions for me. There is Dynamic Area AF Mode you might want to consider trying and see if it works for you, but don’t try it on a once-in-a-lifetime shot.
The insert in this photo will show you what I mean about ideal focus point location. The longer the focal length of your lens is and the shorter the distance to the subject, it becomes that much more important to precisely place your focus point on the eye. In a multiple subject shot, your focal point should be on the animal that is the closest to you.

There is also a story to this photo that is important in telling prospective buyers and making the image mean something more to those who hear it. This will make the image more compelling and personal to them.
Room to Move
It is also important that you consider how you frame or crop the photo. I like to give the animal room to move or open space in the direction the animal is looking or heading. An image will not look as good, if for example, you have the subject placed against the right edge of the image and that is the direction it is heading. It will look like the animal has nowhere to go or about to fly/walk / etc off the edge. Have a look at this final version of my image and note that the bald eagle has room to fly further to the left of the image.

Now I will crop it badly, so you can see a side-by-side comparison of what I mean by leaving room to move. The following image will show you the difference and you judge for yourself which one looks better:
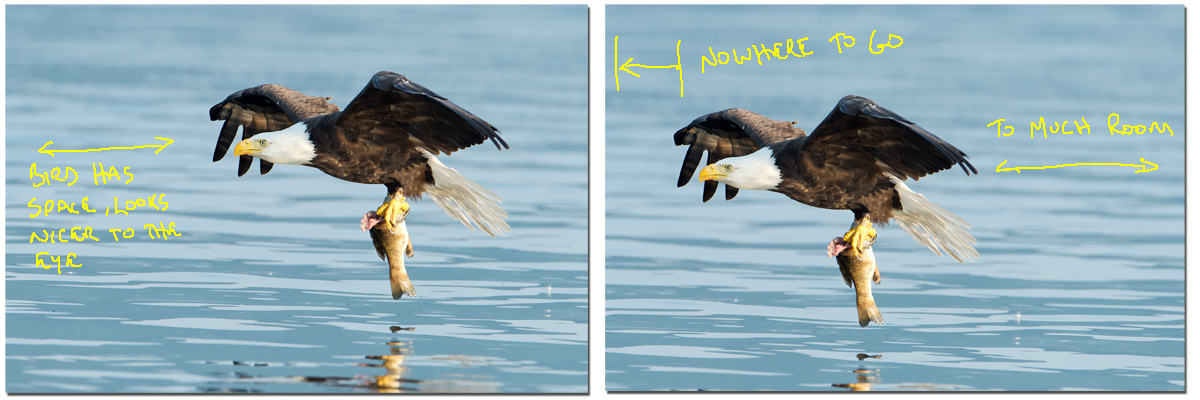
To me and many others, the subtle difference in the left image makes a huge difference to how it will be perceived.
Background Placement
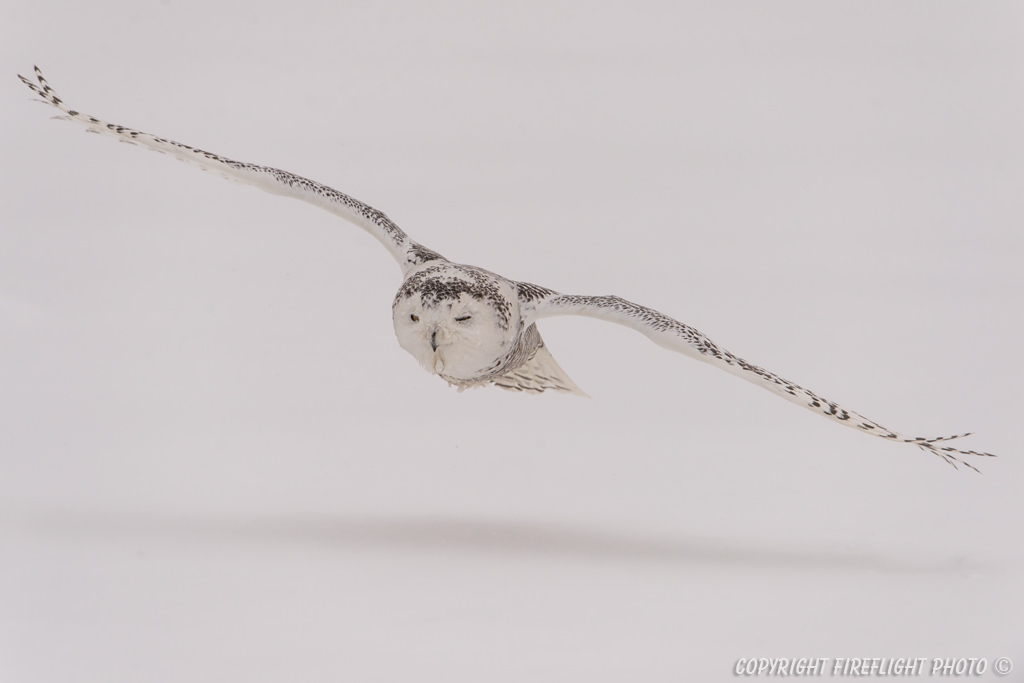
What is the story you are trying to convey and how do you best display that in your image? Let’s revisit the snowy owls that I have been photographing for the last two months and done previous articles on.
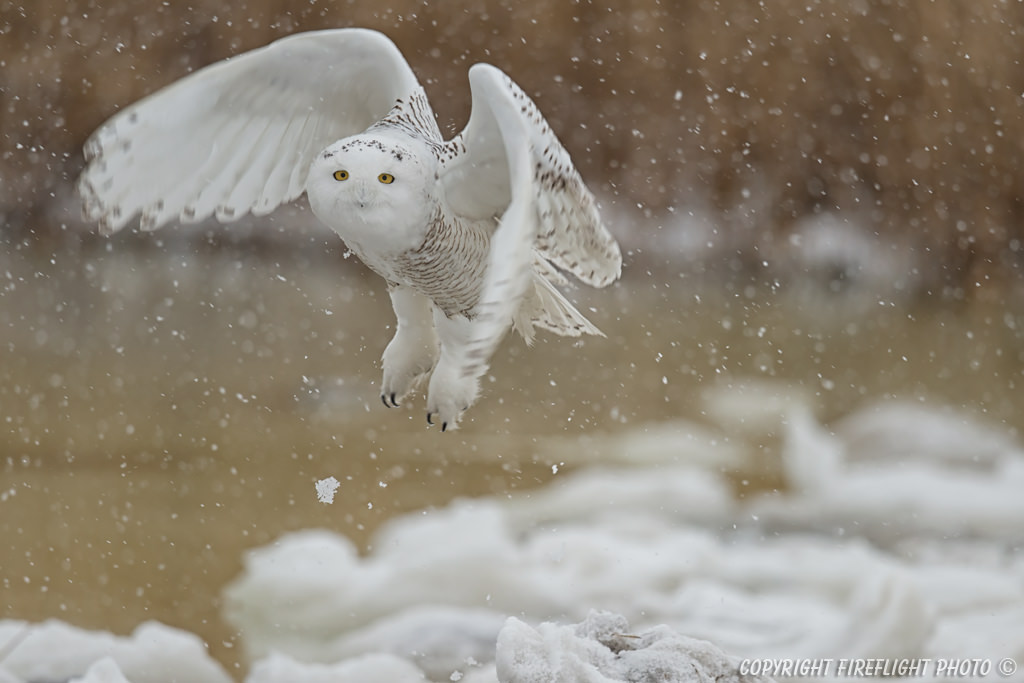
I went out last two winter snowstorms with the intention of getting dramatic photos of owls with snow falling as the backdrop and important part of the image. Darker colors over lighter ones in the backgrounds will show this snow falling more prominently and better convey the message of the image. This first image will show you a photo I am happy with, because I was able to move 15 feet to the right of my original position and place a nicer golden color behind the owl that contrasts with the white snow falling and will show beautifully in the final image.
When I first found this owl, I was to the left of it with a white snow-covered marsh as the backdrop. Let me tell you that it is hard to convey a snowstorm with white as a backdrop. The following image was taken during a more severe snowstorm than the previous photo, but it just doesn’t look like it, because the snow doesn’t contrast with the background. This subtle difference in how you frame your subject can make a huge difference and should be taken into consideration. The below image is a beautiful photo, there is ice on the owls face, it’s eyes are almost closed because the heavy snow falling hurts it eyes and it is heading right for me. However, you just can’t see the snow falling, because it blends with the background and thus an important element of this story is missing.
Action or Motion Versus Static
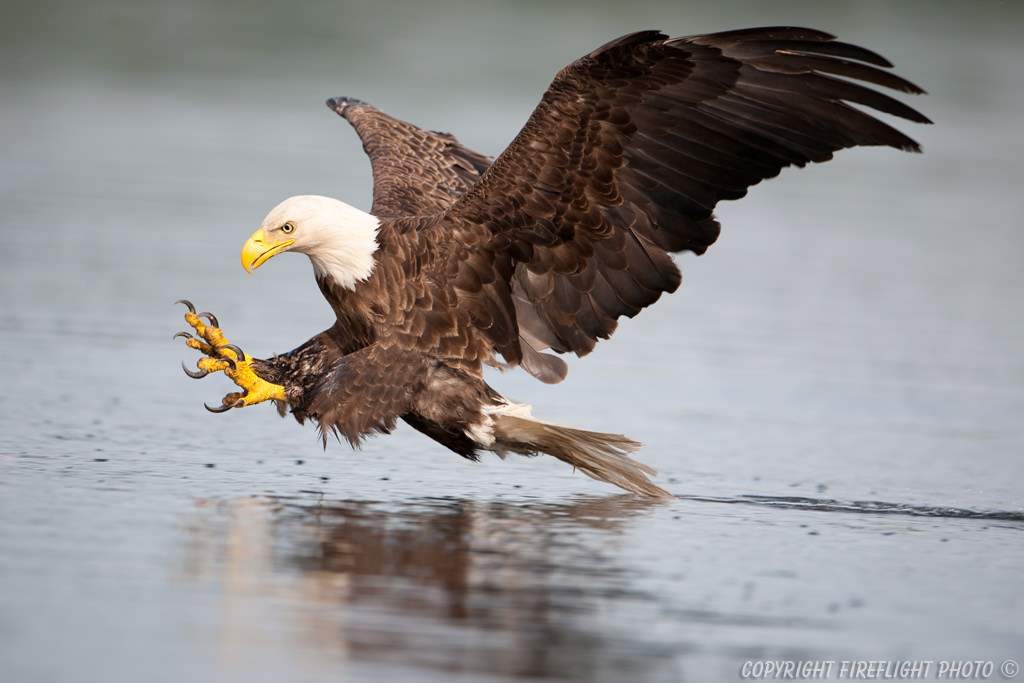
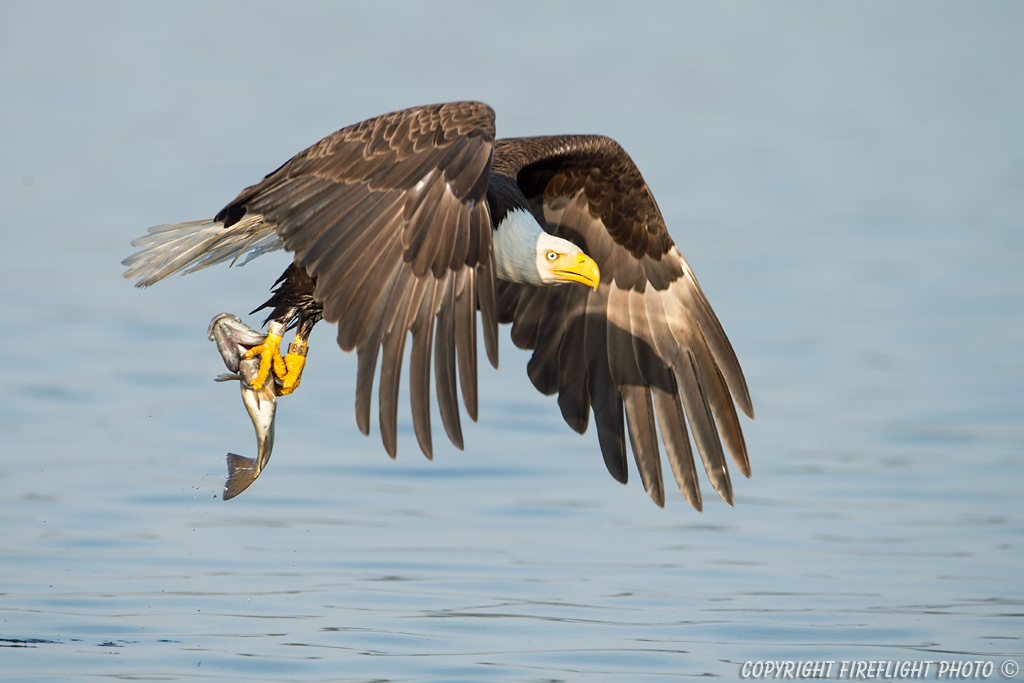
You can’t always pick what is going to happen, but if you are ready for it when it happens, there are action sequences everywhere waiting to be captured. To me, an image with an animal running, flying, jumping or whatever can be very visually appealing and help tell a more dramatic story. Don’t get me wrong, there are many other ways to tell a story and one way that is very powerful in doing that, is animal interaction. Action is a little harder to capture, because it usually requires a quick reaction time and most likely you will need to pan to follow and capture it. I won’t show another owl photo to convey my point, as you have seen plenty of dramatic in-flight sequences and I hope you agree that action shots can be very appealing photos. The bald eagle shot below is one of my favorites – it is an action shot taken standing in a 17ft dingy, hand-holding a 600mm. It has drama, anticipation, beautiful early morning light, great composition and even the subtle tail feathers dragging across the surface help tell the story of this image. Also, a reminder about the frames per second importance I have mentioned before for action shots, the bald eagle with the fish at the very beginning of this article is the very next frame to the image below and both were taken approximately 1000th of a second apart.
Anticipation
Anticipation can be a frustrating photographic tool, because what you anticipate will happen doesn’t always turn out so. When it all comes together, the image you get can be so rewarding and will drive you further along in your photography adventures and skill level. Sometimes you have to wait hours in one spot for what you think might happen and sometimes things happen suddenly and unexpectedly, in either case, be ready for it.
My wife and I had just arrived at a bald eagle nesting site on a pond near our house, as we stopped to say hello to another boat that was eagle watching. I saw a streak of white movement far away in the middle of the pond. I realized it was a bald eagle flying low over the water and then I saw a splash. The eagle had just grabbed a fish and was about to bring it back to the chicks in the nest. Here is where anticipation worked for me, I quickly moved my boat into a direct line of flight between the bald eagle and the nest hoping the eagle would take a direct route to the nest. In this instance the eagle not only took a direct route, but it also flew past our boat low over the water and within 30 feet of us. I snapped that 600mm around, focused on the face of the bird and held down the trigger following the bird until the angles were bad. The resulting bald eagle with a fish in its talons image is one of my favorite bald eagle photos. The lesson in this story is the fact I had learned the eagle habits and through that knowledge had put myself in a great location to possibly grab an action photo.
Animal Interaction
I mentioned it briefly earlier that interaction is another powerful tool that helps tell stories and create more powerful images. Haven’t we all gone ‘oooh aaah’ at an image of a six-month-old bear cub cuddling with mum or some similar image? Having more than one animal in the photo presents more complications to the photographer, like multiple sets of eyes that generally need to be sharp. Let me show you an image of a bald eagle delivering fish to its eaglet that I just love and then I will explain the technical difficulties of this shot, which will in itself lead to other pointers for you.
This image has a story, the baby screaming for food about to arrive, the anticipation of the delivery, the interaction between the parent and the baby. There are many technical aspects to this image that are important and they are the following:
- Two animals equal two sets of eyes. It would be great if both sets of eyes are sharp and it would be awesome if both sets of eyes are visible. I happen to be in the right spot to have both of these qualities happen. There was an element of luck in that happening, but I had at least placed myself in the right position for it.
- Originally, I was photographing a single bird and because I was shooting with a prime lens, I was not able to zoom in or out. I happen to be at the right distance from the original single bird to allow for both to fit in the frame without clipping any of the birds. I think an image is much more powerful if there are no parts clipped off the central subjects.
- There are no harsh shadows in this image, which can be a problem. Part of that is because it was 7 AM in the morning and the sun was still low and not so harsh, the other part to that is, I placed myself directly between the bird and the sun putting me in the best position for good light.
- This image doesn’t come to you that often, think about what has to happen for you to get this image. The light has to be good, the action has to happen at the right time, you have to be in the right place, both eyes have to be visible if possible, both eyes have to be sharp, you have to be the right distance away so as not to crop anything, the image has to be sharp, the water in the background can’t look horrible like sometimes happen in bad light. That’s a lot of elements that need to come together at one time; this means you probably have to go out quite a few times before it happens to you. The moral of the story is, persistence pays off.
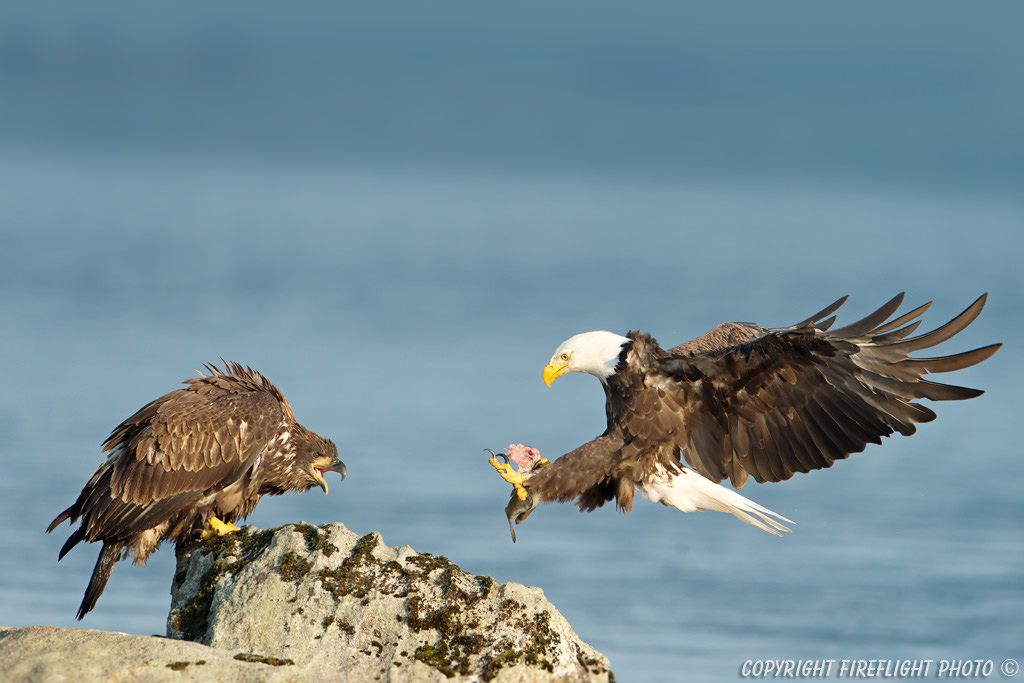
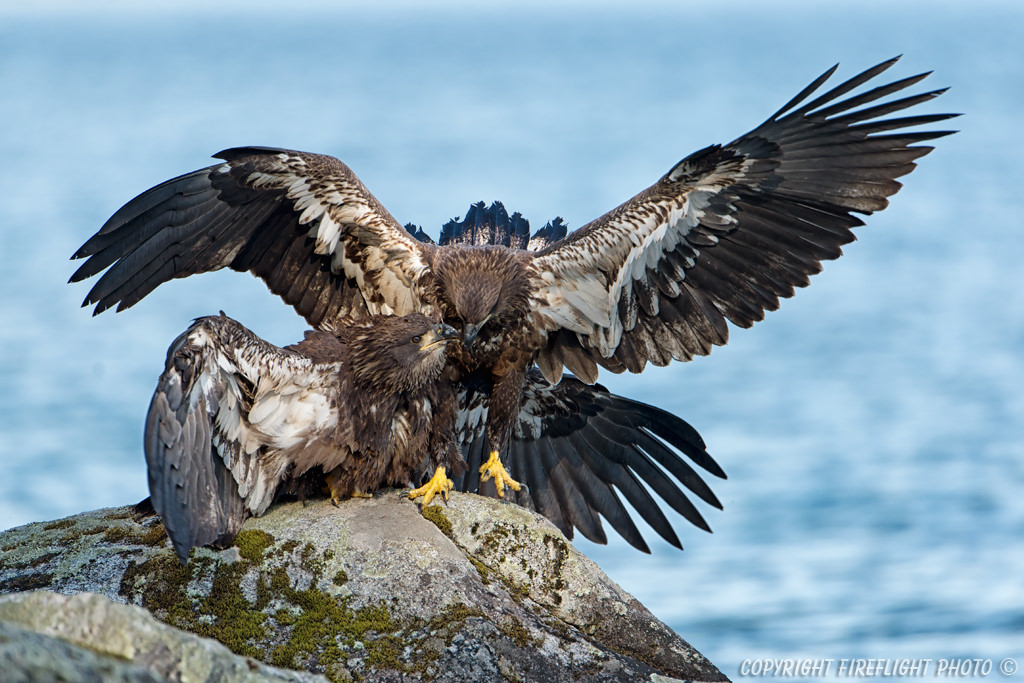
In closing, I would like to underline how powerful animal interaction is in telling the story. It is always harder to get interaction shots, because it requires a greater knowledge of your subjects and a lot more time and persistence. The animals have to be comfortable in your presence in order to display their natural behavior. Also as I have mentioned before, multiple subjects create technical challenges in getting compelling images. If animals accept your presence, they will give you a front seat view to their most intimate relationship and opportunities of a lifetime. The following photo shows two immature bald eagles two months old squabbling over food. We were able to get this photo, because we had been present since before their birth and they had become comfortable with us. Just remember to respect them and let them approach you and not the other way around!
Improving Your Chances of Success
There is a positive aspect to the predictability of nesting birds in the fact that they will constantly travel to the same location (nest), which opens opportunities to capture both action and interaction photos. Some examples of this would be a bird delivering fish to its nest and thus presenting you with flying shots, where the bird has prey in its talons. Another would be the interaction of the eaglets in the nest, and yet another would be action shots that happen when food is delivered. The babies come alive and interact with the parent, pop their heads up over the edge of the nest etc. There are also predictable patterns during the nesting period as to when parents will deliver food to their young ones and thus increase your chances of success.
On a cautionary note, respect the distance required, so as not to disturb the animals. Bald eagles have been known to abandon their nest and chicks if constantly disturbed or afraid to approach their nest. So please don’t get over-zealous in getting the shot and in the process harm the very subject you are photographing.
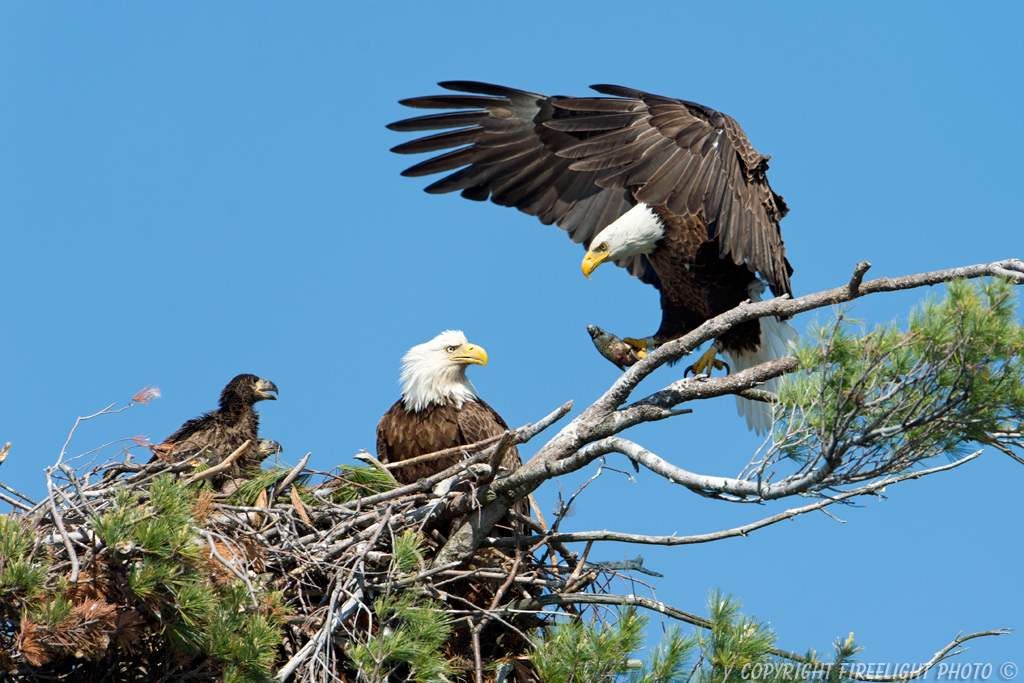
The final image is that of nesting bald eagles and a parent about to drop off a fish to its hungry eaglets. Notice how the eaglets are standing tall in the nest looking forward to their next meal. Because of this, they have their heads in view and present a powerful photographic opportunity for you to tell their story. The presence of both parents on the nest, which is rarer than you might expect, adds to the story and presents a more compelling image.
Happy shooting everybody and may the light be with you!
All images copyright Robert Andersen.
Great article. Thanks for the tips.
Nice article, Robert. Kudos to you for some great snowy owl shots that show its natural behavior, and are derived without baitingr. I have to wonder though why the site put a clearly baited snowy owl as the cover shot at the top of the page!
Hello Melissa
Sorry for the slow reply – I haven’t been around much, but I have learned over the years there are sow many ways animals are staged or baited, its tough, but I managed to get some pretty cool photos (I think) just waiting for nature to do its thing :) – Patience is a virtue, especially in photography
Rob
Rob,
I have a D4s with 300mm f/2.8 with TC-20E III teleconverter. Most of my images are out of focus
Hello Mike,
I have neither the years of experience ( I have 3 years experience with DSLRs ) Or the Gear ( I use the beginner D610 with Tamron 150-600 MM) in comparison to yours. But I have one small advice to give to you about the Out of Focus shots that you are talking about.
I am not sure if you are referring to using the focus via the Shutter Button OR the Back Button (AE-L,AF-L) Focus.
I had a hard time while shooting BIF using the Shutter Button, and found that keepers for me increased many folds after I started to use Back Button Focus Technique. You can google more about it and see some videos on youtube in case you want more details but that is the thing that helped me fix my focus related issue very quickly.
I hope it works for you as well.
I will add few pics on this post once I reach home !!
Regards,
-DS
Great shot and a fantastic bird.
Sadly, many photographes attracted those fantastic bird with mouses.
I hope this is not the case!
Hello
Thanks and NO its NOT the case. I have already had a spaz at photographers who throw mice. There is a record of that happening to the Rye Harbor Owl and that is why we think she is so friendly or not afraid of humans. I hate the act because it takes away from the hard work true wildlife photographers put it. The shots can be gotten through patience and waiting for the bird to fly – lazy photographers can’t wait, it’s sad and they interfere with the natural behavior of the bird :(
Rob
Thanks for mentioning your position, in that case the compliment of “fantastic super shots” applied in a full compliment.
In my area (Quebec) some tours are organized at +$2500. to photographs that bird and they mention “Mouses included” !!! Sad!
I think a lot of this type of photography of using bait is centred the fact that some photographers are lazy and require instant gratification and they are not given the time required if they are on tours.
I think it is very sad that any animal has to die just to give some photographer an opportunity to take a photograph of another animal. Sick really.
I prefer single point C AF, but my batting average for birds in flight is very low.
Do you recommend locking the focus and shooting away, changing to dynamic focus with 9 points selected or trying to track the bird with a single point.
I noticed on your money shot if the single point AF was on the birds eye and centered you might have missed the shot.
What do you advise?
I use single point – I have tried dynamic focus with 9 points but I hate it, I see the focus spot jumping around as you are panning and you have no control over where it focuses – So I do it the hard way. One you are on the bird the camera does a pretty good job of staying focused even in flight. BTW it takes practice to get it right, it takes a little time. I used to make my husky run full speed at me and I would practice panning on him and staying focused on his face. Many years of chasing the bald eagles in my area has made me pretty comfortable hand holding, picking up the bird in flight and panning but I still miss shots :(
Rob
To answer in one word :)
Yes !!
Rob
Hello Robert,
fabulous images and excellent article. I have one more question however regarding the settings you use to capture birds in flight. I have received varying advice on what settings I should have, so I am never really sure what I should use.
This is what I have:
AF-C Priority Selection = Release
Dynamic AF area = 21
Focus tracking with lock-on = Short
I shoot at Continuous High release mode and Continuous-servo AF.
Using rear auto focus and Dynamic-area AF , I select a focus point on the bird’s head, preferably the eye and lock the focus.
As the bird takes flight I press the the rear auto focus button again while pressing the shutter attempting to keep the focus point on the bird’s head as it moves.
I will occasionally use Auto-area AF if the bird is against a very plain background or in the sky.
My results are mixed and I have tried both hand-holding my 500mm f/4 or mounting on a gimbal. Both serve their purpose. I really want to improve my bird photography and would appreciate your feedback on my camera settings and technique I use?
By the way, I use a D3s. I also wondered if you tend to use the center focus point or does that really matter?
I don’t really see anything wrong with your settings per se – However I wouldn’t trust dynamic af – that means you leave it up to the camera where it focuses.
The all important focus point is the eye of the animal / bird in question. Generally when tracking a bird, eg: panning with it, I don’t alawys find I have time to change my focus point during the act of panning – sometimes when I prepare for launch I will put the focus spot slightly to the bottom and make sure it is pointing to the eye – but sometimes the focus spot is in the middle of the screen (kind of a safe place to be) but focused on the eye. The eye of the animal has to be sharp or your images won’t look right.
You need to make sure you have the speed needed for action shots – sitting or stationary shots require far less speed to get a sharp photo.
Hope this helps
Rob
Hi Robert, appreciate the response. Just want to clarify one thing. So you use Single-point AF?
To answer in one word :)
Yes !!
Ro
Great, thank you!!! Will now get out there and give it a go!
Describing your thought processes in tandem with your physical actions makes this really understandable. That, combined with the annotated photos and followup comments makes this the most helpful wildlife tutorial I’ve viewed. Thanks! I can’t wait for the weather to improve so I can try this with my 70D and new Tamron 150-600.
Thank you Dan
I actually have some follow up photos and pointers – Not sure how to post them yet, but I appreciate the compliment, this makes writing the article worth it.
Rob
Hi Robert,
I never read such a simple article, Just fantastic/amazing. The way you explained is simply superb. I love it:)
And also the photo’s are great.
Hello Arun
Glad you like it – I appreciate the compliment :)
Rob
Great article and comments Rob.
This may sound simple, but an older photographer with glasses I have found that I get better results if I “shoot” and focus with both eyes open. I found out many years ago in the military that in lots of instances I could shoot with both eyes open.
With using both eyes I do not having to squint so I do not get that tired and watery eye after a few minutes with the resulting blurred focus. Also with using both eyes I am more aware of what is happening around the subject.
I use a Nikon D800 with a Sigma 50-500, and no tripod, plus no mice or raw meat.
I find that I really enjoy the journey involved in getting to the locations in the Australian bush where I can photograph the birds. Even if I do not get that “keeper” image, no day in the bush is wasted.
Great to hear and you know what, photography is not just about getting those keeper images, it’s also about getting out there and just experiencing this wonderful world in person :)
Rob