For years, Lightroom’s tools for selective adjustments left something to be desired. The “detect edges” feature often adds noise to soft areas like clouds, whereas the standard brush and gradient tools can affect too much of the image. Range masking fixes those problems.
Table of Contents
What Is Range Masking in Lightroom?
Range masking was added to Lightroom a few years ago and has since become one of my favorite post-processing tools. Lightroom has two types of range masking: luminance (which selects portions of the image by brightness) and color (which does the same by color). Both are very powerful ways to apply local adjustments to the exact areas of an image you want.
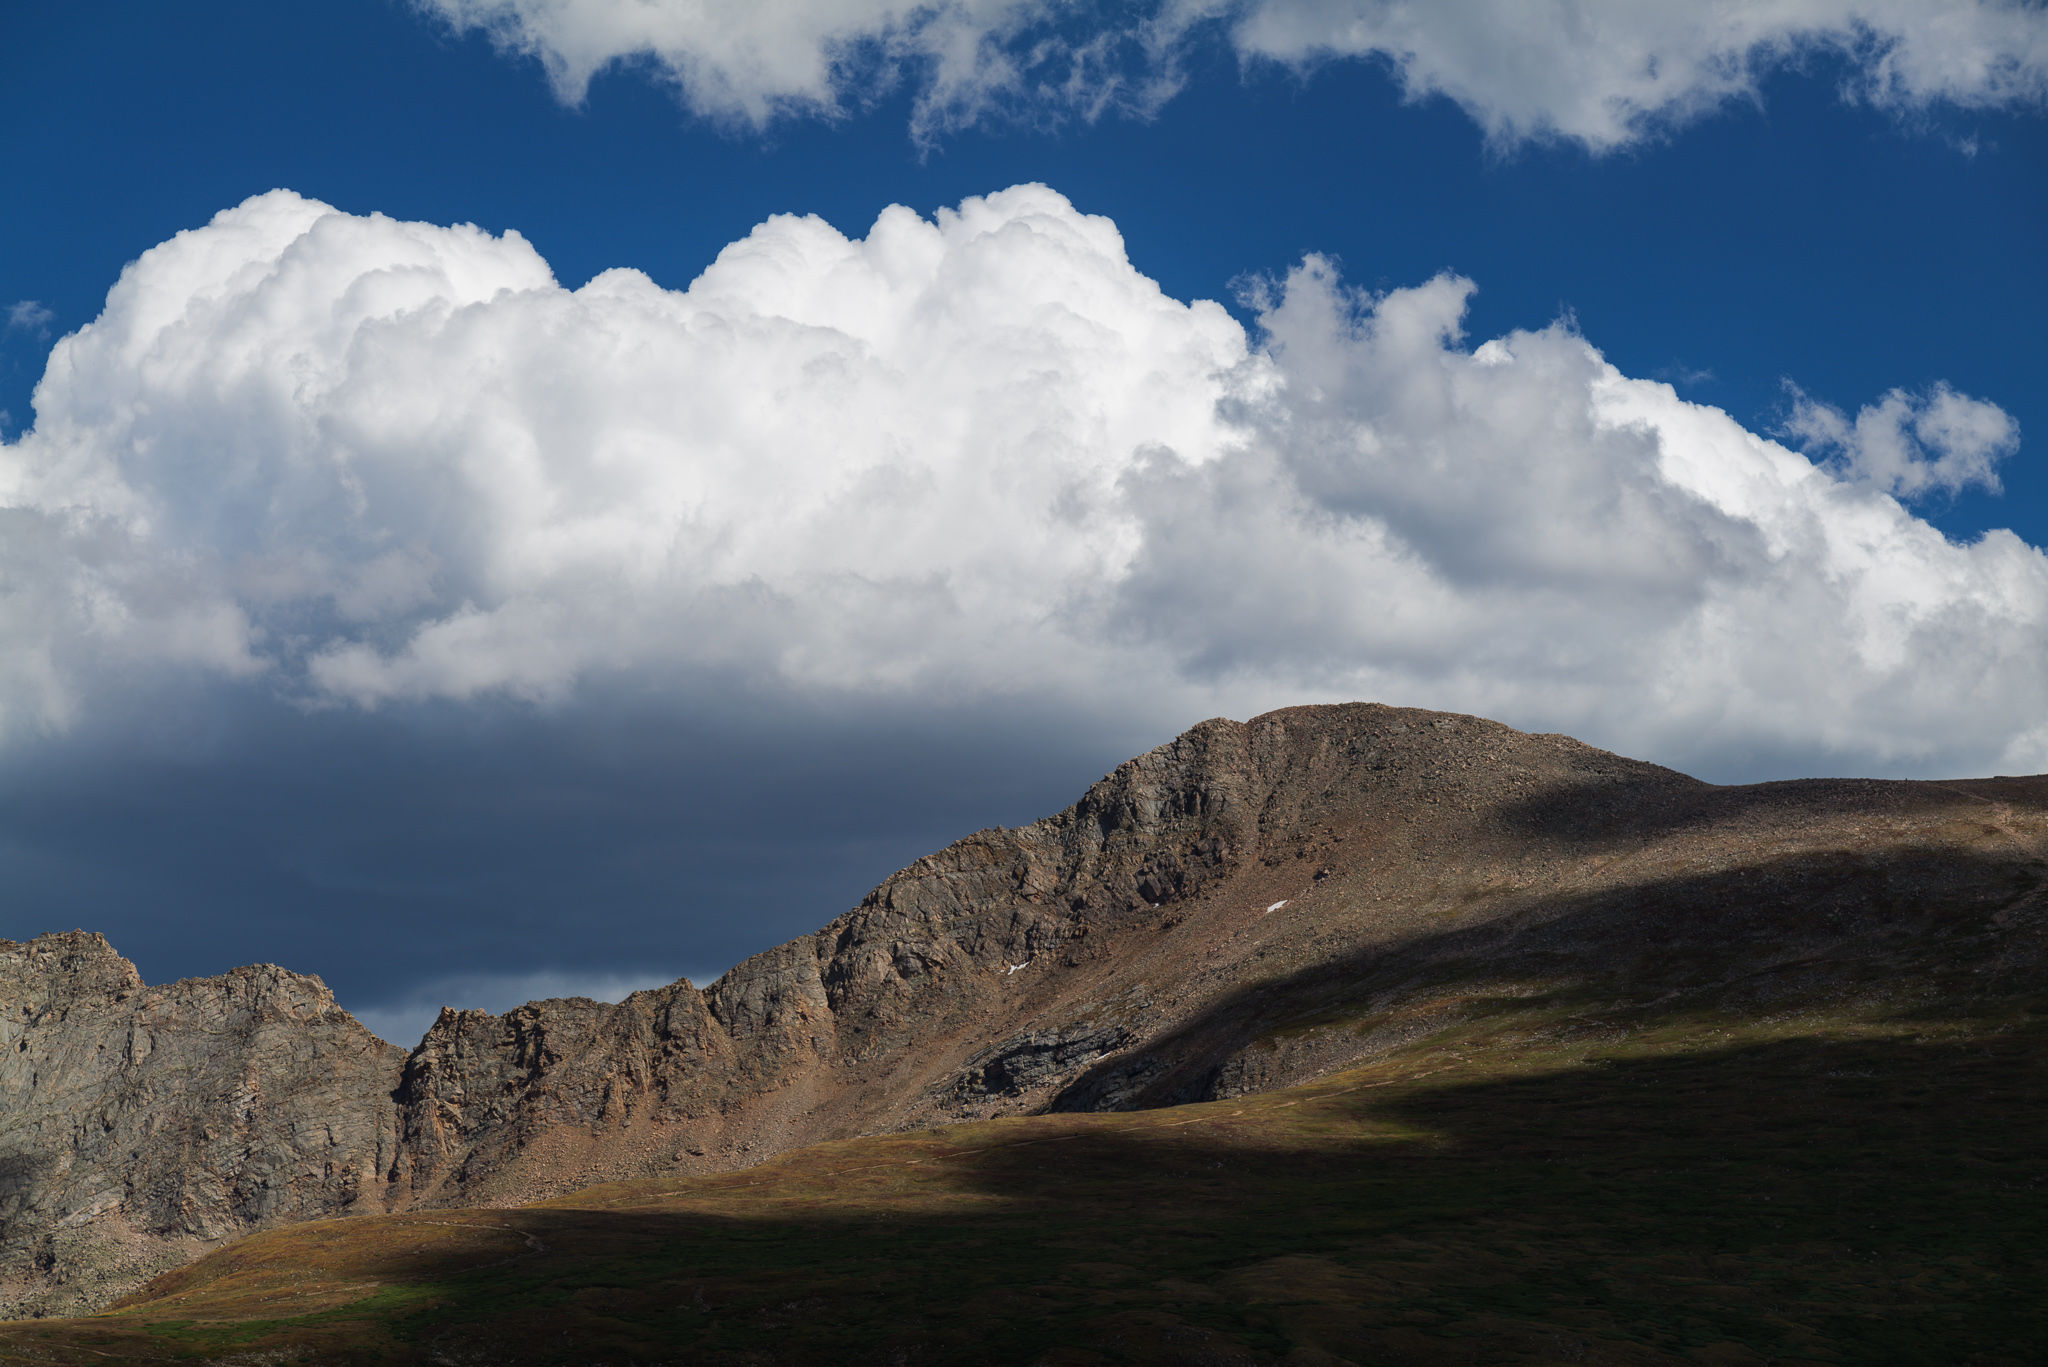
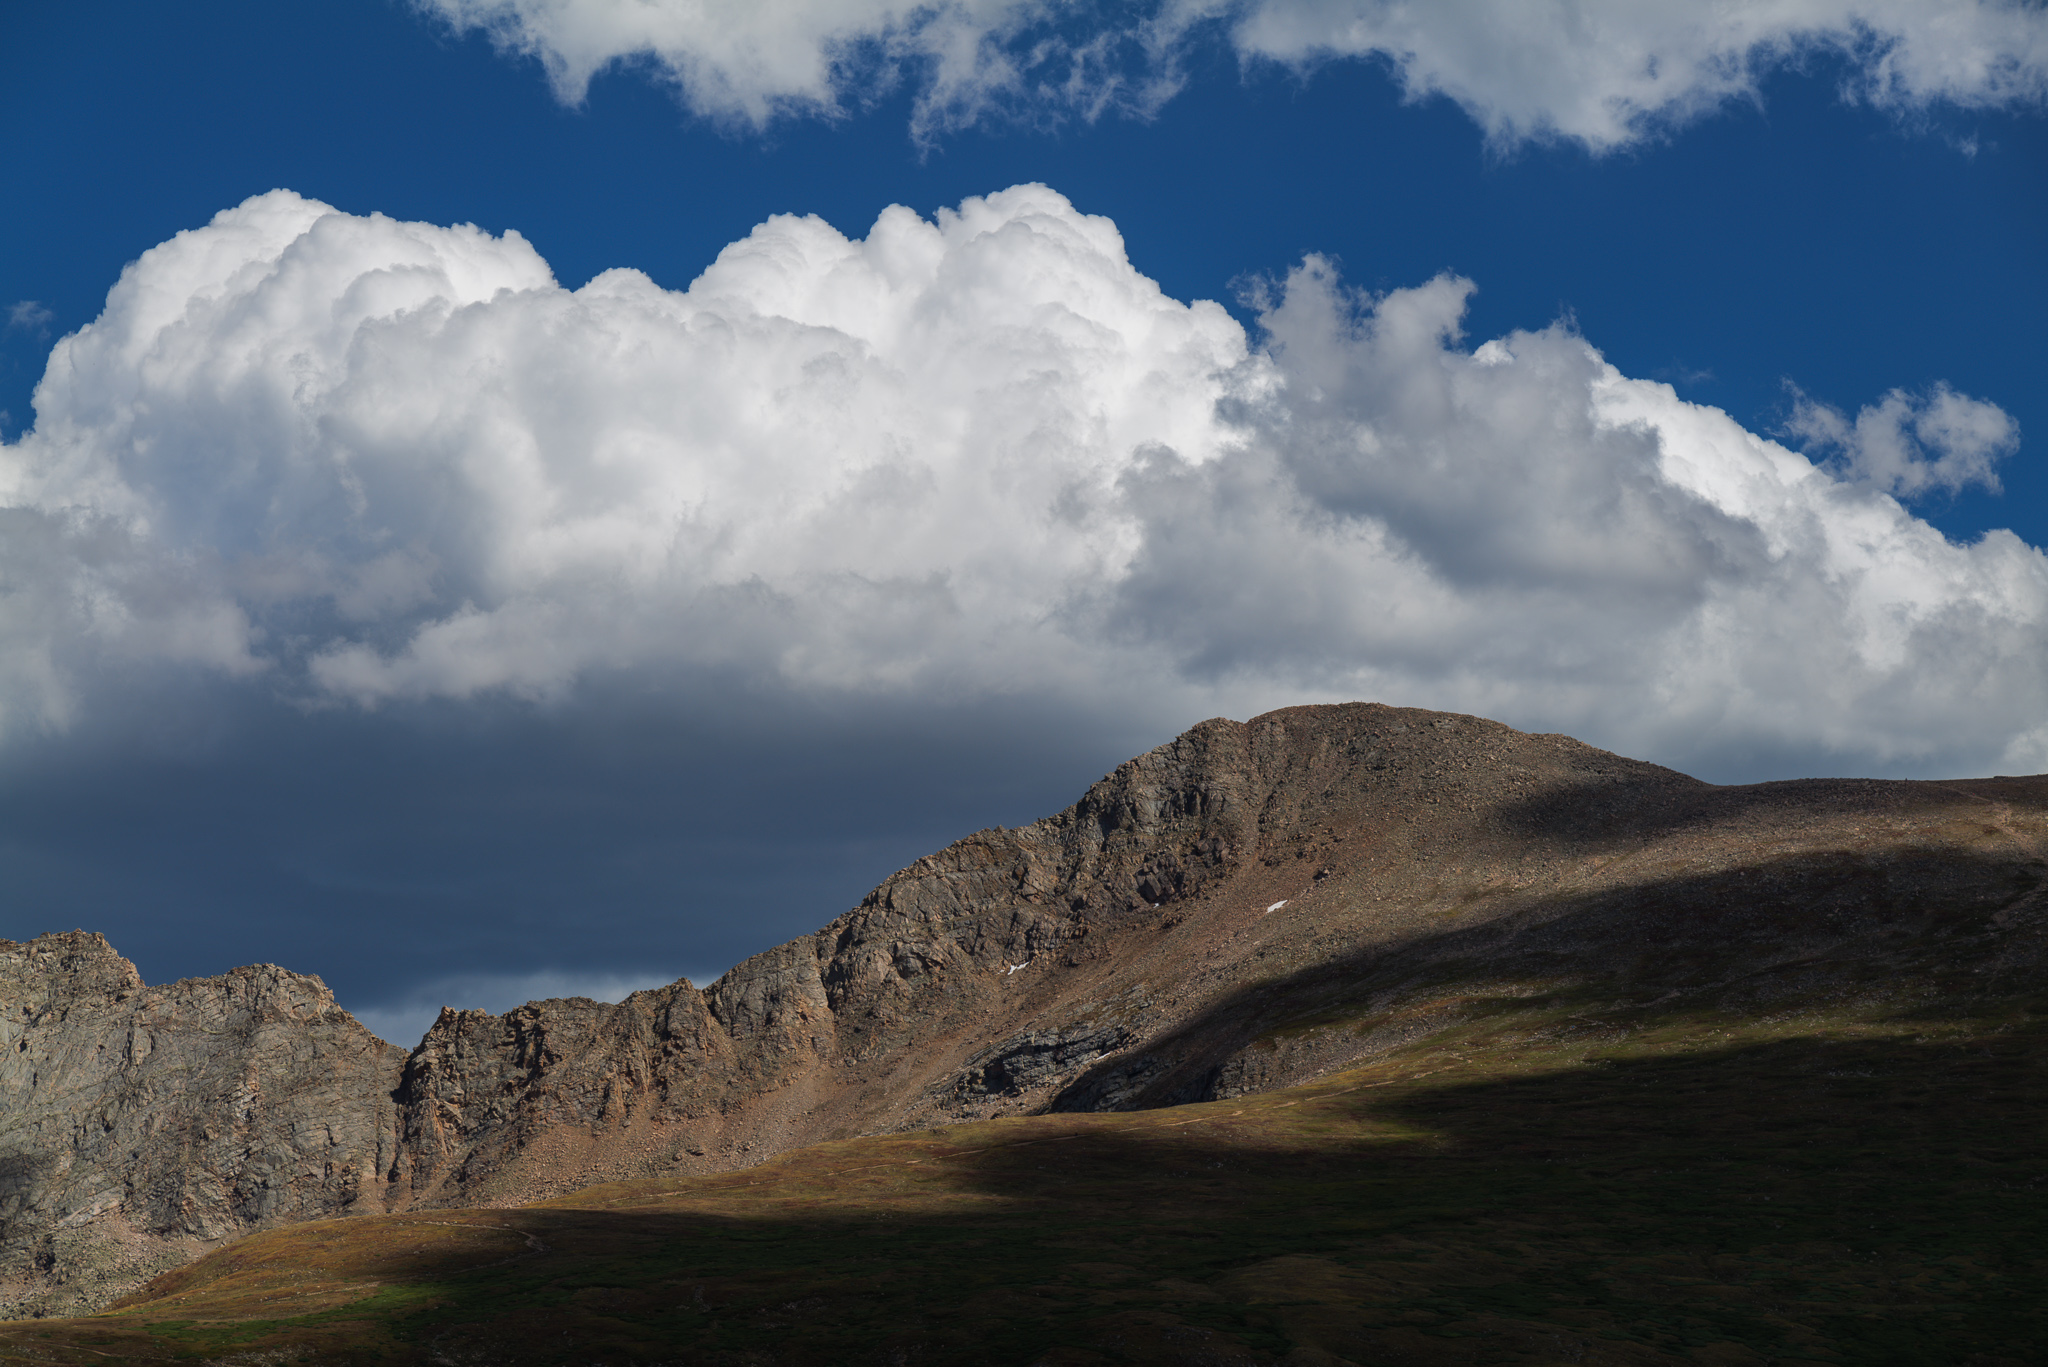
For example, say that there’s a bright cloud in your photo that you want to darken without affecting anything else in the photo. You don’t need to worry about painting a perfect mask around the cloud with the brush tool. Instead, you can use a range mask to tell Lightroom to selectively edit the bright tones in the cloud and completely ignore the rest of the sky. Here’s how such a thing looks in practice, starting with the original photo:
And then Lightroom’s preview of the range mask I created:
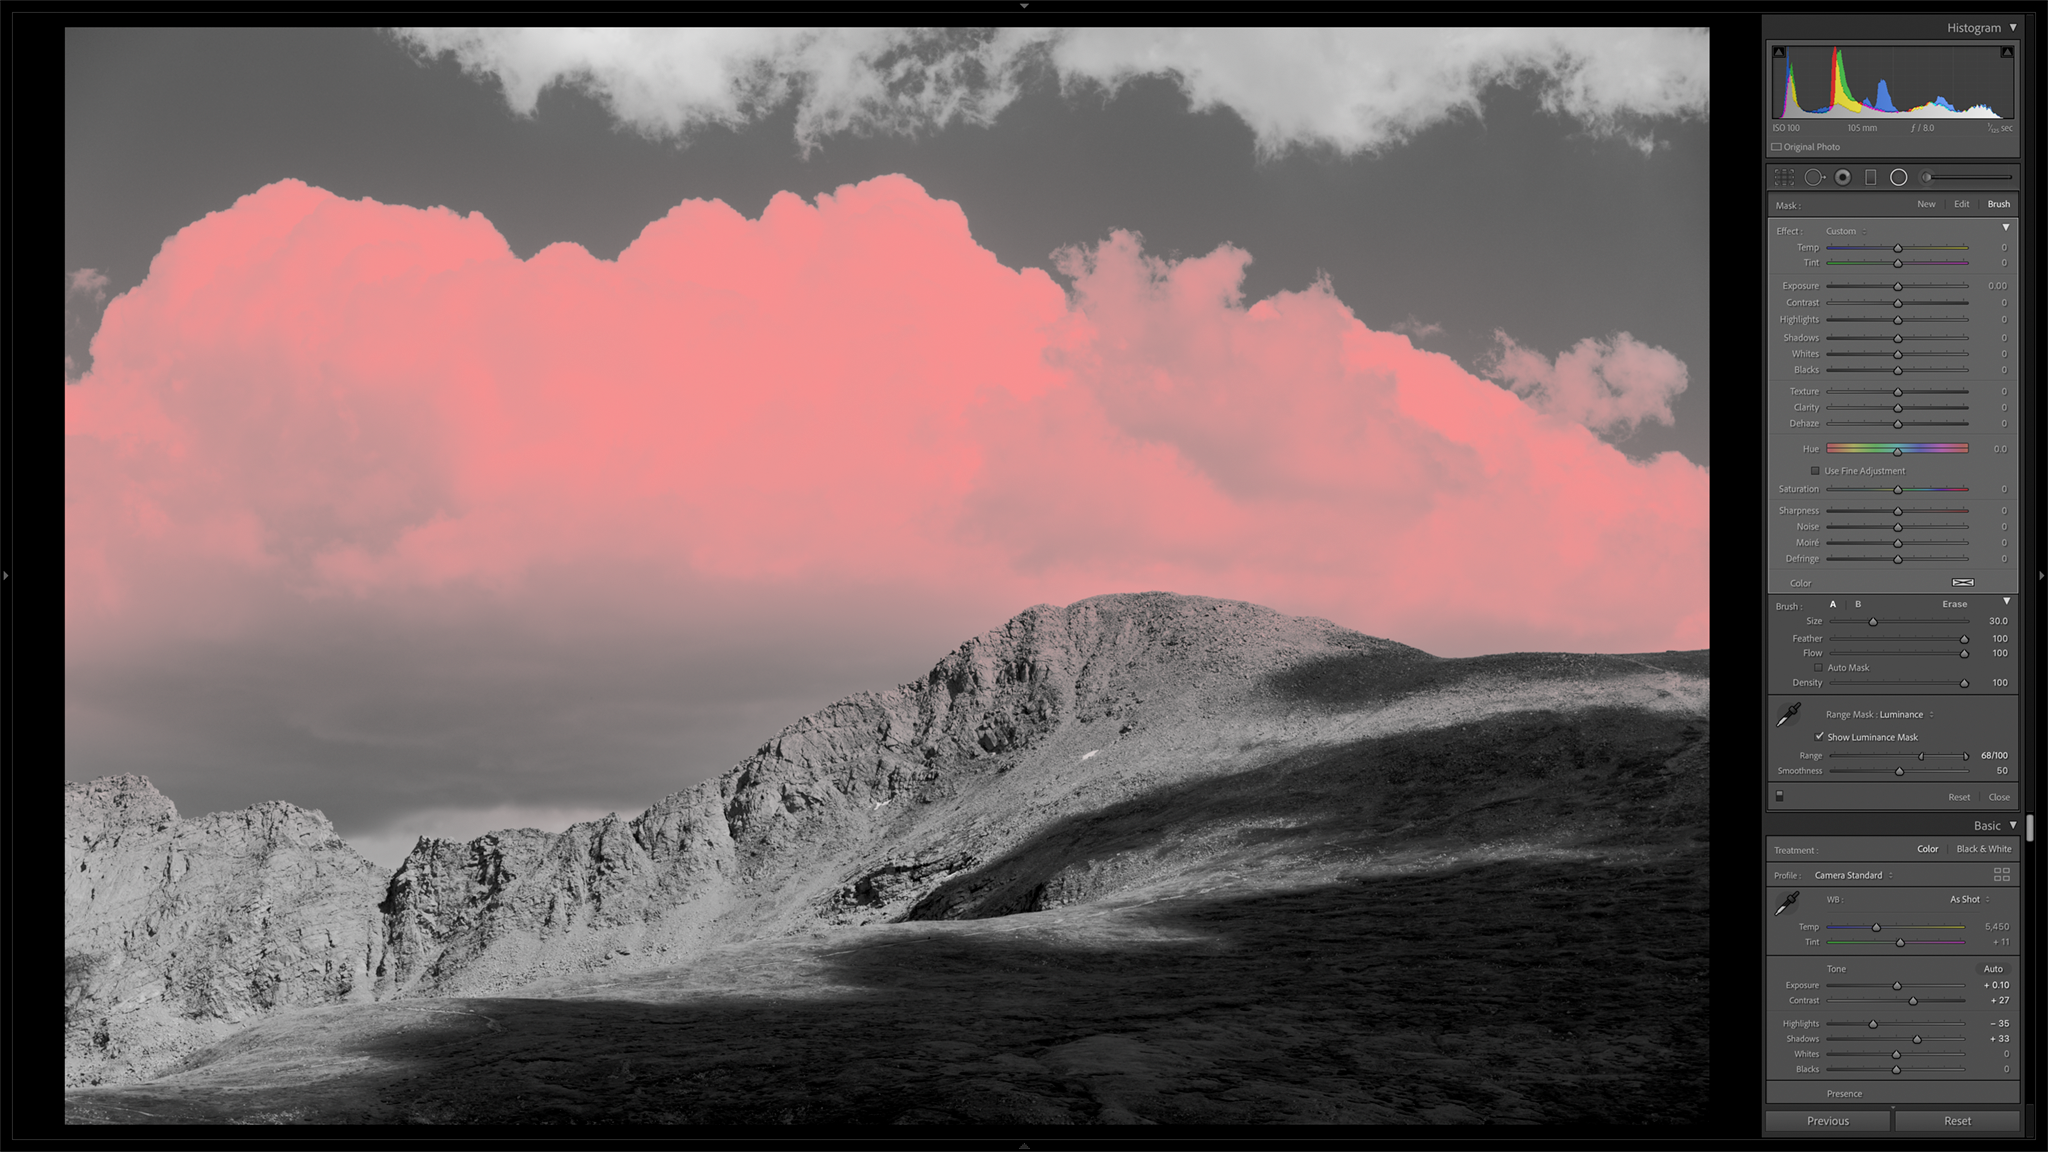
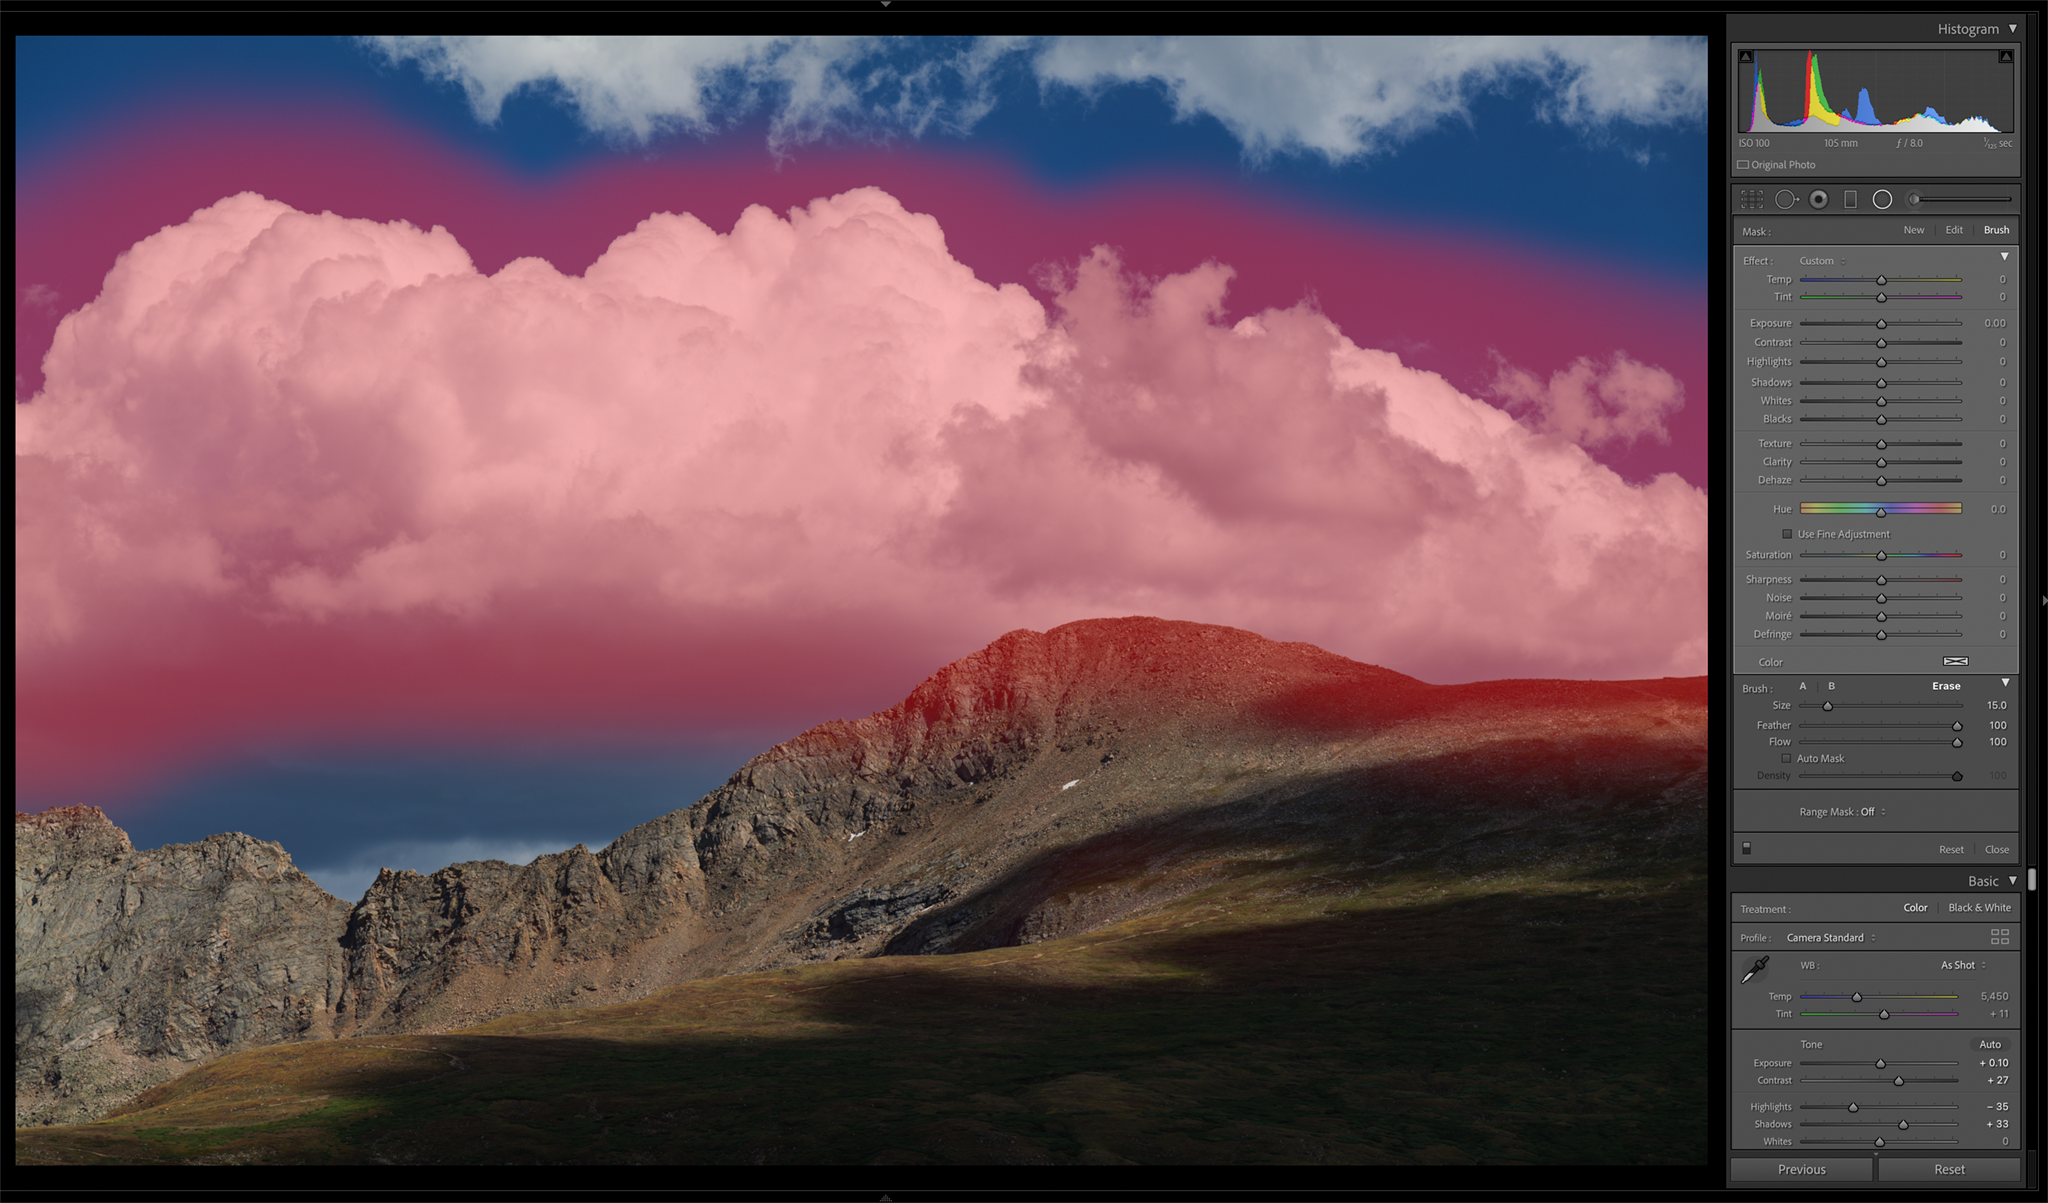
At this point, any edits I make will affect only the areas highlighted in red, which allows for very nice selective post-processing. That’s what makes range masks so powerful.
How to Use Luminance Range Masks
The process of using range masks in Lightroom is fairly straightforward. Here are the steps if you’re planning to create a luminance mask:
With Lightroom’s gradient or brush tools, paint over the entire area that you want to affect. It’s fine to include some extra areas, but make sure to get 100% of the regions you need.
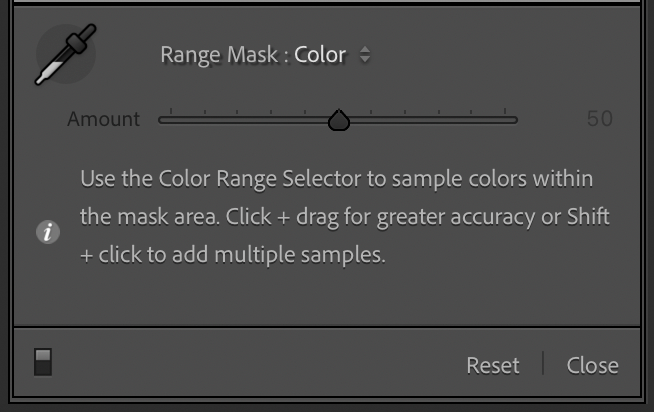
Look at the bottom of the local adjustment panel. You’ll see a section called “range mask. Change it from “off” to “luminance,” and this full dialog pops up:
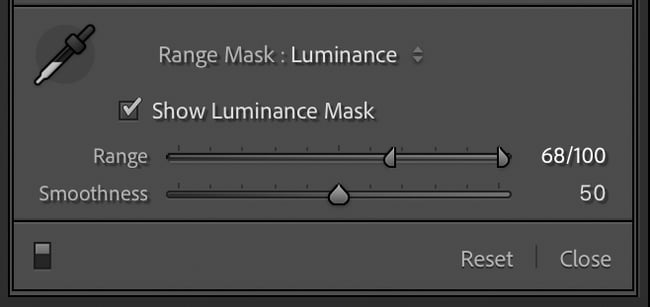
Click “show luminance mask” to see Lightroom’s preview and get a good sense of what areas you’re affecting. Then, use the “range” slider to tell Lightroom which tones to affect. For example, if you set the slider from 0 to 30, you’ll only be affecting the dark tones – and if you set the slider from 35 to 65, you’ll only be affecting the midtones. In this case, I chose a range of 68 to 100, which isolated the brightest tones in the clouds. (You can also use the eyedropper tool to select tones, if you prefer.) Again, this is the mask I ended up with:
After that, use the “smoothness” slider to soften the mask or give it harsher edges. The default value of 50 is usually good, but feel free to adjust if you’re getting halos or harsh effects.
Now it’s time to turn off “show luminance mask” and start actually making your edits! Any editing you do will only affect the tones you’ve selected (and, of course, only in the area of your brush/gradient).
How to Use Color Range Masks
The color range mask works in a similar way, except it selects areas based on color rather than brightness values.
Rather than using a simple slider to include or exclude certain tones, the color range mask tool uses an eyedropper tool instead. It looks like this:
All you need to do is click on the eyedropper tool, then click on something in your photo of whatever color you want to adjust. Lightroom paints a mask over those colors and excludes everything else. Pretty easy!
You’ll notice that the only slider involved is called “amount.” When the slider is at 0, only the areas of the exact color you selected will be included in the mask. On the other hand, when it’s set to 100, Lightroom barely takes your color selection into account and instead applies the gradient/brush almost at full strength – almost as if there were no range mask at all. 50 is the default value and usually a good choice, but you may want a lower value if you want more isolated edits to the exact colors you’ve selected.
There are also two extended ways to use the eyedropper tool if the one-click method isn’t working well enough:
- Hold down the Shift key while you click a color, and you can choose up to five colors for Lightroom to add to the range mask.
- Rather than just clicking, you can click and drag to select a much larger area of the image for Lightroom to analyze the colors. (This can be used in combination with pressing the Shift key if you want to have multiple such areas selected.)
If you’ve added multiple color range mask eyedroppers, and you’re unhappy with one or more of them, you can Alt+Click (Option+Click on Mac) to delete any that are bothering you.
I used range masking for the image below because I was finding it difficult to brighten the yellow flowers selectively any other way. This version is before I added the range mask:
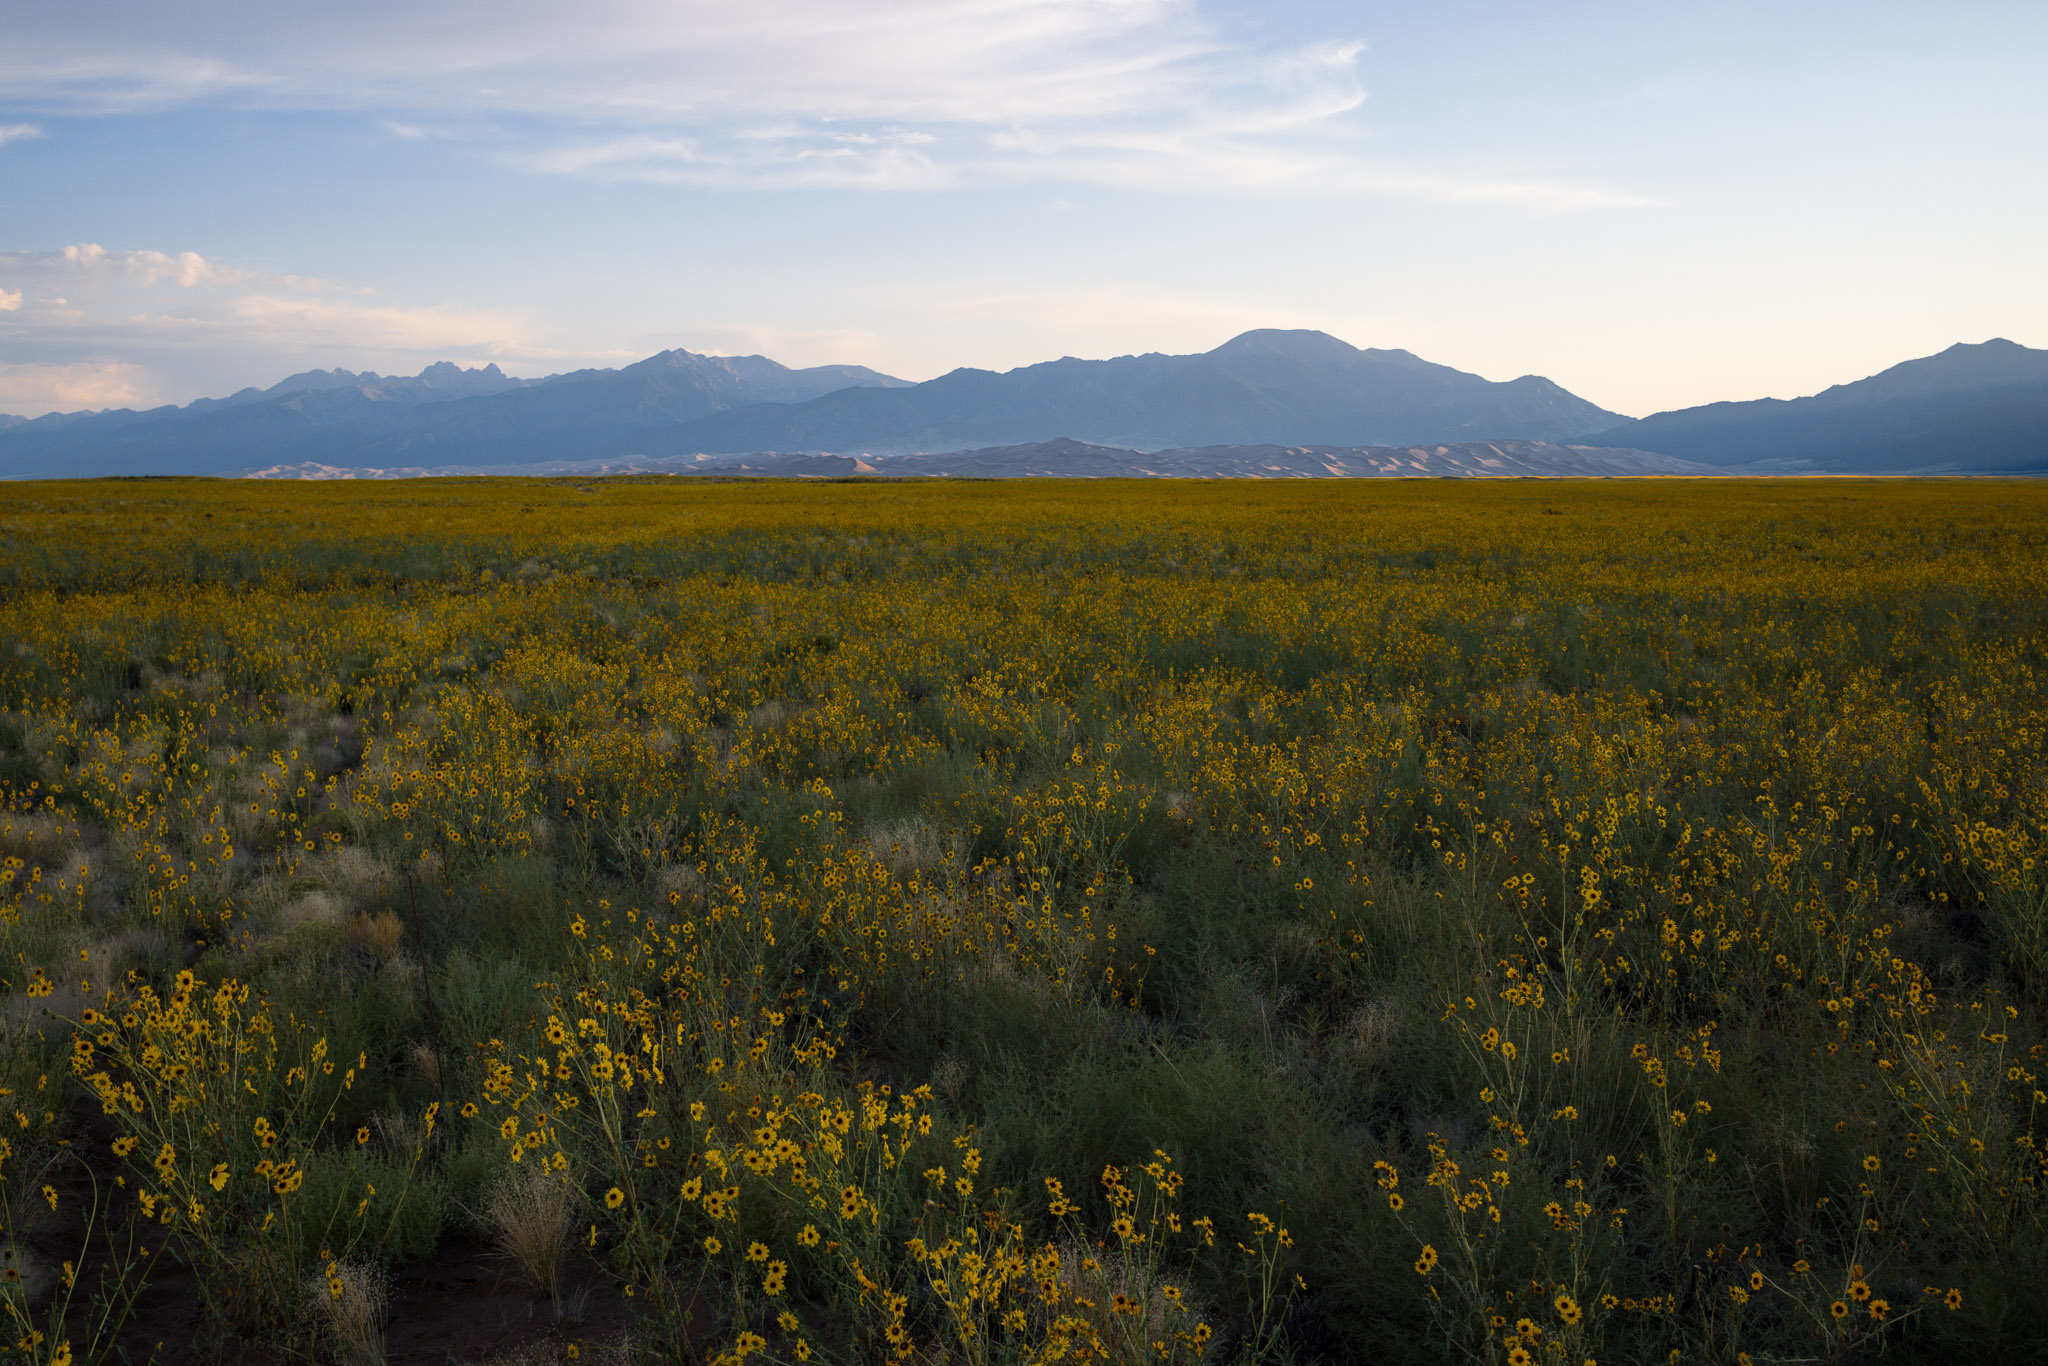
I couldn’t use the HSL panel for the image above because it was adjusting the yellow colors in the sky as well (and adding some color noise). A standard gradient tool – with or without luminance masking – wasn’t a terrible option, but it selected a bit too much of the flowers’ stems for my taste. So, the color range mask was the way to go.
In this image, I created a gradient that only affected the foreground. Then I used the click+drag method in the color range mask to isolate the yellow tones:

You’ll note that this does include a few of the green tones as well, but is mainly focused on the yellow flowers. Then it was a simple matter of adjusting the sliders in the gradient panel to brighten the flowers to my liking. Here’s the final result:

Note that with the color range mask, there is no “show color mask” option, so it can be a bit harder to tell what areas you’re affecting. You can get around this by simply pressing the “o” key on your keyboard, which is the shortcut for showing your local adjustment mask in Lightroom.
What Are Depth Range Masks?
You may notice that there’s a third option in Lightroom’s range masking tool, alongside luminance and color: depth. With most cameras, this option is going to be grayed-out, and you won’t be able to use depth range masking at all.
However, if you shot a .HEIC image file with a camera that supports depth mapping, you’ll be able to use this tool to selectively mask areas by how far away they are. This applies to some Apple iPhones when shot in portrait mode but generally isn’t found on DSLRs or mirrorless cameras yet. In the future, we may see it become more commonly available.
Downsides of Range Masks
In general, range masks don’t have very many downsides and cause very few artifacts in a photo. It’s one reason why I prefer them over the “detect edges” tool or the HSL panel most of the time. Still, if you do an overdramatic edit, you can end up getting some halos with range masking that may not have shown up with a more standard gradient or soft brush too.
Another minor downside is that the tools may not perfectly mask your subject in every situation. For example, different parts of people’s faces – their eyes, lips, hair, skin, etc. – are generally so different from each other in luminance and color that range masks can’t select everything at once. If you want to make broad edits to people’s faces or other such subjects, it’s better to use a standard brush tool than to rely on range masking.
But the biggest issue with range masking is more general. After years of editing in Lightroom and a lot of other post-processing software, I’ve come to the conclusion that it’s better to do fewer local edits whenever possible, including range masking.
This isn’t some ethical crusade against local edits. There’s nothing wrong with them in theory, and they often can lead to results that are impossible to achieve any other way. But they demand a high degree of care. In practice, it is very easy to use local edits with bad results (not just range masking, but even gradients).
Specifically, if you have a large number of local edits, they can overlap and compete with each other in unwanted ways, leading to color shifts, halos, and other artifacts. Finding the source of these issues can be almost impossible without deleting all your local edits entirely. Not to mention the slowdown penalty in Lightroom once you exceed about a dozen local adjustments.
The process I recommend instead is to try to bring an image as far as possible without any local edits. Only once you’ve achieved that is it time to edit the image locally – and even then, I’d aim for just a few well-placed gradients or soft brushes if possible.
This applies to any local adjustments, including range masking. Just don’t overdo it. Local adjustments are great features (and range masks in particular), but if you let them become your primary editing tool, you may find that your process becomes unmanageable.
Conclusion
I consider range masking to be the best feature added to Lightroom in years. It offers an elegant way to edit selective parts of an image without adding excess noise or other artifacts. And once you get the hang of it, it’s very easy and intuitive.
While I still prefer to use global sliders as much as possible, range masking is a helpful tool when you need to make precision edits. I’d go so far as to say that a majority of gradients and brush edits in Lightroom can benefit from a range mask restriction. It’s a tool that I highly recommend learning for almost every Lightroom-based photographer.
Hello Spencer. The “Range Mask” section is missing from the bottom of the panel, so I can’t enable it. The panel otherwise looks identical to that shown here. I’m using the latest version, 11.4.1. I’d like to add that Photography Life tutorials are the most comprehensive I know of. Thanks!
I select the subject in lightroom and invert the mask to select the entire background, and some of the mask selects the subject, then I use the brush to subtract the mask from the subject, and when I set sharpness to zero, texture to zero, and I set clarity to zero. The subject has glowing soft edges several pixels wide. It is a terrible inaccurate mask.
I worked through a “walkthrough” exercise on rangemasks some time ago, and al;though I could see some benefits I felt it was quite hard work to get them and went no further. When I read your sentence ” It’s fine to include some extra areas…” I realised where I had been going wrong!
Thanks!
Great article!!
Can you say some more on the use of range masks in selecting noisy area for noise reduction & sharpening? Is it effective to adopt range masks for the task? If not, what is the best way in selecting the nosy areas?
Thanks a lot!
Spencer, though I’ve been using the LrC range mask since it was introduced, I learned of additional functions from your article. Thanks!
That’s awesome! I’m happy to hear it.
Very helpful description, thank you.
Glad you found it useful!
Great article as usual Spencer! I’ve used color range masks a lot with graduated filters but I really didn’t know how to use luminance range masks with the brush tool. Thank you so much for the information!
It’s a useful combo! Just make sure you have “detect edges” turned off with the brush (at least most of the time) because of the added noise.
Thank you!
I recently bit the subscription bullet (although I do have 4 months free courtesy of a back-up disc purchase). I’d tried a trial of ON1 but wasn’t that impressed.
So I have an upgrade from LR6.14.
I am really impressed with range masks. So much more user-friendly than ON1’s masks.
I might even contentedly pay the subscription …
I’m not a fan of the subscription model but have learned to live with it. And I give Adobe credit, they have waited longer than I expected without raising its price. Hopefully that continues.
A very clear explainer on an interesting tool! Your advice seems sound – I look forward to trying it out.
Happy to hear it! I think you’ll find range masks to be pretty useful.