In today’s article, I’ve explained the entire process from start to finish behind one of my landscape photos. I tried to cover as much as possible – the story behind the photo, camera equipment, settings, refining the composition, post-processing, and so on. I hope you find it useful!
Given the challenges of going out and shooting new landscapes with the pandemic, this is likely something I’ll continue for a little while: complete behind-the-scenes articles about some of my existing photos. Hopefully this gives you a nice look into my process as a landscape photographer. (This series is also meant to be a continuation of the Almost Portfolio article that I wrote recently – except, in addition to the process of refining a composition, I’m also covering topics like camera settings and post-processing.)
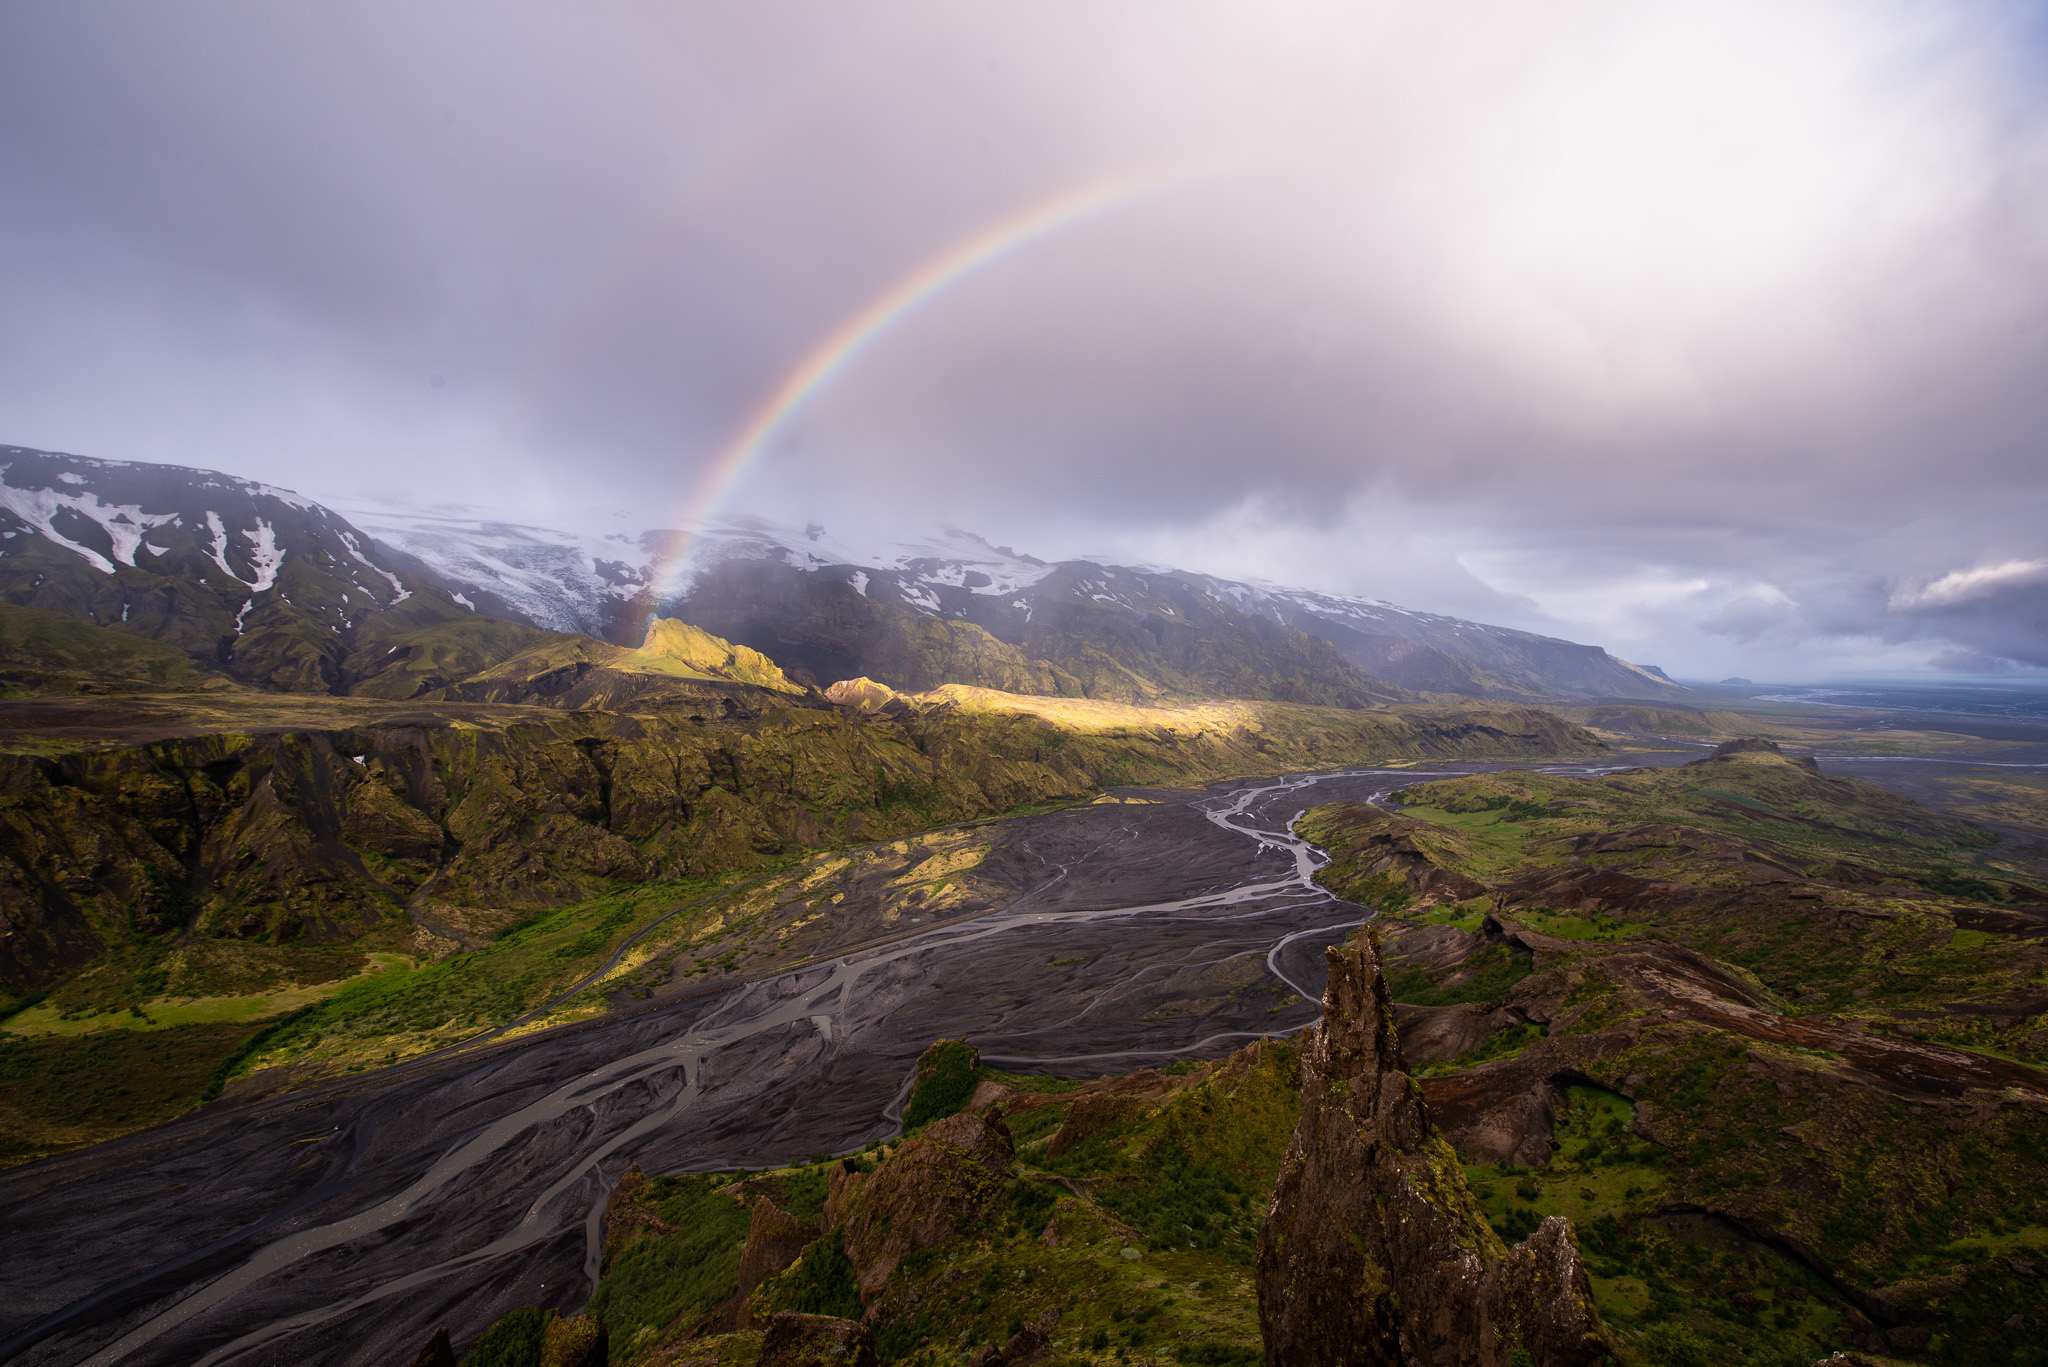
Here’s the first photo in this “behind the shot” series – a rainbow at sunrise (in fact, just barely a double rainbow) in the beautiful Thorsmork region of Iceland. I took this in July 2018:

Table of Contents
Conditions
One of the most amazing hikes in Iceland is the Laugavegur, a (roughly) four-day trek from the country’s highland interior to the south coast. I did this hike with my dad in 2018, although we planned a few extra days to camp and explore some of the interesting locations along the way. Photography makes slowpokes of us all.
Most days were overcast, and after a week of exhausting hikes, I had begun to regret bringing such a heavy camera kit along. With two Nikon D800e cameras (one regular, one IR-converted), the Tamron 15-30mm f/2.8 VR, and the Nikon 70-200mm f/4 – not to mention my tripod, filter kit, and several extra batteries – I went for quality over comfort by a wide margin.
The first day with amazing light happened fairly late in our hike, at a location called Thorsmork. Somewhat ironically, Thorsmork is very easy to reach compared to almost any other part of the Laugavegur hike, with a bus service from Reykjavik (Iceland’s capital) and a few other cities. As such, it’s a fairly popular location with tourists and even has a buffet breakfast available (which we, along with the few other Laugavegur hikers, demolished, while the tour bus travelers sat far away from us in fear).
All of that is to set the scene for this point of the hike. After a week of lugging around all that camera gear with minimal results, wondering if things would ever turn out well for photography, we decided to hike to the top of a mountain called Valahnúkur for sunrise. Though – that makes it sound more impressive than it is. The hike up Valahnúkur is not particularly difficult, certainly the easiest day we’d had of the trip so far.
But sometimes the easy days lead to the best photos. And, at the summit, it was clear that we were about to witness an amazing sunrise. Here’s the first photo I took that morning, with the view off to the west:
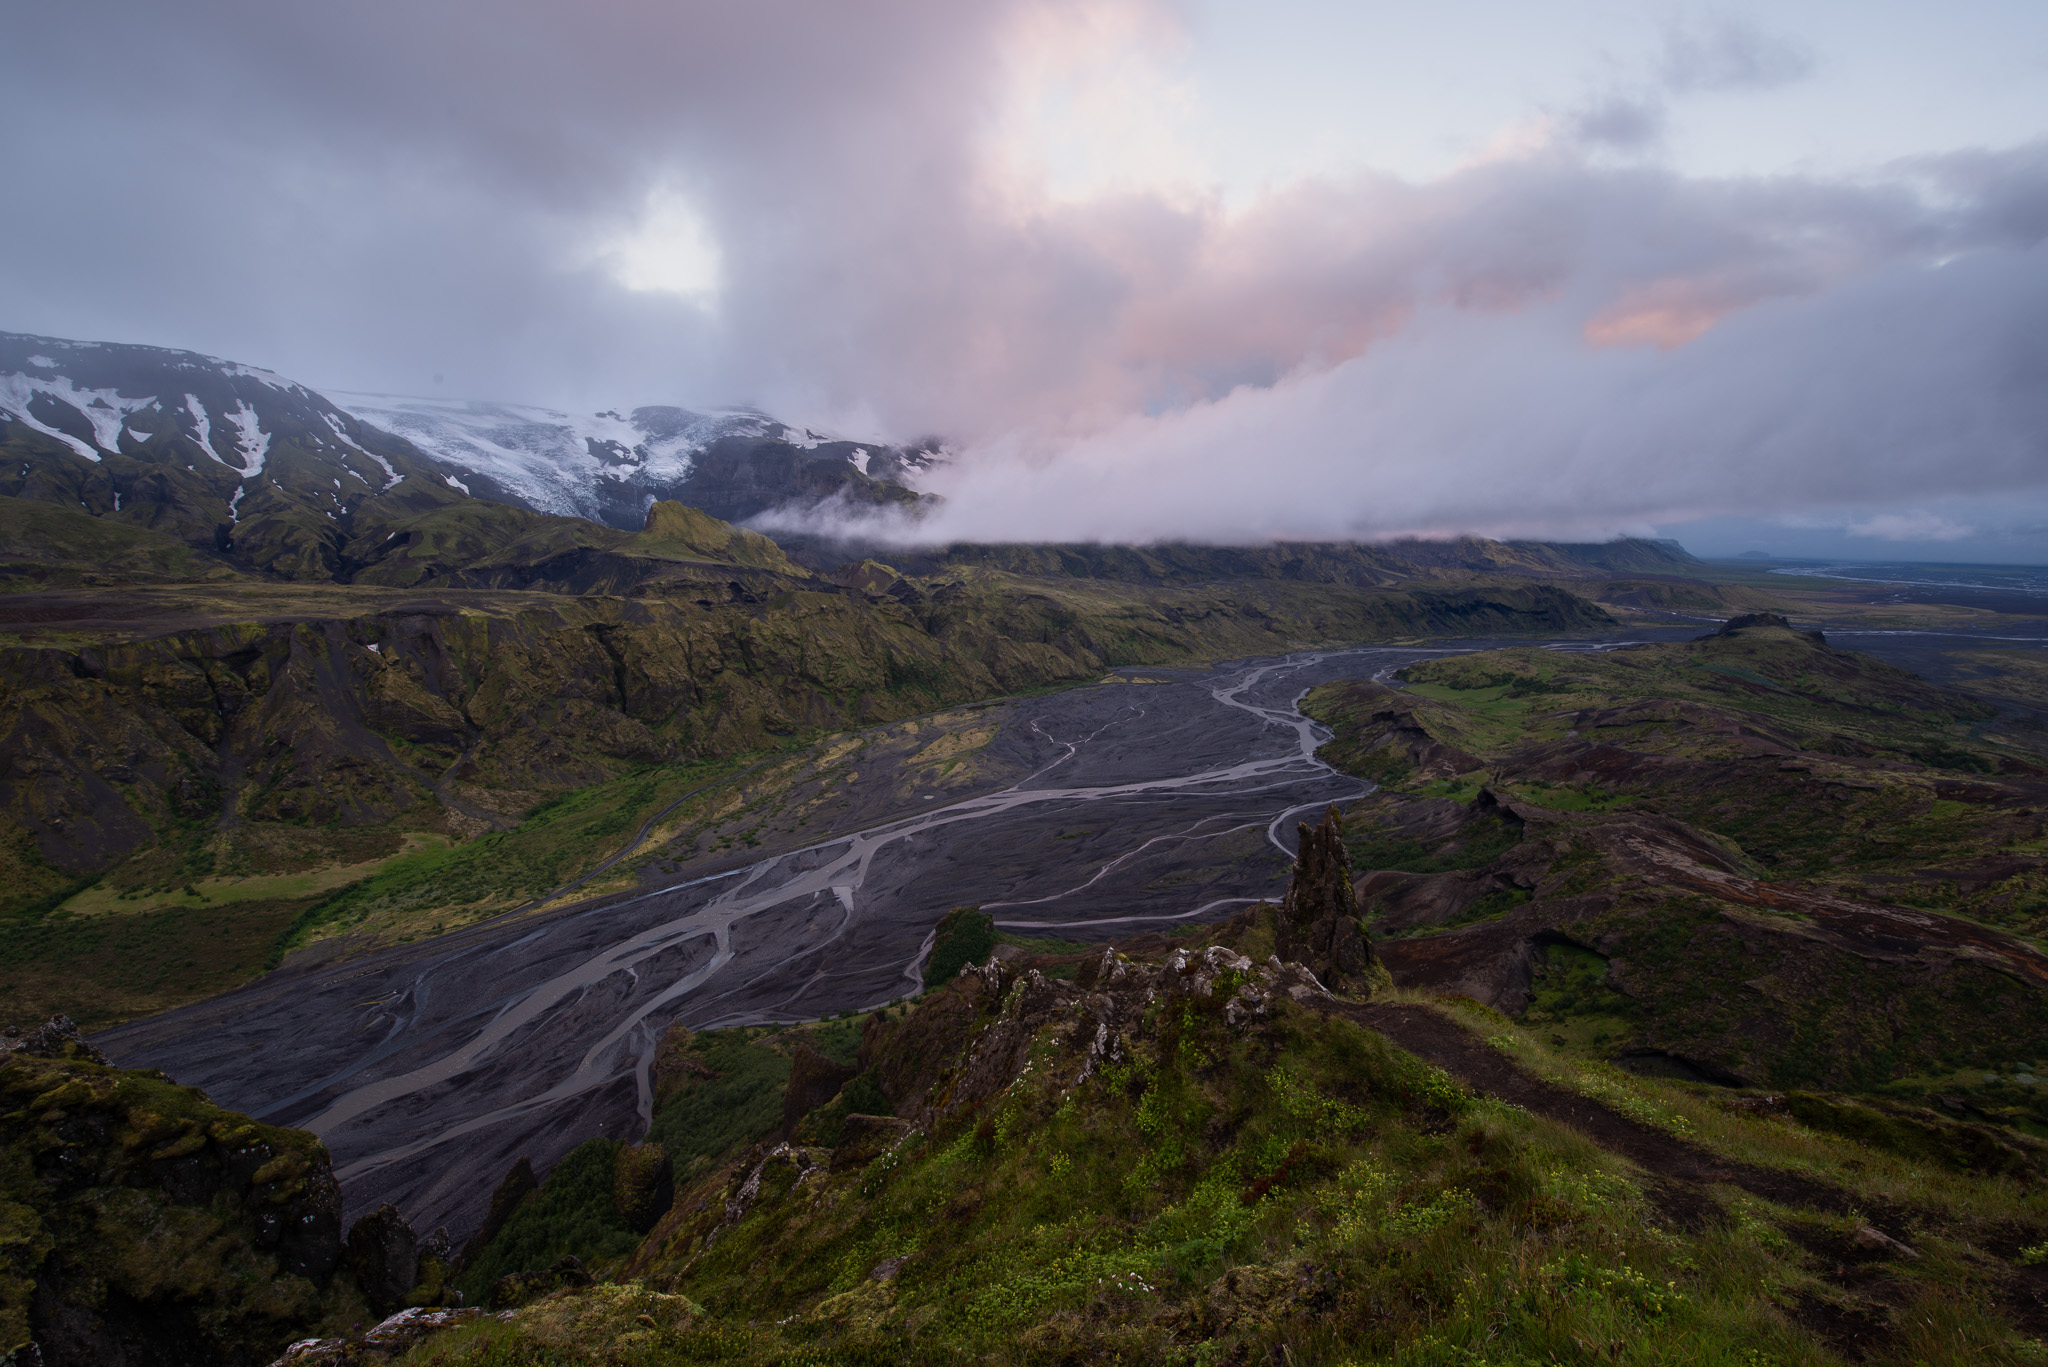
Pretty amazing place!
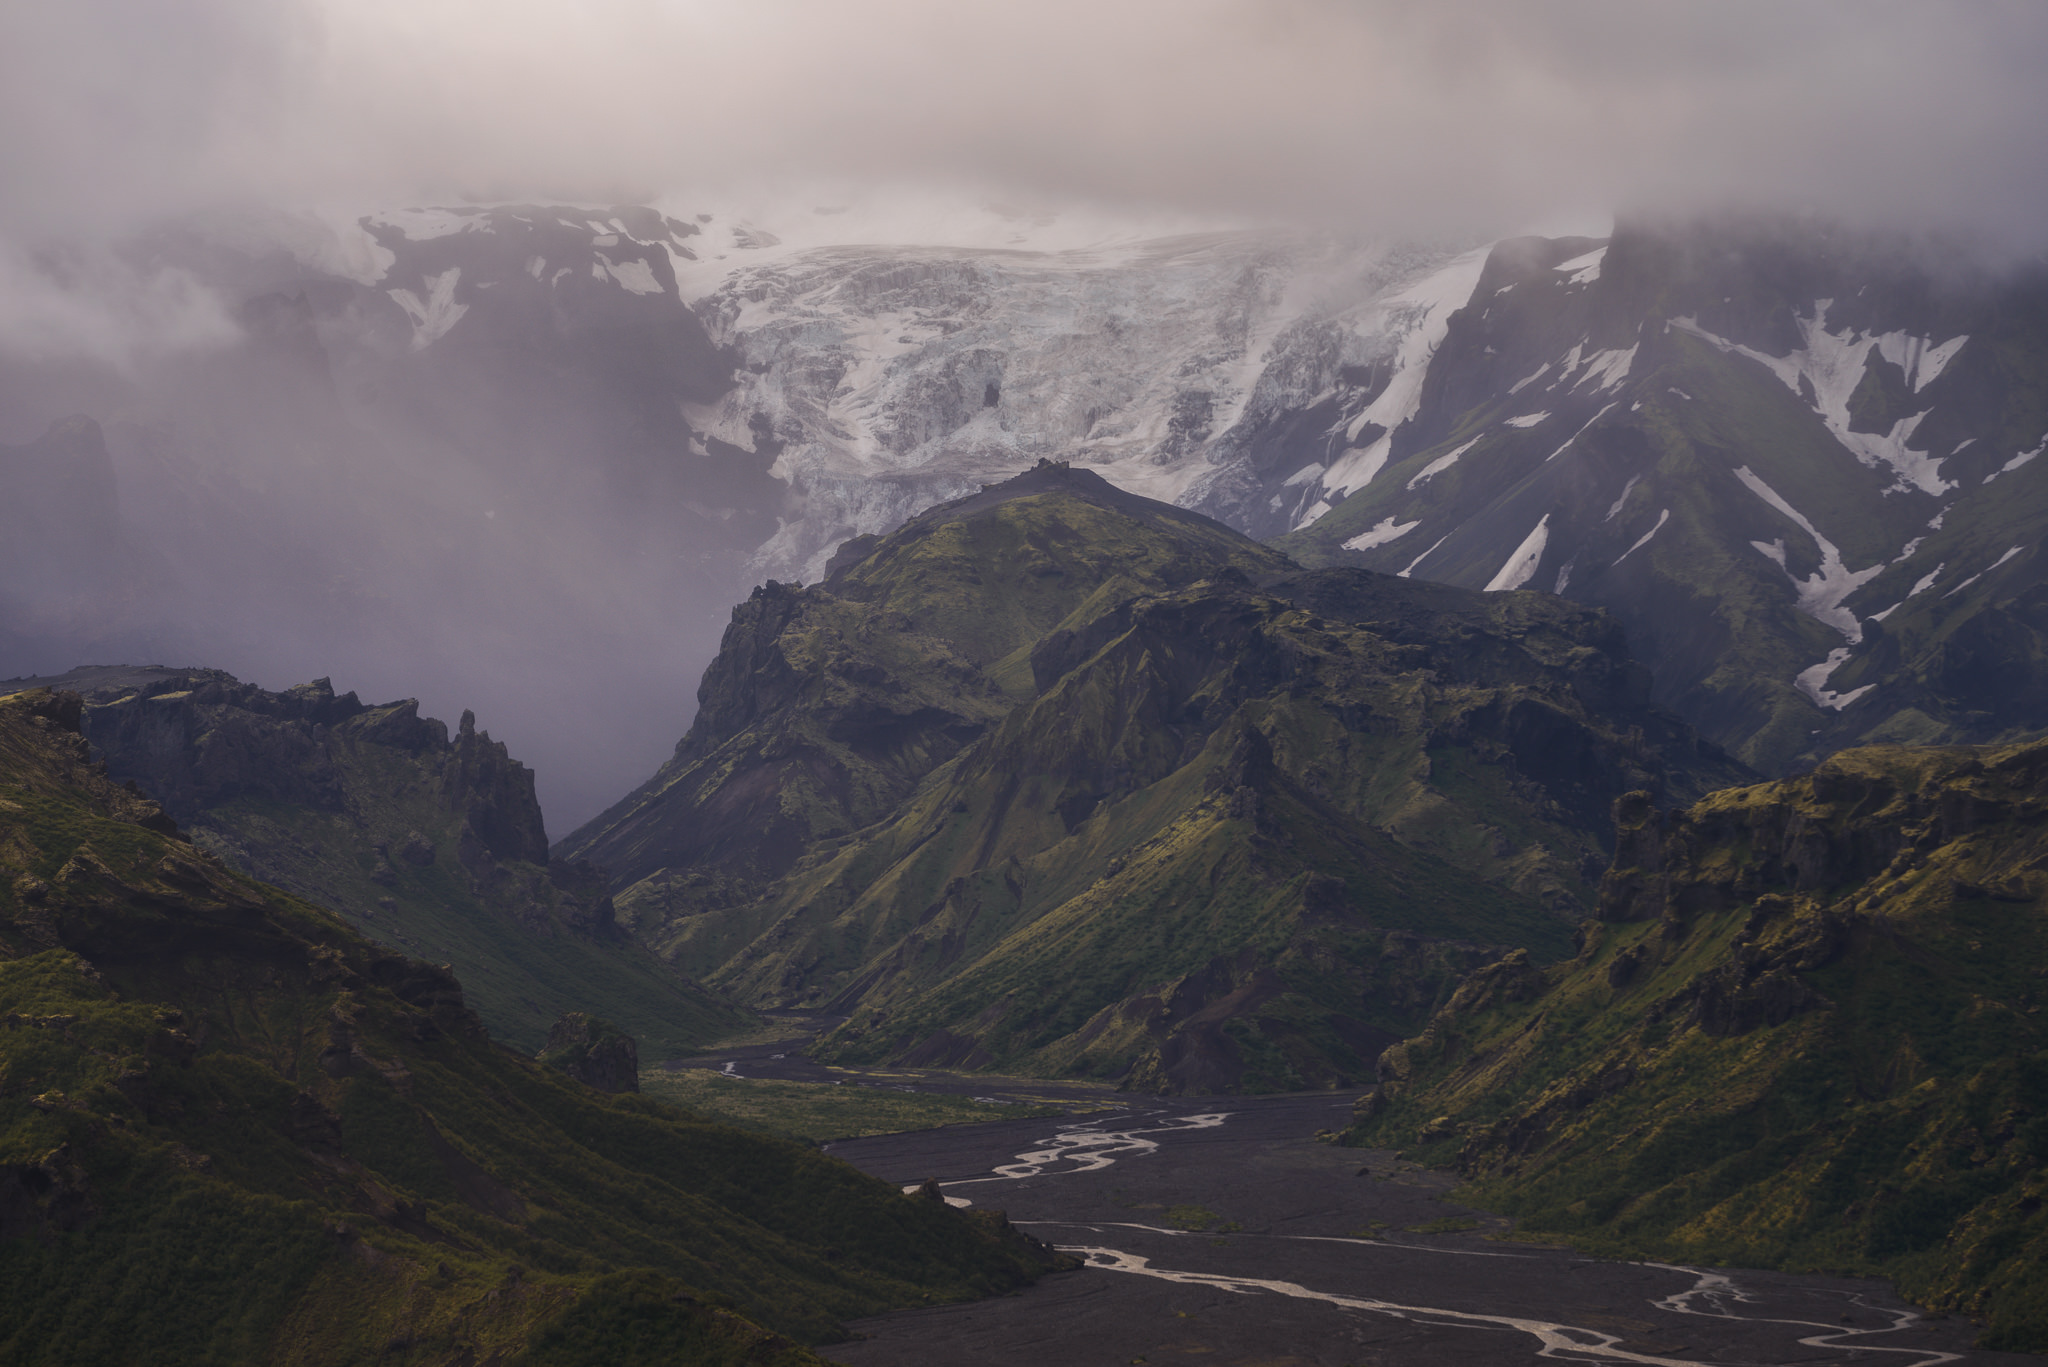
Conditions got even better as the morning went on. At first, the atmosphere was dark and moody, with a lot of distant rain:
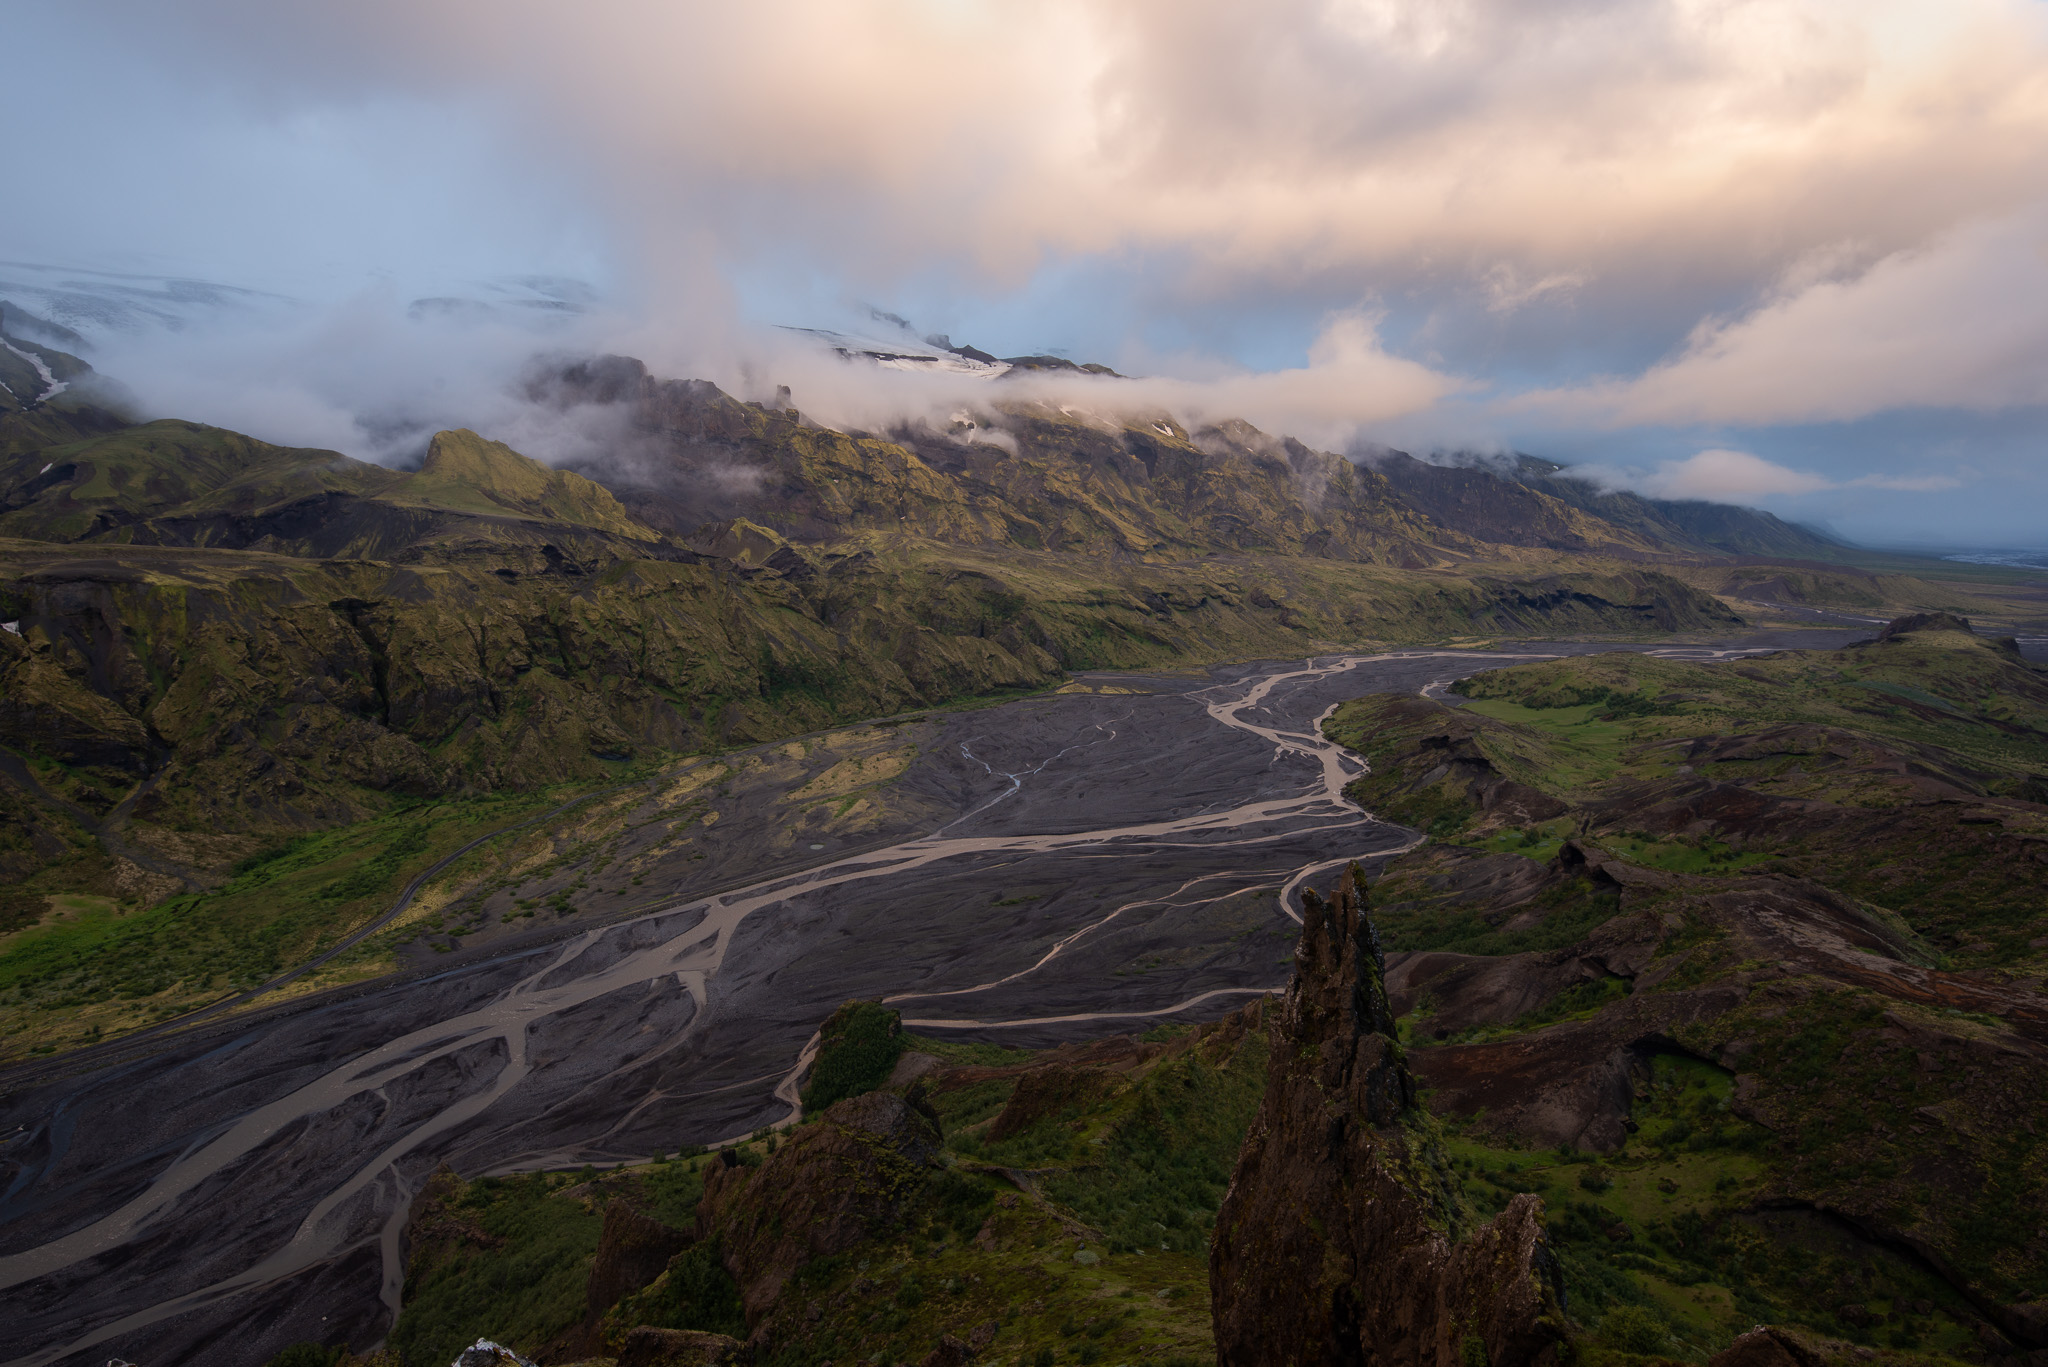
But then a bit of sunlight started peeking through:
And pretty soon it turned into some of the craziest and most beautiful light I’ve ever seen (this view off in the opposite direction):
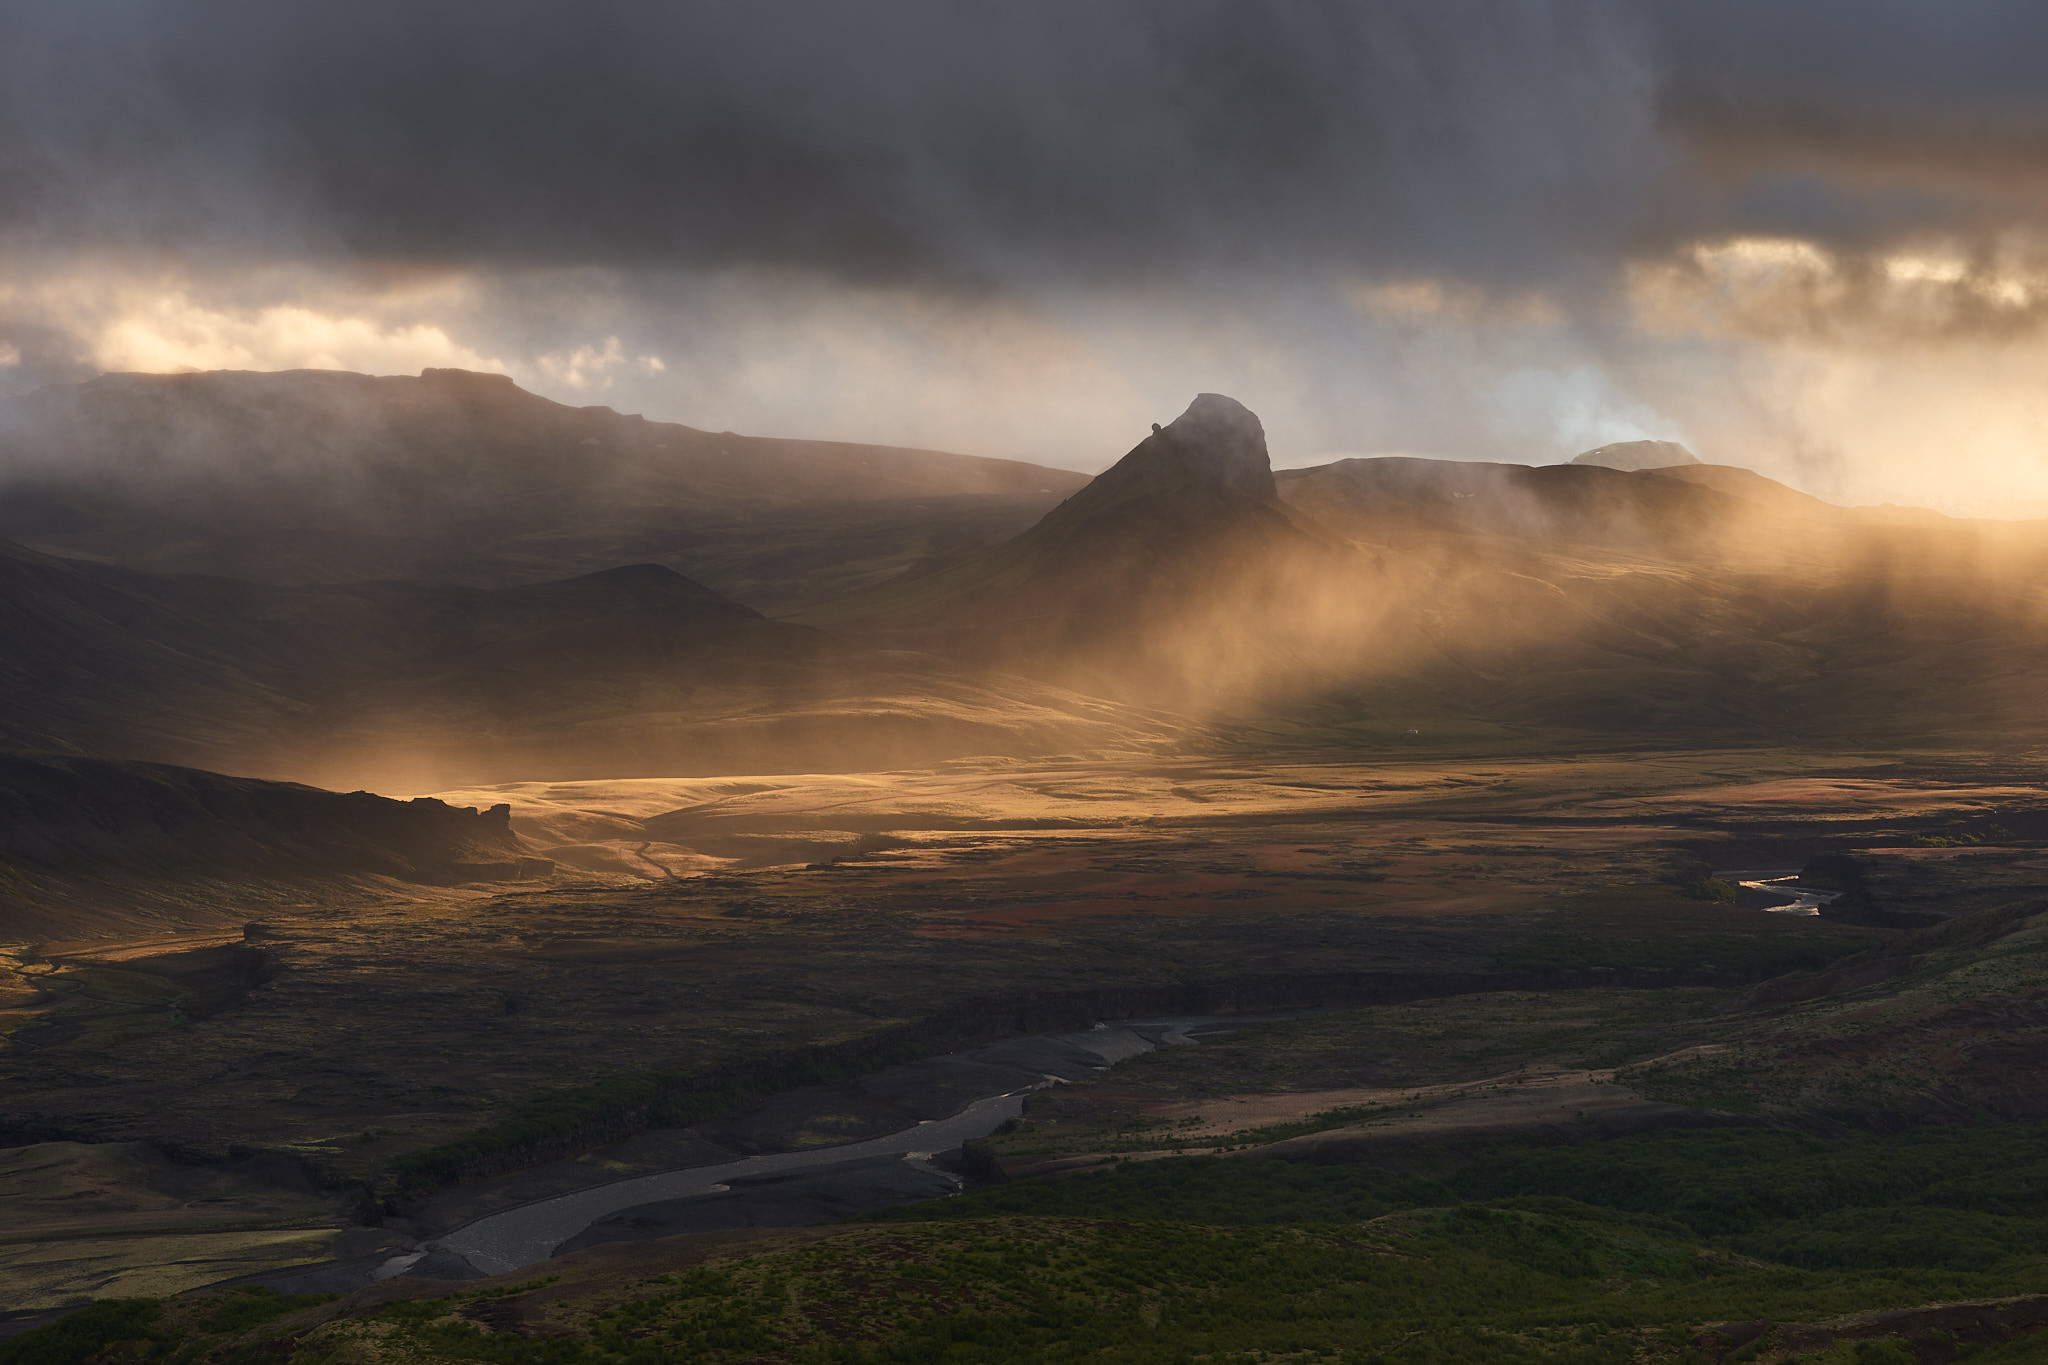
The one thing that didn’t happen was a rainbow. It wasn’t for lack of possibility; with the clouds changing every second, and raindrops periodically dotting my lens, it seemed like conditions were perfect. But it just was not to be.
After waiting for a while – several hours, in fact, thanks to the extended sunrise during Iceland’s summer months – the call of the breakfast buffet was too tempting to ignore. The two of us began hiking back down the mountain.
Not ten minutes later, a rainbow appeared. Unfortunately, since I was partway down the mountain, the view was extremely cluttered and simply not workable for photography. The only chance for a good photo was to run back up the mountain and hope the rainbow would still be there when I arrived.
I gave that run everything I had – and, of course, the steepest and trickiest part of this hike was the last 100 meters – but it was no use. The rainbow had vanished by the time I made it to the top.
There’s good news, though, in the form of something I’ve written about before: The natural world is built on cycles and patterns. When one wave crashes ashore, another follows. When a rainbow appears once, you might want to stick around for a while…
So, I waited. My stomach growled. Twenty minutes later, a hint of color appeared in the sky. A rainbow grew more and more vivid by the second.
It’s times like these that I recommend taking a quick-and-dirty photo. Maybe your camera settings aren’t perfect, and your composition still needs some work. But there’s no telling how long your subject will stay in position, so you just need to take something so you don’t walk away empty-handed. That’s what this photo was for me:
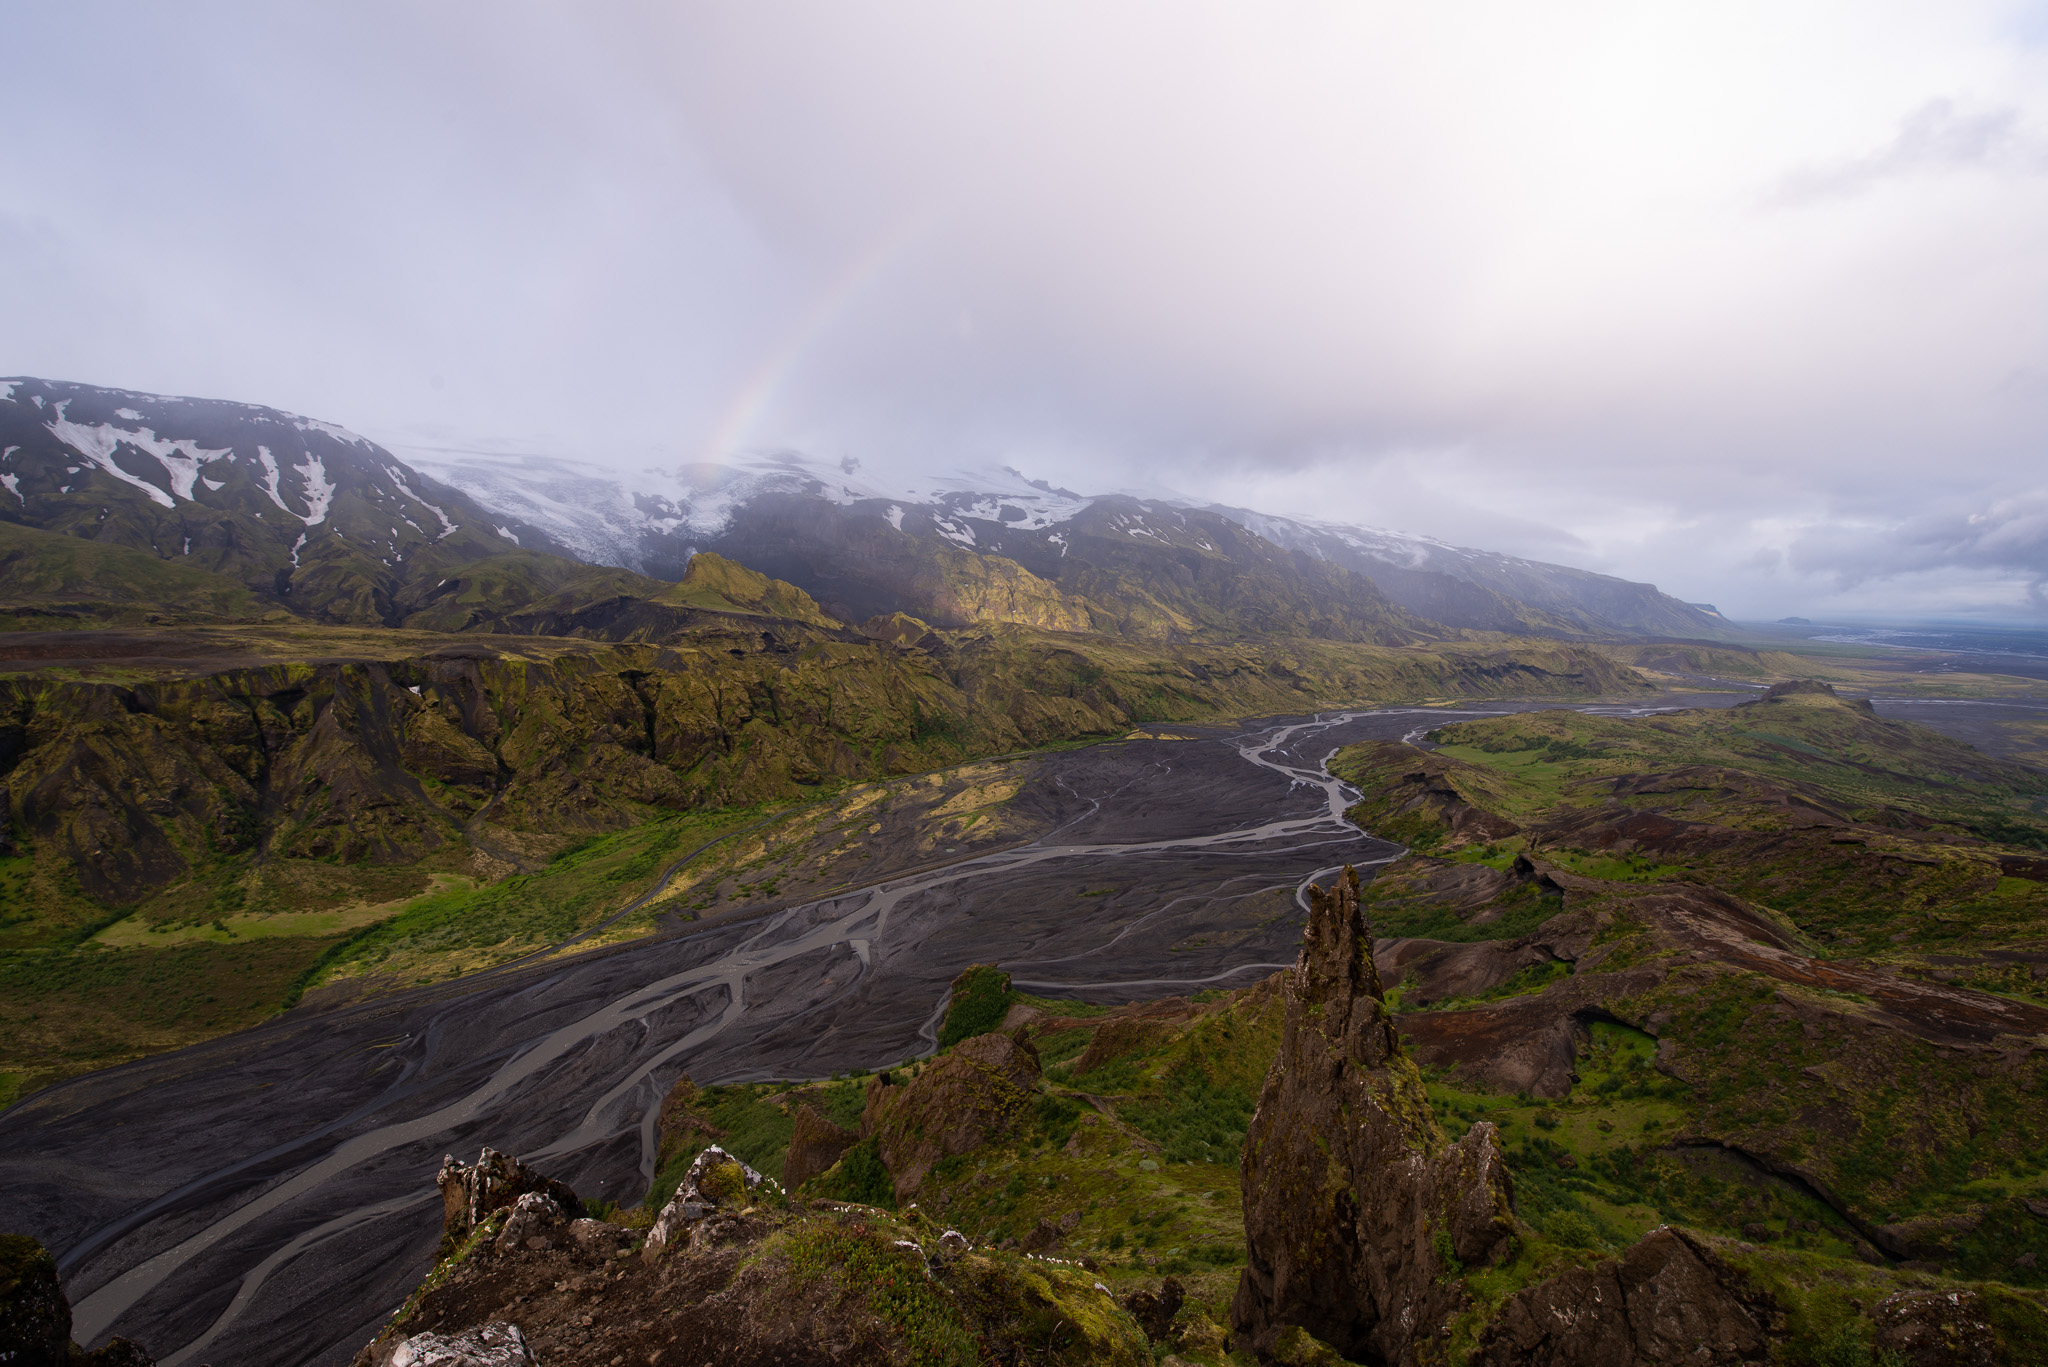
It definitely has some issues. The rainbow, of course, is hardly visible. On top of that, the foreground has some very distracting white rocks that draw way too much attention. The dark spot at the very bottom left is also an annoying distraction. But with the rainbow growing brighter and brighter, I was starting to feel confident that things would turn out well.
Camera Equipment and Settings
I’ll make a quick detour here to talk about the camera equipment and technical settings that I used in order to take these photos. All in all, it wasn’t especially difficult:
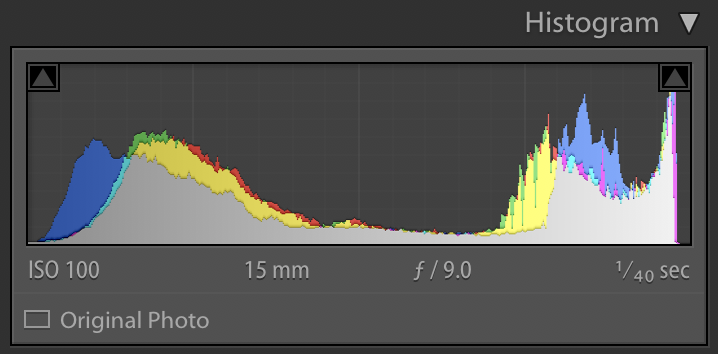
- I was using a tripod and didn’t have any fast-moving objects in the scene, so it was easy to set base ISO and whatever aperture I wanted (and then let shutter speed float to give me the proper exposure; it ended up being 1/40 second.)
- I chose an aperture of f/9, a relatively “medium” aperture, because I didn’t have very demanding depth of field issues. The rocks in the foreground were moderately close, but not enough to necessitate f/11 or f/16. I focused on the tall rock spire on the center-right near the bottom of the image.
- I was using aperture priority mode, as I often do for landscape photography, so the shutter speed just ended up being whatever the D800e’s meter (plus/minus my exposure compensation) deemed necessary for a good exposure. Incidentally, my final portfolio image was properly exposed (i.e. exposed to the right) with zero exposure compensation. Here’s the histogram in Lightroom from the unedited RAW photo:
As for camera equipment, I only had one wide-angle lens with me – the Tamron 15-30mm f/2.8 VC – and I zoomed to the widest angle in order to capture the composition I wanted. Although some photographers may tell you that “getting the whole scene in” is a bad reason to use an ultra-wide lens, sometimes that’s exactly why you need one of these lenses. Here, at any farther focal length, I’d be forced to compose either the foreground or the rainbow awkwardly close to the edges of the frame.
My one regret in terms of camera equipment is that I didn’t use a polarizer with this photo. Polarizing filters are great for emphasizing the colors in a rainbow, but unfortunately the Tamron 15-30mm f/2.8 VC doesn’t have native filter capabilities. It’s still an excellent lens – indeed, one of my all-time favorite wide angles for Nikon – but I do wonder how much more detail I’d have gotten in the double rainbow if I’d been able to capture this with a polarizer somehow.
The Refining Process
After noticing that my quick-and-dirty composition had too much distracting foreground, I initially tried zooming in to 19mm to focus just on the rainbow instead. But, as I mentioned a moment ago, that leads to an awkward cutoff for the foreground that I don’t think works very well:
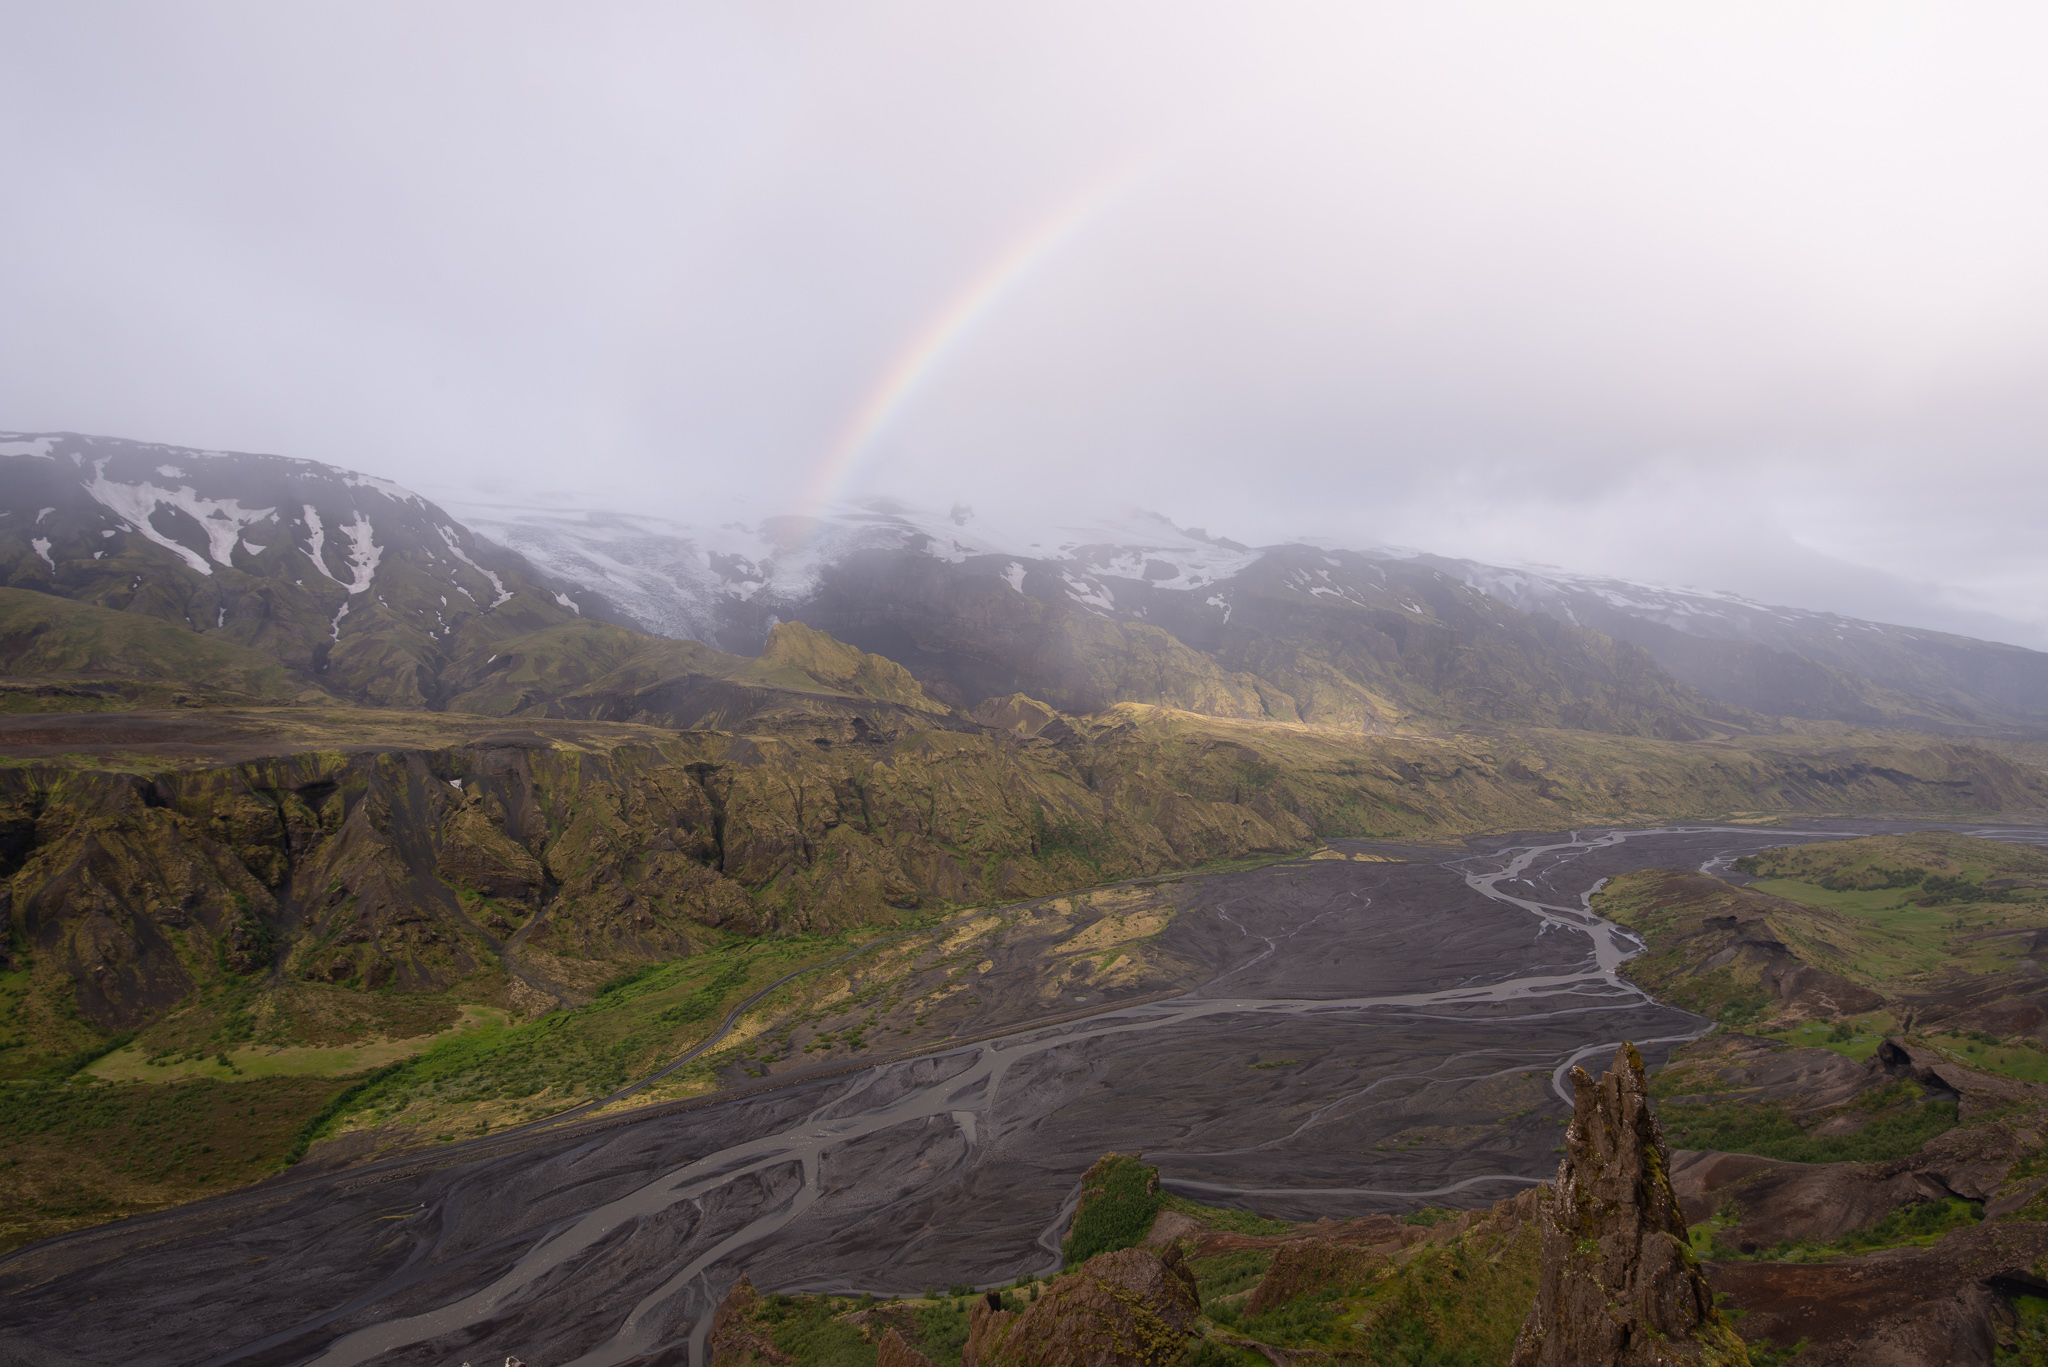
So, I zoomed back out to 15mm and walked forward a bit (the other way to get rid of the white foreground rocks). To me, this composition is much better:

The one remaining issue is that the dark rock at the bottom left is now taking up a lot of space and drawing too much attention. I couldn’t walk any further and exclude it, so I just shifted my composition a bit to the right:
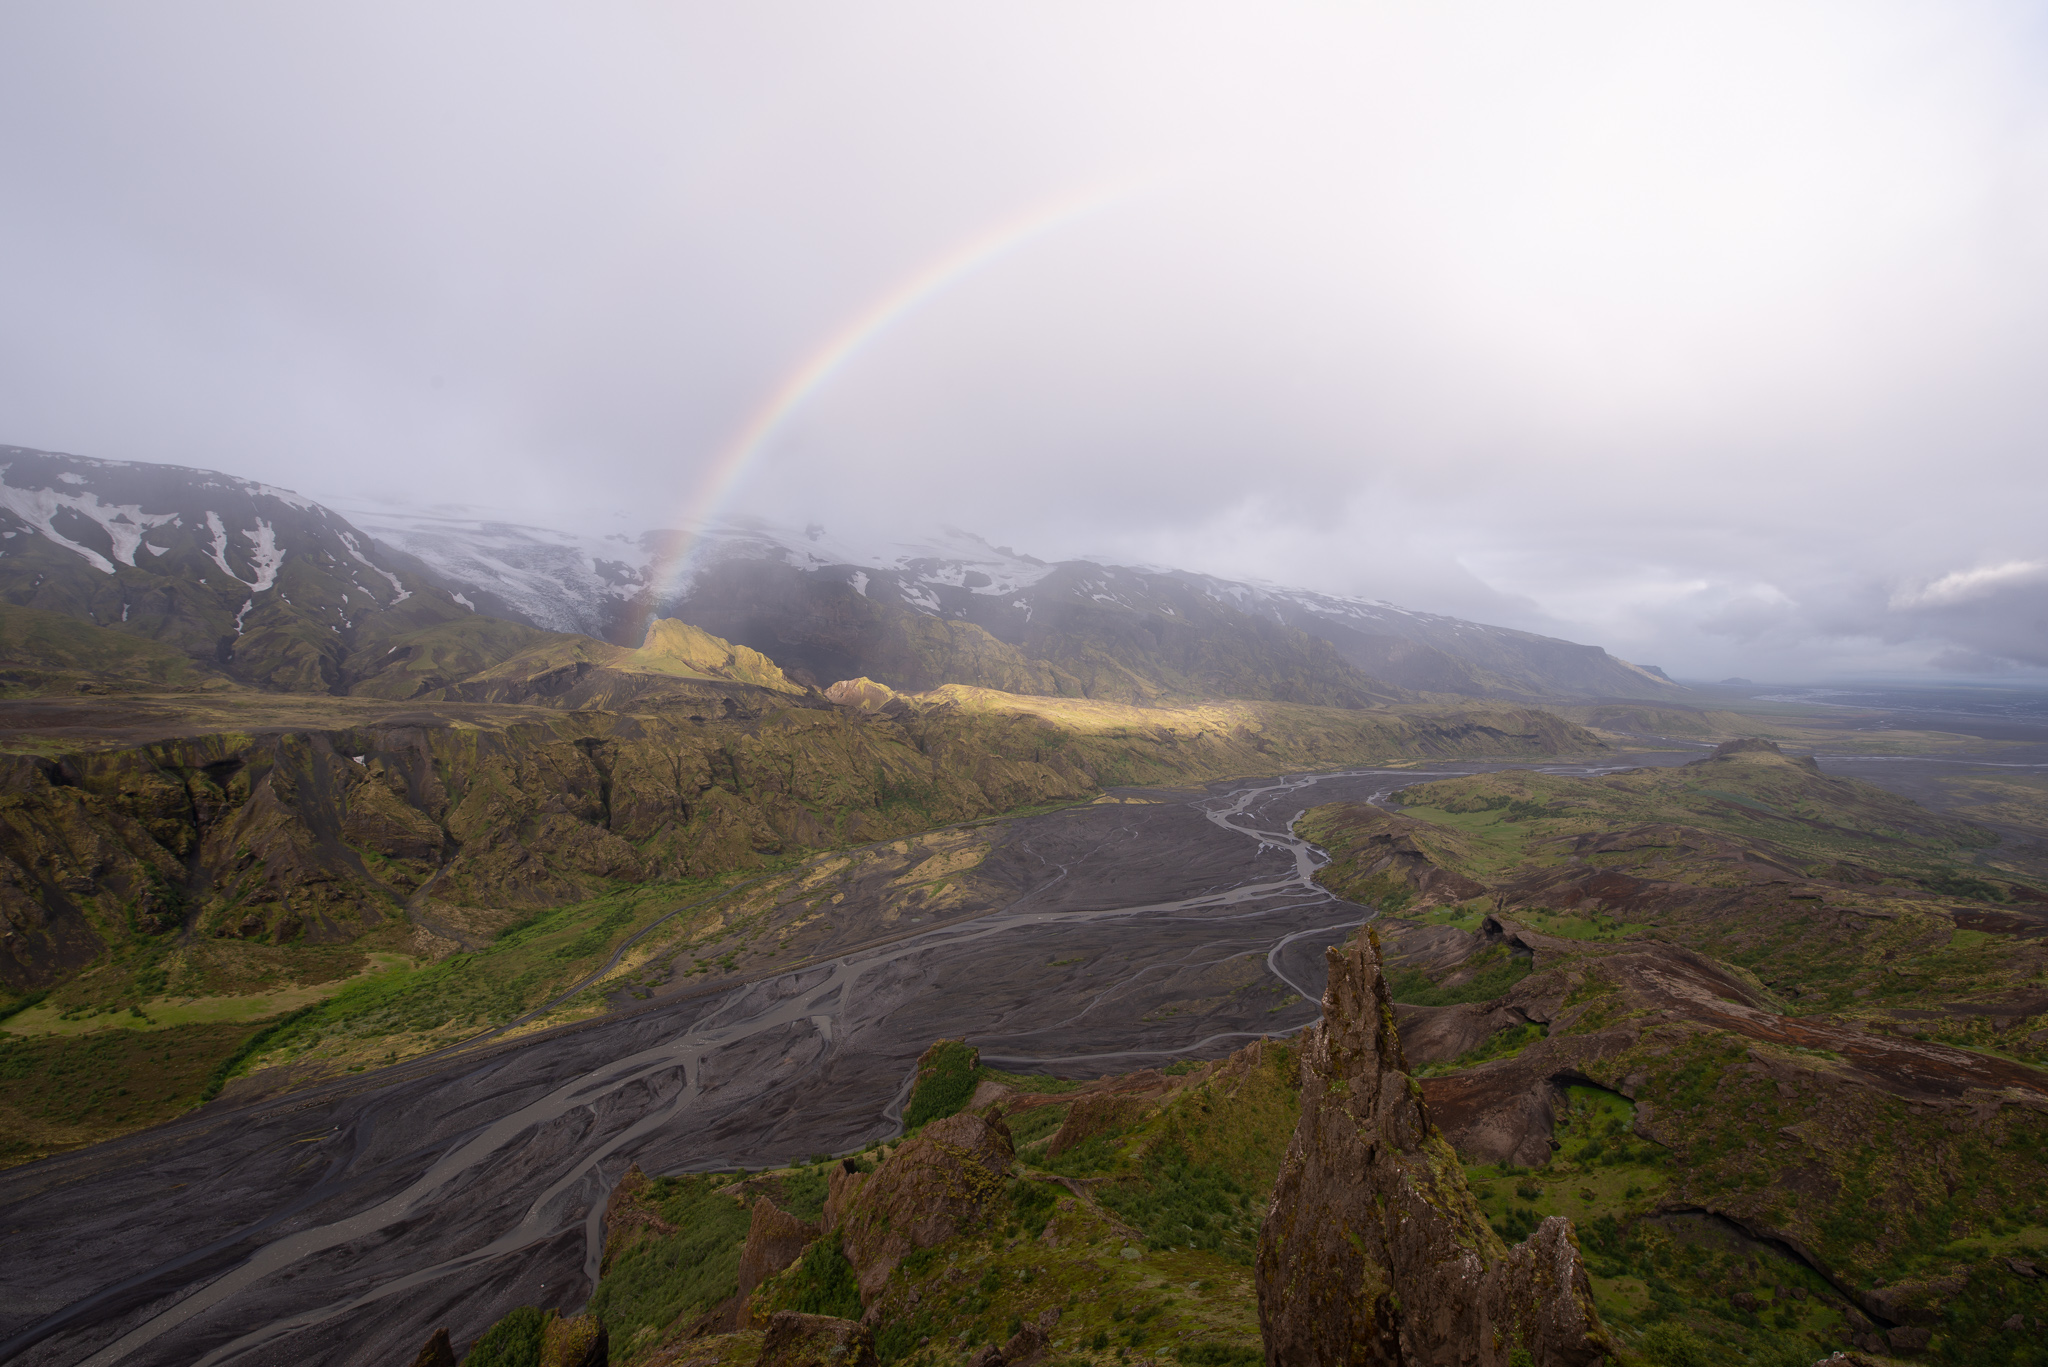
That’s the composition I ultimately decided on and began to post-process in Lightroom – though I did need to cull through a few variations that were extremely similar to this one, as is often the case.
Post-Processing in Lightroom
1. Original, Unedited RAW File
As part of the culling process, I did preliminary edits to several of the photos I thought I might end up choosing (always a good plan if you’ve got a few similar variations). Like I showed just a moment ago, this is the original RAW image of the photo I ultimately liked the most:
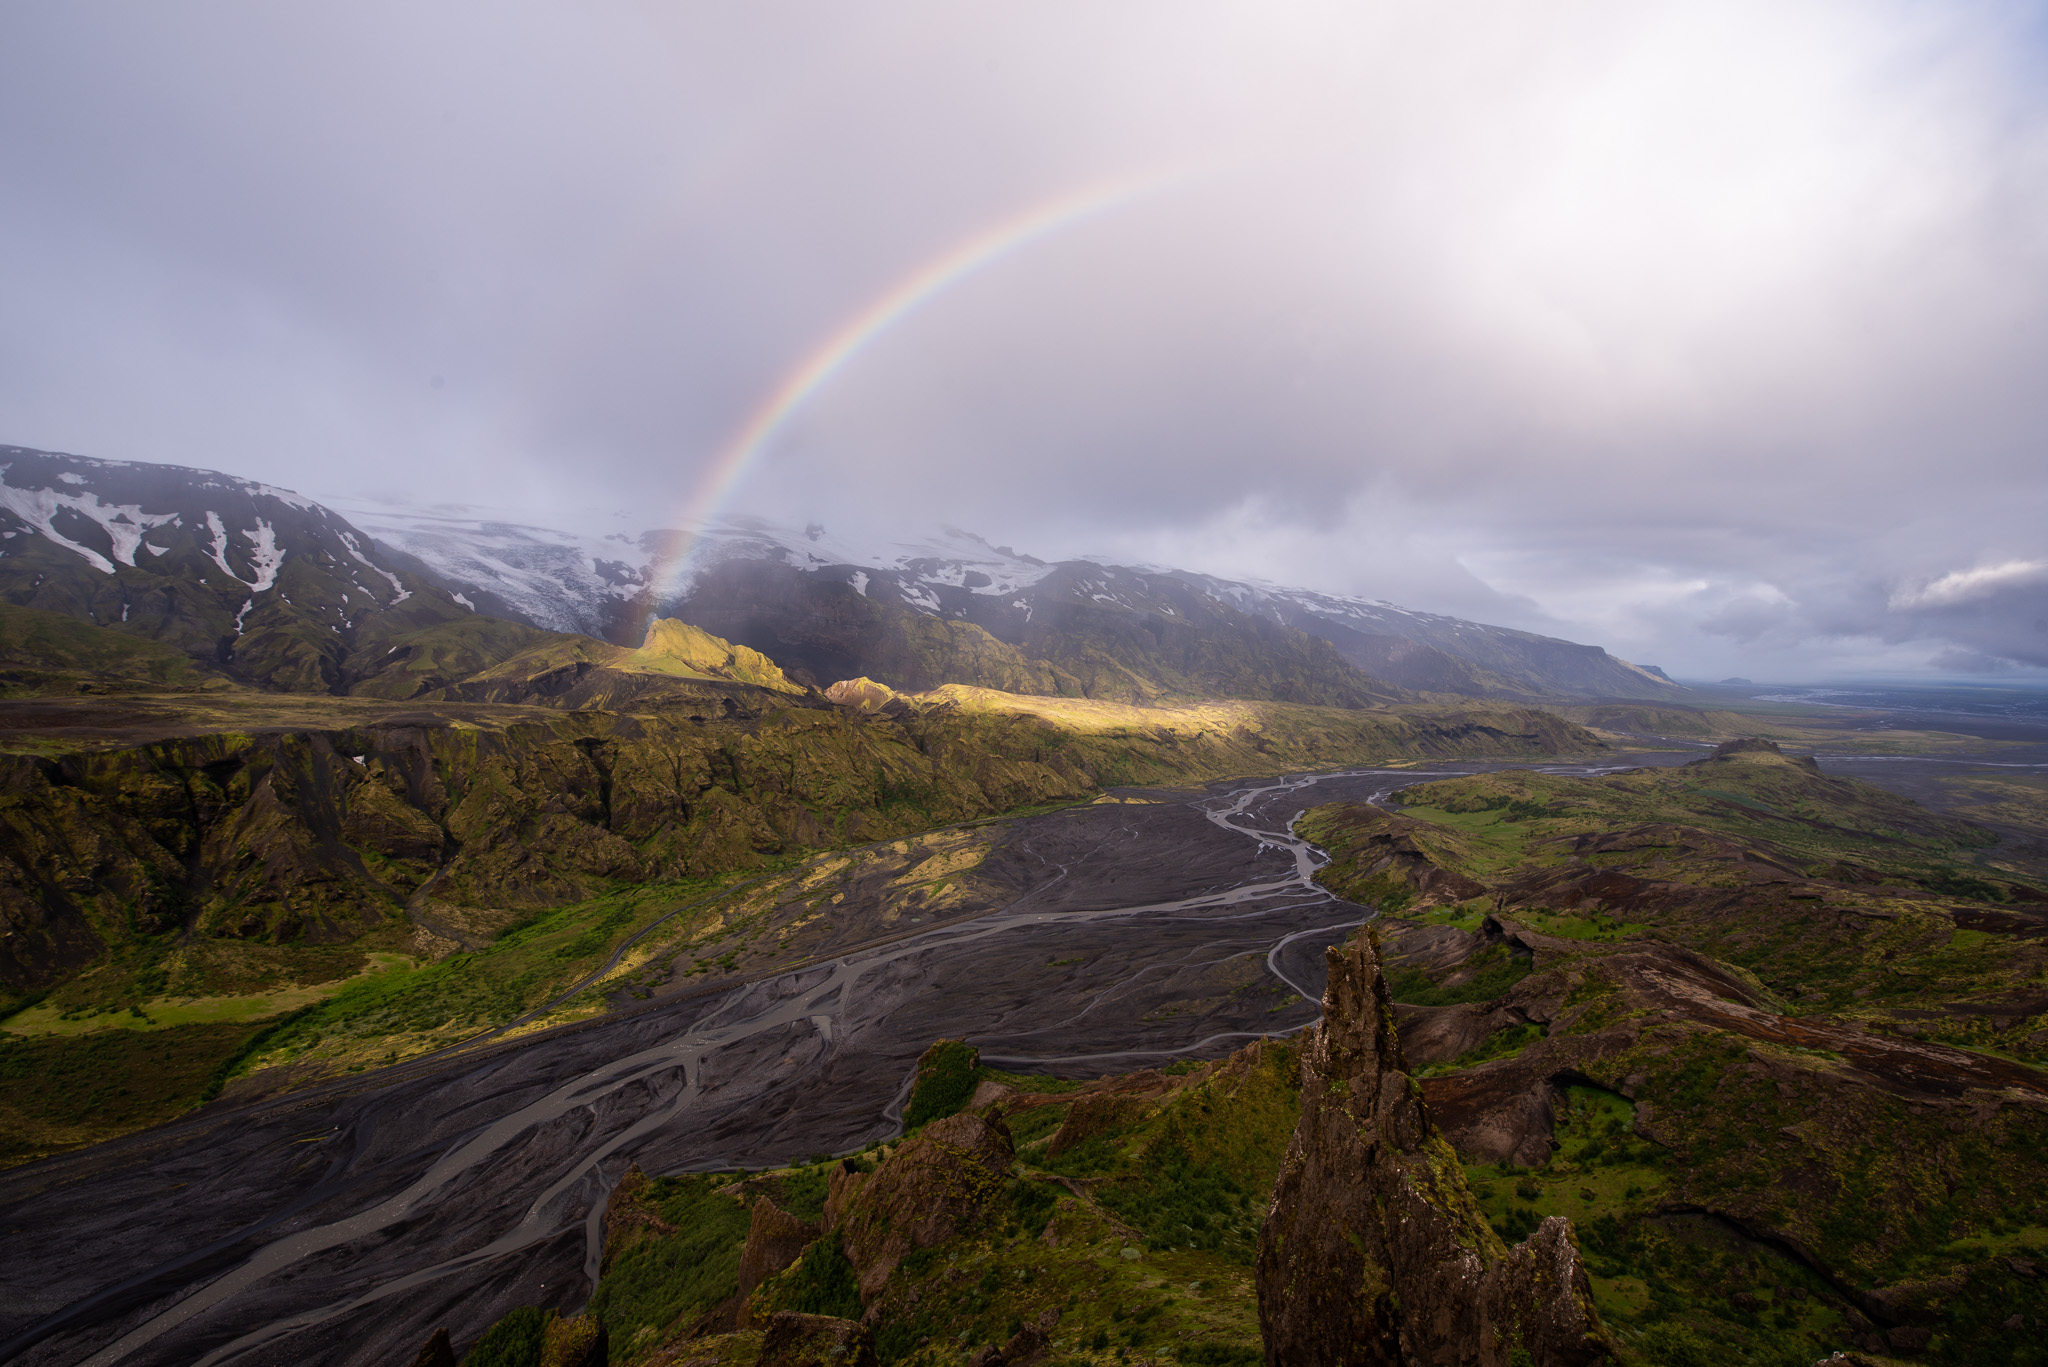
At first glance, at least to me, this RAW photo seems a bit imbalanced. There’s simply too much emptiness on the right-hand side, especially in the sky. But as you’ll see below, with some basic post-processing, a lot of hidden details start to appear that make those regions much less empty. In the end, this turned out to be the most balanced variation that I captured, with the most rainbow visible, too. (Unfortunately, the full rainbow never appeared, but I don’t want to be greedy; it was already the best sunrise I’ve ever had as a photographer.)
2. Basic Adjustments
The biggest issues in the RAW file to me are the high levels of haze and the very bright (nearly overexposed, but not quite) highlight region.
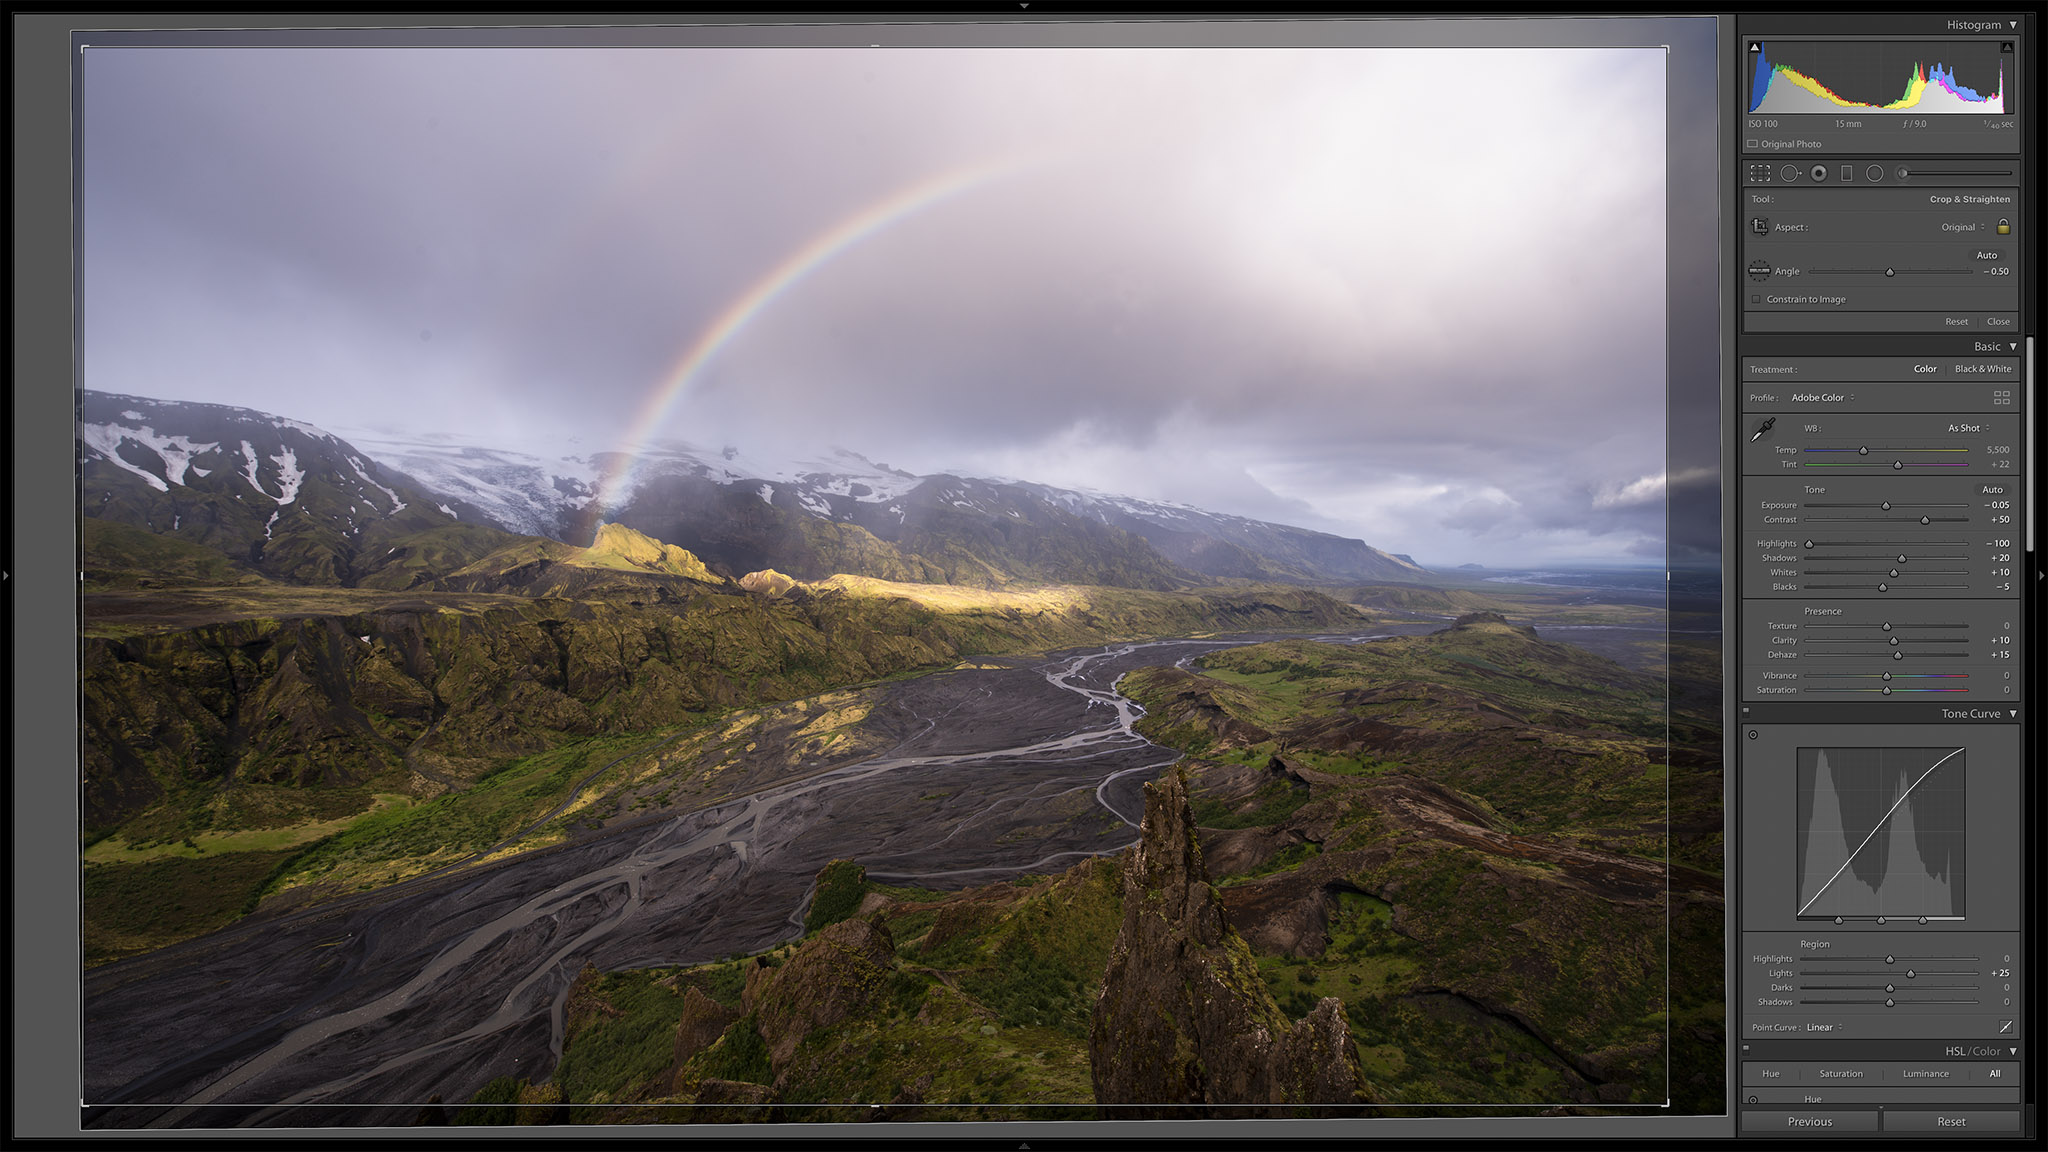
My first step to fix those problems is the Basic Panel in Lightroom. I almost always start there, because I prefer to go from broad adjustments to the small details (i.e., “Global > Local > Spot Adjustment”) when editing my pictures. Here are the specific settings I used in Lightroom:
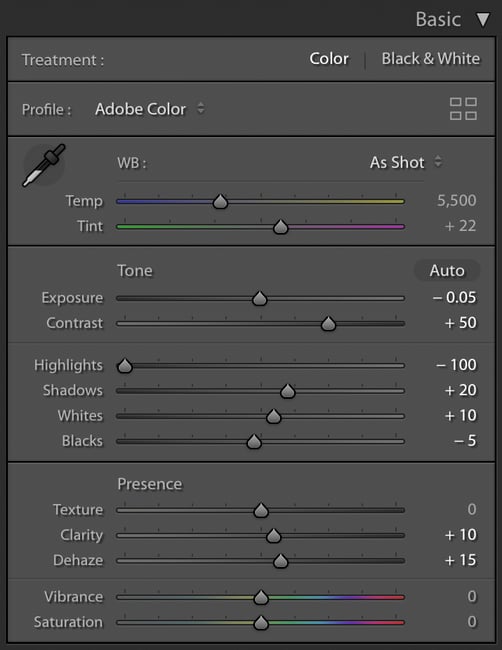
And here’s how that looked in practice:
That’s a pretty good starting point! And, as you can see, the clouds are now starting to get some additional detail that shifts this photo’s visual weight to the right.
In terms of the specific settings I adjusted, one that may stand out to you is my “highlights” value of -100. It seems to me that some photographers are hesitant to push any slider to the most extreme value, even if that’s where the photo looks best. But – so long as you can verify that you’re not introducing excessive noise, banding, or other unwanted artifacts – there’s really no reason to avoid it. Depending on the photo, I use +100 or -100 values on various sliders with some regularity (and -100 highlights is the most common for me by far).
3. Tone Curve
Despite the contrast, clarity, and dehaze boosts that I added, this photo still lacks a certain punch to my eye. Possibly my favorite tool in Lightroom to fix this problem is the unassuming “Lights” slider under the Tone Curve. Here, I used an adjustment of +25:
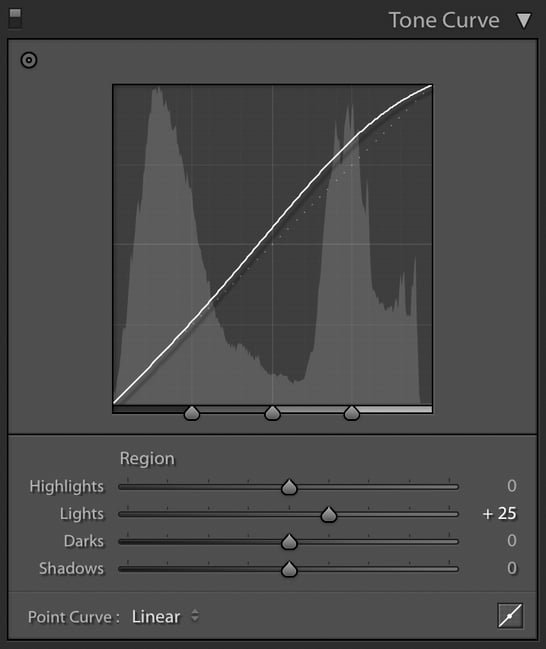
And that did the trick, making this photo pop out much more:

4. Gradient Filter Tool
As much as I like the “Lights” boost that I just added, part of the sky is now too bright once again. I’d like to keep the foreground the same but darken the sky region, which means it’s time to start using local adjustments. In this case, I’ll do so with the help of a gradient:

The slider adjustments I used are too small to see, so here’s the list:
- Color Temperature: +2
- Exposure: -0.40
- Contrast: +20
- Highlights: -50
- Whites: -5
- Saturation: -10
Which translates to a photo that looks like this:

5. Radial Gradient Filter Tool
I’ve done the broad strokes of this photo already, but I’d still like to do a bit of local post-processing. Specifically, the river at the bottom of this photo is an important leading line, and it’s currently a bit too dark for my taste. I’m going to create a radial gradient and do some dodging to make it look better:
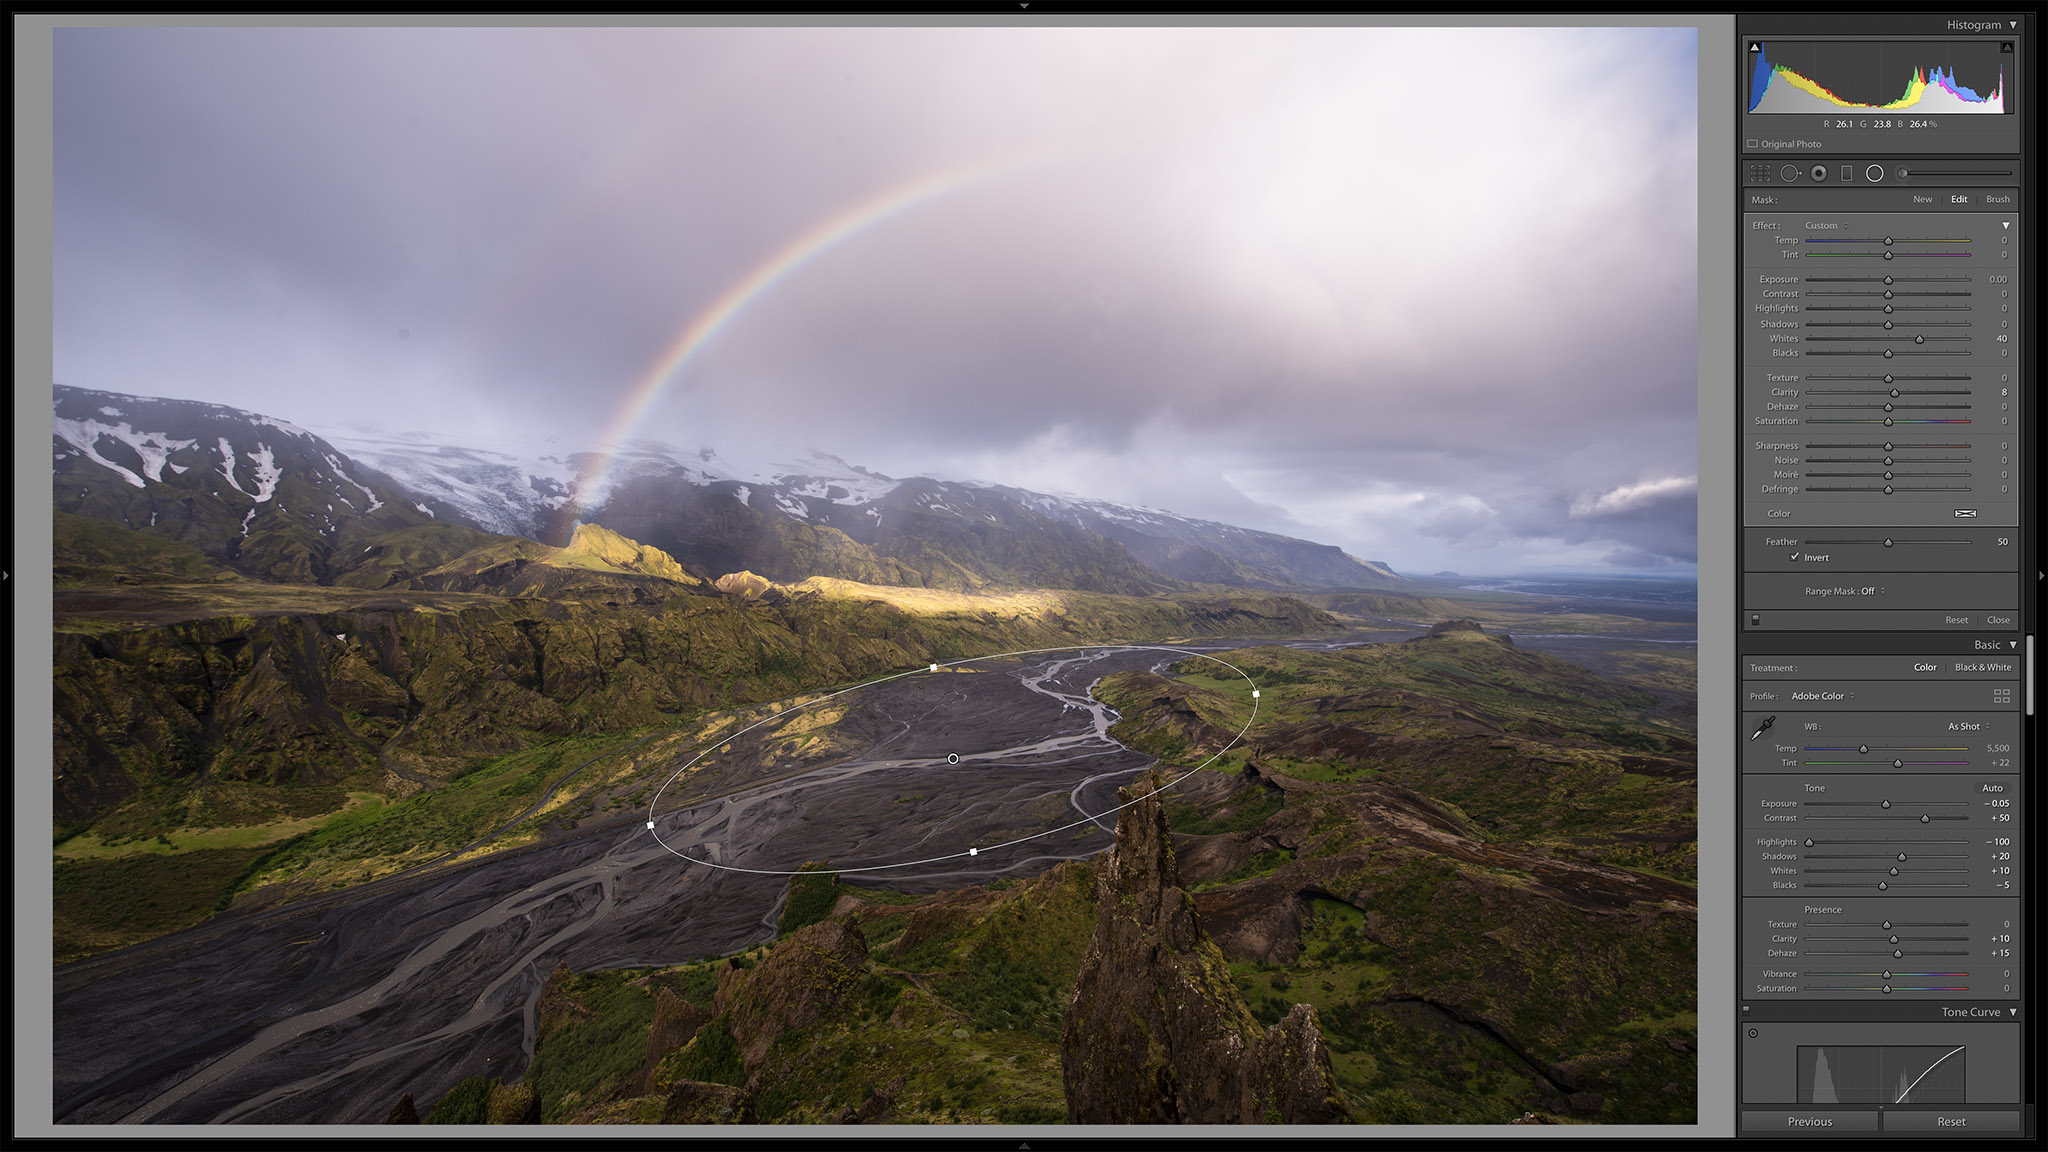
As before, the sidebar is too small to see, so here are the slider adjustments I did:
- Whites: +40
- Clarity: +8
Pretty simple! The photo now looks like this:
6. Cropping
Although I often crop my photos as an early step in the process, just as often I end up waiting and doing it later. That’s because cropping is easier to do when you know the distribution of “visual weight” in the photo – i.e., its balance. That becomes progressively clearer as you make more and more adjustments (like how the sky here now has much more detail than in the RAW image).
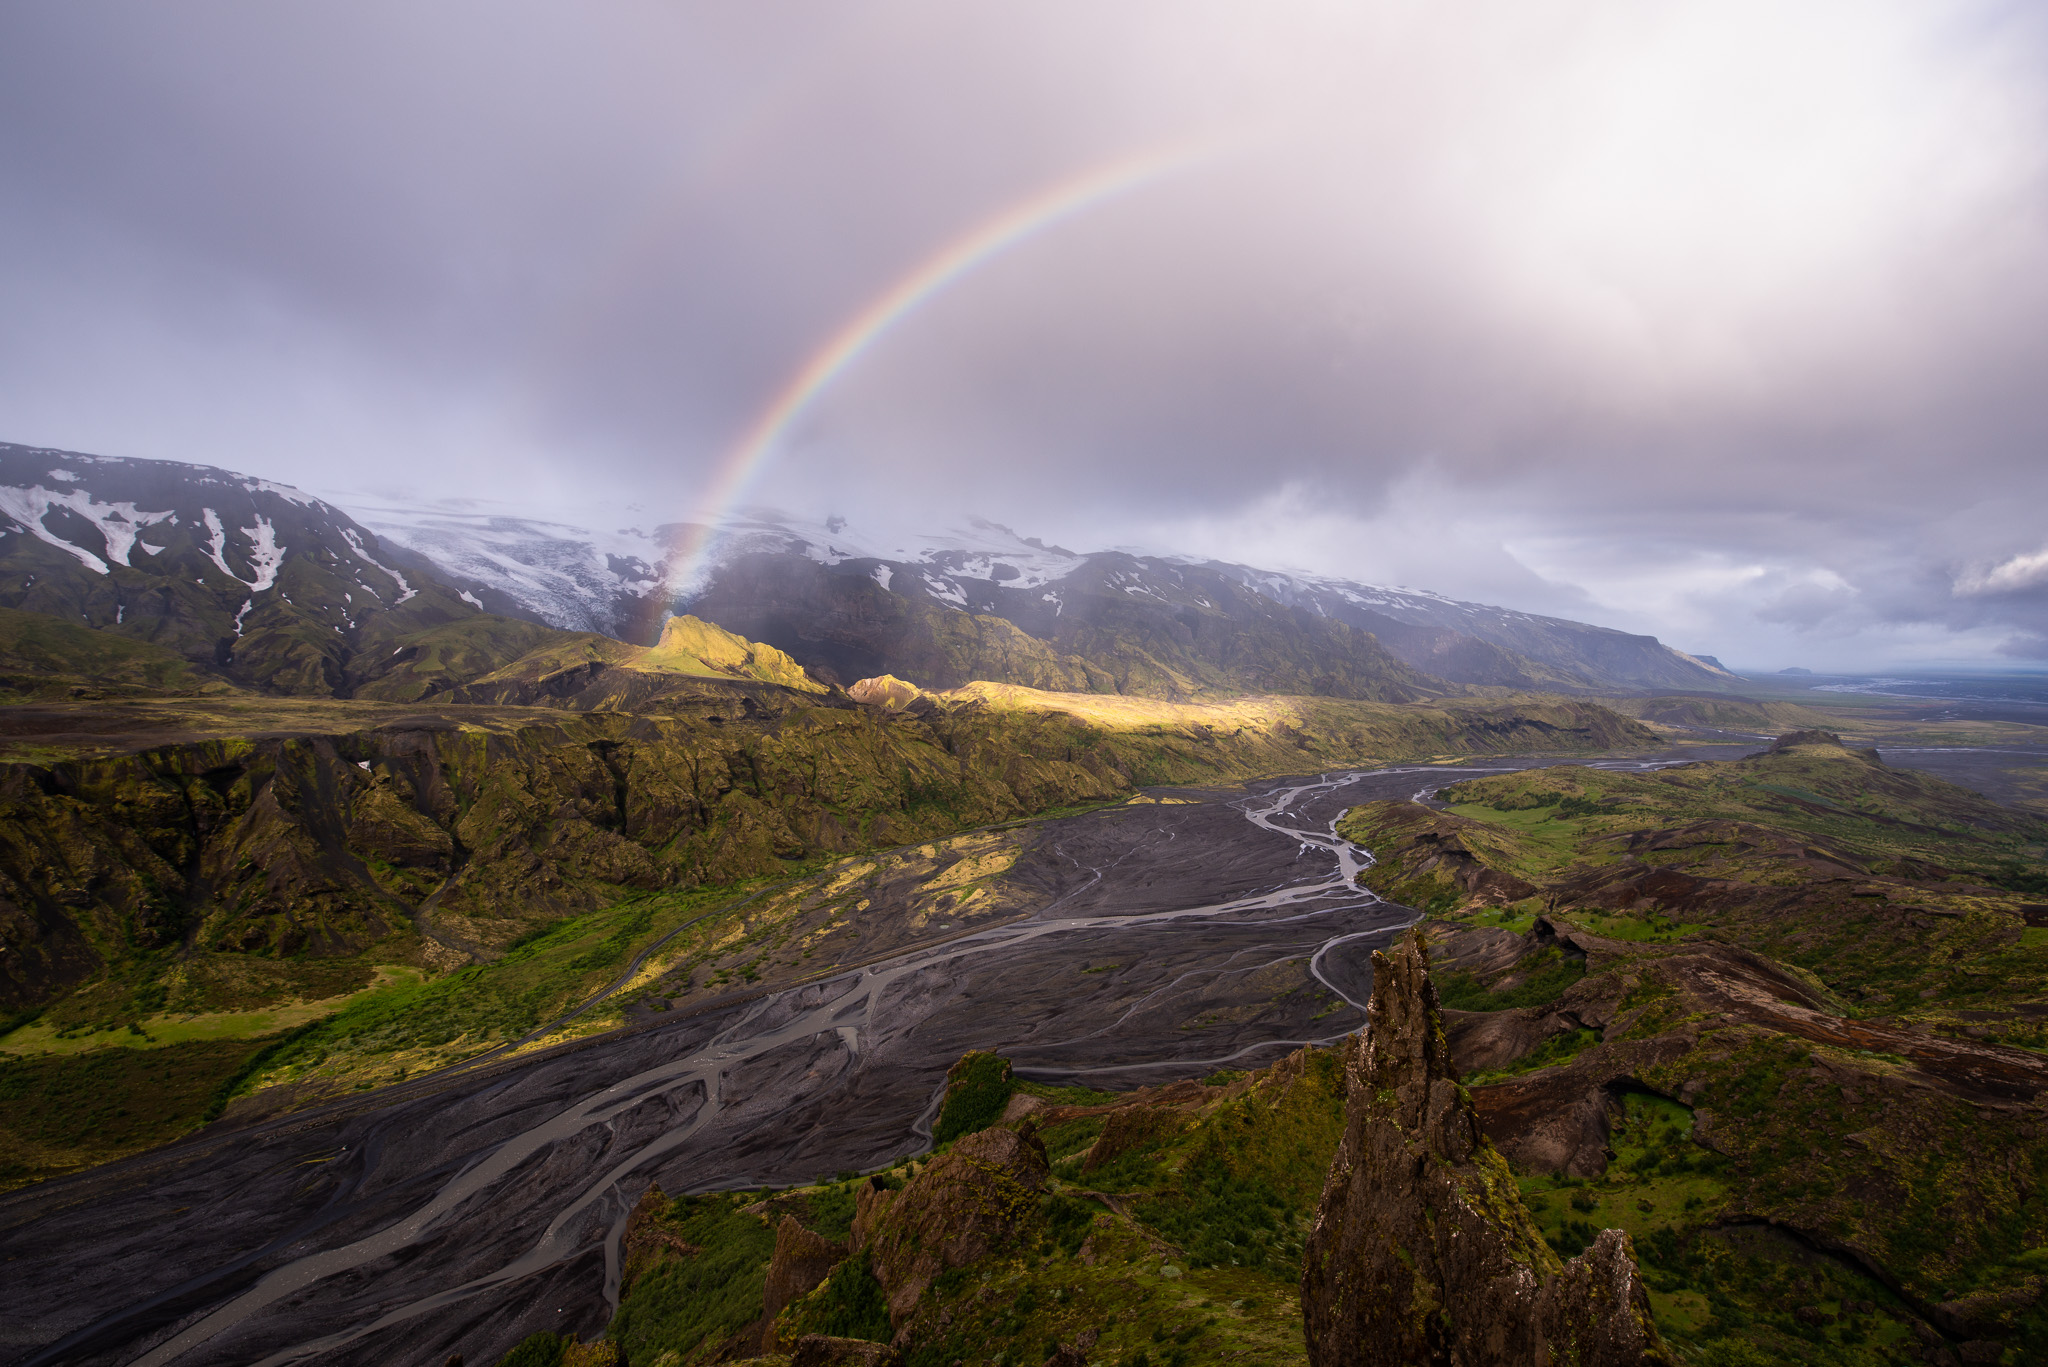
In this case, I didn’t need to crop too much, but I did do a bit – including to trim away a tiny bit of white rock in the foreground at the bottom right, as well as eliminate some of that empty space on the right-hand edge:
You’ll notice that I also ended up rotating the photo a bit (-0.50 degrees to be exact) in order to straighten the horizon. It’s not a huge change – and, in this case, there are a few conflicting signals for leveling the horizon because the distant hills are slanted – but I do think it makes the photo feel a bit more stable. Here’s how things look right now:

7. Dust Spot Removal
The only changes left to make are very subtle. I’ve noticed some dust spots visible in the sky, especially on the left-hand side of the image. Here are all the places that I spot-healed, shown in a magnified crop (many of these are pretty hard to see when viewed at this size, but hey – if you notice them, you might as well remove them):
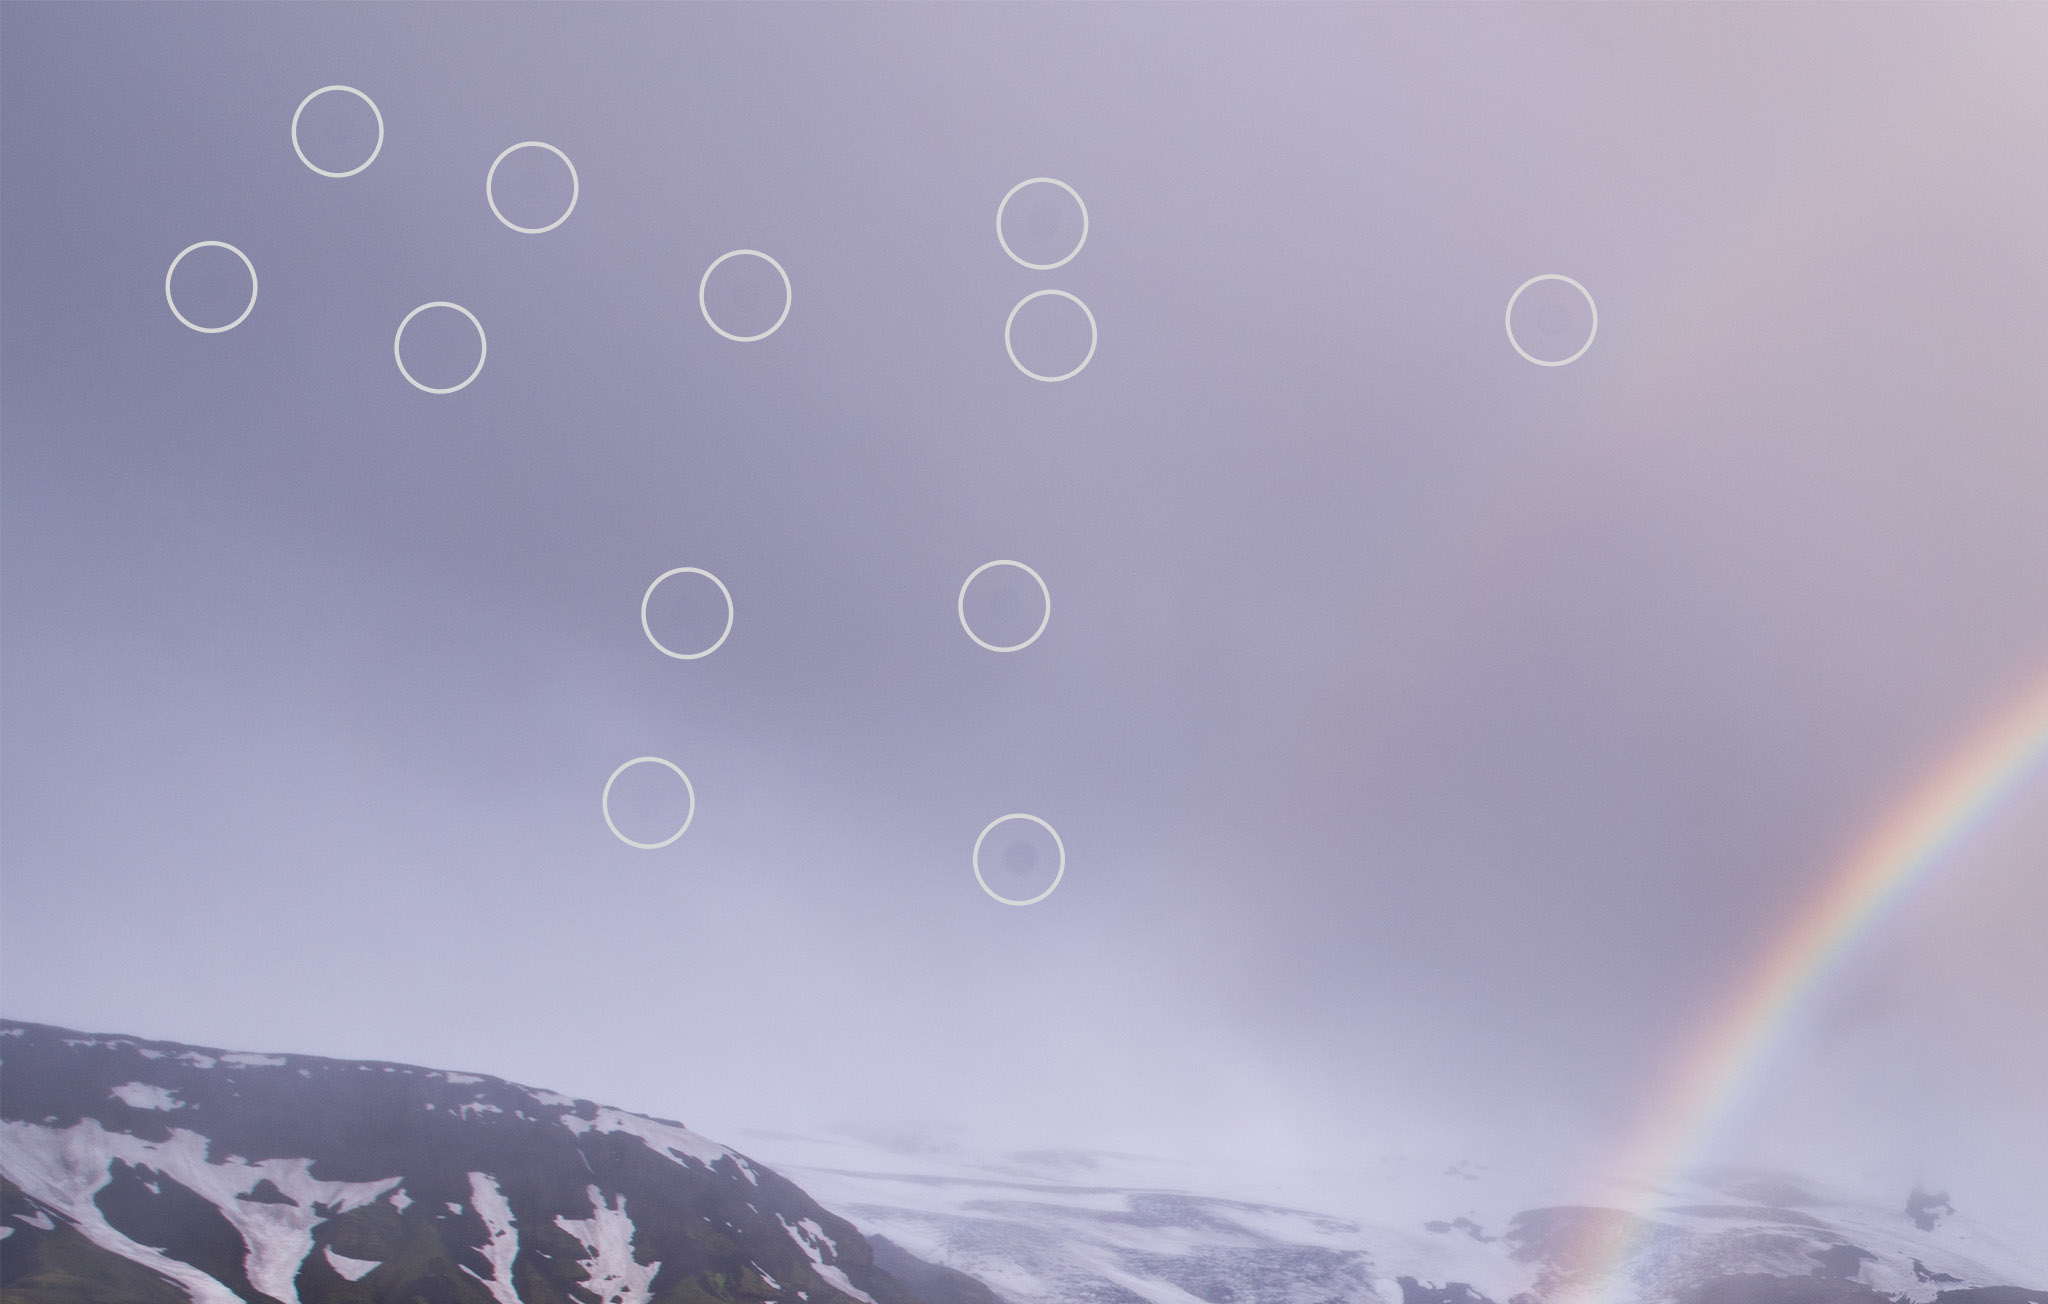
The image now looks like this:
8. Local Burning
The final change I’d like to make is extremely small, but sometimes the littlest details still matter. Notice the bright region of snow right here?

Since there’s no other snow in the hill around it – and because it’s so much brighter than the surroundings – it does add a bit of unwanted distraction.
I personally don’t like cloning out/spot healing anything in my photos (other than dust specks) so long as I can help it. Although this would be an easy spot to clone out, it’s equally easy to do a little bit of local burning and minimize its impact. Here’s how that looked in Lightroom:
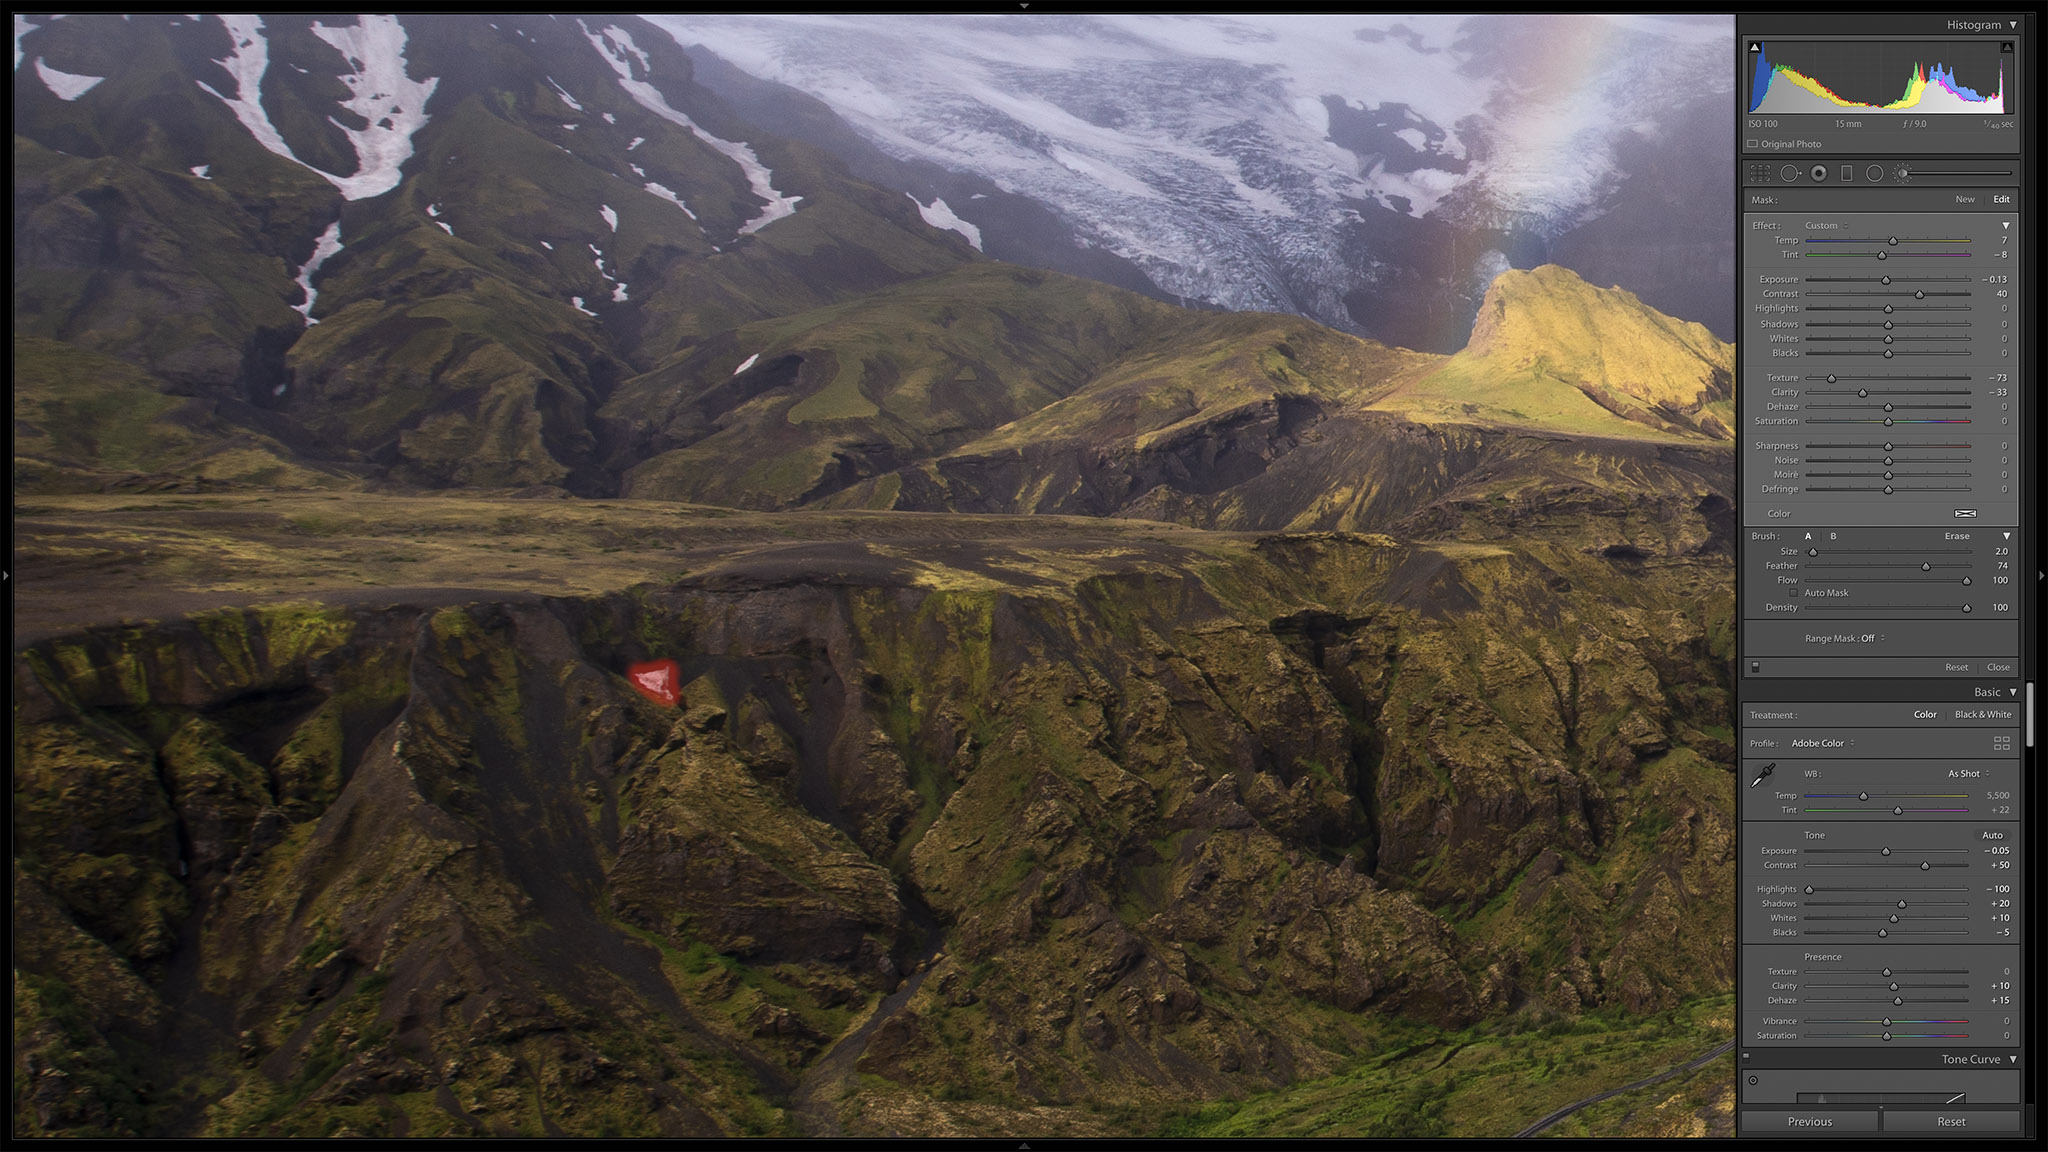
I didn’t put too much thought into which sliders to move; my only goal was to make that bit of snow fade away without looking unnatural. The adjustments I ended up using are as follows:
- Color Temperature: +7
- Tint: -8
- Exposure: -0.13
- Contrast: +40
- Texture: -73
- Clarity: -33
That’s all it takes! This is my final, edited picture (click to see full size):
Conclusion
Every photo is different, and a lot can go into a seemingly simple landscape photo. Each step matters: composition, camera settings, post-processing, and so on. Hopefully this article gave you a good sense of that process for this photo. More “behind the shot” articles coming soon :)
And as always, if you have any questions or comments, please let me know below!
Thank You so much for this behind the photo series! It’s so refreshing to see a Pro reveal some of there “secrets” and I really appreciate it!
Interesting train of thoughts, thanks for sharing it with us! Landscape photography is one of the most interesting genres to me and I consume every tip I can find on the topic. I’ve never had a chance to catch a perfect rainbow shot, I even tried to draw the rainbow in Photoworks but it’s not the same. I hope for an opportunity to get the shot like this for real, haha!
Thanks, Natalie! I’m certain that you’ll catch the perfect rainbow shot at some point, it’s just a matter of time. Keep on going out there and good luck!
Great article – and image. Thanks for sharing. Would love to see more like this!
Much appreciated, Nick! More on the way before long.
Hi Spencer, nice article! Just on question: Is the bright spot, up right, the sun shining through the clouds? If so, how can the rainbow be in front of you. All I know is that the sun has to be in your back to see a rainbow before you (in the rain).
No, that is sun from a low angle reflecting off the front of the cloud at an angle giving the optical illusion that it is shining through. You see that frequently at sunset or sunrise when there also are some cloud on the horizon where the sun is so the entire scene isn’t lit up. Had that with my sunset tonight. You can see the sun in one of the first pictures in the article, with different foreground. Amazing light is amazing!
Thank you both.
Brad is correct! The sun was behind me when taking that picture.
That was so interesting Spencer and very enjoyable!!! Gave me a few things to think about, particularly the importance of taking more versions (when I use live view and a tripod I think I get a bit lazy!) and also although I often use gradient filters I often tend to forget about local adjustments…And by the way, a beautiful image!!
Thanks David! Glad you enjoyed the article. That is one of the difficulties with a tripod. I hate coming home to realize that I took 50 different photos in a row with practically the same composition. Especially when I realize there was a better way to compose it…
Hi Spencer, I loved this article! The area of post processing that I cannot master is using levels and curves. I’d love to see an article that explains the use of this method, and gets right into the mechanics of how to work the graph when you don’t have sliders to help you. I have photos that are failures because of a color being off, where I’d love to manipulate just the one color channel, but cannot make it happen correctly. My results always lead me to put the photo aside towards some future date when the post processing fairy will visit me and show me how to do it right. Meanwhile, I’m sure that you could teach it. :) Best, Elaine
Much appreciated. Elaine! The curves panel has a really strange design, but it’s quite powerful. I use it even more frequently these days for video editing in Final Cut. I’ll try to go into more detail on that tool in the future!
Thanks for sharing your start-to-finish process on a photo! I find it extremely helpful. And beautiful final image!
Sure thing, Adam! Glad you find it helpful and that you like the shot. Hard to beat that location :)
I think the bottom right hand corner could do with a bit more work. Perhaps some selective lightening to differentiate the browns and greens, the foreground pinnacle of rock is a bit unclear from the more distant ground. Did you apply a vignette or is that the lens ? You could also consider cropping out 10% on the right hand side
Hi Ian, I didn’t add any vignette, so what you’re seeing is probably a combination of the lens (not too much, but a bit of vignetting at 15mm and f/9) as well as darker regions in the scene itself. As for your suggestions – I’m happy with the crop and won’t change it, but I might do some detail separation in the foreground eventually. On a larger print or screen size, the rock pillar is pretty distinct, but at smaller sizes, it definitely does get lost.
It is nice to see your thought process and the steps that lead to this image. Thanks for sharing.
You are very welcome! Thanks for the kind feedback.