Death Valley National Park has more extremes than almost any other place on earth. The weather is harsh and the landscape unforgiving. It’s a brilliant combination for landscape photography.
Table of Contents
Conditions and Alternate Shots
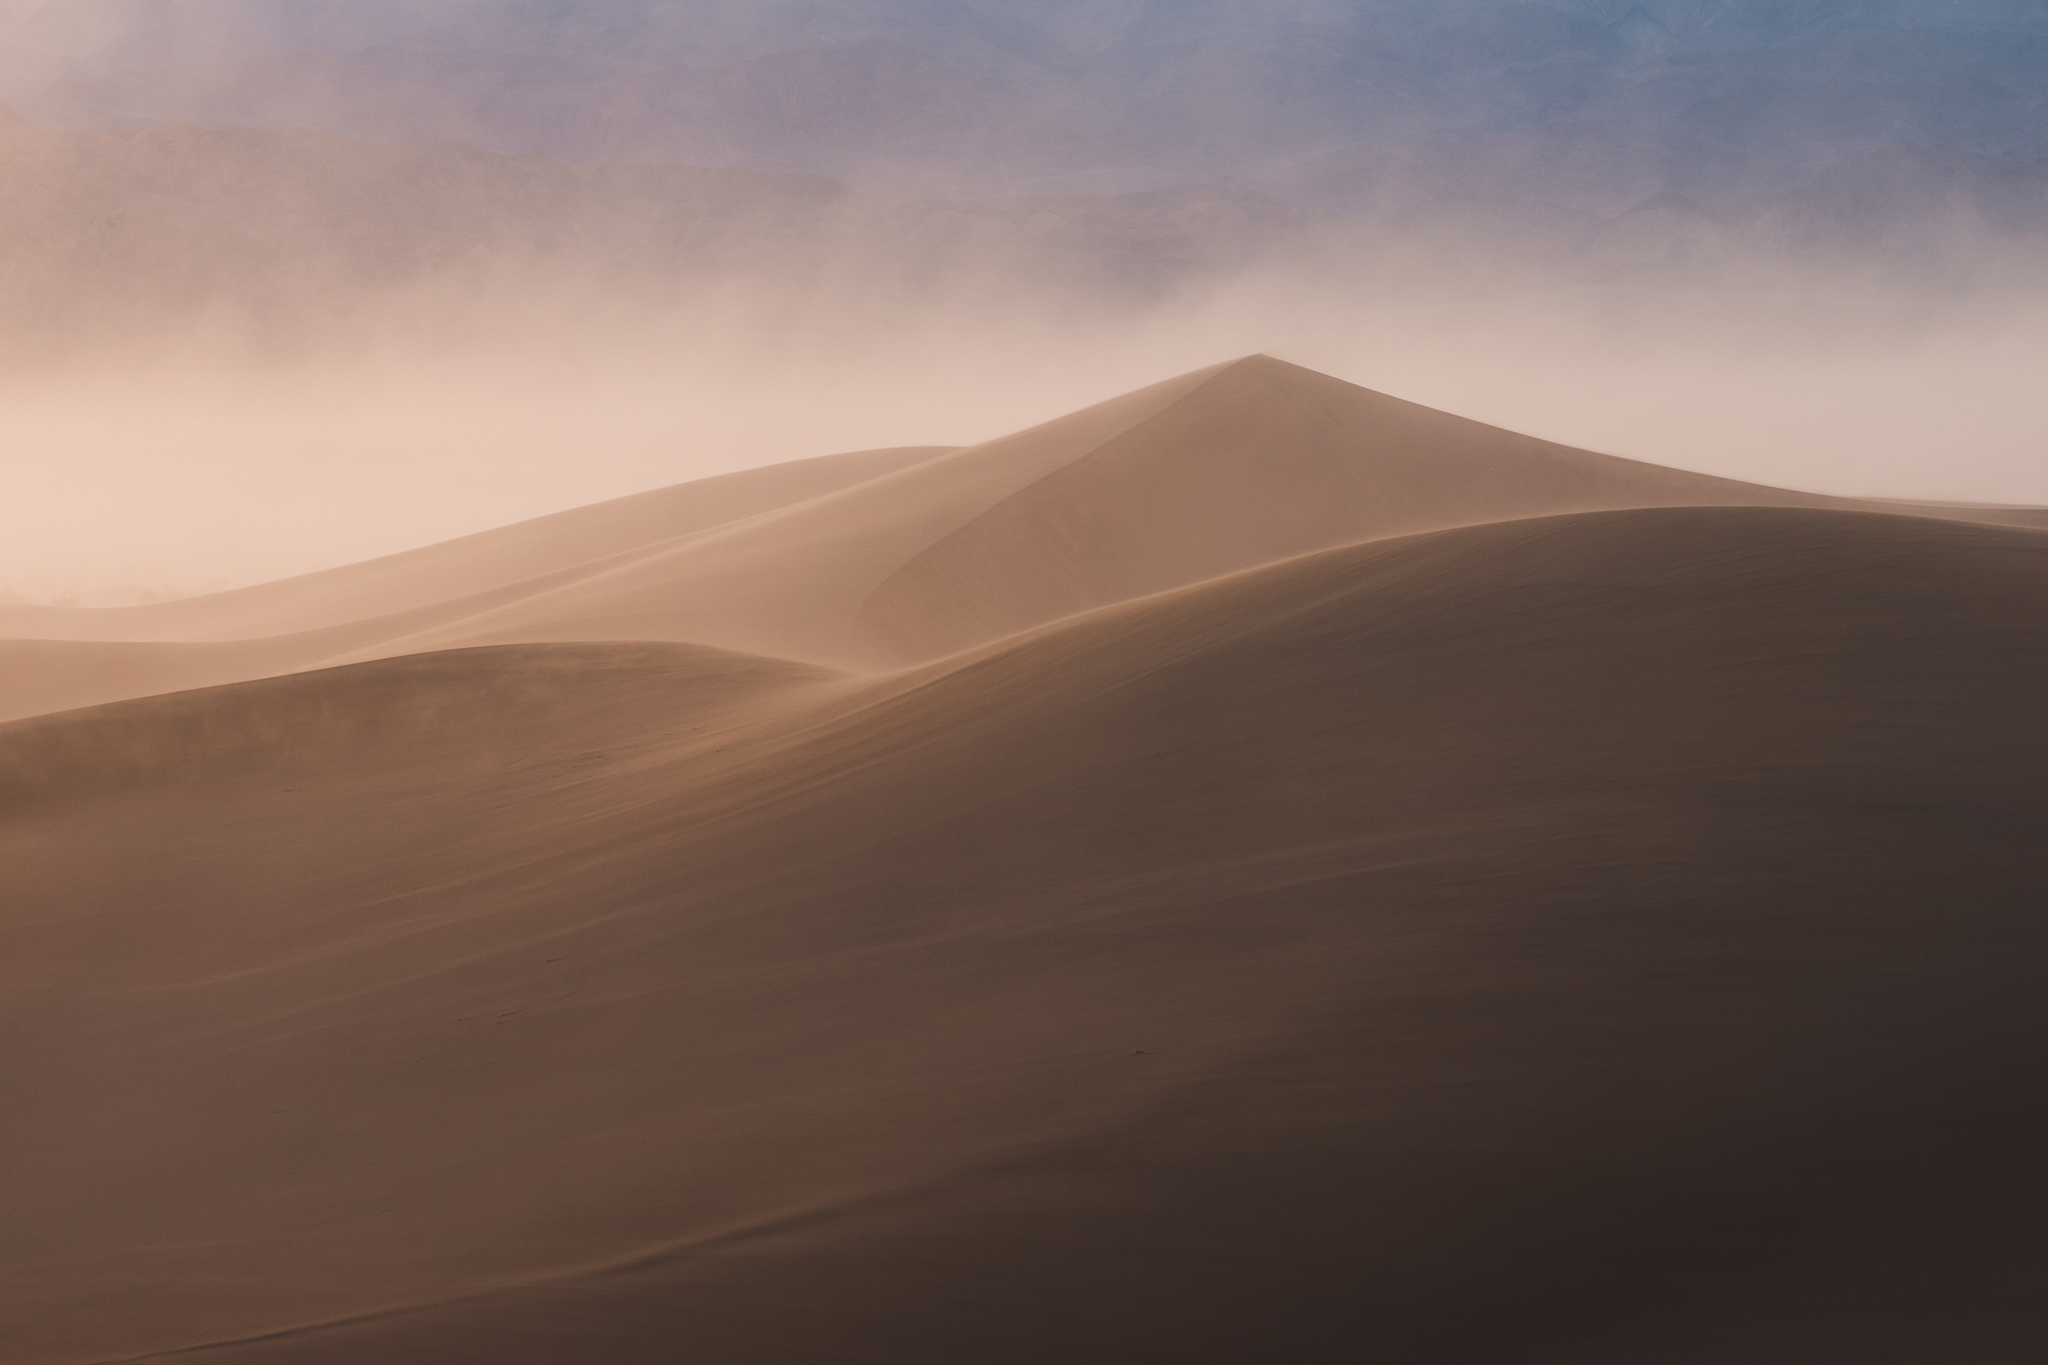
On a windy day in March of 2017, I was taking pictures at the park’s Mesquite Sand Dunes. I always root for some wind when I’m doing sand dune photography, largely because it can erase distracting footprints, but also because it can lead to an interesting atmosphere and beautiful lighting conditions.
That was certainly the case here! The Mesquite Dunes often have a lot of footprints because they’re so popular, but not this evening. And the high wind led to dusty backgrounds that I liked a lot for photography.

This is actually the same evening that a sandstorm covered all of the Mesquite Dunes, one of the most chaotic experiences of my life and something I wrote about a couple years ago. The photo I’m discussing today, however, is from about an hour before the sandstorm hit.
It’s easy to take abstract photos of sand dunes, but if that’s not your goal, you generally need to make sure that your subject is clear and distinct. That’s why I was happy to find this pyramid-shaped mountain:
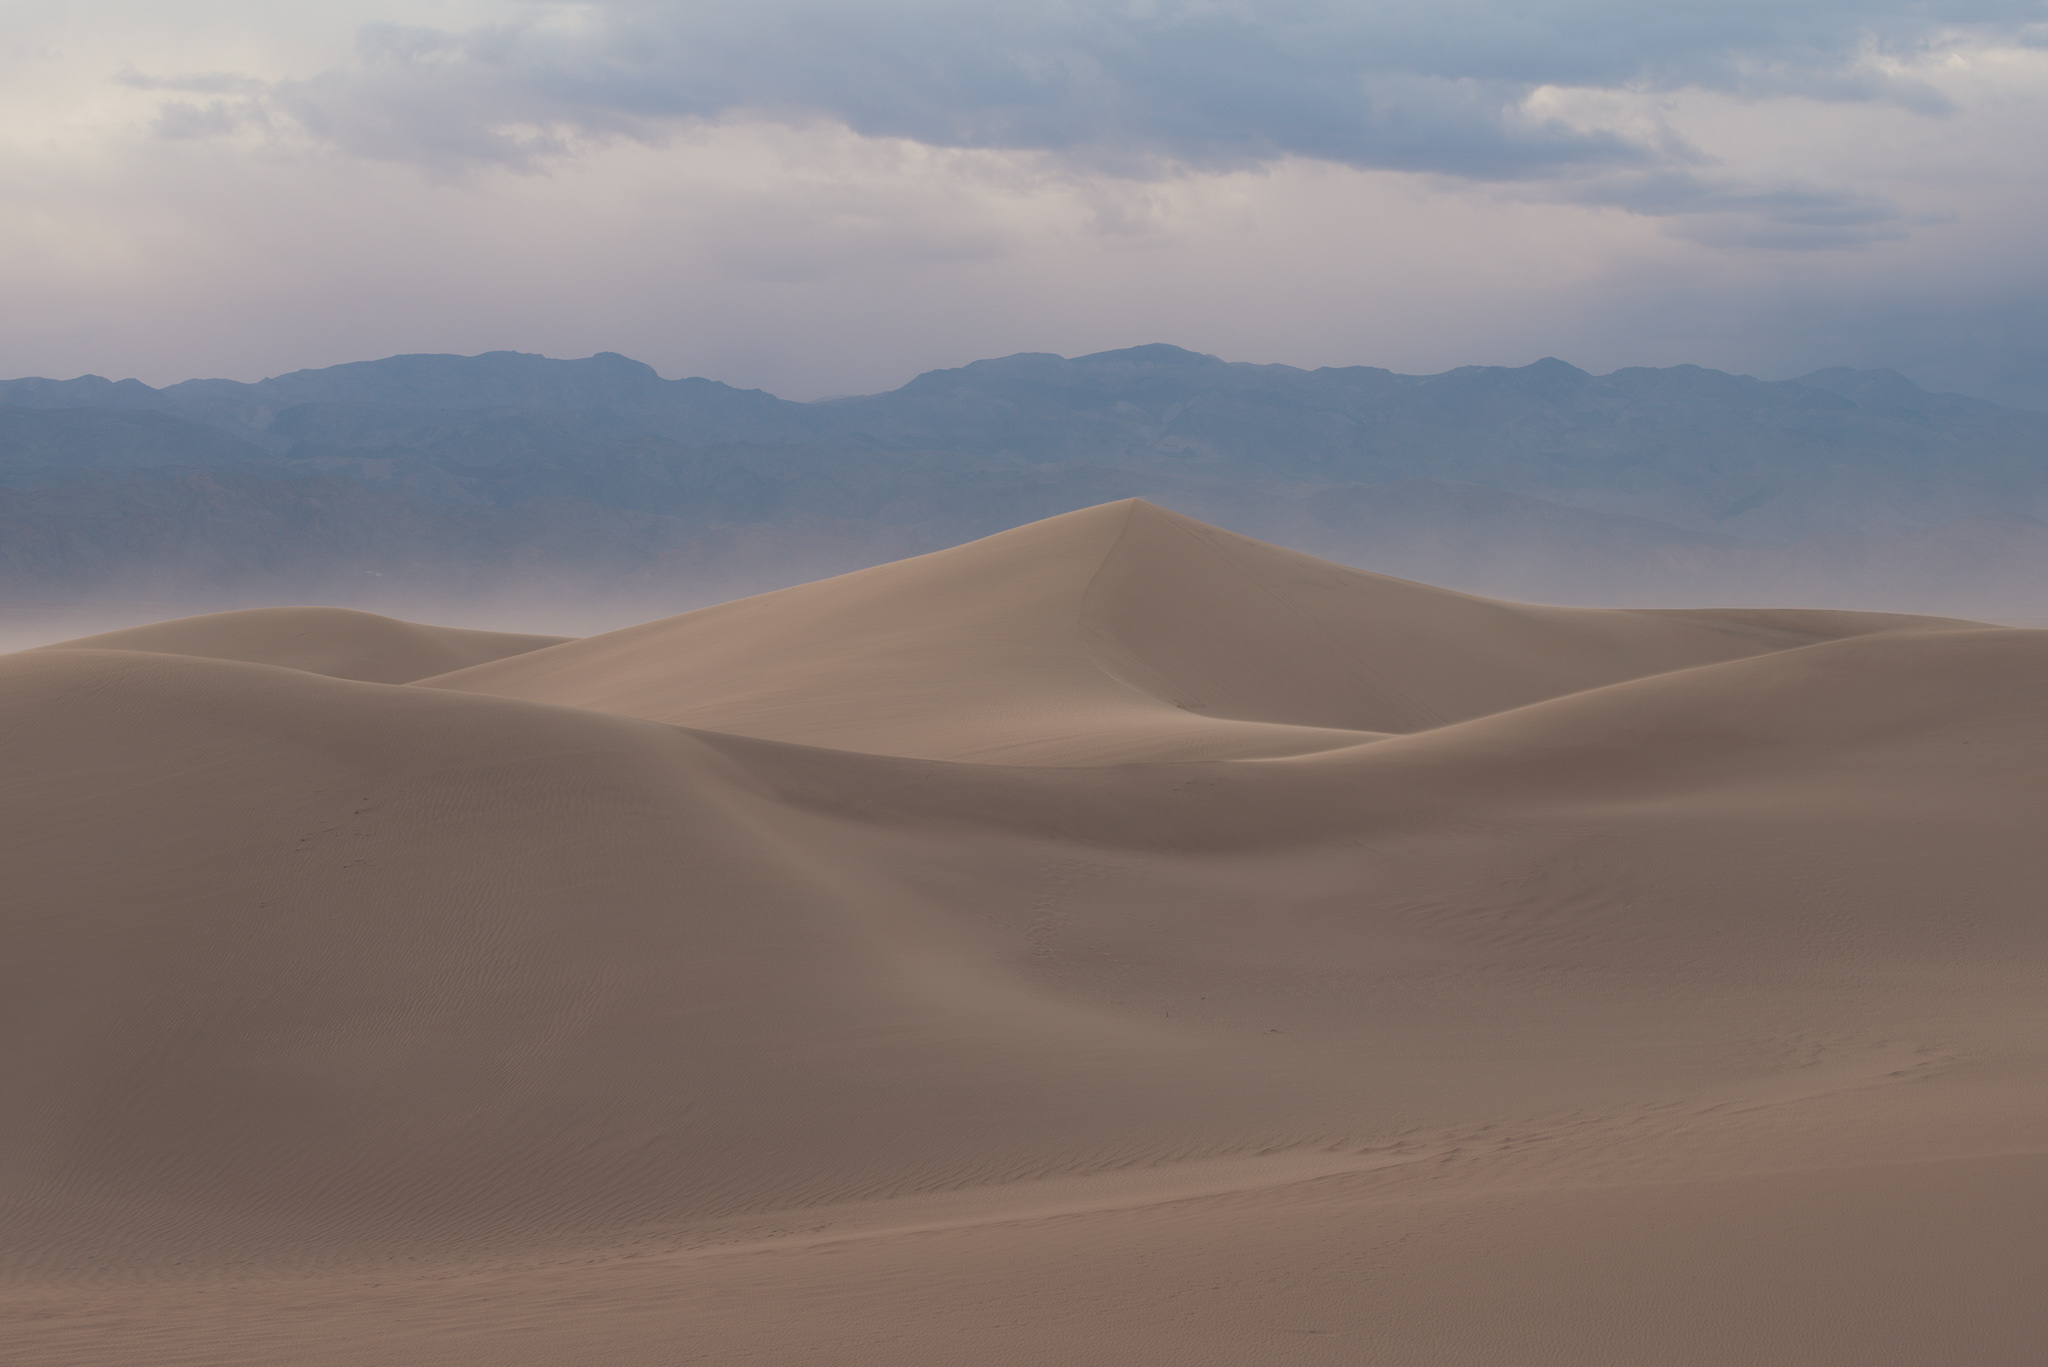
Compare it against the prior photo in this article (the one with the pointy mountain at the top) and you’ll see how much more interesting this sand dune is compared to most.
Sometimes, when I find an interesting subject, my first reaction is to fill the frame with it – either by zooming in or moving forward. I did that in this case as well:
In practice, though, I actually like this second shot less than the first. The composition is too stuffy; notice that the left and right sides of the pyramid dune are cut off by the edges of my composition, whereas the first image includes the whole thing. I don’t really buy the concept of “filling the frame with your subject” as worthwhile in and of itself. Some subjects are better as small details in a wider world, with additional context or negative space around them.
Both photos of this sand dune so far are flawed in another way, too: the nearest dune just isn’t all that visually appealing. It curves in a competing direction from the triangular dune, and its awkward shadows and textures draw too much attention without being very interesting.
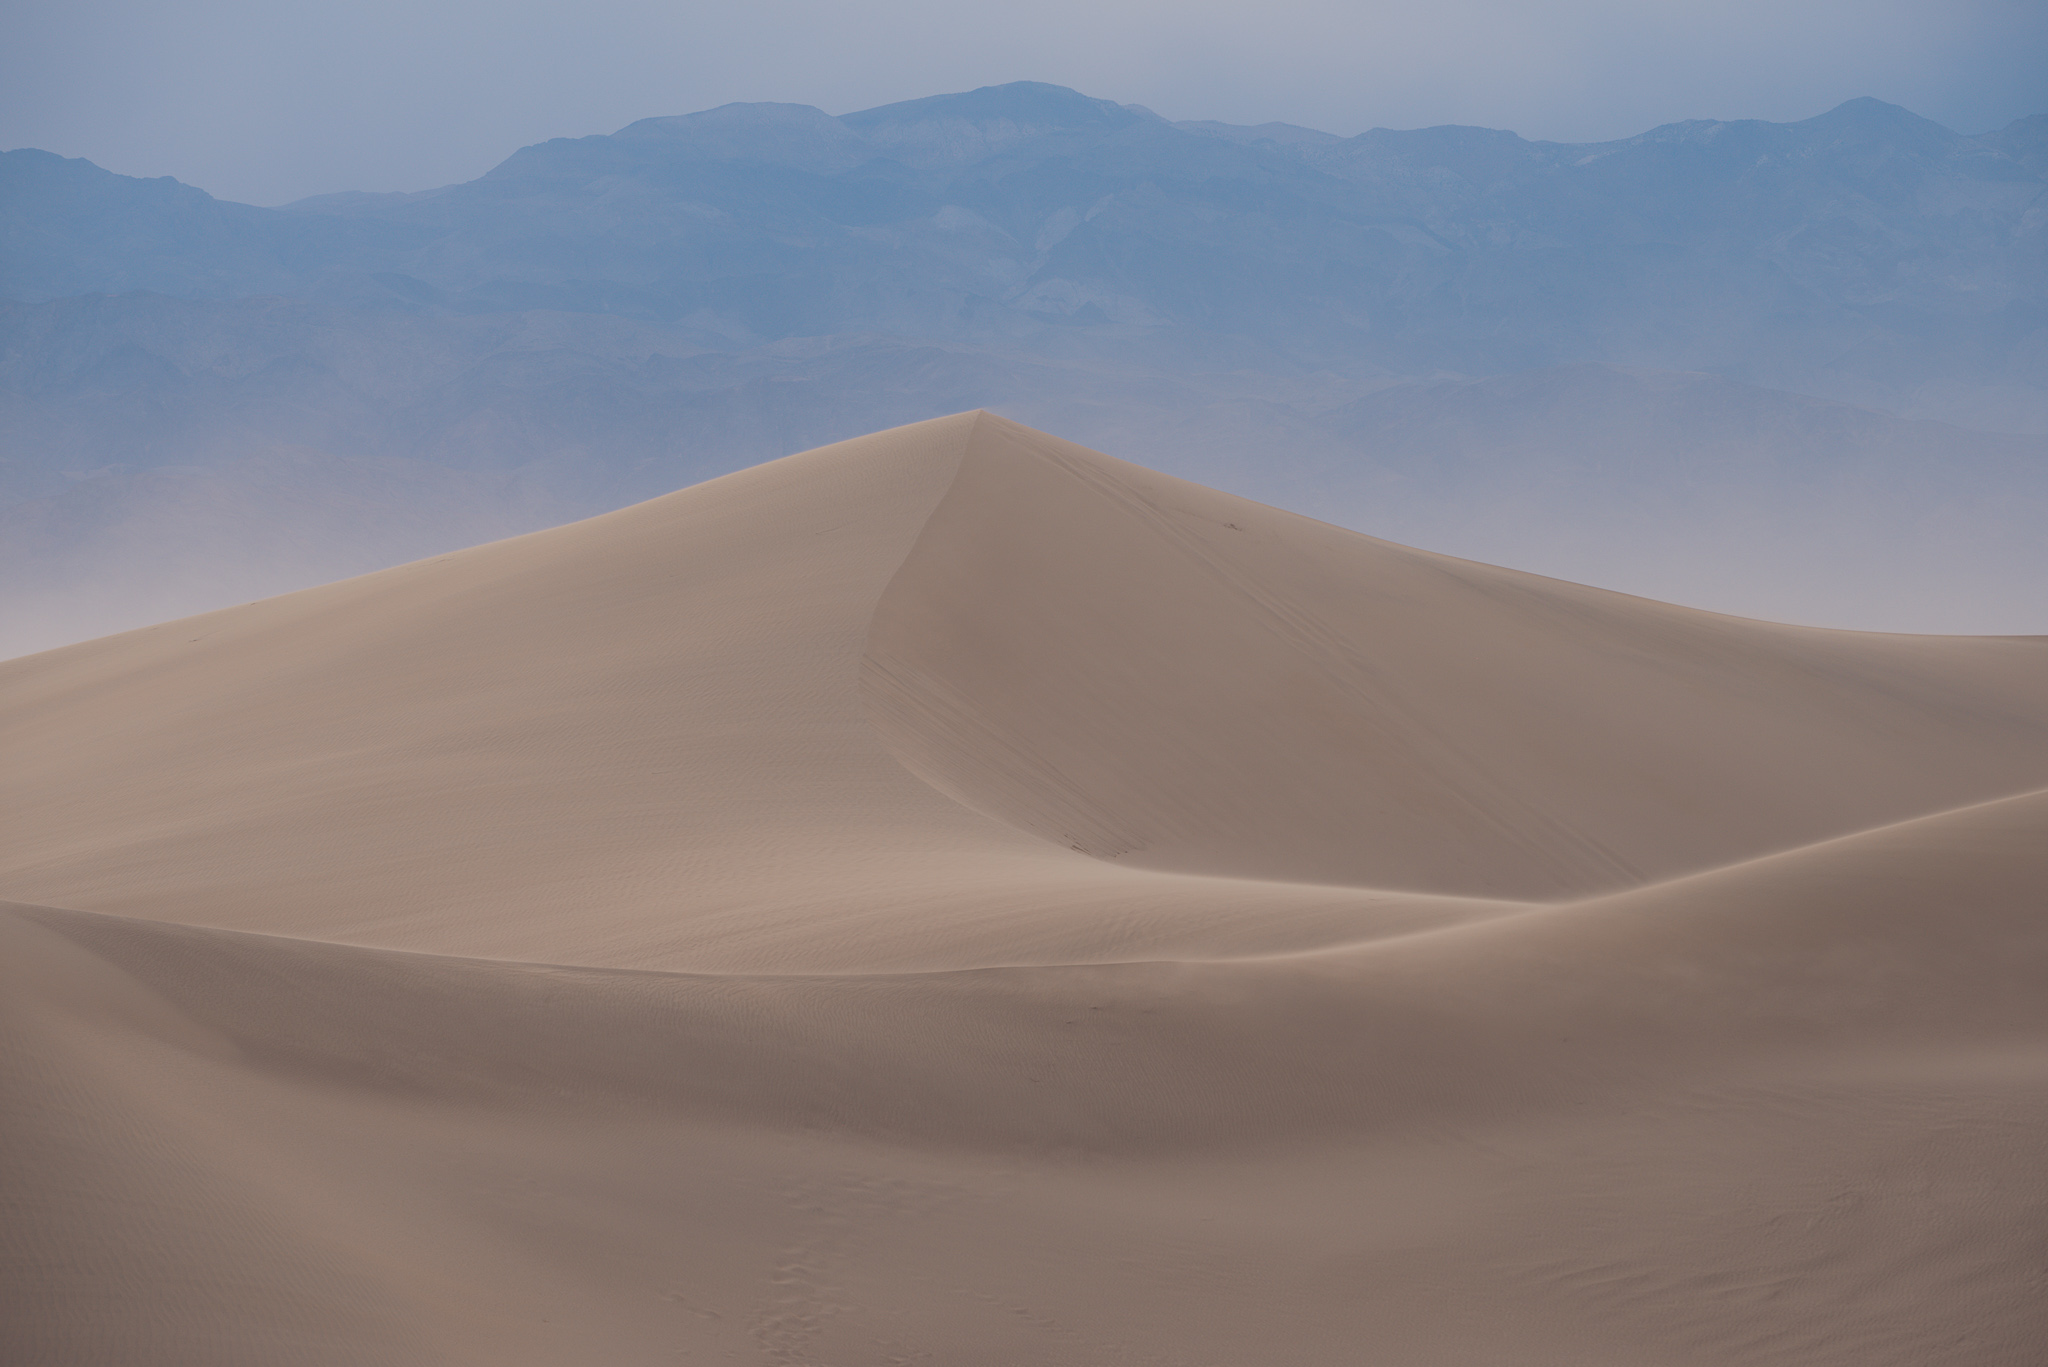
I walked around for a bit in hopes of finding a more pleasant foreground. Before long, I had found a higher vantage point that I liked much more. The nearest dune was smoother, the peak of the pyramid seemed sharper, and even the mountains in the distance looked better (with more breathing space between them and the pyramid dune). Here’s that photo:
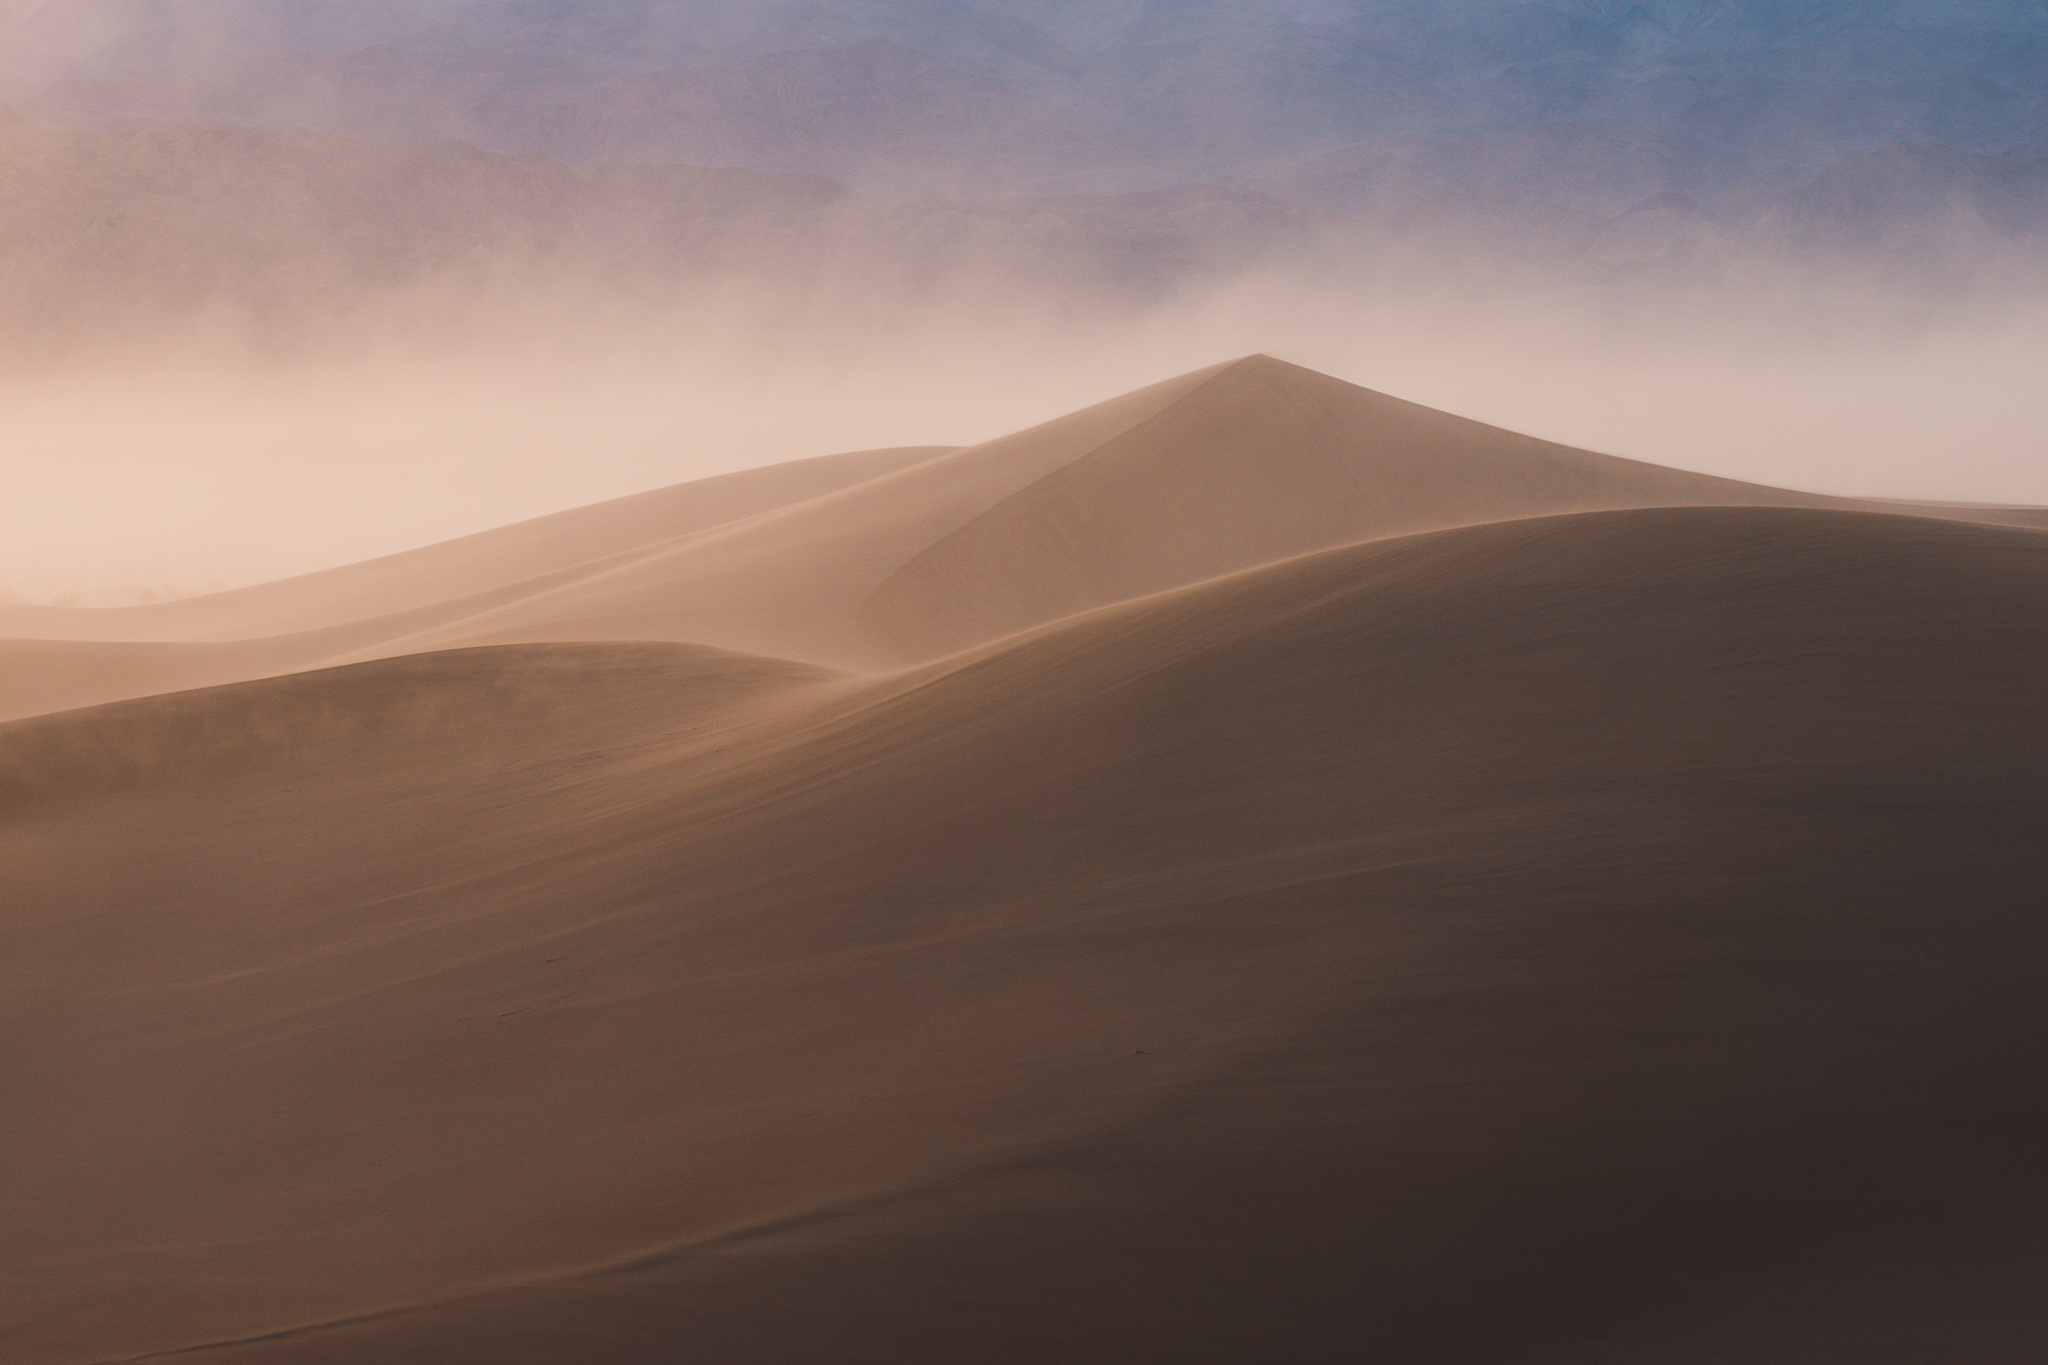
It’s still not perfect – I think my composition is too high, cutting off some useful foreground – but it’s a clear improvement to me. I zoomed out a bit and angled my composition downward to capture my main photograph of the scene:

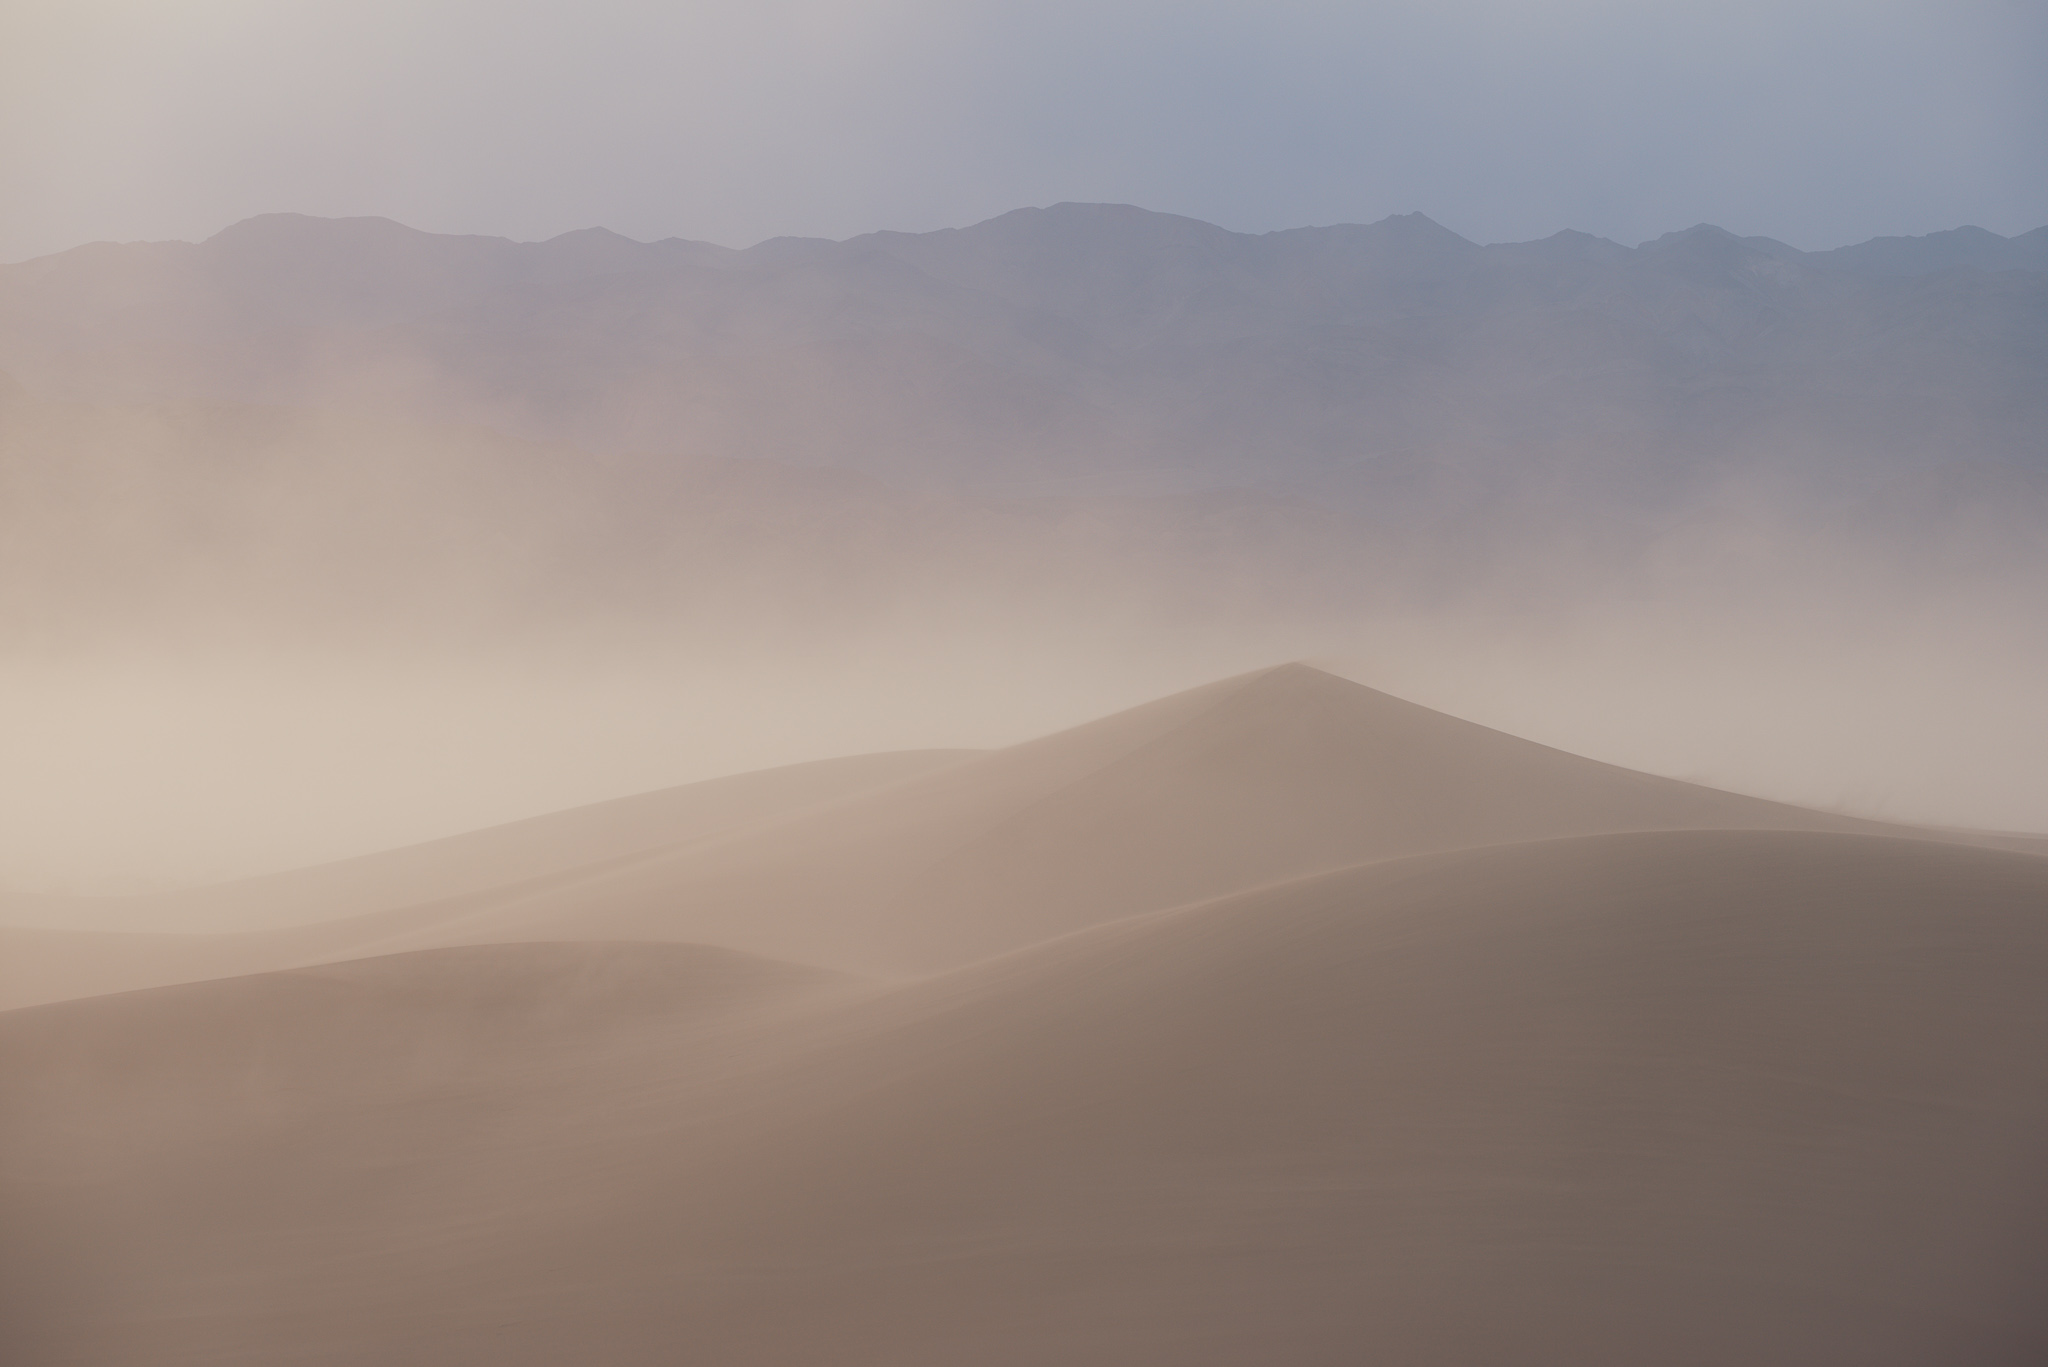
(You might notice that this photo’s composition is different from the picture at the top of this article; that’s just because I cropped out the sky in post-processing.)
Camera Equipment and Settings
I took this photo with the Nikon D800e and my Nikon 70-200mm f/4 lens. Landscape photography is often assumed to be the domain of wide angles, but I personally love using telephoto lenses for a lot of landscape shots. They help isolate details and exclude elements that take away from the message of your photo, making for photos that can feel very intentional.
I also used a tripod while taking this picture, even though it’s possible that I could have gotten a sharp photo handheld (given that I was at 100mm and a 1/100 second shutter speed, with a VR lens). Why?
For starters, it was so windy here that handheld photos probably would have been a bit blurry on average at 1/100 second. But beyond that, I’ve always found tripods to be a useful part of the creative process as well. Being able to compose a scene and analyze it for several seconds, then make minor adjustments, is extremely valuable. Call me crazy, but I almost always find that my photos look more like snapshots when I handhold the camera rather than use a tripod, even in cases where sharpness levels are indistinguishable.
However, sand dunes on a windy day don’t make for the most stable tripod. I recommend collapsing the leg sections as much as possible to lower your tripod significantly. Also, try to make sure that you don’t bury any leg joints on your tripod beneath the sand, or you’ll likely need to clean it later.
I don’t think I used any filters here, although in hindsight a clear/UV filter would have been useful. Personally, I don’t like UV filters in general, because they almost always make your system more susceptible to flare without adding much in the way of damage protection (a lens hood is usually better in that regard). High-end UV filters don’t add much flare, but the really good ones aren’t cheap.
In this case, though, the wind was blowing enough sand to potentially scratch the front element of my lens even with a hood. It ended up being fine, but if you consistently take photos at the beach or other sandy areas, I do recommend getting a good clear filter.
As for my camera settings, it wasn’t too hard:
- Base ISO of 100 – no reason not to
- Aperture of f/8 – a safe, sharp aperture for landscape photography, especially when everything is in the distance
- Aperture-priority mode with no exposure compensation – shutter speed floated to 1/100 second
My raw histogram definitely is not perfect ETTR. Here’s how it looks:
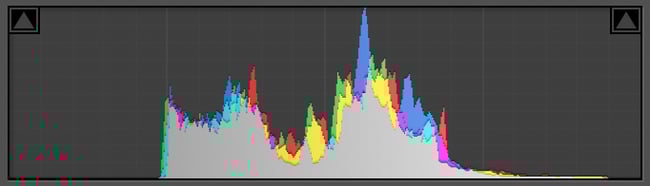
The brightest regions of the histogram correspond to the small area of sunlight in the clouds at the top left of the photo. Especially because I ended up cropping them out, I could have gotten away with a longer shutter speed here with no problem. (As-is, to keep all the detail in those clouds, I’d have been safe with +1/3 additional stop of exposure compensation, possibly +2/3.) It’s not badly exposed enough to add massive amounts of noise, but there’s room for improvement.
Now to the editing stage!
Post-Processing in Lightroom
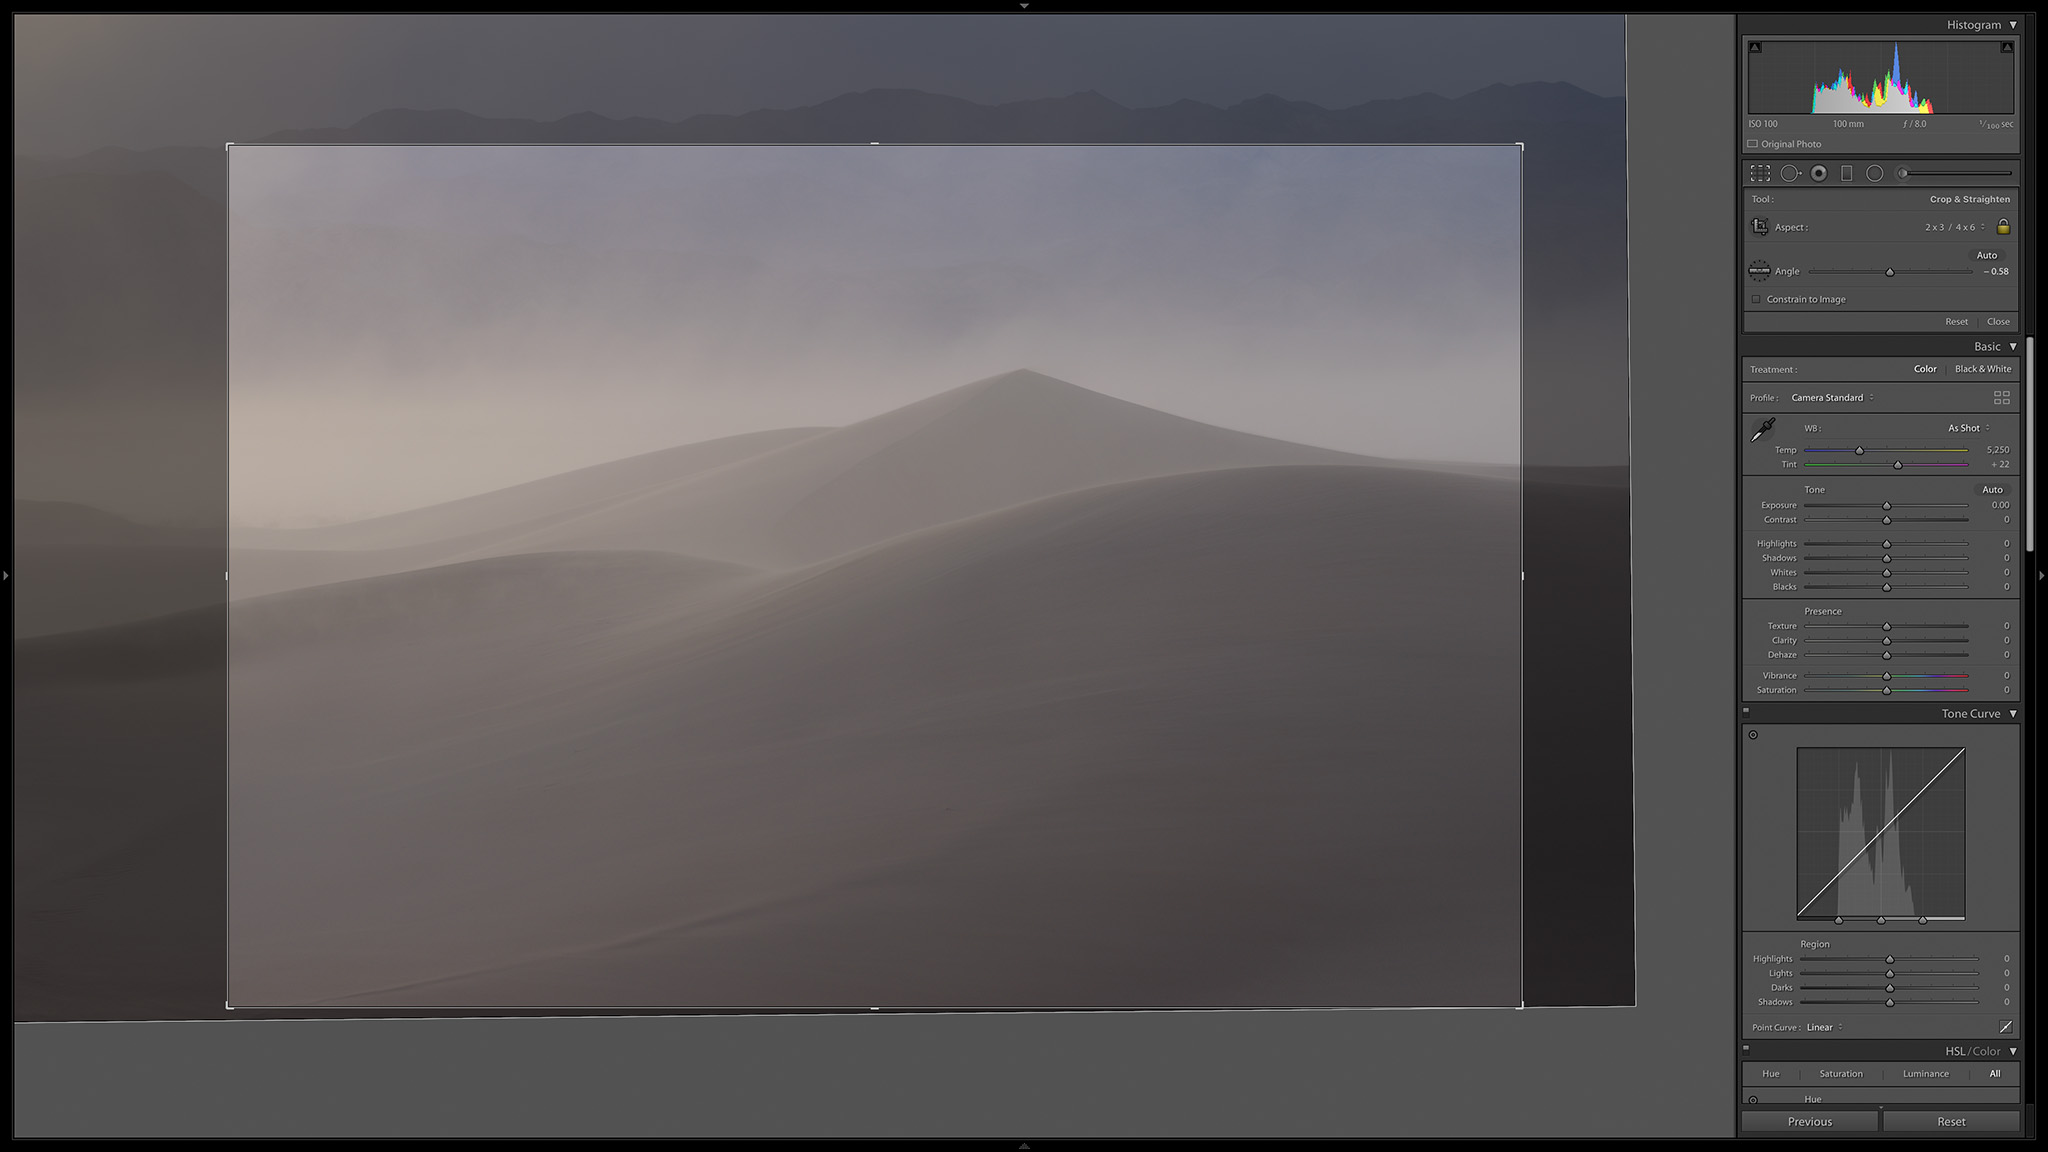
The first step is always to look at your unedited photo and try to visualize the direction you want to go in post-processing. It’s much better to have an end goal in mind than to aimlessly shift sliders back and forth. Here’s my RAW photo in this case:

The biggest issue is the lack of contrast and saturation thanks to all the dust in the air. It’s common for RAW photos to look pretty flat, but this is definitely more than normal. I’d like to recover some of that contrast and beautiful sunset light to help the photo stand out more.
Interestingly, the mountains at the top of the photo have more contrast than the rest of the photo, since they rise higher than a lot of the dust. Because of this, though, the mountains stand out an inordinate amount and take attention away from my primary subject – the peak of the pyramid dune. I could try to get around this by selectively editing contrast in different areas of the photo, but another option is just to crop out the top of the mountains in the first place.
All good things to think about.
1. Crop and Tilt
I tend to crop my photos as a later step in the process, once I have a better idea how my post-processing looks, but in this case I’m cropping much more extensively than normal, so there’s value in doing it earlier. Here’s how the crop dialog looked in Lightroom:
And the result:
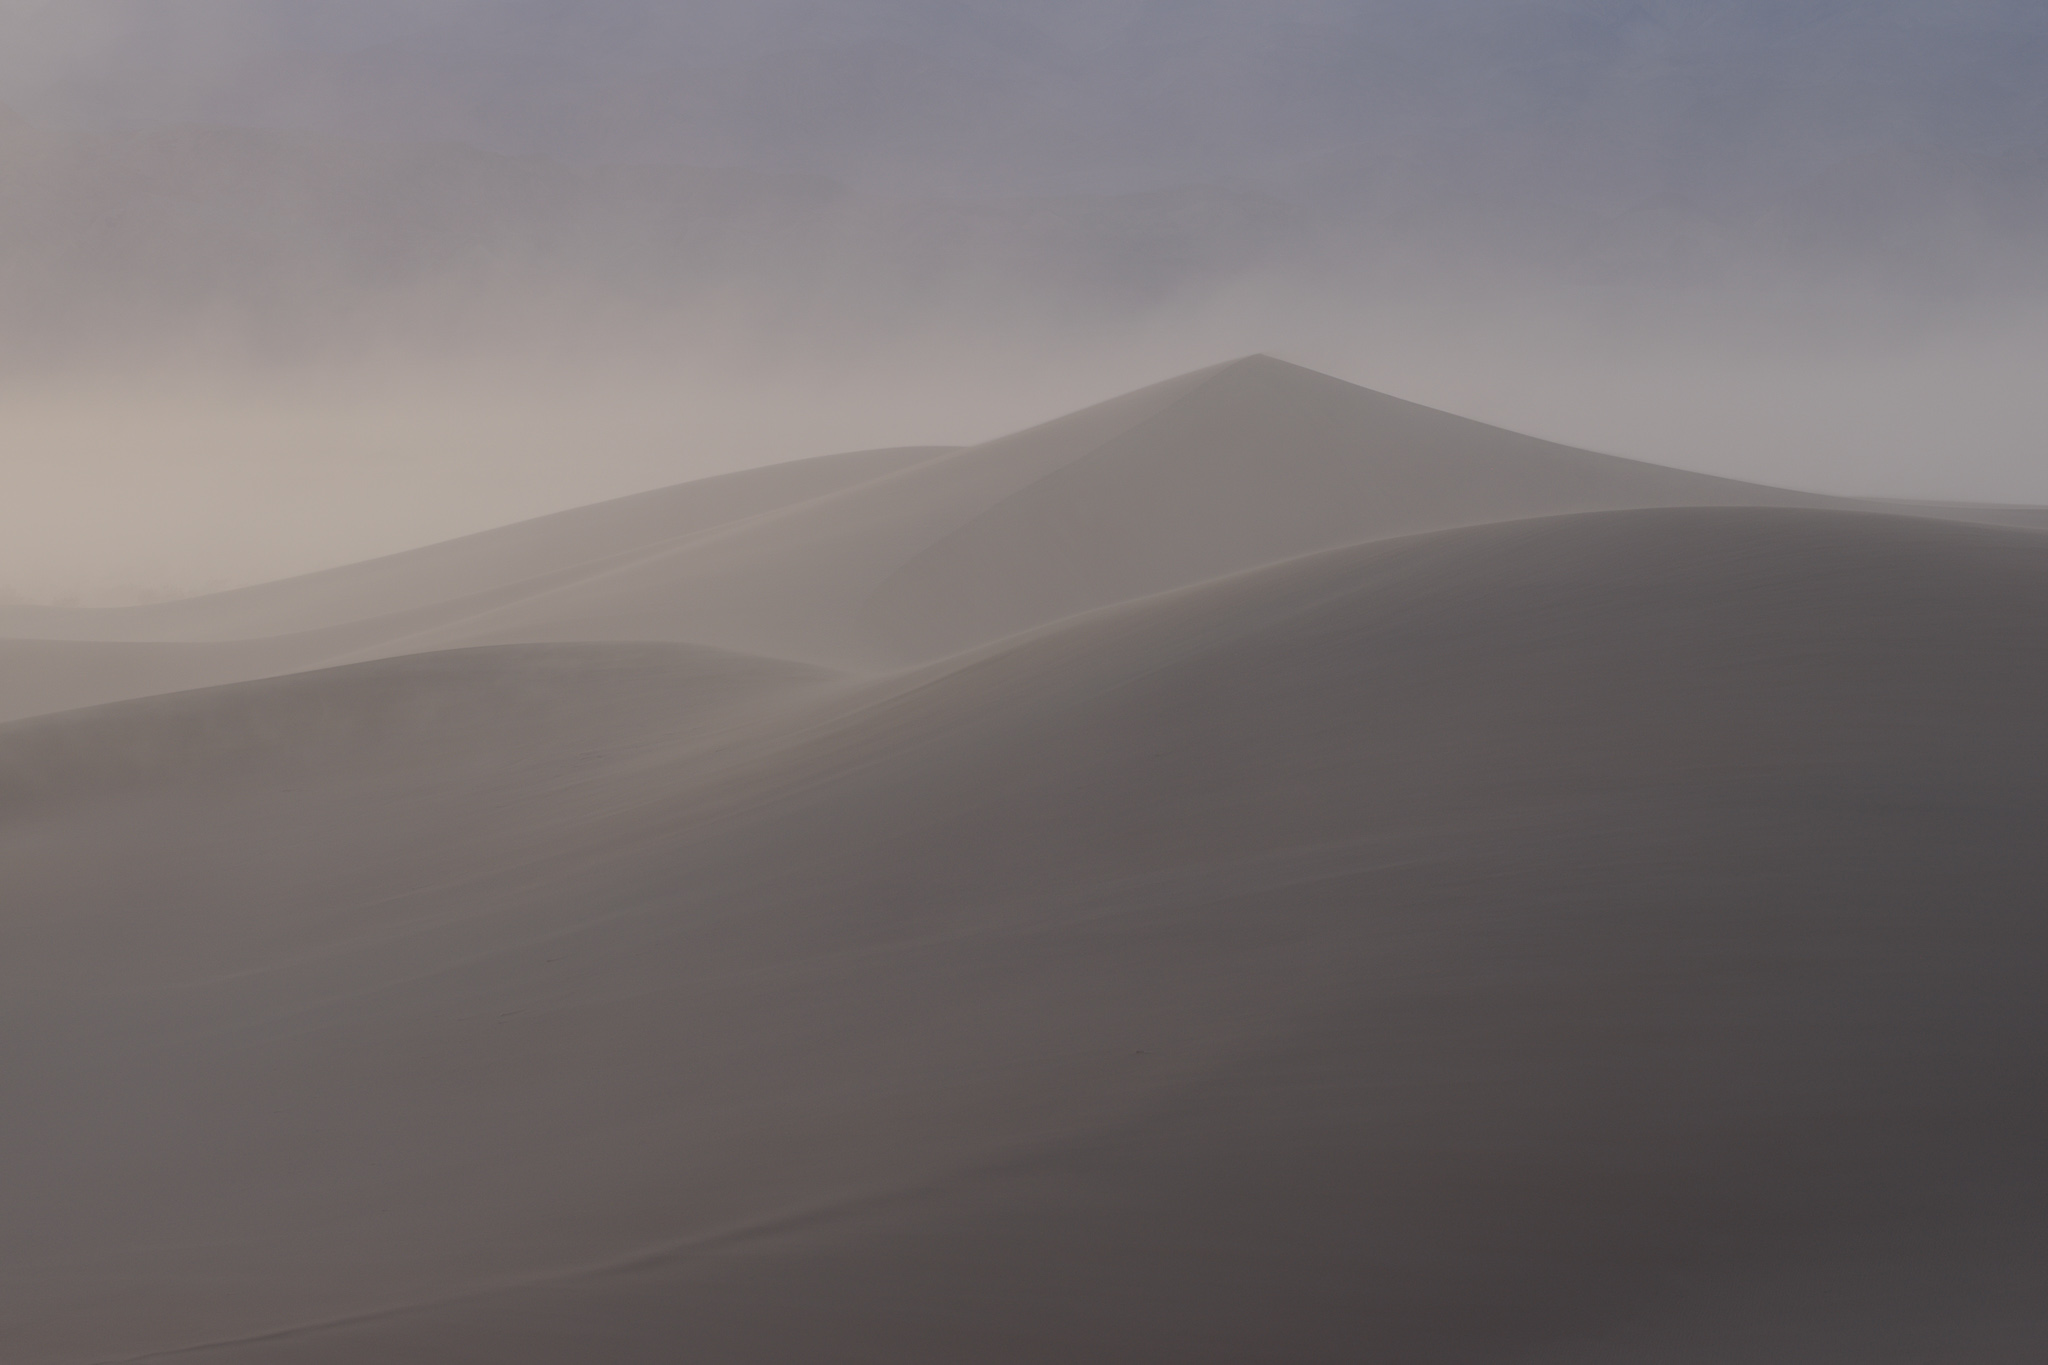
I personally think this is a big improvement. Crucially, it does something I’ve talked about several times before and always aim to accomplish: excluding useless details. The mountains at the top don’t add anything to the emotional message of this photo, which is all about how the wild weather conditions create such smoothly-sculpted dunes in front of me.
Some photographers will object to excessive cropping, and, frankly, I’m among them. You should always try to get things right in-camera and not resort to cropping for the bulk of your composition. In this particular case, there’s no reason why I couldn’t have captured a tighter framing in the field.
Except, of course, I didn’t capture a better framing in the field. I’m always happy when my in-camera composition doesn’t need extensive changes, but that’s where my opinion on the subject stops. If your photo benefits from being cropped, even extensively, I say crop it. Try to get better at composition so that you don’t need to crop so extensively in the future, but don’t arbitrarily decide to avoid cropping a photo if it looks better that way.
2. Basic Panel Adjustments
I’m now ready to get back some of that missing color and contrast with Lightroom’s Basic Panel. A little bit of boost went a long way. Here are the slider settings I used:
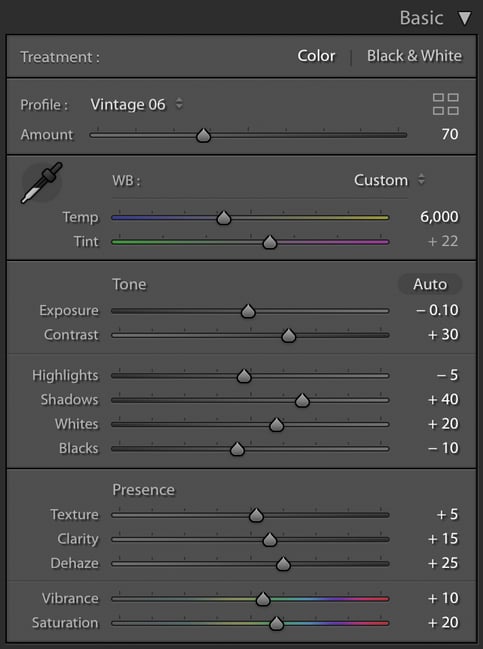
The two biggest factors here were my relatively strong dehaze adjustment of +25, as well as my warm color boost to 6000 K (from an initial value of 5250). I still think that the result could use a bit more pop, but it’s a big improvement over the unedited version:

3. Tone Curve and HSL Panel
If you’ve read my “behind the shot” articles so far, you’ll know that I’m a big fan of Lightroom’s tone curve for boosting contrast, especially in the brighter regions of the photo! Here are my tone curve adjustments for this shot:
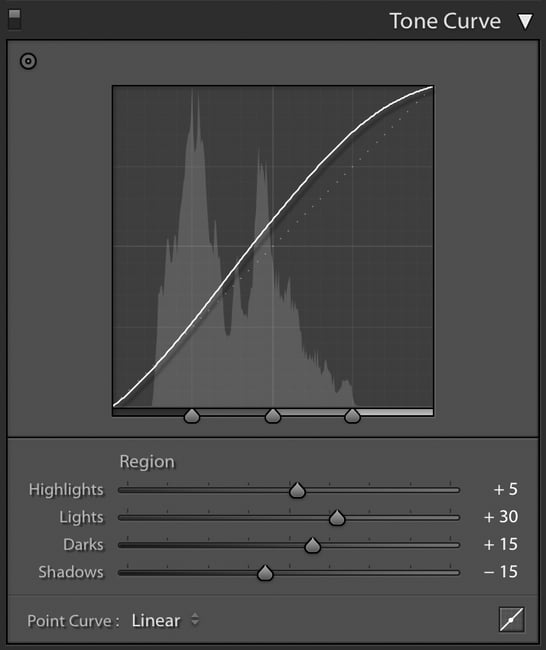
I also like doing minor shifts in the HSL panel to improve the colors of a lot of photos. My most common adjustments are to make purple/violet hues a bit more blue, and yellow hues a bit more orange. I did both of those here:
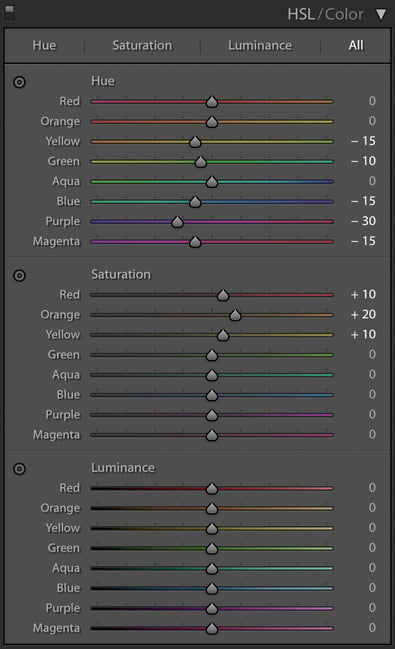
Note that some of these values are a bit stronger than I’d prefer (especially the -30 on purples) from the perspective of minimizing color noise. I’ll fix that later with a higher value for color noise reduction, but in my opinion it’s a worthwhile fix, because the background mountains simply looked way too purple to me.
Here’s how the photo looks now:
Almost done!
4. Gradient Tool and Sharpening
The final edits needed ere are very minimal. To me, the mountains at the top of the frame are a bit too saturated, while I like the colors overall on the sand dunes. The best way to fix the mountains without affecting the dunes is to use one of Lightroom’s gradient tool adjustments:

If you can’t see the settings I used, they’re as follows:
- Tint: -2 (to get rid of that purple color cast even further)
- Contrast: +10
- Texture: -5
- Dehaze: -2
- Saturation: -10
I also did a second gradient tool at the bottom right of the photo to darken that corner just a bit:
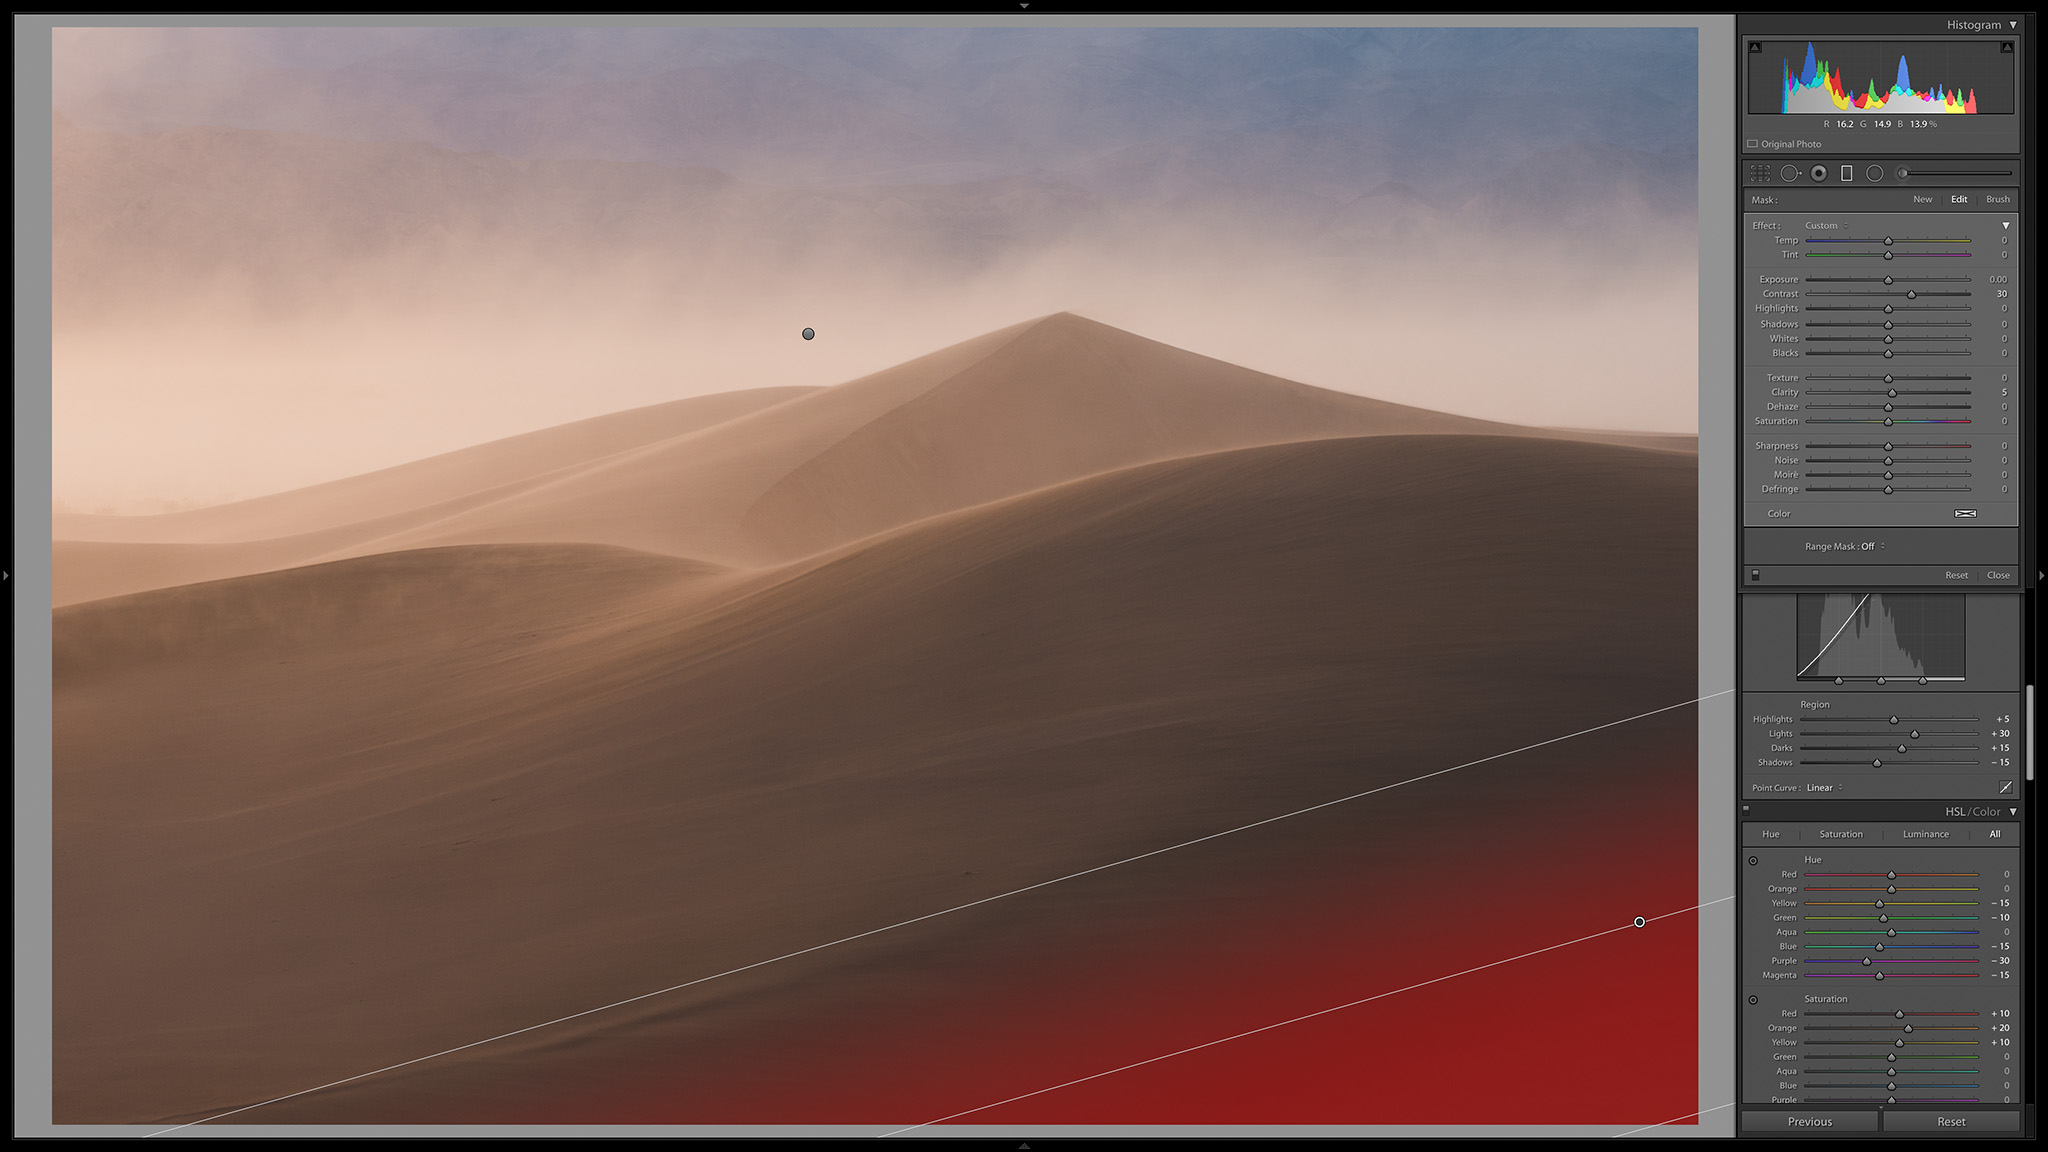
Specifically, I just adjusted the contrast slider +30 and the clarity slider +5.
That does bring me to a brief side note: often, the best way to darken or brighten part of your photo locally is to get creative with the range of sliders at your disposal. The “exposure” slider is pretty limited in its dodging/burning capabilities, and it commonly leaves an obvious halo around your subject. I prefer sliders like contrast, highlights, shadows, and clarity when it comes to local adjustments.
Returning to this photo, I didn’t need any radial gradients or brush adjustments. Instead, the only remaining edit was to sharpen my image. Here are the settings I used:
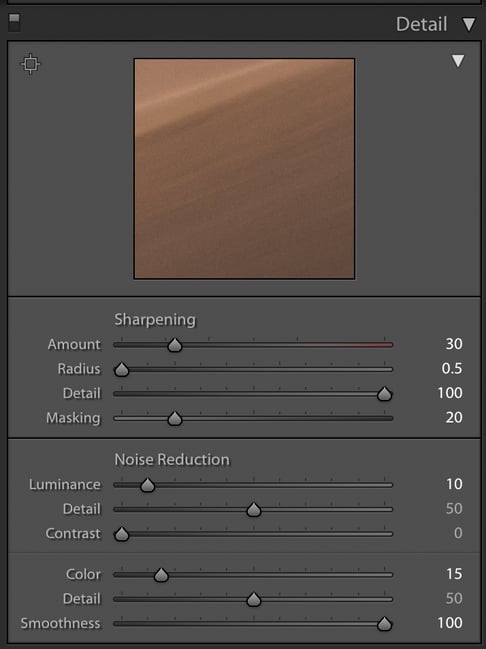
Nothing too out of the ordinary, although I was a bit more aggressive on masking because there’s not much “subject” to this photo that needs sharpening. And, as I mentioned a moment ago, I boosted color noise reduction up to +15 in order to counteract the added noise from my HSL adjustments.
The final image looks like this (click to see large):
Conclusion
When you find yourself photographing an interesting subject, but with a few elements of the photo that you don’t like, my main recommendation is to move around and experiment with different perspectives.
Here, the foreground of my composition wasn’t very interesting initially, but I soon found a higher vantage point that worked out much better. And – though I had to make this correction in post-processing – I found that excluding the mountains at the top of the image led to a stronger, more cohesive photo overall.
Hopefully you learned something from this article and found it to be useful! If you have any questions or comments, please let me know below.
Really enjoyed the insight into how you handled all the various aspects of this image – thank you for sharing your experience. I will definitely read the others in the series.
Thank you Spencer. I am very much enjoying this series.
Happy to hear so, Fabrice! Sorry to say this might be my last one in the series. I’ve enjoyed writing them!