I recently spent a lot of time working with some quite challenging files to prepare my recent article “Photographing aircraft in flight with the Tamron 150-600mm”, and a Photography Life reader asked if I could share some of the details of the processing that I do with difficult files.
So, for those of you who don’t mind wading through a lot of screen shots with some commentary, this article tries to capture the various adjustments I made, and process I used, with one of the shots that did not make it into my “photographing aircraft” article. Those of you who don’t like wheelbarrows full of detail should probably skip this article.
I should also state upfront that I don’t profess to be any kind of expert with post-processing so my approach may seem somewhat scattered or unstructured to some folks. This may be due to the fact that I never do any batch processing of images and I only post process the ones I intend on using for some specific purpose. Plus, I’m self-taught by mucking around a lot…which does not lend itself to creating a disciplined approach.
I treat each photograph as an individual challenge and how I treat it tends to fluctuate with the image. My basic flow for difficult files is DxOMark Optics Pro…then into CS6…then into Nik Suite. For files needing only very simple adjustments I’ll just pop them in and out of CS6 quickly, with the odd tweak in Nik.
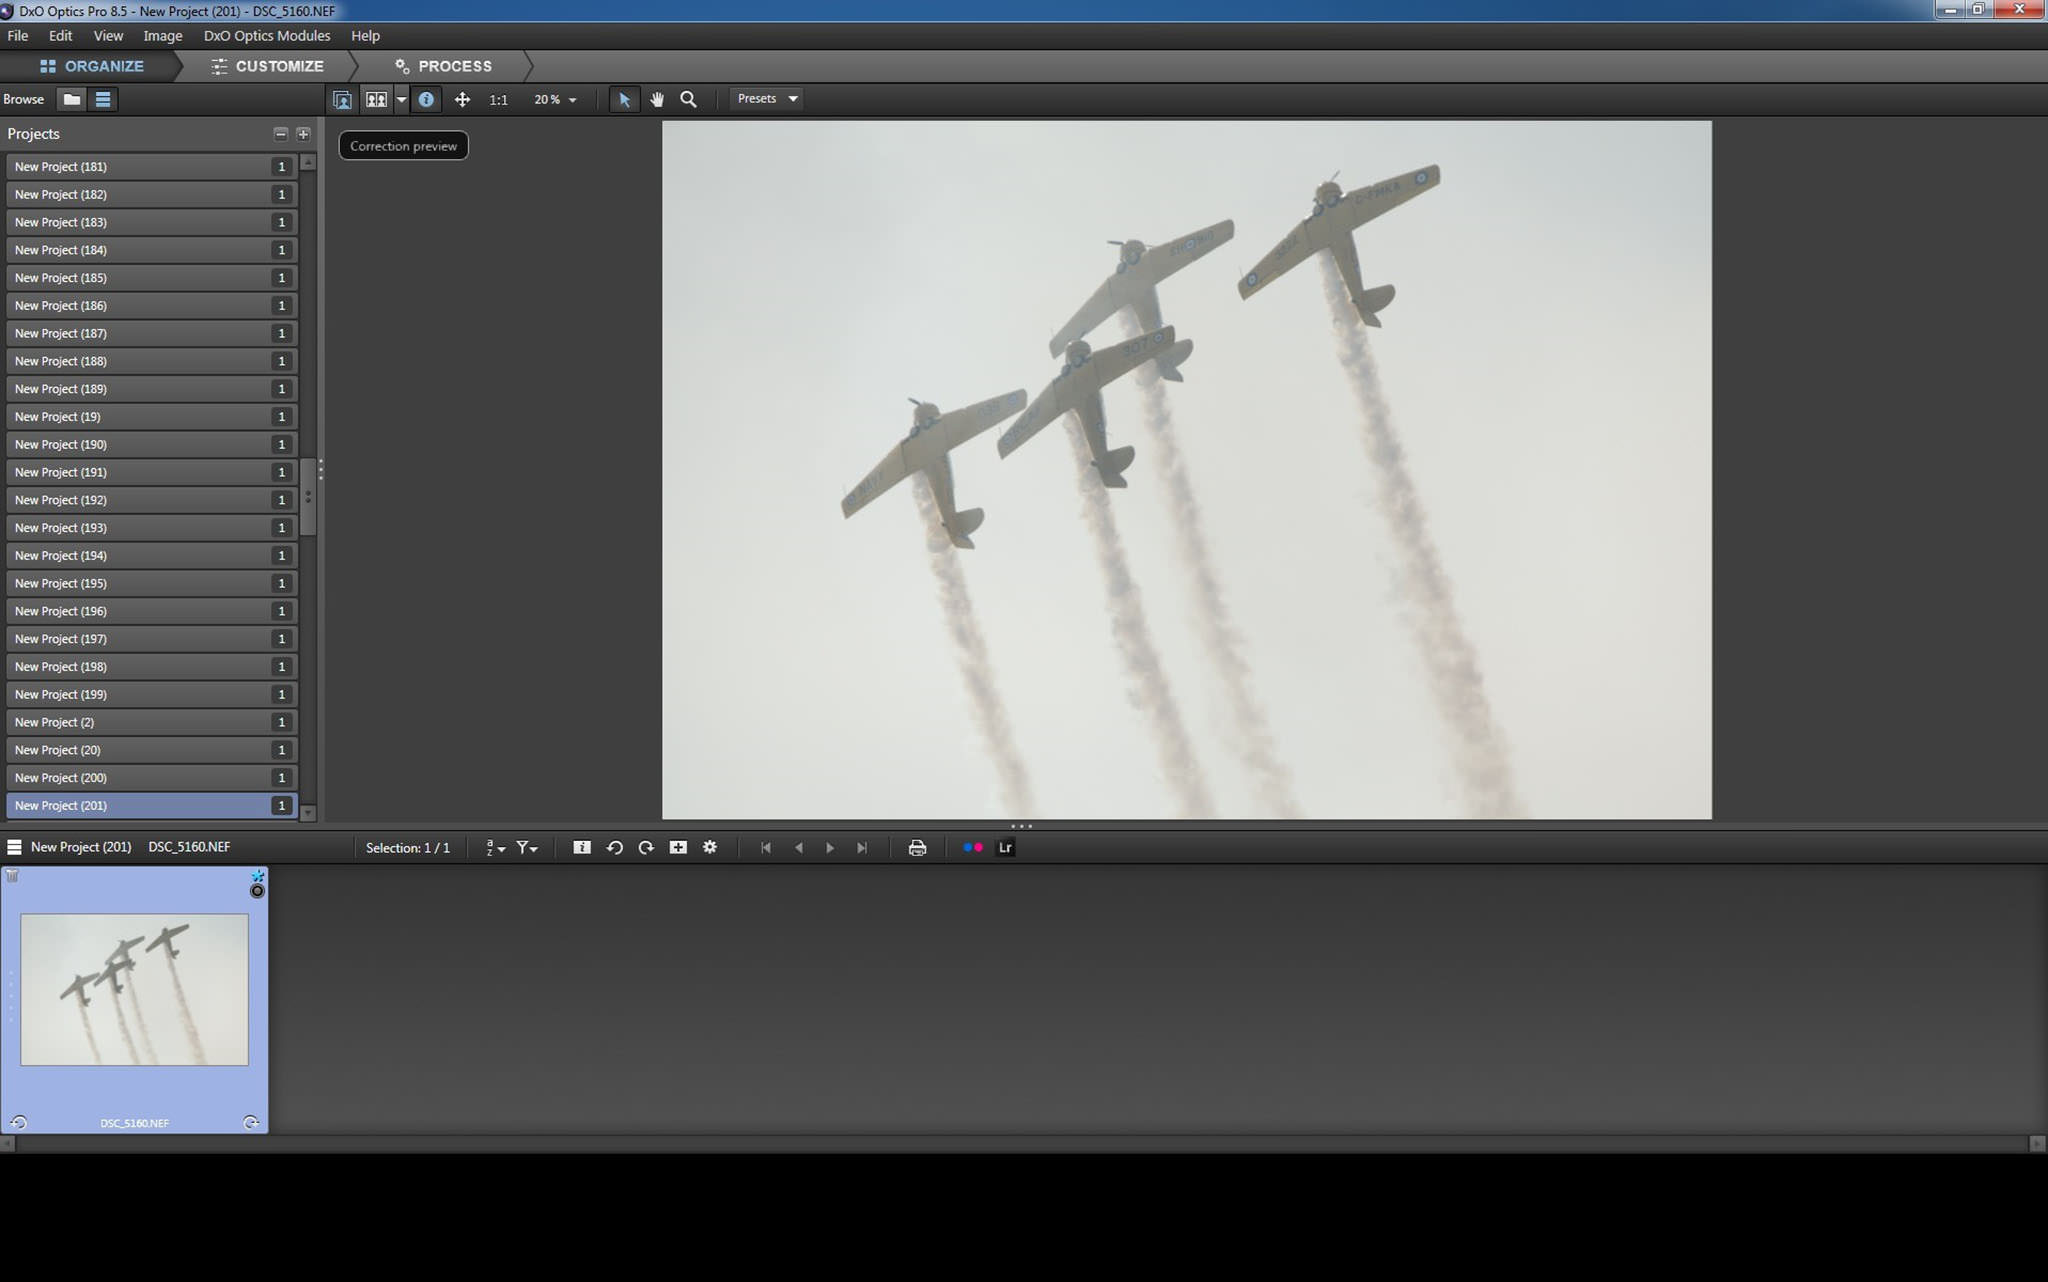
So, let’s get back to the subject image of this article…and its unprocessed RAW appearance.

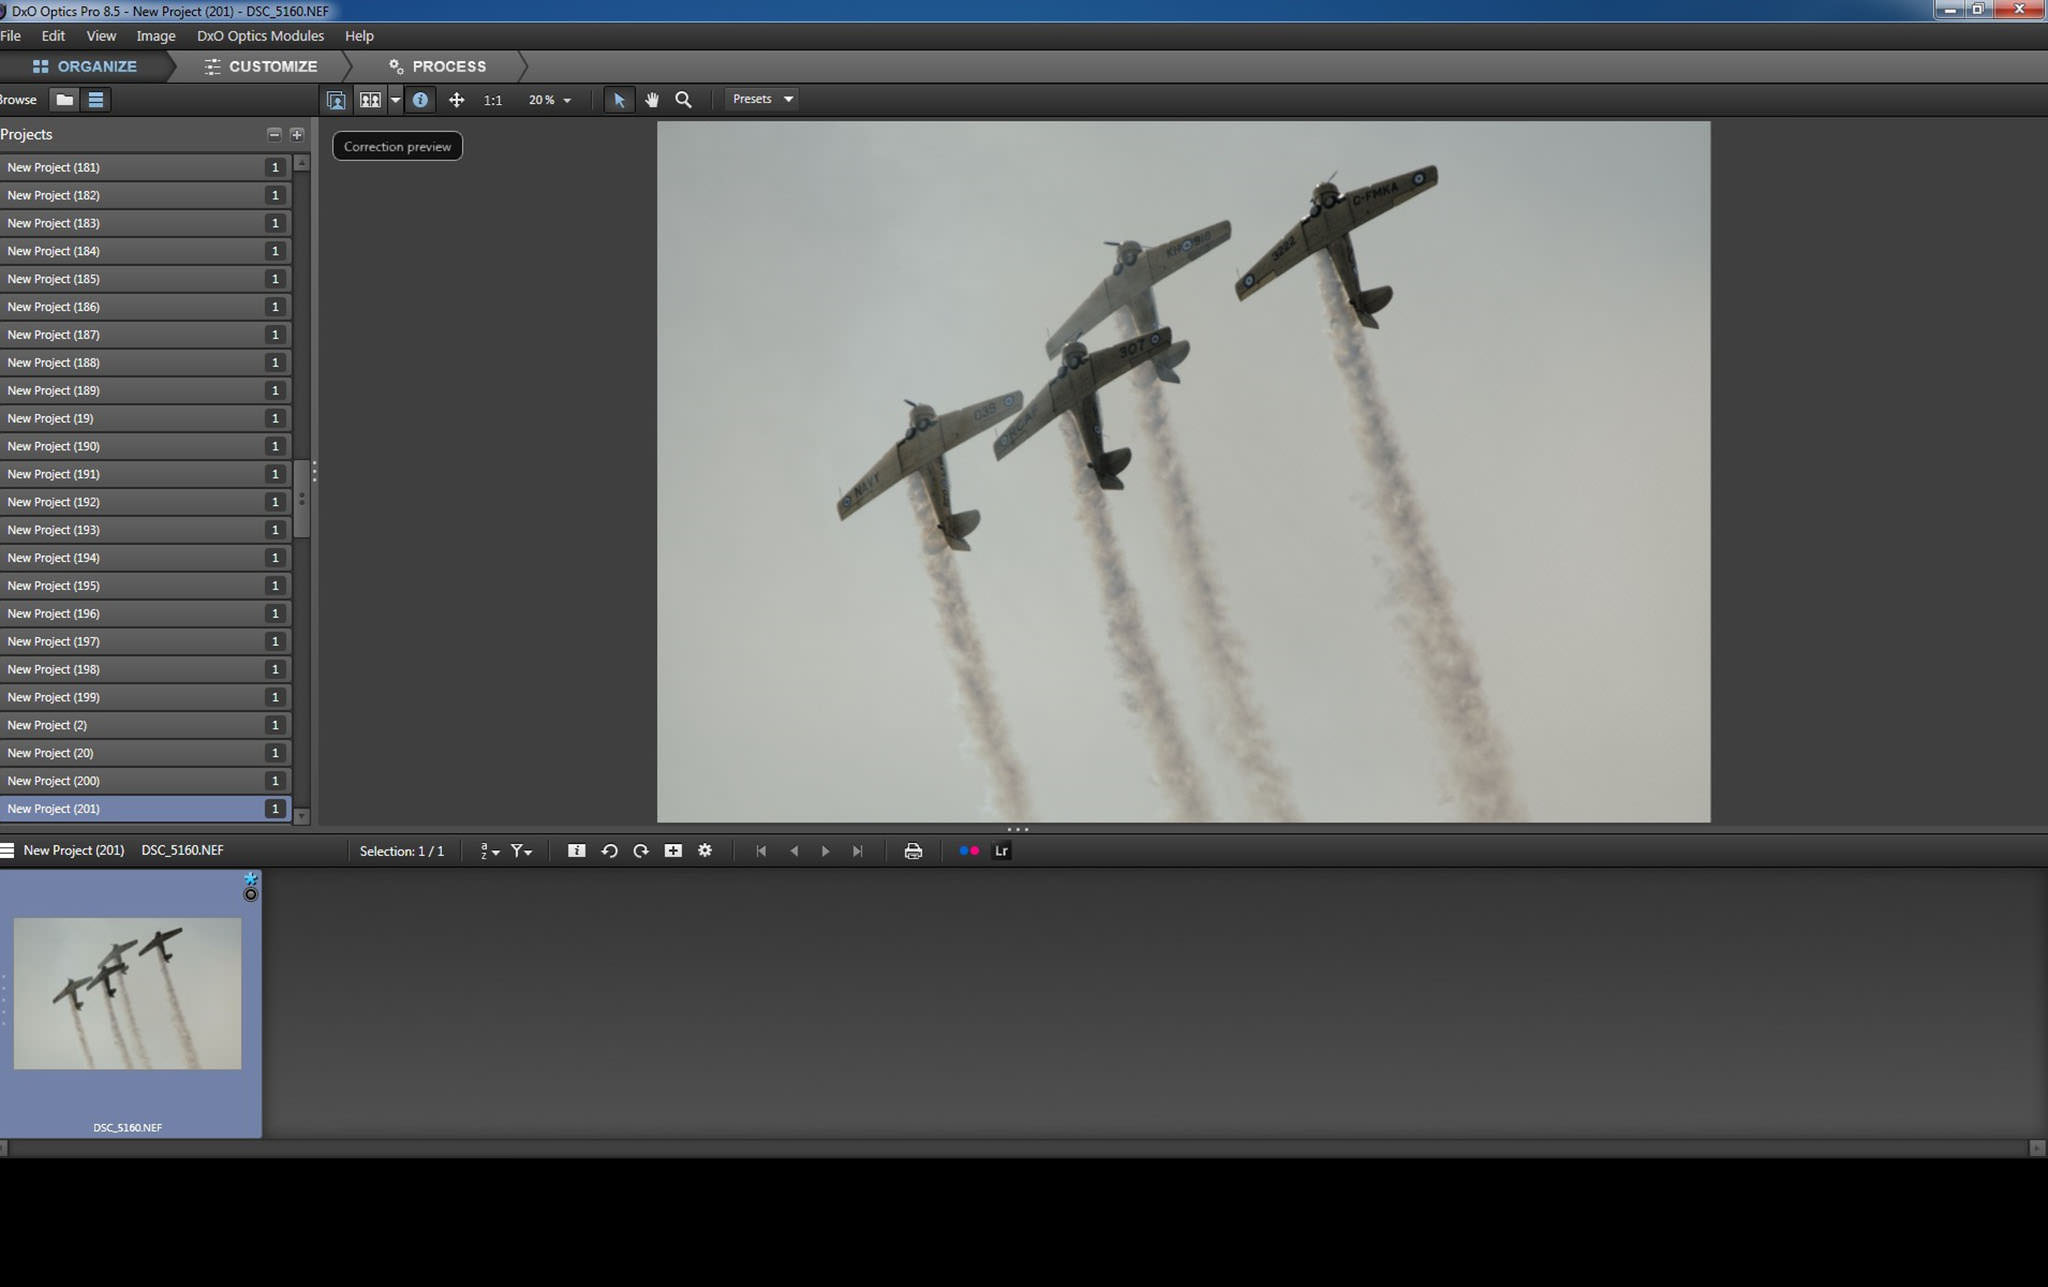
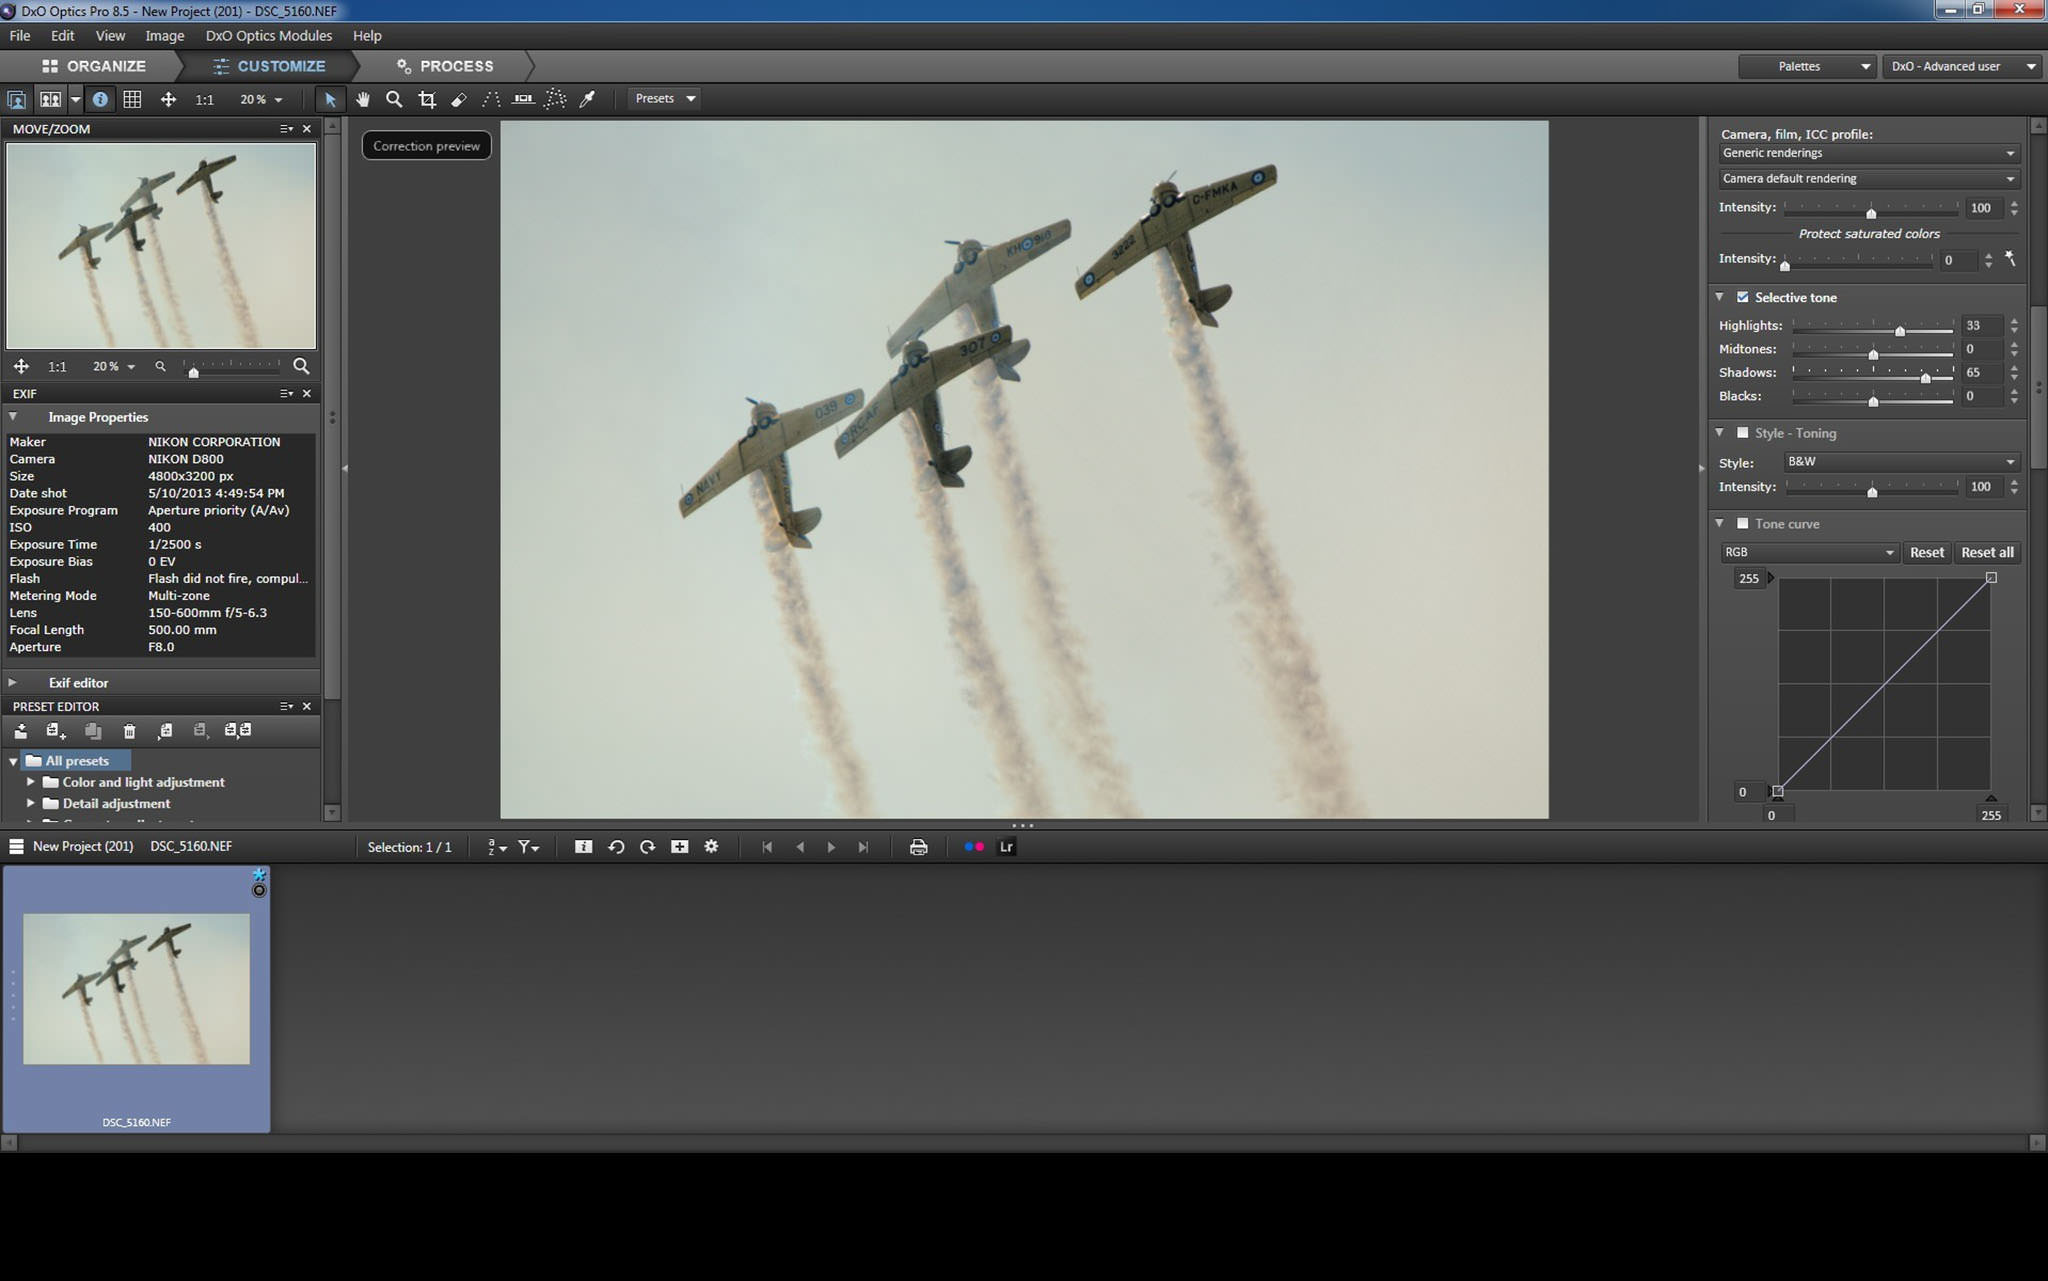
My first step is to bring the RAW file into DxOMark and allow the software to do its automated lens/camera adjustments.
While I don’t use too many presets there are two that I do use quite a bit in DxOMark Optics Pro; ‘Sharpen Fine Details’ and ‘HDR (single shot)’. When working with an image that is very flat and grey, like the subject photo in this article, I find these two presets in Optics Pro can be very helpful to start bringing out details.
Then I open up the Customized menu in DxOMark Optics Pro and make some initial adjustments. These often include ‘Smart Lighting’, vibrancy and saturation. When working with a flat, grey image I’m often very aggressive and I have no hesitation taking vibrancy to the max and also cranking up the saturation a fair bit.
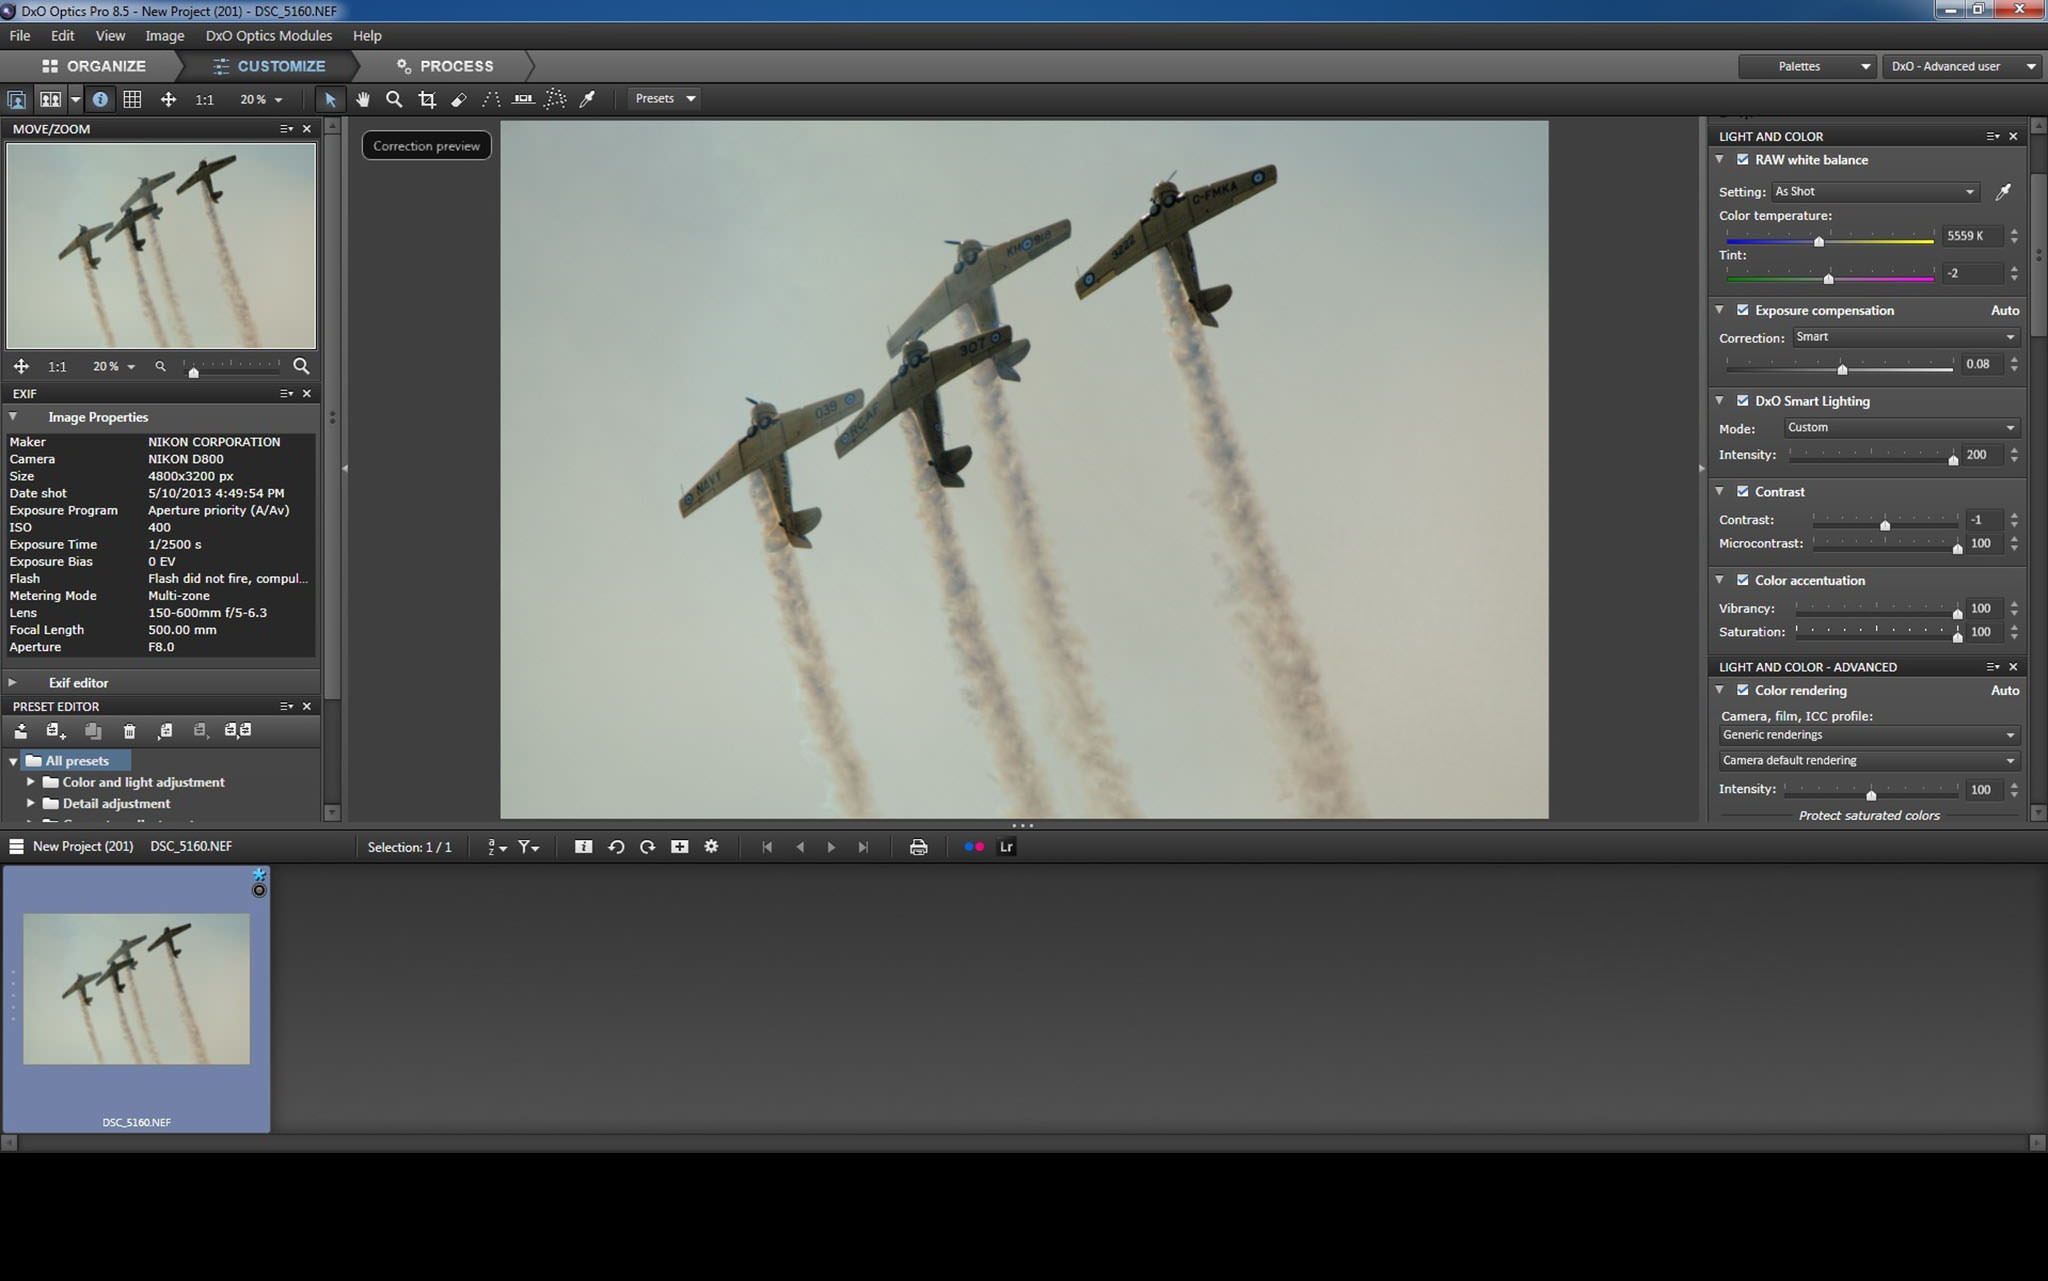
After having a quick look at the results, then I typically make some adjustments to highlights, mid-tones, shadows, and black as needed in DxoMark Optics Pro.
Then I process the file as a TIFF and move it into CS6.
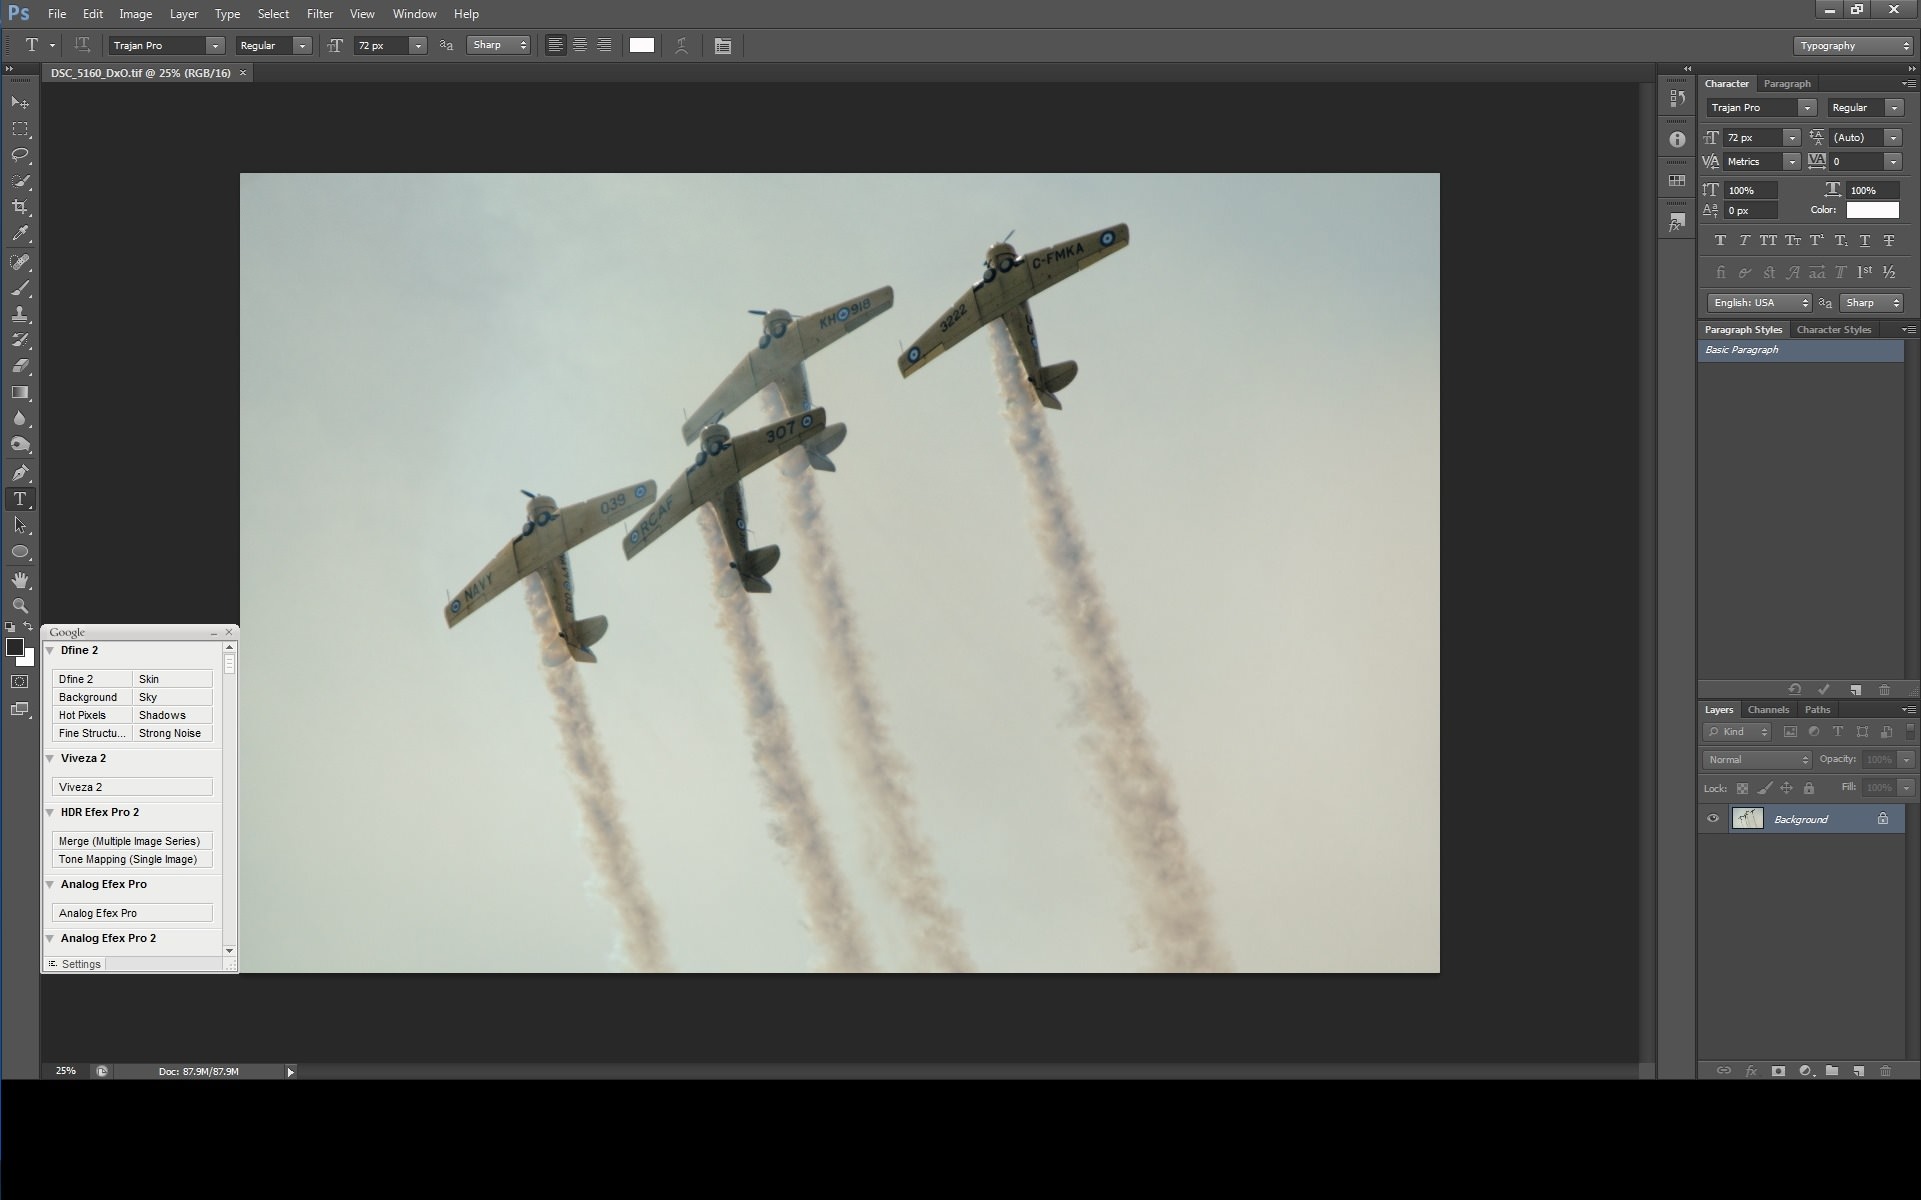
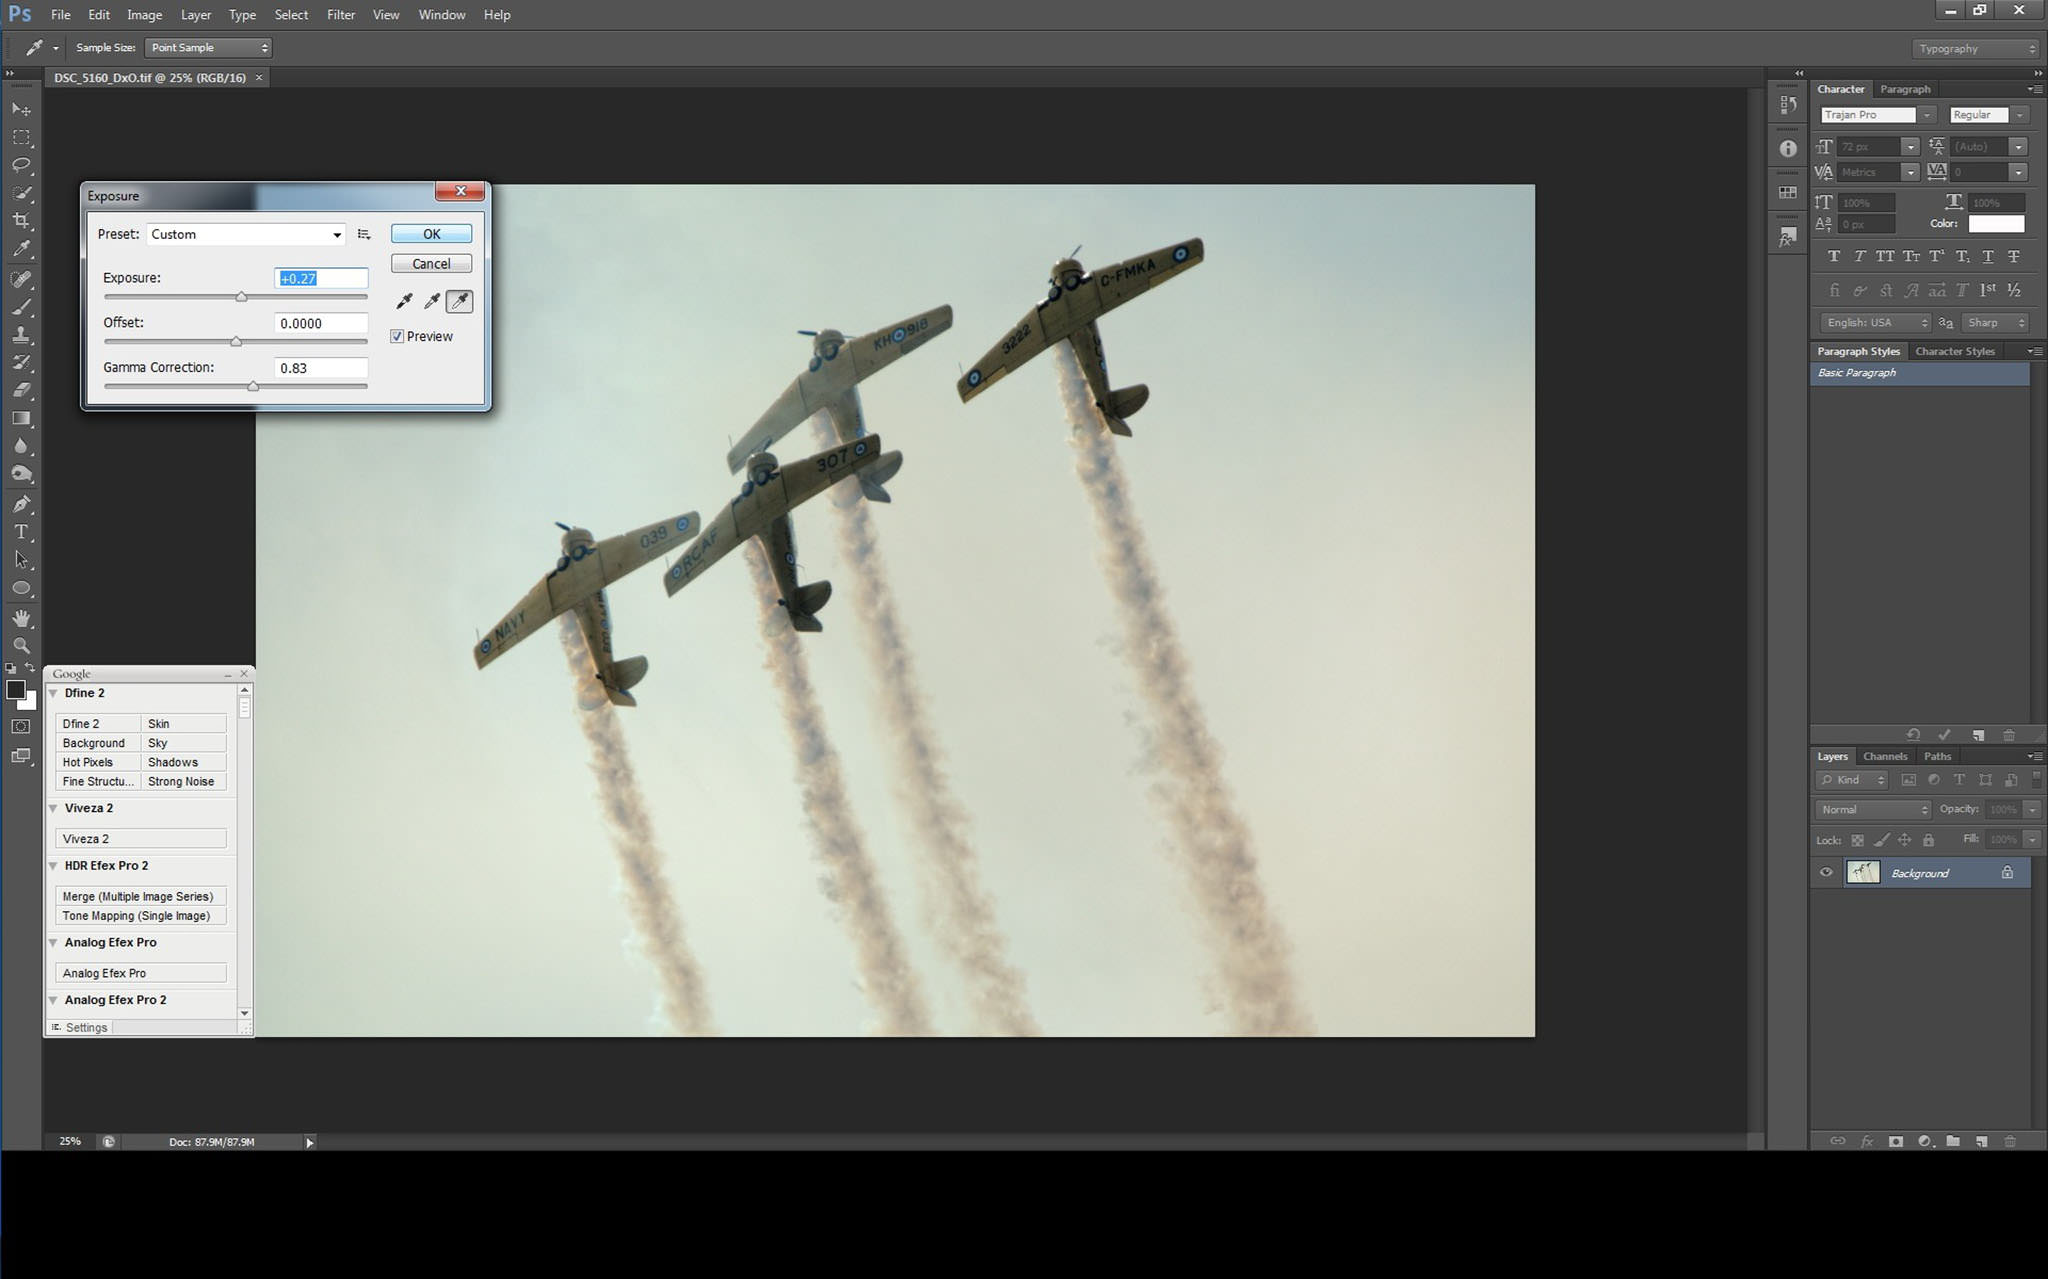
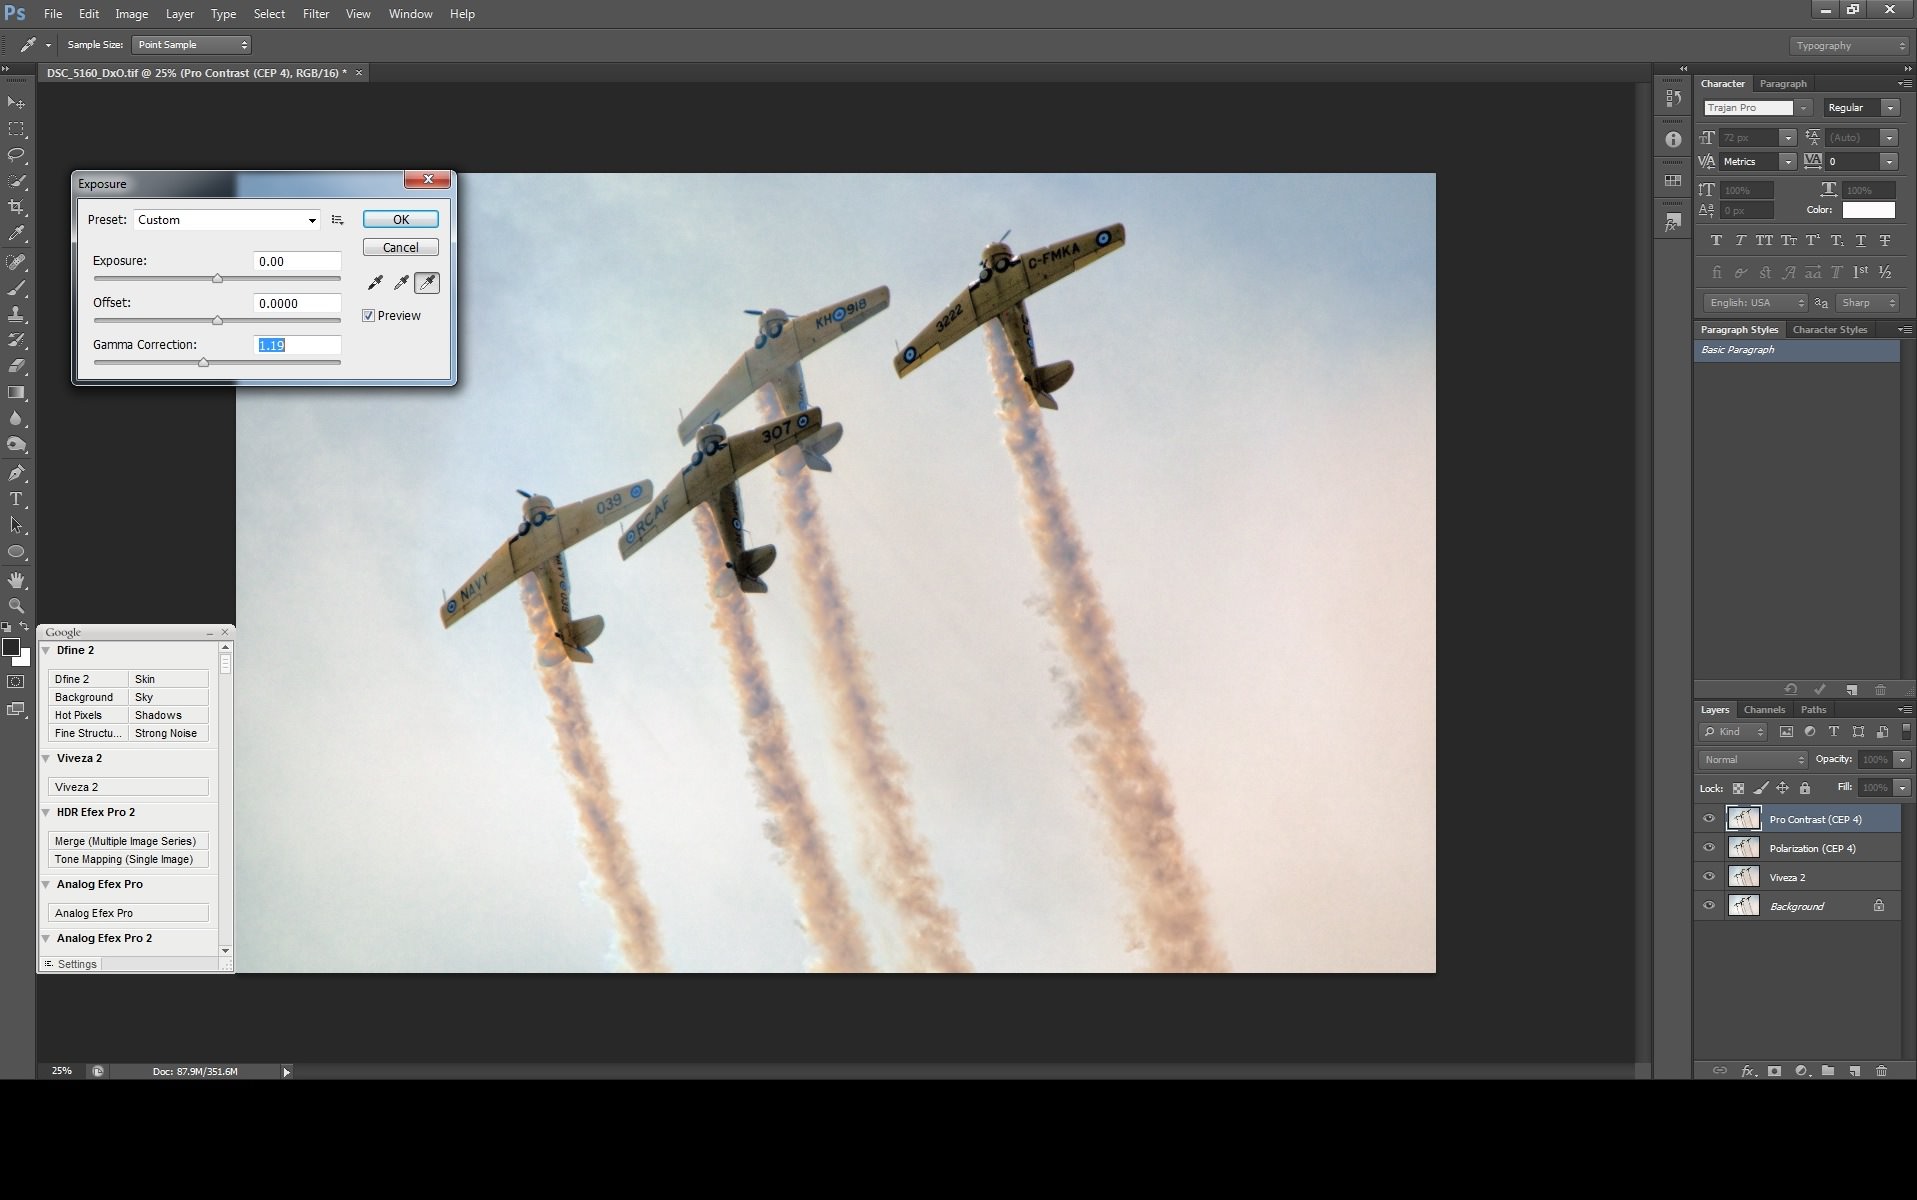
The first thing I do in CS6 is adjust the exposure and gamma correction.
Then I’ll play with the standard curves to see if one of them does something dramatic that I like with the image. If it does, I use it. If not, I move on.
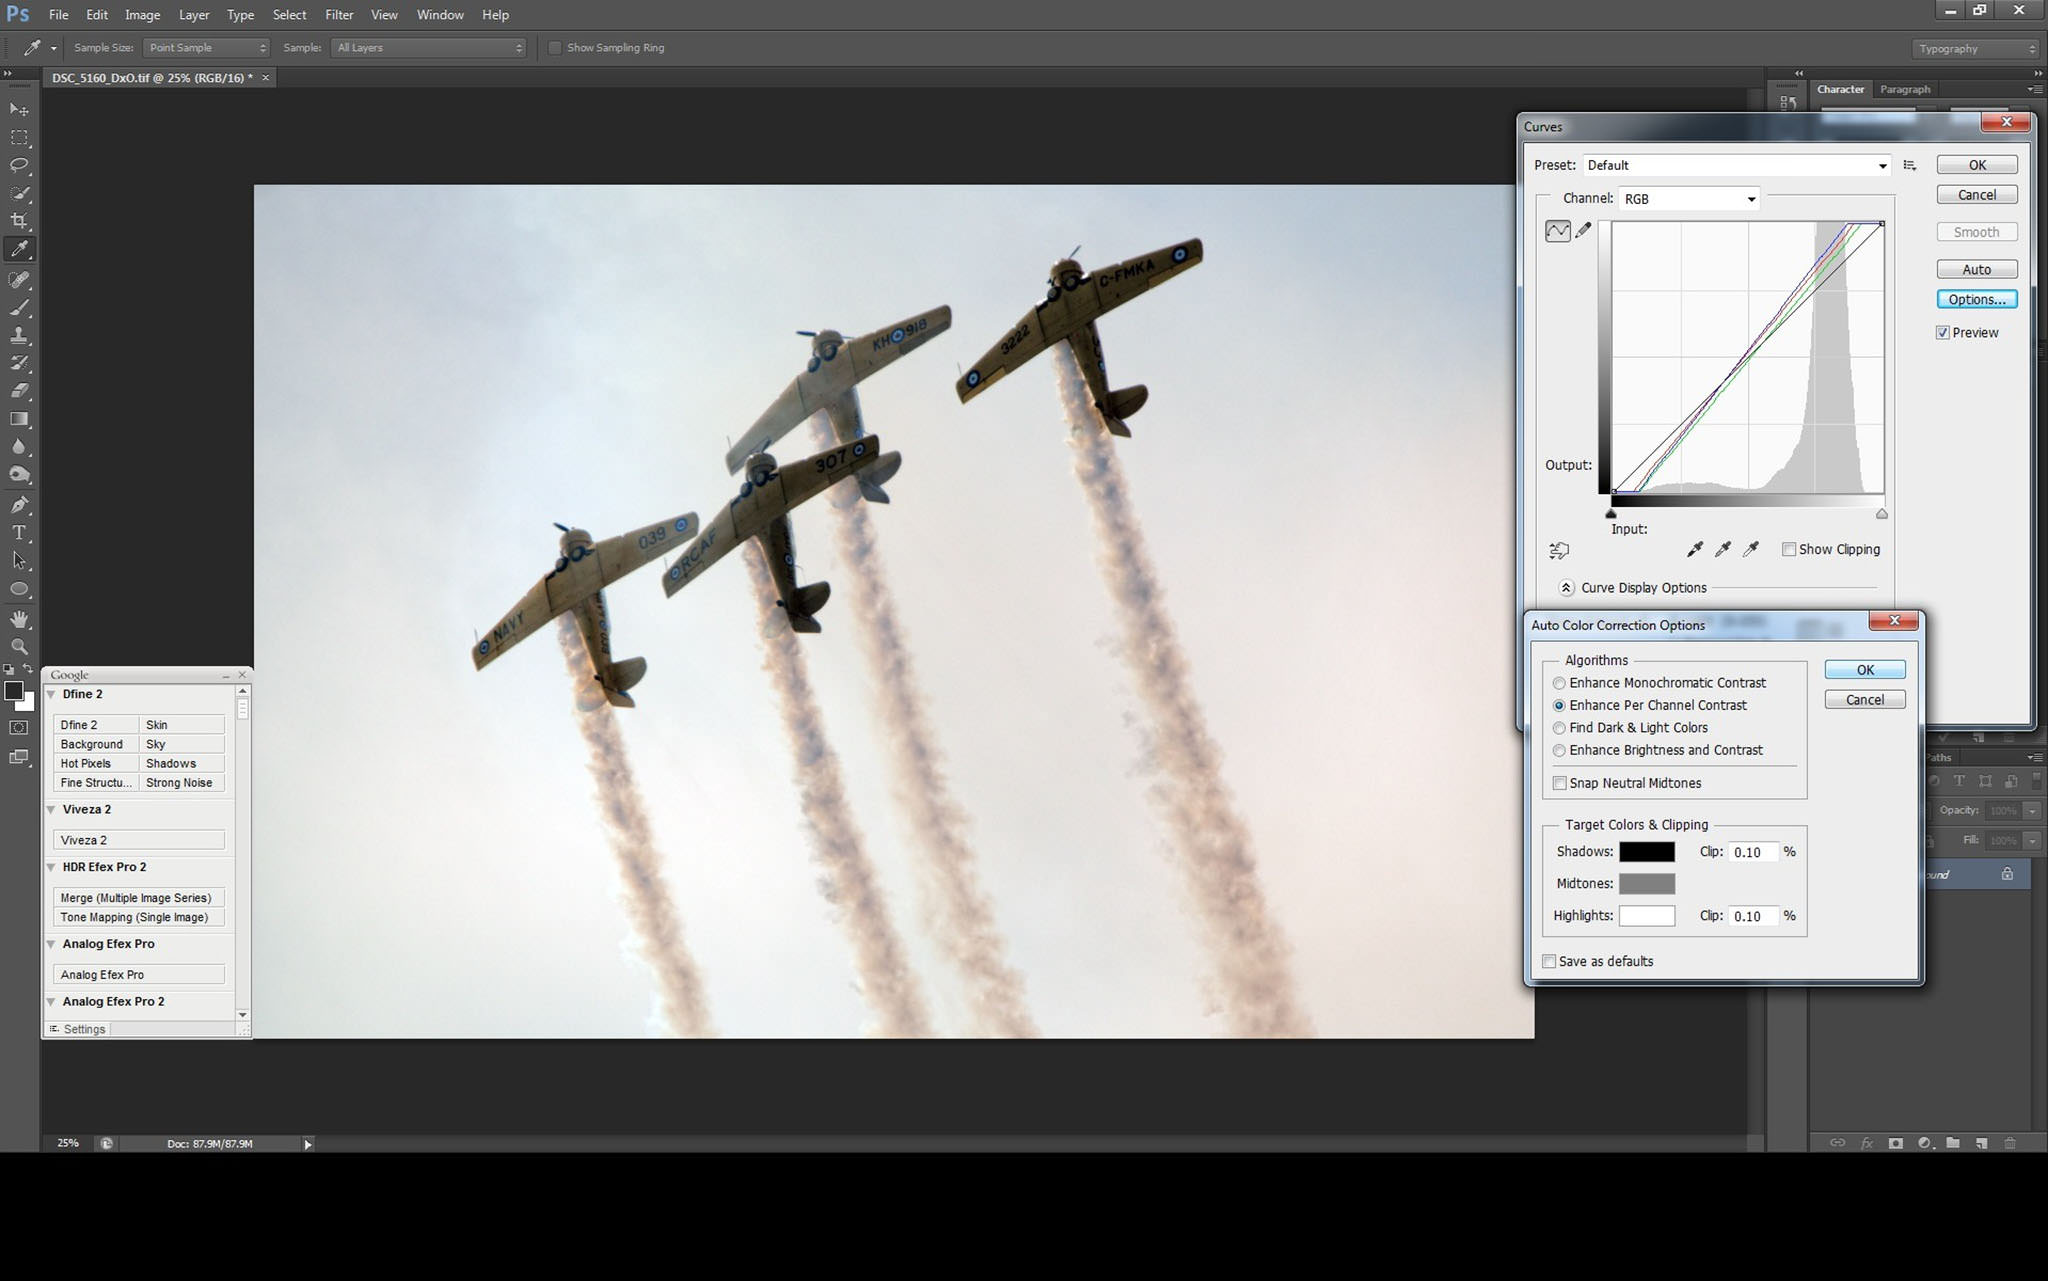
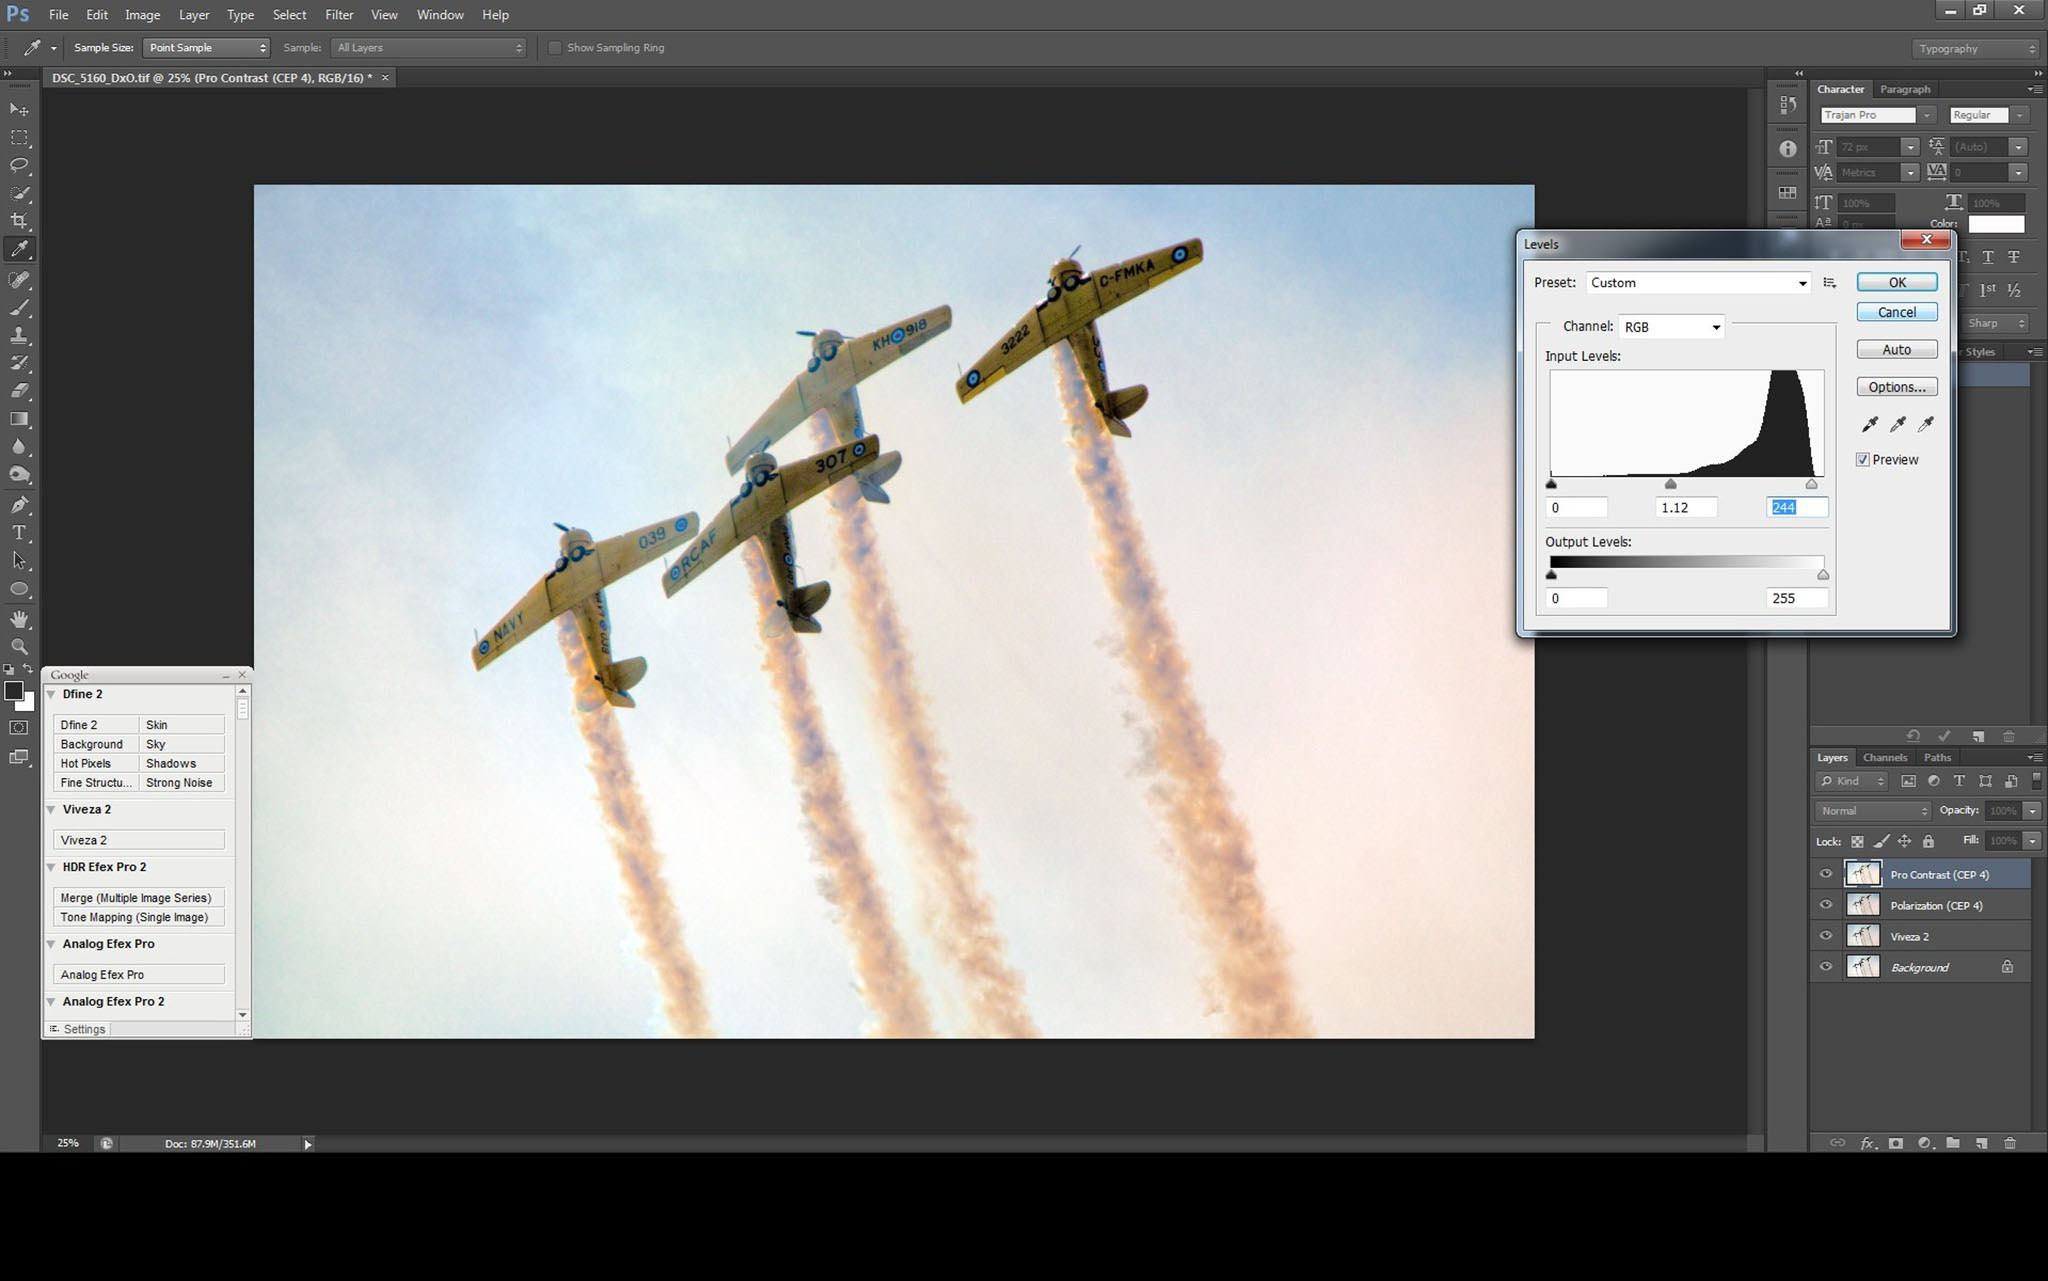
Next, I will typically make some adjustment to the levels to try to create higher levels of differentiation in the shot. Most of the post-processing I’ve done to this point is to work with the overall ‘greyness’ of the image to try and create more density that I can begin to work with later on in terms of getting some colours back in the image.

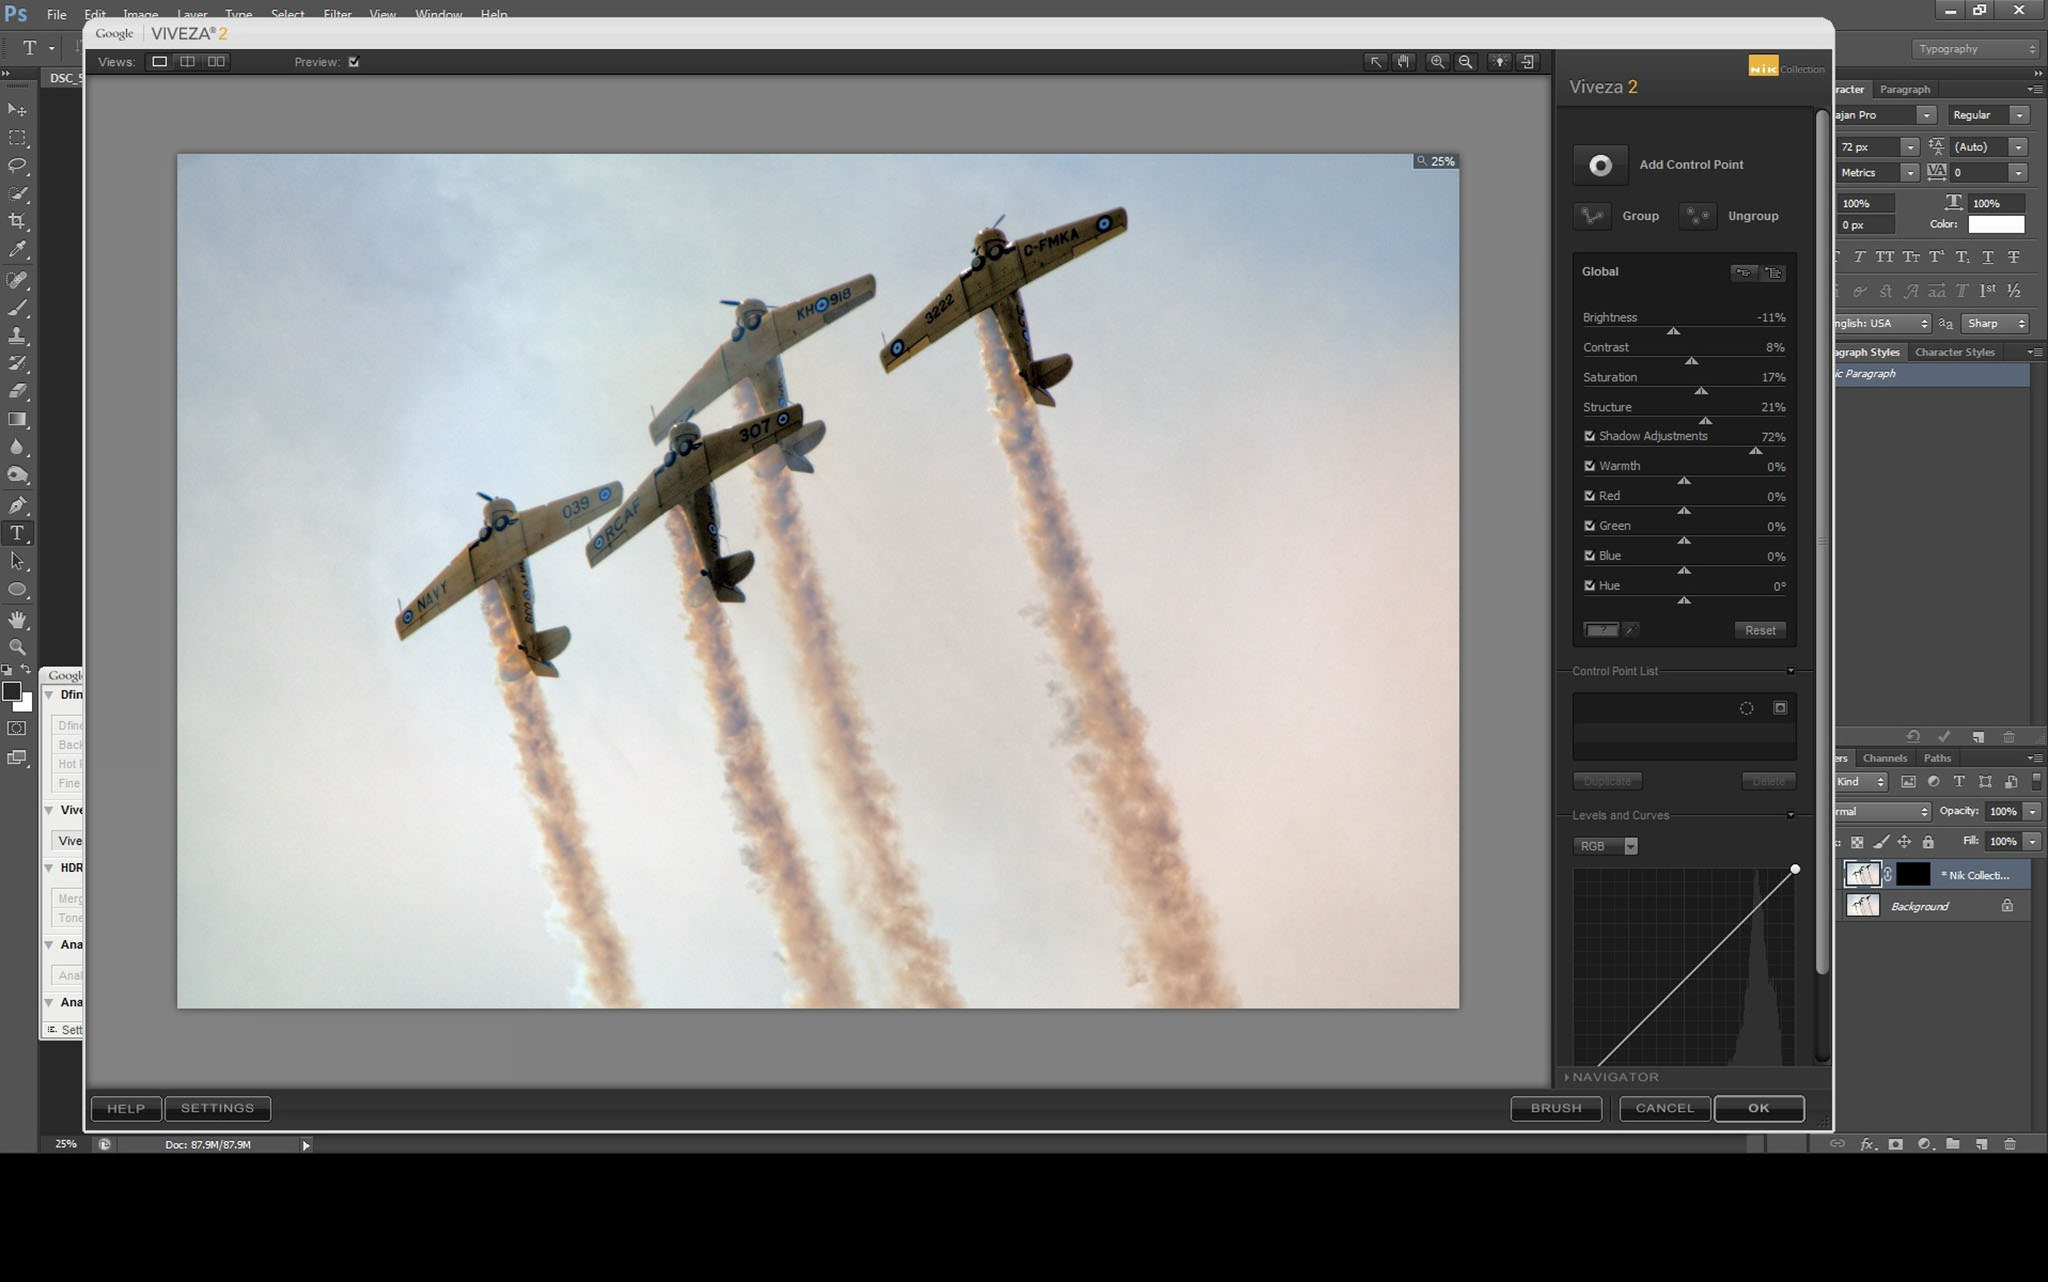
Then I open up Viveza 2 and make adjustments to brightness, contrast, saturation, structure and shadows. At this point the image starts to take shape.
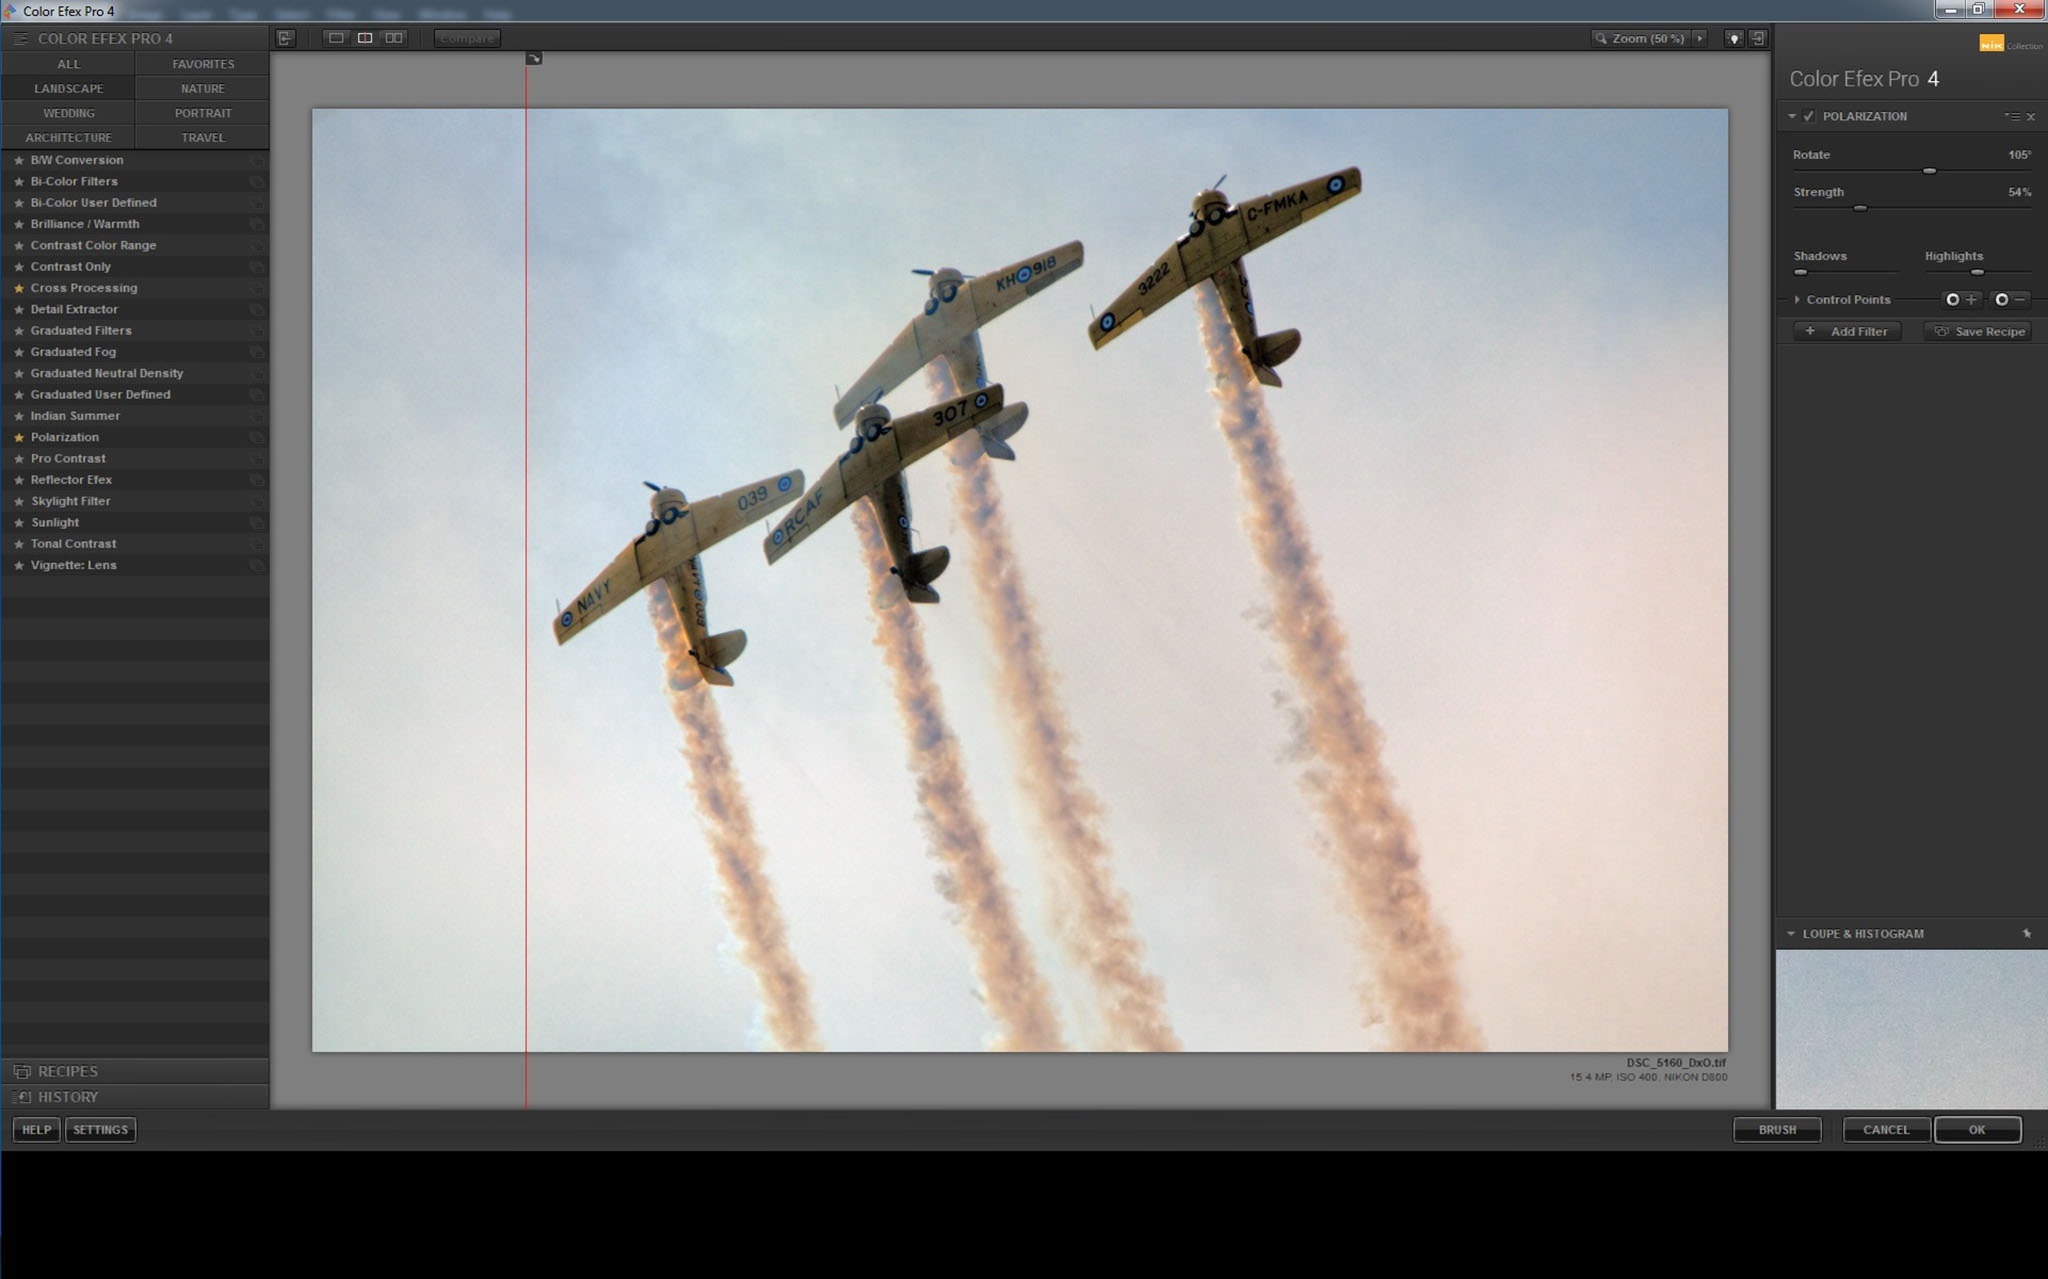
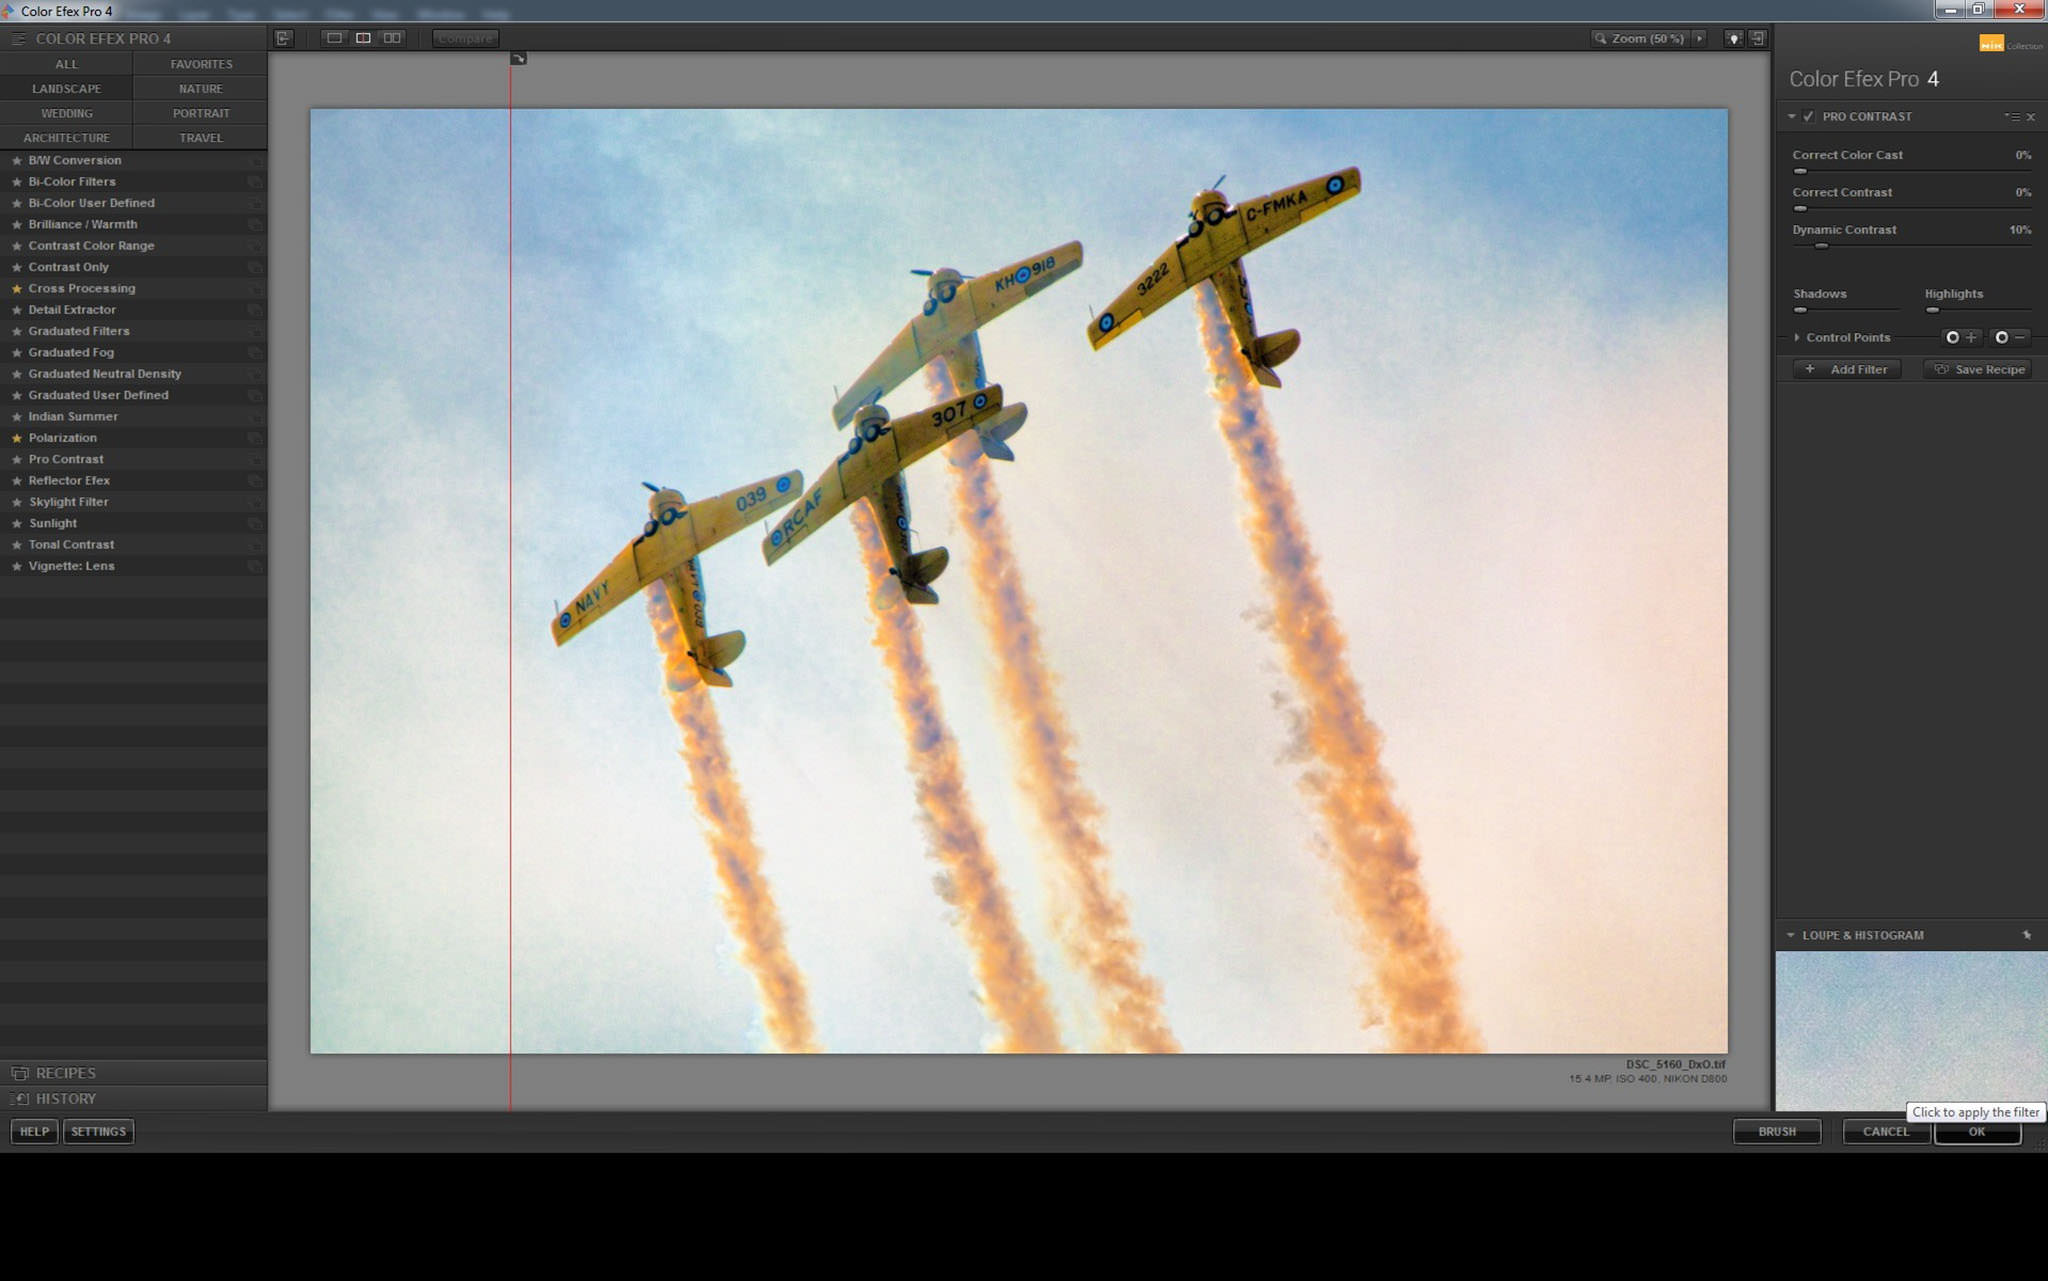
Depending on what I see in the image I’ll often open up Color Efex 2 and adjust polarization and dynamic contrast.
At this point I find it is often useful to go back into CS6 and make some readjustment to the gamma correction so I can get a bit more balance with the image.
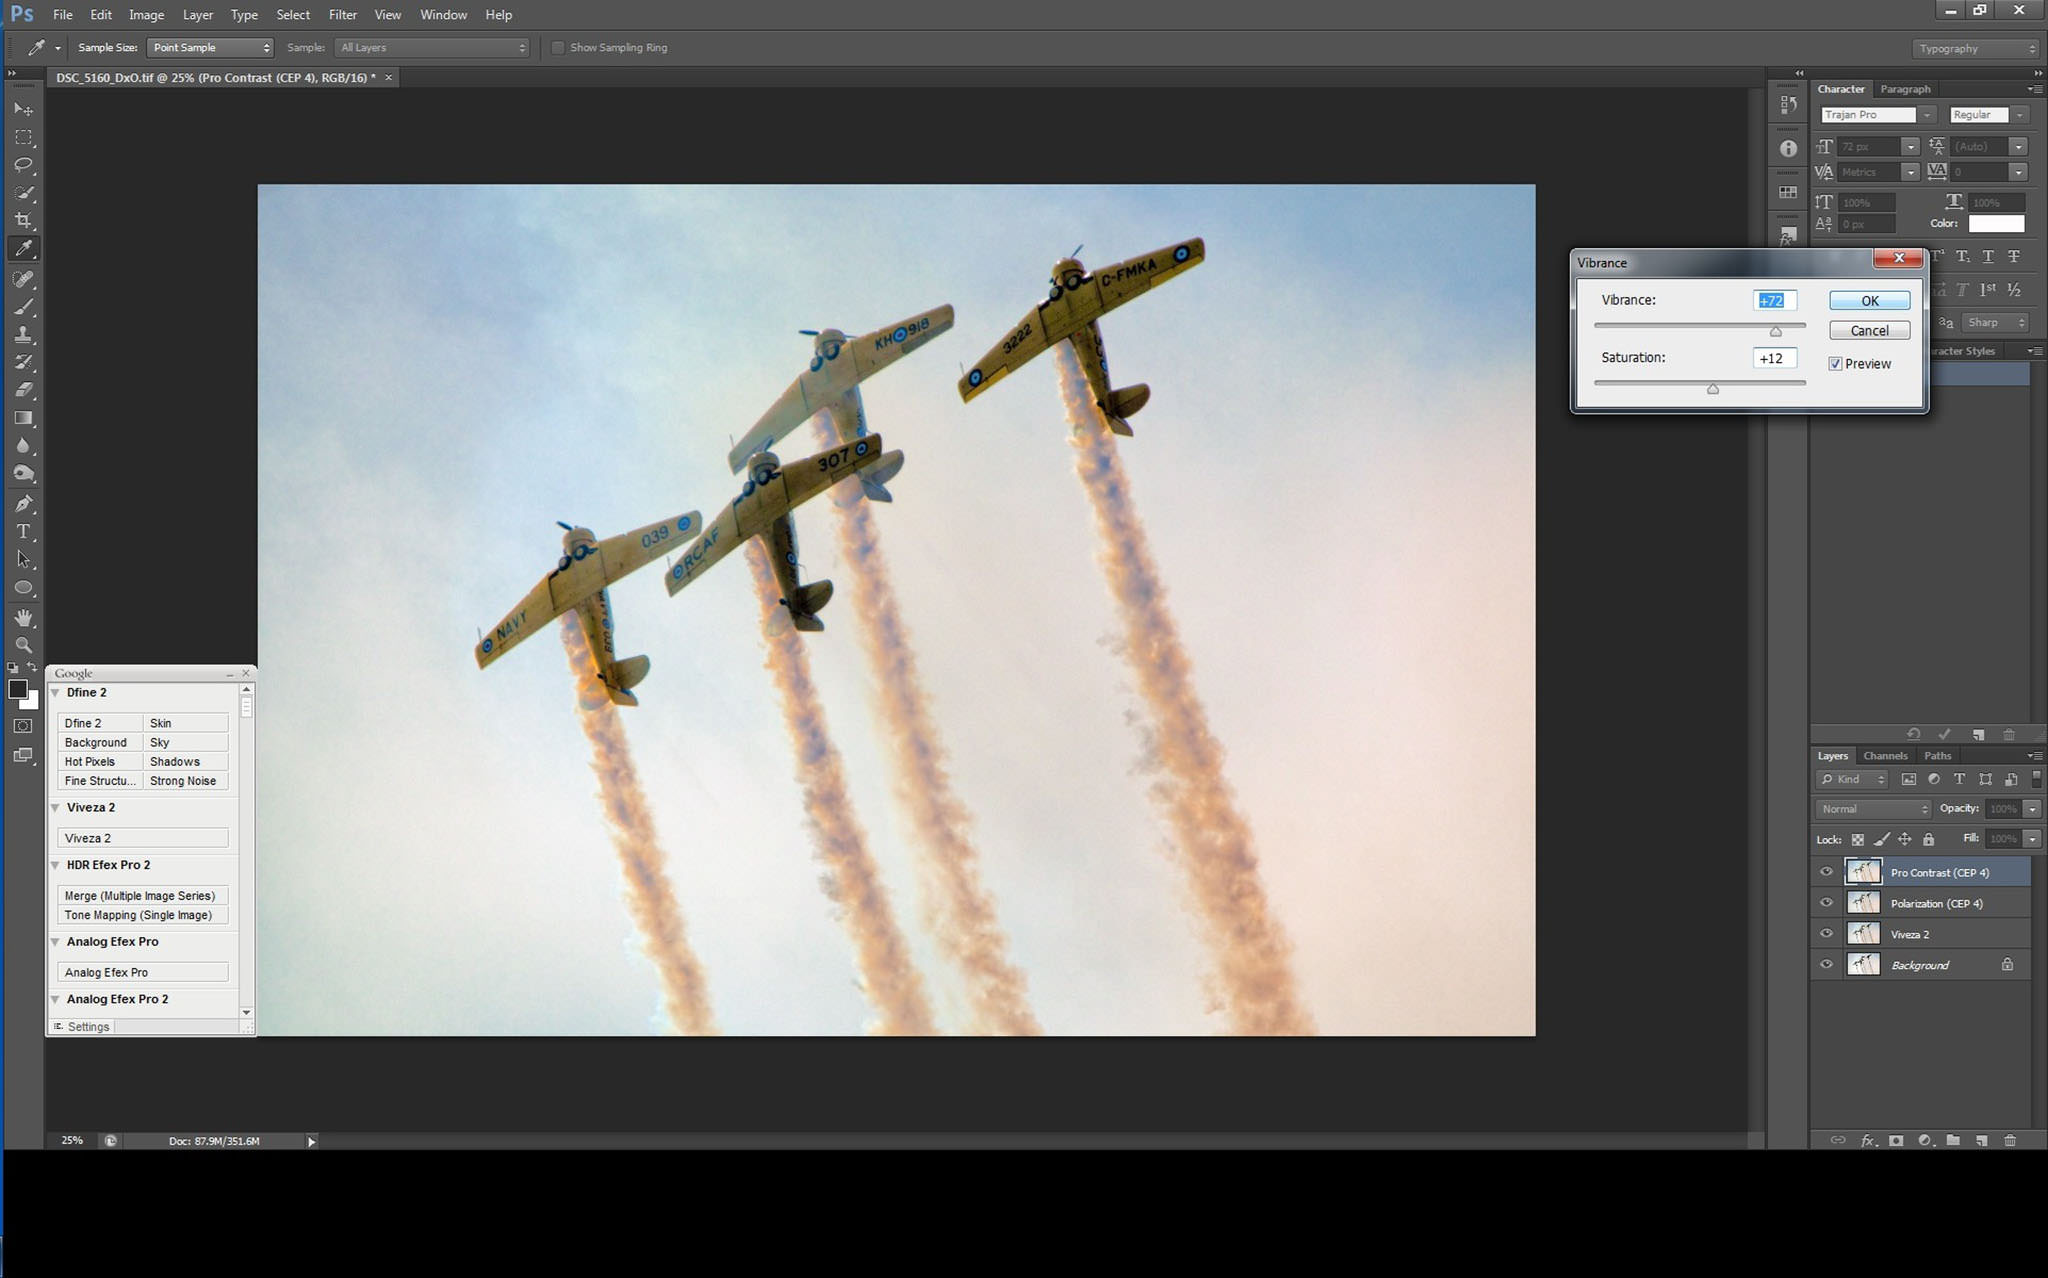
Then I revisit the vibrance and saturation in CS6 and often bump them up a fair bit…again to bring some colour back into the shot.
I often revisit the levels and make some subtle readjustments as necessary.
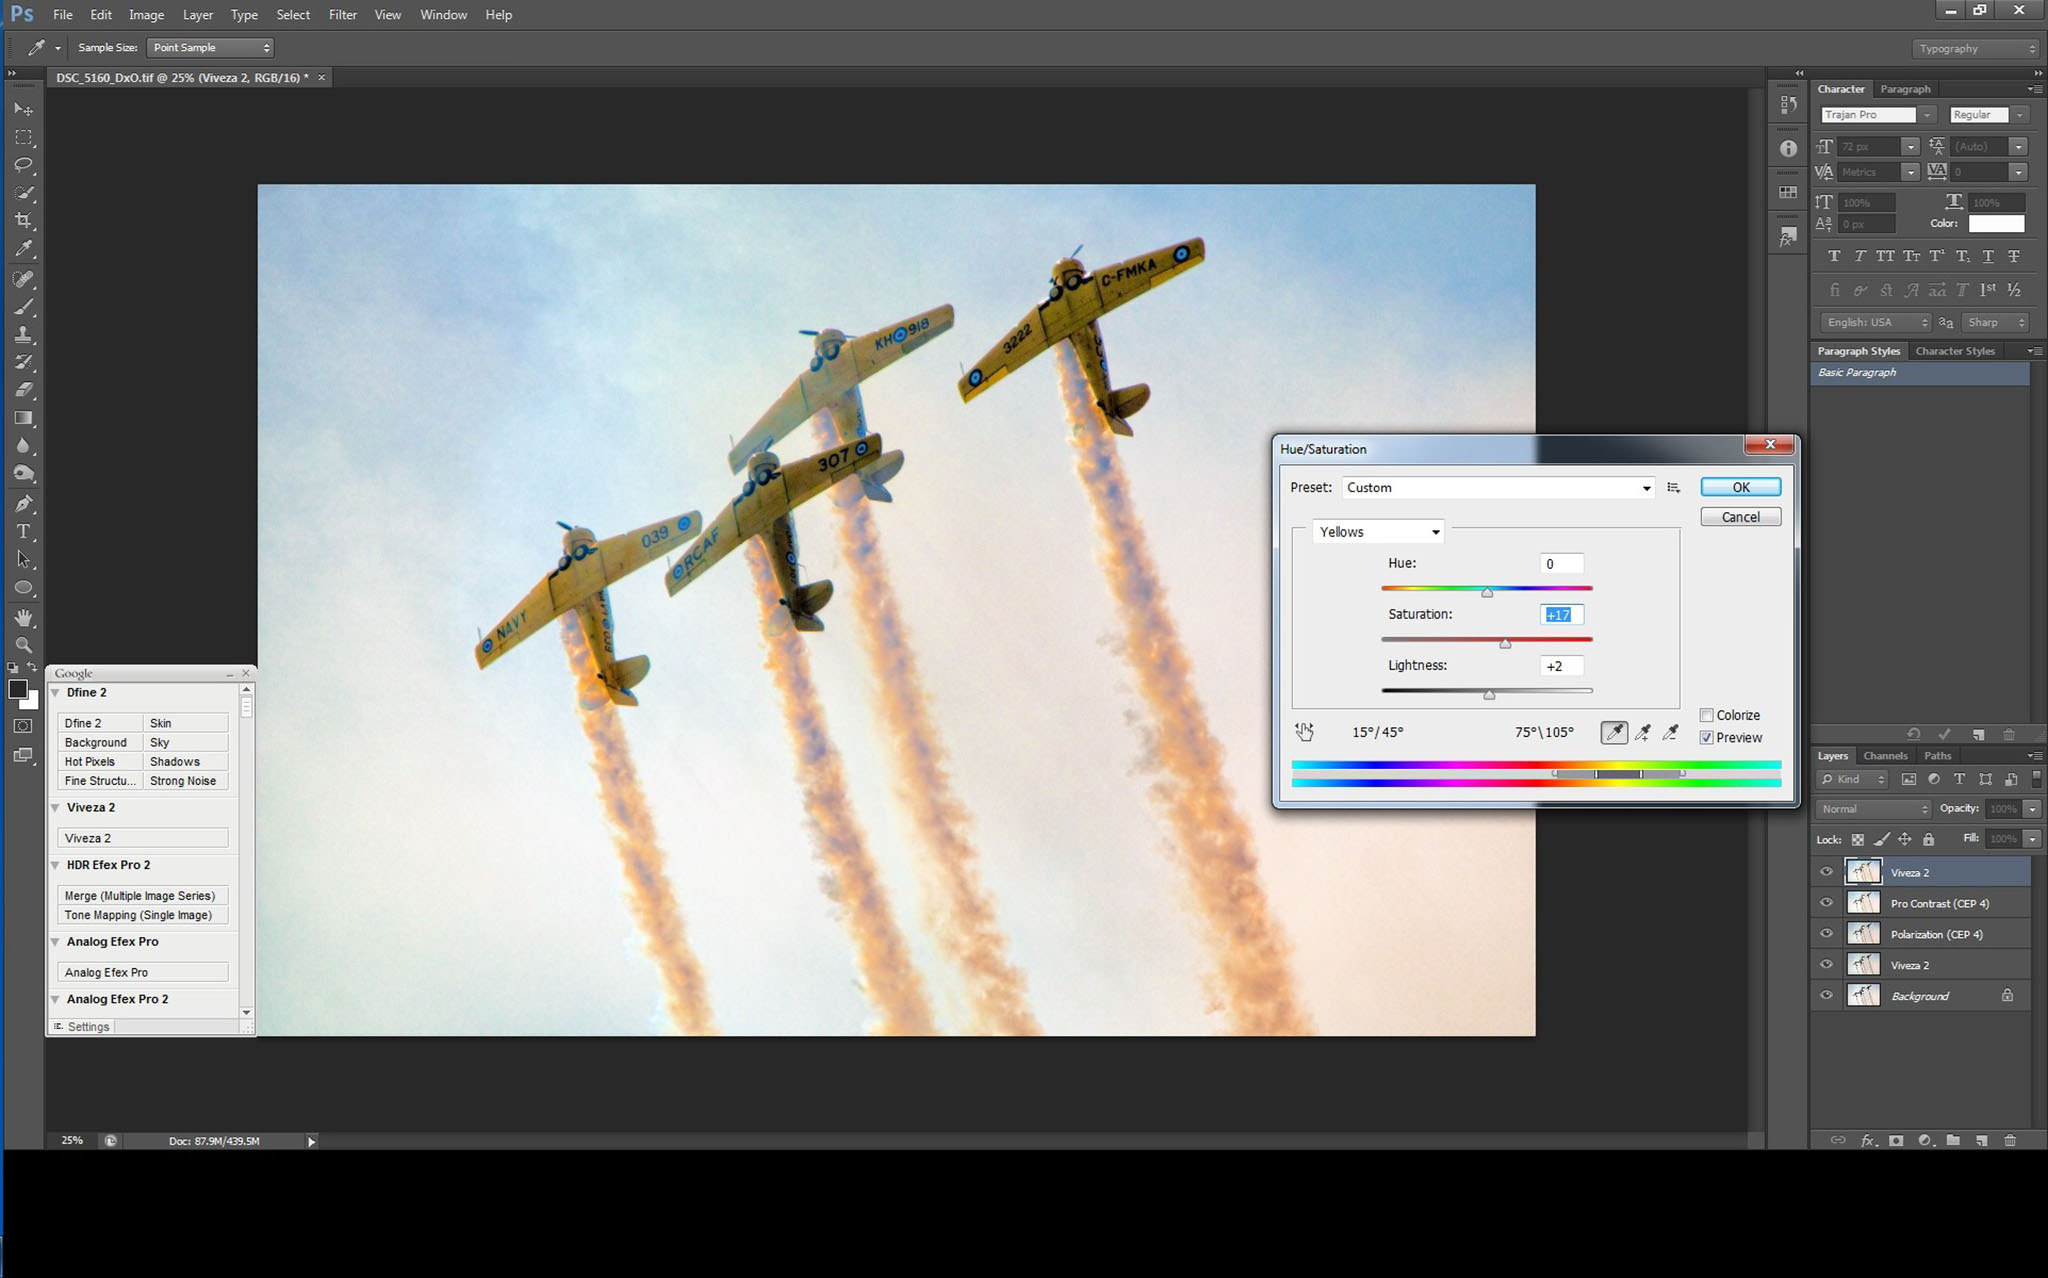
With the subject image in this article I then made some adjustments to the ‘yellows’ in the Hue/Saturation adjustment screen in CS6 to add some extra colour pop to the aircraft.
Then as part of the final image tweaking, I’ll often go back into Color Efex 2 and make some small adjustments to the polarization and dynamic contrast settings.
If the image has gone through a ton of work it sometimes needs a bit of clean up so I will then sometimes use Define 2 for that purpose.

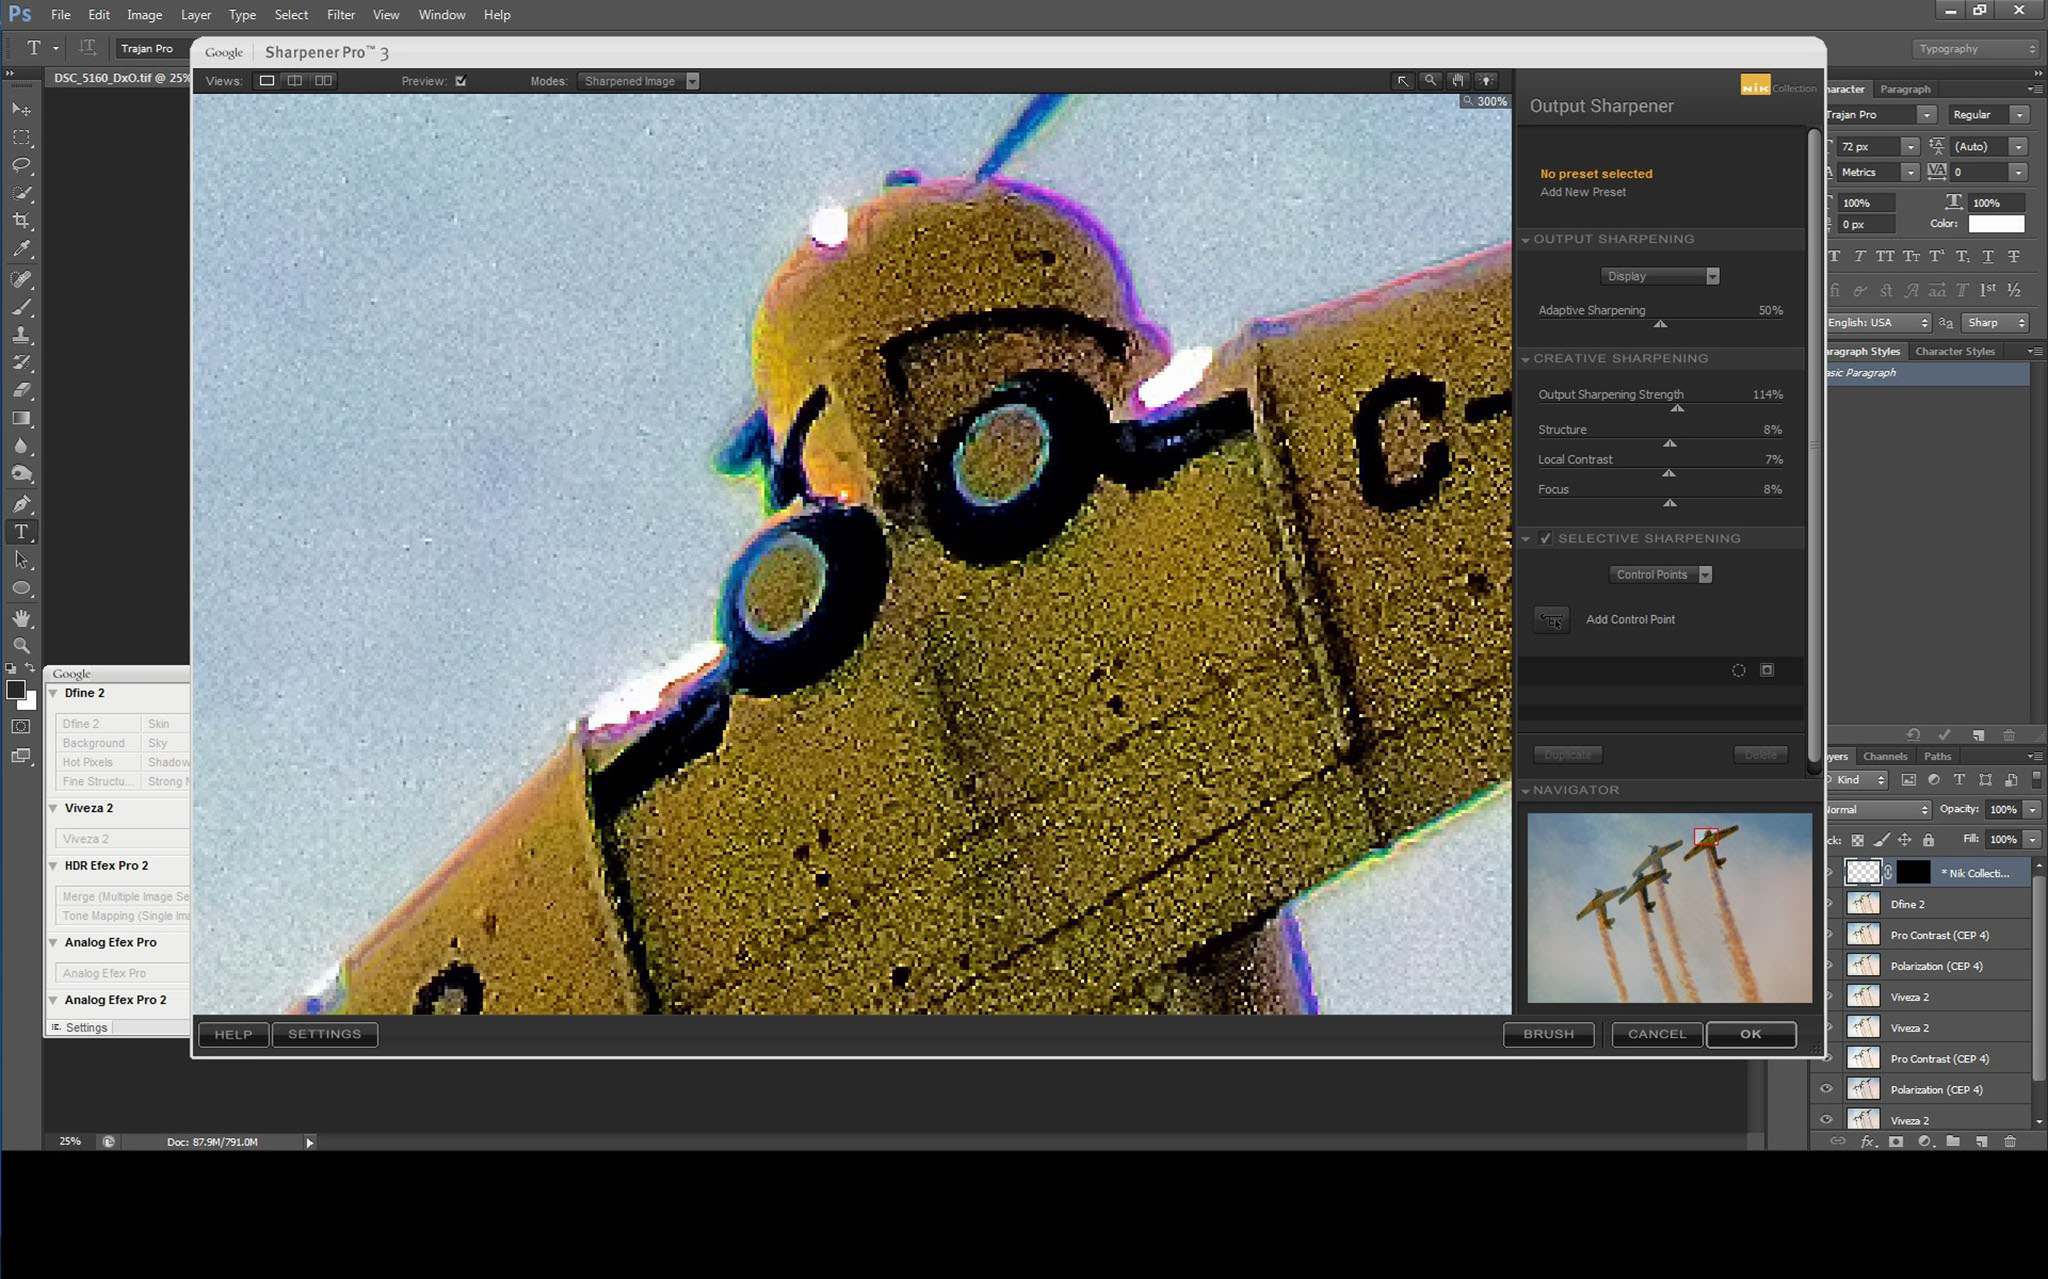
On occasion I’ll then take the image into Sharpener Pro 3 and make a few adjustments.
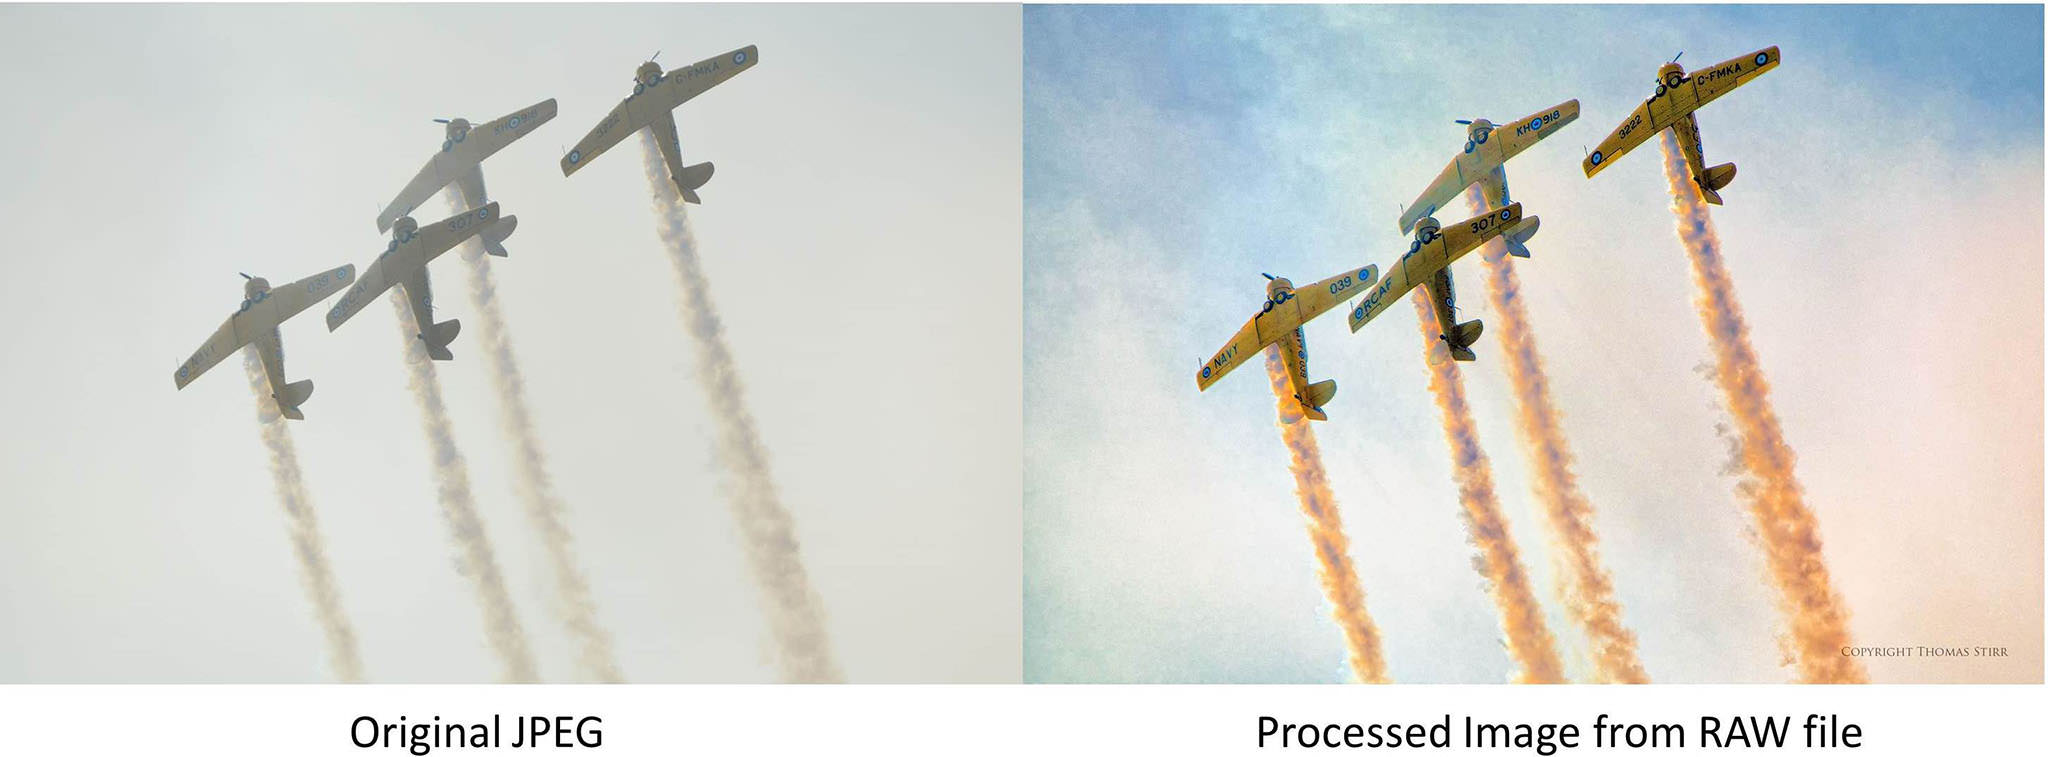
If I’m diligent….or just plain lucky I’ve gone from the following image…
To something like this one below…or hopefully better.

When it comes to using software in post-production I’m not much into experimenting with more and more new programs. I know I drive my tech-savvy son crazy with my lack of enthusiasm for the ‘latest and greatest’ software.
I’m sure I’m only scratching the surface with my current programs…and I’m loathe to spending time learning more new software when I’d much rather be looking through a viewfinder than at a monitor.
Article and all images are Copyright Thomas Stirr. All rights reserved, no use, reproduction or duplication including electronic is allowed without written consent.
A good article. It is not what I would have done myself, probably – I’d have gone for B&W as I feel it would have been less of a compromise. But when I look at the before and after images, the difference certainly is huge. :)
ATTN: Nasim,
I just noticed that my “reply” (comment 105) did not actually hierarchically stack with the message I intended to reply to. Wondering if this is a glitch in your website now that things have been moderated on this article. Just a head’s up… but it makes it hard to follow a thread if there is no thread :)
– Brian
PS: and my reply in comment 106 about my comment reply in comment 105 was placed in the general comment box at bottom, not as a reply, yet it is appearing higher up in the thread. Just FYI there may be a coding glitch now…
(PPS: this comment is also being left in the general, bottom comment box. Let’s see where it ends up)
– Brian
Brian,
that is most likely the result of moderation. Some extensive revision was required here, it’s a rare case. :) Thanks for letting us know, though!
If you are a beginner, you would want to pick an post processing application that you can grow into as opposed to grow out of. There are many out there and many are free. What whatever you choose, learn it well. The key to post processing is to be able look at your image and the meta data, and determine what needs to be done with it. This is difficult for beginners but it is the mastery you want to achieve. Eventually, there are no difficult images. There are only those you can optimize and those you can’t. Those you can’t you leave alone and those you can is where you put your time an energy. If you try to process every image in hope of a good outcome, I am afraid you will be disappointed and waste precious time.
Dear Photography Life readers….
As many of you have observed the tone of the discussion in this forum was not in keeping with the standards that our readers expect. As a result an extensive review of the various comments was conducted by a moderator. Many comments have either been deleted or edited (including many of mine) in an attempt to restore the civility and community spirit of giving and sharing that has always been a hallmark of Photography Life.
Ongoing articles will have moderator oversight, and while it may take a bit of time for the moderator to delete or edit inappropriate comments, please rest assured that the team at Photography Life is dedicated to providing you with the best content of which we are capable of producing. Our intent is also to make sure that the discussions surrounding that content are conducted in a civilized, thoughtful manner.
If you find that comments you made have been deleted or edited…please understand that this has been done to restore decorum. Many of the threads revolved around the tone of the previous discussion and the moderator felt that leaving them on here would only serve to remind people of what had transpired.
Tom
Hi All,
This sure kicked a hornets nest! Regardless, I want to share some honest criticism of myself that might apply to Thomas (note that this in no way is meant to criticize his sharing of what he did or the final result).
1. I am a very thoughtful photographer and process oriented when behind the lens. I try to know every feature / limitation of the camera and lens I am using and try to follow tried and true processes for different types of situations. I often create acronyms for the process I want to apply, so I am thinking carefully about the subject and what I want to convey. That frequently results in keeper photos that don’t require huge amounts of post processing.
2. My post processing is frequently scattered! I came from the film era, and while I am quite computer literate, I often find myself flailing at images that I think can be “salvaged” Most of the time, I think the best thing I could do with marginal images is discard them and sometimes I just don’t. My “process” is undisciplined. Like the author, I probably use too many tools (Lightroom, Topaz Adjust, Photoshop, Perfect Photo Suite) without a thorough understanding of when to use which tool (especially Topaz and Perfect Photo Suite, where I find many similar settings). I think Thomas would admit to some of the same issues.
So, what I would love to see is a list of well reviewed resources on how to develop both a better process and a better understanding of the tools / settings in a somewhat holistic way. For example, I frequently visit OnOne and Topaz’ web sites to watch tutorials. These certainly help in learning specific tools, but does little to improve my understanding of how to combine these tools with LR / PS or with other common tools. Having resources that put all this together would be welcome.
Hi sceptical1,
Thanks for the posting….and yes…I do relate to it very much indeed!
I am the first to admit my shortcomings in terms of my post processing approach. Currently I use four software products (DxO OpticsPro, CS6, Nik Suite and Topaz)…but perhaps in a little more focused way than you describe. For example I only use Topaz when I am working on ‘photo art’.
Like many folks my plan is to be less scattered and to have a more structured approach. This means moving towards something more integrated so it will not only be faster…but will also enable me to improve the quality of my output.
My choice will be different than the vast majority of folks who frequent Photography Life. It may even be viewed as ‘heresy’ by Adobe zealots….as I am planning on “going over to the dark side”….ooooooooooo……by using the DxO suite of software as my platform…..did you hear the blood-curdling scream in the background?
All kidding aside…I have two programs now…DxO OpticsPro (8 and 9)and Viewpoint 2 which I really like. As a raw processor OpticsPro is simply wonderful and Viewpoint 2 is easy and quick to use.
I certainly value self-development and I have been spending quite a bit of time online with the DxO tutorials improving my understanding and skills using the two products I currently have. I will be adding the other DxO products in the new year…or perhaps at the Vistek event in Toronto in October if they have any good ‘deals’ on them.
All of this means that I may have a very simple answer when readers at Photography Life ask me how I process my files….I can put on my black cape and peer out from under it saying…..”I’m on the dark side…you don’t really want to know…arrggghhhhh!”
Tom
Hi Tom,
I have to admit, I find LR so useful for managing images that it would be hard for me to do without it :) My photo management is very well refined, unlike my PP.
That said, I purchased Perfect Photo Suite in the hope that it would provide enough layer goodness for me to not have to join the Adobe cloud. I don’t like the model and feel its the wrong direction for me.
Regardless, I have to do something about my PP! Too much of the time I don’t entirely understand what the tools do, except in LR. I know LR very well and know what things do, but when I want to go beyond that, I am frequently in “no mans land” Despite using PS for a long time, I am still not an expert, which is bad on me.
I have subscribed to Lynda.com in hopes of becoming more proficient, but it really hasn’t helped. Maybe I will try a more photography centric site to get more insight.
Lastly, this is clearly NOT about tools. Your desire to move beyond Adobe doesn’t change the need for an easily repeatable creative process. I will eventually get there, but I need to focus on it the same way that I focus on learning my cameras / lenses / lighting. I emphasize one at the expense of the other. I need to emphasize both because while I don’t think they are equally important, they are equally necessary.
Despite the can of worms this opened, don’t get discouraged – it did lead to some constructive comments and learning, and for that I thank you.
Hi sceptical1,
Thanks for your comments. And don’t worry…I am far too busy to get discouraged about anything!
To add to your posting….
I don’t use any programs like Lightroom for image storage. My filing system is all client based on a Microsoft platform and it integrates everything that I may potentially do for a client…keeping in mind that my client services extend well beyond just photography and video production. My filing system needs to handle image and video files, as well as the complete range of Office files like Word, Excel and PowerPoint. I find one, client-based filing system works extremely well for me. Using any piece of photo software to store images separately would be totally counterproductive.
All of my work is for industrial and corporate clients, mostly business-to-business oriented so my work is extremely focused. I don’t do any consumer-type work…no weddings, school photos, family portraits etc. I understand from other photographers that this type of assignments often results in large volumes of images being taken for client review. Avoiding this type of work like the plague is one of the reasons I don’t need, or do, any batch processing.
We mainly use our in-house studio to support our own poster business (safety, wellness, respectful workplace, motivational etc.). Much of the other photography work I do feeds sales of our own prints….mainly landscape but increasingly also photo art. To this end we have full in-house print production capability including a large format 24″ 12-colour printer and laminator.
I mention all of this because it all leads down to the type of image processing that I do currently. Since I am only ever interested in one specific file for a poster or print, or a few selected images for a client assignment the notion of needing an efficient batch system style of processing to crank through hundreds of images efficiently is completely foreign to me.
I suppose the logical question is…”Then why bother changing what you’re doing now?” The answer is the future. We will need to be much more organized and efficient in the future in order for us to meet our business goals of dramatically expanding the revenue generating potential of our YouTube channel, growing our poster and print sales, pursuing additional book publishing opportunities, and potentially producing our own series of DVDs…all of those initiatives will be fed by our own photography.
So, I know all of my ‘mucking about’ in post processing needs to end and be transformed into a sleek, efficient process to handle our future needs.
Why DxO?
My decision to move towards DxO products is really based on my assessment of the strategic advantage that DxO has as a company and where it will be positioned in the future. With thousands and thousands of proprietary profiles of camera sensors and lenses that their labs have been developing for many years DxO has a significant, sustainable, competitive advantage that it is only starting to leverage as a company. That competitive advantage is not yet well understood in the marketplace. DxO is beginning to develop highly customized software solutions that no other company will be able to do because those other companies don’t have that data base of proprietary sensor and lens testing. I believe that DxO will be the pre-eminent platform of the future and as such is our choice moving forward.
Tom
Hi Tom,
Yeah, our businesses are really different. I do a few assignments and maintain a wildlife stock portfolio, but mainly I do pet photography. I do lots of batch processing. LR, for better or worse, is at the center of that management.
Despite these differences, I can’t really afford to have a disorganized PP system either. I have to get better to get more done and get more consistent results.
I think what you are saying about DxO is quite interesting. I do know that a large number of pro’s swear by them for RAW processing. I will look into it and see if it might offer a better platform for post processing.
Hi sceptical1,
It is likely premature to look at DxO for all your post processing needs right now. I talked to their head trainer very extensively at a photographers’ event in the spring and there are some significant enhancements coming down the pipe with OpticsPro….spot adjustment being one of them. If what their trainer talked about to me comes to life with OpticsPro ’10’ then the software could move beyond being viewed as just an excellent RAW processor by pros.
Tom
Comment partially edited by moderator.
My advice…is to use Lightroom exclusively just for a while.
The one advantage it has over most of the stand alone programmes is that it does give the photographer a complete workflow to follow from RAW file to final output in one completely integrated package. It has its faults too (e.g. not much control over sharpening) but overall is very good.
Once you have a grip on that and the concept of always following a structured workflow, you will find dipping into other software from time to time to take advantage of some specific feature, easier and less likely to cause confusion.
That seems like pretty sound advice It would certainly simplify things and then I could spend time to precisely define where the other tools can assist.
Hj Chris,
I have read nearly all the comments including 192.
Comment partially edited by moderator
My preference would be that they not comment at all unless it is constructive
Hi Tom. As a matter of curiosity, could send me a link to the RAW file please?
Thanks – Chris.
Hello Chris,
I would be pleased to provide you with a link so you can get a copy of the RAW file. Nasim and I are in the process of getting it loaded and ready. Given recent events on here I am not making it available ‘willy-nilly’. If you would like to send me an email….I would be pleased to provide you with the appropriate link when it is available.
You can find my email address on my website which you can find by clicking on my name at the top of this article.
Tom
Comment partially edited by moderator
this picture was taken as part of a review of the Tamron 150-600mm lens. This is not a professional lens. I am sure that the initial result would have been much better with the setup (or many other setups) that you suggested. No kidding. Second, Thomas wasn’t suggesting the initial image was high quality. This was an attempt to salvage a fair image to make it into something acceptable. In that I think he succeeded. Third, Thomas did not present himself as an expert on PP (just the opposite) or suggest that his process was in any way refined.
I think this was meant as both a discussion starter and to show what could be done, not as some process to be followed. Further, he did not recommend specific tools. I would not have used the same tools (I don’t have Nik or DXoMark Pro tools) but that does nothing to take away from what he was trying to do.
I’ve read both the article and all of the comments (to date).
I believe Tom to be a passionate photographer and one who takes great pride in sharing and helping.
I believe Mark and Betty’s initial comments in regards to workflow and tools to be constructive and have merit.
In the end it matters only that you, as an artist, can arrive at a place where you are pleased with the result. The sole purpose of the tools (and knowing how to best use the tools), is to empower you to do so.
Stephen
Dear Tom,
Was trying to find a good way of shooting the moon and somehow got stucked here :) thanks to the prolonged “discussion” above. Hahaha.
Anyway, indeed I found your workflow is a bit too complicated due to the number of softwares being used. Having said that, I do believe that noone should be attacked for trying to share what he or she believes as good-no matter how random it might look to others. After all, that is exactly what learning and sharing is all about: the guts to express. In this case, surely, expressing your workflow.
Personally, I have my own workflow, which I believe is much simpler yet powerful but at any rate it does not give me any right to say nasty things about you at all. In fact, it does not give anyone any right to do so because that very action will surely hurt the learning and sharing process being nurtured here. Let us try to avoid that.
When we see people do things not in the way we believe it should, why don’t we just simply offer a direct solution instead of making such a bottomless fuss about it? Instead of helping other readers, those nasty, degrading comments will just prevent people from trying to learn and to share. This, I believe, is not good at all.
Therefore, by all means, the next time we encounter something which we believe should or could have been done in a better way, do state it or better yet, do prove it.
As for Tom, thanks for being so polite and humble. Can’t really tell what I would have done had I been in your position. Lol. That attitude of yours really should serve as an example for those who are thinking and acting as if they are the smartest individuals on earth. God have mercy.
Anyway, have officially bookmarked this site for my own learning purpose. Hope to learn a lot here.
From Indonesia, with love.
Erdhy
Hi Erdhy,
Thank you very much for your comment….I appreciate the sentiments.
I would be the first to admit that my processing approach on those particular shots is quite complicated, and can certainly appear disjointed to others. I guess since I am used to what I do and how I do it…(and having a warped mind helps)…it takes me very little time…although it does involve many steps….but at the end of the day does give me the results I seek.
Part of the complicating issue I suppose for many Photography Life readers who read this article, and are used to using Lightroom is that I love DxOMark OpticsPro and I use it as my primary RAW processor. That particular software is missing some capabilities so I augment with other software…which currently causes some jumping around. I am currently using two pieces of DxOMark software…OpticsPro and ViewPoint 2. In the new year I will be adding the rest of the DxOMark products to my arsenal which will make my overall process much smoother and faster as it will all be integrated on the DxOMark platform.
Since I do not have that other DxoMark software yet I cannot comment whether it will allow me to completely transition away from Adobe products or not. I may still need CS6 to do the odd spot adjustment….other than that I may not need it for anything else. Spot adjustments are anticipated with the next version of OpticsPro so if, and when, that happens I will be able to fully transition away from Adobe. I also do not know at this point if the additional DxOMark software will also supplant my use of Topaz and Nik. It very well may.
Tom
Hallelujah! THIS is how normal, polite social human beings express their reservations about something they’ve read. Your eloquent choice of language, and the fact that you didn’t feel the need to qualify your opinion with “I’m a professional so I know what I’m talking about” made me want to read the rest of what you had to say. Thank you.
Mark, Betty, you both make compelling points and clearly know what you’re talking about, but, as with all facets of life and work, it’s about “rubbing people up the right way”. In the aftermath and smoking embers of this somewhat ugly quarrel, it seems to me that your initial adversarial tone was your only crime. The fact that something so small could escalate so quickly into such hostility is perhaps something for us all to ponder.
Thanks Thomas for the great image. Thanks also for reviewing so much affordable gear like the tamron 150-600mm and the sigma 150-500mm. I find that you are great at explaining things as you do not complicate them too much. Your reply to sharif’s article about challenging one’s self in which you took the zoo photos was great too. And so was the piece about photographing cormorants.
Hi Muhammad Omer,
You are most welcome! I’m very pleased that you have found a number of articles helpful. The team here at Photography Life tries the best we can to bring articles that (hopefully) will be of interest to readers and provide them with worthwhile information.
Tom