Digital photography has become extremely popular thanks to its accessibility and speed, but to get the best out of those photographs some time needs to be spent editing and tweaking them. Thankfully, plenty of applications are available for you to complete such tasks with, starting with moderate and user-friendly functionality of Google Picasa all the way up to most complex pieces of software, such as Adobe Photoshop (or simply PS). In fact, Photoshop is probably one of the most popular photo processing programs currently available. Most people that use it know but a few percent of its capabilities and are likely never to use all of it, myself included! Fewer people still understand that it has never been targeted squarely for photographic use (the way Adobe Lightroom is, for example), but rather all sorts of graphical editing. How much sense does it make to use such a complex and professional piece of software to edit simple family photographs? Not that much if you’re a simple enthusiast who just wants high quality photographs with minimal fuss. Thankfully, Adobe has something for you as well. Photoshop Elements (PSE in short) is a lighter, simpler, quicker version of its sibling. In essence, it offers all the functionality you’ll ever need to edit your JPG and even RAW images, but through user friendly tools and interface. In this Photoshop vs Photoshop Elements article, I will give you a quick tour of 11 capabilities of Photoshop Elements. Hopefully, this brief comparison will help you decide which one is better for your needs.
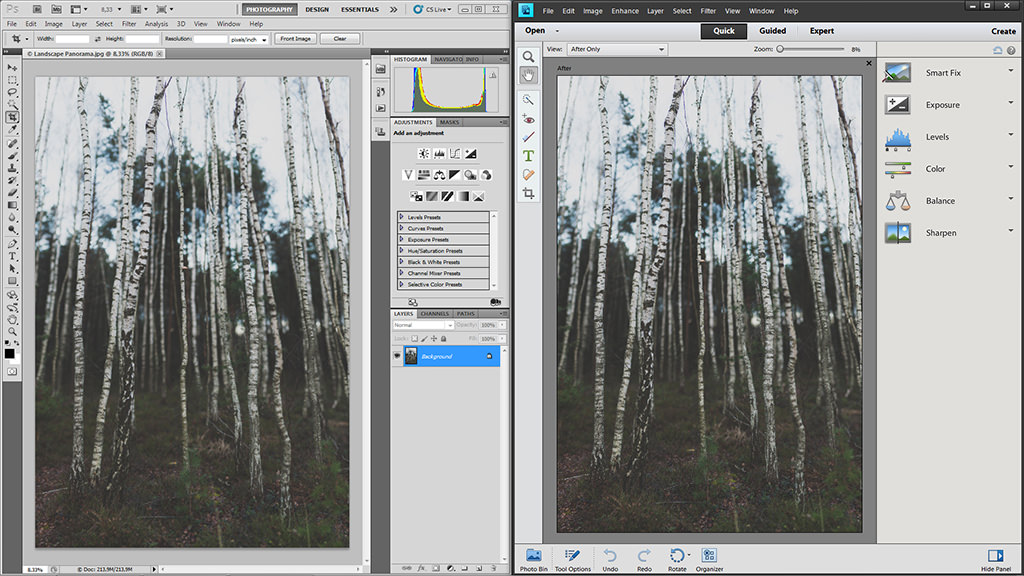
Table of Contents
What is Photoshop Elements?
As the name would suggest, Photoshop Elements is a close relative to the Photoshop CS, but unlike its bigger brother, it’s not targeted at professionals. Don’t get me wrong – Photoshop Elements 11 has a lot tricks up its sleeve, such as RAW support through Adobe Camera RAW plug-in. On one hand, anyone familiar with the regular, full-fledged Photoshop will find themselves right at home. But Elements doesn’t encourage you to use any serious tools manually – in fact, it aims to do most of the work for you with just a few clicks. So if you want your family images to pop and stand out with minimal fuss regardless what sort of gear you use, be it a DSLR, a mirrorless camera or a compact point-and-shoot, this may well be your answer. Luckily, being targeted at a very different audience means the price is also significantly lower. Adobe Photoshop CS6 retails for around $590, while the Extended edition costs a whopping $900. You should really consider whether you need all that functionality, because Photoshop Elements 11 will set you back a mere $60 (current price with instant savings).
Naturally, some Photoshop features are not available in PSE, for example Channel Mixer, which can be used for some advanced B&W conversions, or 16-bit and 32-bit image support. Actions are not present as well – they allow you to record a set of changes you make and then repeat them with a single click on another photograph. In turn, there are several features that Photoshop doesn’t have, such as built-in organizer (you’d use Bridge with Photoshop), various templates and social connectivity. PSE also features tons of automated tweaks, while Photoshop will require you to do everything by yourself. On one hand, it gives you fine control of every step. On the other hand. unless you spend a lot of time post-processing your photographs, doing it all by yourself can be difficult to learn. Both PS and PSE support plug-ins, which can greatly extend capabilities of both programs.
A side note: in this article I am providing screenshots of Photoshop CS5, which has been replaced with CS6. If you happen to already own CS6 or want to buy it, note that the user interface looks different on it compared to CS5 – Adobe decided to use a darker skin with the CS6, similar to how Photoshop Elements 11 looks. Sadly, I do not own the CS6 release. Either way, CS6 is still as complex in comparison and its core functionality is not very different from the older CS5.
User Interface Highlights
In this section, I will give a brief user interface comparison of the two pieces of software. Photoshop CS5 is most likely familiar to most of you, so let’s give that a quick tour first.
1) Photoshop CS5
Not being a professional photographer, you’ve decided to try and improve your family or vacation photographs – make them that bit more vivid and contrasty, perhaps. You go ahead and open them up in Photoshop. Straight away, there’s a problem – a screen with a lot of tools that can make your head spin. It may not be too hard to learn all that for a working pro, but it can be quite a challenge for a person who has never had any experience with graphics applications. Photoshop is an extremely powerful tool with a lot of built-in capabilities. It is practically limitless – more often than not you are likely to be restricted by your imagination and skill rather than the software, it’s that powerful. With the capabilities, however, comes complexity.
Once you open up an image, it gets wrapped with a set of menus and panels on three sides of the screen. A lot of things can be modified to suit user’s preference. Needless to say, there’s an abomination of tools. Some of the tools actually have other tools inside them! And, don’t get me wrong, it’s all great – the layers, the history, the masks, the effects, the left-side panel tools (the whole lot), the adjustment layers and whatnot. But if you’re not even remotely a serious photographer or a graphics designer and just want your family images to look better than they do out of the camera, well, let me put it this way – you’ll hardly find this software simple to use. Far from it. Everything comes with settings and adjustments to fine-tune the result, and different tools can be used in conjunction with one another in many different ways, most of which I do not know myself.
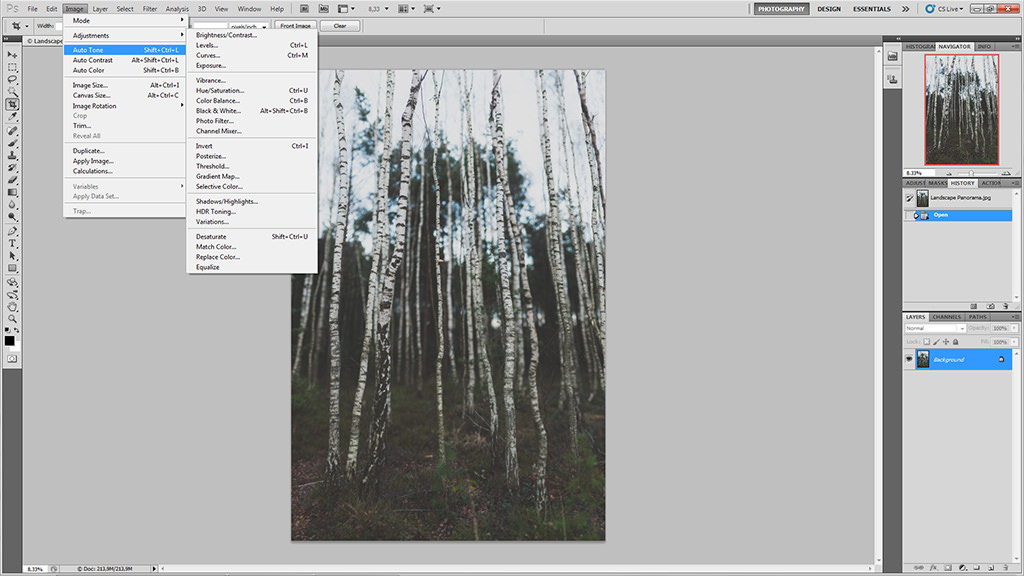
I won’t dive in too deep – there’s just too much to mention. But let me just say this. There are only a few “auto” options available, such as “Auto Tone”, “Auto Contrast” and “Auto Color” in the “Image” menu, and that’s really it. There’s no one-click red-eye removal (at least I’ve never come across it), for example. You use several extremely flexible tools and use them relying on your skills alone. In other words, while Photoshop doesn’t limit the skillful and what they can do, it doesn’t really help the novices either.
A bit of an overkill for family pictures, don’t you think?
2) Photoshop Elements 11
User interface is a different story with Photoshop Elements. While anyone familiar with regular Photoshop layout will probably feel right at home, new users will also find the controls more friendly and easy to understand, because of the three simple edit modes available. You’ll be choosing one over the other depending on your knowledge of tools and how much you want to edit your images. Let’s start with the simplest one and then discuss those intended for more advanced post-processing.
2.1) Quick Edit Mode
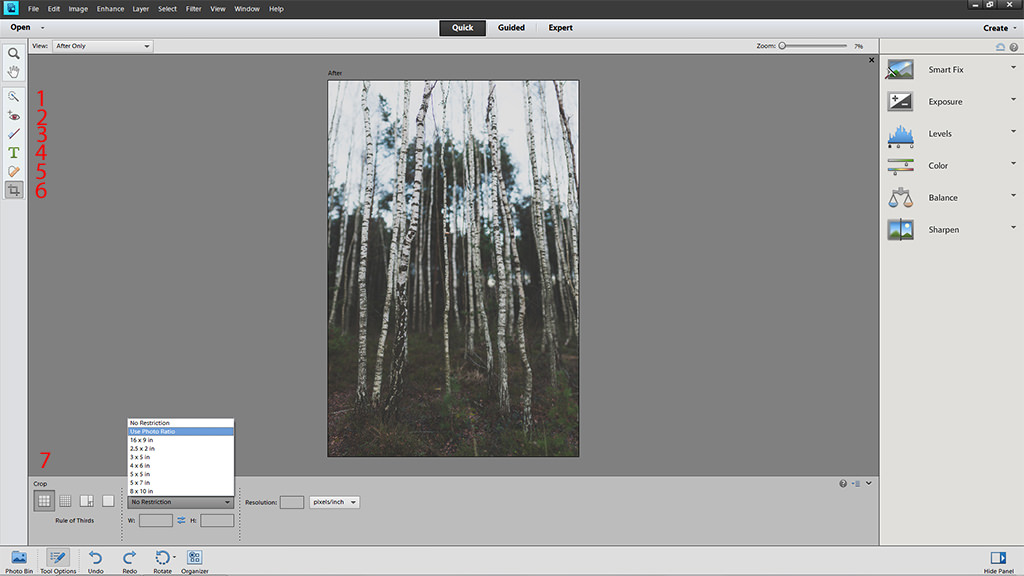
With only a few simple tools available, this is the simplest edit mode and can be used for quick, minor actions.
- On the left-side panel, you have the Quick Select tool, which you can use to select portions of the image that will be edited leaving the rest of your photograph intact.
- There’s also the Red Eye Removal tool that hardly needs introduction – you just select eyes of your subject and PSE will do the rest.
- It’s a similar situation with the Whiten Teeth tool, which you’d use to outline your subject’s teeth.
- Type tool is very straightforward – select the tool and just click wherever you want to put text.
- Spot Healing brush is there to help you remove skin imperfections, such as blemishes, or unwanted objects from your image. It’s not super-precise and can hardly be used for highly-detailed and complex object removal, but works very well for small objects with simple backgrounds.
- Finally, there’s the Crop tool. Strangely enough, for such a simple tool, I find it mildly annoying to use in Photoshop Elements Quick Edit mode. It’s quite difficult to select the whole image for cropping and continue from there (for example, if you want to crop while keeping the aspect ratio locked), because you have to start drawing your crop rectangle on the image itself (there is a workaround, though – read the next paragraph). Even more strangely, it acts completely differently – and much better – in Expert Edit mode, where it’s also available.
- All of these tools have specific settings available. The corresponding panel appears as soon as you select one of the tools. You will find it at the lower part of the window, right under your photograph. Being able to fine-tune your tools makes them much more flexible. For example, to bypass Crop tool limitations and crop by keeping original aspect ratio, select the tool and choose “Use Photo Ratio” from the drop-down menu of the middle section down in the settings panel.
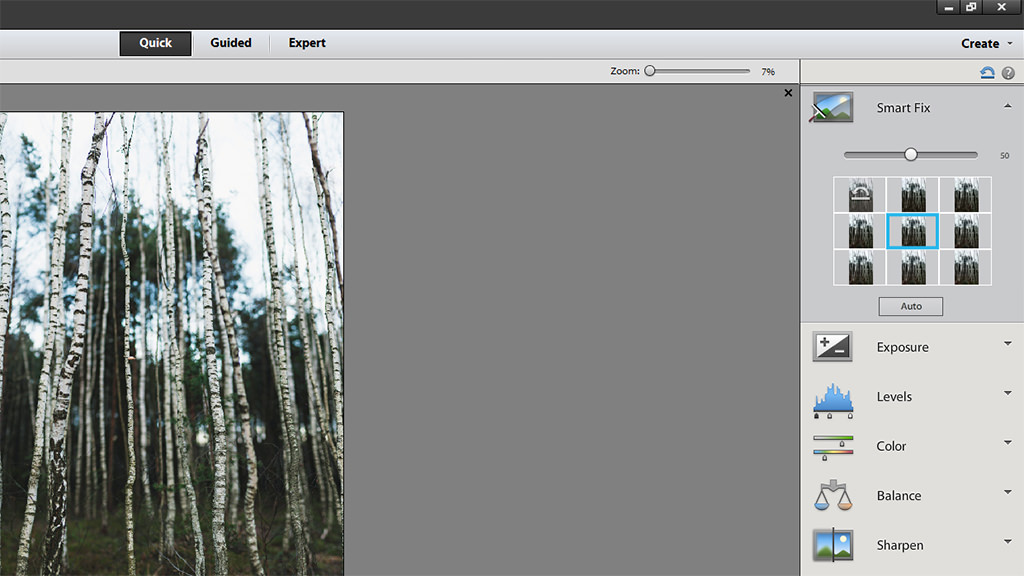
But that’s not all you can do in Quick Mode. There is a set of options on the right side of the screen, too. These are post-processing options and allow you to change contrast, color and lightness of your photograph among other things. Clicking on any will expand the menu and give you a slider along with several preset looks to choose from. Extremely user-friendly and intuitive, these options should prove simple to experiment with and get the result you want. Try it! The first option, Smart Fix, puts all the other options into one for those who just want their image to look good without spending time getting to know what each set of presets does.
2.2) Guided Edit Mode
Guided Edit mode is somewhat different to Quick Edit mode. It gets rid of all the left side panel tools except two basic ones (the Zoom and Hand tools) instead focusing on various corrections and effects. You can find “Touch Ups” and “Effect” on the right side of the screen. Selecting one will switch to a different panel where a set of options will appear to guide you through the process of fine-tuning Effects and Touch Ups. As you can see, there are many to choose from. Instead of covering all of them for you, I’ll just give a couple of examples (boring!) and let you learn the rest of them yourself (the fun part).
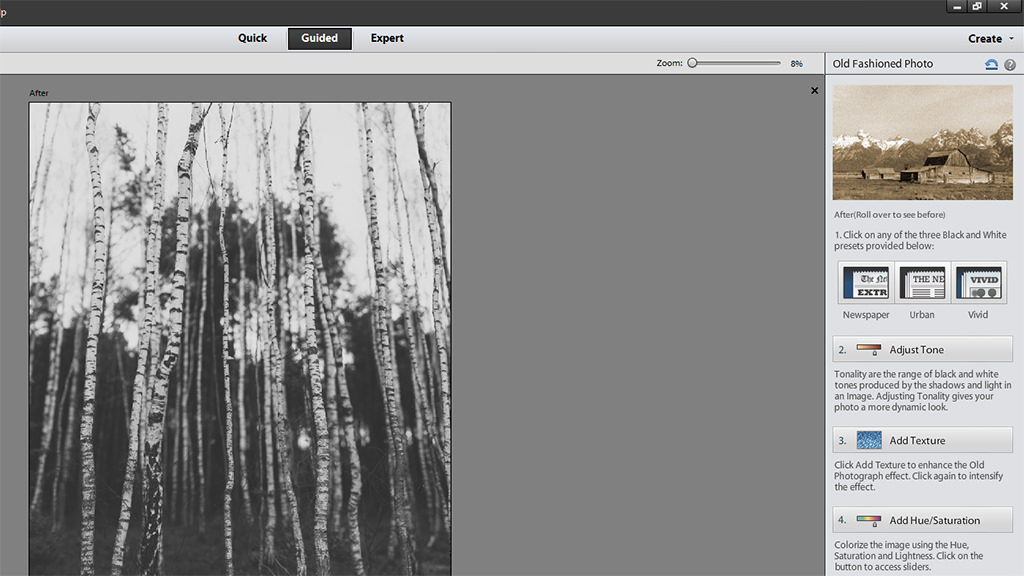
- Old Fashioned Photo effect allows you to convert your image into a vintage B&W or sepia photograph. Once you select the effect, a new panel will appear with 4 (or any of the 4) steps for you to take. The first step allows you to choose one of the three available conversion modes – “Newspaper”, “Urban” and “Vivid”. I chose “Urban” for our sample image, but suggest you try all of them for yourself and see which one fits you better depending on your photograph. The next step is “Adjust Tone”. Clicking on the setting will automatically adjust shadows and highlights of your image to make it more contrasty. The third step adds scratches and (mostly) digital grain to the image to help it appear old and of lesser technical quality. Click several times to intensify the effect. Strangely enough, although the first step allows you to convert your image to B&W, digital grain appears to be color. The only way to cancel out the random coloring is to take the last step – “Add Hue/Saturation”. This step will basically allow you to add a color cast to your image. You can cancel out any step by clicking on any of the previously taken again. Click “Done” to apply your steps and get back to previous panel.
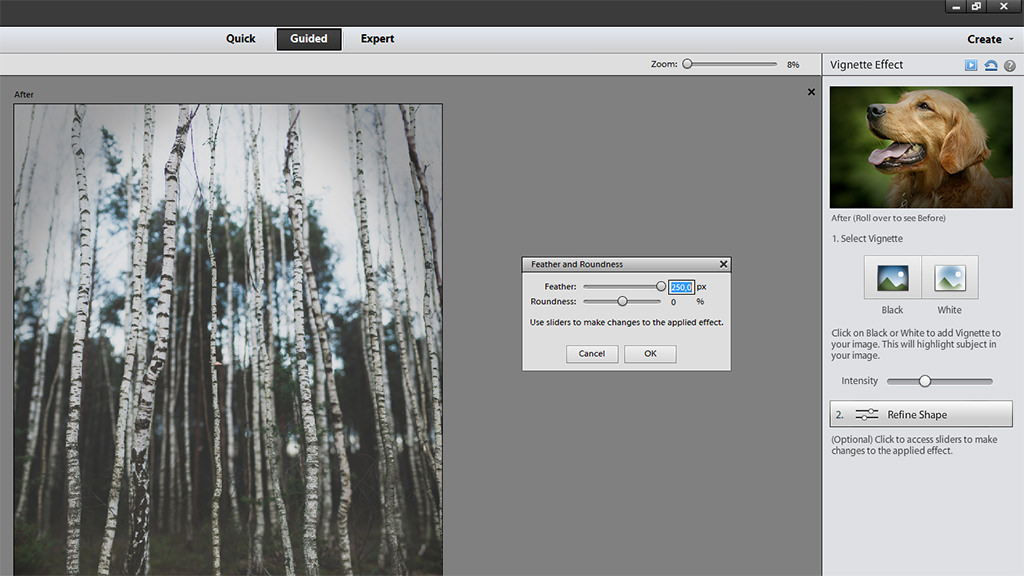
- Vignette effect is likely going to be one you’ll use rather often. Adding vignetting is a powerful way of guiding the viewers eye away from image borders towards your subject and is often used even by professional photographers. I, for one, choose not to remove natural lens vignetting from my images and more often than not don’t even see it as a shortcoming of a lens design at all. If you click the “Vignette” effect, two steps will be available for you. First of all, you must choose whether you want a black or white vignette. You ought to choose the black one almost always – white vignetting, in my opinion, very rarely suits any sort of photograph with the exception of, perhaps, high-key images (very bright photographs). Once you choose your vignette, you will notice it doesn’t look too good. Adjust the intensity slider to make it less prominent. Still not quite good enough? Don’t worry – that’s what the second step is for. It allows you to fine-tune your vignette and make it more subtle. Click “Refine Shape” and two sliders will appear, “Feather” and “Roundness”. I usually set Feather to its maximum value for smoothest transition and set Roundness depending on the image. The more times you click Refine Shape slider, the more subtle the vignetting will get, so use until you’re fully satisfied (especially the Feather slider).
2.3) Expert Edit Mode
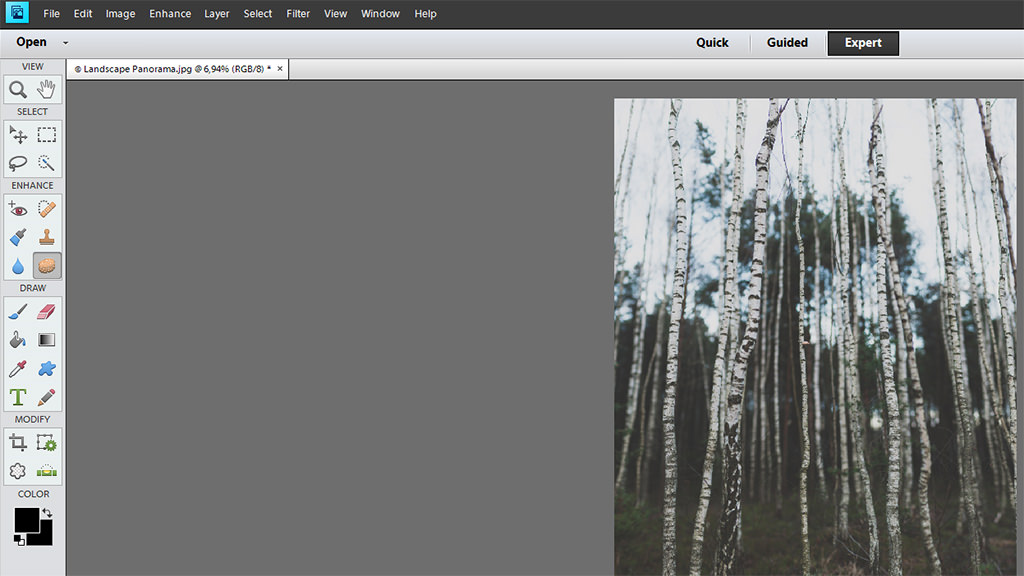
In this mode, Photoshop Elements allows you to take full control of your post-processing workflow. Gone are the effects replaced, instead, with a number of powerful tools on the left side of the screen. You’ll find some of them familiar if you’ve tried the “Quick Edit” mode (and more or less all of them will be known if you’re familiar with regular Photoshop tools), but many are new, like the “Lasso” and “Smart Brush”. These tools are divided into five categories – “View”, “Select”, “Enhance”, “Draw”, “Modify”. In addition, Color settings are available at the bottom of the tools panel. I won’t be covering these tools in more detail as, like the name suggests, “Expert Edit” mode is supposed to be used by photographers who know the basic uses of most popular tools, filters and settings. Suffice to say there’s a lot less guidance in this mode. It requires you to use a set of different adjustments to achieve previously accessible single-click actions. If you want to use this mode effectively but don’t yet know what all of the tools and adjustments are for, prepare to spend quite a bit of time learning and experimenting.
Which to Buy – Photoshop or Elements?
Before you decide where to put your hard earned money, you should go through the functionality of Adobe Photoshop, Photoshop Elements and Lightroom and decide what is important for your daily work. If all you need is basic photo editing, Lightroom is the way to go (see our Photoshop vs Lightroom article for more info). If you need more advanced editing and fine tuning of your images, whether it is working with multiple layers, adding text, advanced removal of unwanted objects or creating panoramas, Elements would nicely complement Lightroom. If you need advanced tools, availability of many great third party plugins and a slew of other functionality with practically limitless possibilities, Photoshop is the way to go instead of Elements.
If you are just starting out, we always recommend to start with Lightroom or Elements first, before even thinking about Photoshop. If you only have a few hundred images that you need to edit and store, Elements is plenty enough. But if you have thousands of images, Elements cannot stand a chance against the robust photo organizing / cataloging capabilities of Lightroom. So for most people that enjoy taking many pictures and have years of photos to sort through, Lightroom would make a lot of sense over Elements. For those situations, Lightroom should be the first choice. Once you are ready to explore the world of “destructive” advanced editing, give both Elements and Photoshop a try – both can be used as trial software for 30 days, which should be enough time for you to decide what you truly need.
If you happen to be considering purchasing the software, here are some links from our trusted reseller, B&H.
- Click here to purchase Adobe Photoshop Lightroom for $119.99 (includes a bunch of freebies).
- Click here to purchase Photoshop Elements 11 for $59 with instant rebate (regular price $81.99).
- Click here to purchase Photoshop CS6 (Windows) for $589.99 (get the Extended edition here for $899.95). Click here for Mac version (get the Mac Extended here).
Summary
Even though Photoshop Elements is a simplified version of full-fledged Photoshop, it’s still a very powerful piece of software and is likely to suit the needs of both beginners and aspiring amateurs. It combines user-friendly interface with a very large amount of tools available. Obviously, I was only able to cover a small portion of all that’s possible focusing on the simple and quick adjustments – we didn’t even get to Layers, let alone catalog-based Elements Organizer. But, hopefully, you found this article useful in your choice of Photoshop versus Photoshop Elements for your post-processing needs.
For a detailed list of differences between Adobe products, take a look at the Adobe Comparison Guide, which outlines most of the differences in functionality and features.
Can you do head swap in photoshop elements?
Any commercial products that are free to download, you are loading virus into your computer too. Just the dodgy name of the site you suggested is enough to send me running away.
Bought a PS element,after about three months messing with it, I managed to edit some pictures nicely. There are some features way more advance than aperture but will triple up your time as well, the result is a bit better but not worth the many extra time. I still can’t get pass image organizer in one screen and editing in another vs aperture, all in one screen. How do you save edited image in PSE? The images always come back flashing for editing more.
They have been providing excellent work in this field and that is the reason they are the preferred choice of people.
Please send your valuable reviews on serif x7 photoplus software…thanx..dr puneet
i LOVE your website so simple yet informative and written in plain language thank you!
Hi good article Thanks.. Do you have any info where I can learn how to make DVD labels. Actually how to select size, diameter etc I have Adobe CS6 Premier, Photo shop etc. I have not been able to find any.
Hi,
Good couple of articles comparing Adobe’s photo programs. I use PSE 11 to do B&W from RAW. Only hitch is I have to switch from 16 to 8-bit to go to B&W from colour and for further refinements.
How much work can Lightroom do in 16-bit?
Thanks
Eric
If you are a home user or hobbyist, save your money and go with Photoshop Elements. It has all the features of Photoshop that you are likely to ever need. However, if you are planning to enter the graphic design or photography business, you will need to know industry-standard Photoshop, which offers many more advanced tools and productivity enhancements over Photoshop Elements , and I do not recommend the photoshop cc, because as a designer , You wont want to pay for it every month in the rest of your life , it is better to get the photoshop cs6 extended on student-photoshop com ,it is cheaper and worth
Hello, I really enjoyed your article. I am wondering of Photo Shop elements will still allow me to add text to an image?