There are many reasons why Photoshop has so far managed to hold its ground as the undisputed king of the image processing world. One of the primary reasons is that it keeps evolving every year, as it has for thirty-one years. It stays up to date in two main ways. First, it improves upon existing features like selection and healing tools. And second, it keeps coming out with new features every year or two. One of the key new features this year – and also one of the most anticipated – is a sky replacement option. Let me demonstrate in this article how to use the new sky replacement feature and how effective it is.
Table of Contents
Sky Replacement
Despite all the hype around the sky replacement feature, I was skeptical about it initially. Through the years, I have come across many tools in Photoshop and other software that sounded great on paper but did not work as expected. Nevertheless, the sky replacement tool proved me wrong.
Replacing a sky might trigger an ethical debate. So I guess it is best to leave it to personal choice. In my opinion, replacing a sky that you did not see in the first place is unethical. But as always, photography is an art form, and no one gets to point fingers at an artist’s choices.
Also, contrary to what you might think, it is also possible to use the sky replacement feature without triggering an ethical debate. For example, there are many situations where I go for a different exposure and white balance setting for the sky compared to the foreground. Previously, it could have taken a long time with layer masks or blend if to get a seamless result. But with the sky replacement feature, it gets a lot easier and faster.
So, let me take you through a step-by-step process of replacing the sky effectively using Photoshop’s sky replacement option using the image below:

With the image opened in Photoshop, simply go to the top menu option “Edit > Sky Replacement” and a new window pops up, as you can see below:
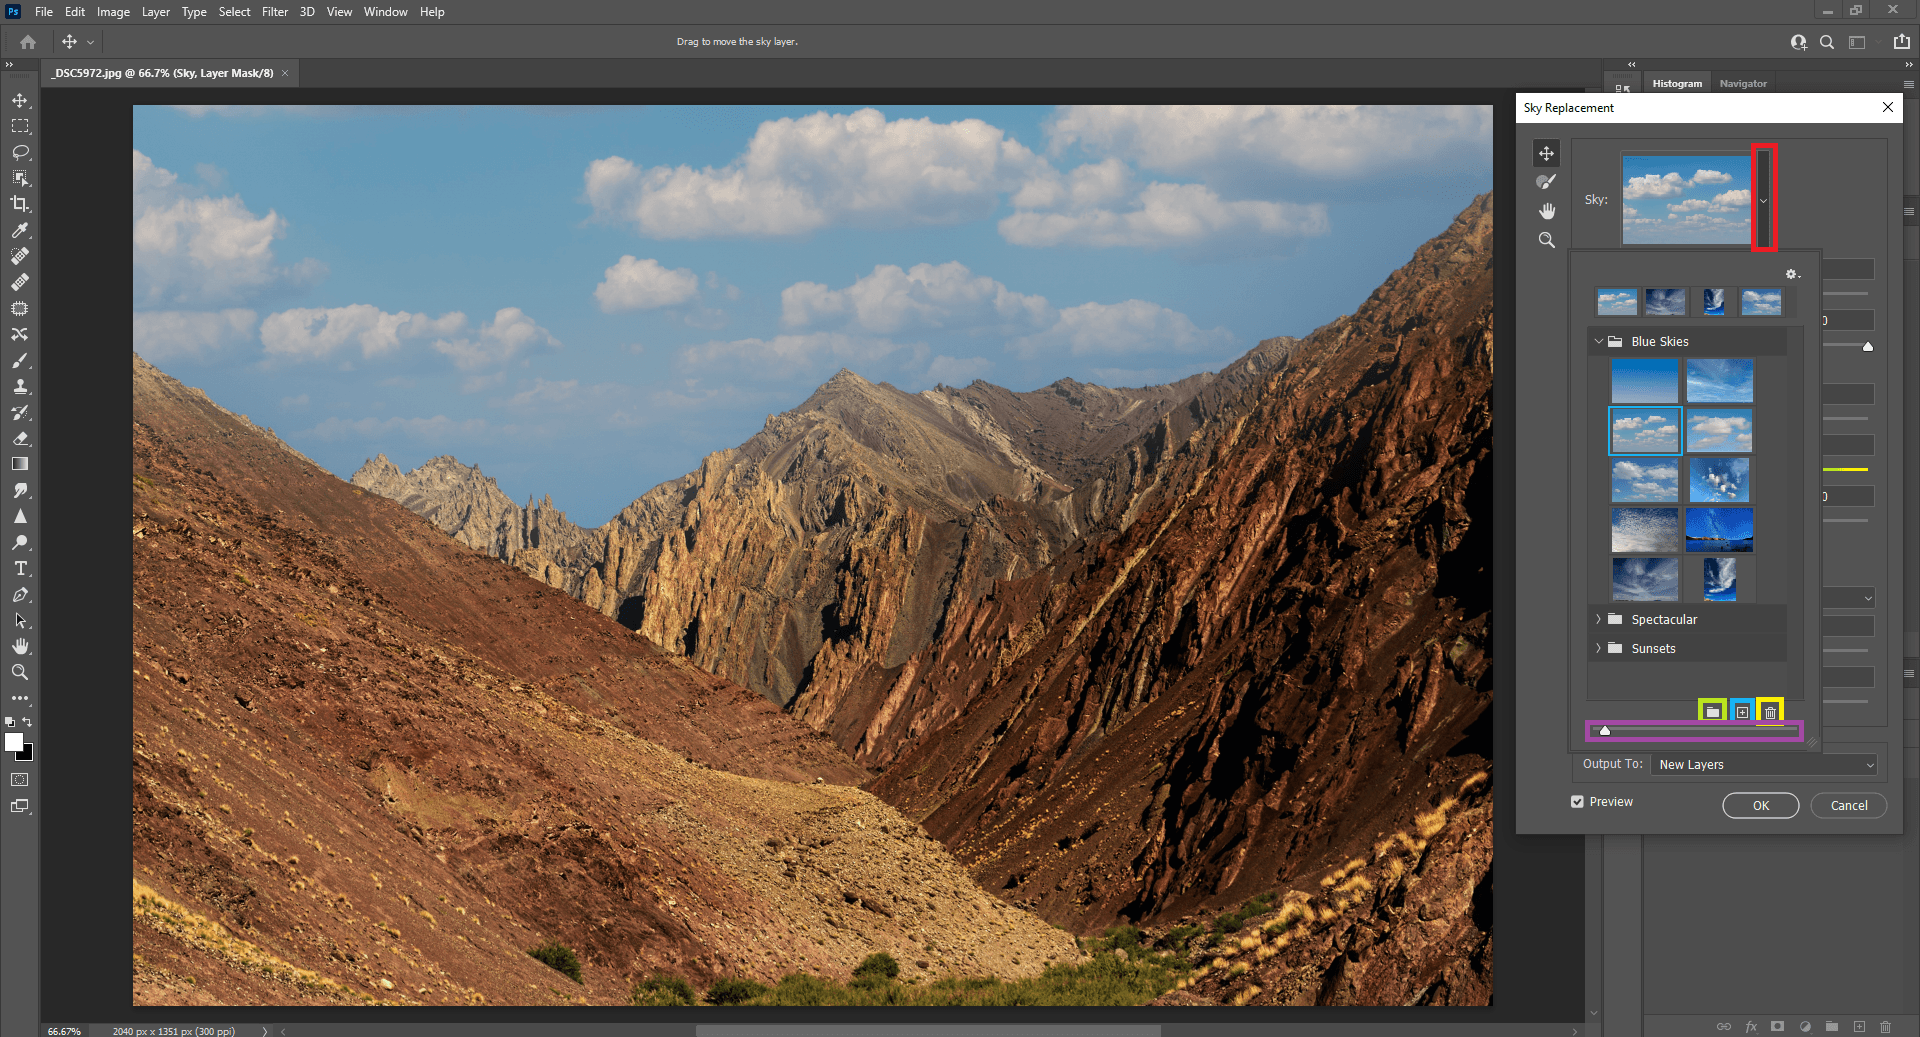
Sky Replacement Window
When you click on the dropdown option, Photoshop lets you choose a new sky for the image. There are three sources available for use as a new sky: a pre-installed sky in Photoshop, an image from your local hard drive, or an image from Adobe Stock if you’re subscribed to it.
You can also group the skies by type – as you can see in the image above, some of the defaults are “blue skies,” “spectacular,” and “sunsets.” You can create custom groups by clicking on the folder icon (shown in the image above with a lime green box around it). You can also add a sky from your hard drive with the browse icon (directly next to it, with a blue box around it in the image above). The trashcan icon that follows is to remove a sky from the list. And then the purple slider is just a basic way to change the size of the sky’s thumbnail preview.
The moment you click on a sky, you could see that the sky will be automatically applied to your selected image. The rendering is unbelievably seamless, and even adjusts the foreground colors to match the chosen sky. I have worked on manually blending composites before, and I know how long it can take to get a similar result to what you see below.
The sky replacement feature is AI-based but allows a good degree of customization. Let me take you through some of the most useful customizations one by one.
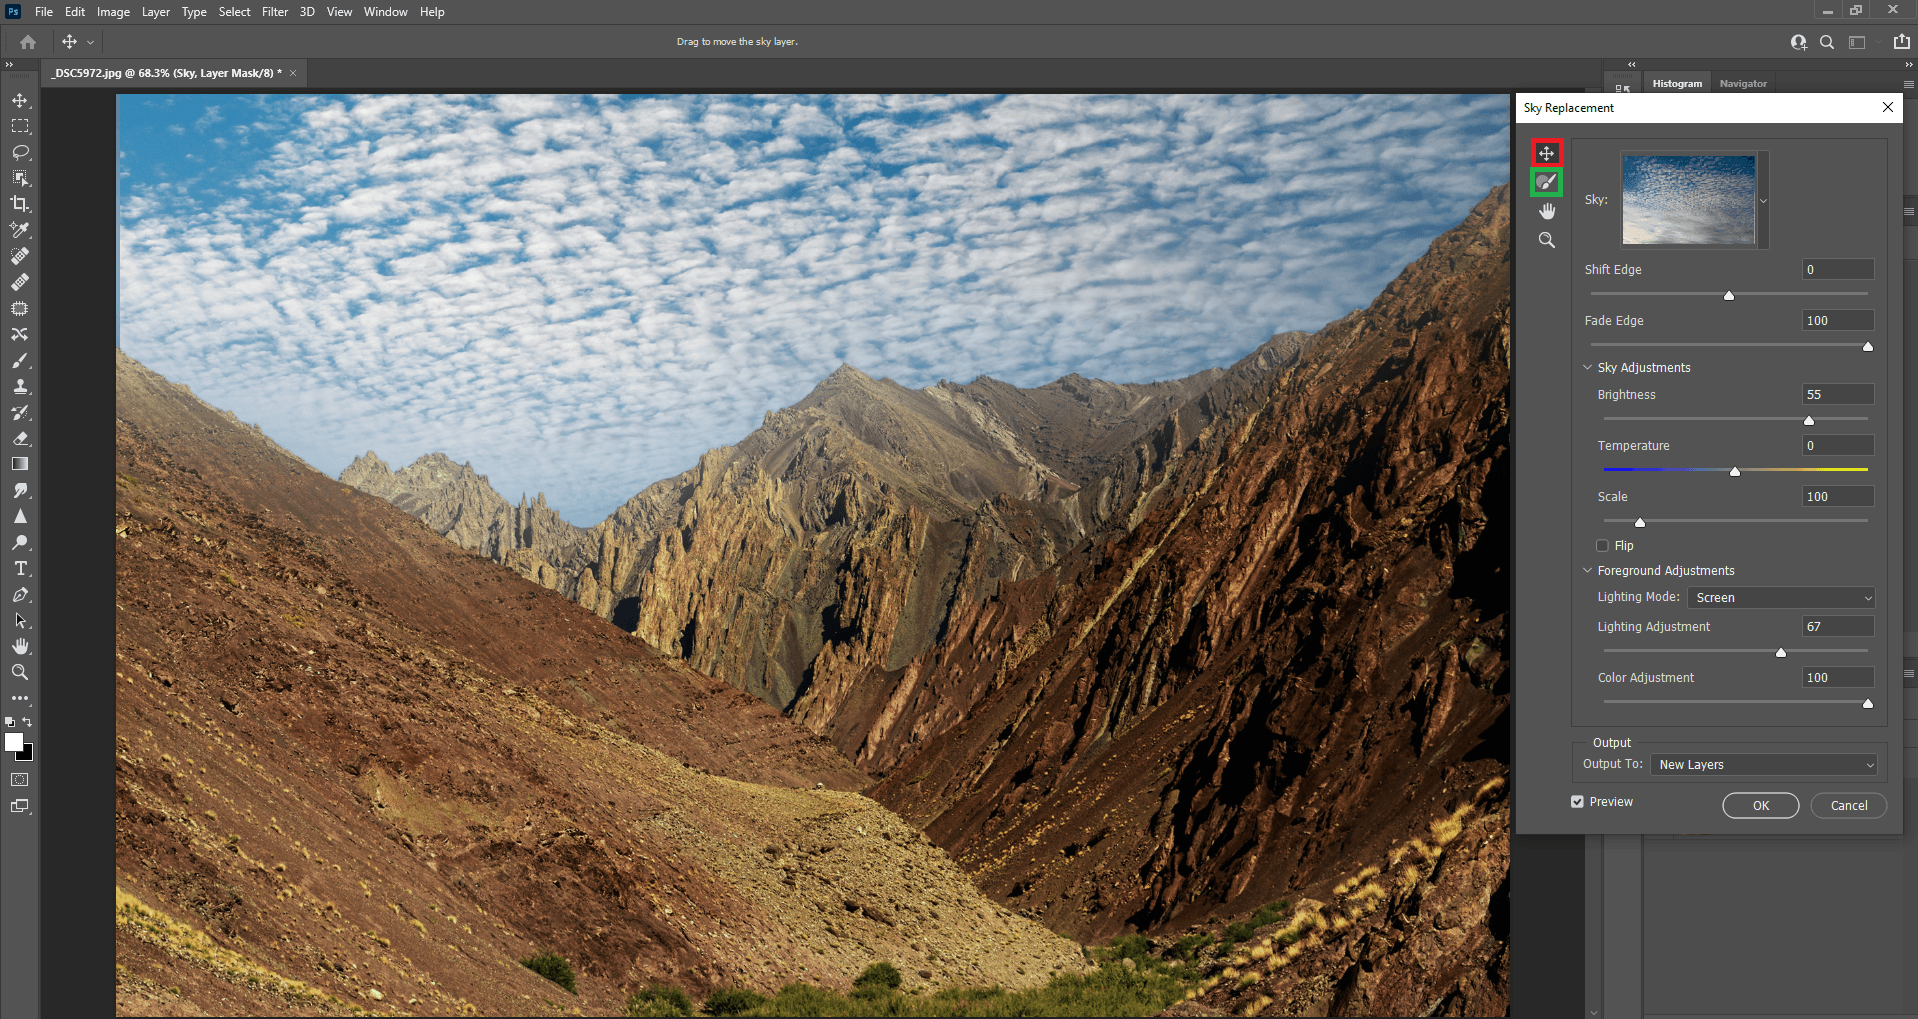
First, depending upon how much of your frame is filled with your foreground, you might want to reposition the sky to match the foreground. Make sure the “move” icon is clicked (marked red in the screenshot above). Then click on the sky and drag it to the position you prefer.
The sky replacement AI works by selecting and masking your foreground. It works great most of the time, but if you feel that the selection isn’t as it should be, you can use the sky brush option (marked green). After you’ve selected it, click/drag on any area of the sky you wish to add to the mask, or click/drag while pressing the Alt/Option button to remove from the mask. This will allow you to fine-tune Photoshop’s automatic foreground selection if it doesn’t look quite right.
Even if the blend looks seamless, always make a habit of zooming into 100% and looking at the edges. In some cases, there might be a halo around the extreme edges or part of the foreground that Photoshop missed, which is where the sky brush tool comes in handy.
Blending Foreground and Sky
Getting a seamless blend is the main challenge, as is true of most compositing in Photoshop. If done improperly, it will be pretty obvious to a trained eye that the sky is copy-pasted from elsewhere. That’s why Photoshop has foreground and sky customization options with a series of sliders.
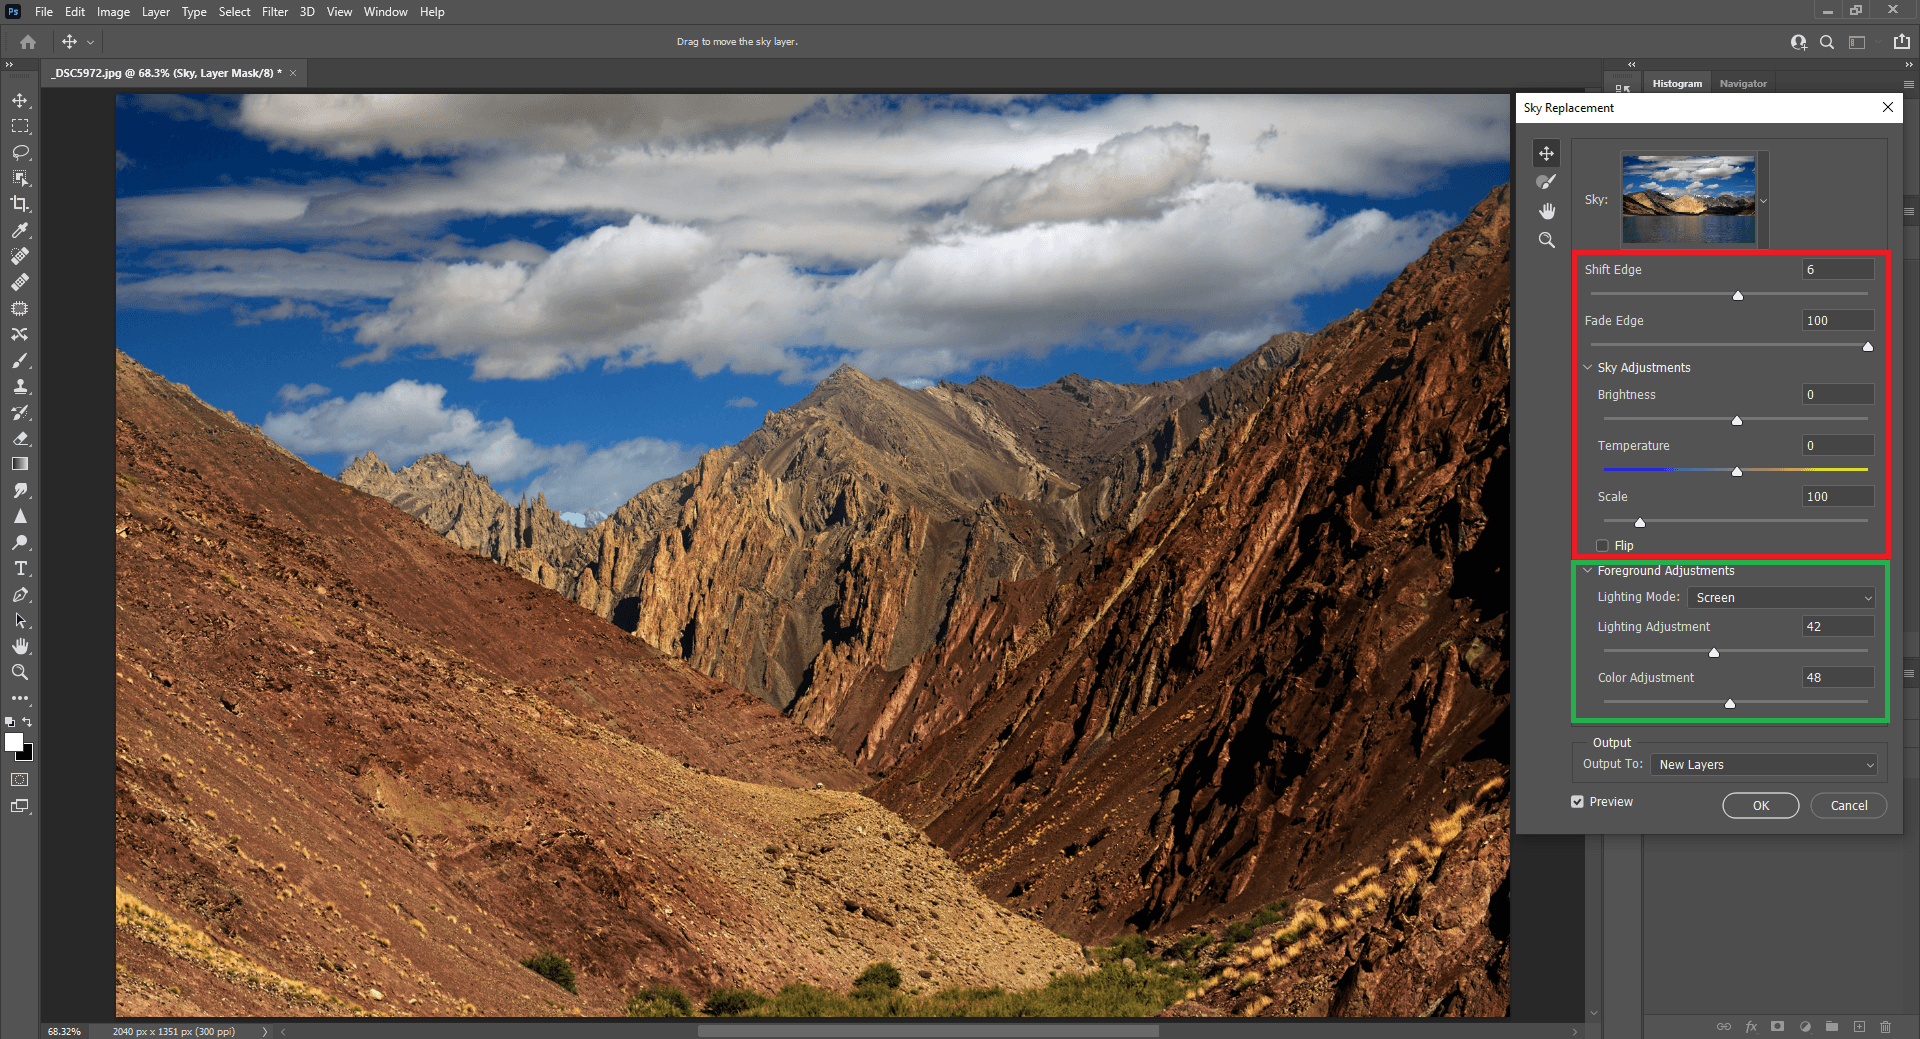
Most of the options are self-explanatory and can be optimized quickly with some trial and error. You can adjust the masking between the sky and foreground with the “shift edge” and “fade edge” sliders. You can adjust the tones in the sky with “brightness” and “temperature,” and how large it is with the “scale” slider (though going too high here will reduce the sky’s resolution). You can also flip the sky horizontally if you so choose.
And then the foreground adjustments are useful in cases where it is not possible to get a seamless appearance by adjusting the sky alone. The more different the conditions were between foreground and sky, the more editing you may need to do here.
These sliders are also pretty intuitive and easy to use in practice – just slide them until you like how the photo looks – but I will make a quick note about the “lighting mode” dropdown. It has only two options: Multiply and Screen. To put it simply, Multiply darkens the area where the foreground blends with the background, whereas Screen brightens the areas where the foreground and background overlap. The intensity by which the blend area needs to be brightened or darkened can be adjusted using the Lighting adjustment slider.
Your goal with the sky replacement tool should be to make the transition from sky to foreground look as seamless as possible. You can do further editing later to the hues and contrast of the image, so long as you’re starting from a good base.

Outputting the Sky Replacement
The last option shown is the Output tab. This gives us a couple options: “Duplicate Layer” and “New Layers.” If you select “Duplicate Layer,” Photoshop flattens all these edits into a single layer, which it places above the layer you’ve been working on. On the other hand, if you select “New Layers” instead, Photoshop outputs each component of the sky replacement as its own layer. For example, you may end up with a “Sky” layer, a “Foreground Lighting” layer, and a “Foreground Color” layer, all of which are automatically created by Photoshop.
While the end result looks the same regardless of which output you choose, it’s always best to go with the “New Layers” selection if possible, because it lets you go back and re-adjust any edits rather than baking them into one layer. However, it does increase the image’s file size if you don’t flatten the layers later.
Here is what your layers will look like in Photoshop if you’ve selected “New Layers” and clicked ok:
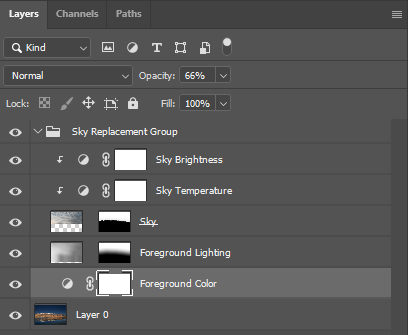
In the illustration above, notice how Photoshop has created individual layers for every slider in the Sky Adjustment and Foreground Adjustment tabs. You can edit the properties of each of these layers by double clicking on it, just like any other adjustment layer in Photoshop.
Here’s a diagram showing the original slider that created each layer (on the left) and the adjustment that opens when you double click the layer (on the right):
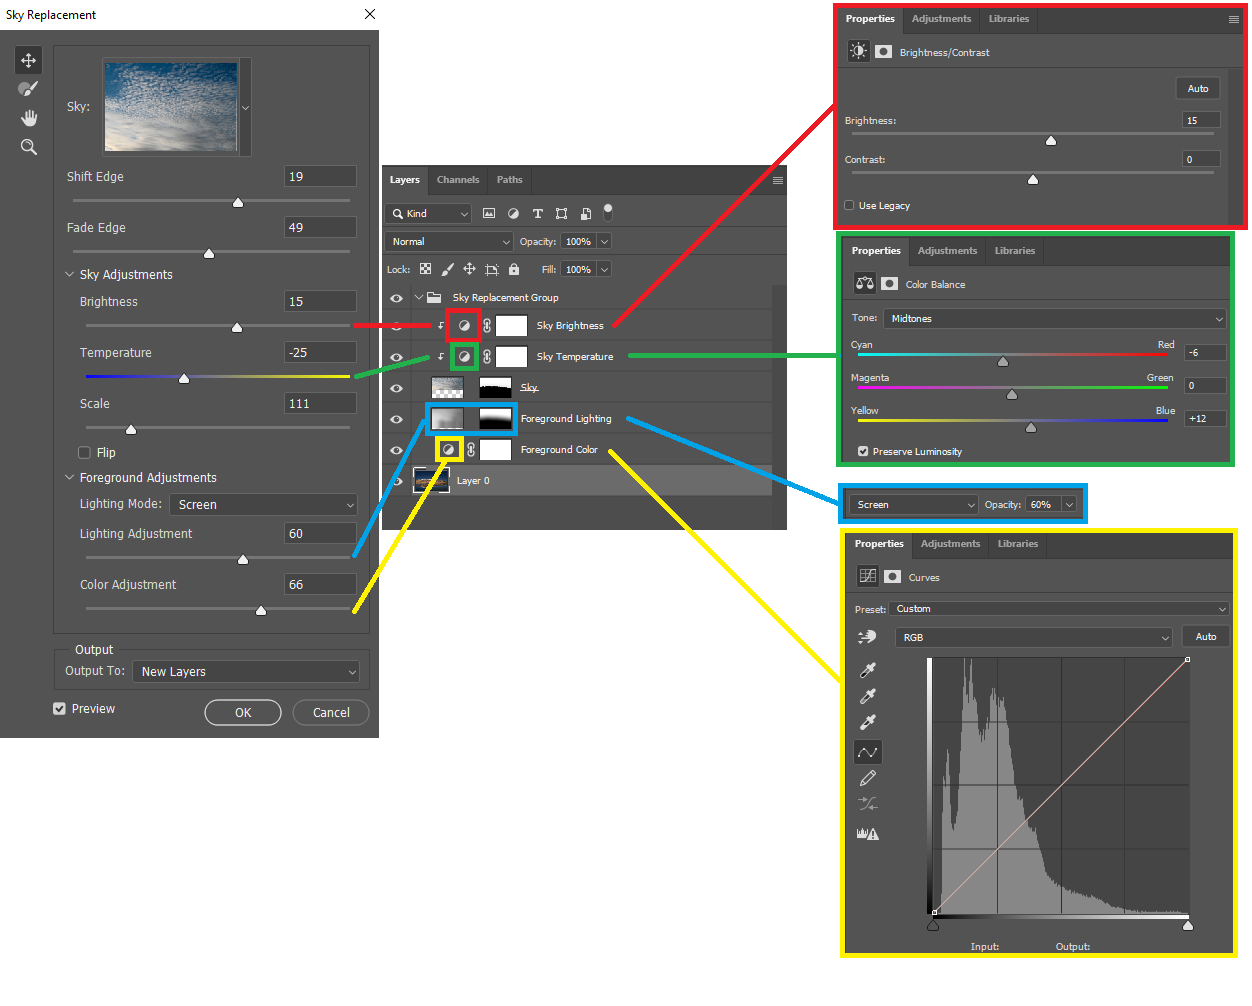
You can also change the masks that Photoshop created on layers like Foreground Lighting and Sky, should you so choose. And you can also change the opacity of each layer, or the whole group, in order to tone down any particular effect.
Conclusion
In this article, I have explained sky replacement, one of Photoshop’s most anticipated new features this year, including how to use it for the best results. I personally find it very useful. It might not be a one-click solution for all scenarios. But sure does make blending a lot easier, whether you’re after an easier method of blending an HDR or a full-on swapping the sky for a composite image. You may be surprised at how often it’s useful even for standard sky edits, so don’t avoid it just because you’re averse to full-on sky replacement.
If you have any questions about how this tool in Photoshop works, let me know in the comments below. Happy clicking and blending!
Sky replacement fails when the original sky has clouds in it. It works very well to take a blue sky and turn it into something else, but if you want to take a cloudy sky and turn it blue it simply does not work well. The clouds will still be visible. It should be called blue sky replacement. Luminar AI sky replacement has the same issue.
Nasim! I do apologize for accusing you to remove my 2 comments!!! Shame on me!!! All the best!!!
Nasim, you removed my 2 comments? What are you afraid of?
If you use CS6 and want to easily replace a sky go for Anthropics/Landscape pro!! Easy to replace a sky and you can use pics of the sky you did make yourself. Dont worry about Adobe Photoshop at all. Cheers!!!
I can’t believe all these negative comments. If you don’t like sky replacements, don’t do them, but that doesn’t make you a better photographer than others. We use so many things that manipulate our photos these days! What is it that bothers you? Adding something that wasn’t there? Do you never do the opposite, i.e., remove a distracting element? How is that different? Do you never use any HDR techniques? How about taking a burst of shots to capture the one fame that you could not deliberately capture? The borders between what you are willing to accept or not are highly personal and fluid. If I look at a beautiful (to me) landscape, does it suddenly become less beautiful if I find out that the sky was replaced? That a shrub or a rock was removed because it was distracting? If you are a documentarian or such a purist that you cannot accept any change shoot JPEG and accept out-of-camera photos. If you do anything else, you are simply adapting the image to your taste, and to what extent you are willing to go is no more than a personal decision that doesn’t have any universal ethical value.
The Issue with sky replacement is losing trust in a photo. I’m going to stop posting great out of ordinary landscapes and sunset because people will tell me, hey! you never shot it that way, it’s fake you used Adobe’s new tool.
I’m reminded of a photo exhibit I attended about 15 years ago. The photographs exhibited were multi-exposures. The photographer stated in her artists statement that the images were made with film cameras and no digital manipulation was used. She wanted the viewer to know the image had been made by her – not software. That what is in the photograph was actually in front of the camera lens, not brought in from an outside source. It occurs to me here that these sky replacement images should be labeled digital collages.
A few years ago I took a sunrise during what I learned was the Sahara Dust Effect over the Upper Niagara River, one of the most spectacular sunrises I had ever seen. I planned the shot meticulously and followed the plan to a T. The image came out better than expected, I must say I was more than pleased. In the photograph was a private dock with two chairs, because of this I thought I should contact the dock owner before I did anything with the photo and I did just that. The dock owners absolutely fell in love with the photo and wanted a 30 x 20 copy done but then something happened, the husband asked if the image was photo shopped. I was very upset but said nothing, calmly put the sample 20 x 16 back into the shipping box, put it in the back of my vehicle and drove away. I refused to sell that image and still have it. The moral of the story …. that is what image tampering has done to photography, nobody trusts what they see anymore.
Reg Pelletier
Niagara Falls Ontario
Canada
Dear readers of Photography Life,
We have never promoted techniques like sky replacement, and never will. It is simply a tool that we showed how to use in this article, but our whole team (including Madhu) never utilizes this technique in any of the images we showcase at Photography Life. If we write about a technique in any article, it is simply to showcase the possibilities of the software. Whether one chooses to use the technique – we leave that up to each individual.
My personal stance on sky replacement: it takes away the pleasure of doing photography. I love chasing light, and sometimes I spend days in the same location to get the ideal light. If I can simply replace the sky in any of my photos, why even bother?
As I mature in life and my photography, I realize that I actually want to go the opposite way and tone down on post-processing. Photography today is more accessible than ever, and the automation tools we have can do pretty much anything. I wrote about this in several of my articles on smartphones and the future of photography – all this is inevitable. But for many of us, these trends in AI, object replacement, fake bokeh, etc aren’t going to affect our photography and techniques we utilize in the field, as we don’t do it to get the “ultimate” result that we could post on Instagram to get instant fame. I’m off social media completely, and I’m happier than ever. Spencer is the same way. Heck, he is having a boatload of fun with his medium format film camera, and the guy is crazy enough to get into large format film photography – something I never had the guts to do. So if you are into this kind of stuff, expect some really cool articles coming your way! And no, he won’t be replacing the sky in his film photos 😂
Well said Nasim,the main pleasure I get from my photography is capturing what I see, you can’t get the perfect sky every time but it just increases the pleasure from your work when you do
Thanks for the clarification Nasim.
When I decided to write the article, I knew that it would trigger a debate. In fact, remember being in a dilemma on whether to write it or not. The primary reason for the dilemma was, how would I write on something I don’t intend to use? In fact, I initially had a thought to write the top 5 new features in Photoshop 2021. For an article titled so, I had to include the crazy AI-based filters, quick actions and libraries that the subscription comes with. I myself couldn’t stop laughing at how far the AI goes to ‘make life easy’ for us. If you are looking for an example, you can make a grumpy person smile with a single click.
As mentioned in the article, many photographers, including me, have been blending bracketed images manually for a long time that the AI does with a few clicks. This article did not cover the sky replacement tool alone. It was intended on given an understanding of how the AI does it so that anyone can choose to do it manually.
On the other hand, one should not forget that Photoshop is a tool primarily developed for graphics designers, and it still is so. Besides, they have to keep coming with updates to justify the subscription. Obviously, Adobe does not care about how ethical you are. They seek more subscriptions. How would they do it? By making things easier! They know that serious photographers would either do it manually or stay away from it altogether. They target people who seek to do the same thing with a single click. I am certain Instagram would have been an inspiration with all those crazy filters.
There is another point that I think is worth a mention. When a post-processing software ‘makes life easier’, there is so much criticism about it. But what about the tech mumbo jumbo that comes packed with modern camera bodies. Once I tried photographing wildlife with the Sony A7R IV and Sony’s 600mm f/4. I just had to turn into the Eye AF. Snap! The camera system did so much that I felt; why am I standing behind it? To press the focus button? I just compared that to one of my inspirations in photography, Mr Murugesan, who would carry a camera system mounted on a wooden tripod that weighs almost 20 Kgs and walk days together in the Himalayas to get a not-so-sharp image of a leopard or a monal. I ain’t supporting Adobe here. Why are we against it? It is primarily because our sense of self-righteousness pricks us that we are getting something that we didn’t put effort into. Most of the camera manufacturers are moving in a direction that is not too different from where Adobe is heading in.
To sum it up, I realize there have always been two types of people. The ones who enjoy the process of climbing a mountain and others who wanna reach the summit by any or all means, even if it involves a chopper drop.
In a highly acclaimed site like PhotographyLife, we authors need to address the needs of both and leave it to personal choice whether to use it or not. Our job starts and ends with writing about what’s out there.
Nasim! Great to ‘see you’ there at PL! Notwithstanding your comment on making a photos in the field please note not all photographers are made the same as you are!!! Some of the photographers treat taking a photo as the 1 st step in the process of making the final outcome where the camera, lens, computer, software are merely the tools to achieve the goal. I’d like you to have a look at the master of the master in photography field, Ryszard Horovitz who use his gears, software to create his MASTERPIECES known world wide here: www.ryszardhorowitz.com/analog.html
Or very beautiful portraits made by Forough Yavari, here: www.foroughyavari.com/
Both R. Horovitz and F. Yavari use cameras, lenses, computers, software to achieve final FANTASTIC outcomes called ART!!! Both of them got recognition world wide and this fact cannot be denied by ‘purists’ who spent month in the field chasing the ‘perfect’ sky, or ligthing!
I hope you will keep my comments on this page to show your readers, that photography, at least for some, is not chasing the light, perfect lighting, sky in the field but in ….. the ‘studio’ where all world masterpieces are being made by a very talented ARTISTS.
Cheers,
Waldemar
Peter Dombrovskis, an Australian photographer, one of few recognized best landscape photographer in the World, used to chase ‘ideal light’ and paid big prize dying in the field!!!
Ansell Adams great a photo, one of many, Moonrise over Hernandez New Mexico, has been made IN THE ….. DARKROOM FOR SOME ONE WEEK!!! One has to remember that GREAT PHOTOGRAPHERS, did do manipulate their great photos in the darkrooms and now great photographers do this in the computers. Simple like this…..
Oh, some great photographers at PL don’t, or are trying almost impossible, to make great photos in the field only for using Photoshop is a ….. SIN!!
Cheers from down under…..
Waldemar
This is a good tool for advertising, realty, and other marketing needs. I wouldn’t use it for landscape photography, but I’m sure it’s used in landscapes shown in ads and brochures. It’s a tool, not a one-size-fits-all.
Thanks, Madhu, for the tutorial!
I’m sure almost everyone tweaks their photos a little. It’s an interesting question how much can you tweak before you leave photography, stop recording the visual world, and enter some other graphic art that is no longer photography but usually pretends to be. I don’t know exactly where that line is but changing skies and taking objects out of photos crosses it for me. I’ve always thought that when people use photoshop it’s because they want to cross that line.
It’s clip-art (remember that) and not photography.
I look at it two ways, because I shoot two ways. I do a bunch of Real Estate photography, and agents and sellers love it when I can give them a blue sky, so I do a lot of replacements, and this tool speeds up the workflow.
For my personal work in landscapes, I stay away from it. Shooting under less than optimal conditions, at a place I may never return to, is something that stretches my ability and is a challenge. I may not get the shot I thought I was going to get. But I try to figure out how I can reframe what I have into something I may like more.