Most photographers are aware that layers are one of the most famous, even infamous, features in Photoshop. Layers form the very base of non-destructive editing in Photoshop, and almost all Photoshop workflows involve multiple layers. As a result, it’s important to understand how these layers can blend with each other using Photoshop’s blend modes.
This article will give you a basic understanding of blending and take you through the most useful blend modes. If you are new to Photoshop, please go through my beginner’s guide to Adobe Photoshop article before you proceed with this one.
Table of Contents
What Are Blend Modes?
In Photoshop, blend modes are options found in the “Layers” tab. They define how a given layer blends with the layers below it. Take a look at the picture below:
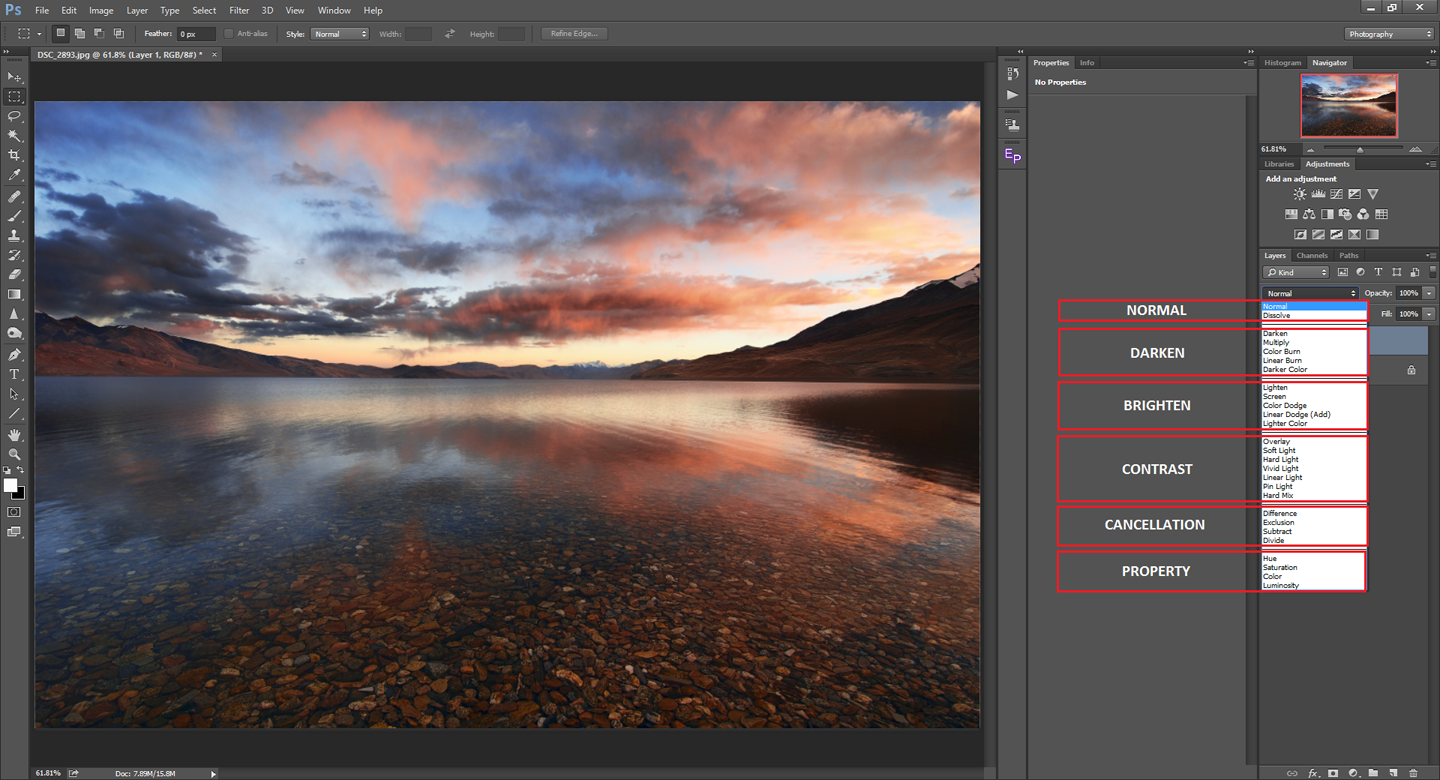
As you can see in the screenshot above, Photoshop has a total of 27 blend modes in 6 groups. The name of the groups already give you an idea of what they do. Although there are 27 in total, most of us would find only a few useful in most of the scenarios. There are a few blend modes that I have neither used nor have seen anyone use, and this article only covers the dozen or so blend modes that I find the most useful.
Opacity and Fill
Before we venture into the blend modes specifically, you should understand two other tools within the same Layers panel in Photoshop: opacity and fill. Take a look at the image below:
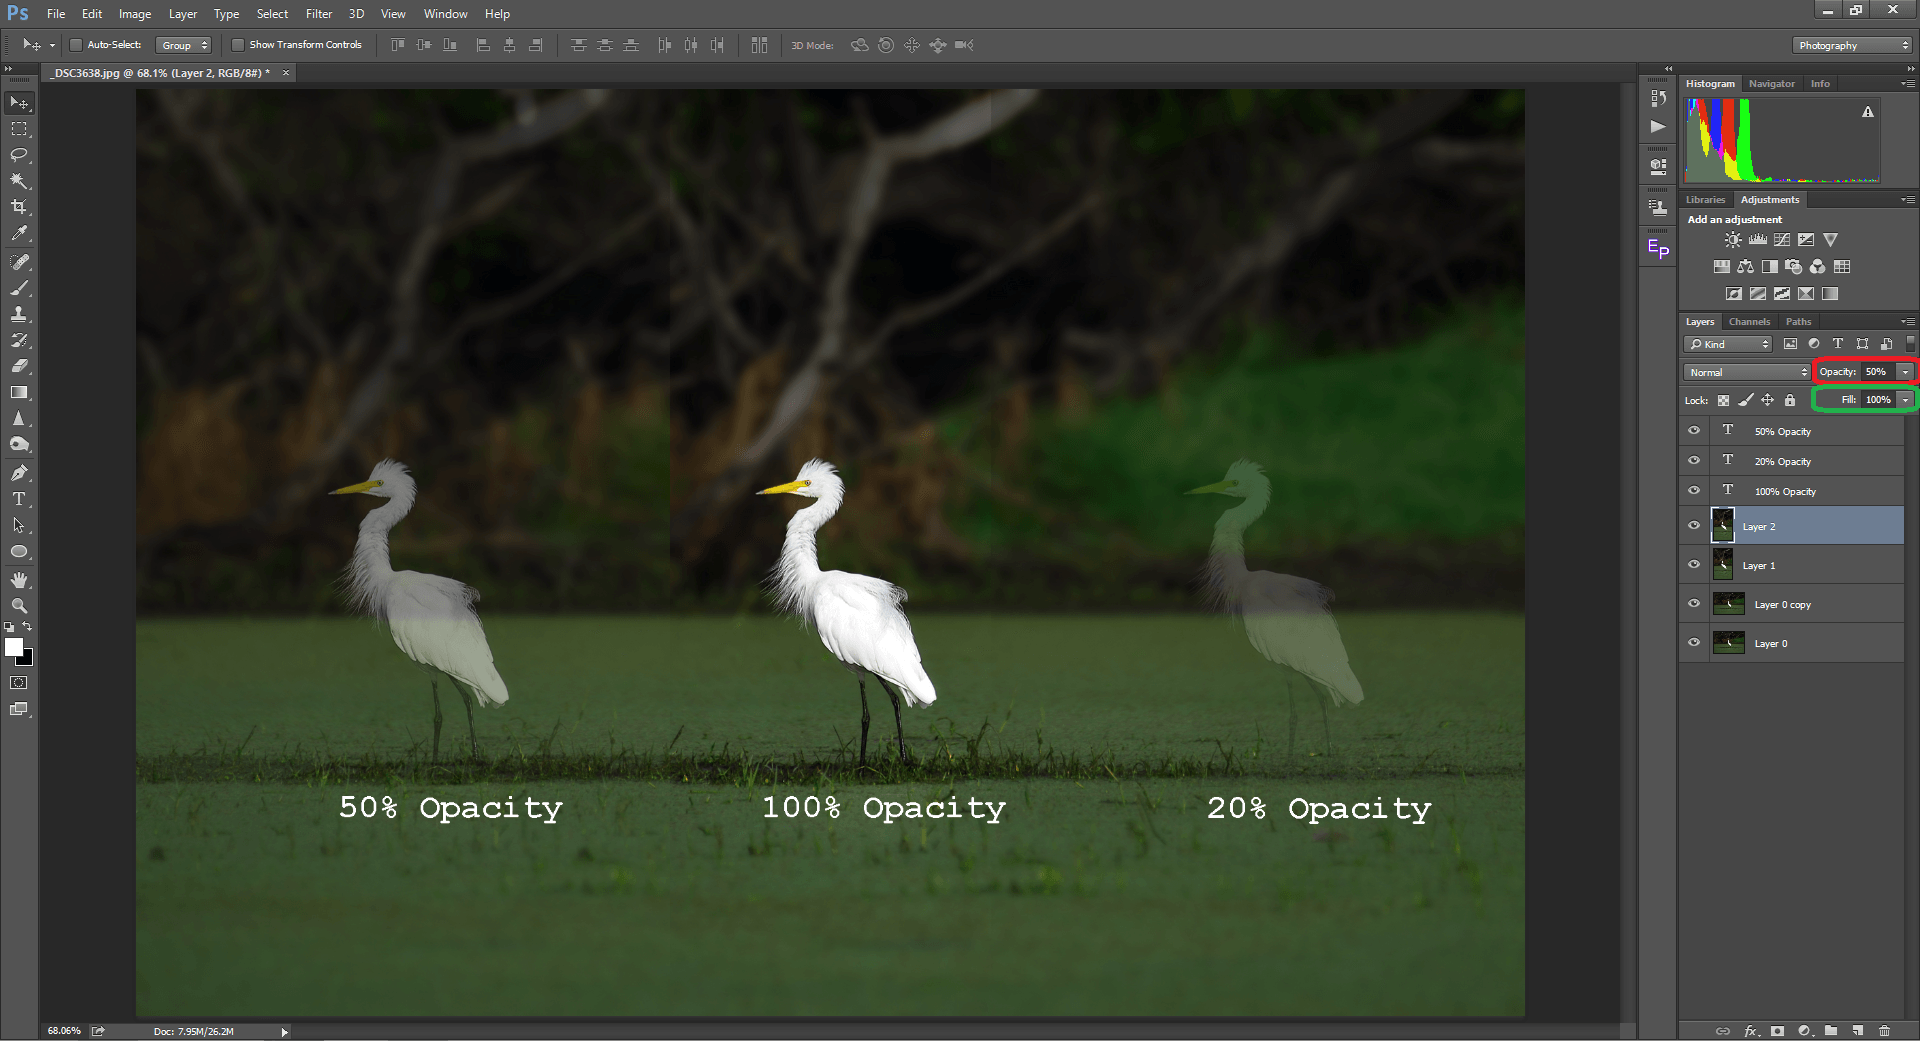
I have three copies of the same image placed one on top of the other. Opacity of any layer can be changed by using the opacity dropdown menu (marked red in the picture above).
The difference between the three copies is pretty obvious. The one in the center is 100% opaque – in other words, blocking everything in the layers below. The image on the left is 50% opaque, meaning it is translucent. It shows both the selected layer and the one below overlapped. Compare the one in the left with the one on the right. The 20% opaque layer shows 80% of the background and 20% of the selected layer.
Applications of Opacity
Opacity is very commonly used in photography to reduce the effects of a particular layer. The demonstration above explained how opacity works in theory. Now, let me show you how it can be practically used. Take a look at the image below:
As you can see, I have applied a simple curves adjustment layer to enhance the contrast. But you will notice that the effect looks overdone. Sometimes, it’s difficult to make accurate adjustments with the adjustment tool itself. The opacity slider comes to the rescue in such conditions. All I have to do to decrease the strength of this adjustment is bring down the opacity of the curves layer. The image below is the result, where I brought down the opacity of the curves layer to 42%:
Opacity vs Fill
For a long time, I was one among the people who never saw any difference between opacity and fill (the other dropdown option, below opacity). I have seen many times that both opacity and fill yield exactly the same results. If both opacity and fill do the same thing, what is the purpose of having two options? That was a question that confused me for a while. I understood the difference only after I got familiar with Photoshop’s “special blend modes.”
Photoshop’s Special Blend Modes
Earlier in this article, we saw that Photoshop has 27 blend modes. Out of those, Photoshop has 8 blend modes that are special: Color Burn, Linear Burn, Color Dodge, Linear Dodge, Vivid Light, Linear Light, Hard Mix and Difference. Those are the only eight modes where opacity and fill work differently. For the rest, they both give the same results.
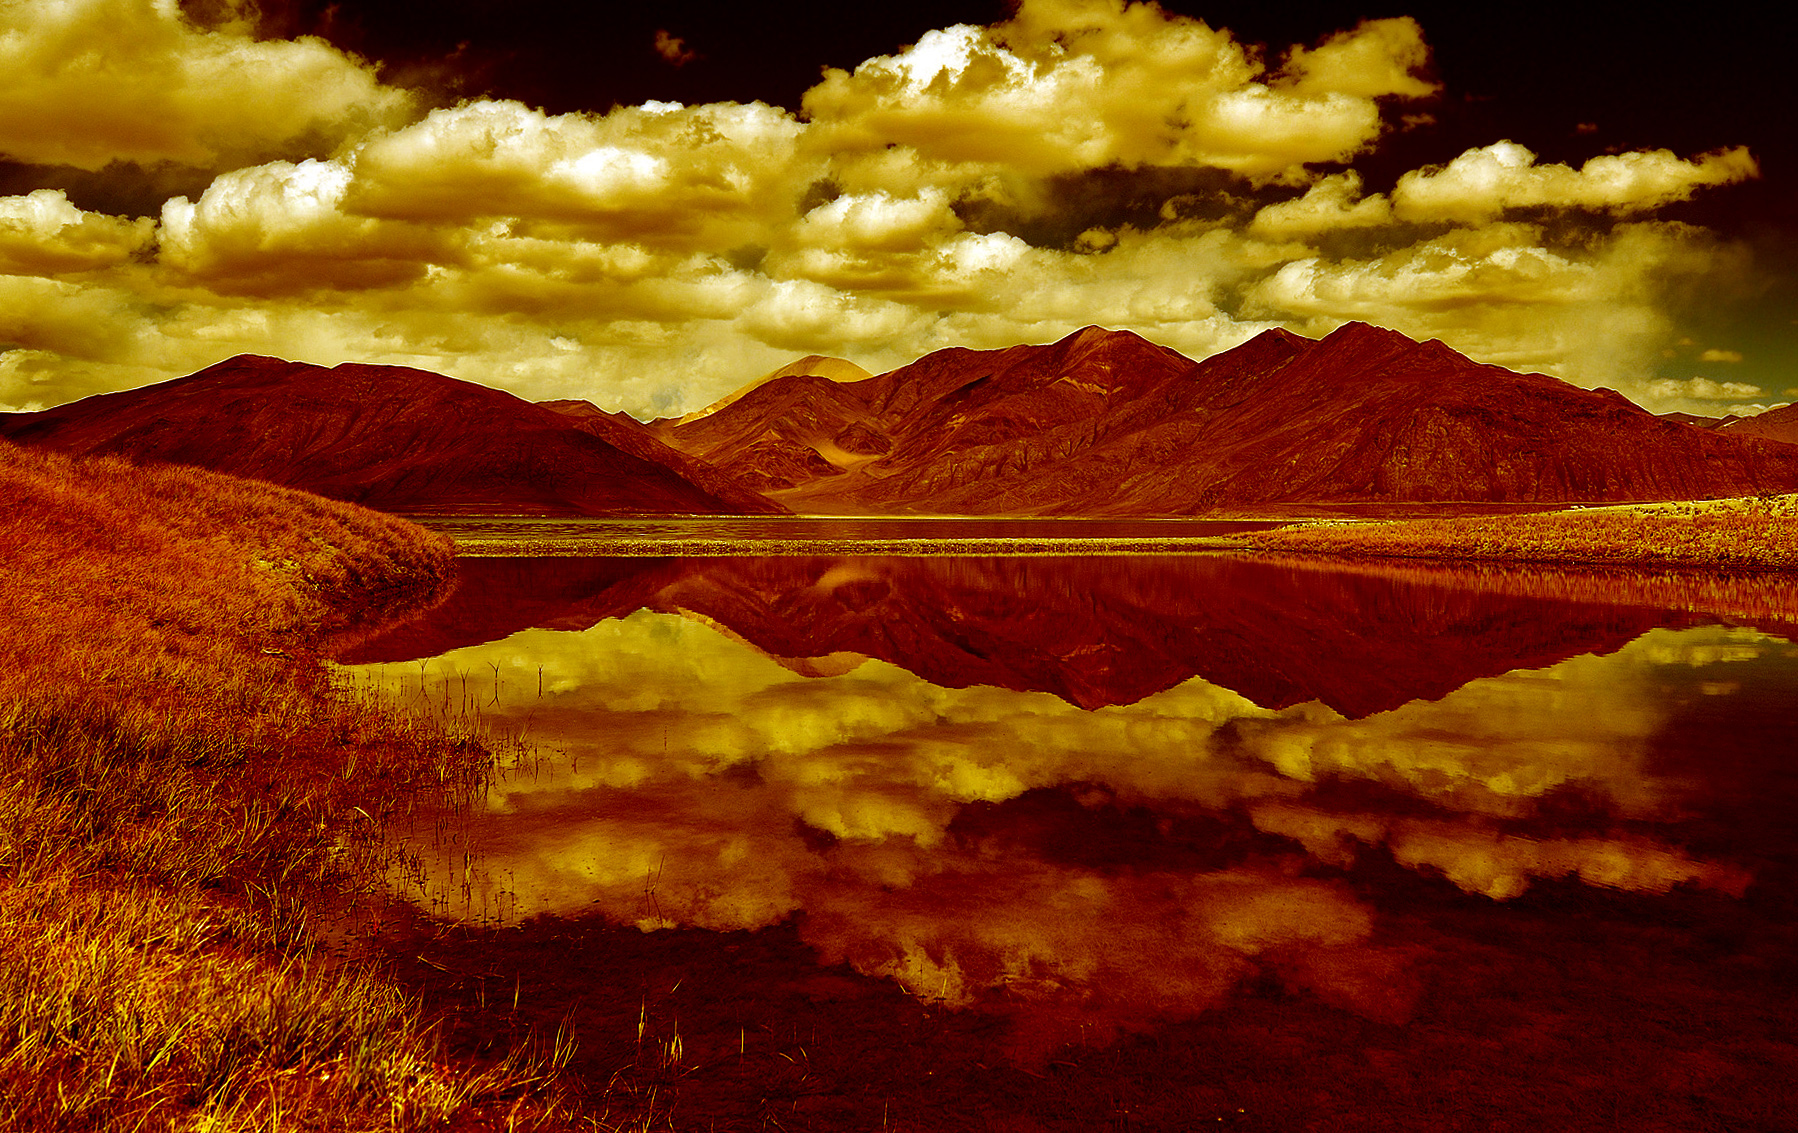
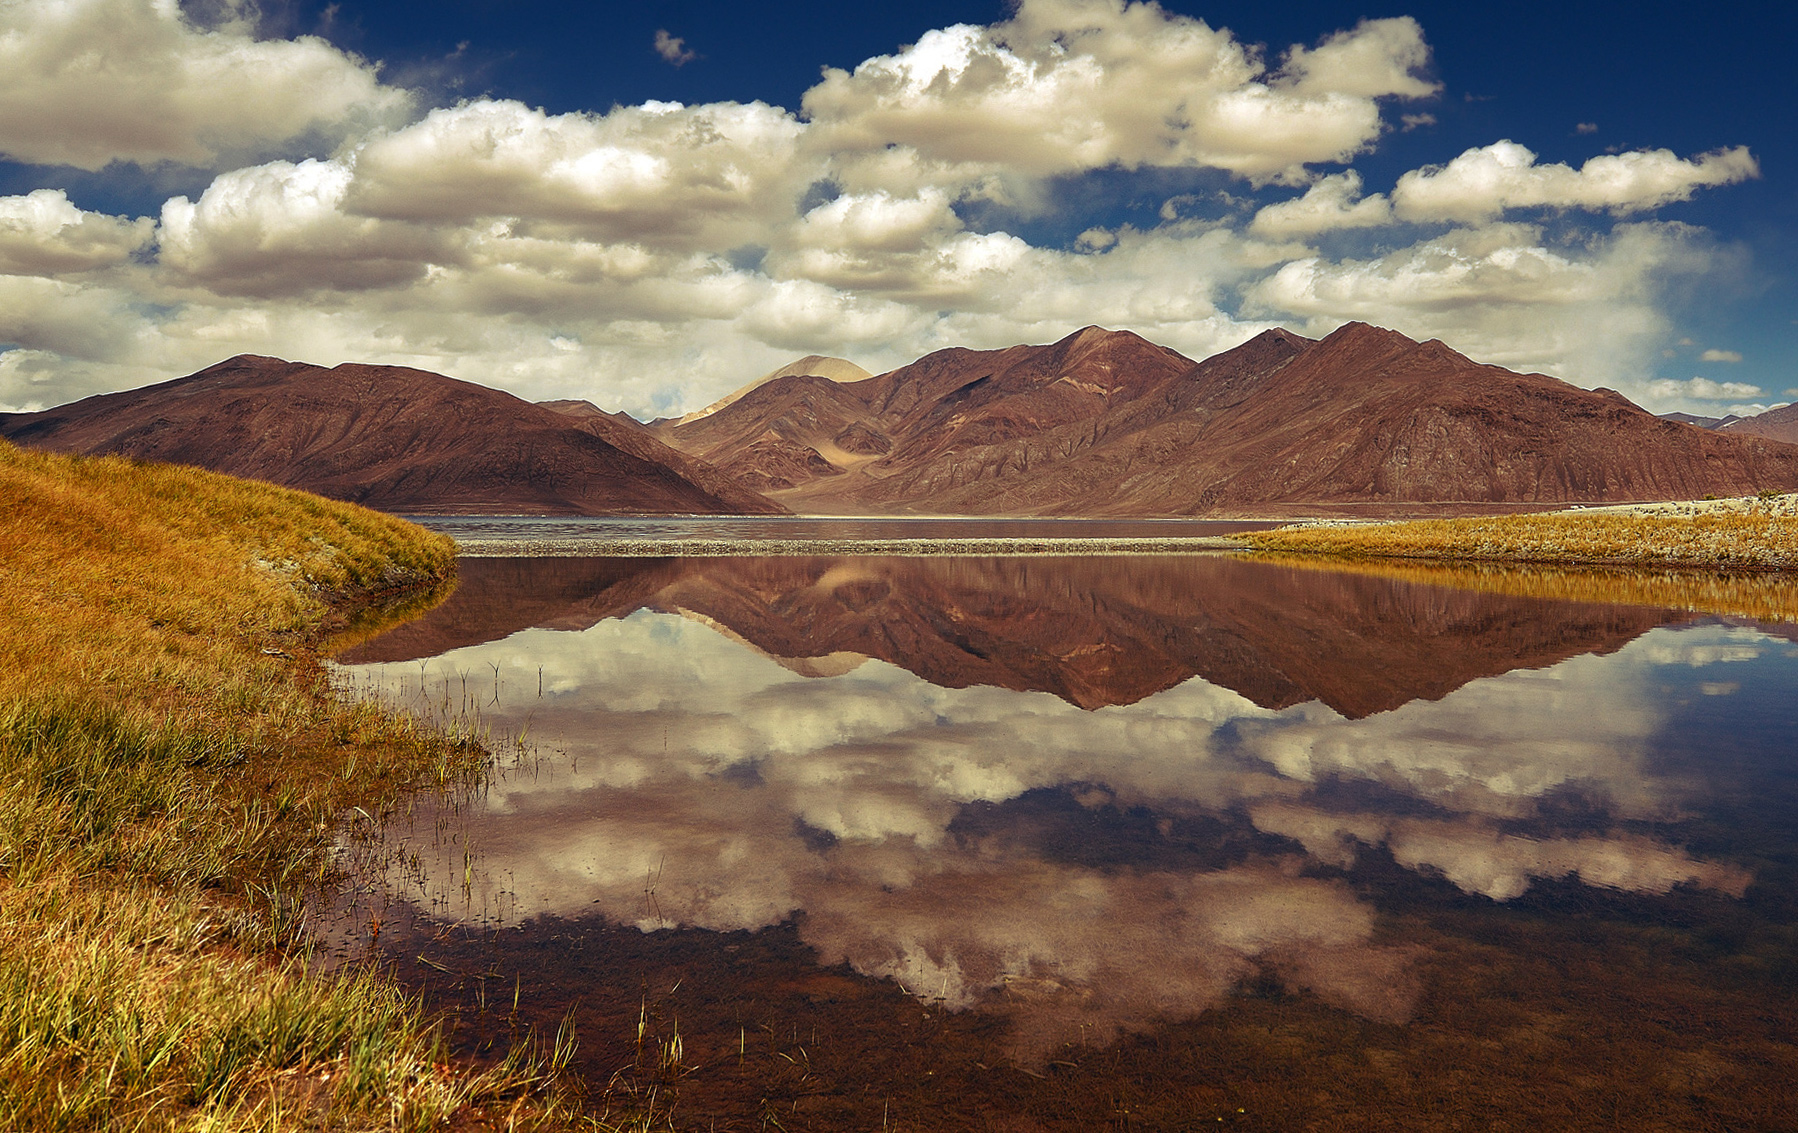
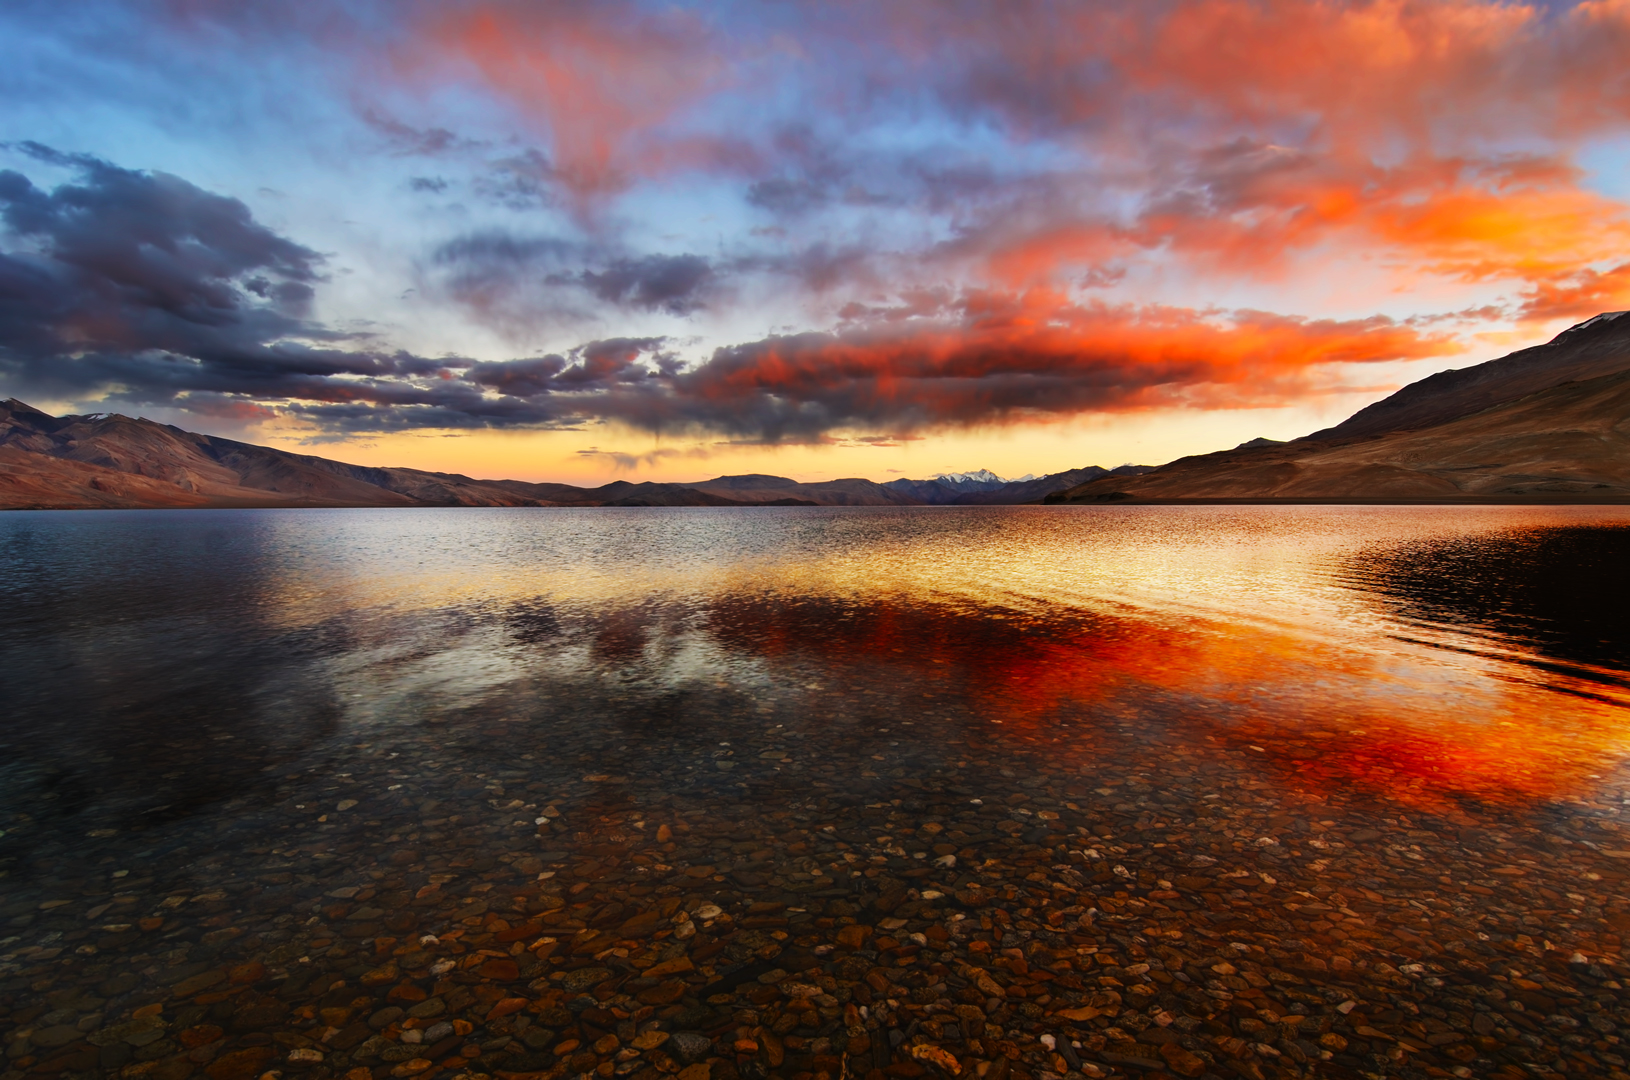
Let me explain the above with an example so that you can understand the difference between the two vividly. Take a look at the original image below:

Let’s say that I wish to add a hue of orange to the mountains and the grass. To do this, I can add a layer on top of the image which is entirely solid orange (255, 163, 63 to be precise). I can then select Color Burn as the blend mode. The resulting image is shown below:
Looks horrendous, doesn’t it? To control it, let me bring the opacity down to 25%, as shown below:
The image definitely looks better, but it has more of a sepia effect than the warm tone I’m actually after. For the image below, I brought the Fill down to 25% instead of Opacity:
The one above looks a lot more natural. The difference between Opacity and Fill becomes quite obvious; the two modes project light in entirely different ways.
In particular, decreasing Opacity simply lowers the transparency of the layer across the whole image. Fill, on the other hand, affects various parts of the image differently. To be specific, it all depends on the “effect” of your chosen blend mode – for example, the fact that Color Burn darkens the image in the shadows more than in the highlights. When you lower the Fill, it first decreases the effect where it was already the weakest, while taking longer to decrease the effect where it was the strongest. That’s why the 25% Fill image above has darker, warmer shadows than the 25% Opacity image. In other words, Color Burn has a greater effect on the shadows, so the warm appearance of the shadows lasts longer when decreasing Fill.
Understanding Photoshop’s Blend Modes
Even though there are 27 blend modes that Photoshop offers, most of us would not be using all of them. In fact, there are a few blend modes that I wonder if anyone would use at all. Let me take you through the most useful ones. I shall start with the simplest leading to the more complex ones.
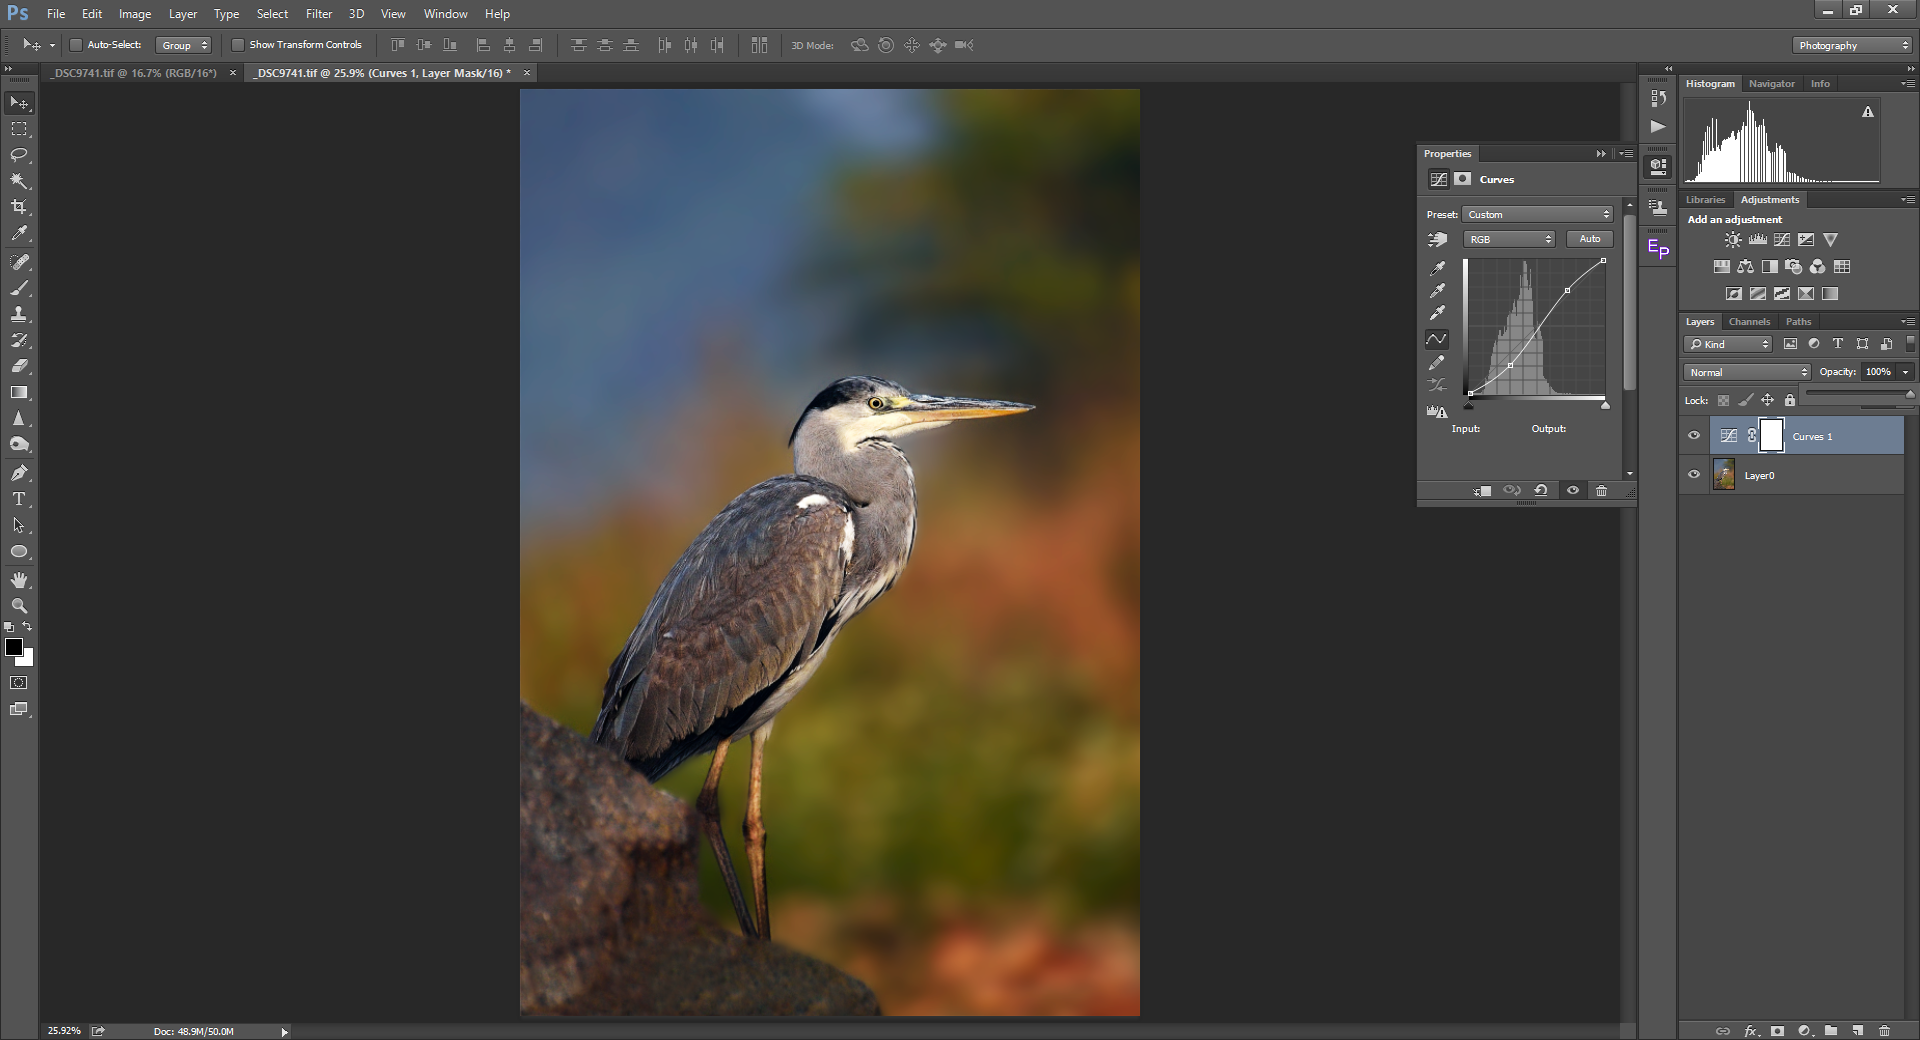
1. Normal
For obvious reasons, Normal is the default blend mode. Photoshop simply pastes the selected layer on top of the underlying layers, and the specified opacity and/or fill determines how transparent it is.

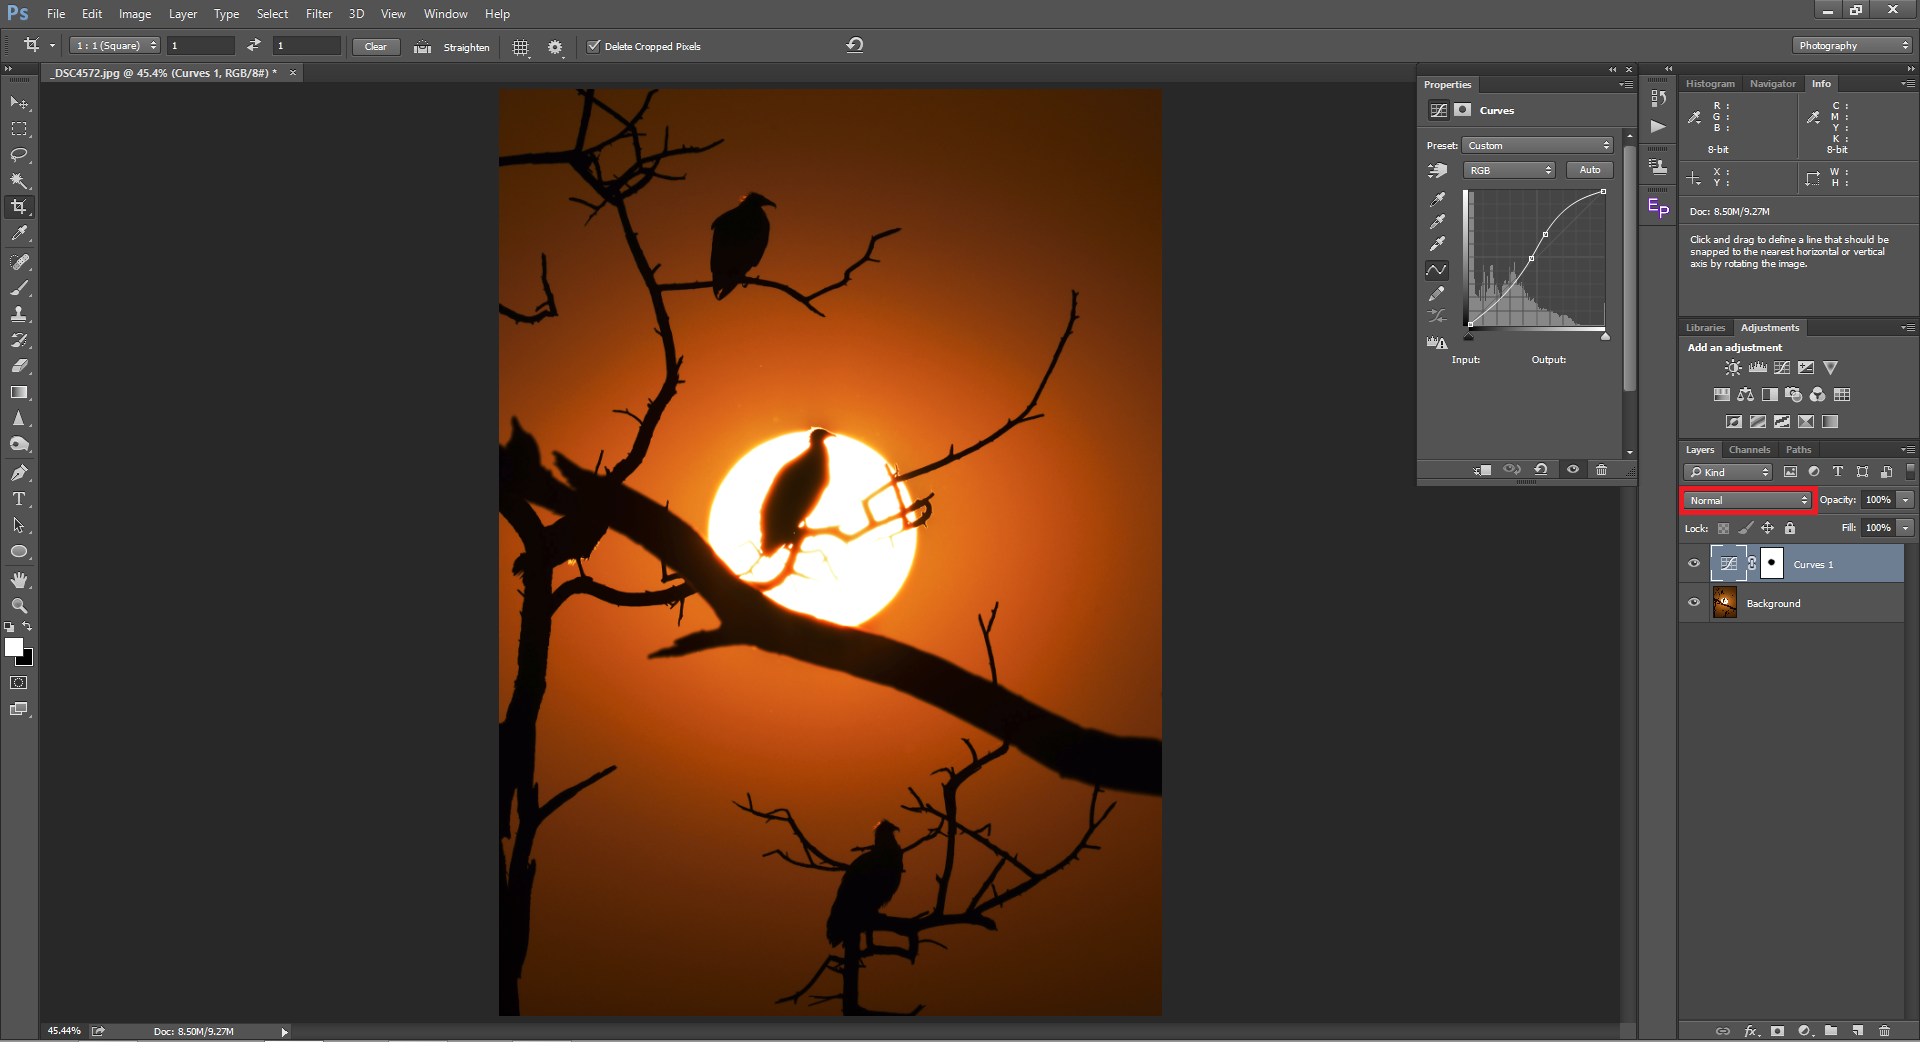
The screenshot above shows a simple curves adjustment layer to enhance the contrast of the image. In addition to contrast, you can also notice that color has been oversaturated and the hue has shifted to be much redder. These sorts of shifts are relatively common when doing a curves adjustment, but they’re not always what you’ll want.
2. Luminosity
Luminosity blend mode is the solution for the above-mentioned problem. It’s the bottom blend mode in the dropdown menu, and a member of the Property group. As such, it only alters the selected property of luminosity, leaving the other properties untouched. In other words, it only brightens or darkens the pixels and does not change their saturation or hue.
Take a look at the illustration below, where I used the same curves adjustment but set the curves layer to a blend mode of luminosity:
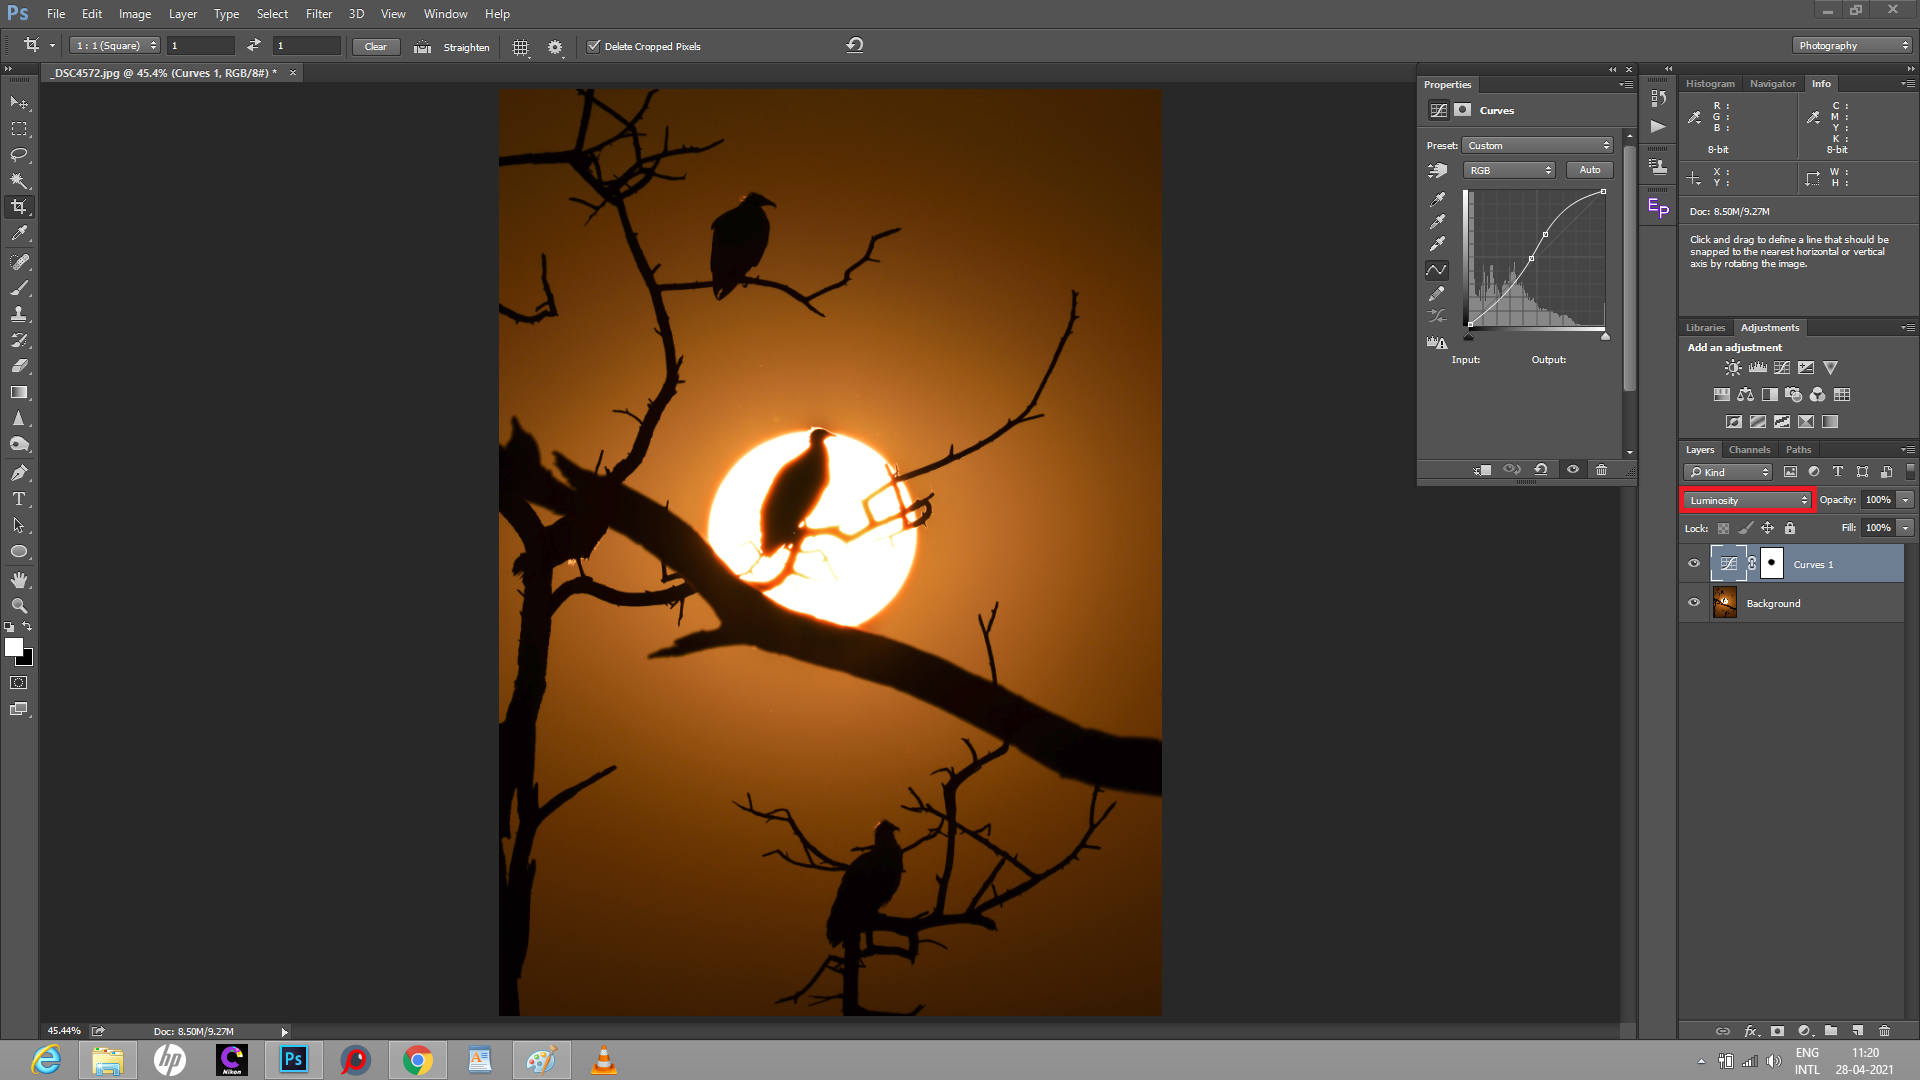
In the above image, contrast is added, but the saturation remains unchanged.
Sometimes, using Luminosity in this manner can seem to under-saturate an image, since our eyes are used to seeing a bit of a saturation boost when bumping contrast. The heavier the contrast you’re applying, the more it may seem to be under-saturated.
3. Saturation
Another useful blend mode from the Property category is saturation. This blend mode is useful for someone who wishes to control saturation beyond the normal use of Photoshop’s saturation slider. Photoshop’s saturation slider isn’t always perfect, since it applies an equally amount of saturation to the entire image, sometimes over-saturating areas that were already colorful. While one possible solution to this problem is the Vibrance slider, which works on less-saturated pixels first, the Saturation blend mode is another handy option.
Here’s how it looks in practice on the same shot as before:
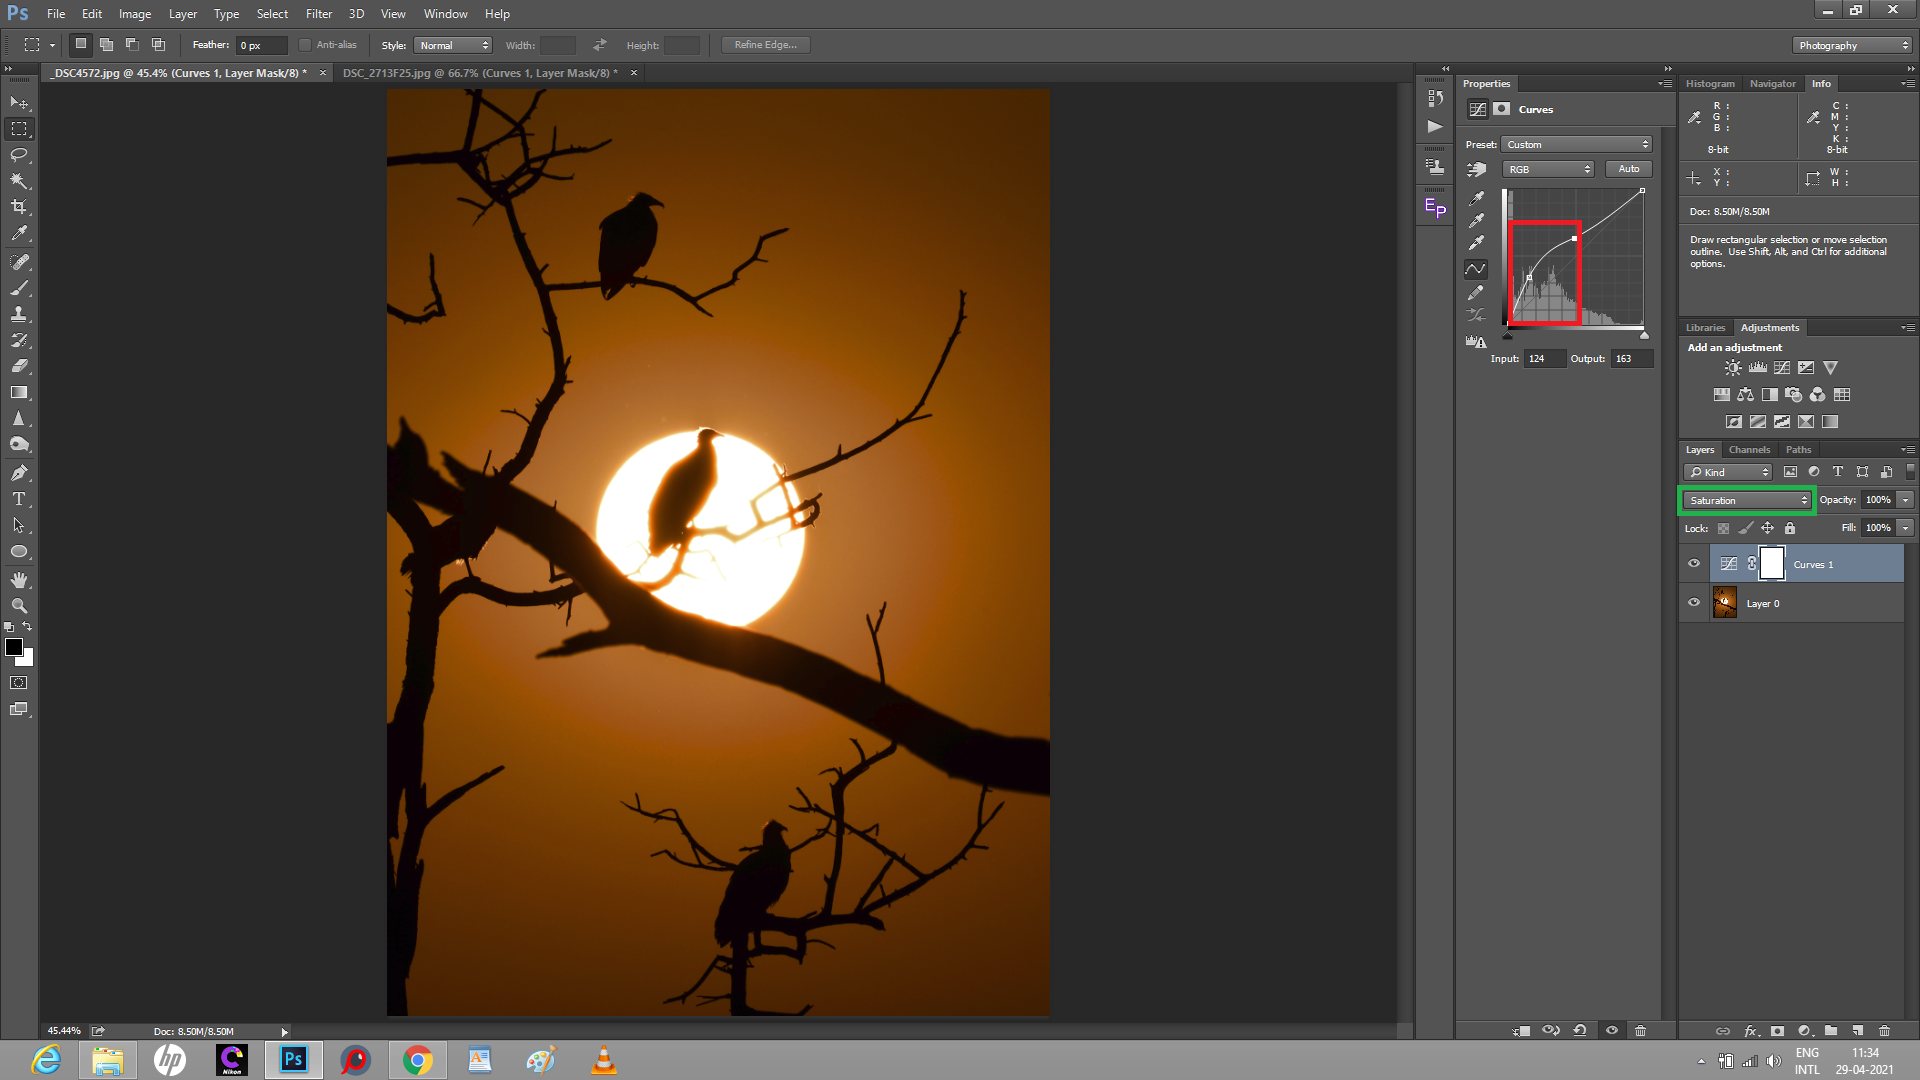
The differences may seem subtle, but pay attention to the edges and corners of the image. They have substantially increased in saturation compared to the original (and there’s no hue shift toward red, like there was with the Normal blend mode).
In the screenshot above, you can see that I changed the shape of my curve (marked in red) to “brighten” the dark areas. I put the word brighten in quotes because, with the Saturation blend mode selected, the actual luminosity of the pixels will not change. It’s only their saturation that will change – and, in this case, it boosts the shadow saturation somewhat, while leaving the highlights untouched. That’s why the darker corners of the image gained saturation, while the rest did not.
In the same way as Luminosity applied the curve only to the brightness of the pixels, Saturation blend mode affects only the saturation. It will not add contrast, nor will it change the color. That’s the power of these “property” blend modes.
4. Hue
Hue is a property blend mode as well, and it changes the base hue of a layer. Take a look at the picture below:
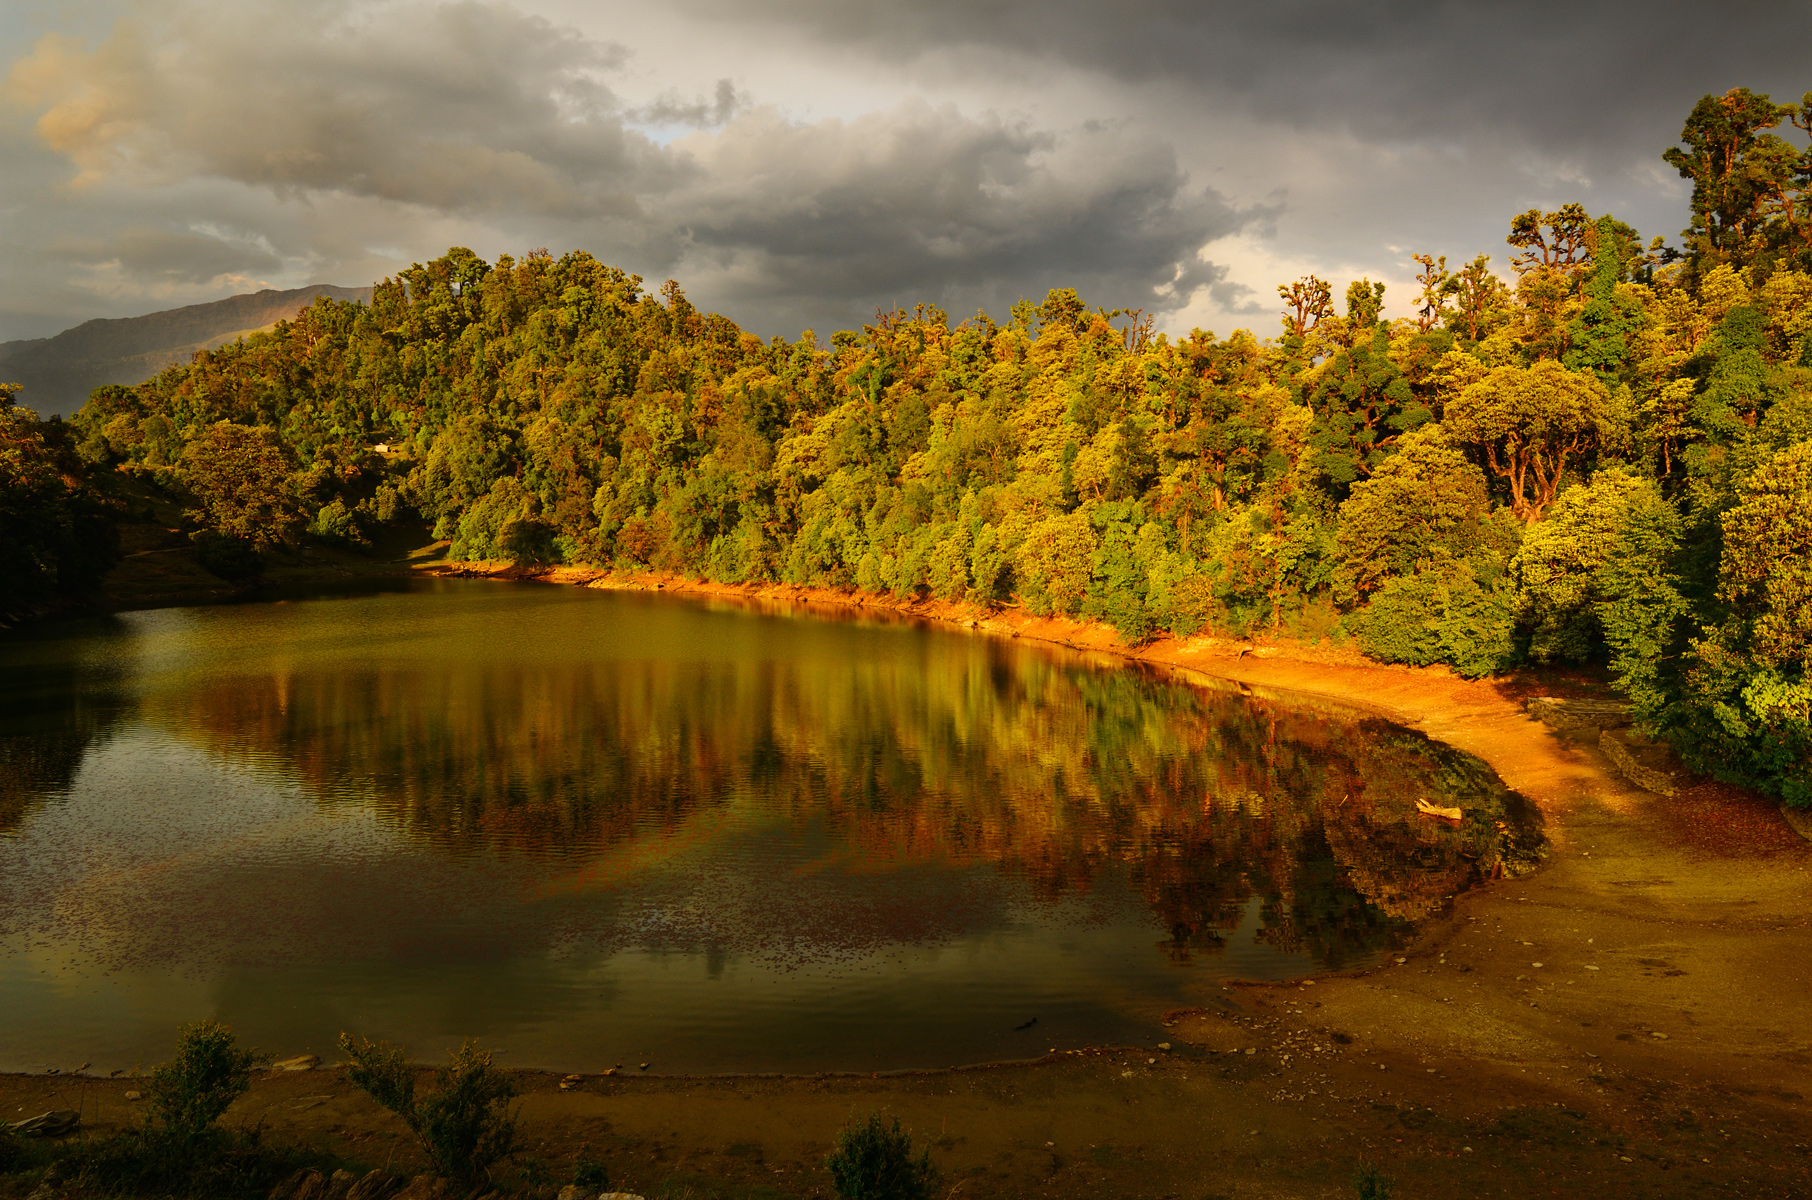
The golden hour has flushed some of the green hues in the trees. Let us say that I want the trees to be greener rather than orange. The Hue blend mode becomes useful in such scenarios.

In the above illustration, I have added a solid layer with a yellow-green color over the original image, and I set it to the Hue blend mode. In order to affect just the trees, I have masked out everything else using a layer mask. You can see that the oranges and reds in the trees have been replaced by hues of green.
The Hue blend mode finds its use when changing colors is necessary. You can take things further if you wish, such as the example below, where I made the trees even greener by painting a green hue on my top layer:
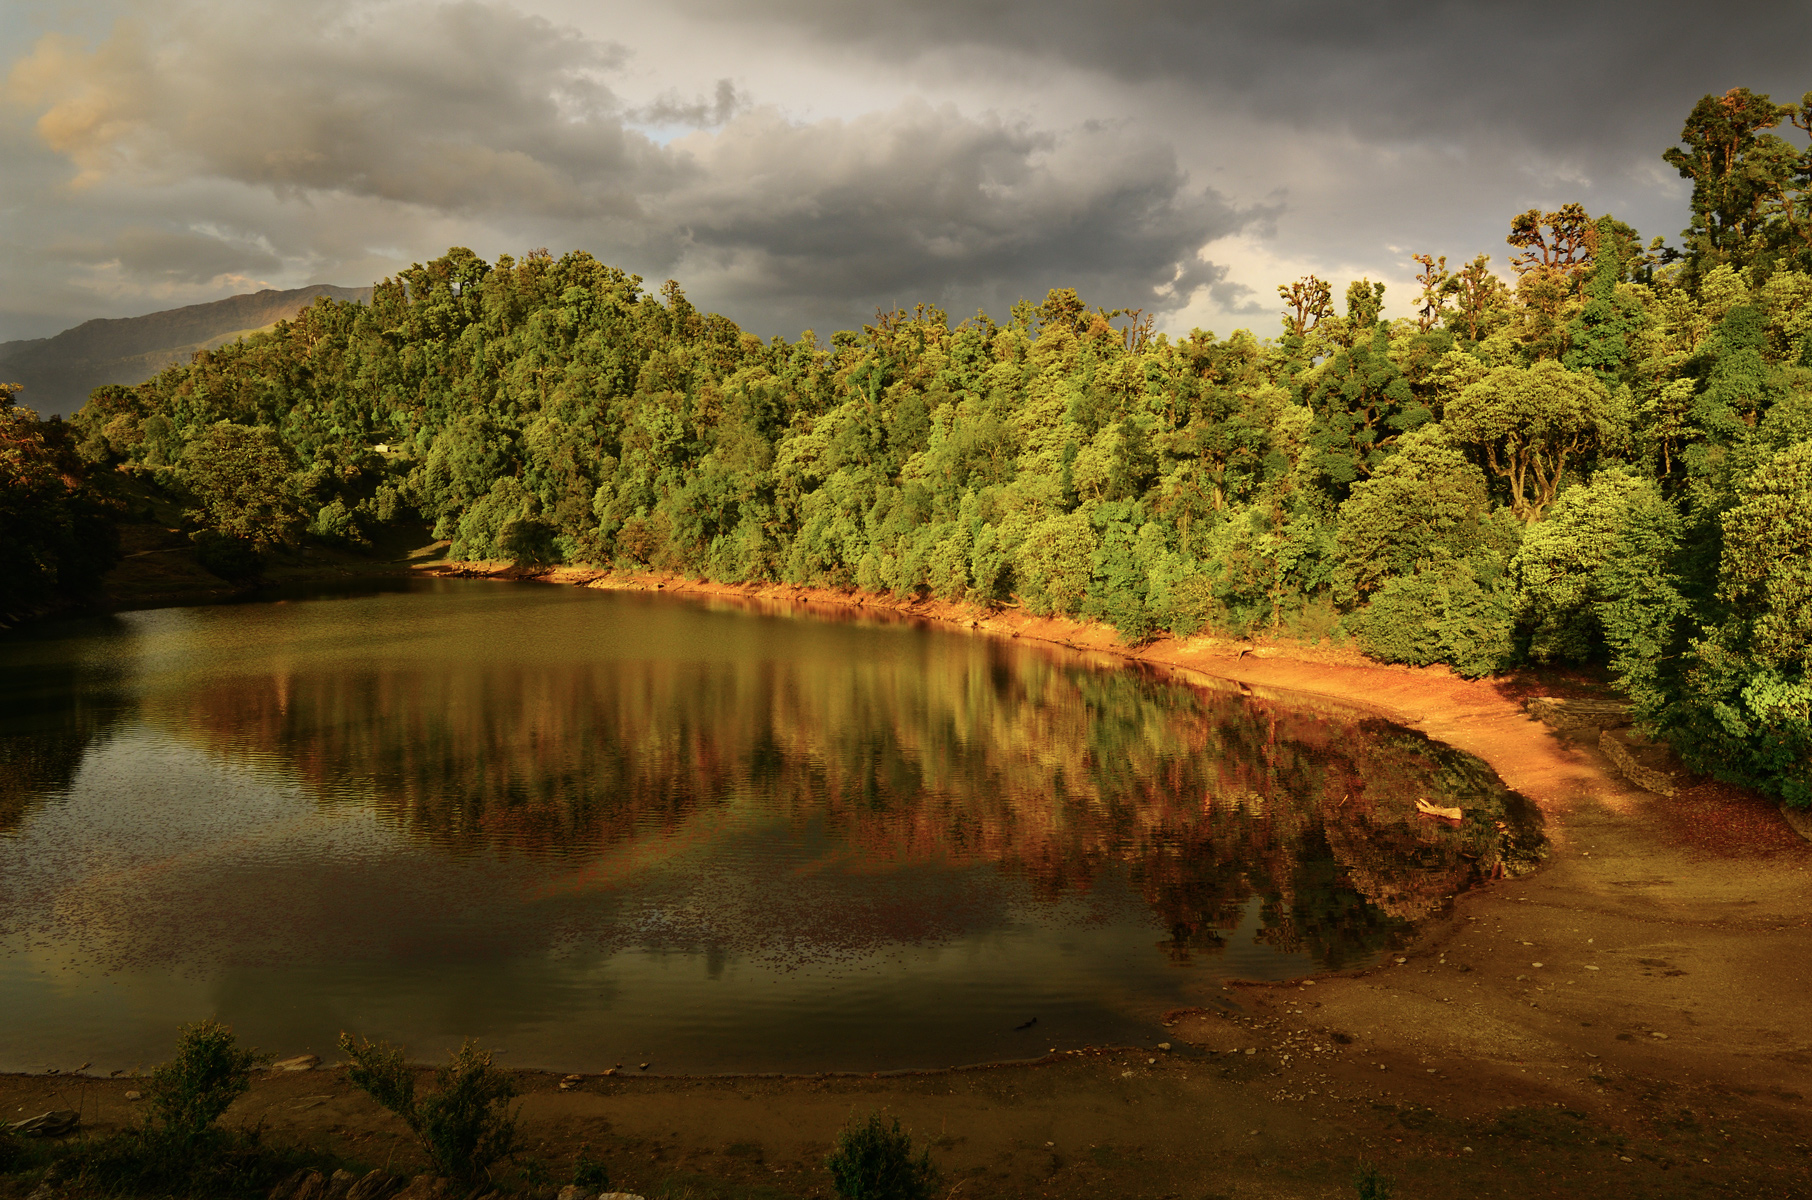
I personally don’t prefer to use Hue for my own photography (at least not to make edits as dramatic as this), as it brings in the question of ethics. But that is my personal choice, and it’s important to know what it does in case you need to do difficult color corrections.
5. Multiply
So far, this article has gone through some of the simpler blend modes. Now let me take you through the more complex ones.
Multiply belongs to the darken group. Take a look at the image below:
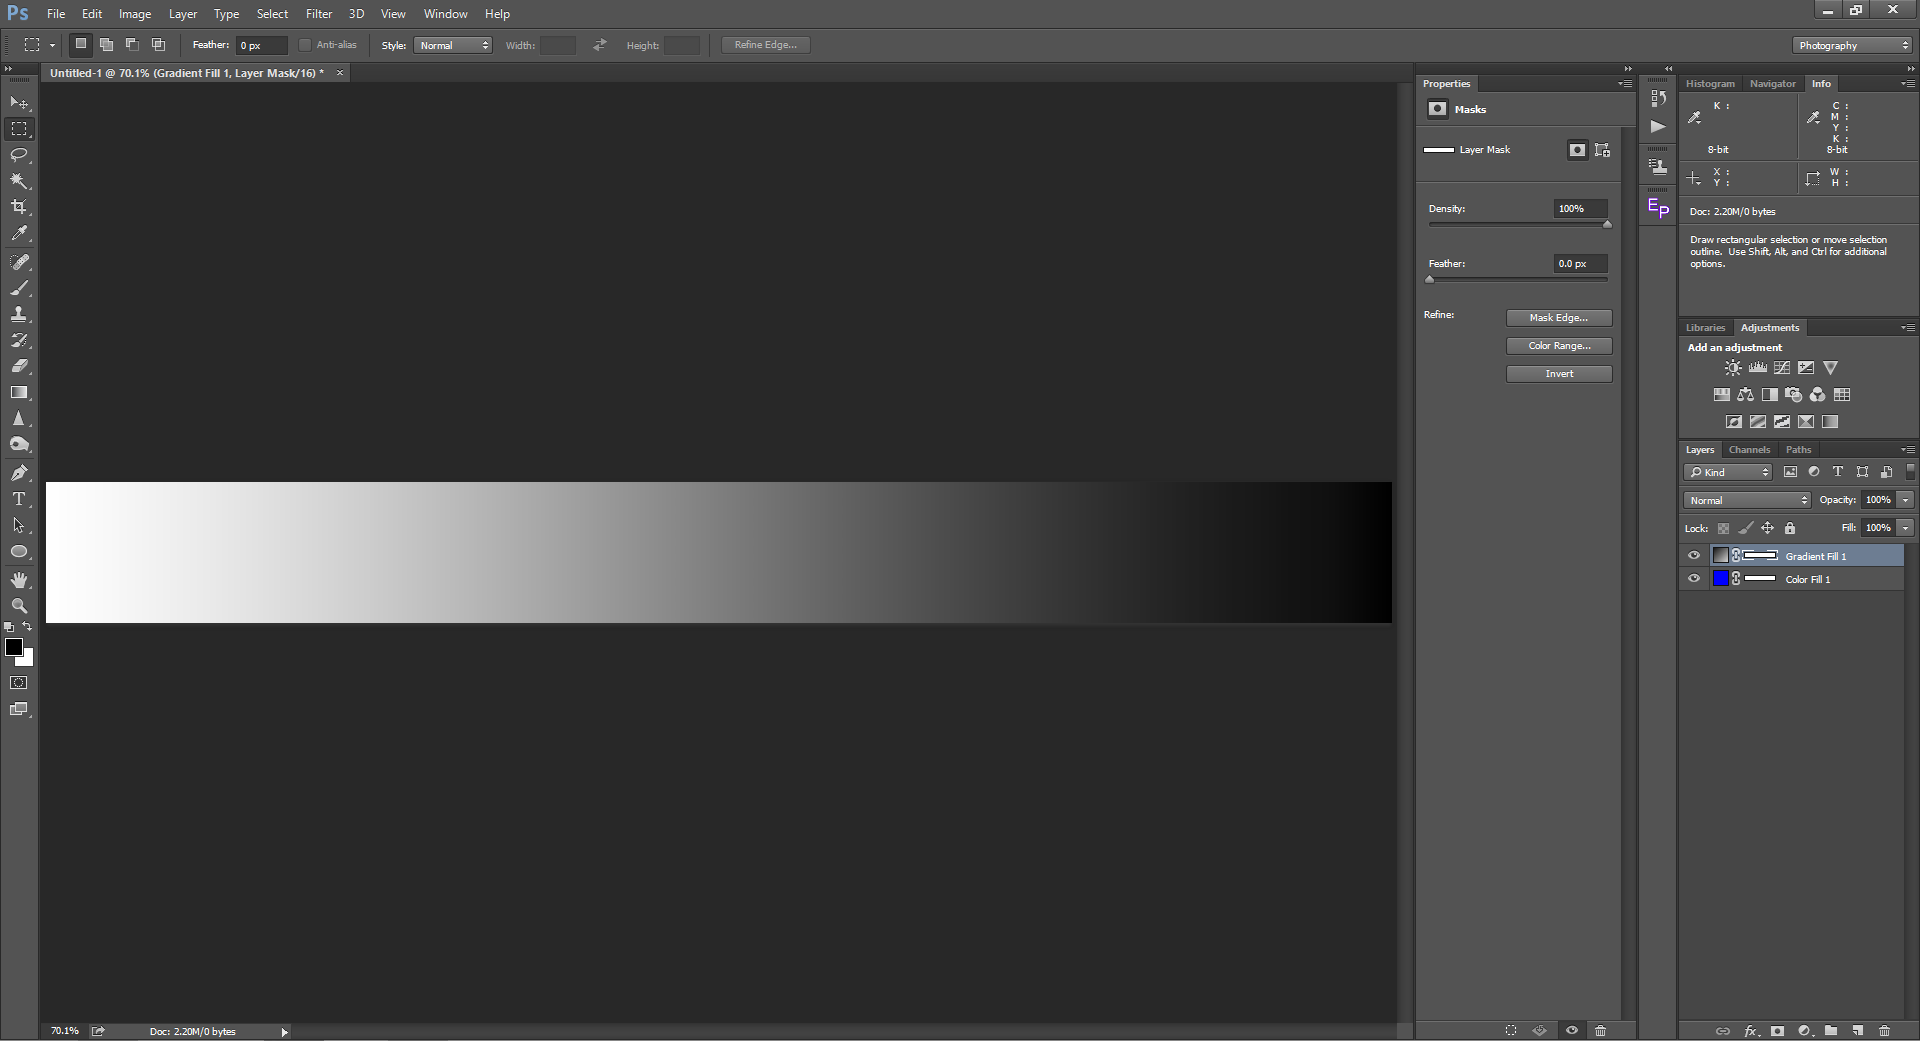
What you’re looking at above is simply the top layer, a white-to-black gradient that I made. Given that the blend mode is set to Normal and there is 100% opacity and fill, there is no way to see the solid blue layer below it.
But take a look at what happens when I change the top layer’s blend mode to Multiply (marked red):
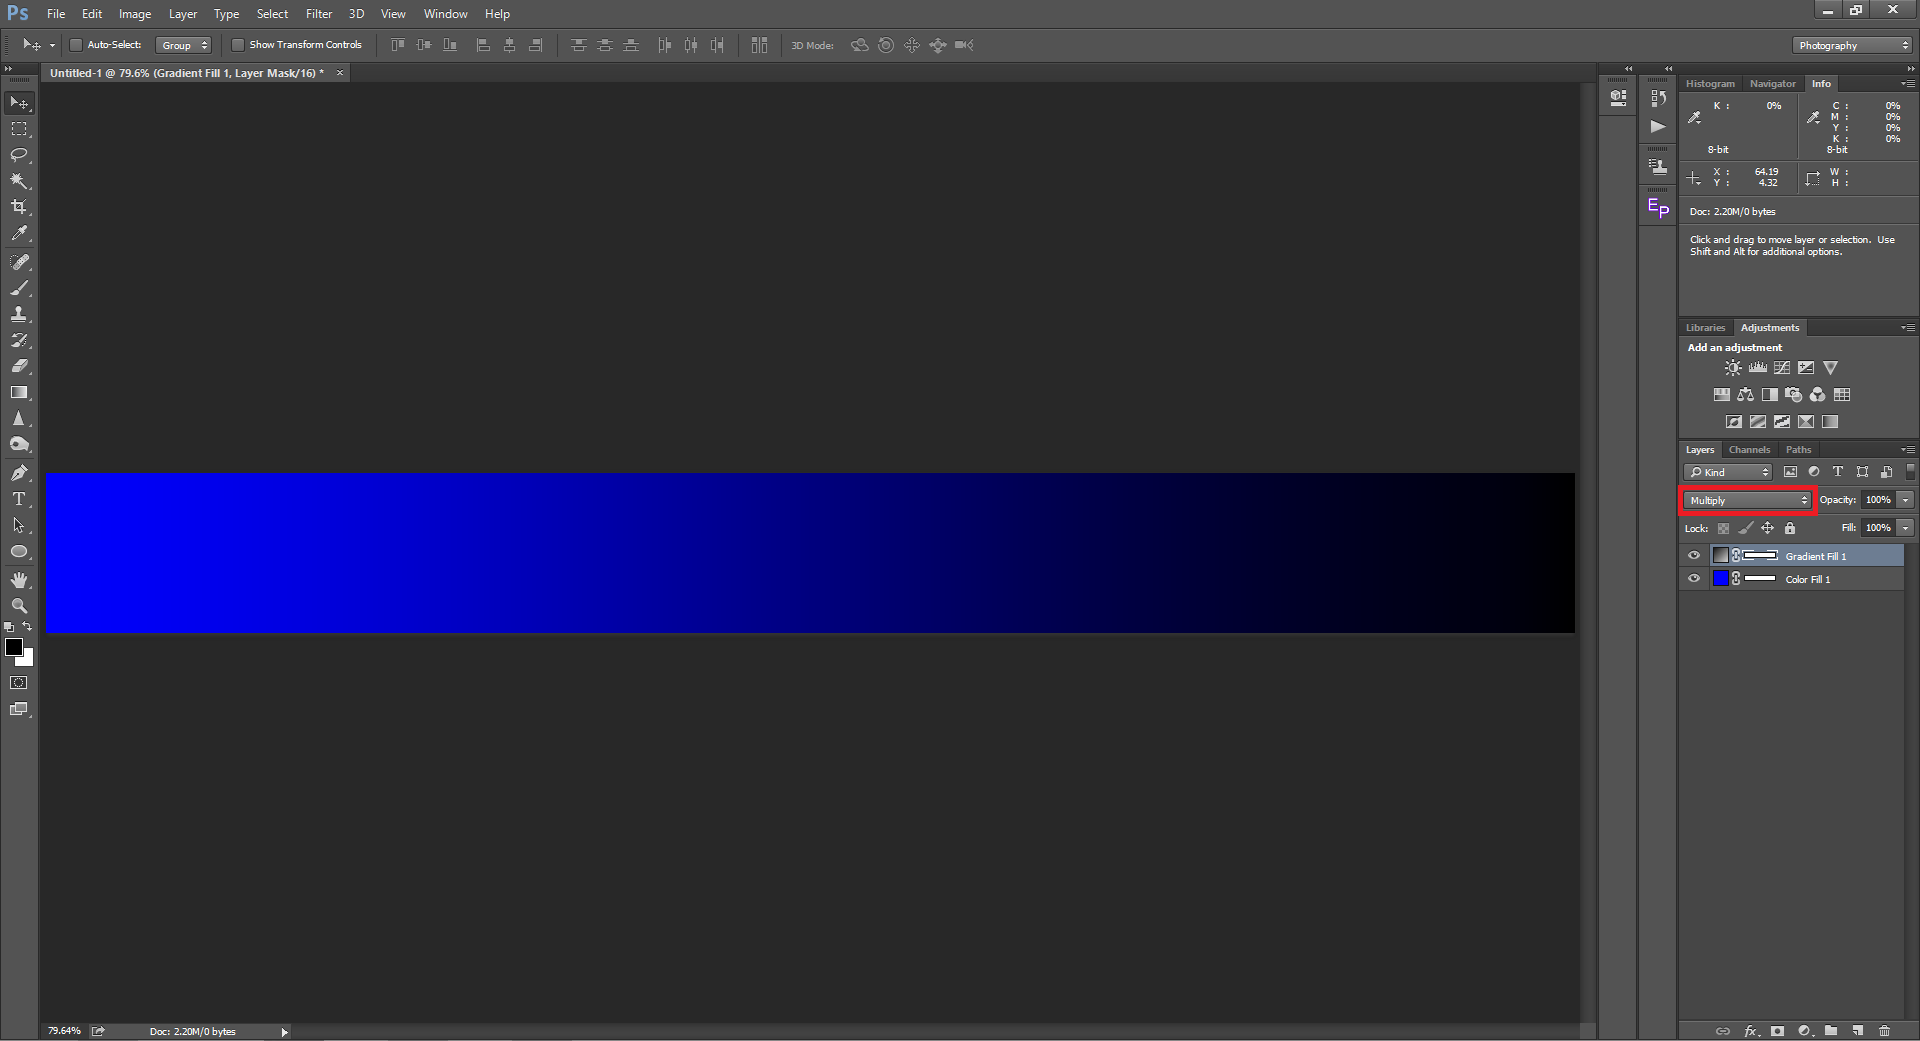
You can see that the gradient is now applied to the underlying solid blue layer.
Let me explain how it works. Whatever photography means to you – art, science, even camera gear – to Photoshop, digital imaging is nothing more than mathematics. In the selected top layer, the brightest pixel in the gradient (pure white) can be represented as the number “1,” and the darkest pixel (pure black) as 0. When we multiply any number with 1, the answer is the number itself. When we multiply any number with 0, the answer is 0. The result is that our gradient is solid blue at the very left (since it’s “blue × 1 = blue”). On the very right, it’s solid black (since “blue × 0 = 0”).
So, you can see why the Multiply blend mode is called Multiply!
5.1. Creating a Vignette Using Multiply
Now that you now know how multiply works, let us use it to create a vignette.

I have created a radial gradient fill layer over an image to which I’d like to add a vignette. You can do the same using the menu option Layers > New Fill Layer > Gradient. Selecting a gradient from white to black from the presets, I have chosen radial as style and 258% as the scale. Once I change the blend mode to multiply, I get the underlying layer with a vignette, as shown below:

If required, you can change the magnitude of the vignette by double clicking on the icon on the left to gradient layer and changing the scale. If you wish to leave the subject out of the vignette, you can always mask the area of the subject by making a layer mask and painting with a black brush.
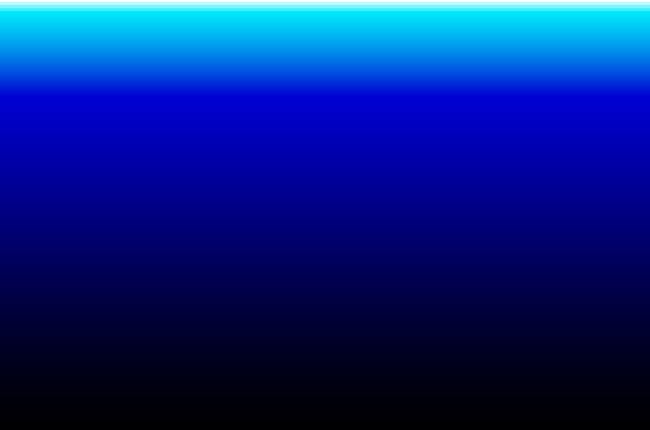
To summarize, multiply blend mode masks out 100% white, shows 100% blacks, and darkens everything in between with varying intensities corresponding to their brightness.
6. Color Burn
Color Burn is another blend mode that finds a wide array of uses. This blend mode belongs to the darken group. As the name suggests, Color Burn adds color and darkens the image. It differs from multiply by keeping white areas of the image white, rather than making them the color of the other layer. For example, here’s how a similar gradient looks with Color Burn:
Color Burn is one of the eight special blend modes. So, as mentioned earlier in this article, Opacity and Fill will give different results. Opacity will merely lower or increase the strength of the selected layer. On the other hand, Fill affects different parts of the image differently, keeping the darkening and color shift effects more strongly in the shadow areas.
6.1. Working with Color Burn
Even though Color burn looks similar to Multiply, with real world applications it brings out dramatic results. Take a look at the picture below.

Take a look at the screenshot below to see the result when I duplicated the layer (Control/Command + J) and changed the blend mode to color burn.
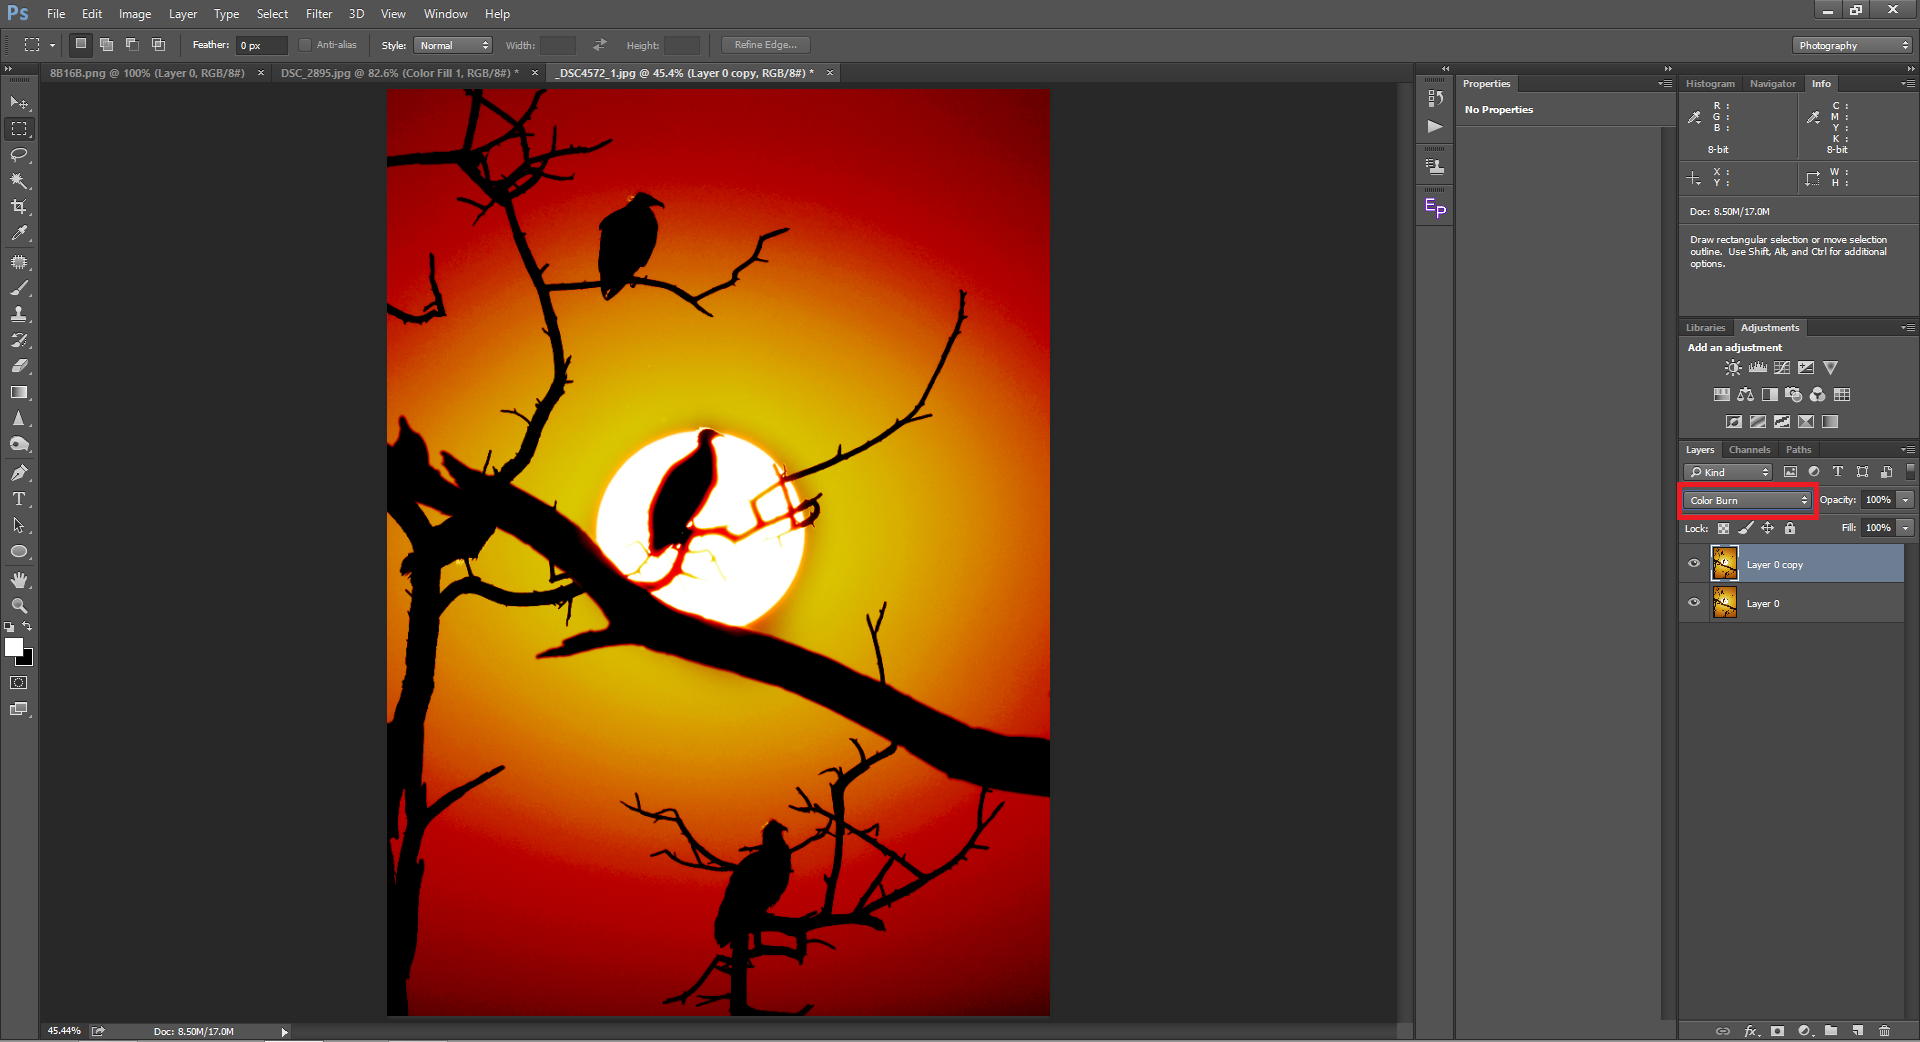
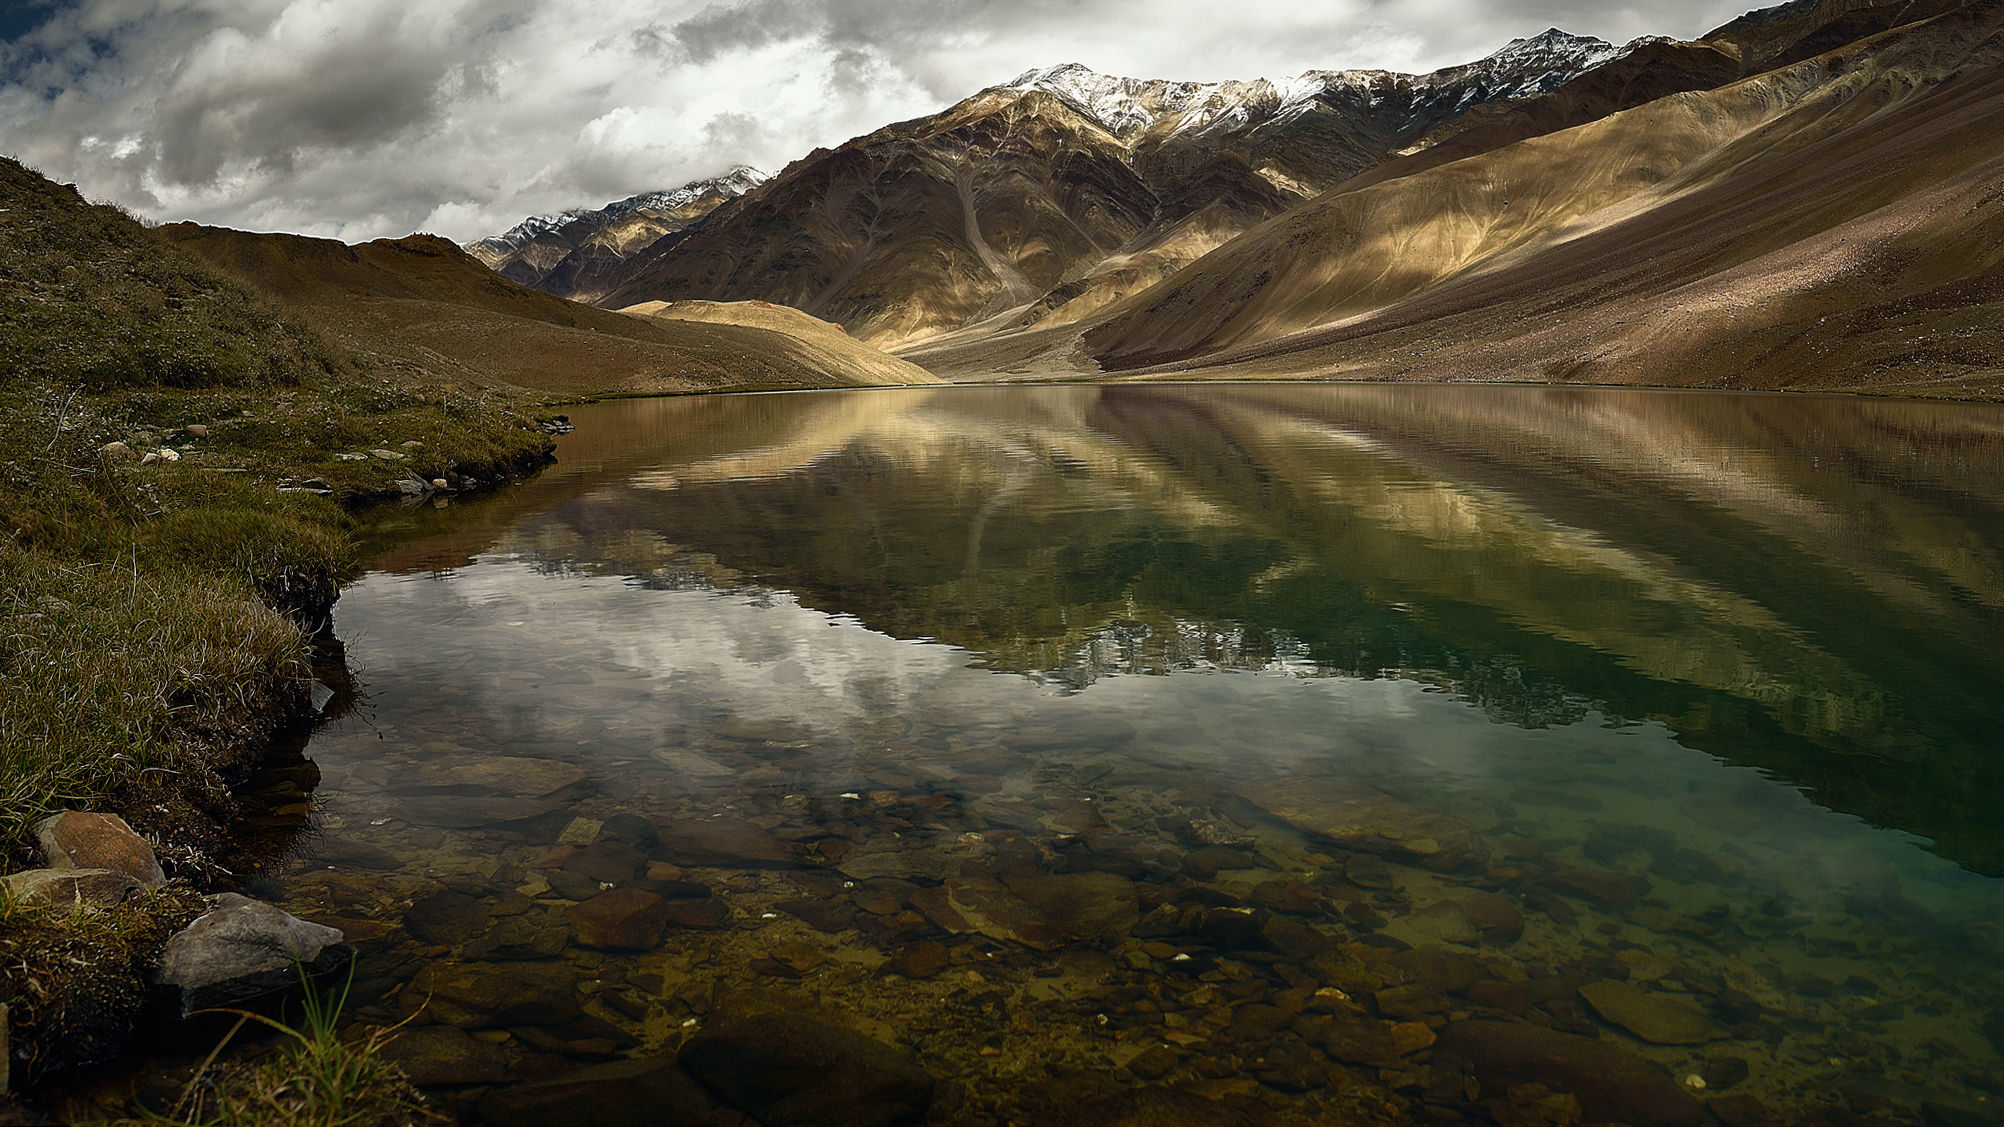
It’s way too intense in that case, but let me take you through another example where Color Burn works great. Look at the picture below:
Let’s say I want to darken the image and add a hue of saturated blue to the sky. It is a simple two-step process with the Color burn blend mode, as shown below:
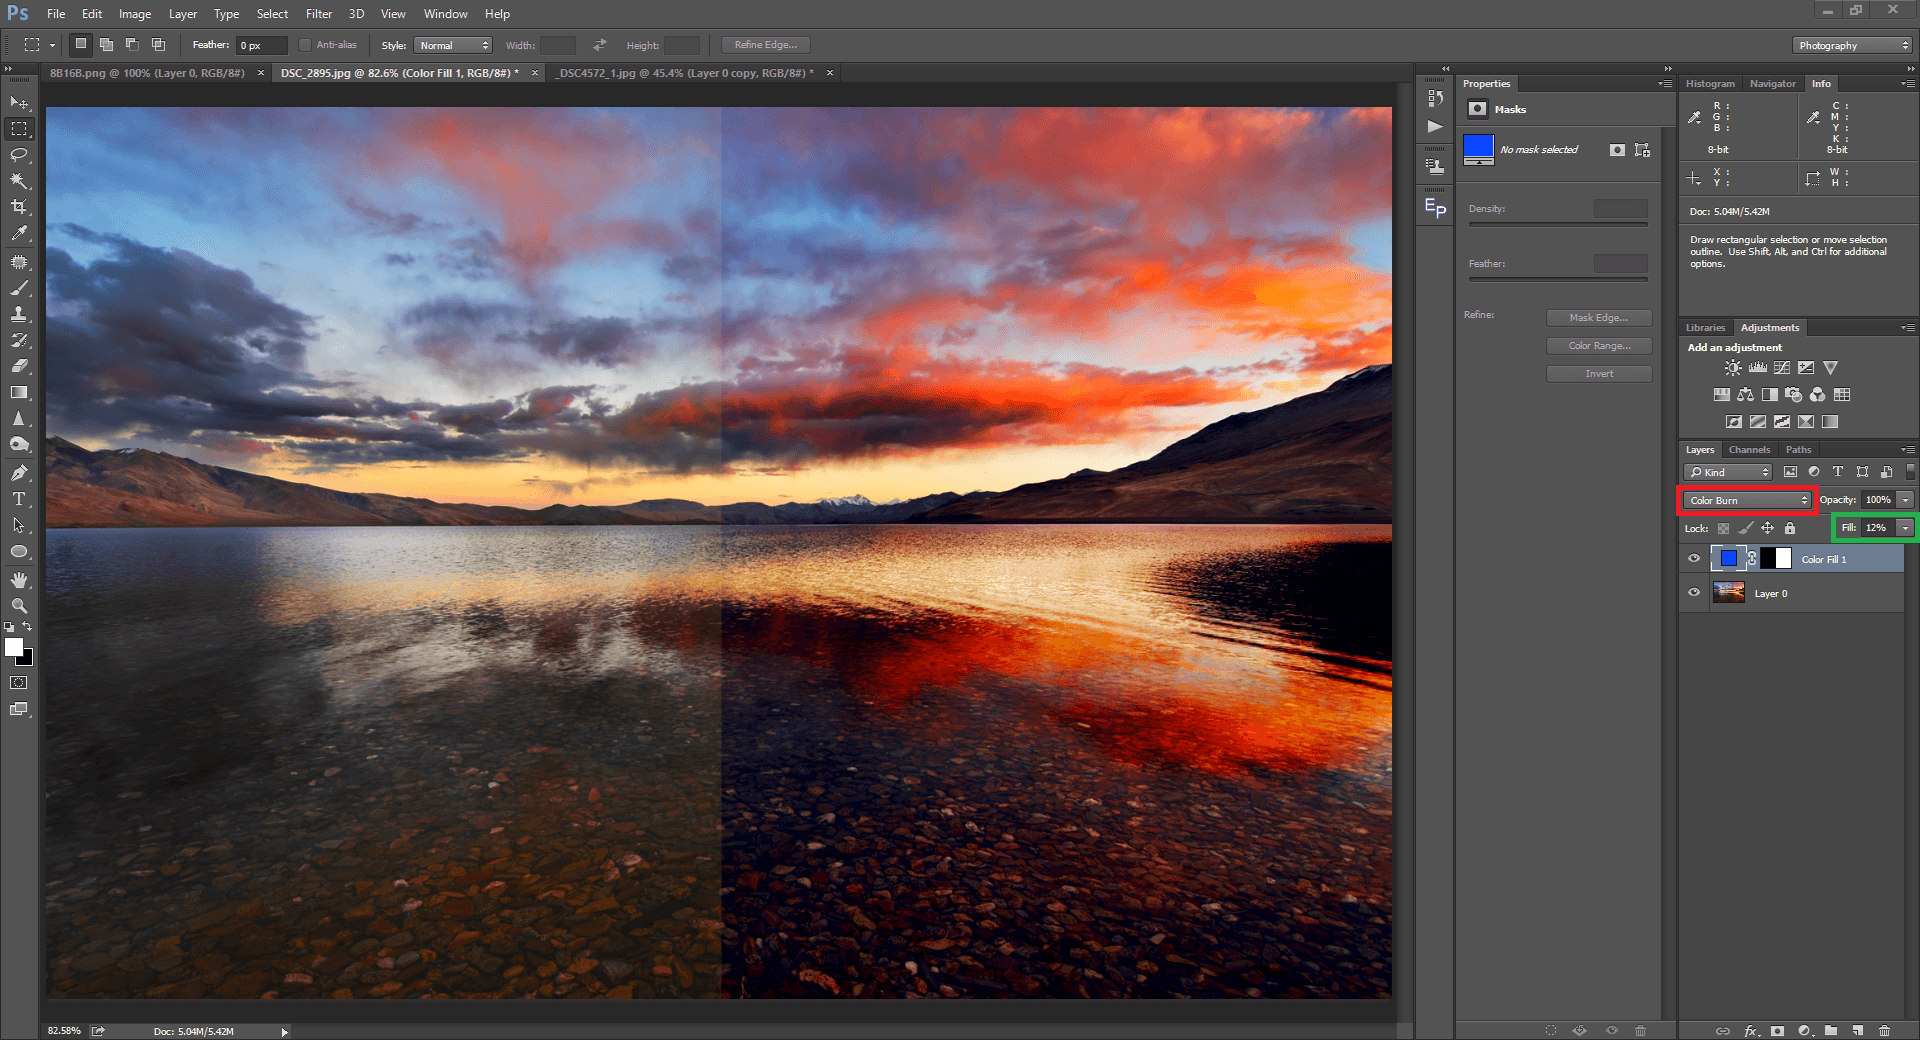
I added a solid color layer (with a saturated tone of blue) over the image and selected the Color Burn blend mode. To control its strength, I pulled the Fill down to 12%. In most cases, controlling the Fill gives better results than changing the opacity, provided the selected blend mode is one of the special blend modes.
As mentioned earlier in the article, Color burn adds color. So obviously, this blend mode tends to oversaturate. Care should be taken not to oversaturate.
7. Screen
If you have understood the darken blend modes above, you aren’t going to take much time understanding the lighten blend modes. They simply are exact opposites. Screen is the opposite of Multiply. The screen blend mode works just like multiply. The only difference is that it reverses 0 and 1 in Photoshop’s math. It considers pure black as 1 and pure white as 0.
7.1. Using Screen Blend Mode to Brighten
Screen blend mode becomes a simple one click solution to brighten images. Take a look at the picture below, which I think is too dark:
You can use the Screen blend mode to brighten this image very easily. Simply make a copy of the image as a new layer using control/command + J and change the blend mode to Screen. The result is shown below, and you can lower the opacity or fill to make the effect less pronounced if desired:
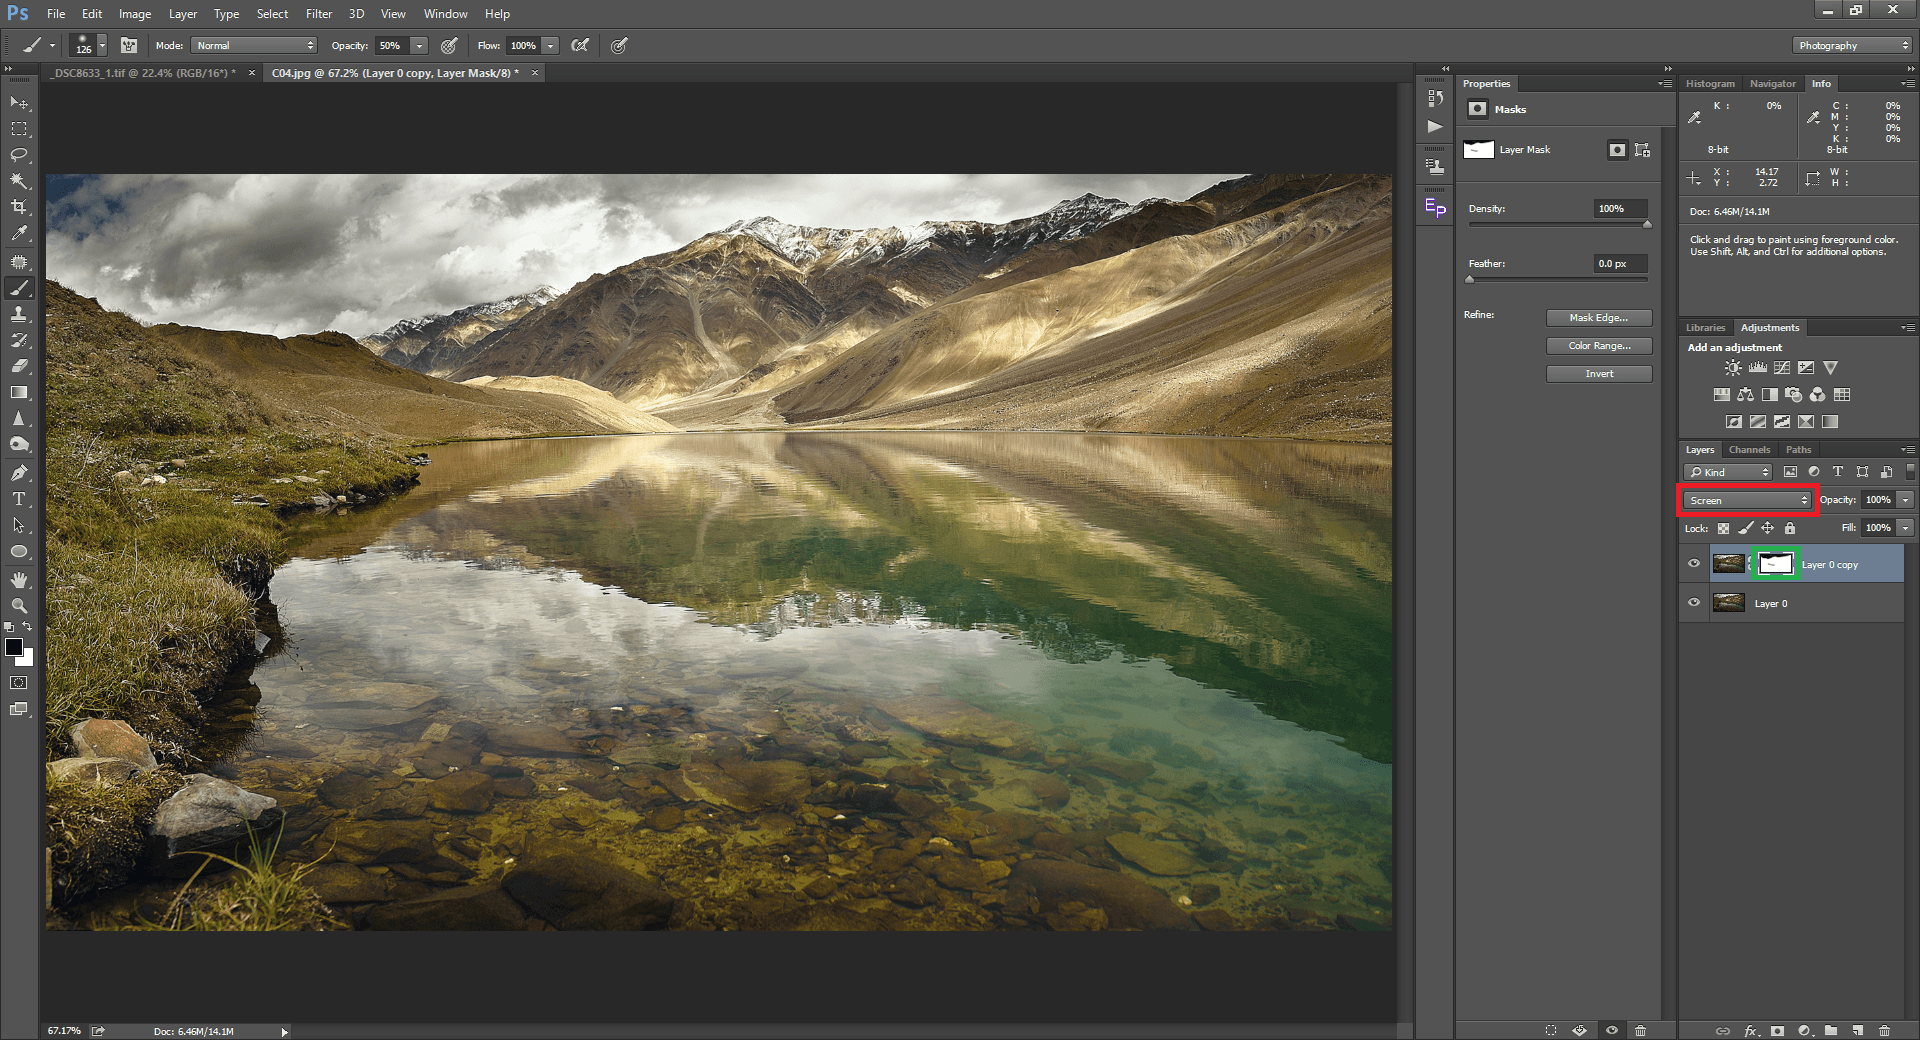
This blend mode has a strong effect on highlights and can make them look overexposed, so I masked out the effect from the clouds at the top of the image. You can see my mask highlighted in green.
Beyond that, one of the best parts about the Screen blend mode is that it doesn’t have much of an effect on the darkest shadows, meaning that it’s a good way to boost a photo’s brightness without losing lots of contrast. You might be used to brightening a photo with a Camera Raw filter or a brightness adjustment layer, but I encourage you to try the screen blend mode at some point instead (in combination with a layer mask to avoid blowing out the highlights).
8. Color Dodge
As the name implies, Color Dodge saturates the color as well as brightening the image. It is simply the opposite of Color Burn. You can use it in combination with a low Fill to brighten and saturate just the highlight regions of an image. However, it is very easy to blow out highlights using Color Dodge, so I personally do not use it all that often.
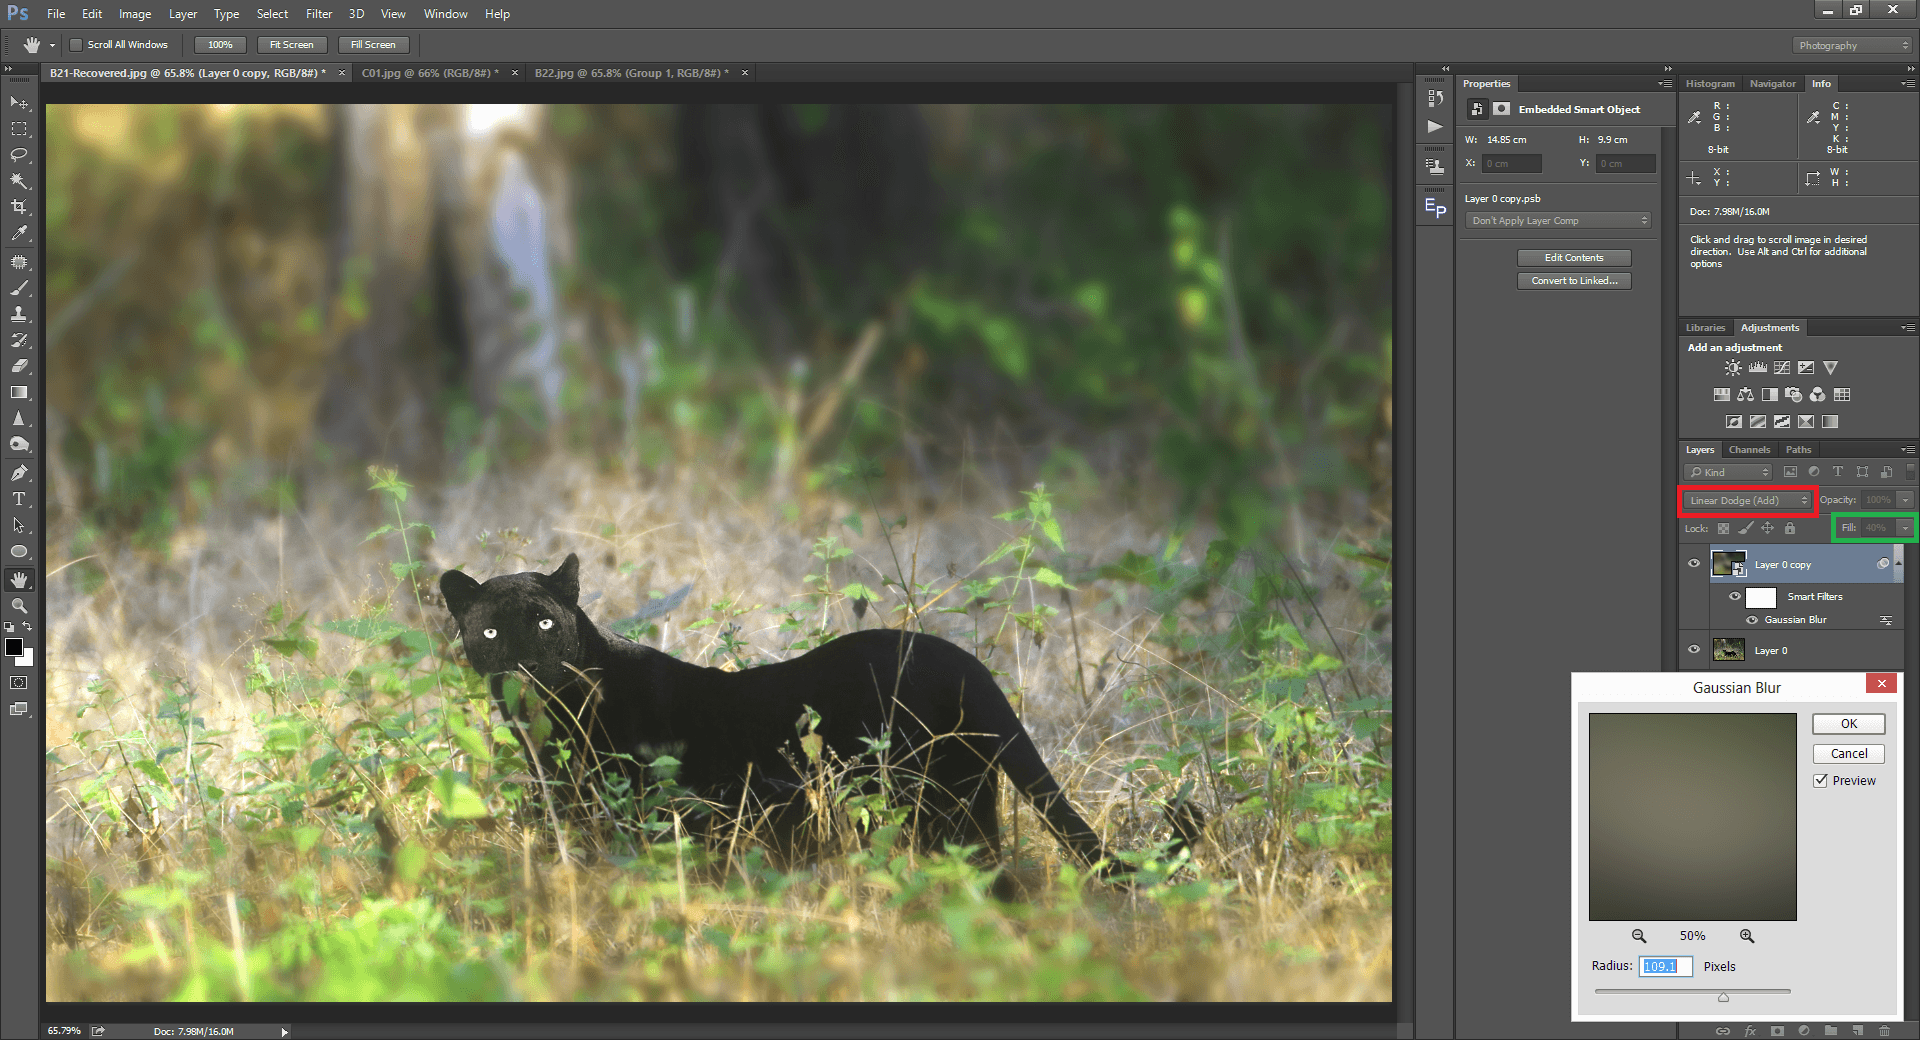
9. Linear Dodge
Linear Dodge sums the values of the two layers, which means it will give you much brighter images very quickly. It’s an even stronger brightening effect than Color Dodge. But it still has its uses in photography; let me show you how to use Linear Dodge to create the Orton Effect.
With Linear Dodge, creating Orton effect is a simple process. First, duplicate the layer with Control / Command + J. Second, convert the new top layer into a smart object. Then, select it and create a Gaussian Blur filter (Filter > Blur > Gaussian Blur). I used a radius of 109 pixels in this case, but if you think the blur or the brightness is too strong, you can always double click on the words “Gaussian Blur” below the layer to go back and lower it. (This is only possible if the layer is a smart object.)
Then, set the blend mode of the upper, blurred layer to Linear Dodge. Linear Dodge is also a special blend mode. Use the fill, if required to bring down the magnitude and projection. The result is as shown below:
10. Overlay
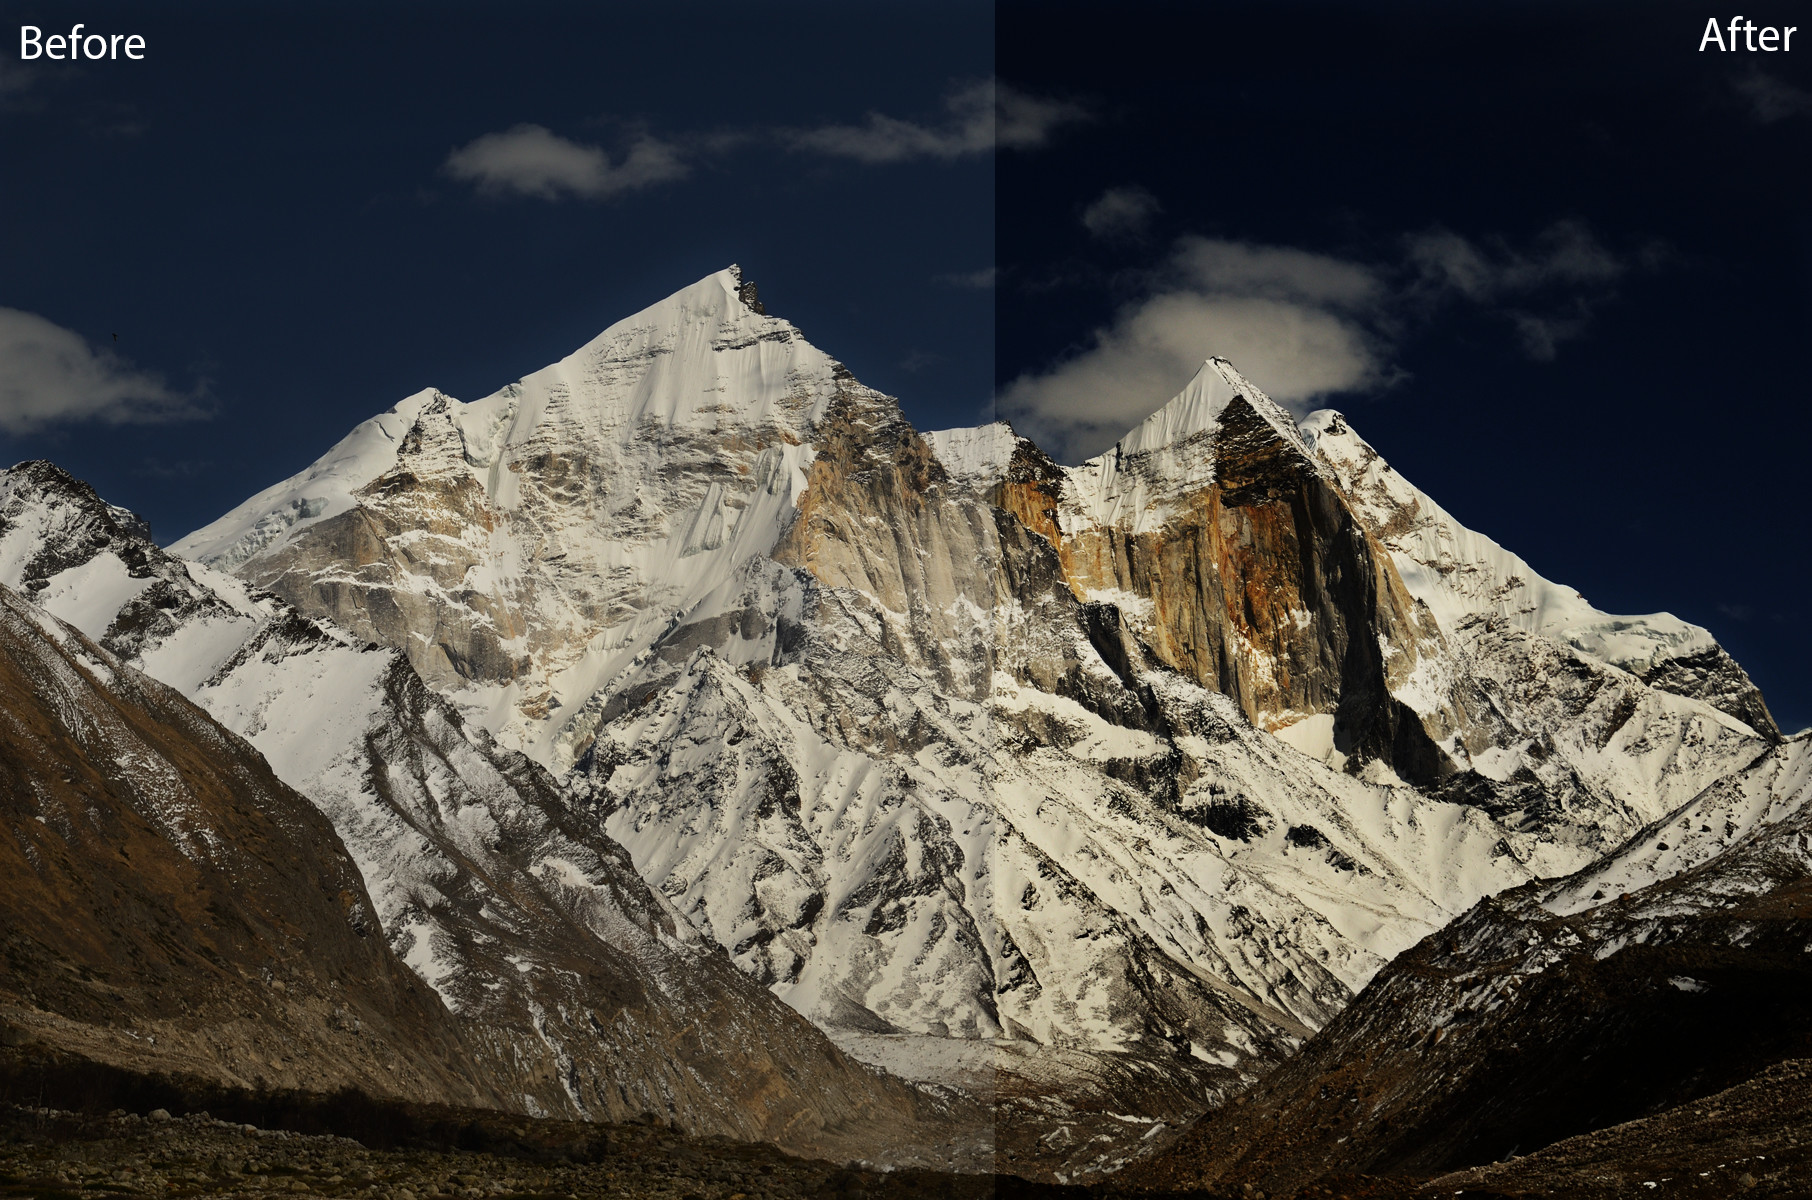
This is one of the most-used blend modes of all, and for good reason. Overlay brightens the brights and darkens the darks, while keeping middle gray as gray. Sounds familiar? What is brightening the highlights and darkening the shadows called? Contrast! Obviously, Overlay belongs to the contrast group.
Adding contrast using Overlay is pretty simple. You just need to duplicate your layer and change the blend mode to Overlay. As always, you can use the Opacity/Fill slider to bring down the intensity. As Overlay isn’t a special blend mode, both Opacity and Fill work the same way.
11. Soft Light
This blend mode works pretty similar to Overlay, but with lesser intensity. You can call it “subtle Overlay.”
Since we know how overlay works, let me explain one of the various uses of Soft Light: sharpening your image.
To sharpen your image using Soft Light, create a duplicate of your layer, and select the new top layer. Convert it to a smart object. Go to Filter > Other > High Pass. The High Pass filter applies contrast only to the edges of an image. Try pulling the slider to the right. You can see that the edges get more pronounced. Drag it too much, the algorithm will start sharpening the noise as well. Generally, a value between 5-8 on the slider works best.
Now click ok and change the blend mode to Soft Light. You can see that the outcome is sharper, without having sharpened the image’s noise.
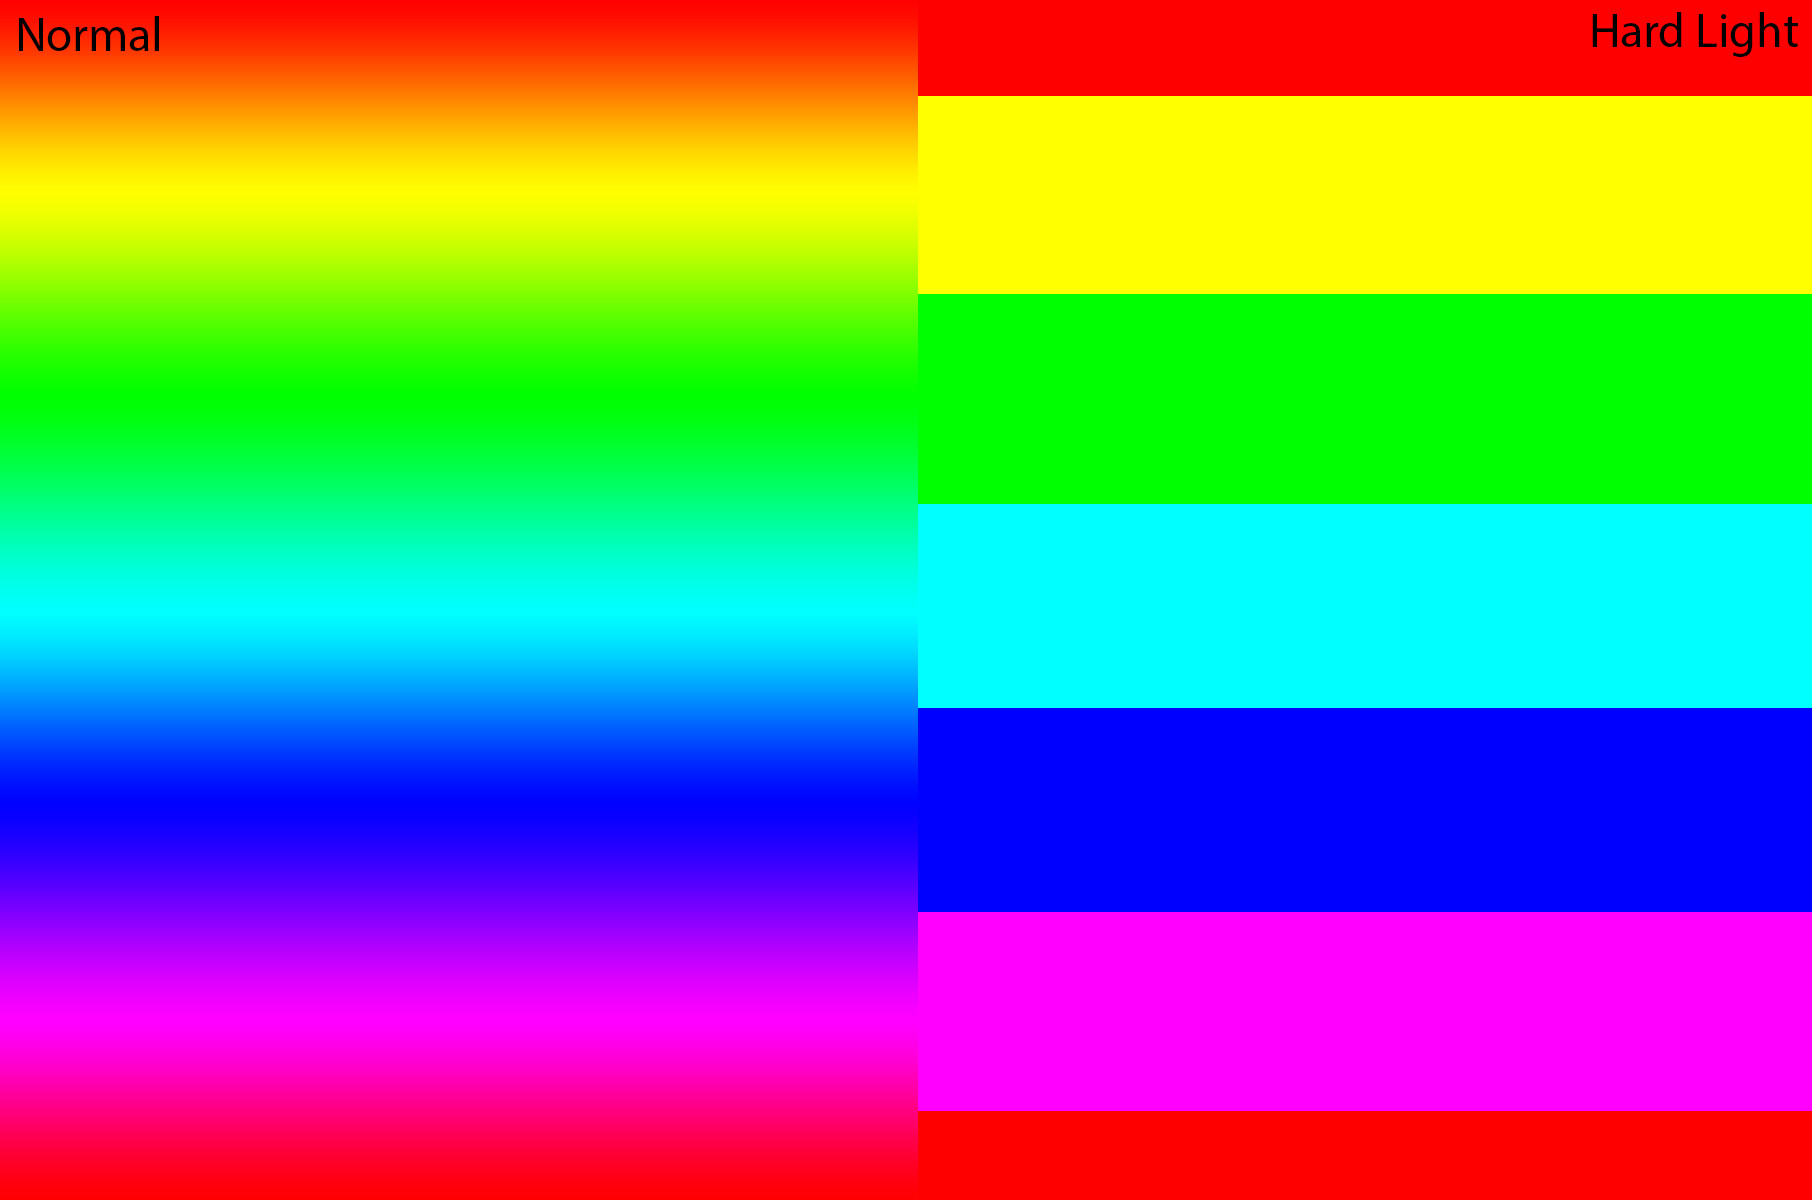
12. Hard Light
The Hard Light blend mode converts all the RGB colors to its nearest base color. Take a look at the illustration below to understand.
One might wonder where to use this mode. For obvious reasons, we photographers do not use it directly. But this blend mode has its indirect uses like selection. For example, you have an image with a gradient which is hard to select using the quick select or the magic wand. In that case, you can make a copy of the layer, convert it to Hard Light, and make an easy selection on the Hard Light layer. You can then save your selection as a channel or layer mask, delete the Hard Light layer, and apply your selection back to the original image.
Conclusion
I hope this article gave you some insights into how the blend modes in Photoshop work for photography. Although I didn’t cover all of them, the twelve that I’ve detailed above are the ones I use the most in day-to-day photography. Of course, the applications of the various blend modes are endless. Once you understand how they work, there are so many ways to use them, whether for photography, graphic design, or whatever project you’re working on.
The examples I used in this article were primarily meant for easy understanding, but you can go much further than this. For example, you can try applying different blend modes to adjustment layers rather than to duplicates of your original layer. I routinely use the Overlay blend mode on a saturation adjustment layer as a final step in my editing process. It adds to the photo’s overall contrast in a way that I like. So, go ahead and experiment with them!
If you have any questions or wish to add something that you felt was missing in this article, please write it down in the comments section so that our readers could benefit from it. Everyone has their own favorite uses for these blend modes, and we’d love to hear which ones you use and recommend the most.
I read your all articles, that’s really amazing and very helpful. Thank you so much for Information provided enginfo.marathivachak.com
Great explanation, so much info! Thanks!! :)
Thanks a lot. Very well written, very informative and very helpful.. I am a fan of your YouTube channel too..
So well written and explained. Have you written any book on photoshop?
Thanks for this great explanation, it has really helped a lot! Many of the blend modes have been a mystery to me until now — and now it’s all finally making sense to me.
Gregory,
I’m glad it helped
Have you been able to find any documentation from Adobe on the exact math of the special modes Fill function? I’d like to figure out how exactly they function but for now just testing on color wheels and gradients to reverse engineer it.
Excellent survey. Very well written
Great Article. I am now motivated to venture beyond Overlay, Soft light and Luminosity blend modes. Thank you Madhu !
Thanks Krish. I’m glad it gave you more to ponder upon.
Great article Madhu. I use the blend modes frequently but your article encourages me to use and understand them even more. Thanks so much. Also, excellent photos, congrats
Thanks Fernando. I’m glad you found it useful.