In this article, I want to share some of the most important tips I have learned as a photographer over the years – the bits of knowledge that I try to keep in mind for every photo captured, and the things I wish I knew early on. Almost all these tips are related to composition and creativity, not camera equipment, but it’s a bit deceiving; you still need a grasp of the technical side of things if you want to master photography.
Below are the top tips you should keep in mind when you’re moving from beginner to intermediate level in photography.
Table of Contents
1. Don’t Follow the Rules
This is the first tip on the list – don’t follow the rules – because it is arguably the most important.
You still have to learn how to use your camera. You still need to understand the basic ways to impact the mood of a photo. And you still need to keep learning new techniques in photography.
But don’t just follow the rules because someone told you so.

Photography is about creativity, and it doesn’t mesh well with a rigid mindset. Rules might work for yearbook portraits, where every photo needs to look the same. But if your goal is to create something that says something, following the rules is the easiest way to lose your personal style.
What do I mean by the rules? You’ve probably heard many of them before: “Don’t take pictures under harsh, midday sunlight”. “Compose your photos according to the rule of thirds whenever possible”. “Use a wide-angle lens for landscapes, and use a telephoto for wildlife”. “Don’t tilt your horizons”. “Make sure your main subject fills the frame”. The list goes on and on…
It’s all about what you’d expect, but there’s not much excitement to it.
Don’t get me wrong; sometimes, the best photo of a particular scene does coincide with some of the rules. But there is little correlation between “the best” photo of a scene and “the most rule-abiding” photo. The two are completely different.
If you look at the most famous photos in history, you’ll be shocked to see how few of them follow the rule of thirds, or were taken at golden hour, or used “the right” lens. Name a rule for taking good photos, and I guarantee that some of the best pictures of all time go completely in the opposite direction.
Some people say that you have to learn the rules to break them. If that works for you, don’t let me stop you. But if you try to internalize all the big and little rules of photography, spoken and unspoken, good luck untangling them from your personal style later on.

2. Focus On Emotion
Good photos grab our attention for one reason or another. They connect with us. They make us feel something – some sort of emotion.
Emotion is everything in photography. If your viewer doesn’t connect with your photo emotionally, do you think they’re going to remember it? Do you think they’ll remember you, years down the line, when they think about work that inspired their own photography?
I still remember my favorite photos (and paintings, and songs, and movies) because they made me feel emotion – probably the same emotion the artists themselves felt while creating the piece.
Do you know why we love books? No matter how untalented we are in a particular area, no matter how ignorant, books let us peek into the world’s greatest minds. It’s the closest you can get to thinking the same thoughts as Plato and Aristotle, or Marie Curie, or Albert Einstein.
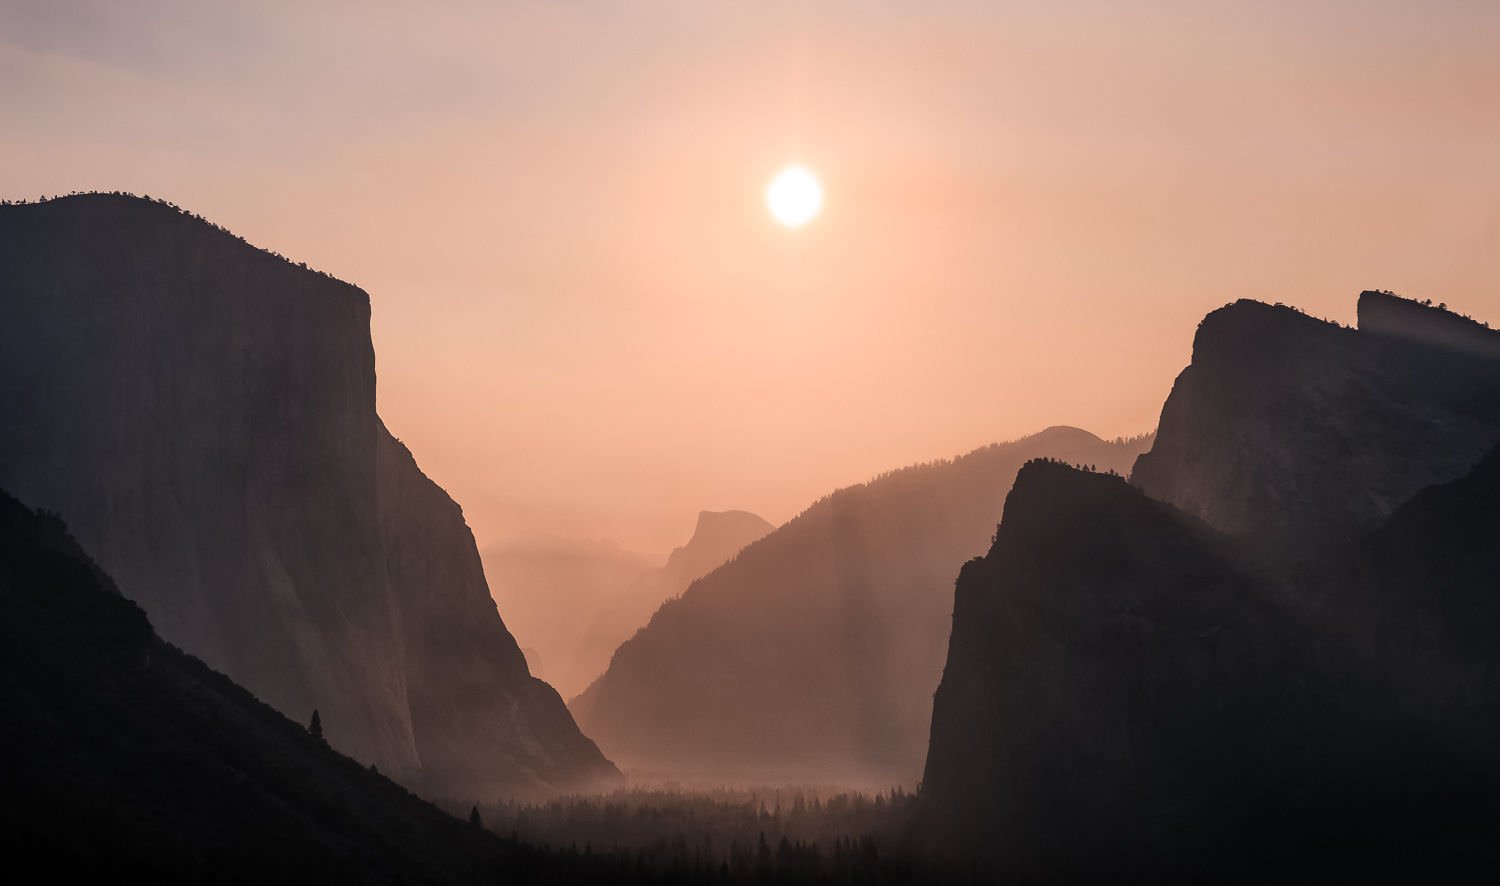
A brilliant, emotional photograph is no different. You know exactly what Ansel Adams felt while looking at Yosemite, because you can see it in his photos. You can feel it. It’s all there in the way he composed his frame.
So how in the world do put emotion like that into your own photos? The answer is easier than you think, although deceptively hard as well: Just make conscious decisions.
Every decision you make in a photo skews its emotional impact. What time of day are you photographing the scene? Under what weather conditions? Is your composition balanced or imbalanced; the colors vivid or subdued? Does your main subject stand powerful against the rest of the image, or is it a speck in the middle of a barren wasteland?
All of these are decisions. And there are many others – dozens, hundreds – that you make for every photo. Most of it is unconscious, and that’s not good. The more you can pinpoint these unconscious decisions and bring them to the surface, the more you can tilt the emotional scales of a photo to match the way you really felt at the time. And the stronger your photos will be.
3. Put in Some Effort
It’s easy to take quick photos of a scene without much effort. But remember the previous tip: Meaningful photos are a product of thoughtful decisions. If you want to change the “default answer” for some element of a photo, it often takes at least a bit of effort.
Is “eye-level” really the best, most effective way to capture your subject? Is the lens you already have on your camera the right one? Are you standing at the perfect spot to emphasize everything exactly how you want?
Good photos are worth the effort. This doesn’t mean you need to run up a hill with your camera gear or otherwise push yourself physically to the limit. Sometimes, it’s as easy as stopping the car and getting out when it would be easier just to keep driving. Or trying out more than just one composition at a promising scene.
Put effort into your photos, and they’ll find a way to meet you halfway.
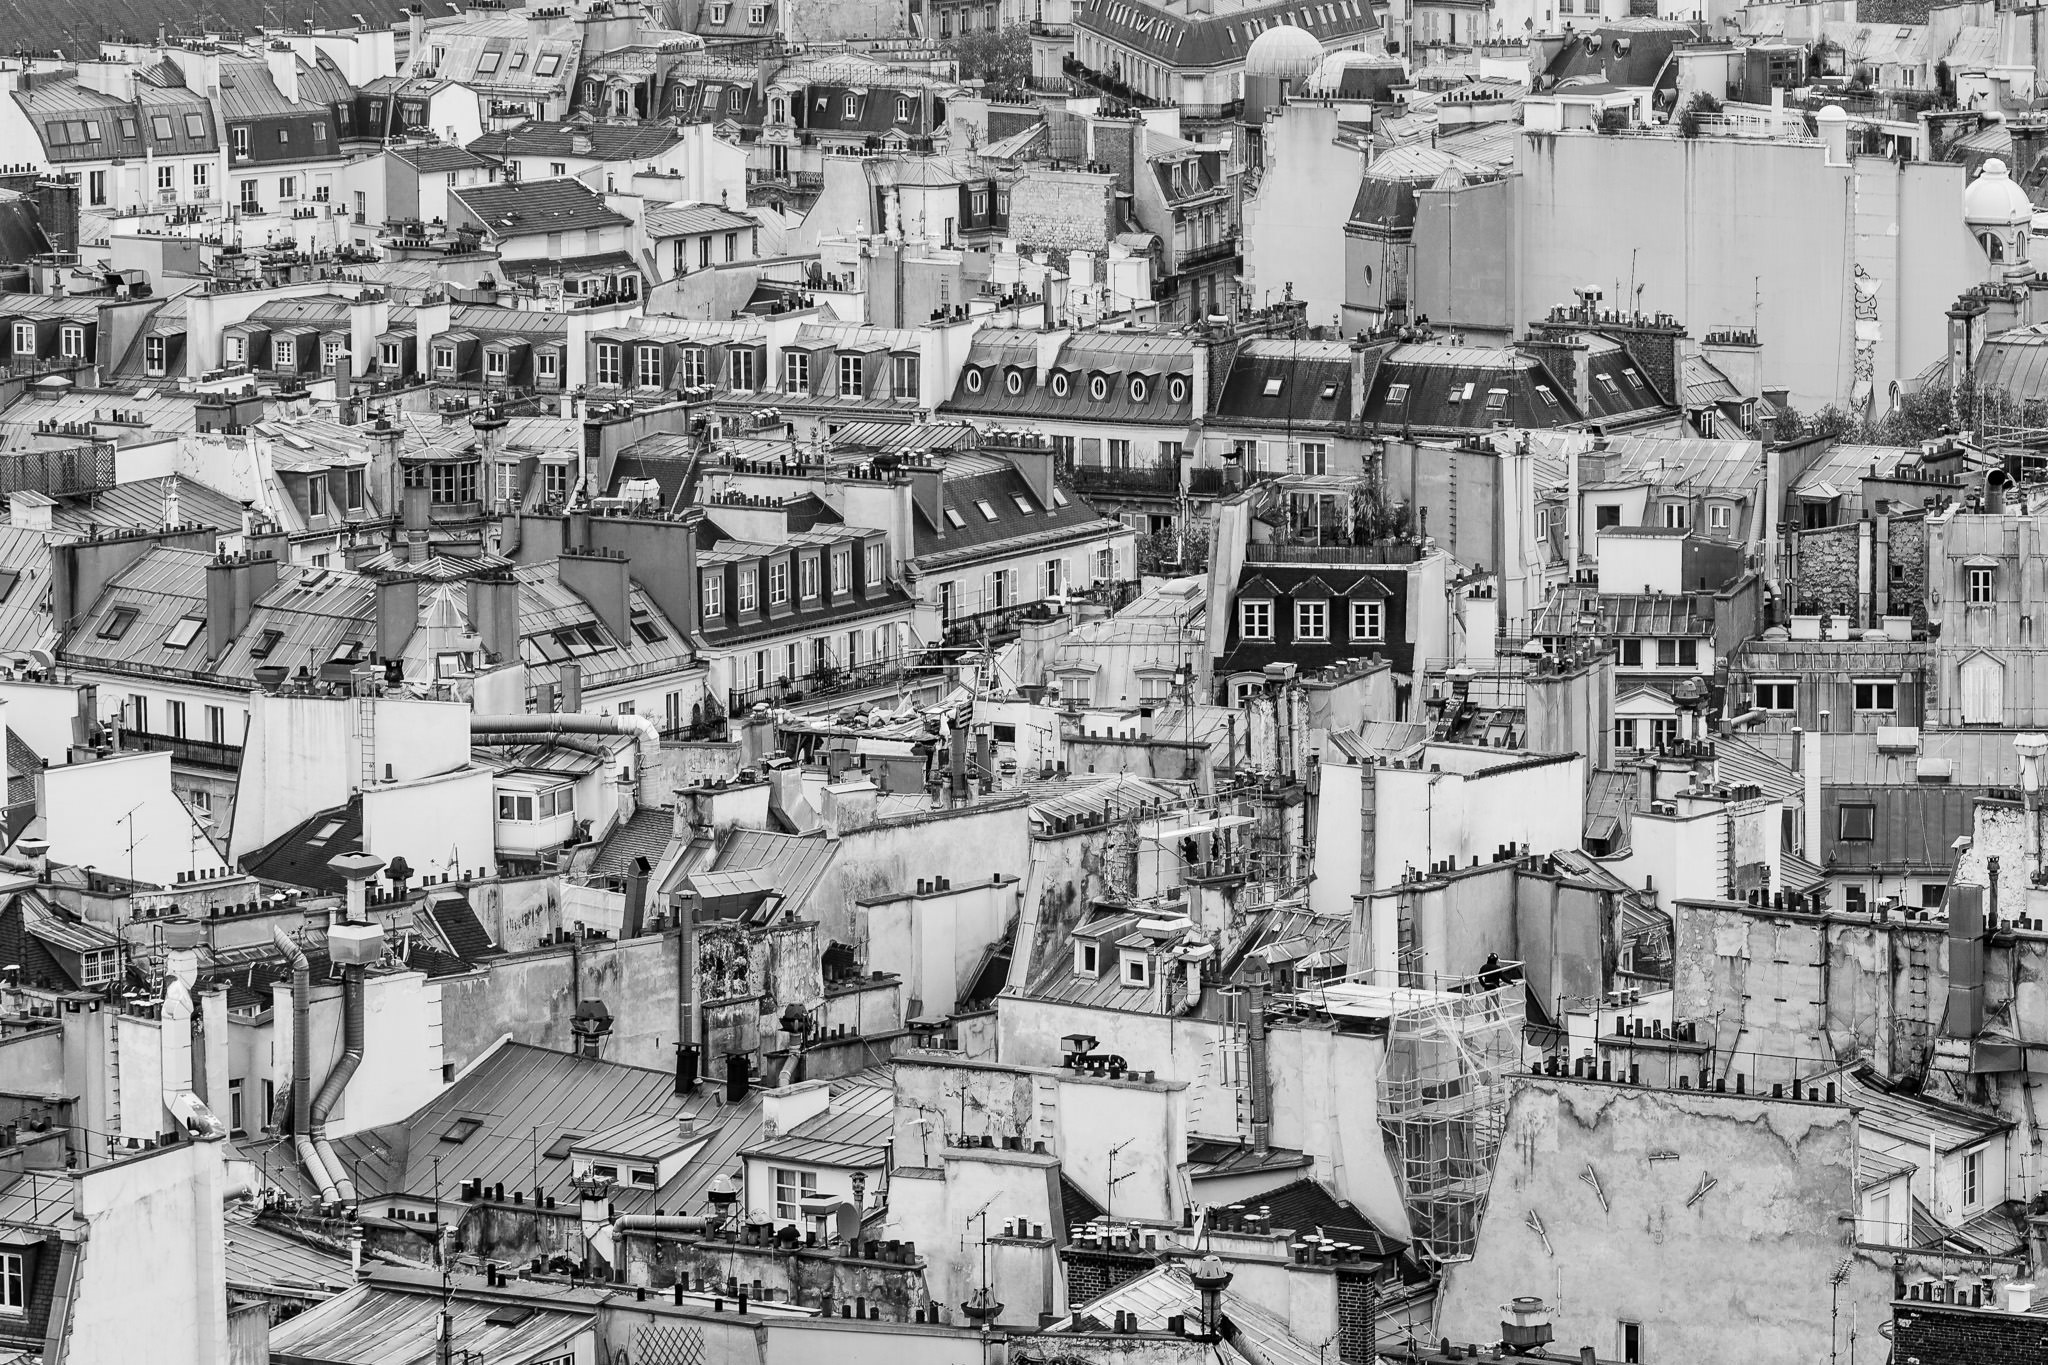
4. Simplify
One of the best ways to make your emotional message as strong as possible is to exclude anything in the photo that takes away from that message.
This requires a degree of thoughtfulness and intent when you’re in the field. You need to know what parts of the photo are helping and what parts are hurting. Then start asking yourself how to eliminate the problems.
Should you change around your composition or camera position? What about – in something like studio photography – adjusting the subject itself to fit your message more strongly?
When I’m composing photos, I spend at least half my time finding a way to simplify the message I want to convey.
But that doesn’t necessarily mean what you think it means. It’s not about eliminating as much as possible from the photo until your final composition is empty and minimalist. Not at all! That’s sometimes what you want, but other times it’s the opposite; your goal might be to take a complex, disorderly photo.
You can apply this same principle – simplification – even when you want your photo to be a chaotic mess. Just eliminate anything from the composition that makes your photo more grounded and harmonious.
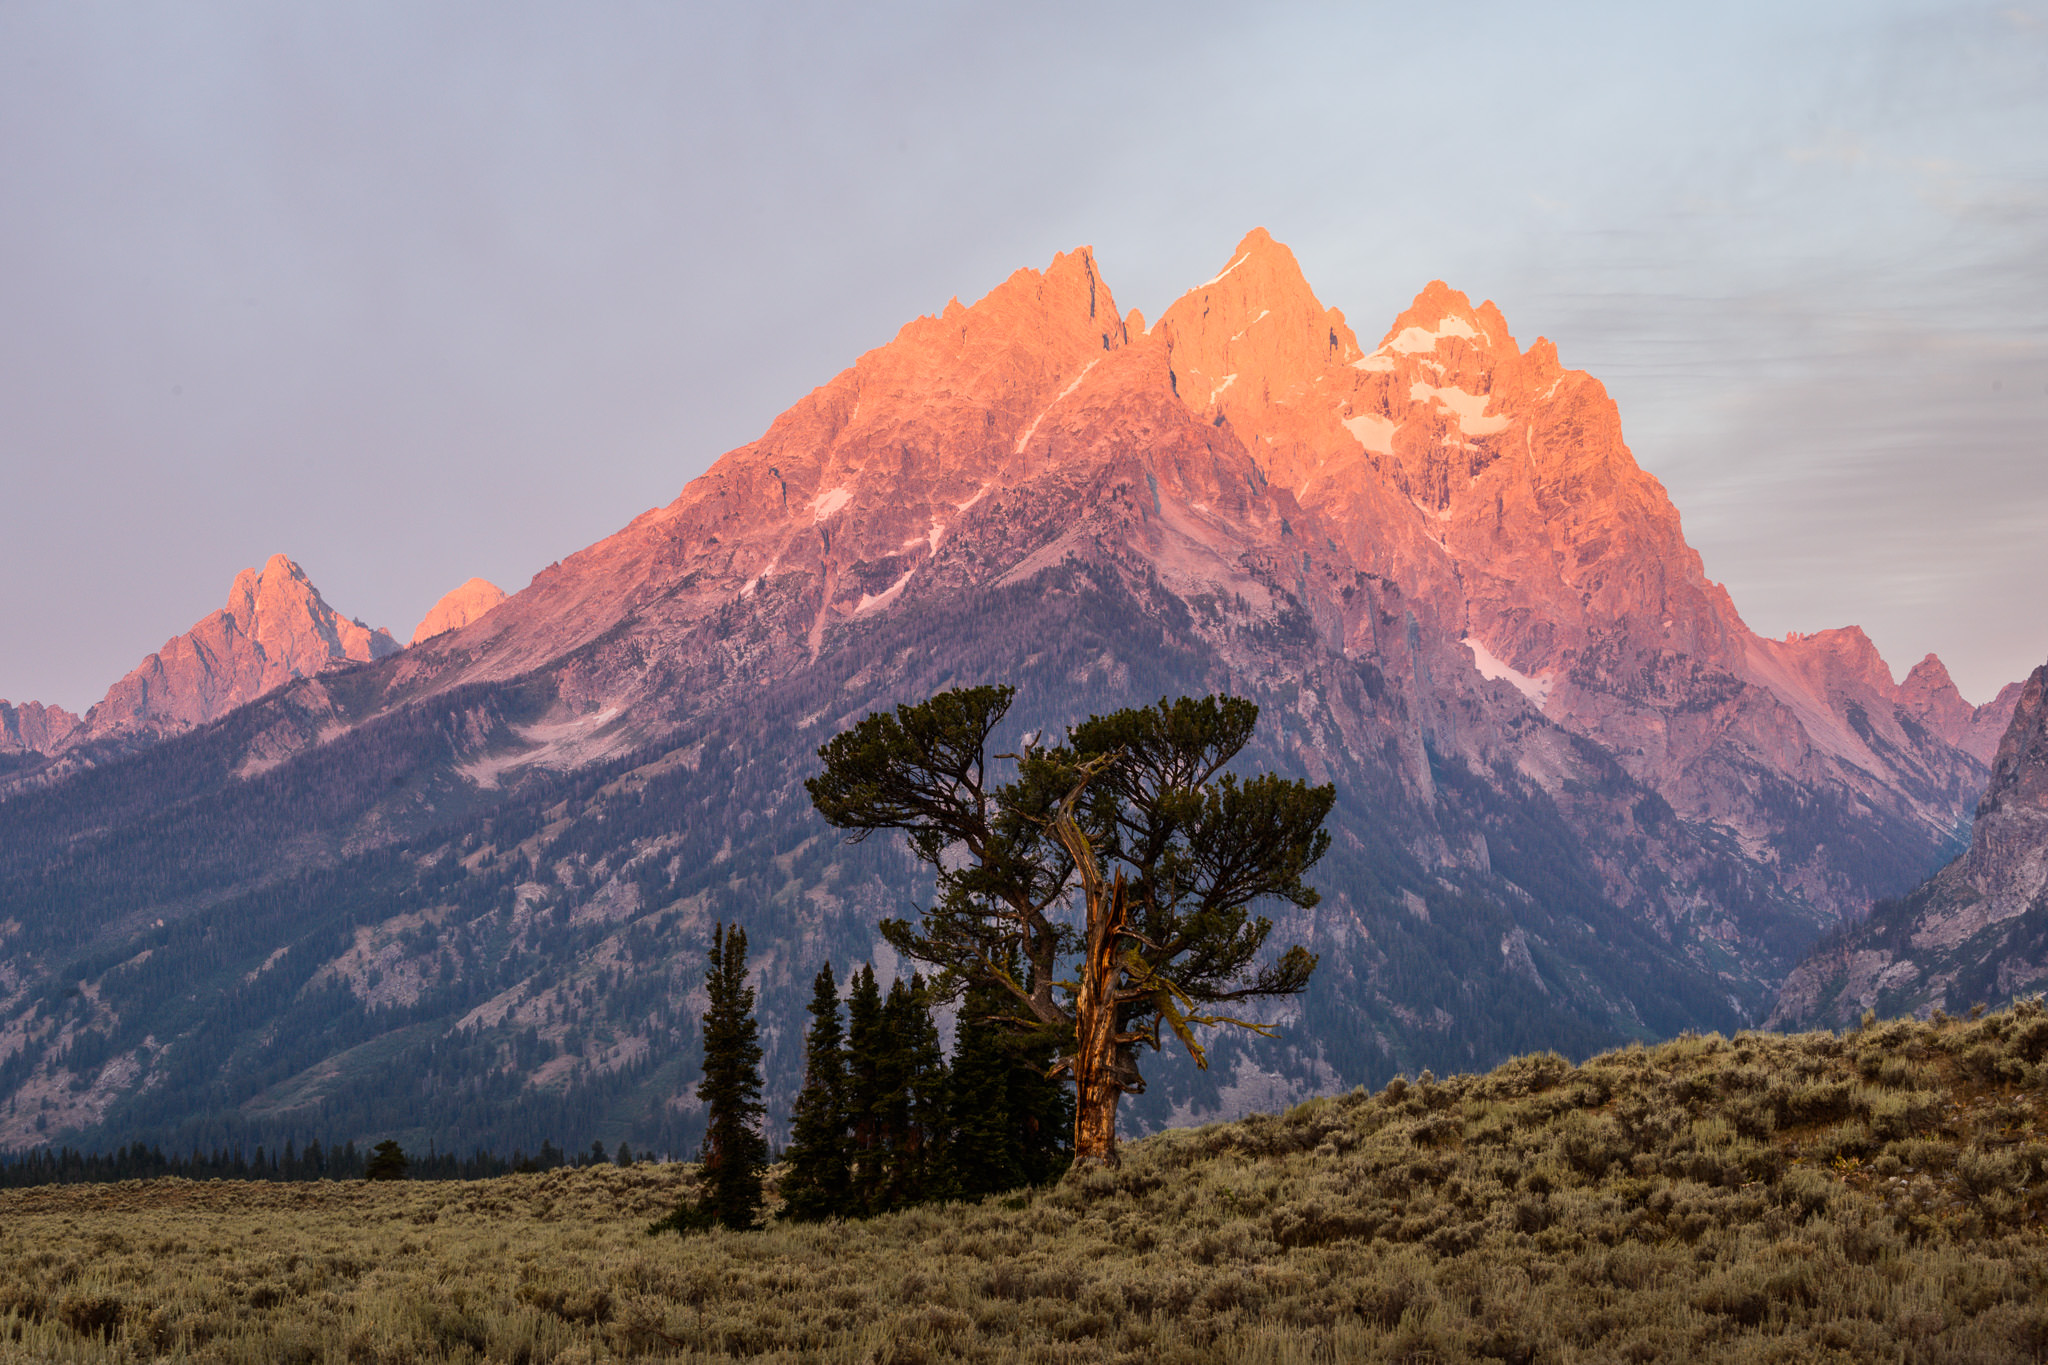
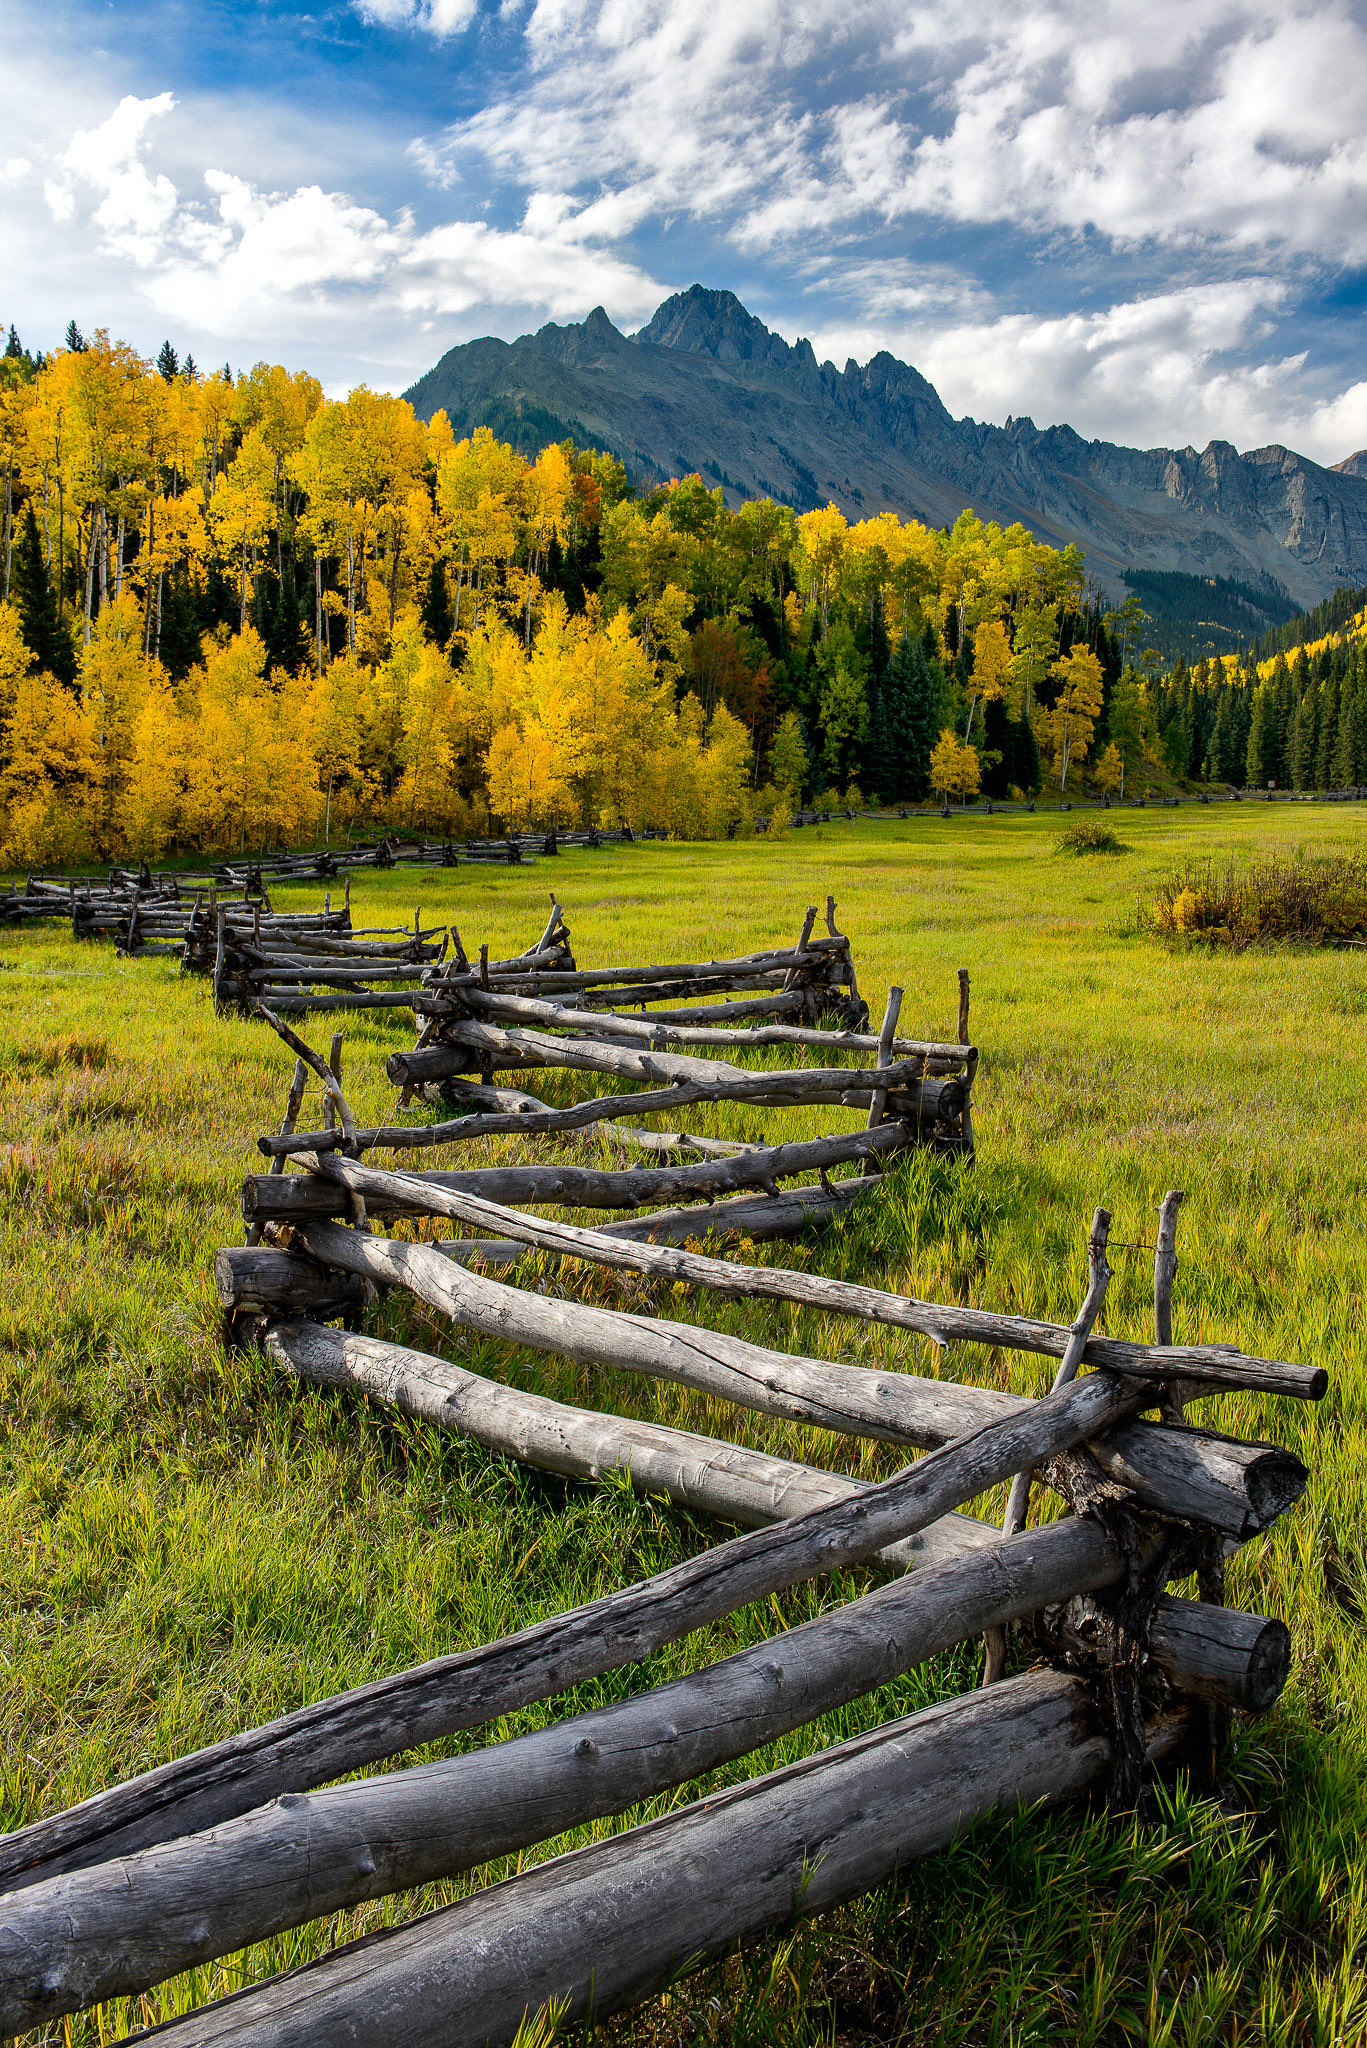
5. Find Good Light – For Your Subject
Remember rule number one? There are no rules. There’s no such thing as universally good or bad light in photography.
But there is such a thing as good light for your particular subject. Whatever emotions your subject carries – intensity, gentleness, subtlety, isolation, warmth – some type of light carries similar emotions.
When both your subject and your light say something similar, your photo, and your emotional message, will harmonize with one another. Your message will be as cohesive as possible.
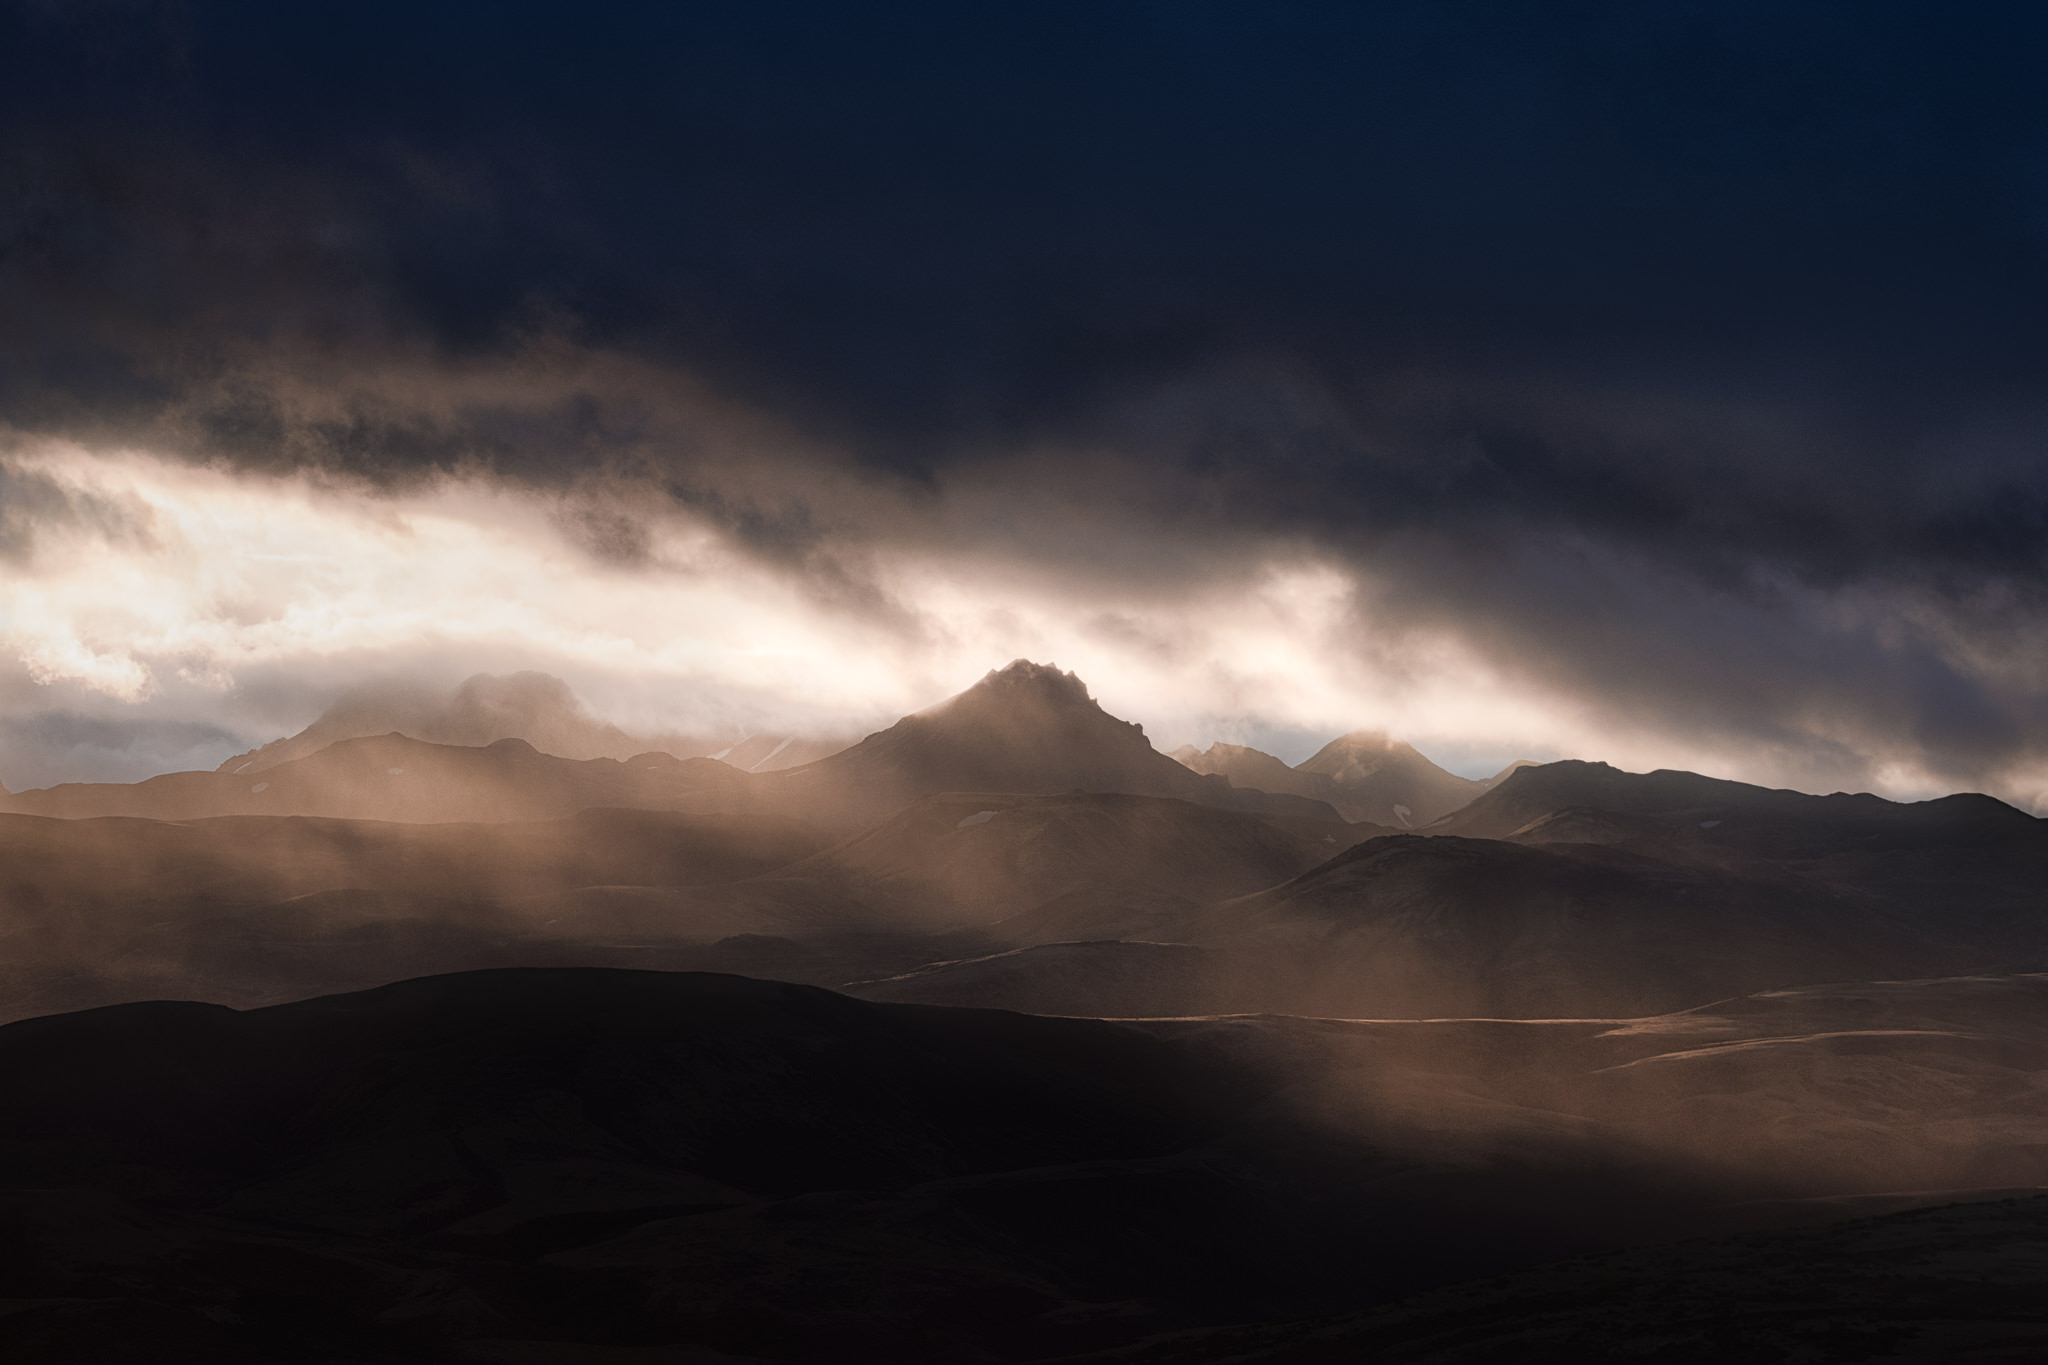
“Golden hour” around sunset and sunrise has a great reputation among photographers, and it works very well with many subjects. But in some cases, the message carried by soft sunlight and vivid colors is completely at odds with the message you want to send. What about chaos, drama, tension? Or subtlety and bleakness? Perhaps the best light to match your scene is a storm cloud overhead or an impenetrable fog.
Good light is light that complements your subject and makes it look the way you want. For every subject and every emotional message, some lighting condition will look the best. It just might not be the one you expect.
6. Look Behind You
Photographers tend to be very focused people. When we concentrate on the world in front of us, we can lose sight of the world around us. Sometimes, though, the best photographs simply happen in the opposite direction.
So, when you’re out taking pictures, remind yourself to keep looking around so you don’t miss anything good. Look behind you, in particular, since it’s easy to lose track of the scene in the opposite direction. I’ve taken some of my favorite photos by turning around and seeing an amazing scene – and I’ve missed at least as many good photos by forgetting to do so.
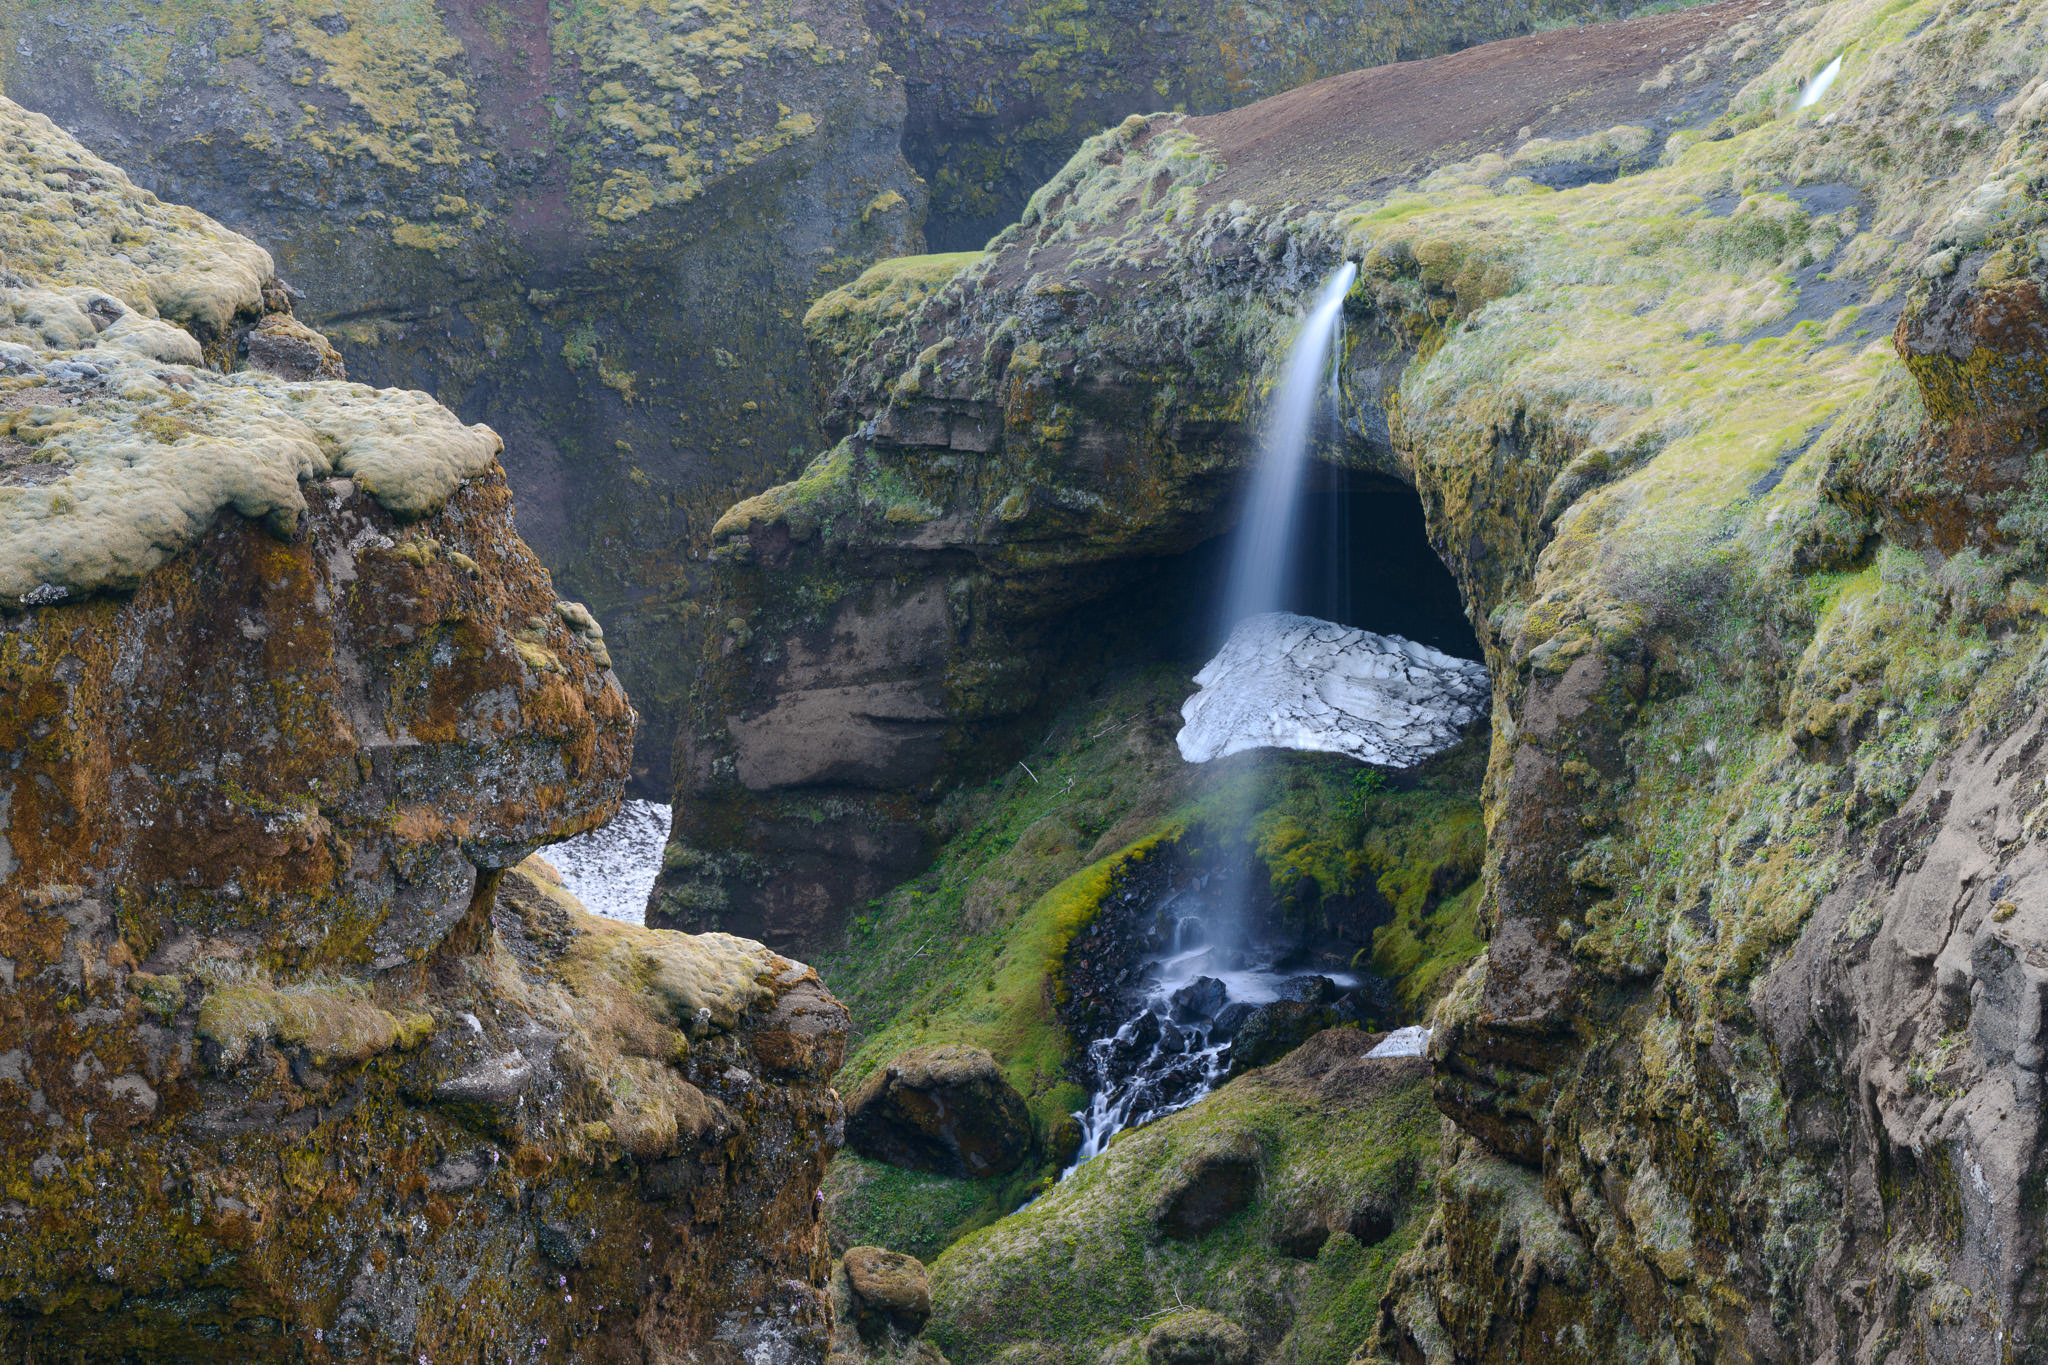
7. Refine Your Photos in the Field
Your best chance to improve a photo happens in the moments after you take it, when the subject is still in front of you and you can refine your composition. If you miss your chance, and the framing is awkward or your message isn’t clear, that’s it; you can only do so much to fix these things in Photoshop.
Quite often, I’ll take more than a dozen photos of a given scene, each one building on the last. It isn’t always the case, but the later photos generally work the best out of the set – because they’ve had the most thought put into them.
Especially if you have a promising composition or harmonious light, work with it a bit! Take a photo and pay attention to what looks good and bad. Improve it as much as you can in the field, making every part of the image as good as possible.
One of the worst feelings is to look at a nearly amazing photo on your computer, realizing that it’s only a small change away from being perfect. And then realizing that you didn’t refine your composition at all in the field, so you don’t have the shot you want.
Take a look at the series below, from start to finish:
8. Watch the Edges
It seems that distractions attract more and more attention the closer they are to the edge of a photo. To me, the edges of your composition are just as important as the center, even though they’re not what we gravitate toward immediately.
Sometimes, you can fix distractions pretty easily in Photoshop by cloning out pixels (although some photographers prefer not to do that, or aren’t allowed as part of their job). Other times, you can selectively darken and change contrast in distracting areas for a similar effect.
But once again, the best time to fix this is in the field. Watch the edges of your composition from the start, and you’ll account for them in your framing. You won’t always be able to clear the edges of all distractions, nor would you always want to do so – but either way, at least think about them in the field. Make sure they add to the photo you want to take.
9. Watch Your Primary Subject
There’s another type of distraction to keep in mind as well: anything that covers your primary subject. If your subject is obscured, it can lose a lot of its potential impact.
That’s not a universal rule (see tip #1). Sometimes, partly covering your main subject is a great idea, like showing just a single eye of an animal through a patch of leaves.
But if you cover part of your primary subject on accident, it can be distracting. You’ll end up with a photo that looks amazing, aside from blade of grass obscuring part of your foreground subject. Or you’ll take a great concert photo, except a single piece of confetti is blocking the performer’s eye.
So, watch out for your primary subject. If any less important object blocks it, make sure that’s how you want things to be.
10. Put It Into Perspective
One of the more overlooked tools of composition is perspective – the ability to move forward and backward to change the relative size of everything in your photo.
Say that you’re photographing a tree in front of a mountain, but the tree is huge and the mountain looks tiny in the distance. What do you do?
Simple – move backward, changing your perspective, so that the tree shrinks in size compared to the mountain. And then zoom in with a longer lens so that your subjects are both the right size in the frame.
11. Look For Interconnectedness and Visual Puns
Sometimes, you’ll notice a sense of similarity between two elements of a photo that ties them together and leads to a more unified photo. In the most extreme cases, these are almost “visual puns” that make it clear why the photographer chose to take a picture.
It’s like photographing a person in a red shirt walking by a red fire hydrant. Or a lighthouse reflected in a pool of water shaped exactly like the lighthouse.
This sort of interconnectedness doesn’t always, or even often, happen. It’s something you’ll only find from time to time. But keep an open mind, and you may notice something that strikes your eye and leads to a great photo.
12. Scout
The best way to take a good photo at sunset is to take a walk at noon.
Yes, I know that Tip #1 said sunset isn’t always good light and noon isn’t always bad light. So, if you like, flip the saying around: “The best way to take a good photo at noon is to take a walk at sunset”. Still applies.
When you scout for scenes, you’re thinking of good places to return when conditions are at their best. Whether this is for landscape photography, street photography, portraiture, or something else, you’ll always gain valuable knowledge on where to take photos if you just look around a bit.
Scouting is something of a hidden art in photography, but if you get it right, you’ll have a wealth of good locations at your disposal.

13. Form a Vision
A big part of taking great photos is picturing great photos in your head. If you look at the subject in front of you, can you envision the best possible image of that subject? Can you see how a master photographer would frame the photo, post-process it, and print it – before you even take the picture?
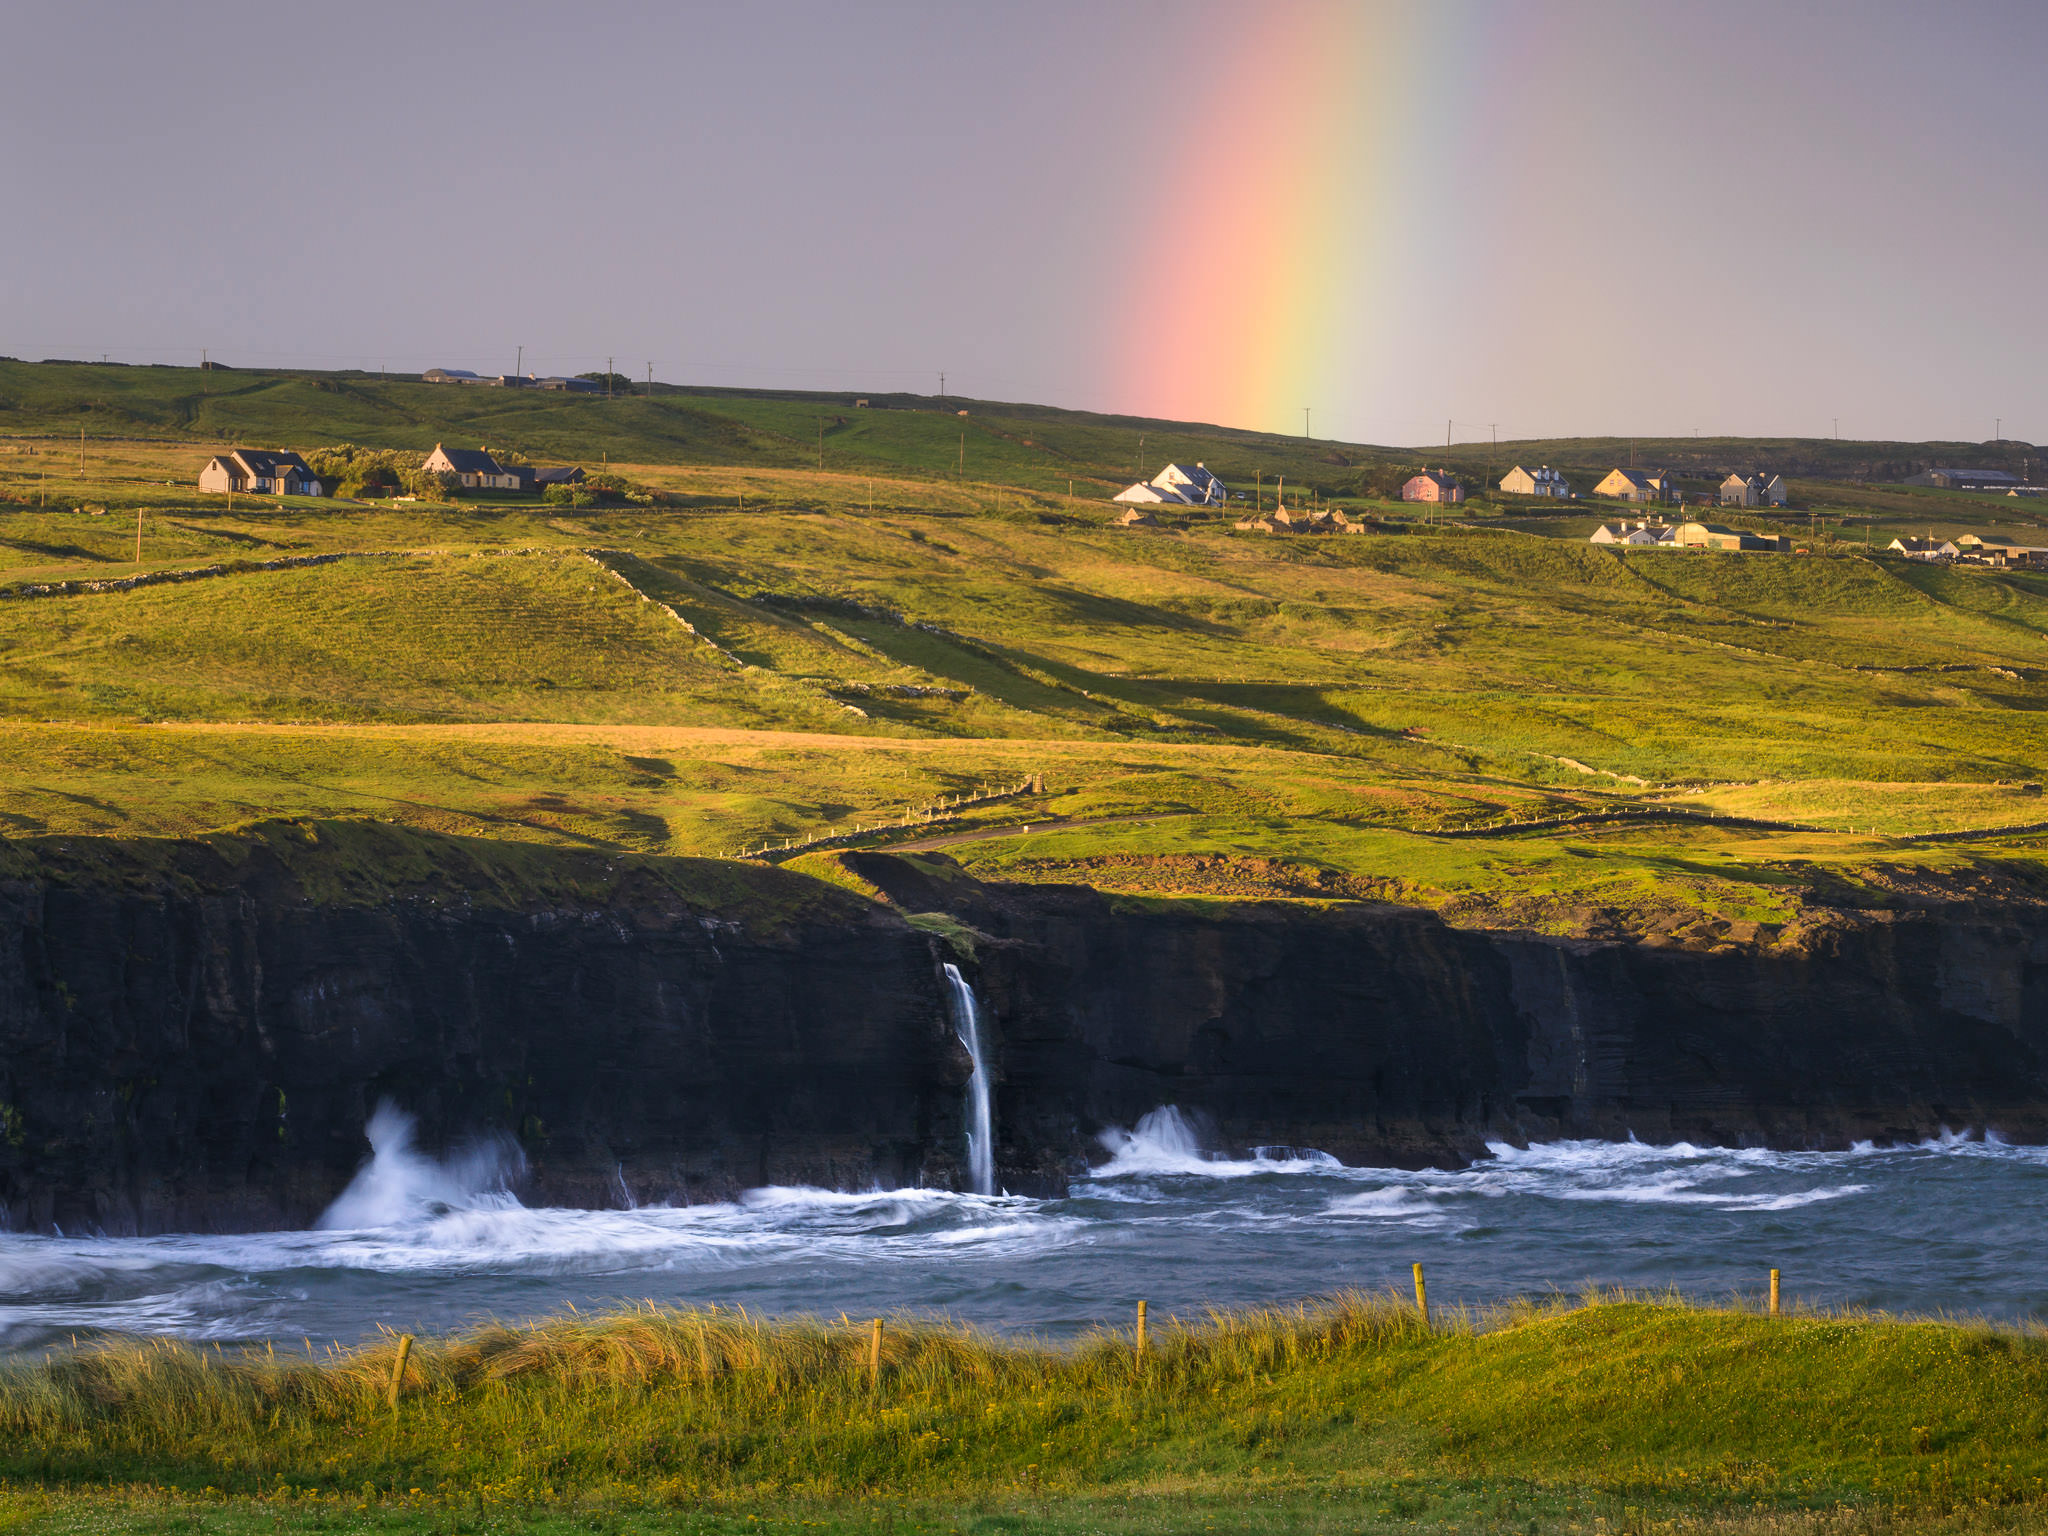
Imagine the best possible photo of the scene in front of you. Then do what you can to make that photo a reality. Take a look at this photo, for example:
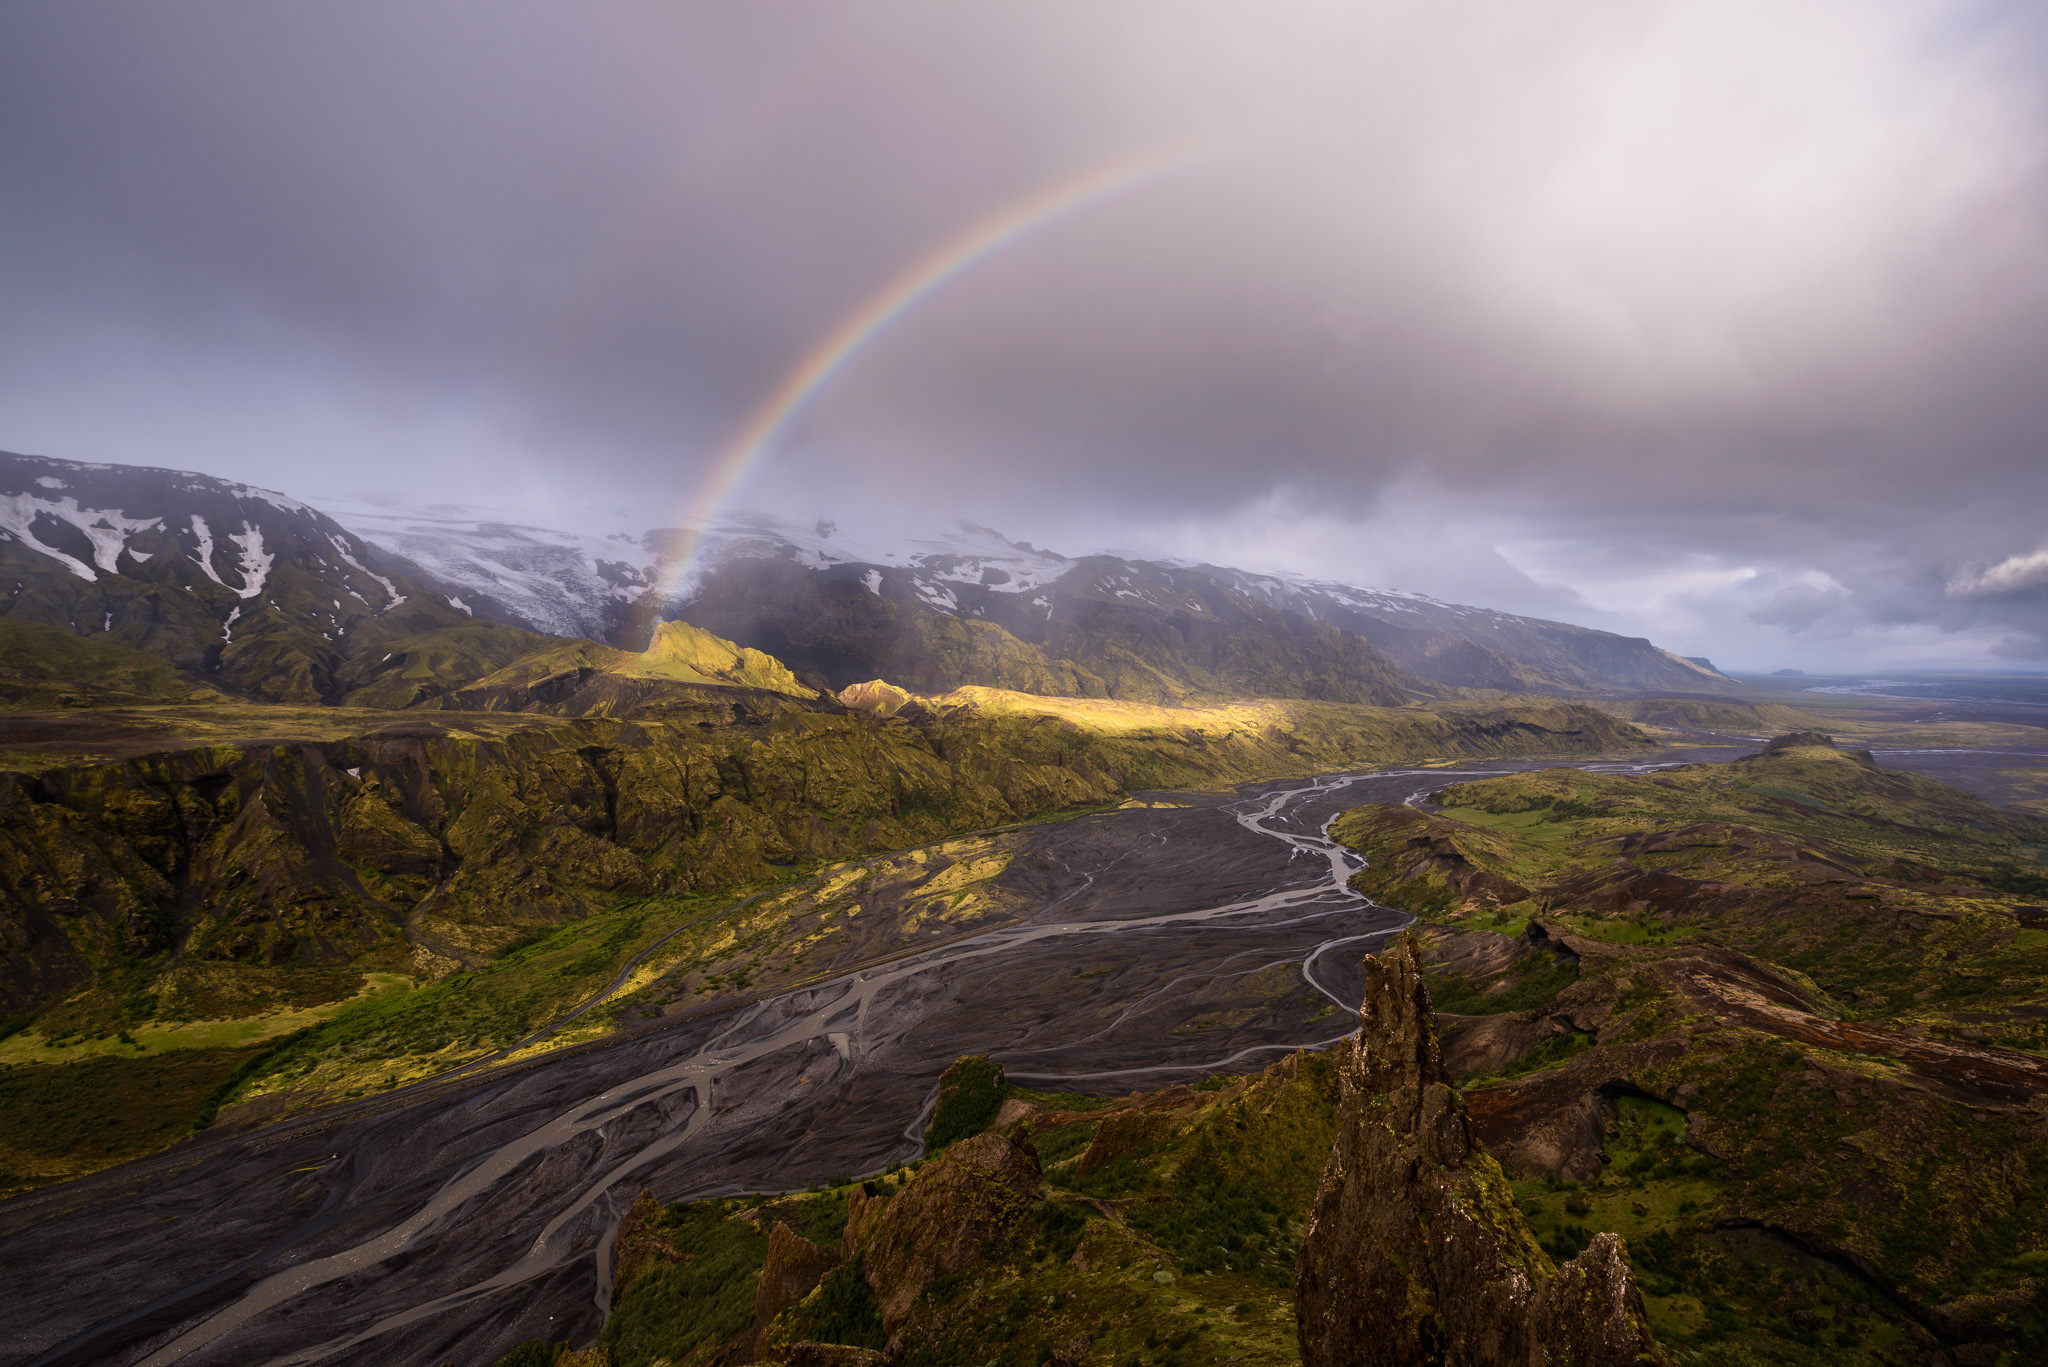
When I took the photo above, I had already been shooting sunrise from this vantage point for hours (thanks to the long sunrises during Iceland’s summer). As I hiked back down for breakfast, I saw a rainbow appear over the area I had been photographing. Even though I was nowhere near this spot, I saw the photo in my mind’s eye. I knew how it would look, and I knew it was worth running back to capture.
When I did, I was too late; the rainbow had faded. But I knew that the photo would be worth waiting for, so I waited. Less than thirty minutes later, another one appeared – and I got one of my favorite photos from the trip.
14. Match Your Tripod to Your Composition
This goes back to an earlier tip: #3, putting in some effort.
Most photographers set up their tripod at its maximum height, attach their camera, and then start composing. This is exactly backwards. Instead, try composing freehand, without a tripod to restrict your composition. When you’ve found the best possible camera spot – and only then – match your tripod to meet your framing.
Otherwise, you’re missing out on so many framing possibilities – quite often the best ones.
15. Capture Your Subject Doing Something
A landscape photo is nice. A bird photo is nice. A portrait photo is nice.
But are any of them memorable? The photos that stick with you aren’t just nice; they tell a story.
One of the strongest photos I remember shows an orangutan holding a leaf over his head to shield himself from the rain. Keywords: “holding”, “to shield.” It’s a photo of a subject doing something.
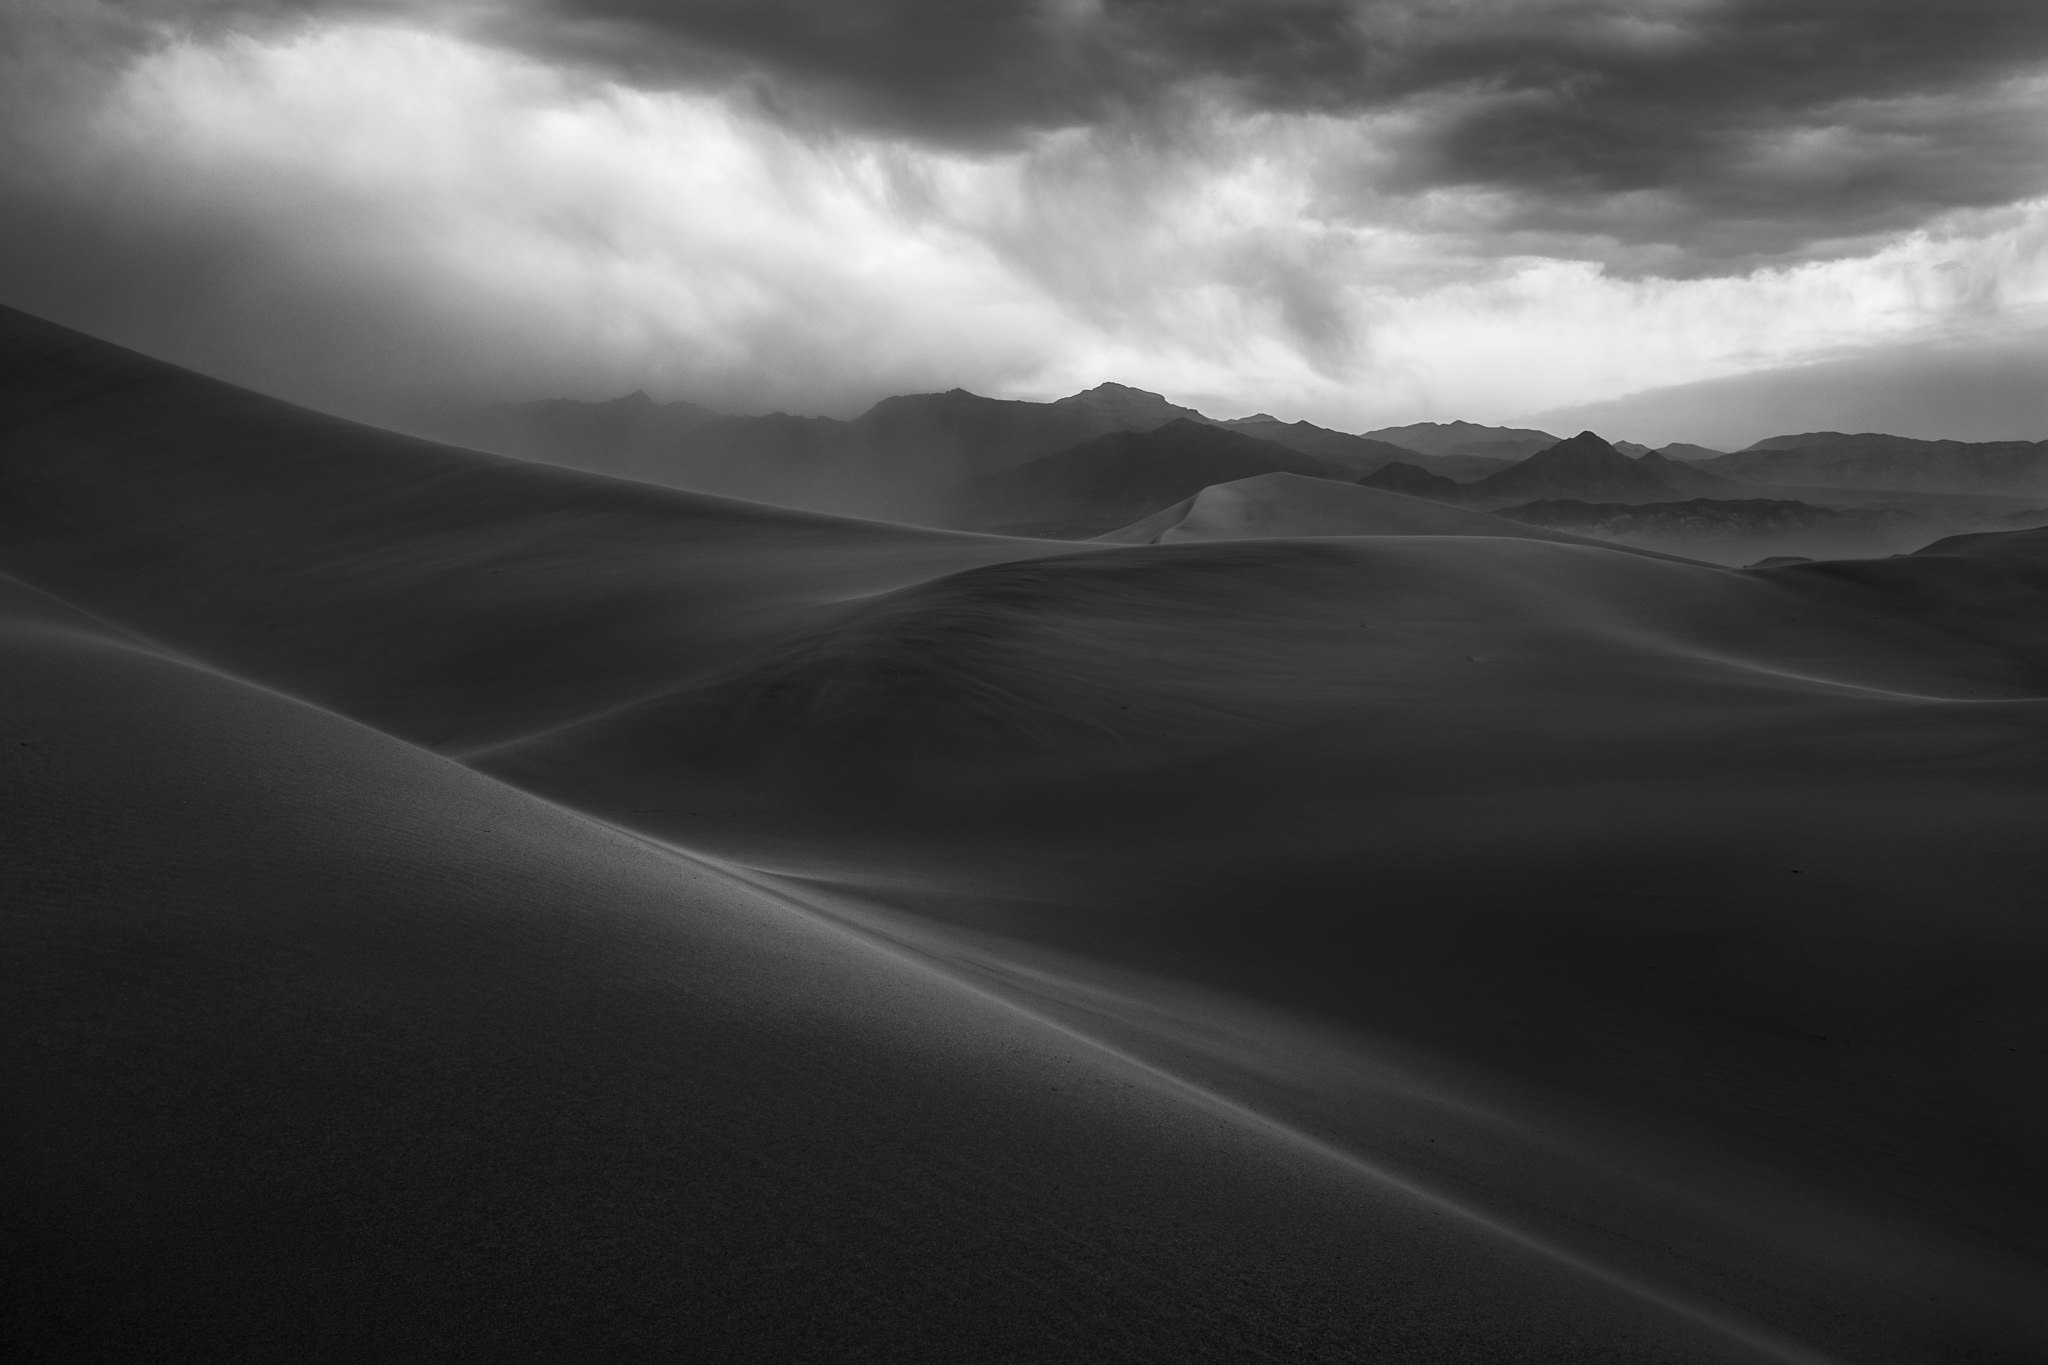
Are you more likely to remember a photo taken of sand dunes on a nice day? Or a photo taken as a sandstorm approached and turned the atmosphere into a hazy, swirling mess of new sand dunes forming?
Capture your subject doing something, even something minor like showing a slight smile or jumping over a puddle. If it’s landscapes you like, try to capture your scene telling a story – a recent snowfall, a colorful sunrise, a bizarre cloud, and so on. Photos that tell stories will stick with you.
16. Walk Farther
Don’t just put extra effort into one particular photo or another; put extra effort into your photography as a whole, and you’ll see results.
Make it a point to get out of bed for sunrise even when you’re tired and the sky doesn’t look promising. Walk another half hour to see what you find off the beaten path. Stay out in the city and take street photos even if you’re nervous about photographing strangers. Borrow a book about photography even if you think you won’t learn much from it.
Landscape photographer Galen Rowell managed to photograph a rainbow over the Potala Palace because he ditched his camera bag in a bush and took off running to reach the right position in time. It became perhaps his most famous image.
“Walking farther” doesn’t just mean walking farther. It means, more generally, taking that extra step to capture the photos you want, and to improve your photographic skills as a whole.
17. Wait for Patterns
Some of the most interesting things you see while taking pictures will be gone in an instant, too fast to capture a photo.
It’s frustrating when that happens, but it isn’t the end of the world. After all, so much of the world – both nature and human society – is based on patterns. If something happened once, chances are good that it will happen again.
Remember the photograph from tip #13, when I photographed a rainbow in Iceland? I missed out on the first rainbow to appear, but that didn’t deter me. I stayed put, knowing there was a good chance that another would form before long. And it did.
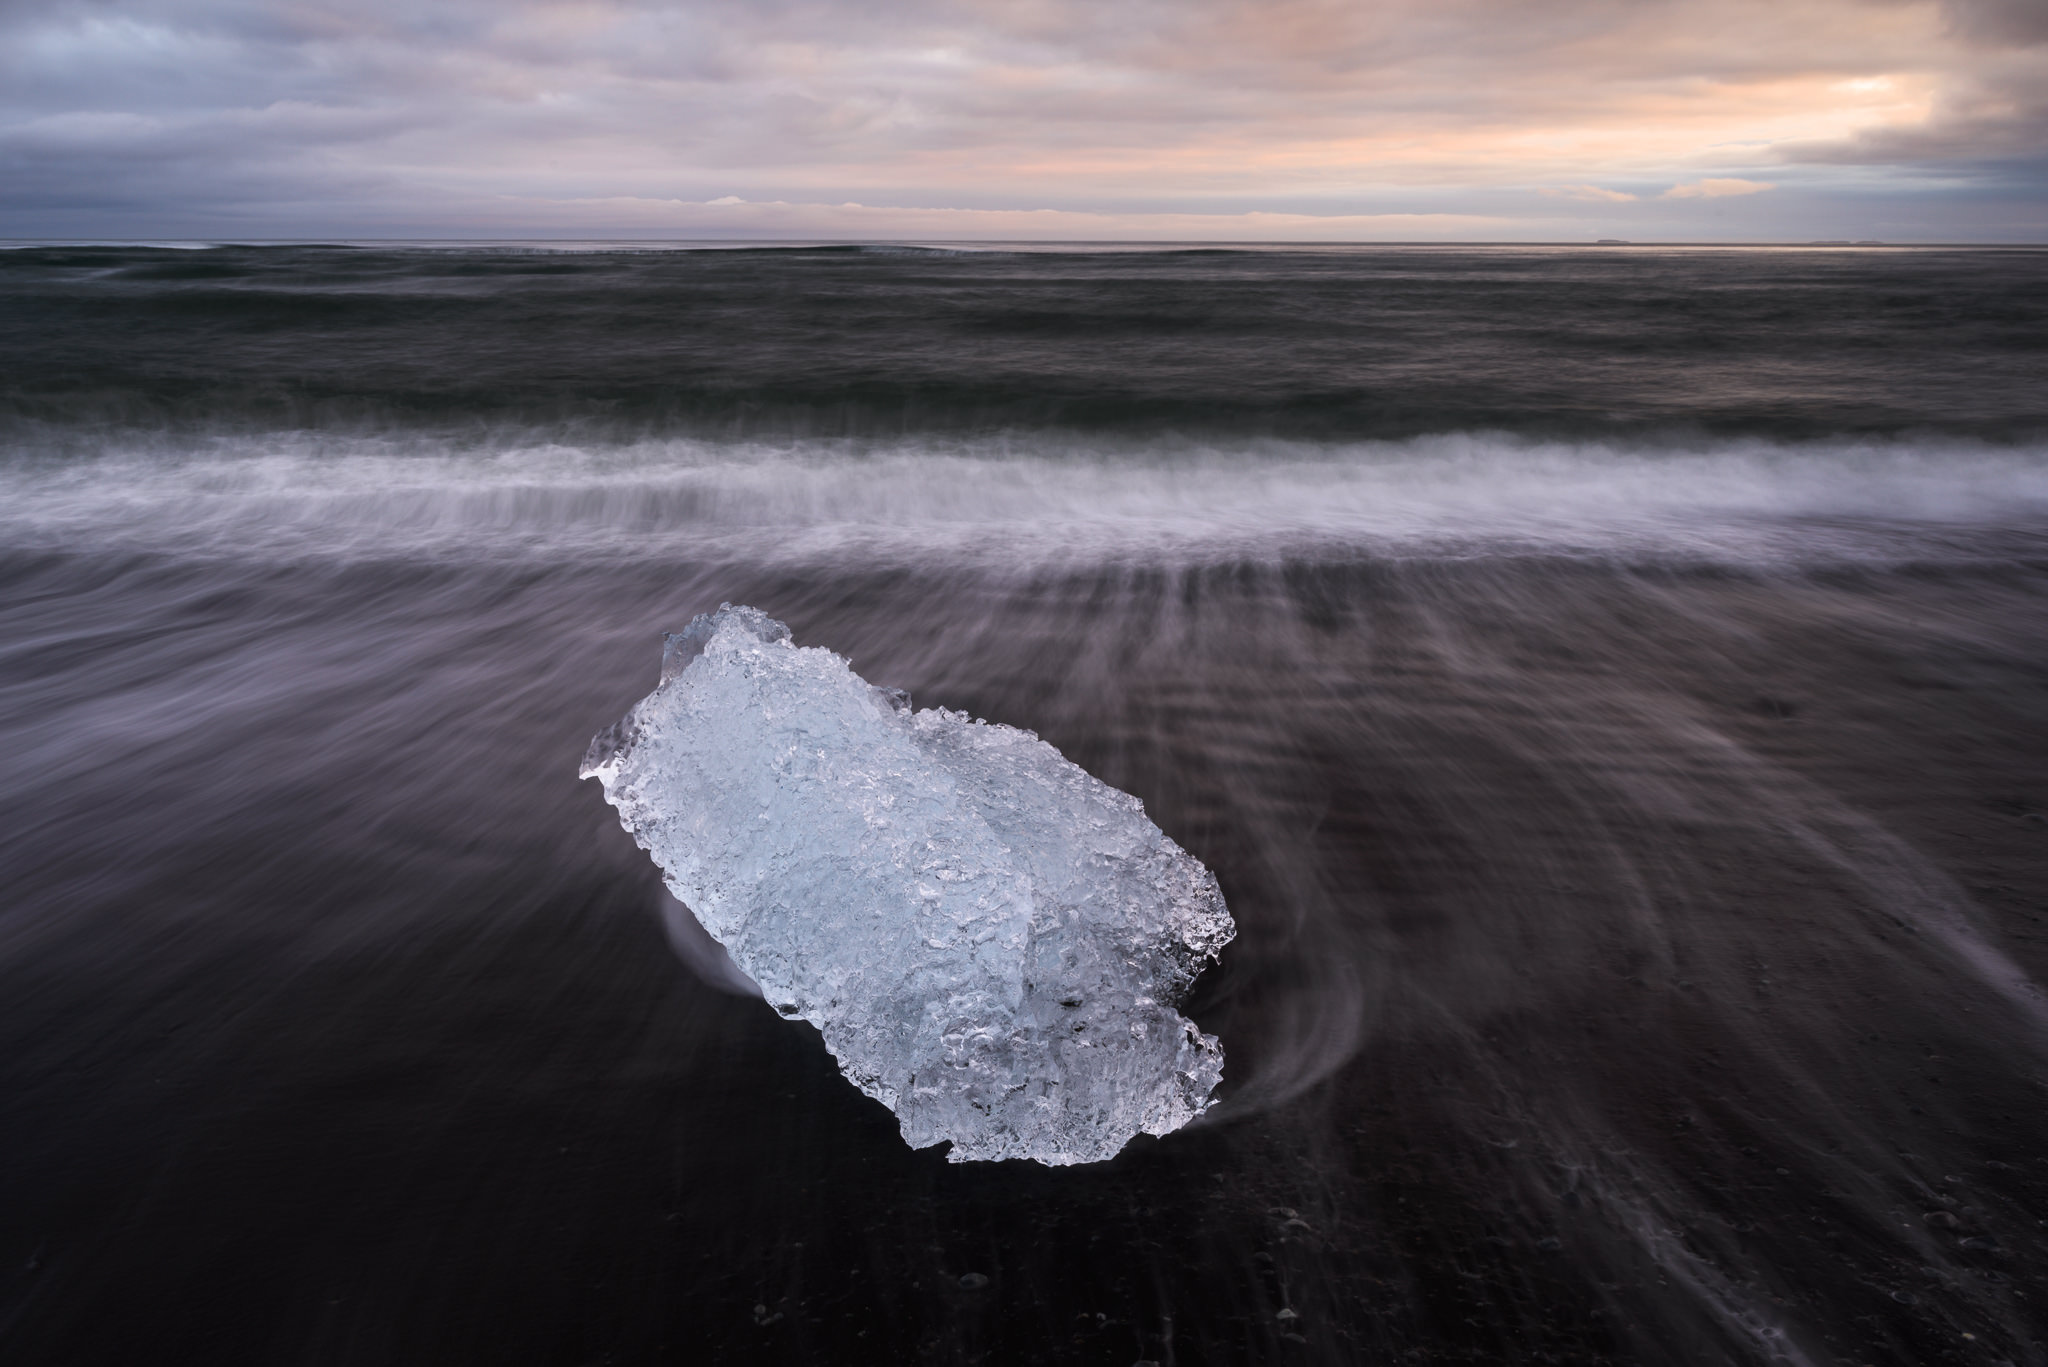
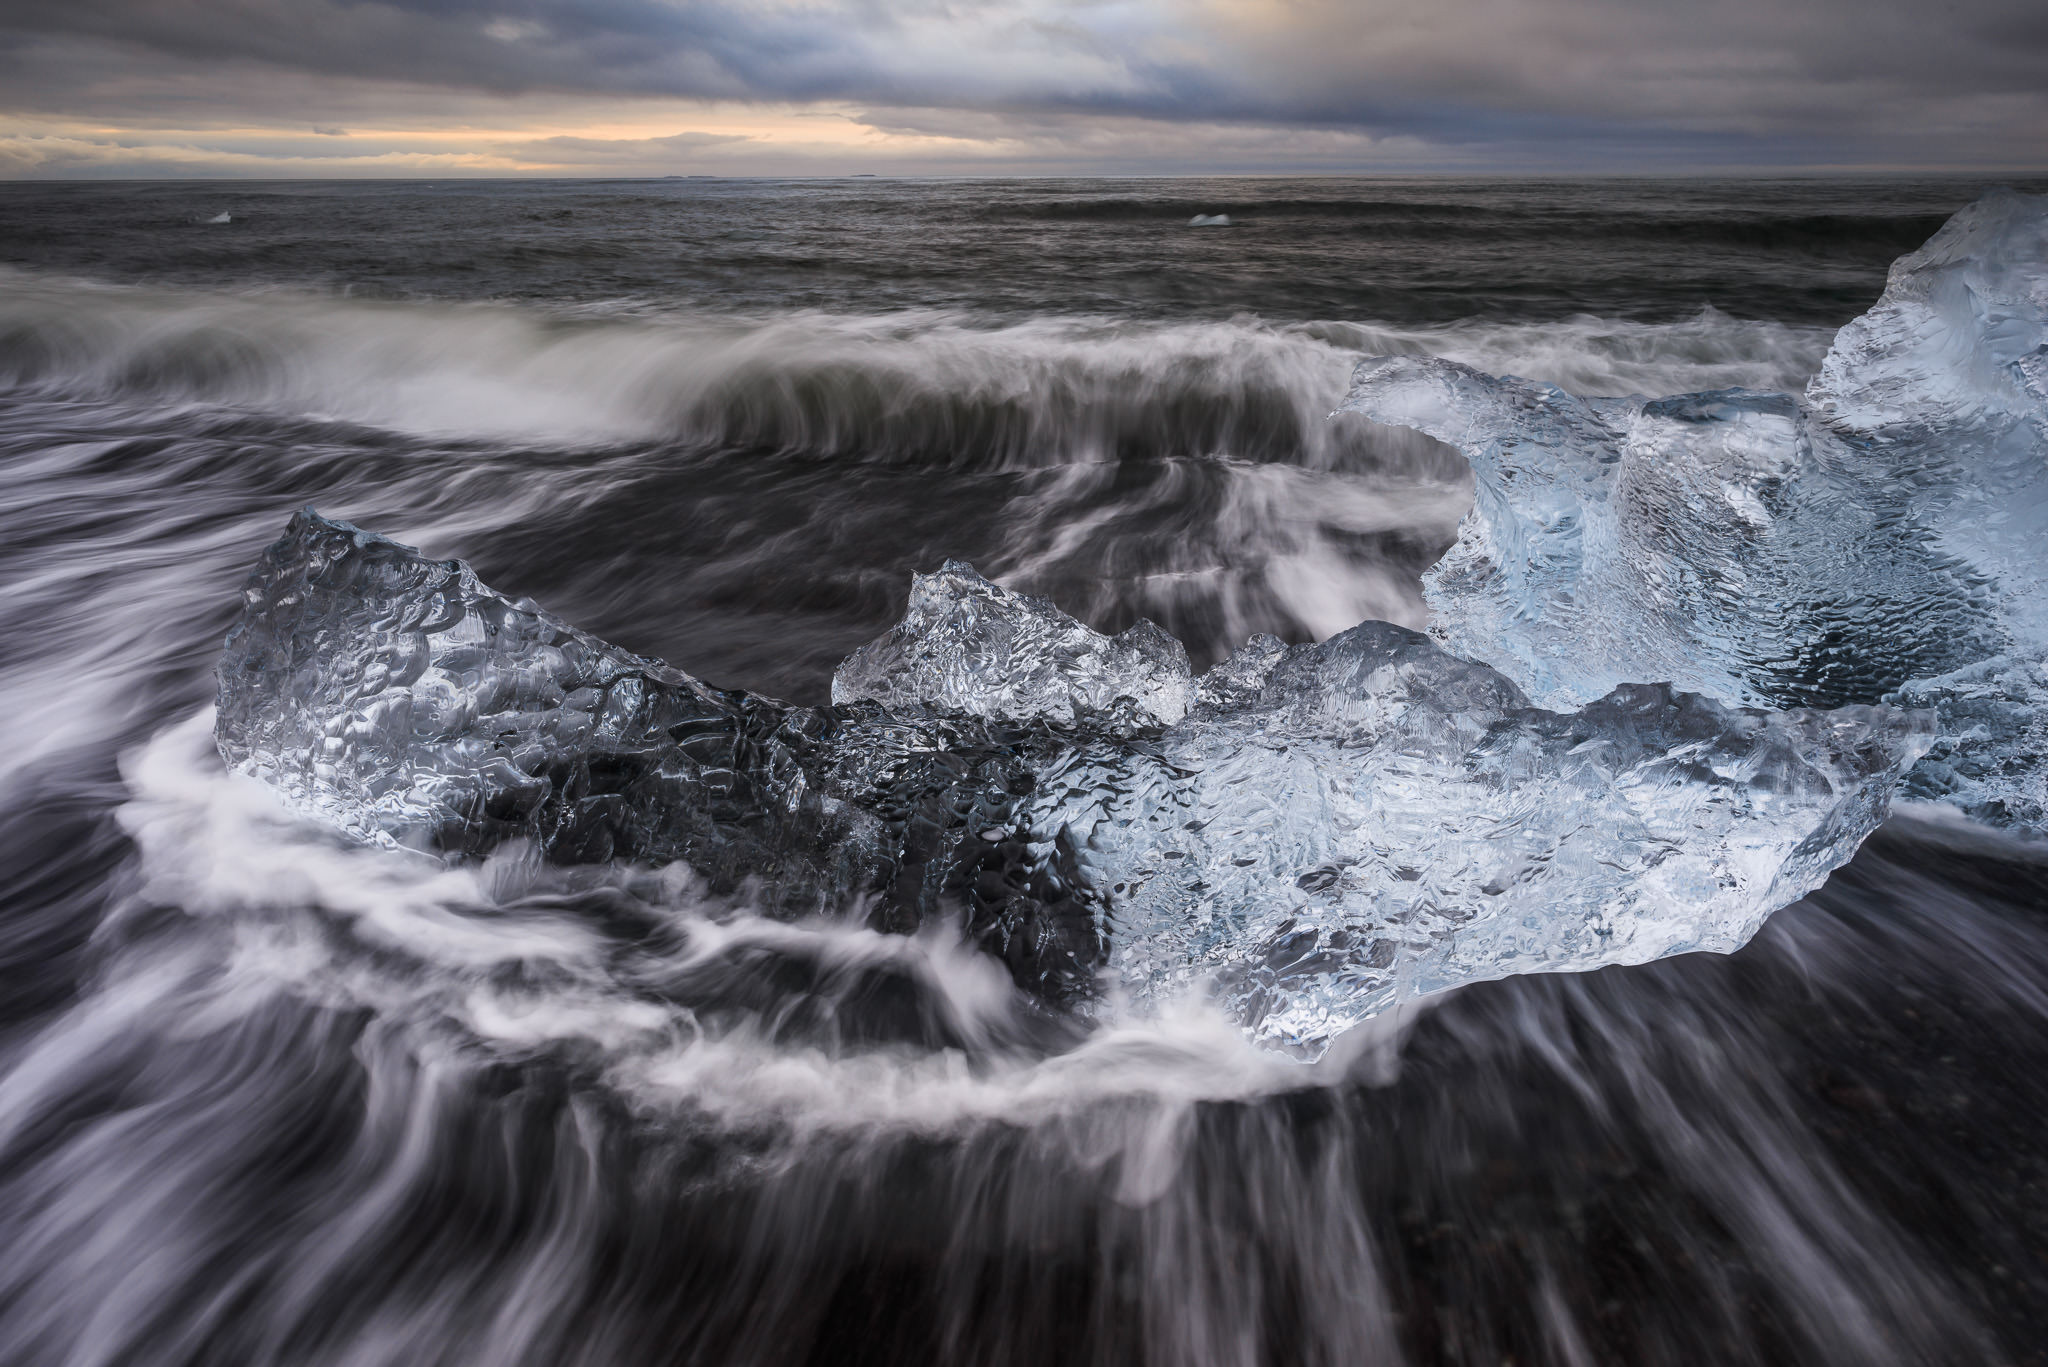
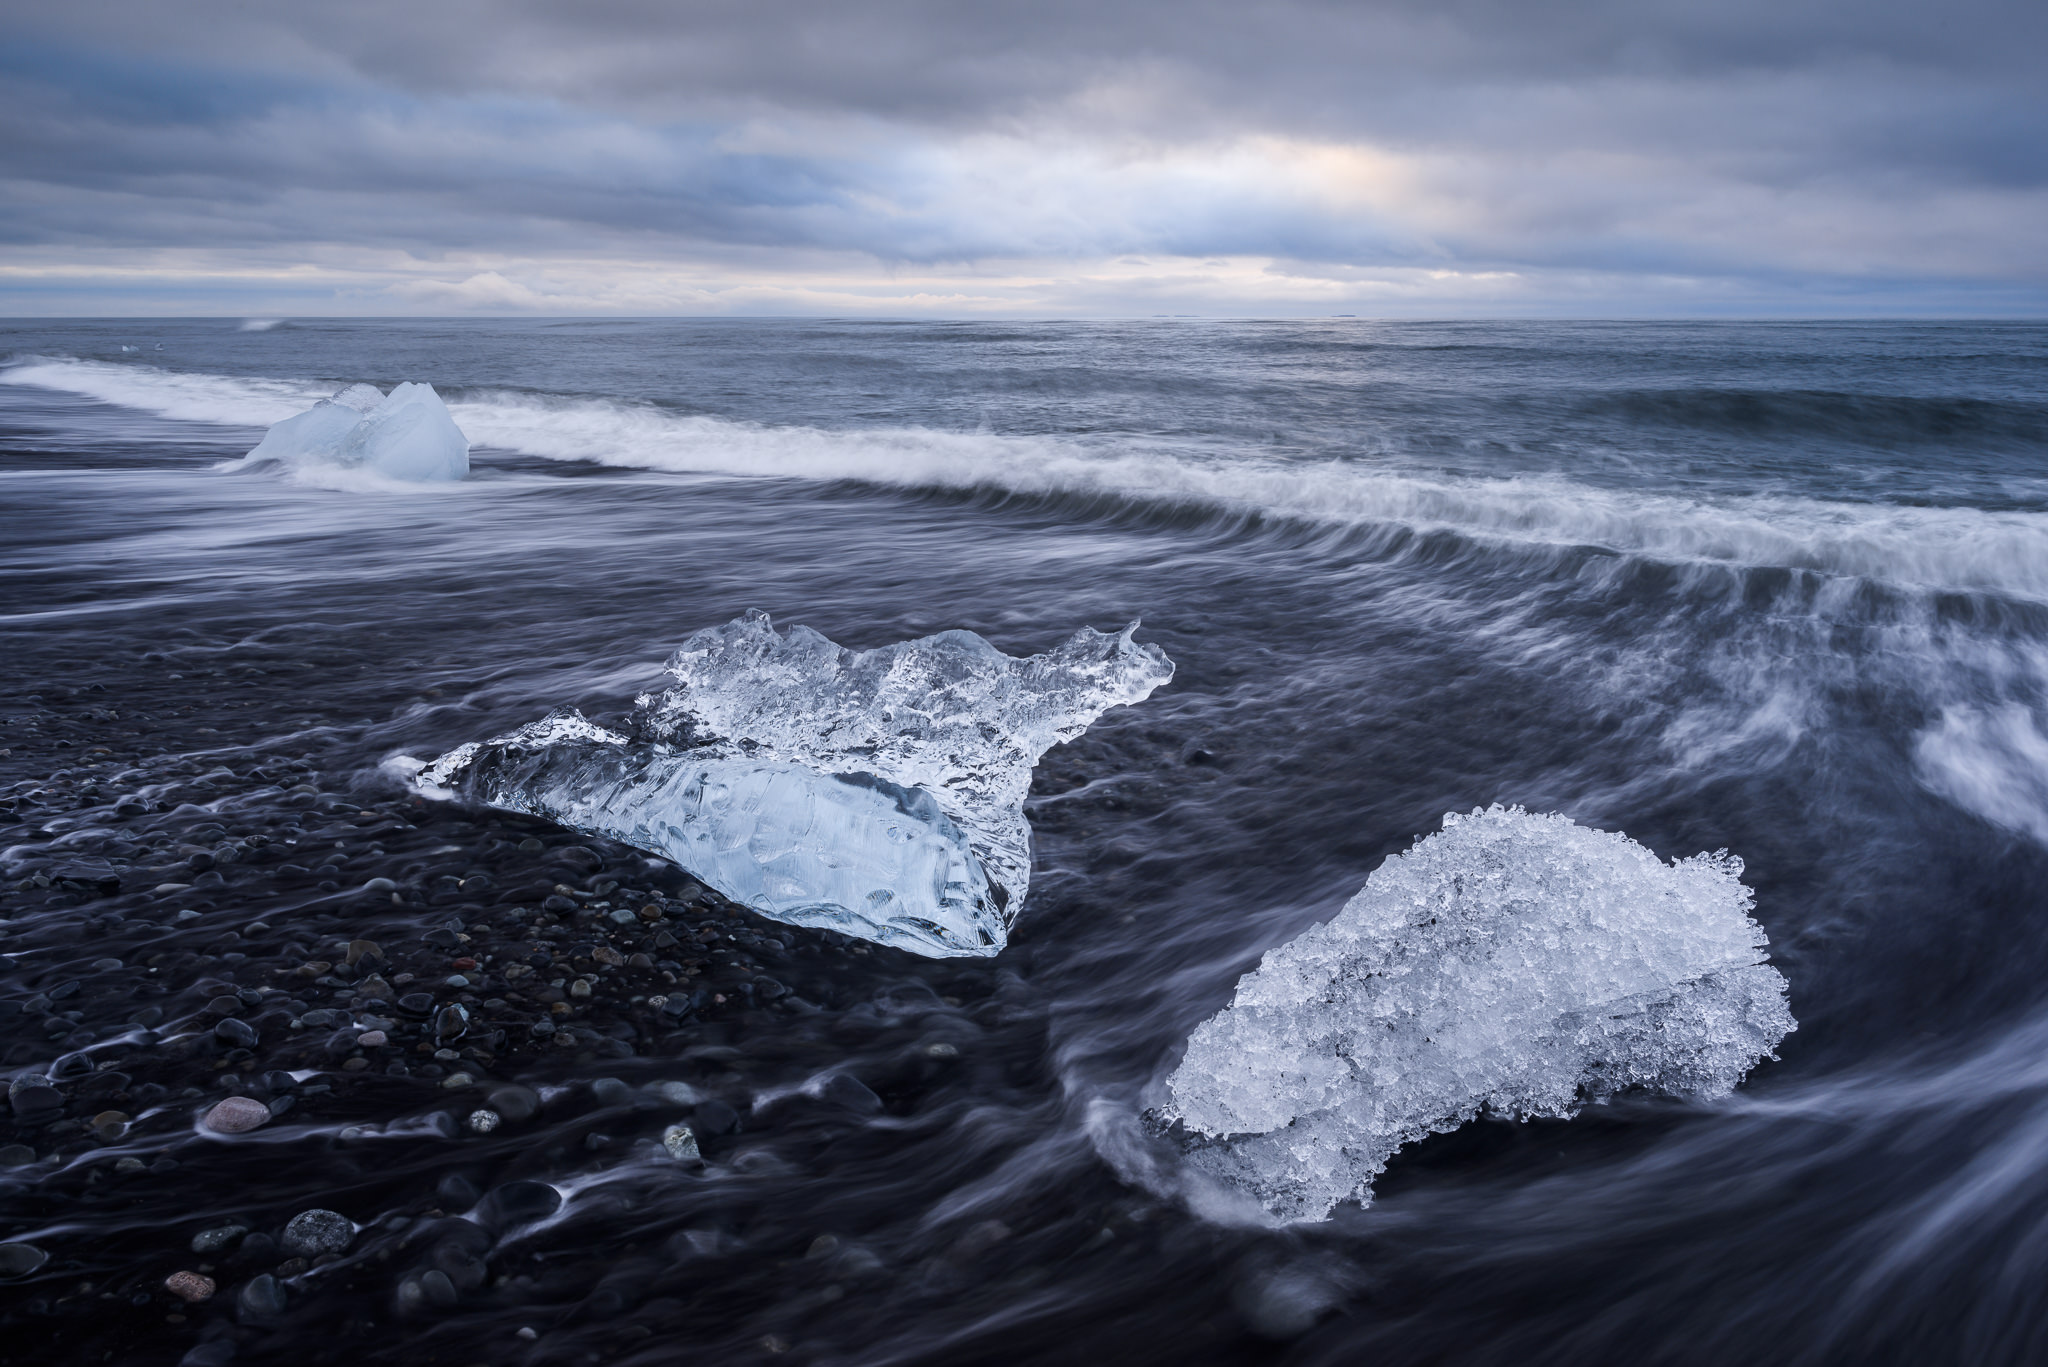
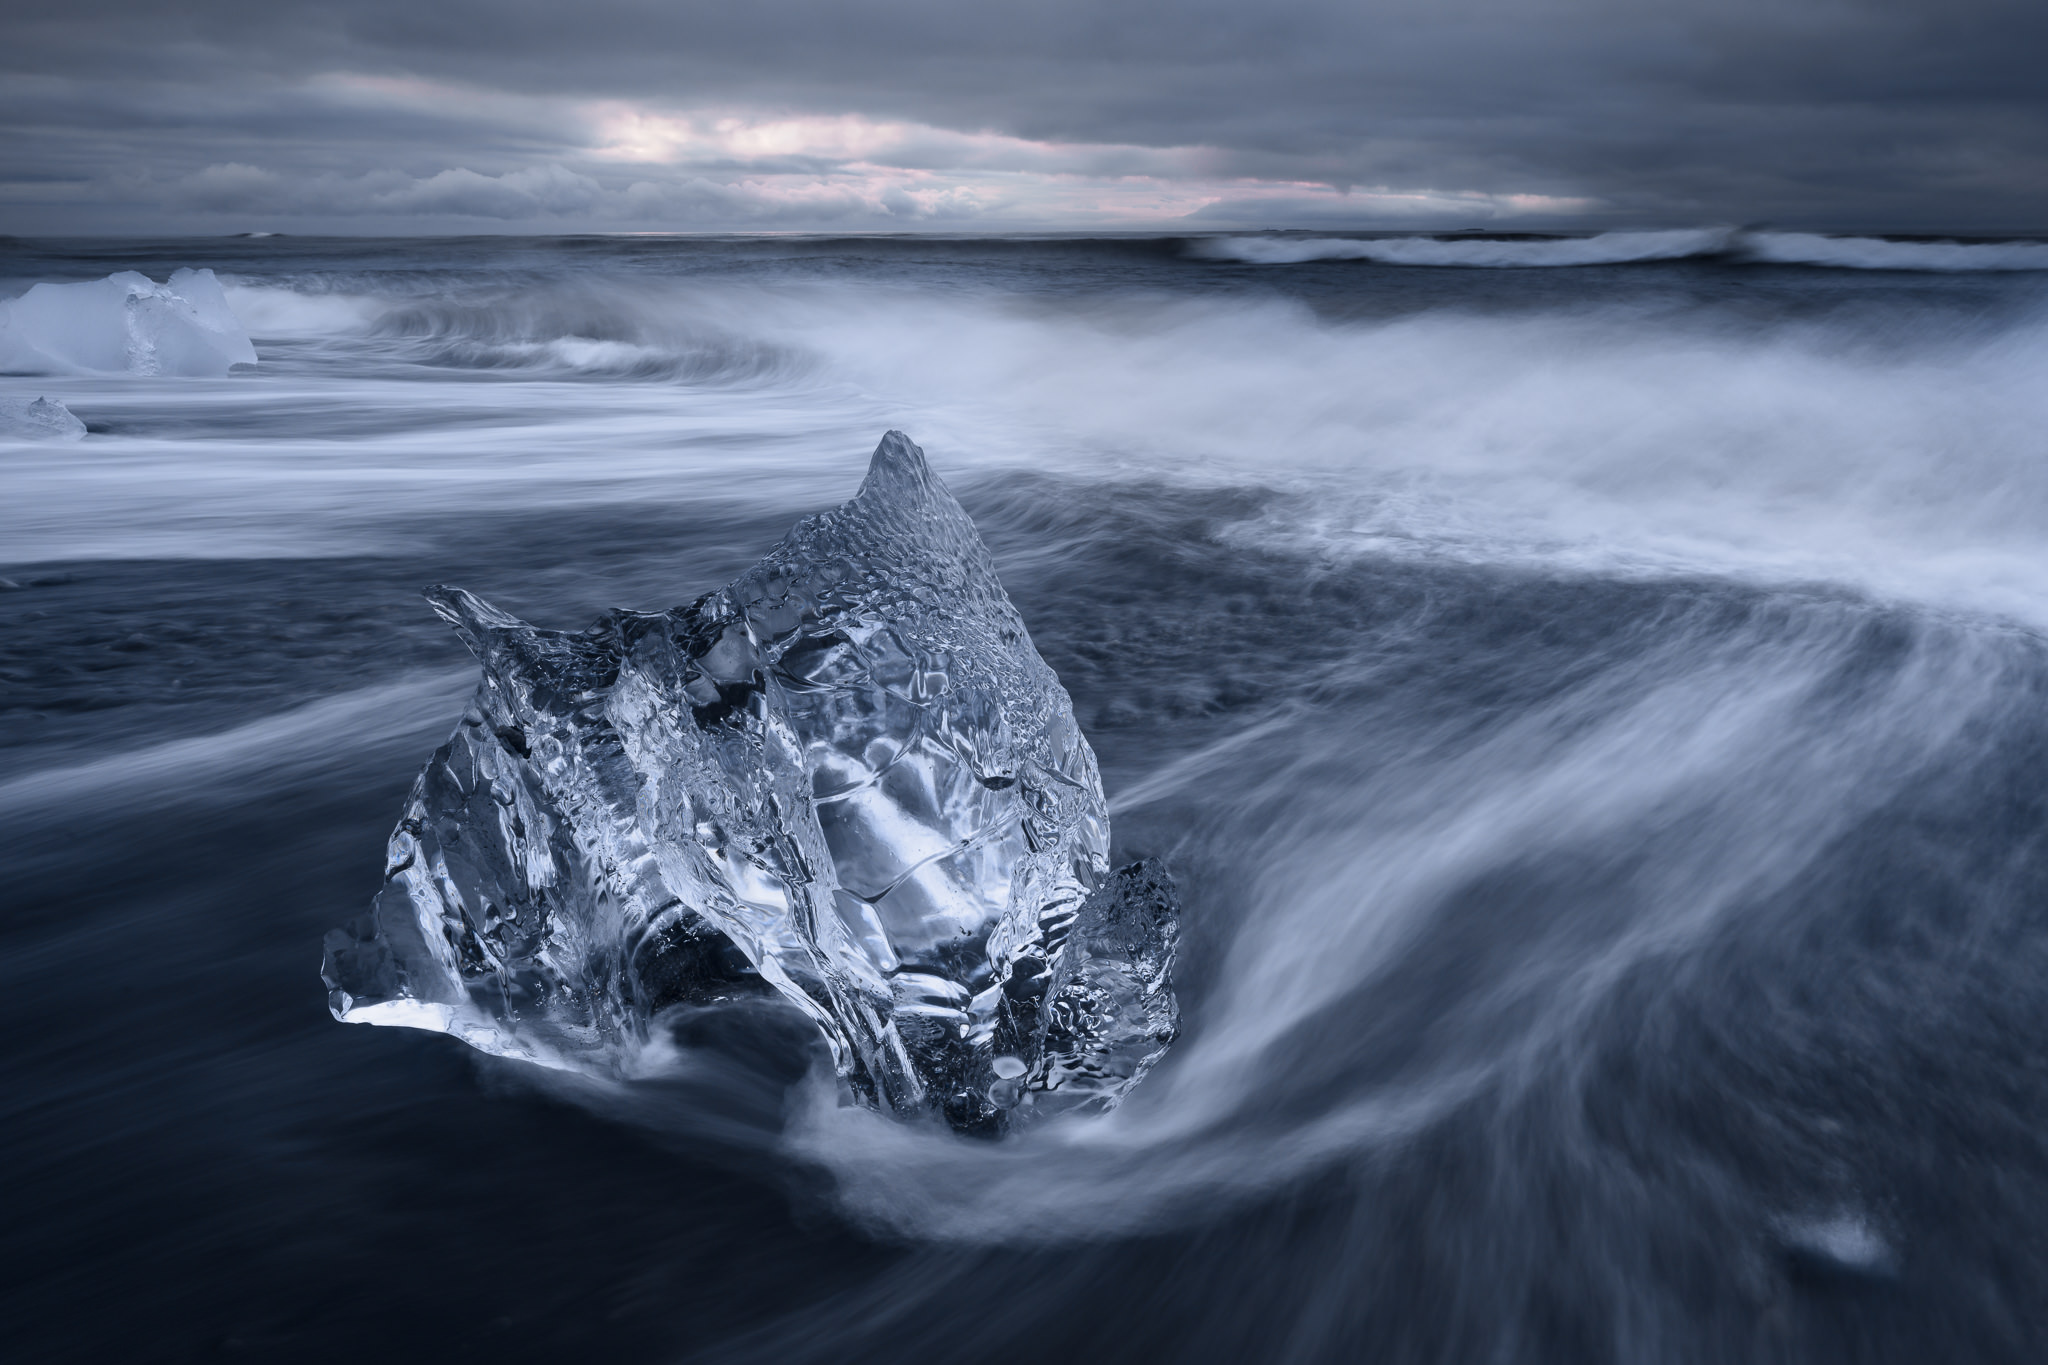
Another example, also from Iceland: I was taking pictures at a glacial lagoon when a bird flew by the perfect iceberg. I had my camera set for landscapes, not action, and I missed the shot. But before long, the same bird flew by the same iceberg again. It was going in circles. So, I set my camera to the right settings, and I waited. The bird flew by a third time, and I got the photo:

The cyclical bird.
18. Be Selective
Here’s a bit of a dirty secret in photography: Display nothing but your best work. If you only show people your good photos, they’ll think you only take good photos.
Most of my work is awful. The vast majority is unpublishable. But I know that – so I only display the top 1% (or less). That makes my portfolio look much better than it has any right to look.
Even the best photographers in history took more duds than winners. Ansel Adams said that twelve significant photos in one year is a good crop; I’ve never managed nearly that many, but I’m working on it.
That’s not to say you should only display twelve photos or fewer each year. Still, try to be selective about what you show. Every photo affects the average quality of your portfolio, and you always want to be on the right side of that scale.
19. Don’t Avoid Bad Weather
There’s a saying in photography: Bad weather makes good photos.
You already know that’s a simplification. Bad weather isn’t good if you’re going for a happy, positive mood, or you want the colors of a bright blue sky.
But bad weather is very atmospheric; it carries a strong emotional message. If you find a scene that harmonizes with it, bad weather is amazing for photography.
So, don’t be afraid to take pictures when it’s rainy, snowy, or foggy, with wild clouds in the sky. Focus on personal safety if there’s lightning or other danger, of course – but don’t stay inside just because it’s a dreary day. Dreary is a powerful mood.
20. Think About Your Scene Abstractly
When you’re looking at the world in front of you, what do you see?
Of course, there’s the literal side of things: a person posing for a portrait, or a canyon with clouds overhead. But below the surface of each photo are abstract qualities like light, color, points, lines, and shapes.
You might be photographing a mountain with the sun overhead, but the underlying structure of the picture is a blue triangle with a yellow circle above it. A portrait photo is an oval with lines and shapes around it, holding it in place in your photo’s structure.
If you can think of your subject in an abstract way, reduced to the patterns and colors it carries, you’ll find that your compositions become more creative and structured along the way. You’re not trying to take a portrait photo; you’re trying to compose a series of colors in the foreground and background, balancing them against one another for the most harmonious effect.
When you take a good photo and break it into component parts, you’ll find that its design almost always continues to work well. Often, its emotional message mirrors that of the literal version.

21. Memorize Your Camera
The final tip on this list is to memorize your camera. Learn it inside and out – every button, every important setting. Just because this article has focused strongly on composition and creativity does not mean the technical side of photography is unimportant. In a way, every technical decision is really a creative decision in disguise.
You stumble upon an amazing landscape, and you know you have only a couple minutes before the light fades. Pull out your camera. What do you do next?
First, compose the photo. Match your tripod to your composition. Focus on your subject. Use the right settings and camera to subject distance to get enough depth of field. Set base ISO. Pick a shutter speed to get the proper exposure. Take a safety photo, and analyze it. Adjust anything that needs to be fixed. Repeat.
All of this is so much easier if you have your camera memorized. With your eyes closed, you should know which button is which. You should be able to look at a scene and recognize that your camera is likely to overexpose or underexpose the photo, and by how much – before you take it.
That’s something that comes with practice (as do the rest of the tips in this article), but it also comes with using a particular piece of equipment for a while and understanding its quirks. This is another reason not to fall into the upgrade cycle; if you chase different camera equipment all the time, you won’t give yourself the time you need to learn the ins and outs of your current gear.
Conclusion
Hopefully, you found this list to be a useful way to continue your photography journey. When you go out and take pictures for yourself, putting all this knowledge to use, you might remember tips sporadically. You’ll probably invent tips of your own; write them down. Over time, refer back to this list or any other resource that you find useful. Photographers love sharing information – their knowledge and experience. Often, you can learn in a few minutes something that took them years of practice to put into words.
Above all else, keep practicing and experimenting. Keep having fun. Something about photography – the artistry, the technical side, the excuse to get out into the world – attracted you to it in the first place. Don’t lose that spark, and you’ve already mastered one of the most important things there is, whether you’re an expert or a beginner.
Great article,helped me understand a lot of things.Cleared some of my doubts thanks for sharing this.Appreciate it very much.
#6 is critical. One of my favorite shots was directly opposite of the shot I was actually trying to take! I won’t post a link here, in case that violates the terms… but it’s a great point to remember.
#12 is also a good one to remember – it’s a trip that may not yield much, but it can pay huge dividends later. Knowing that a trip is a “scouting” trip really removes the stress and brings back the fun.
My “wrong way” photo, from Maroon Bells near Aspen, Colorado: www.drmilesphotography.com/Galle…-DGZST74/A
Ah, beautiful image, thank you for sharing! I read your first comment before I saw this link, love the colors here.
Thank you, David! You’re welcome to post a link if you like, but either way, quite true – a large portion of my favorite photos also happened when I turned around or started photographing something I didn’t initially plan to do.
Just brilliant! Thank you so much!!
Wonderful article! Thank you.
Thank you, Richard!
Set your camera on fully-automatic mode and leave it there! Just forget about your camera and look at things.
Looking is everything and that once you look at something you like to look at, use your camera to show others what you like about what you have looked at.
Looking is a very dynamic thing, and involves moving ones head to get the best view. Tiny changes in a point of view can make a vast difference. For this reason, I think that putting a camera on a tripod is stultifying. It removes all of the dynamics and energy from a photograph.
Sure, you can get a sharp photograph from a tripod, but what is the point of a sharp dull photograph?
Look – see what you like – point the camera at it – press the button. Repeat as often as necessary.
Modern cameras (especially mirrorless) have such great image stabilisation that most of the time really is just a choice (and maybe an affection) rather than a necessity.
Memorise your camera? No – set it on full auto and forget your camera! Just put it on full auto and leave it there until that becomes a problem! Just set it on fully automatic, and point your camera at what you want to show people and press the button often. 99% of the time, the camera will get its part of the deal right.
Aeons down the line, having taken thousands of photographs, maybe you will find that your camera does not do what you need it to when set on “auto”. Then, but only then, get into “settings” and fiddling with your camera.
Composition can be done when you press the button on the camera. It can also be done later in processing software. Neither is better or more worthy of merit. There is no reason to get it right in the camera.
In digital photography, cameras are much-of-a-muchness, but software is not. Buy the best processing software and learn to use it. It will cost you a fraction of the cost of a new lens or camera body, but will be much more important in getting you a good final piece of work.
These are views arising from my way of working as a successful fine art photographer – my camera is set on “Auto” almost all of the time.
Thanks for your comment, Alistair! We definitely have different perspectives on this, but I’m glad you found a solution that works for you. Here’s where I have a different point of view:
“There is no reason to get it right in camera” – that’s something I especially disagree with. Cropping in post-processing is a valid way to adjust your composition, no doubt. But there is no way to change the relative sizes of objects in post-production; no way to get lower to your subject or higher up; no way to change which items you actually include in the photo in the first place (only exclude). If your portrait subject tilts their head differently, you can’t change that in post-processing, short of extensive and time-consuming digital manipulation.
“Putting a camera on a tripod is stultifying” – I can see that in some cases, but on balance, a tripod is an immense help for many photos, at least in genres like landscape. About half the photos in this article were taken at 1 second shutter speed or longer, some of which intentionally capture motion blur to add to my emotional message. That’s simply not possible handheld. It’s important that you match your tripod to your composition and not the other way around, but once you’ve done that, the only stultifying part is carrying the extra weight – an issue for some photographers, but something that I and many others are willing to accept.
“Set it on full auto” – If you do this, you’re losing a lot of the creative flexibility that comes from choosing the right camera settings. I don’t think you need to be on full manual all the time, since that can take some extra time for each photo. But once you know what you’re doing and what each setting does, something like aperture priority is quicker than Auto. And it gives you much more creative flexibility.
For the bird photo above, Auto probably would have used a shutter speed of 1/200 or so, which would have made the bird blurry. For the iceberg photo, it probably would have used a shutter speed of 1/30 second, a wider aperture, and a much higher ISO – eliminating the nice motion in the water, reducing depth of field, and making the photo grainier. For no reason.
I’ll grant that a beginning photographer or someone who is more interested in photos as a recollection of an event will be perfectly served by Auto. There’s a reason why it exists. But there is no downside whatsoever to learning how to use these settings, except that it requires some extra learning. The results will be well worth the effort, I believe.
This isn’t to disparage your method; I think everyone should find a technique that works for them, and it seems like you’ve done just that. But I believe that most photographers will find value with learning the technical side and getting as much of the composition right as possible in the field.
awesome post. best article i’ve read on this site (or many other photography sites) for a while.
Thank you for the kind words, Chuck, glad you enjoyed it so much!
Great post. I don’t shoot many landscapes, but your top about visualizing shapes is spot on, regardless of your genre. Eric Kim is great at that. Thanks for all the awesome tips!
Thank you, Brandon! Yes, it often helps to abstract the objects you’re photographing, composing according to their fundamental shapes and colors to get your point across.
Very useful especially as a teaching device for patience
Thanks. Love it
very useful indeed..
good reading stuff :)