Data loss is a very painful experience that unfortunately many of us go through at some point in our lives. In my workshops, lectures and this website, I spend quite a bit of time advocating the need for a well-established workflow that incorporates solid backup strategies to prevent data loss. And during this process, I came across many different backup routines practiced by other photographers, some of which I found to be downright scary. You have probably heard of horror stories of professional photographers losing their life’s work, or wedding photographers losing images of weddings that they were not able to deliver to their clients yet.
It sure happens, and it usually happens at the worst possible time too! It is one thing when you lose your personal data or photos, and totally another when you are dealing with a client who paid you money. I cannot imagine how one could even handle a situation with lost wedding photos, as it would be impossible to recreate those precious moments. Sadly, for many of us, it seems like data loss has to take place in order for us to seriously consider a solid backup strategy and workflow.
But it does not have to! In this article, I will walk you through two scenarios for establishing a good photography backup workflow: a low-cost and painless workflow for hobbyists, and a much more serious workflow for enthusiasts and professionals. For the second scenario, I will reveal my own backup strategy.
Any time you deal with data, there is always a potential for partial or complete loss, and it is not a matter of “if”, but a matter of “when”. You might think your data sits safely on your computer and your external drive, but what if you lose both? Have you thought of a possibility of burglary, fire, flood or other natural disasters? What do you have in place today to protect your data from such catastrophes? If you have never thought of such questions, it might be a good time to revisit your workflow and make necessary adjustments, before it is too late.
Table of Contents
Start with a Solid Workflow
Before you think about a backup strategy, it is a good idea to revisit your current workflow process. Where do you import your images? Where do you store your images and how? Is there a single place where your data resides, or is it scattered in different locations?
These are all very important questions to ask and if you do not have the answers or you are confused about the process, this is where you need to start. Personally, I like taking a simplistic approach to file management. I always import my images to a single folder and store them there, which makes it easy to locate, backup and potentially restore images.
I organize images with a two-tiered approach: both on file system level and on software level (Lightroom), a process that I dubbed “hybrid file management”, which you can read about below. It is a very solid and proven approach, and I am happy to say that many photographers have successfully adopted it, using it actively as part of their workflows. Let’s discuss it in detail.
If you have not read my article on photography workflow, now is the time to do it, as you need to understand what workflow stands for and what it is comprised of.
Here are my recommendations on setting up a workflow process:
- Do not reinvent the wheel – use best practices
- Do not oversimplify
- Do not overcomplicate
- Do not dismiss important workflow components
- Take time to establish a good, solid workflow
- Once a solid workflow is established, stick to the same process for consistency and efficiency
- If new technology is available or there is a faster/better way to do something, make your workflow flexible to modify it as needed
- Look at all the recommended options before committing to a certain workflow process (again refer to point #1)
File Management and Organization
A major part of your workflow starts with the transfer of images from your camera to your computer. Whether you copy images or import them via software, you need to decide where and how you will be storing those images. And this is one of the most critical steps because it will define your backup strategy going forward.
While some photographers prefer importing images first and organizing them later, I strongly oppose such practice, because it can lead to inconsistencies and other problems in the long run. My preference is to organize images at the time of import and if I never have a chance to revisit my files, it is not a big deal, as images were properly named and stored in the first place. This leads us to the importance of file management and organization – a topic I have written about a number of times in the past due to its importance.
Another article that you should give a read, is on organizing photos in Lightroom. Whether you use Lightroom or any other software, I recommend that you check this article out, as I discuss the process of organizing and storing images in detail.
In short, I store all images in a single folder called “Photos”, which is located in the root folder of my storage drive, and I group photos in folders by year and event name. A very simple and yet effective method of storing images that works for myself and thousands of other photographers. But how do you actually do it? Let’s take a look at two different methods – manual file management and file management via software.
Manual File Management
Manual file management is the most simplistic approach to file management and organization since everything is done manually and it is something that you are already familiar with. You start by copying images to a designated folder, then you decide on the folder structure and where those files will reside in the file system, and finally, you name the files to your liking. You do this on the file system level, and the process is really no different than the process of transferring other files from external media. I detailed this process in my “how to organize pictures” article.
Manual file management is simple because it is easy to understand. Those who do not use Lightroom, Bridge or other software with file management capabilities often end up using this process, and sometimes even quite effectively. Since one knows exactly where the files are going, it also simplifies the process of backing up images.
However, there are many disadvantages to manual file management. First, it is quite inefficient, since traditional file systems are not designed and optimized for easy file management and indexing. Your computer might have the capability to preview your RAW images, but it surely has no way of reading the proprietary EXIF metadata in order to be able to filter through specific criteria, like the type of gear that was used, or the date when images were captured.
Your operating system cannot go through this data and index it, to make it easily searchable for you. In addition, there is a big potential for file duplication, as your operating system has no clue about what photos you are copying – it just does what you want it to do. Even if you do efficiently manage files on the file system level, how would you be able to locate a specific photo without going through tens, hundreds or even thousands of images? That’s when file management via imaging software comes into play.
File Management via Software
Whether you use Lightroom or any other file management software, the advantages of software that is capable of going through images and extracting information are numerous. First, such software, being a specialized tool for photography needs, can be very efficient in scanning through and gathering of valuable metadata, then indexing it for search purposes.
Software can reduce and potentially even eliminate duplication, which can save space and improve the efficiency of the backup process. Once indexed, images can be easily searchable in many different ways. For example, you can use Lightroom’s library filter to see what lenses you use the most, which is really neat. You can filter through specific metadata such as lens, camera and even find images captured at specific apertures and shutter speeds.
But just like any other process, file management with software certainly does have its own disadvantages. It is more complex to understand. It requires the creation and potential maintenance of a database catalog, which adds more steps to the backup process. If done improperly, it can result in files residing in different folders, drives, etc, making it difficult to identify file locations. And lastly, it is often impossible to share data and access it from multiple computers, making such a process potentially difficult to implement in workgroup environments.
Hybrid File Management
What if you were able to combine the best of the two worlds to create the most efficient way to organize your photos? I came up with a name for such a process and called it “hybrid file management“.
I personally use this method, and after tens of thousands of images stored over a period of 12+ years (with very positive feedback from many other photographers), I would call it the ultimate way to organize images. In short, you get all the advantages of both manual file management and file management via software.
If executed right, you end up with very few disadvantages to worry about. The reason why hybrid file management works best, is because you organize images both on file system level and software level. If you ever lose your software catalog/database, you have enough information on file level to be able to easily rebuild that database from scratch. Since files are already properly named and sorted, you don’t have to worry about doing it again via software. You also do not lock yourself into using one particular software package – you could easily move to other software in the future with this approach.
So how does hybrid file management work? Below are some of the steps, which you can extract from the same article I pointed out above on organizing images in Lightroom:
- First, decide on the master folder to store your photos, such as “Photos” or “Pictures”. Ideally, put it in a root folder of your storage drive, as previously explained.
- Come up with a proper and consistent way to name files, so that you have enough information on the file system level to be able to quickly locate files. Ideally, each of your file names should contain the date (year, month and day) and the name of the event or sub-event, followed by a sequence number. For example “20200418-Jane and John Wedding-0001.NEF”
- Import images using software such as Lightroom and create folder structure during the import process. Images should be renamed at the time of import.
- Do not heavily rely on keywords and other software-based indexing criteria to reduce software dependency.
- If you need to reorganize or rename images, do that through software to avoid potential mismatches between the database and the file system. Software such as Lightroom performs moving and renaming of images on the file system level, and automatically remaps images in the database after the completion of the process. Use the provided tools to mass-rename images when necessary.
- After completing the editing process, force the software to write changes to each image (this will write changes to DNG files or force the creation of sidecar / XMP files), so that you do not lose your changes if your database gets corrupted or lost.
These steps are discussed in detail in the below video, where I demonstrate the file management capabilities of Lightroom:
Once you come up with a solid workflow and you organize your images, it is time to think of a backup strategy.
The Simple Approach: Hobbyists
What is the “bare minimum”, low-cost approach for performing backups if you are a hobbyist? Beginner photographers cringe when looking at complex backup strategies of enthusiasts and pros, because the process can be over-the-head complex and very expensive.
So if you are just starting out, I recommend a simpler and more cost-effective approach for backups. No, I won’t suggest keeping your images on your memory card as a backup – that is not good enough even for a beginner! You want to make sure that you are protected against two main potential problems: hard drive failure and loss / theft / natural disaster.
Basically, always keep two backups, at the minimum, in two separate physical locations. The second part is very important. Do not just rely on keeping one single backup or multiple backups in a single location. This is something you should not skip on and it should become a good habit in the future.
Hard drives fail and having another backup will certainly give you peace of mind. But it won’t protect you from theft, flood, fire or other natural disasters. So while buying that external drive for backups, make it two in order to have two copies of the same data. Establish an offsite backup routine, depending on how often you shoot and how important your pictures are for you – have a weekly, monthly or quarterly process of updating your offsite backups to keep that data somewhat fresh.
The good news is, hard drives are very cheap nowadays. You can buy a small, portable, large capacity hard drive for less than $100. Just buy two of those and store the second drive somewhere safe, preferably away from where you live. If you do not want to pay for storage services, perhaps you could ask your parents or your relatives to store that drive for you. If it is too much of a hassle, just get a storage box in your local post office or bank and make it a routine to drop off the updated backups.
As for the backup process itself, you can do it manually at zero cost, which would require copying and overwriting files each time, or you could pay $20-50 to buy backup software that will back up your photos automatically. There are many different software and hardware solutions out there to accomplish automated file backups. Apple offers Time Capsule, and there are literally hundreds, if not thousands of backup software suites. For backing up my PCs at home, I have used Acronis software successfully for many years, and it works great. You can backup and restore not only individual files but also entire volumes and partitions if needed.
So here is the quick summary:
- At the minimum, buy two external drives for backups.
- Backup to one drive on a continuous basis either using automated software tools or manual file copy.
- Backup to the second drive as often as you will be taking it offsite. You can rotate the two drives, but you have to make sure that you are not just doing incremental/differential backups – you have to have full backups for rotation.
If you follow this process, you will have your images stored in three places: your computer, an external drive connected to your computer and another external drive that is sitting in an offsite location.
What About Cloud Storage?
With cloud storage getting incredibly cheap and potentially even free, you might wonder if it is worth keeping your backups on the cloud. Companies like Adobe, Dropbox, Amazon, Google and many others have been offering free limited storage or practically unlimited storage if you subscribe to their services.
For example, if you are an Amazon Prime member, you can get a ton of storage for your photos without extra cost. And you can upload not only JPEG images but also RAW files as well, as detailed on this page. Sounds great, doesn’t it? Why wouldn’t you skip on the second external drive, since the “Cloud” can be considered an offsite backup?
Well, it all depends on how much you shoot and what your upload bandwidth is like. Unless you live in an area where providers can supply you with a boatload of upload bandwidth, trying to upload your entire collection of photos might take a very long time. I would start by estimating the total storage that your photos are currently consuming. If it is reasonable, and your bandwidth can keep up without angering your ISP, then go right ahead. It will save you the hassle of going offsite for backups.
In case your computer hard drive dies, you have a backup of your files on an external drive. If both fail, you still either have the offsite backup, or a backup in the cloud depending on which route you take. With this method, you won’t risk losing everything you have, as the likelihood of all three failing or disappearing on you is extremely small.
Solid Backup Strategy: Serious Amateurs and Pros
If you are a serious amateur or a pro with a large collection of photos, creating a solid backup strategy is your responsibility, so you should take it very seriously. If you are a pro, it is a part of your job, it is what you are paid to do, even if you think you are not paid enough. I cannot imagine what this photographer went through, trying to explain to 20 different customers that her photos were stolen from her car:
Leaving 20 photoshoots in a single location like a car is not something one should do. This is a serious problem in the workflow process and if the photographer followed best practices, she would have had copies of every shoot on her home computer or a single external drive at the minimum.
People can be nice and understanding, but some might start a lawsuit and bring your business and you down in no time! I can’t blame clients suing photographers for such poor practices. You cannot repeat a wedding. You cannot bring back a deceased person. Those memories would be lost forever, all thanks to a poor workflow and no backups. Don’t make the same mistake – re-evaluate your current workflow processes and make sure that you back up after every single shoot.
Obviously, for a serious amateur, semi-pro or a pro, a simple manual backup process with two external drives, or one external drive + cloud storage would not work for a number of reasons:
- A single, cheap external drive is not only unreliable but also too slow to handle thousands of images from every shoot.
- External drives are often limited in capacity, which limits how much data can be backed up to them.
- One should seriously evaluate cloud storage reliability, bandwidth capacity and simulate failure to see how much time a restore would take to complete. For critical shoots and time-sensitive jobs/clients, cloud storage might not even be an option.
A more serious approach should be taken with establishing a good backup strategy, which involves fast, reliable storage and images stored in multiple locations. You want to follow the 3-2-1 backup rule, which states that three copies of data should be kept (1 primary and 2 backups), with files kept on two different media types and one backup being offsite. So far that’s the only option that I talked about for a reason – it is the best backup strategy and it really works.
Now if you don’t have a lot of content and you have a lot of time on your hands, you can adopt the above-mentioned workflow for hobbyists and still be fine. However, if you cannot afford to be down and your business heavily depends on your ability to quickly process images, you should look into more serious storage solutions.
First, start off with your editing machine. Does it have enough redundancy built-in to keep you going if a primary drive fails? While a lot of photographers prefer editing from a laptop with a single hard drive, I would explore the possibility of adding a secondary drive in a mirror / RAID 1 configuration.
This way, no matter where you are, you won’t have to worry about dealing with repairs and restoring your work – the data is duplicated on two drives. If one of the drives fails, you can continue working and you can replace the failed drive at your convenience. However, this does not mean that you should think of the second drive as a backup, it is NOT (see more on this below)!
If you have a dedicated workstation, ideally, you should have a separate volume dedicated for photos, which is hosted on two drives in a mirror configuration (protected with RAID 1). I go through such configuration in my ultimate PC for photography guide. In such configuration, if one of the drives fails, you will have the exact copy of your photos on the other drive. So if you experience a failure, you just replace the failed drive and the rebuild process will be very fast. In comparison, a failed RAID 5 volume might take several days to complete and during this process, everything will slow down to a crawl.
RAID is Not a Form of Backup
Whether you run RAID 1 (mirroring), RAID 5 (striping) or any other type of redundant RAID, never make the assumption that your data is backed up and you do not need to back it up elsewhere. RAID does not replace backup, plain and simple!
When RAID volumes need to be rebuilt, especially if it is a RAID 5 volume, there is always a chance that another drive might fail during the rebuild process. In fact, most people buy drives for a RAID volume in the same time-frame, which increases the chance of more than one drive dying at the same time. RAID is great to keep your storage running and keep you working, but you should always have at least two more backups, as explained above. Personally, I have been staying away from RAID 5 and only going with RAID 6 when building new high-capacity storage arrays.
What about external storage? Remember, for a 3-2-1 backup, you will need at least two more backups on different media, with one being an off-site backup. This means that aside from your working machine, you will need a primary backup device and a secondary backup device that will be taken off-site.
I recommend that you size your primary backup device with good potential for future growth. I personally have over 15 TB of images alone, and if I add all the video footage, that’s another 10 TB+ of data. So for me, a small storage box with a couple of drives simply won’t cut it. After going through a number of different storage solutions, I ended up choosing the Synology DS1817+ for my current needs. It is a very powerful device that hosts a total of 8 drives (8 TB each) and gives me roughly 48 TB of total storage in RAID 6 configuration. I put everything I have on the DS1817+ and it still has plenty of storage left to use.

The way I would size storage needs is by looking at each year of images. How fast is your data growing each year? If you have a lot of data and you don’t want to invest in a big storage box, one solution would be to start archiving your work. A number of photographers I know use this method and it works for them – they archive their old images to external drives and mirror the data. They keep two mirrored drives in a closet and another drive in an off-site location. They do this for each year. To mount and dismount drives when they need access to them, they just buy a little accessory device, which is connected via USB to their machines.
Personally, I prefer all of my data to reside in one place, because I find myself accessing older images often, and I do not want to store so many hard drives. There is no right or wrong – you can go with either solution, as long as you are not forgetting about the 3-2-1 backup strategy.
As for off-site backup, there are plenty of different options, including options for cloud storage. If you don’t want the expense and the hassle of cloud storage, simply drop off your drive in your parents or kids’ house. If you would rather not go that route, get a PO box at your local postal office. Another option is to run a wire to your neighbor’s house (or use Wi-Fi) and exchange some space, so that you can store your files there, and your neighbor stores their files in your house. Just make sure that your houses are not too close to each other in case of fire, or flood. I am sure you can come up with plenty of other options. The end goal is to simply get at least one copy out of your home environment.
To recap, here is my recommended backup process for serious amateurs, semi-pros and pros:
- Dedicate two separate hard drives for images on your editing machine. Put them in RAID 1 configuration for redundancy.
- Get an external storage array to make it your primary storage or backup volume. If it is your primary storage, there is no need for step #1, but you will need another storage device for redundancy and backups.
- Either use another external storage for off-site backups, or subscribe to a solid cloud solution tailored for photographers.
- Use automated software for backups to replicate data in order to improve speed and efficiency of backups.
My Backup Workflow
If you are interested in how I back up my data, here is the entire process:
- Primary Editing Machine: iMac Pro with minimal local storage to accommodate Lightroom catalogs.
- Primary Storage: Synology DS1817+ NAS with a 10GbE network card for quick access of media across the network.
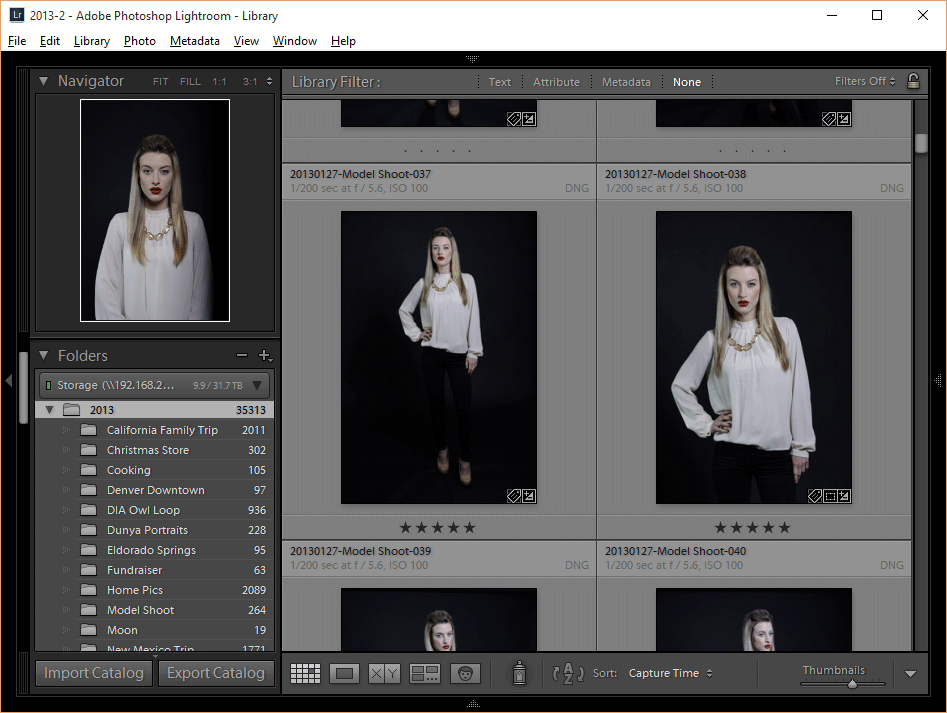
- How Data is Stored: All Lightroom catalogs are stored locally on the iMac Pro, and backed up regularly to Synology NAS. All images and videos are stored on the NAS directly, and accessed by mapping a network share via AFP (see AFP vs SMB). Data is accessed similarly on PC desktops by mounting the storage drive via CIFS. Here is how the images show up in Lightroom:
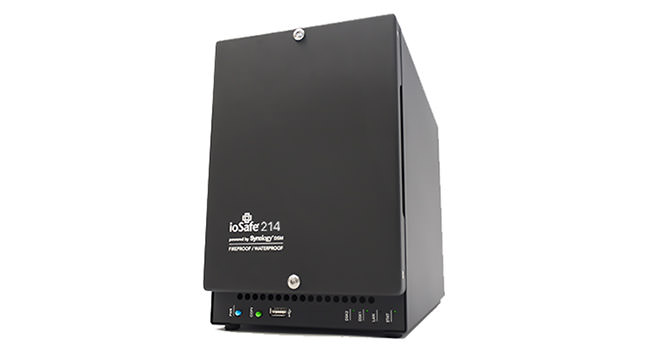
- Secondary Backup: All data on the NAS is replicated to ioSafe NAS (fireproof and waterproof) automatically. I check on my backups regularly.
- Off-site Backup: 2x high-capacity external drives (in rotation) that Synology backs up to every month via a scheduled job. Drive is replaced once backup is complete.
Easy Steps You Can Take To Help Prevent Image Loss
Losing irreplaceable images might just be every photographer’s worst nightmare. Fortunately, there are a few easy steps you can take to help prevent image loss. Almost all of these steps can be implemented right away with little to no cost or change to your overall workflow. While they might seem a little excessive, the resulting additional protection for your images should outweigh any inconvenience or minor cost.
Write Images To Two Memory Cards In Camera
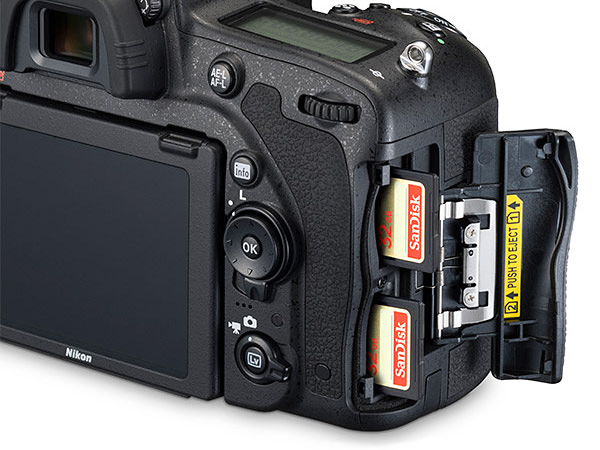
If you have a camera with two memory card slots, the first step you should take is to write to your cards in backup mode instead of overflow mode. This means that any photos you take will automatically be written to two memory cards instead of only one. If one card should happen to fail, all of your images should still be safe on the other card. Of course, this also means that you have half as much storage space to work with while you shoot. Fortunately, memory cards are cheap, so buy some extras and back everything up in-camera as you shoot.
Stick A Card In Your Pocket
If you’re like most people, once you’re done shooting for the day you toss your gear into your trunk and drive home (or wherever you’re staying). The next step in protecting your images is to separate the memory cards as soon as you’re done shooting. This means that you should pull one card out of your camera and stick it in your pocket. Why? If something happens to your camera on the way home, chances are you’ll still have a copy of your images safe inside your pocket.
What could happen to your camera on the way home? Maybe you decide to stop for gas or food but someone saw you with a bunch of camera gear and decided to follow you and steal your gear in the parking lot. Maybe you go into a restaurant and bring your camera inside with you but somehow forget and leave it behind. I’ve even heard of a photographer who’s car was rear-ended and all of the camera gear in the trunk was destroyed. Maybe your gear makes it home safely, only to get stolen in the middle of the night. Having a memory card with all of your images on it someplace besides inside your camera is the best way to make it through any of these scenarios without losing any images. Of course, these are all worst-case scenarios and aren’t likely to happen, but image loss is never something you can anticipate.
Back Up Images Immediately
Part of any good workflow is backing up your images in a timely manner. Getting them off of your memory cards and onto permanent storage should prevent you from accidental image loss due to formatting a card that hasn’t been backed up. This should be a part of every photographer’s workflow.
Immediate image backup becomes even more important while you are traveling. Simply having your images on two different memory cards is not enough of a backup strategy. Having a laptop with an external hard drive is an important part of an on-the-road backup plan. Once your images are backed up to the hard drive, it can be kept separately from your camera and laptop (ideally in a hotel safe or other secure location). Over the course of your travels, this external hard drive will come to contain all of the images you’ve shot, so regardless of what happens to your memory cards or hard drive (damage, theft, corruption, loss, etc…), you should hopefully arrive home safely with one good copy of everything.

Create Smart Previews In Lightroom
Let’s jump ahead in the workflow to the editing process. You might think that by this point you’ve already done everything you can to protect your images, but I’ve got a few more tricks for you. Take note, this step only applies if you’re a Lightroom user.
Lightroom has had the ability to create Smart Previews of images for a long time now, since version 5. This feature allows images to be edited without the source file (either RAW or JPEG). It also allows images to be exported at a resolution of up to 2500 pixels on the long side (depending on the original file size) without the source file.

You can use this feature as yet another way to back up your images. Once you’ve made your image selections, create Smart Previews of all of the images you want to keep. Not only does this allow you to edit them without the source file (which is very convenient for laptop users), but it also allows you to export images if something ever happens to the source files. As long as you have access to your Lightroom catalog, you have access to your images. Of course, the maximum image size will be smaller than what you could possibly export from the original file, but a smaller image is better than no image at all!
Summary
The thought of potentially losing data is very scary, especially when your work depends on it. If you have been slacking on establishing a solid workflow process with a working and proven backup strategy, don’t wait until you lose data – act now and save yourself a lot of time and money in the long run. It might require a bit of effort and some investment, but it is totally worth it!
Please keep in mind that the above-described processes work for me and many others, but they might not be ideal in every case. Take time to evaluate your backup needs and come up with a solution that you can actually simulate for a potential disaster. You do not want to end up with something that does not work, or you are too lazy to properly execute. Make it a strict and a routine practice to not only back up your photos, but also check on those backups, making sure that they are taking place successfully.
I hope you found the information in this article useful. I would love to find out what your current photography backup solution is – please leave feedback in the comments section below! If you need advice, please feel free to ask and I will do my best to answer your questions.
Nasim–great article! I like how you give specific tips on how you stay organized. I have been applying these since I took your class a few years ago.
I want to know if I should make a new catalog per year or have a single catalog that holds all my photos?
Also, I work my photos per your recommendation of having a local (SSD) and backing up the photos to the NAS. But I noticed that when I accessed the photos on the NAS, they are encrypted and I can’t open them. Is that because Lightroom has a default encryption that only allows me to access the photos via the Lightroom App?
Any help is much appreciated.
Thank you,
Mark
Dear Nasim, this is an excellent article. Thank you so much!! I just upgraded to a Synology DS920+ NAS. Does it make sense as a second back up to use a large DAS (like a Glyph 16 TB) or do you recommend backing up to a second NAS? I am already using the Synology C2 Cloud Back up but I am missing the second backup.
Thank you Nasim.
I have 100K+ photo files and looking to improve my data management strategy.
This article is very helpful.
Hi Nasim, thanks for this thorough article! If you’re looking for software that automates this entire process and more, try Mylio. It consolidates photos from all different sources, organizes them efficiently into one library, then syncs that library to all of your devices. Originals can be stored anywhere you want, and your mobile devices get optimized versions to save space. That means you can manage your photos from anywhere while keeping the originals safely preserved at home.
Hi Nasim, I wanted to see what you thought of my considered back up system. I am a hobbyist with a lot of photos (I’ve been snapping away for years!)
I use a mac book pro where my catalog file is I want to buy something like the WD My Cloud EX2 Ultra, 4 TB – www.amazon.co.uk/dp/B0…otolife-21 – its a RAID system (2x 2TB) this I will use for my photo storage (which btw is saved similarly to how you describe, it is very ordered and by year/subject).
I would then connect directly to this when at home so it would be my premier storage of photos.
I would then back up to a cloud system, not sure what yet.
What do you think? I must stress I am not a professional I do not get paid for photography it is all for my own pleasure.
I ask because at present and due to various reasons including traveling (trying to “work” remotely) and bad internet connections in various rental accommodations my photos are saved on a portable hard drive and also Dropbox (plus an extra hard drive stored at a family members) but this is not a particularly seamless way to do it as I’m sure you are aware! I am now in a place with better internet (although the upload speed isn’t great) and not traveling anywhere near as much so want to set up something more practical. Any advice would be appreciated
Thank you
Rae, why buy that if you can just buy two hard drives and RAID them on your computer? If you only have a laptop, then the above solution should work just fine. However, I would look at other more practical solutions that have better software and connect to the Internet for backing up your files automatically. Look into 2-bay Synology and QNAP devices. If you want something that can also protect you in case of fire or flood, then check out the ioSafe devices.
Nasim thank you so much for your reply I will look into all suggestions. You may hear back from me if I get confused by all the tech info I will be reading about ! :-) The tech side of photography is definitely not my strong point but I try.
Good article, you’ve not said which program you use to copy and verify the files / backups? I still manually drag and drop but with large volumes of files I’ve had the odd file corrupt over the years so trying to improve. I’ve also built a new PC with lots of drives, I’m starting with x2 10TB NAS drives (DAS) which I’m considering mirroring in RAID. I also wanted to use ReFS because it finds and fixes corruption…but it’s been pulled from all editions of Win 10 apart from workstation! It’s not even on the pro variant! Now I am at a loss as my plan has went down the drain.
Im basically building from scratch a PC, (same case etc, but nearly everything else new including PSU) new mb etc but using some old hdd and bought x2 new ones. I planned to intially start off using the new x2 10TB in a mirror in the tower I have using ReFS but just noticed MS only have this option (ReFS) in workstation and i and currently running home!
Spec will be fairly high level – ryzen 9 3.8ghz 12 core, 128gb ddr4 3600mhz ram, 1070nvidia gtx 8gb gpu, 1tb samsung evo 970 m.2 card (win10 going here) and a 1200watt psu.
Im going to use some old drives (only 3 years old) and eventually upgrade to larger ones (x2 6tb and x2 2tb and a 500gb ssd currently owned) but like I mentioned ive bought x2 seagate ironwolf nas drives (10tb) to add into the setup now i have more sata ports. People keep saying raid isnt a backup – something i dont understand because it is surely, as long as you have a copy offsite too? Considering this and raid ready to find and fix any corruption i hope ill have a good setup. Ps using the excellent dark base pro 900.
What do you recommend, do I just shell out for the workstation version to get ReFS or another option? I like the sound of the ReFS option as it will find and fix / prevent corruption being copied across the drives. I then plan to replace the other drives with 10TB or more, mirroring of course. I have no real experience with ReFS or storage spaces or proper backups (been really bad for this and manually copy stuff) but i want to get better. Because i have a huge pc that can take loads of drives i want to keep it all in here for now. Advice re ReFs and backups locally first?
Tony Northrup has an old video recommending mirroring, and offsite backups, and using ReFS but it was before it was phased out. I’ve tried to contact him but no reply as of yet, any advice appreciated. Keeping the files in the tower for now (don’t want NAS things all over my desk when I have space inside).
I have Acronis for backup but it freezes photoshop raw . I tried shutting down the protection but that doesn’t help l need something better
Glad to see this topic get some coverage – I’m a IT professional who dabbles in photography and I regularly get a lump in my stomach thinking about long-term data implications of my hobby. I suspect the vast majority of photos captured in the last 10-15 years won’t survive to see 2050 due to a variety of data management problems.
Anyone running their own business should consider roughly half of small businesses fail after experiencing a disaster – this could be something as big as a hurricane destroying your place of business or as small as a break in walking out with a bunch of electronics. Or even something as simple as a spilled drink shorting out a critical device!
Security is also a serious consideration for any storage solution – in my case I’m using 2-factor authentication for both devices and cloud services for admin logins, combined with password generated and managed using Dashlane password manager. Cloud sync connects using application keys generated in Backblaze (do not use the master application key, create a new application key!). Cloud sync is also configured to encrypt outbound data using a dedicated password.
Another major consideration is the technical challenges involves in recovering from a major loss – so far I’ve experienced a couple of drive failures w/o issue, but have lost a few folders to human error during routine work. Ideally I would have a second NAS with identical hardware so I could test a complete restore from backup… but right now I’ve decided to accept the risk a complete device failure could require a complex data recovery effort. Also worth noting recovering things like Lightroom catalogs may require extra effort if you need to recover specific edits on demand.
If all this sounds like something you don’t want to think about, then I’d recommend paying for a dedicated software-as-a-service solution – I don’t have specific recommendations since that’s outside my budget, maybe that’s something others can fill in blanks on. I don’t recommend attempting a DIY solution unless you are comfortable with the risk of a total loss – mistakes will happen and it takes a lot of experience to minimize their impact over the long run.
Great article!
Nas and raid is really great and comfortable as it does everything automatically. Unfortunately I have a small Synology Nas.
I found also useful the cloud software of syno, that can automatically sync from my pc too to Nas. I used that when I had only one hdd in my DS214. So I had one copy at least – but in real time, automatically and online.
For backup I use Free File Sync, what is really cool for manual backups. You can set everyting, save the settings and next time you only need to push sync.
(A very hobbyist :) )
Two points here:
1) NEVER ever have all your drives on the network, including your internal home network. Proper security of the home network is not that easy, especially if you use “smart” devices, which are basically security nightmare. There are more and more tools for automatic attacks and you can not prevent that. However, the biggest threat is ransomware, which can spread from your laptop or work PC to ALL backup drives and you are done… Use at least ONE completely offline archive which is synced only time to time (once per week/month or so). Also the cloud backup is good for this, but:
2) Make sure you use very good encryption for anything stored in the cloud. Cloud storage is very attractive target for hackers and also providers like Amazon, Google and others feel free to scan your data – because of security reasons – but they also sneak for personal data etc. Remember that many cameras and all phones store GPS in EXIF, this can have serious consequences. Not to talk about storing sensitive and important documents non-encrypted in the cloud, that is plain stupid.
This gets a lot worse for small/medium businesses – they have more targets, more money, and more complexity and rarely can afford dedicated security professionals to help manage risk.
The most common attacks I read about are ransomware and in most cases the businesses simply pay up. No idea how badly that impacts the bottom lines – but not hard to imagine it’s pretty painful.