I have been shooting the night sky since my grandfather gave me my first 35mm SLR in junior high. Today’s digital SLRs allow us to shoot amazing things that I could only dream of a couple of decades ago! In this article, I will go over some of the tips and suggestions for capturing the stunning beauty of the Milky Way.
Table of Contents
Planning
Before you go out shooting, it’s best to do some planning to know the best times and locations to even see the Milky Way. For starters, there are some basic terms that should be defined to help you know which time of night is dark enough.
Twilight
Generally speaking, the night is between sunset and sunrise, but of course, it does not get suddenly darker like a light switch! There are some transition periods between day and night that are good to know. This transitional period is known as twilight, and can be dawn (morning) or dusk (evening). Most photographers are familiar with the phrases “golden hour” and “blue hour”. They are rather broad terms without any real scientific measurement, but they are the coveted times of day with beautiful light before, during, and after sunset or sunrise. We’ll try to define them a bit more accurately in a minute. But first, let’s look at the scientific terms.
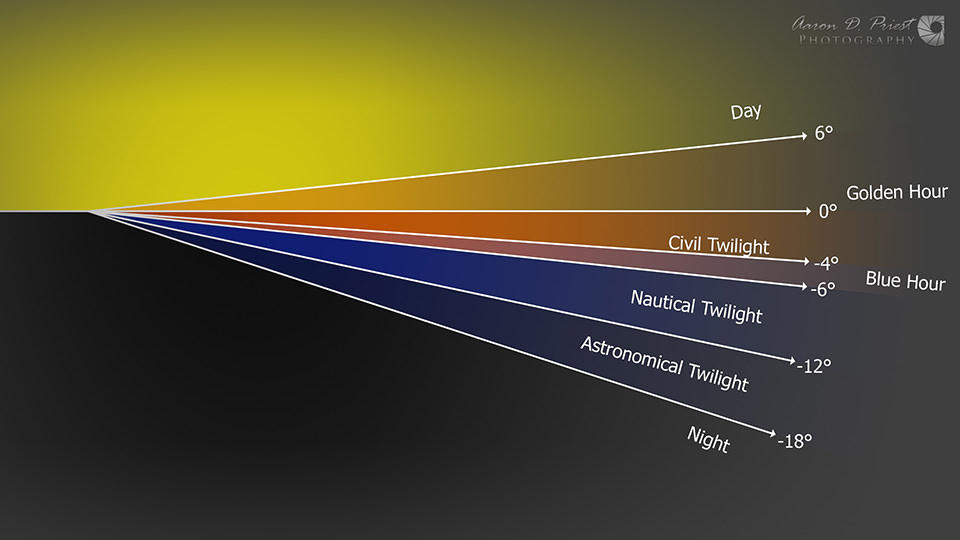
Twilight is defined in three distinct phases, and is based on the elevation of the sun: civil, nautical, and astronomical. Sunset and sunrise are when the sun is at 0° elevation on the horizon. To see the sun at this measured time you would have be at sea level and observe the sun rising or setting over the ocean with no obstructions. If you are higher on a mountain, you will see sunrise earlier. If you are in a valley, you will see it later of course. For example: Cadillac Mountain in Acadia National Park throughout most of the year is the first place in the United States to see the sunrise because of the elevation and how far east it is. Other times of the year it is Mars Hill in Aroostook County.
Civil twilight is when the sun is between 0° and -6° below the horizon. Nautical twilight is -6° to -12°, and astronomical twilight is -12° to -18°. Twilight at dusk or evening begins with civil twilight at sunset, dims through nautical twilight, and ends after astronomic twilight when the sun is -18° below the horizon. At this time the night sky is as dark as it will be for the rest of the night until dawn when the process will reverse with astronomic twilight beginning when the sun reaches -18° below the horizon, climbs through nautical twilight, and ends after civil twilight at sunrise. Blue hour and golden hour overlap some of these twilight phases and definitions of them vary, but you could consider golden hour to be when the sun is 6° above the horizon to -4° below the horizon, and blue hour from -4° to -6°.
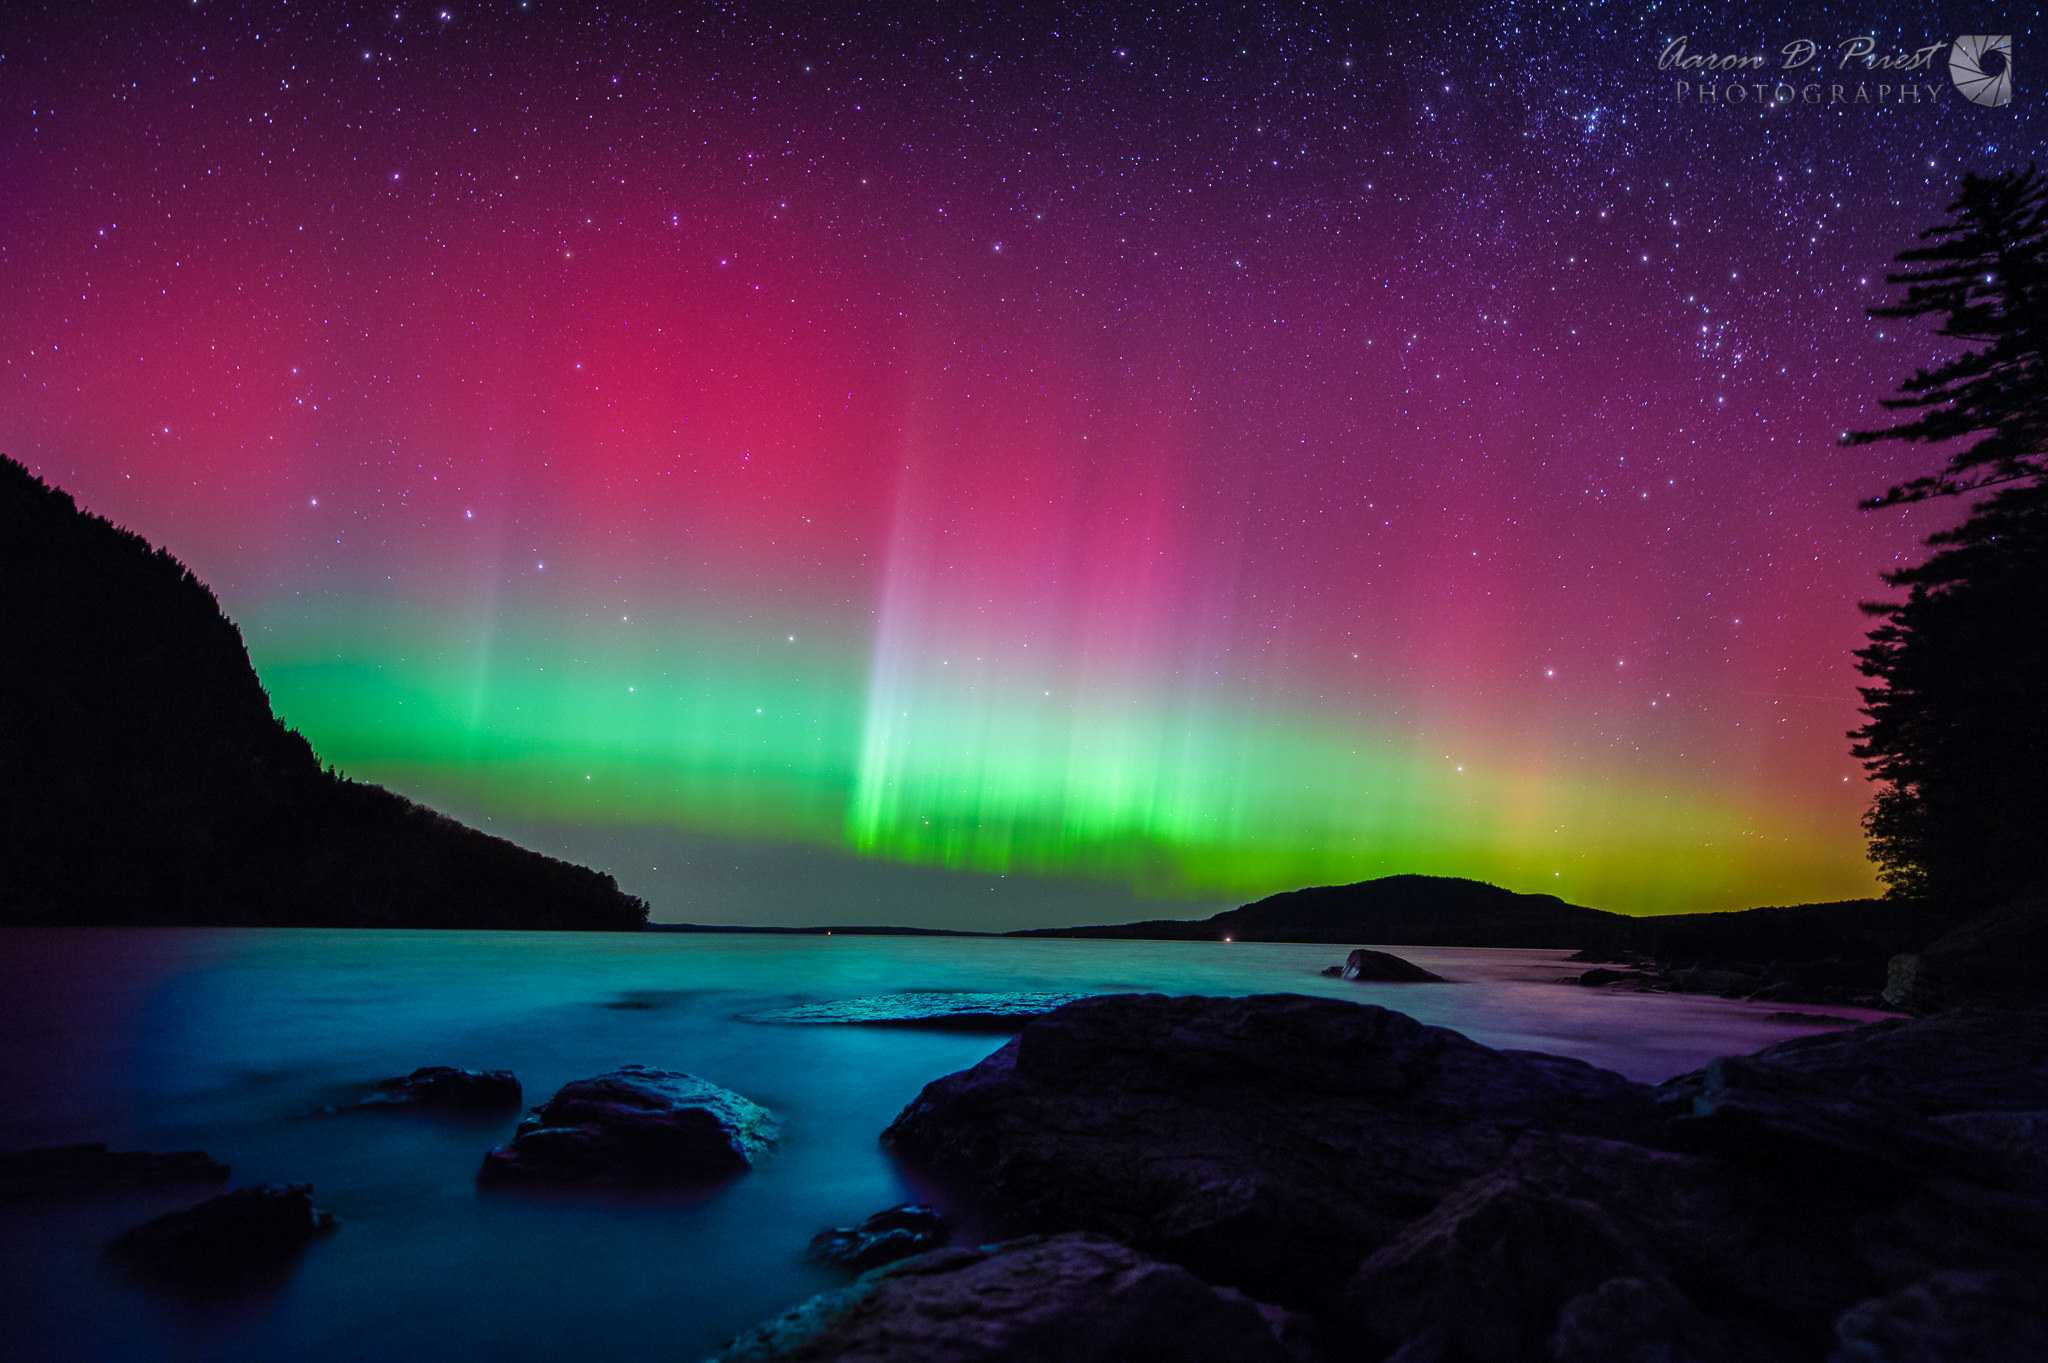
The Milky Way is best photographed during the darkest period of night between the end of astronomical dusk and the beginning of astronomical dawn. On either side of that is nautical twilight and blue hour, where only the brightest stars and a few planets are prominent but the Milky Way will get washed out. Blue hour and nautical twilight are my favorite times to either start a timelapse for star trails, or end one, with some rich dark blue colors in the sky.
Location
Astronomic dusk and dawn will vary between seasons and locations. To translate these twilight terms into specific times for our geological location we have to use apps and almanacs. One of my favorite apps for this on an iPhone is PhotoPills. It is a powerful all-in-one program that I’ve found no equal for on Windows, Mac, Linux, or Android. But there are several other programs you can jump between to get some of the same information. The Photographer’s Ephemeris is a good program on an Android. Stellarium is free for Windows, Mac, and Linux and a great tool for looking at constellations, planets, sun, moon, and Milky Way positions for a specific location and date.
Seasons
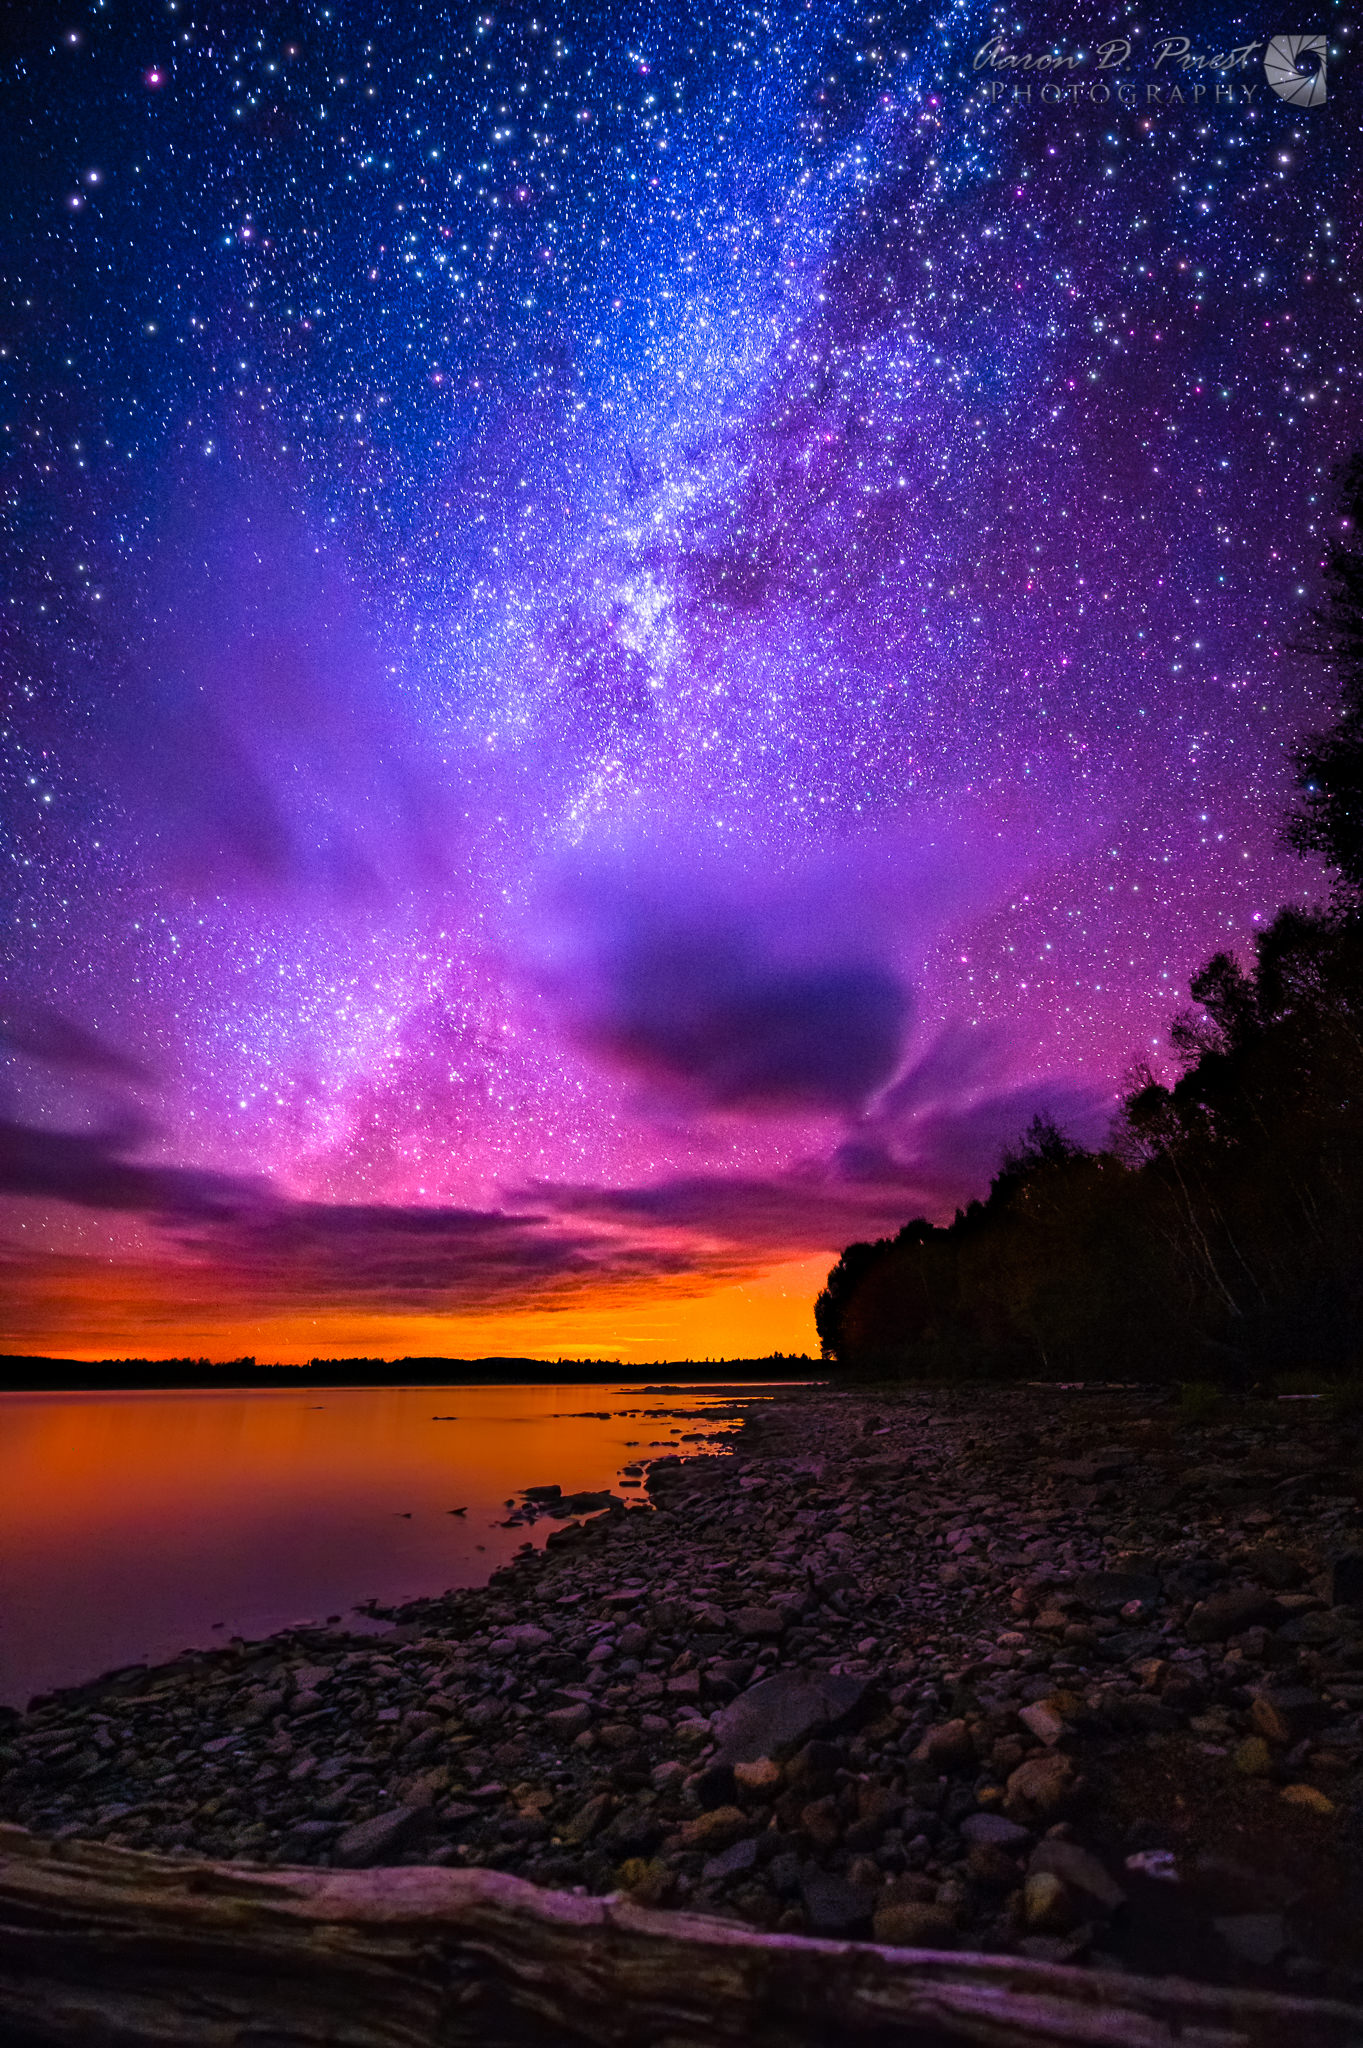
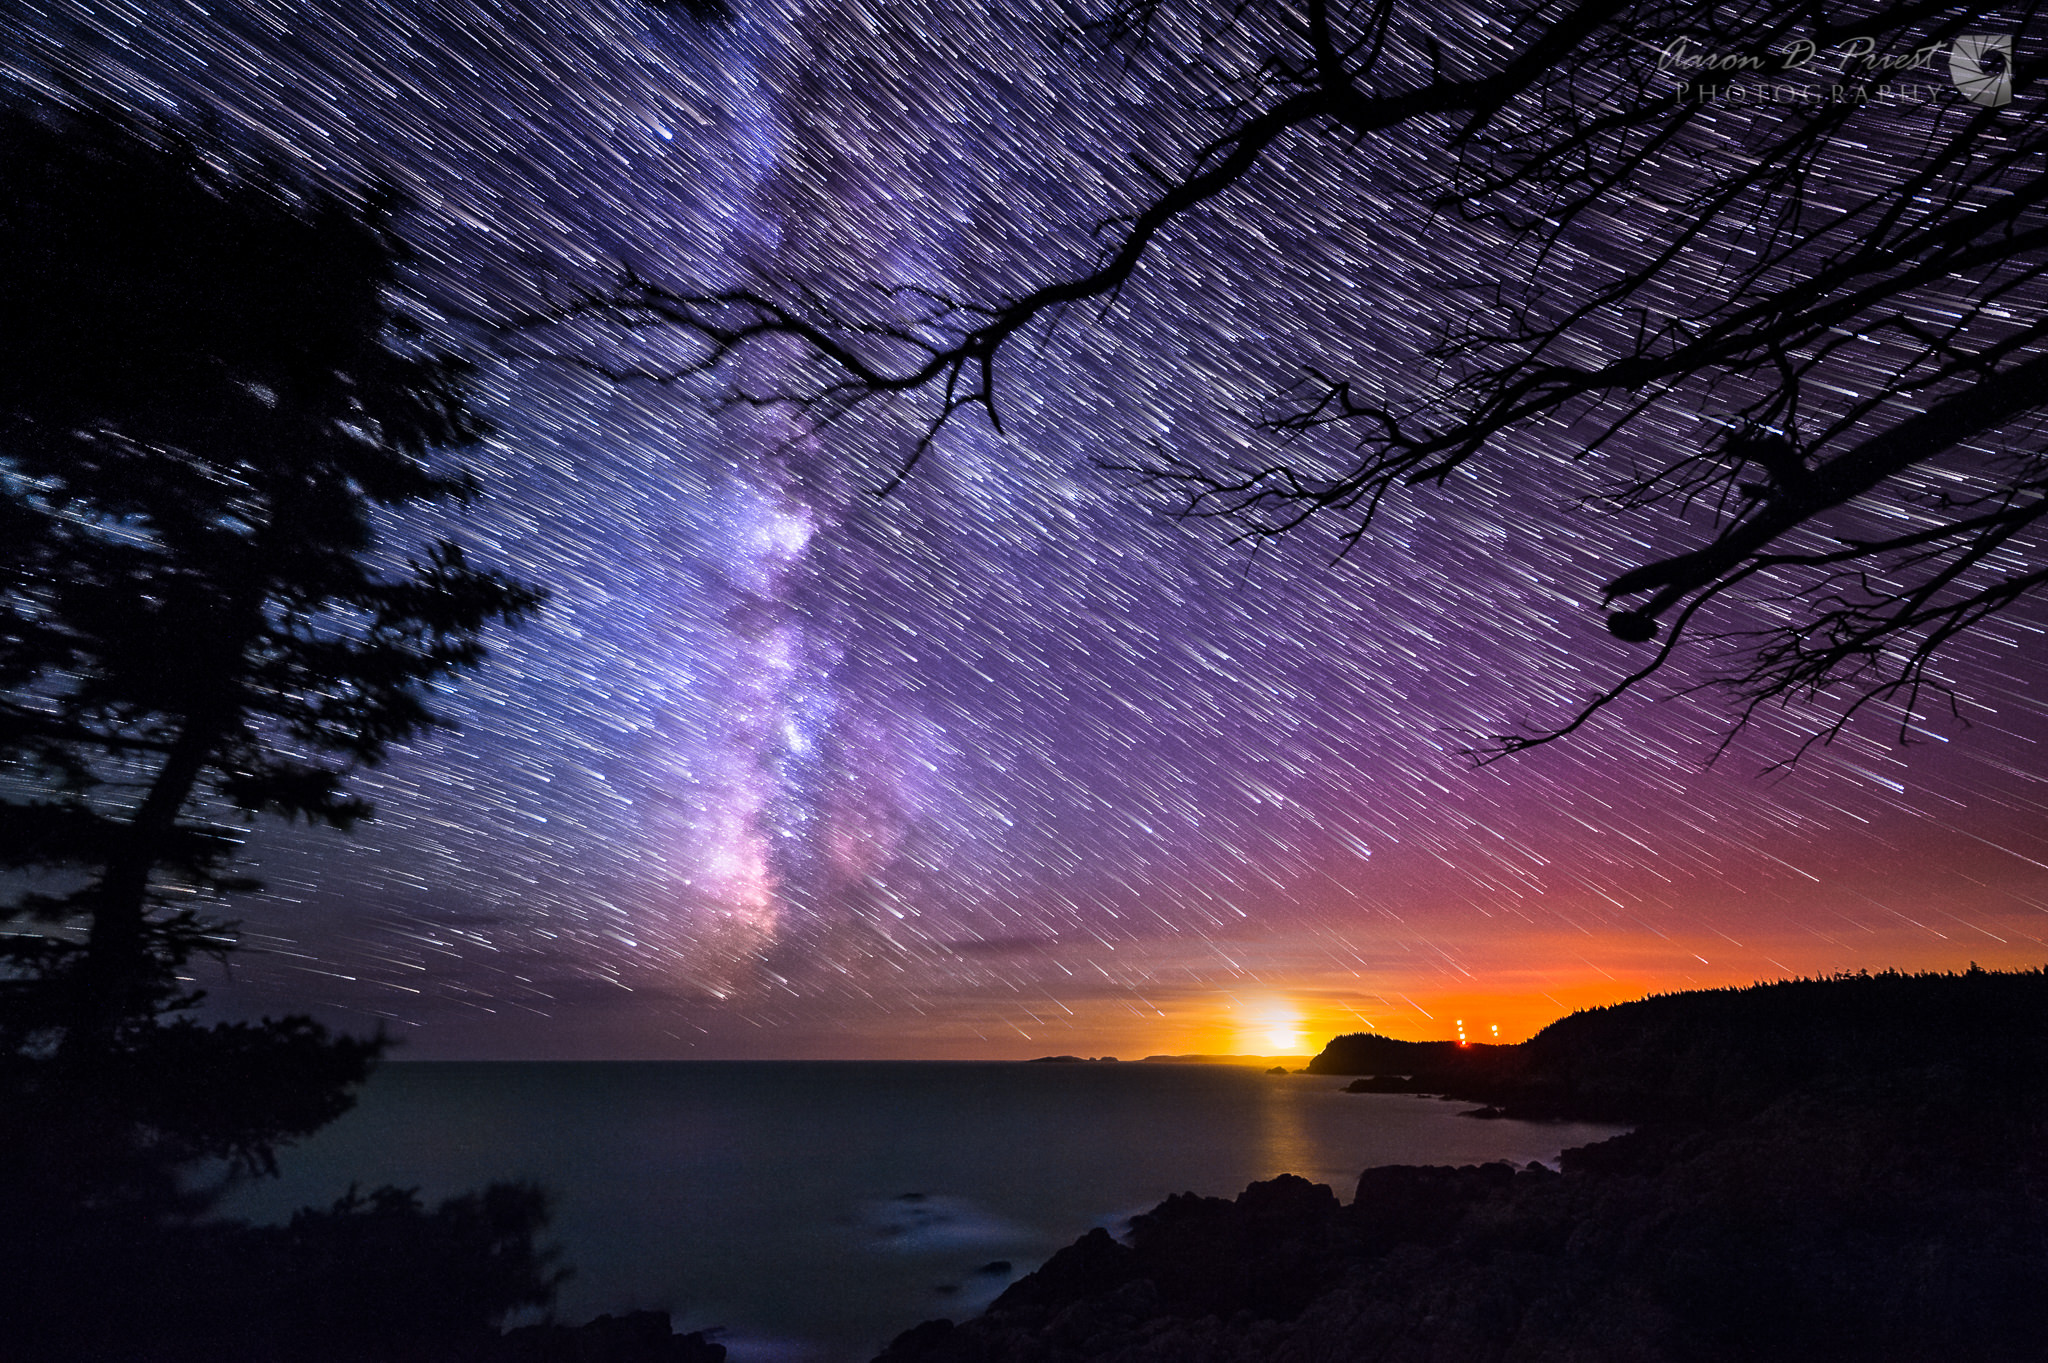
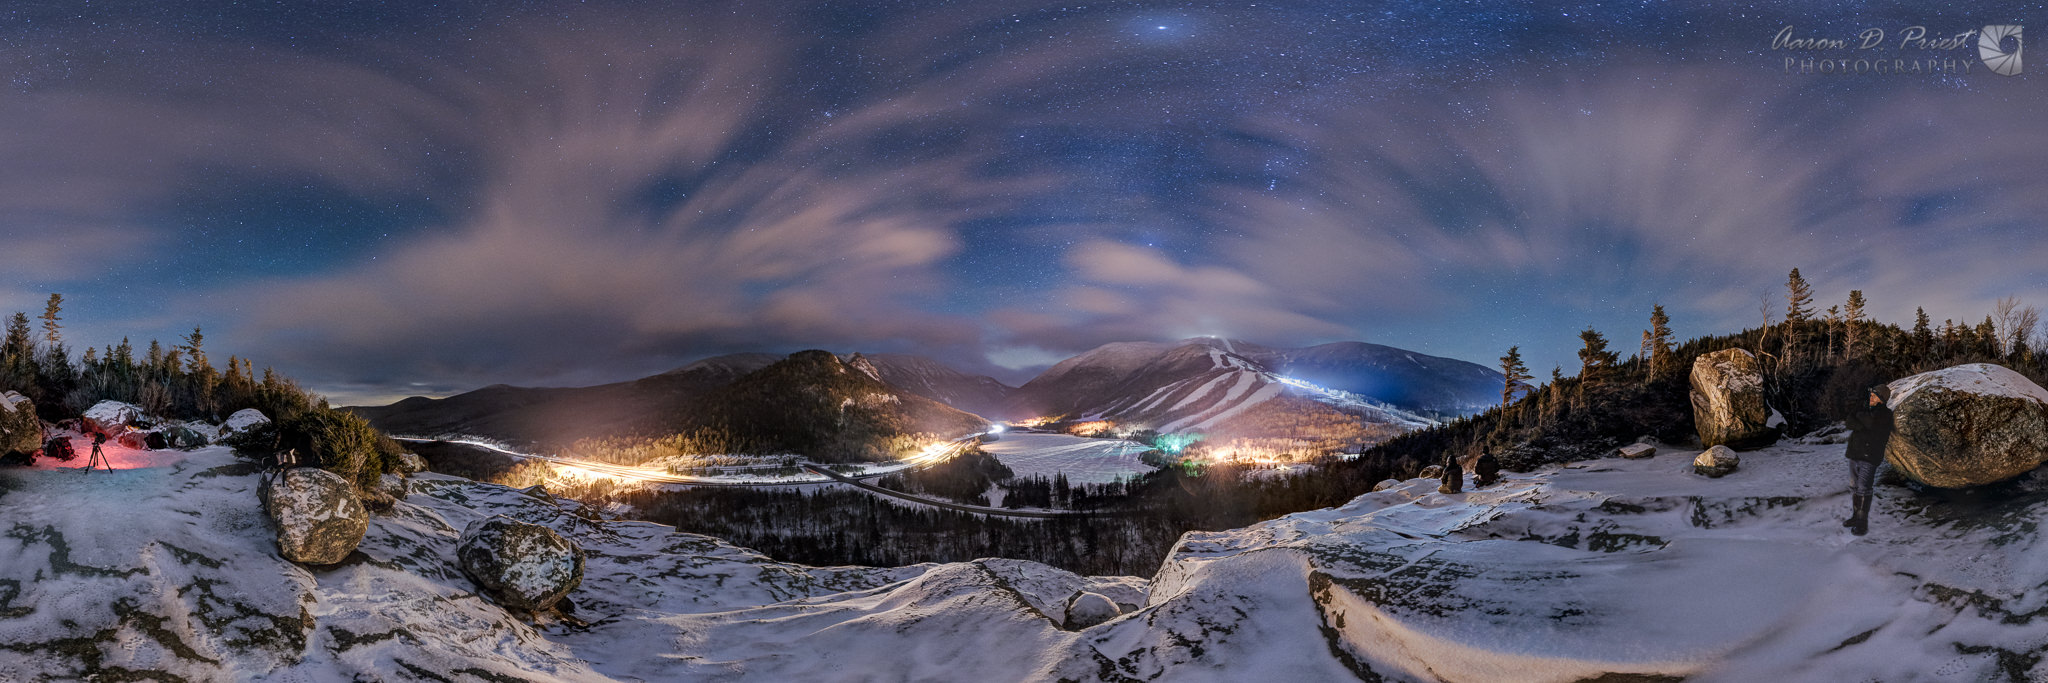
The Milky Way changes orientation and elevation throughout the year as the earth pivots on its axis during our seasons. You can see the Milky Way all year long, but it’s the galactic core or center of our galaxy that is the brightest and most photogenic, and that is what we are trying to capture. Where I live in Maine, the galactic core rises from the horizon around 132° on the compass dial in the early morning hours before astronomic dawn in the spring, and the Milky Way forms a nice low panorama in the sky. By summer it is visible for much of the shorter nights but is oriented up and down and passes directly overhead around midnight or a little later, about 165° to 212° on the compass dial. In the fall the galactic center is visible right after astronomic dusk and sets below the horizon very quickly, still standing straight up and down and passing directly overhead, from 206° to 228°. In the winter, the dimmer portion of the Milky Way (one of the spirals we live in), passes directly overhead and settles into a very wide arch around 180° of the horizon. Quite often light pollution on the horizon prevents you from getting a very good panorama of it though. It’s pretty much the opposite for those that live in the Southern Hemisphere. It’s easiest to see this by changing dates and times in Stellarium. PhotoPills also makes it easy with their tutorial.
See the virtual tour
Light Pollution
Light pollution is big factor in choosing a good location. You want to get far away from city lights for dark skies and a clear view of the Milky Way. Dark Sky Finder is a good map for looking at light pollution in the United States. You are looking for areas in the black or blue ranges if possible. There is also an iPhone app available. Dark Site Finder is another resource with some world maps.
Moon Phase
The moon phase will greatly affect your ability to shoot the Milky Way. It is best to shoot during a new moon, as the brightness of a quarter moon or more will wash out the Milky Way, and it is impossible to capture the Milky Way during the weeks the moon is sitting in the middle of the galactic core. This is easily predicted with software like PhotoPills and Stellarium though. Often the week before and after a new moon can still be useful for Milky Way photos as the moon rises or sets during the night and still leaves a few hours of shooting. Also, moon rises and moon sets are beautiful for timelapses, and a quarter moon or less behind you makes for some great foreground lighting. A quarter moon or more will give very strong foreground lighting and interesting shadows for timelapses. With the correct white balance, it can look like a daytime photo, but still have several stars in the sky. The sky will be quite blue like nautical twilight, and timelapses or star trails can be very beautiful with fewer stars and brighter foregrounds.

Weather
Weather is another critical component of planning your shot obviously. Usually, I’ve already planned a location and time for a Milky Way composition days or months in advance, but the weather will be the final determining factor. Weather Underground is good for looking up current weather and sky conditions, moon phase, and start/end of each twilight phase for your location, particularly in the astronomy section. What I analyze the most is the cloud cover on the hourly graph for the night. I’m looking for 0-10% cloud cover for clear Milky Way shots. If there’s 20-50% at dawn or dusk with a slight breeze, I know I might have some epic timelapse material instead! Clear Sky Chart is another good resource that astronomers use. You can see the cloud cover, transparency, seeing, and darkness for various observatories throughout North America. There’s an iPhone app for that as well.
Tide
If you are shooting around the ocean, the tide is a critical subject you must be aware of—potentially life-threatening and certainly hazardous to unattended camera equipment. It’s easy to lose track of time and get stranded at a place you easily walked out to at low tide, or leave a camera running for twenty minutes or more and find the tripod legs under a foot or more of water unexpectedly. Like weather or anything else, it is wise to plan ahead and be aware of circumstances, such as the times of high and low tide, and the amount of rise. Storms further out in the ocean can make it surge higher or faster than expected too, even if the weather is clear where you are. Most GPS units will give you tide estimates for your location. One of my favorite iPhone apps is TideTrac, it only requires cell phone service once for an area so load it up when checking the weather before heading out in the field where you might not have service. Weather Underground has a great marine forecast section that includes current heights of waves based on marine buoys.
Packing
Camera body
Photographing the night sky is not difficult, but it is one field of photography where the right equipment absolutely makes all the difference. Getting sharp photos of dim moving objects like stars and the Milky Way is a lot more demanding than well-lit subjects during the day or with artificial light.
Sensor technology continues to improve with every new generation, getting more sensitive with less noise at high ISOs. Generally, full-frame cameras have an advantage over crop sized and smaller sensors due to the size of each pixel being larger and able to capture more photons in the same time frame. Sensor size, pixel density (number of megapixels), and in-camera processing all determine the quality of image at high ISO. You want a camera that can shoot cleanly to ISO 2500 at least, and preferably ISO 3200 to 6400 for very dark skies. Some newer mirrorless and crop sensor cameras are capable of this.
For my setup, I use an unmodified Nikon D700.
Lenses
The wider the focal length and aperture the better for Milky Way compositions. A wide aperture of at least f/4 is best, preferably f/2.8 unless your camera is capable of extremely high ISOs. Not every lens is sharp at f/2.8, and many f/1.4 and f/1.8 primes are not sharp enough until stopped down to at least f/2. Many lenses produce oblong and pear-shaped stars in the corners at wide apertures, this is known as coma and is not easily fixed in post-production. Distortion and vignetting are much easier to fix.
A few notable lenses are exceptional at wide apertures with very little coma, particularly the Nikon 14-24mm f/2.8G, Rokinon 14mm f/2.8 (manual focus), Sigma 35mm f/1.4 Art, and Tokina 11-16mm f/2.8 AT-X116 Pro DX II (for crop sensors). Generally speaking, lenses with an aspherical lens element have better coma control.
Camera Support
A sturdy tripod is a must for long exposures, particularly in the dark where you are bound to bump it or knock it over. Pay close attention to those shooting around you and give them space, both for this reason and to avoid stray light from ruining their shots. I recommend not raising a center column at all if you can avoid it to keep your center of gravity low and your tripod less likely to get knocked over, especially if you are leaving it for a while for a timelapse.
A good ball head is easier to compose with in the dark than a geared video head, where you might not be able to tilt high enough very easy or use in portrait orientation. Panning/gimbal heads on a leveling base also work very well and are my preference as I often shoot panoramas of the Milky Way.
Whatever you use, it’s a good idea to be comfortable using it during the day before struggling with it at night and turning the wrong knob, throwing a camera or lens off balance and damaging something. Everything is more challenging in the dark, particularly if it’s cold and you are wearing gloves!
Dew / Frost
The bane of night photography: dew and frost! Without getting too scientific, dew forms when an object radiates heat faster than it can absorb it, causing water vapor in the air around the object to condense on it. If the dew point is below freezing, you get frost instead. Practically speaking, the front lens element of a wide-angle lens is the perfect candidate! Dew and frost will form on your lens before you see it on anything else and you won’t even notice it until you see your photos starting to get fuzzy and dim later at home. If you live in a very dry, arid environment this might not be an issue for you, but if you live near the coast it’s a constant struggle!
The best solution is to keep the lens warmer than the ambient air around it so dew can’t form in the first place. Hand warmers rubber-banded to the lens barrel and close to the front lens element are a good solution, as are electric dew heaters like astronomers use. Once dew has formed, it is hard to wipe it off or get the lens warm enough to dry out off with just a hand warmer.
Filters
UV and “protective” filters make matters worse as you are adding another very thin layer of glass with an air pocket behind it. They dew up faster than your lens will. I recommend taking them off at night to avoid dew and glare, unless you are shooting near sea spray or in ocean fog, in which case a filter is sometimes easier to clean afterward.
A lens hood will also help prevent dew on longer lenses. Many wide-angle lenses have a fixed lens hood already.
Battery power
Long exposures will eat up battery life quickly. Don’t be surprised if you get far fewer shots than you would normally get during the day before your battery dies. Cold temperatures make batteries even less efficient. It’s a good idea to carry a couple of spares in your pocket or inside a coat near your body to keep them warm. During the winter you can swap out batteries more often and you’ll find an almost dead battery has quite a bit of juice left over after it has warmed up again. A vertical grip with a second battery makes a big difference at night, particularly when shooting long timelapses.
Intervalometer
An intervalometer allows you to shoot a photo in regular intervals to speed up later as a video, a.k.a. timelapse. Most Nikon cameras have a built-in intervalometer in the menu, but it’s limited to 999 frames on all but the most recent models. That should be plenty for most scenarios.
Canon users can try out Magic Lantern firmware if you are brave and your model is supported. There are also many external remotes that offer an intervalometer feature, too many to list here in detail, from simple to complex.
Promote Control is one of the more popular complex remotes for HDR bracketing, focus stacking, timelapse, and bulb ramping and is my personal choice.
Outdoor Equipment / Safety
Obviously a flashlight or headlamp is a necessity for night photography shooting. I recommend one with a red LED mode to preserve your night vision. Spare batteries and an extra flashlight are very wise precautions.
Here are some more recommendations for extended night photography:
- Whistle (many headlamps and camera backpacks have one already)
- SOS and slow blink modes on flashlights (cell phones don’t always have service and batteries die)
- Map and compass if you are driving off-road or hiking, GPS units can fail or lose battery power
- Walkie-talkies for groups to stay in contact
- Bug spray, I always regret it when I forget this! That and a handkerchief always seem to get left behind in the truck when I’m hiking!
- Personal protection such as mace, pepper spray, bear spray, etc. (check local laws obviously)
- Trash bag, plastic bucket, etc. to set your backpack on or in to prevent dew, mud, mist, etc. from getting your gear wet
- Rain jacket during the summer or scarf / small blanket during the winter to wrap around the camera and keep dry / warm during long timelapses
- Extra layers as it can get very cold at night: boots, hat, gloves, extra jacket, etc.
- Water, snack, and a first aid kit are always a good idea to have nearby, or on you for a long hike

3) Shooting
A good baseline exposure for the Milky Way on a full-frame sensor with dark skies is 14mm, f/2.8, ISO 4000, 25 seconds, and then tweak your settings from there.
Aperture
Typically as wide open as you can go on a moonless night, but if you have an f/1.4 prime it might have less coma and vignetting stopped down some. Usually, you don’t want to go as far as f/4 with the Milky Way unless your camera has a very high ISO range, such as a Sony A7S.
Camera ISO
ISO 2500 to 6400 is a good ISO range for the Milky Way with dark skies. Conventional wisdom would dictate using as low an ISO as possible for less noise, but night photography is very different. Unless you are using a tracker or stacking images for longer exposures, we have to use very high ISOs to capture enough detail of the Milky Way. You’ll want to experiment to find the ideal balance between detail and noise with your camera body.

Shutter Speed & Focal Length
Wide-angle lenses let you use longer exposures at night without stars streaking. A good rule of thumb is to divide 500 by your focal length for the maximum number of seconds you can use for exposure and still get acceptably sharp stars. It’s a relative figure—stars don’t appear to move as fast near the north star, but the further away from Polaris and the closer to the equator you get, the faster the stars appear to move. If you don’t have a 35mm full-frame sensor, divide again by the crop factor (1.6 for Canon crop sensor DSLRs, 1.5 for Nikon crop sensor DSLRs, and 2 for most mirrorless cameras). 14mm to 35mm on a full-frame sensor is best for Milky Way photography. 50mm and higher usually need a tracker to avoid streaking at long enough shutter speeds. Here are some examples:
- 500 ÷ 14mm on a full frame sensor = 35 seconds
- 500 ÷ 24mm = 20 seconds
- 500 ÷ 18mm ÷ 1.6 for a Canon crop sensor = 17 seconds
- 500 ÷ 50mm ÷ 2 for a mirrorless sensor = 5 seconds
I often subtract another 5 to 10 seconds from these estimates to ensure sharp stars when shooting along the horizon, especially when printing large like 24×36 from a high resolution sensor. For timelapses and star trails a small amount of streaking won’t matter.
There is a much more complicated and accurate exposure rule for those that are interested. As sensors get denser with more megapixels, or larger such as medium format, the “500 Rule” falls short. This is why I often subtract 5 to 10 seconds from the result. A more accurate formula would be:
(35 x aperture + 30 x pixel pitch) ÷ focal length = shutter speed in seconds
To figure out the pixel pitch of your camera, divide the sensor’s physical width in millimeters by the number of pixels in width, and multiply by 1000 to measure it in microns. For example, a Nikon D810 is 35.9 x 24mm and 7360 x 4912 pixels. 35.9 ÷ 7360 x 1000 = 4.88 μm (rounding up).
Therefore, a 20mm f/1.8 lens on a 36 MP D810 would equal about 10.5 seconds: (35 x 1.8 + 30 x 4.88) ÷ 20 = 10.47 (rounding up)
The 500 Rule would say 500 ÷ 20 = 25 seconds, which has significant streaking in the corners on a 36MP camera if you zoom in or print large. You could probably get away with 15 seconds though and look acceptably sharp.
Don’t forget your “order of operations” from high school math class for the above formula: solve the multiplication before the addition or you won’t get the correct results!
Here is more information on this formula from the author’s website (in French)

White Balance
White balance won’t affect RAW files, just JPEGs, TIFFs, and the preview image on the camera’s rear LCD display. I find a proper white balance is useful when shooting in the field though to get a better preview of my image and exposure, since the histogram won’t be of much use for really dark scenes. A manual white balance of somewhere between 3000° and 4000°K is best for the Milky Way. I’m usually around 3450° or 3570°K on my Nikon. It doesn’t have to be precisely accurate, you can change it in Lightroom or Camera RAW later. If shooting timelapses and editing using LRTimelapse, a manual white balance is preferred over auto white balance for consistency.
LCD Brightness
The brightness of the rear LCD on your camera will probably be way too bright for reviewing images at night. It will fool you into thinking your photos are exposed brighter than they really are, and it will annoy others shooting near you! I dial it down until I can barely see the difference in shade between the two darkest colors (black and dark gray) in the sample palette, about -2 to -3 on a Nikon.
Viewfinder Cover
It’s a good idea to cover your viewfinder or close the curtain to it for long exposures at night. During the day stray light through the viewfinder usually only affects your meter reading and not the image itself, but during long exposures at night it can show up on the edges of your frame, particularly if you have a light source behind you or a headlamp or flashlight hits the back of your camera. Many cameras ship with a little plastic cover (that soon gets misplaced), sometimes on the camera strap. You can also cover your camera with a hat, coat, etc.
RAW vs JPEG
RAW files store much more data than JPEGs, which is important for good post-processing later of night photos. If your camera has a choice between 12 or 14-bit RAW files, go with the highest quality and image size possible for better noise reduction and shadow boosting later.
See the virtual tour
Noise Reduction
There are two types of noise reduction in your camera’s menu: high ISO noise reduction and long exposure noise reduction. High ISO noise reduction doesn’t apply to RAW files, only JPEGs and the embedded preview image, so I leave it disabled to avoid extra processing time by the camera. Long exposure noise reduction applies to all file types and removes hot pixels from sensor heat during long exposures (typically 8 seconds or more on most cameras). It doubles your exposure time and shoots the second photo with the shutter curtain closed, then removes any exposed pixels it finds in the second shot from the previous one before saving the file.
For a 30 second photo, a minute isn’t a long wait, but for a 4 to 8 minute ground exposure, it can feel like eternity! Night photography is a craft that takes a lot of patience to master though, and I usually leave long exposure reduction enabled unless I’m shooting a panorama or timelapse.
If you are shooting a panorama or especially a timelapse for star trails, you can’t have a long interval between shots for long exposure noise reduction. Instead, you can shoot a “dark frame” at f/22 with a lens cap on to capture nothing but hot pixels, and then apply it to your light frames later.
Pixel Fixer is a great program for dark frame subtraction if it supports your camera model because it can work on RAW files. Other programs like StarStaX can also use dark frames as TIFFs. More dark frames make for better analyzing, but not every program can do this. I usually shoot somewhere between 10 and 30 dark frames for every shutter/ISO combination that I used during the night, if I’m not using long exposure noise reduction in camera.
Focus
Critical focus is necessary for sharp stars. Infinity is usually not where it is marked on your lens. Autofocus on most cameras will not work on dim stars. The best method is to manually focus on a very bright star using live view on a tripod. If you have good enough eyes, you can roughly center a star in the viewfinder and then switch over to live view. Live view won’t see any stars until at least 5x usually, and then you can pan around a bit until you find it and zoom in again to 10x or higher. Don’t zoom with your lens, most zoom lenses have “focus breathing” where they shift focus slightly as you zoom. Manually adjust your focus until the star in live view is as small a pixel as you can get it with no soft edges or halos around it. Make a note of where this point is on your depth of field scale and tape your lens down for the night with masking tape or anything that won’t leave a sticky residue, unless you are going to do focus stacking later.
Stacking
Often a single exposure of the Milky Way does not have enough depth of field or a long enough shutter speed for ground details. To get around this you have to shoot a longer exposure that is sometimes refocused for a closer object. I often lower my ISO or narrow my aperture by a stop or two and shoot very long exposures of the ground to combine later in Photoshop. The exposure difference varies on light pollution, ground details (woods, snow, grass, water, etc.), and moonlight, but sometimes it is 3 or 4 stops more than the exposure of the stars, which can mean a shutter speed of several minutes if I also lowered my ISO for less noise or closed my aperture for more depth of field.
Timelapses
Timelapses are a lengthy discussion and deserve a dedicated article, so this is only a brief introduction with a few resources to check out if you are interested. Timelapses are easy to shoot between astronomic dusk and dawn because the exposure remains constant. Any intervalometer with manual exposure will work. However, shooting sunset into Milky Way or the opposite into sunrise is considered the holy grail of timelapsing due to the complexity. It usually involves some form of exposure ramping or bulb ramping (shifting ISO/exposure in bulb mode).
DslrDashboard is a good app for “easy” holy grail timelapses and worth investigating, especially if your camera has built-in WiFi. There is also a cheap battery-powered wireless router that can be used for cameras without WiFi on that website.
LRTimelapse is a powerful program for gradually changing Lightroom/ Camera RAW edits over time (such as white balance or exposure) for both panoramas and timelapses. I use it frequently for timelapses and panoramas.
As mentioned previously, a Promote Control can do timelapses, manual bulb ramping, focus stacking, and a number of other functions.
Ramper Pro is a new, high-end timelapse controller with motion control, interval fairing, light sensor, histogram monitoring, 3D support, and more. This is more complicated than DslrDashboard, but it’s an all-in-one box that doesn’t require a netbook, tablet, or laptop in the field. It’s become my favorite tool for holy grail timelapses.
Dynamic Perception and eMotimo build some very affordable and easy-to-use sliders and motion control robotic heads.
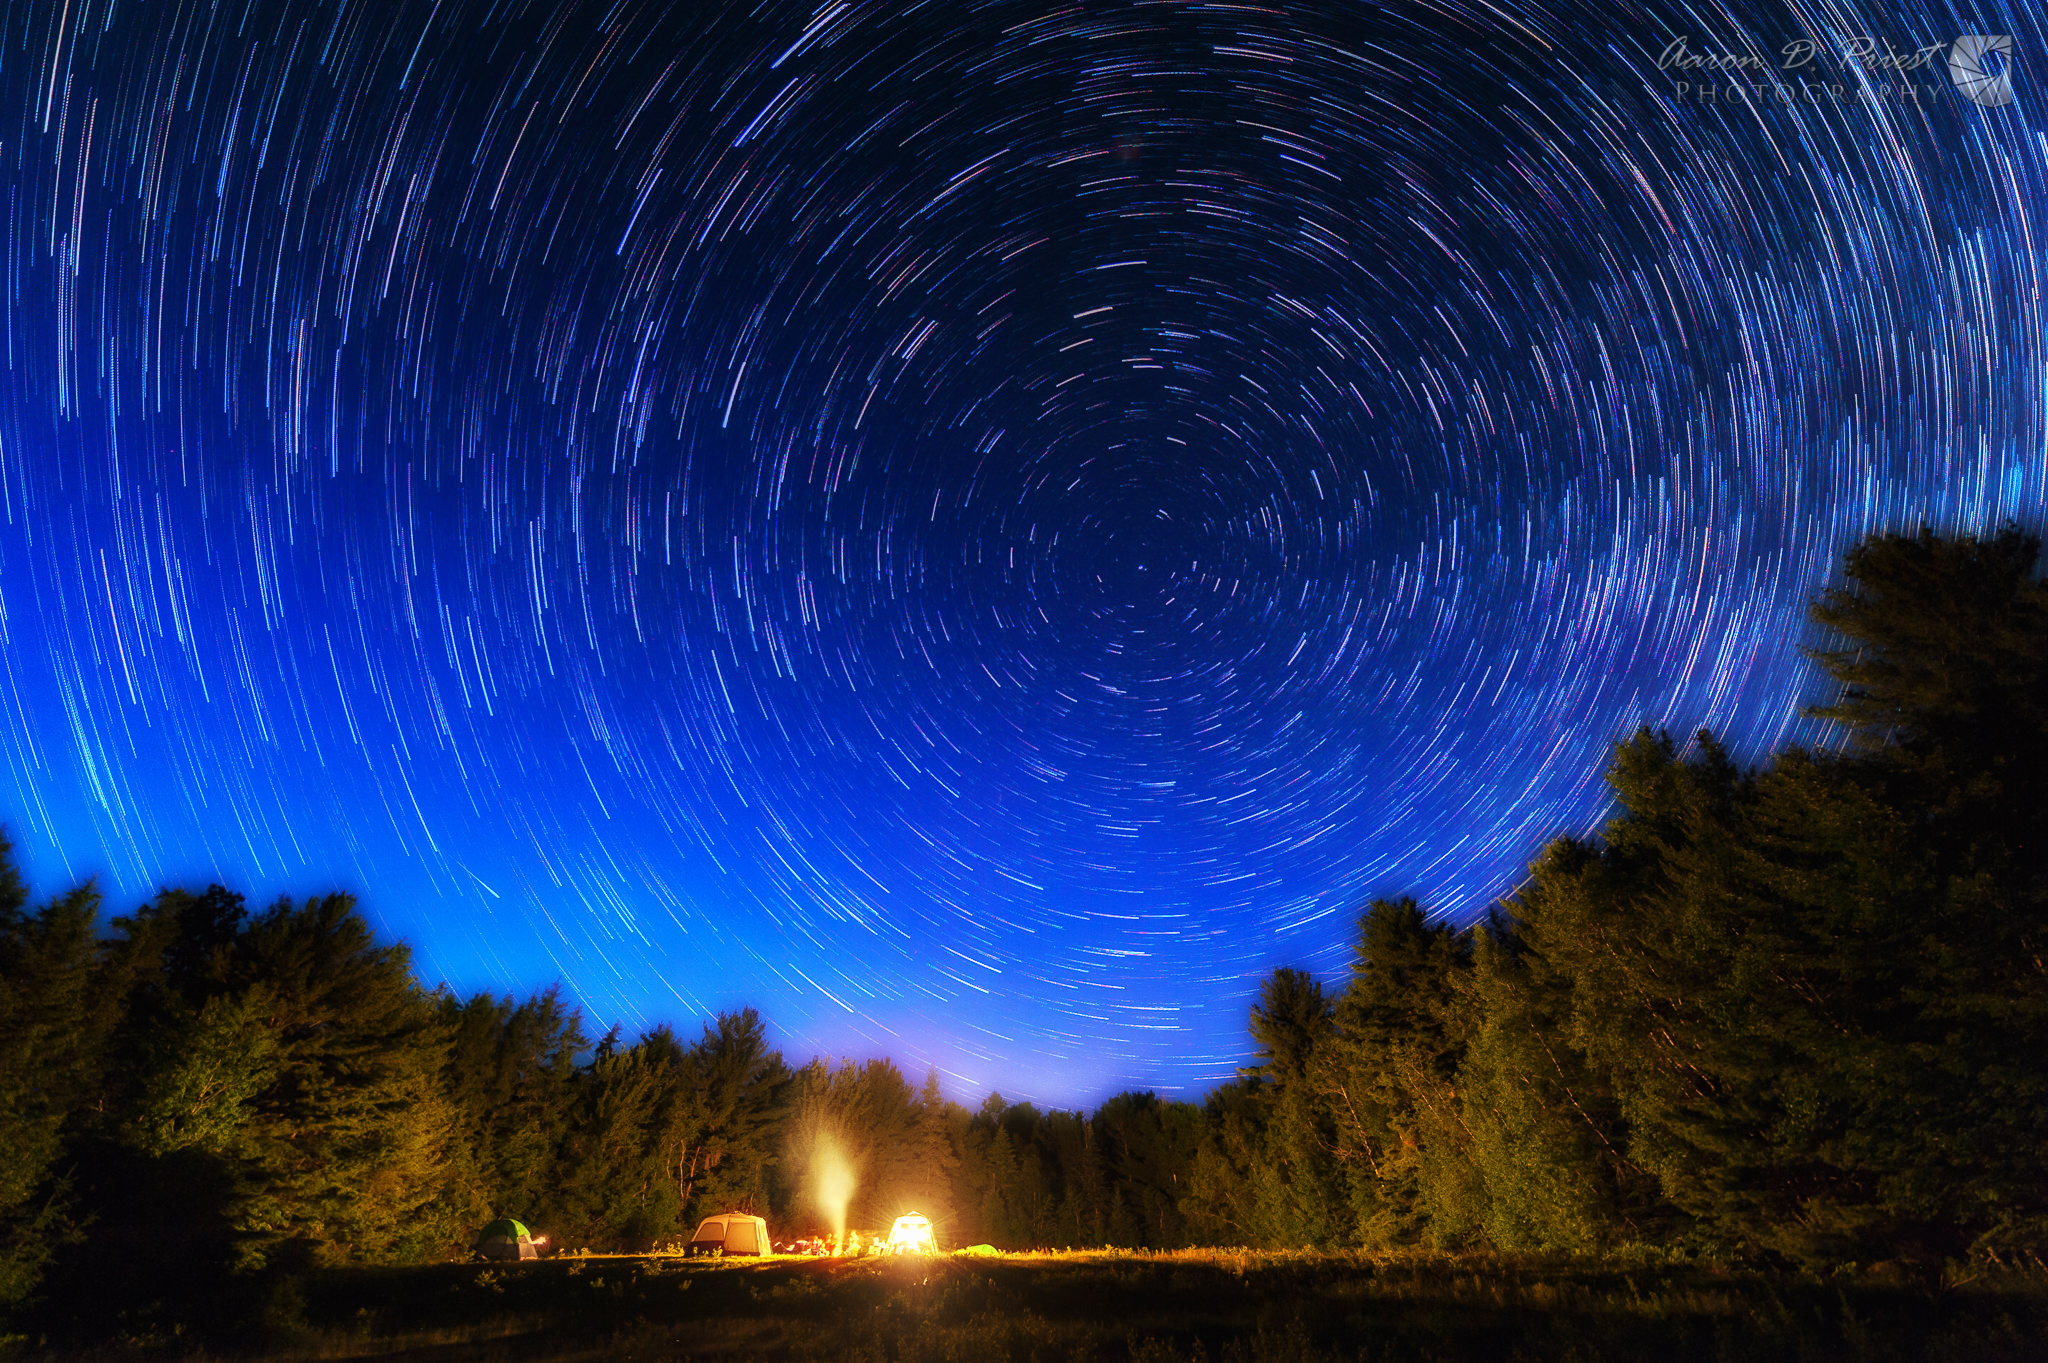
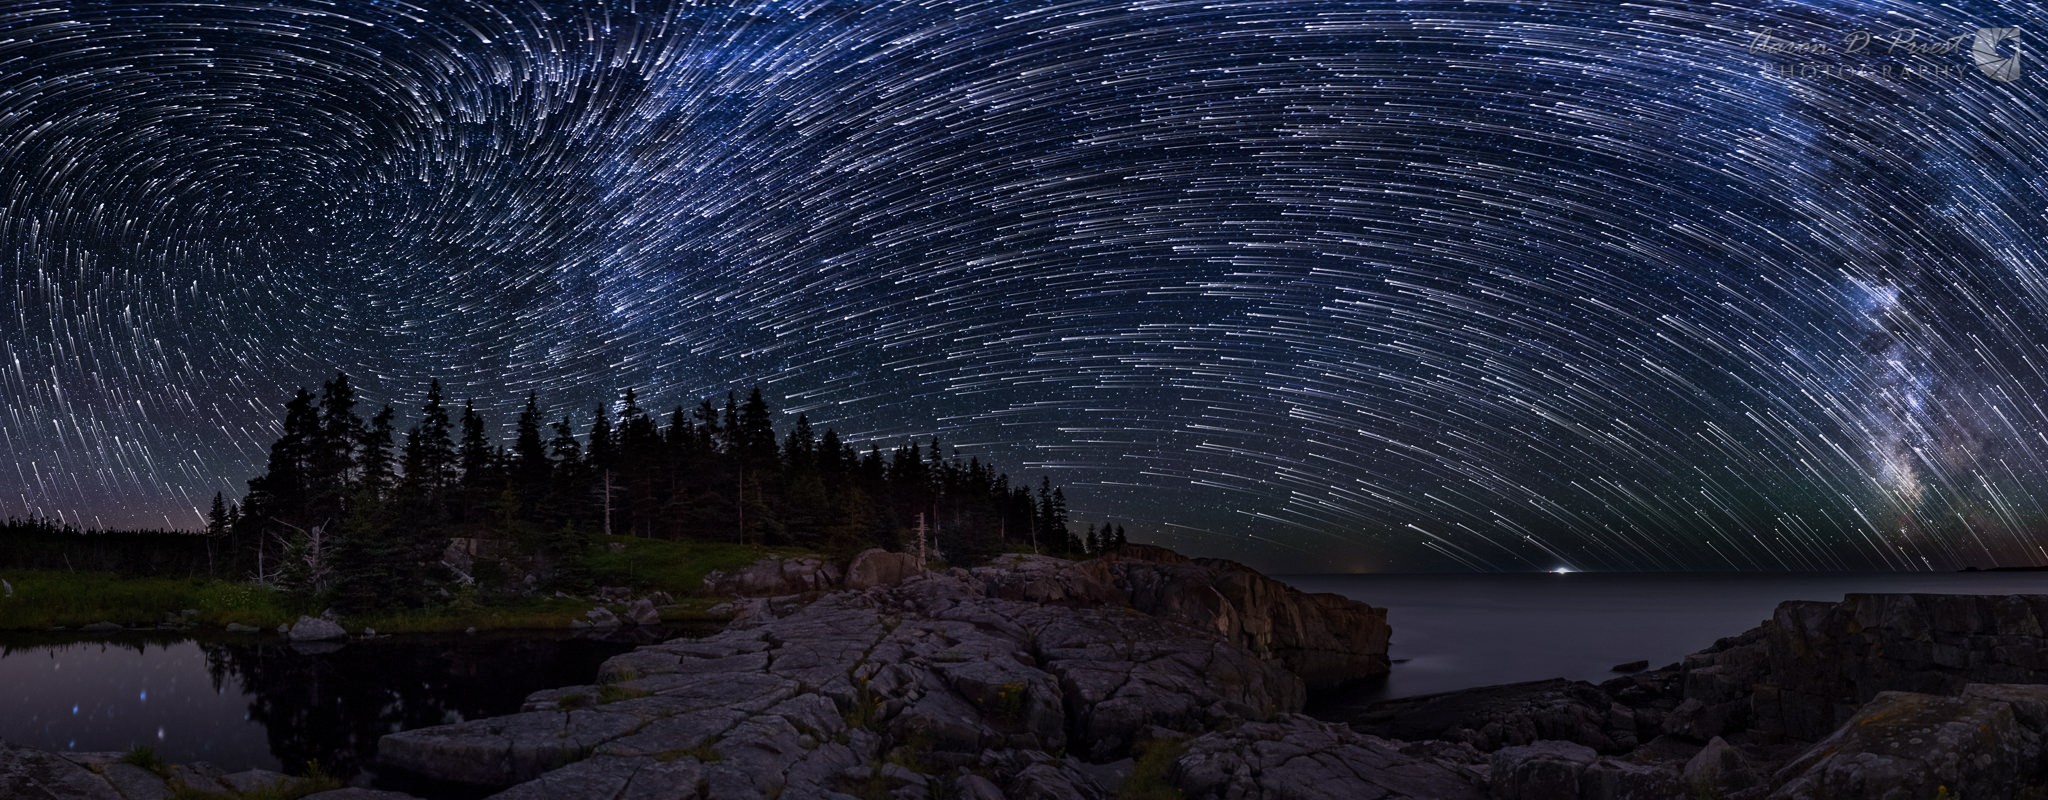
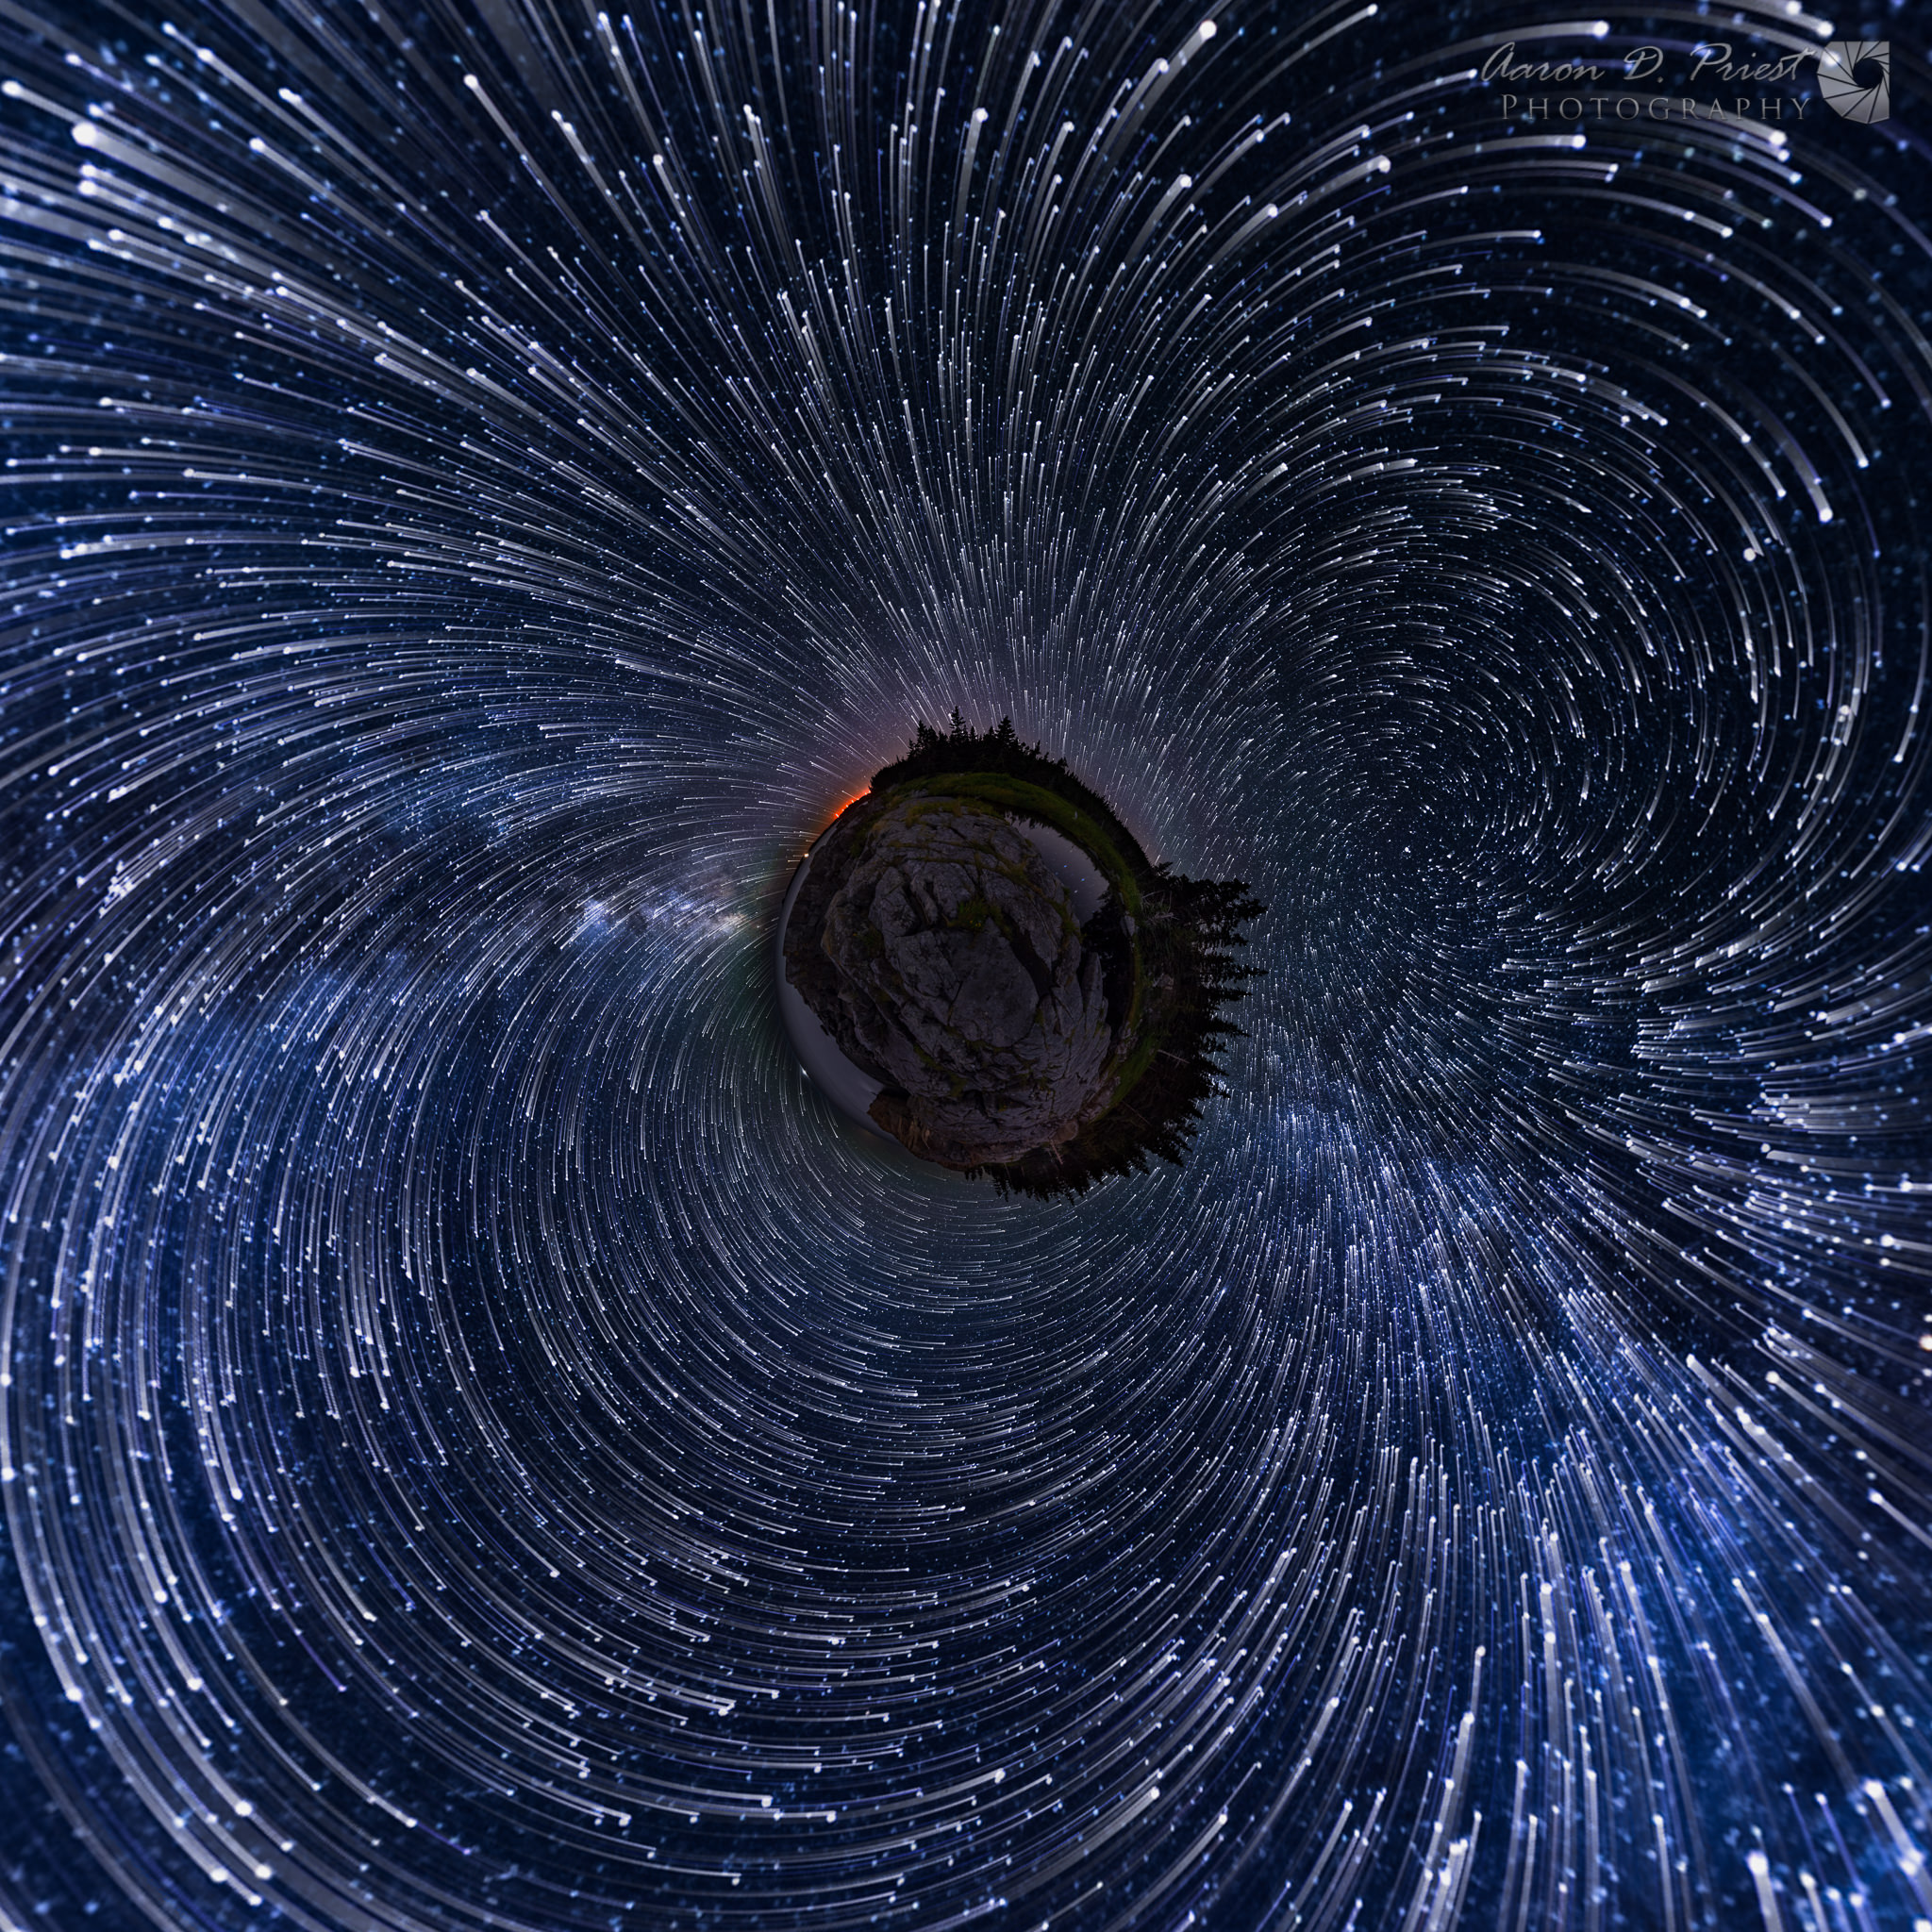
Star Trails
Star trails are very closely related to timelapses, in that you capture the images with the same process, but instead of playing them back fast for a video you stack them into a single image to see the star movement. You can also use a single long exposure instead of stacking multiple short exposures. There are merits to both methods. I wrote a longer article on my website detailing why I prefer stacking over a single long exposure.
I find that using the same exposure as you’d use for the Milky Way produces too many stars to look good when stacked. It’s better to knock your ISO down 2 or 3 stops. This also means that star trails look good with a little bit of moonlight as that also reduces the number of visible stars. I like starting or ending my star trails timelapse during astronomic twilight to get some of the cobalt dark blue color in my skies. I’ll let it overexpose at the beginning or end and choose how many frames I want to use later when stacking to get the brightness I like.
A short interval is important to prevent gaps in your star trails. This means disabling long exposure noise reduction.
StarStaX is an excellent free program for stacking stars. It supports dark frames and has features for gap filling, comet trails, reverse trails, and more. Currently, it cannot export a 16-bit file, only 8-bit, but it does support TIFFs (both import and export).
Advanced Stacker Plus is a photoshop plugin, and lives up to its name. It’s my preferred method of stacking star trails. I recommend taking Steven Christenson’s online workshop from his website on how to get the most out of it.
Photoshop’s stacking modes can also be used natively, but the two programs mentioned are much faster.
Star Tracer (Windows only) is a great program for extending star trails if you didn’t shoot enough frames, and also for gap filling.
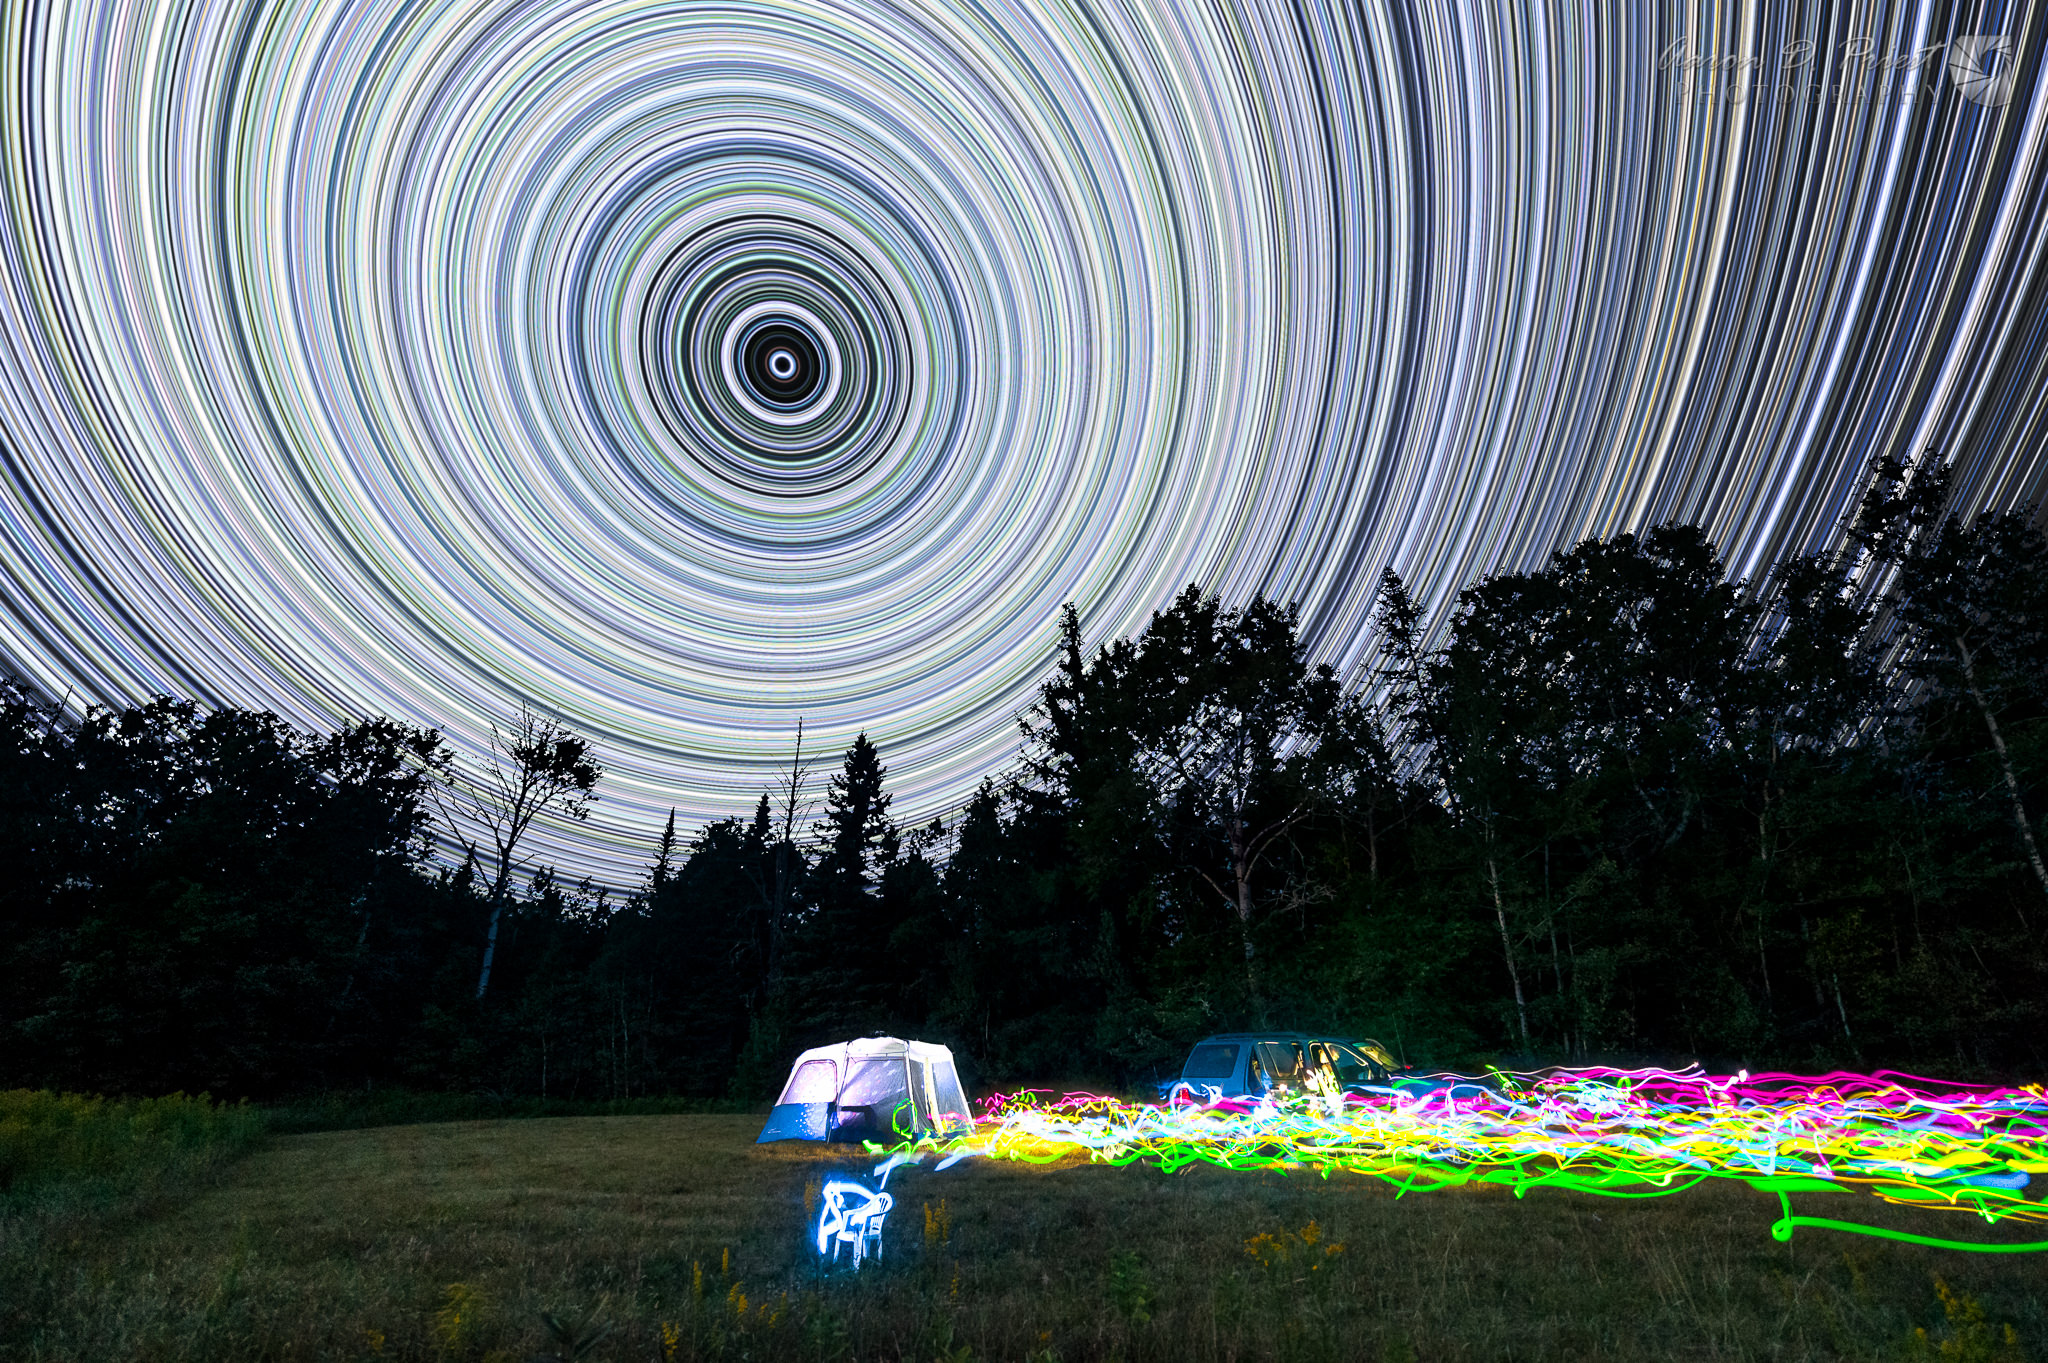
Sathya Narayanan has made a couple of Photoshop scripts that are great for creating vortex star trails and creative effects.
More Night Photography Resources
- Antoni Cladera of PhotoPills interviewed several well-known night photographers and put together an excellent resource on shooting the Milky Way
- Another great article on using the PhotoPills app to shoot the Milky Way
- David Kingham has a great eBook on shooting the night sky that I highly recommend
- I keep a list of my favorite apps and websites for iPhones, iPads, Androids, Windows, Mac, etc. on my own website

The Rule of 500 is completely obsolete and will most likely result in trailing, even with wide angle lenses. The NPF rule is far superior for preventing trailing. Go to the following site and put in all the required data and it will give you a trailing free shutter speed.
web.archive.org/web/2…-d-etoiles
Yes, that is exactly the more complicated formula discussed in this article under shutter speed and focal length. ;-) I helped bring it to several photography apps like PhotoPills, PlanIt Pro, and qDslrDashboard. It’s much more accurate with today’s higher megapixel sensors.
Great article and pictures. Good to see the D700 doing the business. Still a superb camera.
Thanks Denis!
The exif data for each photo is underneath to show the camera settings. I sprinkled the photos throughout the article to break up the text and show what could be shot with all of the information in the article put together. I have kept a much longer article updated over the years on my own website that might interest you, adding more content every month or two to keep up with technology and answer new questions that come up at workshops and presentations: galleries.aaronpriestphoto.com/Artic…hotography
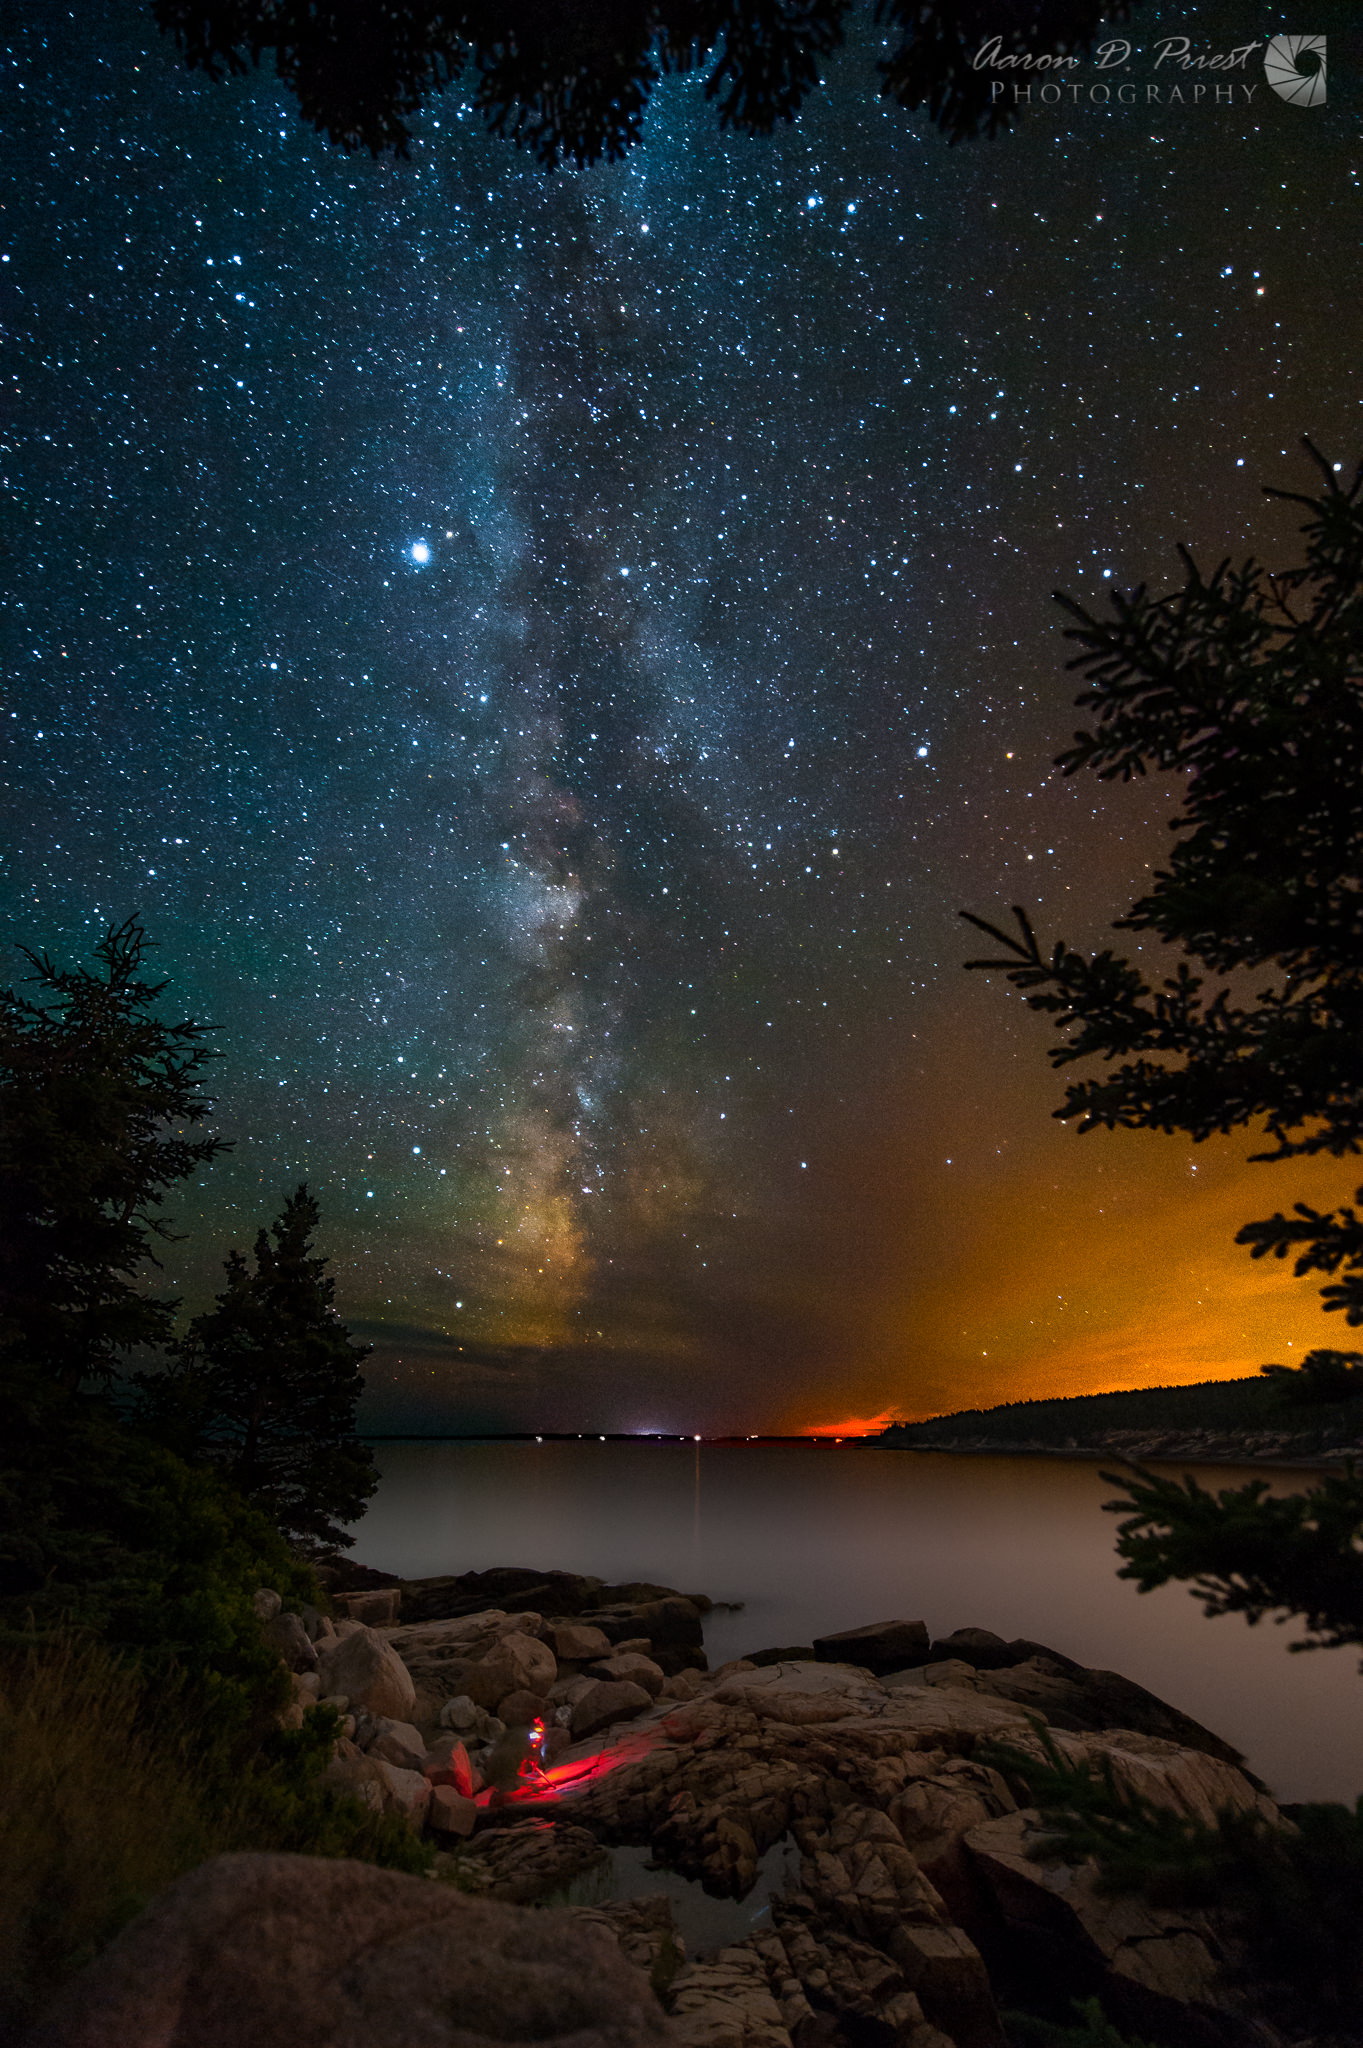
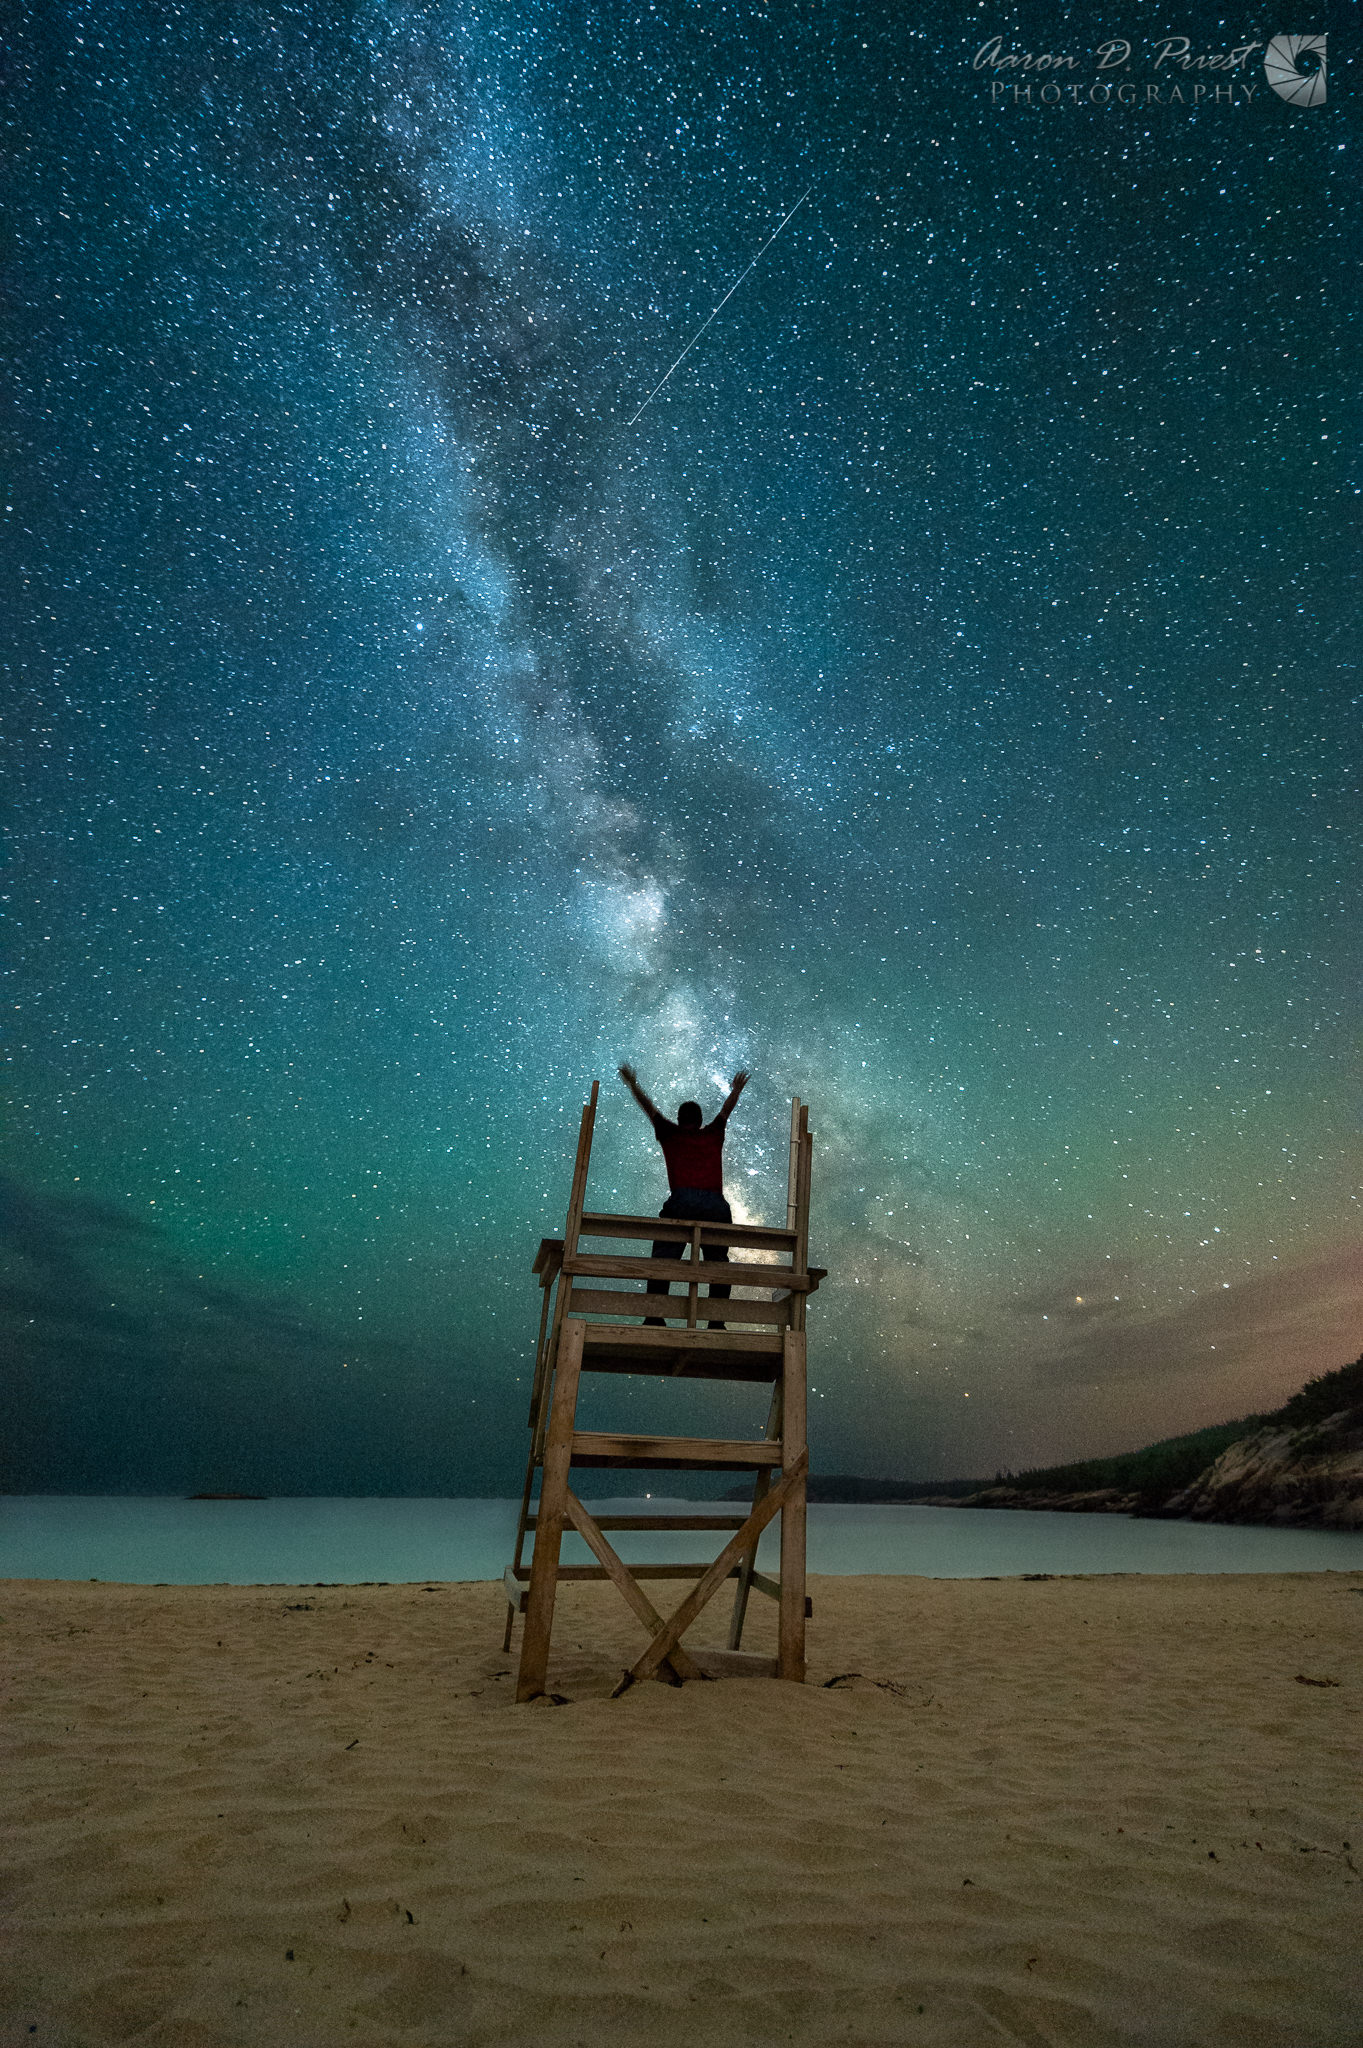
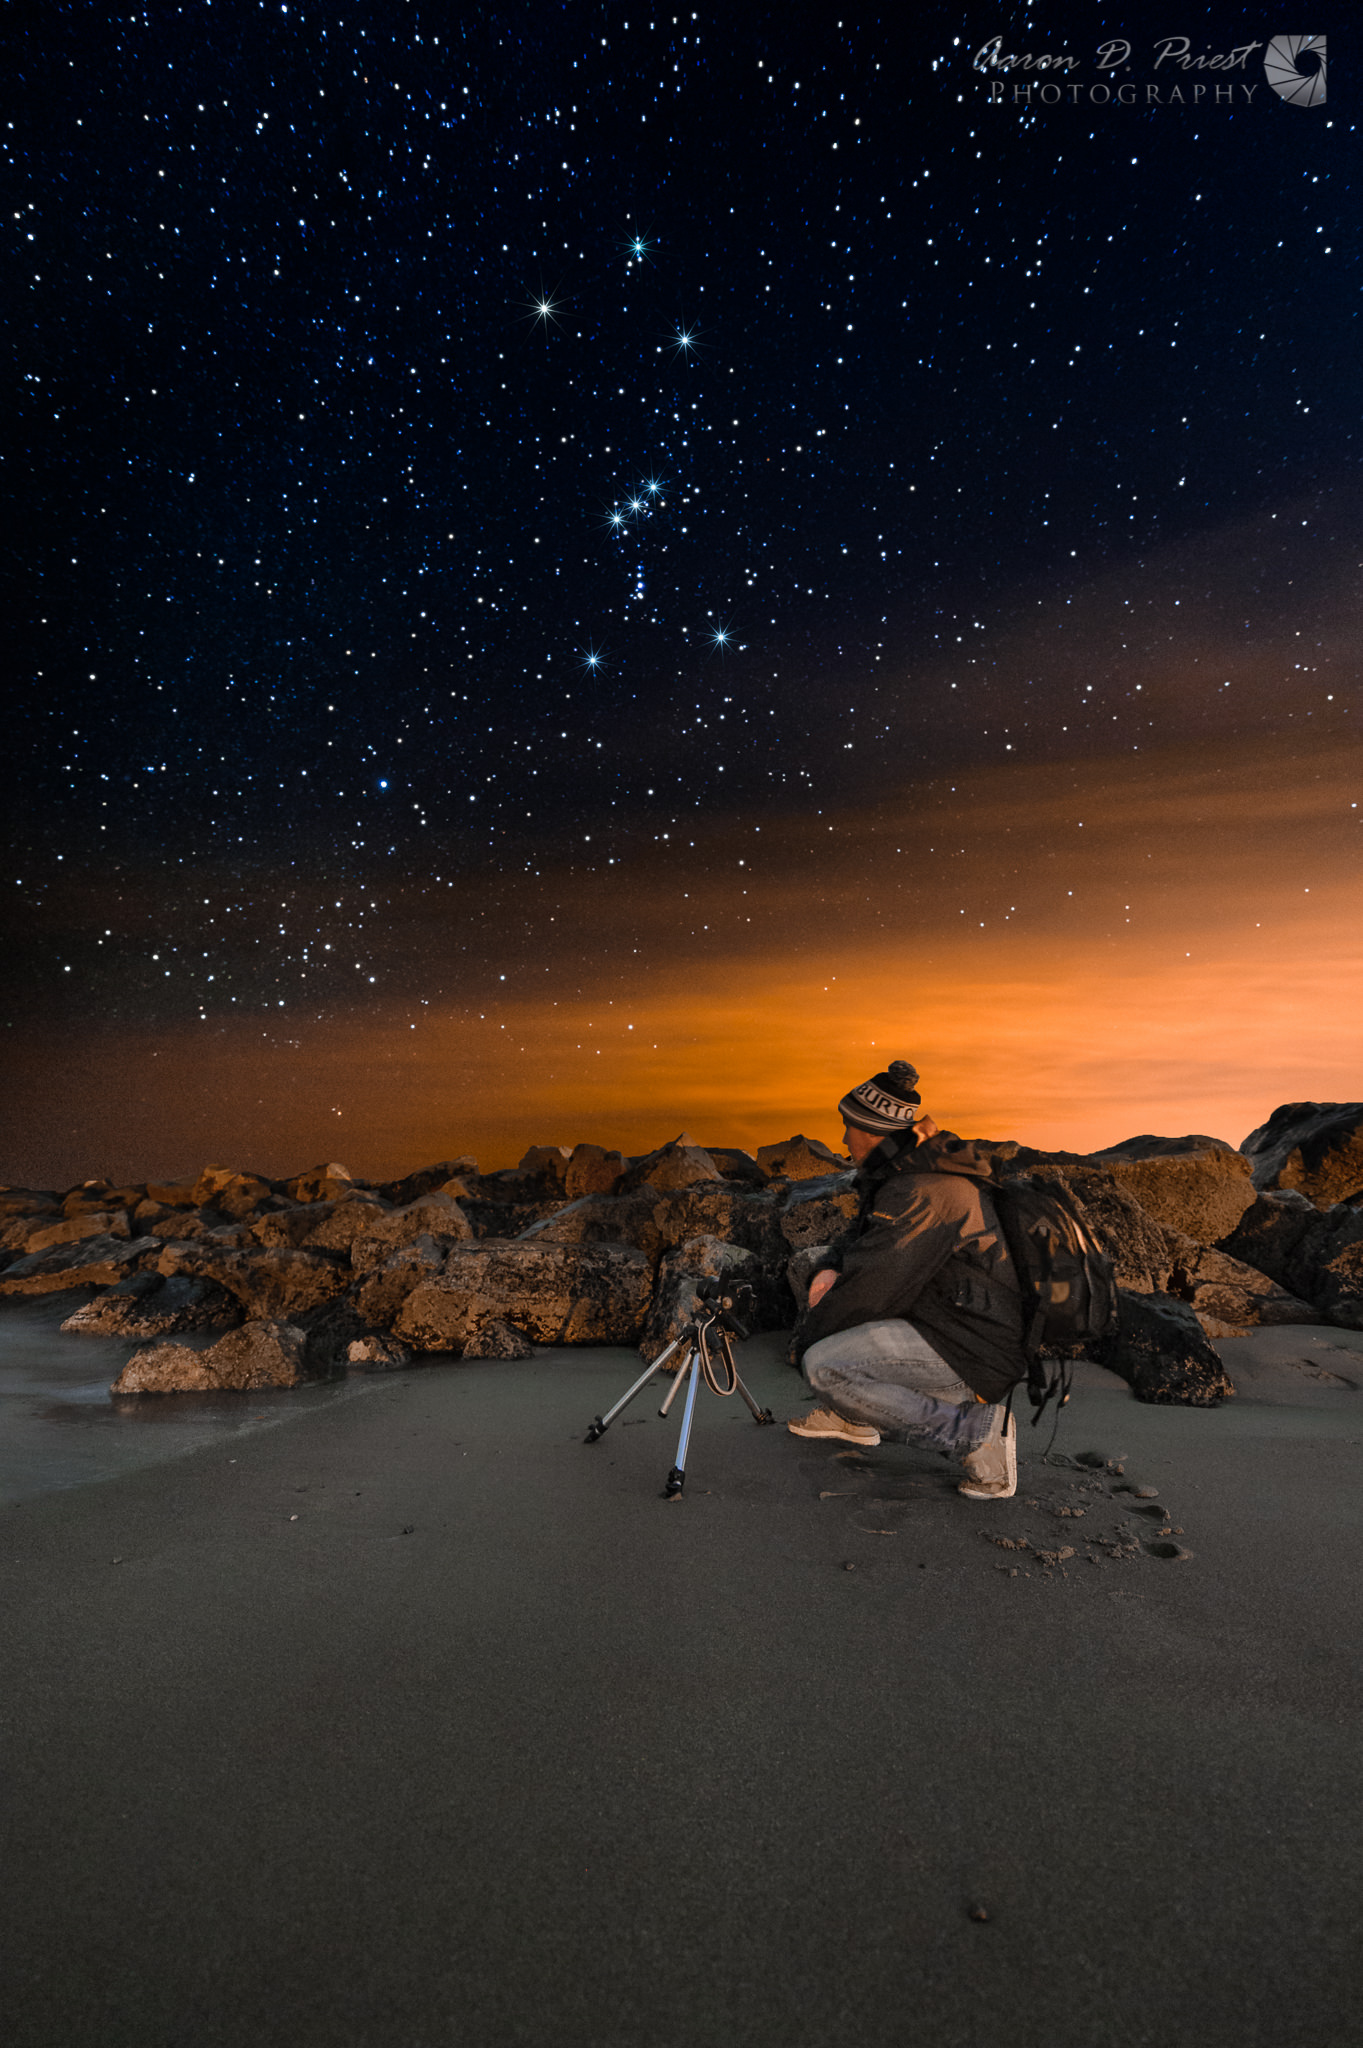
Regarding the image specifically that you were referring to, that is my good friend, Jon Secord, on Wallis Sands Beach in Rye, New Hampshire. It’s probably a 20-25 second (can’t recall) exposure of the sky for sharp stars, blended with a 1 minute exposure of the ground in Photoshop for more shadow detail, and Orion itself was enhanced with a plugin called StarSpikes Pro to highlight the constellation overhead.
Gday Aaron. It may be four years on from when you posted this incredibly informative (and at times overwhelming) article but it is still the most inspirational piece on night sky photography. If I may venture a small criticism though, it would be say that perhaps with each photograph a brief description on how each result was obtained would be much appreciated by those of us who are not digital natives,the children of the 50’s. For example the shot of you crouching on the beach is an utterly awesome( and I don’t use that word lightly)shot. How did you do it? As a seventy year old, getting the right exposure is an adventure in itself so to try to achieve a shot of similar magnitude would be a project of the highest order. Probably increase my life expectancy by twenty years. I understand that there are constraints on time and space and that such information would extend an already huge tutorial but some of us need a little more clarity. It would be interesting to know. after four years, has new technology, hardware / software, changed your approach to achieving your remarkable results. From a personal perspective, technology has certainly improved my own results to somewhere near mediocrity but as any fisherman will tell you it’s the participation and anticipation that keeps you going back. Thank you to you and the rest of PL team of writers for helping to keep us inspired.
Great tips, thank you very much. Under the photos in the captions does 30/1 for example mean minutes or seconds of exposure time. Thanks again.
Thanks Camilo! The automated captions that read the EXIF data go a little wonky for more than 1 second exposures. 1/500 for example would display correctly. 30/1 means 30 seconds. 300/1 would be 300 seconds, or 5 minutes. Some might be blended images of two exposures though, such as 17 seconds for the sky and 4 minutes for the ground, with the EXIF data only showing one or the other.
Hi,
I would like to suggest reading my page about startrails :
sweiller.free.fr/Startrails.htm
You can also download and test our StarMax freeware !
BR
Sylvain
Excellent Article. Very detailed yet precisely written with extraordinary photographs. Thanks for sharing.
Beautiful and very useful article. I have been owning d700 for four years now. I was planning to upgrade to d750. But no need after reading this. :) thank you.
The D750 is a phenomenal low-light camera, don’t let me get in the way! :-P I primarily shoot with a D810 now, but I still use my D700 a lot as a 2nd camera when the D810 is shooting a large pano or long timelapse. My most creative shots are often done with the D700 as a backup camera as I’m not over-analyzing everything and I have time to have fun and experiment, vs. frantically setting up a complicated shot on a deadline with the primary camera. Maybe I should reverse the camera roles… haha!
wow wow wow i cant say how amazed i am… I would love to see a tutorial on how to get my picture like that, in that same circular form at first i thought it was a dedicated fish eye lens lol but only to see its the bulbous 14-24mm nikkor… Is it that you take many pics and stack them together Sir? I am intrigued by this kinda of photography and would like to know how it is done. I can identify some places here in Jamaica that has some decent milky way i can photograph. PLEASE Reply via email and please do that “how to” video and post on youtube so we all can learn from it.
Many thanks,
Noelle.
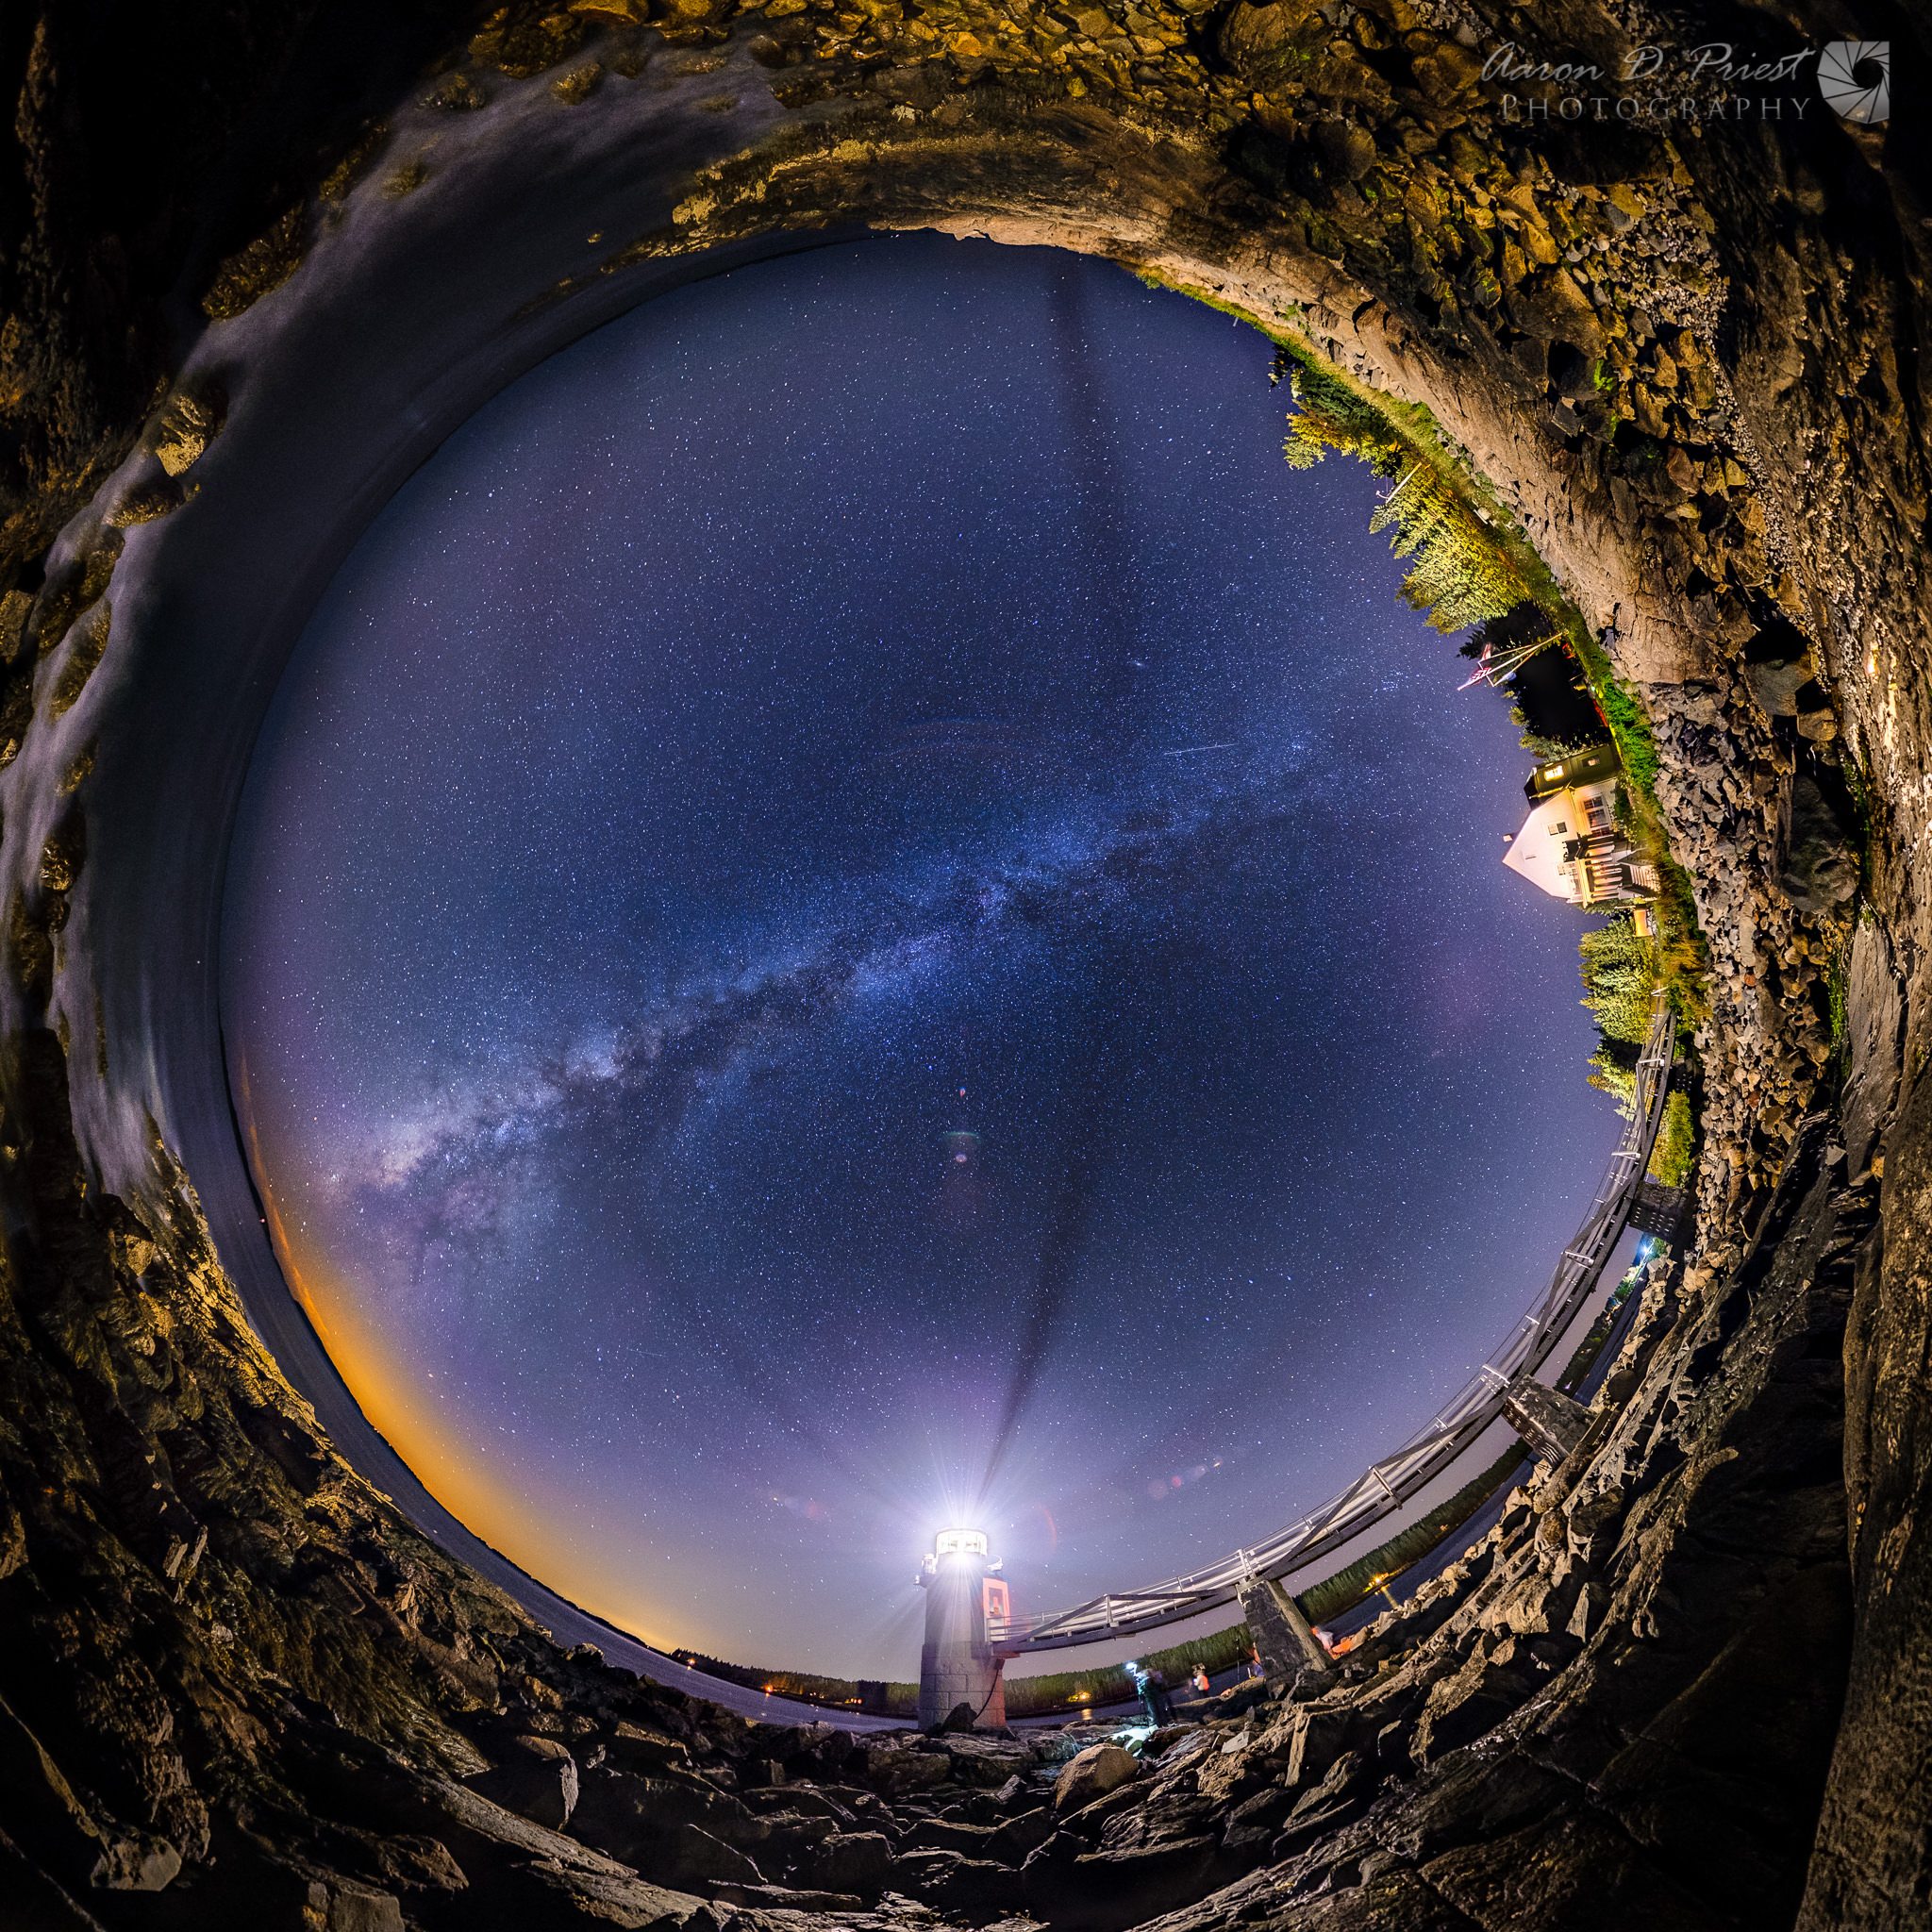
Thanks Noelle! “Little planets” (or stereographic projection) are made from spherical panoramas, where you shoot the entire sphere and stitch it. The full sky view (or inverted stereographic projection) is done the same way, only instead of tilting the view down for a little planet perspective, you tilt the view up for a full sky or fish eye perspective. It takes some practice to get good at stitching spherical panoramas without any seams. Best to start with regular rectangular panoramas first, and then graduate to multi-row panos, and then full spheres. You’ll need a nodal slide and find the no-parallax point on your lens for good stitching, particularly for full spheres. Fisheye lenses like 8mm on a full frame let you shoot a sphere in one row with 3 or 4 photos. Nodal Ninja makes some good panning heads for fisheye lenses to do this easily on a pole, they are already calibrated for that specific lens. PTGui is a good program for stitching the spheres, and can easily make little planets out of them. To get an inverted little planet you simply tilt your view up 90° in PTGui. For more resolution, I usually shoot at 14mm or 24mm with my 14-24mm f/2.8. 14mm takes two rows of 6 photos and 24mm takes 3 rows of 12 photos, so it’s a lot more complicated and results in much higher resolution than an 8mm fisheye of 4 photos. There are other shooting patterns too that are more efficient, but the simplest are those two with the 14-24mm f/2.8. You need a multi-row panning head to do that with this lens, like the Nodal Ninja 4 or bigger.
You are amazing!Can I please ask a layman question. Will I ever be able to see those pictures with my naked eyes in real life if I gaze at sky. I mean do we need a camera that works on long exposure to capture this spectacular view as shown in your photographs. I hope it is not a stupid question
That’s a very good question! It really depends on how good your night vision is and how dark the skies are at your location (light pollution). The longer you are out and the better your night vision adapts will help too. It takes a good 15-20 minutes in complete darkness for your eyes to really adjust. Where I live, I can easily see the Milky Way overhead from my back yard with the naked eye, and it only takes a minute or two before it starts to come into view from my eyes adjusting, but I have pretty good night vision too. I don’t see the color in the Milky Way though, and certainly not the detail that the camera can pick up with a long exposure. It’s more like white, whispy clouds as a long band stretching through the sky to my eye, quite faint but easy to make out.
Thanks a lot for this. Please may I ask you one last question why is that our naked eyes cannot see the colours as depicted in your pictures while an ordinary camera can?
A good friend of mine, and co-instructor at workshops occasionally, wrote this excellent article for Space.com on that topic. It’s about northern lights, but the same would apply to the Milky Way or any dim light really: www.space.com/23707…color.html
Wow! Such a fantastic explanation. Thanks a lot for putting effort on making this article. Your images are truly awesome, jaw-dropping and inspiring. However, I’m wondering about your post-production workflow. What do you fix first, second, and so on? It’d be great if you could explore or make another article on that. And also what really challenging is the timelapse during sunset to dusk or night to sunrise as you’ve mention before. I’m really curious about that. Once again, thanks for all.
A detailed post-production workflow takes a day or two to cover in a workshop, it would be difficult to go into in a shorter article without screen-captured video, of which there are already quite a few on Youtube and Vimeo. In a nutshell though, I usually edit in Lightroom and I start with the camera profile at the very bottom of the list first. Sometimes, with my D810, the Flat profile gives me more shadow detail and I can always dial in a little more contrast later manually. Every camera is different. From there I go to my lens corrections, vignetting, and chromatic aberration. 100% on the vignetting slider is usually way too much and introduces amp glow in the corners, particularly on a lens like Nikon’s 14-24mm f/2.8 which does not need more than about 60% or so on that slider (Adobe’s lens profile is too aggressive with that lens). Then I work on my sharpening and noise, and the mask between the two. Sometimes I work on my white balance first and then sharpening / noise. The rest is playing around with shadows, highlights, whites, blacks, contrast, etc. on a global level, but very carefully, reserving the real work for selective tools like a radial filter, graduated filter, or brush. With timelapse and panoramas, I often can’t do as much with selective tools and I have to be very careful with global adjustments to make sure they sync right across all images properly.
“Holy grail” timelapse from sunset to Milky Way or Milky Way to sunrise is indeed challenging. There’s a reason it’s called the “holy grail” of timelapses! One of the easiest ways of pulling it off today is using DslrDashboard to control your camera’s exposure (via a tablet or phone), and edit everything with LRTimelapse. Gunther has some great videos and tutorials on his site for this: lrtimelapse.com/?ap_i…aronpriest