In this article, we will take a closer look at how to photograph the Milky Way bow. I wrote this guide from the point of view of a person who has largely taught himself. During the last four years, I have also had the invaluable help of a fellow night photographer. I made all the mistakes and then tried a lot of corrections while I learned and worked to inspire others to try it out, too. I will admit to liking my night photos when they look like they are taken at night, apart from moonlight shots which may sometimes turn night to day.
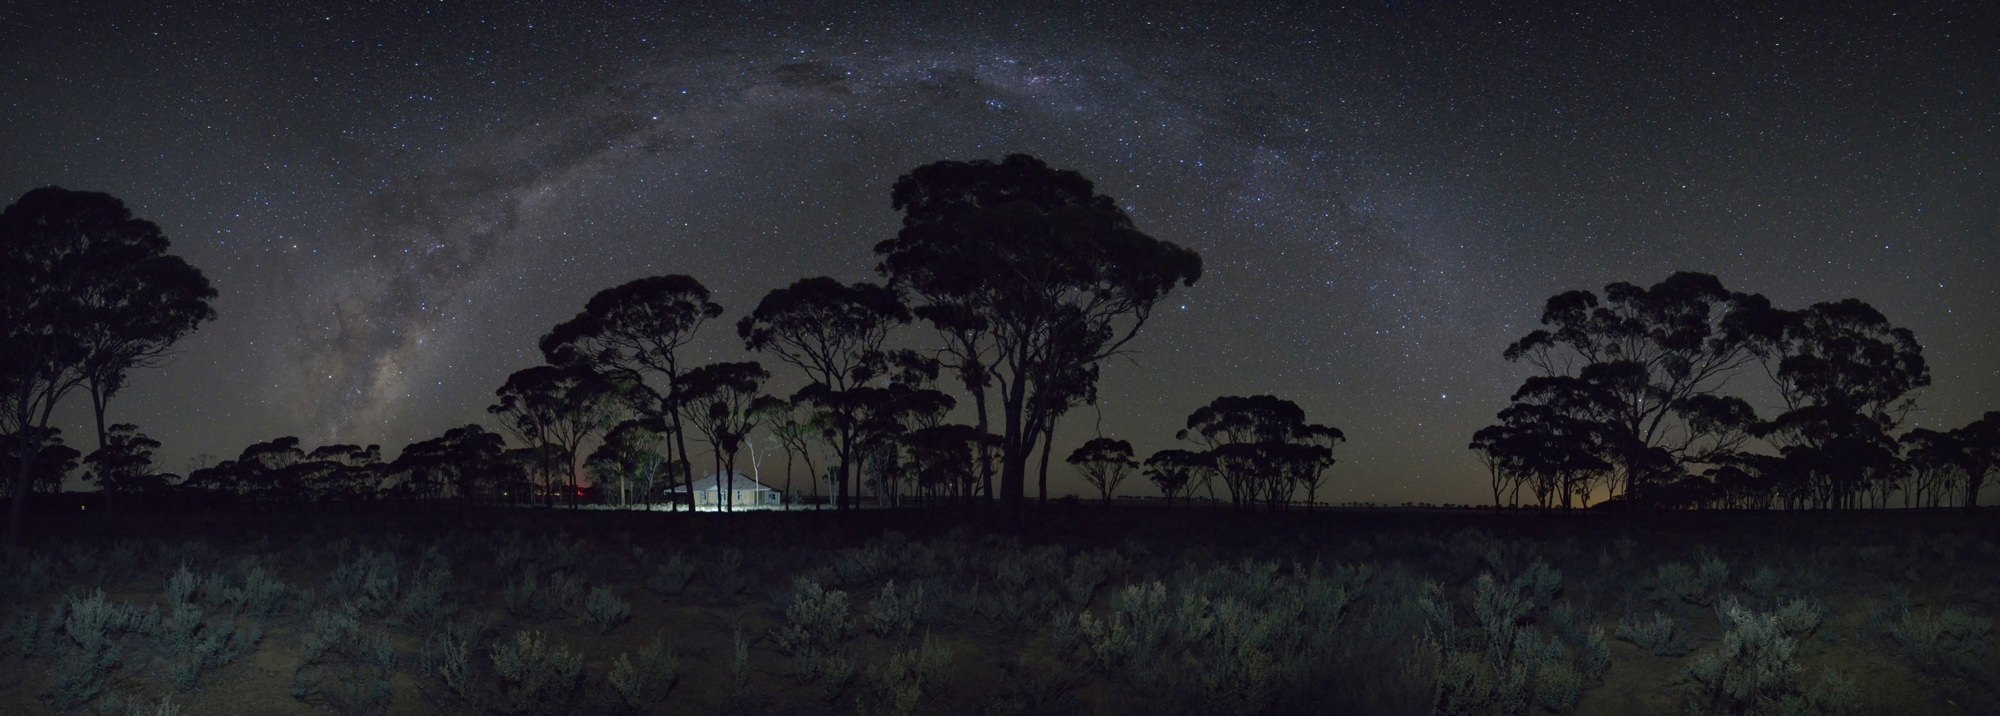
Table of Contents
Background and History
I grew up on the pacific island of Tarawa in the middle of the Pacific Ocean in the 1960s. We had no pollution – no big cities. Just coconut trees and inky black skies at night, with the Milky Way sitting above the ocean. I was the oldest son, so I got to sit with the stopwatch and count for my father as he tried to capture the stars and Milky Way on film. Sadly, he never truly did. Only after the introduction of digital could I see why: There are far too many things to go wrong on film. The following tutorial is all taken from my experience using a Nikon D600 and Samyang 14mm f/2.8. This is a full frame camera and lens, but all the techniques below can easily be converted to DX and crop-sensor cameras.

Basic Camera Settings
Below are the basic camera settings I use for photographing the Milky Way bows:
- Camera Mode: Manual
- White Balance: 4000-4200
- ISO: 3200-5000
- File Format: 14 bit RAW + JPEG (since some things I want to do don’t use RAW)
- Shutter Release: 2 second timer. That way, you are not touching the camera at all, apart from start of the timer. Alternatively, use a remote
- Shutter Speed for Single Shots: 20 seconds
- Shutter speed for Bows: 25 seconds (more on this later); the time does not change, regardless of moonlight or darkness levels
- Aperture: f/2.8 on a dark night, or the widest aperture on your lens. In moonlight, f/4-5.6
- Long Exposure Noise Reduction: On
- VR / IS: Off, if your lens has it
Another valuable tip is to move the focus from the shutter release to a dedicated button (such as AF-On). That way, the shutter release only captures the photo and does not re-focus, so that you don’t end up with a ruined image. Or, switch to manual focus only.
Having done all this, my first shot is to test and make sure that everything is perfect. For example, are the corners of the shot pinpoints or trails? This is something you will need to correct out in the dark. Sometimes, a piece of paper with your settings written on it may be a good idea to use. Especially when beginning astrophotography, the night environment is perfect for making mistakes that are easy to avoid during the day. A list of exposure settings and other menu settings is crucial to remember, and, if you forget, you can easily refer to the paper – you do have a torch! All this becomes second nature the more you learn and practice.
Another good tip is to use the “My Menu” setting (if your camera has one) to store all the important settings you would use at night. Another option is to store these settings in a dedicated camera mode such as U1 / U2 or menu banks.

Focusing
This is one of the hardest things to do at night. There is an article on Photography Life about focusing at night, but I will cover a bit of information here as well.
I advise you to use “live view” – find a bright star, magnify the LCD, and focus manually, as there is no auto focus in the black of the night. Or, the lazy way I use is to focus on the clouds or some other object at infinity during the day. Once it is perfect in live view, tape the focus ring of the lens so that it stays in the same position. The advantage of the tape is that it prevents you from moving the lens focus accidentally, ruining your night sky images. This is also a good time to turn off autofocus.

Rules and Some Math
My first two tries showed a lot of promise, so I thought I would look into this more, but I needed more light so it was a case of how much time could I hold the shutter open for. The Internet showed me two rules for the ideal time: the “600” and “500 rule.”
Basically, you divide this number by your focal length, which yields the time in seconds that your maximum shutter speed can be, while avoiding star trails in the image. For example, for a 14mm lens, you would get a 42 second exposure when using the 600 rule (600 divided by 14mm = 42).
However, I found that the stars would trail all the time when shooting for this long. Things were better with the 500 rule, which says that I should be OK at 35 seconds. Still, I found my stars where not pinpoints at the edge of the frame, and I was back to the drawing board to find the right time. I went down to 28sec, 26sec, 25 sec and finally down to 23 sec, where I could see no trailing at all. So by reverse engineering, I ended up with 333 as the right figure. As you can see, it is a long way from 500 or 600!
So if I apply the “333 Rule”, I would get 23.78 seconds with the same 14mm lens. This works fine, but I cannot change the internal shutter speed on a Nikon to numbers between 20 and 25, unless I use a remote shutter release. The solution is just to pick one or the other; you should not see too much trailing at 25 seconds, but you can go down to 20 seconds if you want to be safe.
If you have a cropped sensor camera such as the Nikon D7100, use the following math: 333 divided by 1.5 (crop factor) = 222, so this becomes a “222 Rule” for 1.5x cropped sensor cameras. Next, divide the focal length by this number to obtain the right shutter speed. For example, for an 18mm lens, 222 divided by 18 would result in a 12.3 second exposure time.
For APS-C / DX shooters, the Samyang 10mm f/2.8 ED AS NCS CS would be the right choice, equivalent to a 15mm lens on full-frame cameras.
For any other camera system with a different crop factor, use the same base numbers as a reference and take into account the crop factor. For example, for Canon cameras with a 1.6x crop factor and an 18mm lens, the numbers would look like this:
- 333 divided by 1.6x (crop factor) = the “208 rule”
- 208 divided by 18mm = 11.5 seconds
Use these settings as a start, but always test and check your first shot to see if you need to adjust differently. All lens / camera combinations are different, so check by enlarging the shot on the back of the camera to see the full detail. It also depends upon the area of the sky which you photograph, since the stars move more quickly across the sky when they are closer to the celestial equator (farther away from the North Star for readers in the Northern Hemisphere). So, all of these figures are estimates, but they should get you on the right track.

Tripod and Tripod Head
On this very site there is an excellent article on choosing a tripod. Over time, you will find that the best tripods are worth the money, as they will serve you for many years to come. Consider a solid tripod to be an important investment, so buy it once and buy the right one from the start. My own tripod has no center column, so it is rock steady. And, at 6’3″, my viewfinder is at my eye level. I use a ballhead that is calibrated on the bottom, so that I can move the head around in correct movements of degrees to take panoramic images.

My tripod has a few little extras. I have a small bubble spirit level on the top of each leg, so I can easily see the angle of the tripod. Using a single spirit level is not as accurate, once you come to stitch a group of 13 shots to make a full 360-degree panorama or 16 shots of a double row Bow.

I use an “L-bracket” on the camera, so changing from vertical to horizontal orientation is as easy as detaching the camera and flipping it, with the head staying unchanged. Another worthwhile investment.
I use the “Virtual Horizon” feature of the camera to level the camera up to the level head of the tripod, and I always have a little drag on the tripod head so the camera cannot move on its own under its own weight. You do not want any mistakes to end up with hard-to-fix issues once you load up your images on a big screen.
Planning
I use four tools to help plan where I go, when, what direction to shoot, and, most importantly, what I can expect to see:
- Stellarium – this will show you where to find the Milky Way, and it is very easy to use.
- Moon Phase Plus – or a similar app to see the state of the moon.
- Google Earth – to see the site before you get there (though I always get there early to look around; things change!)
- Night Lights – to see how dark it is where you are planning to take pictures. I live in Perth, Western Australia, so I am blessed with very black skies and so few cities around.
Don’t forget to get a good app to check on weather, especially any cloud movements in the area.
The Early Shots
My own experience started when I purchased a Nikon D600 and a Samyang 14mm f/2.8 AE. My first ever shot was on a moonlit night and the fire we had that day:
I counted in my head as I held the shutter open with a remote and did not even think in those days to use a proper timer. It is very confusing out in the dark and there is a lot to remember, so the first few nights where a real trial. My next night out, I chose a very dark night without a moon:

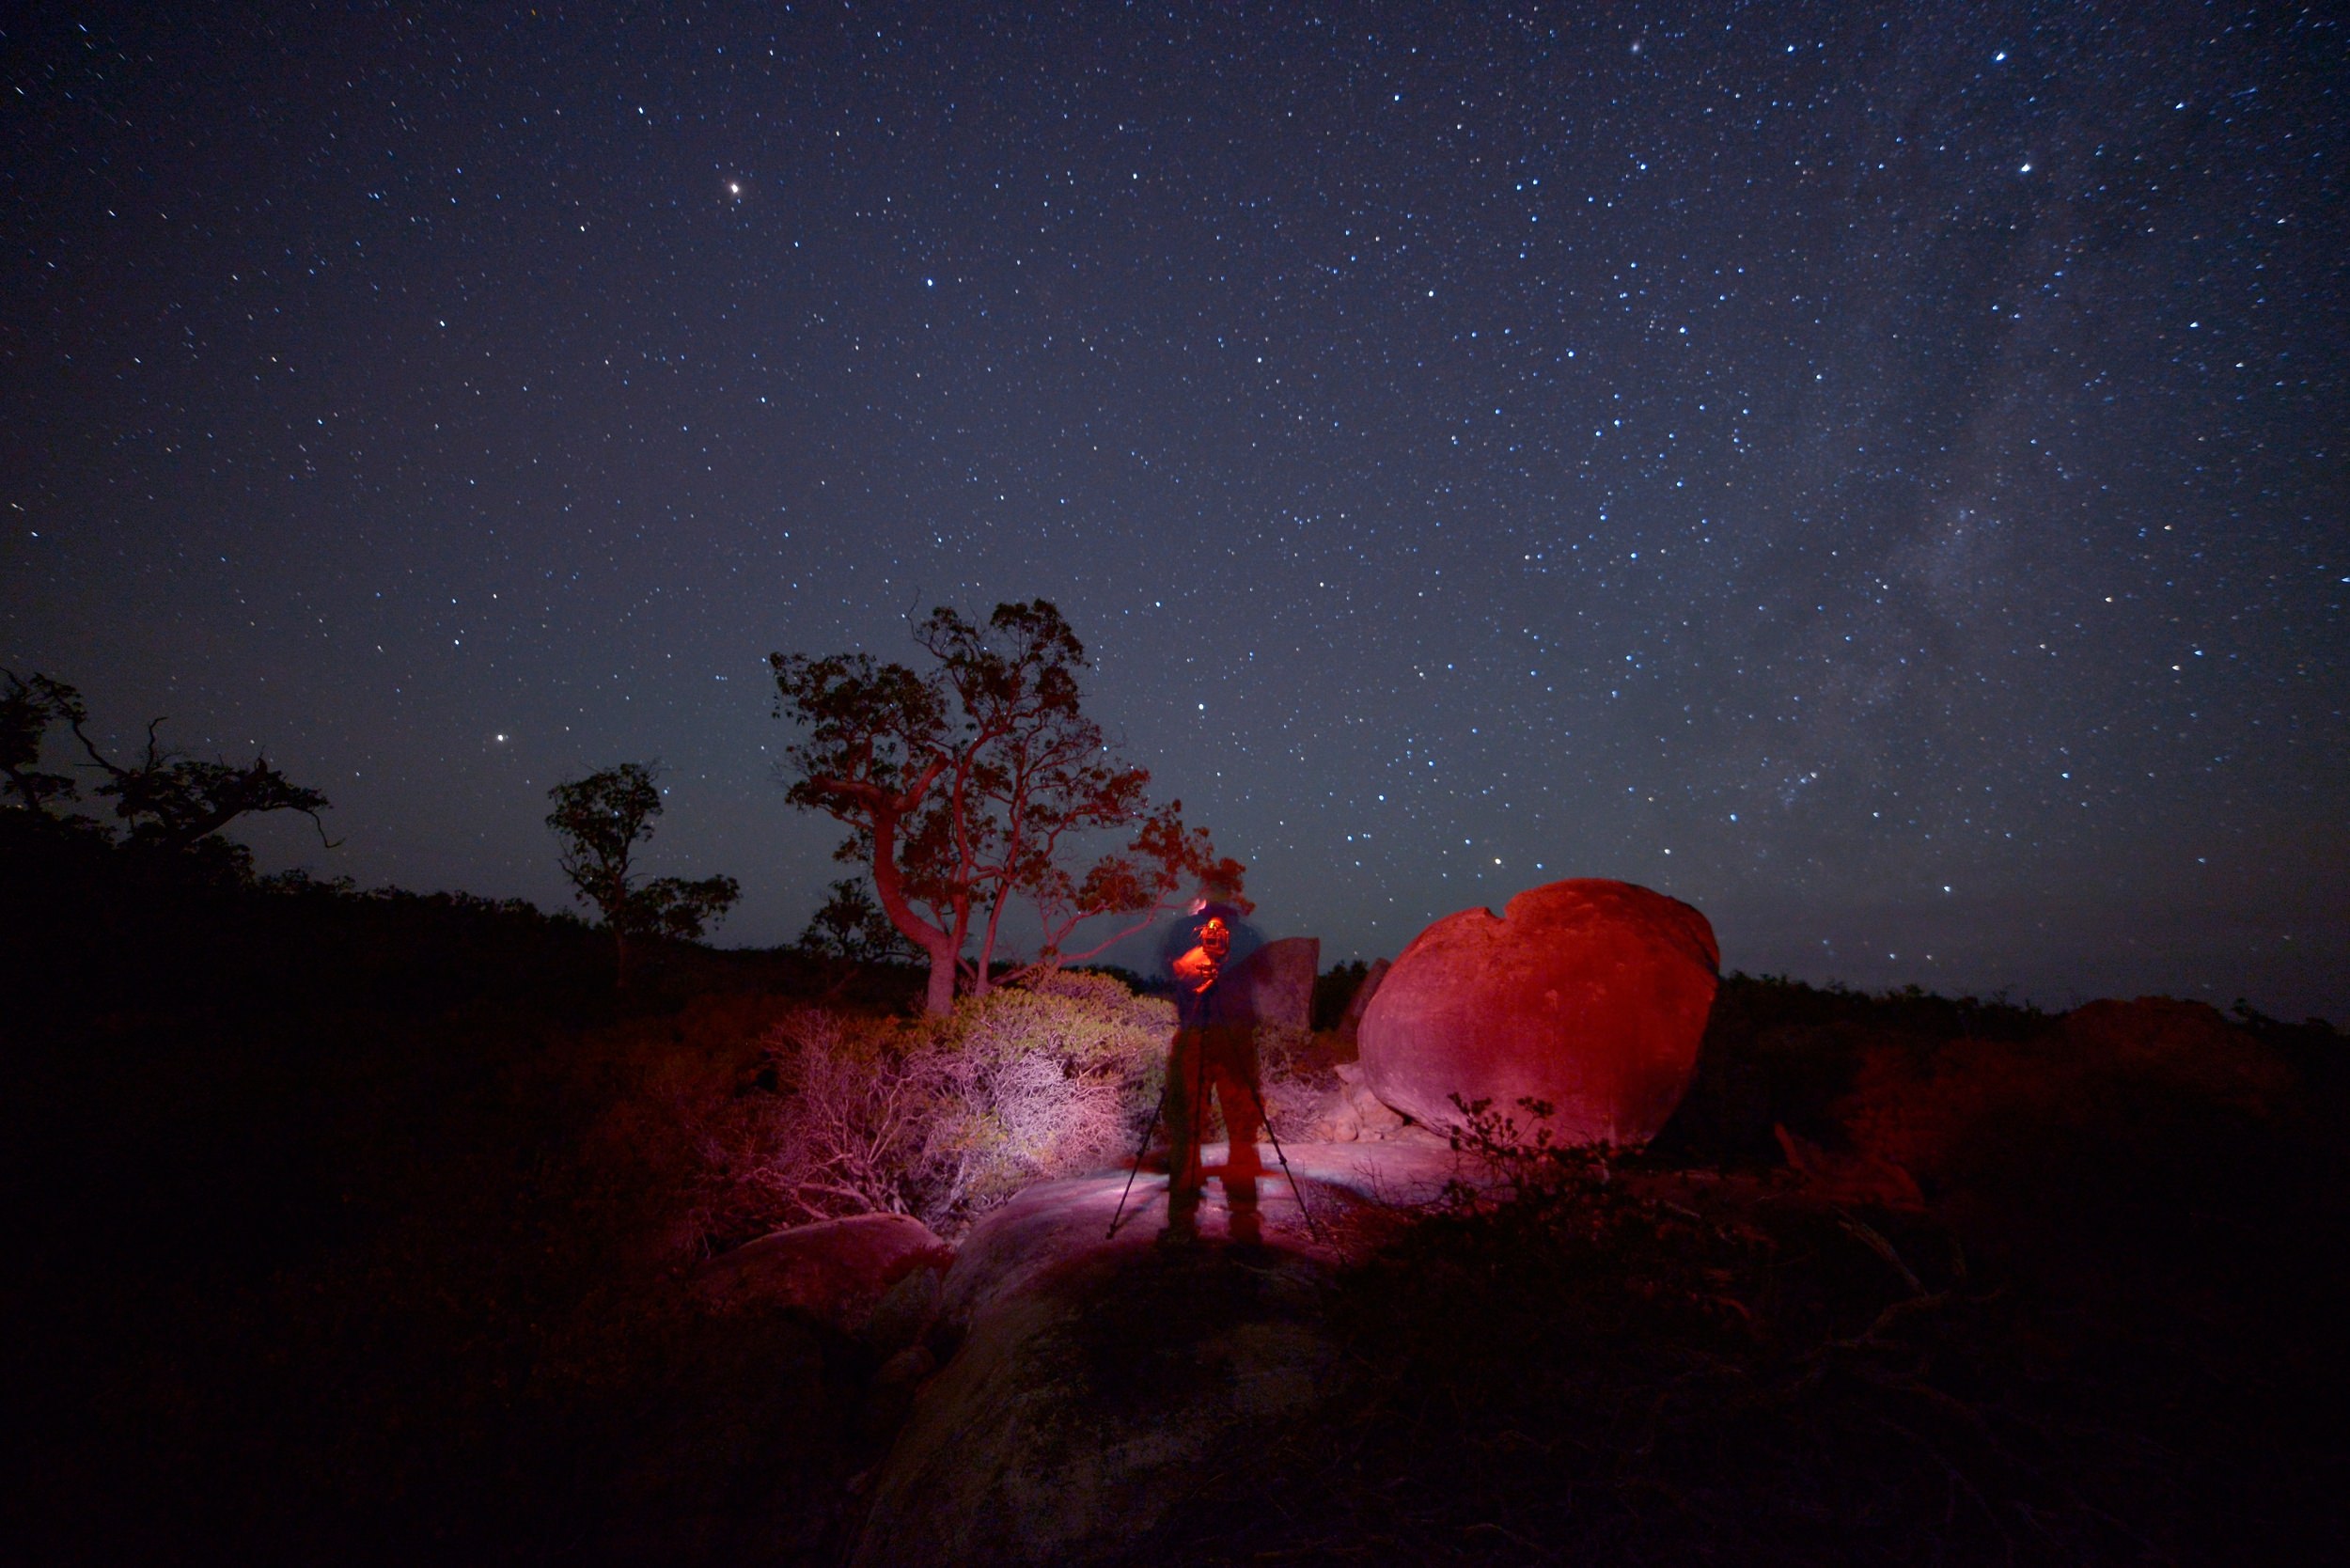
Never give up if your shot may not be quite what you wanted – I asked my fellow photographer to stand still while he stood to the side of his camera and set it. He turned on his head lamp, adjusted the Nikon D800E and 14-24mm, then moved back to take the shot. Here is that shot hands, camera, tripod and body as one – out under the stars, the magic of long exposure.
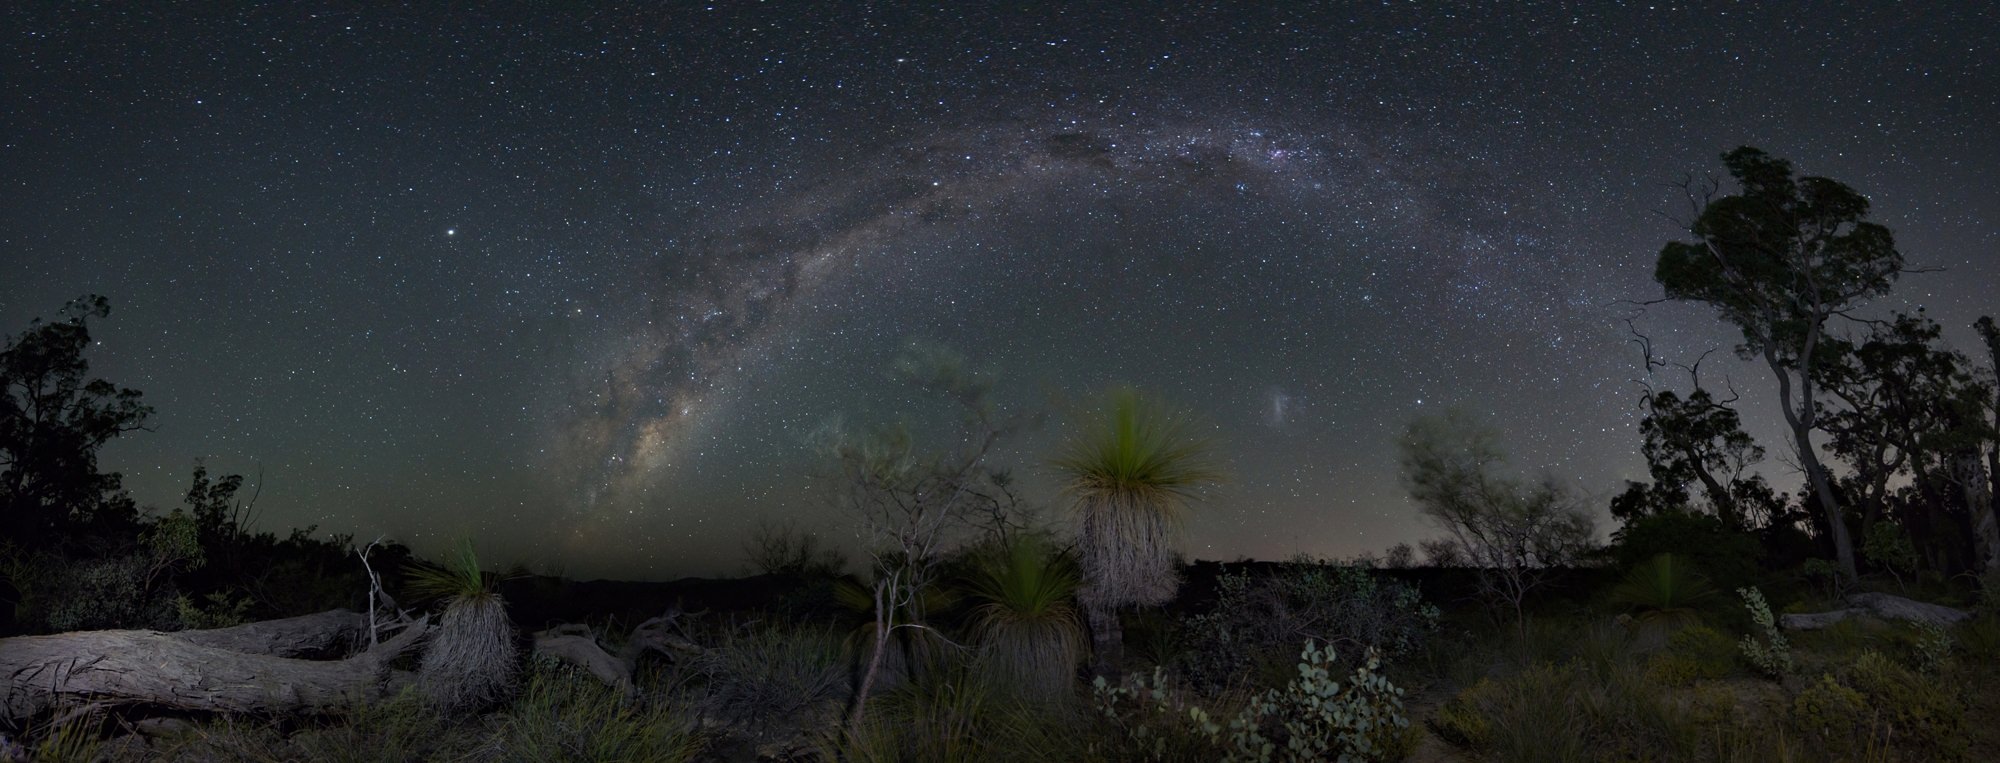
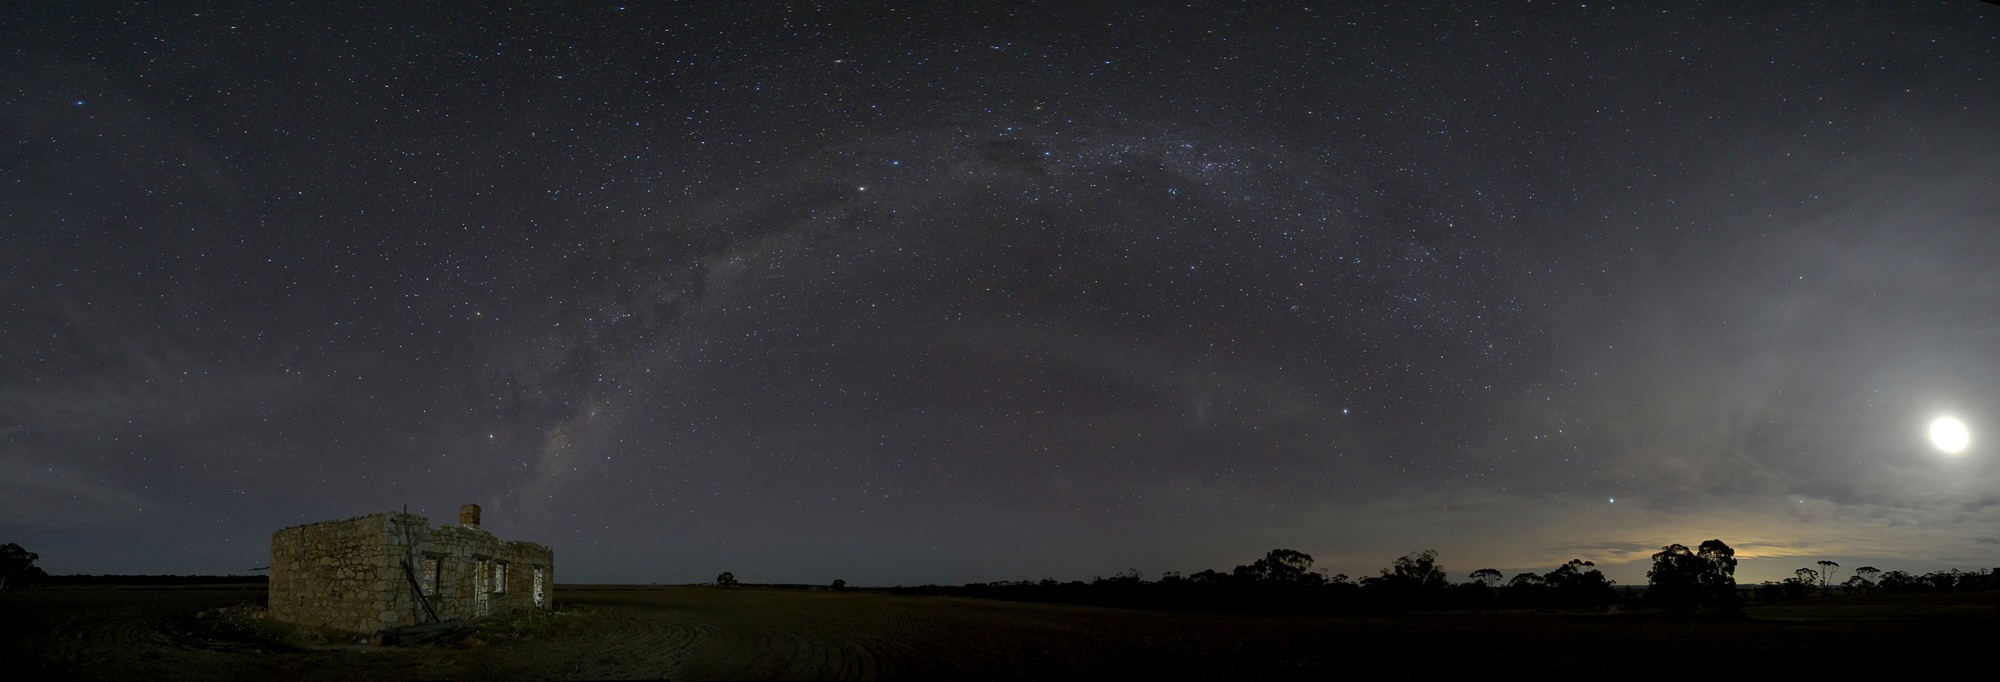
The Milky Way Bow
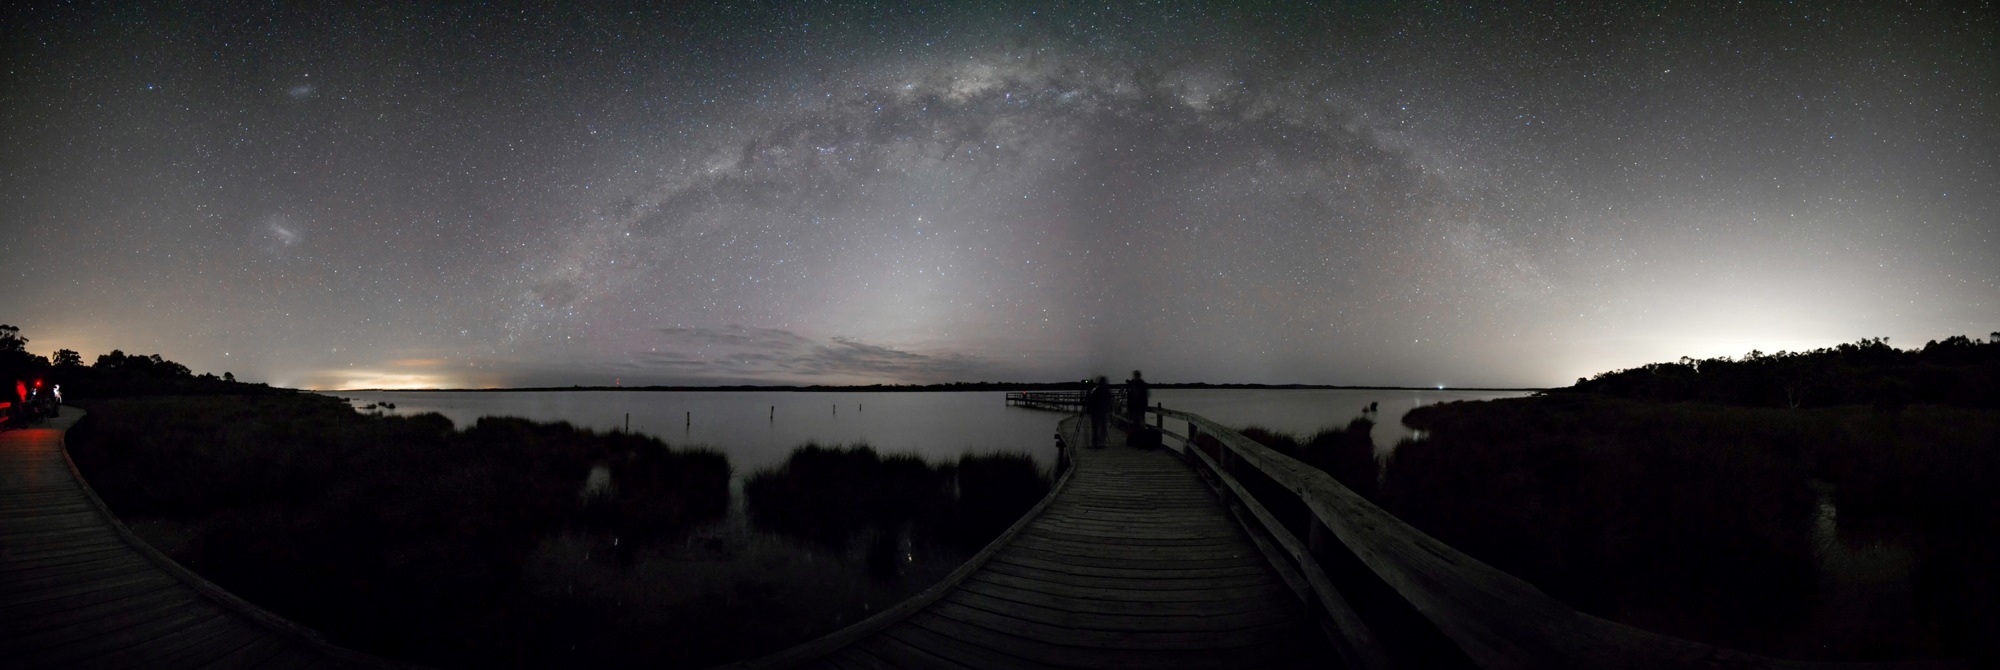
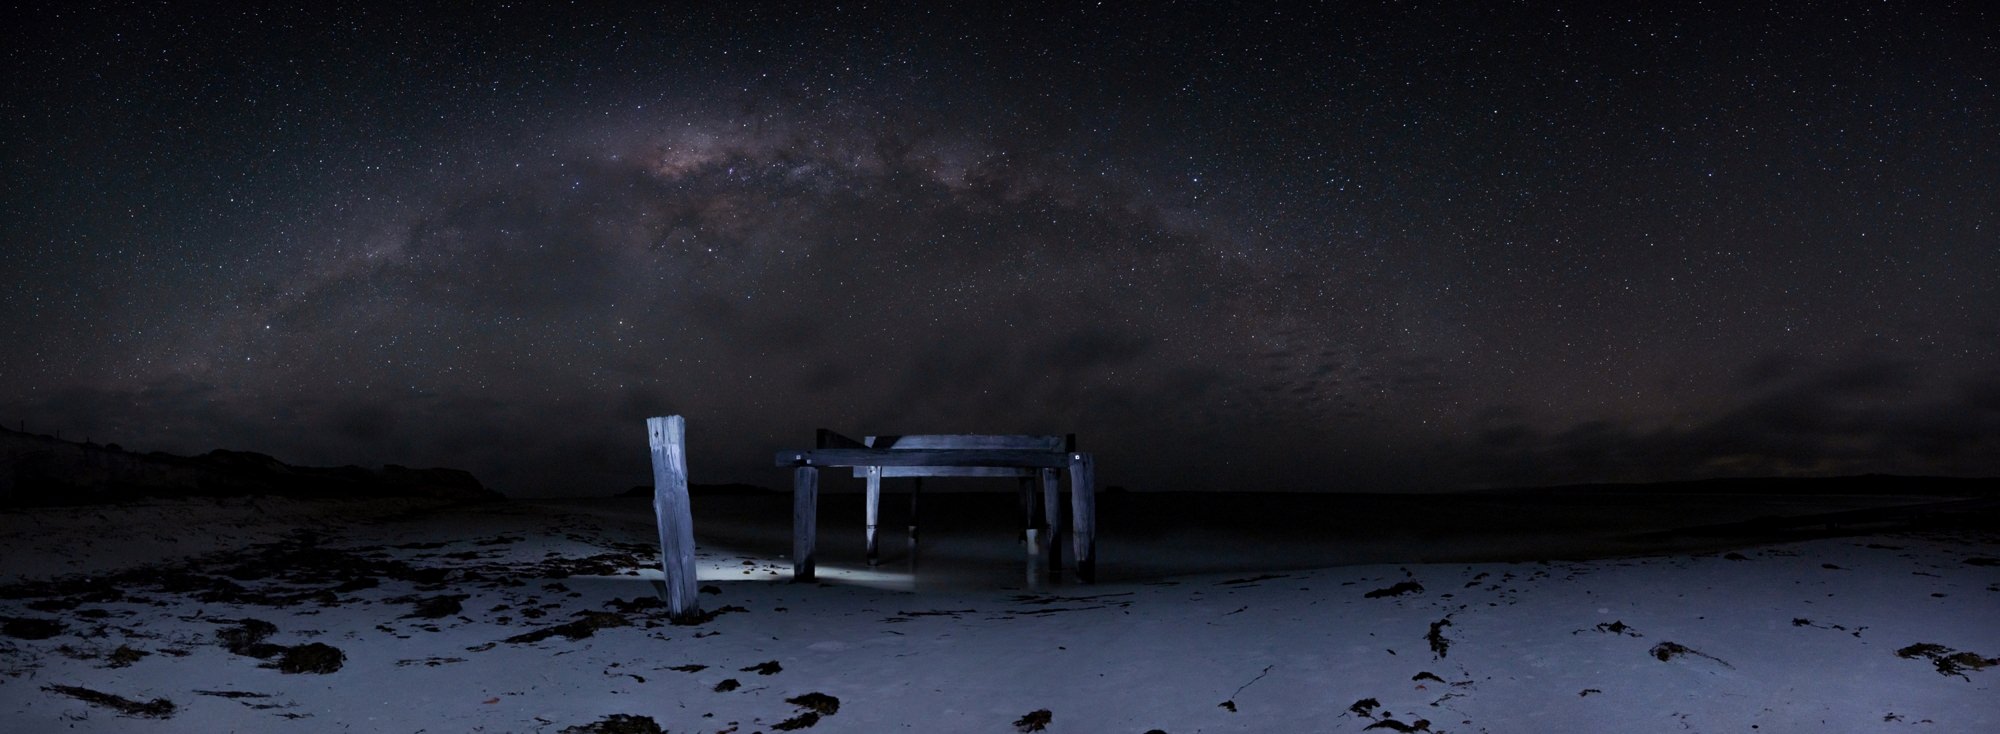
The next step is to be able to make a Milky Way Bow out of your shots. I must confess here – I had no idea how to go about it. I first took them as horizontals, as it took less time and easier to stitch. Wrong! It was a harder and a wrong way to take the photos. You are better off capturing photos in vertical format, as you also get the most number of stars in the shot and information when it is all stitched together.
I had my Milky Way Bow shots 3 months before I could get a good program to stitch them. Most programs would stitch well for day shots, but fail for night shots. I tried a number of different tools including Adobe Photoshop, Lightroom, Arcsoft Panorama Maker, Microsoft Ice and Hugin. I had all sorts of problems with them all in their own ways. For example, compare the two shots below. The first one was stitched in Photoshop – the ground is flat and you see double stars at the joins, but not the way you see the stars in the sky.

My second night partner told me try PTGui – it turned out to be the best for astrophotography. It is not free, but the results speak for themselves:
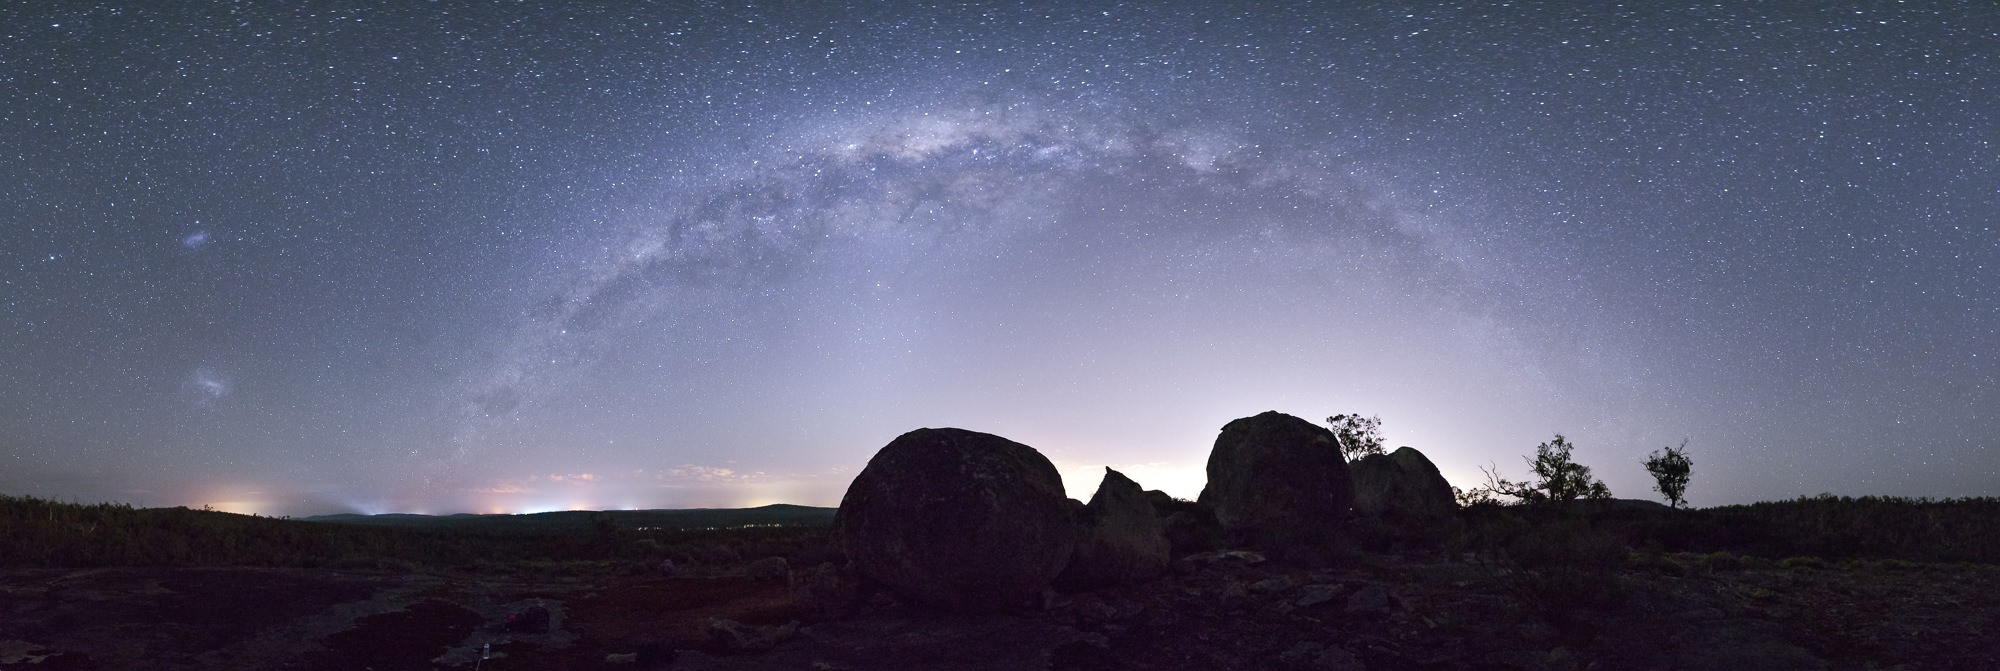
You have to set control points and you have far more control over the end result. You can move the whole thing about and use masking tools as well (the best way to get rid of airplanes).
Setup
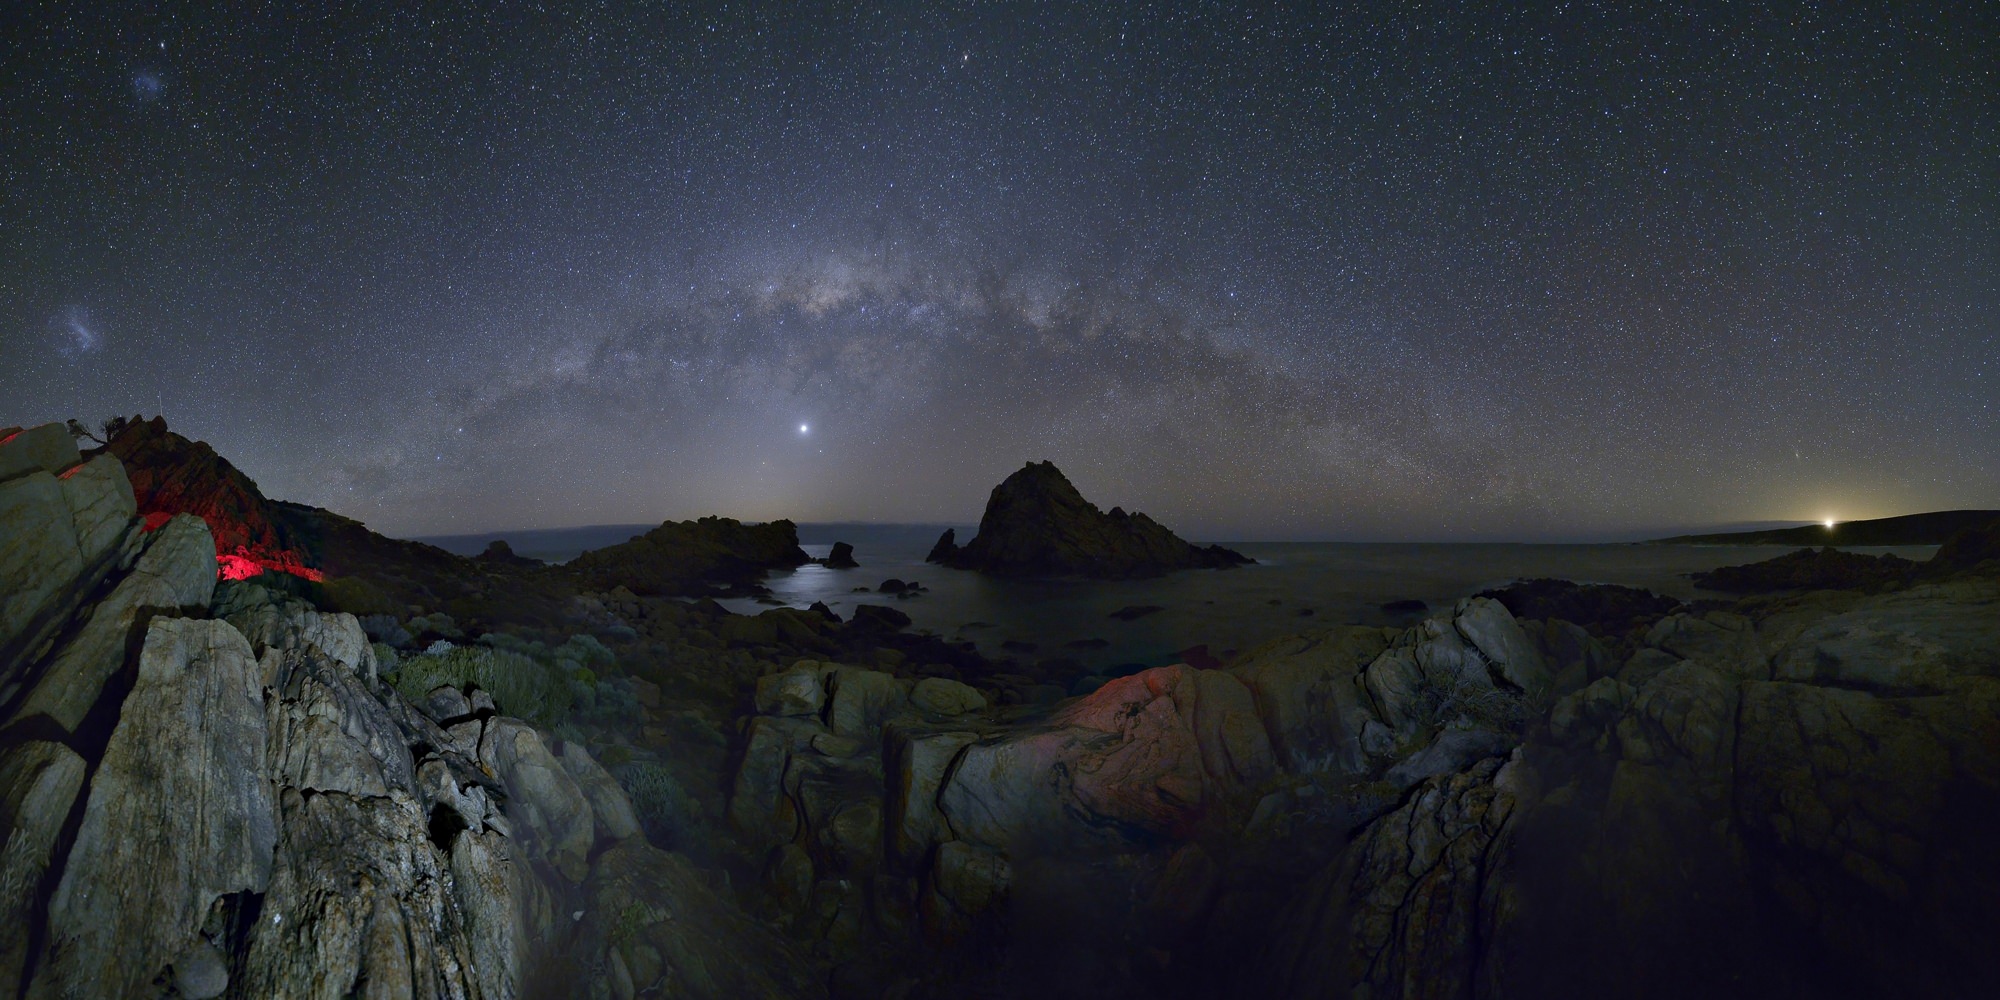
When I do a Milky Way Bow or a 360 degree panorama, I take the time to make sure that the tripod head is level on all three of my extra bubble levels. Then it is a matter of making sure that the Virtual Horizon in camera is also good. I then start from a set point on the tripod head with my 14mm lens and move the setup in 30 degree increments for each vertical shot before or after the Milky Way Bow. This is where the slight trailing stars at 25 seconds can be eliminated in the stitching process. I have even done a two-row stitch of the Milky Way:
Sometimes, you have to be flexible. When I got to the site, what I thought was my 14mm was in fact my 50mm f/1.8 lens, and my 16-35mm f/4 was also in the bag. I had never used this lens for astrophotography, but a three-hour drive was a long way to go to get it. So another tip is to always double check and make sure you have everything in your bag before you leave! The Nikon 16-35mm f/4G VR shone after I went through the finished photo set from that lens and luckily, I kept a spare tape on the top of my tripod leg, just in case.
Summary
I hope that in some way this article has taken the mystique out of night photography for you. I am just an average Joe, not a pro photographer, so this is the information and the tips I can share with you based on what I have learned so far. It is my hope that if you get a chance, you will get the camera out and give it a try. There is nothing like the very first photo on the back of your camera at night!
When my fellow night shooter asked me why I wanted to do astrophotography, my answer was “test the brain, patience and the resolve.” It always pays to plan ahead, so you have some things to work on. If you never plan, you will never go – as simple as that. Some of the shots from this article are from 4 hour drives out of the metro area, so keep in mind that you have to plan and you must think well ahead of time. If you follow a few simple principles pointed out in this article, I am sure you can get some great images at night!
I would also like to point out that none of these shots have been altered in post-processing software other than some global edits. I did not enhance the Milky Way in Photoshop like many others do, because as a former film shooter, I prefer this natural look. I have printed large metal 1200cm x 750cm pictures for my home, so that I can remember why I own a camera and enjoy life.
Hope to catch you out under the stars, enjoying the night sky!
This guest post was contributed by Steve Paxton.
Congratulations Steve, this is a superb article on the subject of night sky photography. I have tried to capture a Milky Way Bow a couple of times in the rare days of darkness over here in the NW of England but never achieved the results that you have here. I can now see, after reading this article a few reasons why. Mainly, I followed none of your rules. The tripod was too light, not realising why my stars all trailed, wrong iso –wrong lens!! The end results were usually a blurred, tilted and unrecognisable sky. Not researching the terrain beforehand nor the actual moon phase and placement of the Milky Way did no help. Trying to stitch the photo’s afterwards with inappropriate programs made things even worse. So – at last a guide by a guy who is just a very keen enthusiast and writes in a language that I can understand is really welcome.
I have the Nikon D7100 and several lens. Used MS Ice to stitch.
Regards and thanks, Herb
Herb
Thank you for your comment. I think that if you follow some of the principles here you will get a head start and you can see just what you can achieve. I wrote this to try and inspire others like myself who wanted to learn but can not find the simple info or how to. I do count it a valuable lesson that I taught myself and learn’t the principles the hard way. As you can see by my results you can, if you stick with it and are willing to give it a go you will get the results. Its always best to start off with what you have learn to use it, only get better gear once you get a little more enthusiastic about taking these shots then think about upgrading. A good solid tripod and head are a must if you want to even start, calibrations on it for consistent results of movement.
I hope you can get some photos under your belt that you can see it is worth trying and giving it a go. Planning even in the UK will give you some good results if you use all the tools to plan. Happy night shooting.
Steve
Hi Steve,
First, your photo super awesome and really beautiful. I like the way you said “My own experience started when I purchased a Nikon D600…………” it makes me feel that everything come from ordinary thinking and not too hard to get them. I will learn from your technique and try to set any function till I can get the best one.
Thanks for good sharing. :))
Thailand
Chanapa
Glad you like my fav photo up front, I thought best to start at the top. In a way I am glad I did not have the Apps and I had to learn from scratch made me understand better than not having to think on it. It is worth trying with the help of the info here it will stand you in good stead and you will be able to adapt it to you camera lens combination. I had plenty of things go wrong but its very easy these days to make even a double Row Bow with no auto head but my own and the tripod.
Plan and think things out its all logical once you see it. Many thanks for reading and going to give it a go why I wrote the article so it was seen as easy as it is if you follow a few rules. Enjoy the night sky.
Steve
Hello Steve,
Thx for the great article. My motivation has doubled to get out under the night sky. I have some big plans this year. Planning is key to get things right. You drive 4 hours. I have to hike up my backyard mountain 4 hours. Spending all that time to realise you forgot something is a let down. Making the most out of those situations are a treat too ;) Your work is a pleasure to look at. My goals are not far away. Cheers. Thx again.
Timo Wolf
Bad Hindelang, Germany
Timo
I am glad that you have found some inspiration in the article that was my main aim to share what I have learn’t and that way help others along the same path. If you follow the few basic principles you will get a result, then after that the sky is the limit. Planning and preparation is the key things don’t just fall into place. I wish you well and will tell you that the more times you try the better you will get. Many thanks and all the best.
Steve
Joshua
Certainly match all the fun trying to get them in the first place which is half the battle. many thanks.
Steve
fun photos
Thanks for the reply Steve, as you say, fingers crossed for some clear skies! The moon looks like its in full force which might be an issue but far better than clouds!!
I certainly aim to be taking plenty of stuff written down with me, very good tip!
Dan
Dan
You can still get some good shots of the stars but they will not be as intense but a very good time to have a learn its certainly not as black . Moon light will make it easier to help you get use to the camera at night and where every thing is. Try the APP at the first comment as well wish I had it when I started but at least I learn’t the hard way. Good Luck.
Steve
I particularly liked the shot with the boulder illuminated with a yellow light, from underneath. Others are great, for different reasons.
Steve, these photos are obviously taken in Australia – where, if I am allowed to ask? I went on a night shoot last year, at the Perth Observatory in Bickley Valley (which is not “in” Perth – it’s deliberately located in a reasonably deep valley, so that contamination of the night sky by lights from the city is minimised). A four hour drive to find a suitable location would possibly be a turn off for some people.
I do remember, as a child, lying on my back on our tennis court, with my brothers, staring at the night sky – but city lights weren’t such an issue in those days, there weren’t as many and they weren’t anywhere near as bright as the lighting that came along later. And later on, the sky in the “real” outback – it had a clarity which was awesome! – in the far north of South Australia, in the Northern Territory, and in western New South Wales and western Queensland.
When I was fumbling with my cams on my first attempt to shoot the night sky last year, I hadn’t had the benefit of advice from anyone with your experience. I wish I’d seen this article first – but I did manage to capture some good shots of the Milky Way, including the showpiece of the southern sky – the Southern Cross – so it was a successful shoot anyway.
One of the best things about our hobby [??} or profession is the willingness of other photographers to share their knowledge and experience. There are occasional trolls, but in the grat scheme of things, they are few and far between. And the rest of the personalia on this and similar websites are just simply very nice people!
Jean
All the shot are from Western Australia half made up of trips out of Perth to the Foot Hills, the other half are to the real out back 3 and 4 hours drive the further you get out of the city lights the blacker the sky. The interesting thing is in Perth you can see the Southern Cross and the Pointers clear but not the stars of the Milky way that they reside in. Look up “the legend of Emu in Milky Way” its a most interesting read.
I hope the info will give you some where to start and give it a try again and I do agree all the people here and those who I have met are more than willing to help you learn. Enjoy the Night Sky.
Steve
Thanks for your thoughtful article Steve. Your panos really look excellent and this is something I will probably start experimenting with in the future.
Just one question, if I may? I have mostly used the D750 (which is basically the same sensor as your D600) and have now taken a “backwards step” to the D500 (which suits my other photography needs better).
While using the D750, I found that I could get slightly better results by keeping the ISO fairly low (400-800) and lifting the exposure in post production, typically lifting exposure by 2 or three stops and making up the rest of the difference by only lifting shadows and lifting localised areas. Due to the near complete ISO invariance of this sensor, I find that the result is somewhat less noise in those areas where I have not needed to lift exposure as much, and similar noise in those that I have.
I have found this technique to become critical with the D500, as this camera has dreadful battery performance when shooting long exposures at high ISO’s. I typically like to produce both a star trail and a starscape from a session, and sometimes even a time-lapse movie, but at 4000 ISO and 30-second exposures, I get between 60 and 70 exposures, whereas at 400 ISO and 30 seconds, I get upwards of 300 exposures.
Have you ever tried this technique, and have you found any problems with it?
Peter
I think it should be me asking the question both my Fellow night shooter and I are looking at getting a D750 for just that reason. On the other hand the link that Aaron put up front the spread sheet says BOTH our D600 & D800 are ISO invariance but my few looks at this tend to tell me other wise and why the D750 looks the right way to go. My next night shoot I will be looking into this big time maybe I don’t need a D750 at all but this is yet to happen.
You sound just like the two of us as we do very much the same at night as well we both get a good battery life out of our camera’s and never noticed a drop in performance apart from our oldest batteries (original). The only battery I have that does not perform as well is my first and oldest battery, the cold does not help an old battery. I have three and tend to reserve my old one for day work and the two new ones for night work with that in mind I have a number written on each battery. Are your batteries old I would have thought that the newer camera would have been better than that if its not an old battery.
I am not sure if some one like Aaron has had any experience on this it may be worth dropping a line and asking the question.
I feel I have only added more questions than answers for you but hope you can get to the bottom of this and it is only a very old battery that would be easy. I hope you get the chance to get out and try getting a Bow as you already seem to enjoy the night like me.
Steve
There are a lot of people that claim that some camera models have a much higher power consumption at higher ISOs and thus shorter battery life. I’ve never actually measured this because I often shoot 12+hr timelapses in the cold and I power the camera from an external power source in an insulated bucket. I also prefer a vertical grip with a larger battery in it, it balances better with telephoto lenses during the day. So I personally haven’t noticed any issues with this, but I’ve read it a lot from others.
The D750 is indeed a tough camera to recommend. The sensor is amazing, but the build quality is poor. There have been three recalls on the shutter and we’ve had several rentals at workshops just die on day 2 or 3 with “eRR” on the display or not power up at all. But I also know some wedding photographers that put thousands of frames on them every wedding and swear it’s the best camera ever made. I personally prefer the ergonomics, ports, and buttons of the pro bodies like the D300, D500, D700, D800, D810, D850, etc. over the D600, D610, or D750. I feel the D750 should have been called a D650, simply due to body style. The sensor on it is really good for low light photography though!
I too have been experimenting with shooting at lower ISOs and boosting in post vs. high ISO in the field. I felt that the D750 and D800 could pull that off, but the D810 was better to raise ISO and expose to the right if possible. The D850 I’m still unsure of, it definitely has a boost around ISO 400 where it has a lot of dynamic range, but the noise level is different vs. doing it in post vs. in camera. Not better or worse persay, but different. And some scenes seem to look better with one method vs. the other. This could be due to the RAW processor though, as in Adobe not having finished tweaking the D850 rendering. I need to experiment again with Lightroom 7.3 and the new camera profiles to see how this changes things. Capture One likely has completely different results being a different RAW processor.
Sorry I missed your reply Aaron
Nothing beats experience. Working without that is always risky. I have a suspicion that the D750’s shutter doesn’t like high shutter speeds.
I seem to operate at the ends of the spectrum. 75% of my shutter count is birds, mostly trying for in flight, and thus running at speeds at or over 1/2000th, and this may be what caused my issues, and I wonder why studio and wedding togs who never reach these types of speeds aren’t having bad experiences? But, I don’t have that all-important experience to be confident in this claim.
Most of the rest of my shots are at very slow shutter speeds, several seconds being common.
I tend to find it very difficult to spend any of my money on expensive items that don’t bring a direct improvement to results. I own a good camera, a couple of stunning lenses, an exceptionally sturdy but also very heavy old tripod (inherited from my father) and just the minimum for the rest. I haven’t even made the necessary investment in a much-needed speedlight, never mind an even more expensive battery grip.
Having sayd that, I would really like to know more about your external power source. Is it mains-driven, or battery-powered?
You may be on to something with the D750 shutter speed, I haven’t researched that! Sounds like a good theory at any rate. ;-)
I have a home-built solution with a DROK 12V to 7.5V step down converter and Anderson PowerPole connectors so I can use a variety of 12V sources from a Goal Zero Sherpa 100 and solar panel for hiking to a big truck battery for 24hr timelapses, and I can mix/match cables between various devices with an Anderson PowerPole distribution block to power multiple things at once (dew heater, camera, pan/tilt head, controller, etc.). A much simpler solution for most people that doesn’t require making your own cables is Tether Tools Case Relay system: www.tethertools.com/produ…er-system/ It will cost a bit more, but so do the tools for crimping your own plugs if you don’t already own them.
Gents
I have followed this conversation with a great deal of interest does not sound good for my new D750 better the devil you know(D600).
www.flickr.com/photo…ed-public/
As I said at the start your info Aaron is pure gold and some thing we all can learn from. I do count myself as a beginner I also will look at your link.
Steve
Thank you Aaron
I tried my own home-made solution too, but haven’t got it to work yet…
Peter
I found this link i think you should read Re D500 battery.
www.amateurphotographer.co.uk/lates…life-79779
Steve
Thanks for the reply Steve. I am aware of the difference between the newer Li-Ion-20 and the older Li-Ion-01. I have two of each, but the figures I quoted used the LI-Ion-20’s exclusively.
Also, I must make it clear that I do get great battery life when shooting shorter exposures. As an example, when shooting air shows and model aircraft, (typically shutter speeds between 1/250th and 1/2000, with low to medium ISO’s and very low usage of the screen but extensive use of both AF and VR on my 500mm f4), I have acheived over 2000 exposures on a battery a couple of times.
Also, low temperatures are not really an issue for me, as the area I live in (South Africa) seldom sees temperatures much below freezing. I certainly never operate in temperatures below -5C.
I have definitely determined that the D500 has much higher battery drain at high ISO’s and long exposures than previous Nikons, and this has been confirmed by a friend with the same camera. But let’s park that discussion, as the D500 is definitely not the best choice as an astro camera, if only due to the paucity of fast, short glass.
If it had not been for three shutter failures in less than 70 000 actuations I would still be happily shooting the D750, but as it was I just couldn’t trust it anymore. Also an average repair period of 8 weeks didn’t help much. For this reason, I personally would not recommend the D750 for anybody who shoots a lot. Apart from that, it is a brilliant all-rounder, but I would probably rather look at a second-hand D810 or even better a D810A.
Peter Connan wrote:
“…While using the D750, I found that I could get slightly better results by keeping the ISO fairly low (400-800) and lifting the exposure in post production, typically lifting exposure by 2 or three stops…”
I agree. I have done this type of testing on my D750 several times. I shot dark sky images using the same aperature (e.g., f/2.8) and the same shutter speed (e.g., 15 seconds) and a range of of ISO settings from ISO 200 up to ISO 6400. I found that ISO settings of 400 or 800 seemed to give the best results after boosting the exposure in Lightroom. ISO 200 was too dark for this test (would have needed wider aperture or longer exposure). Noise would increase noticeably with ISO 3200 to 6400 but these did not need an exposure boost in post processing.
Aaron D. Priest wrote:
“…The D750 is indeed a tough camera to recommend. The sensor is amazing, but…”
I think the D750 is a great night sky camera but wish it had the body/control layout of the D700/D8xx series of cameras. I especially miss having a viewfinder shutter. Nowadays I have to drape a dark cloth over the eyepiece for long exposures. But given the price difference between the D750 and the D810/850 and the quality of the night shots I’m pretty happy with the D750.
David
Your comment has made my year it was not looking very good from the above comments. my main reason for the D750 was its night ability as a person who is very happy out in the dark. I think the pixel size, weight and pricing are way in favour than the D810/850 and above all else the way I shoot as well. I do admit to having a piece of black leather in the ND filter holder to put on top of the view finder when the ND filter is used.
Many thanks for restoring my faith..
Thanks for this article, as you have stated it’s designed to help us newbies and for that I reckon spot-on. Am off to dark Scotland later this month so hoping to capture some decent skies. Any thoughts on using trackers to get longer exposures?
Cheers, Dan
Dan I myself have not got a tracker but I have had my camera put on one result was stunning with my 50mm F1.8 @ F2.8 part of the Milky way.
www.flickr.com/photo…ed-public/
It is something that I have thought of very seriously but for the moment I am enjoying the freedom of being just a tripod and Camera. Plan well the time you go, so you can prepare for the trip where is the Milky Way, Moon and what Scenery you wish to add as interest. Have a sheet of info with you its confusing out in the dark, buttons, menus and setting. Go positive with the right info and above you can see what you can get, I practiced in my office at home in the dark a few time to get use to the dark. No joke!
My friend has tried in Scotland a few times been beaten by clouds I hope it works for you. This closest place I see in the UK to the Black of Western Australia. All the very best.
Steve
Next time you want a long drive, to take these shots, try somewhere off the “Track”, near the Devil’s Marbles, in the Northern Territory. You won’t find a sky in WA as black as that!
Thanks for the reply Steve, as you say, fingers crossed for some clear skies! The moon looks like its in full force which might be an issue but far better than clouds!!
I certainly aim to be taking plenty of stuff written down with me, very good tip!
Dan
Fantastic article and well written Steve,
Even a dummy like yelf can understand the concept. Getting my head around the maths is and will always be an issue but what you have put down I can follow and even take a copy with me the next opportunity I have to get out.
Shaun :-)
apologies for the typo. Yelf = Myself
Thank you Shaun I wanted to do it as simple as possible and try and inspire others to have a go, with a little of the right info and technique. Enjoy the time out in the Black of night and keep at it the more you try the more you learn yourself.