There are some popular conditions for landscape photography that every photographer already knows: sunrise and sunset, storm clouds, fog, and so on. But one that doesn’t get mentioned very often is the light produced by a full moon on a clear night. The subtleties of moonlight aren’t always visible to the naked eye, but long exposure photography can lift the curtain. The results may have hints of familiarity, but they also have unique characteristics that make them stand out from typical, daytime photos. Photographing landscapes under the full moon (also referred to as “moonscapes”) is a process with its own set of challenges, so I will explore it in more detail in this article, and hopefully provide some tips for those who are interested in trying it out.
Table of Contents
1) The Influence of the Landscape
When you’re taking pictures at night, the landscape — specifically, its reflectivity — plays a larger role than during the day.
For example, you’re not going to get good photos of a dense rainforest under moonlight, since the scene won’t be bright enough for a camera to record. However, if you’re in an empty field (or, best of all, a place with bright sand or snow), you’ll be able to see plenty of details.
A good rule of thumb is that conditions are good for photography if you can see well enough at night to walk around without tripping. Done well, the results will be just different enough from daylight to strike viewers as unusual, showing a side of the landscape that is normally hidden from view.
2) The Colors of the Moon
Moonlight has a distinct tone to it, and one that is rare to see at other times of day.
On one hand, you’ll see well-defined shadows that may remind you of midday sunlight. But in other ways, the two are quite different. Moonlight is actually very soft, and the shadows, though sharp-edged, are much brighter than they are during they day.
Under the full moon, you’ll also notice some colors that are very different from those at any other time. Look for pale yellow highlights and dull-blue shadows, particularly if you’re taking pictures in a landscape with high reflectivity (again, sand and snow most of all).

The sky at night is also unusual in color, with much deeper blues than you’ll find during the day. Although a moonless night sky can look black or even brown in photos, the full moon almost always leads to dark, blue colors, with more and more saturation as you approach the moon itself.
Whether or not you include parts of the sky in your final photo, it’s an interesting look. Photographers are always looking for new ways to capture a landscape, and the distinct light of the full moon is a great way to do exactly that.

3) Including the Moon in Your Photo
A lot of times, you’ll be in a situation where it’s possible to capture the moon in your photo at night. While this can look good in many cases, it also comes with some challenges. The reason is simple: Putting the moon in your photo at night is a lot like putting the sun in your photo during the day.
Like the midday sun, the full moon will be far brighter than anything else in your photo (unless you’re in a city, potentially). This means that photos with the moon are susceptible to a number of issues, including high levels of flare and exposure difficulties.
If your lens is prone to flare (such as the 14-24mm f/2.8 that I like using at night), you’ll need to be very careful about where you position the moon in your photo if you want to avoid extreme ghosting. And, along the same lines, make sure that your lens is totally clean before you take a photo. Even a few specks of dust — normally, nothing that you’d ever notice — can bounce off the light in funny ways and create extra dots of flare in an image.
It’s not just dust, either. One night, it was so cold out that my breath was freezing to the back of my camera. I didn’t realize it for a while, but some had also crystallized on the front element of my lens! When I tried to photograph the moon, the resulting photos had so much flare and smearing that they were totally unusable.
Plus, along with extra flare, you may find it difficult to expose a scene properly when the moon is much brighter than anything else in your photo. Just be sure to expose to the right, even if it means that your photo looks too dark out of camera, so that anything you care about still has enough detail to recover (including the portions of blue sky right next to the moon).
However, it isn’t impossible to capture the moon successfully in a photo. If you position it well, avoid getting dust on the front of your lens, and set a good exposure, you can end up with an image that works really well.
4) Camera Settings and Equipment Considerations
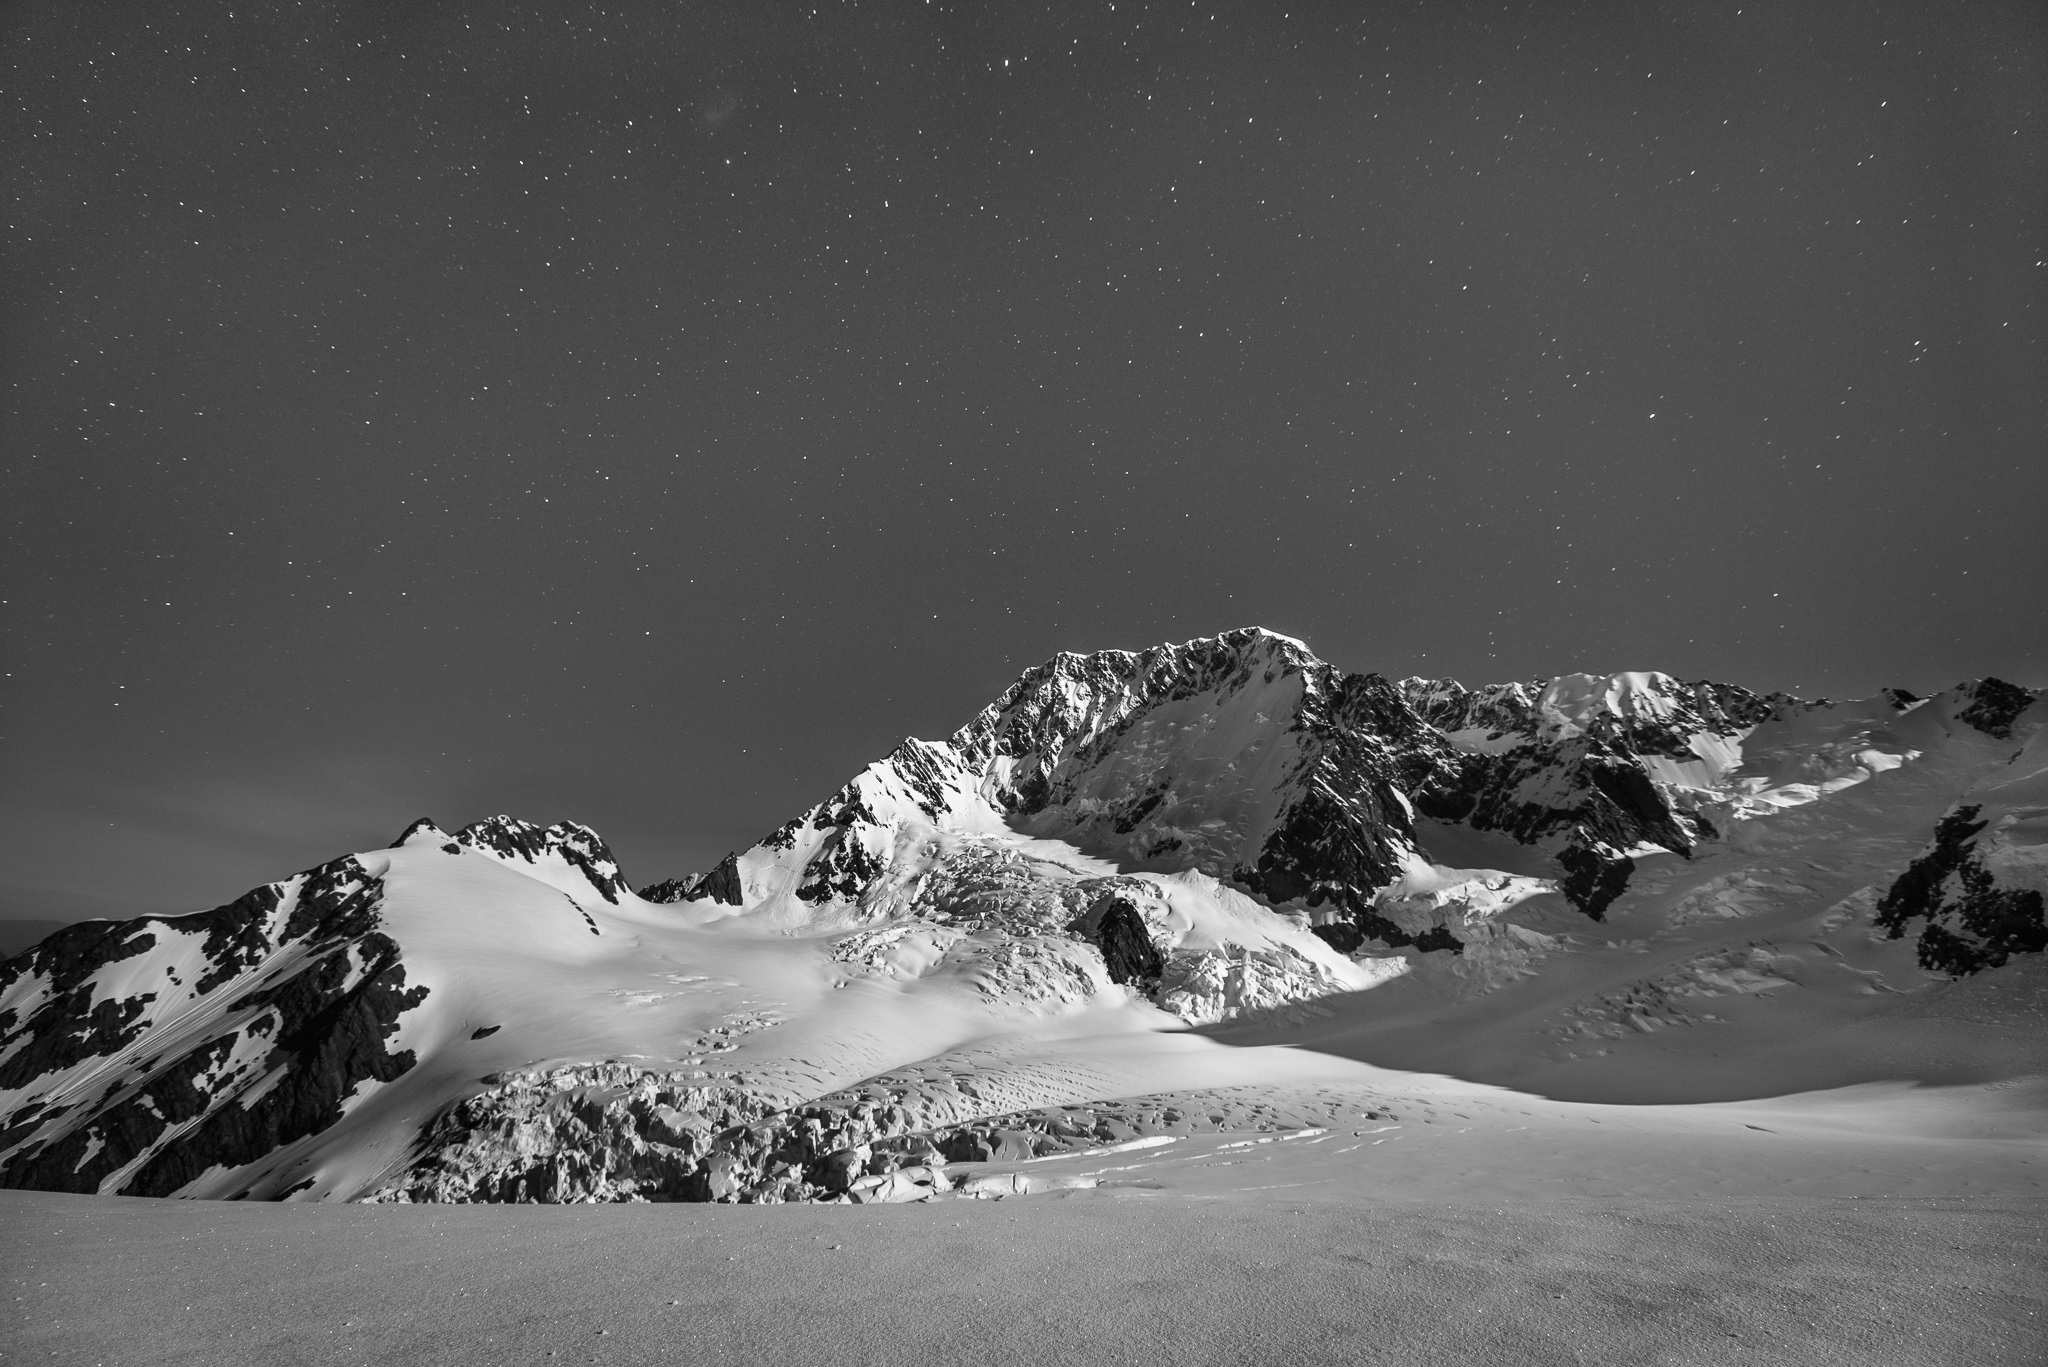
The full moon is surprisingly bright. Depending upon the landscape, your camera settings may be closer to what you’d find at the end of sunset rather than in the middle of the night.
For example, while taking pictures on a glacier at night, I was able to use an ISO of 100 or 200 for many of my photos (combined with a 30-second exposure and wide apertures). Normally, that’s very unusual at night. So, don’t use the “typical” nighttime camera settings without first making sure that they actually apply.
As I mentioned a moment ago, when you include the moon in your photo, this is even truer. To avoid overexposure, you’ll need to use very low ISO values, and potentially smaller apertures or shorter exposures that you’d ever expect at night. The photo below was shot at 30 seconds, f/4, and ISO 100. (Normally, I’ll shoot nighttime photos at f/2.8 and ISO 1600 instead, which is a full five stops — 32x — different.)

This is where it helps to have a camera that is ISO invariant. If you do, you’ll be able to brighten the darkest areas of a photo without penalties that are significantly worse than what you’d see by simply using a higher ISO in the first place.
As far as camera equipment, the full moon gives you way more flexibility than you’d normally have at night. You’re not confined to full-frame cameras and 14mm f/2.8 lenses if you want to capture something that looks good, although you certainly still have to use a tripod.
In fact, if the landscape is reflective enough, I use my 70-200mm f/4 for a surprising number of nighttime shots. When I do, I’m even able to keep it at ISO 100 or 200 most of the time. That bodes well for any photographers who are interested in this type of photo, including those with crop-sensor cameras and kit lenses.
However, like always, you have to pay careful attention if you want your stars to appear as sharp pinpoints in the sky. Just like moonless nights, you’ll need to use wide lenses and relatively quick exposures if it’s one of your priorities.
5) Conclusion
Hopefully, if you’re a photographer who likes to showcase landscapes in a unique way, you’ve found this article to be useful. The full moon is a beautiful sight, and its light isn’t something that a huge number of photographers tend to capture in their images.
These tips, of course, don’t only apply to the full moon; they’re relevant for any nighttime photography where the moon is bright enough to illuminate the landscape. Naturally, though, the brightest conditions happen when it’s full, which leads to a particularly attractive environment for landscape photography.
So, the next time you have a chance to photograph landscapes at night, keep an eye on the moon. If the moonrise is at a reasonable hour, and it’s bright enough to illuminate the landscape, you should strongly consider bringing out your camera. Not all scenes work well under moonlight, but, if conditions are right, you have the potential to capture some amazing photographs.
Hi Spencer,
Quite informative article, particularly about Moonscape photography. Thank you very much.
Ajayan
Hi Spencer,
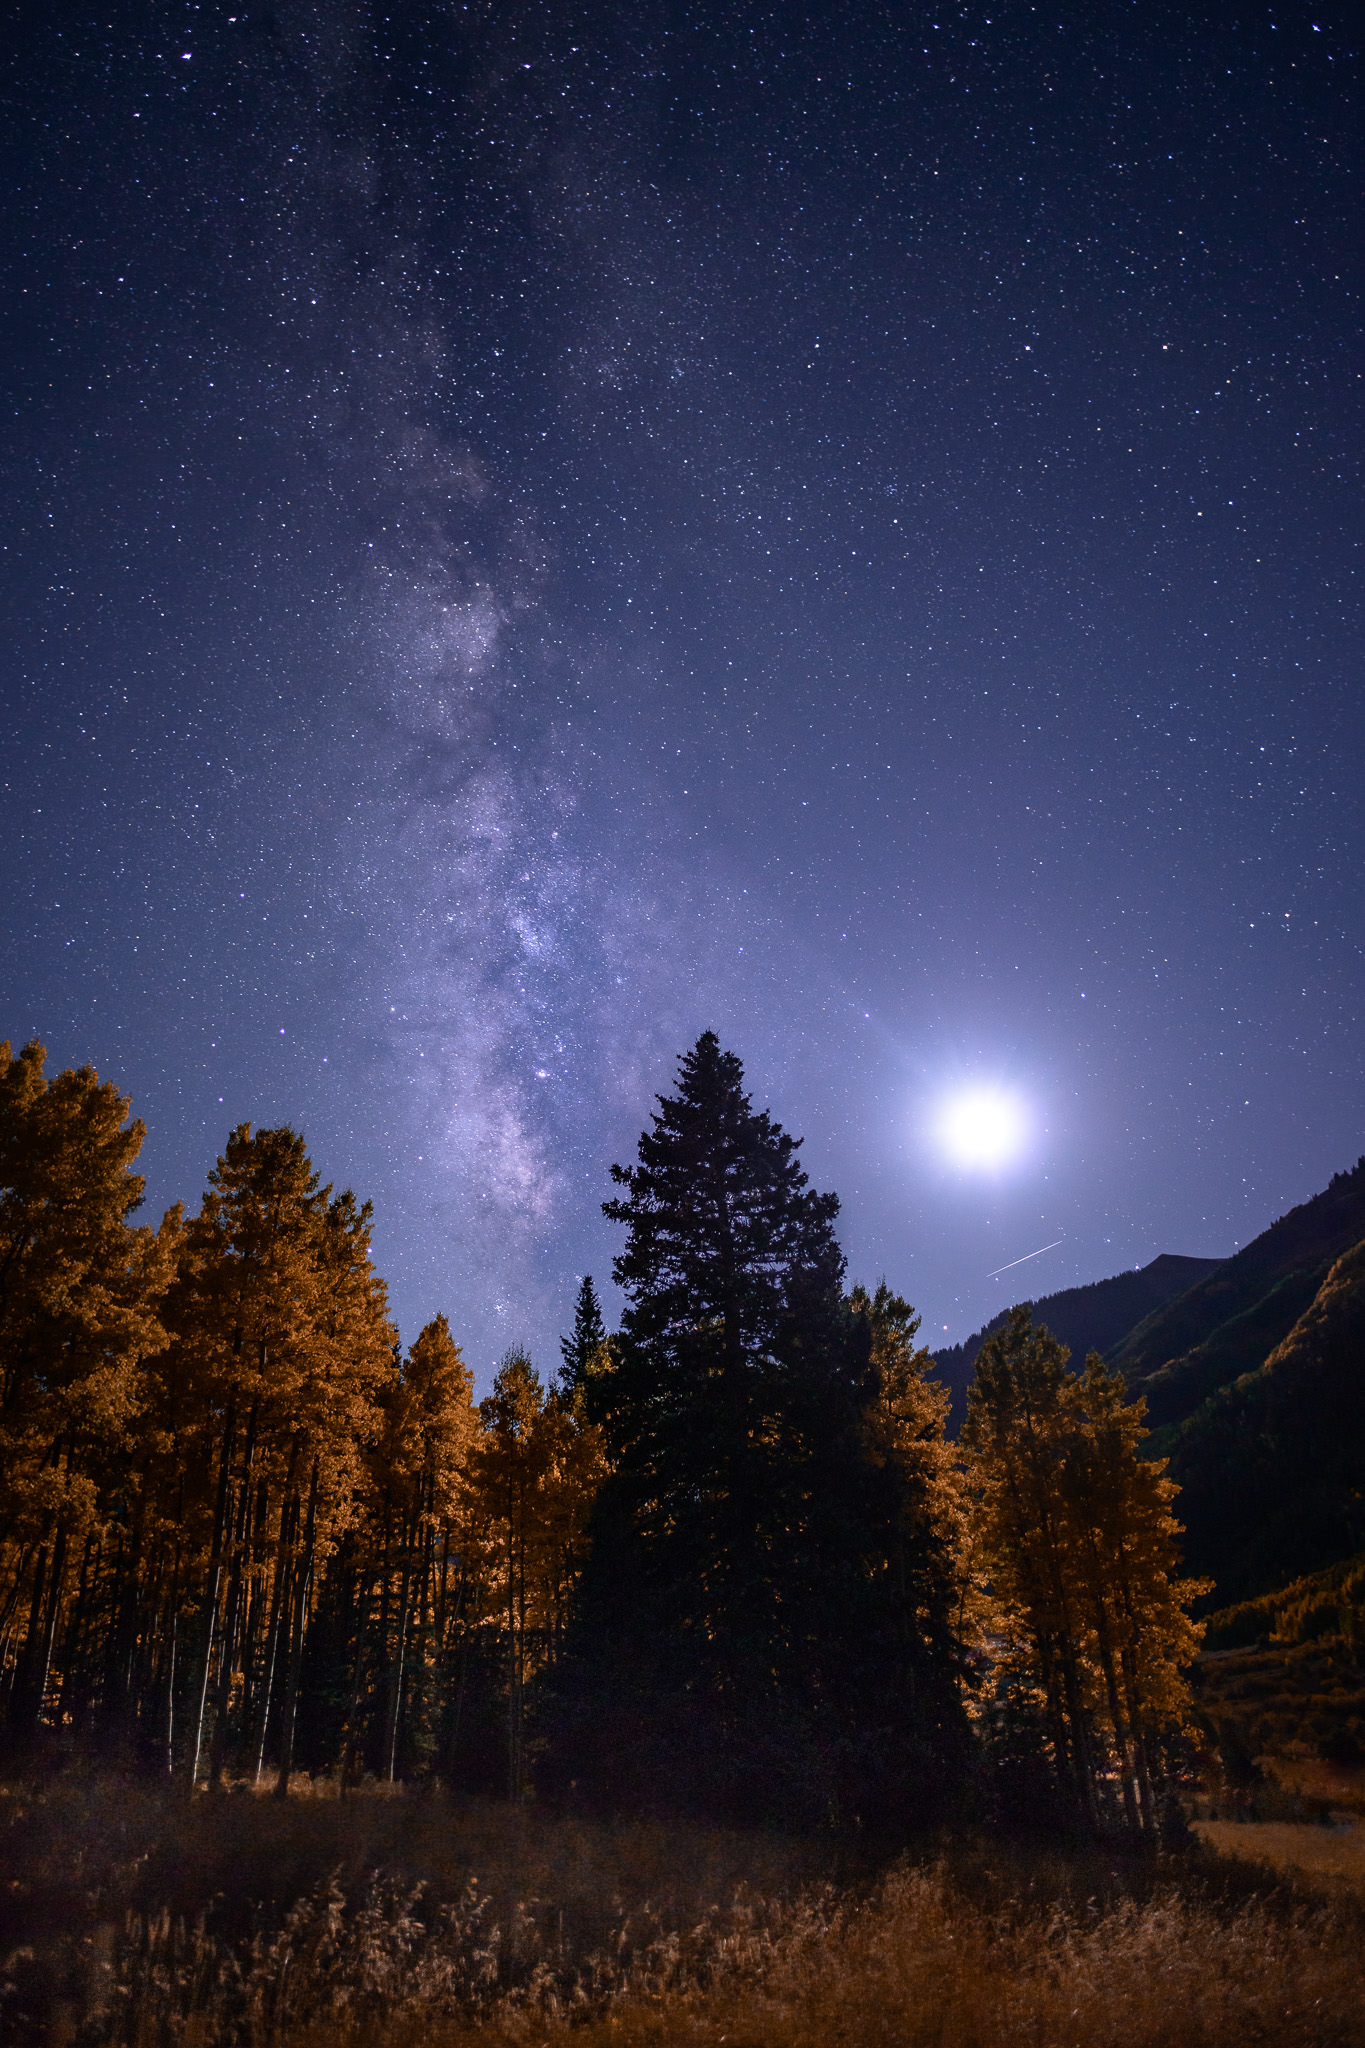
Love the forest tree and stars image! It’s nice that you’re writing more stuff on shooting at night. Personally I love shooting at night when I’m out in the boondocks where there’s less light pollution though in this part of the world, our challenge is the almost always cloudy sky during the monsoon season. The other impediment to going out at night is a warm bed that invites slumber.
Oggie R
Spencer its great to see some one else out there using the light of the moon to light the landscape at night. My own experience is WB auto as daylight ISO depends on how much light and the milky way, which is a far cry to dark night WB of 4000K and ISO 3200 BUT always 20 sec exposure to get pin points over the whole image.
www.flickr.com/photo…ed-public/
www.flickr.com/photo…ed-public/
www.flickr.com/photo…ed-public/
While all moons are tiny crescents the always show as a whole round moon but all are around 30% or less each time but the lighting on the landscape is just perfect. In the land of OZ in WA no water falls but if i get to NZ a rainbow from a water fall will be one of the things i will try for. keep up the good work.
a few more images in the comments to
photographylife.com/how-t…-lightroom
Steve
Thank you, Steve, these are excellent photos!
What setting do you use or recommend for white balance?
Shooting RAW, it doesn’t really matter, except for how you want your JPEG preview to look on the back of the LCD. So, I always just shoot with auto white balance and adjust it in post-processing if I don’t like the camera’s choice. There’s no image quality difference whether you set white balance in camera or in post, assuming that you’re shooting RAW.
If I were shooting JPEG, I would adjust it on a case-by-case basis. However, the camera’s auto white balance is usually a good place to start, and tends to be fairly accurate.
Thank You Very Much Sir………..
Very Truly said, small speckle can almost dismantle the image…..
Really Grateful for your tips….
Glad you enjoyed it, Prajwal!
This is some beautiful pictures, I like both the pinpoint stars as well as the star trails. The shot of the milky way is incredible, completely overexposing the moon to get the stars and the trees, that is bold and unique !
Another beautiful opportunity with moonlight landscapes is to shoot waterfalls. Under the right conditions, you can get a rainbow :-)
Thank you, Mickaël! It’s definitely on my bucket list to take waterfall photos where a rainbow is visible under the moonlight.
Thanks for the info. The one thing I have always had problems with in after dark photography is exposure. If left on auto it seems the camera is always trying to make it appear as daylight by over exposing. I have gone totally to manual exposure and wonder if metering off a gray card might be a better way around it.
That’s definitely a common problem. When light levels get too low, the meter on many cameras will give you inaccurate readings. I also shoot manual in cases like that, usually by checking my histogram every few shots. It’s hard to eyeball exposure at night without using a histogram, since the LCD’s high brightness can fool you into underexposing your photo.
When it is dark you need to underexpose a stop or so, depending on how dark it is, to correct your camera. You need to make sure the camera stops thinking it needs to add light… Black cat in a coal cellar needs underexposing, snow and beaches usually need over exposure for the same reason. Hope this helps.