When photographic architecture, landscapes and even people, photographers often desire to increase detail and resolution, capture a wider angle or create a unique look that is impossible to achieve with standard camera gear. That’s where panorama photography comes in – it can be a great technique to utilize in order to accomplish such goals. Although the concept and the technique itself are fairly straightforward, panoramic photography often confuses many photographers. We often get many inquiries about this topic from our readers and one of the most frequently asked questions is about the specific type of gear to buy in order to produce stunning panoramas. And that’s certainly one of the biggest myths about panoramic photography – you rarely ever need such gear! Most of the panoramas I have stitched so far have been done without panoramic gear and although I do own a panoramic slider, I rarely ever get to use it. Read on this article on panorama photography tips to find out why!
At PL, we have written quite a bit about the subject of panoramic photography. A while ago I wrote a detailed tutorial on panorama photography, where I cover a lot of the basics of this technique. The topic was further expanded by a number of other contributors like John Sherman, who wrote an article on how to create HDR panoramas in Lightroom, Spencer Cox, who wrote an article on the hidden benefits of panorama photography, and my friend Brad Judy, who wrote an article on how to stitch images with Microsoft ICE. On top of all this, we have even written about a method of stitching panoramas when photographing people for that unique, shallow depth of field look, which was later expanded to a Lightroom tutorial, including an article on fixing panorama merging errors. In short, a lot has already been said about this technique, which is why I want to cover some specific panorama photography tips and the myths surrounding it.
Table of Contents
1) Are Panoramic Heads Absolutely Required?
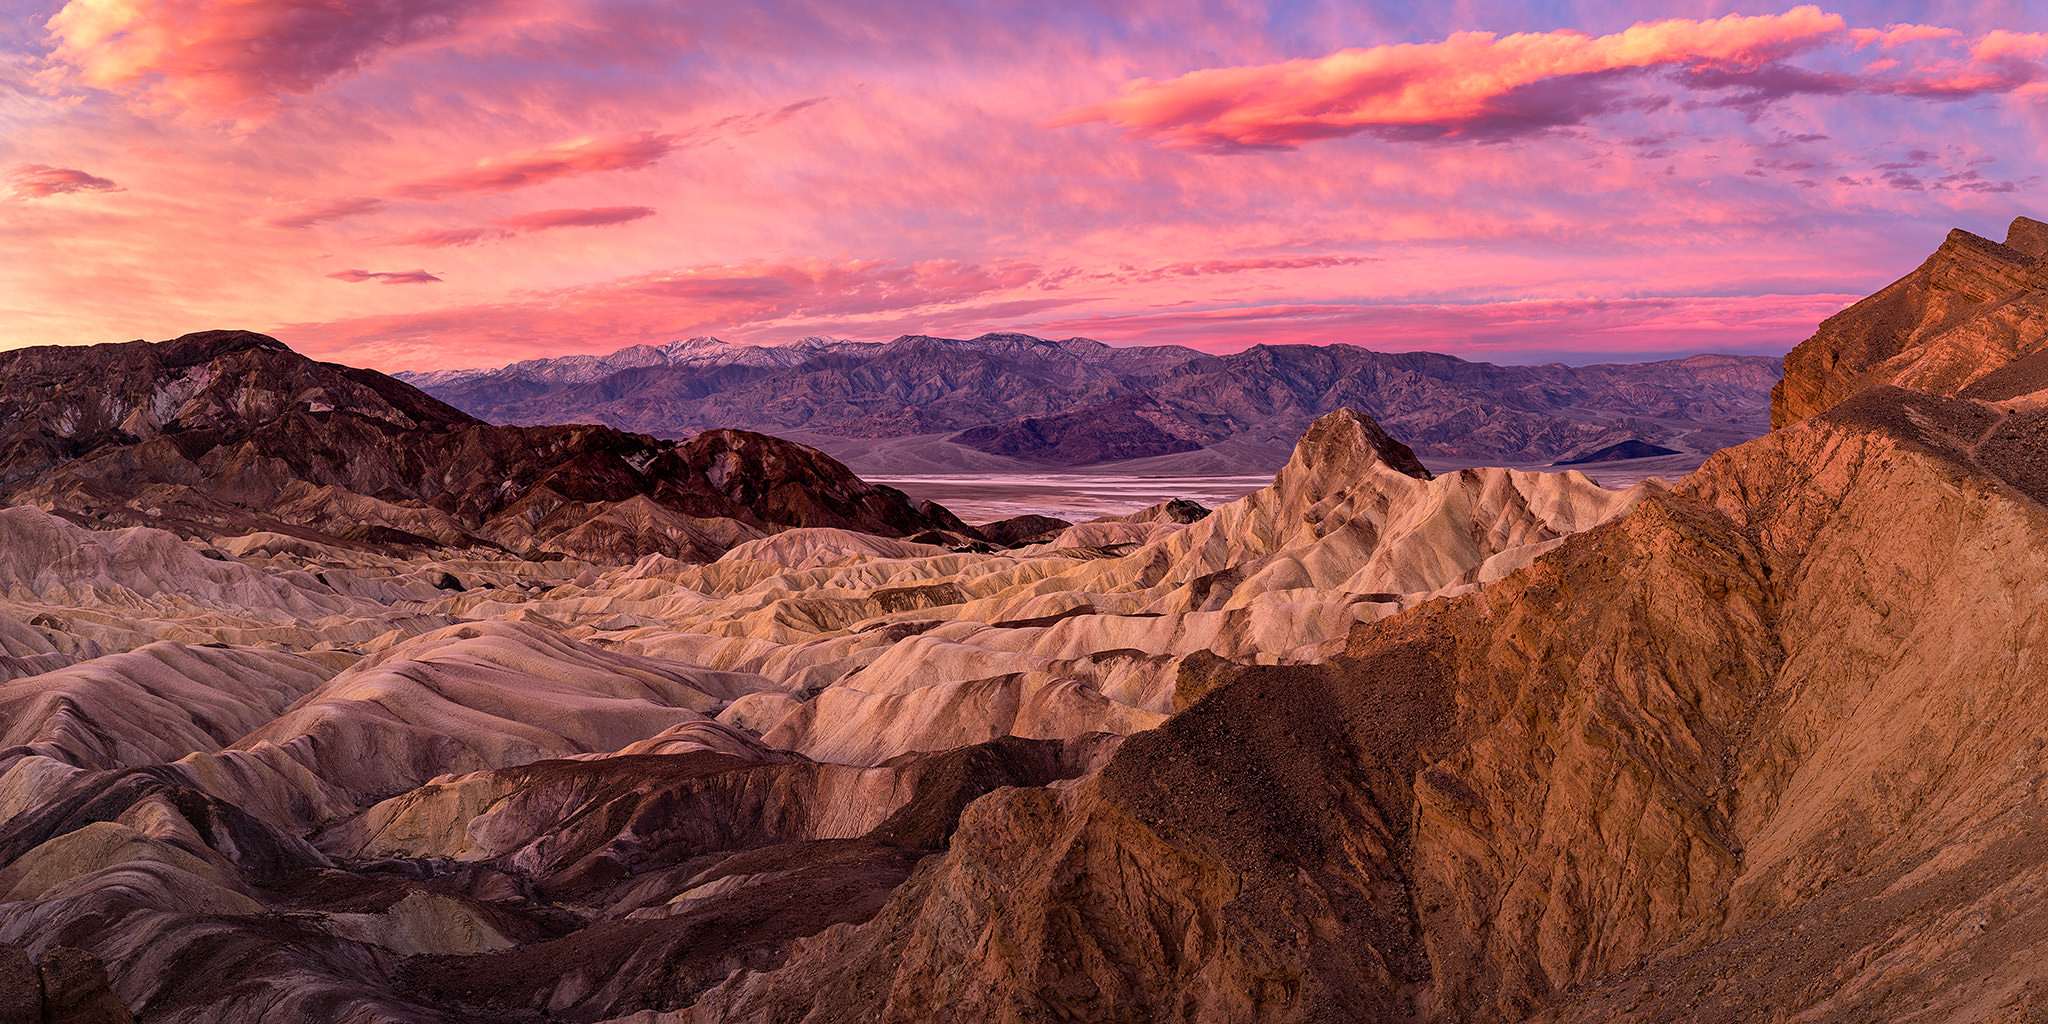
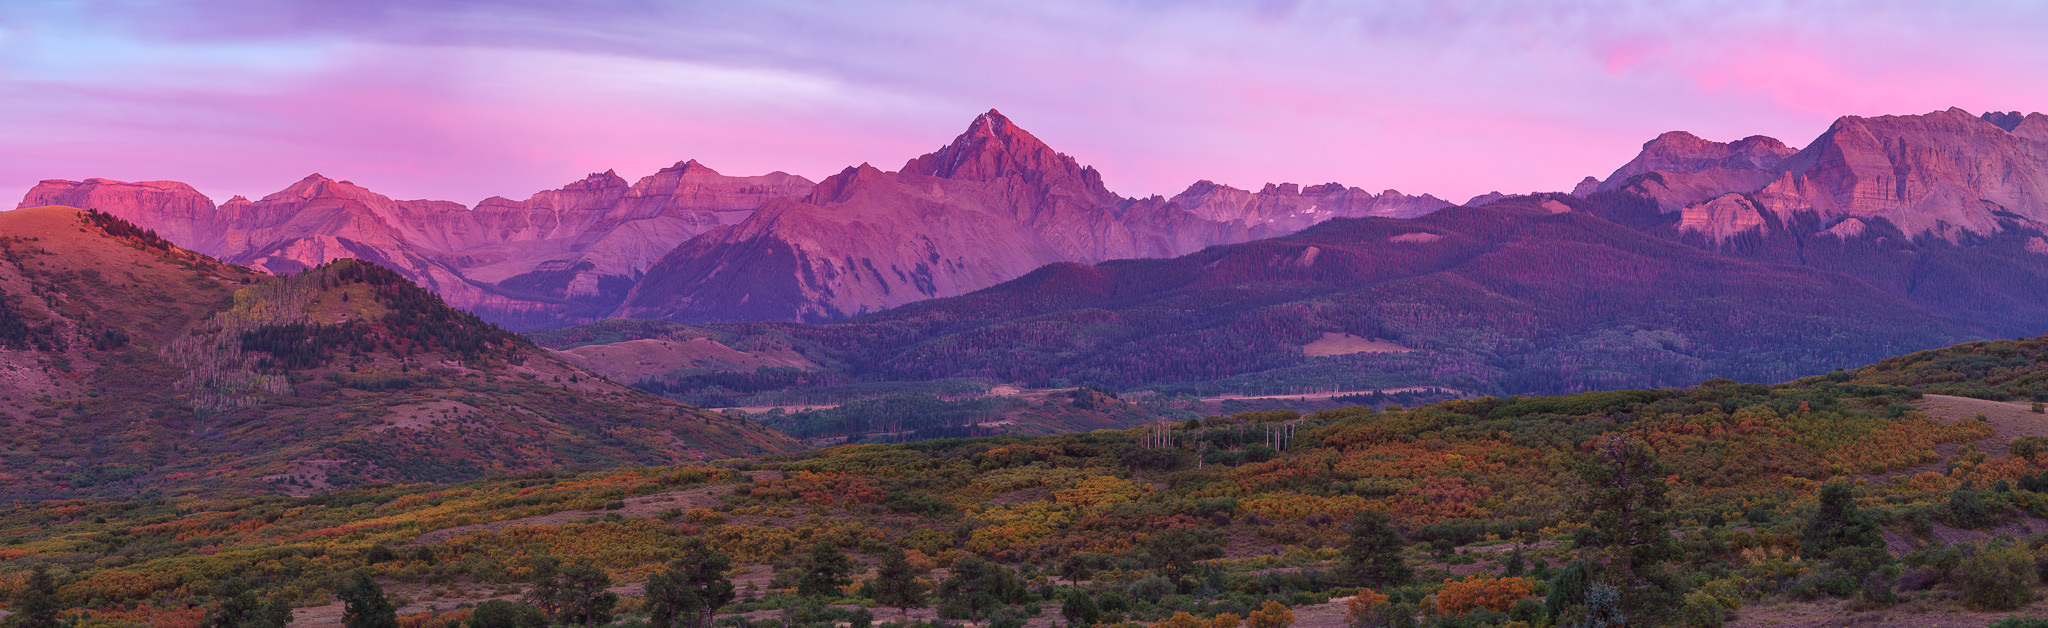
Let’s start with the biggest myth surrounding panoramic photography – that you always need a panoramic head. Many photographers advise that a panoramic head is absolutely required for proper stitching of panoramas and that it is a must-have piece of gear. That’s certainly NOT true and I would personally stay away from such unsupported statements. The fact of the matter is, panoramic photography gear is ONLY needed when the scene contains close foreground objects and if you are shooting with lenses other than tilt and shift. When you photograph from a high vantage point / overlook or a point where the nearest foreground object is located at infinity focus, you do not have any concerns with parallax. So you could easily make a large panorama without any special equipment. I have stitched many panoramas without any special equipment, including the Zabriskie Point panorama you see in the beginning of this article. Why don’t I use a panoramic head whenever I can? There are several reasons for this – let’s take a look at them in more detail.

I shot this panorama hand-held. Light conditions were changing so quickly due to high wind and clouds, that I simply would not have been able to set anything up. Although I tried to rotate my hand around the entrance pupil of the lens, there were still some stitching issues to deal with. I had to use some cloning in Photoshop to take care of those.
1.1) Lack of Time for Proper Preparation / Testing
Lack of time is one of the biggest reasons why I rarely get to use a panoramic head. Although I do everything I can to prepare well in advance of shooting a particular scene (which I would have typically previously scouted and researched for), I don’t always have the time to set everything up for a panorama. Unfortunately, once you get into complex panoramas, especially the ones that involve multiple rows, it can take quite a bit of time to get everything fully leveled, prepared and tested. If there are any foreground objects, or if you shoot at longer focal lengths and parallax can be a potential issue, you would have to also make sure to get the camera and lens moved to their “no parallax” point (which you would need to know well ahead of time). And God forbid if you decided to zoom in / out (change your focal length) and forget about moving the setup accordingly – that’s a recipe for a potential disaster. In short, stitching complex panoramas takes time and patience, and if you should be prepared to deal with all those issues.
1.2) Wind
Another reason why I often don’t shoot panoramas is due to wind. If it is extremely windy, forget about panoramas. Not only does wind cause objects like trees and bushes to move, which would make it a real pain to try to stitch, but the wind would also shake your setup and potentially cause blur in your images. One of the biggest frustrations with shooting panoramas, is later discovering that a single image out of your sequence was blurry! I have had so many great panoramas, which I never ended up using, just because one or two images from the sequence was completely unusable. Why didn’t I pay enough attention in the field? That’s what the next section is all about – timing.
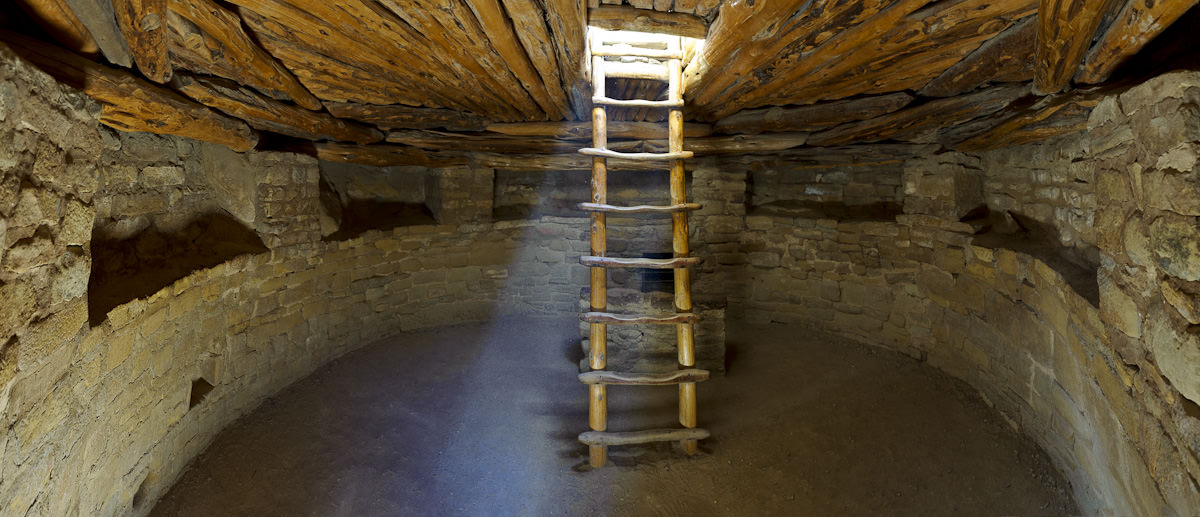
I shot this panorama hand-held, without any panoramic equipment – there was simply no space in there to put a tripod and did not have any time. Although the panorama did stitch, if you look closely, you will find some parallax errors. In addition, the shape of the kiva got strangely transformed and skewed.
1.3) Condition Changes and Clouds – Exposure Time, Timing and Speed
When photographing critical moments like sunrise and sunset, where everything happens too quickly, you might regret the decision to shoot panoramas fairly quickly. Why? Because everything happens too quickly and you cannot quite do that with a panoramic setup, especially if it involves more than 5-6 exposures. When shooting at low light levels, which is typically the case when you shoot sunrise / sunset moments, if your exposure time is too long (say more than half a second), shooting panoramas can be a bad choice. First of all, light levels will change too quickly during these peak moments. Even if you shoot in full manual or lock your exposure (which is required for proper panorama stitching), by the time you are done with the whole panorama, the brightness of the scene might have drastically changed, making it impossible to produce an even panorama. On top of that, long exposures would cause the scene to change too! For example, if you have clouds in your scene, even half a second might be too long for such panoramas, since the clouds would be in a completely different place in your last shot of the sequence. Lastly, if you do decide to shoot changing conditions, you will need to learn how to do everything at a very fast pace. So you need to be fully aware of such potential – if conditions change too quickly, shooting a panorama might be a complete waste of your time.
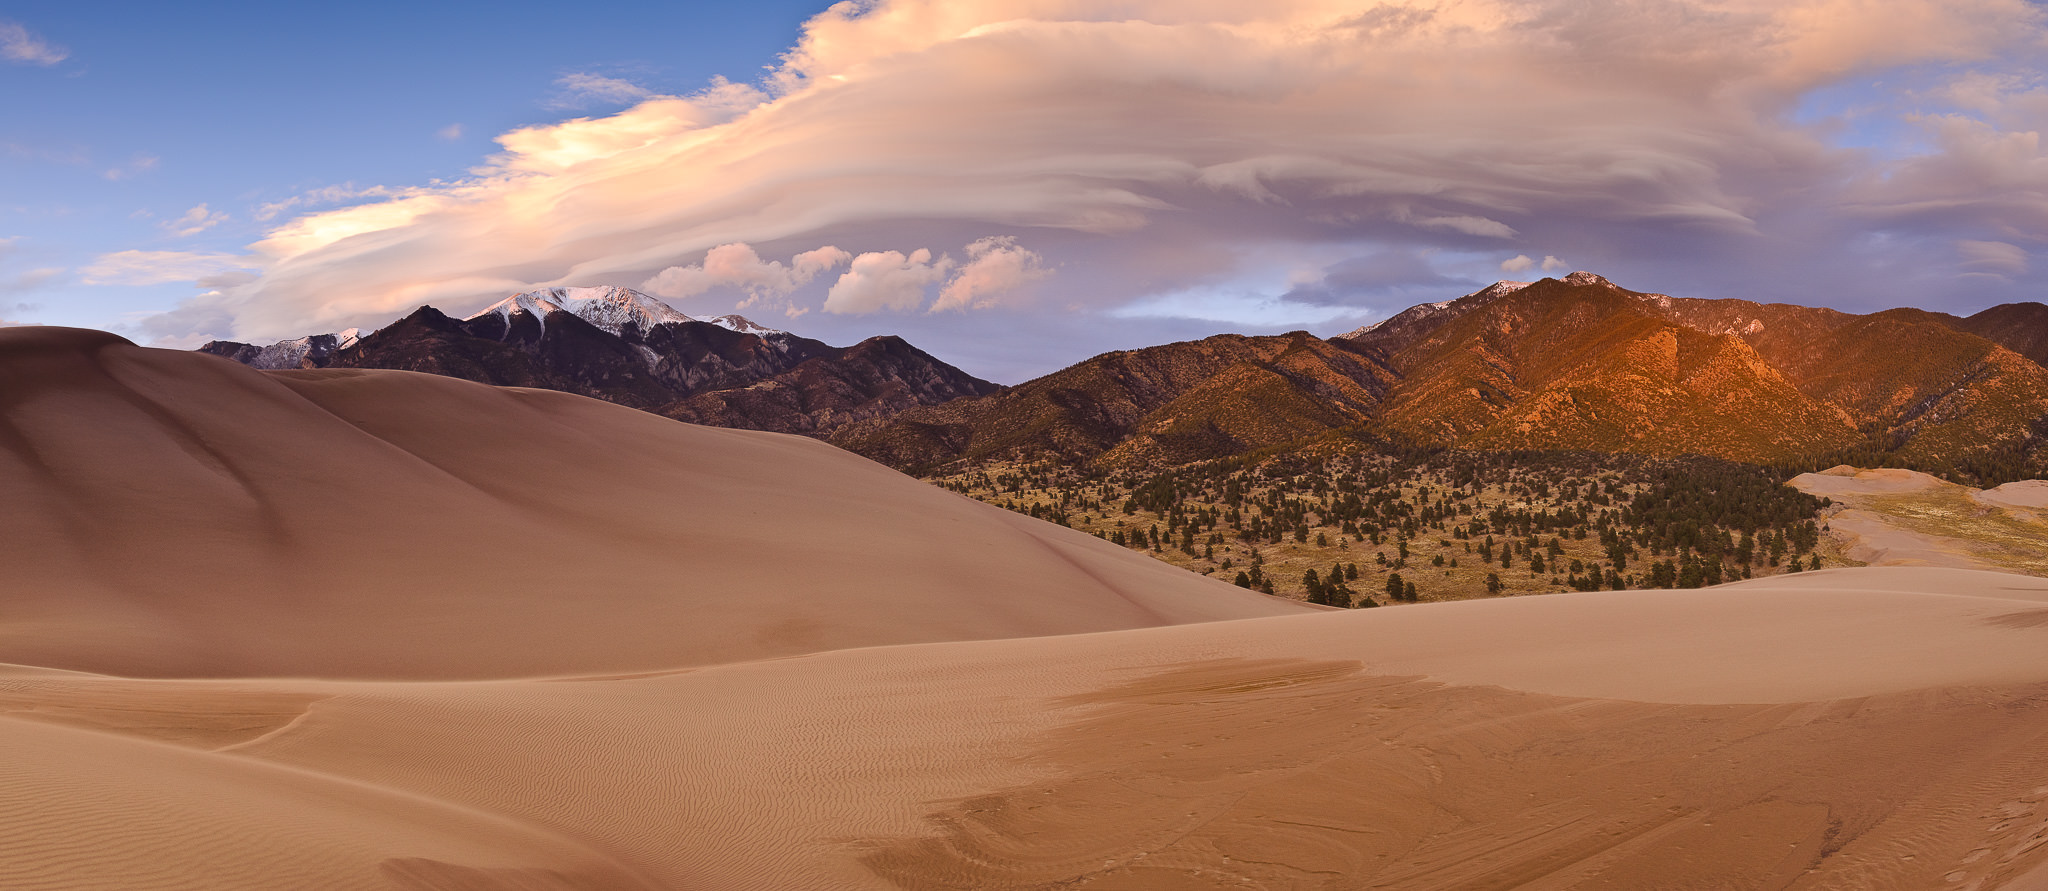
Another panorama that I shot hand-held, without any panoramic equipment. I was standing on the top of the dune as I shot the panorama, so I did not have to worry about foreground elements / parallax issues. It was extremely windy and cold, so I had to increase my ISO a bit to keep my shutter speed fast enough.
1.4) Distractions and Scenes Not Worth Stitching
Many photographers, including myself, end up shooting panoramas of scenes that are not worth shooting in the first place. Sometimes the scene itself is not very photogenic, sometimes there are too many distracting elements and other times, the light is just too flat. I have taken countless panoramas that I never stitched, because I would not have been pleased with the results. It is one thing if you are starting out and shooting panoramas for practice, but totally different if you find yourself shooting those pointless panoramas that are no different than your average “crap shot”. Sometimes you are far better off spending your extra time scouting locations and finding something interesting to photograph, than wasting your time figuring out those “no parallax” points or sitting and waiting for hours trying to get your computer to finish the stitching process. And how about spending a lot of money on expensive panoramic heads that are too heavy to lug around with in the field? I value my time and if I see a scene that is absolutely not worth shooting, I won’t do it. The more crap you shoot, the more time you waste. More images to import, more images to store and more time to waste just to figure out at the end that it was all not worth the effort you put into it.
Why did I shoot it in the first place? Because I had no idea what I was doing at the time.
1.5) Storage and Computer Requirements
Another reason why you might want to stay away from panoramas is huge storage and fast computer needs. Guess how big that 400 MP of Zabriskie Point panorama is? Almost 4 GB! Yes, that’s a single file with all the details in it. In fact, Lightroom could not even handle such a file, because I had to save it in a different format (PSB), as files over 2 GB cannot be saved in the common TIFF format. But that’s not the worst part – the process of stitching the panorama was quite painful. Since I now prefer Lightroom to stitch panoramas (due to the fact that Lightroom 6 / CC is capable of creating DNG files that can be edited just like RAW images), multi-row panoramas can take a really long time to stitch and in some cases, they cause Lightroom to crash completely. For the Zabriskie Point panorama, I had to retry about 10 times before the panorama finally stitched without issues. In between, I tried out PTGui as well and although it did a great job overall, it was still not able to produce a DNG file. So once Lightroom finally did it, I ended up going to the DNG version, as I had more editing room to play with. My second part of the struggle was the editing process. Both Photoshop and Lightroom made my fast PC look like junk, literally. I quickly realized that 32 GB of RAM was inadequate and if I wanted to speed everything up, I would have to down-sample my panorama to smaller resolution. Keep all of this in mind. Unless you only shoot a few images, those multi-row panoramas might give you a lot of different kinds of headache, which start after you offload those images to your computer. I cannot even imagine what folks like Aaron Priest go through when they stitch multi-row panoramas shot in HDR! (by the way, check out his excellent article on photographing the Milky Way).
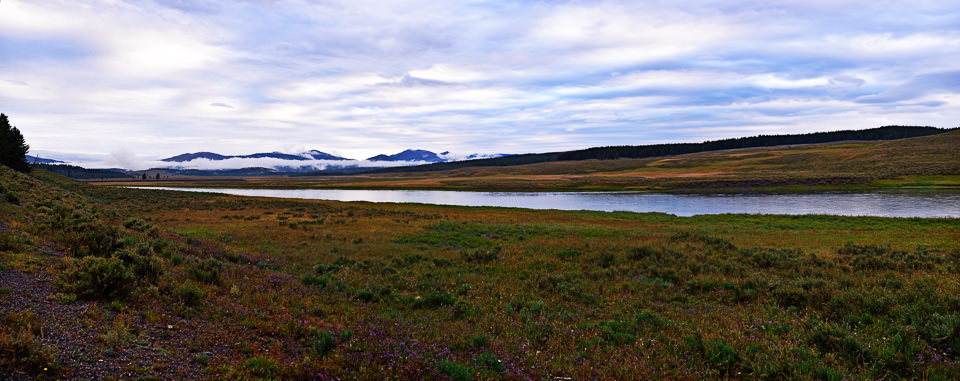
This was my first panorama that was stitched with extremely long exposures of 20-30 seconds. It is a single row panorama using a standard ballhead – no special panoramic equipment was used.
2) Why Shoot Panoramas
With all this talk about why I often choose not to shoot panoramas, you might have gotten a feeling that I am against panoramic photography. No, that’s definitely not the case. I do shoot panoramas when the conditions call for them and I rarely regret my decision after the fact. Panoramic photography is a wonderful technique for many reasons – Spencer did a great job at explaining those in his Hidden Benefits of Panorama Photography article. Being able to get a different angle, increase resolution for ultra-large and super detailed prints are the primary reasons why I sometimes shoot panoramas. Over time, I learned how to scout locations for panoramic photography, anticipate light conditions and set up my gear quickly for proper single row or multi-row panoramas. As you practice this technique in the field, you too will find out what works and what does not for you. Despite all the factors and disadvantages pointed out above, I would still encourage everyone to give panoramic photography a try!
Just take a look at the below crop detail from the Zabriskie Point panorama:

At 400 MP, it has so much detail that I could make it into a huge wall-size print, or a smaller super-high resolution print that you could pixel-peep at close distances.
3) Parallax and the Need for Panoramic Equipment
Now that we talked about cases where you do not need a panoramic head, let’s talk about situations that call for using such a device. As I have already pointed out earlier, you only need to use a panoramic head when there are potential issues with parallax, which means that you are dealing with foreground objects. Why do you need to worry about parallax? Well, just like when you see what happens when you extend your finger and look at the scene with one eye, then notice changes in the background when you look at the same scene with your other eye, the same thing happens when your lens rotates around the camera base. Take a look at the below illustration that explains this phenomenon, courtesy of Wikipedia:
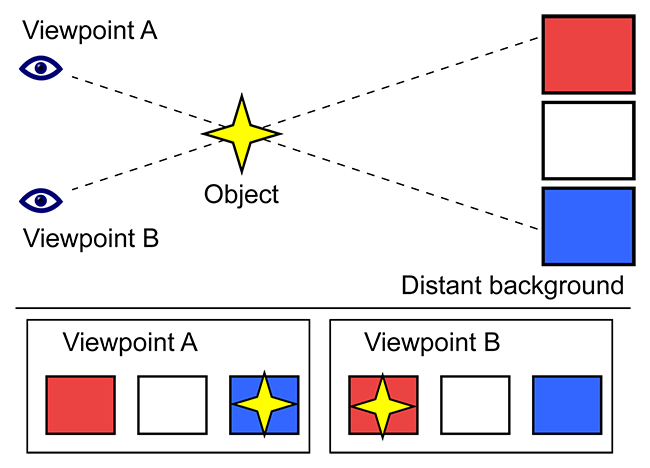
When your lens moves around the tripod base of your camera, the background relative to your foreground subject would appear differently between shots taken at different framing positions. Although many software packages today have methods to deal with slight parallax issues, severe parallax errors yield to badly stitched panoramas. In extreme cases, software sometimes cannot even stitch such panoramas.

You can see from my shadow on the left that I have been shooting vertical, hand-held panoramas for a while. This shot was captured back in 2008 with the Nikon D700 using this technique – a total of 6 exposures. Crazy to think that I could capture a panorama today with similar resolution using just two images with the Nikon D810!
The solution is to use proper panoramic equipment, which would allow moving the rotating base away from the camera to the entrance pupil of the lens. Once properly set up and the camera rotates around the entrance pupil of the lens, or the “no parallax” point as often referred, software won’t have any problems stitching such panoramas and there won’t be any issues in the resulting images.
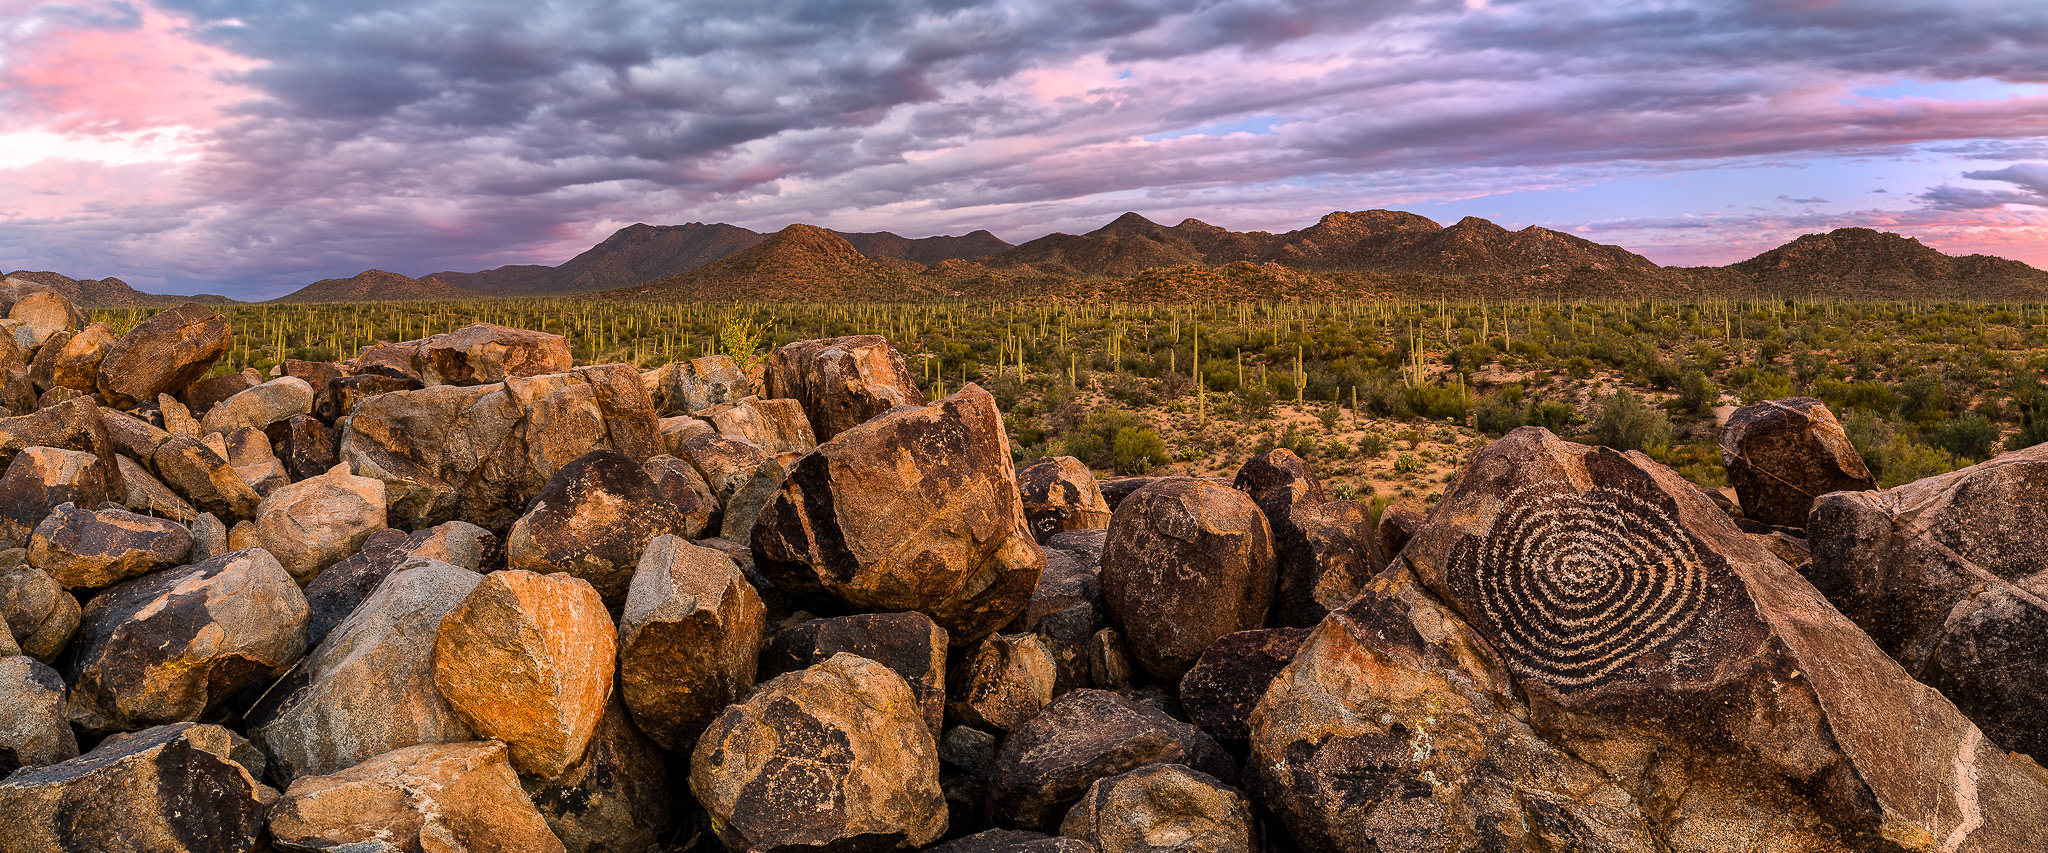
This particular image would not have been properly stitched without panoramic equipment, since the rocks are so close in the foreground. I used my nodal slide and shot a total of 9 vertical images, which I later stitched in Lightroom.
4) Panoramic Head Recommendations
If you are serious about panoramas and you are planning to shoot a lot of them, or if you do architecture photography where you typically deal with close foreground objects, you will surely benefit from a solid panorama head – that’s when investing in such a setup will be beneficial for your photography. And this is where a lot of people get stuck, because there are so many different options and so many different price points. When it comes to panoramic photography, you can spend as little as $50 and as much as thousands of dollars for advanced motorized heads. There are many different manufacturers of panoramic heads: Nodal Ninja, Manfrotto, Cambo, Bushman Panoramic, Gigapan, Really Right Stuff, Kirk Enterprises, Agnos, Novoflex and many more. So which one to get then?
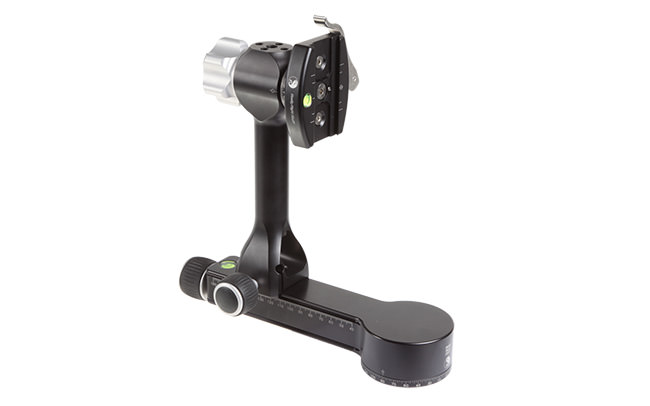
If you already have a solid Arca-Swiss tripod head with a leveling base, I would recommend to start out with a single nodal slide. When it comes to tripods and tripod heads, I believe in investing once – get yourself the best tripod and tripod head you can buy and never worry about it again. For this reason, my choice for the tripod heads has been Really Right Stuff (RRS), because well, they do make the really right stuff. RRS is one of the most expensive brands out there for a reason: they make everything in the US and their quality is top notch. I own a couple of RRS heads and my most favorite one is the RRS BH-55. I have used many different tripod heads in the past and once I tried out the BH-55, I could not use anything else. Yes, it is that good. The best part about the BH-55 is that it is modular – you can use a panorama-friendly clamp like the PC-PRO. With this clamp on my BH-55, I don’t have to worry about leveling my tripod legs. Once I make sure that the tripod stands securely, I level the clamp itself, then mount my camera on it. But the BH-55 with the PC-PRO clamp won’t solve the parallax issue – you will need one more component, which is the MPR-CL II nodal slide. Basically, you attach your camera in vertical or horizontal orientation (I prefer vertical for more resolution), you slide the clamp on the PC-PRO, then secure it at the point of no parallax. From there, you can use the panning base of PC-PRO to pan the camera. The setup is not ideal for shooting multi-row panoramas, but it can be done. When shooting multiple rows, all you have to do is release the tension on the BH-55 ballhead, move the setup up or down, lock the ball and continue using the panning base of the PC-PRO. What’s great about this setup is that I only need to carry a single lightweight MPR-CL-II nodal slide with me. If I decide to shoot a panorama, I mount it on my PC-PRO/BH-55 and I am ready to go. What’s not great about this setup is cost – BH-55 PCPRO itself is $575, plus $140 for the MPR-CL II – $715 total.
For most people, full size heads are overkill. If you don’t want to spend so much money, just get a single slide if you already have a solid ballhead with a panning base and you should be good to go. It might take a bit more time to get your tripod leveled, but it will save you hundreds of dollars. If I wanted to get a budget-friendly setup, I would personally go for the Sunwayfoto FB-44II Ballhead, along with the Sunwayfoto DMP-200R nodal slide. If you shoot panoramas with wide angle lenses or small-size lenses, get the DMP-140R instead. Or get both, since they are so cheap. That’s $160 for the ballhead and $55-70 for the nodal slides – less than $250 for the whole setup. Not bad.
If budget, size and weight are not an issue and you want to make a living selling wall-size prints, you might want to look into full size panorama heads. If that’s the case, don’t settle for cheap full size heads – get the best. The last thing you want is to be frustrated in the field, just because you invested in a flimsy setup. My number one choice would be the RRS Multi-Row Pano Package, which includes the PG-02 LR Pano-Gimbal Head with B2-LR-II clamp and the above-mentioned MPR-CL II nodal slide. At $795 for pano is not cheap, but it is still pretty competitive if you compare such a setup to other high-end brands like Nodal Ninja. For example, Nodal Ninja’s Ultimate M2 is around $700 and if you want to go take panoramic photography to another level, the Nodal Ninja Ultimate M2 Giga will cost you a whopping $1,000. For me, such high-end gear is not very practical in the field, since it not only adds quite a bit to the weight of my bag, but also occupies the precious space of my Think Tank Airport Commuter camera bag.
5) Always Take Your Safe Shot First!
Whenever you decide to do a panorama, my recommendation is to always start out with your “safe shot” first, which is a single shot of whatever you are trying to photograph. In case things go haywire and your panorama does not work out, the last thing you want is come back with absolutely nothing, especially if the conditions were just perfect. When shooting in the field, I always make sure to take both panoramic and non-panoramic images and I recommend that you do the same – it is certainly a good practice.
6) Shoot Vertical and Zoom In For Most Details
When I do panoramas, I always shoot vertical. Why? Because I get more resolution. If I shoot horizontal, I could capture the whole scene in just 3-4 images. If I switch to vertical, I have to shoot around twice the number of images, but the end result is worth it – I get way more resolution from a single row panorama. Another tip is to avoid shooting too wide. If you shoot with wide-angle lenses, especially those that distort the scene too much, you will typically not only add too much crap to the scene (empty sky, too much foreground, etc), which translates to loss of resolution due to cropping, but your scene might also stitch with too much distortion built-in and you will find yourself trying to fix all that using various post-processing tools. I find that focal lengths between 35mm and 70mm on full-frame cameras (approximately 24mm – 50mm on APS-C) typically work quite well for panoramas. When doing multi-row panoramas, you will need to use even longer focal lengths for more details / more overall resolution.
When shooting multiple rows, make sure not to go crazy about shooting the sky on its own row – unless you have distinct clouds that are not moving too fast, you might have a hard time stitching it all together later on. I usually try to include at least a little bit of the ground when including the sky, so that the software can use that part for stitching.
Hope these tips help with your next panoramic adventure. If you have any questions, please feel free to ask in the comments section below!
Hi Nasim,
I am currently struggling trying to choose between two panning setups for my Canon 5D Mark IV- one using a leveling base, and the other using a panning clamp. I am planning to use them with a ballhead like RRS BH-40 which already has a panning base. Both setups have their pros and cons:
– Leveling base allows you to level the panning base of the ballhead and that’s all you need, but it is bulky and heavy and costs a lot (RRS TA-U-LB costs $215 and weighs 335g). It is also not easy to mount/dismount it to avoid extra weight when you don’t need it and only add it when shooting panos.
– Panning clamp, if bought separately from the head, is also expensive and heavy (RRS PC-LR costs $255 and weighs 336g) but more flexible in use. Besides, you can buy it as part of the ballhead and then the extra cost is only $160 and extra weight is only 182g for RRS BH-40. However, to use panning on the clamp, you must have the camera mounted perfectly horizontal, otherwise rotating the clamp will have camera view draw an arc and this will be obviously a problem with framing and stitching.
I am intentionally not discussing parallax challenges here and just want to make the right decision on the panning mechanism itself.
Could you please advise?
Hi Boris,
I have the RRS TA-3-LC-HK leveling base in a 75mm video bowl of my tripod. I’ve never really seen the practicality of the TA-U-LB vs. a ballhead in comparison, because all of the weight is above the fulcrum when leveling, where with the larger TA-3-LC-HK you have one hand below the fulcrum when leveling, and not as much load to flop around. In your case, I think I would go with the PC-LR mounted to the stem of the BH-40. You won’t get any arc at all when panning because you are panning above your ballhead, and not below it. If you want to do a multi-row panorama, or a single row tilted down, then you’d need a multi-row panning head on top of that panning clamp (don’t tilt the ballhead down in other words, or you won’t be level anymore).
Hope that helps!
Thank you Aaron! I hope you won’t mind a follow-up question…
So you say “You won’t get any arc at all when panning because you are panning above your ballhead, and not below it.” My understanding is that if my camera on the ballhead is leveled itself (i.e. the lens axis is always horizontal, parallel to the Earth surface), then of course my panning clamp plane is horizontal, and all is well. But if I am taking, say, a panorama of a canyon (means my camera is intentionally tilted and looks down at an angle), or a panorama of the mountains or skyscrapers (so my camera is tilted up and looks up to the sky at an angle), then I have an arc problem. Correct? In this scenario leveling base would help because I could use it to level the base of the ballhead and use panning ring there (below the head), as opposed to panning at the clamp. Am I missing something here?
P.S. Yes I do understand the fulcrum considerations… if I decide to go with a leveling base then choosing the model with the right fulcrum will be my next challenge – thank you for this tip!
What you really want is a multi-row panning head, or a pano-gimbal head, on top of your ballhead and panning clamp. If you want to get serious with panos anyway. There are a few reasons for this: one is that you are still panning level, even if tilted up or down, but more importantly you can see how many degrees you are tilting up and down and this is very useful later with apps like PTGui where you can do manual alignment of shots (Adobe doesn’t let you, it only auto-aligns). Also, you don’t have to worry about the roll axis when tilting up and down, you have independent control of both pitch and heading without worrying about roll, where a ballhead has all three axes loose at once and it’s a pain to shoot a proper pano that way–especially at night if you do any astrophotography or long exposures after dusk. :-)
Yes, I understand that… but need to make small steps first. Can’t get everything at once and become a master in a day. :)
Thank you very much for your advice!
Haha, for sure! A piece at a time. :-)
Great informative article! I already own an Arca-Swiss tripod. Which single nodal slide would you recommend for single and multi-row panos?
Thanks in advance,
Kevin
Thanks for sharing your hard earned knowledge Nasim. I found this article really helpful as I was frustrated with some of poor panos that I have done but overwhelmed at the cost and multitude of options for the proper pano rigs. I am getting into astro photography and am inspired by the multi-row shots of the Milky Way I have seen on social media, but now I realise that getting a full pano rig will be overkill for me, at this stage at least. I think I will be much better off with a single slider, as you mentioned, and putting my $ into a astro tracker. You saved me big time!
While useful, there are some common miss-understandings about shooting and post noted here.
1. Using a pano head is best when using lenses below 100mm unless you have mastered manual rotation. Even then, using a pano head is better than not. Using a pano head with detents is also better, using a robot head is even better if it gives you xml info on the shoot.
2. Using a pano head is still valid above 100mm lenses to simply center the lens, this will help but pretty much all parallax is gone after 100mm. You can easily shoot, but perhaps not stitch giga pans well without a pano head beyond 100mm.
3. The idea of need to level for the shoot is greatly overrated. While not a bad idea or something that should be done, it’s simply so easy to do in post that if time is a consideration, forget about it and shoot.
All for now.
Robert
Hi Nasim,
I own a D750 and im planning to shoot Panoramas (second trial) for my trip to Scotland next month.
I shoot with a Nikon 16-35 f4.
I shot some handheld on my previous trip to England but i noticed these parallax errors when i was stitching them in Photoshop especially with foreground components.
So im gonna try a panoramic head this time and Its a road trip so im gonna keep the Panoramic head setup and in the back seat of the car for the whole trip and only use it when i take a panorama.
For a guy who wants to try this kinda setup and dont wanna spend so much, which is the cheapest setup that can work for my camera lens combination?
Are any of these or similar a viable option?
SunwayFoto CR 30 360deg Mini Compact Panoramic Head
Manfrotto 3418 QTVR Spherical Panoramic Head Kit with 302 Base
Professional 360 Swivel DSLR Panoramic Tripod Ball Head
I’m not asking you to select a product for me from the above rather asking which kind of product i should search for..
Thanks in advance
I’ll jump in with a suggestion if Nasim doesn’t mind. I tried looking up the nodal points for your Nikon 16-35mm f/4 because I haven’t used that lens for panoramas and didn’t know how long a nodal slide you’d need. I didn’t find much for verified information, but one source recommended this:
16mm – 150mm
20mm – 145mm
24mm – 140mm
28mm – 137mm
35mm – 142mm
That means you’d want at least a 150-160mm long nodal slide to leave room for your camera clamp. The SunwayFoto CR 30 would be too short at 85mm, if that chart is close to correct. A Nodal Ninja 6 would be an ideal panning head for your D750 and pretty much any lens from 8mm fisheye to 200mm. Lots of people at panorama workshops are very happy with it. It’s on the lower end cost for high quality panning heads (which easily hit 2-3x more), but not the cheapest setup you could find. It would probably make you a lot happier than most things that are cheaper though, as far as weight, size, quality, and ease of use goes. You could also try to find an older Nodal Ninja 3 on eBay or what not, but I still think the slide would be too short for that 16-35mm f/4 (it would be fine with a prime lens), and it wouldn’t have the nice click-stops on the rotator that the Nodal Ninja 6 has. Some zoom lenses just have a lot of parallax because the nodal point is so far out from the camera sensor, requiring a long nodal slide.
I guess one would have to go thru the calibration of finding the NPP based on the lens-body combination, as there are infinitely many combo, made much more by the types of L-brackets used.
My Canon 1635 f4 fortunately has only one NPP across all focal lengths, so it is a breeze to just remember one offset distance and that’s it.
I’ve never heard of a zoom lens having a fixed entrance pupil at all focal lengths, I’m not sure that’s optically possible. :-P Were you checking through the viewfinder or via LiveView? The latter is more accurate, checking from the sensor itself. You’ll most likely find that it shifts around a few mm on the nodal slide. But, depending on the distance between your closest and furthest subjects, the accuracy might not be that important. Also, depending on what you were viewing to calculate it (the distance), you might not have even been able to even measure it.
Strange it might seem, but it’s true. Using live view to check for NPP at extreme left and right panning.
My 2470 has two NPP, one from 24mm up to approximately 60+mm, and another NPP at 70mm.
In either lens, when stitching in autopano, the stitch errors are less than 3%.
How I determine the NPP, I use two pencils, one located about 1m away from camera and the further located 3m away. When the NPP is set correctly, left, center and right pan, the two pencils align and appear perfectly as a single pencil. :)
Interesting. I do something similar myself and at workshops. We setup a pencil or similar item about 1m away and the further item more like 6-9m away. We usually test about f/8 since the aperture also makes a difference, but at some point the further object will no longer be sharp enough to see and f/8 is often the sweet spot of a lens. We turn on grid mode in live view and move the camera/tripod around until both pencil tips line up on the center line, then we swing to the left or right and zoom in and move the camera back and forth on the nodal slide until the tips line up again. They should line up equally for both sides of the frame when zoomed in when you get it right on the nodal slide. Quick and easy. :-) You can verify it in the field in a hurry too with the same method, but I think it’s more precise with pencils indoors.
Great article Nasim. There is one thing I am curious about though after reading this and your older tutorial. How do you deal with changing light conditions while photographing a panorama? I understand the steps of setting manual exposure, manual focus, lock white balance and metering off a part of the scene with lighting between brightest and darkest, check a few exposures and start. But, for example in the Zabriskie Point Panorama, how fast were you shooting between exposures and how long did it take to capture all the shots you needed? With the sun low on the horizon the colour temp would have changed as would the colours of the sky quite quickly. Is it all just a matter of pre-processing in say Lightroom to match all the shots before merging or is there things you can do in the field to assist? Similarly if you are dealing with lighting changes due to clouds I guess there isn’t much you can do except start the exposures again? Thanks
I can answer some of this if Nasim doesn’t mind. I shoot hundreds of panoramas a year, many of them gigapans and 360 panos. I usually shoot them completely manual with a fixed focus (sometimes focus stacking), fixed exposure (sometimes HDR), fixed white balance, etc.; everything as manual as possible. If I’m shooting a multi-row panorama at twilight (dawn or dusk) when the light is rapidly changing, then I’ll start with the sky for dawn and shoot the ground last so the light balances a little better between the two, and I’ll start with the ground at dusk and shoot the sky last. This way I’m getting the most light possible on the ground to balance the changing sky. Either a click-stop rotator (Nodal Ninja makes some good ones) or a robotic panning head help with shooting as fast as possible to accommodate moving clouds, changing light, etc. Even so, during that blue hour transition of civil to nautical twilight, the quality of light changes rapidly, especially the color temperature as you noted. To fix that I often ramp my exposure and/or my white balance from the first frame to the last frame with either Gunther Wegner’s LRTimelapse (free up to 400 frames) or Jeffrey Friedl’s Timelapse Support Lightroom Plugin. It may seem counter-intuitive to use timelapse software for panoramas, but really all you want to accomplish is a simple, smooth ramp from exposure A to exposure B (or white balance) and either program works great for this in Lightroom! You can’t use any of the deflickering features of course with a panorama because your content between frames is dramatically different (vs. a timelapse of consecutive frames), but if you used a fixed exposure you won’t need to anyway. If you accidentally used aperture priority or auto ISO then you could also try “Match Total Exposures” first in Lightroom, but in my experience this does not always work well, especially for twilight panos, and ramping it after is more challenging. A fixed exposure is much easier to work with in post-production.
Secondly, many of the newer tools in Lightroom such as clarity and dehaze are not global adjustments. They are very localized sliders and will not be applied equally between images of different content. The same can happen with the highlights, shadows, whites, and blacks sliders. So you can end up with exports from Lightroom where your sky is quite a bit different in brightness between each frame depending on the percentage of sky that appears in that frame, and they will not stitch well in Photoshop or PTGui. Lightroom’s own limited panorama feature seems to recognize this and adjust for it, but if you export to TIFF to stitch in another app like Photoshop or PTGui you’ll notice it with extreme edits. Go careful with those sliders, or switch to the older 2010 process in the develop module for more consistency (losing those tools).
Lastly, PTGui (Pro version only) has fantastic vignetting, exposure, and white balance optimizations that can help with very subtle differences between images. I try to fix as much as possible upstream with shooting technique and RAW editing first though, so it doesn’t have to struggle with big differences between images.
Happy shooting!
Thanks Aaron, some great tips there. Much appreciated.
If Nasim gets a chance I’d love to know how long it roughly took to get all the exposures for the 400mp panorama.
Nasim: please, disregard my query above. I bought a rail and a custom L-Bracket for my D610 and they work like a charm. Thank you!
Nasim: I shoot with a Nikon D610 and the Nikkor 24-120mm f4 lens; shoot panos between 60-70mm. Would the Sunwayfoto DMP-200R nodal slide work with my setup? Many thanks and great article!
Excellent article and discussion. However, for me it’s about cutting down on the lenses I need to carry. Some of my best panoramas were shot on outings where I took only a 50mm lens out on a hike to reduce weight.
Great tips! Thank you. After reading your article I purchased a Sunwayfoto CR-30 nodal and a Neewer Pro 69mm Tripod Leveling Base with Offset Bubble Level. So, I was able to get a basic set up for well under $200. I’m still waiting on the Base, but the CR-30 is pretty impressive. These tools, and your advice will certainly improve my panoramas.
Thanks,
Ted Gersdorf
Deerfield Beach, FL